N
20
|
N
40i
|
N
60i
T1 Traffic Module
User Manual
English
en

© 2006 Brunswick New Technologies Asia Pte Limited. Navman is a registered trademark of Brunswick New Technologies Asia Pte
Limited and is used under licence by Navman New Zealand. Navman is part of the Brunswick Corporation, headquarters Chicago, IL. All
rights reserved.
The software contains proprietary information of Navman; it is provided under a licence agreement containing restrictions on use and
disclosure and is also protected by copyright law. Reverse engineering of the software is prohibited.
No part of this publication may be reproduced, stored in a retrieval system, or transmitted in any form or by any means, electronic,
mechanical, photocopying, recording or otherwise, without the prior written permission of Navman.
Back-On-Track, Drive-Away, NavPix, Smart
and Turn-by-Turn are either registered trademarks or trademarks of Brunswick New
Technologies Asia Pte Limited and are used under licence by Navman New Zealand. All rights reserved.
Microsoft Windows 2000 SP3 and XP SP2, Microsoft Internet Explorer and ActiveSync are either registered trademarks or trademarks of
Microsoft Corporation in the United States and/or other countries. All rights reserved.
Adobe and Adobe Reader are either registered trademarks or trademarks of Adobe Systems Incorporated in the United States and/or
other countries. All rights reserved.
Location Identifiers © 2005 International Air Transport Association.
All other trademarks and registrations are the property of their respective owners.
Published in New Zealand.
Disclaimer
Due to continued product development this information may change without notice. Navman does not warrant that this document is
error-free.
The screenshots and other presentations shown in this manual may differ from the actual screens and presentations generated by the
actual product. All such differences are minor and the actual product will deliver the described functionality as presented in this User
Manual in all material respects.
Safety Camera POIs
Navman products are designed to be used as an aid to safer driving. You can receive messages to alert you to locations of safety
cameras, which will enable you to monitor your speed through these areas.
Navman does not warrant that all types and locations of safety camera data are available, as cameras may be removed, relocated or
new cameras installed.
Navman does not condone speeding or any other failure to comply with your local traffic laws. It is your responsibility to drive within the
posted speed limit at all times and to drive in a careful manner.
Navman accepts NO liability whatsoever for you receiving any speeding fines or points on your license through using this device.
Navman does not guarantee the accuracy of the data contained within this database either expressed or implied.
In the event you receive a fine or any other penalty for speeding or contravention of any traffic law, or are involved in an accident,
Navman is not responsible for any damages of any type.
In some countries the data information regarding safety or speed cameras may conflict with local law and/or regulations. It is your
responsibility to make sure that your use of the data is in compliance with local laws and/or regulations. Usage is at your own risk.
Compliance
This device complies with part 15 of the FCC Rules. Operation is subject to the following two conditions: (1) This device may not cause
harmful interference, and (2) this device must accept any interference received, including interference that may cause undesired
operation.
The software is based in part on the work of the Independent JPEG Group.
T1 Traffic Module | Important safety information
3
Important safety information
PLEASE READ CAREFULLY BEFORE INSTALLING PRODUCT
IN VEHICLE
This is the safety alert symbol. It is used to alert you to potential personal injury
hazards. Obey all safety messages that follow this symbol to avoid possible
injury or death.
WARNING indicates a potentially hazardous situation which, if not avoided,
could result in death or serious injury.
CAUTION indicates a potentially hazardous situation which, if not avoided, may
result in minor or moderate injury.
CAUTION used without the safety alert symbol indicates a potentially hazardous
situation which, if not avoided, may result in property damage.
Removing original equipment, adding accessories or modifying your vehicle could affect the vehicle’s safety or make it illegal to operate
in some jurisdictions.
Follow all product instructions and all instructions in your vehicle owner’s manual regarding accessories or modifications.
Consult your country’s and/or state’s laws regarding operation of a vehicle with any accessories or modifications.
It is your sole responsibility to place, secure and use the Navman in a manner that will not cause accidents, personal injury or property
damage. Always observe safe driving practices.
Mount the Navman in a position that is secure and does not obstruct the driver's view.
Attach the T1 antenna in a position that is secure and does not obstruct the driver’s view.
Do not mount the Navman or attach the T1 antenna in a way that may interfere with the safe operation of the vehicle, the deployment of
air bags or other safety equipment.
Do not operate the Navman while driving.
Before you use the Navman for the first time, familiarize yourself with your device and it's operation.
Do not attempt to attach the Navman or attach or adjust the antenna while driving.
On main roads, the distance to an exit calculated by the Navman may be further than the distance shown on road signs. Road signs
show the distance to the start of an exit while your Navman shows the distance to the next intersection, i.e., the end of the exit ramp or
road. To prepare to exit a road, always follow distance information on road signs.

T1 Traffic Module | Important safety information
4
Do not handle the Navman while it is hot. Let the product cool, out of direct sunlight.
Do not expose the Navman to direct sunlight in an unattended vehicle for prolonged periods. Overheating may damage the unit.
To discourage theft, do not leave the Navman, mounting bracket or any cables in plain view in an unattended vehicle.
Failure to adhere to these warnings and cautions may lead to death, serious injury or property damage. Navman disclaims all
liability for installation or use of the Navman that causes or contributes to death, injury or property damage or that violates
any law.
Navman is not responsible for the accuracy of any traffic-related information supplied by other parties and disclaims all
liability for any accident, injury or property damage resulting from reliance on such information.

T1 Traffic Module | Contents
5
Contents
Important safety information...................................................................................................................3
Introduction ............................................................................................................................................6
Box Contents ....................................................................................................................................7
T1 components .................................................................................................................................8
How does my T1 receive traffic information? ....................................................................................9
How will I know when a Traffic Event occurs?.................................................................................10
How do I view the Traffic Overview screen? ...................................................................................11
How do I view the Event List screen? .............................................................................................12
How do I view the Event Details screen? ........................................................................................14
How do I know if a detour is recommended? ..................................................................................16
Traffic messages ........................................................................................................................17
How do I view my route?......................................................................................................................18
Traffic information ...........................................................................................................................18
3D Map screen ...............................................................................................................................19
2D Map screen ...............................................................................................................................21
What else can I do? .............................................................................................................................23
How do I use the Map menu? .........................................................................................................23
How do I check the Traffic system status? ......................................................................................25
How do I customize Traffic preferences? ........................................................................................26
Traffic and other TMC Events ..............................................................................................................27
Support information..............................................................................................................................28

T1 Traffic Module | Introduction
6
Introduction
Thank you for purchasing the Navman T1 traffic module. The T1 can be plugged into your Navman to
identify potential traffic delays in your area and help you avoid them. Use this manual to learn how to
operate your T1 efficiently and safely, and discover all the different features available to you.
In this section
Box Contents ......................................................................................................................7
T1 components ...................................................................................................................8
How does my T1 receive traffic information? .....................................................................9
How will I know when a Traffic Event occurs?....................................................................10
How do I view the Traffic Overview screen? ......................................................................11
How do I view the Event List screen?.................................................................................12
How do I view the Event Details screen? ...........................................................................14
How do I know if a detour is recommended? .....................................................................16
T1 Traffic Module | Introduction
7
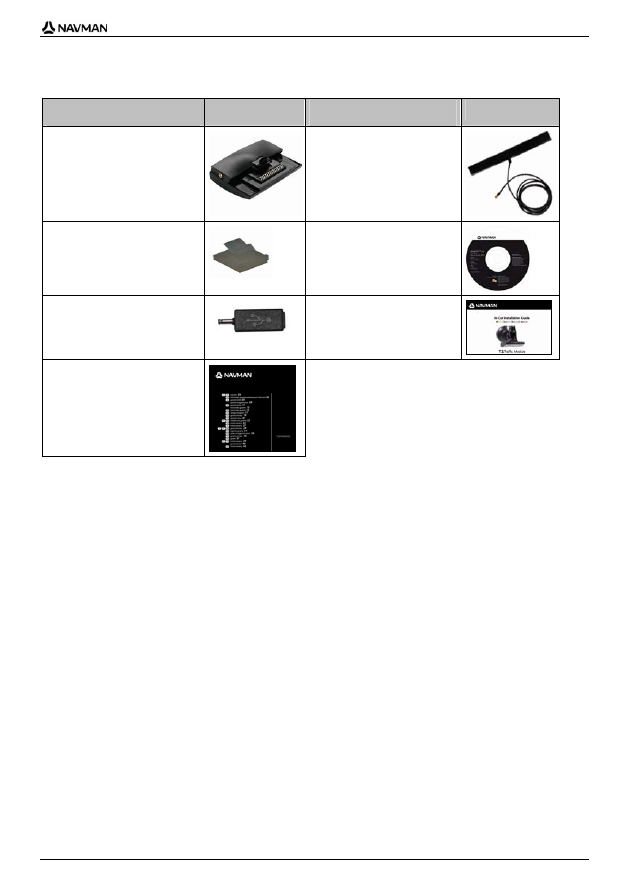
Box Contents
Item
Item
T1 Traffic module
FM antenna
4 FM antenna fixing pads
(including two for second
vehicle)
CD containing User Manual
USB adaptor
In-Car Installation Guide
Limited Warranty Agreement

T1 Traffic Module | Introduction
8
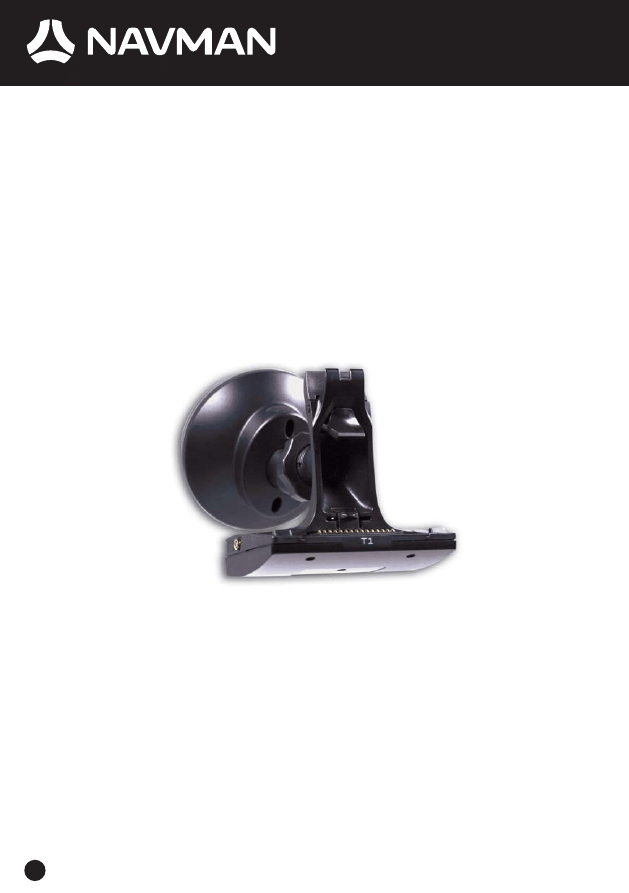
T1 components
Component
Description
Fixing Pads on FM
Antenna
Allows you to attach your FM Antenna to the fixing pads on your
windscreen. For more information refer to the In-Car Installation Guide.
FM Antenna
Allows your T1 to receive RDS-TMC signals.
FM Antenna Plug
Transmits the data received from the FM Antenna to the T1.
FM Antenna Socket
Socket for connecting to the FM Antenna, so your T1 can receive RDS-
TMC messages.
Headphone Socket
Socket for connecting headphones or earphones to your Navman.
Power Socket
Socket for connecting to the 12V DC Power Adaptor.
The fixing pads that attach to your windscreen are semi-permanent. When attaching the fixing pads to your
windscreen, position carefully and press for 5 seconds.
CAUTION Do not bend the FM Antenna when removing from your windscreen.
T1 Traffic Module | Introduction
9
How does my T1 receive traffic
information?
When used with the T1, your Navman can receive current traffic information for all main roads and
motorways, enabling you to avoid potential delays on your route.
The Traffic Message Channel (TMC) broadcasts real-time traffic and weather information via the FM
Radio Data System (RDS). FM radio stations transmit TMC data on a cycle of several minutes, with
hundreds of Events able to be broadcast to TMC receivers, such as the T1.
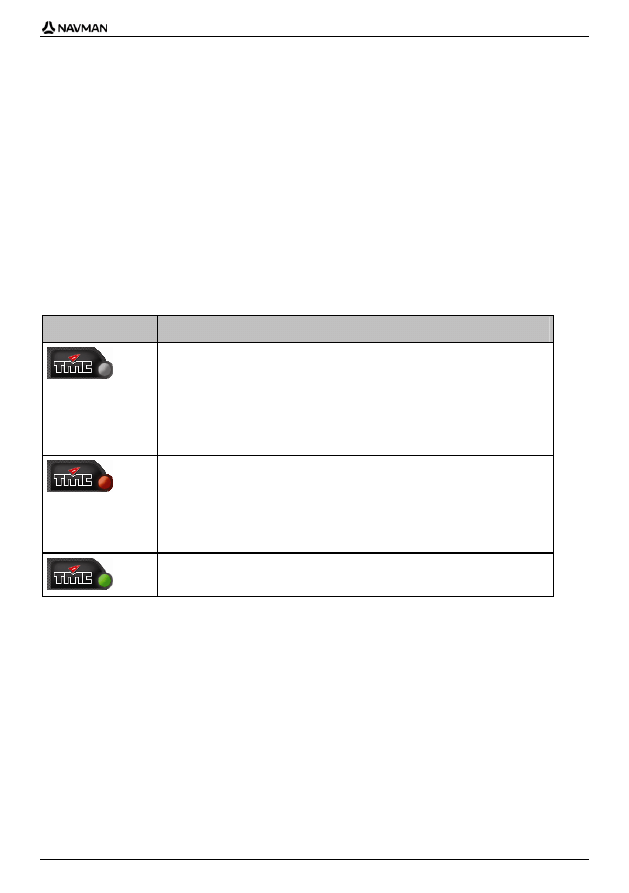
Traffic status
Your current traffic status is indicated by the colour of the TMC icon in the bottom-left corner of the
map screens.
The following table describes the three traffic status icons:
Traffic Status
Description
The TMC status is
grey
if traffic is currently inactive due to one of the following
conditions:
The T1 is connecting to the TMC service.
The T1 cannot receive TMC data. This may be due to poor radio coverage in
the local vicinity.
You are in a country that is not supported by the T1.
Click to display the Traffic Overview screen.
The TMC status is
orange
if one of the following conditions apply:
You have navigated into a country that is not supported by the T1, but there
are still traffic events listed on the Event List screen.
You have separated your Navman from the T1, or the T1 is not receiving
power but there are still traffic events listed on the Event List screen.
Click to display the Traffic Overview screen.
The TMC status is
green
if the T1 is active and receiving traffic events.
Click to display the Traffic Overview screen.
Your traffic status is displayed in more detail on the Traffic System Status screen.
How do I see my Traffic status if the TMC icon isn't
displayed?
If the TMC icon is not displayed, follow the instructions in the enclosed In-Car Installation Guide to
insert your Navman into the T1.
T1 Traffic Module | Introduction
10
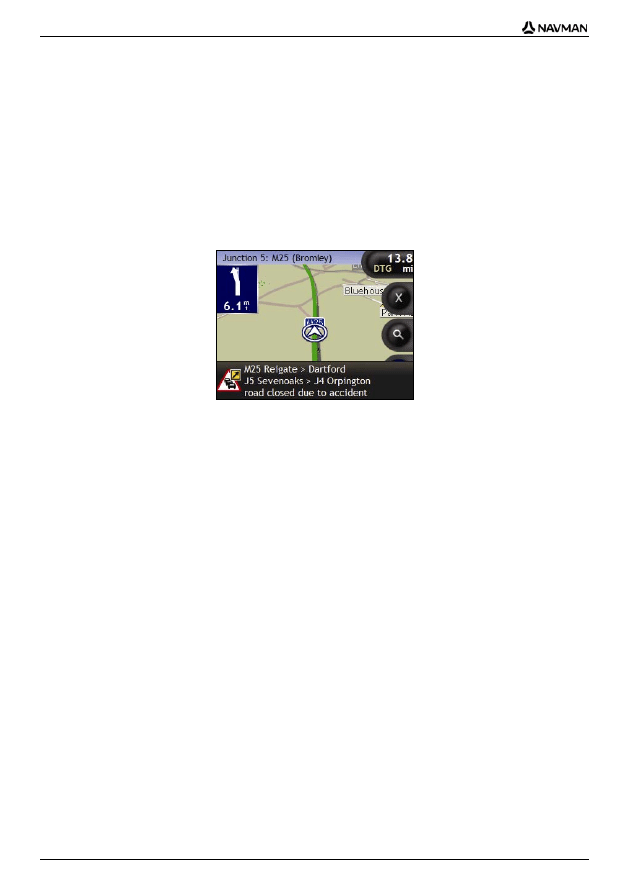
How will I know when a Traffic
Event occurs?
Your T1 begins working the moment it is installed. Incoming Events are handled according to your
Traffic Preferences. For more information, see "How do I customize Traffic preferences?" on page 26.
When travelling through an area in which you can receive TMC transmissions, your T1 will decode
these Events and send them to your Navman. Your Navman will display an icon at the Event location
on the 3D and 2D Map screens, and an audible warning is given if an Event is on your route. Where
the extent of an Event is a specific distance, the road will be highlighted and arrows will indicate the
direction affected.
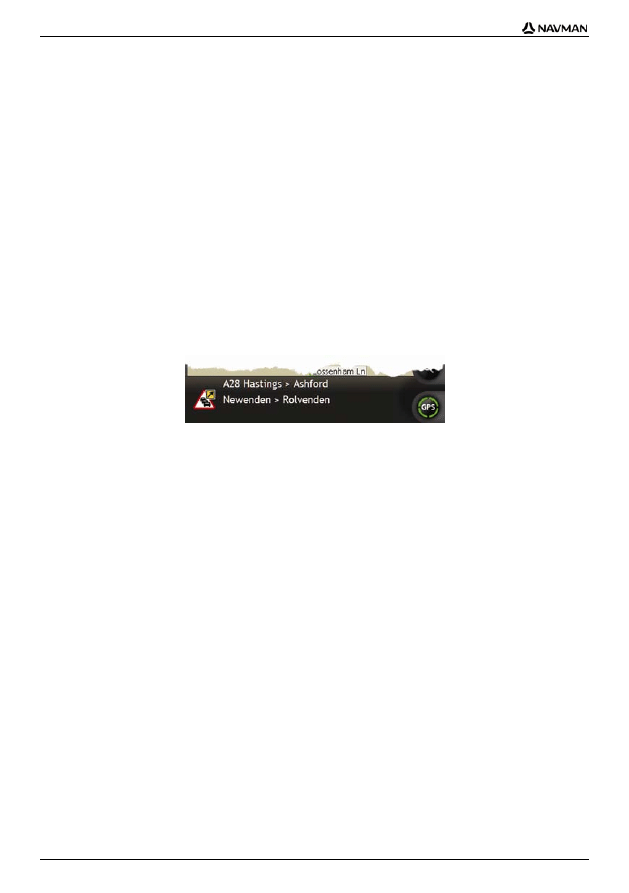
A message will display at the bottom of the screen used to view your route. This details the road
name, the section of road affected and the type of Event that has occurred. The message remains on
screen for 8 seconds and is added to the Event List.
T1 Traffic Module | Introduction
11
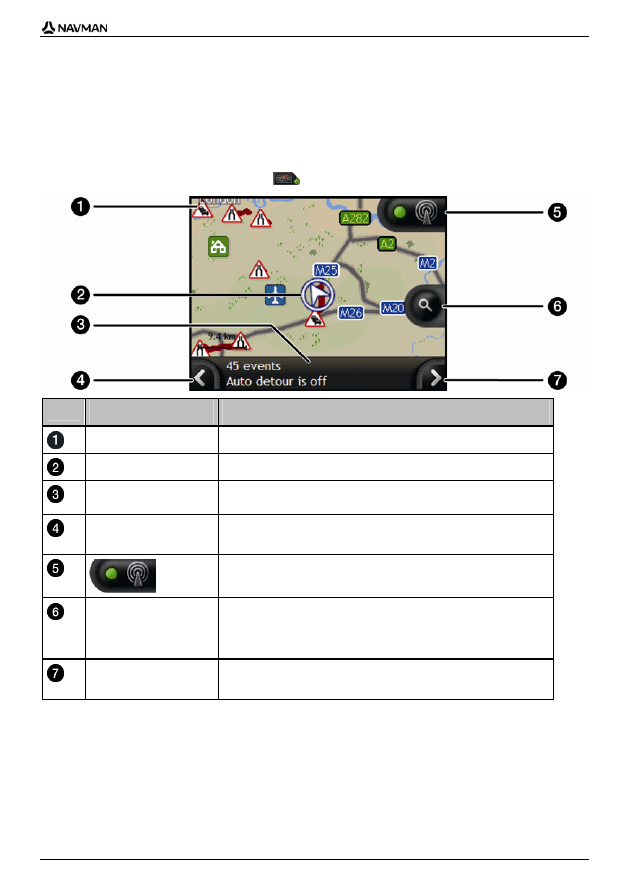
How do I view the Traffic Overview
screen?
Your Navman provides a general overview of the traffic situation on your selected route, including all
Events in the immediate vicinity.
To display the Traffic Overview screen, tap
.
Element
Description
Event icon
Displays icon to indicate type of Event.
Current position
Your current position is marked with
.
Status Bar
Displays the number of Events on your route, and indicates whether
Auto Detour is on or off.
Tap to return to the previous screen.
Tap to display Traffic System Status screen.
Zoom
To view zoom options, tap
.
To display a smaller area in greater detail, tap
.
To display a larger area in less detail, tap
.
Tap to display the Event List screen.
T1 Traffic Module | Introduction
12
How do I view the Event List
screen?
Your Navman creates a list of Events as they are received, which is displayed on the Event List
screen. This screen can only be viewed if the TMC icon is
green
or
orange
.
Element
Description
Event menu
Choose one of the following:
All Events - displays all Events received.
Route Events - displays Events on the route ahead.
Route Events are only displayed if a calculated route is in effect and
there are one or more Events on the route.
Tap to cycle through options.
Event description
Displays details of the Event, including:
Name of road and direction in which Event is taking place.
Location of where Event begins and ends.
> indicates an Event from a location, to a location.
<> indicates an Event between locations.
Type of Event.
Event icon
Displays icon to indicate type of Event.
Tap to return to the previous screen.
Event order
Choose one of the following:
Distance - displays Events by order of distance from current
location.
Age - displays Events by order of time received, or time last
updated.
Road - displays Events in order of highway designation, with
Events on current road first.
Tap to cycle through options.

T1 Traffic Module | Introduction
13
Element
Description
Position indicator
Displays your position in the Event List screen.
Scroll buttons
Allow you to view all Events by moving up and down through the list
Event number
Displays the number of Events in current list.
T1 Traffic Module | Introduction
14
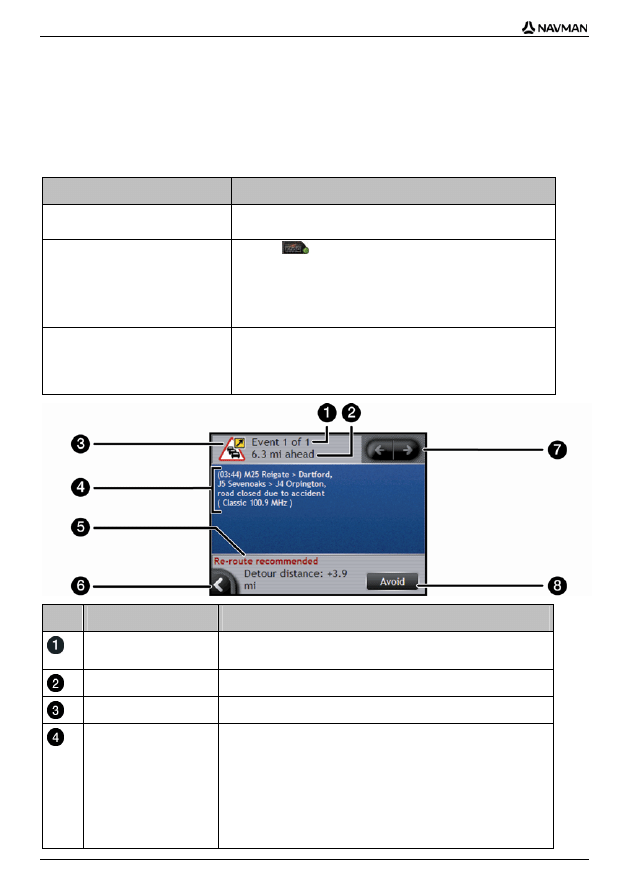
How do I view the Event Details
screen?
There are several ways to view details of an Event received by your T1.
Choose one of the following:
Location
Option
From any of the screens used to view
your route
Tap the Event message when it appears on screen.
The Event Details screen will display.
From any of the screens used to view
your route
Tap .
The Traffic Overview screen will display.
Tap .
The Event List screen will display.
Find and tap the event you want to view.
The Event Details screen will display.
From the 3D or 2D Map screen
Tap and hold the traffic icon, which displays at the location of
the event.
The Pop-up menu will display.
Tap
Show Details.
The Event Details screen will display.
Element
Description
Event number
Displays the number of the Event currently displayed and the total
number of Events in the list.
Event distance
Displays distance of Event from current location.
Event icon
Display icon to indicate type of Event.
Event description
Displays Event details, including:
Time Event was received, or last updated.
Name of road on which Event is taking place.
Location of where Event begins and ends.
> indicates an Event from a location, to a location.
<> indicates an Event between locations.
Type of Event.

T1 Traffic Module | Introduction
15
Element
Description
Detour information
Displays details of detour recommendation, if any. For more
information, see "How do I know if a detour is recommended?" on
page 16.
Tap to return to the previous screen.
Tap to view next Event in list.
Tap to view previous Event in list.
Avoid / Unavoid
Initiates new route to avoid an Event.
Only available if a detour or re-route is available.
T1 Traffic Module | Introduction
16
How do I know if a detour is
recommended?
When a Traffic or Clearance Event occurs on your route, a detour will always be recommended. The
detour Event message will display in the status bar on the screens used to view your route. A detour
icon will display at the Event location on the 3D and 2D Map screens.
Detours are only recommended for Traffic or Clearance Events on a calculated route.
How do I initiate a new route when a detour is
recommended?
Complete one of the following options:
If ...
Then ...
Automatically accept recommended
detours is selected in your traffic
preferences
your new route will automatically be calculated and
displayed.
An audible warning will inform you that your route has
been changed.
Automatically accept recommended
detours is not selected in your traffic
preferences
display the detour event on the Event Details screen.
Tap
Avoid to accept detour.
How do I avoid an Event on my route?
1. From
the
Event List screen, tap the Event you want to avoid.
The Event Details screen will display.
2. Detour information displays at the bottom of the screen. For more information, see "Traffic
messages" on page 17.
If a detour has been calculated, Avoid is available; tap Avoid to accept new route and avoid
Event.
The 3D Map screen will display.
How do I un-avoid an Event on my route?
If you have chosen to avoid an Event and a new route has been calculated, you can un-avoid that
Event and return to your original route.
1. From
the
Event List screen, tap the Event you want to un-avoid.
The Event Details screen will display.
When an Event has been avoided, the Event icon will display negative. For more information, see
"Traffic messages" on page 17.
2. Re-route information displays at the bottom of the screen.
If a re-route has been calculated, Un-avoid is available; tap Un-avoid to accept new route.
The 3D Map screen will display.
T1 Traffic Module | Introduction
17
Traffic messages
The Event Details screen displays detour status information.
Detour Not Available messages
If a detour is not available, one of the following messages will display:
Message
Description
This Event is not locatable
This clearance is not locatable
A specific location for the Event cannot be
identified.
This Event does not affect your route
This clearance does not affect your route
The Event is not on the current leg of your
journey, or is behind your current position.
You are avoiding this Event
You have accepted this clearance
The Event is not on the current leg of your
journey.
You are too distant to re-route
You are too distant to accept this clearance
The Event is currently too distant to affect your
journey.
Detour not found
Clearance route not found
A detour / re-route could not be calculated.
Detour Recommended messages
If a detour is recommended, one of the following messages will display:
Message
Description
Finding detour....
Recalculating route.....
Your Navman is calculating a new route. During calculation, the %
complete will display.
Exiting this screen before the new route is calculated will cancel the
operation.
Detour distance.....
Clearance change
A detour has been calculated.
The difference between the distance of your current route and the
proposed route is displayed.
T1 Traffic Module | How do I view my route?
18
How do I view my route?
When your T1 is enabled, the screens used to view your calculated route will contain Traffic
information. Event messages and traffic icons will display as they occur. If an Event message
obscures your current location, the map will adjust to display both the message and your location.
You can view your route in several ways by pressing
to cycle through the map screens.
In this section
Traffic information ...............................................................................................................18
2D Map screen ...................................................................................................................21
Traffic information
When an Event message is received while you are using any of the screens used to view your route,
the status bar will be replaced with the Traffic information.
T1 Traffic Module | How do I view my route?
19
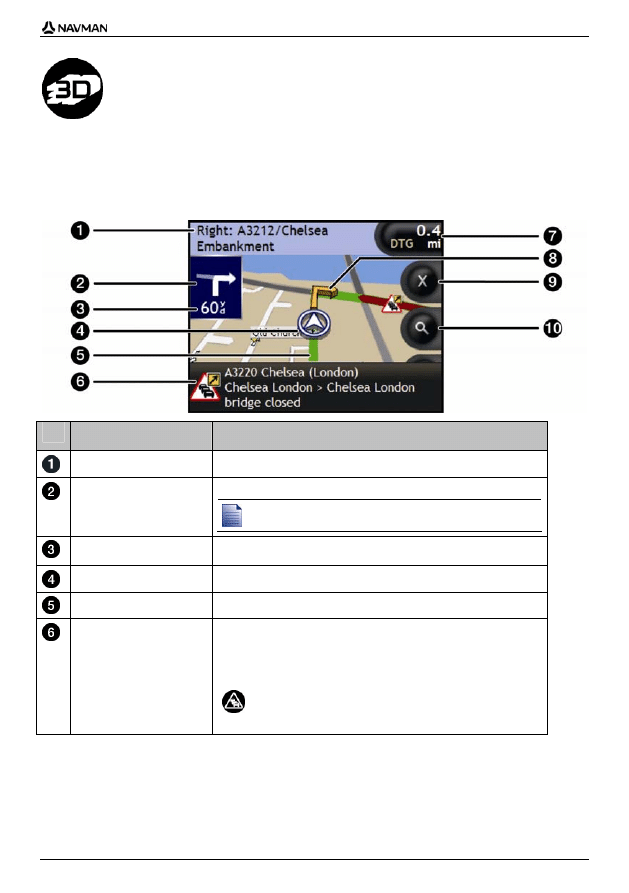
3D Map screen
The 3D Map screen is oriented to your travelling direction.
To view the 3D Map screen when a route has been calculated, press
to cycle through the screens.
Tap and drag the screen, to move across the map.
Tap the map, to view the Map menu.
Item
Description
Next instruction
The direction and name of the street to turn in to.
Direction of next turn
The direction of your next turn.
To repeat the voice prompt of your next turn, tap the turn arrow.
Distance to next turn
The distance to your next turn
Current position
Your current position is marked with
.
Route
Your current route is highlighted.
Status bar
Displays one of the following:
The name of the street you are located on
Speed
warnings
Active
POIs.
Status Bar is replaced by current Traffic Events, when
Traffic is enabled. For more information, see "Traffic
information" on page 18.
T1 Traffic Module | How do I view my route?
20
Item
Description
Information
Displays one of the following options:
Time
km/h or mph (Speed)
TTG (Time to Go)
DTG (Distance to Go)
ETA (Estimated Time of Arrival).
Tap to cycle through the options.
During a Multi-stop trip, Time to Go, Distance to Go and ETA will display
as: Time to Waypoint, Distance to Waypoint and ETA at Waypoint.
Next turn arrow
Your next turn is highlighted in a different colour from future turns.
The default colour of your next turn is
orange
, but will depend on the
colour theme you are using.
Cancel route
Cancels your current route
Zoom
To view zoom options, tap
.
To display a smaller area in greater detail, tap
.
To display a larger area in less detail, tap
.
T1 Traffic Module | How do I view my route?
21
2D Map screen
The 2D Map screen shows your current position (if a GPS fix is active) and surrounding street names.
If a route has been calculated, the route and turns are highlighted. The 2D Map screen is displayed
Course Up, unless the Map Display preference is to North.
To view the 2D Map screen, press
to cycle through the screens.
Tap and drag the screen, to move across the map.
Tap the map, to view the Map menu.
Item
Description
Next instruction
The direction and name of the street to turn in to.
When you cycle through the Information options, a function description
will display briefly at the top of the screen.
Direction of next turn
The direction of your next turn.
To repeat the voice prompt of your next turn, tap the turn arrow.
Distance to next turn
The distance to your next turn.
Current position
Your current position is marked with
.
Route
Your current route is highlighted.
Scale bar Displays
map
scale.
TMC Icon
Indicates Traffic is enabled and displays one of the
following:-
Green
- Your Navman is receiving Traffic Events; non-
expired events appear in the Event List.
Orange
- Your Navman is not receiving current Traffic
Events; non-expired events appear in the Event List.
Grey
- Your Navman is not receiving current Traffic
Events; the Event List is empty.
T1 Traffic Module | How do I view my route?
22
Item
Description
Information
Displays one of the following options:
Time
km/h or mph (Speed)
TTG (Time to Go)
DTG (Distance to Go)
ETA (Estimated Time of Arrival).
Tap to cycle through the options.
During a Multi-stop trip, Time to Go, Distance to Go and ETA will
appear as: Time to Waypoint, Distance to Waypoint and ETA at
Waypoint.
Cancel route
Cancels your current route.
Zoom
To view zoom options, tap
.
To display a smaller area in greater detail, tap
.
To display a larger area in less detail, tap
.
Compass and GPS
Information
Tap to cycle through the options;
Blue compass heading
- Tap and hold to alternate between
displaying North or your destination at the top of the screen.
Tap and hold to display the GPS Status screen.
Green quadrants
- Indicates a valid GPS signal is being used to
fix your position. Between one and four quadrants will display
indicating the signal strength. Tap and hold to display the GPS
Status screen.
Red circle
- Indicates No signal.
Status bar
Displays one of the following:
The name of the street you are located on
Speed
warnings
Active
categories.
Status Bar is replaced by current Traffic Events, when
Traffic is enabled. For more information, see "Traffic
information" on page 18.
T1 Traffic Module | What else can I do?
23
What else can I do?
In this section
How do I use the Map menu?.............................................................................................23
How do I check the Traffic system status? .........................................................................25
How do I customize Traffic preferences? ...........................................................................26
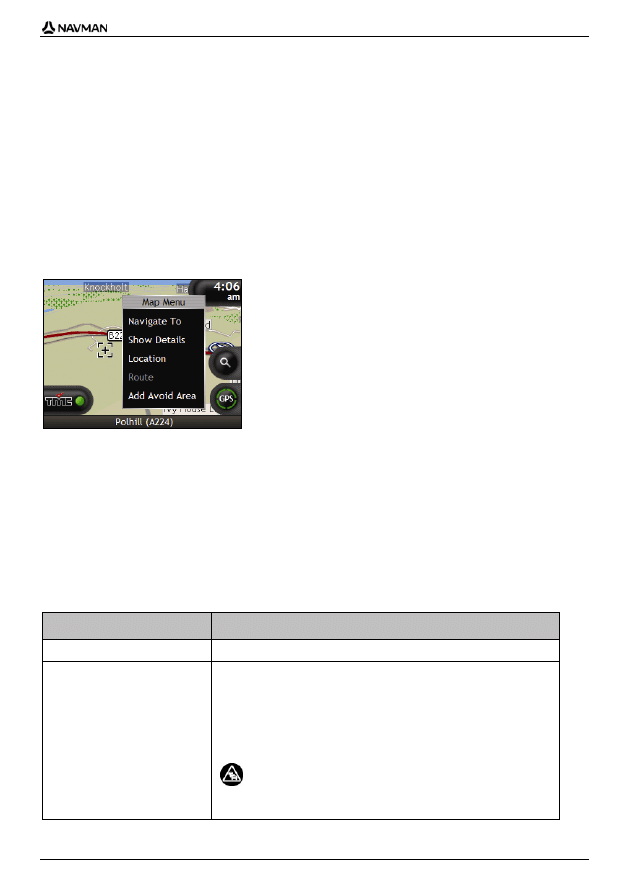
How do I use the Map menu?
The Map Menu allows you to access navigational functions from the 3D Map and 2D Map screen.
Displaying the Map Menu
1. Tap to display the 3D Map and 2D Map screen.
2. Tap and drag to move around the map to your selected location.
3. Tap the map.
The Map Menu will display.
Map Menu options
The following options are available via the Map Menu:
Menu Option
Description
Navigate To
Calculates a route from your current location.
Show Details
Displays the Location Details screen from which you can:
View details of the location
Add the location to your multi-stop trip
Save the location as a favourite
Access and edit your route preferences
Navigate to the location.
If the cross-hairs are positioned over a traffic event, Show
Details will instead display the Traffic Event Details screen. For
more information, see "How do I view the Event Details
screen?" on page 14.

T1 Traffic Module | What else can I do?
24
Menu Option
Description
Location Displays
the
Location sub-menu from which you can:
Add To Favourites. Displays the New Favourite screen for you to
add the location as a favourite.
Nearest POI. Displays the Select Directory screen. Select the
directory, then the directory location to navigate to.
Add To Trip. Adds the location to your multi-stop trip.
Set As Start Location. Sets the location as your departure point.
Route
Only available when navigating a route.
Displays the Route sub-menu from which you can:
Detour. Detours your route to avoid the next 1, 2, 5, 10 or 15
kilometres or the next 1, 2, 5, 10 or 15 miles.
Demonstrate. Starts the route demonstration, demonstrating
navigation from your current position or departure point.
Stop Demonstration. Stops the route demonstration.
Skip Waypoint. Skips the next stop on your multi-stop trip.
Show Entire Route. Displays your entire route on the 2D Map
screen.
Show Summary. Displays a summary of your route, including your
departure and destination addresses, estimated time to arrival and
the distance remaining to your destination.
Add Avoid Area
Adds an Avoid Area for you to size.
Remove Avoid Area
Removes the selected Avoid Area.
T1 Traffic Module | What else can I do?
25
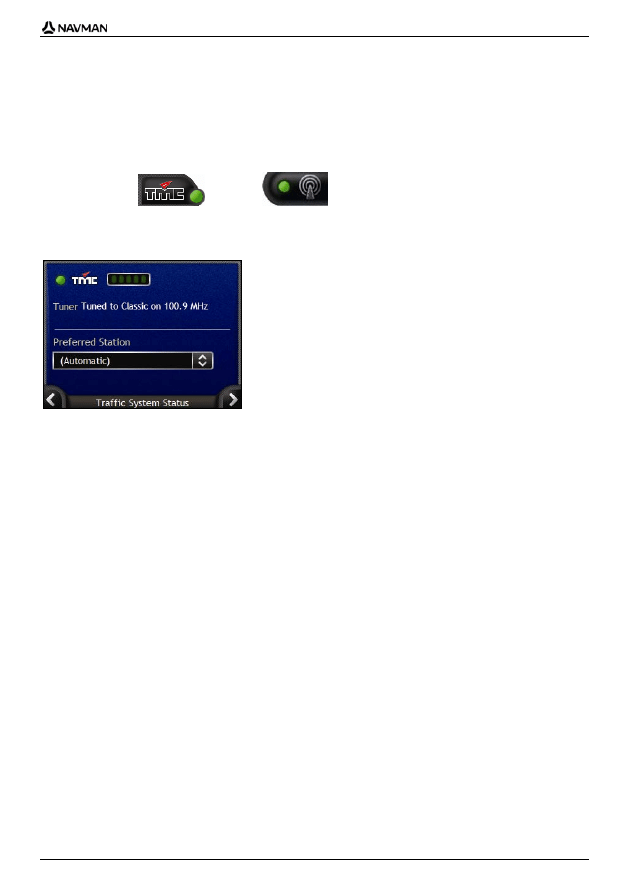
How do I check the Traffic system
status?
You can view the status of the traffic system and change the radio station used to receive traffic
events via the Traffic System Status screen.
or
The Tuner section displays the name and frequency of the radio station currently being used to
receive traffic event information. A bar shows the strength of the traffic signal being received; the more
green circles, the stronger the signal.
How do I Change my Preferred Radio Station?
Select your preferred radio station from the Preferred station box; your preference is automatically
saved.
T1 Traffic Module | What else can I do?
26
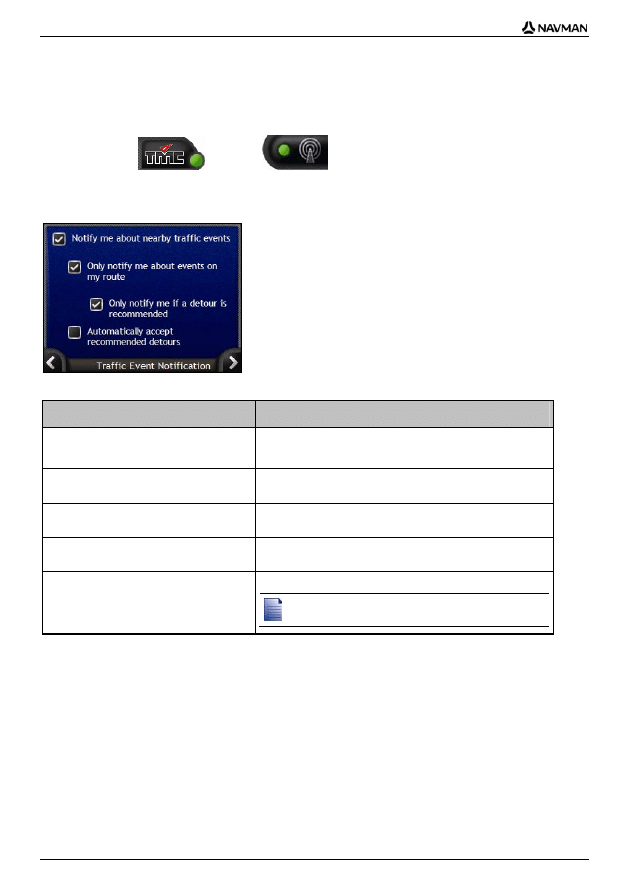
How do I customize Traffic
preferences?
or
Complete the following:
If you want to ...
Then ...
be notified about nearby traffic events
select the Notify me about nearby traffic events check box.
be notified about events that affect your
current route
select the Only notify me about events on my route check
box.
be notified only when a detour is
recommended
select the Only notify me if a detour is recommended
check box
automatically accept recommended detours
and have a new route calculated
select the Automatically accept recommended detours
check box.
turn off traffic event notification
clear the Notify me about nearby traffic events check box.
Event icons will still display on the 3D and 2D Map screens.
Your preferences are automatically saved.
Tap to return to the previous screen.
T1 Traffic Module | Traffic and other TMC Events
27
Traffic and other TMC Events
Each TMC Event is sorted in to one of nine categories. When an Event is received, one of the
following icons will display:
Event Avoided
Event
Message Type Event Description
Danger
There is a dangerous situation on the route; for example,
people are on the road.
Traffic
Any event that will cause a delay on a route.
Weather
Weather conditions are adversely affecting a route; for
example, there is ice on the road.
Warnings
There is a situation of which you should be aware on the route,
but it is not serious enough to be considered a dangerous
situation; for example, a minor accident has taken place.
Forecast
An event is expected to occur on a route.
Restrictions
There is a restricted flow of traffic on a route; for example, a
lane has been closed on a motorway.
Clearance
A Traffic Event that has now been cleared.
Information
All other events.
Roadworks
Roadworks are taking place on a route.
If a Traffic or Clearance event has a recommended detour, the following icons will display:
Event Avoided
Event
Message Type Event Description
Traffic Detour A
Traffic Event, for which a detour is recommended.
Clearance Re-route
A Clearance Event, for which a re-route is recommended.
Avoided Event icons will only display on the 2D Map and 3D Map, at the Event location.

T1 Traffic Module | Support information
28
Support information
Support for Australia
Navman Australia Pty Ltd
PO Box 479
Gladesville, NSW 2111
Australia
Support: http://support.navman.com
Website: http://www.navman.com
Support for Europe
Navman Europe Ltd
4G Gatwick House
Peeks Brook Lane, Horley
Surrey RH6 9ST
United Kingdom
Support: http://support.navman.com
Website: http://www.navman.com
Support for New Zealand
Navman New Zealand
PO Box 68-155 Newton
Auckland
New Zealand
Support: http://support.navman.com
Website: http://www.navman.com
Support for US and Canada
Navman USA Inc
5275 Capital Boulevard
Raleigh, NC 27616-2925
United States of America
Phone: 866-9-NAVMAN
Support: http://support.navman.com
Website: http://www.navman.com


MN000717A-G
Document Outline
- N-series_T1-UM_cover_f_UK.pdf
- T1 Traffic Module - Titan_English.pdf
- Blank-A5.pdf
- N-series_T1-UM_cover_BACK.pdf
Wyszukiwarka
Podobne podstrony:
GE MT96 Series Final Manual EN v01
Meridian series en
Dynacord SL Series info (en, de)
Budzik Versa wielkość karty kredytowej instrukcja EN
A11VLO250 Series 10
G2 4 PW EN wn Rys 01
Manual Acer TravelMate 2430 US EN
Ćwiczenie 01 EN DI
eci en
BVSOI 3 001 E en
A Biegus projektowanie konctrukcji stalowych wg PN EN 1993 1 1 cz 1
Flavon Active dopping EN
5817 PN EN ISO IV 2007
Pisownia ę ą en em om
NS2 lab 4 4 7 en Configure Cisco IOS IPSec using Pre Shared Keys
PN EN 1990 2004 AC Podstawy projektowania konstrukcji poprawka
EN w9 wspolpraca z siecia
więcej podobnych podstron