© Copyright 2013 Heather Jarmusz – All Rights Reserved
Patterns designed by Heather Jarmusz for Ham and Eggs.
Materials Needed:
Small amounts (less than 1 skein)
of worsted weight yarn
in taupe, purple, pink and green
Stitch marker
Crochet hooks in sizes F & J
(I highly recommend Clover Amour
hooks! They are worth the extra $$!!)
Fiberfill stuffing
Large tapestry needle
Jingle bell or other rattle device
Scissors
(2) 12-mm safety eyes
Stitches & Techniques:
Sc: single crochet
Dc: double crochet
Ch: chain
Invdc: invisible decrease
(similar to sc2tog, but uses only front
loops of the stitches)
Mr: make magic ring
(Alternately, you can ch 2,
6 sc in 2nd ch from hook)
Whipstitch
F/o: Fasten off
Bunny Head
With
Taupe
and
F hook
Rnd 1: Make magic ring (mr), 6 sc in ring (6 sts). Place marker in first st for beg of
Rnd; move marker up as each Rnd is completed.
Rnd 2: 2 sc in each st around (12 sts).
Rnd 3: *2 sc in next st, sc in next st; rep from * around (18 sts).
Rnd 4: *2 sc in next st, sc in next 2 sts; rep from * around (24 sts).
Rnd 5: *2 sc in next st, sc in next 3 sts; rep from * around (30 sts).
Rnd 6: *2 sc in next st, sc in next 4 sts; rep from * around (36 sts).
Rnd 7: *2 sc in next st, sc in next 5 sts; rep from * around (42 sts).
Rnds 8-18: Sc in each st around (42 sts).
Insert 12 mm eyes in between rounds 13-14, 10 sts apart.
Rnd 19: *Invdc over next 2 sts, sc in next 5 sts; rep from * around (36 sts).
Rnd 20: *Invdc over next 2 sts, sc in next 4 sts; rep from * around (30 sts).
Rnd 20: *Invdc over next 2 sts, sc in next 3 sts; rep from * around (24 sts).
Rnd 21: *Invdc over next 2 sts, sc in next 2 sts; rep from * around (18 sts).
Rnd 22: *Invdc over next 2 sts, sc in next st; rep from * around (12 sts).
Stuff firmly, shaping as you go so the head stays nice and round. Insert
jingle bell, making sure it is surrounded by fiberfill in the center of the head.
Rnd 23: *Invdc over next 2 sts; rep from * around (6 sts). F/o and close up
hole. Weave in ends and trim off.
Bunny
security blankie
© Copyright 2013 Heather Jarmusz – All Rights Reserved
Patterns designed by Heather Jarmusz for Ham and Eggs.
Nose
Using
Pink
and
F hook.
Rnd 1: Mr, 9 sc in ring (9 sts).
Rnd 2: 3 sc in next st, sc in next 4 sts, 3 sc in next st, sc in next 3 sts (13 sts).
Rnds 3-4: Sc in each st around (13 sts).
F/o, leaving a long tail for sewing to bunny’s head, in between the eyes. Stuff lightly.
Ears
Using
Taupe
and
F hook.
Rnd 1: Mr, 6 sc in ring (6 sts).
Rnd 2: 2 sc in each st around (12 sts).
Rnd 3: *2 sc in next st, sc in next st; rep from * around (18 sts).
Rnd 4: *2 sc in next st, sc in next 2 sts; rep from * around (24 sts).
Rnds 5-15: Sc in each st around (24 sts).
Rnd 16: *Invdc over next 2 sts, sc in next 6 st; rep from * around (21 sts).
Rnd 17: Sc in each st around (21 sts).
Rnd 18: *Invdc over next 2 sts, sc in next 5 st; rep from * around (18 sts).
Rnd 19: Sc in each st around (18 sts).
Rnd 18: *Invdc over next 2 sts, sc in next 4 st; rep from * around (15 sts).
Rnd 19: Sc in each st around (15 sts).
Rnd 20: *Invdc over next 2 sts, sc in next 3 st; rep from * around (12 sts).
Rnd 21: Sc in each st around (12 sts).
F/o, leaving a long tail for sewing to bunny’s head. Fold in half and whip-stitch closed.
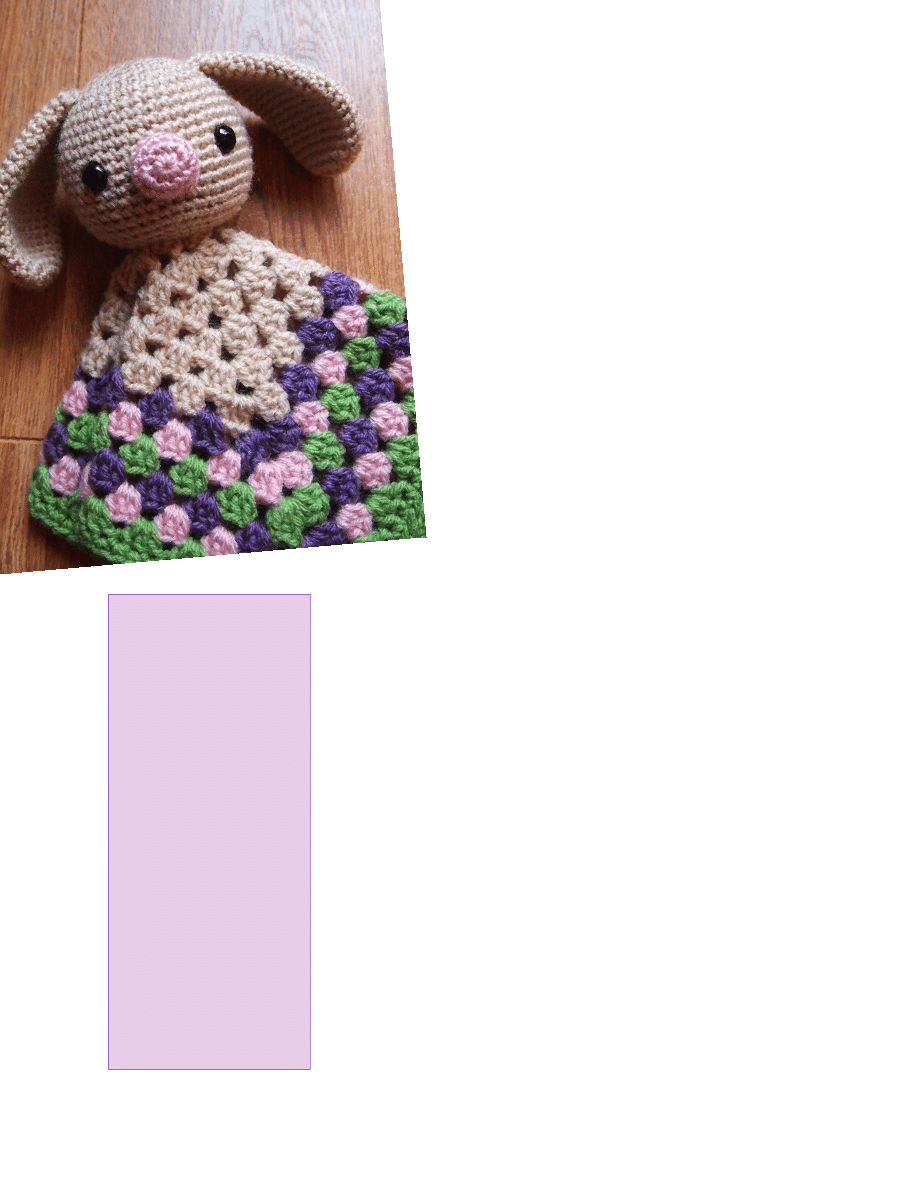
Blankie Body
There are a TON of tutorials on the web on how to make granny squares, so if this doesn’t
make sense to you, you should be able to find a photo or video tutorial that will help. :)
Start with Taupe, use J hook.
Round 1: Leave a
long
tail for starting (you will use this to sew the blankie to
the snowman’s head). Ch 6, join with sl st to form a ring. Ch 3 (counts as double
crochet for blankie), 2 dc in ring; ch 3; 3 dc in ring; ch 3; 3 dc in ring; ch 3; 3 dc
in ring; ch 3, join with sl st to top of starting ch 3. (4 clusters of 3 dcs and 4 ch-3s).
Round 2: Sl st in next 2 dcs and ch 3 space of round 1. Ch 3 (counts as dc),
2 dc in ch-3 space, ch 3, 3 dc in same ch-3 space of round 1 (makes a corner).
Repeat around in remaining 3 ch-3 spaces of round 1, join with sl st to top of
starting ch 3.
Round 3: Sl st in next 2 dcs and ch-3 space of round 2. Ch 3 (counts as dc),
2 dc in ch-3 space, ch 3, 3 dc in same ch-3 space of round 1(makes a corner).
*3 dc in space between the 2 groups of 3-dcs of Rnd 2 (see photo at left). [3 dc,
ch 3, 3 dc] in next corner.** Rep from * to **, joining with sl st in top of ch 3.
Continue with granny pattern (repeating round 3). As each round progresses, you
will add more groups of 3 dcs in the new ch-3 spaces from the previous rounds.
To achieve the look of the granny blankie in the photo, work:
6 rounds of white, 1 round of purple, 1 round of pink, 1 round of green,
1 round of purple, 1 round of pink, 1 round of green.
Chain 6
Sl st to make ring
Ch 3 (counts as dc), 2 dc in ring; ch 3; 3
dc in ring; ch 3; 3 dc in ring; ch 3, 3 dc
in ring; ch 3, join with sl st in top of
starting ch 3.
3 dc
in ring
Ch 3
How to start a Granny Square
Round 3
3 dc in space btwn
2 groups of 3-dcs of
rnd 2
© Copyright 2013 Heather Jarmusz – All Rights Reserved
Patterns designed by Heather Jarmusz for Ham and Eggs.
Edging: at the end of your last round of green, join with a sl st in top of starting
ch-3. Ch 1, sc in same space as join. Sc in each st around, working 5 sc in the ch-
3 corner spaces. Join with sl st in starting sc of round.
In between color changes, I like to finish a round with a sl st in top of starting
ch-3, fasten off the old yarn, and join the new yarn in the opposite corner with a
ch-1, 1 sc, ch 2, then continue pattern as you normally would. Weave in all ends
except
for the starting tail you left, which you will now use to sew to the snow-
man’s head.
Assembly
Sew nose between the safety eyes.
Sew blankie to bottom of bunny’s head, making sure the head faces a diagonal
corner (you want the head to face forward on a diamond, not a square, so when
it’s folded, it looks right).
Sew ears to top of bunny’s head. I sewed them so they would make floppy ears,
but if you change the positioning of them, they can stand up, which is also cute.
Weave in/trim all ends and you’re done!
Legal Mumbo-Jumbo
This pattern is © copyright 2013 Heather Jarmusz for Ham and Eggs. Do not
resell or distribute this pattern (that’s stealing, after all!). You may use this
pattern for your own personal use and sell your finished items created from this
pattern, but you cannot claim the pattern as your own. I politely ask that you
credit me, Heather Jarmusz, as the designer of this pattern, and that you
include a link to my Etsy shop if you sell your items online. You can even copy/
paste this text: For this and other crochet patterns, please visit
www.hamandeggs.etsy.com.
Thank you so much for respecting my work and copyright.
If you have any questions, please feel free to email me at
. Thank you so much for your purchase! Enjoy!!
Wyszukiwarka
Podobne podstrony:
Bunny Bag Pattern
Penguin blankie pattern
Penguin blankie pattern
bunny patterns
blankiety Karta odejscia dla?solwentow
Pattern Peyote Little Mouse Amulet
JG RUST Patterns 9 15
canoe purse pattern2 flap1
Patterson Ch J Rodzicielstwo lesbijek i gejów
Pattern Peyote Tiny Ladybug Earrings
gingerbread patterns
Dietary Patterns Associated with Alzheimer’s Disease
mallard pond pattern
Pikachu Pattern
więcej podobnych podstron