46304-050000-5000A February
8,
2005
Managing Your Data

1 2 3 4 5 6 7 8 9 10
© Copyright 2005 Autodesk, Inc.
All Rights Reserved
This publication, or parts thereof, may not be reproduced in any form, by any method, for any purpose.
AUTODESK, INC. MAKES NO WARRANTY, EITHER EXPRESSED OR IMPLIED, INCLUDING BUT NOT LIMITED TO ANY IMPLIED
WARRANTIES OF MERCHANTABILITY OR FITNESS FOR A PARTICULAR PURPOSE, REGARDING THESE MATERIALS AND MAKES
SUCH MATERIALS AVAILABLE SOLELY ON AN “AS-IS” BASIS.
IN NO EVENT SHALL AUTODESK, INC. BE LIABLE TO ANYONE FOR SPECIAL, COLLATERAL, INCIDENTAL, OR CONSEQUENTIAL
DAMAGES IN CONNECTION WITH OR ARISING OUT OF PURCHASE OR USE OF THESE MATERIALS. THE SOLE AND EXCLUSIVE
LIABILITY TO AUTODESK, INC., REGARDLESS OF THE FORM OF ACTION, SHALL NOT EXCEED THE PURCHASE PRICE OF THE
MATERIALS DESCRIBED HEREIN.
Autodesk, Inc. reserves the right to revise and improve its products as it sees fit. This publication describes the state of this product at the
time of its publication, and may not reflect the product at all times in the future.
Autodesk Trademarks
The following are registered trademarks of Autodesk, Inc., in the USA and/or other countries: 3D Studio, 3D Studio MAX, 3D
Studio VIZ, 3ds max, ActiveShapes, ActiveShapes (logo), Actrix, ADI, AEC-X, ATC, AUGI, AutoCAD, AutoCAD LT, Autodesk,
Autodesk Envision, Autodesk Inventor, Autodesk Map, Autodesk MapGuide, Autodesk Streamline, Autodesk WalkThrough,
Autodesk World, AutoLISP, AutoSketch, backdraft, Biped, bringing information down to earth, Buzzsaw, CAD Overlay, Character
Studio, Cinepak, Cinepak (logo), cleaner, Codec Central, combustion, Design Your World, Design Your World (logo), EditDV,
Education by Design, gmax, Heidi, HOOPS, Hyperwire, i-drop, IntroDV, lustre, Mechanical Desktop, ObjectARX, Physique,
Powered with Autodesk Technology (logo), ProjectPoint, RadioRay, Reactor, Revit, VISION*, Visual, Visual Construction, Visual
Drainage, Visual Hydro, Visual Landscape, Visual Roads, Visual Survey, Visual Toolbox, Visual Tugboat, Visual LISP, Volo, WHIP!,
and WHIP! (logo).
The following are trademarks of Autodesk, Inc., in the USA and/or other countries: AutoCAD Learning Assistance, AutoCAD LT
Learning Assistance, AutoCAD Simulator, AutoCAD SQL Extension, AutoCAD SQL Interface, AutoSnap, AutoTrack, Built with
ObjectARX (logo), burn, Buzzsaw.com, CAiCE, Cinestream, Civil 3D, cleaner central, ClearScale, Colour Warper, Content
Explorer, Dancing Baby (image), DesignCenter, Design Doctor, Designer's Toolkit, DesignKids, DesignProf, DesignServer, Design
Web Format, DWF, DWFit, DWG Linking, DXF, Extending the Design Team, GDX Driver, gmax (logo), gmax ready (logo),Heads-
up Design, jobnet, mass, ObjectDBX, onscreen onair online, Plasma, PolarSnap, Productstream, Real-time Roto, Render Queue,
Visual Bridge, Visual Syllabus, and Where Design Connects.
Autodesk Canada Inc. Trademarks
The following are registered trademarks of Autodesk Canada Co. in the USA and/or Canada, and/or other countries: discreet, fire,
flame, flint, flint RT, frost, glass, inferno, MountStone, riot, river, smoke, sparks, stone, stream, vapour, wire.
The following are trademarks of Autodesk Canada Co., in the USA, Canada, and/or other countries: backburner, Multi-Master
Editing.
Third Party Trademarks
HTML Help © 1995-2002 Microsoft Corp. All rights reserved.
Internet Explorer © 1995-2001 Microsoft Corp. All rights reserved.
All other brand names, product names or trademarks belong to their respective holders.
Third Party Copyright Notices
© 1999-2000 Janus Systems SA de CV. All rights reserved.
Visual J#
®, .NET™, Windows®, and Microsoft® SQL Server™ 2000 are either registered trademarks or trademarks of Microsoft
Corporation in the United States and/or other countries. Copyright © 2003 Microsoft Corporation. All rights reserved.
Portions of this software © 1981-2003 Microsoft Corp.
XtraGrid ©, XtraBars ©, XtraTreeList ©, XtraPrinting ©, and XtraNavBar © are either trademarks or registered trademarks of
Developer Express Inc.. Copyright © 1999-2004 Developer Express Inc., All rights reserved.
GOVERNMENT USE
Use, duplication, or disclosure by the U. S. Government is subject to restrictions as set forth in FAR 12.212 (Commercial Computer
Software-Restricted Rights) and DFAR 227.7202 (Rights in Technical Data and Computer Software), as applicable.

Contents
|
iii
Contents
Autodesk Data Management Server . . . . . . . . . . . . . . . . . . . . . . . . 1
Upgrading to Autodesk Vault 4 . . . . . . . . . . . . . . . . . . . . . . . . . . . . . . 3
Installing Autodesk Data Management Server . . . . . . . . . . . . . . . . . . . . . . . 3
Install IIS on the server . . . . . . . . . . . . . . . . . . . . . . . . . . . . . . . . 4
View the pre-installation report . . . . . . . . . . . . . . . . . . . . . . . . . 5
Run the pre-installation checks again after corrections. . . . . . . 5
Install Autodesk Data Management Server . . . . . . . . . . . . . . . . 6
Upgrading to Full Microsoft SQL Server . . . . . . . . . . . . . . . . . . . . . . . . . . . . 7
Working with Multiple Vaults . . . . . . . . . . . . . . . . . . . . . . . . . . . . . . . . . . . 7
Configuring the Windows XP SP2 Firewall . . . . . . . . . . . . . . . . . . . . . . . . . 7
Advanced Configurations . . . . . . . . . . . . . . . . . . . . . . . . . . . . . . . . . . . . . . . 8
Setting up and Installing Autodesk Vault . . . . . . . . . . . . . . . . . . . . 9
Key Terms . . . . . . . . . . . . . . . . . . . . . . . . . . . . . . . . . . . . . . . . . . . . . . . . . . 10
About Autodesk Vault . . . . . . . . . . . . . . . . . . . . . . . . . . . . . . . . . . . . . . . . . 11
Data Management . . . . . . . . . . . . . . . . . . . . . . . . . . . . . . . . . . . . . . . 12
Integrating with Autodesk Inventor . . . . . . . . . . . . . . . . . . . . . . . . . 12
Integrating with AutoCAD Products . . . . . . . . . . . . . . . . . . . . . . . . . 13
Determining Vault Configurations . . . . . . . . . . . . . . . . . . . . . . . . . . . . . . . 13
Working with Design Teams . . . . . . . . . . . . . . . . . . . . . . . . . . . . . . . 14
Working As a Single User . . . . . . . . . . . . . . . . . . . . . . . . . . . . . . . . . . 16

iv
|
Contents
System Requirements . . . . . . . . . . . . . . . . . . . . . . . . . . . . . . . . . . . . .17
Install Autodesk Vault 4 . . . . . . . . . . . . . . . . . . . . . . . . . . . . . .17
Logging into Vaults the First Time . . . . . . . . . . . . . . . . . . . . . . . . . . .18
Log into Autodesk Vault the first time . . . . . . . . . . . . . . . . . . .18
Using Autodesk Vault Explorer . . . . . . . . . . . . . . . . . . . . . . . . . . . . 21
Key Terms . . . . . . . . . . . . . . . . . . . . . . . . . . . . . . . . . . . . . . . . . . . . . . . . . . .22
Working with Autodesk Vault Explorer. . . . . . . . . . . . . . . . . . . . . . . . . . . .23
Start Autodesk Vault Explorer . . . . . . . . . . . . . . . . . . . . . . . . . .24
Adding User Accounts. . . . . . . . . . . . . . . . . . . . . . . . . . . . . . . . . . . . .24
Create a user account and grant vault access . . . . . . . . . . . . . .25
Setting the Working Folder. . . . . . . . . . . . . . . . . . . . . . . . . . . . . . . . .27
Set a working folder on your local drive . . . . . . . . . . . . . . . . . .27
Relocate the working folder. . . . . . . . . . . . . . . . . . . . . . . . . . . .28
Creating Folder Structures for Vaults . . . . . . . . . . . . . . . . . . . . . . . . .28
Create a folder . . . . . . . . . . . . . . . . . . . . . . . . . . . . . . . . . . . . . .29
Creating Folders for Other Projects . . . . . . . . . . . . . . . . . . . . . . . . . .29
Create additional folders . . . . . . . . . . . . . . . . . . . . . . . . . . . . . .29
Create library folders . . . . . . . . . . . . . . . . . . . . . . . . . . . . . . . . .30
Managing Files with Autodesk Vault Explorer. . . . . . . . . . . . . . . . . . . . . . .32
Add files to vaults . . . . . . . . . . . . . . . . . . . . . . . . . . . . . . . . . . .33
Getting Previous Versions. . . . . . . . . . . . . . . . . . . . . . . . . . . . . . . . . .33
Get a previous version of a file or project . . . . . . . . . . . . . . . . .33
Getting Latest Versions . . . . . . . . . . . . . . . . . . . . . . . . . . . . . . . . . . . .34
Get the latest version of a file or folder. . . . . . . . . . . . . . . . . . .34
Understanding Check Out . . . . . . . . . . . . . . . . . . . . . . . . . . . . . . . . .35
Check out a file for editing . . . . . . . . . . . . . . . . . . . . . . . . . . . .35
Understanding Check In. . . . . . . . . . . . . . . . . . . . . . . . . . . . . . . . . . .36
Check in a file . . . . . . . . . . . . . . . . . . . . . . . . . . . . . . . . . . . . . .37
Understanding Undo Checkout . . . . . . . . . . . . . . . . . . . . . . . . . . . . .38
Undo a check out. . . . . . . . . . . . . . . . . . . . . . . . . . . . . . . . . . . .38
Attaching Files in the Vault . . . . . . . . . . . . . . . . . . . . . . . . . . . . . . . .39
Attach a file . . . . . . . . . . . . . . . . . . . . . . . . . . . . . . . . . . . . . . . .39
Remove Attachments. . . . . . . . . . . . . . . . . . . . . . . . . . . . . . . . .40
Move files within a vault . . . . . . . . . . . . . . . . . . . . . . . . . . . . . .40
Label files . . . . . . . . . . . . . . . . . . . . . . . . . . . . . . . . . . . . . . . . . .41

Contents
|
v
Display the history of versions . . . . . . . . . . . . . . . . . . . . . . . . . 43
Display other files used. . . . . . . . . . . . . . . . . . . . . . . . . . . . . . . 44
Display where files are used . . . . . . . . . . . . . . . . . . . . . . . . . . . 44
Packaging Files with Pack and Go. . . . . . . . . . . . . . . . . . . . . . . . . . . . . . . . 46
Package a set of files . . . . . . . . . . . . . . . . . . . . . . . . . . . . . . . . . 47
Customizing View Panes in Vault Explorer . . . . . . . . . . . . . . . . . . . . . . . . 49
Customize fields . . . . . . . . . . . . . . . . . . . . . . . . . . . . . . . . . . . . 49
Performing Vault Tasks in Autodesk Inventor . . . . . . . . . . . . . . . . 51
Key Terms . . . . . . . . . . . . . . . . . . . . . . . . . . . . . . . . . . . . . . . . . . . . . . . . . . 52
About the Vault Add-in for Autodesk Inventor . . . . . . . . . . . . . . . . . . . . . 53
Organizing Files. . . . . . . . . . . . . . . . . . . . . . . . . . . . . . . . . . . . . . . . . . . . . . 53
Specifying the Workspace in Vault Projects . . . . . . . . . . . . . . . . . . . 53
Specifying Libraries in Vault Projects . . . . . . . . . . . . . . . . . . . . . . . . 54
Creating Folder Structures in Vaults . . . . . . . . . . . . . . . . . . . . . . . . . 54
Working with Legacy Projects. . . . . . . . . . . . . . . . . . . . . . . . . . . . . . . . . . . 55
Converting Existing Project Files . . . . . . . . . . . . . . . . . . . . . . . . . . . . 55
Vaulting Existing Data . . . . . . . . . . . . . . . . . . . . . . . . . . . . . . . . . . . . 56
Logging into Vaults in Autodesk Inventor . . . . . . . . . . . . . . . . . . . . . . . . . 56
Log into a vault. . . . . . . . . . . . . . . . . . . . . . . . . . . . . . . . . . . . . 56
Setting Up Vault Enabled Projects . . . . . . . . . . . . . . . . . . . . . . . . . . . . . . . 57
Set up a new project file for a vault . . . . . . . . . . . . . . . . . . . . . 58
Specify new library paths . . . . . . . . . . . . . . . . . . . . . . . . . . . . . 59
Map the project root. . . . . . . . . . . . . . . . . . . . . . . . . . . . . . . . . 59
Map a library in the vault . . . . . . . . . . . . . . . . . . . . . . . . . . . . . 61
The Vault Browser . . . . . . . . . . . . . . . . . . . . . . . . . . . . . . . . . . . . . . . 62
Adding Autodesk Inventor Files. . . . . . . . . . . . . . . . . . . . . . . . . . . . . 63
Add files to the vault from Autodesk Inventor . . . . . . . . . . . . 64
Adding Projects . . . . . . . . . . . . . . . . . . . . . . . . . . . . . . . . . . . . . . . . . 65
Add a project to the vault. . . . . . . . . . . . . . . . . . . . . . . . . . . . . 66
Checking Out Files . . . . . . . . . . . . . . . . . . . . . . . . . . . . . . . . . . . . . . . 66
Check out a file from Autodesk Inventor. . . . . . . . . . . . . . . . . 66
Checking In Files . . . . . . . . . . . . . . . . . . . . . . . . . . . . . . . . . . . . . . . . 68
Check in a file from Autodesk Inventor. . . . . . . . . . . . . . . . . . 68

vi
|
Contents
Undoing File Check Outs . . . . . . . . . . . . . . . . . . . . . . . . . . . . . . . . . .69
Undo a check out in Autodesk Inventor . . . . . . . . . . . . . . . . . .70
Getting Latest Versions . . . . . . . . . . . . . . . . . . . . . . . . . . . . . . . . . . . .71
Get the latest version of a model in Autodesk Inventor . . . . . .71
Viewing the History of Files . . . . . . . . . . . . . . . . . . . . . . . . . . . . . . . .71
View the history of a file in Autodesk Inventor . . . . . . . . . . . .72
Starting Autodesk Vault Explorer . . . . . . . . . . . . . . . . . . . . . . . . . . . .73
Start Autodesk Vault Explorer from Autodesk Inventor . . . . . .73
Using Vaults in AutoCAD-based Products . . . . . . . . . . . . . . . . . . . 75
Key Terms . . . . . . . . . . . . . . . . . . . . . . . . . . . . . . . . . . . . . . . . . . . . . . . . . . .76
About AutoCAD Vault ARX . . . . . . . . . . . . . . . . . . . . . . . . . . . . . . . . . . . . .77
Performing Tasks In Vaults . . . . . . . . . . . . . . . . . . . . . . . . . . . . . . . . . . . . .77
Log into a vault in AutoCAD based products . . . . . . . . . . . . . .78
Setting the Working Folder. . . . . . . . . . . . . . . . . . . . . . . . . . . . . . . . .79
Set a working folder on your local drive . . . . . . . . . . . . . . . . . .79
Creating Folders in Vaults. . . . . . . . . . . . . . . . . . . . . . . . . . . . . . . . . .80
Create a folder for a vault project . . . . . . . . . . . . . . . . . . . . . . .80
Checking In Files the First Time . . . . . . . . . . . . . . . . . . . . . . . . . . . . .81
Check in a file for the first time . . . . . . . . . . . . . . . . . . . . . . . .81
Checking Out Files . . . . . . . . . . . . . . . . . . . . . . . . . . . . . . . . . . . . . . .84
Check out a file . . . . . . . . . . . . . . . . . . . . . . . . . . . . . . . . . . . . .84
Working with Library Files . . . . . . . . . . . . . . . . . . . . . . . . . . . . . . . . .85
Create a library folder . . . . . . . . . . . . . . . . . . . . . . . . . . . . . . . .85
Add a library file in Autodesk Vault Explorer . . . . . . . . . . . . . .85
Attach a library file from the vault to a drawing . . . . . . . . . . .85
Check a file in . . . . . . . . . . . . . . . . . . . . . . . . . . . . . . . . . . . . . .86
Undoing File Check Outs . . . . . . . . . . . . . . . . . . . . . . . . . . . . . . . . . .87
Undo a check out. . . . . . . . . . . . . . . . . . . . . . . . . . . . . . . . . . . .87
Refreshing Models from Vaults. . . . . . . . . . . . . . . . . . . . . . . . . . . . . .87
Refresh a model . . . . . . . . . . . . . . . . . . . . . . . . . . . . . . . . . . . . .88
Reloading Xrefs from Vaults . . . . . . . . . . . . . . . . . . . . . . . . . . . . . . . .88
Reload xrefs from a vault. . . . . . . . . . . . . . . . . . . . . . . . . . . . . .89
Starting Vault Explorer . . . . . . . . . . . . . . . . . . . . . . . . . . . . . . . . . . . .89
Recommended Workflows . . . . . . . . . . . . . . . . . . . . . . . . . . . . . . . . . . . . . .90
AutoCAD Mechanical and Mechanical Desktop . . . . . . . . . . . . . . . .90
Workflow overview . . . . . . . . . . . . . . . . . . . . . . . . . . . . . . . . . .90
AutoCAD Electrical . . . . . . . . . . . . . . . . . . . . . . . . . . . . . . . . . . . . . . .91
Workflow overview . . . . . . . . . . . . . . . . . . . . . . . . . . . . . . . . . .91

Contents
|
vii
Maintaining Vaults . . . . . . . . . . . . . . . . . . . . . . . . . . . . . . . . . . . . . 93
About Autodesk Vault Manager . . . . . . . . . . . . . . . . . . . . . . . . . . . . . . . . . 94
Start Vault Manager . . . . . . . . . . . . . . . . . . . . . . . . . . . . . . . . . 94
Stopping and Starting the Web Service . . . . . . . . . . . . . . . . . . . . . . . 95
Create a Vault . . . . . . . . . . . . . . . . . . . . . . . . . . . . . . . . . . . . . . 96
Delete a vault . . . . . . . . . . . . . . . . . . . . . . . . . . . . . . . . . . . . . . 97
Moving File Stores . . . . . . . . . . . . . . . . . . . . . . . . . . . . . . . . . . . . . . . 97
Move a file store . . . . . . . . . . . . . . . . . . . . . . . . . . . . . . . . . . . . 97
Detaching and Attaching Vaults . . . . . . . . . . . . . . . . . . . . . . . . . . . . 97
Detach a vault . . . . . . . . . . . . . . . . . . . . . . . . . . . . . . . . . . . . . . 97
Detach the master vault . . . . . . . . . . . . . . . . . . . . . . . . . . . . . . 98
Attach a vault . . . . . . . . . . . . . . . . . . . . . . . . . . . . . . . . . . . . . . 98
Backing Up Vaults . . . . . . . . . . . . . . . . . . . . . . . . . . . . . . . . . . . . . . . 98
Create a backup. . . . . . . . . . . . . . . . . . . . . . . . . . . . . . . . . . . . . 99
Restore a vault from a back up . . . . . . . . . . . . . . . . . . . . . . . . . 99
Purging Vault Data. . . . . . . . . . . . . . . . . . . . . . . . . . . . . . . . . . . . . . 100
Purge vault data . . . . . . . . . . . . . . . . . . . . . . . . . . . . . . . . . . . 100
Installing Autodesk Content Center Libraries . . . . . . . . . . . . . . . 101
Key Terms . . . . . . . . . . . . . . . . . . . . . . . . . . . . . . . . . . . . . . . . . . . . . . . . . 102
Setting Content Center Library Configurations . . . . . . . . . . . . . . . . . . . . 103
Working with Design Teams . . . . . . . . . . . . . . . . . . . . . . . . . . . . . . 103
Working As a Single User . . . . . . . . . . . . . . . . . . . . . . . . . . . . . . . . . 104
Installing the Server and Client Components . . . . . . . . . . . . . . . . . . . . . 104
Autodesk Data Management server . . . . . . . . . 104
Configure local computers to access shared libraries. . . . . . . 105
Working As a Single User . . . . . . . . . . . . . . . . . . . . . . . . . . . . . . . . . 106
Install Content Center and all the libraries on
the same workstation . . . . . . . . . . . . . . . . . . . . 106
Install Content Center where all users have
exactly the same configurations . . . . . . . . . . . . 106
Removing Components . . . . . . . . . . . . . . . . . . . . . . . . . . . . . . . . . . 106

viii
|
Contents
Managing Content Center Libraries. . . . . . . . . . . . . . . . . . . . . . . 107
Key Terms . . . . . . . . . . . . . . . . . . . . . . . . . . . . . . . . . . . . . . . . . . . . . . . . . .108
Setting up Shared Libraries. . . . . . . . . . . . . . . . . . . . . . . . . . . . . . . . . . . . .109
Install the server and client components . . . . . . . . . . . . . . . .110
Create shared project (.
) file and configure
Content Center libraries . . . . . . . . . . . . . . . . . . .110
Configure local project settings. . . . . . . . . . . . . . . . . . . . . . . .111
Preview the Content Center libraries configuration
on a local machine . . . . . . . . . . . . . . . . . . . . . .112
Share libraries across design workgroups using an included
project file . . . . . . . . . . . . . . . . . . . . . . . . . . . . . .112
Maintaining Content Center Libraries . . . . . . . . . . . . . . . . . . . . . 113

1
1
In This Chapter
Autodesk Data
Management Server
The Autodesk
®
Data Management Server manages
databases for Autodesk
®
Vault and Autodesk
®
Productstream
™
, and shared Autodesk
®
Content Center
libraries for Autodesk Inventor
®
. When you install
Autodesk Data Management Server, you have a central
server that local machines can access for data
management.
■
Overview of Autodesk Data
Management Server
■
Installing the server
■
Configuring the server

2
|
Chapter 1 Autodesk Data Management Server
Key Terms
About Autodesk Data Management Server
Autodesk Data Management Server is the database server that works in
conjunction with Autodesk data management solutions: Autodesk Vault,
Autodesk Productstream, and Content Center libraries. The Autodesk Vault
and Autodesk Productstream clients as well as Autodesk Inventor access the
same Microsoft
®
SQL server. The server contains one database instance for
Vault and Productstream and a separate database instance for Content
Center libraries.
NOTE
The success of your data management systems depends upon how you
organize and access your files. If you are not familiar with data management
systems, we recommend that you contact your Autodesk
®
authorized
reseller or Autodesk Professional Services for advice.
Term
Definition
Autodesk Data
Management Server
The server used in conjunction with Autodesk Vault, Autodesk Productstream, and
Content Center for storing files and version data.
data management
A means to organize and track files and design modifications through the design
process.
web service
Enables Vault clients to communicate with the server when viewing and editing
data. If the web services are turned off on a server, Vault clients connecting to that
server lose communication with the server. Always alert vault users prior to
stopping web services.
Internet Information
Services (IIS)
A Microsoft
®
Web server.

Installing Autodesk Data Management Server
|
3
Upgrading to Autodesk Vault 4
If you are upgrading from a previous version of Autodesk Vault to version 4
and are using the MSDE supplied with Autodesk Vault, or if you have
upgraded to the full SQL installation:
■
Use Autodesk Vault Manager to backup all data stored on the server.
■
Use the Windows Add/Remove Programs feature to remove the previous
version of Autodesk Vault.
■
Remove Autodesk Vault 4.
NOTE
You do not need to remove Microsoft SQL Server Desktop Engine
(AUTODESKVAULT).
Installing Autodesk Data Management Server
NOTE
If you are not the data management server administrator, or the server
and databases have already been installed and configured, you can move ahead
to the client chapters.
Install Autodesk Data Management Server before installing the clients that
will be accessing the server. The Autodesk Data Management Server is
available on the Autodesk Vault 4 CD with Autodesk Inventor
®
Series,
Autodesk Inventor
®
Professional , AutoCAD
®
Mechanical , and AutoCAD
®
Electrical. The Autodesk Installation Wizard walks you through the license
agreements and installation.

4
|
Chapter 1 Autodesk Data Management Server
Autodesk Web Server
Autodesk Web Server is a substitute for IIS that allows a single client on the
same computer as the server to access the server. This is useful for a single-
user installation or for evaluating Autodesk Vault.
If IIS is not on the server and you require more than a single-user installation,
you must install Microsoft
®
Internet Information Services (IIS) before you
install Autodesk Data Management Server.
Microsoft Internet Information Services (IIS)
Autodesk Data Management Server requires Microsoft Internet Information
Services (IIS) for anything more than a single-user installation. Before the
server is installed, a check is performed to verify the presence of IIS.
Install IIS on the server
1 On the Start menu, click Settings > Control Panel.
2 In the Control Panel dialog box, double-click Add or Remove Programs.
3 In the Add or Remove Programs dialog box, click Add/Remove Windows
components.
4 In the Windows Components Wizard, scroll to and select Internet
Information Services (IIS).
Only the default set of IIS components are required for Autodesk Data
Management Server. There is no need to select additional components.
5 If needed, insert the original Microsoft
®
Windows
®
installation CD into the
CD drive on the server. Click Next.
The IIS Windows components are installed.

Installing Autodesk Data Management Server
|
5
Server Checks
When you start the Autodesk Data Management Server installation, a series
of checks are performed to verify that your operating system is configured
properly. For a complete list of the conditions that are checked prior to
installation and additional information, see the on-line help for the installer.
■
If all of the checks pass, the installation continues.
■
A warning indicates that there is the potential for a problem during
installation. If the installation does not continue as a result of a warning,
corrective actions may be necessary before proceeding.
■
If any of the checks fail, a course of action is indicated so that you can
correct the issue and then recheck the configuration.
The results are displayed in the installation wizard indicating which of the
conditions have passed, generated a warning, or failed. A text report is stored
in a log file named setup_mm-dd-yyyy.log located in C:\Documents and
Settings\[user]\Local Settings\Temp\AutodeskDataManagement. Should it be
necessary to seek assistance, the report can be forwarded to your IT personnel
or to Autodesk.
View the pre-installation report
■
In the Autodesk Data Management Setup, click View Report.
A text file that includes the version of the operating system, the date and
time of the installation, the machine name of the computer, and the
complete results of the pre-installation checks is displayed in your default
text editor.
Run the pre-installation checks again after corrections
■
In the Autodesk Data Management Setup, click Recheck.
The conditions are all checked again and the report window is updated to
reflect the new results.

6
|
Chapter 1 Autodesk Data Management Server
Install Autodesk Data Management Server
1 From the Front End Universal Installer for Autodesk Products, click Autodesk
Data Management Server to begin the installation.
Or
Insert the Autodesk Vault 4 CD into the CD drive, and then navigate to the
server folder and double-click server.exe.
2 Pre-installation checks are run automatically to verify the requirements of the
server computer. If all of the checks pass or there are any warnings that can be
ignored, click Next. If any of the checks fail, make the necessary corrections
and then click Recheck. For more information, see Server Pre-checks.
3 Click Install to install required components that may be missing.
4 Once the required components are installed, the Autodesk Data
Management Server 4 Installation Wizard starts. Click Next.
5 You are prompted to accept the terms of the license agreement. Click I accept
the license agreement, and then click Next.
6 You are prompted to register your license of Autodesk Data Management
Server. An Internet connection is required to register. Enter the required
information and then click Next. If you do not have an Internet connection,
you can register your software on the Web at
www.autodesk.com/vaultregistration.
7 Enter the name of the Autodesk reseller from which you purchased your
product, the number of users who will access the server, and the applications
with which you will use the Autodesk Data Management Server, and then
click Next.
8 The default destination folder is C:\Program Files\Autodesk\Data Management
Server [version]. Click Next to accept the default location or click Browse to
select a new location and then click Next.
9 Click Next to begin installing Autodesk Data Management Server.
10 You are prompted to view the Readme file, view the Managing Your Data.pdf
file, and to launch Autodesk Vault Manager. Make your selections, and then
click Finish.

Upgrading to Full Microsoft SQL Server
|
7
Upgrading to Full Microsoft SQL Server
To use Autodesk Vault with teams larger than ten members, we recommend
upgrading the default installation of MSDE to Microsoft SQL Server 2000. For
more information about upgrading the MSDE installation, see the Autodesk
Vault Manager Help.
Working with Multiple Vaults
A vault is created when Autodesk Data Management Server components are
installed. Typically, you use a single master vault for holding design data,
since data and folder mappings cannot be shared across vaults. For
information on how to create additional vaults, see chapter 5, Maintaining
Vaults.
Configuring the Windows XP SP2 Firewall
Windows® XP Service Pack 2 enables the Windows Firewall for added
security. The firewall must be configured to allow clients access to the
Autodesk Data Management Server.
1 From the Windows Start menu, click Control Panel.
2 Double-click Security Center and then Windows Firewall.
3 In the Windows Firewall dialog box, click the Exceptions tab, and then click
Add Port.
4 In the Add a Port dialog box, enter the following information:
Name: Vault
Port: 80
5 Ensure that TCP is checked.
6 Click OK.

8
|
Chapter 1 Autodesk Data Management Server
Advanced Configurations
For more information about configuring Autodesk Data Management Server,
see the Autodesk Data Management Server Advanced Configuration Guide
available in the on-line knowledge base at www.autodesk.com. The guide
covers advanced topics such as:
■
Upgrading from Autodesk Web Server to IIS.
■
Managing a Remote File Store.
■
Changing Settings in Configuration Files.
■
Operating Vault on an existing SQL server instance.
■
Upgrading MSDE to full SQL Server.
■
Running Vault with SSL.
■
Deployment Troubleshooting.
9
2
In This Chapter
Setting up and
Installing Autodesk
Vault
Learn about vault configurations and system
requirements for installing Autodesk
®
Vault and logging
in for the first time.
■
About Autodesk Vault
■
Vault configurations
■
Installing Vault clients
■
System requirements
■
Upgrading
■
Logging in

10
|
Chapter 2 Setting Up and Installing Autodesk Vault
Key Terms
Term
Definition
Autodesk
®
Data
Management Server
The server used in conjunction with Autodesk Vault for storing files and version
data.
Autodesk Vault
A system for data management and version control.
Autodesk Vault Explorer
The standalone client for Autodesk Vault used to organize information in the
vault. This interface can be used to manage any Microsoft
®
Windows
®
file in
Autodesk Vault.
client
The components that users interact with most frequently. In Autodesk Vault, the
clients are Autodesk
Vault Explorer, the Vault add-in for Autodesk Inventor
®
Series, and the AutoCAD
Vault ARX.
data management
A means to organize and track files and design modifications through the design
process.
design team
Two or more people working in a collaborative environment.
server
The central location where all the vault data is stored and from which it is
retrieved. The server must always be online for clients to access the vault. The
vault server is configured using Autodesk Vault Manager.
single user
An individual working in an isolated or non-collaborative environment.
vault
The logical combination of a vault database and a vault file store that contains all
of the information managed by Autodesk Vault. Each installation of Autodesk
Vault can maintain several independent vaults. A single client can connect to
several different vaults, but not simultaneously.
Vault Manager
An application for performing vault system administration tasks such as backing
up and restoring vaults.
versioning
The practice of retaining an iterative file history in order to track modifications.
Windows workgroups
A peer-to-peer network configuration using Microsoft Windows with
decentralized administration.
About Autodesk Vault
|
11
About Autodesk Vault
Autodesk Vault is a workgroup data management system for sharing design
data across your project team. The vault is a file management and version
control system for all engineering and related data providing design team
members with a central and secure collaborative environment.
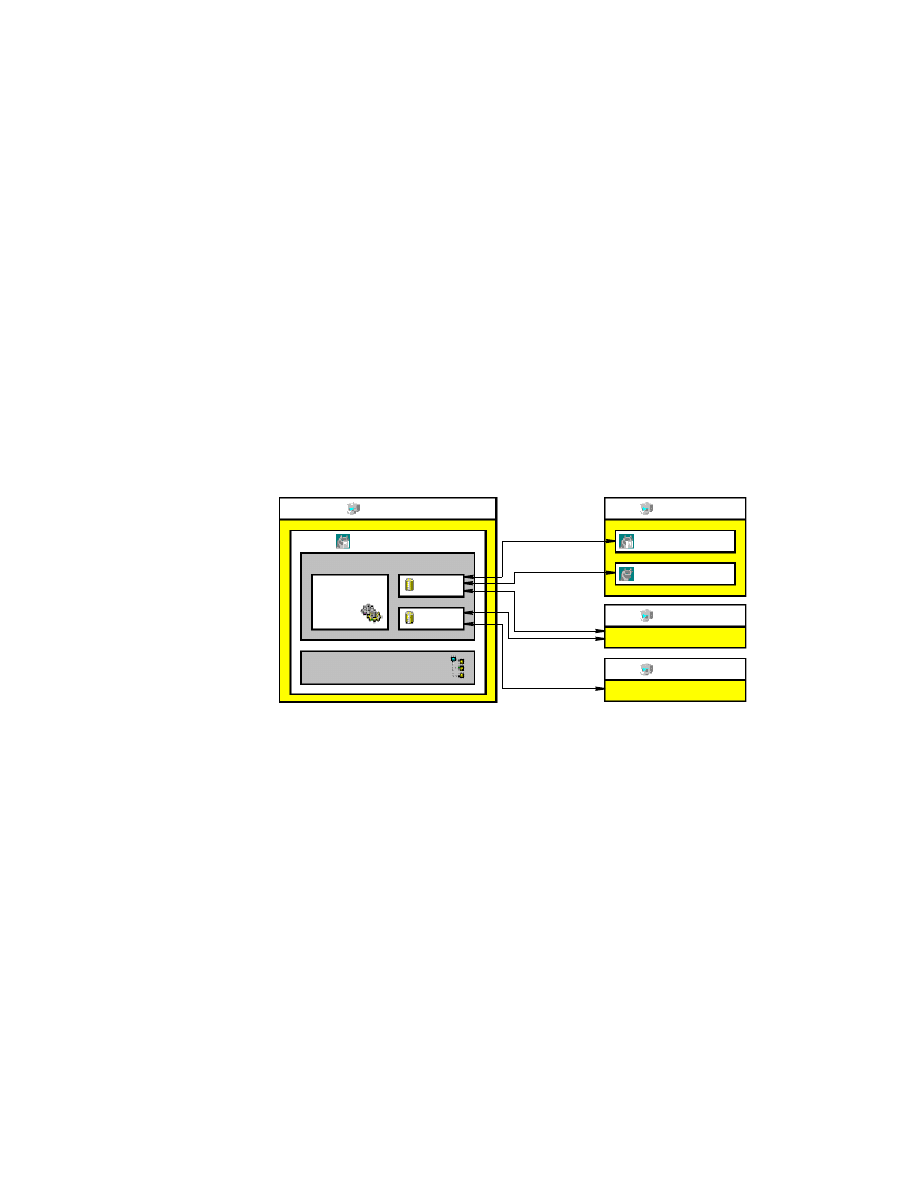
Autodesk Vault consists of two components: the Autodesk Data Management
Server and Vault clients. The server stores the master data files of all your
design information. The clients provide access to the files stored on the
server.
Design teams use Autodesk Vault for version control and to store and share
all types of engineering files and related data. Files can be Autodesk Inventor,
AutoCAD
®
, Autodesk
®
DWF
™
(Design Web Format), FEA, CAM, Microsoft
®
Office Word, Microsoft
®
Office Excel, or any other file used in the design
process.
The clients include:
Autodesk Vault
Explorer
A stand-alone client providing full access to the vault.
Vault add-in
for Autodesk
Inventor
Manage parts, assemblies, and other Autodesk Inventor
files that are stored in the vault from the Autodesk
Inventor interface.
Vault Manager
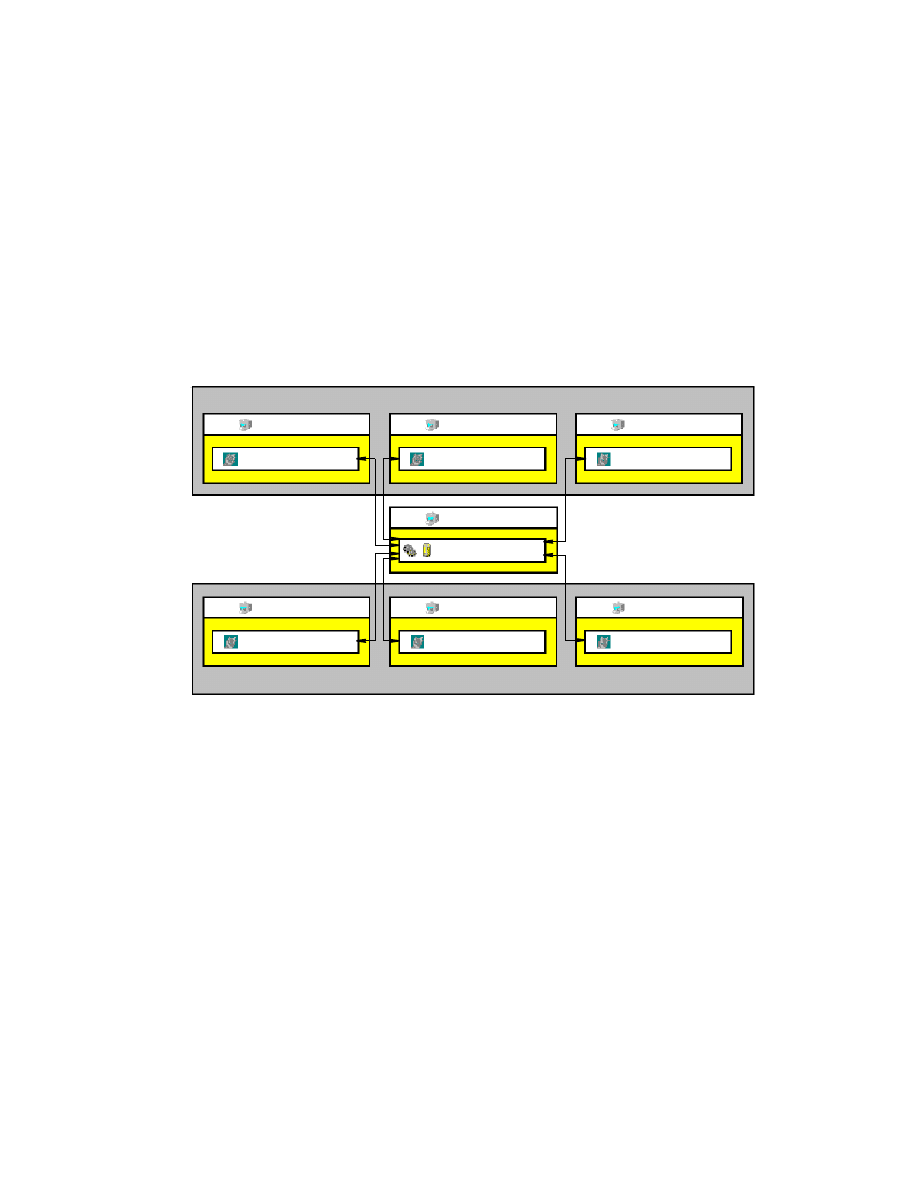
Vault A
Vault B
Vault File Store
Database
Engine
Server
Client 1
Client 2
Client 3
Vault Explorer
Inventor Add-In

12
|
Chapter 2 Setting Up and Installing Autodesk Vault
AutoCAD Vault
ARX
Perform basic vault functions within AutoCAD,
AutoCAD
®
Mechanical, AutoCAD
®
Electrical, and
Autodesk
®
Mechanical Desktop
®
.
Microsoft
®
Office
Perform basic vault functions on documents,
spreadsheets, and other non-CAD data within any of the
Microsoft Office applications.
NOTE
The success of your data management systems depends upon how you
organize and access your files. If you are not familiar with data management
systems, we recommend that you contact your Autodesk authorized reseller
or Autodesk Professional Services for advice.
Data Management
All versions of files checked into the vault are retained, along with any file
dependencies, providing a living history of the project. Team members have
access to the files and data stored on the server, and the history of files. They
check out files to prevent more than one member from editing the same file
at the same time. After a file is checked back into the vault, team members
can refresh their local copies.
Integrating with Autodesk Inventor
Autodesk Vault integrates with Autodesk Inventor software using an
Inventor add-in. You can store and manage your Autodesk Inventor files,
including:
■
Assemblies
■
Drawings
■
Parts
■
Presentations
■
Project files
■
Linked documents

Determining
Vault
Configurations
|
13
Integrating with AutoCAD Products
The AutoCAD Vault ARX integrates data management with AutoCAD,
AutoCAD Mechanical, AutoCAD Electrical, and Autodesk Mechanical
Desktop. You can store and manage your AutoCAD files, including:
■
Drawings (.dwg)
■
Image files
Determining Vault Configurations
Before you install Autodesk Vault, determine the installation scenario best
suited for your company. Examples of scenarios are:
■
A single design team
■
Multiple design teams
■
A single user
If you install a system that is too small, it can limit functionality or require
reconfiguration in the future. There are several key factors to help you
determine a scenario:
■
Number of users in a design team
■
Number of design teams
■
Availability of a network
■
Availability of a server separate from user workstations
■
Need to centrally administer vaults
After you choose the appropriate scenario for your situation, continue by
installing and configuring the software components.
14
|
Chapter 2 Setting Up and Installing Autodesk Vault
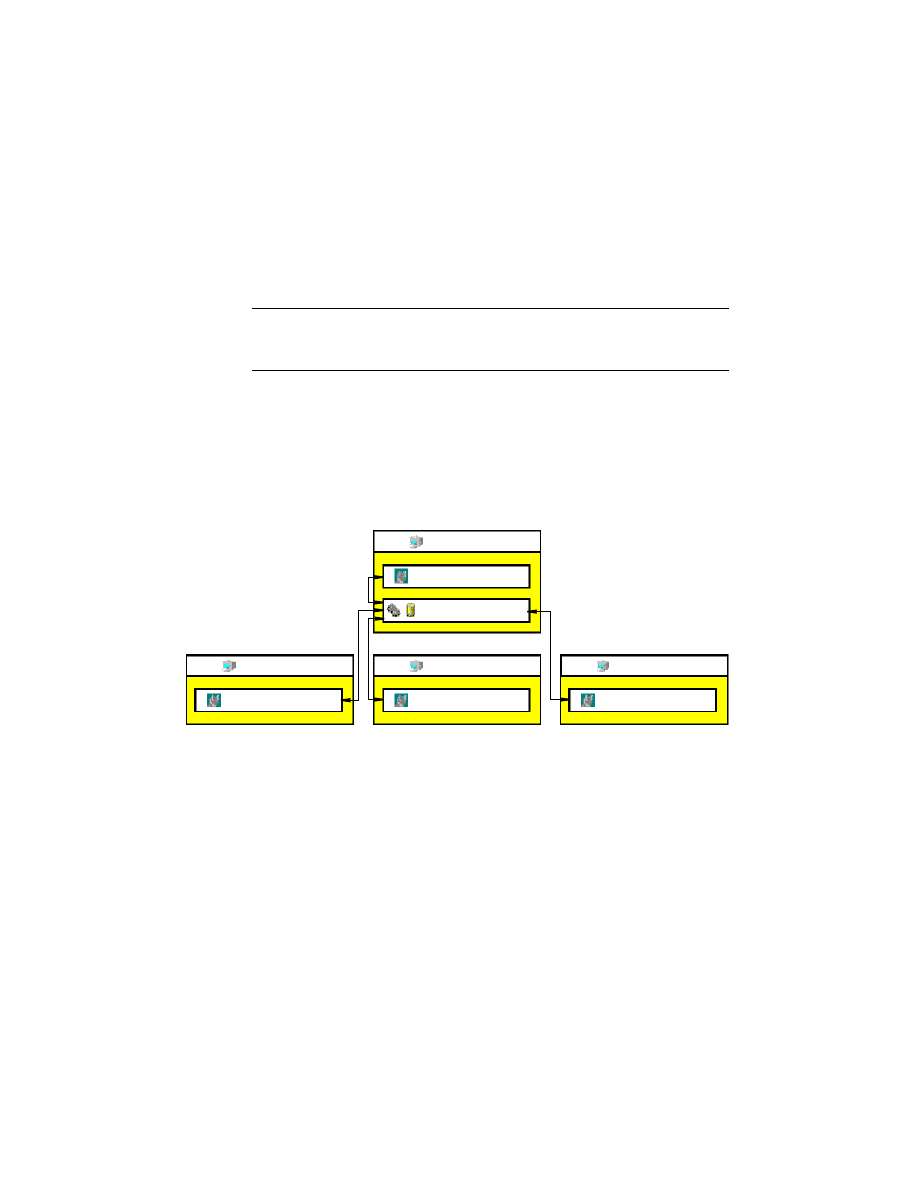
Working with Design Teams
When two or more users are actively sharing files on a design project, they
constitute a design team. Designate a team member as the project leader. The
team leader is responsible for the initial setup of the vault folders and project
file.
NOTE
The standard database installed with Autodesk Data Management
Server limits the number of Autodesk Vault users to ten. To expand the number
of users, upgrade to the full version of Microsoft
®
SQL Server.
Key characteristics of a design team configuration:
■
Network required (Windows file sharing capabilities, no domain required).
■
A separate server is recommended for optimal performance, although one
of the user computers can be used.
■
Autodesk Data Management Server components can reside on a Windows
server operating system or on a Windows desktop operating system.
To set up multiple design teams, use multiple instances of the scenario for a
single design team, or install the Autodesk Data Management Server
components on a server separate from the user workstations. Each team
member has the Autodesk Vault client components installed locally.
Server Components
Client Components
Client Components
Client Components
Client Components
Client 1
Client 2
Client 3
Client 4
Determining
Vault
Configurations
|
15
Key characteristics of a multiple design team configuration:
■
Two to three design teams that work independently of one another, and
do not share files across teams.
■
Network required (Windows file sharing capabilities, no domain
required).
■
A separate server is recommended for optimal performance. Installation of
Autodesk Inventor is not required on the server.
■
Autodesk Data Management Server components reside on a Windows
server operating system.
Design Team A
Design Team B
Client Components
Client Components
Client Components
Client Components
Client Components
Client Components
Server Components
Client 1
Client 2
Client 3
Server
Client 4
Client 5
Client 6
16
|
Chapter 2 Setting Up and Installing Autodesk Vault
Working As a Single User
A single user working in a noncollaborative or isolated environment can
install and run Autodesk Data Management Server components and
Autodesk Vault client components on the same workstation.
NOTE
When working in a single user environment, it is not necessary to have
Microsoft
®
Internet Information Services (IIS) installed. You can use the Autodesk
Web Service included on the installation CD. For more information, see chapter
1, “Autodesk Data Management Server” on page 1.
Key characteristics of a single user configuration:
■
Single user (or multiple single users).
■
Network not required.
■
Separate server not required.
Installing Vault Clients
The Autodesk Vault 4 installation CD is available with Autodesk Inventor
Series, Autodesk Inventor
®
Professional, AutoCAD Mechanical, and
AutoCAD Electrical. The CD contains both Autodesk Data Management
Server and Autodesk Vault clients.
Client Components
Client 1
Server Components

Installing
Vault
Clients
|
17
The vault clients work in conjunction with the Autodesk Data Management
Server. The Autodesk Data Management Server must be installed and
configured before the clients can access the server. For information about
installing Autodesk Data Management Server, see chapter 1, “Autodesk Data
Management Server” on page 1.
NOTE
Nonserver versions of Microsoft Windows support a maximum of 10
simultaneous users, depending on server configuration.
System Requirements
Autodesk Vault clients require a licensed installation of Autodesk Inventor
Series, Autodesk Inventor Professional, AutoCAD, AutoCAD Mechanical,
AutoCAD Electrical, or Autodesk Mechanical Desktop. Refer to the hardware
and software requirements for each product.
Although the Autodesk Vault clients can be installed on the same computer
with Autodesk Data Management Server, we recommend you install Autodesk
Data Management Server on a dedicated computer.
NOTE
To install the Autodesk Vault clients, you must have either Microsoft
Windows administrator privileges or power user privileges.
Install Autodesk Vault 4
1 Insert the Autodesk Vault 4 installation disc in the CD drive.
The Autodesk Vault Installation Wizard starts.
2 Follow the instructions in the wizard.
NOTE
Autodesk Vault 4 clients are not compatible with previous versions of
Autodesk Vault. If you are upgrading to Autodesk Vault 4.0, all server and client
components must be upgraded.

18
|
Chapter 2 Setting Up and Installing Autodesk Vault
Logging into Vaults the First Time
When Autodesk Data Management Server is installed, a vault and two user
accounts are created. The name of the vault is Vault. The account names are
administrator and guest. No password is assigned to either account and the
names are case insensitive. The “administrator” account has full administrator
privileges. The “guest” account is assigned the consumer role with permissions
restricted to view only.
NOTE
If a user account has already been created for you, log in using your
user name and password.
Log into Autodesk Vault the first time
1 Use one of these methods:
■
On the Start menu, click Programs > Autodesk > Autodesk Data
Management > Autodesk Vault Explorer.
■
On the File menu in Autodesk Inventor, AutoCAD, AutoCAD Mechanical,
Autodesk Mechanical Desktop, or AutoCAD Electric, click File > Vault >
Log into Vault.
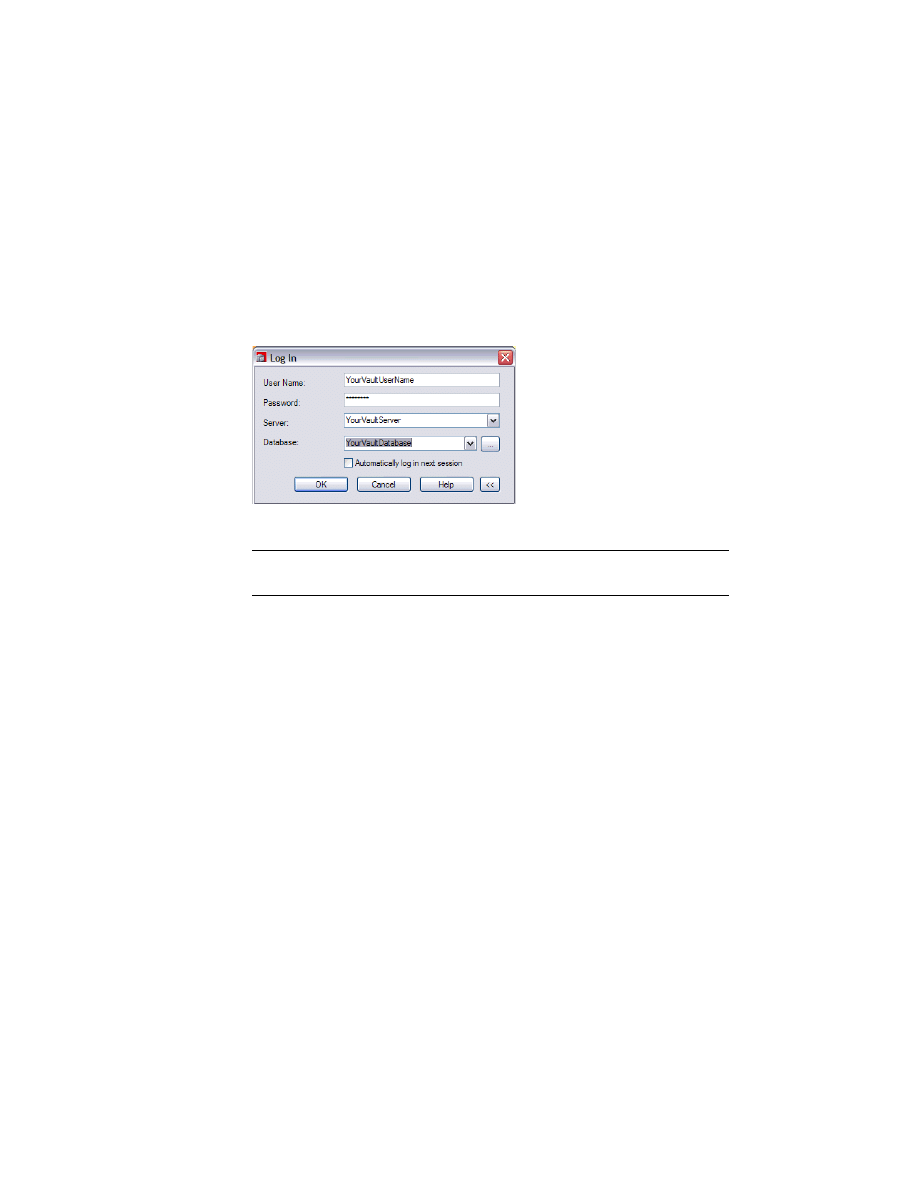
2 In the Log in dialog box, verify the following:
User name
The name for the vault account.
Password
The password associated with the vault account.
Server
The name of the computer on which the vault server is
installed.
Database
The name of a database located on the specified server.
The default is Vault. Click the browse button to select
from a list of available databases on the server.

Installing
Vault
Clients
|
19
A default user ID, vault server, and database are set up for you to get started
using the vault right away. If a user account has already been created for you,
use your own account information. If a user account has not been created for
you, or the default values are not present, contact your vault administrator.
3 Use either the default values or, if an account has been created for you, use
your own account information. The default values are:
User Name: Administrator
Password: <empty>
Server: <Name of the computer on which the vault server is installed.>
Database: Vault
4 Click OK.
You are logged into the vault.
NOTE
You have the option to save the account information to automatically
log into the vault the next time.

20

21
3
In This Chapter
Using Autodesk Vault
Explorer
Manage files in the vault and vault user accounts using
Autodesk
®
Vault Explorer, the stand-alone interface to
Autodesk Vault.
■
About Autodesk Vault Explorer
■
Folders in Autodesk Vault
■
File versions
■
Searching for files
■
Vaulting existing data

22
|
Chapter 3 Using Autodesk Vault Explorer
Key Terms
Term
Definition
check in
Returning a modified file to the vault. The previous version is retained in the file
history.
check out
Retrieving a read/write copy of a file stored in the vault for editing.
latest version
The most recent version of a file stored in the vault.
local copy
The copy of the vault source file placed in the local working directory.
previous version
An older version of a file stored in the vault. Previous versions of a file are retained
and are accessible at any time.
working folder
A local folder to which files are copied from the vault.

Working with Autodesk Vault Explorer
|
23
Working with Autodesk Vault Explorer
You must log into a vault to work with Autodesk Vault Explorer. Use
Autodesk Vault Explorer to:
■
Manage a vault.
■
Manage vault user accounts.
■
Set a working folder.
■
Create folders in a vault.
■
Add, check in and check out files, including non-Inventor files and non-
DWG files, except for AutoCAD
®
Electrical files.
■
Move files in a vault.
■
Rename files in a vault.
■
View the history of design changes.
■
Attach 2 or more files in a vault, creating an association between them.
■
Get the latest or previous version of a file.
■
Package files using Pack and Go.
NOTE
If you do not know your user name and password, contact your vault
administrator.
24
|
Chapter 3 Using Autodesk Vault Explorer
Start Autodesk Vault Explorer
1 Use one of these methods:
■
On the Microsoft
®
Windows
®
Start menu, click Programs > Autodesk >
Autodesk Data Management > Autodesk Vault Explorer.
■
On the desktop, double-click the Autodesk Vault icon.
2 In the Log in dialog box, enter your user name, password, the server name,
and the name of the computer.
3 Click OK.
NOTE
You can optionally save the account information to automatically log
into the vault the next time.
Adding User Accounts
The vault is a secure database. Before anyone can use a vault, the
administrator must add accounts for users and grant levels of permission
within the vault using roles.
For more information about users, roles, and managing accounts, see
Autodesk Vault Explorer Help.
Working with Autodesk Vault Explorer
|
25
Create a user account and grant vault access
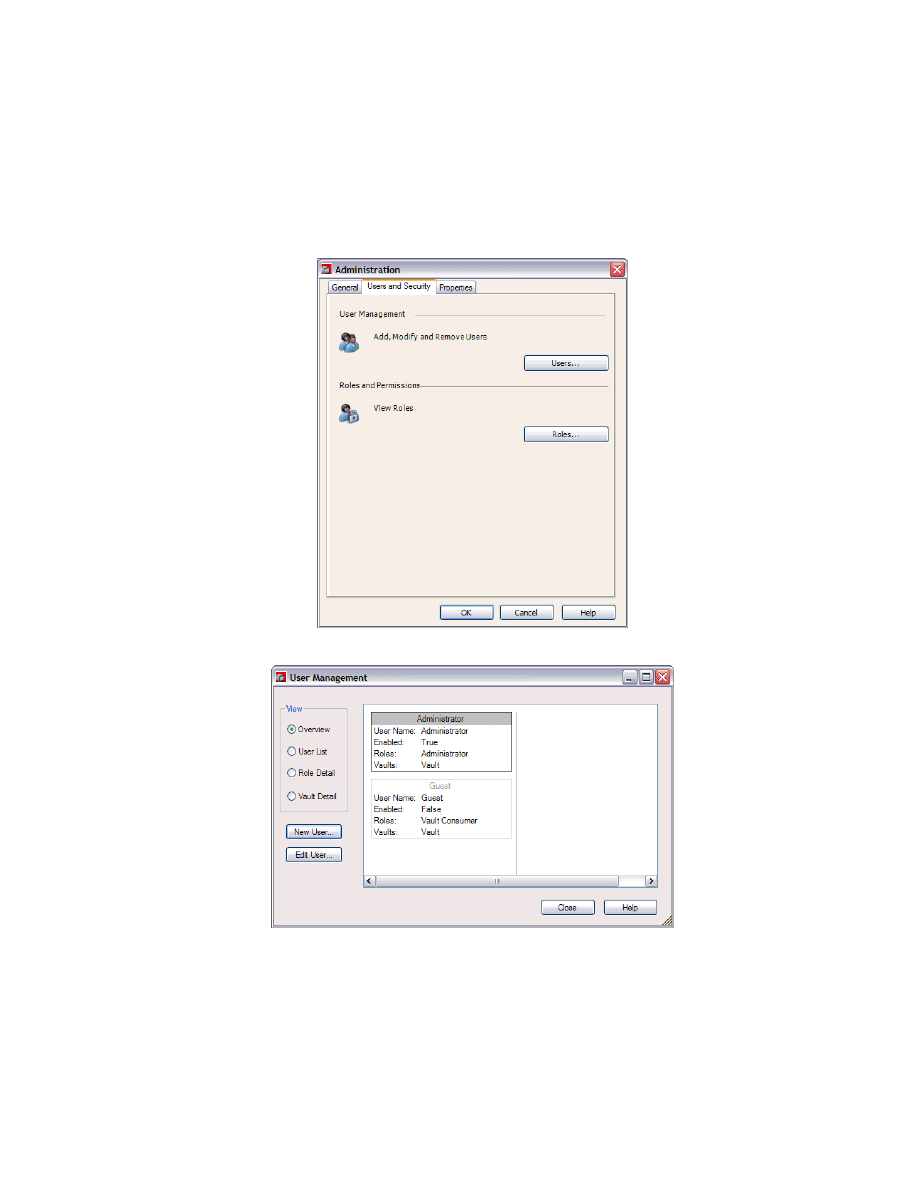
1 Click Tools > Administration.
2 In the Administration dialog box, click the Users and Security tab > Users.
3 In the User Management dialog box, click New User.
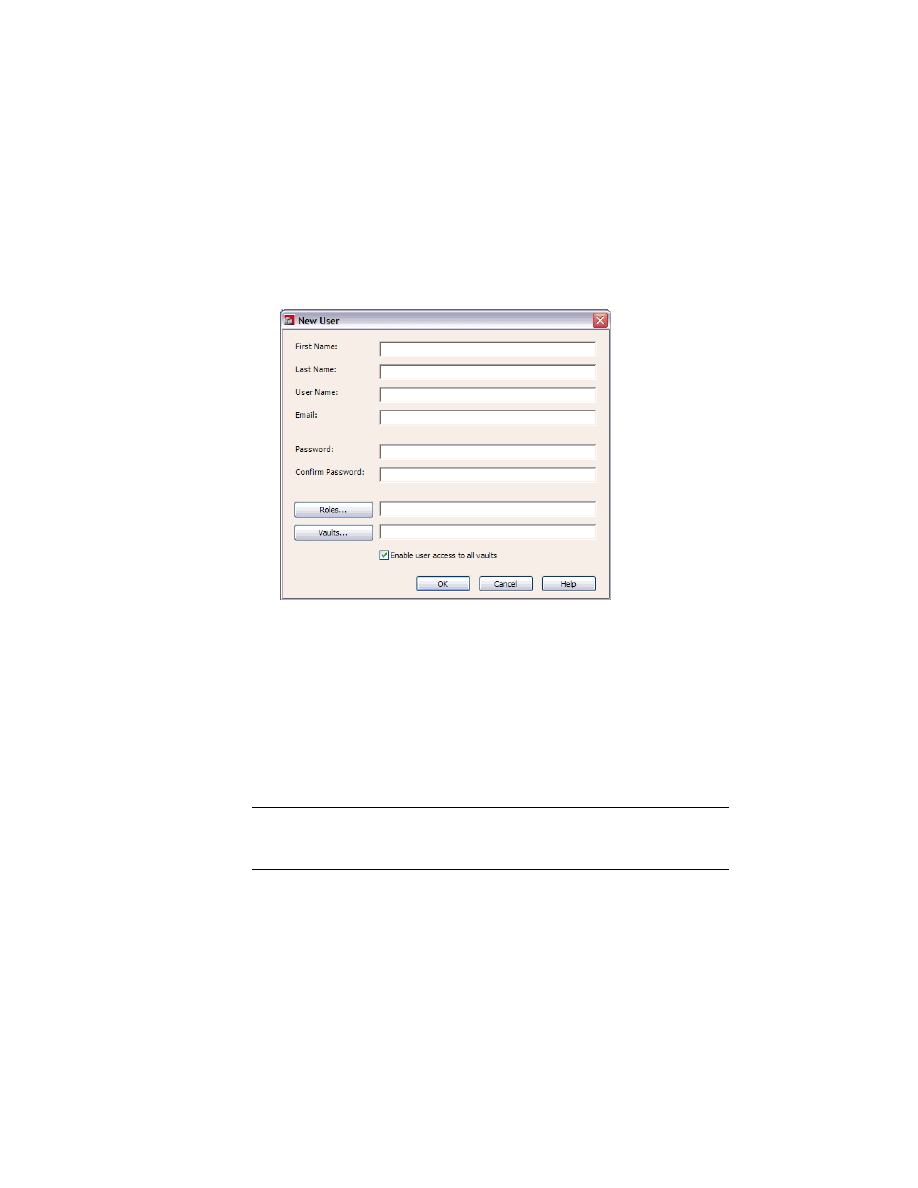
26
|
Chapter 3 Using Autodesk Vault Explorer
4 In the New User dialog box, enter the information for the new user:
■
Frst name
■
Last name
■
User name
■
E-mail address
5 Enter a password and confirm it.
6 Click Roles and assign one or more roles to the account. Roles determine the
level of access to the vault.
7 Click Vaults and select one or more vaults for the account to access.
8 Select the Enabled check box. Until the account is enabled, it is not available
for use and cannot access the vault.
9 Click OK.
Repeat this process for each new user account needed. Each new user is
granted access to the selected vaults on the server.
NOTE
Each user logs into the vault with a unique user name and password.
Restrict access to the administrator account to only the assigned vault
administrator.
Working with Autodesk Vault Explorer
|
27
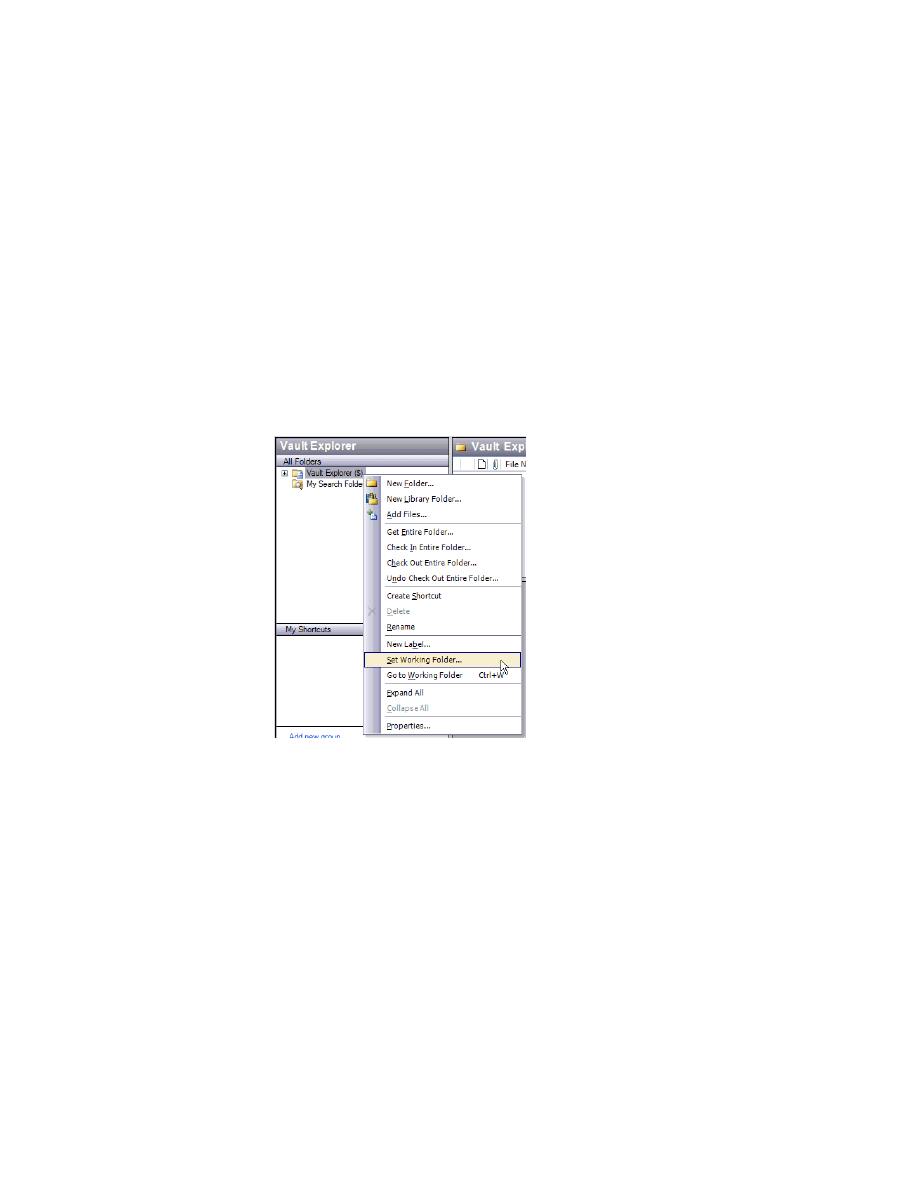
Setting the Working Folder
The working folder is the folder on the local computer to where files are
copied from the vault. You must set a working folder before your can perform
any action that copies a file out of or into the vault, such as retrieving files
and checking files out or in.
Before you set the working folder, plan the folder structure. The working
folder should be a single, consistent local directory that is not shared by
other users. You set the working folder from the root directory of the vault,
Vault Explorer ($).
Set a working folder on your local drive
1 Right-click the Vault Explorer ($) folder, and then select Set Working Folder.
28
|
Chapter 3 Using Autodesk Vault Explorer
2 In the Browse for Folder dialog box, browse to a folder on your local
computer or network share, or create a new folder where you will store the
files you retrieve from the vault and then click OK.
The location of the working folder is displayed above the main pane.
Relocate the working folder
1 Right-click the Vault Explorer ($) folder, and then select Set Working Folder.
2 Specify a new location on the local drive or network share.
NOTE
AutoCAD
®
Vault ARX only – If you do not set a working folder, then the
first time you add a file to the vault using the ARX, the working folder is set on
the local drive as My Documents/Vault.
Creating Folder Structures for Vaults
To create the folder structure for the vault, use Autodesk Vault Explorer. The
root directory in a vault is the Vault Explorer ($) folder.
NOTE
Autodesk Inventor
®
only – Because Autodesk Vault uses the Autodesk
Inventor project file as a reference for file organization, set the folder structure
inside the vault identical to the folder structure of the project on the local
computer.
Working with Autodesk Vault Explorer
|
29
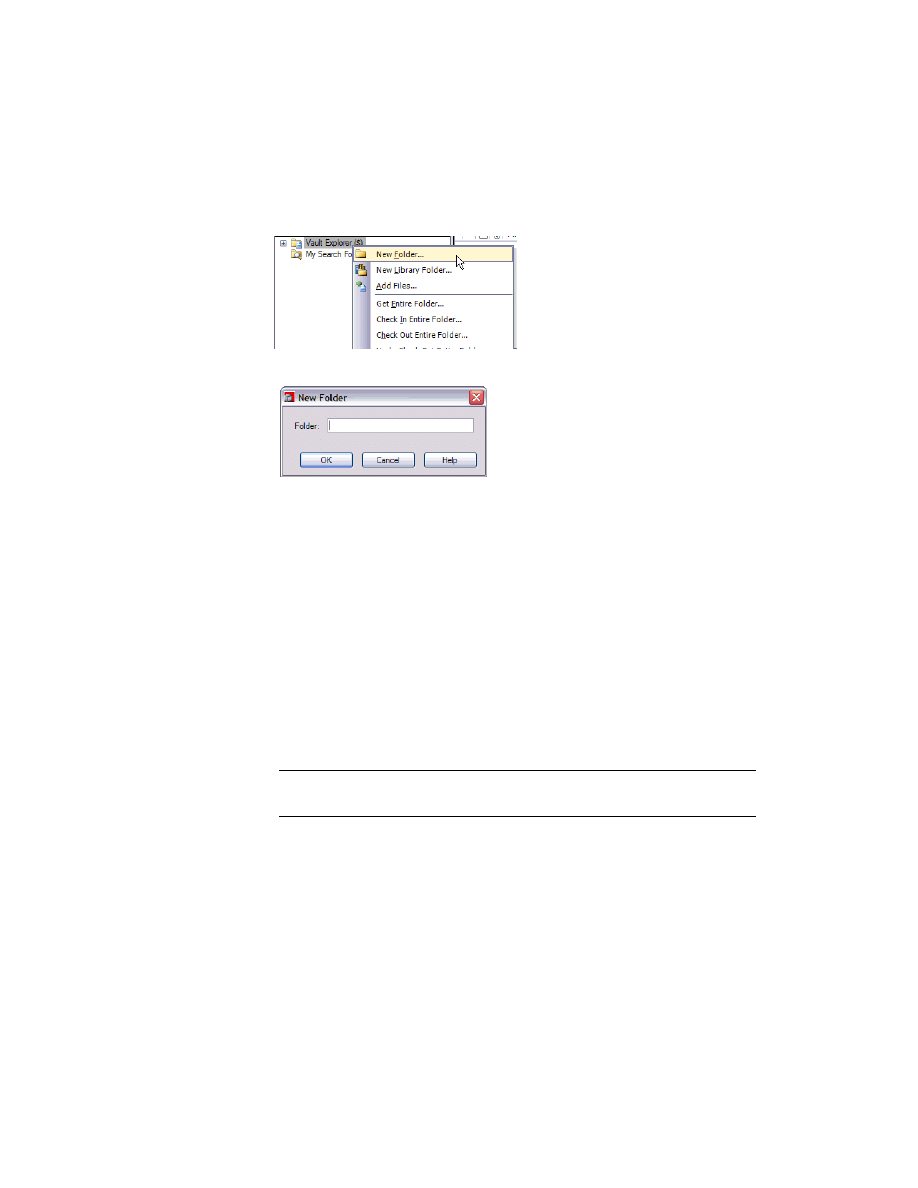
Create a folder
1 Right-click the Vault Explorer ($) folder, and then select New Folder.
2 In the New Folder dialog box, specify a name for the folder.
3 Click OK.
The folder is created below the root level of the vault. Additional subfolders
might be created automatically when you add files to the vault using the
Vault add-in for Autodesk Inventor and for AutoCAD
®
based produces.
Creating Folders for Other Projects
You can create a folder off of the root ($) for each project. The root working
folder remains the same.
Create additional folders
1 Right-click a vault folder, and then select New Folder.
2 In the New Folder In dialog box, specify a name for the folder.
3 Click OK. The new folder is created within the selected vault folder.
NOTE
Files checked out to the working folder must be checked back into the
vault from the same working folder.
30
|
Chapter 3 Using Autodesk Vault Explorer
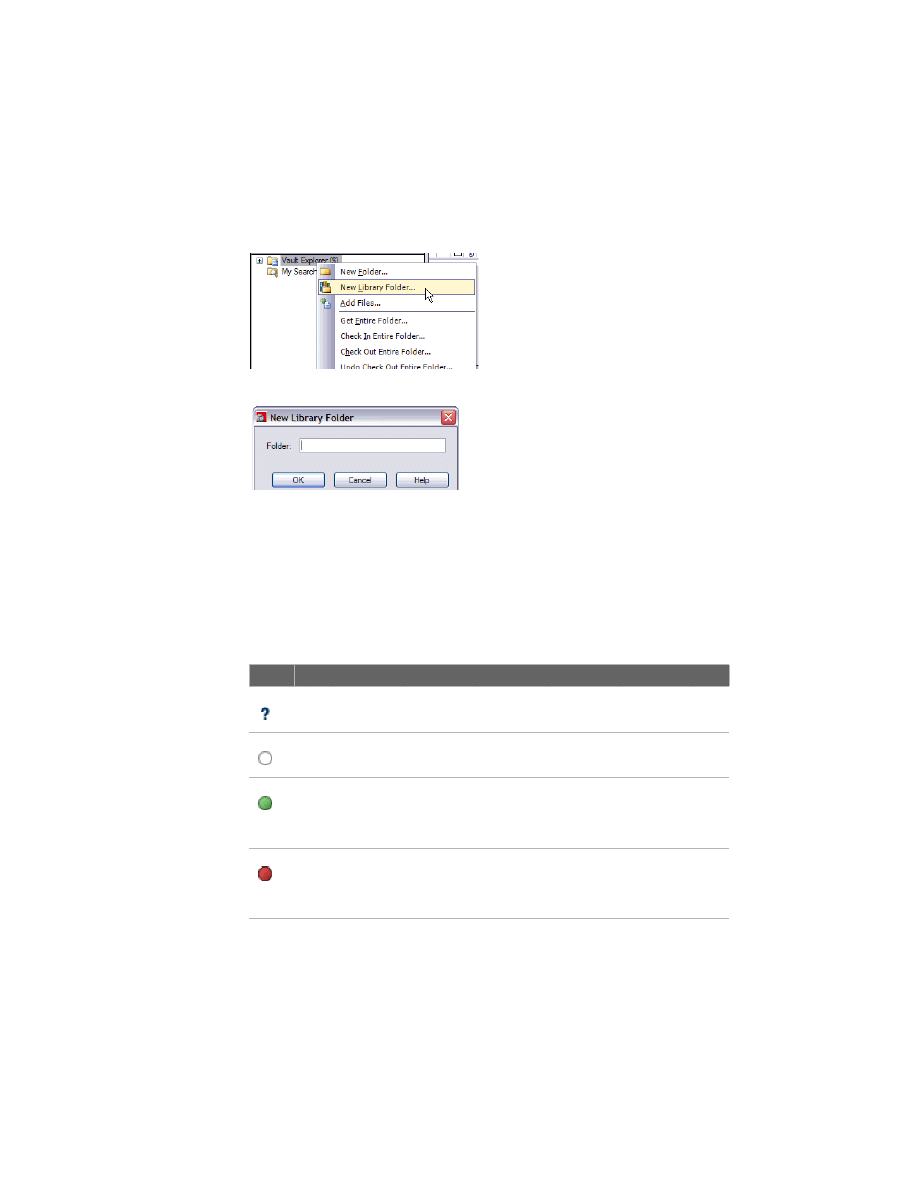
Create library folders
1 To add a library folder, right-click the root level directory ($), and then click
New Library Folder.
2 In the New Library Folder dialog box, enter a name.
You can create library folders directly off the root level of the vault or
underneath another library folder.
File Status Icons
One set of icons indicates the status of files in the Autodesk Vault Explorer
window, the Vault browser in Autodesk Inventor, and the Xrefs Manager in
AutoCAD based products.
Icon
Description
Not in the vault or the file has missing parent/child relationships. Use the Add Files
command to add the item to the vault or resolve the missing links.
Checked in to the vault and the version you are working on is the same as in the
vault. Also referred to as the Latest Version.
Checked in to the vault, but the version you are working on is newer than the
latest version in the vault. This typically means that your local file was changed
without checking it out. To save the changes, check the file out, and make sure
the Don't Get Local Copy option is selected.
Checked out of the vault, but the version you are working on is older than the
latest version in the vault. This typically means that another user made changes
since your last update. Use Get Latest Version to update to the latest available
version.
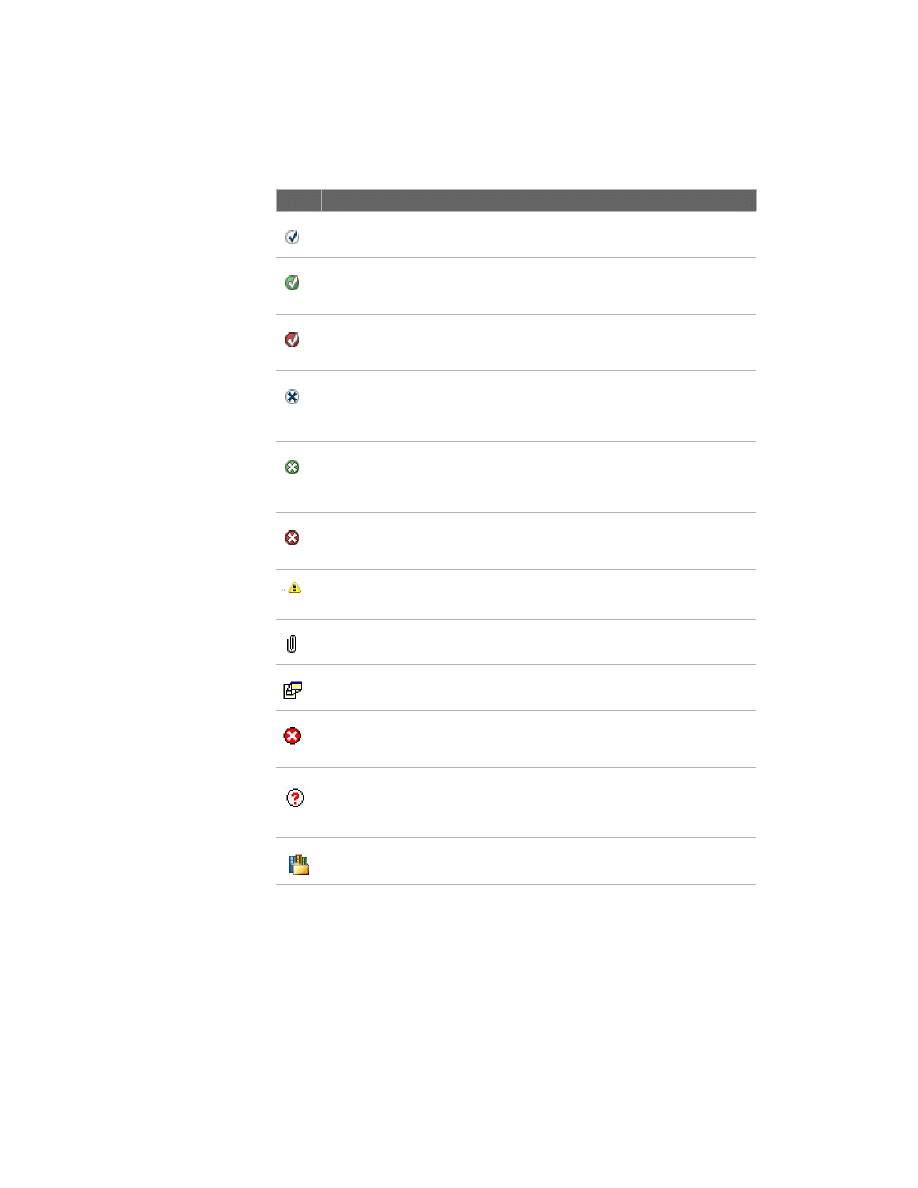
Working with Autodesk Vault Explorer
|
31
Checked out to you and the version you are working on is the same as in the vault.
Also referred to as the Latest Version.
Checked out to you, but the version you are working on is newer than the latest
version in the vault. This typically means that you made changes to the model
since the last time you checked out the file, but have not checked it back in.
Checked out to you, but the version you are working on is older than the latest
version in the vault. This typically means that you started with a version from the
vault that was older than the latest, and checked it out to promote it to the latest.
Checked out to another user, and the version you are working on is the same as in
the vault. Also referred to as the Latest Version. This typically happens if the other
user did not check changes back into the vault. Check with the other user before
proceeding.
Checked out to another user, but the version you are working on is newer than the
latest version in the vault. This typically happens if the user checked in saved
changes to the vault, but kept the file checked out. Use Get Latest Version to
update to the latest available version.
Checked out to another user, but the version you are working on is older than the
latest version in the vault, and another user checked out this file. Use Get Latest
Version to update to the latest available version.
Autodesk Inventor only: User is not logged into the vault.
Has attachments. Expand the tree to see what files are attached.
Has third-party OLE linked files. This is displayed in the Autodesk Inventor browser
only. Expand the tree to see what files are linked.
An an error occurred when adding your project to a vault. You must resolve the
errors in order to add the files to the vault. This icon can also mean that you need
to set a project folder mapping in the Map Folders dialog box.
File doesn't exist in the expected working folder. This is common in two cases: 1)
you created a new file but haven't saved it to disk yet, and 2) an attachment isn't
in the same folder as the file it is attached to. This is a requirement for files that are
attached to Autodesk Inventor documents.
Library folder. The files within this folder are not intended to be edited when used
in context of another assembly.
Icon
Description
32
|
Chapter 3 Using Autodesk Vault Explorer
Managing Files with Autodesk Vault Explorer
Autodesk Vault Explorer provides a complete interface to the vault for
managing design data and vault projects.
Any non-CAD files can be added to a vault using Vault Explorer. When
adding CAD data from Autodesk Inventor or any of the AutoCAD-based
products, be sure to add the files from within the CAD application to
maintain file relationships.
■
For Autodesk Inventor design files, use the Autodesk Vault add-in for
Inventor.
For more information about adding Inventor files, see chapter 4,
“Performing Vault Tasks in Autodesk Inventor” on page 51.
■
For DWG host files containing xrefs in applications such as AutoCAD,
AutoCAD
®
Mechanical, AutoCAD Electrical, or Autodesk
®
Mechanical
Desktop
®
, use the Autodesk Vault ARX.
File relationships are maintained among files stored in the vault. When
getting a file, checking a file out, or checking a file in, the files related to a
selected file can be included. The following terms refer to related files:
Children
Files on which the selected file depends.
Parent
Files that are dependent on the selected file.
You can use Autodesk Vault to manage and track the many different types of
files and data associated with your design project, including Autodesk
Inventor and AutoCAD data to documents and spreadsheets.
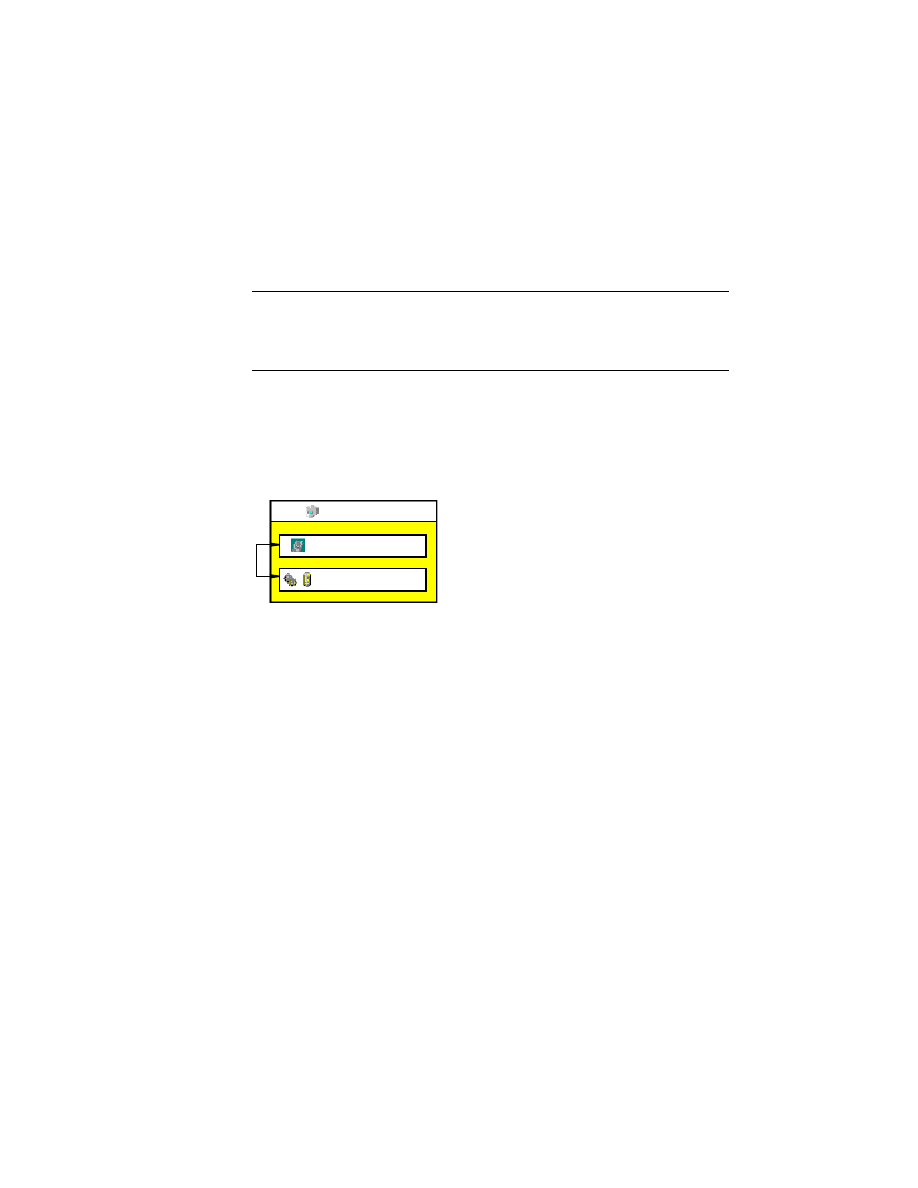
Child
Parent
Managing Files with Autodesk Vault Explorer
|
33
Add files to vaults
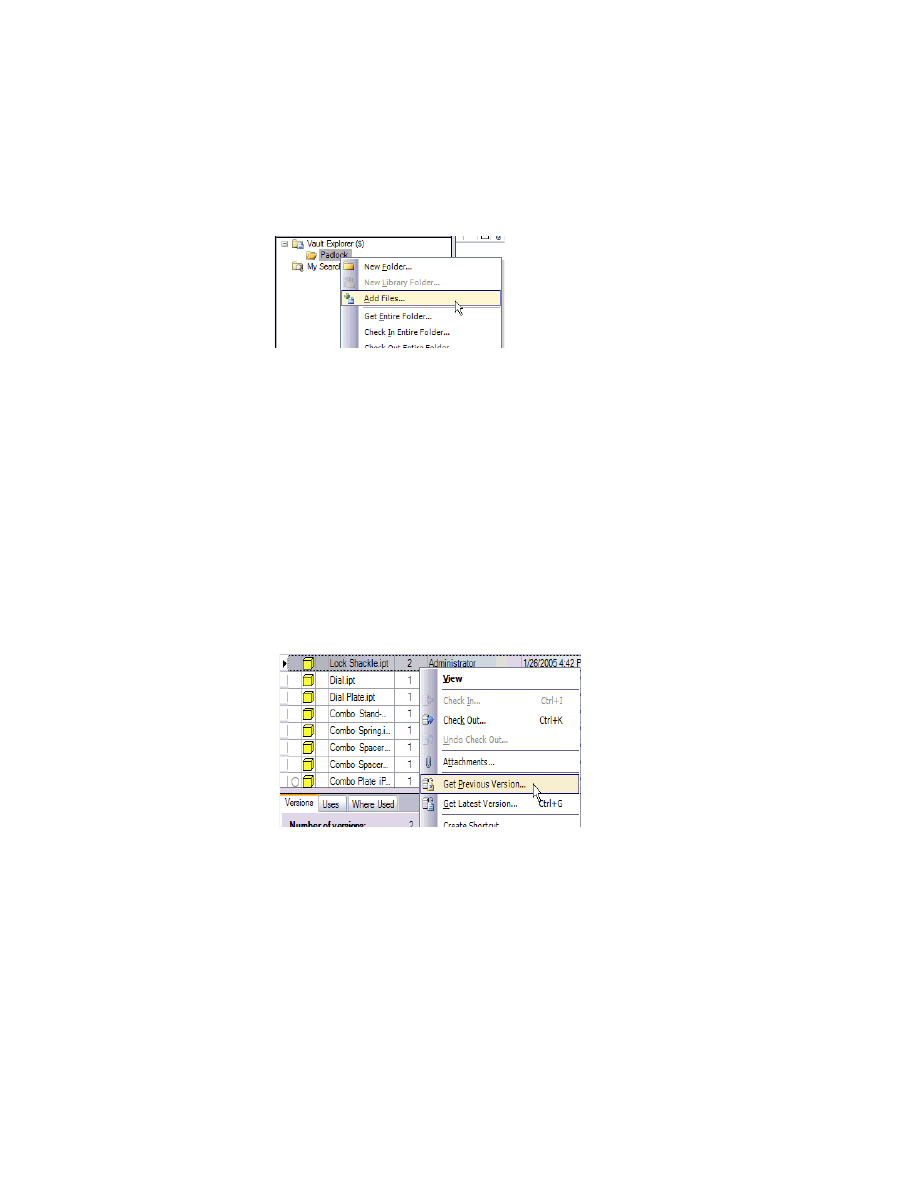
1 Right-click a vault folder, and then click Add Files.
2 In the Add files dialog box, select the file to add to the vault.
3 Click OK.
After you add a file to the vault, you can delete the local copy. When you
want to view or modify a copy of the file, you use Autodesk Vault to retrieve
a version of the file and check it out.
Getting Previous Versions
Get Previous Version retrieves a past version of a file or a project and places
a read-only copy in your working folder. Historical versions can never be
modified. You can only create a new version of a file.
Get a previous version of a file or project
1 In the Vault Explorer window, right-click a file or project, and then click Get
Previous Version.

34
|
Chapter 3 Using Autodesk Vault Explorer
2 In the Get Previous Version dialog box, select a version of the file or project
to get.
3 Click OK.
A read-only copy of the file is placed in the local working folder. You can view
the file but you cannot modify it. To modify the file, you must check it out.
NOTE
Autodesk Inventor only: Library files and referenced files outside of the
workspace are retrieved to a directory parallel to the working folder.To ensure
that the correct version of the libraries is referenced, check out the project file
from the vault and modify the library search paths to point to the new location.
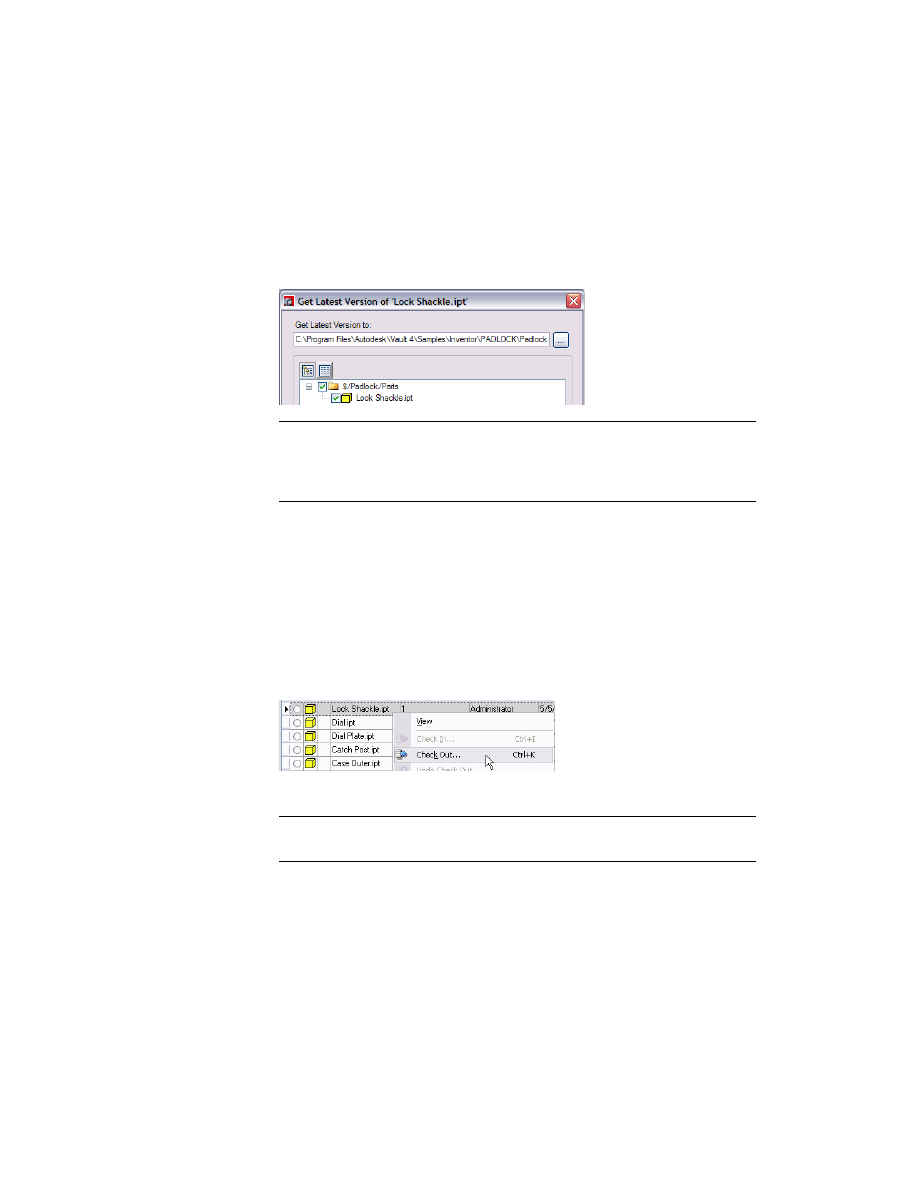
Getting Latest Versions
Get Latest Version retrieves a read-only copy of the most recent design data
that is checked in. You cannot modify it until you check it out using
Autodesk Vault Explorer, the Vault add-in for Autodesk Inventor, or
AutoCAD based products.
Get the latest version of a file or folder
1 In the Vault Explorer window, right-click the file or folder, and then click Get
Latest Version.
Managing Files with Autodesk Vault Explorer
|
35
2 In the Get Latest Version dialog box, click OK.
The most recent version is copied to the local working folder. If the most
recent version in the vault is different from the copy currently in the working
folder, you are prompted about overwriting data.
Use the advanced options to get the parents and children of the selected file.
NOTE
Autodesk Inventor only: Library files and referenced files outside of the
workspace are retrieved to a directory parallel to the working folder. To ensure
that the correct version of the libraries are referenced, check out the project file
from the vault and modify the library search paths to point to the new location.
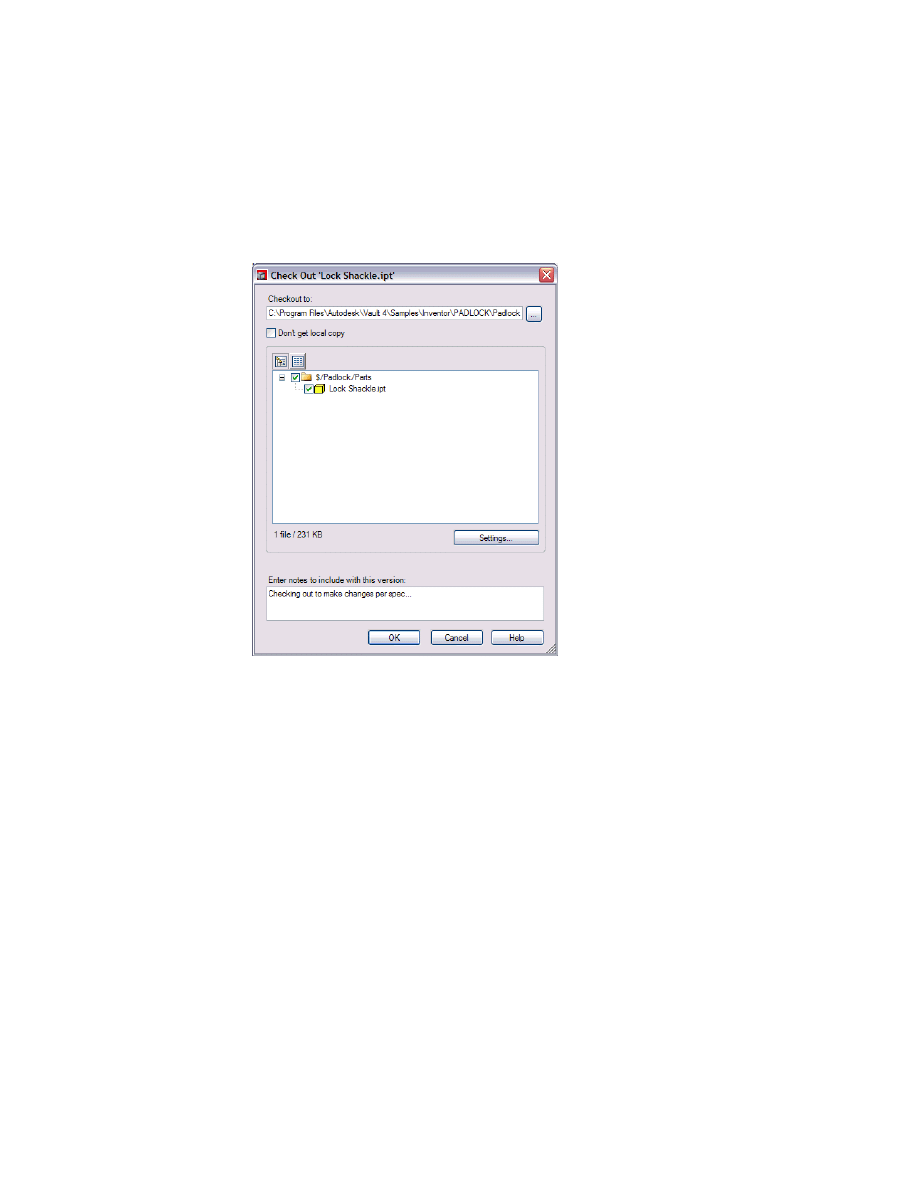
Understanding Check Out
When you check out a file, the read-only attribute of the local copy changes
to read/write, and you can edit it. No one else can modify a file you check
out until you check it back into the vault, but they can retrieve read-only
copies. Only one member of a team can check out a file at one time.
Check out a file for editing
1 In Autodesk Vault Explorer, right-click a file, and then click Check Out.
2 In the Check Out dialog box, you can add a comment.
NOTE
Autodesk Inventor relies on consistent file locations to resolve links.
Check files out to the default working directory.
36
|
Chapter 3 Using Autodesk Vault Explorer
As you check files out and in, use comments to add information for managing
versions and to track the actions performed during the last working session.
Use the advanced options to check out the parents and children of the
selected file.
3 Click OK.
A check mark next to a file indicates that the file is currently checked out for
editing. No other team members can check out a file that is currently checked
out. However, others can get read-only previous versions and latest checked
in versions of files that are currently checked out.
Understanding Check In
Check In returns the local copy of the file to the vault with the changes that
have been made. When a file is checked in, it becomes the latest version and
is accessible to others.
You must check in files from the working folder to which they were checked out.
If files are moved from the working directory, you cannot check them back into
the vault but you can undo the check out. The file properties CheckOutMachine
and CheckOutLocalSpec specify the required location of the file.

Managing Files with Autodesk Vault Explorer
|
37
Check in a file
1 In Vault Explorer, right-click a file, and then click Check In.
2 In the Check In dialog box, you can:
■
Check in the file with your changes, or check in your changes, and keep
the file checked out for further editing.
■
Delete the local copy upon check in, if you check in the file.
■
Add a comment containing information for managing versions and to
track the actions performed during the last working session.
■
Use the advanced options to check in the parents and children of the
selected file.
3 Click OK.
38
|
Chapter 3 Using Autodesk Vault Explorer
The information for the file in Vault Explorer indicates that the file is
checked in. The file becomes the latest version and other team members can
check it out.
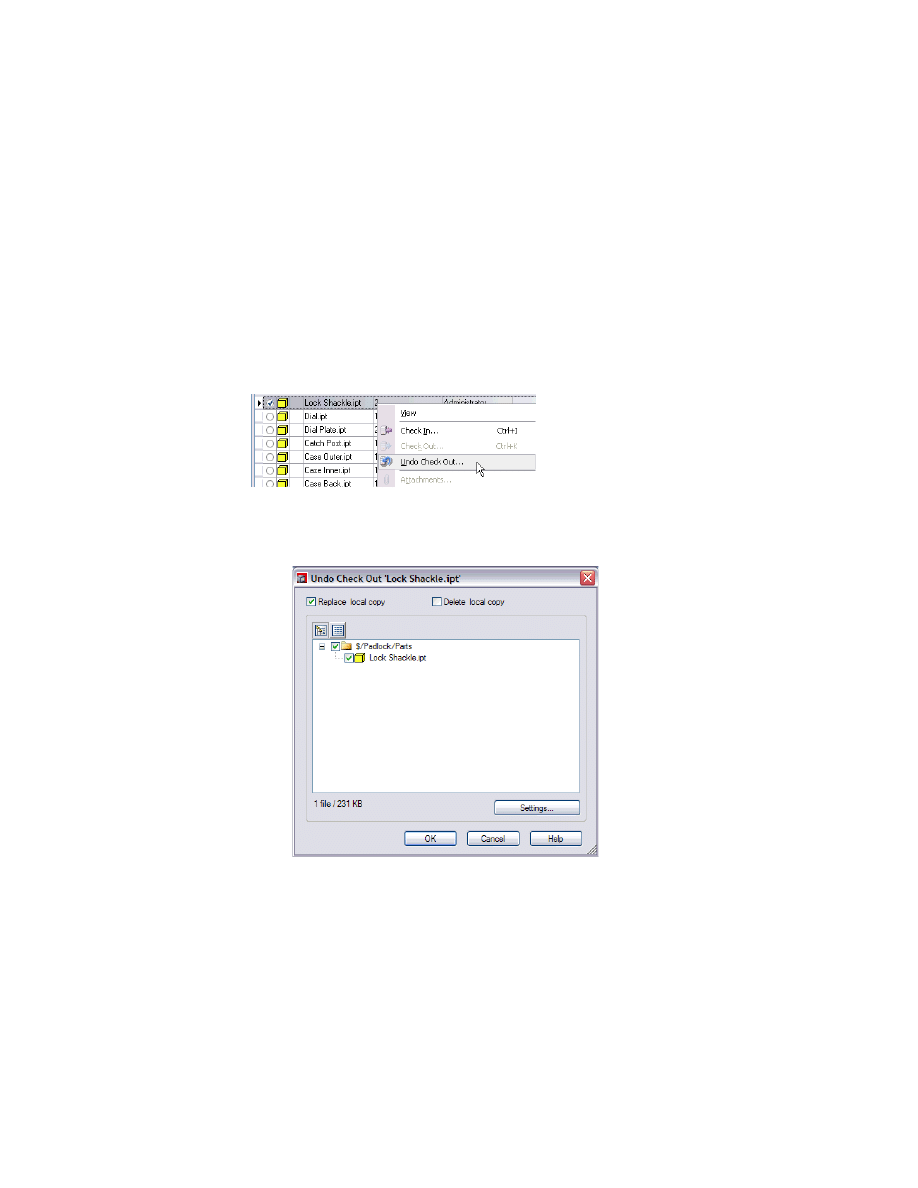
Understanding Undo Checkout
Undo Checkout removes the checked out status on the file. The latest version
of the file that was checked in is restored to the vault.
Undo a check out
1 In Vault Explorer, right-click a file, and then select Undo Check Out.
A prompt indicates that undoing a checked out file results in loss of changes.
2 To make the local file the same as the file in the vault, select Replace local
copy.
3 Click OK.
The file is returned to the vault. Any changes made to the local copy are lost.
Managing Files with Autodesk Vault Explorer
|
39
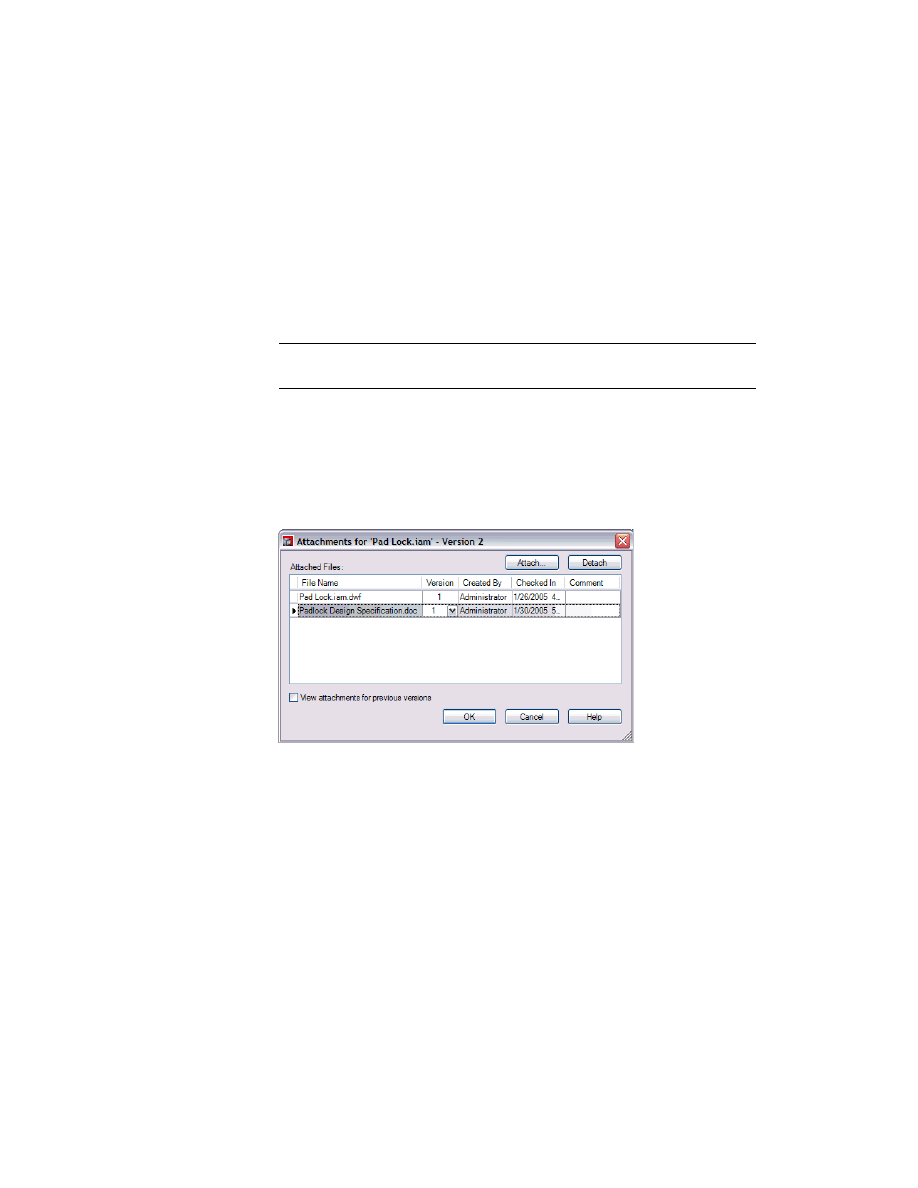
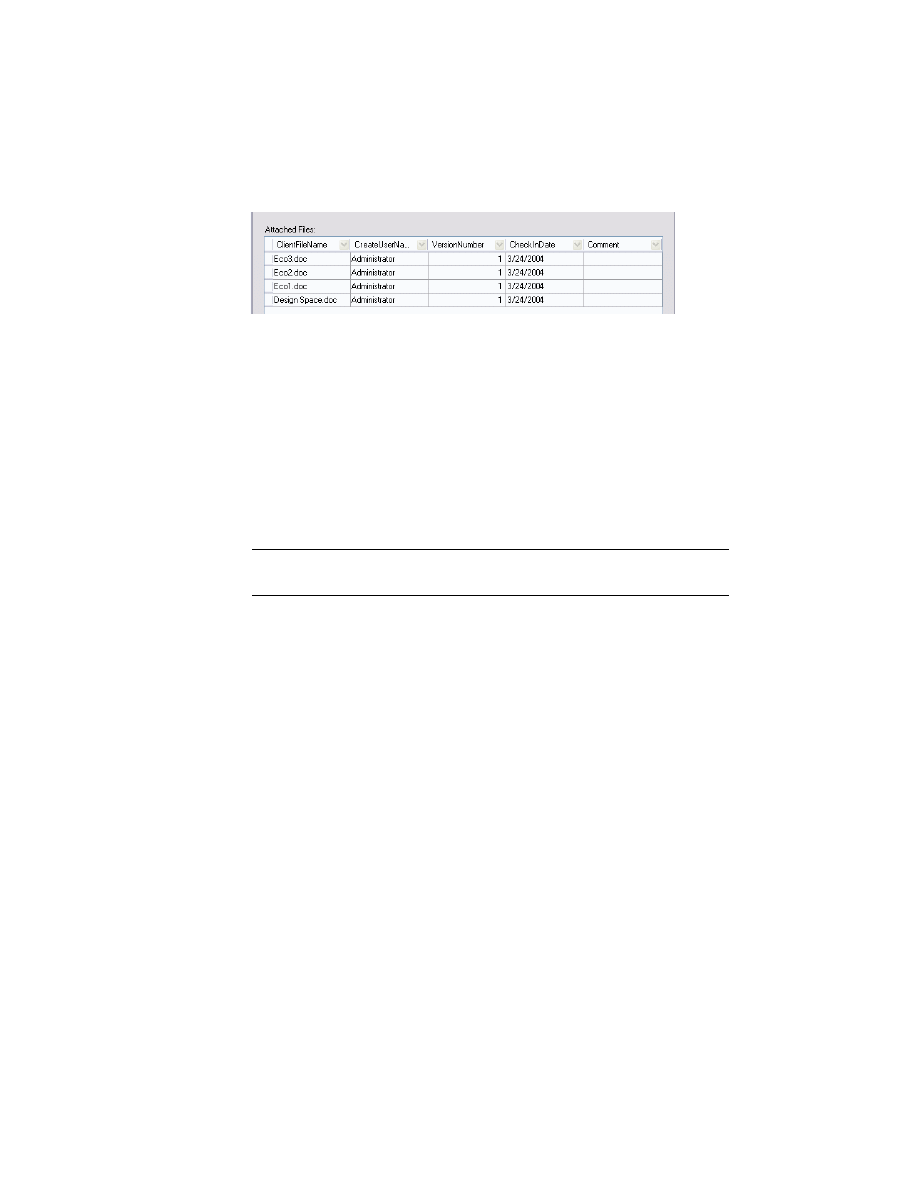
Attaching Files in the Vault
An attachment among files links them in the vault. You can manually add
attachments among any two or more files within the vault. Using
attachments, you can check out all the files that are linked, and work on
them as a unit. You can attach different file types. For example, you can
attach a set of images to a Microsoft
®
Office Word document, and you can
attach assembly instructions to the actual CAD assembly files.
NOTE
Do not attach files that can be assembled (Autodesk Inventor) or
referenced together (AutoCAD based products).
Attach a file
1 Select a file in the vault for which you want to define an attachment.
2 On the Vault menu, click Attachments.
The Attachments dialog box displays the current attachments.
3 Click Attach.
4 In the Select File to Attach dialog box, browse to and highlight the files to
attach.
To select multiple files, use a crossing window or hold down
CTRL
or
SHIFT
.
5 Click Insert.
40
|
Chapter 3 Using Autodesk Vault Explorer
The files are attached to the file you selected in the vault, and are displayed.
6
When you finish all attachments, click OK.
Remove Attachments
1 Select the file in the vault from which to remove an attachment.
2 On the Vault menu, click Attachments.
3 In the Attachments dialog box, select the file to remove.
4 Click Detach.
As a project grows, it might become necessary to move files and change the
folder structure within a vault. Use Autodesk Vault Explorer to reorganize
files and folders on the server.
NOTE
Reorganizing files is only performed using Autodesk Vault Explorer.
Never move files that are located in the working folder.
Move files within a vault
1 Ask all users to check in their local data and delete the local copies.
2 Using Autodesk Vault Explorer, drag one or more files from the existing
location to a new location, to reflect the new file organization.
3 Drop the file in the new location and select Move from the context menu.
4 Check out the Autodesk Inventor files and resolve any broken links.
5 After the vault files are moved and broken links are resolved, ask all users to
log into the vault and get the latest version of the top-most file to their
working folders.
Managing Files with Autodesk Vault Explorer
|
41
Renaming Files Within Vaults
As a project grows, it might become necessary to rename files within a vault.
Folders cannot be renamed. You must use Autodesk Vault Explorer to rename
files so that file relationships are maintained.
For more information about renaming vaulted files, see the Help within
Autodesk Vault Explorer.
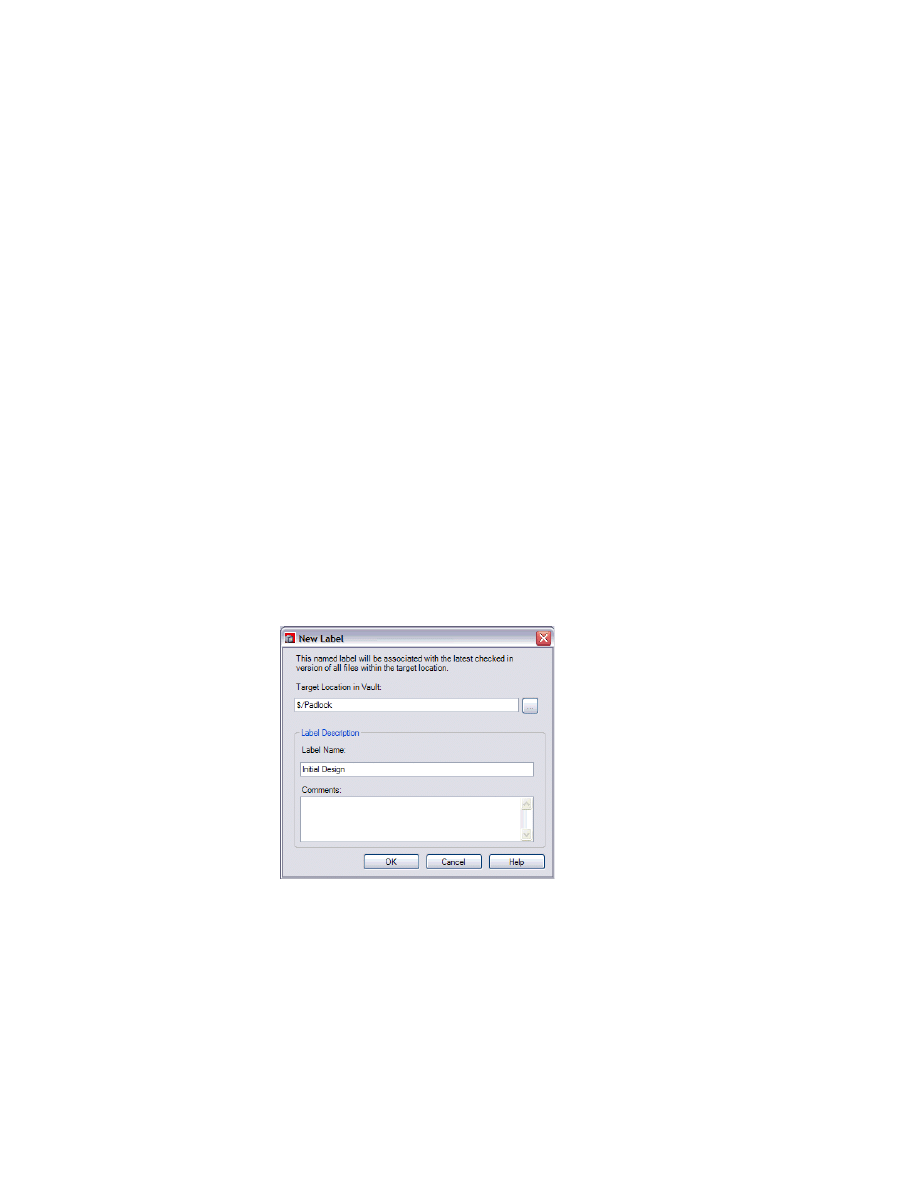
Labeling Files
In Vault Explorer, you can label development milestones such as customer
proposals, design reviews, or concept variations so they can be easily
identified. Using labels, you can establish baselines and track progress for
work-in-progress files. You can also rename labels, extract labeled files from
the vault using Pack and Go, and restore labeled files.
When you create a label, the most recent checked in version of every file in
the project is assigned that label. There is no limit to the number of labels
that can be assigned to a project. You cannot create more than one label with
the same name. For more information on labels, see Labeling Files in the
Autodesk Vault Explorer Help.
Label files
1 Click File > New Label.

42
|
Chapter 3 Using Autodesk Vault Explorer
2 In the New Label dialog box, enter a name for the label that indicates the
milestone for that project. Label names can contain any alphanumeric text,
excluding \ / : * ? " < > |.
3 Optionally, enter a comment to describe the label. Labels help identify the
contents of the label.
4 Click OK.
Copying Designs
Create new products based on existing Autodesk Inventor or AutoCAD
designs by copying the entire assembly structure along with the related 2D
drawings for 3D models within Autodesk Vault Explorer. You can manipulate
existing assemblies to derive new designs and "one offs" complete with
documentation.
In the Copy Design dialog box, you can selectively choose which parts of an
existing design to copy, reuse, exclude, or replace. A naming scheme can be
defined for the files being copied to the new design. A prefix and a suffix can
optionally be added to the files automatically. The new files can also be
automatically incremented if the original file names end in an integer. This
is useful for when CAD files are named using item or part numbers. Autodesk
Inventor presentation files and drawing files can be automatically named to
match the names of their direct part or assembly child. For more
information, see Copying Designs in the Autodesk Vault Explorer Help.
Publishing DWF files
DWF files can be automatically published for CAD files checked in to the
vault using the vault add-ins for supported CAD applications. The .dwf
attachments are only created for files that have changed or for files that do
not have .dwf files published already. Automatic .dwf publishing can be
turned off to save room and keep the size of the vault down. You can also
specify a default folder location for the published .dwf files. For more
information on automatic .dwf publishing, see Help in Autodesk Vault
Explorer or each of the supported CAD application add-ins.
Managing
Versions
|
43
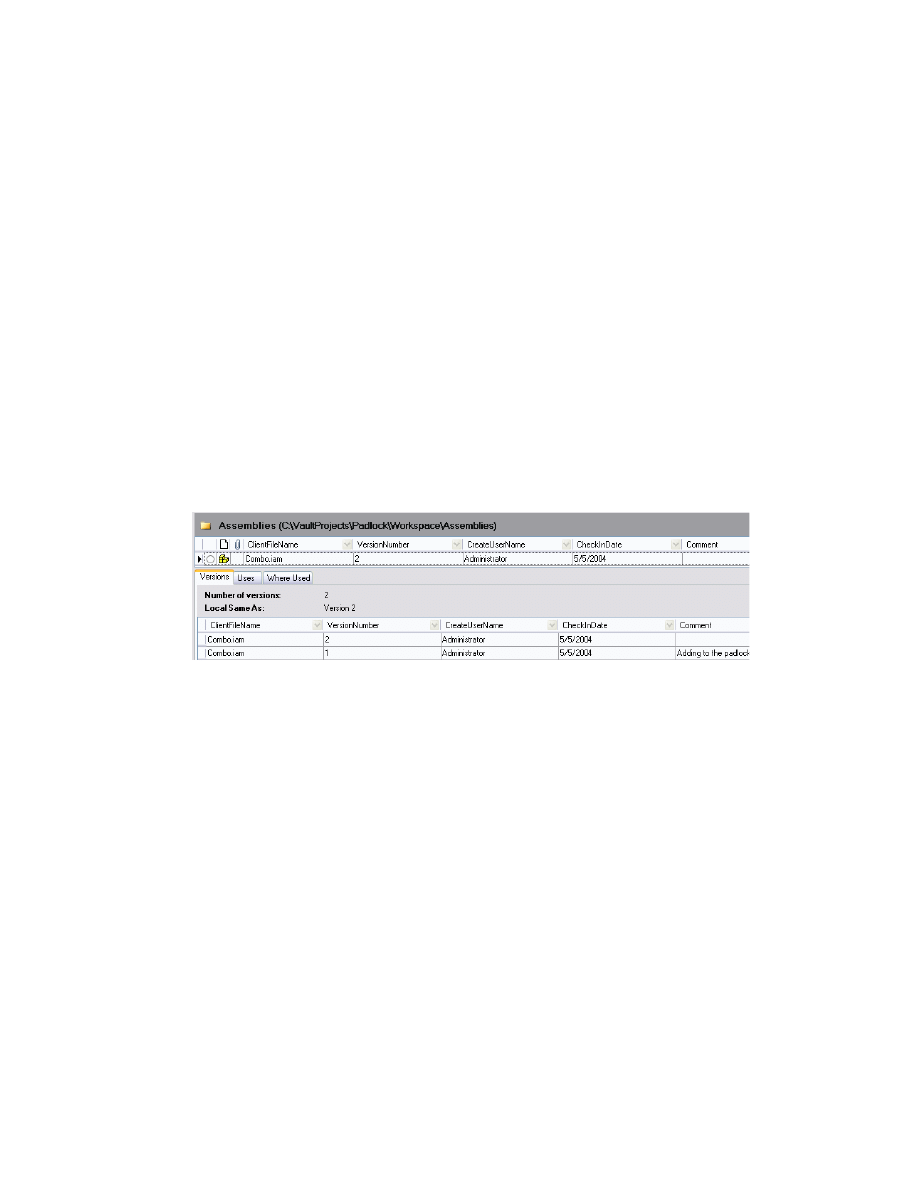
Managing Versions
In addition to tracking versions, Autodesk Vault tracks properties associated
with the data. You can use the version information and properties to help
manage and search for data.
The files stored in the current vault are listed in the main pane of the Vault
Explorer. Version and file information for the selected file is displayed in the
bottom pane under three tabs; Versions, Uses, and Where Used. Each
heading at the top of the pane represents a property field for the file. As you
add more properties to a file, more fields are available for customizing the
views within the tabs.
Display the history of versions
■
Click the Versions tab.
By default, the file name, version number, user name, check in date, and
comment are displayed.
44
|
Chapter 3 Using Autodesk Vault Explorer
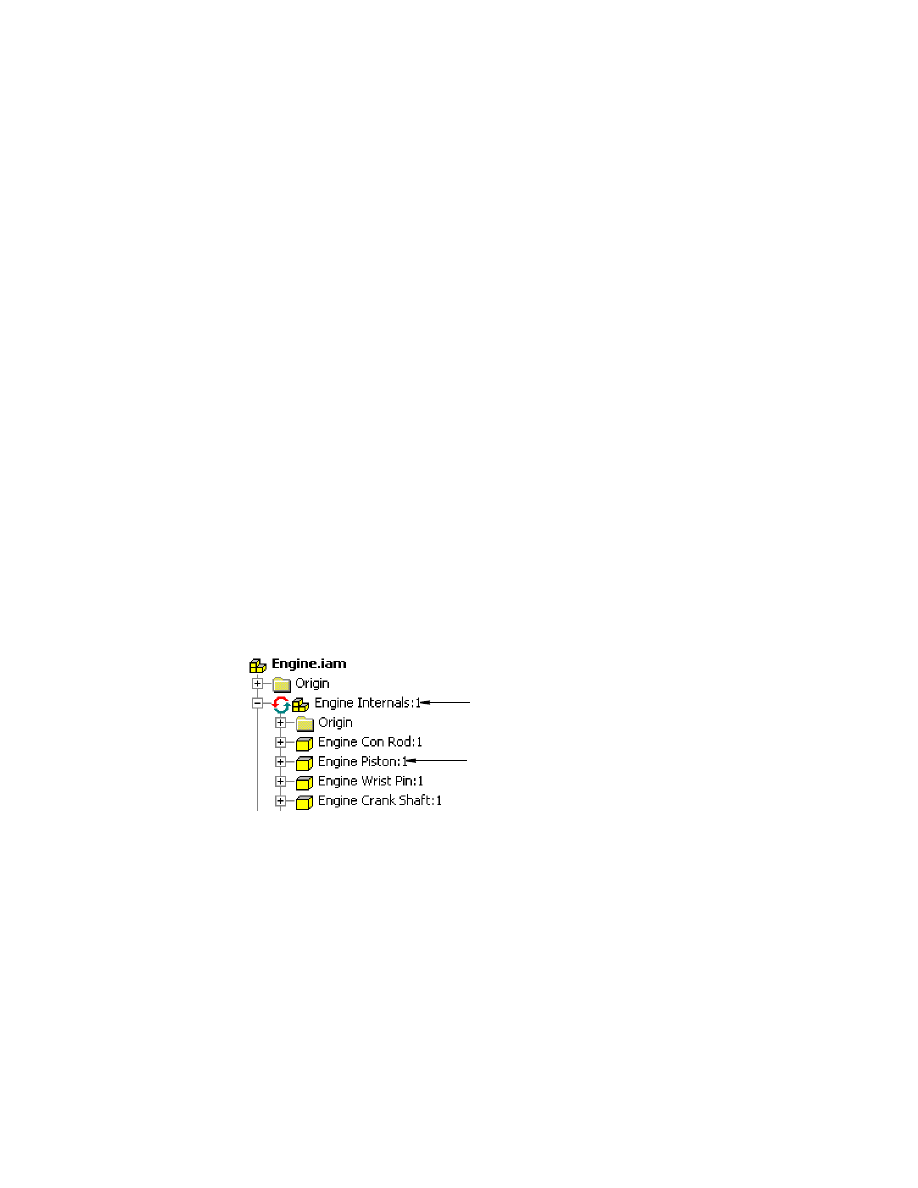
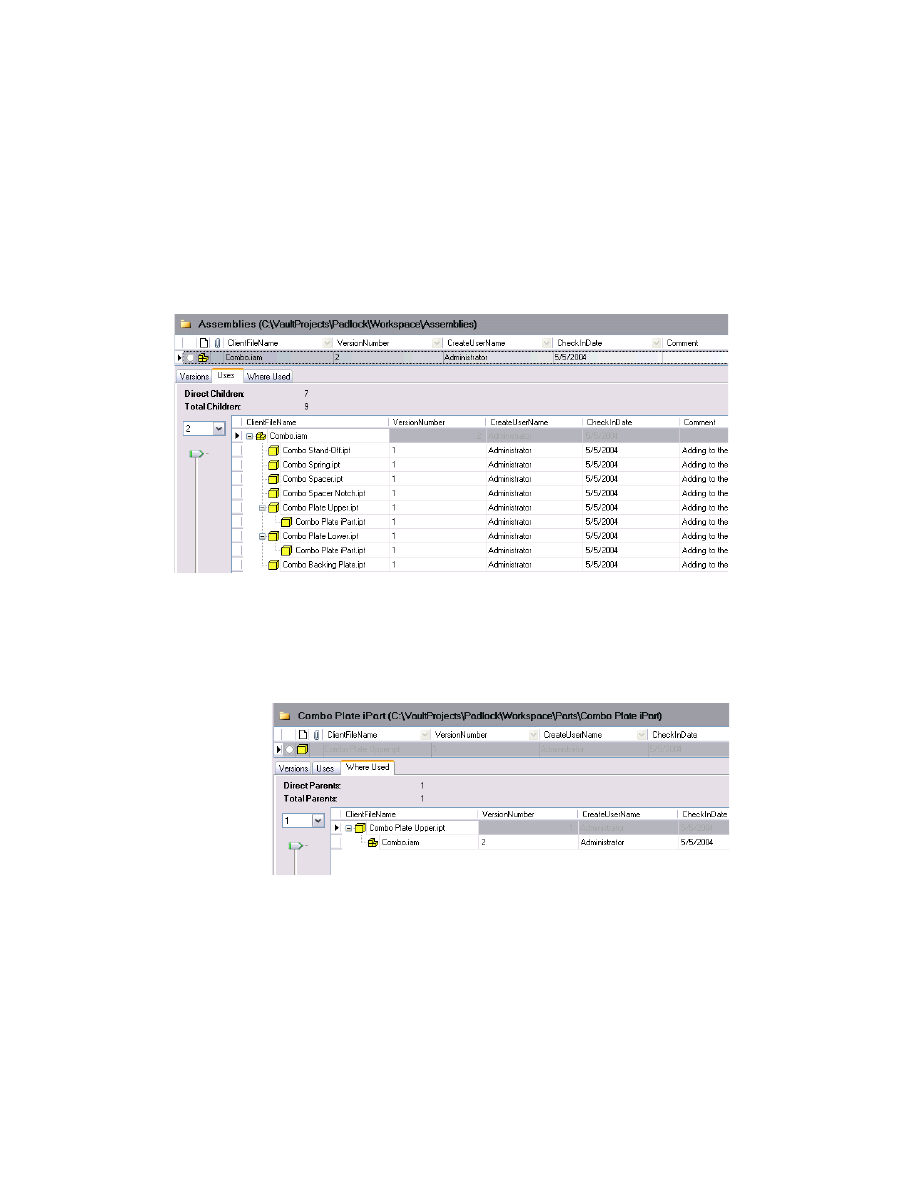
Display other files used
1 Select a model.
2 Click the Uses tab.
The selected model is shown at the top. Other files used by the currently
selected file, and the children and attached files are listed in a hierarchy as
shown in the following illustration:
Display where files are used
■
Click the Where Used tab.
A list of parents in which the selected file is used is displayed. The
component is listed at the top. Each assembly using the part is listed below.
By default, the user name and version used in the model are displayed.
Performing
Searches
|
45
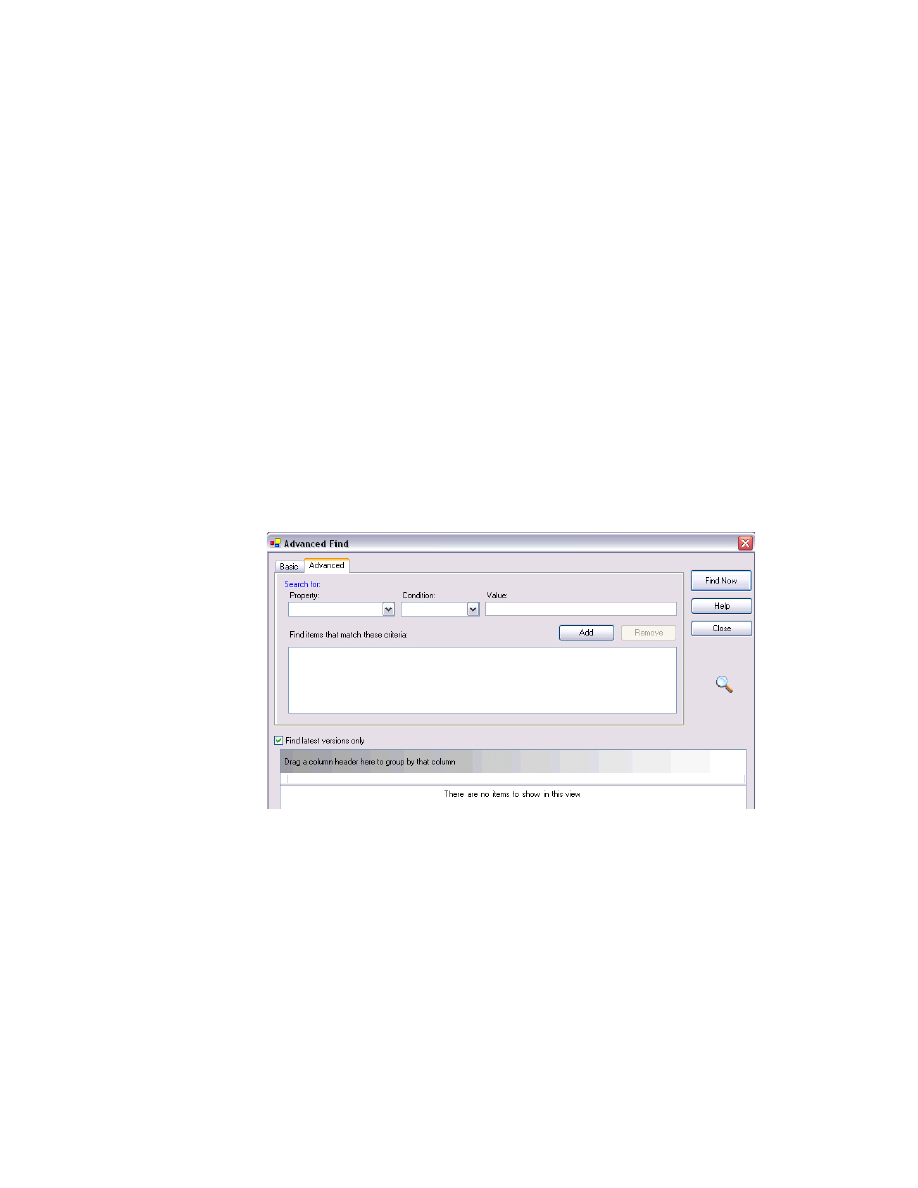
Performing Searches
While the Version History, Uses, and Where Used tabs summarize important
information about versions, you use the Advanced Find dialog box for basic
searches and to create customized search criteria for locating specific
information in your data. To ensure efficient searches, we recommend you
set your own guidelines for your team regarding custom property names and
values.
Perform a basic search
1 On the Tools menu, select Advanced Find, and then click the Basic tab.
2 Enter your search criteria. Click Find Now.
The results of the search are displayed at the bottom of the Advanced Search
dialog box.
Perform an advanced search
1 On the Tools menu, select Advanced Find, and then click the Advanced tab.

46
|
Chapter 3 Using Autodesk Vault Explorer
2 In the Property list, select a document property.
The Property list contains all the properties associated with the files stored in
the current vault.
3 In the Condition list, specify a condition by which to search.
4 Enter a value to be used in the search criteria.
5 To add the search criteria to the list of stored searches, click Add.
6 Click Find Now.
The results of the search are displayed at the bottom of the Advanced Search
dialog box.
Packaging Files with Pack and Go
Pack and Go packages a file and all of its referenced files in a single location.
All files that are referenced by a selected file are included in the package
unless otherwise specified in the Pack and Go dialog box.
Use Pack and Go to:
■
Archive a file structure.
■
Copy a complete set of files, while retaining links to referenced files.
■
Isolate a group of files for design experimentation.
■
Retrieve a previous version of a design and copy it into an isolated folder.
■
Send the package to an extended team or vendor.
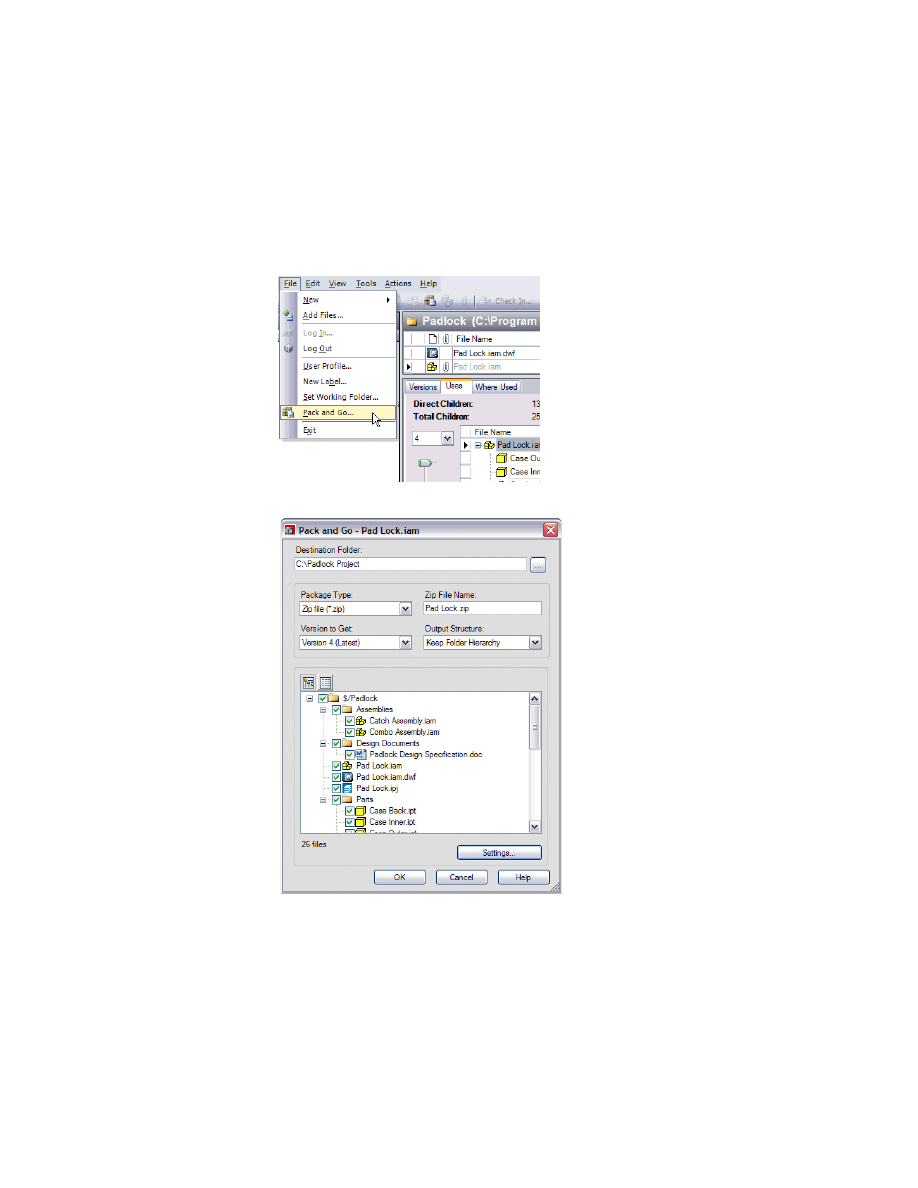
Packaging Files with Pack and Go
|
47
Package a set of files
1 Browse to the location of the file and highlight it. On the File menu, click
Pack and Go.
On the Uses tab, the total number of referenced files is shown.
2 The Pack and Go dialog box shows a list of the files to be packaged.
48
|
Chapter 3 Using Autodesk Vault Explorer
You can:
■
Package the current or an earlier version with Pack and Go.
■
Package the files to a .zip file or recreate the folder structure in the
destination folder.
■
Determine the structure of the files being packed. You can flatten all files
and place them in a single folder, or preserve the structure as it appears in
the vault.
NOTE
If you choose to flatten all files and place them in a single folder, any file
sharing the same name as another file is automatically renamed to avoid file
name collisions. This may require that you manually resolve the renamed files in
their native CAD systems.
3 Click Settings.
4 In the Settings dialog box, select the option to include children only, or to
include all related files, which retrieves parents and children.
5 Click OK.
6 Click OK to exit the Pack and Go dialog box.
The packaging operation begins.
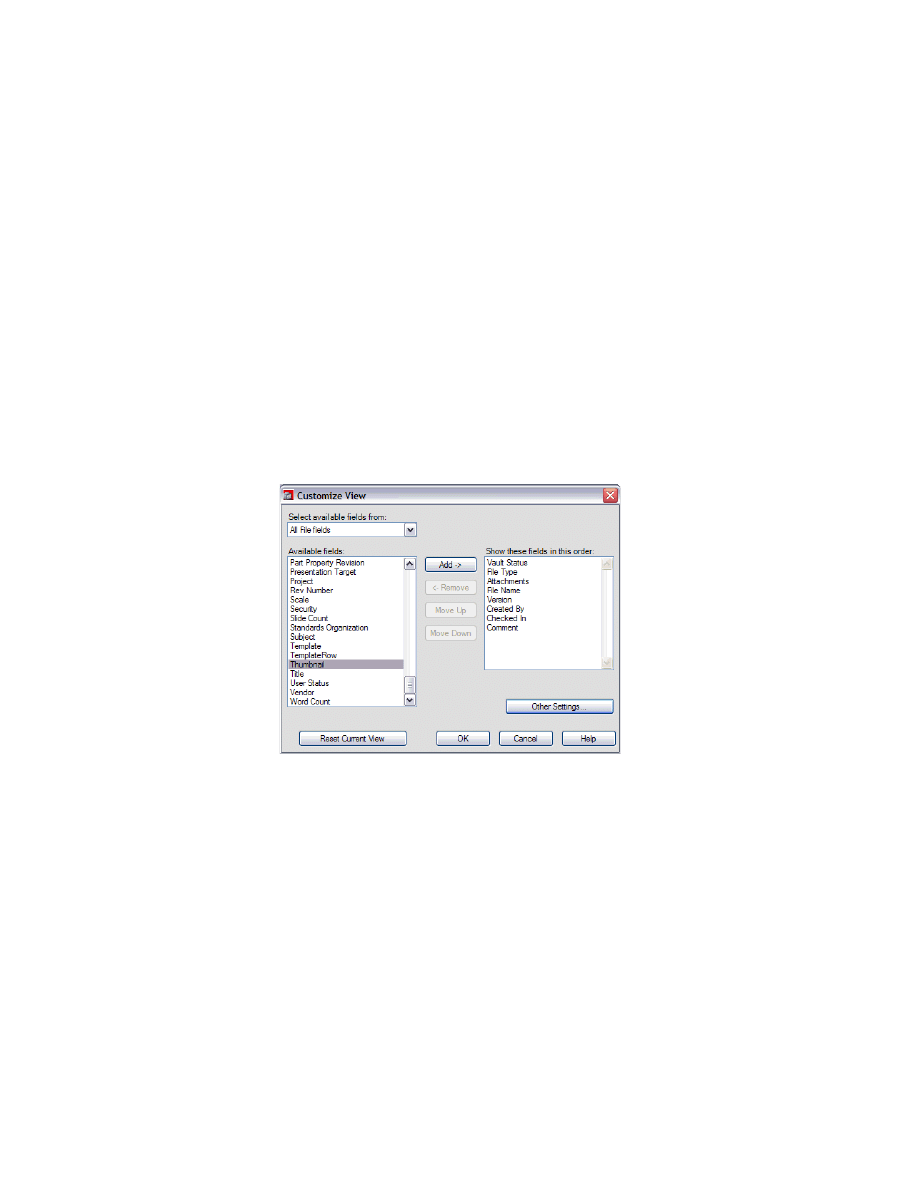
Customizing View Panes in Vault Explorer
|
49
Customizing View Panes in Vault Explorer
The main pane and the preview pane of Vault Explorer display version and
other information about the selected files. You can customize each pane
separately to show only the information pertinent to your project. Each
column represents a property in the vault. The properties that are shown can
be selected, the columns can be filtered, and the overall display in the panes
can be customized. For more information on customizing the view, see
Customize the View in the online Help.
Customize fields
1 In the main pane or preview pane, right-click and click Customize Current
View.
2 In the Customize View dialog box, select which fields are available to choose
from.
50
|
Chapter 3 Using Autodesk Vault Explorer
3 Select a field from the Available fields list, and then click Add. The field is
moved to the list of fields currently displayed in the view.
4 To remove a field from the current view, select the field from the Show these
fields in this order list, and then click Remove. The field is returned to the
Available fields list.
5 Click Move Up or Move Down to change the display order in the Autodesk
Vault Explorer window.
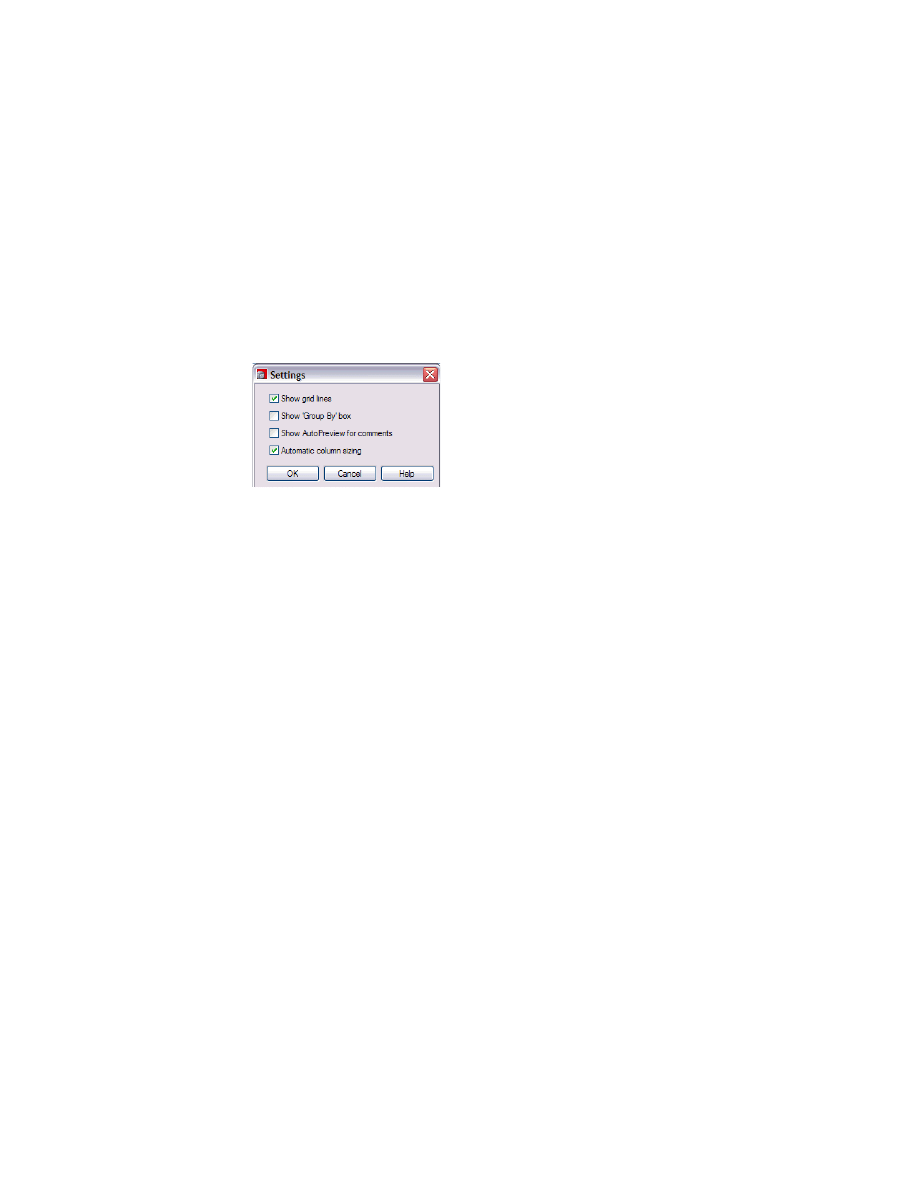
6 Click Other Settings to access additional display options such as grid lines, a
Group By box, and automatic column sizing.
7 Click OK.

51
4
In This Chapter
Performing Vault
Tasks in Autodesk
Inventor
Learn how the Autodesk
®
Vault add-in integrates with
Autodesk Inventor
®
. Before you proceed, make sure you
are familiar with setting up Autodesk Inventor projects
and the structure of your design project.
■
Creating projects for use with
Autodesk Vault
■
Converting existing projects for
use with Autodesk Vault
■
Performing Vault operations

52
|
Chapter 4 Performing Vault Tasks in Autodesk Inventor
Key Terms
Term
Definition
Vault add-in for
Autodesk Inventor
The Autodesk Vault client interface that is integrated with the Autodesk Inventor
software application. This interface is used to manage the complex relationships
among Autodesk Inventor files and communicate this information to the vault.
project file
The locations and settings that identify all the information necessary for a set of
Autodesk Inventor design files to resolve their relationships. The file extension is .ipj.
library
A collection of Autodesk Inventor design files that are commonly used in designs
and infrequently modified.
add file
Placing Autodesk Inventor files in the vault for the first time using the Inventor
add-in. Always use the Inventor add-in to add Autodesk Inventor files to the vault
to retain file and data relationships.
vault enabled project file An Autodesk Inventor project file configured for use with Autodesk Vault. The
multi-user setting is set to Vault and the paths are modified as necessary.
vault browser
A specialized browser added to the Inventor browser panel for working with files
in a vault. The Vault browser is available once Autodesk Vault is installed and the
current project is vault enabled.
workspace
Within a vault project, the logical location for storing Autodesk Inventor files for a
design. Set up the file structure of the workspace folder to be the same as the file
structure of the local working folder.

About the Vault Add-in for Autodesk Inventor
|
53
About the Vault Add-in for Autodesk Inventor
The vault add-in works within Autodesk Inventor, and adds tools for
managing files to the Autodesk Inventor interface. Through the add-in, you
can add files to the vault, check in and check out files, and map folder
locations. The add-in works only with Autodesk Inventor files. We
recommend you use the add-in to place Autodesk Inventor design files in a
vault so that relationships among the files are preserved.
When the Autodesk Vault Client is installed, the Vault browser is added to
the Autodesk Inventor browser bar and the Vault submenu is added to the
Autodesk Inventor file menu.
Organizing Files
Typical designs might include parts, libraries, iPart Factories, purchased parts,
and common manufactured parts. To organize your files for effective data
management, it is helpful to understand how Autodesk Inventor finds these
files using the workspace and library search paths in the Autodesk Inventor
project file, and how the Autodesk Inventor Content Library and iPart
Factories publish parts.
The workspace path in an Autodesk Inventor project file indicates the
location of the design data. In a vault-enabled project file, the workspace
path specifies the location of the design data in the vault relative to the
project file.
Specifying the Workspace in Vault Projects
In the vault project file, define the workspace path as a period (.), meaning
the same folder as the project file, or to a subfolder below the project file,
such as .\Workspace.
NOTE
The best practice is to set the workspace path to the same folder as the
project file.

54
|
Chapter 4 Performing Vault Tasks in Autodesk Inventor
For large design projects, the workspace folder can contain additional
subfolders. However, you cannot map a project search path to a workspace
subfolder. You can use Autodesk Inventor frequently used subfolders to
further organize data within your project.
For more information about setting up frequently used folders, see Autodesk
Inventor Help.
Specifying Libraries in Vault Projects
Libraries l, including the Autodesk Inventor Content Library, contain files
that are used in multiple designs. Library files do not change often and are
frequently reused. For example, common components that are purchased,
such as fasteners or electric motors, can be stored in a library.
Library files are typically stored in a library folder separate from the project
files on a shared server so that all members of a design team have access to
them. Library files cannot be modified in a vault-enabled project. Libraries
cannot be located within the cone of influence.
Creating Folder Structures in Vaults
The master files for a vaulted project are all stored in the vault. To modify the
files, they must be checked out to the local working folder. For ease of data
management, the vault folder structure is set up to match the working folder
structure for the project. For example, the vault folder structure for a project
called Clamp is set up parallel to the structure of the local working directory
and workspace folder.
Library folders cannot be located in the same folder structure as the model
files in the vault. You add libraries to a vault at the root level of the vault
directory. A project file must include a library search path for each of the
libraries used by the model.

Working
with
Legacy
Projects
|
55
Working with Legacy Projects
Design projects that were created before Autodesk Vault was installed can be
converted to vault projects. To create a vault for a legacy project, convert the
project file to a vault enabled project file, and then add the existing data to
the vault.
NOTE
Before you convert a legacy project to work with the vault, back up the
project file and data.
Converting Existing Project Files
Existing Autodesk Inventor projects can be converted for use with Autodesk
Vault. To convert an existing project, you modify the project file to work with
the vault and add the design data to the vault.
For more information about modifying a project file to be vault compatible,
see “Converting Existing Project Files” in the Autodesk Vault Help.
Tips for converting projects to work with vaults
■
In a shared or multi-user project, set the Multi-user setting to Vault.
■
You can consolidate Autodesk Inventor design files and the associated.ipj
file manually.
■
Before you remove a reference in the .ipj file, relocate the necessary design
files from that location to the one referenced in the vault enabled .ipj file.
■
Set up libraries in the vault for common components that are shared
across multiple Vault Projects.
Include libraries for iParts and Autodesk Inventor Content Libraries that
are referenced by the project.
In the Autodesk Inventor Projects dialog box, verify that the Autodesk
Inventor Project File references the vault libraries correctly.
■
For multi-user projects, make sure all users have their files checked in. All
current data must be in the workgroup.
NOTE
When converting an existing project to a vault-enabled project, turn on
Using Unique File Names in your Autodesk Inventor project file. For more
information, see Autodesk Inventor Help.
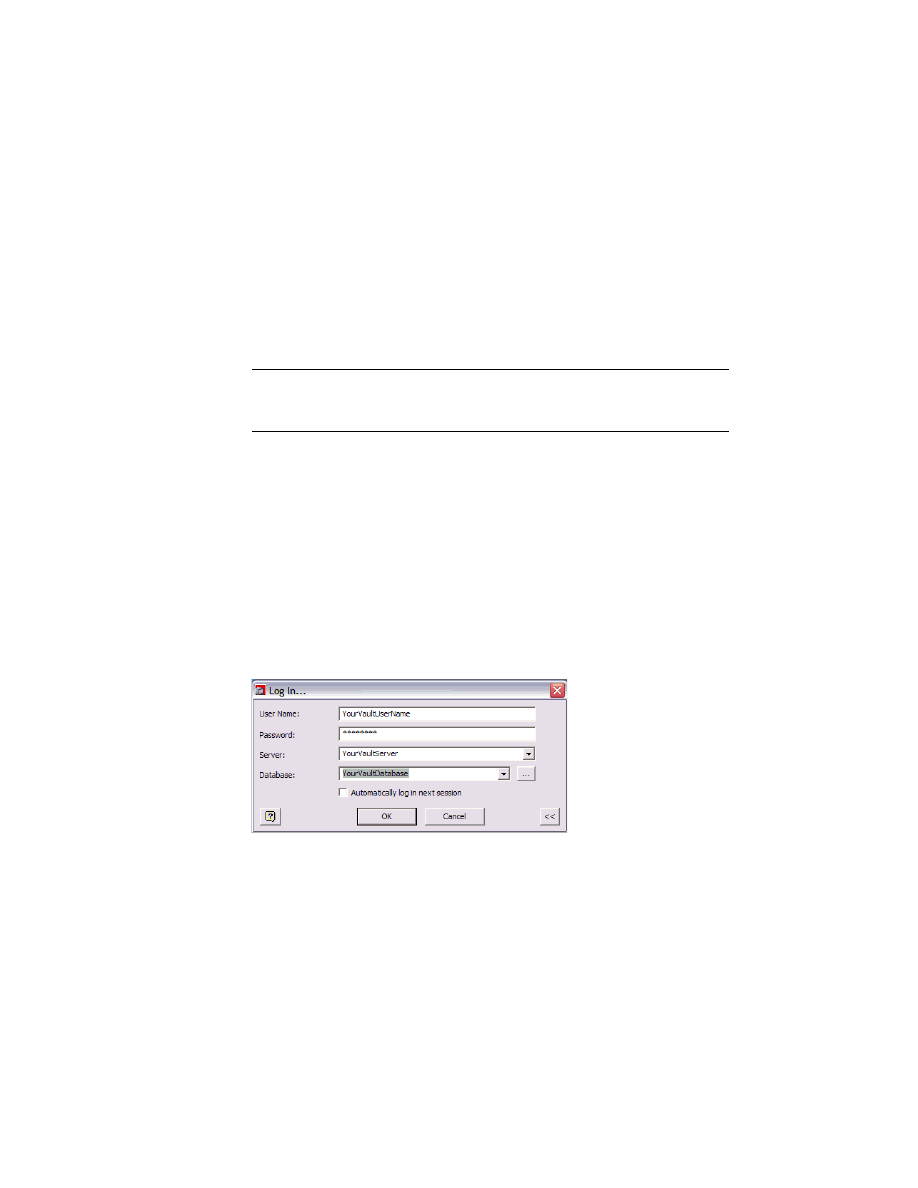
56
|
Chapter 4 Performing Vault Tasks in Autodesk Inventor
Vaulting Existing Data
Existing Autodesk Inventor design data can be added to the vault. The data
can be associated with a legacy Autodesk Inventor project file that has been
converted to a vault project file or used with a brand new vault project file.
In the Autodesk Vault add-in for Inventor, use the command Add Project to
add existing data to the vault.
For more information about adding a project to the vault, see “Adding a
Project” and “How to Add Files (Inventor)” in the Autodesk Vault Help.
NOTE
It is important to use the Vault add-in for Inventor when adding
Autodesk Inventor files to the vault. The add-in interprets the special
relationships among design files and records this information in the vault.
Logging into Vaults in Autodesk Inventor
If a vault is not open, the Vault browser displays yellow icons with
exclamation points in front of each file. When you log into the vault, the
icons change to indicate the current status of the files, and the vault features
are available on the context menu.
Log into a vault
1 Start Autodesk Inventor.
2 Click File > Vault > Log in.

Setting Up Vault Enabled Projects
|
57
User name
The name for the vault account.
Password
The password associated with the vault account.
Server
The name of the computer where the vault server is
installed.
Database
The name of a database located on the specified server.
The default is Vault. Click the browse button to select
from a list of available databases on the server.
A default user ID, vault server, and database are set up for you to get started
using the vault right away. If a user account has already been created for you,
use your own account information. If a user account is not yet created for you
or the default values are not present, contact the vault administrator.
3 In the Log in dialog box, enter your user name, password, the name of the
vault server, and the name of the vault database.
4 Click OK.
Setting Up Vault Enabled Projects
Autodesk Vault can manage only vault-enabled project files. When you start
a new Autodesk Inventor model, create the vault-enabled project file before
you create any model files. Configure the project file to take the maximum
advantage of Autodesk Vault.
Set up library folders in the vault to manage reusable common components,
iParts, and content libraries. You must map the library search paths in the
project file to the library folders in the vault.
For more information about mapping, see “Mapping Folders” on page 59.
Autodesk Inventor project files include several settings that tell Autodesk
Inventor where to look for model files. When Autodesk Inventor opens the
components of an assembly, it looks in the folders specified in the project
file. For example, if a component is a non library component, Autodesk
Inventor looks in the workspace folder specified in the project file. If a
component is a library part, Inventor looks in the library paths specified in
the project file.
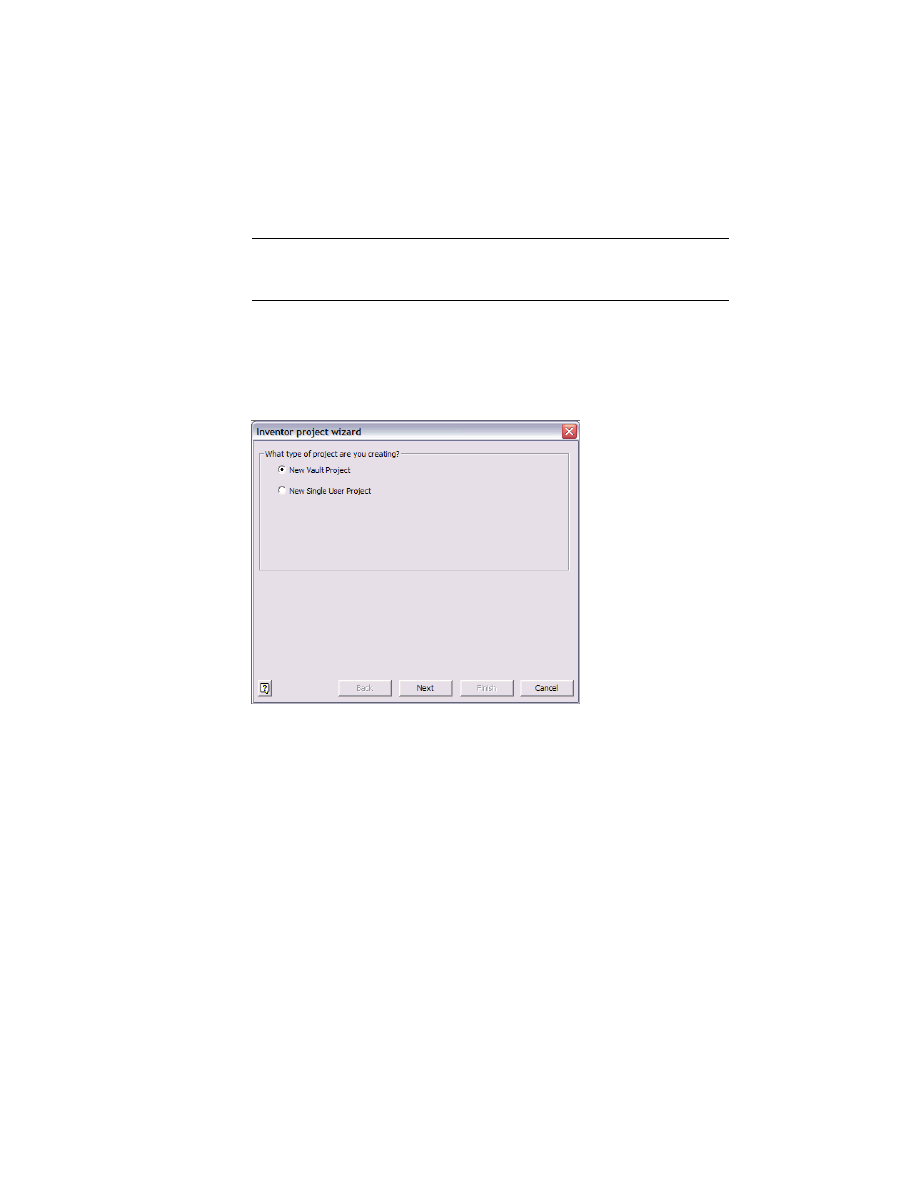
58
|
Chapter 4 Performing Vault Tasks in Autodesk Inventor
For more information about project files, see the sections about projects in
the Autodesk Inventor Getting Started manual.
NOTE
You can convert existing projects to work with Autodesk Vault. For
more information about adding legacy projects to a vault, see “Converting
Existing Project Files” on page 55 and “Adding Projects” on page 65.
Set up a new project file for a vault
1 Start Autodesk Inventor.
2 In the Open dialog box, click Projects > New.
3 In the Autodesk Inventor project wizard, Select New Vault Project.
4 Click Next.
5 Name the vault project and specify the project location.
6 If you are referencing existing part libraries in the new project, click Next and
select the libraries for the project.
If you are not referencing libraries, or you will be using new libraries, click
Finish instead.
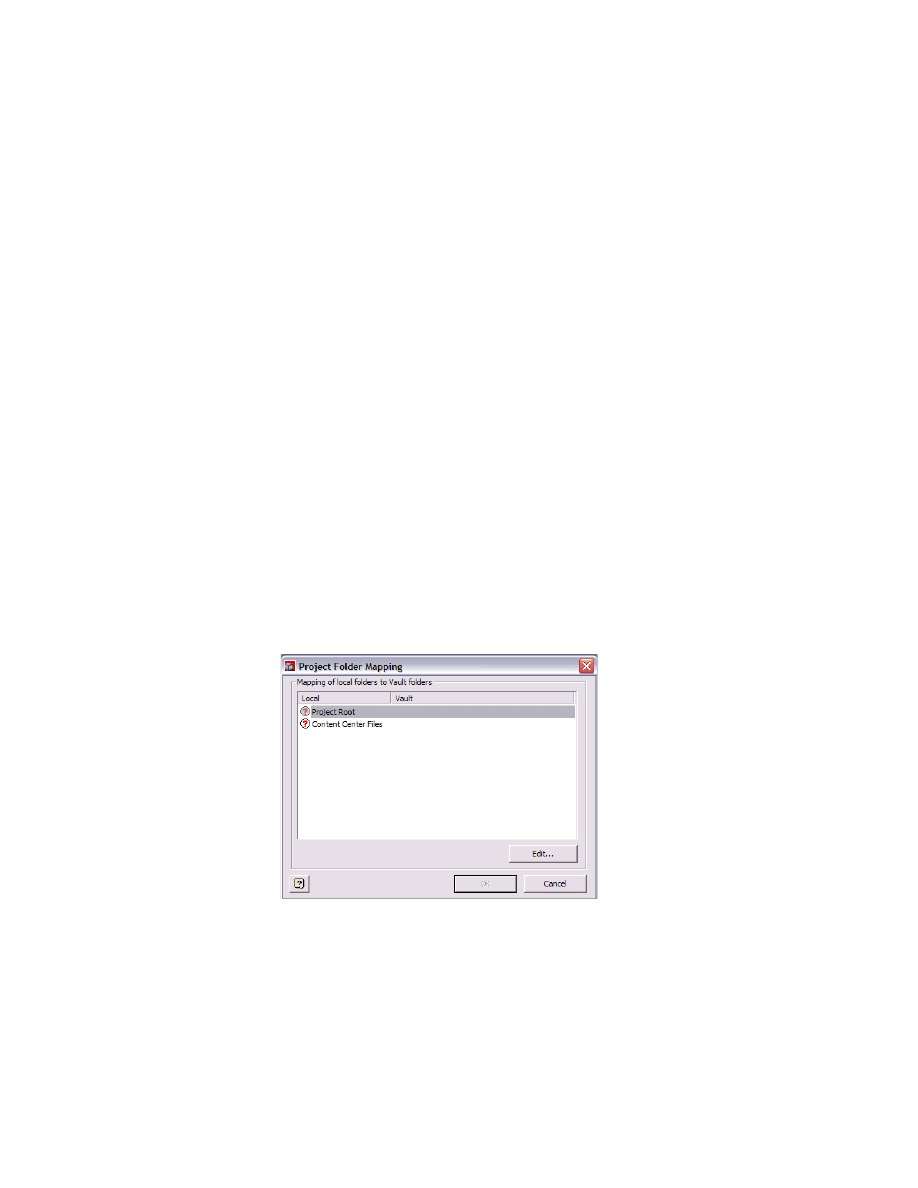
Mapping
Folders
|
59
Specify new library paths
1 Click File > Projects.
2 Double-click the new vault project to make it the active project.
3 Enter the library search paths where the library components are located on
the network.
4 Click Save. Click Cancel to close the dialog box.
The new project file is now vault-enabled. As you create files in the project,
you can add them to the vault using the Vault add-in for Autodesk Inventor.
For more information about adding files to the vault from Inventor, see
“Working with Files in Vaults” on page 62.
Mapping Folders
After the vault enabled project file is created, map the project root and any
referenced libraries to corresponding folders in the vault.
Map the project root
1 If you are not currently logged into the vault, on the File menu in Autodesk
Inventor, click Vault > Log in.
2 Click File > Vault > Map Folders.
3 In the Project Folder Mapping dialog box, select Project Root, and then click
Edit or double-click Project Root.
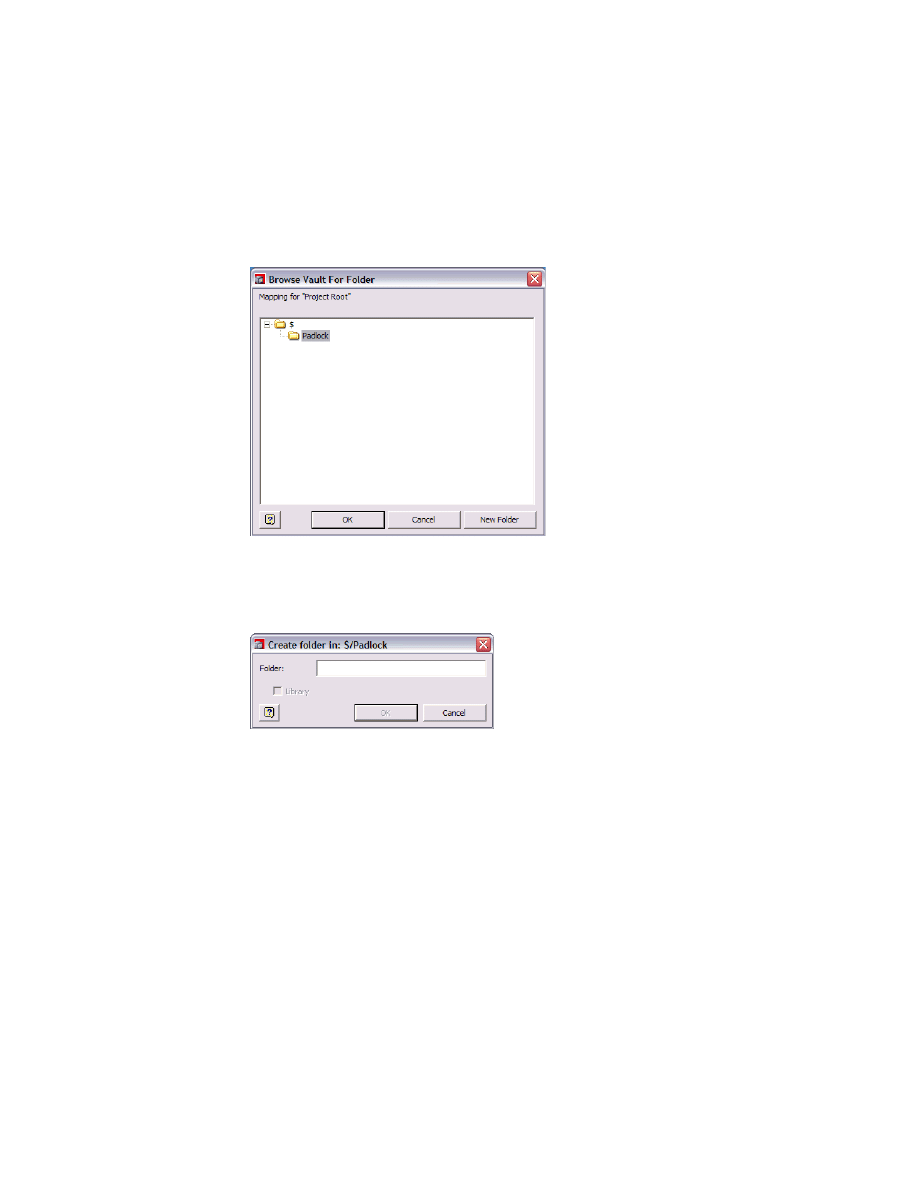
60
|
Chapter 4 Performing Vault Tasks in Autodesk Inventor
The Browse Vault for Folder dialog box displays a list of the folders in the
vault.
4 If the necessary folder exists in the vault, select the vault folder from the list
and then click OK.
The existing vault folder is mapped to the project root.
5 To add a new folder to the vault, select the root of the vault, $, and then click
New Folder.
In the Create Folder dialog box, enter a name for the new vault folder.
6 Click OK.
7 In the Browse Vault for Folder dialog box, select the new vault folder.
Click OK.
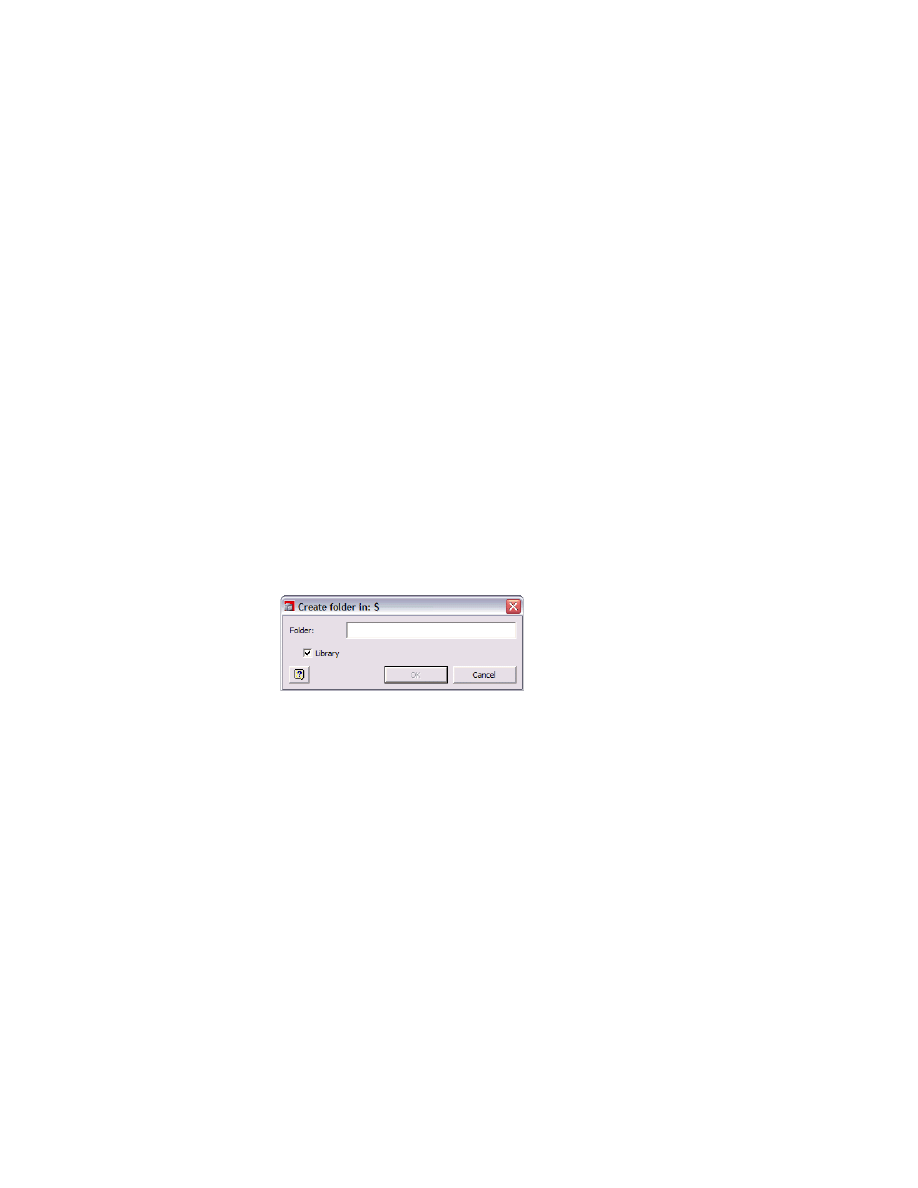
Mapping
Folders
|
61
8 Click OK to exit the Project Folder Mapping dialog box.
The new vault folder is mapped to the project root.
When you map a vaulted library to a project, turn on the Library check box
when you create the library folder. You can only create library folders directly
off the root level of the vault.
Map a library in the vault
1 If you are not currently logged into the vault, on the File menu in Autodesk
Inventor, click Vault > Log in.
2 Click File > Vault > Map Folders.
3 In the Project Folder Mapping dialog box, select the unmapped library. Click
Edit.
The Browse Vault for Folder dialog box lists the folders currently in the vault.
4 If the necessary folder exists in the vault, select the vault folder from the list
and then click OK.
The existing vault folder is mapped to the selected library.
5 To add a new folder to the vault, select the root of the vault, $, and then click
New Folder.
In the Create Folder dialog box, enter a name for the library folder, and select
the Library check box.
6 Click OK.
A library folder is added to the vault.
7 Select the new library folder. Click OK.
8 Click OK to exit the Project Folder Mapping dialog box.
The new vault library folder is mapped to the selected library.
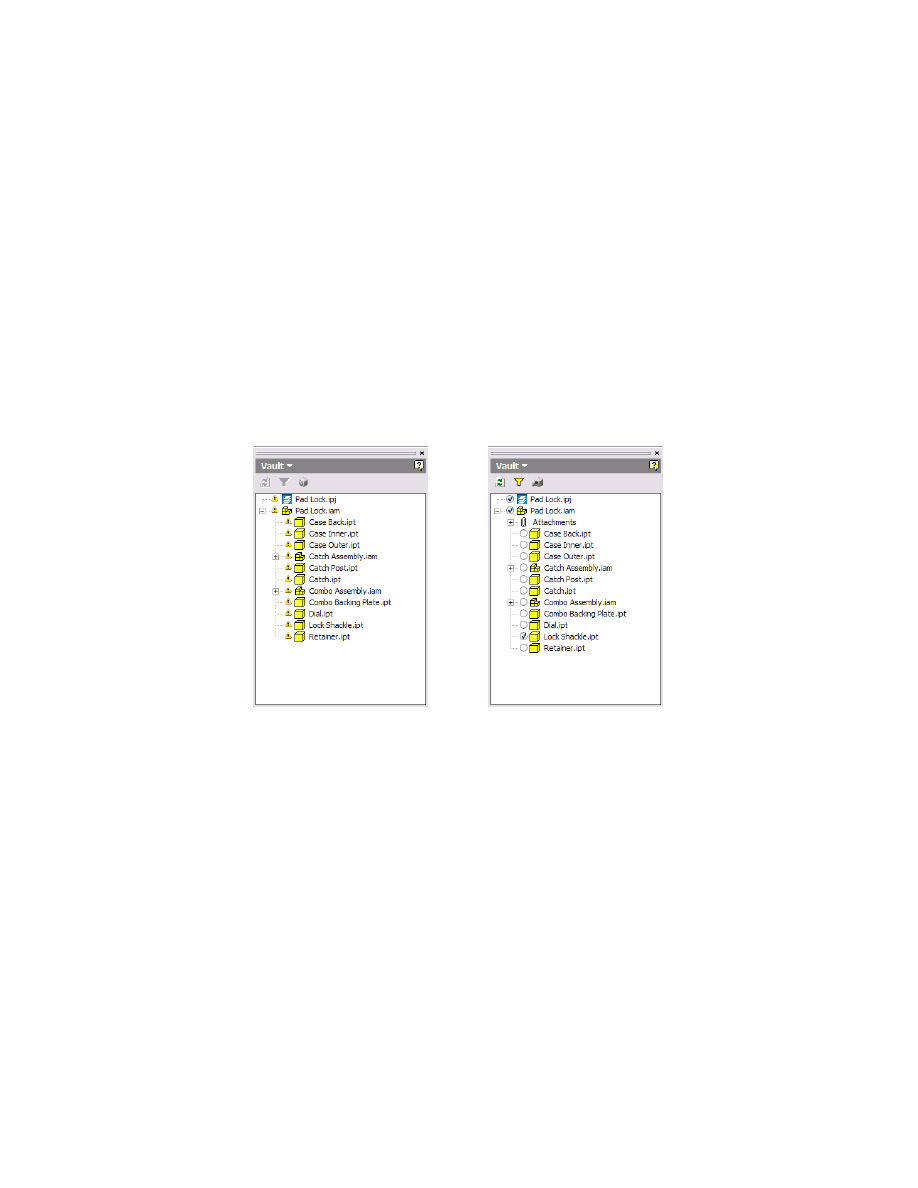
62
|
Chapter 4 Performing Vault Tasks in Autodesk Inventor
Working with Files in Vaults
When you work on a file that was checked out of the vault, you are working
on a local copy of the file and not the original file. At no point do you ever
work on the actual vaulted file. When a modified file is checked into the
vault, the modifications are available as the latest version in the vault. All
past versions of a file are maintained in the vault.
The Vault Browser
When Autodesk Vault is installed, the Vault browser is added to Autodesk
Inventor. The Vault browser displays the status of model files in the vault and
provides quick access to Autodesk
®
Vault Explorer.
The Autodesk Inventor Vault browser
indicating the vault is closed
The Autodesk Inventor Vault browser
indicating the vault is open with files
checked out

Working with Files in Vaults
|
63
Filter the Vault browser
■
Click the filter and then select a criteria from the list to show only files that
are:
■
Not currently in the vault
■
Checked out to you
■
Checked out to other users
■
Modified
Log into a vault
■
Right-click the vault status icon in the Vault browser, and then select Log in.
Log out of a vault
■
Right-click the vault status icon in the Vault browser, and then select Log out.
Launch Vault Explorer
■
Right-click the vault status icon in the Vault browser, and then select Launch
Vault Explorer.
Adding Autodesk Inventor Files
You can store any type of design data in a vault, including documents,
spreadsheets, and model files. Non-Autodesk Inventor files are added to the
vault using Autodesk Vault Explorer. To maintain the relationships among
Autodesk Inventor model files, you must use the Vault add-in for Autodesk
Inventor to add them to the vault.
A question mark icon is displayed next to Autodesk Inventor files that are not
currently in the vault.
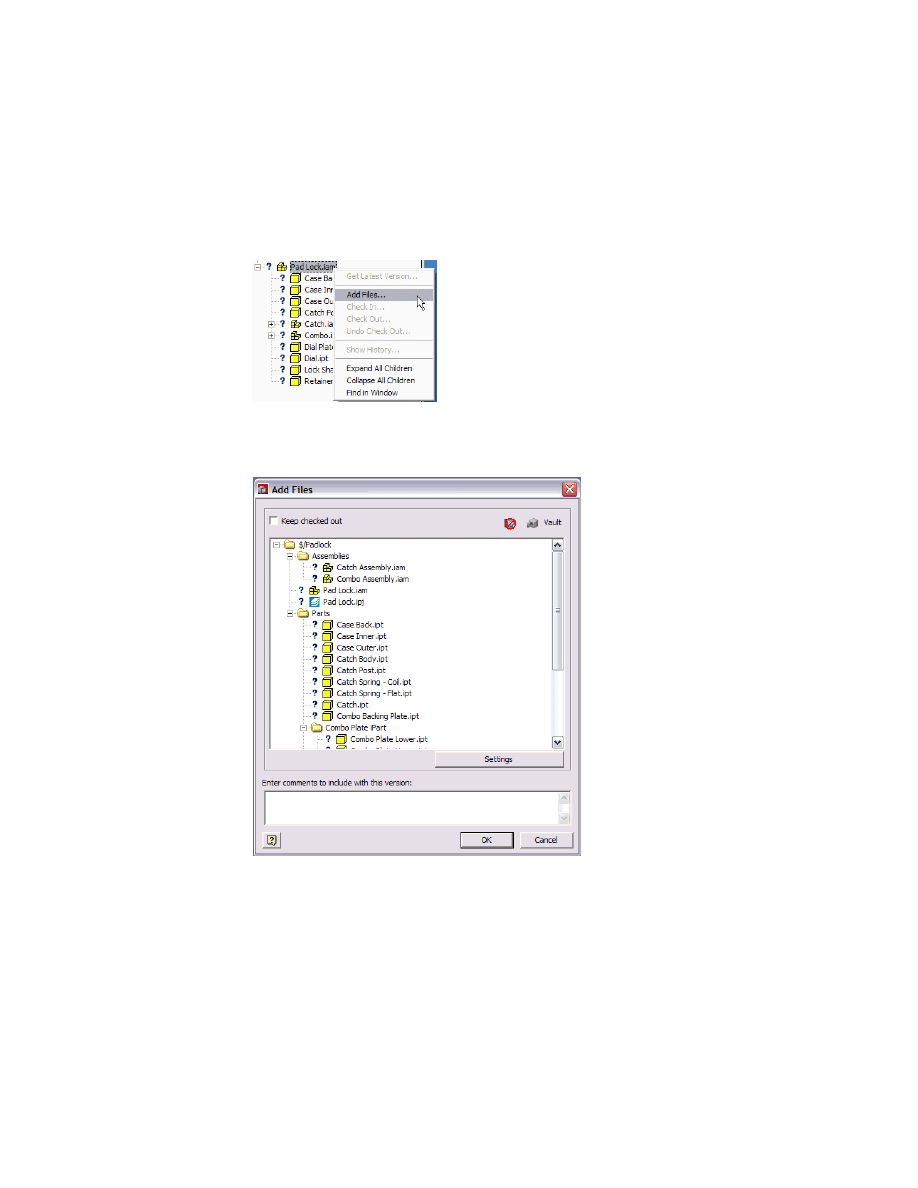
64
|
Chapter 4 Performing Vault Tasks in Autodesk Inventor
Add files to the vault from Autodesk Inventor
1 On the Autodesk Inventor browser bar, select Vault browser.
2 Right-click on a file in the Vault browser, and then click Add Files.
3 In the Add Files dialog box, the list of files to be added to the vault is
displayed.
You can add comments describing the files.

Working with Files in Vaults
|
65
4 If you want to add the files to the vault and keep them checked out so you
can continue working on them, select Keep Checked Out.
5 Click OK.
When the Autodesk Inventor files are added to the vault, the file
relationships are recorded as well. The status of each file added to the vault
is indicated by the icon next to the file name in the Vault browser.
NOTE
Any subfolders required below the project file are created automatically.
Adding Projects
You can add an entire Autodesk Inventor project to a vault in a single
operation. All drawings, parts, assemblies, and presentations for the active
project, as well as any support files within the project structure such as
documents and spreadsheets, are added to the vault at the same time.
NOTE
Autodesk Inventor project files that are not enabled for the vault cannot
be added to the vault. The project file must be vault-enabled and the project
folders must be mapped to vault folders prior to adding the project.
Library files that have not been added to the vault are added if the library
path in the project file is mapped to a vault folder. Library files are the only
files located outside of the project structure that are added to the vault using
the Add Project command.
Each time you use the Add Project command for the active project, any new
files contained within the local project structure that are not yet in the vault
are added to the vault.
The Add Project command maintains the relationships among the files being
added, including:
■
Assembly files (.iam) including relationships with .idv files
■
Part files (.ipt)
■
Drawing files (.idw)
■
Presentation files (.ipn)
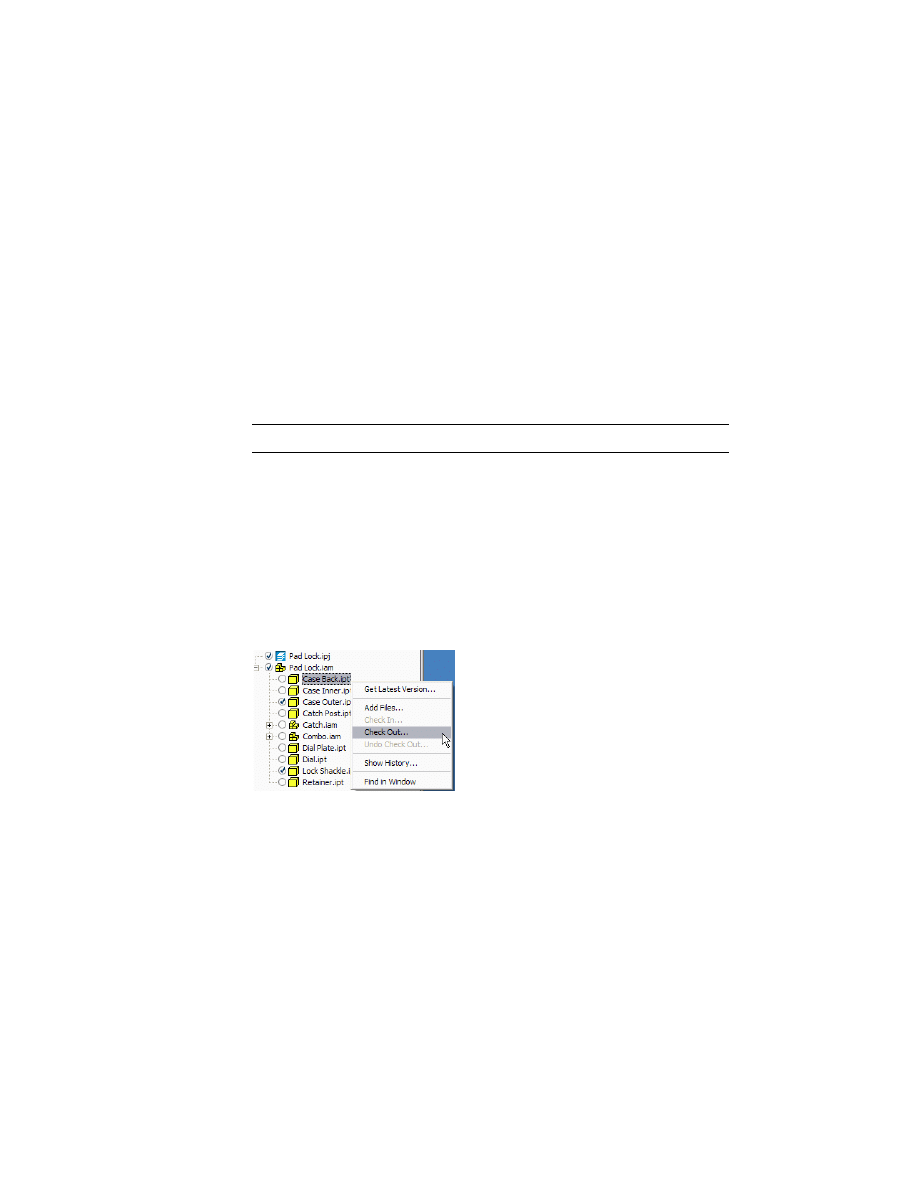
66
|
Chapter 4 Performing Vault Tasks in Autodesk Inventor
Add a project to the vault
1 Click File > Vault > Add Project. If the vault folders are mapped to the project,
the local files are scanned for relationships.
2 In the Add Project dialog box, verify that the project structure is complete in
the file list.
3 Click Settings to specify whether or not .dwf files are created when files are
added to the vault. The .dwf attachments are only created for files that have
changed or for files that do not have .dwf files published already.
4 Enter a comment for the files.
5 Click OK.
The files are added to the vault.
NOTE
Use Add Projects to add IDW files or an entire project.
Checking Out Files
To make changes to a file, you must first check it out of the vault. No one else
can check out a file that is checked out until it is checked back in to the vault.
You can check out one or any number of files.
Check out a file from Autodesk Inventor
1 In the Vault browser in Autodesk Inventor, right-click, and then click Check
Out.
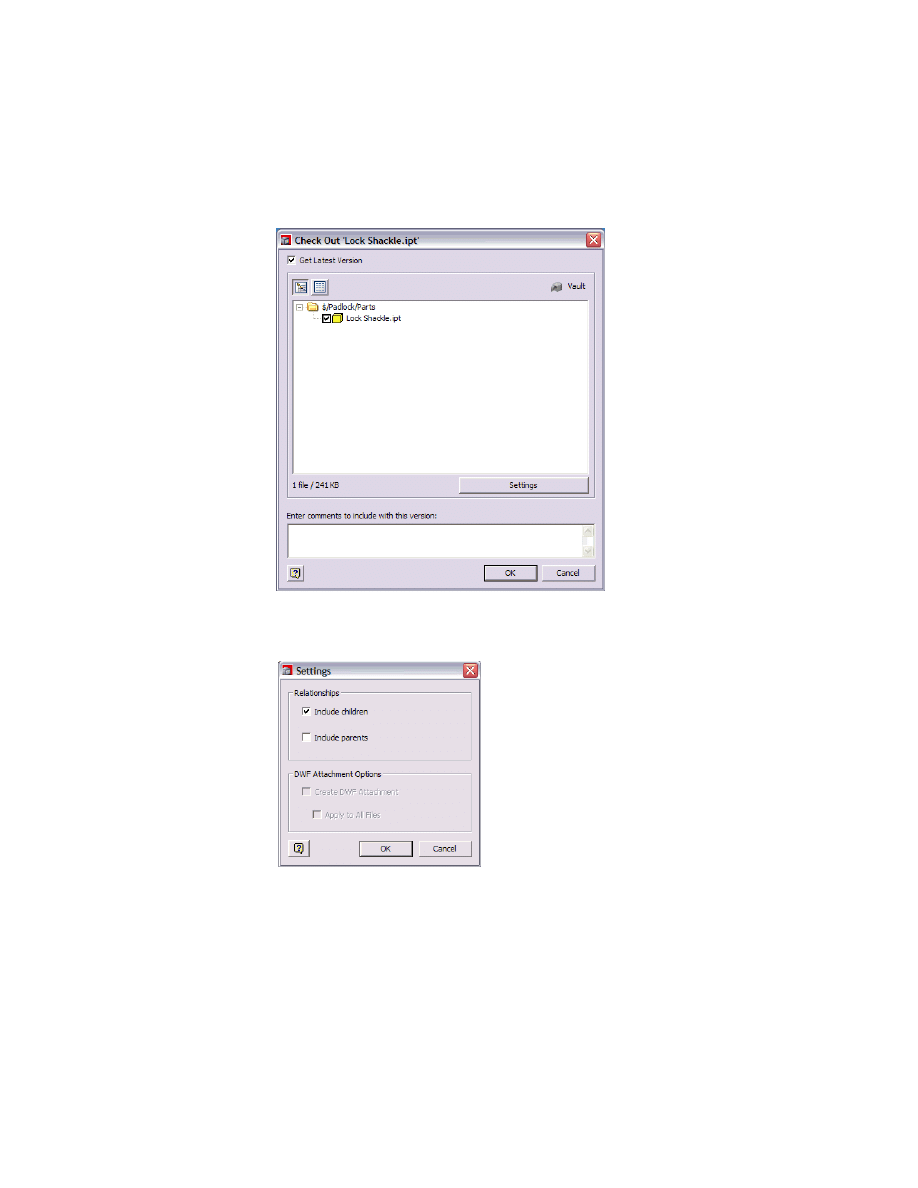
Working with Files in Vaults
|
67
2 In the Check Out dialog box, enter a comment and specify whether or not to
get the latest version.
Click Settings to specify whether or not .dwf files are created when files are
added to the vault. The .dwf attachments are only created for files that have
changed or for files that do not have .dwf files published already.
3 Click OK.
A read/write copy of the selected file and any specified dependencies are
placed in the local working folder. The status of the checked out files is
indicated in the Vault browser.
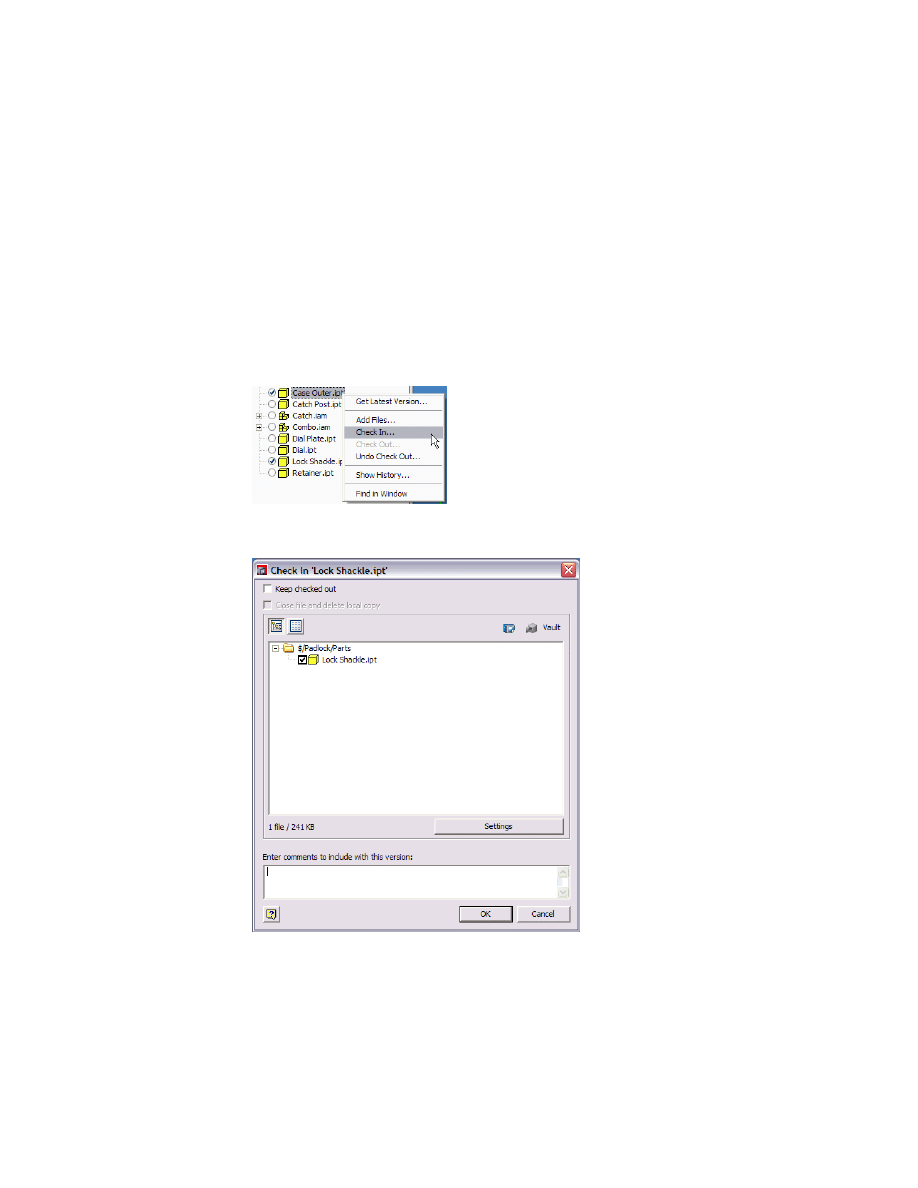
68
|
Chapter 4 Performing Vault Tasks in Autodesk Inventor
Checking In Files
As you work on Autodesk Inventor files, you save changes to your local copy.
To record the changes in the vault, you must check the file in.
Check in a file from Autodesk Inventor
1 Save the file.
If the file is not saved, you are prompted to save the changes.
2 In the Vault browser in Autodesk Inventor, right-click an Autodesk Inventor
file, and click Check In.
3 In the Check In dialog box, enter a comment and specify whether or not to
keep the file checked out for further editing.
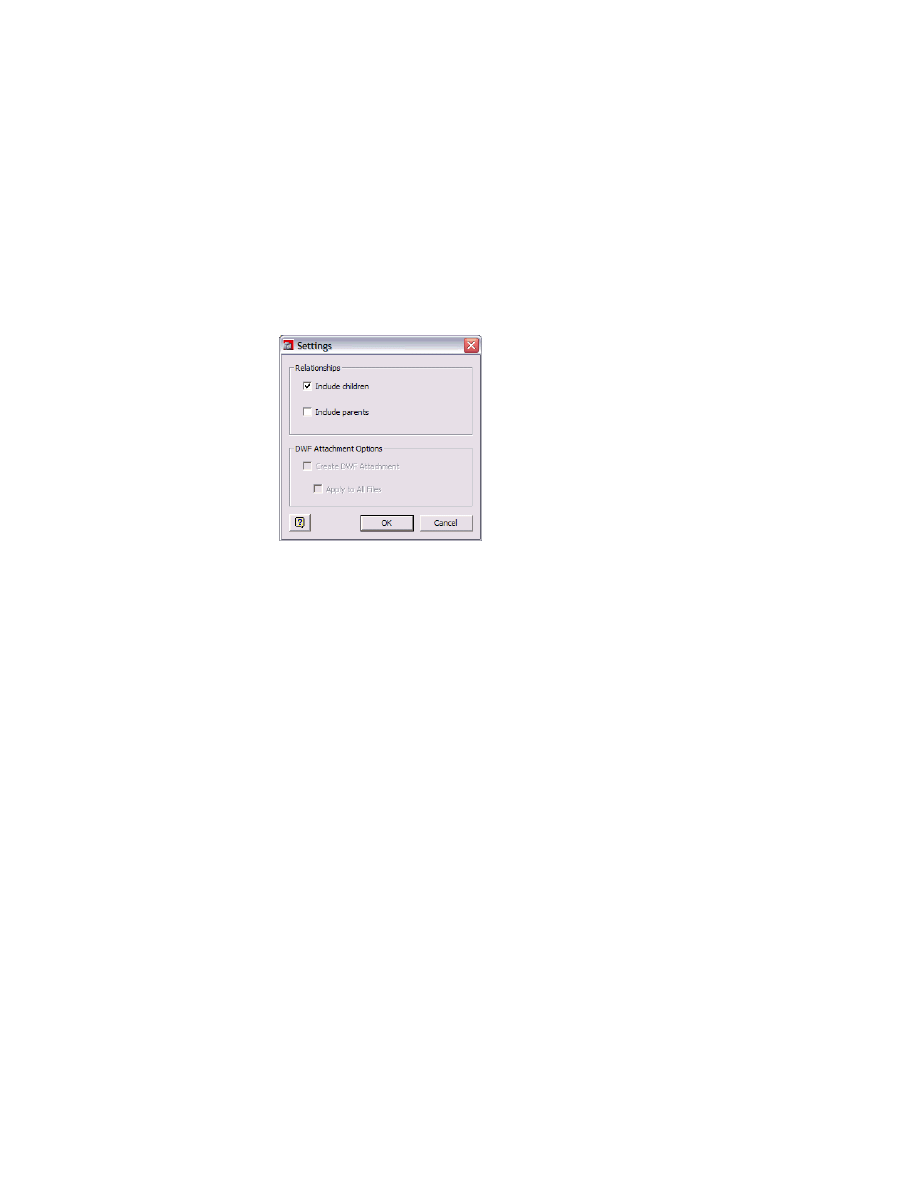
Working with Files in Vaults
|
69
If you are checking in an entire assembly, a drawing, or a presentation, you
can choose to close the file and delete the local copy. If you choose not to
check in all the components of the assembly, this option is not available.
Click Settings to choose whether or not parents and children of the file are
also checked in at the same time and to specify whether or not .dwf files are
automatically created when files are checked in. The .dwf attachments are
only created for files that have changed or for files that do not have .dwf files
published already.
4 Click OK.
The files and specified relationships are checked back into the vault. The
status of the checked in files indicates that the files are in the vault.
Undoing File Check Outs
You can undo a file check out. Undo Check Out removes the check out status
of the file in the vault and the file is restored to the latest version that was
checked in. You can choose whether or not the local copy is replaced with
the version in the vault.
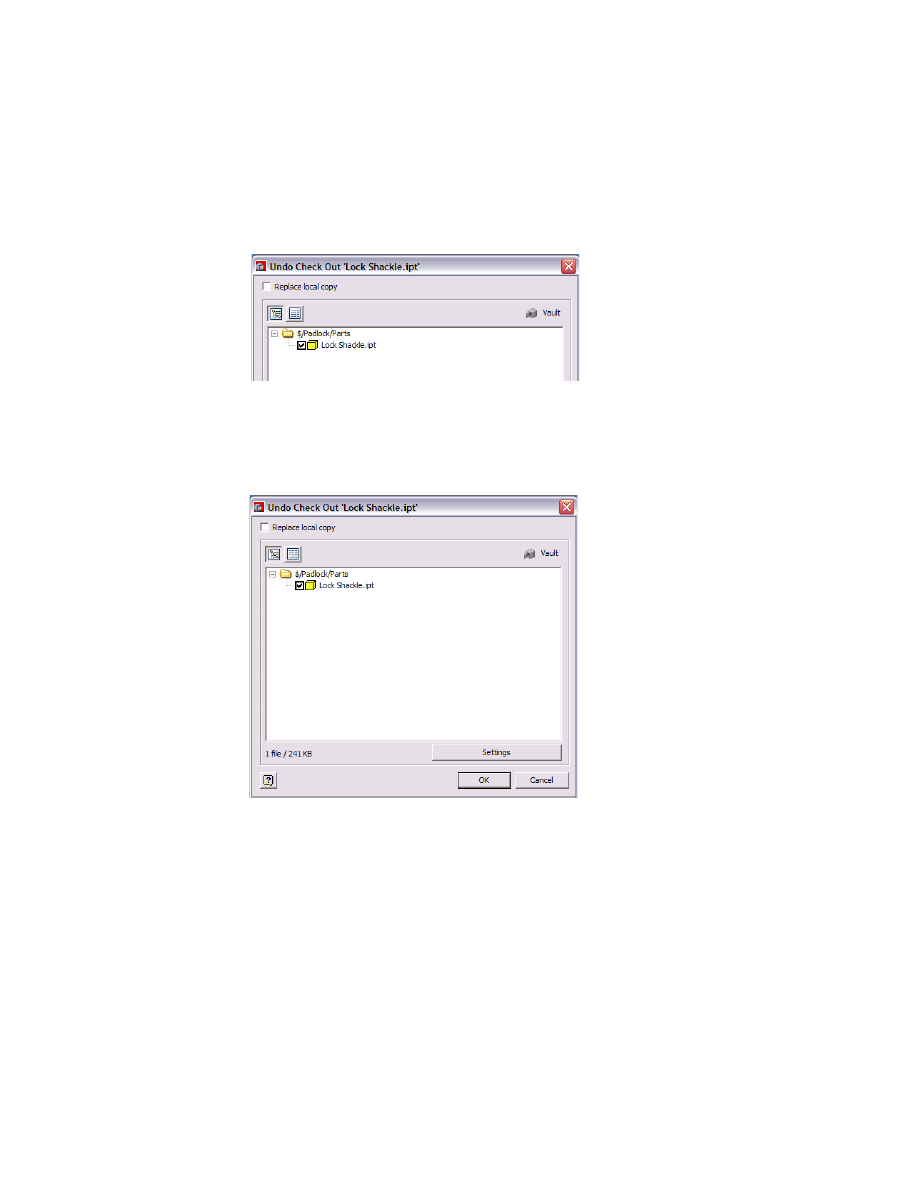
70
|
Chapter 4 Performing Vault Tasks in Autodesk Inventor
Undo a check out in Autodesk Inventor
1 In the Vault browser in Autodesk Inventor, right-click an Autodesk Inventor
file, and then click Undo Check Out.
2 In the Undo Check Out dialog box, specify whether or not to replace the
local copy with the latest version in the vault.
If you replace the local copy, changes made to the local copy are lost.
Click Settings to choose whether or not parents and children of the file are
returned to the vault without saving any changes.
3 Click OK.
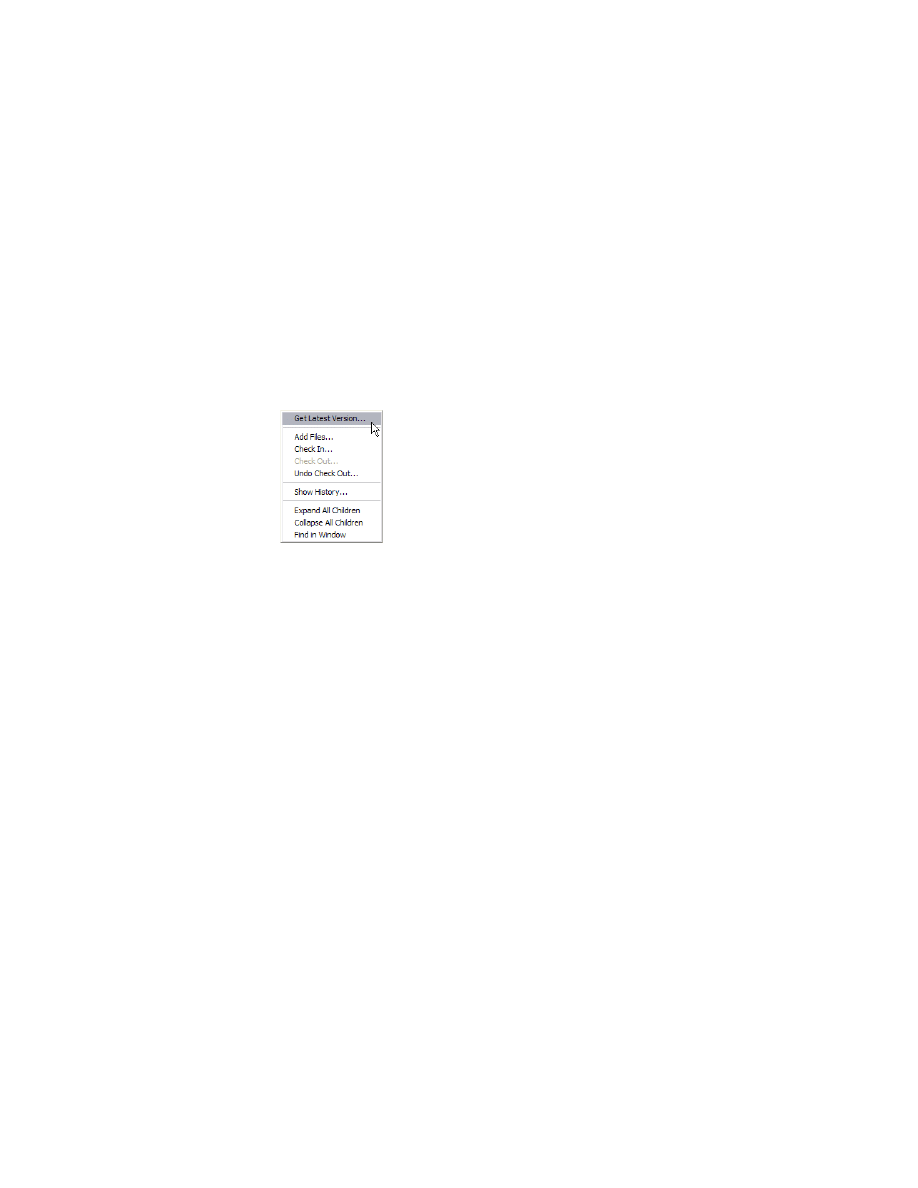
Working with Files in Vaults
|
71
Getting Latest Versions
You can retrieve the latest versions of parts and assemblies from the vault
that are not checked out to you. Use this method to synchronize the models
in your current Autodesk Inventor session with the rest of the design team
and to keep your assembly current. Files that are checked out to you and local
files that have changed are not updated. Files modified by other users are
updated to the latest versions in the vault.
Get the latest version of a model in Autodesk Inventor
1 In Autodesk Inventor, in the Vault browser, right-click, and then click Get
Latest Version.
You are prompted to verify that the files in memory are going to be updated.
2 Click OK.
Viewing the History of Files
The history shows the versions of files that exist in the vault, the date each
version was checked in, and the authors of the modifications.
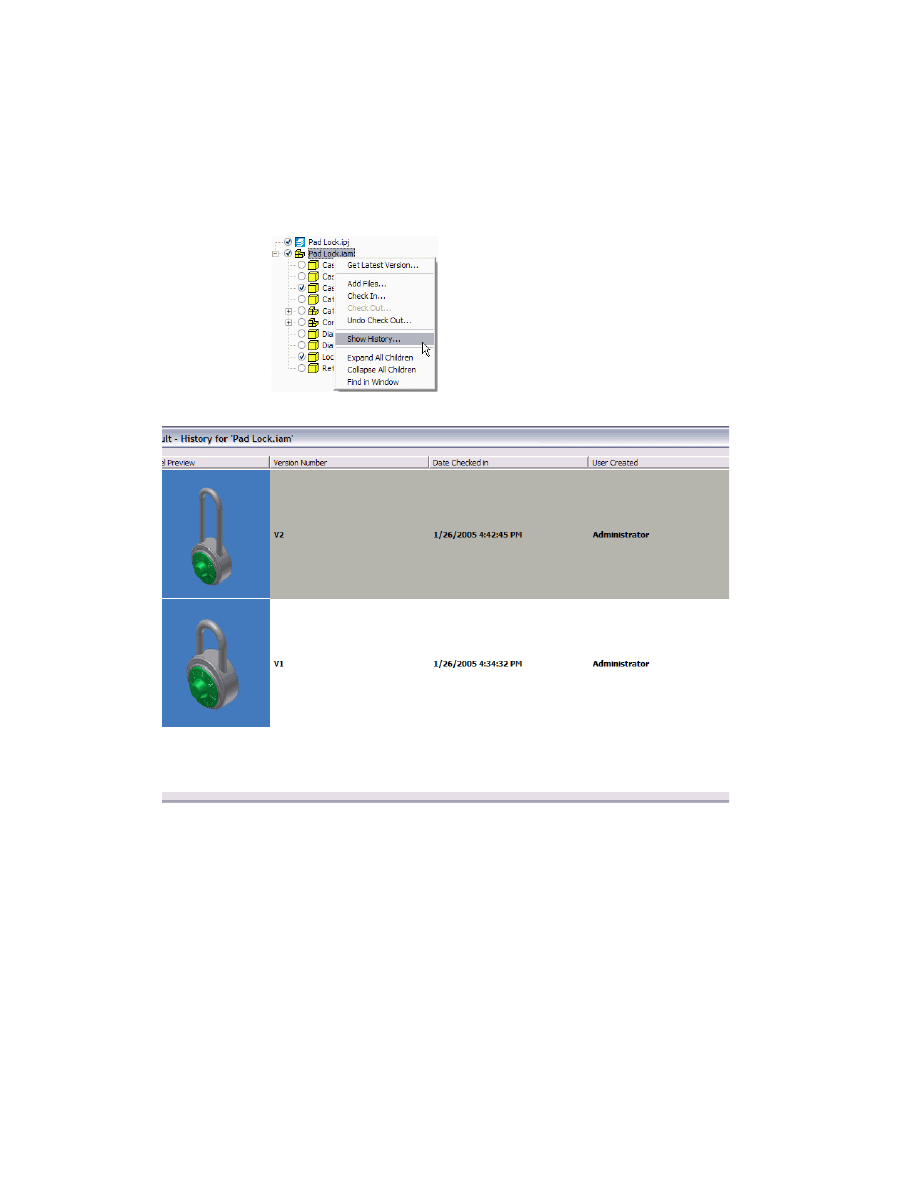
72
|
Chapter 4 Performing Vault Tasks in Autodesk Inventor
View the history of a file in Autodesk Inventor
■
In the Vault browser, right-click a file, and then select Show History.
The history of the file is displayed in a dialog box.

Working with Files in Vaults
|
73
Starting Autodesk Vault Explorer
When you start Autodesk Vault Explorer from inside Autodesk Inventor, you
have access to the vault features and the features in the Vault add-in for
Autodesk Inventor.
Start Autodesk Vault Explorer from Autodesk Inventor
1 On the File menu in Autodesk Inventor, click Vault > Launch Vault Explorer.
The Log in dialog box is displayed.
2 Log into the vault.
Autodesk Vault Explorer displays the contents of the opened vault.
NOTE
You can also right-click the Vault button in the Vault browser to launch
Vault Explorer.

74

75
5
In This Chapter
Using Vaults in
AutoCAD-based
Products
In this chapter, you learn how to use Autodesk
®
Vault
with AutoCAD
®
, AutoCAD Mechanical
®
, Autodesk
®
Mechanical Desktop
®
, and AutoCAD
®
Electrical.
■
Performing vault operations
■
Recommended workflows

76
|
Chapter 6 Using Vaults in AutoCAD Based Products
Key Terms
Term
Definition
ARX
A technology that provides the foundation for design software applications to
share intelligent object data.
AutoCAD Vault ARX
The Autodesk Vault client interface that is integrated with AutoCAD, Mechanical
Desktop, and AutoCAD Mechanical software. This interface is used to manage the
complex relationships among the files within AutoCAD, Mechanical Desktop and
AutoCAD Mechanical and communicate this information to the vault.
Project Manager ESW
The Project Manager Enhanced Secondary Window through which vault
operations are performed in an AutoCAD Electrical project.
Xref Manager ESW
The Xref Manager Enhanced Secondary Window serves as the interface by which
all vaulting activity can be performed and managed. Standard Xref operations are
also available.
check in for the first time Checking in a DWG or image file to the vault for the first time. Adds a file to the
vault so the file can be managed by the vault.
check in a file back into
the vault
Returning a modified file to the vault. The previous version is retained in the file
history.
check out
Retrieving a read/write copy of a file stored in the vault and downloading the file
to the working folder on the local drive for editing.
refresh from the vault
Compares the vaulted file to the corresponding file on your local drive and
updates the vault status icons (AutoCAD, Mechanical Desktop and AutoCAD
Mechanical only).
reload from the vault
Downloads one or more files from the vault to your working folder on your local
drive and reloads them into AutoCAD.
latest version
The most recent version of a file stored in the vault.
local copy
The copy of the vault source file placed in the local working directory.
previous version
An older version of a file stored in the vault. All previous versions of a file are
retained and accessible at any time from Autodesk
®
Vault Explorer.
working folder
A local folder to which files are copied from the vault for editing. A working folder
must be mapped to the root $.
($)
The root of the vault. Analogous to C:\ on the local computer.

About AutoCAD Vault ARX
|
77
About AutoCAD Vault ARX
AutoCAD
®
Vault ARX works within AutoCAD, AutoCAD Mechanical,
Mechanical Desktop, and AutoCAD Electrical, adding data management
tools to the interface. Through the AutoCAD Vault ARX, you can add files to
a vault, and check files out and in. The AutoCAD Vault ARX works with both
DWG and image files. The recommended method for performing vault
operations depends upon your working environment.
For more information about performing vault operations with AutoCAD
Electrical files, see “AutoCAD Electrical” on page 91.
When AutoCAD Vault ARX is installed, the Xref Manager becomes an
Enhanced Standard Window (ESW) that supports both drawing xrefs and
image files in the same window. The Xref Manager supports all of the vault
operations and status icons. The vault commands are only available when
you are logged into the vault. You can also access the vault commands from
the file menu and the command line when you are logged into the vault.
NOTE
To support Vaulting commands in SDI (Single Document) mode, set
the SDI system variable to “0.”
Performing Tasks In Vaults
To access a vault from inside AutoCAD, AutoCAD Mechanical, Mechanical
Desktop, and AutoCAD Electrical, you must log into the vault. Use the vault
icon located in the AutoCAD tray to log in. When you are not logged into
the vault, the icon appears as a closed safe. After you log in, the vault icon
changes to an open safe. The tool tip on the vault icon indicates the login
status and the server\database you are currently logged into.
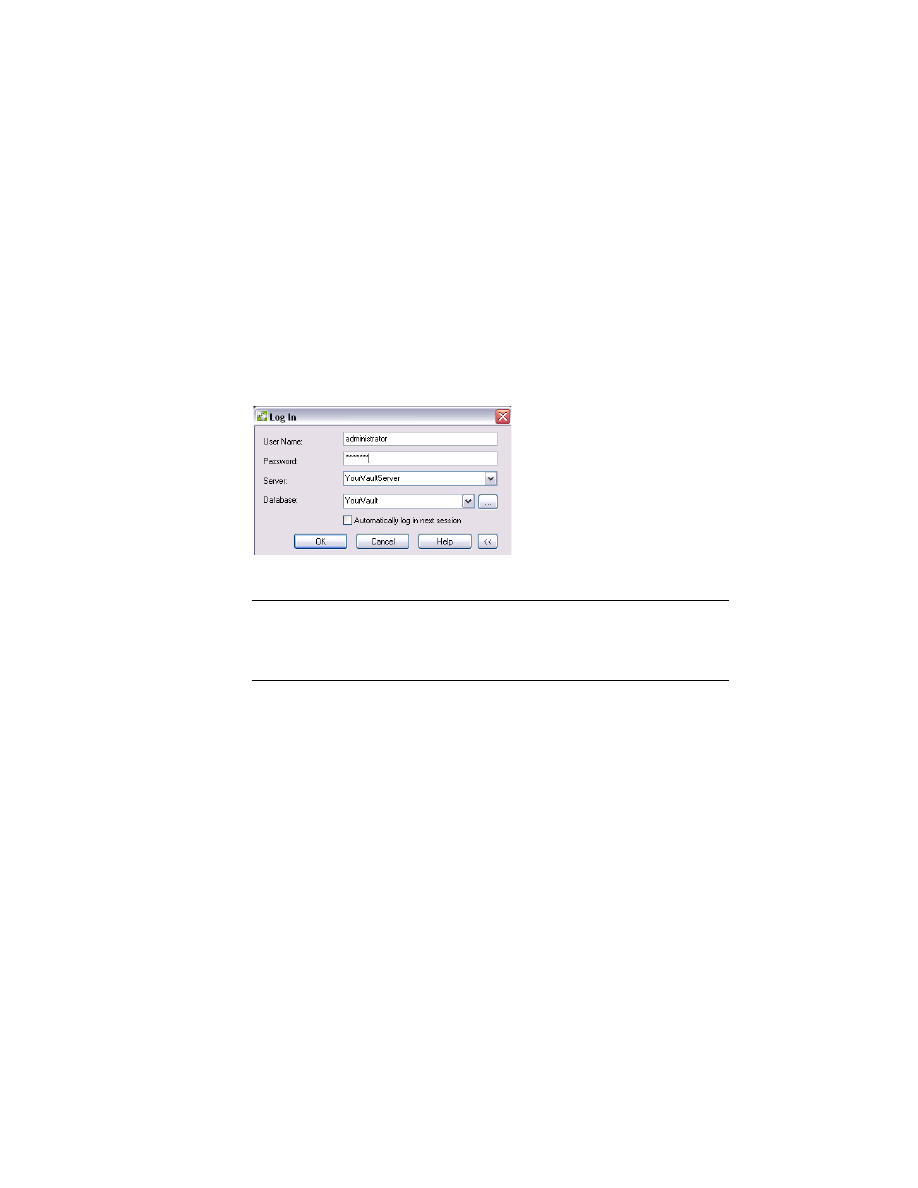
78
|
Chapter 6 Using Vaults in AutoCAD Based Products
Log into a vault in AutoCAD based products
1 Start AutoCAD, AutoCAD Mechanical, Mechanical Desktop, or AutoCAD
Electrical.
2 Use one of these methods to open the Login dialog box:
■
Click File > Vault > Log in.
■
In the AutoCAD tray, right-click the vault icon, and then click Log in.
■
At the command line, enter vault. Press
ENTER
. Enter login. Press
ENTER
.
■
On the Vault toolbar, click the Log in tool.
■
In the Xref Manager window, right-click the background, and click Log in.
3 In the Log In dialog box, log in.
4 Click OK.
NOTE
The names of the vault server and vault database are stored in your
system registry. The user name and password can be saved for quick login. Click
Automatically login next session to automatically log into the vault using the
current account the next time you start Autodesk Vault.
The vault server stores a unique copy of each version of a file in its file store.
These files stored in the vault are called the master files or master copies.

Performing
Tasks
In
Vaults
|
79
Setting the Working Folder
The working folder in the vault specifies the folder to which files are added and
from which they are checked out. The vault server copies files from folders
defined in the vault to folders specified as their working folders. You must set
a working folder to perform any action that copies a file out of the vault.
NOTE
For more information about mapping a working folder, see chapter 3,
“Using Autodesk Vault Explorer” on page 21.
Set a working folder on your local drive
1 Start Autodesk Vault Explorer in AutoCAD, AutoCAD Mechanical,
Mechanical Desktop, or AutoCAD Electrical, using one of these methods:
■
On the Vault menu, click File > Vault > Launch Vault Explorer.
■
Double-click the vault icon in AutoCAD.
2 In Autodesk Vault Explorer, right-click $, and then click Set Working Folder.
For data managed by the AutoCAD ARX:
■
It is required that the working folder be set at the root ($).
■
Vault ignores the working folder set for any sub-folders for the AutoCAD
data managed by the AutoCAD ARX.
For data managed by the Vault Explorer, you can set a working folder on any
folder.
3 In the Browse for Folder dialog box, browse to the working folder on your
local computer where you plan to store the files you check out of the vault.
If necessary, create a working folder on the root $.
NOTE
The Working Folder is set only once. Plan the folder structure before
you start.
If you do not set a working folder for $, then the first time you add a file to
the vault in AutoCAD, AutoCAD Mechanical, Mechanical Desktop, or
AutoCAD Electrical, a working folder named Vault is set on the local drive
(My Documents/Vault).

80
|
Chapter 6 Using Vaults in AutoCAD Based Products
Creating Folders in Vaults
Use folders to organize your files in the vault in the same way you organize
files on your computer. You can use Autodesk Vault Explorer to create the
folder structure for the vault or you can do so within AutoCAD, AutoCAD
Mechanical, Mechanical Desktop, or AutoCAD Electrical. The root directory
in a vault is represented as $/.
NOTE
You can define library folders for read-only parts. For more information
about creating library folders and working with library files, see “Working with
Library Files” on page 85.
Create a folder for a vault project
1 Right-click $, and then click New Folder.
2 Enter a descriptive name for the vault project. Click OK.
You can create a folder off of the root ($) for each additional project. The root
working folder remains the same.
NOTE
In AutoCAD Electrical, it is recommended that you check out an entire
project. For more information, see “AutoCAD Electrical” on page 91.
Working with Files in Vaults
When you work on a file that is checked out of the vault, you work on a local
copy of the file and not the original. At no point do you ever work on the
actual vaulted file. When a modified file is checked into the vault, the
modifications are available as the latest version in the vault. All past versions
of a file are maintained in the vault.
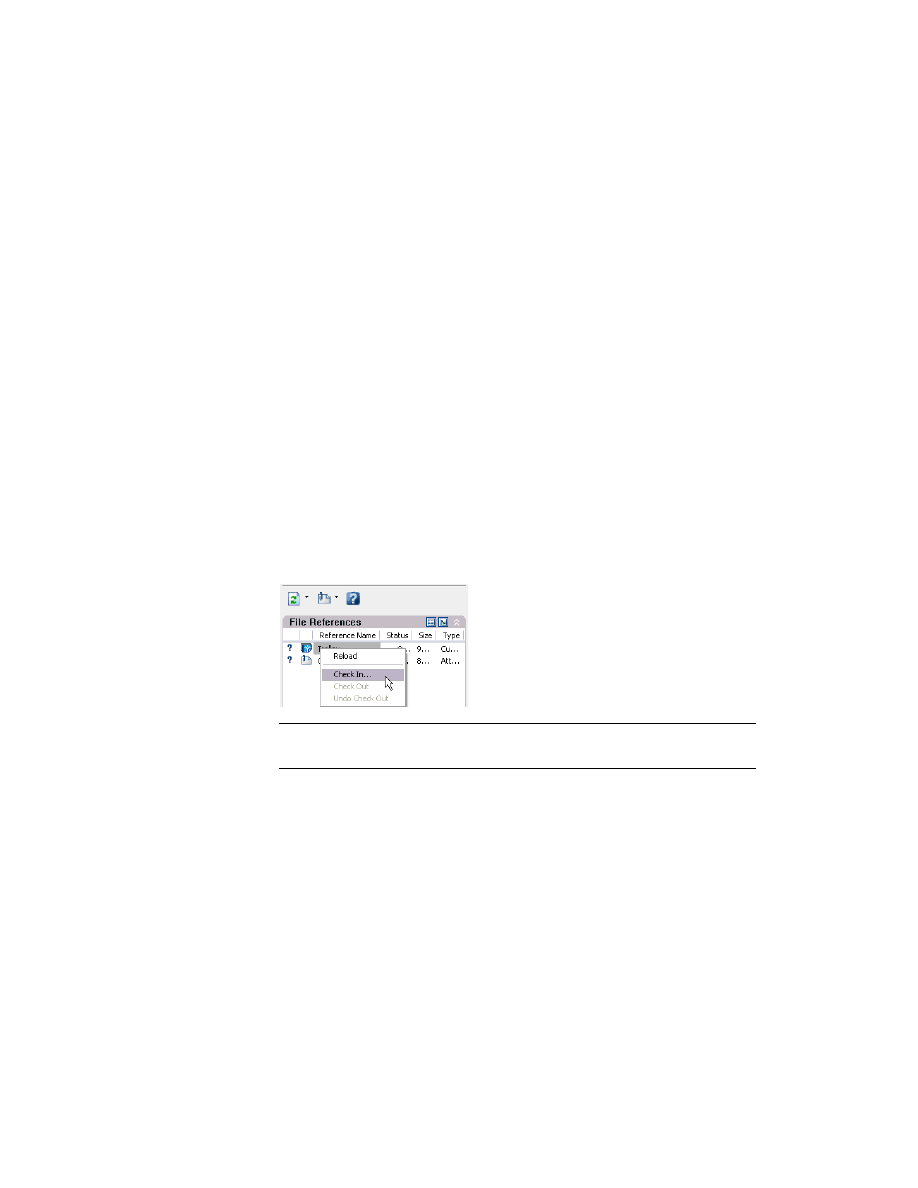
Working with Files in Vaults
|
81
Checking In Files the First Time
Use the Check In command to store DWG and image files in a vault. Use
Autodesk Vault Explorer to add non DWG files to the vault. It is
recommended that you add AutoCAD, AutoCAD Mechanical, Mechanical
Desktop, and AutoCAD Electrical files to the vault from within the respective
program.
Use the Check In Folder command to check in an entire folder or to add files
to the Vault for the first time. The Check In Folder command is used to check
in AutoCAD Electrical projects.
Check in a file for the first time
1 In AutoCAD, AutoCAD Mechanical, or Mechanical Desktop, open the file to
add to the vault. For more information about performing vault operations
with AutoCAD Electrical files, see “AutoCAD Electrical” on page 91.
2 Use one of these methods:
■
Click File > Vault > Check In.
■
At the command line enter vault. Press
ENTER
. Enter checkin. Press
ENTER
.
■
On the Vault toolbar, click the Check In tool.
■
In the Xref Manager, right-click the file name, and then click Check In.
NOTE
If the active DWG is a host file containing xrefs, the xrefs are listed in
the Check In dialog box.
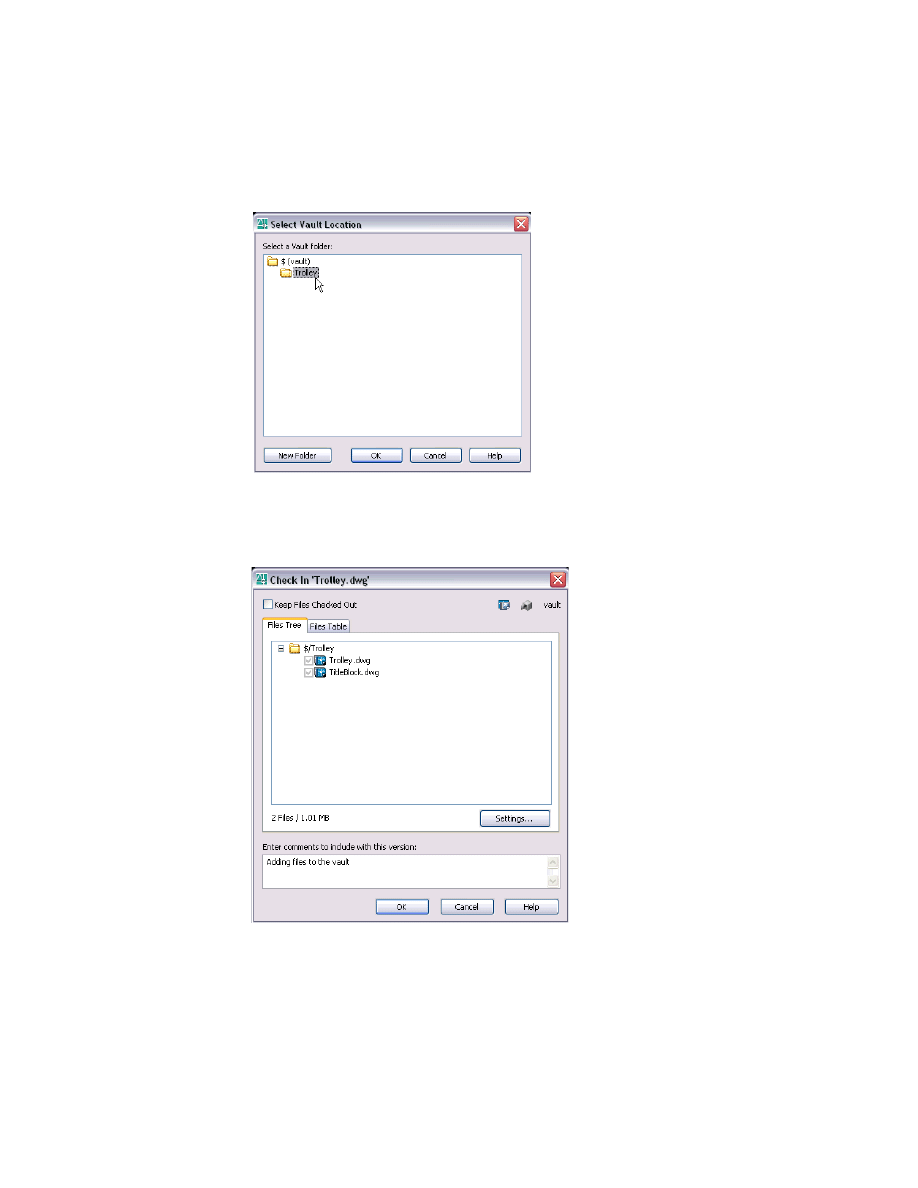
82
|
Chapter 6 Using Vaults in AutoCAD Based Products
3 In the Select Vault Location dialog box, specify where to add the new files.
4 To create a new folder in the Select Vault Locations dialog box, click New
Folder. Create a new folder at the root ($) or on an existing folder.
In the Check In dialog box, all files that are referenced into the active file are
displayed.
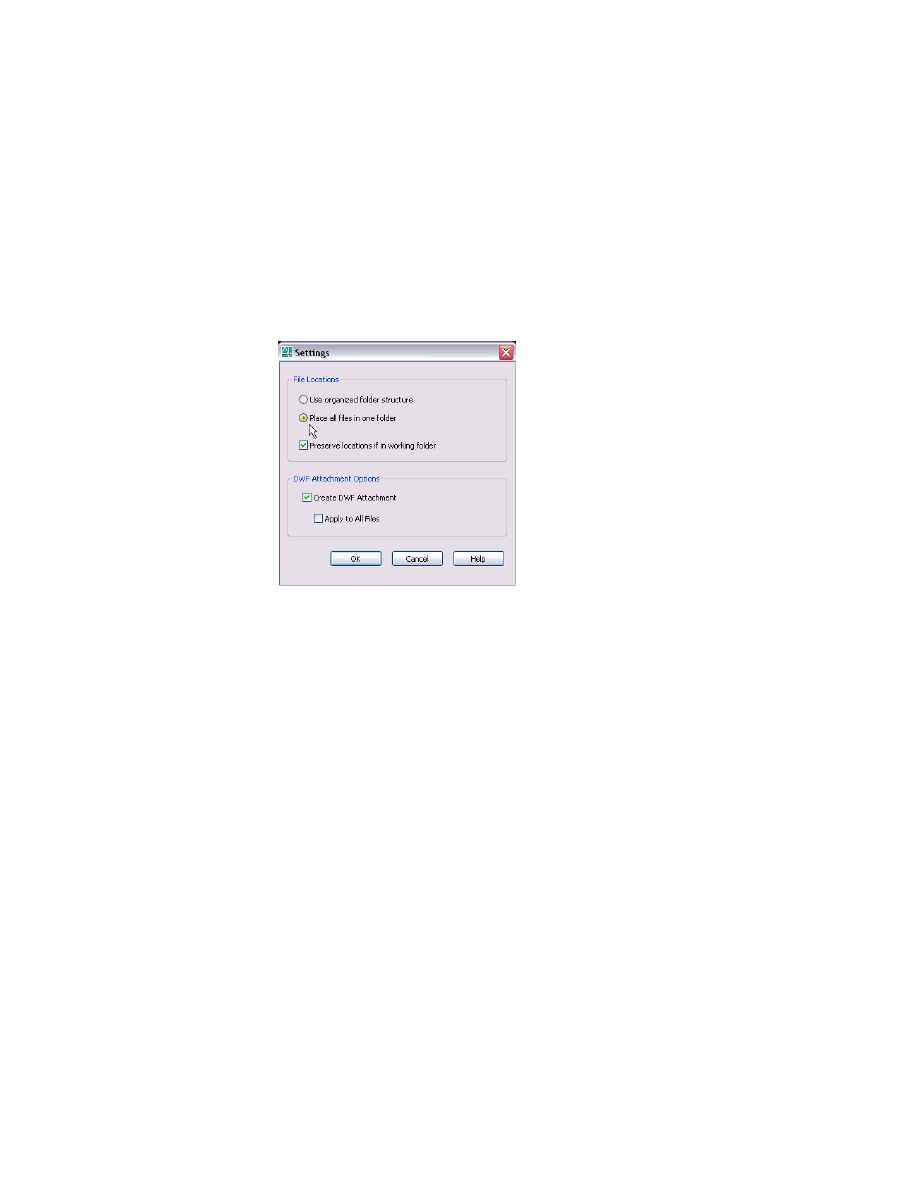
Working with Files in Vaults
|
83
5 Click Settings > Place all files in one folder.
The File Locations settings determine how files are added to the vault the for
first time.
The Create DWF Attachment settings specify whether or not .dwf files are
created when files are added to the vault. The .dwf attachments are only
created for files that have changed or for files that do not have .dwf files
published already.
6 Click OK.
7 Click OK to exit the Check In dialog box.
When you add a host file and associated xrefs to the vault, the relationships
are recorded and maintained. The status of each file added to the vault is
indicated by the icon next to the file name in the Xref Manager.
Any subfolders required below the host file are created automatically.

84
|
Chapter 6 Using Vaults in AutoCAD Based Products
Checking Out Files
To make changes to a file, you must first check it out of the vault. A file that
is checked out of the vault cannot be checked out by anyone else until it is
checked back in. In a host file containing xrefs, you can check out one file,
multiple files, or all referenced files within the Xref Manager. Files that do not
contain xrefs can only be checked out one at a time.
NOTE
In AutoCAD Electrical, check out the entire project before making
modifications to any single file.
Check out a file
1 In AutoCAD, AutoCAD Mechanical, or Mechanical Desktop, use one of the
following methods to check out a file:
■
Click File > Open from Vault.
■
On the AutoCAD toolbar, expand the Open tool, and then click the Open
from Vault tool.
■
On the Vault toolbar, click the Check Out tool.
■
In the Xref Manager, right-click one or more xrefs, and select Check Out
(only available in a vaulted file that contain xrefs).
If you are not logged into the vault you are prompted to log in.
2 In the Select file dialog box, highlight a vault folder.
3 Click OK, or click the arrow on the Open button and select one of the
following options:
Open
(Check Out)
Checks out the drawing file that opened (default).
Open
(Check Out All)
Checks out the drawing files that open and all dependents
(only available in host files that contain xrefs).
Open
(Read Only)
Opens the file in a read only state without checking it out
of the vault.
Click OK.
A read/write copy of the selected file and any specified dependencies that are
checked out are placed in the local working folder. The status of a checked
out file is indicated in the Xref Manager.

Working with Files in Vaults
|
85
Working with Library
Files
Library files do not change often and are frequently reused. When you check
a file into a library folder in the vault, it becomes a library file. You can create
new library folders in Autodesk Vault Explorer or in the Select Vault Location
dialog box in AutoCAD, AutoCAD Mechanical, or Mechanical Desktop.
Create a library folder
■
In Autodesk Vault Explorer, right-click the root level directory, and then
click New Library Folder.
NOTE
You can create a new Library folder in the Select Vault Location dialog
box in AutoCAD, AutoCAD Mechanical, or Mechanical Desktop when you
check a host file into the vault for the first time.
Library folders can be created only directly off the root level of the vault.
Add a library file in Autodesk Vault Explorer
1 In Autodesk Vault Explorer, right click the root ($) and then click New Library
Folder.
2 Enter a descriptive name for the new library folder.
3 In Windows Explorer, browse to the file you want to add, and drag it to the
new library folder.
Attach a library file from the vault to a drawing
1 Start with a file from the vault opened in AutoCAD, AutoCAD Mechanical,
or Mechanical Desktop.
2 In the Xref Manager, right-click the background, and then click Attach from
Vault.
3 In the Select file dialog box, double-click the Library folder. Highlight the
library file name. Click Open.
4 Insert an instance of the library file into your current drawing.
5 Save the drawing, and then check the library file into the vault.
NOTE
You must check the host file into the vault to create a relationship
between the host file and the library file.
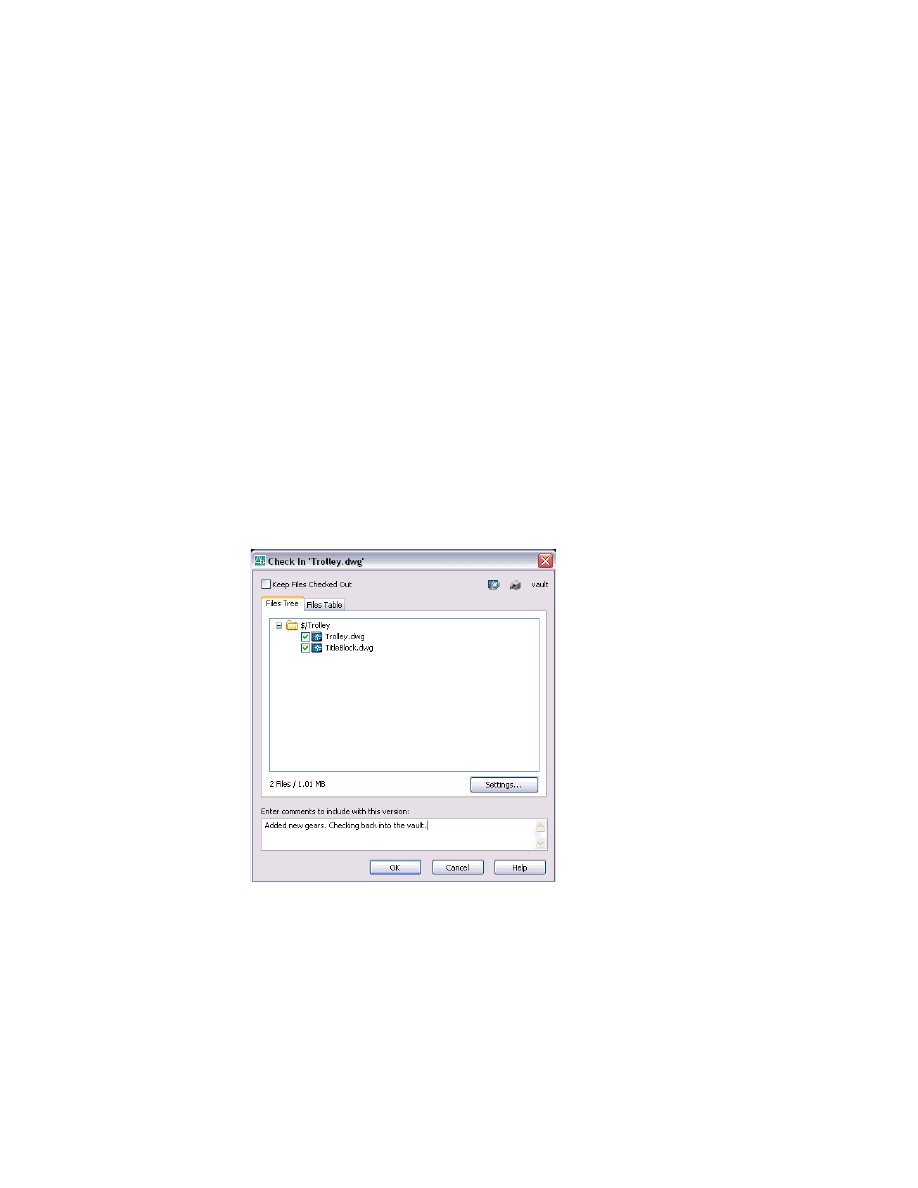
86
|
Chapter 6 Using Vaults in AutoCAD Based Products
As you work on AutoCAD, AutoCAD Mechanical, Mechanical Desktop, or
AutoCAD Electrical files, you can save changes to your local copy. However,
to record the changes in the vault, you must check the file back in. You can
check files back into the vault from within AutoCAD, AutoCAD Mechanical,
and Mechanical Desktop. For AutoCAD Electrical, check in the entire project.
Check a file in
1 In AutoCAD, AutoCAD Mechanical, or Mechanical Desktop, save the files.
2 Check the files back into the vault using one of these methods:
■
On the File menu, click File > Vault > Check In.
■
In the Xref Manager, right-click one or more files, and then click Check In.
■
On the Vault toolbar, click the Check In tool.
■
At the command line, enter vault. Press
ENTER
. Enter checkin. Press
ENTER
.
3 In the Check In dialog box, select Keep Checked Out to keep the file checked
out for further editing.
This checks in your changes to the vault so that others can update their files,
and keeps the file checked out to you. You can also enter a comment regard-
ing the changes made to the file.
4 Click OK.
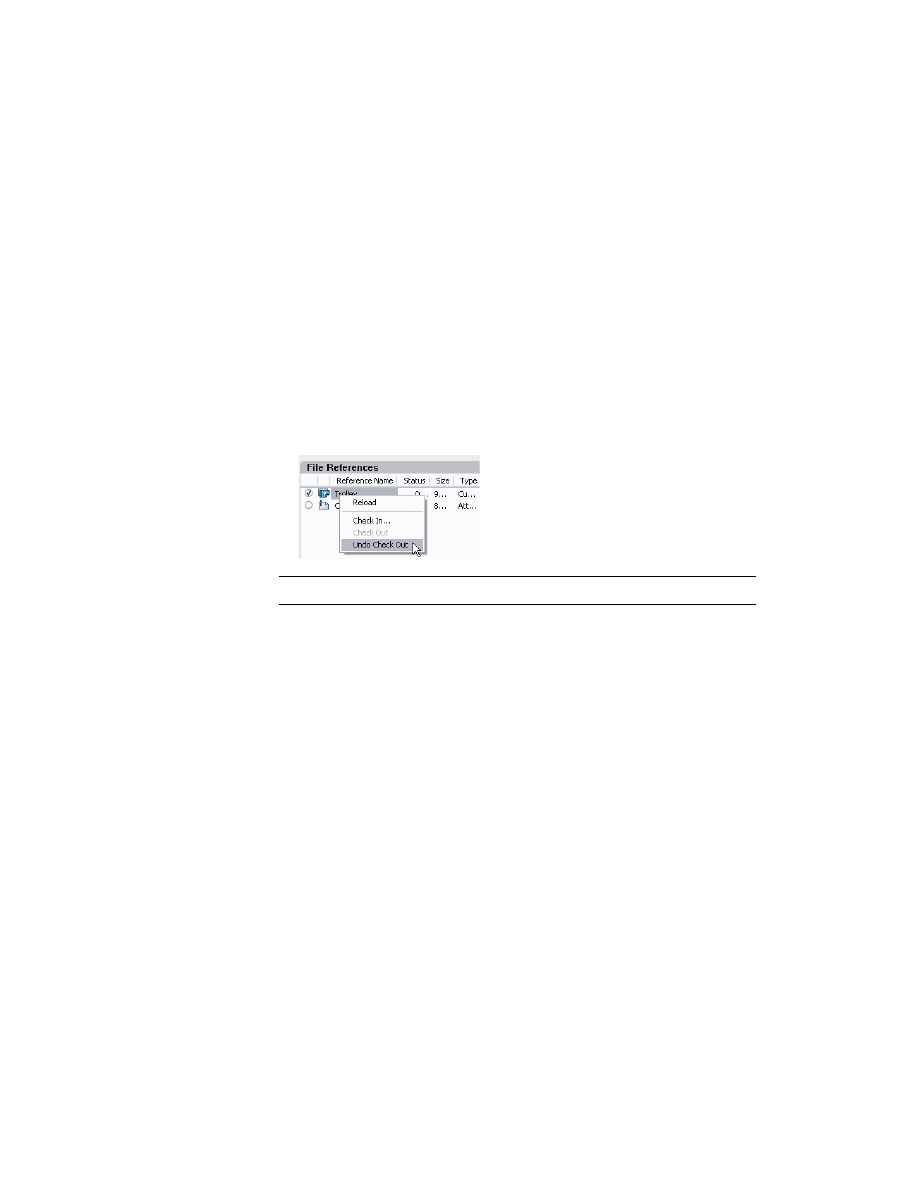
Working with Files in Vaults
|
87
The files and specified relationships are checked back into the vault. You can
view the status of files in the Xref Manager.
Undoing File Check Outs
A file that is checked out can be returned to the vault without checking in
changes. Undo Check Out releases your reservation on the file.
Undo a check out
1 In AutoCAD, AutoCAD Mechanical, or Mechanical Desktop, undo the check
out of one or more files using one of these methods:
■
Click File > Vault > Undo Check Out.
■
In the Xref Manager, right-click one or more files, and then click Undo
Checkout.
NOTE
In AutoCAD Electrical, undo the check out of the entire project.
Refreshing Models from Vaults
The Refresh from Vault command updates the status icons in the Xref
Manager. Use this command to display the most current status information
about the files in the vault project you are working on.
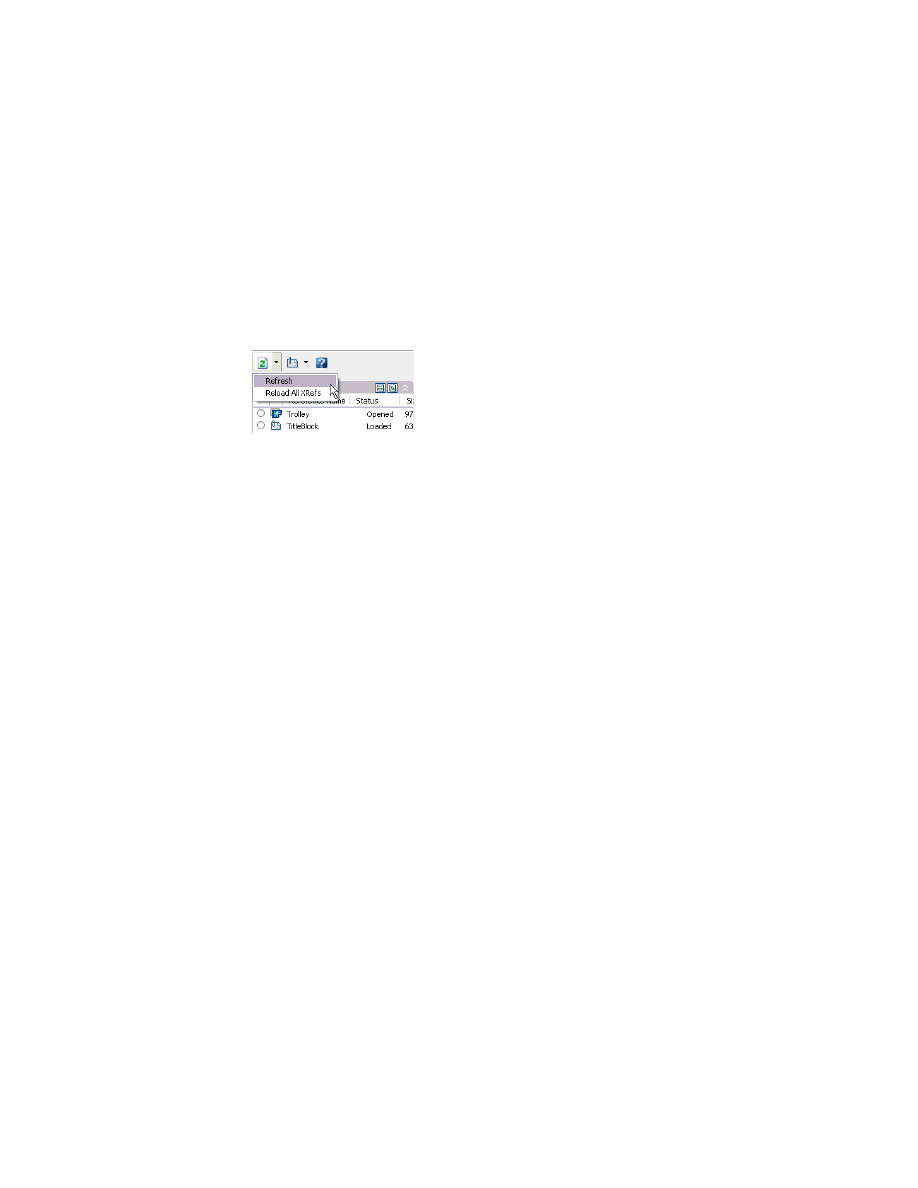
88
|
Chapter 6 Using Vaults in AutoCAD Based Products
Refresh a model
1 In AutoCAD, AutoCAD Mechanical, or Mechanical Desktop, on the Insert
menu, click Insert > Xref Manager.
2 In the Xref Manager refresh the model using one of these methods:
■
Right-click the background, and then select Refresh from the context
menu.
■
In the header of the Xref Manager window, click the Refresh tool.
3 Click OK.
Reloading Xrefs from Vaults
In files that contain xrefs, use the Reload all Xrefs command to download the
latest version of the referenced files to your working folder on your local
drive. Use this command to synchronize the models in your current
AutoCAD, AutoCAD Mechanical, or Mechanical Desktop session with the
rest of the design team and to keep your file current.
Files that are checked out to you and local files that have changed are not
updated. Files modified by other users are updated to the latest versions in
the vault.
You can cancel the download by clicking the Cancel button on the progress
dialog box.

Working with Files in Vaults
|
89
Reload xrefs from a vault
1 Use one of these methods:
■
In AutoCAD, AutoCAD Mechanical, or Mechanical Desktop, in the Xref
Manager, list view, right-click one or more files, and then click Reload.
To select multiple files, hold down
SHIFT
or
CTRL
as you select the files.
To remove files from the selection set, hold down
SHIFT
or
CTRL
as you
■
To reload all xrefs from the vault, in the Xref Manager, Xref Manager
toolbar, click the Reload All Xrefs tool.
■
To access the reload command, at the command line enter -xref. Press
ENTER
. Enter reload. Press
ENTER
.
2 At the prompt, verify that the files in memory are going to be updated.
Starting Vault Explorer
In AutoCAD, AutoCAD Mechanical, Mechanical Desktop, or AutoCAD
Electrical, use one of these methods to start Autodesk Vault Explorer:
■
Click File > Vault > Launch Vault Explorer.
■
In the AutoCAD tray, double-click the vault icon.
■
In the AutoCAD tray, right-click the vault icon, and then click Launch
Vault Explorer.
When you launch Autodesk Vault Explorer, you have access to the vault
features and the features in AutoCAD Vault ARX.

90
|
Chapter 6 Using Vaults in AutoCAD Based Products
Recommended Workflows
The workflows for AutoCAD Mechanical and Mechanical Desktop differ from
those for AutoCAD Electrical.
AutoCAD Mechanical and Mechanical Desktop
Before you can add files to the vault you must set a working folder in
Autodesk Vault Explorer. Launch Autodesk Vault Explorer within AutoCAD
Mechanical to log into the vault and set a working folder.
In files that contain structured components, use the Externalize command to
create xrefs of components you want to exist in separate files, such as:
■
Components you want to track and control file versions.
■
Components that are frequently reused.
You can perform all vault operations on the File menu, the Vault toolbar, at
the command line, and within the Xref Manager. File status information
is
only available in the Xref Manager.
Workflow overview
1 Start AutoCAD Mechanical or Mechanical Desktop.
2 Log into the Vault.
3 If you did not set a working folder to your local drive, start Vault Explorer and
set a working folder. Switch back to AutoCAD Mechanical or Mechanical
Desktop.
4 Open a file you want to add to the vault.
5 Add the opened file to the vault using the Check In command. If the file
contains xrefs, they are added to the vault when you check the host file into
the vault for the first time.
6 Use the Open from Vault command to open and check out DWG and image
files in the vault. If the file contains xrefs, you can check out one or more of
the referenced files within the Xref Manager.
7 If you are working on a file containing xrefs, view the status of the files in
Xref Manager. Use the Refresh and Reload command to get the latest versions
of files that are out of date.
8 When you finish modifying the files, check them back into the vault. This is
especially important when you are working on files that have a relationship
to other vaulted files.

Recommended
Workflows
|
91
AutoCAD Electrical
In AutoCAD Electrical you work on one project at a time. The project file
(WDP) lists all the DWGs that are part of a project. When you make a change
in one drawing, all files related to that drawing are automatically updated.
To maintain the relationship among the DWG files that are defined in the
project file, you must check out the entire project to the working folder to
modify one or more files. In a multiple user design environment, select a
Project Engineer responsible for the checking out and checking the entire
project for others to work on.
Use the Project Manager ESW to perform all of your vaulting operations. In
AutoCAD Electrical, you can select all files within a project to:
■
Check in all
■
Check out all
■
Undo check out
■
Get latest all
Workflow overview
1 Start AutoCAD Electrical.
2 Log into the Vault.
If you did not set a working folder yet, start Autodesk Vault Explorer and set
a working folder and the switch back to AutoCAD Electrical. In a multiple-
user design environment, each person working on an AutoCAD Electrical
project must specify the same working folder for Autodesk Vault.
3 Add all your project files to the Check In All command in the Project
Manager ESW.
4 Use the Open Project from Vault command to open and check out the entire
project from the vault.
5 To work on one or more files in the project, check out the entire project to
your working folder using the Check Out All command in the Project
Manager ESW. You must check the entire project before making
modifications in AutoCAD Electrical in order to ensure all files in the project
are updated.
6 When you are finished modifying the files, check them back into the vault
using the Check In All command in the Project Manager ESW.

92

93
6
In This Chapter
Maintaining Vaults
In this chapter, you learn about maintaining vaults, and
backing up and recovering data.
■
Stopping and starting the Web
services
■
Creating vaults
■
Moving vaults
■
Backing up the vault
■
Restoring the vault
■
Purging old vault data

94
|
Chapter 6 Maintaining Vaults
About Autodesk Vault Manager
A vault consists of:
Knowledge-
VaultMaster
database
Stores the users of the system, the vaults to which they
have access, and a global list of the vaults.
Vault database
Stores information such as file names, users names,
properties, and file relationships.
File store
A directory structure that contains the actual data files.
Autodesk
®
Vault Manager includes tools for maintaining
databases and file stores. Never directly move, delete, or
edit a file in the file store.
NOTE
A database consists of a .mdf file and a .ldf file. These two files must be
kept together for a vault to work properly.
All database and file store maintenance should be performed using Autodesk
Vault Manager. Autodesk Vault Manager is the administrator’s interface for
maintaining the vault file stores and databases, such as backing up and
restoring data, creating new vaults, and purging old data.
The administration utilities in Autodesk Vault Manager are also available
from the command line. You can use the command line commands in
conjunction with scripts to create custom schedules and automated
maintenance tasks.
You must log into Autodesk Vault Manager with a vault account that has
been assigned the Administrator role. In order to perform most vault
maintenance, you must also have SQL administrator privileges. See Vault
Manager Help for more information on the SQL administrator account.
For more information about vault maintenance and command line options,
see the Autodesk Vault Manager Help.
Start Vault Manager
1 From the Windows Start menu, select Programs > Autodesk > Autodesk Data
Management > Autodesk Vault Manager.
2 In the Log In dialog box, enter the user name and password for the vault
administrator account.
3 Click OK.

Vault
Maintenance
|
95
Vault Maintenance
Since many of the maintenance operations require the Web service to be
stopped, vault users cannot connect to the vault during maintenance and
any current communication with the vault database will be lost. Ensure that
no users are connected to the vault before performing any Vault Manager
operations. Vault users cannot begin using the vault again until the Web
service is restarted.
Stopping and Starting the Web Service
NOTE
Always alert vault users prior to stopping Web services. The Web service
enables communication between the vault server and vault client applications.
If the Web services are turned off on a server, Vault clients connecting to that
server lose communication with the server.
The following Vault Manager operations require that the Web service is
stopped:
■
Backup
■
Restore
■
Delete Vault
■
Move File Store
■
Detach Vault
■
Detach Master Vault
■
Purge
■
Reindex
When performing any of these operations, you are prompted to stop the Web
service if you have not already done so. Click Yes to stop the Web service or
click No to cancel the operation. Users can no longer access the vault when
the service is stopped. Restart the Web service once you are done with
maintenance. If you exit Autodesk Vault Manager without restarting the Web
service, you are prompted to start it.

96
|
Chapter 6 Maintaining Vaults
Stop the Web service
4 Click File > Stop Web Service.
5 A message stating the service has been stopped successfully is displayed.
Click OK.
Start the Web service
1 Click File > Start Web Service.
2 A message stating the service has been started successfully is displayed. Click
OK.
Creating Vaults
A vault is created automatically when Autodesk
®
Data Management Server is
installed. Typically, use a single master vault for holding all of the design data
for a design team, since data and folder mappings cannot be shared across
vaults. However, you may want to create additional vaults for test purposes
so users can become familiar with vault procedures without affecting the
main vault. Contractors may want to use multiple vaults to isolate data from
completely independent clients who each have separate libraries and shared
content.
Create a Vault
1 Click Actions > Create Vault.
2 Enter a name for the new vault. The name cannot contain special characters or
spaces.
3 The file store can be located in a default location, or a new location can be
specified. Click OK to create the new vault with the default file store location
or click Select File Store Location to specify a new location and then click OK.
NOTE
The default path for the file store is C:\Documents and Settings\All
Users\Application Data\Autodesk\VaultServer\FileStore.
Deleting Vaults
Vaults that are no longer in use can be deleted. Before deleting any vault,
back up the data.

Vault
Maintenance
|
97
Delete a vault
1 Click Actions > Delete Vault.
2 You are prompted to verify your actions. Click OK.
Moving File Stores
The file store can be moved from its existing location to another location on
the same machine. To move a file store to a location on a remote machine,
see Managing a Remote File Store in the Advanced Configuration Guide
available in the online Vault knowledge base. Use only Autodesk Vault
Manager or the command line utility to move a file store.
Move a file store
1 Click Actions > Move File Store.
2 In the Move File Store dialog box, browse to a new location for the file store
3 Click OK.
Detaching and Attaching Vaults
Detaching a vault disconnects it from the server so it can be moved to
another location. Before detaching the master vault database, you must
detach all other databases. The vault and its log file are detached. The names
of the files for a vault named Vault are:
■
Vault.mdf
■
Vault_log.LDF
After the vault is detached, you can move the two corresponding files. The
.mdf and .ldf files must be kept together. Attaching a vault reconnects the set
of vault files that were moved to the database engine.
Detach a vault
1 Ensure no users are accessing the vault and then stop the Web service.
2 Select a vault from the main view in the vault manager.
3 Click Actions > Detach Vault.
4 You are prompted to confirm your actions. Click Yes.

98
|
Chapter 6 Maintaining Vaults
Detach the master vault
1 Ensure no users are accessing the vault and then stop the Web service.
2 Click Tools > Detach Master.
3 You are prompted to confirm your actions. Click Yes.
NOTE
You must detach all other databases before detaching the master vault.
Attach a vault
1 Click Actions > Attach Vault.
2 In the Attach Vault dialog box, enter the name of the data file or click the
browse button to locate the file.
3 Enter the name of the log file or click the browse button to locate the
transaction log file.
4 Enter the name of the file store or click the browse button to locate the file
store.
5 Enter the name of the vault.
6 Click OK.
For more information on detaching and attaching vaults, see the Autodesk
Vault Help or visit the Autodesk
®
Web site, www.autodesk.com, and search for
support document TS81609.
Backing Up Vaults
Back up vault databases and file stores so the can be archived and restored
later. Always back up your vault data before upgrading your vault software.
The Autodesk Vault Manager can back up:
■
Server data files and transaction log files for the master vault and all other
vaults on a server.
■
All data from the vault file stores associated with the vaults on the server.
Databases and file stores are backed up together.
NOTE
For routine data back up, use the Microsoft
®
Windows
®
task scheduler
with the Autodesk Vault Manager command line back up utility. On the
Windows Control Panel, select Scheduled Tasks. Follow the instructions for the
scheduling wizard.

Vault
Maintenance
|
99
Create a backup
1 Stop the Web services.
2 Click Tools > Backup.
3 Specify the location to store the backed up data. To browse for a location,
click ... and locate a directory using the file browser.
4 Click OK.
Taping Back Ups
If you are using tape backup software that supports the Microsoft
®
SQL
Server, you can back up the SQL instances belonging to Autodesk Vault
during your standard backup. The vault file store and the SQL database are a
matched pair. Back up both files at the same time. You can use the command
line Vault Manager utility to create a script for backing up data. For more
information on using the command line Vault Manager utilities, see the
Autodesk Vault Manager Help.
Restoring Vaults from Back Ups
Autodesk Vault Manager is used to restore the vault database and file store
from an existing back up.
■
Restore server data files and transaction log files for the master vault and
all other vaults on a server.
■
Restore all data from the vault file stores associated with the vaults on the
server.
NOTE
To restore a server, you must have an existing valid backup.
Restore a vault from a back up
1 Stop the Web services.
2 Click Tools > Restore.
3 Restoring a vault deletes the current datasets and file store. This action
cannot be undone. You are prompted for confirmation before proceeding.
Click Yes.
4 Select whether you are restoring a directory or a file.
5 In the Restore from directory field, specify the location of the backed up data.
To browse for a location, click ... and locate a directory using the file browser.

100
|
Chapter 6 Maintaining Vaults
6 Select whether the database is to be restored to the original location or to a
different location. If you choose Select Restore Location, specify a target
directory for the database.
7 Select whether the file store is to be restored to the original location or to a
different location. If you choose Select Restore Location, specify a target
directory for the file store.
8 Click OK.
The vault data is automatically migrated when it is restored using Vault
Manager. If you are restoring the data using the command line, you must
migrate the data after it is restored.
NOTE
Back up files created using Autodesk
®
Productstream
™
cannot be
restored to an Autodesk Vault server installation.
Purging Vault Data
To help maintain drive space and to minimize file store size for better
searching, you can purge old versions and out-of-date information from the
vault.
Purge vault data
1 Stop the Web services.
1 Select a vault from the main pane.
2 Click Tools > Purge.
3 In the Vault Version Purge dialog box, specify how many of the file versions
to leave in the vault or how old files should be before purging.
4 Click OK.

101
7
In This Chapter
Installing Autodesk
Content Center
Libraries
This chapter discusses configurations and system
requirements for the installation of Autodesk
®
Content
Center libraries.
■
Determining Content Center
configurations
■
Installing components
■
Removing components

102
|
Chapter 7 Installing Autodesk Content Center Libraries
Key Terms
Term
Definition
client
The components of client/server software that users interact with most
frequently. The Content Center client is the dialog interface within the Autodesk
Inventor
®
product that allows access to library databases containing standard
content which is available for reuse.
design team
Two or more people working in a collaborative environment.
server
The components of client/server software that perform background tasks for the
system. This piece of the software must always be online for clients to be able to
use the system. In Content Center, the server components (libraries) are
configured using the Content Center configuration dialog box.
single user
An individual working in an isolated or non collaborative environment.
Content Center
The interface providing access to Autodesk Inventor Content Center libraries.
Shared libraries
Content Center Libraries installed on an Autodesk
®
Data Management Server
and made available for Content Center clients.

Setting Content Center Library Configurations
|
103
Setting Content Center Library Configurations
Before installing Content Center, determine the installation scenario best
suited for your company. Consider whether installing Content Center
libraries on a shared Autodesk Data Management Server is a solution to your
company’s needs. Content Center libraries installed on the Autodesk Data
Management Server can be shared with users running Autodesk Inventor 10
on their local machine.
After you choose the appropriate scenario for your situation, continue by
installing and configuring the software components.
The Installation type option you specify during installation determines how
the Content Center libraries are installed on a local machine.
Working with Design Teams
When two or more users are actively sharing files on a design project, they
constitute a design team. Designate a team member as the project leader. The
team leader is responsible for the initial setup of the Content Center libraries.
When working with design teams, you can install Content Center libraries
on the Autodesk Data Management Server and configure each user computer
to point to the libraries shared by the server from within Autodesk Inventor
10 in the Configure Libraries dialog box.
The Autodesk Data Management Server manages shared Content Center
libraries for Autodesk Inventor and vault databases for Autodesk
®
Vault.
When you install Content Center libraries on the Autodesk Data
Management Server you have a central server that local machines can access
and share.
Key characteristics of a multiple design team situation:
■
Two to three design teams that work independently of one another, and
do not share files across teams.
■
Network required (Microsoft
®
Windows
®
file sharing capabilities).
■
A separate server is recommended for optimal performance. Installation of
Autodesk Inventor is not required on the server.

104
|
Chapter 7 Installing Autodesk Content Center Libraries
Working As a Single User
A single user working in a non-collaborative or isolated environment can
install and run Autodesk Content Center libraries and Content Center on the
same workstation.
Key Characteristics of a single user situation:
■
Single user (or multiple single users)
■
Network not required
■
Separate server not required
Installing the Server and Client Components
The Autodesk Data Management and Content Center libraries installation
CDs are available with Autodesk Inventor
®
Series 10, Autodesk Inventor
®
Professional 10, AutoCAD Mechanical
®
2006, and AutoCAD
®
Electrical 2006.
The installation wizard walks you through the license agreements and
requirements for client components.
Overview
1 Install Autodesk Data Management server on a shared server. The Content
Center libraries are installed.
2 Install Autodesk Inventor 10 on the local computers.
3 Select the Minimum option. The Content Center is installed without the
Content Center libraries on the local computer.
4 In Autodesk Inventor, specify the Computer Name to connect to in the
Content Center Configure Libraries dialog box.
Install Content Center libraries on a shared Autodesk Data Management server
1 Install the Web server, Internet Information Services (IIS) on the server. IIS
must be installed on the computer before installing Autodesk Data
Management server. For more information, refer to chapter 2, “Setting up
and Installing Autodesk Vault” on page 9.
2 Insert the Autodesk Data Management Sever CD, and click Next to continue.
The Autodesk Data Management Server optionally installs the Autodesk
®
Vault Client and Content Center libraries
3 Install the Autodesk Data Management Server and the Content Center
libraries.

Installing the Server and Client Components
|
105
Configure local computers to access shared libraries
1 Click Autodesk Inventor 10 located on the Install tab and click Next to
continue.
2 In the Content Center library users permissions dialog box, specify your level
of access to the Content Libraries:
■
User can make changes to the Content Center libraries.
■
User can make changes to the Content Center libraries and publish new
parts.
■
Use has read only access to the Content Center libraries.
3 In Select Installation Type, specify the Minimum option on the local
machine. You specify the computer name of the server to connect to later in
the Configure dialog box within Autodesk Inventor. There are 3 installation
options:
Minimum
Installs Content Center. No Content Center libraries are
installed on the local computer.
Complete
Installs Content Center and Content Center libraries on
the local computer.
Custom
Select which features and applications to install.
NOTE
If you select the Custom option, you can further specify features to be
installed or not installed on the local computer.
4 In the Ready to Install Application dialog box, click Next to install Autodesk
Inventor.
5 Start Autodesk Inventor.
6 Open an Autodesk Inventor assembly file and click Content Center in the
Assembly panel.
7 Click the Configure Libraries button.
8 In the Content Center Configure libraries dialog box, click Add Libraries to
specify the server to connect to.
9 Specify the machine name of the server to connect to, and then click the
check button
10 Click the pull-down arrow and select a library.
11 Click Save.

106
|
Chapter 7 Installing Autodesk Content Center Libraries
Working As a Single User
A single user can install and run Content Center and the libraries on the
same workstation.
Install Content Center and all the libraries on the same workstation
1 Click Autodesk Inventor 10 located on the Install tab and click Next to
continue.
2 In the Installation Type dialog box, click the Complete button on the Select
Installation Type screen.
Install Content Center where all users have exactly the same configurations
This applies to all license types.
1 On the Autodesk Inventor installation CD (disk 1 of 3), select Network
Deployment and proceed with installation.
2 You can build a deployment image that will:
■
Install silently on any system. All options are preset during the process of
creating the deployment image. The user cannot change the
configuration.
■
If the install is not silent, the defaults for each option are set to what is
selected during the construction of the deployment image.
This image is suitable for sending installs to client workstations.
Removing Components
Removing Autodesk Inventor removes the read-only libraries. If the libraries,
InventorStandardContent and Parker, have been installed, they are deleted.
To completely remove Content Center libraries from your system, you must
uninstall the MSDE instance, which is shown in Add/Remove Programs as
Microsoft
®
SQL Server Desktop Engine (INVENTORCONTENT). In addition,
removing MSDE using Add/Remove Programs will not delete any user
databases (libraries) that may have been created. including the default
MyLibrary. Those files must be removed manually. These data files are stored,
by default, in the directory, C:\Program Files\Microsoft SQL
Server\MSSQL$INVENTORCONTENT\Data.
NOTE
To preserve modifications made to the default MyLibrary, make a back up,
using the Content Center Library Manager before reinstalling Autodesk Inventor.

107
8
In This Chapter
Managing Content
Center Libraries
In this chapter you learn about having a central server
that local machines can access when you install
Autodesk® Content Center libraries on the Autodesk®
Data Management Server.
■
Setting up shared libraries
■
Configuring included project
files.
■
Viewing library configurations
■
Using included projects to share
libraries

108
|
Chapter 8 Managing Content Center Libraries
Key Terms
Term
Definition
Configure Content
Center
Connects the Content Center to a set of libraries so that content can be instanced
into Autodesk
®
Inventor for reuse.
server
A computer that provides client stations with access to databases, files and
printers as shared resources to a computer network.
family
The basic component in the Content Center library is a family (part family or
feature family). A family contains related content (members) based on the same
underlying template(s). A family is the ultimate target part (feature) itself,
constituted by its size variations. A family cannot be subcategorized.
Families are arranged in categories and subcategories in Content Center Library. A
category is a logical grouping of part types.
library
A published collection of families which the user can add to the Content Center.

Setting
up
Shared
Libraries
|
109
Setting up Shared Libraries
Before beginning, designate an administrator who sets up the team members
with a shared project file (.ipj) configured to point to one or more shared
libraries on an Autodesk Data Management Server. Each team member can
create a personal project using the shared project file (.ipj) as a template.
If you connect to a vault database and the Content Center libraries database,
the administrator creates the vault project file first and makes it the active
project. Then the administrator configures the Content Center libraries in
the Configure Libraries dialog box.
Overview
1 Install the server and client components for a design team.
2 Create a common project file (.ipj) with the Content Center Configured so
that it points to a shared library.
3 In the Project dialog box, under Folder Options, specify a location for the
Content Center files.
4 Share the common project file (.ipj) with all the team members.
5 Each team member creates a personal project, using the shared project file
(.ipj) as a template.
NOTE
You cannot include a project file in an Autodesk
®
Vault project file.
Autodesk Vault does not support included project files.

110
|
Chapter 8 Managing Content Center Libraries
Install the server and client components
1 Install Autodesk Data Management Server and Content Center libraries on a
shared server.
2 On the local computers, each team member installs Autodesk Inventor.
Select the Minimum option so that the Content Center is installed without
the Content Center libraries.
Alternately, you can select Custom and specify additional features.
Create shared project (.ipj) file and configure Content Center libraries
1 In Autodesk Inventor, in the Projects dialog box, create a new project (.ipj)
file or select an existing project (.ipj) file.
2 Click the Edit Content Center Configuration button.
3 In the Configure Libraries dialog box, click the Add Library button.
4 In the Add Library dialog box, select Shared Library (Remote), Enter the
name of the Autodesk Data Management Server to connect to (for example,
SERVERNAME), and then click the check mark to connect.
5 Once the local computer successfully connects to the shared server, Library
Names is populated with the existing libraries on the shared server.
6 Select a library name to add to the shared Content Center, and then click OK.
NOTE
Only 1 library at a time can be added. For each additional library you
need to add, repeat Steps 4 through 6 in this section.
7 In the Project dialog box, expand Folder Options.
When you place and edit a standard library part, the part is copied from the
server to the location specified in Content Center files in Folders Options. You
can specify a path to a network location or to a location on the local drive.
■
Specify a network location on each of the local machines if you want each
user to automatically get the most recent library content. Using a shared
location ensures that everyone in the shared environment is always
accessing the same standard part.
■
Specify a location on the local drive on the local machines if you want to
allow users to decide when they want to update their libraries. In this
scenario, a user must click Refresh Standard Components on the assembly
panel to get the latest content.

Setting
up
Shared
Libraries
|
111
8 When you configure a Content Center library, the Content Center's library
configuration is stored in the active Autodesk Inventor project file (.ipj). The
administrator must share the .ipj file with the other members of the design team.
NOTE
You can view the Content Center library configuration that is being
stored in the project file (.ipj) by clicking on the Edit Content Center
Configuration button in the Project dialog box.
9
Copy the configured project file (.ipj) to a shared location and request each
team member map a drive to this location on their local computer.
Create a personal project file that specifies a path on the user’s local machine,
and use the common project (.ipj) file that is configured with the shared
libraries as a template. Each team member can access the library parts and
create personal filters and favorites.
NOTE
When you create a new project using the project editor, and select the
common project before you click the New button, by default, the new project
created by the wizard uses the selected project as a template. It has the same
library definitions as the template project.
Configure local project settings
1 In Autodesk Inventor, in the Project dialog box, add the common project file
(.ipj) created by the administrator, to your projects:
2 Click Browse. In the Choose Project file dialog box, browse to and then select
and open the common project file (.ipj) created by the administrator.
3 In the Project dialog box, highlight the common project file.
4 Click New.
5 Create a new personal project file.
6 Click Finish to create the file, and then specify a path for the personal project.
7 Double-click the personal project you just created to make it the active project.
8 Click Save to save the project file settings.

112
|
Chapter 8 Managing Content Center Libraries
Preview the Content Center libraries configuration on a local machine
1 In Autodesk Inventor, in the Project dialog box, make your personal Content
Center library project the default.
2 Click the Edit Content Center Library Configuration button.
3 The configured Content Center libraries display.
Sharing Libraries Using Included Project Files
An alternate method for sharing libraries across design workgroups is to
include the common project file in a personal project file.
Libraries installed on the Autodesk Data Management Server are installed as
read-only. Team members can create a personal project file that specifies a
path on their local machine, and then include the common project (.ipj) file
that is configured with the shared libraries. Each team member has access to
library parts and can make changes to them.
NOTE
You cannot include a project file in an Autodesk Vault project file.
Autodesk Vault does not support included project files.
Before beginning, designate an administrator who will set up the team
members with a shared project file configured to point to a shared library on
an Autodesk Data Management Server. Each team member can then create a
personal project file, and then point to the common project as an Included
Library.
Share libraries across design workgroups using an included project file
1 Install the server and client components for a design team.
2 Create a common project file with the Content Center configured so that it
is pointing to a shared library.
3 Each team member creates a personal project file, and then includes the
common project file in the default project settings.

113
9
In This Chapter
Maintaining Content
Center Libraries
In this chapter, the administrator learns how to use the
Content Center Library Manager to perform Content
Center Library administrative tasks.
■
Performing Content Center
Library Manager tasks

114
|
Chapter 9 Maintaining Content Center Libraries
About Content Center Library Manager
Use the Content Center Library Manager to perform Content Center Library
administrative tasks. The Content Center Library Manager manages libraries
locally. It manages the libraries that are installed on the given machine.
Access the Library Manager locally or on a Autodesk
®
Data Management
Server.
Run the Content Center Library Manager on the machine hosting the
libraries: Either a local Autodesk Inventor
®
installation, or an Autodesk Data
Management Server.
The Content Center Library Manager displays the list of Content Center
libraries currently installed on the server.
NOTE
An MDF and an LDF file comprise one library and need to be
maintained as a pair for both Import and Export.
Content Center Library Manager Tasks
Use Content Center Library Manager to create, manage, and delete libraries.
Using the Export command, you can create a back-up of an existing library
on the server You can also use it to create a copy of an existing library so that
is may shared with others accessing libraries from a different server. Select a
library from the list to manage it.
A Content Center library is contained within a SQL Server (MSDE) database.
On disk, this database is stored using a pair of files – with the extensions MDF
and LDF. These files together comprise one library and need to be maintained
together.

Content Center Library Manager Tasks
|
115
Import and Export
You can import and export existing libraries.
Import copies library files (a pair of MDF and LDF files) into the standard SQL
Server (MSDE) data files directory, and then performs an attach operation to
register them with SQL Server and make them available as a Content Center
Library.
For example, use Import to copy library files from a 3rd party supplier to the
Content Center Library Manager you are administrating.
Export copies a set of library files that are in the Content Center Library
Manager to a specified location. You can specify a folder on the same
machine, or a location available on the network.
NOTE
For Import, use the Library Name dialog box to specify the library
name, which may be different than the name of the MDF file.
Create Content Center Libraries
You can create a new Content Center library, which can be configured for use
in a local or remotely served Autodesk Inventor project. This is an alternative
to creating libraries from within Autodesk Inventor.
Attach
Use Attach to create a new Content Center library from a pair of existing data
files already on the server. In the Library Name edit box, specify the library
name. It may be different than the name of the MDF file.
Removes Content Center libraries from the list of available libraries in the
Content Center Library Manager dialog box. Detach does not delete them
from the database. The libraries can be re-attached and made available using
the Attach command, or can be manually copied to another location, for
example, to be backed up, or moved to another machine.

116
|
Chapter 9 Maintaining Content Center Libraries
Detach
Removes a Content Center library from the list of available libraries in the
Content Center Library Manager dialog box. Detach does not delete its data
files (MDF and LDF) from the server. The data files can be re-attached and
made available at a later time using the Attach command, or can be manually
copied to another location, for example, to be backed up, or moved to
another machine.
Delete
Detaches the selected library from the database server, and deletes the data
files (.mdf and .ldf) from the hard disk. All data contained in the library is
permanently deleted.
Properties
Displays high-level information about the library and its data files. Allows
user libraries to be marked as Read-Only or Read-Write.

Index
|
117
Index
A
Add File command
,
Add Files dialog box
,
Advanced Search dialog box
,
Attachments dialog box
,
attachments, file
,
,
AutoCAD based products
check files in and out
,
refreshing models
,
vaults, logging in
,
AutoCAD files
,
AutoCAD Vault ARX
,
Autodesk Inventor
Autodesk Vault add-in
,
Content Library
,
vaults, logging in
,
Autodesk Vault
add-in for Autodesk Inventor
,
adding users
,
components
,
configurations
,
installing
,
legacy projects
,
maintaining
,
master vaults
,
project files, setting up
,
setup for design teams
,
single user setups
,
starting the first time
,
system requirements
,
upgrading versions
,
Autodesk Vault Explorer
,
searching for data
,
starting in AutoCAD based products
,
Autodesk Vault Explorer (continued)
starting in Inventor
,
view panes, customizing
,
Autodesk Vault Installation Wizard
,
Autodesk Vault Manager
,
B
backups, taping
,
Browse for Folder dialog box
,
Browse for Vault Folder dialog box
,
browser, vault
,
C
CAM files
,
Check (*.*) into the Vault dialog box
,
,
check files out and in
,
,
Check In dialog box
,
Check Out dialog box
,
checkouts, undoing
,
child files
,
client components
,
command line switches
,
comments, adding to files
,
Content Library
,
Customize View dialog box
,
D
data
customizing searches
,
managing
,
vaulting existing
,

118
|
Index
design data
adding in Inventor
,
managing
,
design teams
,
,
Autodesk Vault setup
,
setups for multiple
,
dialog boxes
Add Files
,
Advanced Search
,
Attachments
,
Browse for Folder
,
Browse for Vault Folder
,
Check (*.*) into the Vault
,
Check In
,
Check Out
,
Customize View
,
Get Latest Version
,
Get previous version
,
Log into Vault
,
Map Folders
,
New Folder
,
New Library folder
,
Open
,
Pack and Go
,
Project Folder Mapping
,
,
Select Vault Location
,
F
FEA files
,
file status icons
,
file stores
archiving and restoring
,
default paths
,
restoring
,
file versions
displaying history
,
,
getting latest
,
getting previous
,
files
adding
,
adding comments
,
attaching to other files
,
Autodesk Inventor
,
checking in and out
,
checking out
,
,
checkouts, undoing
,
children, parent, sibling
,
editing
,
local copies
,
managing
,
,
,
moving
,
non Inventor, adding
,
files (continued)
removing attachments
,
used in models
,
viewing history in Inventor
,
,
folder structures
,
changing
,
creating
,
folders
adding library
,
creating
,
default working
,
G
Get Latest Version dialog box
,
Get Previous Version dialog box
,
H
history of files, viewing in Inventor
,
I
icon reference, file status
,
L
legacy projects
,
libraries
,
folders
,
setting up
,
vault projects
,
versions
,
Log into Vault dialog box
,
login names, Autodesk Vault
,
M
Map Folders dialog box
,
master vaults
,
Microsoft Excel files
,
Microsoft Word files
,
models, files
,
models, refreshing
,
MoveStore command
,
N
New Folder dialog box
,
New Library folder dialog box
,

Index
|
119
O
Open dialog box
,
P
Pack and Go dialog box
,
parent files
,
project files
vault enabled
,
Project Folder Mapping dialog box
,
projects
,
converting to vaults
,
legacy
,
vault enabled
,
R
Refresh from Vault command
,
Reload all Xrefs command
,
root directory in vaults
,
S
search paths, library
,
,
,
Select Vault Location dialog box
,
server components
,
sibling files
,
single user setups
,
status of files
,
structures, folder
,
U
Undo Checkout command
,
V
vault add-in, Autodesk Inventor
,
vault backups
,
vault databases
restoring
,
vault enabled projects
,
vault projects
folders, creating new
,
legacy
,
libraries
,
mapping working folders
,
workspaces
,
vaults
accessing in AutoCAD based products
,
accessing in Autodesk Inventor
,
adding existing data
,
adding non Inventor files
,
adding users
,
attaching and detaching
,
checking in and out
,
checking in files in Inventor
,
checking out files in Inventor
,
checkouts, undoing in Inventor
,
configuring
,
creating folders
,
folder structures
,
independent
,
master
,
moving file locations
,
multiple design team setups
,
project files, setting up
,
recovering
,
refreshing models
,
restoring databases
,
setting up libraries
,
user access
,
working with files
,
version control
,
versions, tracking
,
view panes in Vault Explorer, customizing
,
W
Windows workgroups
,
workflows
AutoCAD Electrical
,
AutoCAD Mechanical and Mechanical
Desktop
,
working folder
,
working folders
,
,
workspaces
,
existing, mapping
,
projects
,
X
Xref Manager
,
Xref Manager Enhanced Secondary Window
,

Document Outline
- Contents
- 1 Autodesk Data Management Server
- 2 Setting up and Installing Autodesk Vault
- 3 Using Autodesk Vault Explorer
- Key Terms
- Working with Autodesk Vault Explorer
- Managing Files with Autodesk Vault Explorer
- Managing Versions
- Performing Searches
- Packaging Files with Pack and Go
- Customizing View Panes in Vault Explorer
- 4 Performing Vault Tasks in Autodesk Inventor
- Key Terms
- About the Vault Add-in for Autodesk Inventor
- Organizing Files
- Working with Legacy Projects
- Logging into Vaults in Autodesk Inventor
- Setting Up Vault Enabled Projects
- Mapping Folders
- Working with Files in Vaults
- 5 Using Vaults in AutoCAD-based Products
- 6 Maintaining Vaults
- 7 Installing Autodesk Content Center Libraries
- 8 Managing Content Center Libraries
- 9 Maintaining Content Center Libraries
- Index
Wyszukiwarka
Podobne podstrony:
The Truth About Managing Your Career
Managing Your Money For All Ages
Money Management for Women, Discover What You Should Know about Managing Your Money, but Don t!
Managing your money
w back02A Complete Guide Google Apps and Your Data Five Threats that Google Can t Defend Against,
how to protect your data
6822 Protecting your data with Windows 10 BitLocker
Perfect Phrases for Managing Your Small Business
Managing Roaming User Data Deployment Guide
CW2006EX Mill Turn data sheet web
3 Data Plotting Using Tables to Post Process Results
PAT DS 350 Graphic Modular GM Service Data
An%20Analysis%20of%20the%20Data%20Obtained%20from%20Ventilat
Homework Data Structures
cx5500 data sheet enus
data
Flatten Your Abs
2 3 Unit 1 Lesson 2 – Master of Your Domain
więcej podobnych podstron