FIXING TO LATHE & PLASTER
There are many
fixings
on the market today and yet, as far as we are aware, no
fixing is available for a good, solid, reliable fix to lathe and plaster. It’s a popular
question on DIYdoctor and our many years of experience have taught us not to take
chances with wall plugs, toggles and plasterboard fixings. Please see our project on
fixing to plasterboard
for more information.
A section of a lathed wall with plaster removed.
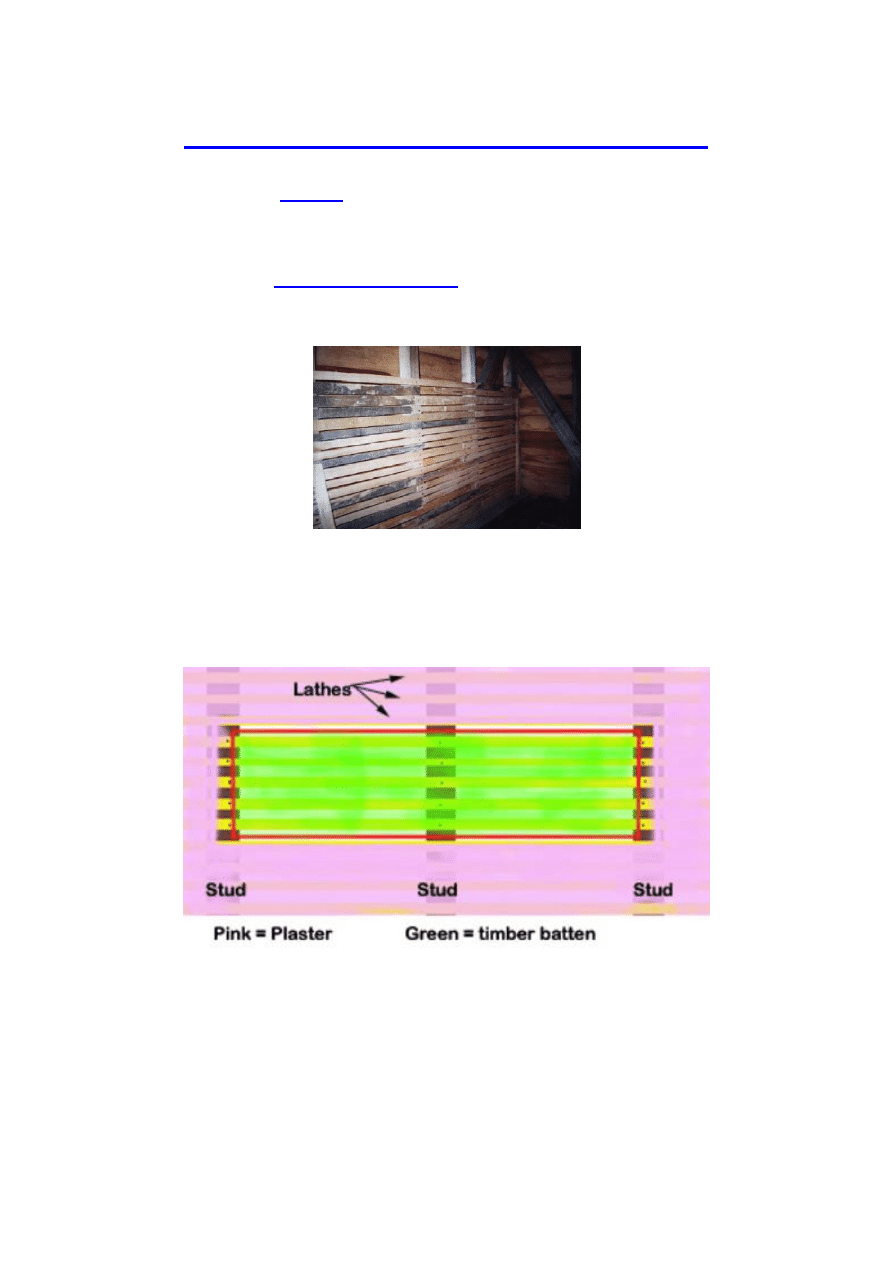
Below is a section of a lathe and plaster wall face on. You can see the pink plaster, which is
pushed onto and into the yellow lathes, which in turn are fixed at narrow spacing to the
upright timber studs.
( Not to any scale)
A section of the wall above where you can see how the plaster is pushed into the lathes.

(not to any scale)
Lathe and plaster was used as a wall finish long before plasterboard and took over
from the centuries old Wattle and Daub finish. Wattle was the name for twigs and
branches that were interwoven between the upright timber posts that formed the
framework of a dwelling. Daub was the name given to the various forms of mud, clay,
lime, manure or other locally available, easily workable fillers that could be pushed
smoothed onto the wattle. The daub was pushed, usually by hand, into the web of
branches forming a weatherproof surface. Lathe and plaster is an extension of that
idea and was used long after the invention of plasterboard by Augustino Sackett in
approximately 1888. Plasterboard took a while to catch on and was introduced to the
UK in 1917. It became widely used and started to replace Lathe and Plaster by the
1930’s.
The plaster is pushed onto and into the timber lathes, which have been nailed to
upright studs. Gaps are left between the lathes to allow the plaster to be pushed in.
When it sets it clings to the lathes making a fairly strong surface. However, most lathe
and plaster walls and ceilings in this country are at least 40 years old and often past
their “sell by” date. The lathes are very flexible allowing the wall to move, the plaster
by now, often crumbling behind and in between the lathes. The only solid fixing
therefore is to replace some of the lath and plaster with a solid surface to fix to. This
involves making a hole in the wall between two studs. The diagram above shows the
timber batten across 3 studs, but between two is fine. Using a hobby knife or sharp
chisel, cut out your hole and cut the lathes back onto the timber studs. The plaster and
lathes are usually about 1 inch thick and a batten size of 2 inches by 1 inch PAR or
PSE (These are timber merchants abbreviations for Planed All Round & Planed,
Square Edge which both mean the timber has been planed to a finish and is not in the
rough “Sawn” state) is sufficient for fixing most things. You can increase the width of
the timber by as much as you like to fix items like coat hooks and microwave brackets
which you would not ordinarily be able to fix to a lathe and plaster wall.

Cut the hole as closely as you can to the size of the batten but it is very likely you will
have gaps between the batten and the plaster surrounding it. Before you fix the batten
it is a good idea to paint the edges with an undiluted solution of PVA adhesive and
bang a few 20mm galvanised staples in along the edges. When the batten is fixed you
can then fill around the perimeter with either plaster, polyfiller or flexible filler from a
tube. The choice of flier will depend on the size of gap, but the PVA will allow it to
stick to the edges of the batten and the staples will give it reinforcement.
Hopefully, whatever it is you need to fix to the wall will cover the batten (which of
course you can paint to match the wall) but if not, and given that its unlikely your
painting match will be “seamless”, sometimes it’s a good idea, instead of trying to
disguise the batten, to make a feature out of it by painting it an entirely different
colour and even putting some beading round it.
For those who are experienced in DIY it is possible to use a slightly thinner batten, or
notch the batten into the studs a little, and cover the batten with plasterboard which
can then be plastered right up to the edges of the existing plaster. This makes the
fixing batten invisible.
Wyszukiwarka
Podobne podstrony:
Fixing to plasterboard and plasterboard fixings
verbs related to fixing and cleaning wordsearch
Introduction to VHDL
Biopreparaty co to
Co to za owoc
Let´s go to England Interm
Przemyśl to
CHCESZ SIĘ ODCHUDZIĆ TO NIE OGLĄDAJ TEGO !!!!!!!!!!
Klastry turystyczne, pochodzenie nazwy, co to
higiena to nie tylko czystośc ciała
EDoc 6 Co to jest podpis elektroniczny slajdy
więcej podobnych podstron