34
CORNER CABINET
Copyright 2004 Martian Auctions
139
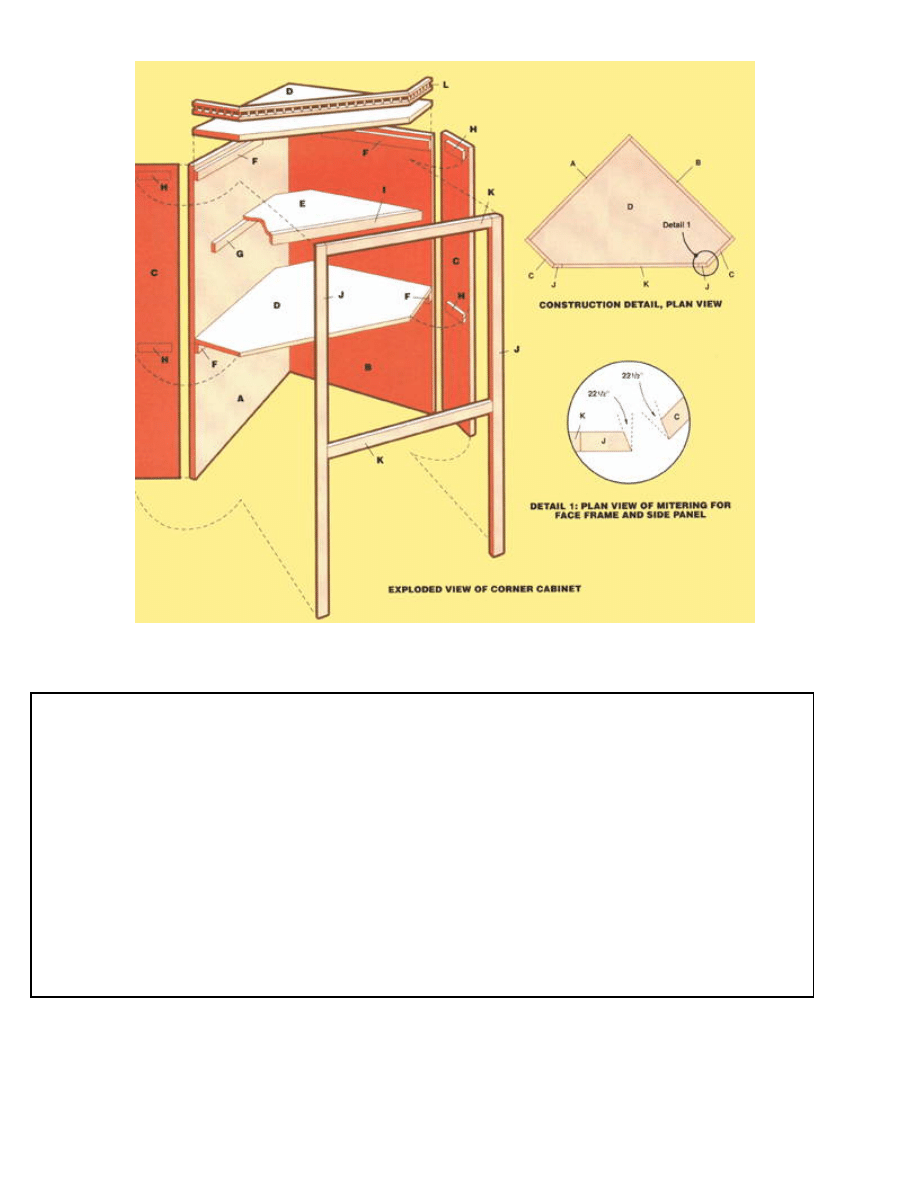
Key
Part
Material
Pieces
Size
A
Left back panel
3/4" oak plywood
1
39" Ã?? 66"
B
Right back panel
3/4" oak plywood
1
38 1/4" Ã?? 66"
C
Side panels
3/4" oak plywood
2
10" Ã?? 66"
D
Desktop and top panel
3/4" oak plywood
2
38 1/4" Ã?? 38 1/4"
E
Shelf
3/4" oak plywood
1
34" Ã?? 34"
F
Cleats for desktop, top panel
1 Ã?? 2
4
31"
G
Cleats for shelf
1 Ã?? 2
2
27"
H
Cleats on side panels
1 Ã?? 2
4
6"
I
Shelf edging
1 Ã?? 2
1
51 1/2"
J
Face frame stiles
1 Ã?? 2
2
66"
K
Face frame rails
1 Ã?? 2
2
37 1/2"
L
Decorative top trim
spindle rail
5 linear ft.
Copyright 2004 Martian Auctions
140
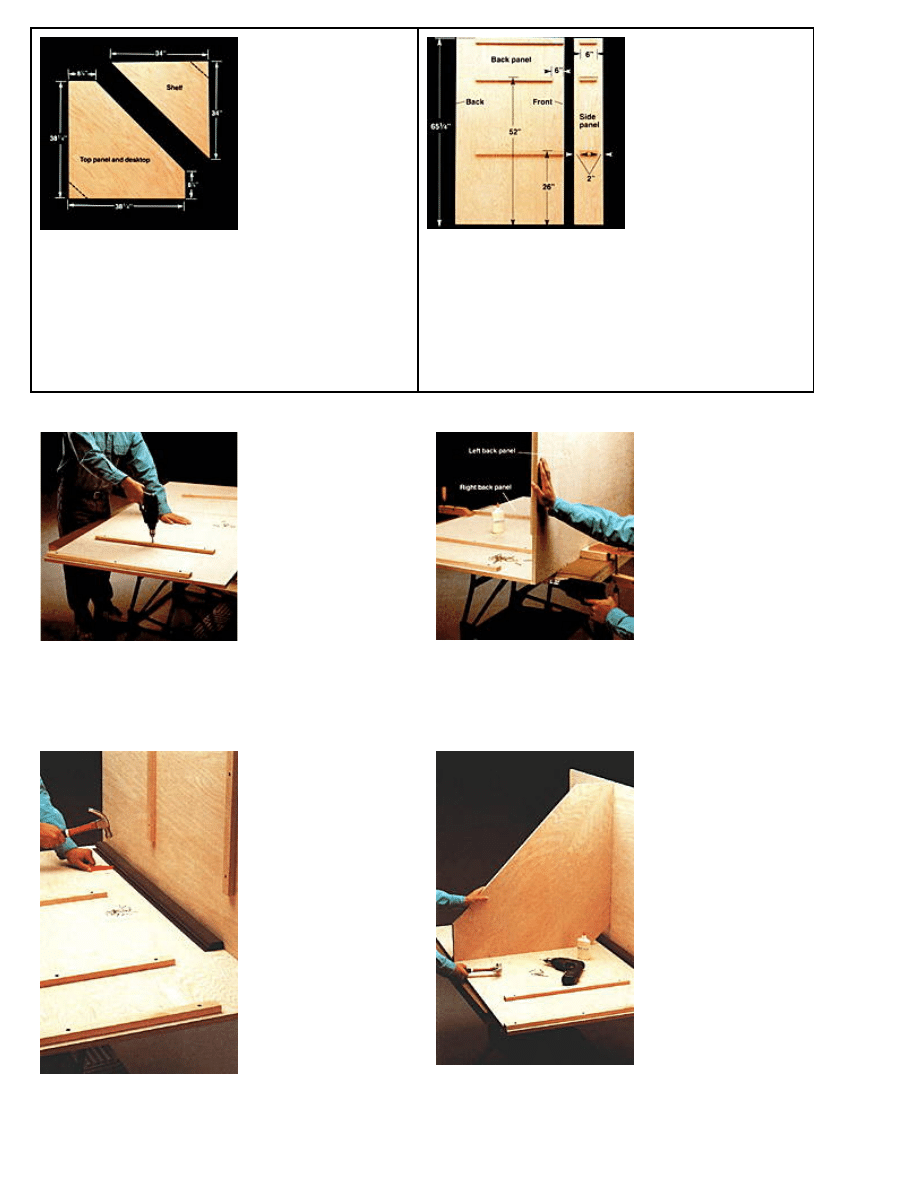
Desktop, top panel, and shelf are made from 3/4"
finish-grade plywood. Use a circular saw and a
straightedge guide to cut the pieces to the
dimensions shown. If you plan to use the cabinet as a
computer work center or an entertainment center,
cut off the back corners of the desktop and shelf (but
not the top panel) to provide ventilation and space
for routing electrical cords.
Back panel and side panels have 1 × 2 hardwood
cleats to hold the desktop, shelf, and top panel. Attach
them to the panels with glue and 1 1/2" screws driven
into counterbored pilot holes. Position cleats according
to dimensions shown. NOTE: If you wish to make the
shelf the same size as the desktop, add shelf cleats to
the side panels (dotted line).
1. Measure and cut back panels (left panel overlaps
right panel, so it is 3/4" wider than right panel). Cut and
attach 1 × 2 cleats. Drill counterbored pilot holes in
cleats, then attach cleats with glue and 1 1/4" screws.
2. Clamp right back panel (38 1/4" wide) to your
workbench, then apply glue to back edge. Butt left
panel (39") against glued edge, and hold in place
with clamps. Join back panels by drilling pilot holes
and driving 2" screws through butt joint.
3. Attach a plastic wire organizer to one back panel
edge, next to the corner joint, using 1" wire nails. (Skip
4. Measure and cut the desktop, then apply glue to
the tops of the desktop cleats mounted on the back
panels. Set the desktop on the cleats, then attach by
Copyright 2004 Martian Auctions
141
this step if you do not plan to store electronic equipment
in the corner cabinet.)
drilling pilot holes and driving 1 1/4" finish nails
every 8".
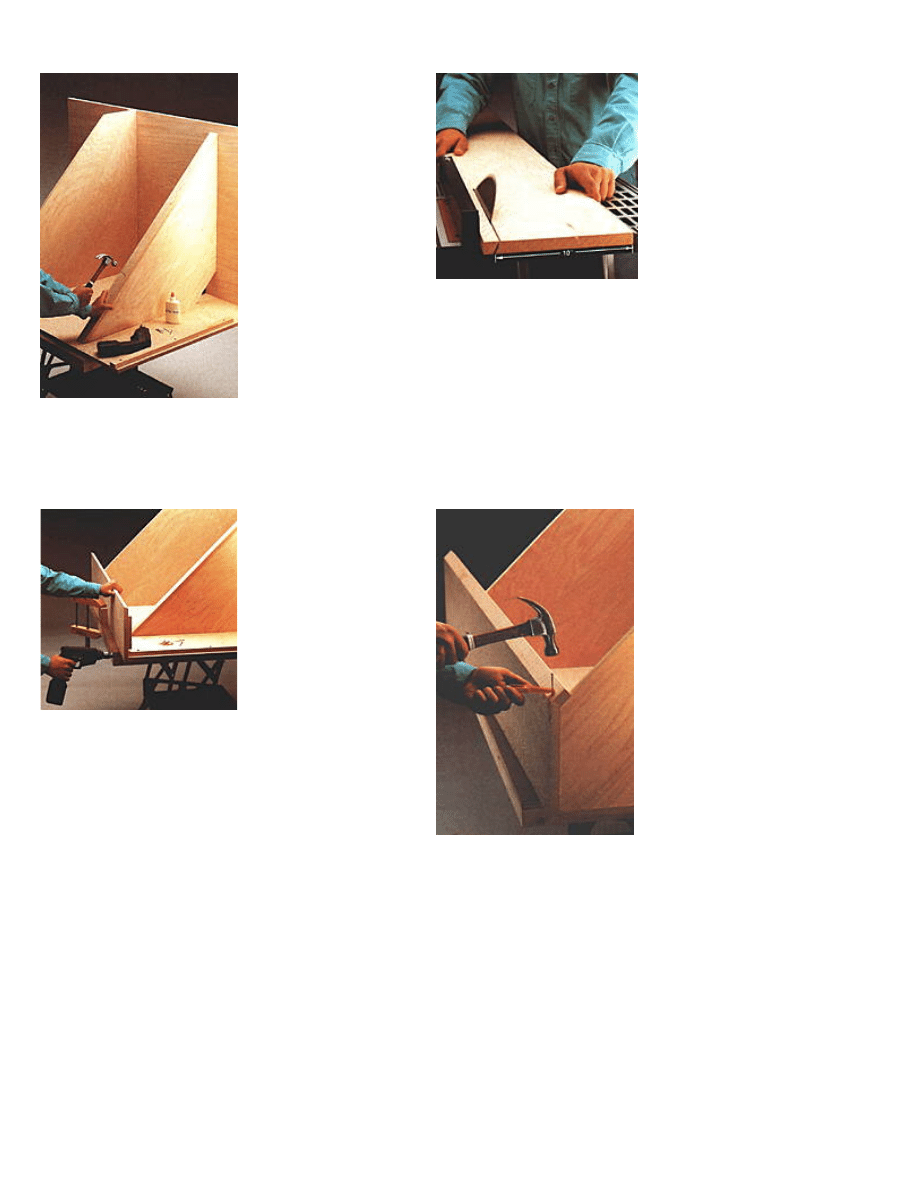
5. Measure and cut shelf, then install on shelf cleats
with glue and 1 1/4" finish nails. Measure and cut a 1 ×
2 hardwood shelf edge with 45º mitered corners to fit
flush with top of shelf. Attach with 2" finish nails driven
through pilot holes.
6. Set a table saw blade to 22 1/2º blade angle, then
cut 10"-wide, 66"-long side panels, beveling the
front edge of each panel.
7. Attach 6" cleats to side panels using glue and 1 1/4"
finish nails, then attach side panels to back panels with
glue and 1 1/2" screws driven into counterbored pilot
holes. Cut top panel and attach to cleats with 1 1/4"
finish nails.
8. With table saw blade set to 22 1/2º, cut 1 × 2
face frame stiles (as in step 6). Apply glue to the
outside edge of each side panel, then attach stiles to
side panels using 2" finish nails driven through pilot
holes at 8" intervals.
Copyright 2004 Martian Auctions
142
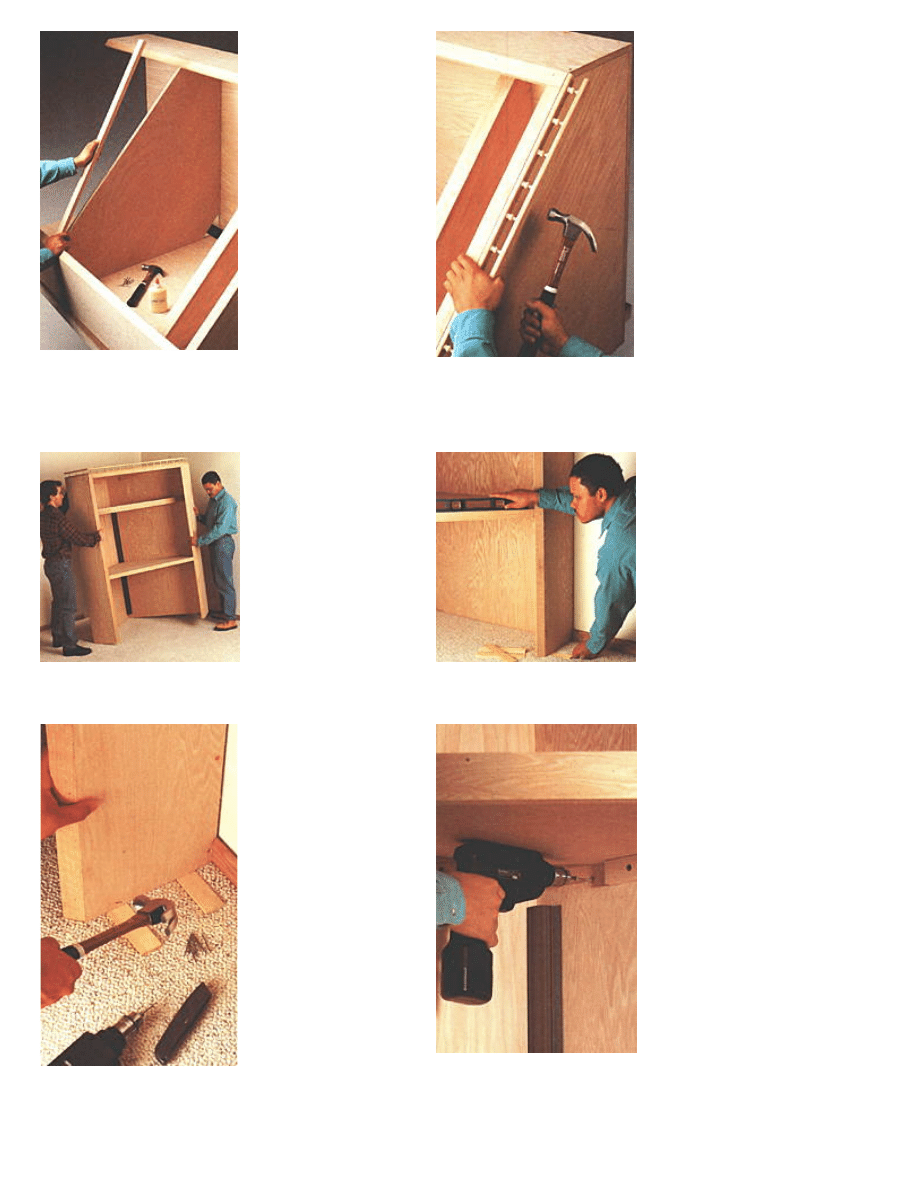
9. Measure and cut 1 × 2 face frame rails. Attach them
to edges of desktop and top panel, so upper edges of
rails are flush with the surfaces of the shelf and top,
using glue and 2" finish nails driven through pilot holes.
10. Measure and cut decorative trim to match the
angle of the face frame stiles and side panels, then
attach the trim to the outside edges at the top of the
cabinet, using finish nails.
11. With a helper, move cabinet into corner, flush
against the walls.
12. Shim below the side panels, if necessary, to
bring the cabinet to level.
13. Drill pilot holes, then toenail the cabinet to the floor
at shim locations, using 2" finish nails. Score the shims
with a utility knife, then break off the excess shim
14. Attach the cabinet to the wall with 3" screws
driven through the back panels and into wall studs.
Drive screws just behind or below shelf cleats to
keep them out of sight.
Copyright 2004 Martian Auctions
143
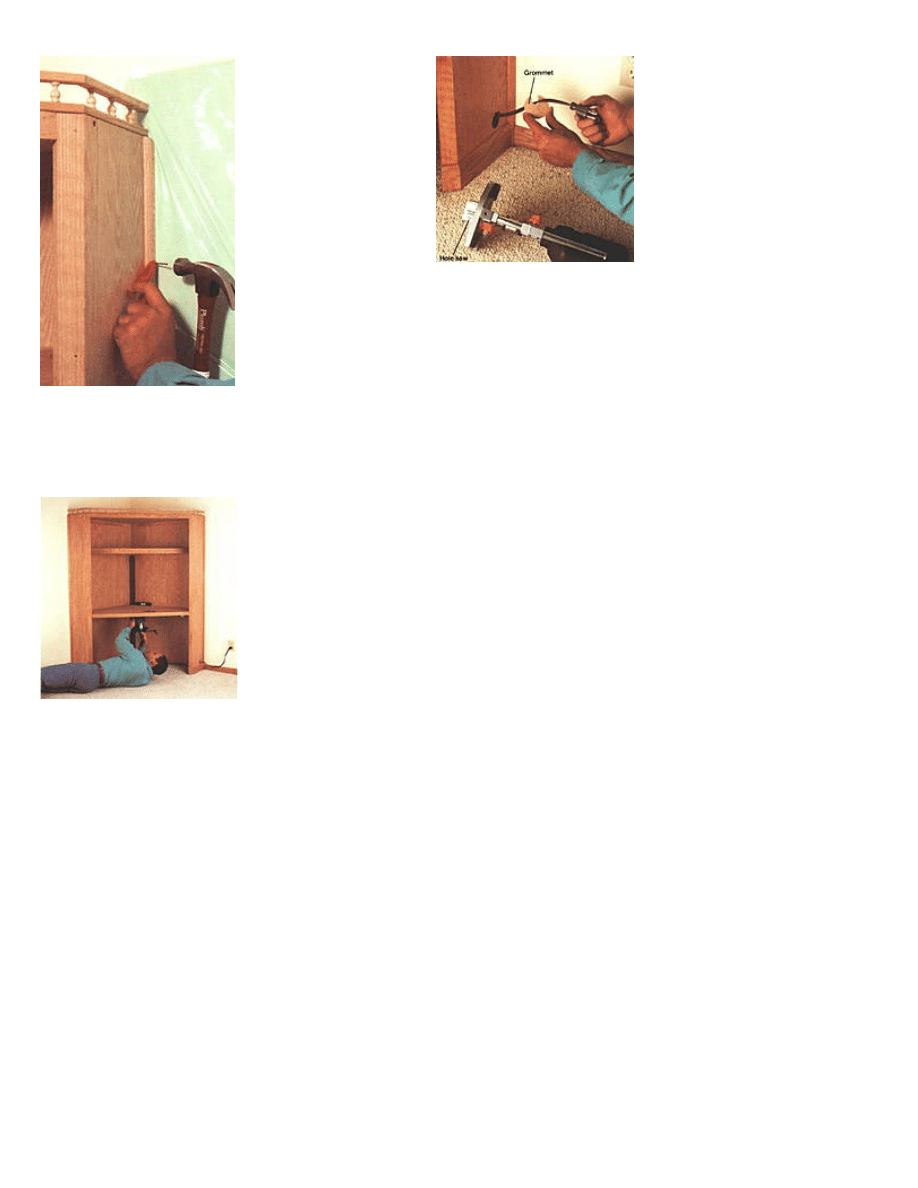
material.
15. Measure and cut base shoe molding to cover the
gap between the cabinet and the walls and floor, using 1
1/2" finish nails. TIP: To protect wall from oil or paint,
insert plastic between molding and wall as you attach
the molding.
16. Sand and finish cabinet then remove plastic. If
cabinet will contain electronic equipment, use a hole
saw or forstner bit to cut a hole for an outlet strip
cord in side panel, then feed cord through hole and
install a grommet.
17. Install any other hardware and computer desk
accessories, like a retractable keyboard slide, that
you need to complete your project.
Copyright 2004 Martian Auctions
144
Wyszukiwarka
Podobne podstrony:
Cabinet Corner Cabinet 2
Cabinet Pine Corner Cabinet
Cabinet corner cabinet
Cabinet corner cabinet
Cabinet Corner Cabinet 3
Corner Cabinet
Corner Buffet Cabinet(1)
Corner Buffet Cabinet(1)
Cabinet Corner Display Cabinet
Corner Buffet Cabinet(1)
cabinetmakerupho00sher
90 Degree Corners, The Final Turn
Plan and Install Kitchen Cabinets
bathroom cabinet szafka lazienkowa
Brydcliffe Cabinet
Display Cabinet 2
Corner Cupboard
box taurus cabinets manual
więcej podobnych podstron