A
M E R I C A
'
S
F
AVO R I T E
W
O O D WO R K I N G
P
L A N S
U - B I L D
B RO U G H T TO YO U BY
:
Bathroom Cabinet
Plan No. 915
Copyright U-Build, Inc., 2000.
All rights reserved. Printed in the U.S.A.
Bill of Material
Quantity
Size
Material
Item
1
3/4
” x
48
” x
96
”
birch plywood
F, G, P, S, W, BB, GG
1
1/4
” x
48
” x
48
”
birch plywood
E, O
25 BF*
3/4
”
birch
A, B, C, D, H, I, J, K, L, M, N, Q, R, T, U, V,
X, Y Z, AA, CC, DD, EE, FF, HH, II
2
1/8
” x
9 1/16
” x
29 7/16
”
tempered glass
sides
1
1/8
” x
14 9/16
” x
30 1/16
”
tempered glass
door
36
3/8
” x
2
”
dowels
12
5/16
” x
3/4
”
glass clips
12
1/4
”
shelf supports
2 pairs
3/4
” x
2 3/4
”
full back-to-back wraparound hinges
2
1 5/8
” x
1 3/4
”
cupboard latches
1 box
1
”
finish nails
1 box
1 1/4
”
finish nails
1 small can
wood filler
1 small bottle
wood glue
2 quarts
primer
2 quarts
white paint
*includes about 20% scrap
NOTES
1. Read all instructions and check materials before beginning work.
2. Read manufacturer’s instructions before operating equipment.
3. “Subassembly” means two or more boards put together to make a component of a larger part of the project.
4. Use wood glue on all joints.
5.
Always
wear safety glasses.
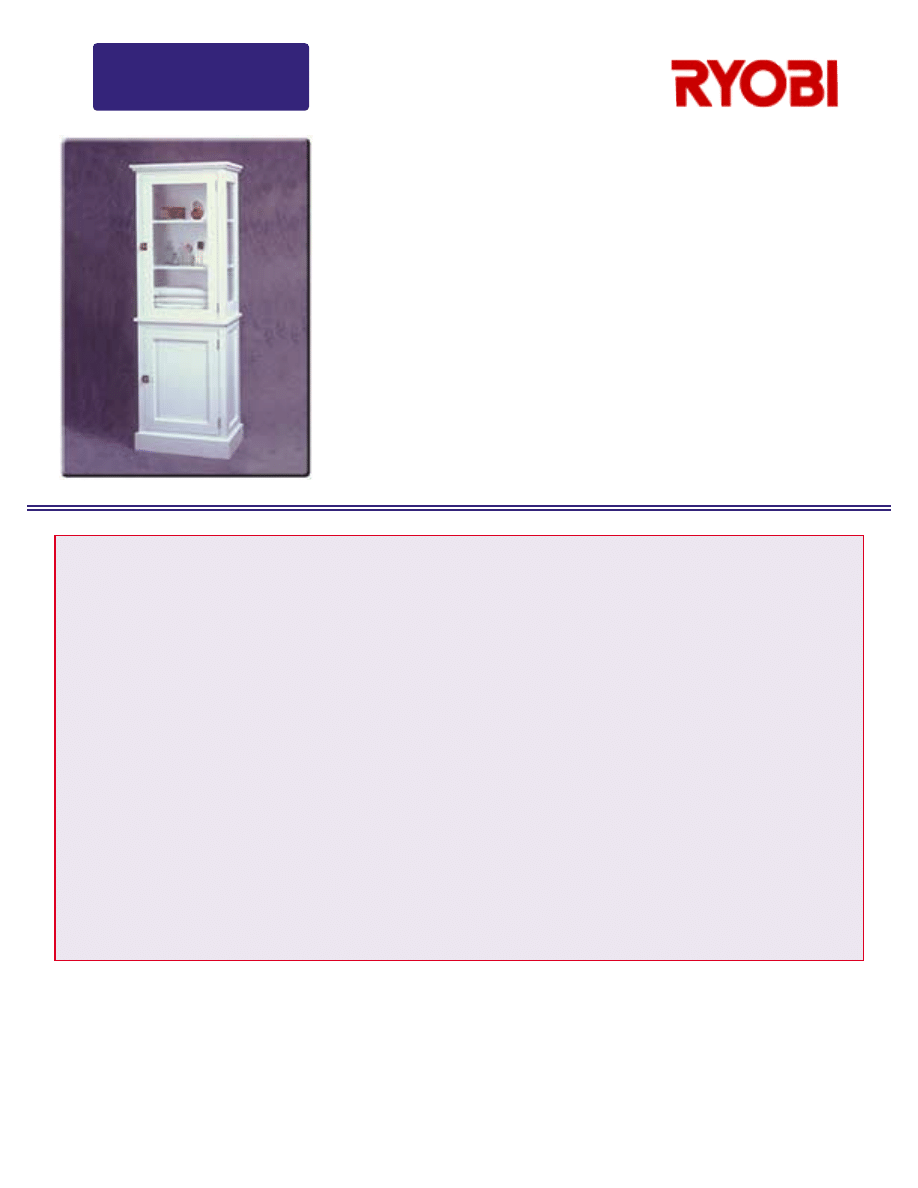
With storage space at a premium in most homes, antique medical cabinets have
become a popular (and expensive) way to add storage space to the bathroom.
This do-it-yourself version, based on a classic doctor’s cabinet, includes the
gleaming display space, generous storage and bright white finish of the originals,
but without the expense of an antique.
Perfect for linens and toiletries, the project makes a great addition to the pow-
der room. With its clean lines and pleasing proportions, it’s also at home in the
kitchen or dining room as a handsome curio cabinet.
The bathroom cabinet measures 68 inches tall by 24 inches wide by 14 inches
deep.
Item
Qty
T
W
L
Material
A
2
3/4
”
2 3/8
”
30 3/4
”
birch
B
2
3/4
”
1 5/8
”
30 3/4
”
birch
C
2
3/4
”
2 3/8
”
8 3/8
”
birch
D
2
3/4
”
6
”
8 3/8
”
birch
E
2
1/4
”
9 1/8
”
23 1/8
”
birch plywood
F
1
3/4
”
20 1/2
”
30 3/4
”
birch plywood
G
1
3/4
”
11 5/8
”
20 1/2
”
birch plywood
H
2
3/4
”
1 5/8
”
30 3/4
”
birch
I
1
3/4
”
1 5/8
”
18 3/4
”
birch
J
1
3/4
”
5
”
18 3/4
”
birch
K
2
3/4
”
4
”
13 7/8
”
birch
L
1
3/4
”
4
”
23 1/2
”
birch
M
2
3/4
”
2 3/8
”
24
”
birch
N
2
3/4
”
2 3/8
”
13 7/8
”
birch
O
1
1/4
”
14 5/8
”
20
”
birch plywood
P
1
3/4
”
13 3/8
”
22 1/2
”
birch plywood
Q
2
1/2
”
3/4
”
13 7/8
”
birch
R
1
1/2
”
3/4
”
23 1/2
”
birch
Item
Qty
T
W
L
Material
S
1
3/4
”
11 5/8
”
20 1/2
”
birch plywwod
T
2
3/4
”
2 3/8
”
35 3/4
”
birch
U
2
3/4
”
1 5/8
”
35 3/4
”
birch
V
4
3/4
”
3 1/2
”
8 3/8
”
birch
W
1
3/4
”
20 1/2
”
35 3/4
”
birch plywwod
X
2
3/4
”
1 5/8
”
35 3/4
”
birch
Y
1
3/4
”
1 1/2
”
18 3/4
”
birch
Z
2
3/4
”
2 3/8
”
34 1/8
”
birch
AA
2
3/4
”
2 3/8
”
13 7/8
”
birch
BB
1
3/4
”
13 7/8
”
23 1/2
”
birch plywwod
CC
2
1/2
”
3/4
”
14 3/8
”
birch
DD
1
1/2
”
3/4
”
24 1/2
”
birch
EE
2
3/4
”
3/4
”
13 7/8
”
birch
FF
1
3/4
”
3/4
”
23 1/2
”
birch
GG
3
3/4
”
10 1/2
”
19 3/8
”
birch plywwod
HH
6
1/2
”
3/4
”
11 1/2
”
birch
II
3
1/2
”
3/4
”
20 3/8
”
birch
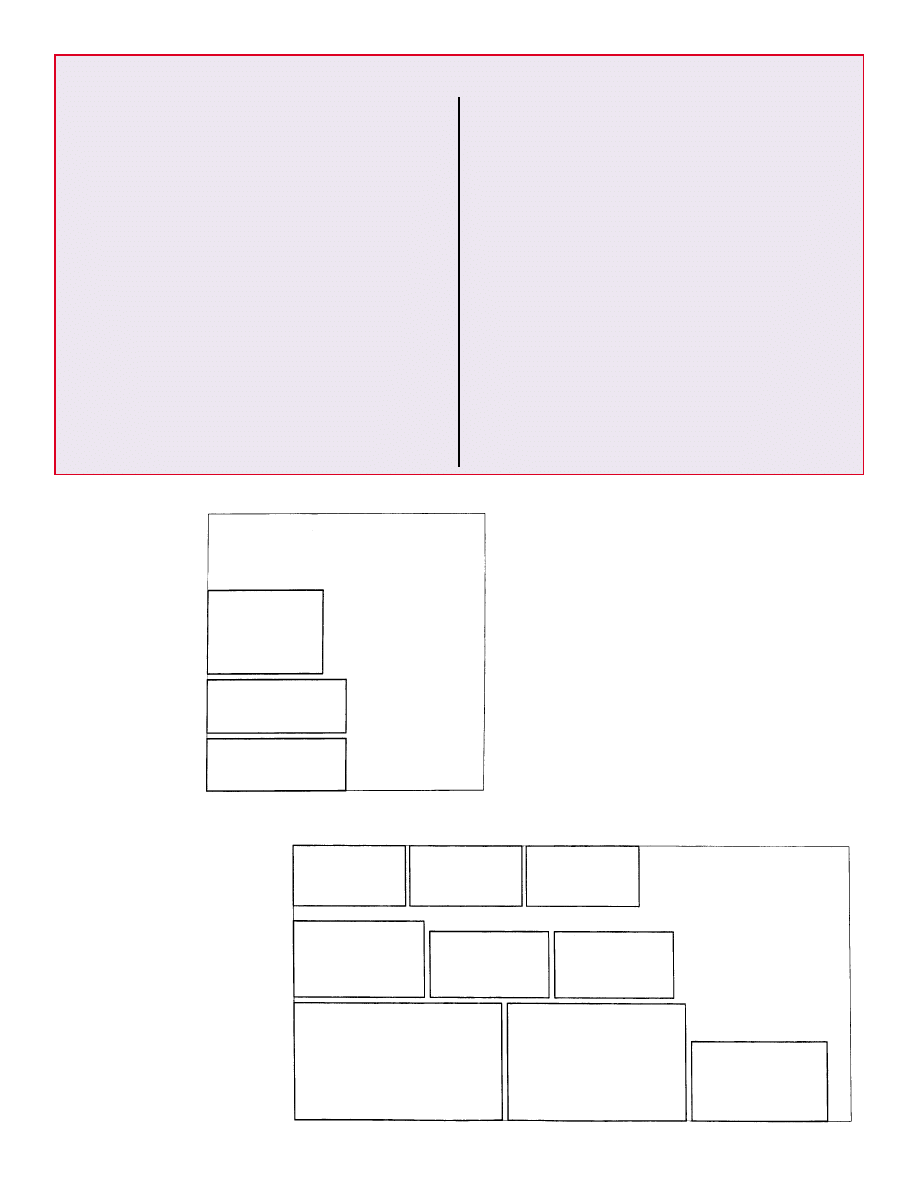
Cutting Schedule
1/4” x 48” x 48”
Birch Plywood Layout
3/4” x 48” x 96”
Birch Plywood Layout
O
E
E
GG
GG
GG
BB
P
G
S
F
W
Isometric
BB
AA
GG
II
DD
EE
FF
CC
HH
W
V
T
U
X
Z
S
P
Q
R
I
C
A
E
N
M
B
J
L
K
D
H
F
G
O
Y
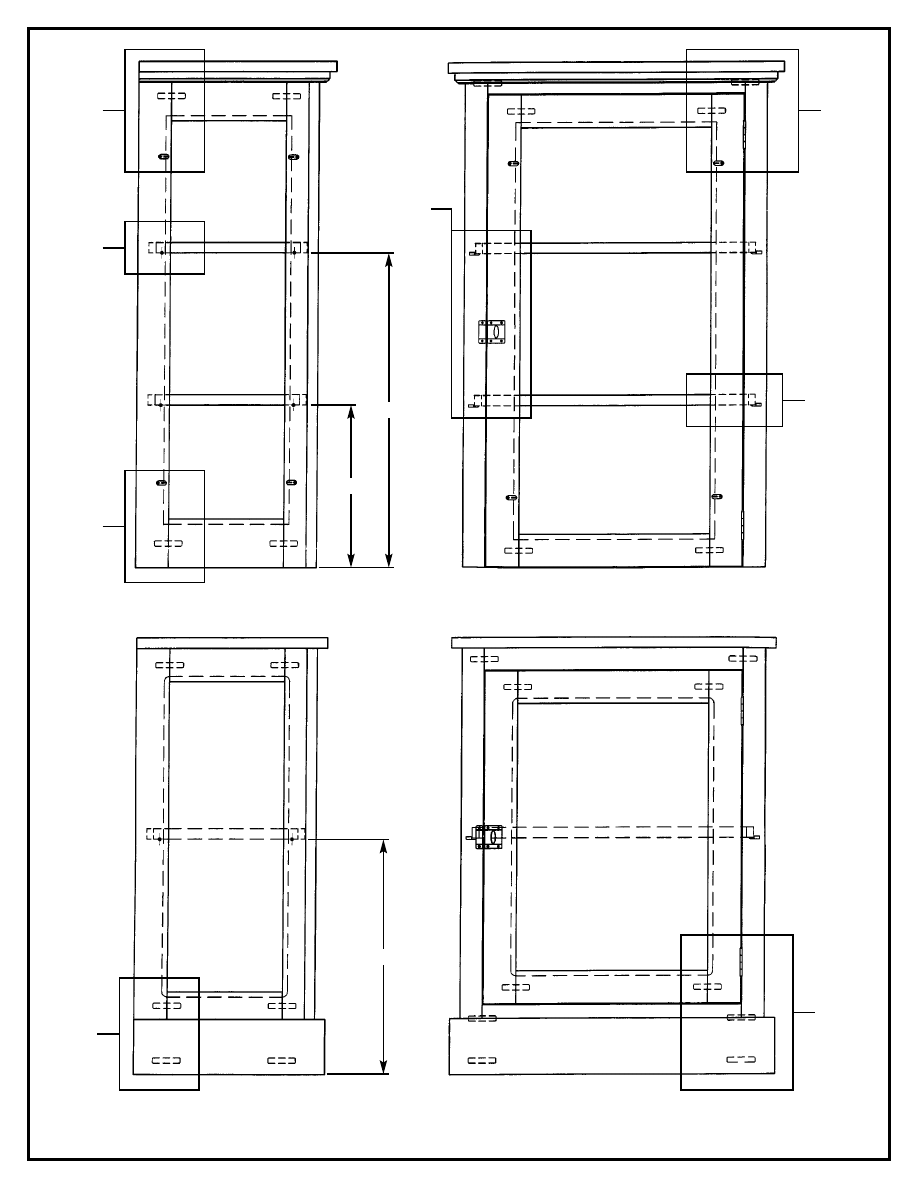
Side & Front Elevations
22 3/4”
11 3/4”
17”
See
Figure 1
See
Figure 5
See
Figure 6
See
Figure 7
See
Figure 8
See
Figure 2
See
Figure 3
See
Figure 4
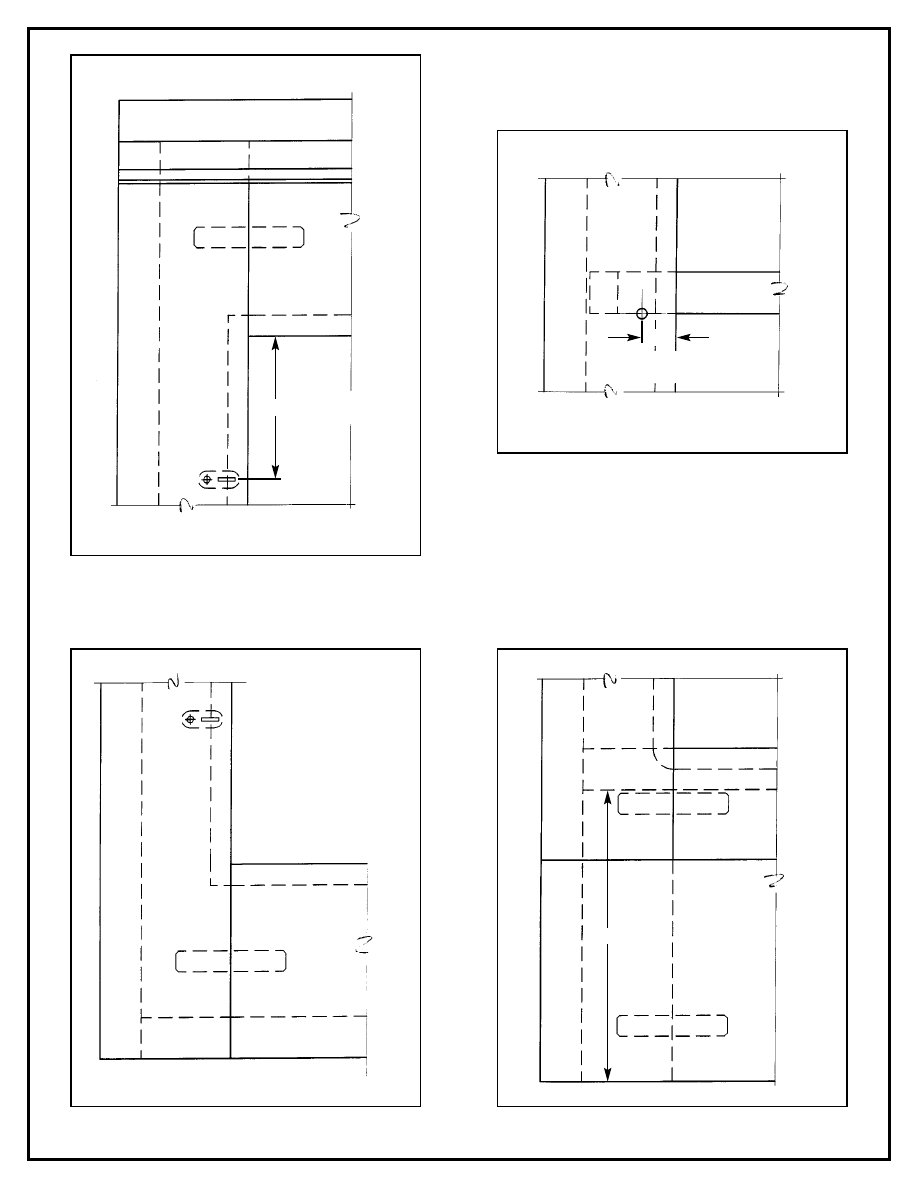
Figure 2
Figure 1
Figure 3
Figure 4
T
V
W
T
W
W
A
D
K
F
G
E
T
V
S
CC
HH
II
EE
Location of
shelf support typ.
Location of
glass clip typ.
2
5/8”
5 5/16”
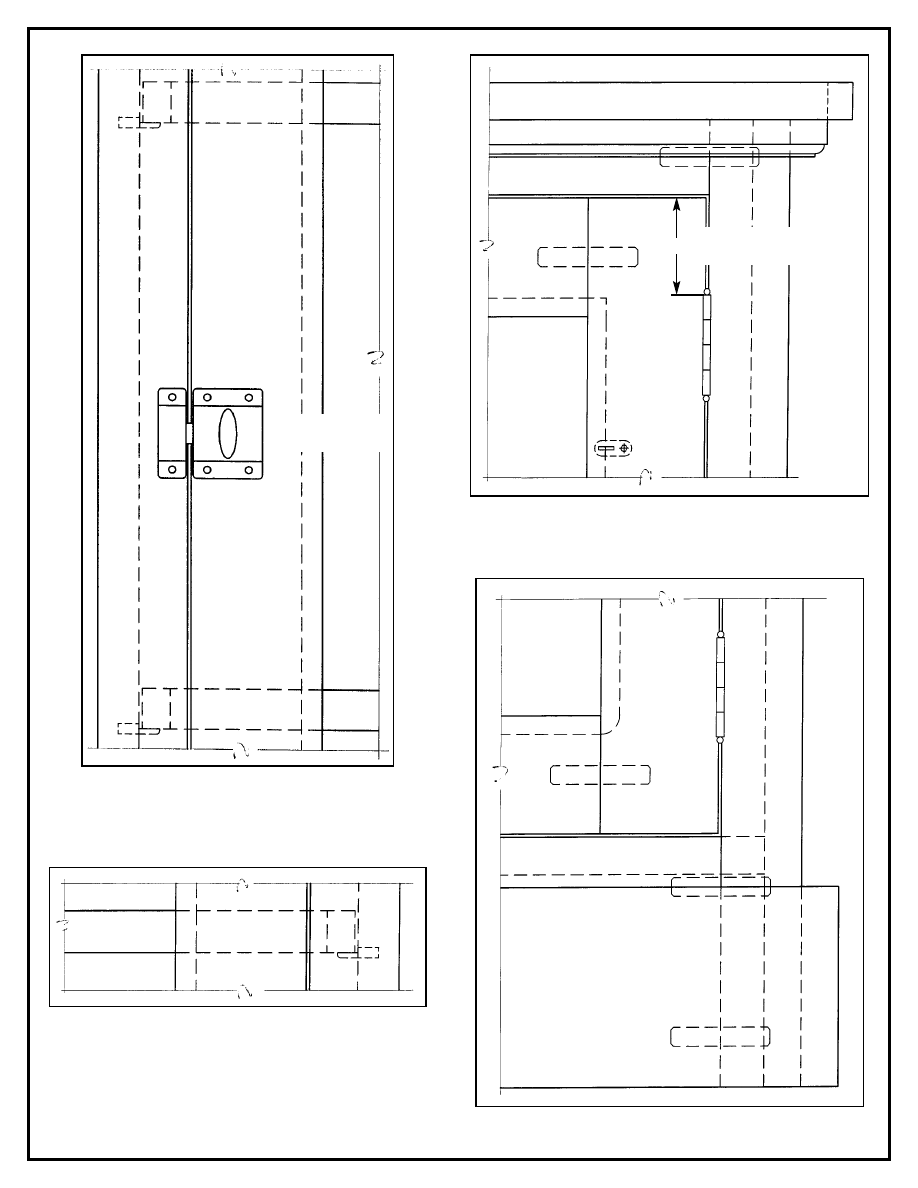
Figure 5
Figure 7
Figure 8
Figure 6
U
X
Z
W
W
W
Z
L
J
G
H
M
N
O
B
K
X
U
Y
Z
X
U
HH
AA
GG
HH
II
FF
EE
DD
CC
II
Center latches
on both doors
Location of
hinges typ.
2”

Read all instructions before beginning any work. Cut all material to sizes shown in cutting schedule.
Assembly Instructions
1.
Assemble side panel frames (A, B, C, D) and (T, U, V), face frames (H, I, J) and (X, Y) and door frames (M, N) and (Z, AA).
Refer to Isometric and Elevations and Figures 1 through 8. Use 3/8” dowels and glue on all joints.
2.
Route a 3/8” rabbet inside all side panel and door frames. Note that the corners of the rabbet are cut square in the upper cabi-
net for the glass panels (see Figures 1 and 3).
3.
Locate and drill 1/4” holes for shelf supports. Refer to Elevations and Figure 2.
4.
Glue panels E into lower cabinet side frames (A, B, C, D) and panel O into lower cabinet door frame (M, N).
6.
Nail and glue lower cabinet sides (A, B, C, D, E) to subassembly (F, G). Refer to Isometric and Figure 4.
5.
Use 1 1/4” finish nails and glue to assemble board G to board F. Refer to Isometric and Figure 4.
7.
Attach lower cabinet face frame (H, I, J) to boards B using 1 1/4” finish nails and glue. Refer to Isometric and Figure 8.
8.
Miter one end of boards K and both ends of board L as indicated in Isometric. Glue boards K and L to the base of the lower
cabinet. Refer to Elevations and Figures 4 and 8.
9.
Use 1 1/4” finish nails and glue to assemble board S to board W. Refer to Isometric and Figure 3.
10.
Nail and glue upper cabinet side frames (T, U, V) to subassembly (S, W). Refer to Isometric and Figures 1 and 3.
11.
Attach upper cabinet face frame (X, Y) to boards U using 1 1/4” finish nails and glue. Refer to Isometric and
Figures 5 and 6.
13.
Miter one end of boards Q and CC and both ends of boards R and DD as indicated in Isometric. Use 1” finish nails and glue
to attach R and Q to board P and CC and DD to board BB. Refer to Isometric and Figure 6.
14.
Route a decorative edge on boards EE and FF (refer to Figure 6). Miter one end of boards EE and and both ends of board FF
as indicated in Isometric. Use 1” finish nails and glue to attach EE and FF to the upper cabinet.
15.
Miter one end of boards HH and both ends of boards II. Attach boards HH and II to shelves GG using 1” finish nails and glue.
16.
Place the upper cabinet on top of the lower cabinet and paint the project.
17.
Attach glass clips, hinges and door latches. Refer to Figures 1, 5 and 6. Install glass in upper cabinet.
Wyszukiwarka
Podobne podstrony:
Bathroom sink unit lazienkowa
Medicine Cabinet(2) szafka scienna na lekarstwa
Medicine Cabinet(1) szafka na leki
cabinet bathroom 2
Cabinet Bathroom 3
Klasycyzm epoki Poniatowskiego Zamek Królewski i Łazienki
W jaki sposób wygodnie zaprojektować łazienkę
Oświetlenie zewnętrzne szafka sterownicza
Corner Buffet Cabinet(1)
63 MT 10 Szafka biurko
Łazienka?z?rier
Jak zaprojektować łazienkę
Jak wybrać wagę łazienkową
Bathroompieces
Lazienki Naci str 85
Łazienka doskonała
warszawa łazienki królewskie pałac na wodzie
007, Coraz większą popularność zyskują sobie wentyla-tory montowane na kratkach wentylacyjnych w łaz
więcej podobnych podstron