43
CABINET BATHROOM
Copyright 2004 Martian Auctions
198
Start At the Top
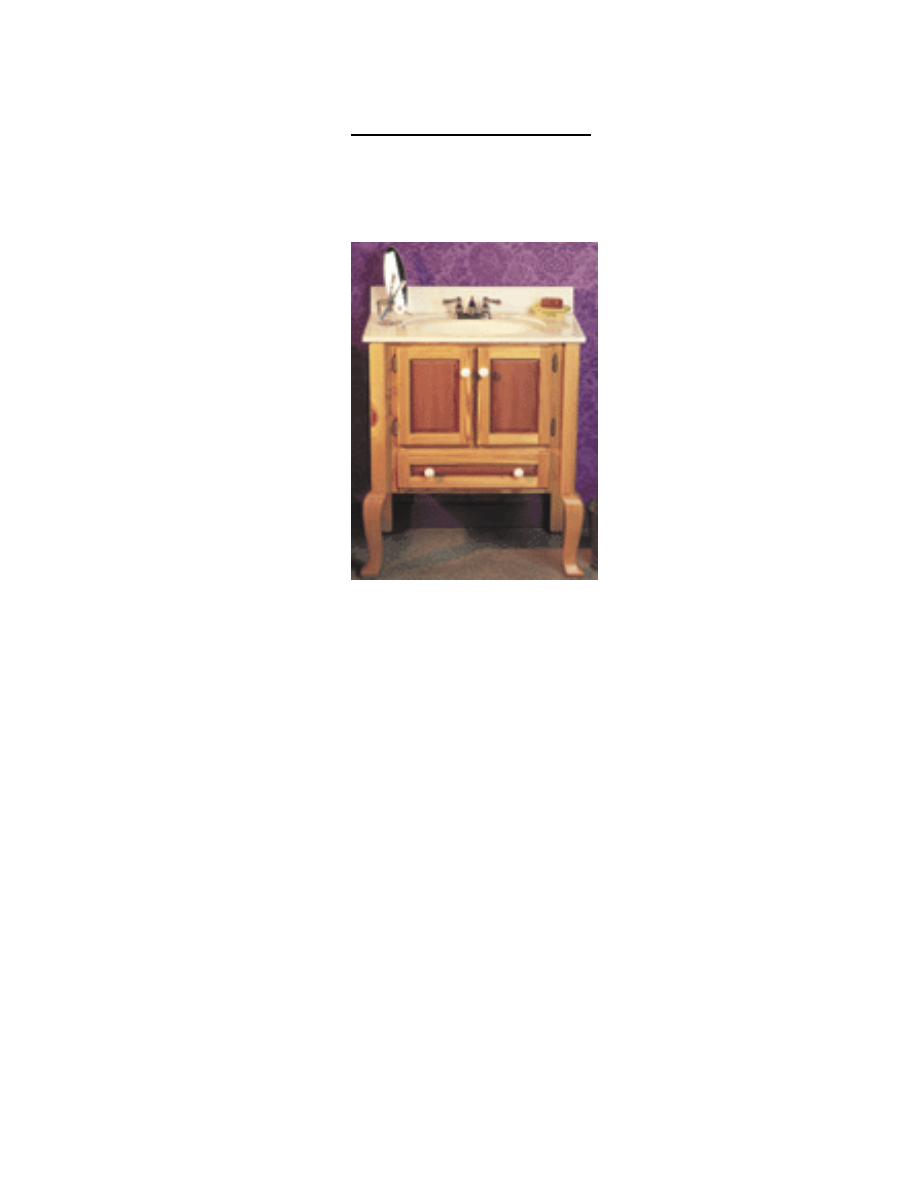
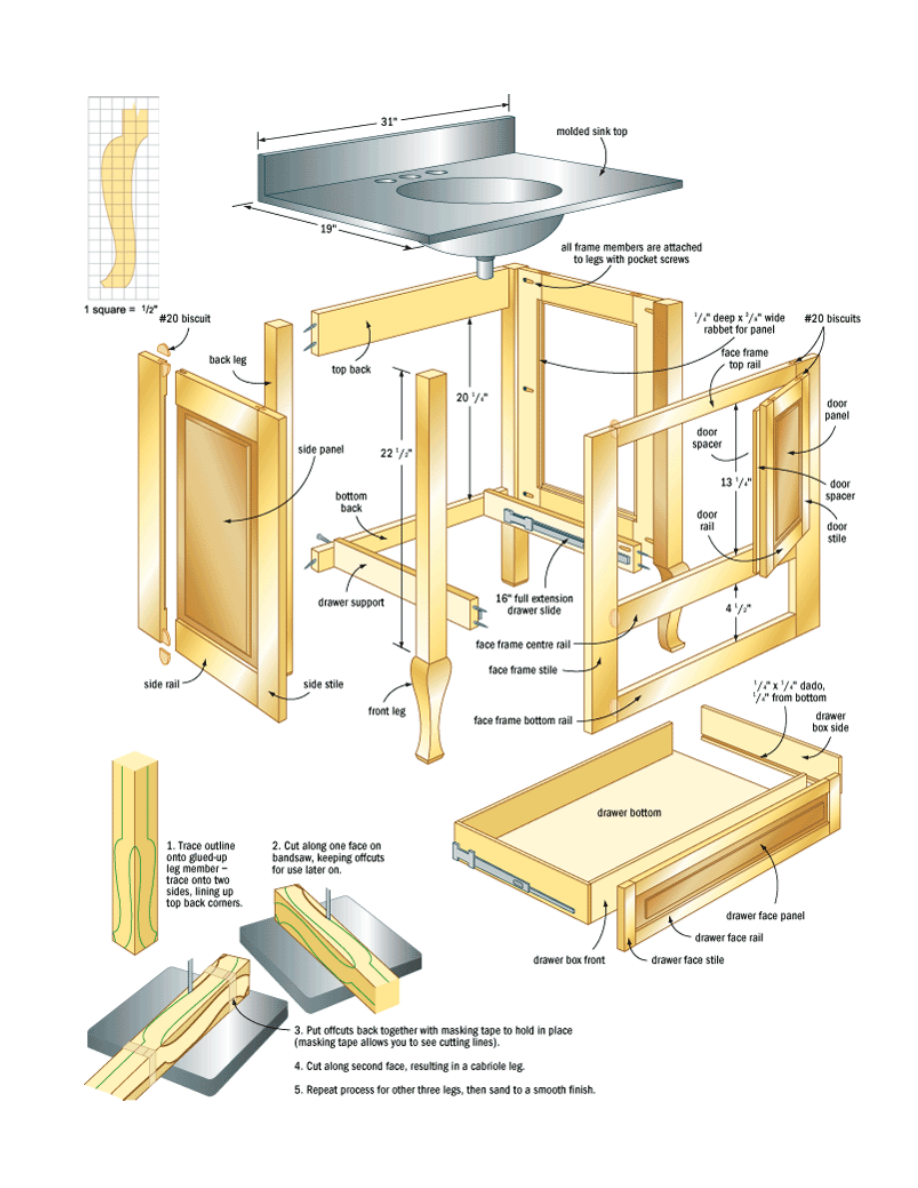
The first thing I needed was a moulded sink top. It measured 19" x 31" and
was the starting point for the project.
My design includes what I call extended cabriole legs on the front,
creating an elegant, old-fashioned look. I used sugar pine for these legs. It’s a little harder than
eastern white pine, but it’s still easy to work with. The outline of the 1/4"-thick hardboard template
I made for the leg profile is on this illustration.
Creating cabriole legs is within the reach of most woodworkers. The plans include step-by-
step directions. The technique is quite straightforward but you’ll need access to a bandsaw and
the patience to sand the inside and outside curves that form each leg. This is where pine makes
life easier than hardwood.
Once you’ve got two front legs and the straight back legs done, it’s time to tackle the side
panels. Although most bathroom cabinets are 32" tall, I went with 36". This is reflected in the
materials list. To shorten this cabinet to a standard height, reduce the side stiles, door stiles and
upper portion of the legs by 4".
The plans show the stiles and rails joined into a frame with #20 biscuits. The panels fit into the
inside face of this frame, within 1/4"-wide x 3/8"-deep table-routed rabbets you make after the
frames are dry and sanded flat.
The next step is to install the side panels, but two things must happen first. The edge of the
panels needs to be routed to fit the 3/8" rabbet you routed in the frame. The four rounded corners
of the frame rabbet must be squared with a sharp chisel. Secure the panel with 1/2" finishing nails
or wood trim on the inside face of the side frame. This is the same design and construction
process I used to build the face frame, door and drawer frames. Build these parts now. Sand
them flat, then rout a round-over profile on the outer edges of the drawer face and doors.
Bring the Cabinet Together
With the side and face frames done, it’s time to join
them to the legs. I used screws driven into angled
pocket holes. This is fast, easy and allows me to
assemble the whole cabinet without waiting for glue to
dry.
When the cabinet is assembled, including the two
back support members, you can measure the opening
for your drawer box. Mechanical slides like the kind I
used require a specific drawer-to-cabinet clearance—
usually 1/2" on each side. That’s why you should
measure your drawer opening and make changes to
the drawer specs if needed. Construction variations
can easily throw dimensions off 1/8"—more than
enough to make mechanical drawer slides perform poorly. The plans show how the drawer
support rails provide a surface for the mechanical slides to fasten to.
I kept things simple with butt joints at all four drawer box corners. The drawer bottom fits into
1/4" x 1/4" dados in the sides, front and back. Install the drawer in its opening on the slides, then
temporarily fasten the frame and panel drawer face to the drawer box with four screws driven
from inside the box. Take the drawer face off for finishing.
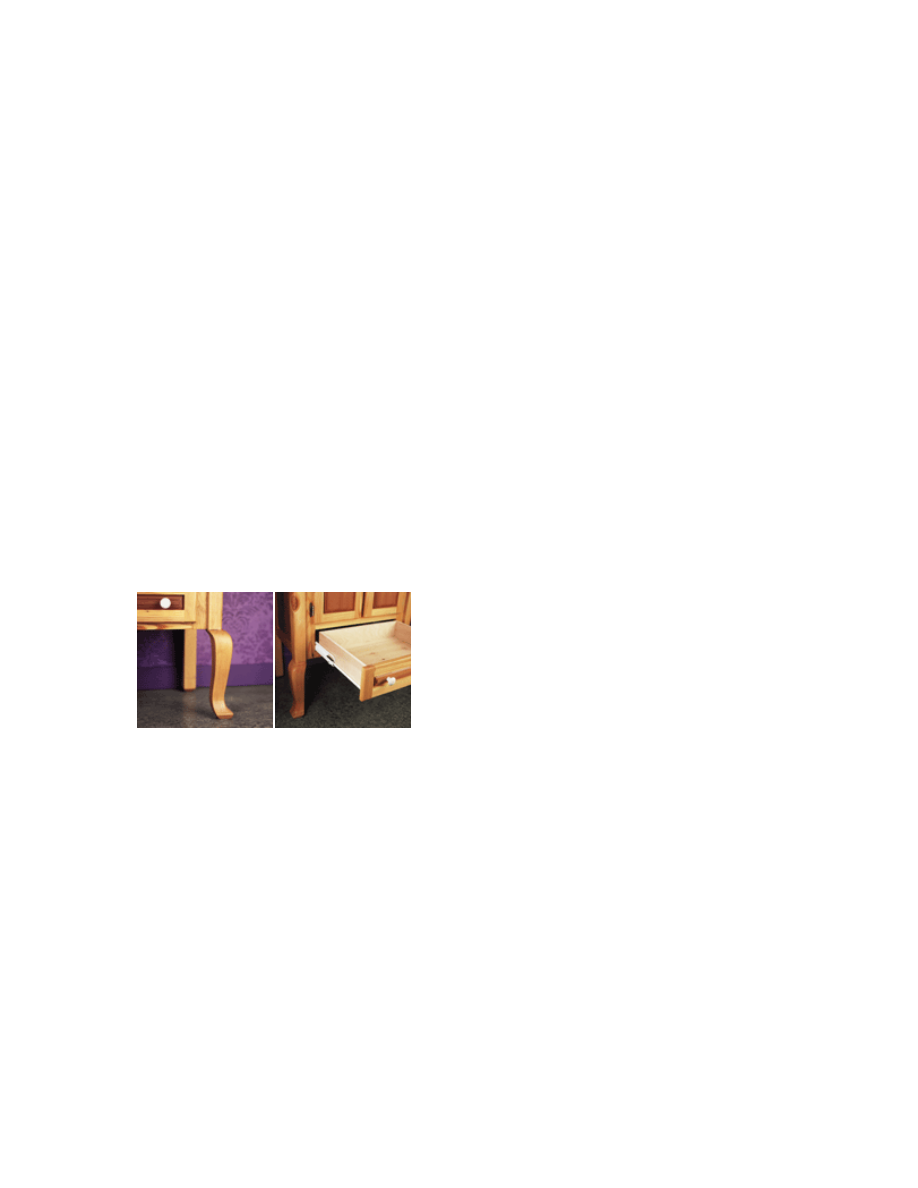
Creative cabriole legs
cut from a template
refine the vanity's stance
and give it a furniture-
like appeal
Sillaot's trademark
drawer slides function
beautifully but require an
eye for precise
tolerances
Final Steps
Minwax pre-stain wood conditioner was used to even out the absorption of the Ipswich Pine stain.
The stain was sealed under three coats of oil-based urethane. Once the finish is complete, seat
the sink top on a bead of silicone applied along the top edges of the cabinet. Screws driven
through the top and bottom back members and into wall studs will secure it to the wall. Hook up
the plumbing and you’re ready to go.
Copyright 2004 Martian Auctions
199

For the Cabinet
Material
Size
Qty.
Front legs
sugar pine
4" x 4" x 36"
2
Back legs
sugar pine
2" x 2" x 36"
2
Side rails
pine
3/4" x 2 1/4" x 9 3/4"
4
Side stiles
pine
3/4" x 2 1/4" x 22 1/2"
4
Side panels
pine
3/4" x 10 7/8" x 18 3/4"
2
Face frame stiles
pine
3/4" x 2 1/4" x 22 1/2"
2
Face frame top rail
pine
3/4" x 1 1/4" x 20 5/8"
1
Face frame centre rail
pine
3/4" x 2" x 20 5/8"
1
Face frame bottom rail
pine
3/4" x 1 1/2" x 20 5/8"
1
Drawer supports
pine
3/4" x 2 3/4" x 16 1/8"
2
Top back cross member
pine
3/4" x 4 1/2" x 25 1/4"
Bottom back cross member
pine
3/4" x 2" x 25 1/4"
1
Sink top
molded acrylic
19" x 31"
1
For the Doors
Door rails
pine
3/4" x 1 3/4" x 7"
4
Door stiles
pine
3/4" x 1 3/4" x 14 1/2"
4
Door panels
redwood
3/4" x 7 5/8" x 11 5/8"
2
Door spacer
pine
1/4" x 2" x 13 3/8"
1
For the Drawers
Drawer box fronts
birch-veneer ply
1/2" x 4" x 18 5/8"
2
Drawer box sides
birch-veneer ply
1/2" x 4" x 16"
2
Drawer bottoms
birch-veneer ply
1/4" x 15 1/2" x 19 1/4"
1
Drawer face rails
pine
3/4" x 1 3/4" x 18 1/4"
2
Drawer face stiles
pine
3/4" x 1 3/4" x 5 1/2"
1
Drawer face panel
redwood
3/4" x 2 5/8" x 19"
1
Drawer slides
full-extension
16"-long
2
Drawer/door knobs
white porcelain
1 1/8" dia.
4
Copyright 2004 Martian Auctions
200
Copyright 2004 Martian Auctions
201
Wyszukiwarka
Podobne podstrony:
cabinet bathroom 2
bathroom cabinet szafka lazienkowa
Corner Buffet Cabinet(1)
Bathroompieces
cabinetmakerupho00sher
Corner Cabinet 1
clean bathroom
Plan and Install Kitchen Cabinets
bathroomC
Brydcliffe Cabinet
Display Cabinet 2
bathroom
box taurus cabinets manual
skład chemia BATHROOM CLEANER
bathroom flash
Bathroom Mirror
Bathroom
Bathroom Shelf
więcej podobnych podstron