Page 1
11TH CENTURY VIKING COMB
06/04/2006 11:15:22 AM
http://www.willadsenfamily.org/sca/danr_as/comb/comb.htm
VIKING
VIKING
VIKING
VIKING COMB
COMB
COMB
COMB
Note: This page contains copyrighted material which is presented as documentation in the course of scholarly research. The owners of this page do not, and in some cases
cannot, give permission to copy the content here.
by
Danr Bjornson
Summary
Viking hair combs have been found dating from the 9
th
to 15
th
century all over Scandinavia. The primary material is antler, due to its strength, but a
few combs of bone and wood are also recorded. The tools used have much in common with carpentry and blacksmithing. The manufacturing and
artistic style of these combs are very similar all over the Viking world, suggesting that at least some of these craftsmen traveled. Most of the evidence
used for this project comes from the Coppergate, Bedern, and Piccadilly sites in present-day York, specifically from the 10
th
and 11
th
century finds.
My primary source was the archaeological document Bone, Antler, Ivory, and Horn from Anglo-Scandinavian and Medieval York by A. MacGregor
et. al. It includes many construction details and technical information that the "generic Viking history" books lack.
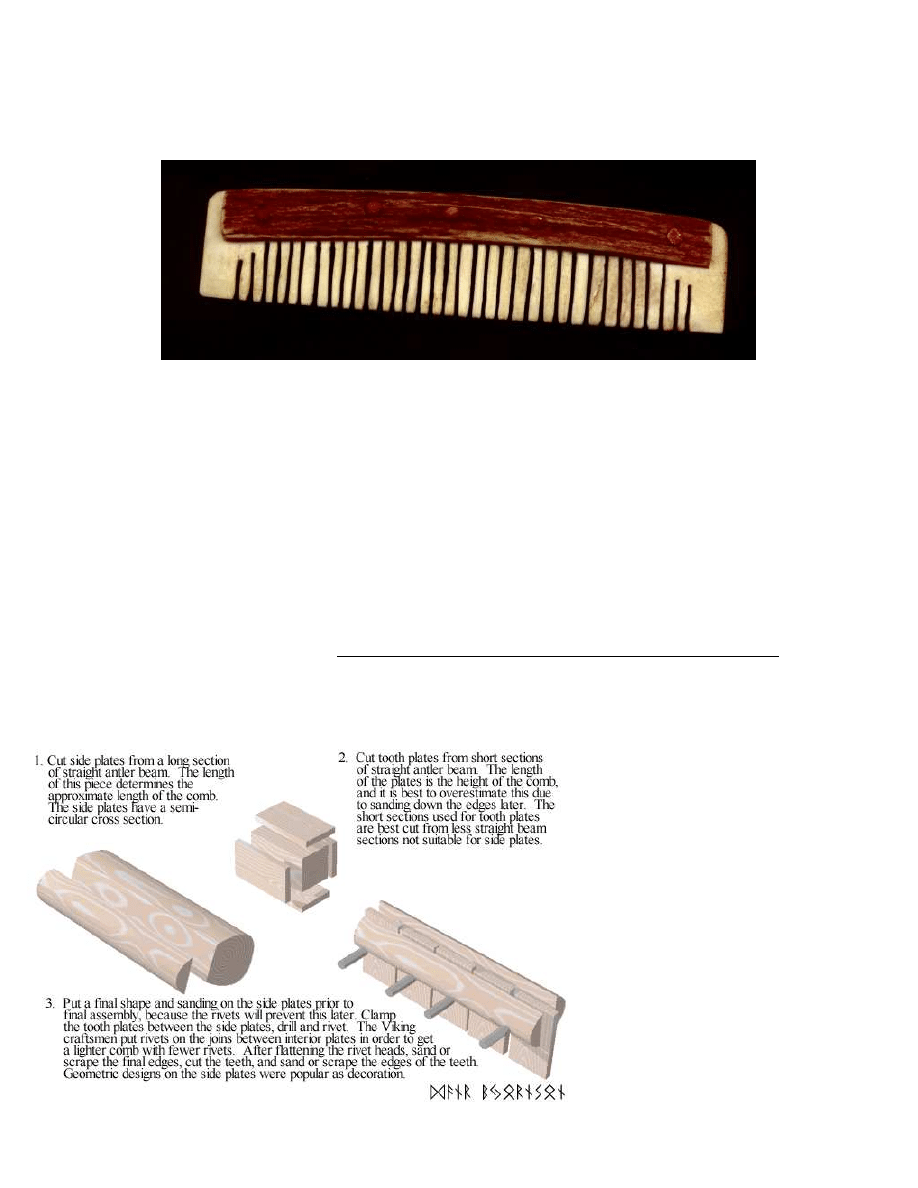
The method of fabrication is summarized in my drawing below. I chose to leave the natural antler surface on the side plates instead of filing them
down and carving decorations. I also chose to use copper for the rivets instead of iron, because it is easier to work.
My father-in-law assisted by teaching me to use his bandsaw. He also showed me to make and set rivets using wire as a raw material.
Page 2
11TH CENTURY VIKING COMB
06/04/2006 11:15:22 AM
http://www.willadsenfamily.org/sca/danr_as/comb/comb.htm
A few things went wrong that I could have done better. I used some tooth plates that were cut too close to the spongy center of the antler, which gave
them a somewhat rough surface. I also broke a tooth while rounding the edges and had to glue it back on.
Main Documentation
There are many archaeological finds of combs in the Viking world. I have chosen just a few, those that provide the best information about how these
combs were made.
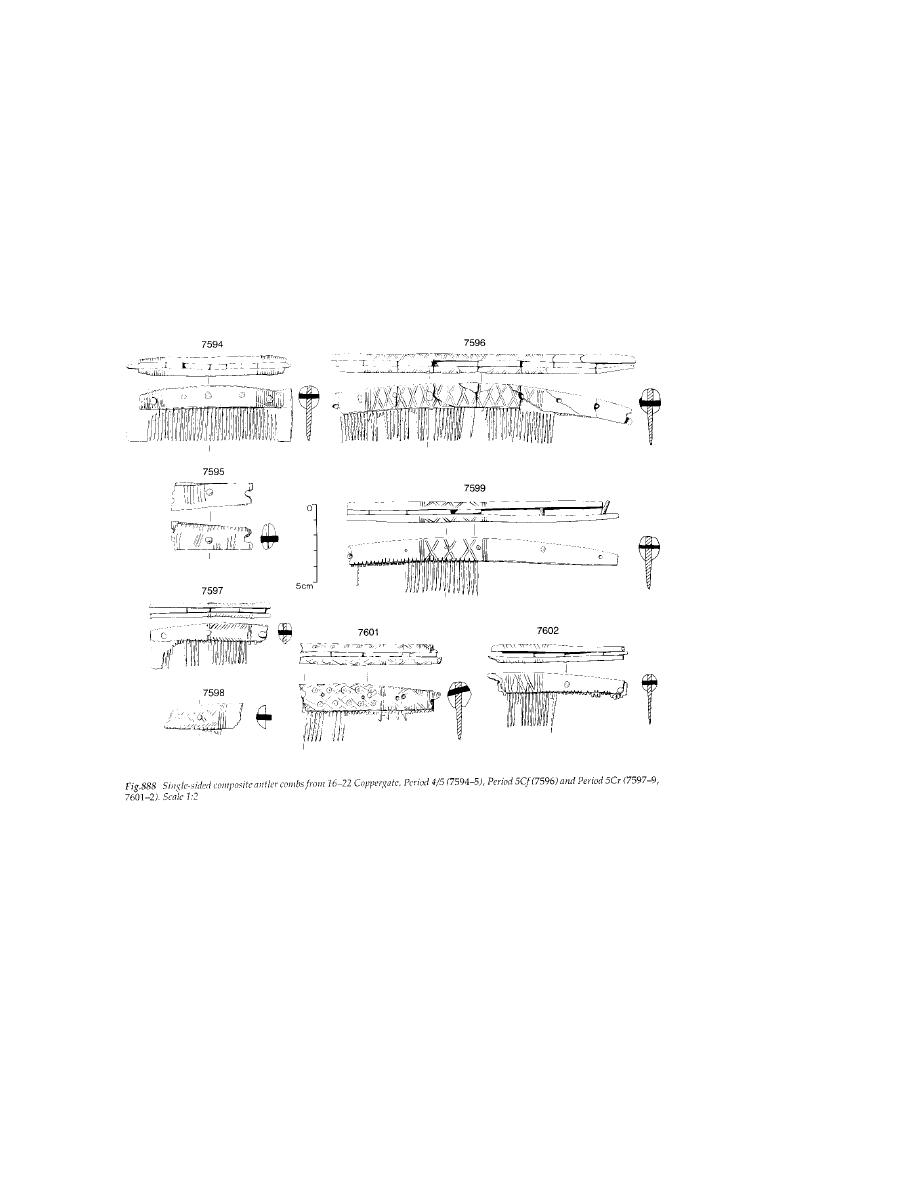
First is the drawing from page 1924 of MacGregor. This picture shows an assortment of combs from the 10
th
, 11
th
, and 12
th
century layers of the
Coppergate site in York. They are all single-sided (teeth on one side), and consist of narrow tooth plates sandwiched between side plates of semi-
circular cross-section and held by rivets. The spaces between the teeth are nearly uniform but not perfect. A few stray saw marks show that the teeth
were cut after being riveted. The teeth are usually not cut all the way to the ends, presumably for greater strength. The rivets are spaced on the joins
between tooth plates wherever possible (1931). The backs of the combs have a curved shape, but the inside may be curved or straight. Some faces of
the comb have
decorations made by saw cuts, usually
in a variety of geometric patterns. The MacGregor book has many more drawings and photos of combs, but this picture shows the common
characteristics of the majority of the combs and fragments found.
MacGregor also goes into great detail as to the frequency of different styles, materials, and decoration among the many finds. The average comb was
single-sided, decorated with saw cuts in a pattern of lines, and had a curved back.
Page 3
11TH CENTURY VIKING COMB
06/04/2006 11:15:22 AM
http://www.willadsenfamily.org/sca/danr_as/comb/comb.htm
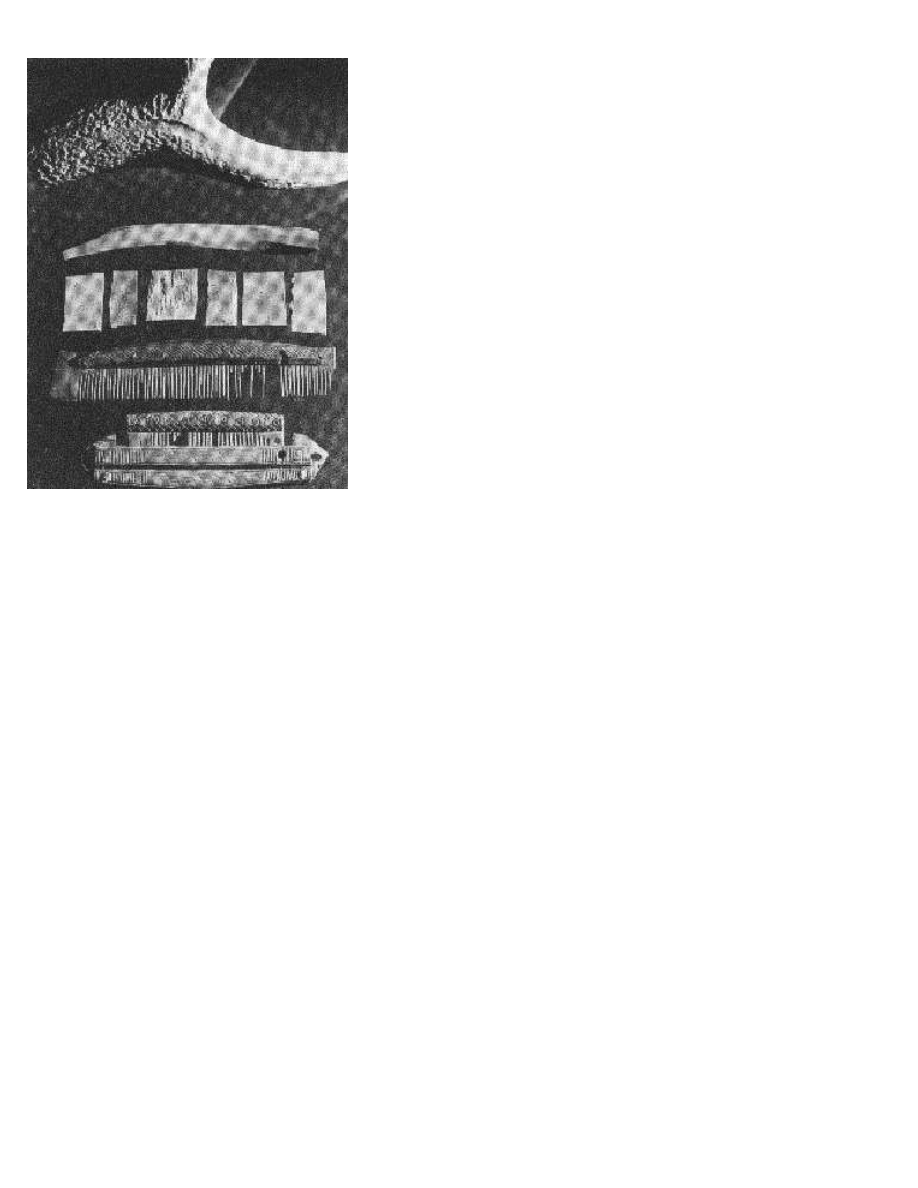
Sawyer shows a nice photo of combs, antlers, tooth plates, and other raw materials on page 107 which is shown to the right. These items date to 12
th
-
century Dublin. The raw materials shown here look very similar to the raw materials left from making my comb.
Sawyer also quotes from an Irish poem of that time in which the taxes due the church were listed. These taxes included, "a comb from every comb-
maker," (107). If the craft was important enough to be taxed by the church, it is likely that comb-making was a skilled and respected trade.
There are numerous pictures of combs in my half-dozen other Viking books, but none provided any additional information useful in constructing the
combs.
Process and Materials
The majority of combs were made of antler, usually red deer. I selected a piece of elk antler because it is close to the size of the antlers used by the
Vikings (MacGregor 1907), and because it was all I had at the time. For the rivets, I chose 16-guage copper wire because it was easier to work than
iron and I had never made rivets before.
I made all cuts on a band saw under the instruction of my father-in-law. The Viking craftsmen used a hand saw, of which a few survive. I did not
wish to waste antler and so chose the greater degree of control available with the bandsaw.
First, I cut a long piece of antler beam. Choosing the straightest side, I cut the side pieces from opposite sides of the beam. If you sight down the
back, you can see the wavy shape of the original antler, even though the tooth plates lie straight as seen by sighting down the teeth. These pieces
began 1/4 of an inch thick and nearly 3/4 inch wide, but sanding reduced their width. I found it easiest to sand them by clamping them together,
thereby making them uniform in size and shape. In the process of sanding I removed the thin edges. I prefer the natural look for my work, so I
decided to leave the natural antler surface, rather than sanding it off and carving the surface beneath as the Viking craftsmen did. Its appearance is
similar to wood grain and gives a pleasing grip for the user.
Next, I cut this antler beam and others into shorter sections suitable for tooth plates. These plates were about 1 1/2 inches long. In a few cases, I
underestimated the length desired and had to scrap those tooth plates. The curved back of the comb helped lead to this error, and in the future I can
avoid this with more careful planning. I cut the tooth plates 3/16 inch thick. Then I sanded each one to take off the thin edges resulting from sawing
out of a circular cross-section and make their edges parallel. When cutting the tooth plates, I had to avoid the soft inner core of the antler, and the
scrap left over from the project illustrates how soft this core material is.

Page 4
11TH CENTURY VIKING COMB
06/04/2006 11:15:22 AM
http://www.willadsenfamily.org/sca/danr_as/comb/comb.htm
When all the plates were cut, I laid them out to find the longest ones that were free of flaws and would fit well between the side plates. Again, careful
measurements would have helped somewhat, but I was measuring "by eye" as the craftsmen would have, though I lack their exerperience. I had to
reject plates cut too close to the surface, because they had too many of the undulations found on the antler surface. In fact, the tooth I would break
later broke along just such an undulation.
Having chosen the tooth plates I wanted, I put the widest ones on the outside. The end plates are important because they have to withstand a rivet
through their center, as contrasted with the other plates, which generally get rivets through their edges. These plates would also lock all the other
plates between them and be subject to stress where they protrude beyond the side plates.
I clamped the tooth plates between the side plates. This was tricky because I wanted to line up the tooth edge of the plates, which is more visible than
the back edge hidden between the side plates. I drilled the holes on the drill press, because of the finer degree of control than with the hand brace,
which the Viking craftsmen would have used. I used clamps to hold the assembly together while drilling. After I drilled each hole, I riveted it prior to
drilling the next hole. This ensured that nothing had a chance to slip or loosen while I was moving clamps around.
For the rivets, my father-in-law showed me how to make rivets from wire. I used 16-guage copper wire because it is softer and easier to work than the
iron used by the Vikings. After slipping a piece of wire through the hole, I tapped the ends into a mushroom shape with the hammer. I alternated
between beating the center, to make the rivet shorter and fatter, and beating the sides of the rivet head, to make a rounded dome shape. This technique
is easy and allowed me to shape both ends of each rivet and tighten it into the hole. I riveted two waste tooth plates together for practice and then used
the same procedure for the combs.
When all the rivets were in, I sanded the edges to shape. This included rounding the back where the tooth plates protruded, giving a nice shape to the
end plates, and making a smooth straight surface where the teeth would be cut.
Next, I marked where the teeth would be cut. I had to take into account the size of each tooth plate, the thickness of the saw blade, and the overall
uniformity of appearance. Because the tooth plates are slightly different widths, the spacing of the teeth is not exactly uniform. It is, however, close
enough to fool the eye except under close examination. The original Viking comb teeth were spaced in exactly the same way. I cut the teeth on the
band saw, making the end teeth shorter to lend extra strength to those end plates.
The last step was to smooth the teeth. This was the most time-consuming portion of the construction, because of the delicacy of the teeth and their
number. I rounded the edge with sandpaper, and attempted to carve the corners off of each tooth with a sharp knife. Carving the edges with the knife
worked fine, until I broke one of the teeth doing so. I glued it back on and continued smoothing the teeth with sandpaper. The Viking craftsmen are
presumed to have used small files for this work.
After this minor accident, I simply smoothed the teeth and did not sand them down to a tapered shape such as that found on most Viking combs. The
non-tapered shape is slightly stronger and seems less susceptible to breakage.
This comb took three hours to build and cut the teeth, and about 6 hours to finish the teeth. I made it for my lady, and it will add a great deal of
authenticity to her regalia.
Sources
MacGregor, A. et. al., Bone, Antler, Ivory, and Horn from Anglo-Scandinavian and Medieval York, York Archaeological Trust for
Excavation and Research, 1999. ISBN 1-872414-99-0. This book goes into great depth about its very specific topic. While its academic
inspirations do not make exciting reading for most, the discussions are well-reasoned and the conclusions well-supported. This series of
books is of great interest to craftsmen seeking authenticity and the technical details that authenticity requires.
Sawyer, Peter, The Oxford Illustrated History of the Vikings, Oxford University Press, Oxford, 1997. This book is much like other
"generic Viking" books, but is more scholarly than most. The book draws on the entire body of evidence, including the recent finds in
the early 1990s. In some cases the writers present several possible conclusions on that evidence where the writers do not agree. It has
little to say about combs beyond that referenced in this paper.
Back to Danr's A&S page.
Wyszukiwarka
Podobne podstrony:
Male linen shirt of 11th century, from Viborg, Denmark
10th Century Norse Antler Comb
History Costume History Costume Design Viking Women
BUICK CENTURY 1991 2005
pacyfic century and the rise of China
Kissoudi P Sport, Politics and International Relations in Twentieth Century
Costume for a 12th Century Lady
amulet vikinga sbornik
The World of the Vikings
Amon Amarth The Pursuit of Vikings
FILTRY 3, //1) Simple comb filter
A 20th century acceleration in Nieznany (2)
s vikingami na svalbard
viking
Composite Construction Wooden Comb
Latvia in the Viking Age
JCC Japan Century Cities Award
więcej podobnych podstron