
Select and
FileUpload
Objects
S
election lists — whether in the form of pop-up menus or
scrolling lists — are space-saving form elements in HTML
pages. They allow designers to present a lot of information in
a comparatively small space. At the same time, users are
familiar with the interface elements from working in their own
operating systems’ preference dialog boxes and application
windows.
However, selection lists are more difficult to script,
because the objects themselves are complicated entities. As
you can see throughout this chapter, the references
necessary to extract information from a list can get pretty
long. The results, however, are worth the effort.
The other object covered in this chapter, the fileUpload
object, is frequently misunderstood as being more powerful
than it actually is. It is, alas, not the great file transfer elixir
desired by many page authors.
Select Object
Properties
Methods
Event Handlers
length
blur()
onChange=
name
focus()
onFocus=
options[i]
handleEvent()
onBlur=
selectedIndex
options[i].defaultSelected
options[i].index
options[i].selected
options[i].text
(continued)
24
24
C H A P T E R
✦ ✦ ✦ ✦
In This Chapter
Triggering action
based on a user’s
selection in a pop-up
or select list
Modifying the
contents of select
objects
Using the fileUpload
object
✦ ✦ ✦ ✦

484
Part III ✦ JavaScript Object and Language Reference
Properties
Methods
Event Handlers
options[i].value
type
Syntax
Creating a select object:
<FORM>
<SELECT
NAME=”
listName”
[SIZE=”number”]
[MULTIPLE]
[onBlur=”handlerTextOrFunction”]
[onChange=”handlerTextOrFunction”]
[onFocus=”handlerTextOrFunction”]>
<OPTION [SELECTED] [VALUE=”string”]>listItem
[…<OPTION [VALUE=”string”]>listItem]
</SELECT>
</FORM>
Accessing select object properties:
[window.] document.formName.listName.property
[window.] document.forms[index].listName.property
[window.] document.formName.listName.options[index].property
[window.] document.forms[index].listName.options[index].property
About this object
Select objects are perhaps the most visually interesting user interface elements
among the standard built-in objects. In one form, they appear on the page as pop-
up lists; in another form, they appear as scrolling list boxes. Pop-up lists, in
particular, offer efficient use of page real estate for presenting a list of choices for
the user. Moreover, only the choice selected by the user shows on the page,
minimizing the clutter of unneeded verbiage.
Compared to other JavaScript objects, select objects are difficult to script —
mostly because of the complexity of data that goes into a list of items. Some
properties of the object apply to the entire object, whereas other properties
pertain only to a single item in the list (each item is called an option). For example,
you can extract the number (index) of the currently selected option in the list — a
property of the entire selection object. To get the text of the selected option,
however, you must zero in further, extracting the text property of a single option
among all options defined for the object.

485
Chapter 24 ✦ Select and FileUpload Objects
When you define a select object within a form, the construction of the
<SELECT>...</SELECT>
tag pair is easy to inadvertently mess up. First, most
attributes that define the entire object, such as
NAME
,
SIZE
, and event handlers,
are attributes of the opening
<SELECT>
tag. Between the end of the opening tag
and the closing
</SELECT>
tag are additional tags for each option to be displayed
in the list. The following object definition creates a selection pop-up list containing
three colors:
<FORM>
<SELECT NAME=”RGBColors” onChange=”changeColor(this)”>
<OPTION SELECTED>Red
<OPTION>Green
<OPTION>Blue
</SELECT>
</FORM>
The formatting of the tags in the HTML document is not critical. I indented the
lines of options merely for the sake of readability.
The
SIZE
attribute determines whether a select object appears as a pop-up list
or a list box. If you omit the attribute, the browser automatically assigns the
default value of 1. This value forces the browser to display the list as a pop-up
menu. Assigning any other integer value to the
SIZE
attribute causes the browser
to display the list as a list box. The number indicates how many options will be
visible in the list without scrolling — how tall the box will be, measured in lines.
Because scrollbars in GUI environments tend to require a fair amount of space to
display a minimum set of clickable areas (including sliding “thumbs”), you should
set list-box style sizes to no less than 4. If that makes the list box too tall for your
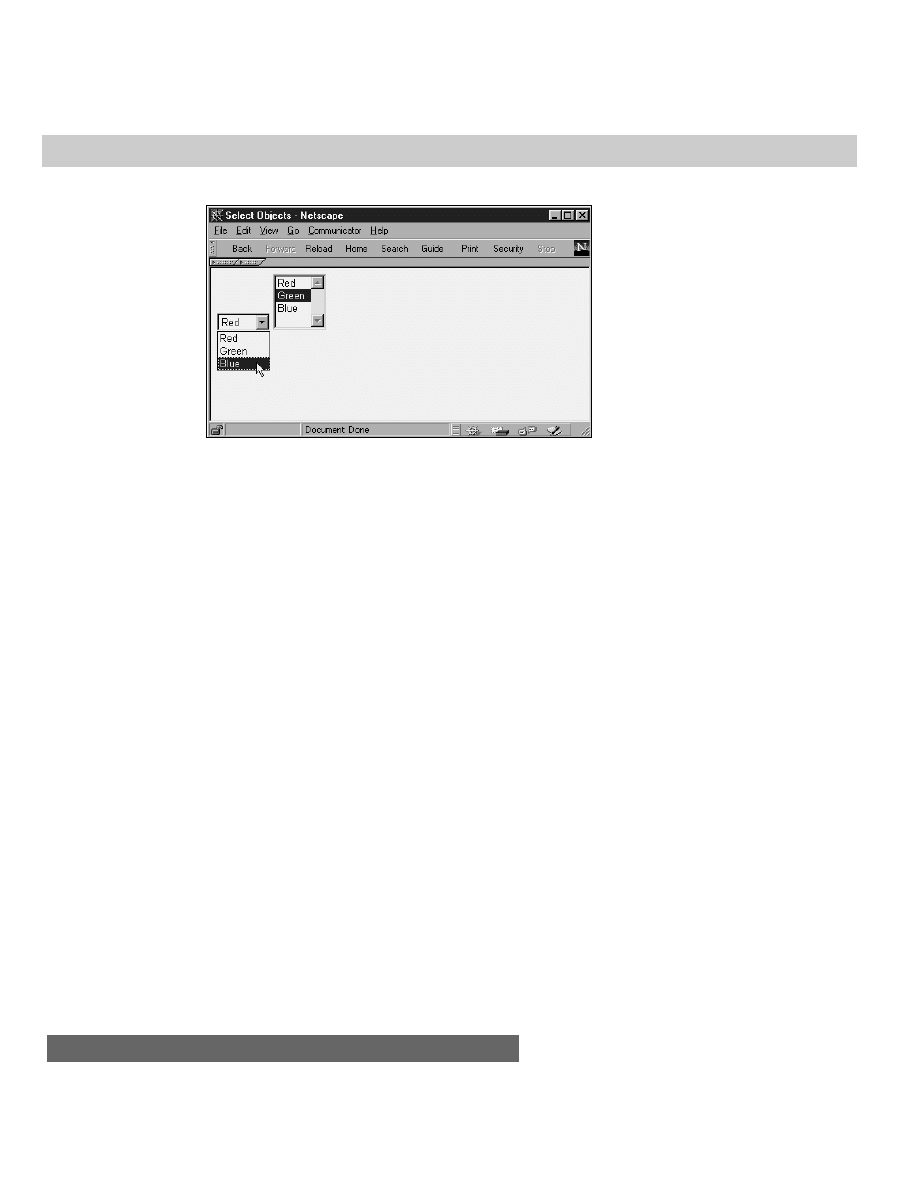
page design, consider using a pop-up menu instead. Figure 24-1 shows two
versions of a select object: one with a size of 1, the other with a size of 4.
Significant differences exist in the way each GUI platform presents pop-up
menus. Because each browser relies on the operating system to display its native
pop-up menu style, considerable differences exist among the OS platforms in the
size of a given pop-up menu. What fits nicely within a standard window width of
one OS may not fit in the window of another OS. In other words, you cannot rely
on any select object having a precise dimension on a page (in case you’re trying
to align a select object with an image). With object positioning in Navigator 4 and
Internet Explorer 4, you can align one edge of multiple items, but you cannot
control, for example, the precise width of a select list or the size of the text in
the list.
486
Part III ✦ JavaScript Object and Language Reference
Figure 24-1: Two
versions of the select
object
In list box form, a select object can be set to accept multiple, noncontiguous
selections. Users typically accomplish such selections by holding down a modifier
key (Shift, Ctrl, or
C keys, depending on operating system) while clicking
additional options. To switch on this capability for a select object, include the
MULTIPLE
attribute constant in the definition.
For each entry in a list, your
<SELECT>
definition must include an
<OPTION>
tag
plus the text as you want it to appear in the list. If you want a pop-up list to show a
default selection when the page loads, you must attach a
SELECTED
attribute to
that item’s
<OPTION>
tag. Without this attribute, the pop-up list appears empty at
first — not a friendly way to greet your page’s viewers. You can also assign a string
value to each option. As with radio buttons, this value can be text other than the
wording displayed in the list; so your script can act on that “hidden” value rather
than on the displayed text, such as letting a plain-language select listing actually
refer to a complex URL. This string value is also the value sent to a CGI program
(as part of the
name=value
pair) when the user submits the select object’s form.
One behavioral aspect of the select object may influence your page design. The
onChange=
event handler triggers immediately when a user makes a new selection
in a pop-up list (except in cases affected by a Navigator 2 bug on Windows
versions). If you prefer to delay any action until other settings are made, omit an
onChange=
event handler in the select object, but be sure to create a button that
lets users initiate whatever action requires those settings.
Modifying select options
Script control gives you considerable flexibility for modifying the contents and
selection of a select object. These powers are available only in Navigator 3 or later
and Internet Explorer 4 or later. Some of this flexibility is rather straightforward,
such as changing the
selectObj.options[i].text
property to alter the display
of a single option entry. The situation gets tricky, though, when the number of
options in the select object changes. The choices you have include

487
Chapter 24 ✦ Select and FileUpload Objects
✦ Removing an individual option (and thus collapsing the list)
✦ Reducing an existing list to a fewer number of options
✦ Removing all options
✦ Adding new options to a select object
To remove an option from the list, set the specific option to null. For example, if
a list contains five items, and you want to eliminate the third item altogether
(reducing the list to four items), the syntax (from the select object reference) for
doing that task is
selectObj.options[2] = null
After this statement,
selectObj.options.length
equals 4.
In another scenario, suppose that a select object has five options in it, and you
want to replace it with one having only three options. You first must hard-code the
length
property to 3:
selectObj.options.length = 3
Then set individual text properties for index values 0 through 2.
Perhaps you’d rather start building a new list of contents by completely deleting
the original list (without harming the select object). To accomplish this, set the
length to 0:
selectObj.options.length = 0
From here, you have to create new options (as you would if you wanted to
expand a list from, say, three to seven options). The mechanism for creating a new
option involves an object constructor:
new Option()
. This constructor accepts up
to four parameters, which let you specify the equivalent of an
<OPTION>
tag’s
attributes:
✦ Text to be displayed in the option
✦ Contents of the option’s
value
property
✦ Whether the item is the
defaultSelected
option ( Boolean)
✦ Whether the item is selected ( Boolean)
You can set any (or none) of these items as part of the constructor and come
back in other statements to set their properties. I suggest setting the first two
parameters ( leave the others blank); then set the
selected
property separately.
The following is an example of a statement that creates a new, fifth entry in a select
object, setting both its displayed text and value property:
selectObj.options[4] = new Option(“Yahoo”,”http://www.yahoo.com”)
To demonstrate all of these techniques, Listing 24-1 lets you change the text of a
select object: first by adjusting the text properties in the same number of options
and then by creating an entirely new set of options. Functions for making these
changes are triggered by radio button
onClick=
event handlers — rare examples of
when radio buttons can logically initiate visible action.

488
Part III ✦ JavaScript Object and Language Reference
Listing 24-1: Modifying Select Options
<HTML>
<HEAD>
<TITLE>Changing Options On The Fly</TITLE>
<SCRIPT LANGUAGE=”JavaScript1.1”>
// initialize color list arrays
plainList = new Array(6)
hardList = new Array(6)
plainList[0] = “cyan”
hardList[0] = “#00FFFF”
plainList[1] = “magenta”
hardList[1] = “#FF00FF”
plainList[2] = “yellow”
hardList[2] = “#FFFF00”
plainList[3] = “lightgoldenrodyellow”
hardList[3] = “#FAFAD2”
plainList[4] = “salmon”
hardList[4] = “#FA8072”
plainList[5] = “dodgerblue”
hardList[5] = “#1E90FF”
// change color language set
function setLang(which) {
var listObj = document.forms[0].colors
// find out if it’s 3 or 6 entries
var listLength = listObj.length
// replace individual existing entries
for (var i = 0; i < listLength; i++) {
if (which == “plain”) {
listObj.options[i].text = plainList[i]
} else {
listObj.options[i].text = hardList[i]
}
}
if (navigator.appName == “Netscape”) {
history.go(0)
}
}
// create entirely new options list
function setCount(choice) {
var listObj = document.forms[0].colors
// get language setting
var lang = (document.forms[0].geekLevel[0].checked) ? “plain” :
“hard”
// empty options from list
listObj.length = 0
// create new option object for each entry
for (var i = 0; i < choice.value; i++) {
if (lang == “plain”) {
listObj.options[i] = new Option(plainList[i])

489
Chapter 24 ✦ Select and FileUpload Objects
} else {
listObj.options[i] = new Option(hardList[i])
}
}
listObj.options[0].selected = true
if (navigator.appName == “Netscape”) {
history.go(0)
}
}
</SCRIPT>
</HEAD>
<BODY>
<H1>Flying Select Options</H1>
<FORM>
Choose geek level:
<INPUT TYPE=”radio” NAME=”geekLevel” onClick=”setLang(‘plain’)”
CHECKED>Plain-language
<INPUT TYPE=”radio” NAME=”geekLevel” onClick=”setLang(‘hard’)”>Gimme
hex-triplets!
<P>
Choose a palette size:
<INPUT TYPE=”radio” NAME=”paletteSize” VALUE=3 onClick=”setCount(this)”
CHECKED>Three
<INPUT TYPE=”radio” NAME=”paletteSize” VALUE=6
onClick=”setCount(this)”>Six
<P>
Select a color:
<SELECT NAME=”colors”>
<OPTION SELECTED>cyan
<OPTION>magenta
<OPTION>yellow
</SELECT>
</FORM>
</BODY>
</HTML>
In an effort to make this code easily maintainable, the color choice lists (one in
plain language, the other in hexadecimal triplet color specifications) are
established as two separate arrays. Repeat loops in both grand functions can work
with these arrays no matter how big they get.
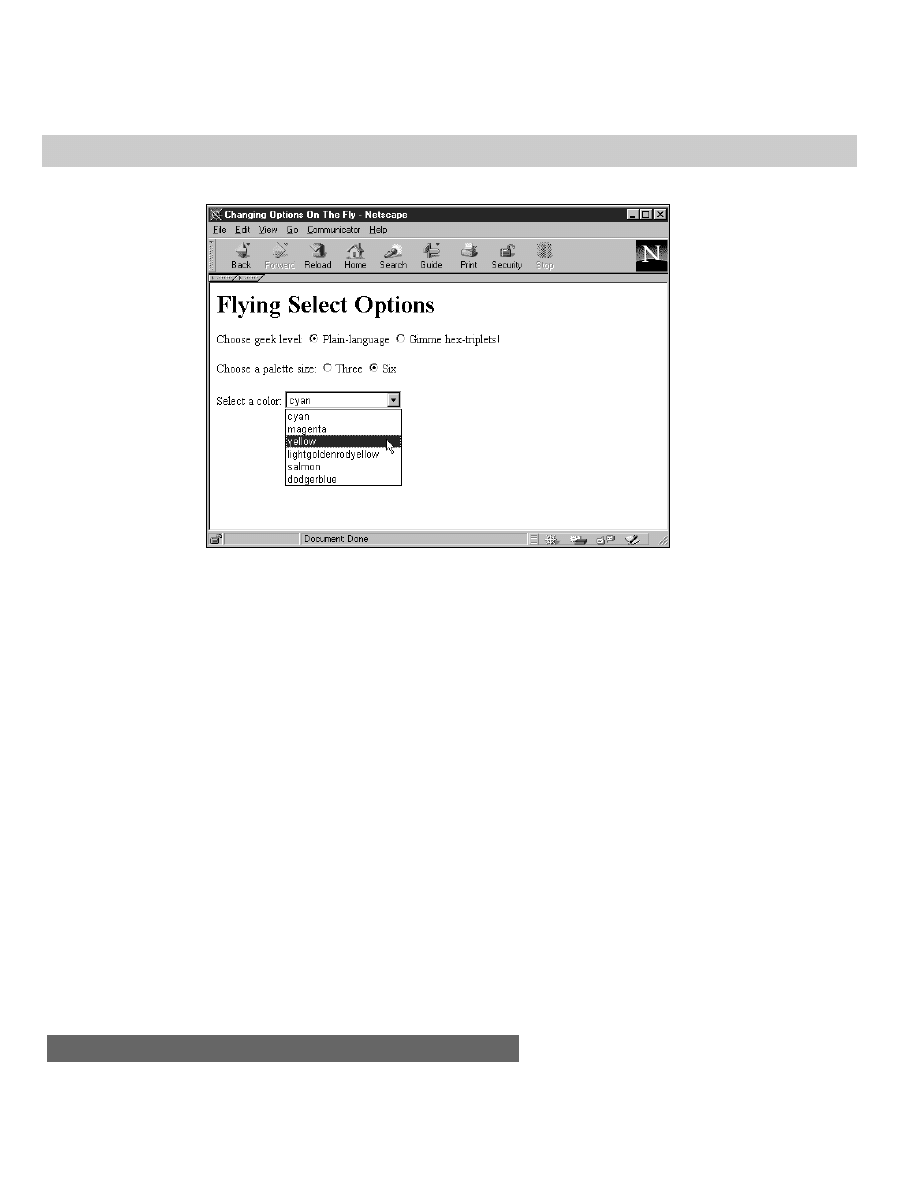
The first two radio buttons (see Figure 24-2) trigger the
setLang()
function. Its
first task is to extract a reference to the select object so additional references will
be shorter ( just
listObj
). Then you find out how many items are currently
displayed in the list, because you just want to replace as many items as are already
there. In the repeat loop, you set the
text
property of the existing select options
to corresponding entries in either of the two array listings.
490
Part III ✦ JavaScript Object and Language Reference
Figure 24-2: Radio button choices alter the contents of the select object on
the fly.
In the second pair of radio buttons, each button stores a value indicating how
many items should be displayed when the user clicks the button. This number is
picked up by the
setCount()
function and is used in the repeat loop as a
maximum counting point. In the meantime, the function finds the selected language
radio button and zeros out the select object entirely. Options are rebuilt from
scratch using the
new Option()
constructor for each option. The parameters are
the corresponding display text entries from the arrays. Because none of these new
options has other properties set (such as which one should be selected by
default), the function sets that property of the first item in the list.
Notice that both functions call
history.go(0)
for Netscape browsers after they
have set up their select objects. The purpose of this call is to give Navigator an
opportunity to resize the select object to accommodate the contents of the list.
The difference in size here is especially noticeable when you switch from the six-
color, plain-language list to any other list. Without resizing, some long items would
not be fully readable. Internet Explorer 4, on the other hand, automatically redraws
the page to the newly sized form element.
The more drastic the differences between select option displays in your page,
the more code is required. But at least you have the flexibility to make yet another
object come alive with JavaScript.
Properties
length
Value: Integer
Gettable: Yes
Settable: Yes ( Nav 3+/ IE4+)

491
Chapter 24 ✦ Select and FileUpload Objects
Nav2
Nav3
Nav4
IE3/J1
IE3/J2
IE4/J3
Compatibility
✔
✔
✔
✔
✔
✔
Like all arrays of JavaScript’s built-in functions, the options array has a
length
property of its own. But rather than having to reference the options array to
determine its length, the select object has its own
length
property, which you use
to find out how many items are in the list. This value is the number of options in
the object (starting with 1). A select object with three choices in it has a
length
property of 3.
In newer browsers you can adjust this value downward after the document has
loaded. This is one way to decrease the number of options in a list. Setting the
value to 0 causes the select object to empty but not to disappear.
Example
See Listing 24-1 for an illustration of the way you use the
length
property to
help determine how often to cycle through the repeat loop in search of selected
items. Because the loop counter,
i
, must start at 0, the counting continues until
the loop counter is one less than the actual length value (which starts its count
with 1).
Related Items:
options
property.
name
Value: String
Gettable: Yes
Settable: No
Nav2
Nav3
Nav4
IE3/J1
IE3/J2
IE4/J3
Compatibility
✔
✔
✔
✔
✔
✔
A select object’s
name
property is the string you assign to the object by way of
its
NAME
attribute in the object’s
<SELECT>
definition. This reflects the entire select
object rather than any individual options that belong to it. You may want to access
this property via the
elements[]
style of reference to a form’s components.
Example
objName = document.forms[0].elements[3].name
Related Items:
forms[].elements[]
property.
options[
index]
Value: Array of options
Gettable: Yes
Settable: No

492
Part III ✦ JavaScript Object and Language Reference
Nav2
Nav3
Nav4
IE3/J1
IE3/J2
IE4/J3
Compatibility
✔
✔
✔
✔
✔
✔
You typically won’t summon this property by itself. Rather, it becomes part of a
reference to a specific option’s properties within the entire select object. In other
words, the
options
property becomes a kind of gateway to more specific
properties, such as the value assigned to a single option within the list.
As is true with many JavaScript properties, you can use the
options
property
by itself for debugging purposes. The value it returns in Navigator is the object
definition (complete with tags). If you have more than one select object in your
page, you can use this property temporarily to review the definitions as JavaScript
sees them. I don’t recommend using this data for your working scripts, however,
because easier ways are available for extracting necessary data.
Example
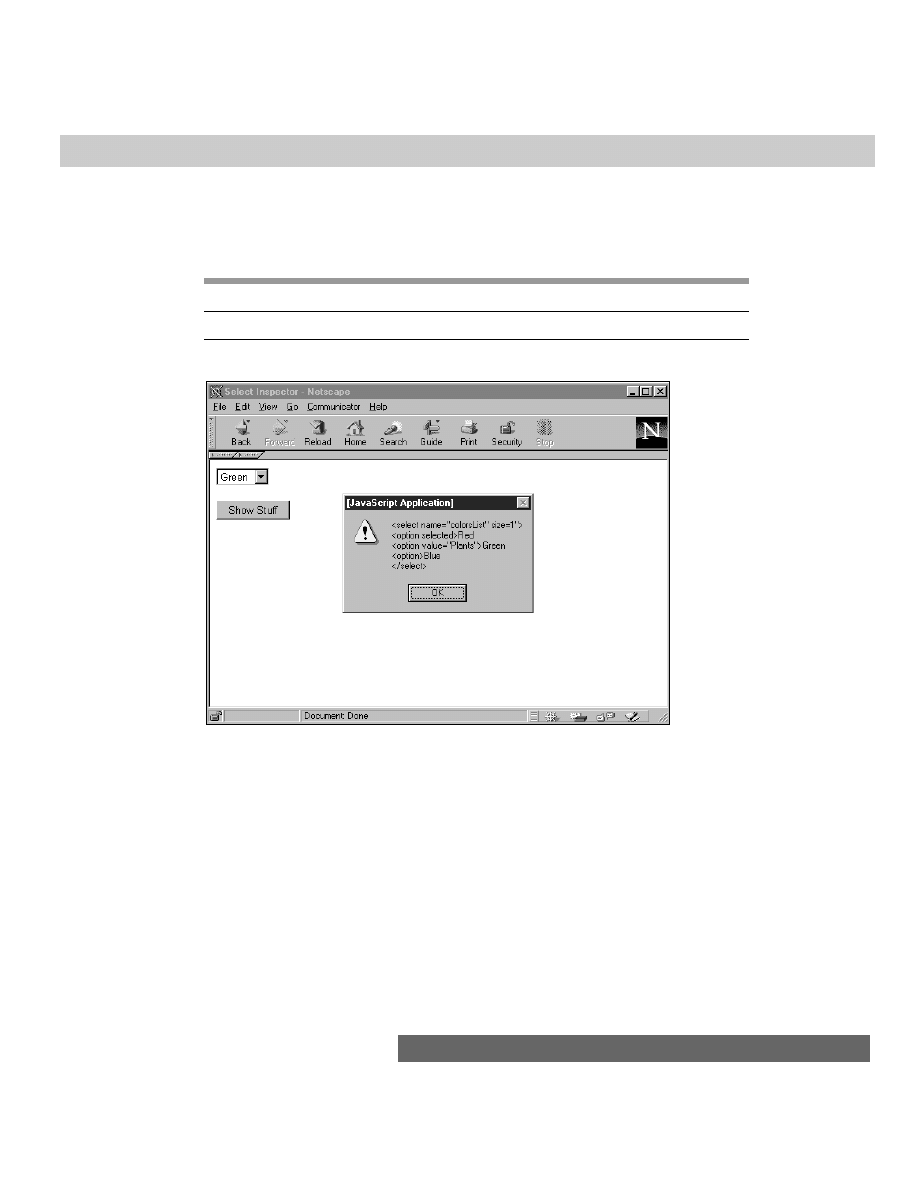
To enable you to inspect how JavaScript sees the selection object defined in the
body, the alert dialog box reveals the definition data. Figure 24-3 shows the alert
dialog box’s contents in Navigator when the first option of Listing 24-2 is selected.
This information should be used for debugging purposes only. Internet Explorer 4
shows only a generic reference to an object in its dialog box.
Listing 24-2: Options Property Readout
<HTML>
<HEAD>
<TITLE>Select Inspector</TITLE>
<SCRIPT LANGUAGE=”JavaScript”>
function inspect(form) {
alert(form.colorsList.options)
}
</SCRIPT>
</HEAD>
<BODY>
<FORM>
<SELECT NAME=”colorsList”>
<OPTION SELECTED>Red
<OPTION VALUE=”Plants”><I>Green</I>
<OPTION>Blue
</SELECT> <P>
<INPUT TYPE=”button” VALUE=”Show Stuff” onClick=”inspect(this.form)”>
</FORM>
</BODY>
</HTML>
Related Items: All
options[index].property
items.
493
Chapter 24 ✦ Select and FileUpload Objects
options[
index].defaultSelected
Value: Boolean
Gettable: Yes
Settable: No
Nav2
Nav3
Nav4
IE3/J1
IE3/J2
IE4/J3
Compatibility
✔
✔
✔
✔
✔
✔
Figure 24-3: A typical readout of the options property in Navigator
If your select object definition includes one option whose
SELECTED
attribute is
included, that option’s
defaultSelected
property is set to true. The
defaultSelected
property for all other options is false. If you define a select
object that allows multiple selections (and whose
SIZE
attribute is greater than 1),
however, you can define the
SELECTED
attribute for more than one option
definition. When the page loads, all items with that attribute will be preselected for
the user, even in discontiguous groups.
Example
isDefault = document.forms[0].listName.options[0].defaultSelected
Related Items:
options[index].selected
property.

494
Part III ✦ JavaScript Object and Language Reference
options[
index].index
Value: Integer
Gettable: Yes
Settable: No
Nav2
Nav3
Nav4
IE3/J1
IE3/J2
IE4/J3
Compatibility
✔
✔
✔
✔
✔
✔
The index value of any single option in a select object will likely be a redundant
value in your scripting. Because you cannot access the option without knowing the
index anyway (in brackets as part of the
options[index]
array reference), you
have little need to extract the index value. The value is a property of the item, just
the same.
Example
itemIndex = document.forms[0].listName.options[0].index
Related Items:
options[]
property.
options[
index].selected
Value: Boolean
Gettable: Yes
Settable: Yes
Nav2
Nav3
Nav4
IE3/J1
IE3/J2
IE4/J3
Compatibility
✔
✔
✔
✔
✔
✔
As mentioned earlier in the discussion of this object, better ways exist for
determining which option a user has selected from a list than looping through all
options and examining the
selected
property. An exception to that “rule” occurs
when a list box is set up to enable multiple selections. In this situation, the
selectedIndex
property returns an integer of only the topmost item selected.
Therefore, your script needs to look at the true or false values of the
selected
property for each option in the list and determine what to do with the text or value
data.
Example
To accumulate a list of all items selected by the user, the
seeList()
function in
Listing 24-3 systematically examines the
options[index].selected
property of
each item in the list. The text of each item whose property is true is appended to a
list. I added the
“\n “
inline carriage returns and spaces to make the list in the
alert dialog box look nice and indented. Had other values been assigned to the
VALUE
attributes of each option, the script could have extracted the
options[index].value
property to collect those values instead.

495
Chapter 24 ✦ Select and FileUpload Objects
Listing 24-3: Cycling through a Multiple-Selection List
<HTML>
<HEAD>
<TITLE>Accessories List</TITLE>
<SCRIPT LANGUAGE=”JavaScript”>
function seeList(form) {
var result = “”
for (var i = 0; i < form.accList.length; i++) {
if (form.accList.options[i].selected) {
result += “\n “ + form.accList.options[i].text
}
}
alert(“You have selected:” + result)
}
</SCRIPT>
</HEAD>
<BODY>
<FORM>
Control/Command-click on all accessories you use:
<SELECT NAME=”accList” SIZE=9 MULTIPLE>
<OPTION SELECTED>Color Monitor
<OPTION>Modem
<OPTION>Scanner
<OPTION>Laser Printer
<OPTION>Tape Backup
<OPTION>MO Drive
<OPTION>Video Camera
</SELECT> <P>
<INPUT TYPE=”button” VALUE=”View Summary...”
onClick=”seeList(this.form)”>
</FORM>
</BODY>
</HTML>
Related Items:
options[index].text
property;
options[index].value
property;
selectedIndex
property.
options[
index].text
Value: String
Gettable: Yes
Settable: Yes

496
Part III ✦ JavaScript Object and Language Reference
Nav2
Nav3
Nav4
IE3/J1
IE3/J2
IE4/J3
Compatibility
✔
✔
✔
✔
✔
✔
The
text
property of an option is the text of the item as it appears in the list. If
you can pass that wording along with your script to perform appropriate tasks,
this property is the one you want to extract for further processing. But if your
processing requires other strings associated with each option, assign a
VALUE
attribute in the definition and extract the
options[index].value
property (see
Listing 24-5).
Example
To demonstrate the
text
property of an option, Listing 24-4 applies the text
from a selected option to the background color property of a document in a
separate window. The color names are part of the collection built into the
Navigator browser.
Listing 24-4: Extracting the options[index].text Property
<HTML>
<HEAD>
<TITLE>Color Changer 1</TITLE>
<SCRIPT LANGUAGE=”JavaScript”>
var newWindow = null
function seeColor(form) {
newColor =
(form.colorsList.options[form.colorsList.selectedIndex].text)
if (newWindow == null) {
var newWindow =
window.open(“”,”colors”,”HEIGHT=200,WIDTH=150”)
}
newWindow.document.write(“<HTML><BODY BGCOLOR=” + newColor +
“>”)
newWindow.document.write(“<H1>Color Sampler</H1></BODY></HTML>”)
newWindow.document.close()
}
</SCRIPT>
</HEAD>
<BODY>
<FORM>
Choose a background color:
<SELECT NAME=”colorsList”>
<OPTION SELECTED>Gray
<OPTION>Lime
<OPTION>Ivory
<OPTION>Red
</SELECT> <P>
<INPUT TYPE=”button” VALUE=”Change It” onClick=”seeColor(this.form)”>
</FORM>

497
Chapter 24 ✦ Select and FileUpload Objects
</BODY>
</HTML>
Related Items:
options[index].value
.
options[
index].value
Value: String
Gettable: Yes
Settable: Yes
Nav2
Nav3
Nav4
IE3/J1
IE3/J2
IE4/J3
Compatibility
✔
✔
✔
✔
✔
✔
In many instances, the words in the options list appear in a form that is
convenient for the document’s users but inconvenient for the scripts behind the
page. Rather than set up an elaborate lookup routine to match the
selectedIndex
or
options[index].text
values with the values your script needs, an easier
technique is to store those values in the
VALUE
attribute of each
<OPTION>
definition of the select object. You can then extract those values as needed and be
merrily on your way.
You can store any string expression in the
VALUE
attributes. That includes URLs,
object properties, or even entire page descriptions that you want to send to a
parent.frames[index].document.write()
method, if you prefer.
Example
This variation in Listing 24-5 requires the option text that the user sees to be in
familiar, multiple-word form. But to set the color using Navigator’s built-in color
palette, you must use the one-word form. Those one-word values are stored in the
VALUE
attributes of each
<OPTION>
definition. The function then extracts the value
property, assigning it to the
bgColor
of the document in the smaller window. Had
you preferred to use the hexadecimal triplet form of color specifications, those
values would have been assigned to the
VALUE
attributes (
<OPTION
VALUE=”#e9967a”>Dark Salmon
).
Listing 24-5: Using the options[index].value Property
<HTML>
<HEAD>
<TITLE>Color Changer 2</TITLE>
<SCRIPT LANGUAGE=”JavaScript”>
var newWindow = null
function seeColor(form) {
newColor =
(form.colorsList.options[form.colorsList.selectedIndex].value)
if (newWindow == null) {
var newWindow =
(continued)

498
Part III ✦ JavaScript Object and Language Reference
Listing 24-5 (continued)
window.open(“”,”colors”,”HEIGHT=200,WIDTH=150”)
}
newWindow.document.write(“<HTML><BODY BGCOLOR=” + newColor +
“>”)
newWindow.document.write(“<H1>Color Sampler</H1></BODY></HTML>”)
newWindow.document.close()
}
</SCRIPT>
</HEAD>
<BODY>
<FORM>
Choose a background color:
<SELECT NAME=”colorsList”>
<OPTION SELECTED VALUE=”cornflowerblue”>Cornflower Blue
<OPTION VALUE=”darksalmon”>Dark Salmon
<OPTION VALUE=”lightgoldenrodyellow”>Light Goldenrod Yellow
<OPTION VALUE=”seagreen”>Sea Green
</SELECT> <P>
<INPUT TYPE=”button” VALUE=”Change It” onClick=”seeColor(this.form)”>
</FORM>
</BODY>
</HTML>
Related Items:
options[index].text
.
selectedIndex
Value: Integer
Gettable: Yes
Settable: Yes
Nav2
Nav3
Nav4
IE3/J1
IE3/J2
IE4/J3
Compatibility
✔
✔
✔
✔
✔
✔
When a user clicks on a choice in a selection list, the
selectedIndex
property
changes to a number corresponding to that item in the list. The first item has a
value of 0. This information is valuable to a script that needs to extract either the
value or text of a selected item for further processing.
You can use this information as a shortcut to getting at a selected option’s
properties. To examine its
selected
property, rather than cycling through every
option in a repeat loop, use the
selectedIndex
property to fill in the index value
for the reference to the selected item. The wording gets kind of long, but from an
execution standpoint, this methodology is much more efficient. Note, however, that
when the select object is a multiple-style, the
selectedIndex
property value
reflects the index of the topmost item selected in the list.

499
Chapter 24 ✦ Select and FileUpload Objects
Example
In the
inspect()
function of Listing 24-6, notice that the value inside the
options[]
property index brackets is a reference to the object’s
selectedIndex
property. Because this property always returns an integer value, it fulfills the needs
of the index value for the
options[]
property. Therefore, if Green is selected in
the pop-up menu,
form.colorsList.selectedIndex
returns a value of 2; that
reduces the rest of the reference to
form.colorsList.options[2].text
, which
equals “Green.”
Listing 24-6: Using the selectedIndex Property
<HTML>
<HEAD>
<TITLE>Select Inspector</TITLE>
<SCRIPT LANGUAGE=”JavaScript”>
function inspect(form) {
alert(form.colorsList.options[form.colorsList.selectedIndex].text)
}
</SCRIPT>
</HEAD>
<BODY>
<FORM>
<SELECT NAME=”colorsList”>
<OPTION SELECTED>Red
<OPTION VALUE=”Plants”><I>Green</I>
<OPTION>Blue
</SELECT> <P>
<INPUT TYPE=”button” VALUE=”Show Selection”
onClick=”inspect(this.form)”>
</FORM>
</BODY>
</HTML>
Related Items:
options[]
property.
type
Value: String
Gettable: Yes
Settable: No
Nav2
Nav3
Nav4
IE3/J1
IE3/J2
IE4/J3
Compatibility
✔
✔
✔
Use the
type
property to help you identify a select object from an unknown
group of form elements. The precise string returned for this property depends on

500
Part III ✦ JavaScript Object and Language Reference
whether the select object is defined as a single- (
“select-one”
) or multiple-
(
“select-multiple”
) style object.
Related Items:
form.elements
property.
Methods
blur()
focus()
Nav2
Nav3
Nav4
IE3/J1
IE3/J2
IE4/J3
Compatibility
✔
✔
✔
Your scripts can bring focus to a select object by invoking the object’s
focus()
method. The method activates the object, but does not, in the case of a pop-up list,
pop up the list for the user. To remove focus from an object, invoke its
blur()
method. These methods work identically with their counterparts in the text object.
handleEvent(
event)
Returns: Nothing.
Nav2
Nav3
Nav4
IE3/J1
IE3/J2
IE4/J3
Compatibility
✔
See the discussion of the
window.handleEvent()
method in Chapter 14 and
the event object in Chapter 33 for details on this ubiquitous form element method.
Event handlers
onChange=
Nav2
Nav3
Nav4
IE3/J1
IE3/J2
IE4/J3
Compatibility
✔
✔
✔
✔
✔
✔
As a user clicks on a new choice in a select object, the object receives a change
event that can be captured by the
onChange=
event handler. In examples earlier in
this section ( Listings 24-5 and 24-6, for example), the action was handed over to a
separate button. This design may make sense in some circumstances, especially
when you use multiple select lists or any list box (typically, clicking a list box item

501
Chapter 24 ✦ Select and FileUpload Objects
does not trigger any action that the user sees). But for most pop-up menus,
triggering the action when the user makes a choice is desirable.
To bring a pop-up menu to life, add an
onChange=
event handler to the
<SELECT>
definition. If the user makes the same choice as previously selected, the
onChange=
event handler is not triggered.
Example
In Listing 24-7, I converted the document from Listing 24-5 so that all action
takes place as the result of a user making a selection from the pop-up menu. I
removed the action button and placed the
onChange=
event handler in the
<SELECT>
object definition. For this application — when you desire a direct
response to user input — an appropriate method is to have the action triggered
from the pop-up menu rather than by a separate action button. A
focus()
method
brings the smaller window forward in case it’s hidden behind the main window.
Listing 24-7: Triggering a Color Change from a Pop-Up Menu
<HTML>
<HEAD>
<TITLE>Color Changer 2</TITLE>
<SCRIPT LANGUAGE=”JavaScript”>
var newWindow = null
function seeColor(form) {
newColor =
(form.colorsList.options[form.colorsList.selectedIndex].value)
if (newWindow == null) {
newWindow = window.open(“”,”colors”,”HEIGHT=200,WIDTH=150”)
}
newWindow.document.write(“<HTML><BODY BGCOLOR=” + newColor +
“>”)
newWindow.document.write(“<H1>Color Sampler</H1></BODY></HTML>”)
newWindow.document.close()
if (parseInt(navigator.appVersion.charAt(0)) > 2) {
newWindow.focus()
}
}
</SCRIPT>
</HEAD>
<BODY>
<FORM>
Choose a background color:
<SELECT NAME=”colorsList” onChange=”seeColor(this.form)”>
<OPTION SELECTED VALUE=”cornflowerblue”>Cornflower Blue
<OPTION VALUE=”darksalmon”>Dark Salmon
<OPTION VALUE=”lightgoldenrodyellow”>Light Goldenrod Yellow
<OPTION VALUE=”seagreen”>Sea Green
</SELECT>
</FORM>
</BODY>
</HTML>

502
Part III ✦ JavaScript Object and Language Reference
A bug in the Windows versions of Navigator 2 causes the
onChange=
event
handler in select objects to fail unless the user clicks outside the select object. If
your audience includes users of these browsers, then consider including a special
routine that uses
document.write()
to include a “do nothing” button next to the
select object that entices the user to click out of the select object. The
onChange=
event handler will fire at a click of that button (or any other location on the page).
FileUpload Object
Properties
Methods
Event Handlers
name
blur()
onBlur=
value
focus()
onFocus=
type
select()
onChange=
Syntax
Creating a fileUpload object:
<FORM>
<INPUT
TYPE=”file”
[NAME=”fieldName”]
[SIZE=”charCount”]>
</FORM>
Accessing fileUpload object properties:
[window.] document.formName.fileUploadName[index].property
[window.] document.forms[index].fileUploadName.property
About this object
Some Web sites enable you to upload files from the client to the server, typically
by using a form-style submission to a CGI program on the server. The fileUpload
object (type
“file”
) is merely a user interface that enables users to specify which
file on their PC they want to upload.
This object displays a field and a Browse button. The Browse button leads to an
open file dialog box (in the local operating system’s interface vernacular) where a
user can select a file. After making a selection, the filename (or pathname,
depending on the operating system) appears in the fileUpload object’s field. The
filename is the
value
property.
You do not have to script much for this object on the client side. The
value
property, for example, is read-only, although it provides a full pathname in MIME-
encoded text. The point is that scripts or CGIs cannot fill this object with a
filename or pathname to surreptitiously extract content from a client disk volume.
Note

503
Chapter 24 ✦ Select and FileUpload Objects
The fileUpload object is available in Navigator from Version 3 onward. Internet
Explorer 4 uses different terminology to talk about this kind of object. But such
objects are referenced the same way in both platforms.
Listing 24-8 helps you see what the object looks like. The syntax is compatible
in Navigator 3 or later and Internet Explorer 4 or later.
Listing 24-8: fileUpload Object
<HTML>
<HEAD>
<TITLE>FileUpload Object</TITLE>
</HEAD>
<BODY>
<FORM>
File to be uploaded:
<INPUT TYPE=”file” SIZE=40 NAME=”fileToGo”><P>
<INPUT TYPE=”button” VALUE=”View Value”
onClick=”alert(this.form.fileToGo.value)”>
</FORM>
</BODY>
</HTML>
In a true production environment, a Submit button and a CGI would be specified
for the
ACTION
attribute of the
<FORM>
definition. I list the object in this book,
primarily because it is reflected as part of the JavaScript object model, even if
scripting it is not a big part of everyday life. Moreover, you may run into difficulty
in extracting the
value
property in Navigator 3 on some platforms without
bringing focus to the object after a file has been chosen.
✦ ✦ ✦
Note
Wyszukiwarka
Podobne podstrony:
Ch24
ch24
ch24
Ch24 Calculate Stress on 3D Parts
Ch24 milling
Ch24 Solations Brigham 10th E
Ch24 04
Essentials of Biology mad86161 ch24
Ch24
Ch24
DKE285 ch24
więcej podobnych podstron