© Renault s.a.s 2008
"The repair methods given by the manufacturer in this document are based on the technical
specifications current when it was prepared.
The methods may be modified as a result of changes introduced by the manufacturer in the
production of the various component units and accessories from which his vehicles are
constructed."
All copyrights reserved by Renault.
The reproduction or translation in part of whole of the present document, as well as the use
of the spare parts reference numbering system, are prohibited without the prior written
consent of Renault.
APRIL 2009
Edition Anglaise
X95
6
Sealing and soundproofing
65A
OPENING ELEMENT SEALING
66A
WINDOW SEALING
68A
SOUNDPROOFING
MEGANE III - Section 6
Contents
Page
MEGANE III - Section 6ContentsPage
65A
OPENING ELEMENT SEALING
Door sealing film: Removal -
Refitting
65A-1
Sunroof seal: Removal -
Refitting
65A-7
66A
WINDOW SEALING
Front side door glass run
channel: Removal - Refitting
66A-1
Front door side exterior
weather strip: Removal -
Refitting
66A-4
Glass run channel in rear
side door: Removal -
Refitting
66A-6
68A
SOUNDPROOFING
Centre floor side
soundproofing: Removal -
Refitting
68A-1
Centre floor rear
soundproofing: Removal -
Refitting
68A-3
65A
-
1
OPENING ELEMENT SEALING
Door sealing film: Removal - Refitting
65A
REMOVAL
I - REMOVAL PREPARATION OPERATION
a
Remove the front side door trim (see Front side
door trim: Removal - Refitting) (72A, Side opening
elements trim) or the rear side door trim (see Rear
side door trim: Removal - Refitting) (72A, Side
opening elements trim).
a
Remove the front side door trim (see Front side
door trim: Removal - Refitting) (72A, Side opening
elements trim).
II - OPERATION FOR REMOVAL OF PART
CONCERNED
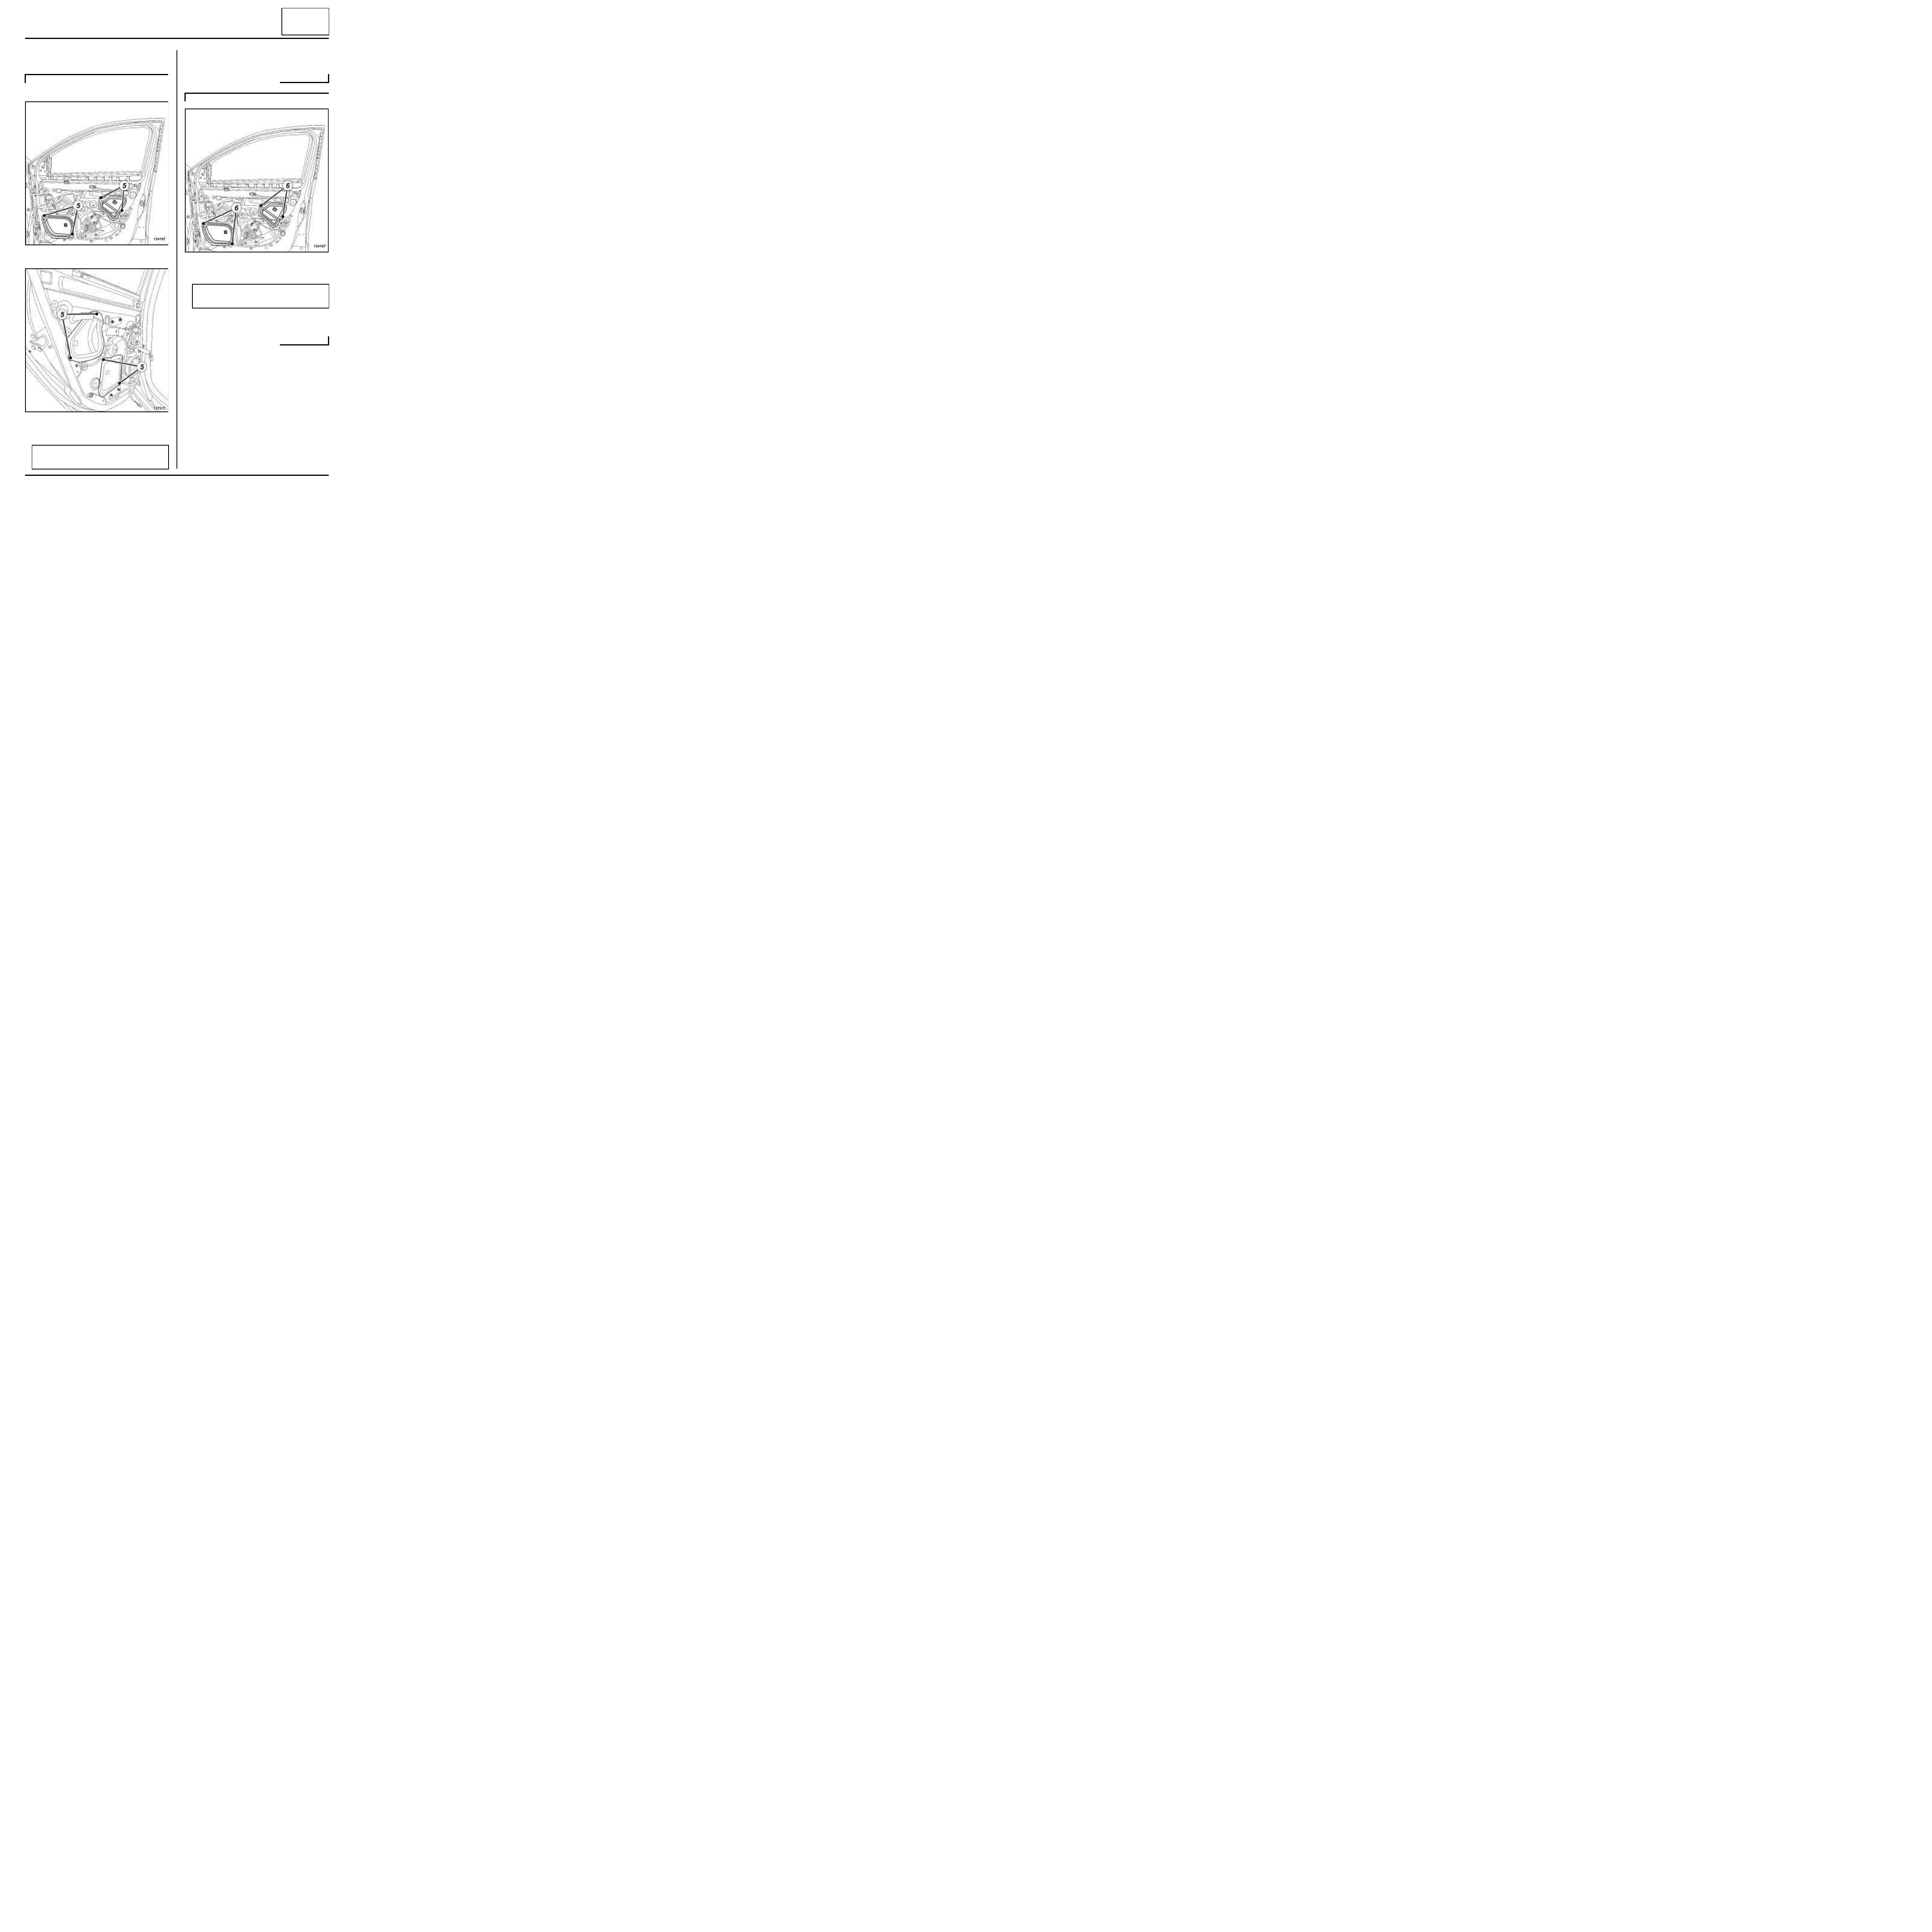
Front door
Rear door
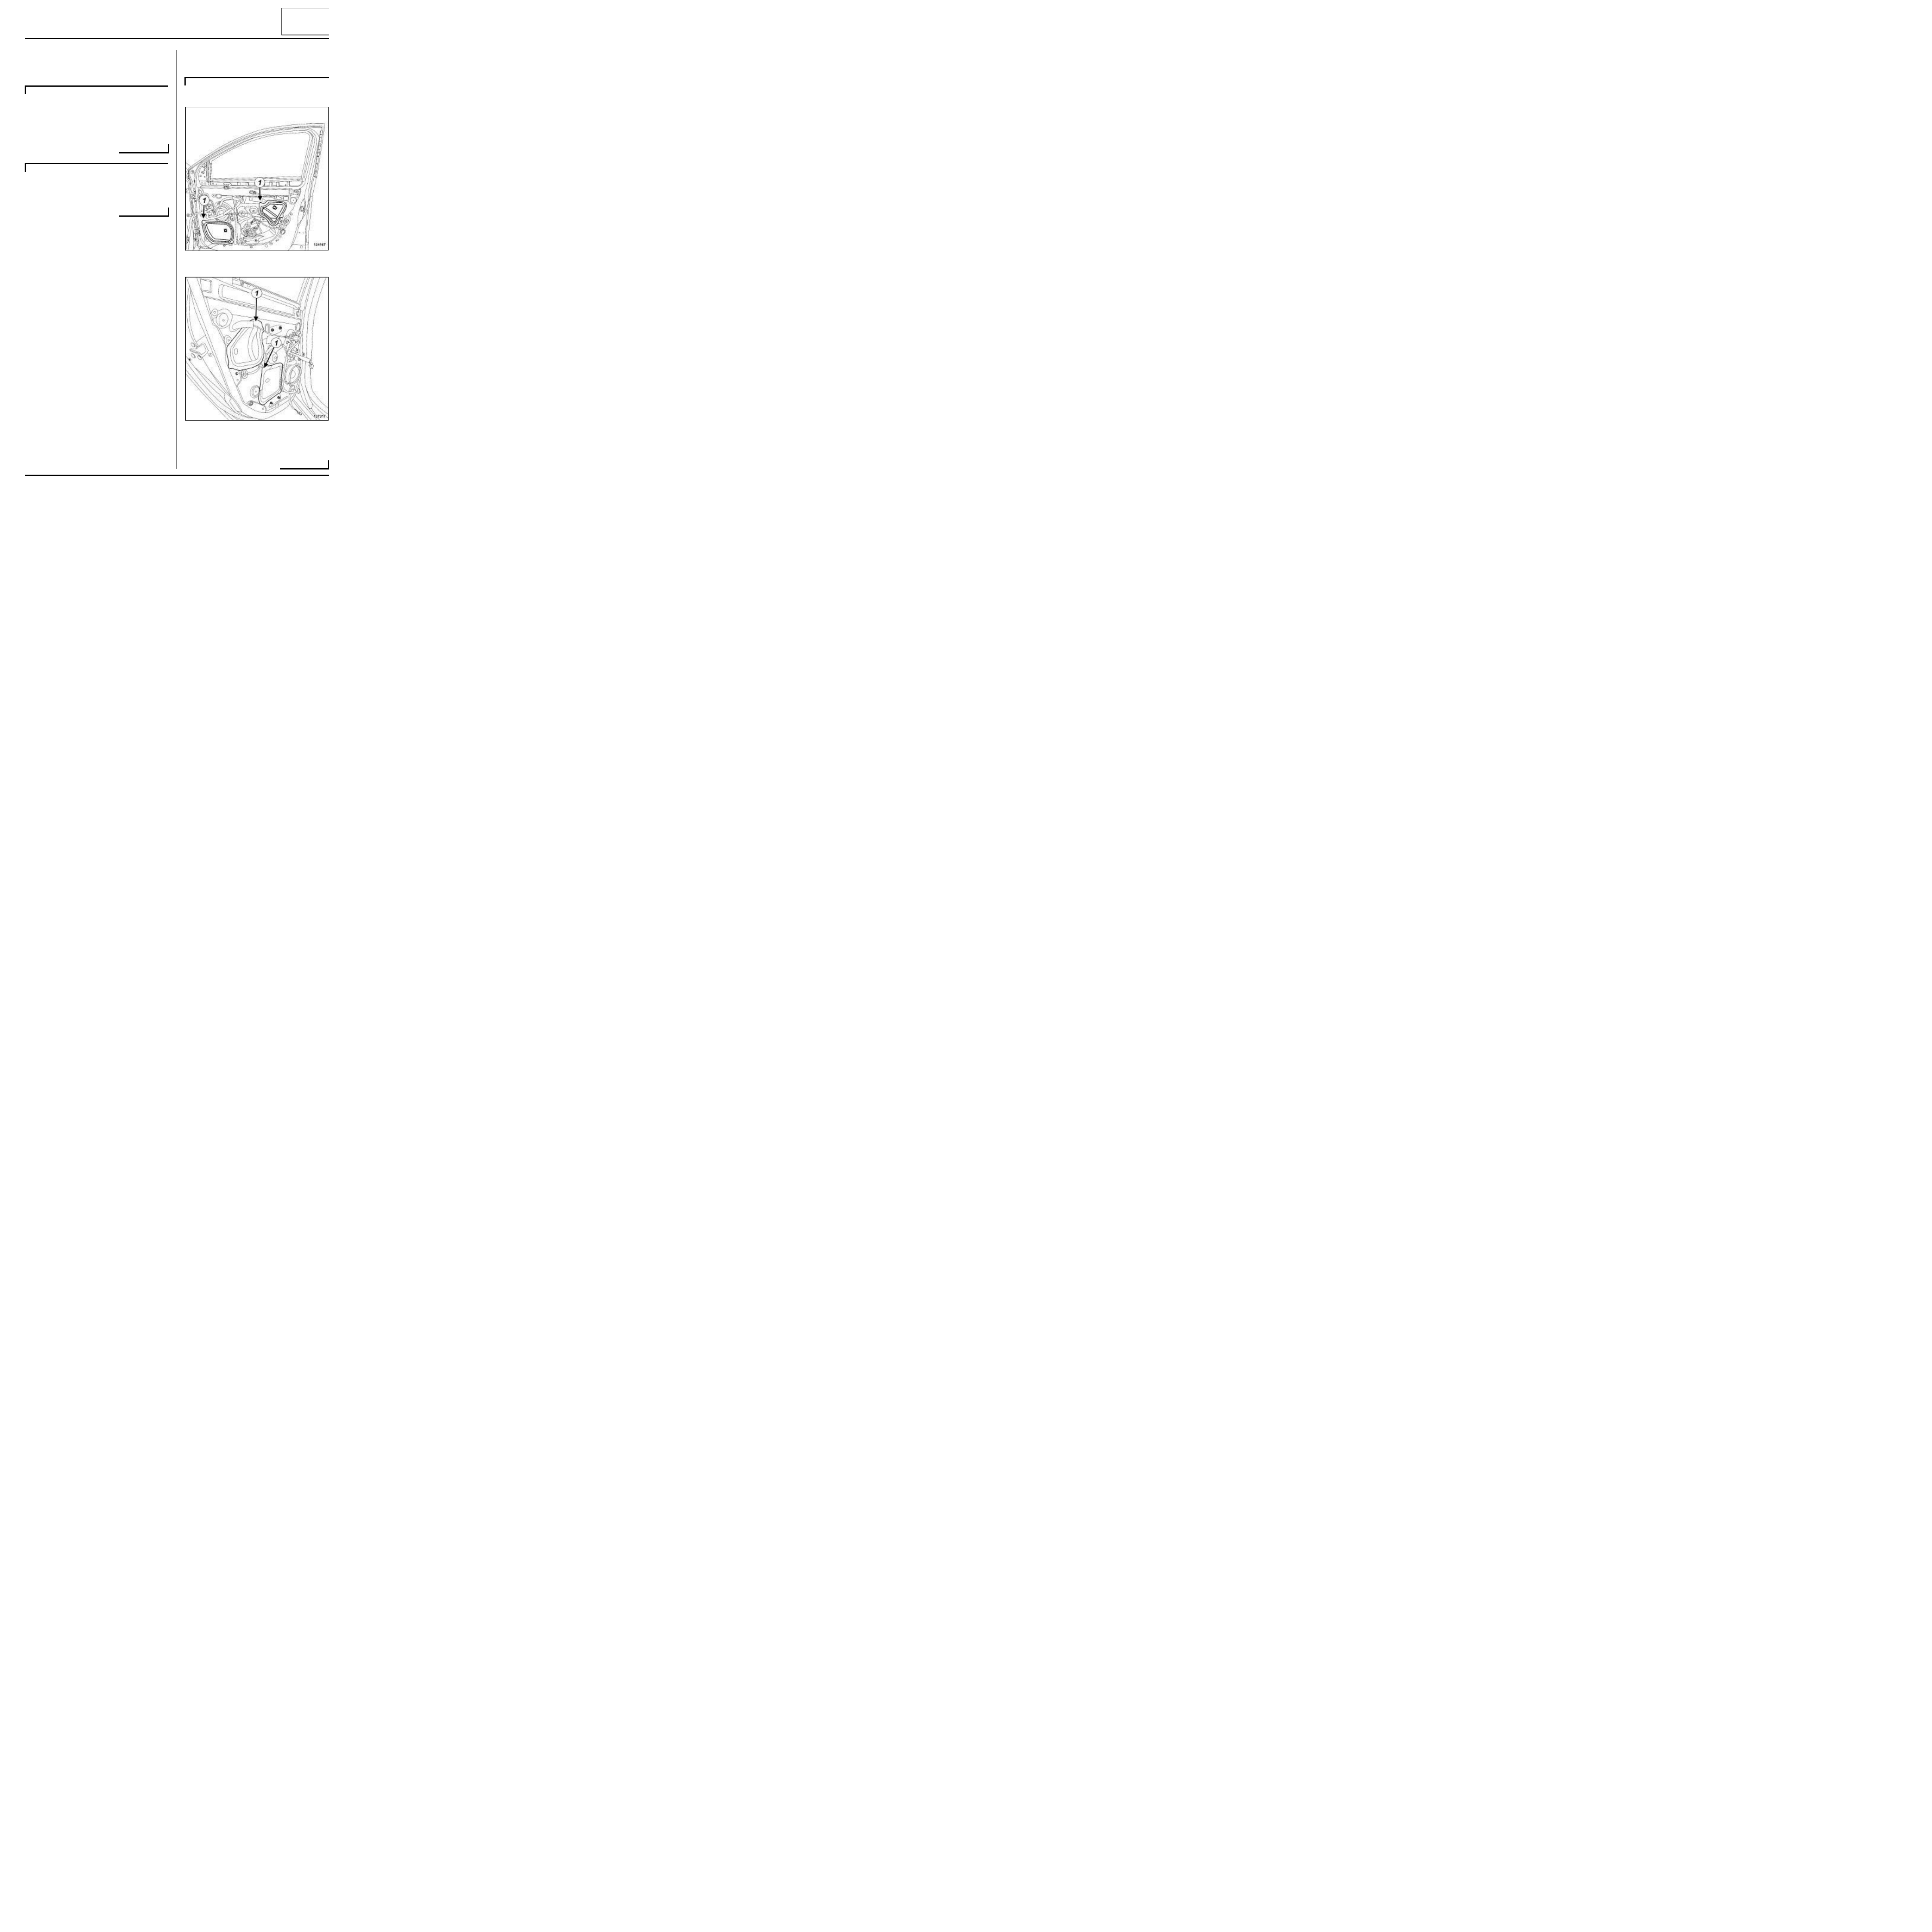
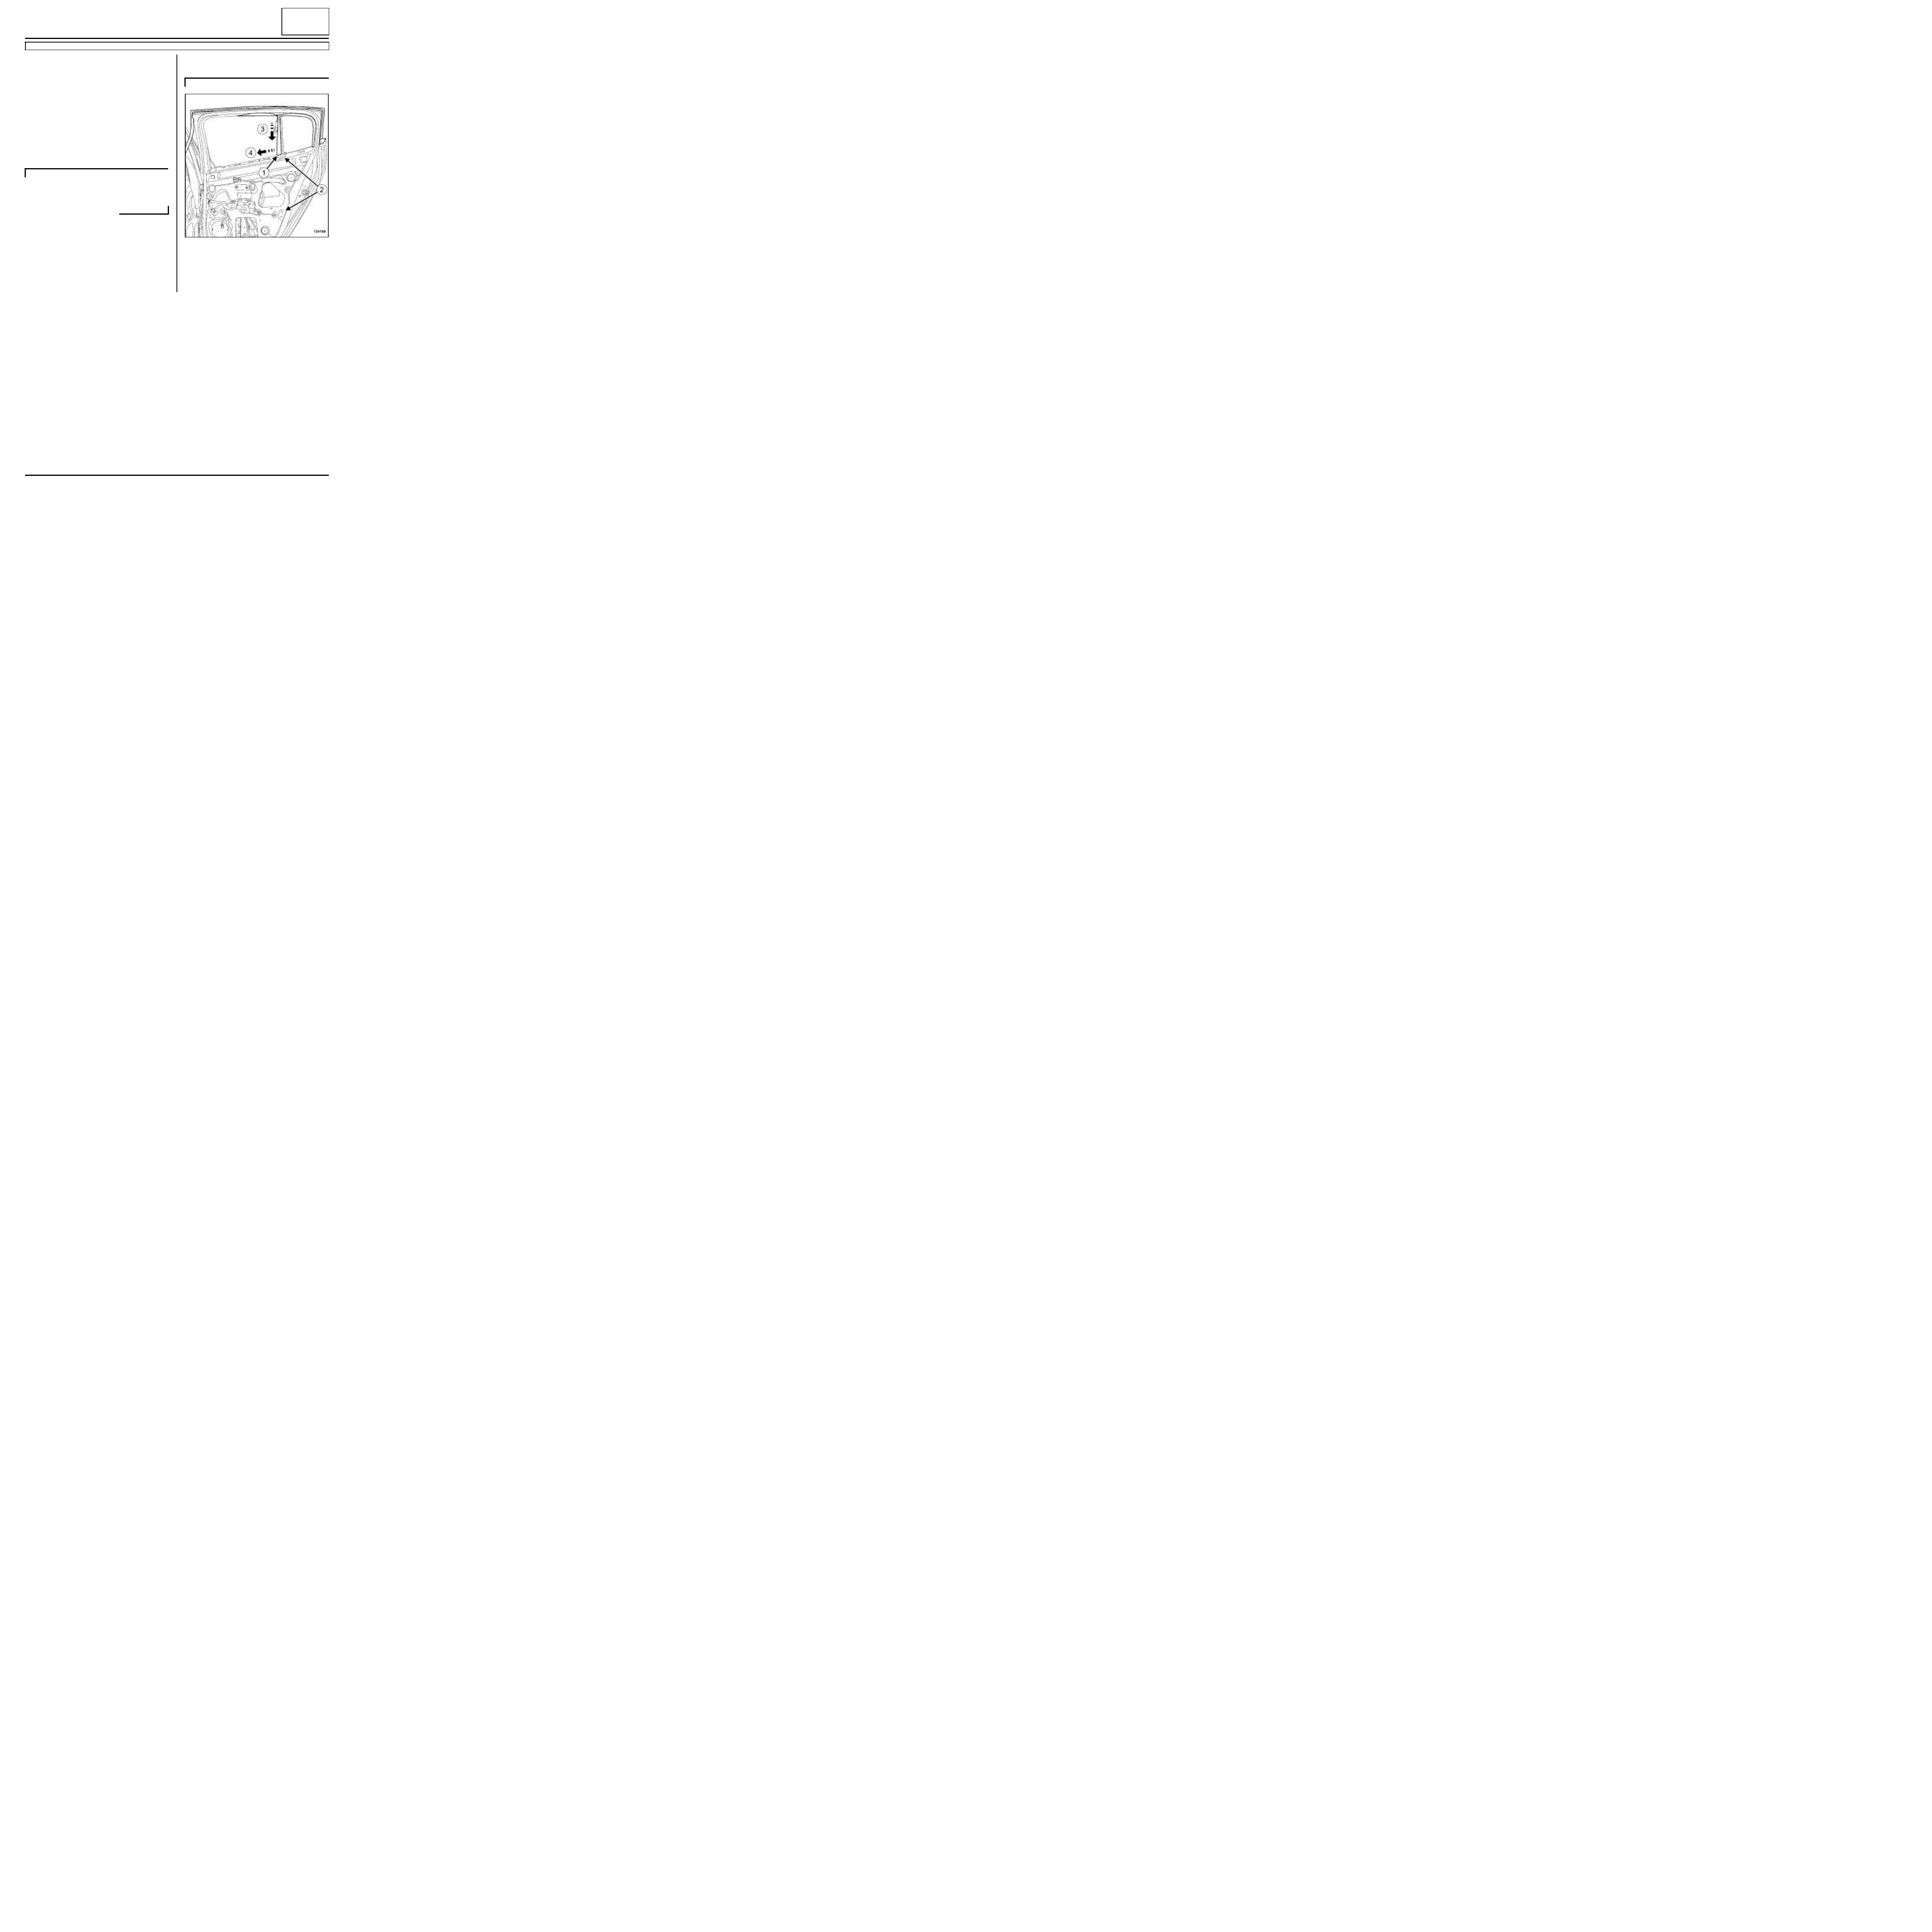
a
Start removing the upper section of the door sealing
film (1) .
B95 or J95 or K95
D95
B95
134167
137317
65A
-
2
OPENING ELEMENT SEALING
Door sealing film: Removal - Refitting
65A
a
Start removing the upper section of the door sealing
film (2) .
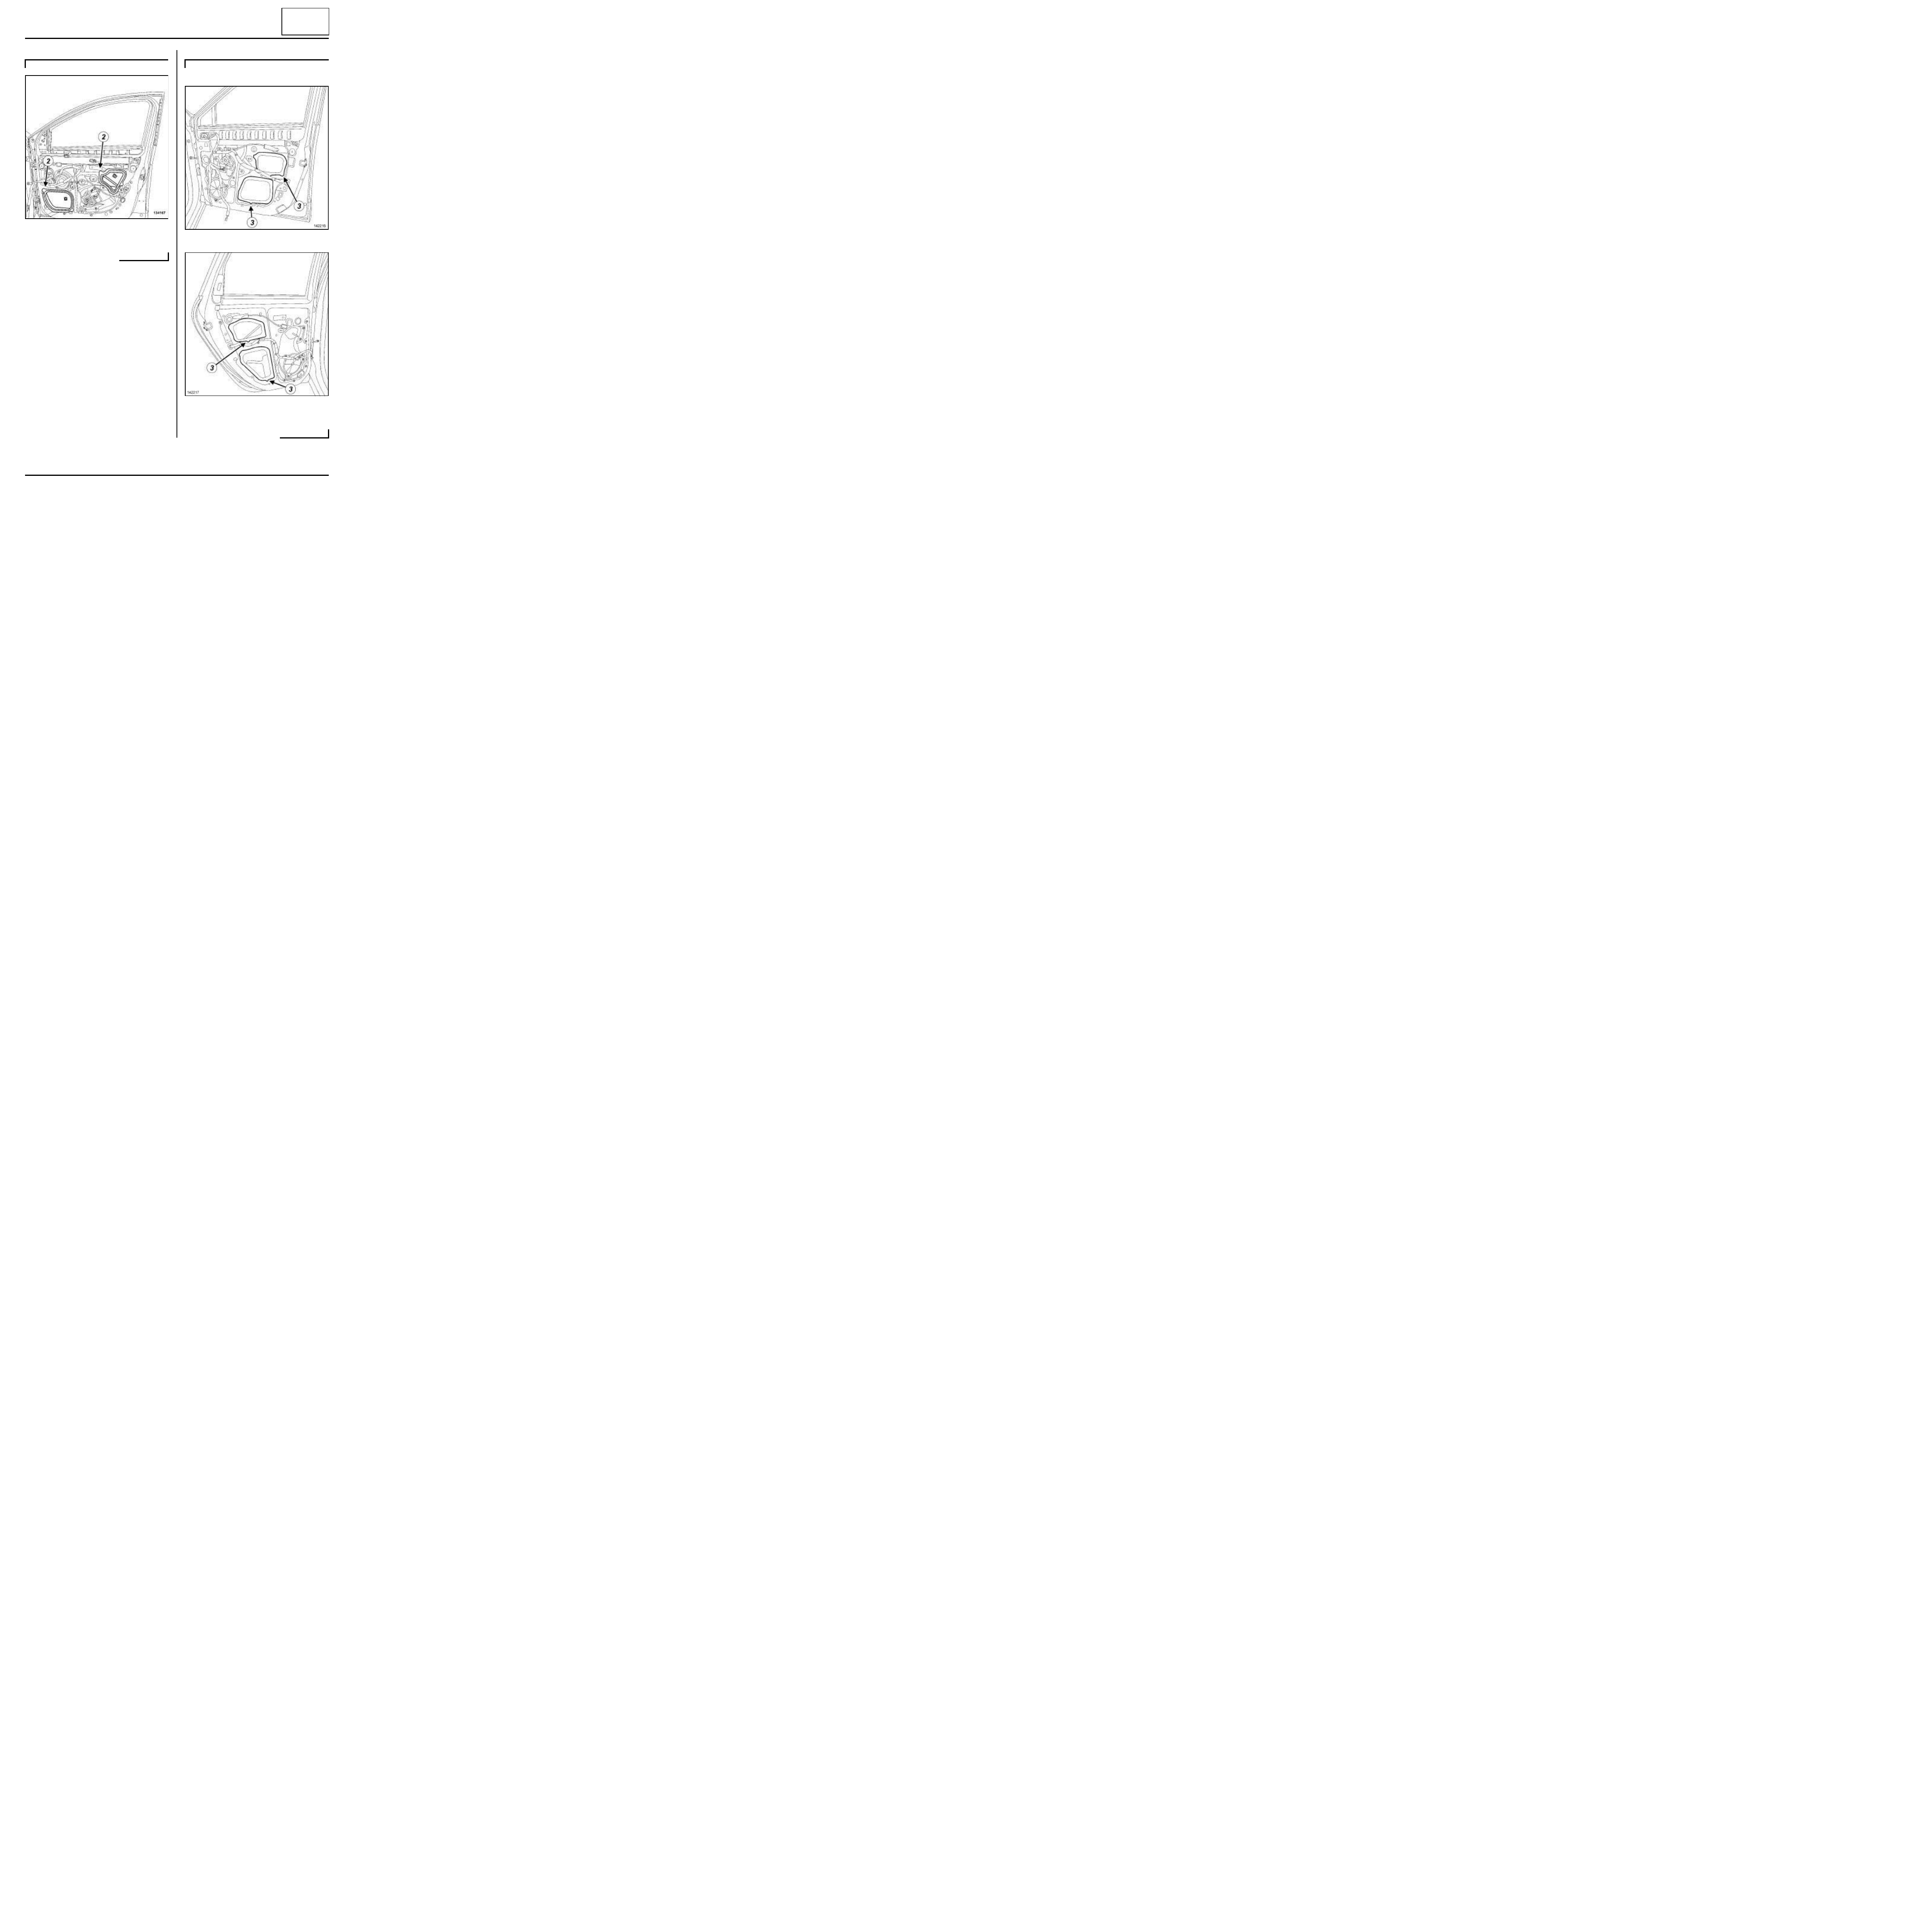
Front door
Rear door
a
Start removing the lower section of the door sealing
film (3) .
D95
134167
J95
142216
142217

65A
-
3
OPENING ELEMENT SEALING
Door sealing film: Removal - Refitting
65A
Front door
Rear door
a
Start removing the upper section of the door sealing
film (4) .
a
Carefully remove the mastic bead from the door box
section around the edges of the door sealing film.
REFITTING
I - REFITTING PREPARATION OPERATION
a
parts always to be replaced: Door sealing film
(60,03,02,10).
K95
134167
142215
Note:
If the mastic bead offers too much resistance,
use a hot air gun set to approximately 100˚C and
held approximately 20 cm away from the door
sealing film to ease its removal.
Note:
Remove the adhesive residue from the door box
section by applying wide masking tape over the
bonding area. Pull gently on the masking tape to
remove any adhesive residue.
Clean the door box section using a LINT-FREE
CLOTH soaked in HEPTANE (see V e h i cle:
Parts and consumables for repair) (04B, Con-
sumables - Products).
WARNING
To ensure the sealing film adheres correctly:
- The door must be clean (free of dust, grease
and anti-adhesive products), with no trace of
impurities and no condensation,
- The area of the door box section where the film
is to be applied must be painted completely,
- There must be a minimum temperature of 15˚
on the surfaces which are to be bonded.
65A
-
4
OPENING ELEMENT SEALING
Door sealing film: Removal - Refitting
65A
II - REFITTING OPERATION FOR PART
CONCERNED
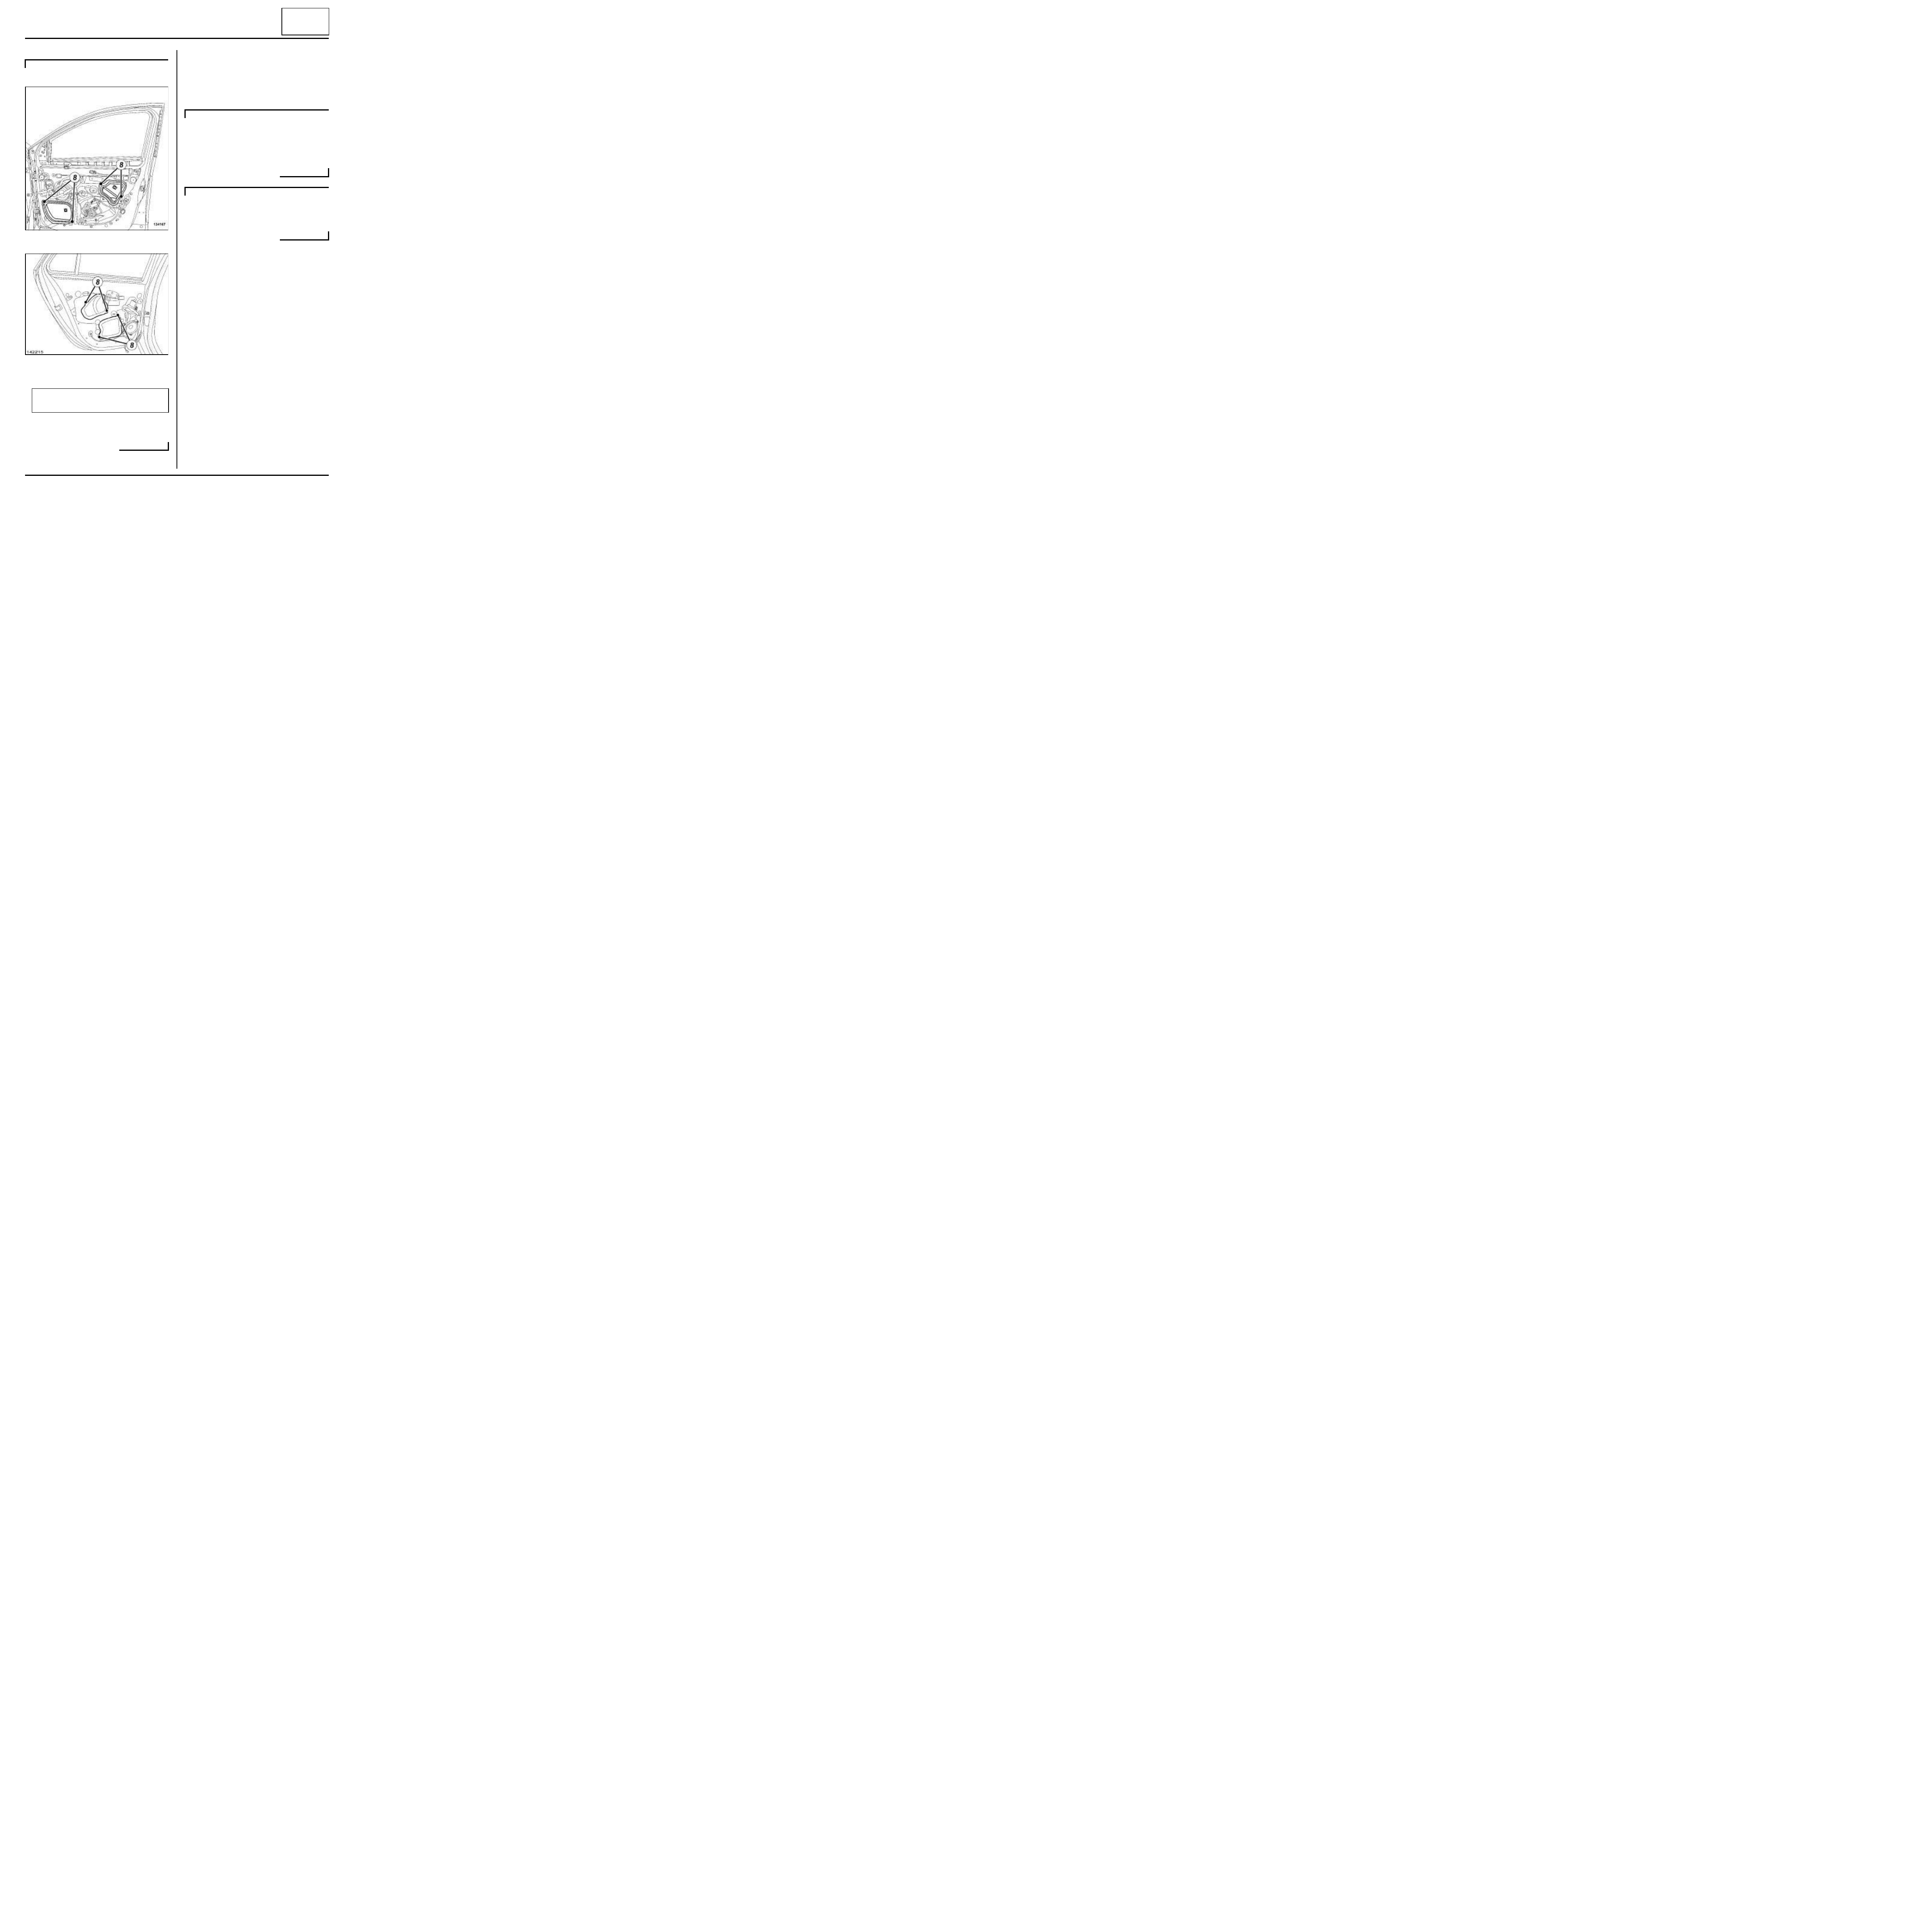
Front door
Rear door
a
Remove the paper protecting the door sealing film
mastic bead.
a
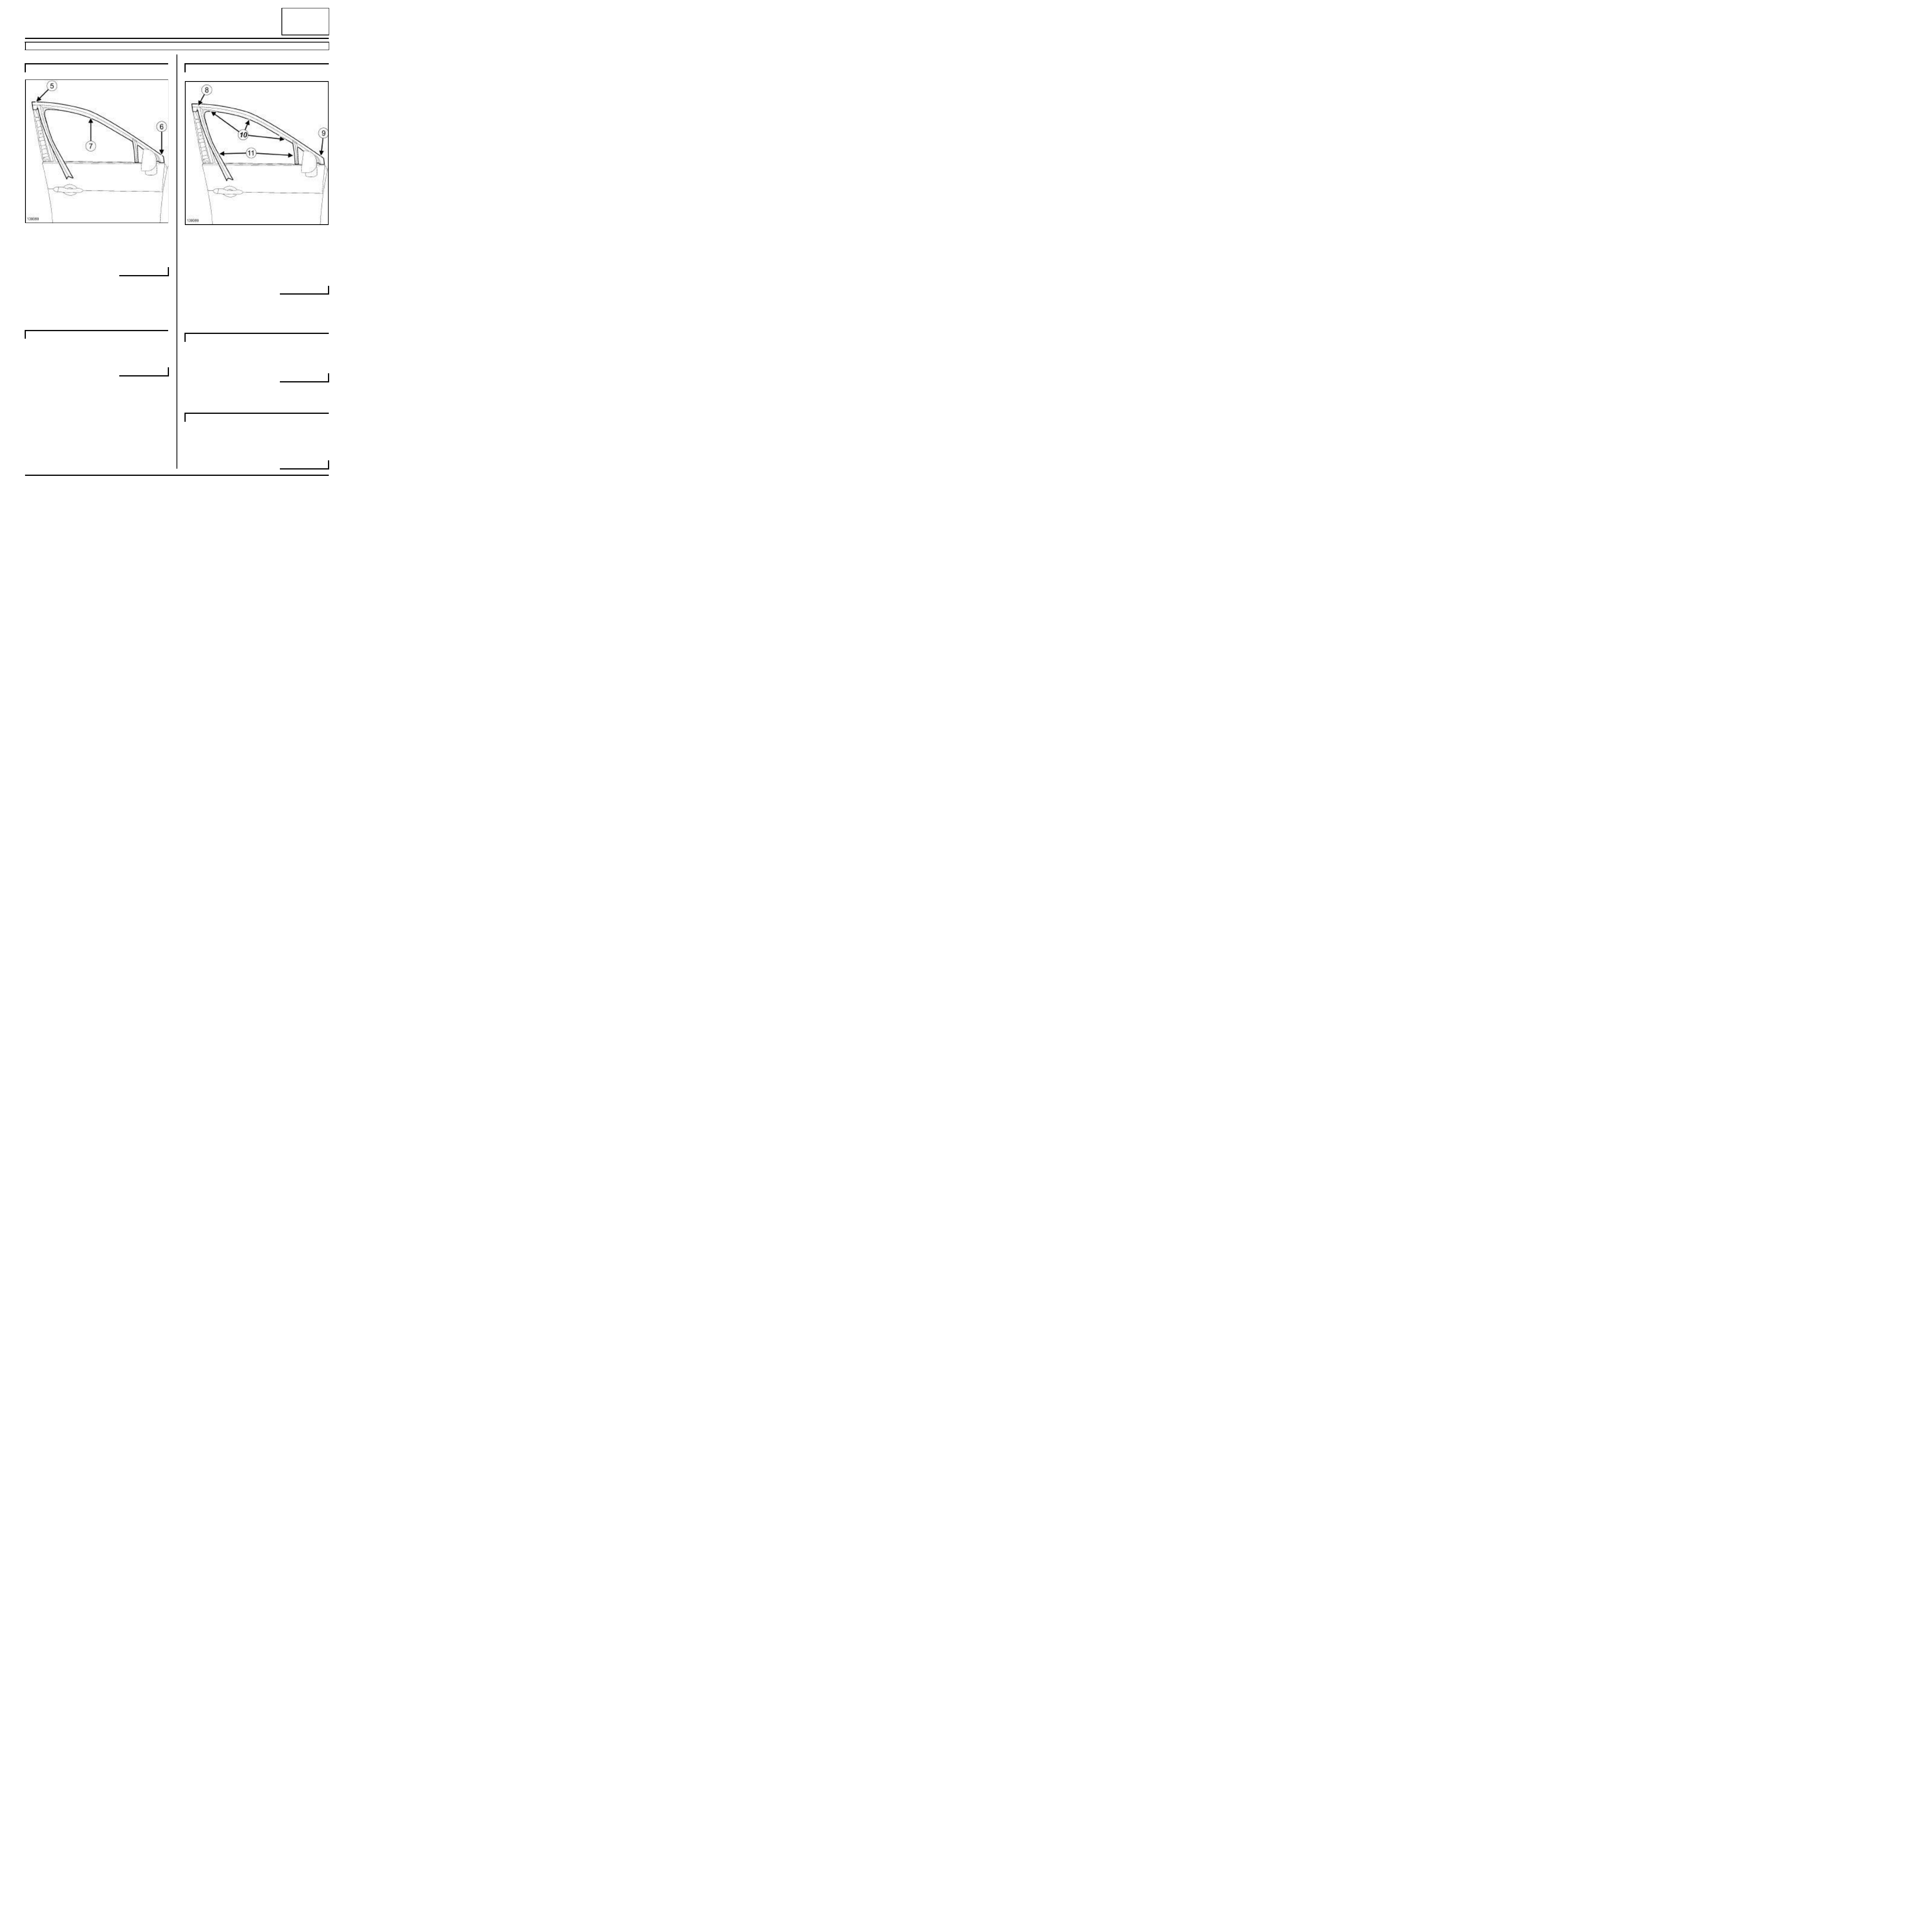
Offer up the door sealing film without forcing it, brin-
ging it into contact with the areas shown (5) .
a
Remove the paper protecting the door sealing film
mastic bead.
a
Offer up the door sealing film without forcing it, brin-
ging it into contact with the areas shown (6) .
B95
134167
137317
Note:
Do not touch the mastic bead.
D95
134167
Note:
Do not touch the mastic bead.

65A
-
5
OPENING ELEMENT SEALING
Door sealing film: Removal - Refitting
65A
Front door
Rear door
a
Remove the paper protecting the door sealing film
mastic bead.
a
Offer up the door sealing film without forcing it, brin-
ging it into contact with the areas shown (7) .
J95
142216
142217
Note:
Do not touch the mastic bead.
65A
-
6
OPENING ELEMENT SEALING
Door sealing film: Removal - Refitting
65A
Front door
Rear door
a
Remove the paper protecting the door sealing film
mastic bead.
a
Offer up the door sealing film without forcing it, brin-
ging it into contact with the areas shown (8) .
a
Position the door sealing film correctly around the
outside edge without applying any pressure.
a
Firmly attach the door sealing film around its entire
edge.
III - FINAL OPERATION
a
Carry out a sealing test (see Technical Note
0653A).
a
Refit the front side door trim (see Front side door
trim: Removal - Refitting) (72A, Side opening ele-
ments trim) or the rear side door trim (see Rear side
door trim: Removal - Refitting) (72A, Side opening
elements trim).
a
Refit the front side door trim (see Front side door
trim: Removal - Refitting) (72A, Side opening ele-
ments trim).
K95
134167
142215
Note:
Do not touch the mastic bead.
B95 or J95 or K95
D95
65A
-
7
OPENING ELEMENT SEALING
Sunroof seal: Removal - Refitting
PANORAMIC SUNROOF
65A
REMOVAL
I - REMOVAL PREPARATION OPERATION
a
Remove the mobile sunroof panel (see Sunroof
moving panel: Removal - Refitting) (52A, Non-
side opening element mechanisms).
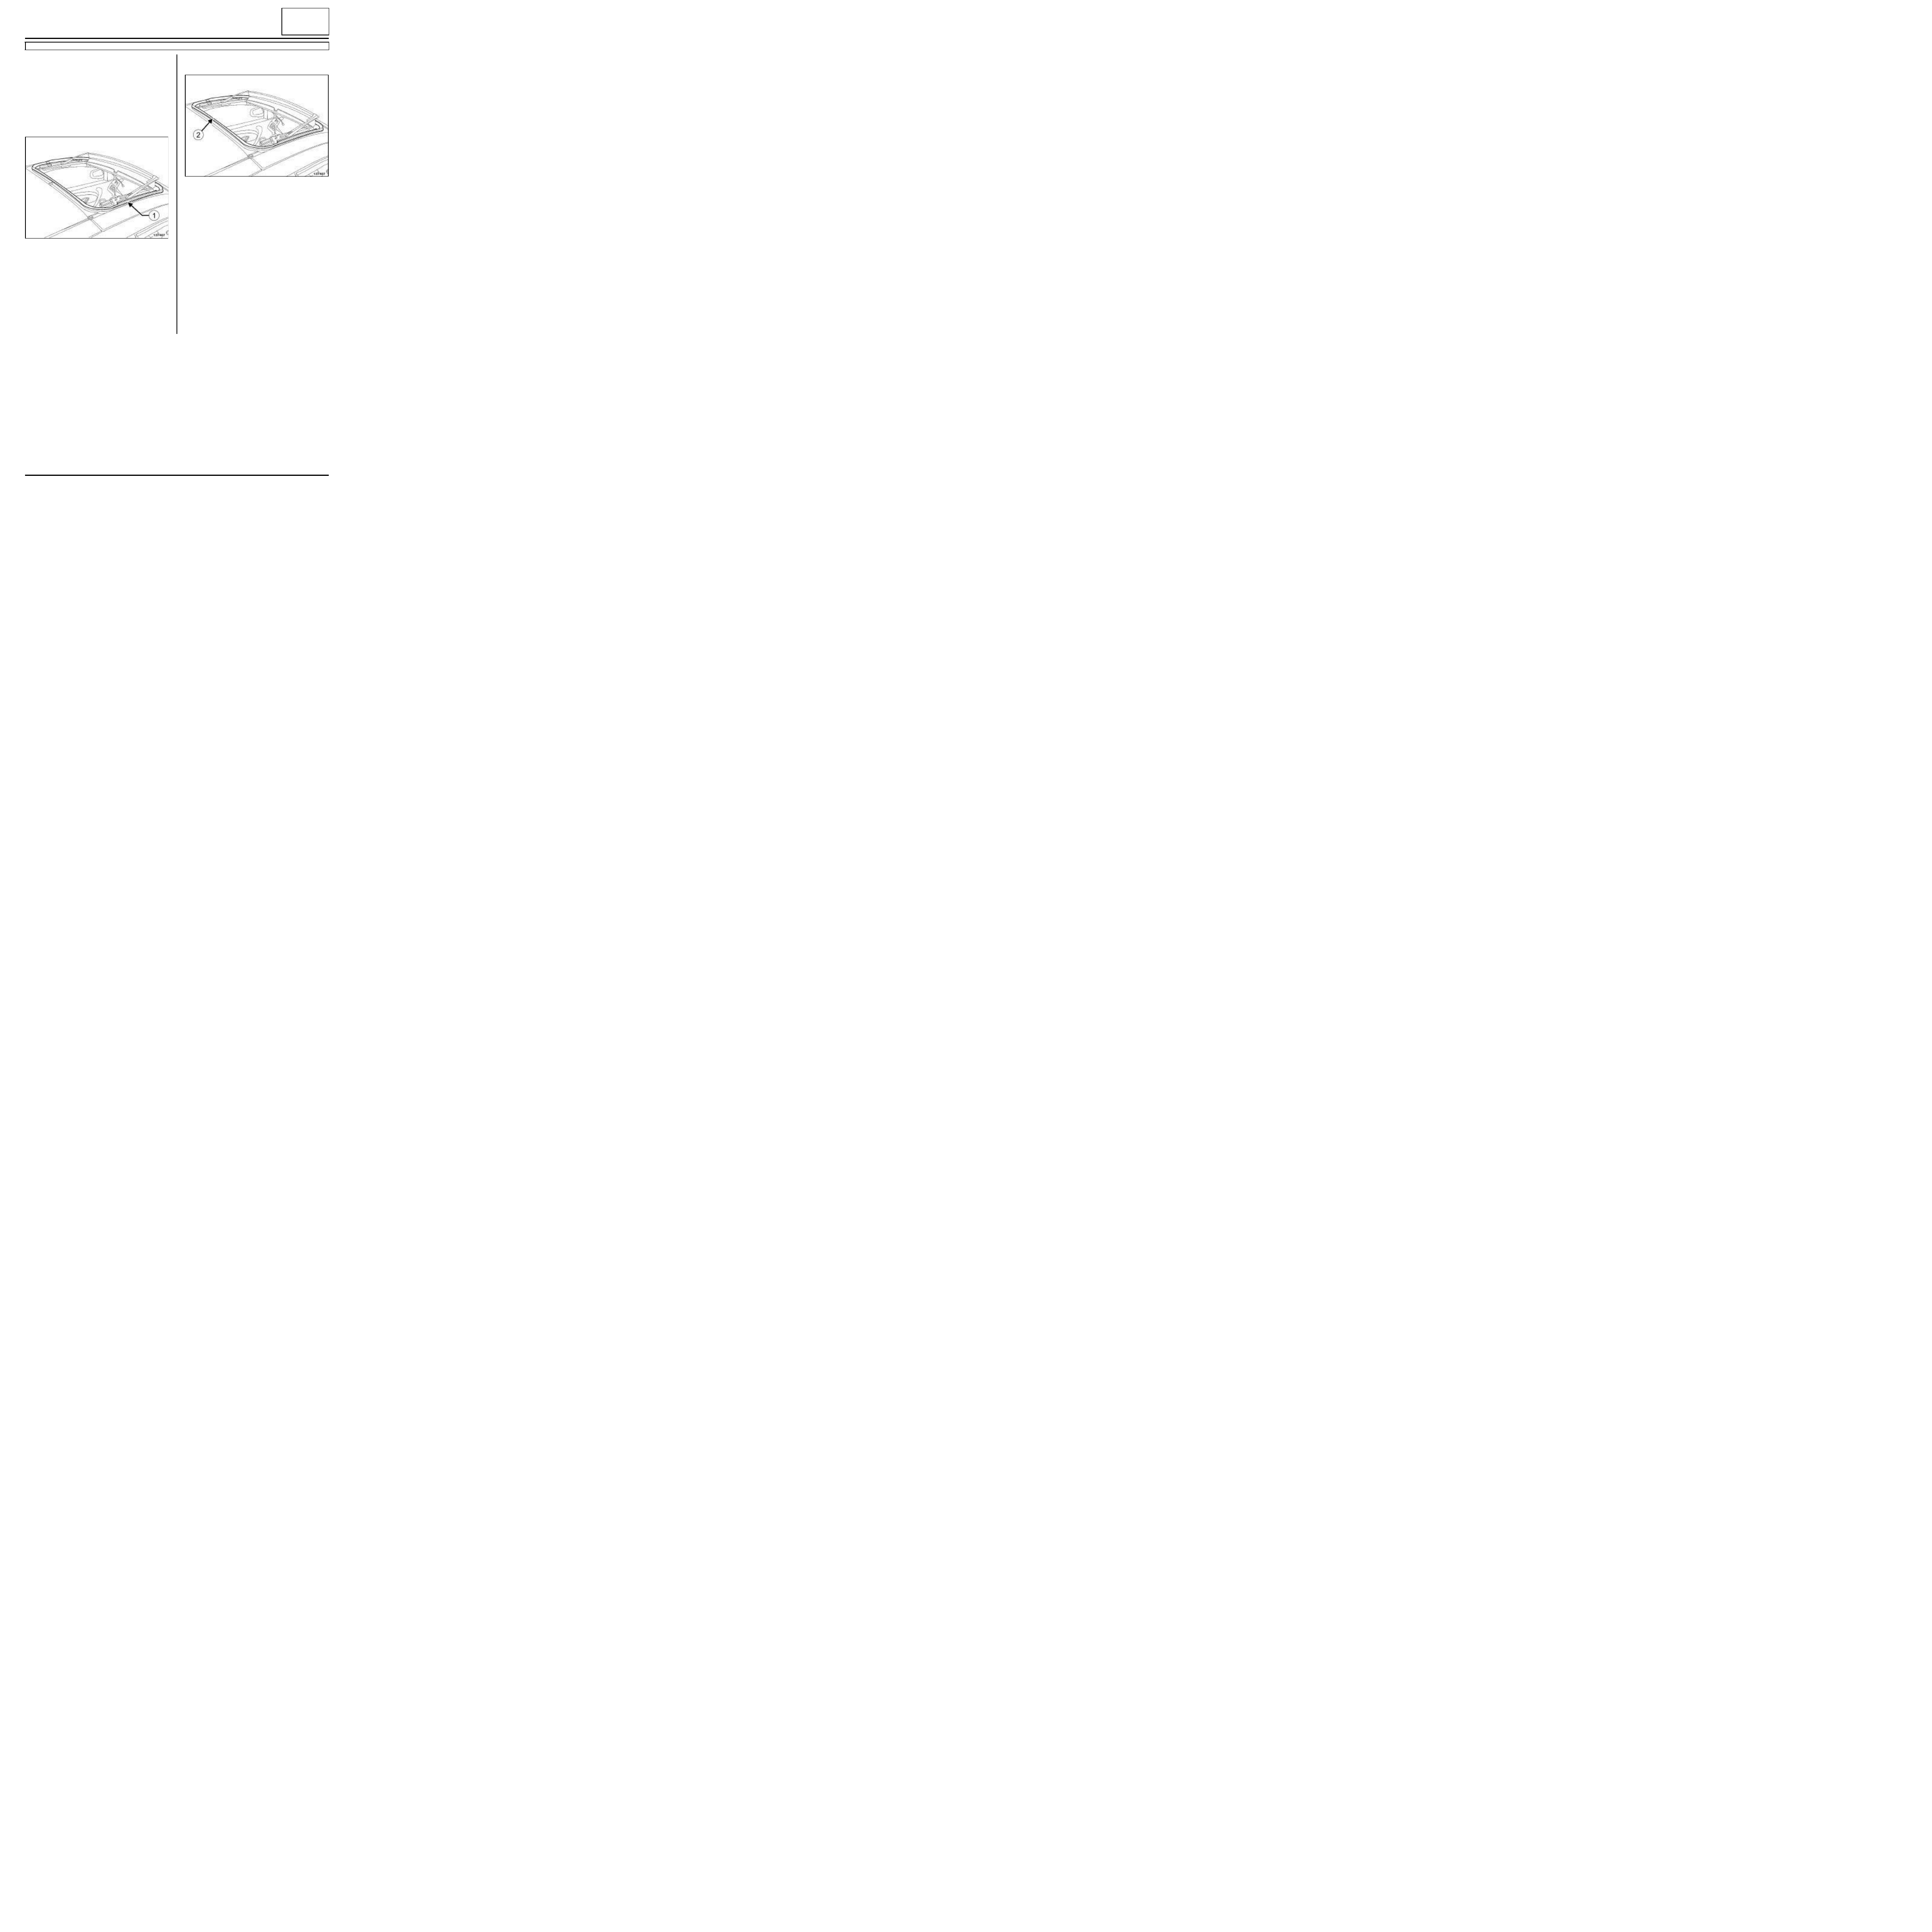
II - OPERATION FOR REMOVAL OF PART
CONCERNED
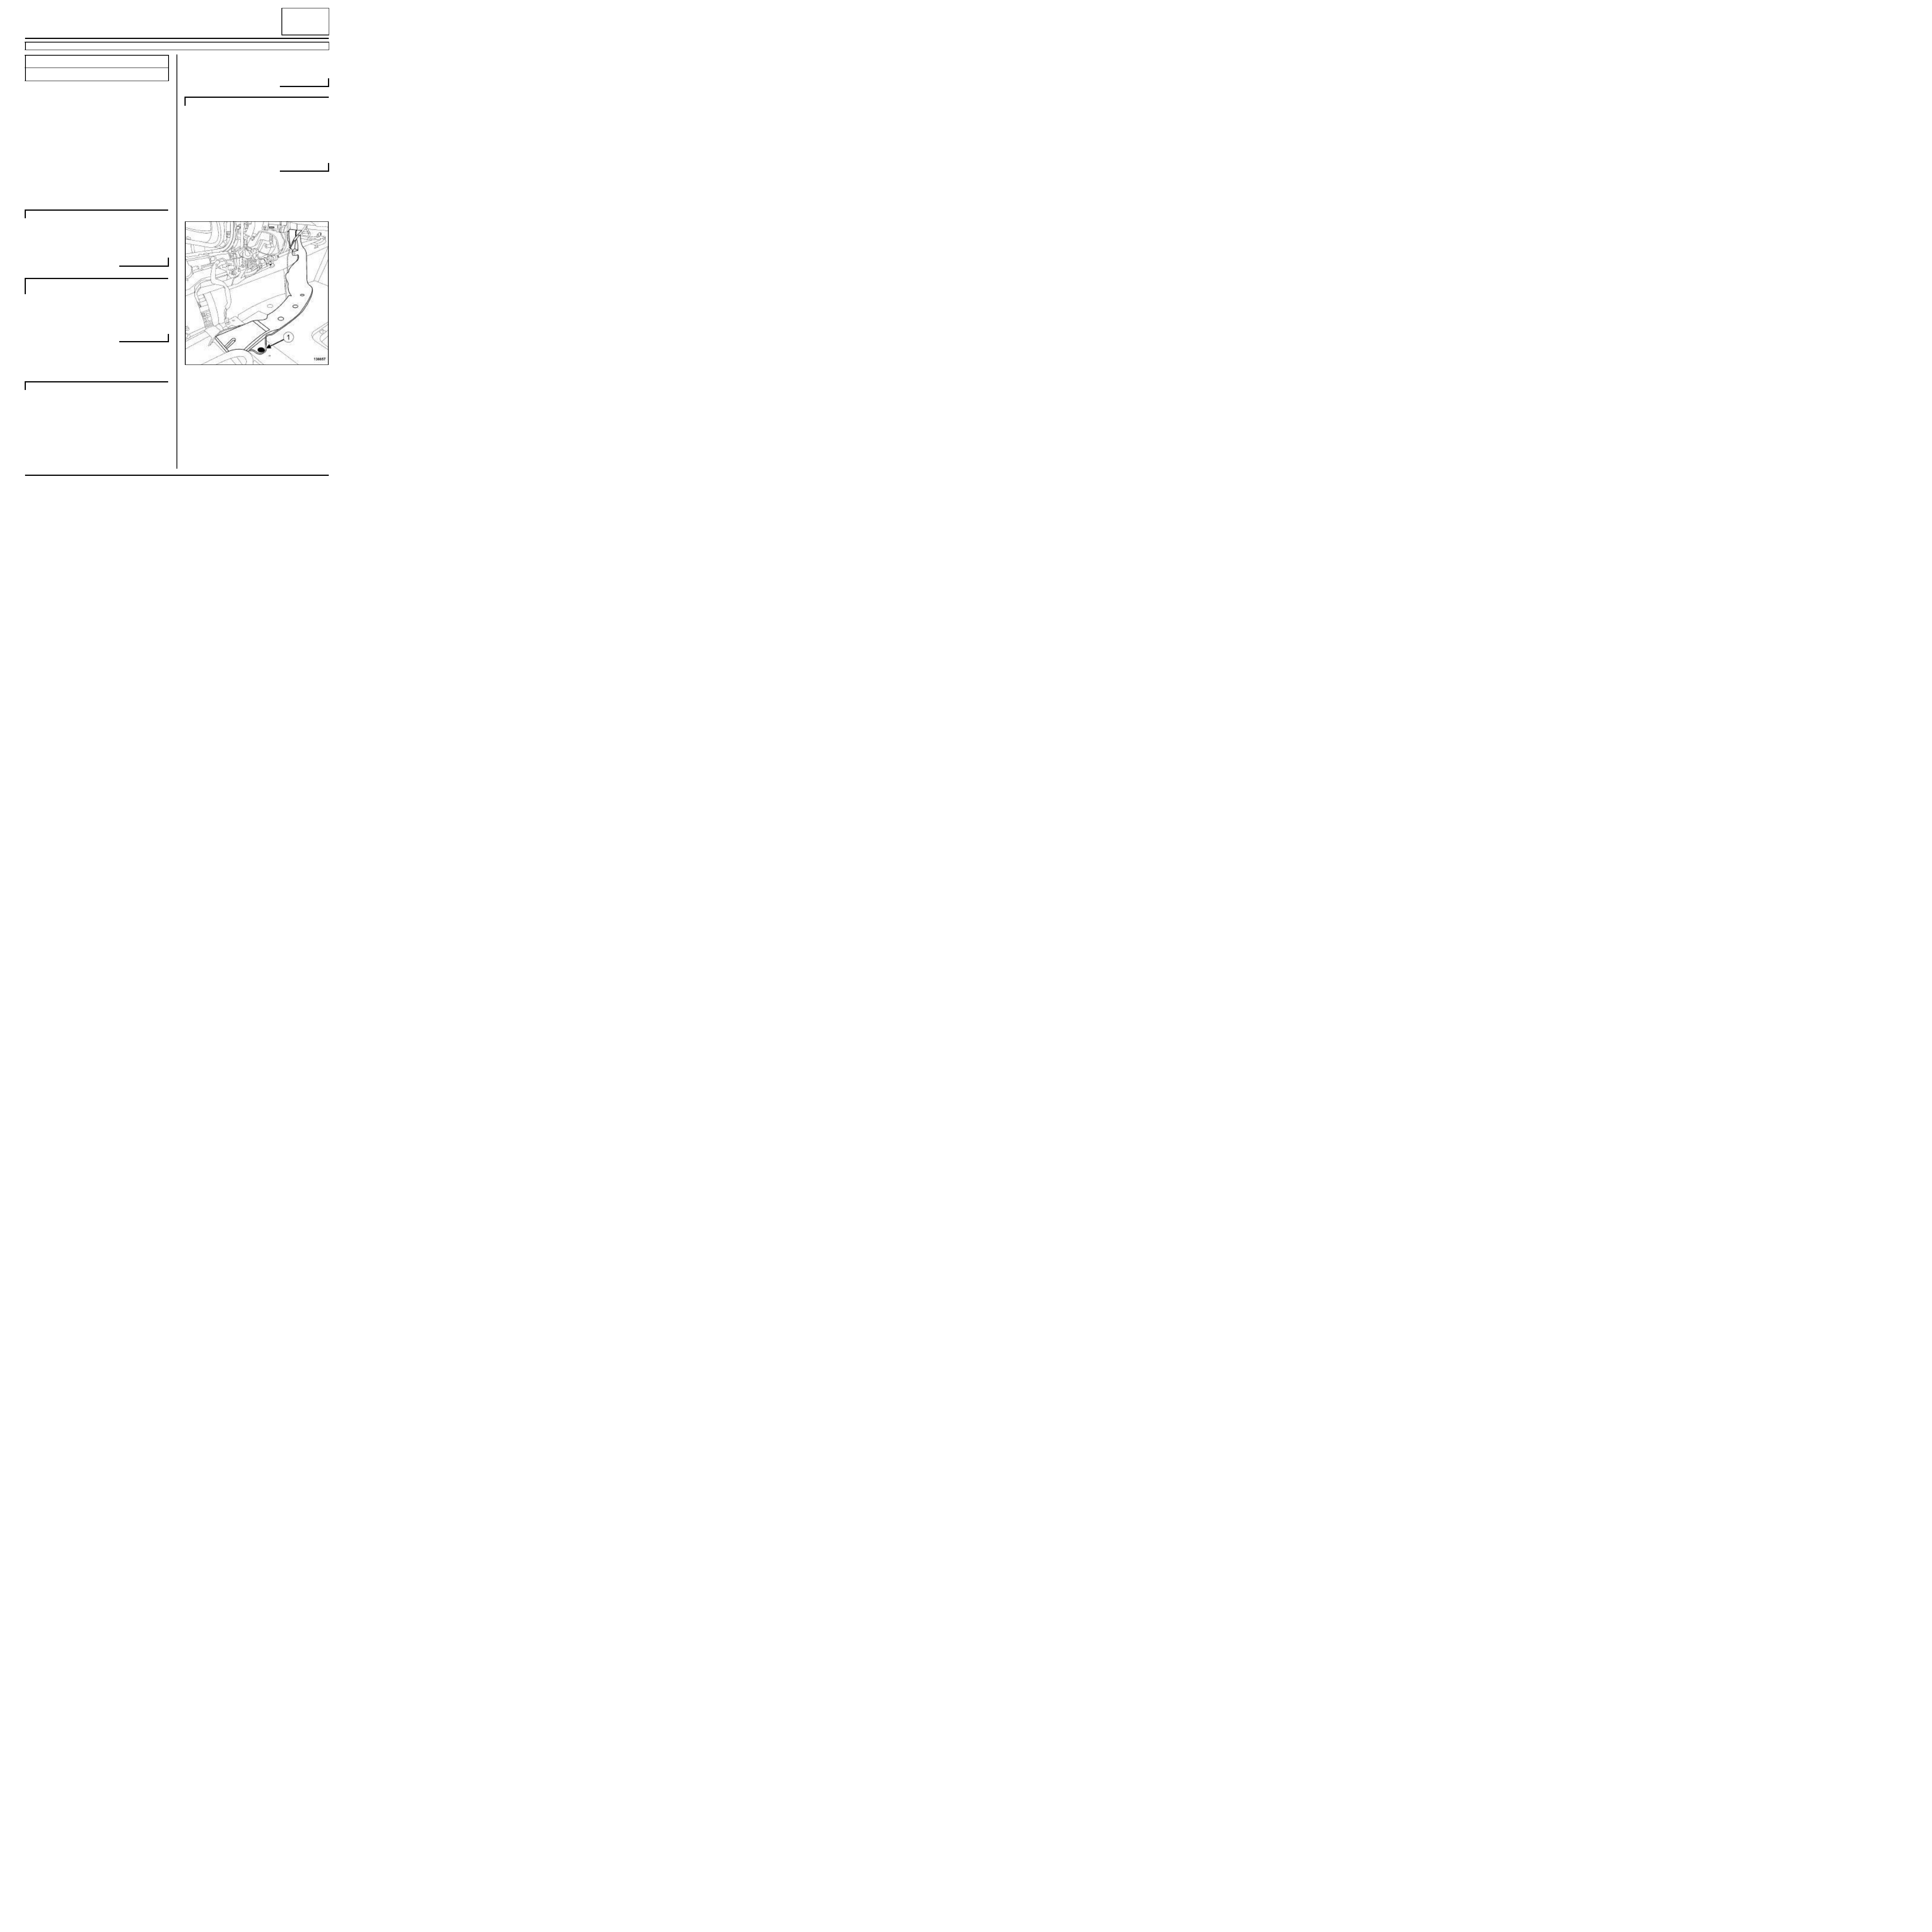
a
Remove the sunroof seal (1) .
REFITTING
I - REFITTING PREPARATION OPERATION
a
parts always to be replaced: Sunroof seal (60,03,
04,16).
a
Clean the bonding area with HEPTANE (see Vehi-
cle: Parts and ingredients for the repairwork)
(04B, Consumables - Products).
II - REFITTING OPERATION FOR PART
CONCERNED
a
Position the sunroof seal joint at the rear central sec-
tion (2) .
a
Bond the sunroof seal using SPECIAL ADHESIVE
FOR WINDOWS (see Vehicle: Parts and ingre-
dients for the repairwork) (04B, Consumables -
Products).
137487
137487
65A
-
8
OPENING ELEMENT SEALING
Sunroof seal: Removal - Refitting
PANORAMIC SUNROOF
65A
III - FINAL OPERATION
a
Refit the mobile sunroof panel (see Sunroof mo-
ving panel: Removal - Refitting) (52A, Non-side
opening element mechanisms).
a
Apply the sunroof motor manual programming pro-
cedure.
a
Programming and initialisation procedure:
- place the button in the sunroof closed position (but-
ton fully turned anti-clockwise to the left),
- keep the centre section of the button pressed: the
roof moves to the fully closed stop and is confirmed
by a "click",
- after hearing the "click", keep the button pressed
for approximately 1 second,
- release the button,
- keep the button pressed until the roof opens ap-
proximately 2/3 of its travel and re-closes comple-
tely (wait 5 seconds before the roof starts to
move),
- release the control,
- the roof is operational once more.
Note:
If the procedure fails (too much time taken
between the two applications of the button or the
procedure is interrupted) restart the program-
ming procedure from the beginning.

66A
-
1
WINDOW SEALING
Front side door glass run channel: Removal - Refitting
B95 or D95 or J95 or K95
66A
REMOVAL
I - REMOVAL PREPARATION OPERATION
a
Remove the door mirror (see Door mirror: Remo-
val - Refitting) (56A, Exterior equipment).
a
Remove:
- the front side door trim (see Front side door trim:
Removal - Refitting) (72A, Side opening element
trim),
- the door sealing film (see 65A, Opening element
sealing, Door sealing film: Removal - Refitting,
page 65A-1) ,
- the front side exterior door weatherstrip (see 66A,
Window sealing, Front door side exterior wea-
ther strip: Removal - Refitting, page 66A-4) .
a
Disconnect the battery (see Battery: Removal - Re-
fitting) (80A, Battery).
a
Remove the front side door sliding window (see Sli-
ding window in front side door: Removal - Refit-
ting) (54A, Windows).
a
Remove the front side door fixed window (see Front
side door fixed window: Removal - Refitting)
(54A, Windows).
a
Remove the front side door pillar exterior trim (see
Front side door pillar exterior trim Removal - Re-
fitting) (55A, Exterior equipment).
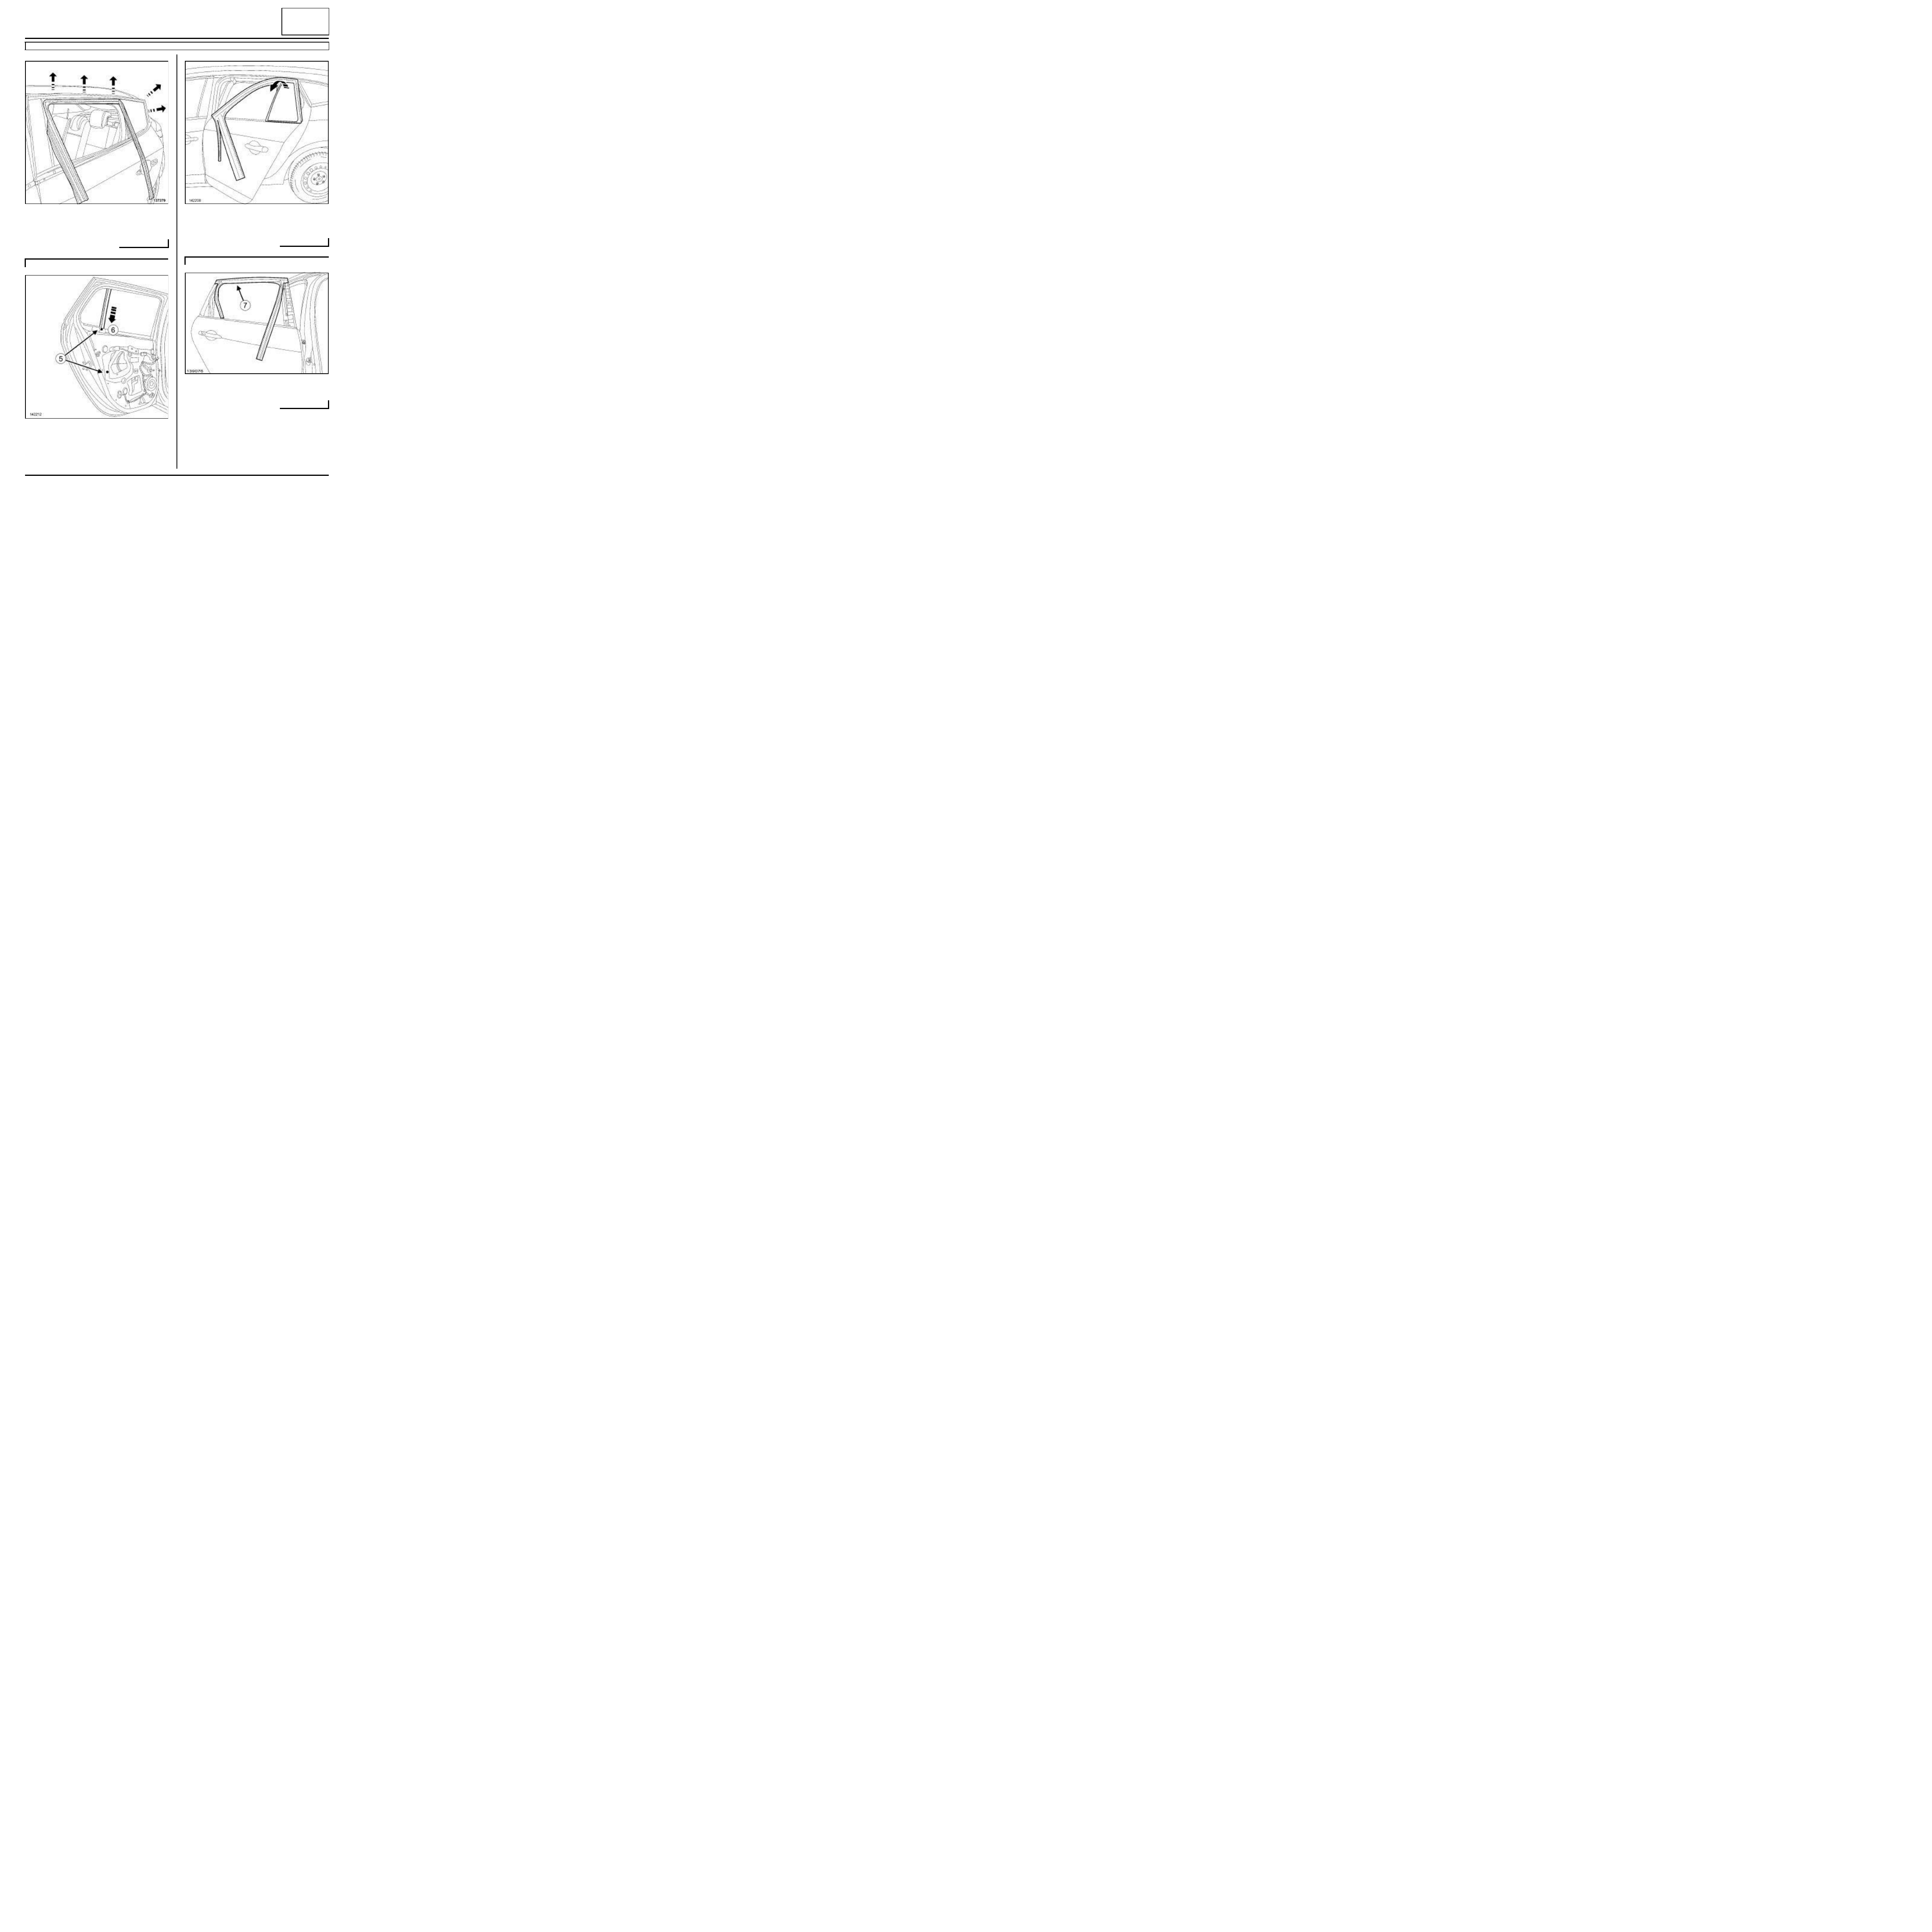
II - OPERATION FOR REMOVAL OF PART
CONCERNED
a
Detach the front side door glass run channel (1) .
a
Detach the front side door glass run channel at (2) ,
(3) and (4) .
a
Remove the front side door window run channel.
B95 or D95
J95
B95 or D95
137382
134129
66A
-
2
WINDOW SEALING
Front side door glass run channel: Removal - Refitting
B95 or D95 or J95 or K95
66A
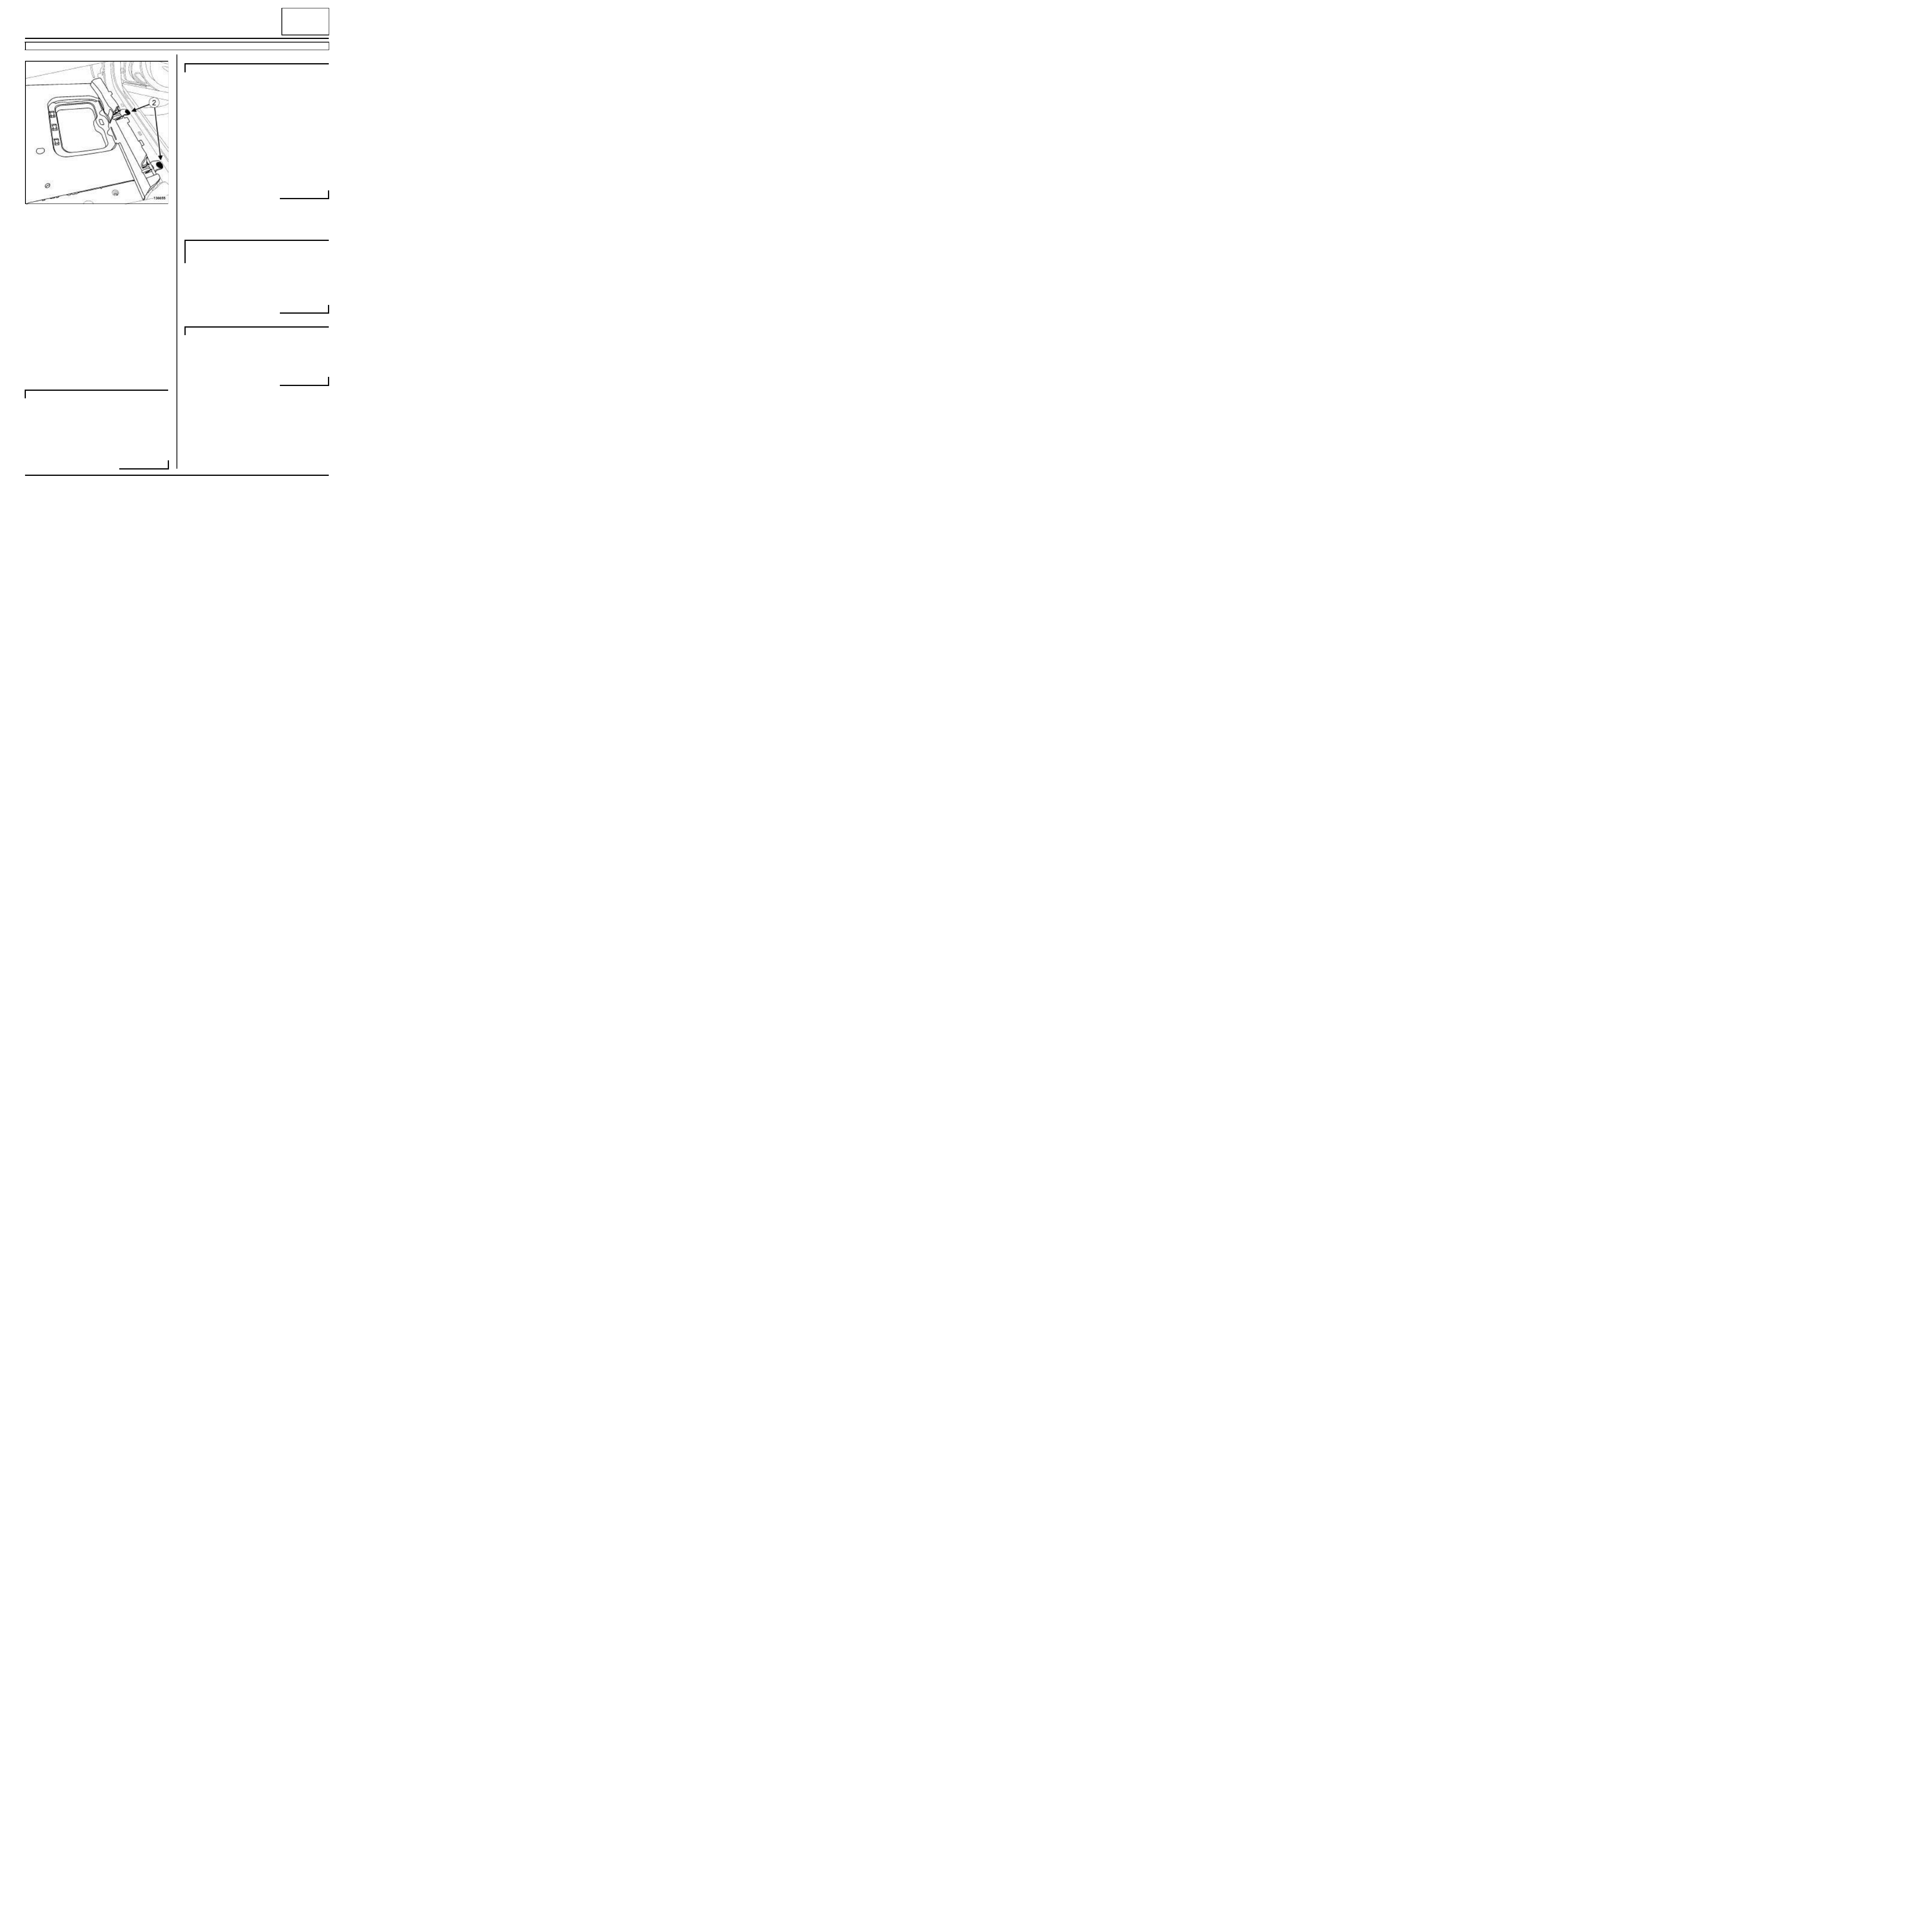
a
Detach the front side door glass run channel at (5) ,
(6) , and (7) .
a
Remove the front side door window run channel.
REFITTING
I - REFITTING OPERATION FOR PART
CONCERNED
a
Fit the front side door window run channel, starting
with the rear upper section (4) .
a
Fit the front side door window run channel and leave
the end sections (11) hanging free.
a
Index at (8) and (9) .
a
Fit at (10) and (11) .
a
Refit the front side door pillar exterior trim (see Front
side door pillar exterior trim Removal - Refitting)
(55A, Exterior equipment).
a
Fit the front side door window channel centre section
(3) , front section (2) and rear section (1) .
II - FINAL OPERATION
a
Refit the front side door fixed window (see Front
side door fixed window: Removal - Refitting)
(54A, Windows).
J95
139069
B95 or D95
J95
139069
B95 or D95
J95
66A
-
3
WINDOW SEALING
Front side door glass run channel: Removal - Refitting
B95 or D95 or J95 or K95
66A
a
Refit:
- the front side door sliding window (see Sliding
window in front side door: Removal - Refitting)
(54A, Windows),
- the front side exterior door weatherstrip (see 66A,
Window sealing, Front door side exterior wea-
ther strip: Removal - Refitting, page 66A-4) .
a
Connect the battery (see Battery: Removal - Refit-
ting) (80A, Battery).
a
Carry out a function test.
a
Refit the sealing film (see 65A, Opening element
sealing, Door sealing film: Removal - Refitting,
page 65A-1) .
a
Carry out a sealing test (see Technical Note
0653A).
a
Refit the front side door trim (see Front side door
trim: Removal - Refitting) (72A, Interior trim).
a
Refit the door mirror (see Door mirror: Removal -
Refitting) (56A, Exterior equipment).
B95 or D95
66A
-
4
WINDOW SEALING
Front door side exterior weather strip: Removal - Refitting
66A
REMOVAL
I - REMOVAL PREPARATION OPERATION
a
Lower the front side sliding door window.
II - OPERATION FOR REMOVAL OF PART
CONCERNED
a
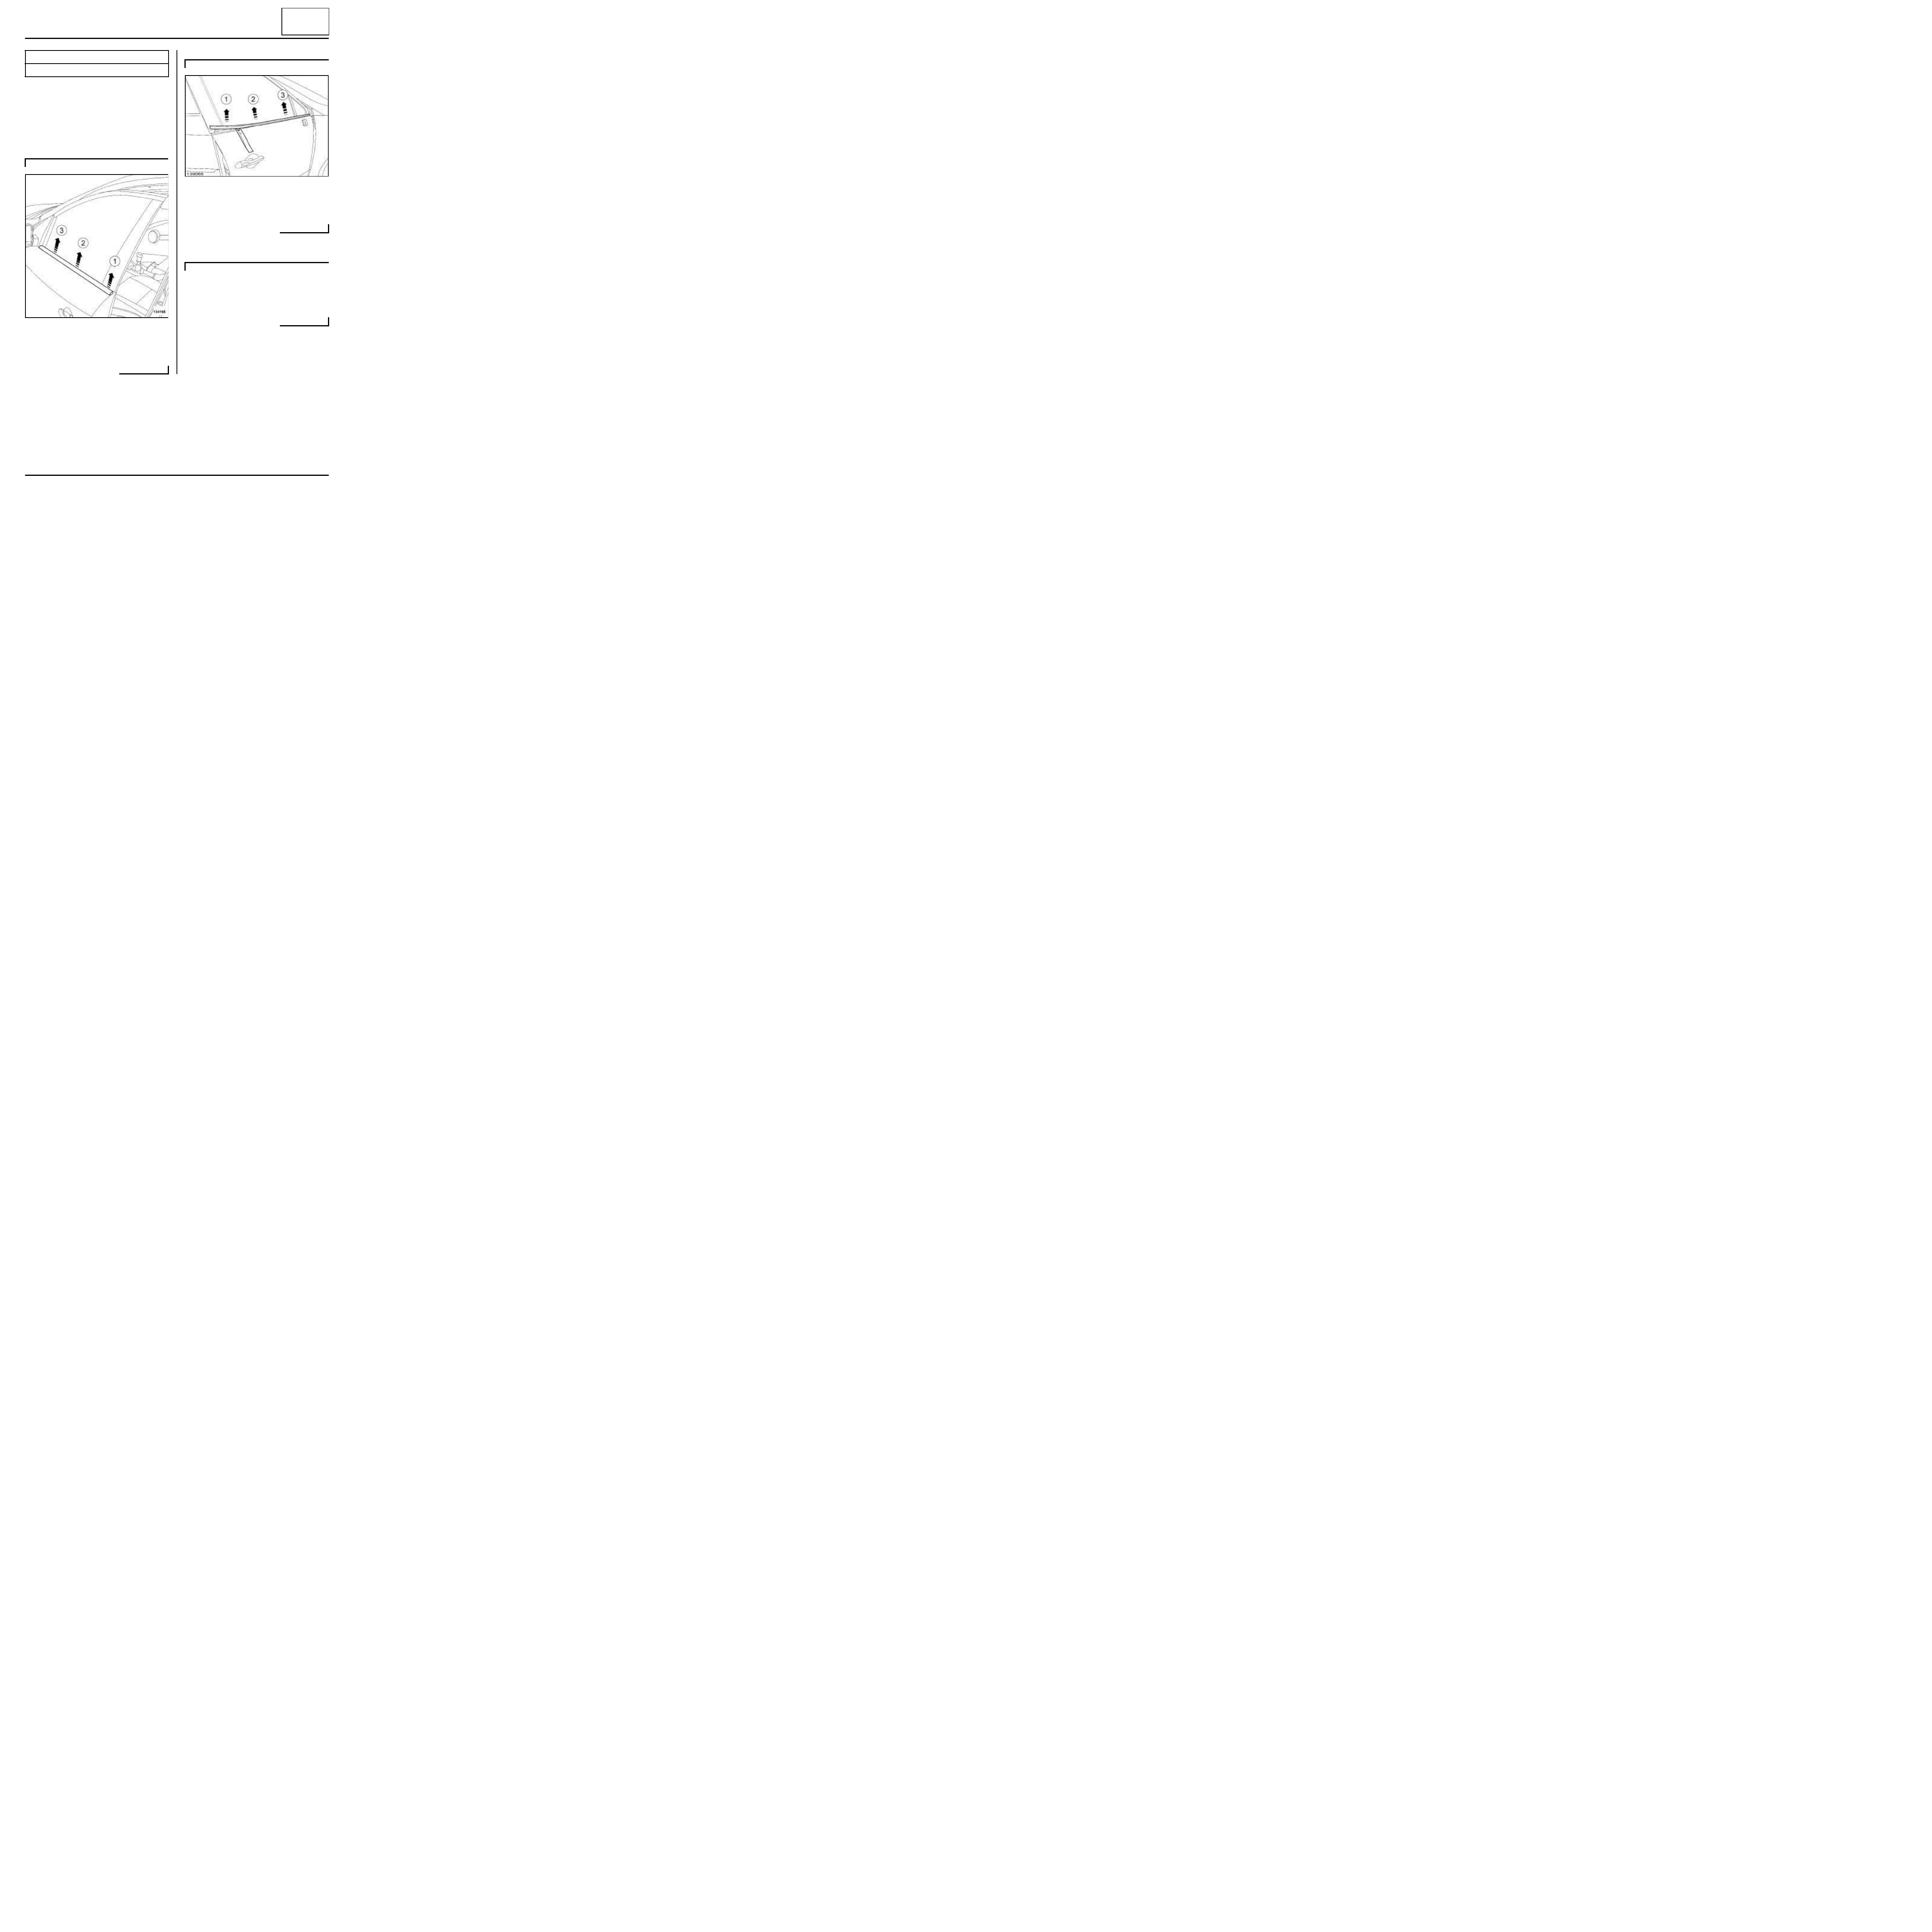
Carefully remove the front side door exterior wea-
therstrip using the tool (Car. 1363) in the order
shown (1) , (2) and (3) (take care not to damage the
part).
a
Carefully remove the front side door exterior wea-
therstrip using the tool (Car. 1363) in the order
shown (1) , (2) and (3) (take care not to damage the
part).
REFITTING
REFITTING PREPARATION OPERATION
a
Check the condition of the clipsand replace them if
necessary.
Essential special tooling
Car. 1363
Set of tr im removal levers.
B95 or K95
134168
J95
139066
J95
66A
-
5
WINDOW SEALING
Front door side exterior weather strip: Removal - Refitting
66A
I - REFITTING OPERATION FOR PART
CONCERNED
a
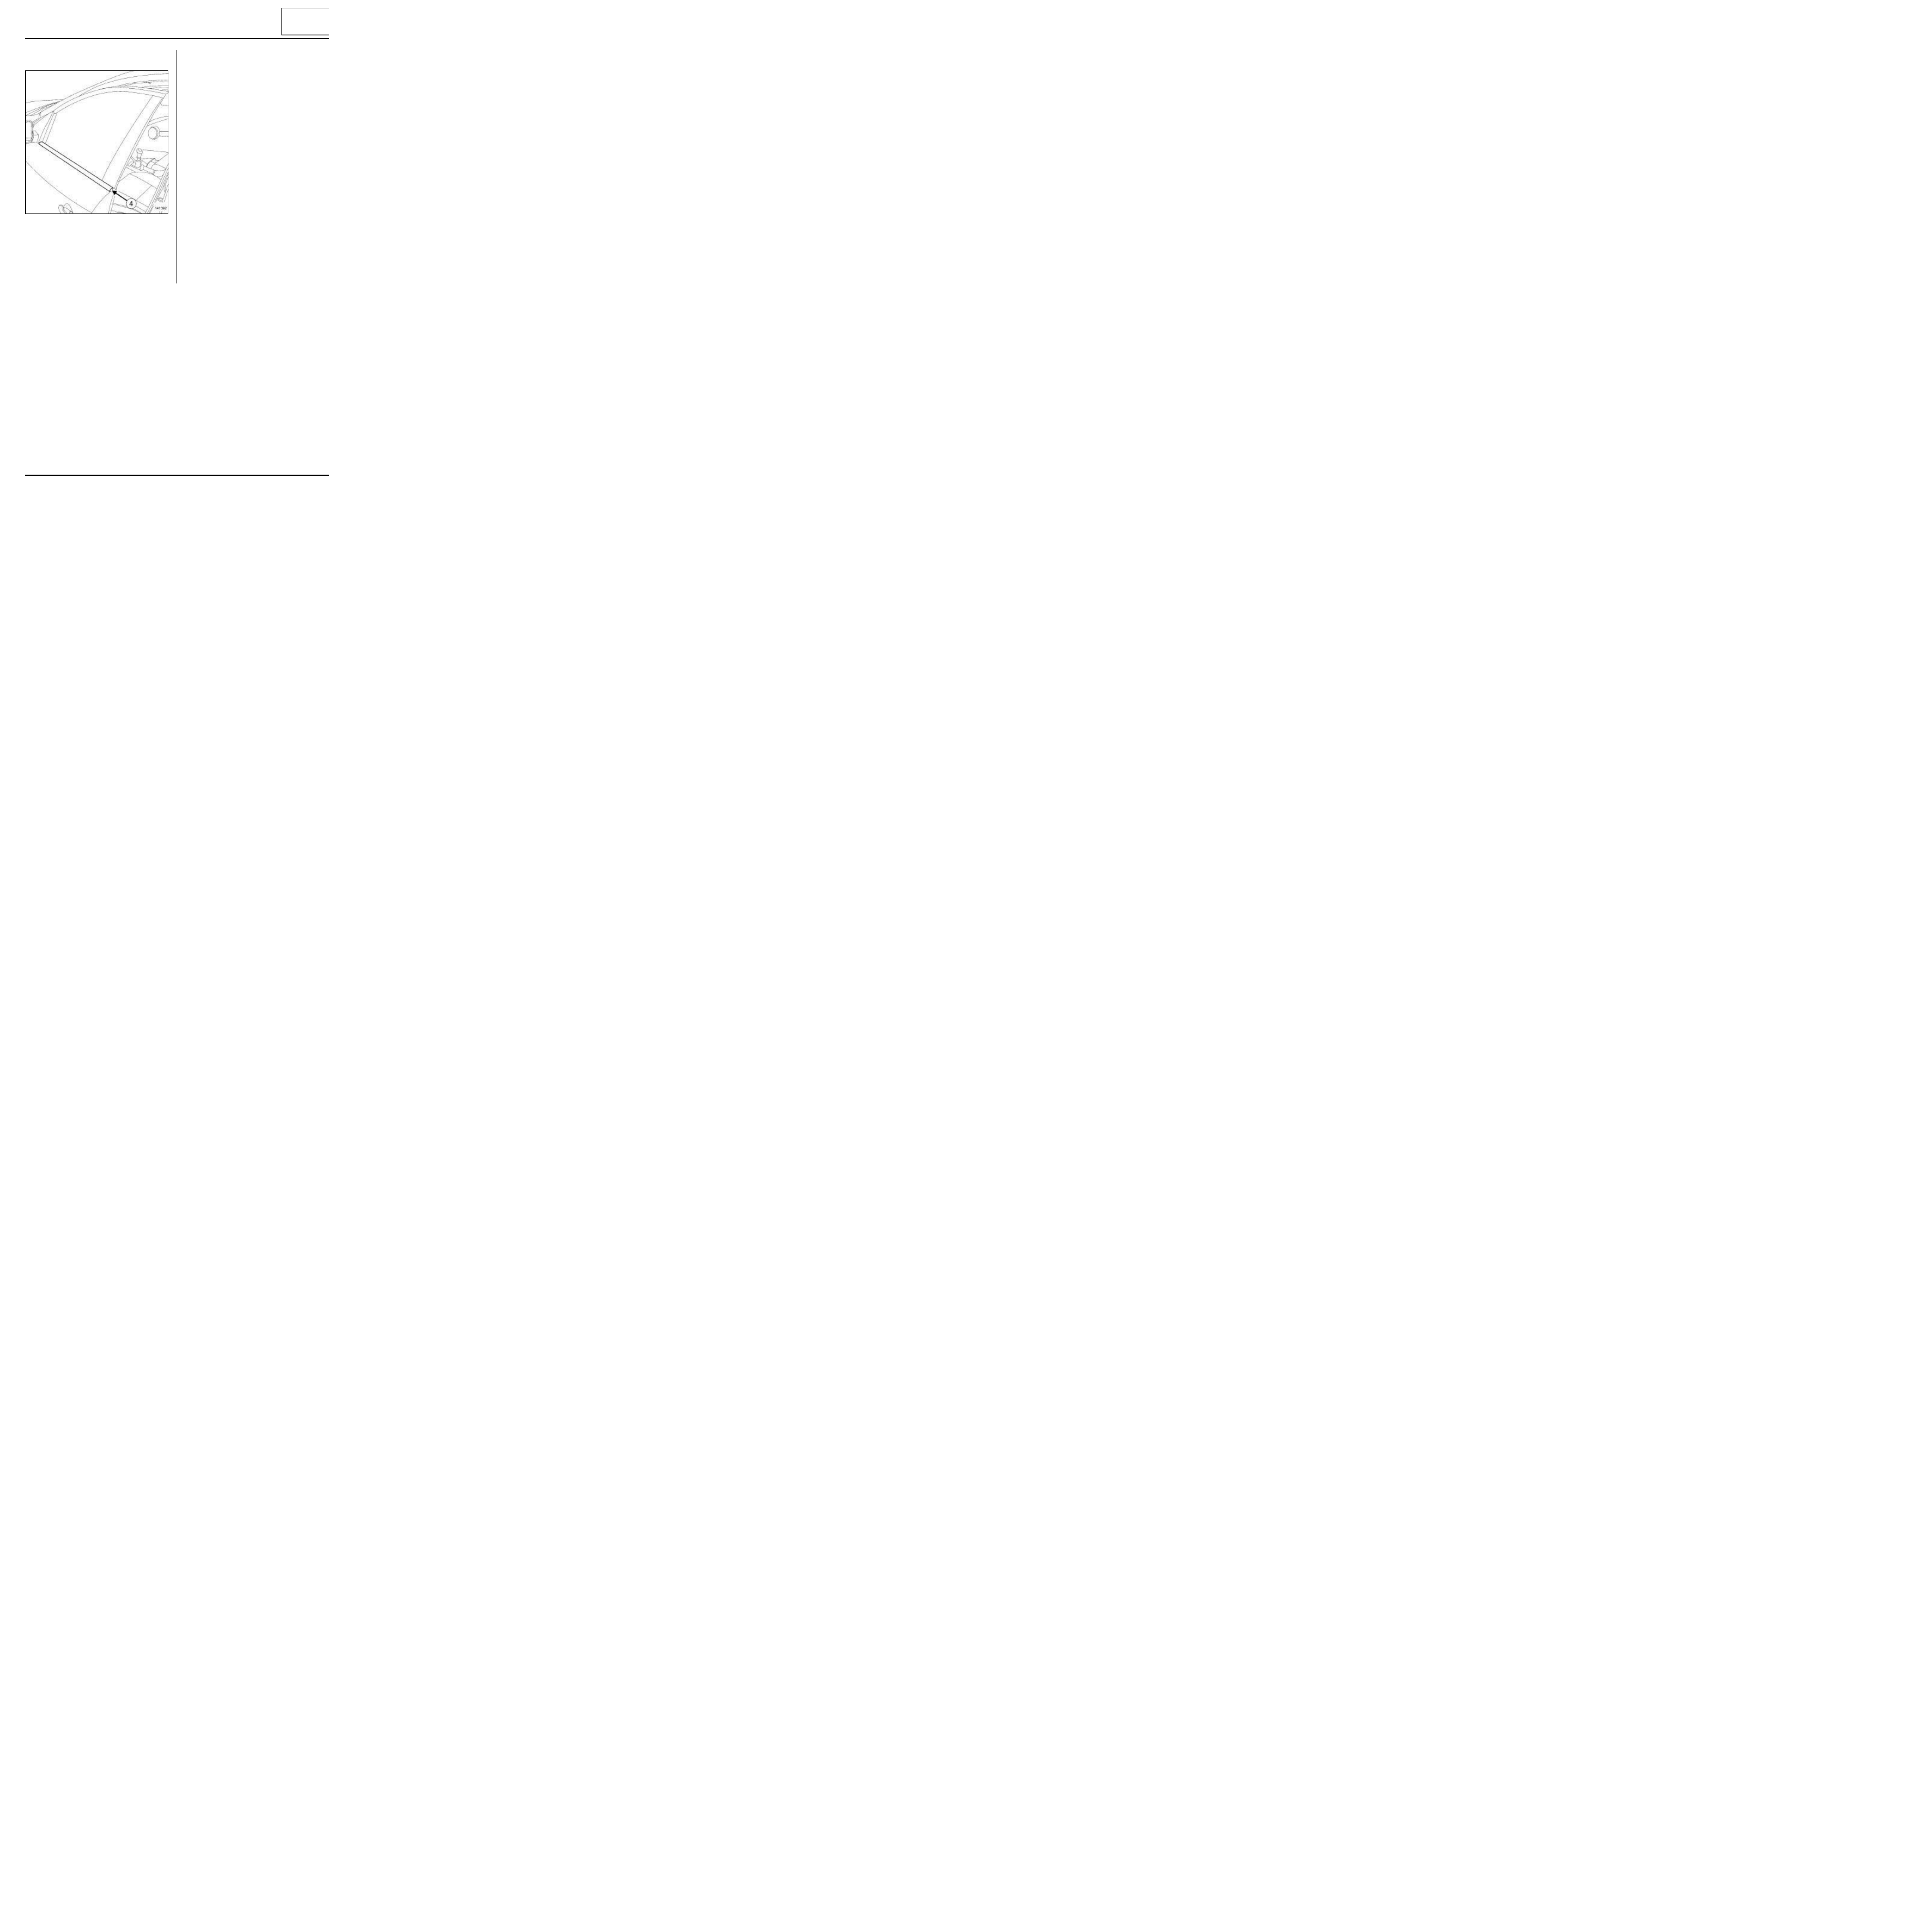
Refit the front side door exterior weatherstrip, star-
ting with the rear section (4) .
a
Check that the front side exterior door weatherstrip
is correctly aligned.
II - FINAL OPERATION
a
Fit the front side door sliding window.
141392
66A
-
6
WINDOW SEALING
Glass run channel in rear side door: Removal - Refitting
B95 or J95 or K95
66A
REMOVAL
I - REMOVAL PREPARATION OPERATION
a
Lower the rear side sliding door window to the low
position.
a
Remove:
- the rear side door trim (see Rear side door trim:
Removal - Refitting) (72A, Side opening element
trim),
- the door sealing film (see 65A, Opening element
sealing, Door sealing film: Removal - Refitting,
page 65A-1) .
a
Remove the rear speaker (see Rear speakers: Re-
moval - Refitting) (86A, Radio).
a
Remove:
- the rear side door pillar exterior trim (see Rear side
door pillar exterior trim Removal - Refitting)
(55A, Exterior equipment),
- the rear side door sliding window (see Sliding win-
dow in rear side door: Removal - Refitting)
(54A, Windows).
II - OPERATION FOR REMOVAL OF PART
CONCERNED
a
Detach the rear side door glass run channel at (1) .
a
Remove:
- the bolts (2) ,
- the fixed window pillar on the rear side door at (3)
and (4) .
B95 or K95
B95
134169
66A
-
7
WINDOW SEALING
Glass run channel in rear side door: Removal - Refitting
B95 or J95 or K95
66A
a
Remove the « rear side door glass run channel -
fixed window - exterior weatherstrip » assembly.
a
Detach the rear side door glass run channel.
a
Remove:
- the bolts (5) ,
- the fixed window pillar on the rear side door at (6) .
a
Remove the "rear side door glass run channel - fixed
window" assembly.
a
Remove the rear side door glass run channel (7) .
137379
K95
142212
142208
J95
139076
66A
-
8
WINDOW SEALING
Glass run channel in rear side door: Removal - Refitting
B95 or J95 or K95
66A
REFITTING
I - REFITTING OPERATION FOR PART
CONCERNED
a
Refit the « rear side door glass run channel - fixed
window - exterior weatherstrip » assembly.
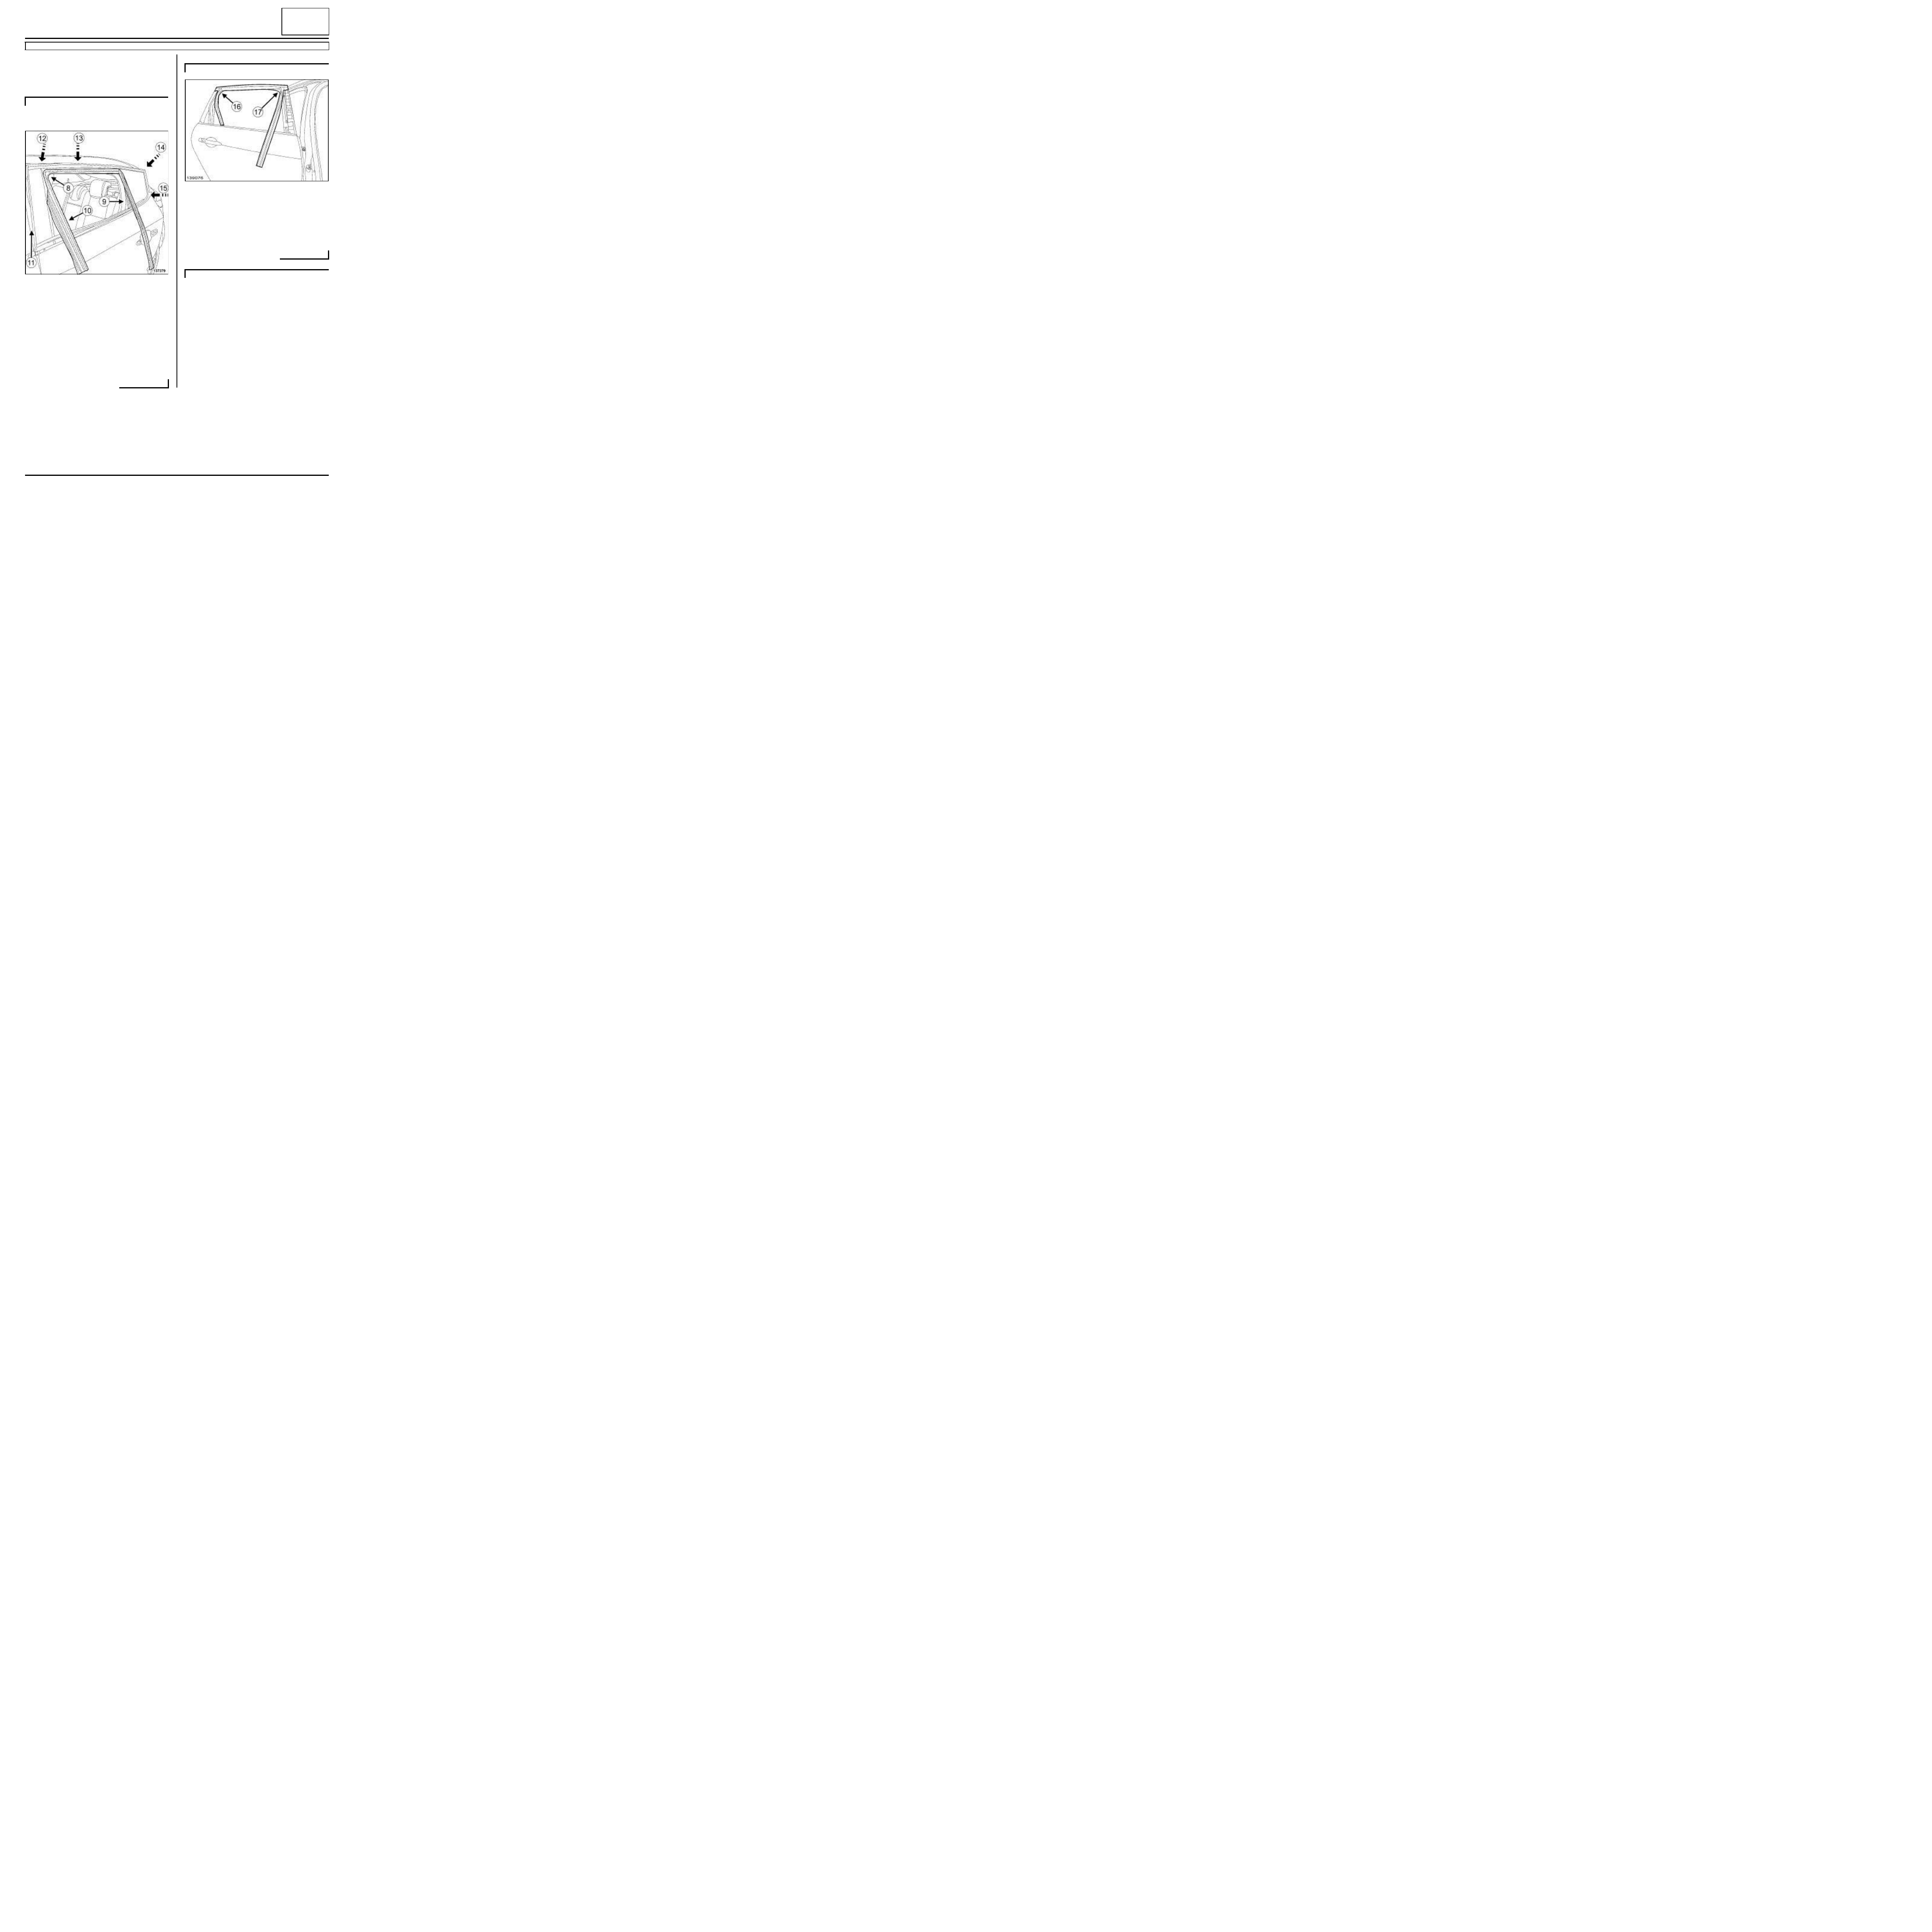
a
Fit the rear side door glass run channel at (8) .
a
Position the sections (9) , (10) of the rear side glass
run channel inside the door box section.
a
Fit the rear side door glass run channel at (12) , (13)
, (14) and (15) .
a
Refit:
- the fixed window pillar on the rear side door,
- the bolts (2) .
a
Fit the section (9) .
a
Fit the rear side door glass run channel at (16) and
(17) .
a
Position the sections of the rear side glass run chan-
nel inside the door box section.
a
Fit the front and rear sections of the rear side door
glass run channel.
a
Refit the « rear side door glass run channel - fixed
window » assembly.
B95
137379
J95
139076
K95
66A
-
9
WINDOW SEALING
Glass run channel in rear side door: Removal - Refitting
B95 or J95 or K95
66A
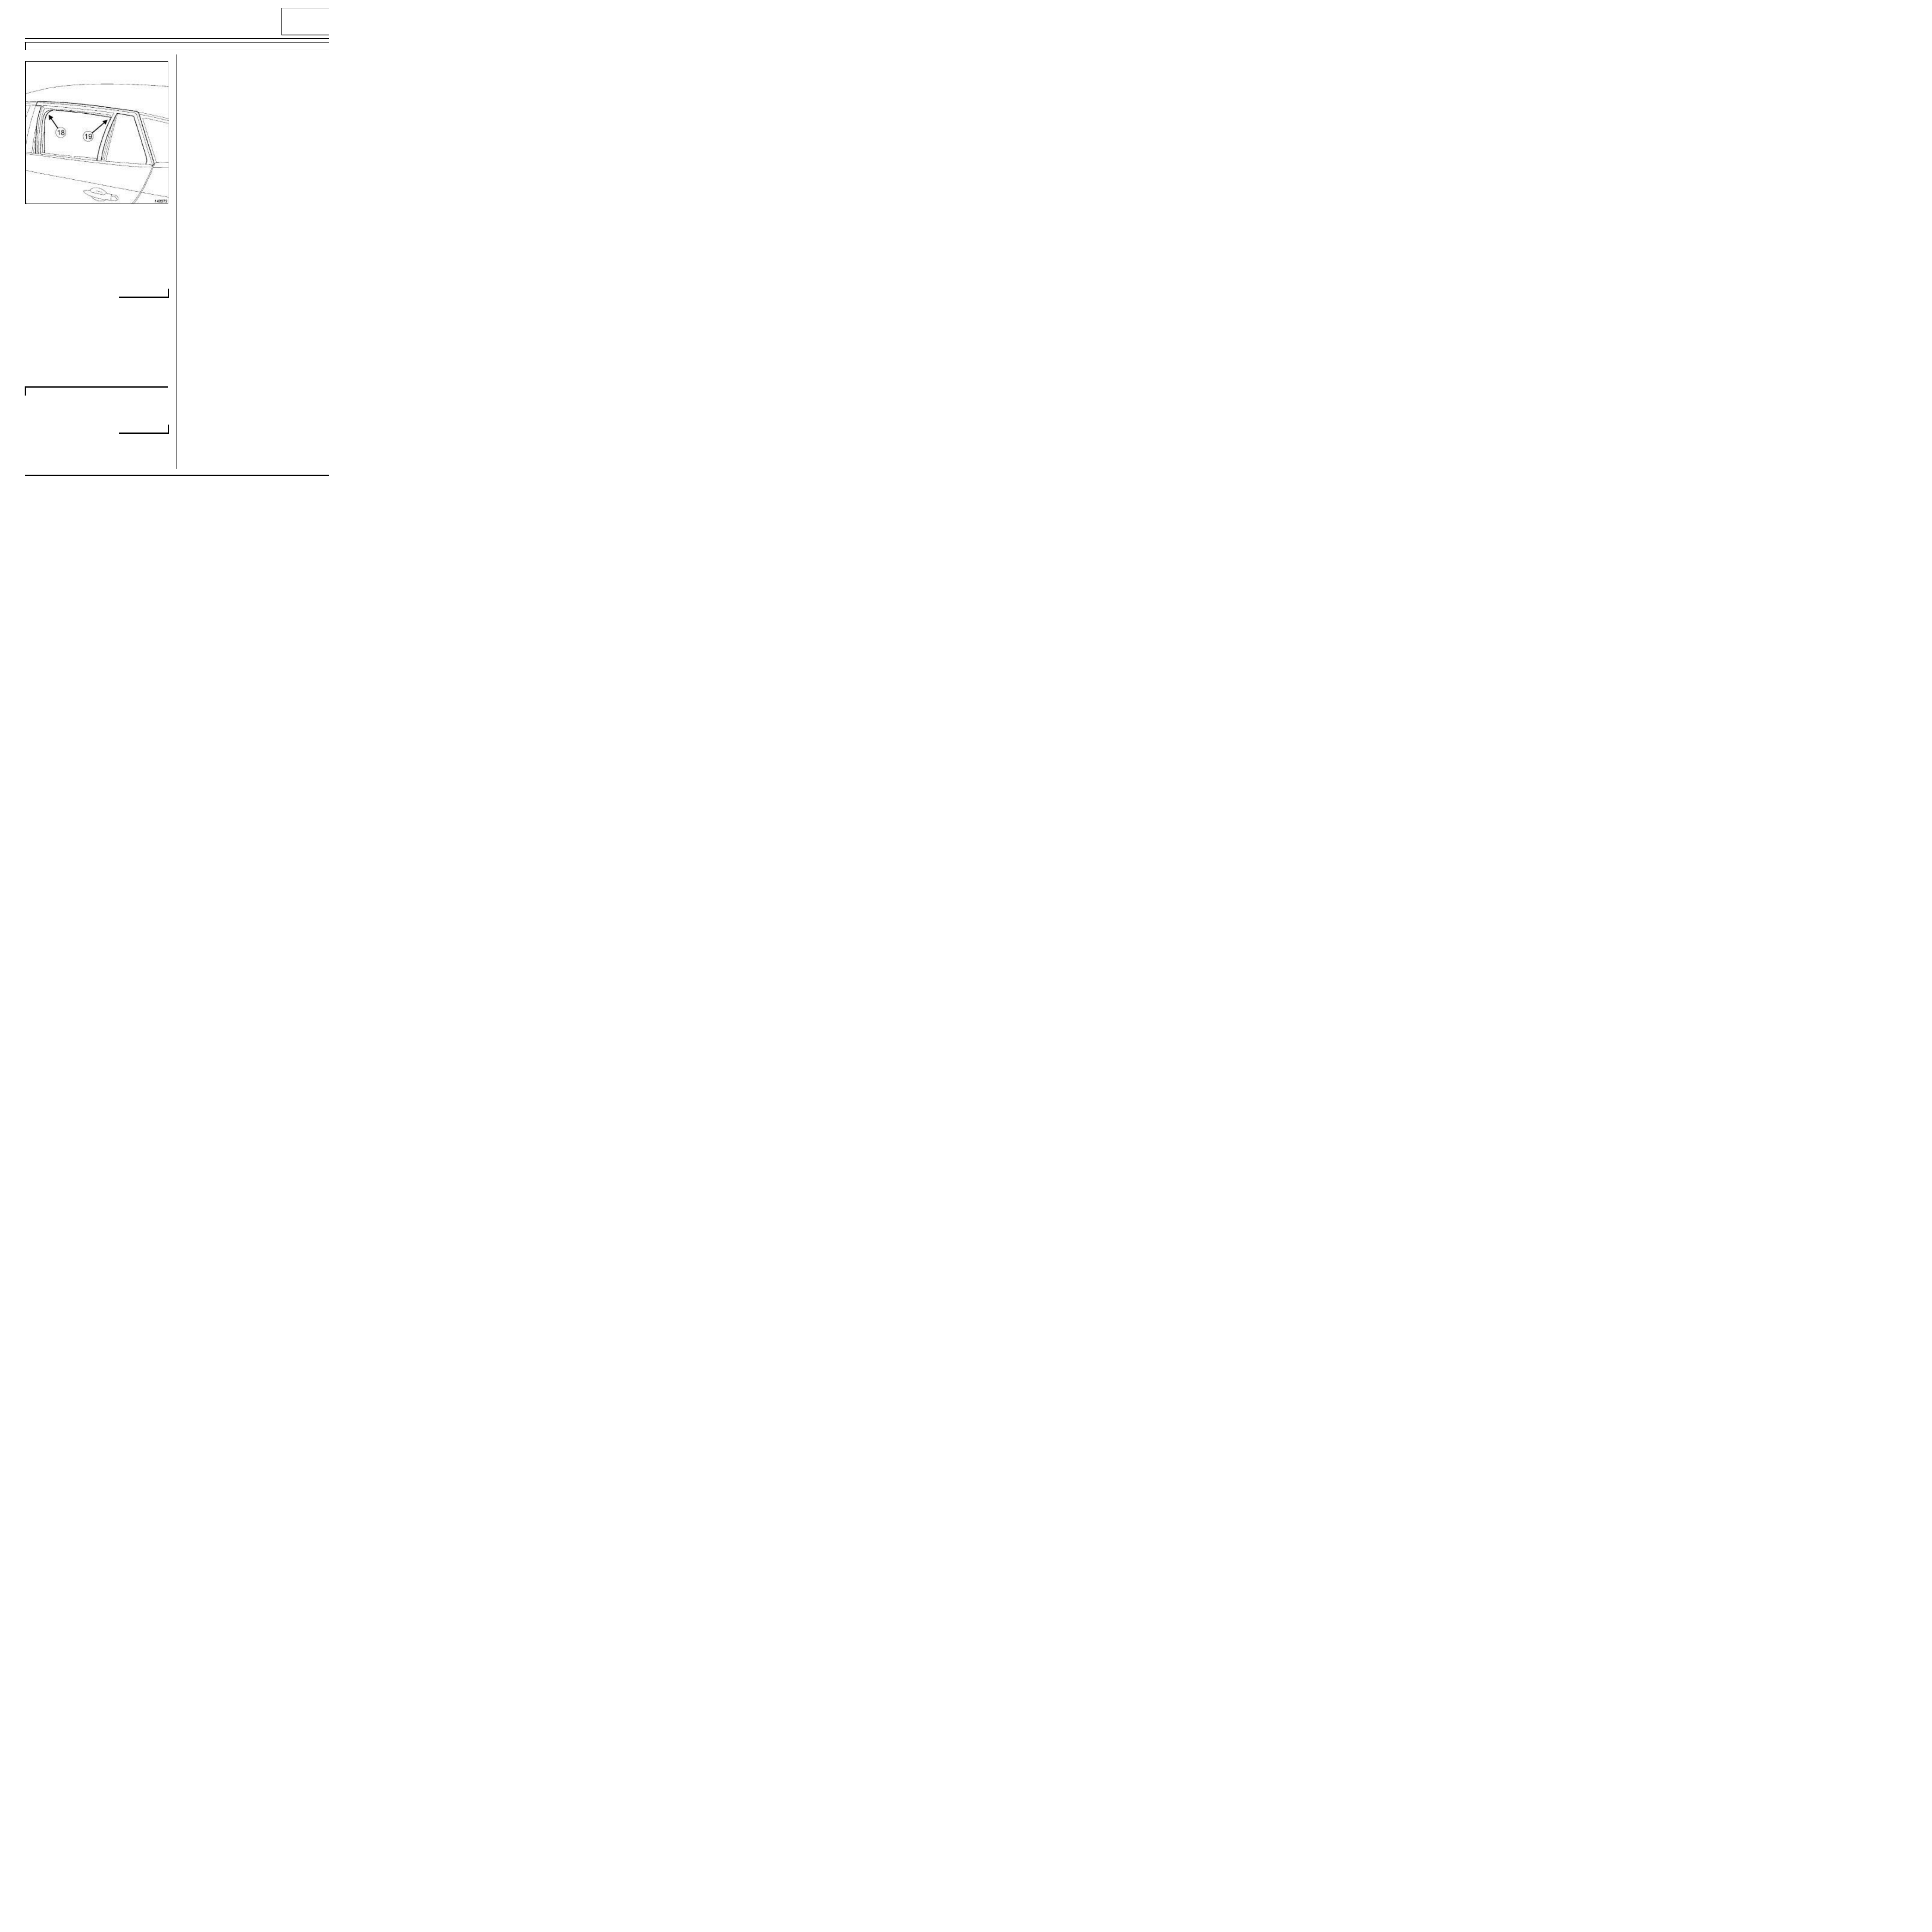
a
Fit:
- the rear side door glass run channel at (18) and
(19) ,
- the fixed window pillar on the rear side door,
- the bolts (5) ,
- the front and rear sections of the rear side door
glass run channel.
II - FINAL OPERATION
a
Refit:
- the rear side door sliding window (see Sliding win-
dow in rear side door: Removal - Refitting)
(54A, Windows),
- the rear side door pillar exterior trim (see Rear side
door pillar exterior trim Removal - Refitting)
(55A, Exterior equipment).
a
Refit the rear speaker (see Rear speakers: Remo-
val - Refitting) (86A, Radio).
a
Carry out a function test.
a
Refit the door sealing film (see 65A, Opening ele-
ment sealing, Door sealing film: Removal - Refit-
ting, page 65A-1) .
a
Carry out a sealing test (see Technical Note
0653A).
a
Refit the rear side door trim (see Rear side door
trim: Removal - Refitting) (72A, Side opening ele-
ment trim).
142272
B95 or K95
68A
-
1
SOUNDPROOFING
Centre floor side soundproofing: Removal - Refitting
B95 or D95
68A
REMOVAL
I - REMOVAL PREPARATION OPERATION
a
Disconnect the battery (see Battery: Removal - Re-
fitting) (80A, Battery).
a
Remove:
- the front seats (see Complete front seat: Remo-
val - Refitting) (75A, Front seat frames and run-
ners),
- the centre console (see Centre console: Removal
- Refitting) (57A, Interior equipment),
a
Remove the rear bench seat base (see Rear bench
seat base: Removal - Refitting) (76A, Rear seat
frames and runners).
a
Remove the rear bench seat base (see Rear bench
seat base: Removal - Refitting) (76A, Rear seat
frames and runners).
a
Remove the floor storage compartment and flap
(see Floor flap and storage: Removal - Refitting)
(57A, Interior equipment).
a
Remove:
- the front door sill lining (see Front door sill lining:
Removal - Refitting) (71A, Body internal trim),
- the rear inner sill trim (see Rear door sill lining:
Removal - Refitting) (71A, Body internal trim),
- the rear inner sill upper trim (see Rear door sill up-
per lining: Removal - Refitting) (71A, Body inter-
nal trim),
- the B-pillar lower trim (see B-pillar lower trim: Re-
moval - Refitting) (71A, Body internal trim).
a
Remove:
- the door sill lining (see Door sill lining: Removal -
Refitting) (71A, Body internal trim),
- the rear panel trim (see Rear panel trim: Removal
- Refitting) (71A, Body internal trim).
a
Remove the floor carpet (see Floor carpet: Remo-
val - Refitting) (71A, Body internal trim).
II - OPERATION FOR REMOVAL OF PART
CONCERNED
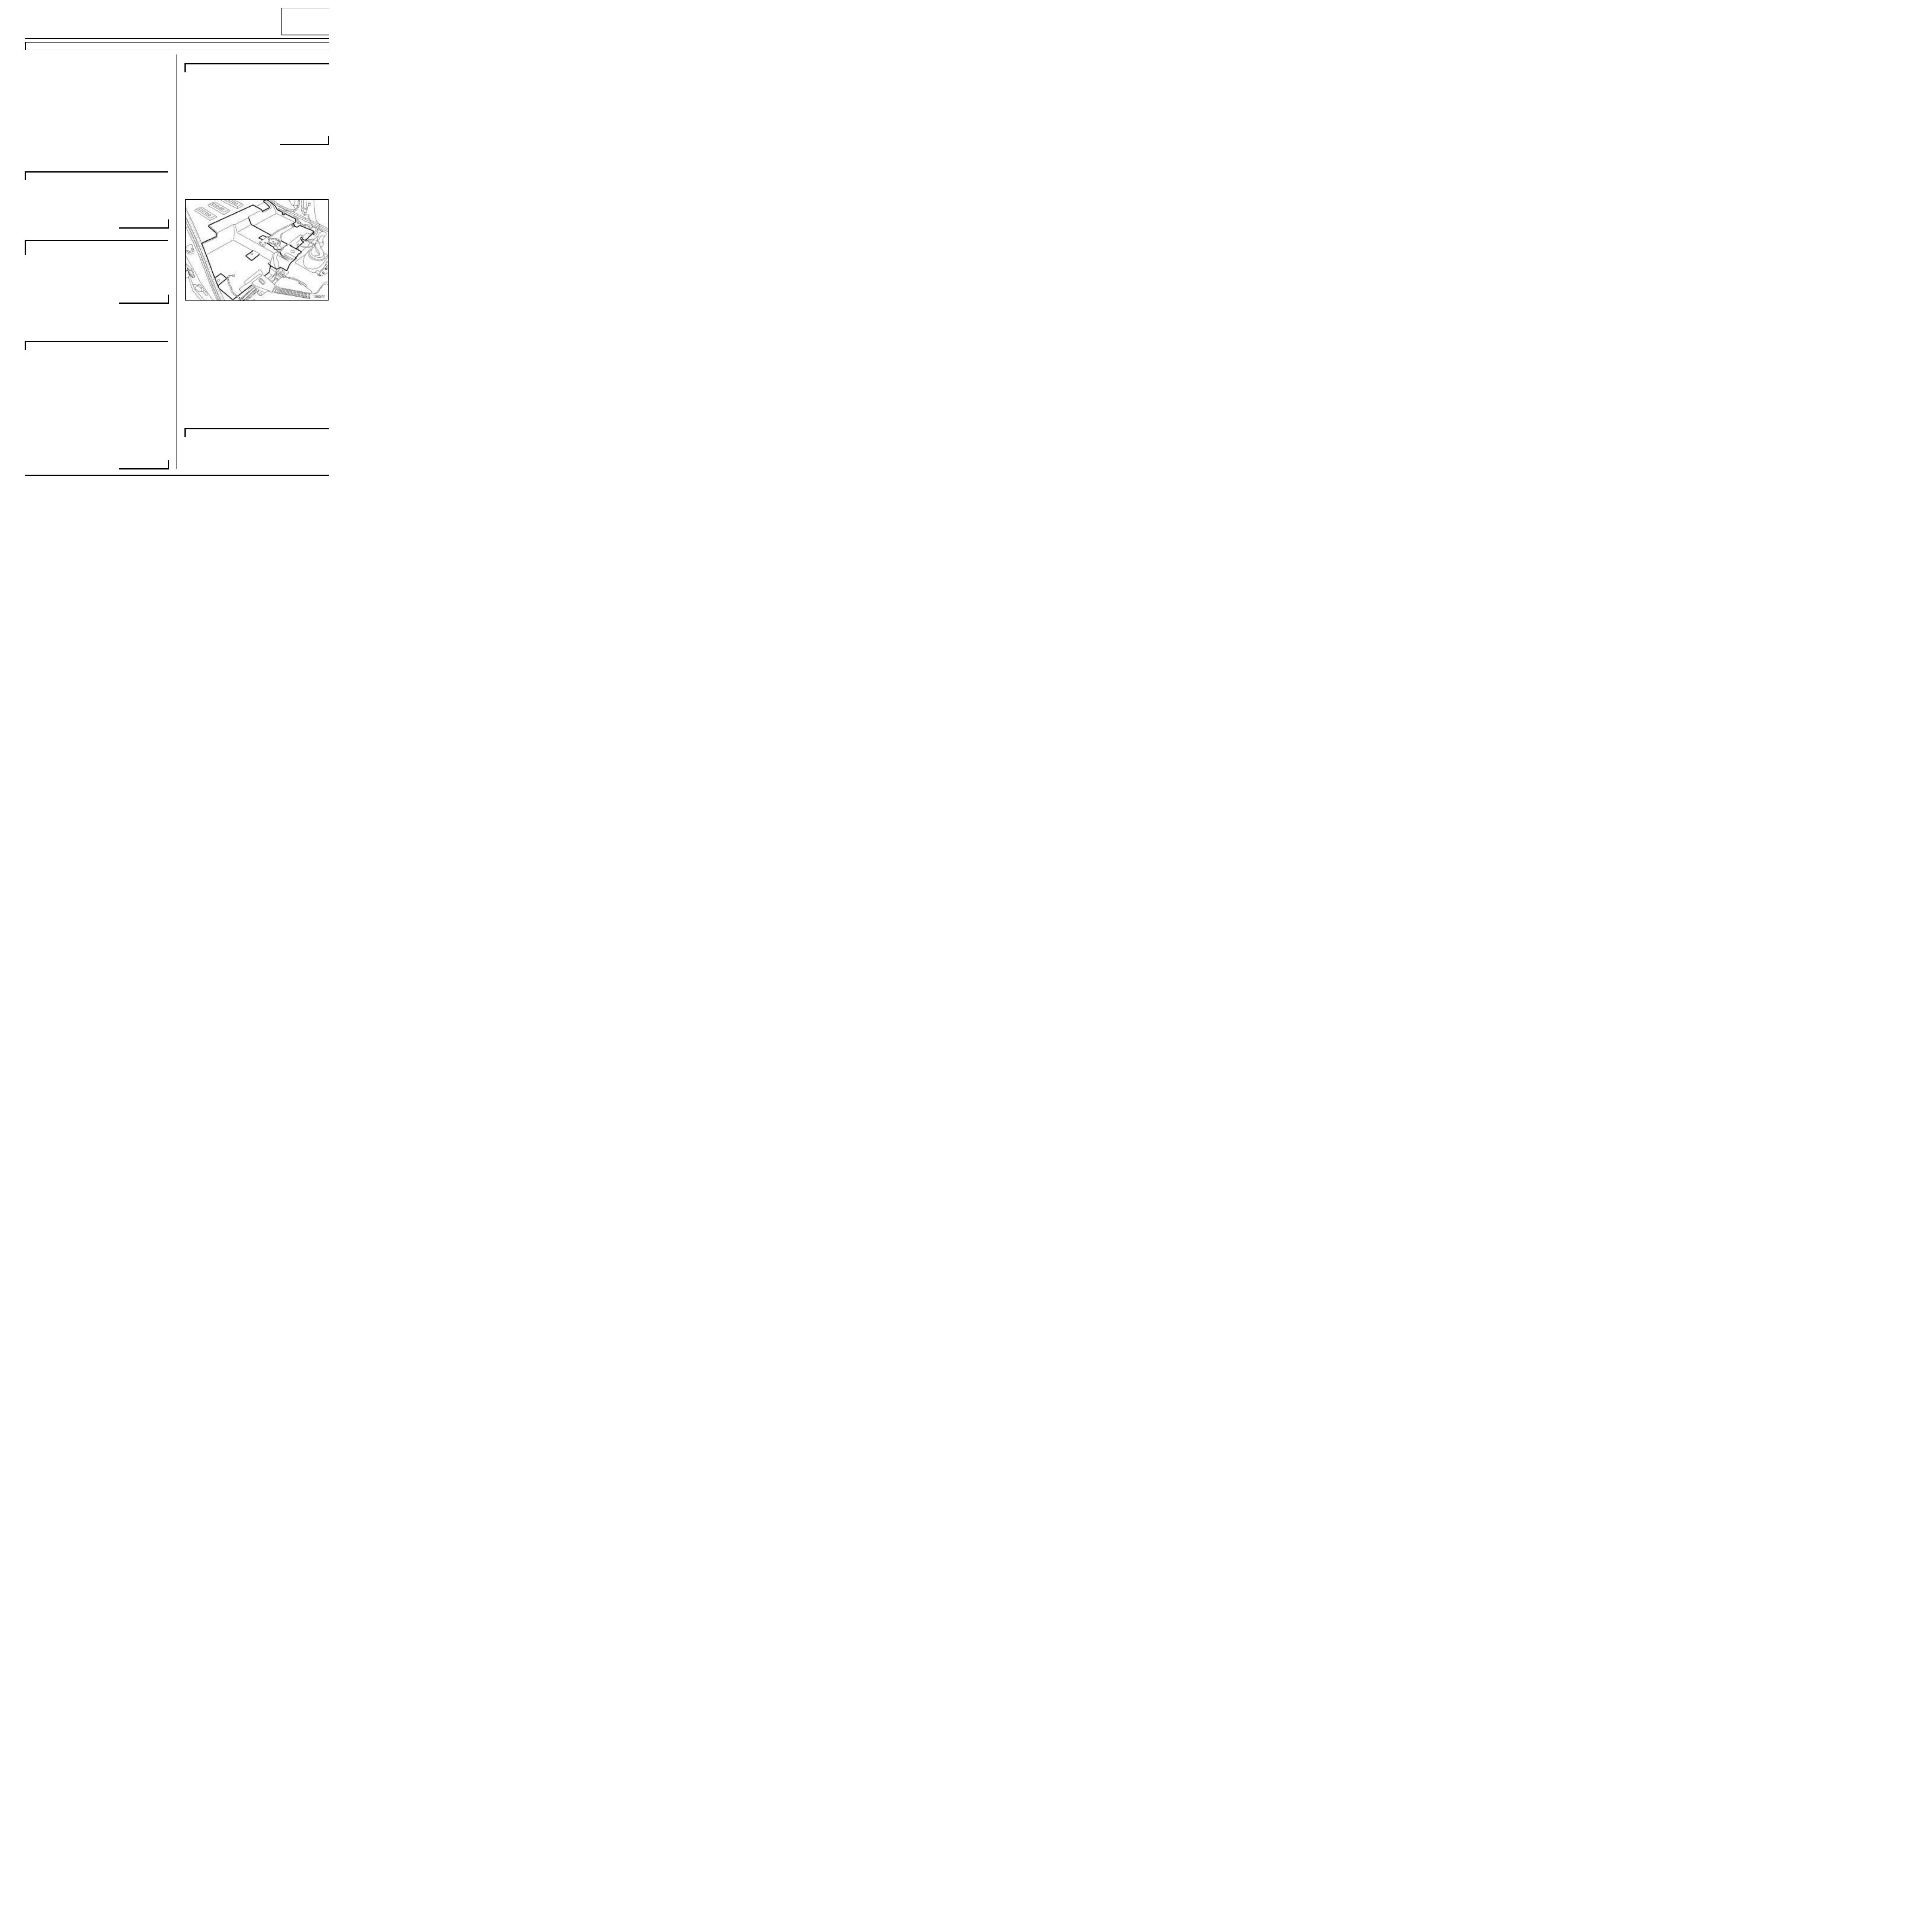
a
Remove the clip (1) using the tool (Car. 1363).
a
Remove the air duct .
Essential special tooling
Car. 1363
Set of tr im removal levers.
REAR BENCH SEAT
REAR BENCH FUNCTION or 1-2/3 REAR BENCH
SEAT + ARMREST + N/R SEATBACK
B95
D95
136657
68A
-
2
SOUNDPROOFING
Centre floor side soundproofing: Removal - Refitting
B95 or D95
68A
a
Remove the clips (2) using the tool (Car. 1363).
a
Remove the centre floor side soundproofing.
REFITTING
I - REFITTING OPERATION FOR PART
CONCERNED
a
Refit:
- the centre floor side soundproofing,
- the clips (2) ,
- air duct ,
- the clip (1) .
II - FINAL OPERATION
a
Refit the floor carpet (see Floor carpet: Removal -
Refitting) (71A, Body internal trim).
a
Refit:
- the rear panel trim (see Rear panel trim: Removal
- Refitting) (71A, Body internal trim),
- the door sill lining (see Door sill lining: Removal -
Refitting) (71A, Body internal trim).
a
Refit:
- the B-pillar lower trim (see B-pillar lower trim: Re-
moval - Refitting) (71A, Body internal trim),
- the rear inner sill upper trim (see Rear door sill up-
per lining: Removal - Refitting) (71A, Body inter-
nal trim),
- the rear inner sill trim (see Rear door sill lining:
Removal - Refitting) (71A, Body internal trim),
- the front sill panel trim (see Front door sill lining:
Removal - Refitting) (71A, Body internal trim).
a
Remove the floor storage compartment and flap
(see Floor flap and storage: Removal - Refitting)
(57A, Interior equipment).
a
Refit the rear bench seat base (see Rear bench
seat base: Removal - Refitting) (76A, Rear seat
frames and runners).
a
Refit the rear bench seat base (see Rear bench
seat base: Removal - Refitting) (76A, Rear seat
frames and runners).
a
Refit:
- the centre console (see Centre console: Removal
- Refitting) (57A, Interior equipment),
- the front seats (see Complete front seat: Remo-
val - Refitting) (75A, Front seat frames and run-
ners).
a
Connect the battery (see Battery: Removal - Refit-
ting) (80A, Battery).
136655
D95
B95
D95, and REAR BENCH FUNCTION or 1-2/3
REAR BENCH SEAT + ARMREST + N/R SEAT-
BACK
D95, and REAR BENCH SEAT
68A
-
3
SOUNDPROOFING
Centre floor rear soundproofing: Removal - Refitting
B95 or D95
68A
REMOVAL
I - REMOVAL PREPARATION OPERATION
a
Disconnect the battery (see Battery: Removal - Re-
fitting) (80A, Battery).
a
Remove:
- the front seats (see Complete front seat: Remo-
val - Refitting) (75A, Front seat frames and run-
ners),
- the centre console (see Centre console: Removal
- Refitting) (57A, Interior equipment).
a
Remove the rear bench seat base (see Single unit
rear bench seat: Removal - Refitting) (76A, Rear
seat frames and runners).
a
Remove the rear bench seat base (see 1/3 and 2/3
rear bench seat:Removal - Refitting) (76A, Rear
seat frames and runners).
a
Remove the floor storage compartment and flap
(see Floor flap and storage: Removal - Refitting)
(57A, Interior equipment).
a
Remove:
- the front door sill lining (see Front door sill lining:
Removal - Refitting) (71A, Body internal trim),
- the rear inner sill trim (see Rear door sill lining:
Removal - Refitting) (71A, Body internal trim),
- the rear inner sill upper trim (see Rear door sill up-
per lining: Removal - Refitting) (71A, Body inter-
nal trim),
- the B-pillar lower trim (see B-pillar lower trim: Re-
moval - Refitting) (71A, Body internal trim).
a
Remove:
- the door sill lining (see Door sill lining: Removal -
Refitting) (71A, Body internal trim),
- the rear panel trim (see Rear panel trim: Removal
- Refitting) (71A, Body internal trim).
a
Remove the floor carpet (see Floor carpet: Remo-
val - Refitting) (71A, Body internal trim).
II - OPERATION FOR REMOVAL OF PART
CONCERNED
a
Remove the rear floor soundproofing.
REFITTING
I - REFITTING OPERATION FOR PART
CONCERNED
a
Refit the rear floor soundproofing.
II - FINAL OPERATION
a
Refit the floor carpet (see Floor carpet: Removal -
Refitting) (71A, Body internal trim).
a
Refit:
- the rear panel trim (see Rear panel trim: Removal
- Refitting) (71A, Body internal trim),
REAR BENCH SEAT
REAR BENCH FUNCTION or 1-2/3 REAR BENCH
SEAT + ARMREST + N/R SEATBACK
B95
D95
108377
D95

68A
-
4
SOUNDPROOFING
Centre floor rear soundproofing: Removal - Refitting
B95 or D95
68A
- the door sill lining (see Door sill lining: Removal -
Refitting) (71A, Body internal trim).
a
Refit:
- the B-pillar lower trim (see B-pillar lower trim: Re-
moval - Refitting) (71A, Body internal trim),
- the rear inner sill upper trim (see Rear door sill up-
per lining: Removal - Refitting) (71A, Body inter-
nal trim),
- the rear inner sill trim (see Rear door sill lining:
Removal - Refitting) (71A, Body internal trim),
- the front door sill lining (see Front door sill lining:
Removal - Refitting) (71A, Body internal trim),
- the floor storage compartment and flap (see Floor
flap and storage: Removal - Refitting) (57A, Inte-
rior equipment).
a
Refit the single unit rear bench seat base (see Sin-
gle unit rear bench seat: Removal - Refitting)
(76A, Rear seat frames and runners).
a
Refit the rear bench seat base (see 1/3 and 2/3 rear
bench seat:Removal - Refitting) (76A, Rear seat
frames and runners).
a
Refit:
- the centre console (see Centre console: Removal
- Refitting) (57A, Interior equipment),
- the front seats (see Complete front seat: Remo-
val - Refitting) (75A, Front seat frames and run-
ners).
a
Connect the battery (see Battery: Removal - Refit-
ting) (80A, Battery).
B95
REAR BENCH SEAT
REAR BENCH FUNCTION or 1-2/3 REAR BENCH
SEAT + ARMREST + N/R SEATBACK
Document Outline
Wyszukiwarka
Podobne podstrony:
Megane III Prof (6)
Megane III Prof (8)
Megane III Prof (4)
Instrukcja radio Megane III
akumulator do renault megane iii coupe 14 tce 16
Renault Megane III
PLATFUSI bezpieczniki i przekaźniki megane 3 iii
akumulator do renault megane iii 19 dci 20 dci
akumulator do renault megane iii 20 tce 20 16v 15 dci
RENAULT MEGANE III
akumulator do renault megane iii coupe 20 tce 15 dci
akumulator do renault megane iii 14 tce 16
akumulator do renault megane iii coupe 19 dci 20 dci
Metody badań pedagogicznych, wykłady z sem III, prof Pielki, EUHE
Egzamin Ochrona Przyrody - Prof. Zając, BIOLOGIA UJ LATA I-III, ROK II, semestr II, Ochrona środowis
Ekonomia matematyczna egz 30.01.2015, Ekonomia II stopień, UMK 2013-2015, III semestr, Ekonomia mate
I rozdzial, WSZiP (UTH) Heleny Chodkowskiej BEZPIECZEŃSTWO WEWNĘTRZNE, III semestr BW, NAUKA O PAŃ
więcej podobnych podstron