® CrossFit is a registered trademark of
© 2008 All rights reserved.
Subscription info at
Feedback to
1 of 6
J O U R N A L
A R T I C L E S
Pulling Exercises: Hip It Before You Whip It
Bill Starr
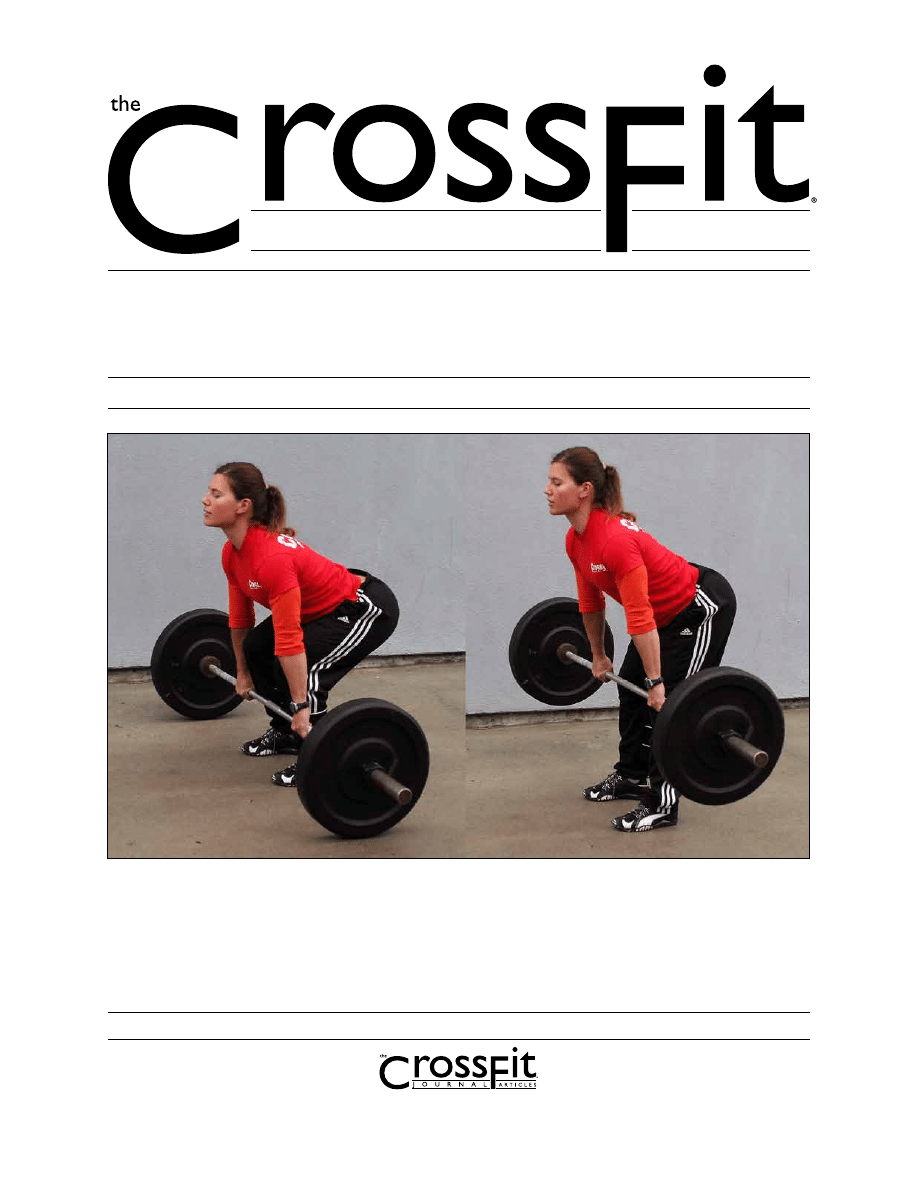
Start all barbell pulls with a controlled, precise form that tracks the hips. It’ll help you get big
weight off the floor smoothly, and ready to accelerate upward in a blur.
Learning how to pull a weight off the floor or a platform correctly can help every strength athlete to better
perform a number of very beneficial exercises: power cleans, power snatches, full cleans, full snatches, clean
and snatch grip high-pulls, and conventional deadlifts. (These form points do not apply to sumo-style cleans
and deadlifts, which I will deal with in a future presentation.)
Although every exercise in strength training consists of a start, middle, and finish, learning how to get a strong
start in those pulling exercises is most critical for success with heavy weights.

® CrossFit is a registered trademark of
© 2008 All rights reserved.
Subscription info at
Feedback to
2 of 6
Pulling Exercises: Hip It ...
(continued)
It has been my observation that most athletes do not pay
close enough attention to this essential aspect of a lift from
the floor. Instead, they casually jerk the weight upward,
thinking ahead to the finish. But if the start is not perfect
for a max attempt, the lift is generally missed. Unless, of
course, light weights are being used. Then the finer form
points aren’t a big factor. However, when the weights get
demanding, technique is paramount for a successful lift.
When a weight is moved off the floor incorrectly, the odds
of completing the lift go way down. This is because when
that first move isn’t right, the middle and top are adversely
affected, sometimes to a great extent. This is particularly
true for power snatches and power cleans since the bar has
to be pulled very high. Conversely, when the start is done
perfectly, following through into the middle and finish of
the lift is a great deal easier to do correctly. Should the bar
move out of the proper line during the start, problems
will occur. So time must be spent honing the technique
for the start if an athlete wants to steadily move the
top-end numbers.
Find Your Own Ideal Starting Position—
and Keep It
In order to do a perfectly executed start on a pulling
exercise, an athlete has to first find where his strongest
position is. It needs to be pointed out that there is more
than one ideal starting position. These vary from athlete
to athlete and are determined by height, body type, and
where their seat of power lies.
For example, a taller athlete can utilize his height by setting
his hips rather high at the start of a pull. This allows him to
use his longer levers, which is always a plus in weightlift-
ing. Yet, this higher starting position is only beneficial when
the athlete is able to maintain it in a strict fashion. Should
his hips rise up too rapidly, then he will no longer be in a
strong pulling position. He will be in a posture that allows
him to pull less forcefully. When this happens, he needs to
lower his hips to where he can lock into that strong start.
Those who possess very strong hips and legs can utilize
that source of power by starting with their hips a bit lower.
Again, that starting position, whether it be with the back
parallel to the floor or much lower than that, must be held
firmly through the initial pulling motion.
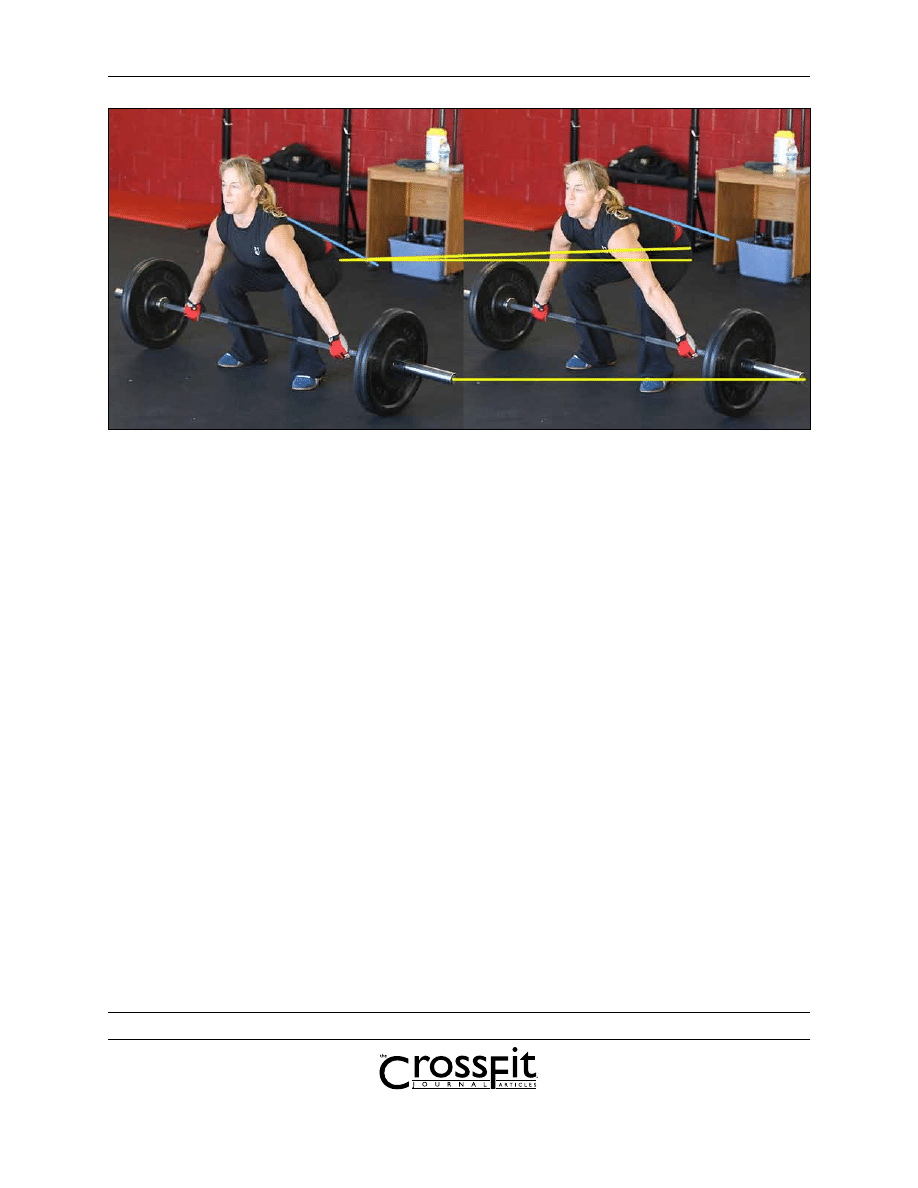
I’ve watched many Olympic lifters get set, and just before
they break the bar off the platform, they shift their hips
either up or down slightly. What they’re doing is selecting
their strongest position to move the weight upward. This
searching move wastes energy and is not exact. The correct
thing to do is to lock into the preferred starting position
and not waver an iota on every single rep. Once an athlete
has learned how to do that consistently, he is well on his
way to heavier poundage on all his pulling exercises.
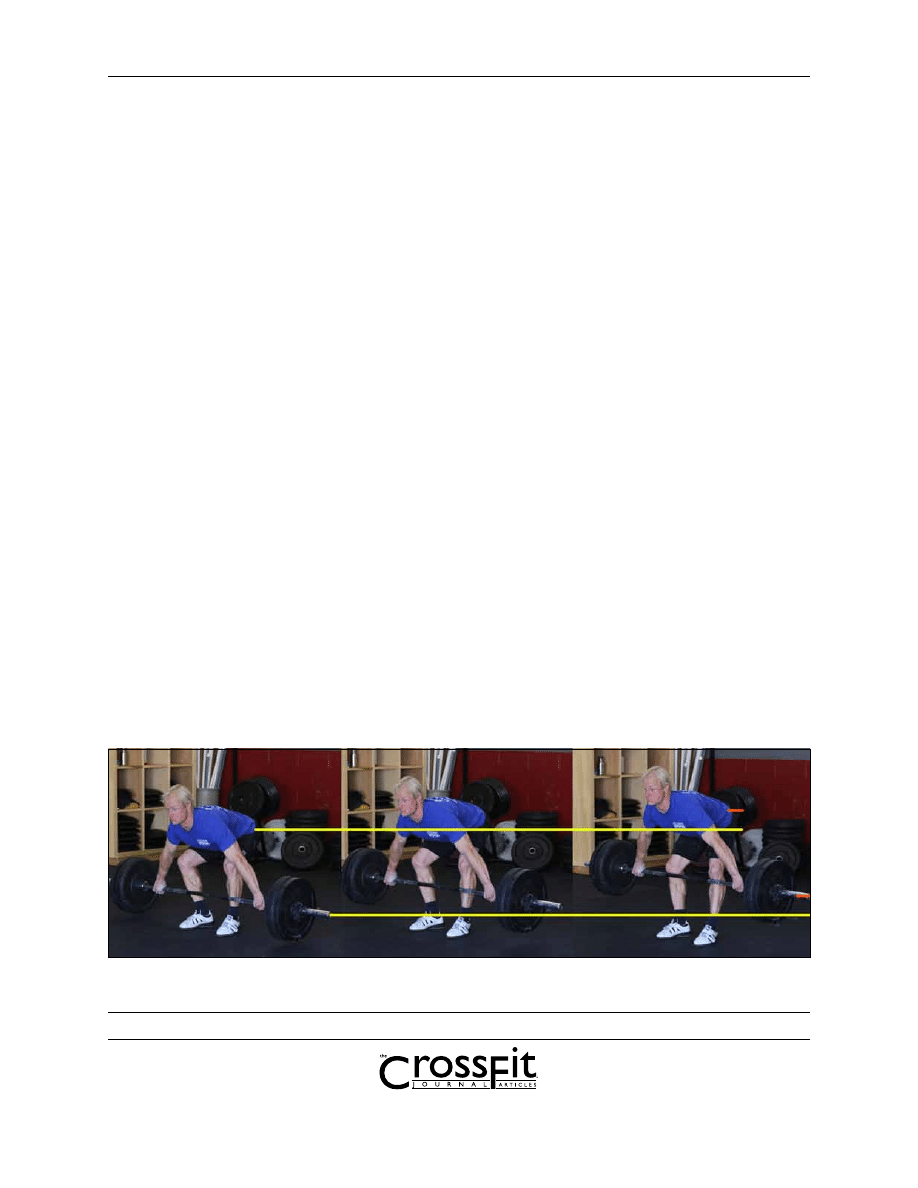
The Bar’s Rise Should Track the Hips,
So Don’t Jerk the Start or Bend Arms too Early
The basic rule is that the bar must climb upward at the
exact same rate as the hips. Concentrate on that simple
idea and that movement and the rest of the lift will
go smoothly.
Unfortunately, strength-training rookies often neglect the
basic bar/hip equation, and rush the start on their power
cleans or power snatches. They believe if they can make
the bar jump off the floor, they’ll have a better chance of
pulling the bar higher. Not necessarily.
If that fast start is done perfectly and followed by a flawless
middle and top, then it indeed is an asset. However, unless
an athlete has spent a great deal of time practicing his
form on the start, which beginners have not, then in all
likelihood, that attempt at jerking the weight off the floor
is going to be detrimental. Here’s why.
Jerking the bar upward will almost always carry it out of
the correct line of pull. Usually, the bar will run forward.
The quick start will also result in the arms bending too
soon, the hips rising up too fast, and the back rounding. All
these are negatives and will greatly reduce the amount of
weight used on an exercise.
Bending the arms before the bar has passed the waist
forces the lifter to lean forward, taking him out of a strong
middle and top position. Plus, bending the arms too early
also affects the finish. The traps need to be contracted
before the arms bend. When these two groups—traps and
arms—work in a smooth, coordinated movement, the bar
will jump at the top, allowing the lifter to rack the bar on
his shoulders or kick it out overhead.
When the back rounds, it is no longer in the ideal position
to let the lifter apply full power to the bar at the critical
finish portion of the exercise. So a fast start is only helpful
to those who have built rock-solid bases and drilled on
their form over the course of several years. It just doesn’t
happen overnight. For everyone else, a controlled start
is a smarter approach. Then the athlete can concentrate
fully on the many aspects of that initial move and when he
does that correctly, the rest falls in place nicely.
In other words, to be successful with a max attempt on a
power clean or power snatch, the bar does not have to come
off the floor fast. More important than speed of movement
at this stage is being able to elevate the bar in a very tight
® CrossFit is a registered trademark of
© 2008 All rights reserved.
Subscription info at
Feedback to
3 of 6
Pulling Exercises: Hip It ...
(continued)
line and keep all the groups involved in that effort fully
contracted and locked in place. At the start of any pulling
movement, form wins out over speed.
The speed comes later, through the middle and at the
conclusion of the lift. The bar moves upward like a whip—
slow at the beginning, gaining speed through the middle,
and no more than a blur at the top. This means that the
most important aspect of that initial pull is that it must be
in a precise line.
A Common Pair of Problems:
Lack of Mastery and Weak Links
There are basically two reasons why beginners and others
pull the bar off the floor improperly. One, they have not
been taught how to do this move correctly, or haven’t done
enough reps to have mastered the technique. Secondly,
athletes, even experienced ones, break form at the start
simply because one or more of the muscle groups that
are responsible for this act are not quite strong enough to
hold the body in the proper position.
For example, an athlete is doing full cleans and as he works
up to his target number for that day, his start is perfect. Yet,
on the max attempt, his hips rise up too rapidly, causing
the bar to run forward and he misses the lift. His form break
was a direct result of a relative weakness in those muscles
involved in holding his hips in the correct placement at the
start. This is usually the lower back, but it could also be the
hips themselves or the adductors or hamstrings.
In other cases, when the weights get heavy, the athlete
begins to round his back excessively, which moves the
bar away from his body and out of the intended line of
pull. So before an athlete can move forward number-
wise on his pulls, he has to take time to strengthen the
weaker area or areas. A point that’s often overlooked is
that form is dependent on strength. As an athlete grows
stronger, he must constantly be on the lookout for signs
of weaker muscles. A great many are involved in stabilizing
that starting position for the pulls: hips, quads, hamstrings,
adductors, abductors, calves, lumbars, lats and rhomboids,
traps, shoulders, and arms. And the abs play a role as well.
It would appear as if nearly every group in the body is part
of the start—and this would be right.
If a certain muscle group displays a glaring weakness, it
needs direct attention right away. It does no good to keep
hammering away on an exercise that cannot be done
with heavy weights because of a weak link. Most can be
corrected in a short period of time with some specific
work. Should a lifter determine that his hamstrings are the
problem in not being able to hold the solid start on his
pulls, get on a machine and knock out two to three sets
of twenty at every workout. A sign that an athlete has rela-
tively weak adductors is when his knees turn inward on
the heavy attempts. Again, the machine will do the job if
you hit it diligently; three sets of twenty at every session.
Notice the difference between the set up position and the pulling position even though the bar has yet to move.
This last-minute shift is disadvantageous.
® CrossFit is a registered trademark of
© 2008 All rights reserved.
Subscription info at
Feedback to
4 of 6
When the back rounds too much, figure out what segment
is lagging behind. It could be the middle or top, but more
than likely it’s the lower back causing the trouble. Start
hitting the lumbars with back hypers and reverse back
hypers at every trip to the gym and start leaning hard
on the good mornings. While calves are not thought of
as being body parts that may influence the start, if they
are way out of proportion in relationship to the rest of the
leg, they can indeed be responsible for a shaky start. Three
sets of thirty three-times-a-week will cure that weakness in
a hurry.
It’s most important that you identify weak areas and if
you do not have the luxury of a good coach or training
mate who knows what he’s doing, this can be a difficult
task. While I do not encourage lifters to train in front of a
mirror on a regular basis, it can be useful in this regard. An
athlete may not even be aware that his hips are rising up
too much. But a session in front of the mirror will quickly
reveal those form flaws.
However, do not get in the habit of always lifting in front of
a mirror. You’ll quickly become dependent on visual, rather
than tactile, cues. In a short period of time, you’ll find that
you can’t do a lift without watching yourself in a mirror.
For anyone planning on lifting in a contest, this will be
extremely troublesome.
The Finer Points of Foot Placement, Grip, Hips,
and Creating a Solid Base
I’ll mention several other ways to improve overall strength
for the starting position, but now I want to go over the
specific form points for that first move off the floor. I’ll use
the clean as my example. Everything pertains to any form
of snatching as well, except the grip is wider.
Foot position: Pulling a heavy weight off the floor starts
with the feet. To find the best foot placement for pulling,
shut your eyes and prepare to do a standing broad jump.
That’s your most powerful thrusting position—feet at
shoulder width with toes pointed forward.
Step up to the bar and set your feet so that your shins are
touching it. This is the most common mistake beginners
make. They set the bar 3-4” away from their legs. The bar
must be tight against your legs if you want a perfect start.
Handgrip: Reach down and assume your grip. To utilize
the grip that fits most, except for those with narrow or very
wide shoulders, extend your thumbs on an Olympic bar
until they barely touch the smooth center.
Hips: Setting the hips may take some trial and error.
Setting them as high as parallel to the floor works well for
some, while others need to lower them to a place where
they feel comfortable. Regardless of where you set your
hips, two things must be done:
1. Your frontal deltoids must be out in front of the bar.
Not a lot, but an inch or two.
2. You must have a very flat back. No rounding at all.
For those who have difficulty getting the feel of what
I’m after, I have them stand up, lock their shoulder
blades together, then lean down and grip the bar
while maintaining that strict back posture.
Pulling Exercises: Hip It ...
(continued)
Notice that the bar and hips rise at the same rate, the back angle doesn’t change, and the bar stays in contact with the shins.

® CrossFit is a registered trademark of
© 2008 All rights reserved.
Subscription info at
Feedback to
5 of 6
Solid base: Look straight ahead, not up or down. Now
you’re in the correct position to start the pull. But before
you do, take a moment to create a solid base. First, lock
your feet into the floor. This can be accomplished by trying
to grip it with your toes. Imagine a bird gripping a tree limb.
Once that’s done, it’s rather easy to tighten the muscles in
the rest of you body, starting with your legs, moving on up
to your hips, back, shoulders, and arms. Become a coiled
spring of muscle.
Practicing the Deadlift is Key
Since the initial move is so critical to success, it has to be
done precisely. In order to achieve an ideal start, don’t
think about pulling the bar off the floor. Rather, think of
pushing your feet down through the floor while maintain-
ing a rock-solid body position. When you do that, the bar
almost magically lifts off the floor. Once it’s set in motion,
keep it moving in the same controlled manner, guiding it
upward still snug against your legs, with your hips rising at
the exact same rate as the bar.
As readers are well aware, what I just described is a deadlift
using a clean grip.
(Note: As the bar passes your knees, you enter the second
or middle pull of the clean, which is covered in the article
The deadlift is the basic move used to improve the start on
a number of exercises—power or full clean, power or full
snatch, or clean and snatch grip high-pulls—for a simple
reason: the muscles and attachments involved in it have
to be strengthened in order to lift more weight in any of
those exercises.
A frequently told story about Norbert Schemansky, one
of America’s greatest Olympic lifters, is pertinent. A young
lifter approached Ski and asked, “What can I do to improve
my overhead press?” Ski replied, “Press.” “Well how about
my squat?” The answer, “Squat.”
Simple but accurate, which in this case means that the
very best exercise to do to improve strength in that start
of the pull is the deadlift. I know that quite a few Olympic
lifters and coaches of that sport shun deadlifts, saying they
are done too slowly and belong to the powerlifters, not
those doing the dynamic lifts.
Not true. Deadlifts have great value to Olympic lifters and
others who incorporate some quick lifts like power cleans
and power snatches into their routines. However, I’m not
talking about the type of deadlifts that most powerlifters
employ, where they round their backs during the lift. Also,
I don’t think really heavy poundages need to be used in
order for the kind of deadlift I recommend to be beneficial.
Since form has to be perfect on every rep, the amount of
weight used is much less than when an athlete pulls such
a heavy load that the back rounds.
The Big Three Exercises for a Strong Start
Three exercises that I utilize to build greater strength in the
starting position are 1. halting deadlifts, 2. deadlifts done
from a lower starting position, and 3. isotonic-isometrics
pulls in the power rack. These are particularly helpful to
those athletes who have moved into the intermediate
or advanced levels. They also can be useful to beginners,
but in most cases, they are better off attacking the weaker
groups that I went over earlier.
Exercise #1
Halting deadlifts
Halting deadlifts are just what the name implies. You pull
the bar up to mid-thigh and pause for a 2-3 second count,
then lower it in a very controlled manner back to the floor.
Both the up and down movements are done very delib-
erately. This forces all the groups involved to work much
harder. The back has to stay flat as a board, the knees are
not allowed to turn in, and the hips must climb upward in
concert with the bar. And, of course, the arms stay straight
throughout, the frontal deltoids are always out in front of
the bar, and the bar is tucked in snugly against the legs.
Pause at the bottom long enough to make sure all your
mechanics are right, then do the next rep. The longer you
pause at the top of the movement, at mid-thigh, the more
it’s going to help you, but you may not be able to hold for
very long at first.
These, as everyone quickly discovers, are tough. Five reps
are plenty, for four to five sets. At the first workout on these,
very few are able to handle a weight equal to their best
clean—which is okay. In strength training, it doesn’t matter
where you start, only where you end up. Halting deadlifts
not only strengthen all the groups and their attachments
that are involved in the start, but it also helps reveal weaker
areas. These usually show up on the fourth or fifth rep of
the work sets. Once these are identified, take the necessary
steps to strengthen them. Start off with relatively light
poundages so you can get the feel of the technique, then
continue to add weight on each set just as long as your
form is perfect.
However, should form break down in any way, stop and
lower the weight. A set done flawlessly is worth more than
one done with sloppy form with twenty more pounds.
Work these regularly, once or twice a week, and you’ll soon
Pulling Exercises: Hip It ...
(continued)

® CrossFit is a registered trademark of
© 2008 All rights reserved.
Subscription info at
Feedback to
6 of 6
be using fifty more pounds than you did at that first session.
At that point, they will have a direct, positive influence on
your power cleans, full cleans, clean high pulls, and even
full deadlifts.
You can also do halting deadlifts with a snatch grip. Use
straps on all of these recommended exercises. Straps will
let you focus fully on the exercise itself without being
distracted with trying to hold onto the bar once the
weights get in the demanding range.
Exercise #2
Pulling from a lower position
Another way to improve the start is to deadlift with the bar
at a lower position than normal. This is useful for beginners
all the way up to very advanced strength athletes, and
it’s rather simple to do. Just use 25-pound plates on the
Olympic bar instead of 45s. Or if you normally use bumper
plates, use the metal 25s. Pulling from this slightly lower
starting position brings some different muscles into the
mix. The key to making these beneficial is to set the hips
extra low and not allow them to climb up fast or so high
that the exercise resembles an almost straight-legged
deadlift. Lock the lowered hips in place and squeeze the
bar off the floor. You can also do these as halting deadlifts,
although most prefer to do a full-range movement.
Pulling from a lower position hits those groups that are
responsible for moving the bar off the floor very directly,
and the results are immediate. After your very first workout
on these, you will be able to tell that your start on any form
of pulling exercise is stronger. Plus, you’ll be able to utilize
ideal form. I had one powerlifter try these; a week later, he
improved his personal best on the deadlift by 20 pounds.
Exercise #3
Pulls in the power rack
Isotonic-isometric holds—where a weighted bar is moved
a very short distance, no more than a couple of inches,
then locked into a pin and held for a specific count—were
part of nearly every strength athlete’s routine during the
sixties, but then lost favor for a number of reasons that I will
not go into. Suffice it to say, they are extremely beneficial
for moving through sticking points and bringing weaker
areas up to par. Beginners and intermediates can do these,
but they’re most useful to those who have been training
for some time, mostly because experienced lifters are able
to concentrate more fully and this enables them to put
more effort into the contractions.
My rule on isometric holds is no less than eight seconds
and no longer than 12. The isotonic part is when the
weighted bar is lifted up to the top pins. The isometric
contraction is when the weight is held tightly against
those pins for a count. With the loaded bar, it’s easier to tell
if you’re applying 100%. With just a bar and no weight, this
is more difficult.
Position the pins inside a power rack so that when you do
the isometric contraction, the bar will be lower than the
normal starting position when it’s pulled from the floor—
not much, but some. While learning to do this highly
concentrated form of exercise, I find it best to do a couple
of warm-up sets before tackling the work set. On the first,
light set, do three reps. Tap the upper pins on the first two,
then hold the third rep for two to three seconds. Do the
same thing on the second set with more weight. On the
work set, you can follow that same procedure and lock
the third set and hold it for the required eight to twelve
seconds. Or you can lock in the first rep on the work set
for the count. After you become familiar with the isotonic-
isometric contractions, you can just do one set, a work set.
Do these at the end of you workout or right after you’ve
finished with a pulling exercise. These can be done at
every session, but only do one work set per workout. Keep
in mind that the amount of weight used is not nearly as
important as being able to maintain perfect body position-
ing while you’re locked into that isometric hold. In most
cases, less is better than more in terms of weight used.
Concentrate on the various form points for the start of the
pull, steadily hone your technique, identify any weaker
areas, then include one or more of the exercises I’ve
suggested to strengthen those areas, and you’ll quickly
be handing bigger numbers in a wide range of beneficial
exercises.
F
About The Author
Bill Starr is the author of the books The Strongest Shall Survive:
Strength Training for Football, Defying Gravity, and thousands
of magazine articles. He was the editor of Bob Hoffman’s Strength
and Health, Joe Weider’s Muscle Builder, and a nationally-ranked
Olympic weightlifter and powerlifter back in the day. Bill was one of
the first professional strength coaches in the country, has forgotten
more about training than most coaches will ever have the opportu-
nity to learn, and makes a very convincing crab cake if you can talk
him into it.
-Mark Rippetoe
Pulling Exercises: Hip It ...
(continued)
Wyszukiwarka
Podobne podstrony:
CFJ Starr OverheadRising
CFJ Starr MasteringTheJerk
CFJ Starr PlatformCoaching
CFJ Starr MorePop
CFJ Starr PyramidStrength
CFJ Starr DontMuddleMiddle
CFJ Starr FullCleans
Starr Flot Rimskoy imperii 439603
CFJ Takano Olympic
CFJ Star Mental Dec2010
Asimov, Isaac Lucky Starr 05 and the Moons of Jupiter(1)
Isaac Asimov Lucky Starr 03 And the Big Sun of Mercury
Raven Starr Her Smile (pdf)
PULLING OIL karacharticle
Asimov, Isaac Lucky Starr 01 David Starr, Space Ranger
Ayla Starr A Story Called Philophobia
więcej podobnych podstron