
ChartPlanner
Version 1.0
User manual

2

3
Datema Nautical Information Services
Copyright (c) 2003
1.0
Index
1.0
Index
2.0
General Information
3.0
Installation
3.1
Settings
3.2
Registration
3.3
4.0
Desktop, Bar and Panels
4.1
The Desktop
4.2
File bar
4.3
Tool bar
4.4
Program bar
4.5
Publication types
4.6
View panel
4.7
Layer view panels
4.8
Show/Hide panel
4.9
Selection panel
4.10
Route panel
4.11
Status bar
4.12
Search
5.0
Making a selection
5.1
Point select
5.2
Route select
5.3
6.0
Advanced features
6.1
Import
6.2
Export
6.3
Update
6.4
Electronic Charts
6.4.1
ARCS permits
6.4.2
ENC Permits
6.5
DFANS Plug-in
6.5.1
View outfit
6.5.2
Cross check outfit
7.0
Support

4
2.0
General Information
CHARTPLANNER – The ultimate voyage planning tool
ChartPlanner is the most comprehensive digital chart catalogue for Nautical Use.
ChartPlanner allows voyage preparations with the click of the mouse. With a ports
database of over 4000 ports, ChartPlanner can be used as a maritime atlas and
marine distance table. The ChartPlanner contains coverage information on standard
Admiralty charts, ARCS, ENCs from various sources, Admiralty List of Lights, List of
Radio Signals and Pilots, making ChartPlanner the ideal tool for selecting your
nautical Publications and making a voyage plan.
COPYRIGHT
No part of this product or its output may be sold, stored in retrieval system or
transmitted in any form or by any means electronic, mechanical, photocopying,
recording or otherwise without the express prior permission of Datema Nautical
Information Services BV
DATEMA NAUTICAL INFORMATION SERVICES
Datema Nautical Information Services BV is part of the Nautical Safety Group of
companies and has a strong position in the distribution of electronic nautical data.
Datema Nautical Information Services provides electronic update services and
distributes electronic chart data from various sources. In addition Datema Nautical
Information Services produces and publishes software for nautical use.

5
3.0
Installation
You have obtained chartplanner either from the Internet or you received a CD. If you
have obtained a Chartplanner CD, insert the chartplanner installation CD into you
CD-ROM drive. If your system supports autorun the CD will automatically start the
installation-menu. If the installation-menu does not start automatically you can run
this to browse to your CD-ROM drive and start the program file start.exe. Within the
Installation-menu you can start the chartplanner installation.
Chartplanner requirements:
Minimal
Pentium II 300 Mhz
64 MB RAM
40 MB free disk space
Recommended
Pentium III 700 Mhz
256 MB RAM
40 MB free disk space
3.1
Settings
After you have installed chartplanner you may wish to setup some initial settings. To
alter these settings choose Edit
? Settings ? tab Route.
Route Speed
Your average speed in knots. This setting is used
in route planning to determine the TTG and ETA.
Scale Min/Max
If you start planning a route the first Scale min
and Scale max are preset with these values
Reset
The large button Reset all settings resets all user defined
values. All the panels will placed into there initially settings to.
The checkbox in this tab allows you to switch on and off the
possibility to select a port on a new route.
Ship Date
These values are used in all the prints you make.
3.2
Registration
After installation you can use the program fully for 30 days. After 30 days
Chartplanner will only start the program to register.
To register the program choose About
? Register.
You can obtain registration information at www.nauticis.com or contact Datema
Nautical Information services (see support for contact details).
The registration codes you receive allows you to use the program for a live time and
update Chartplanner for 1 year. After one year you must register again to be able to
obtain updates.
6
4.0
Desktop, Bar and Panels
The bar and panels are highly configurable. You can show/hide and drag bars and
panels any where on the desktop. To show/hide a bar or panel choose View
?
Toolbars. If a bar or panel is visible (according the View
? Toolbars) but the panel
or bar is not shown on the desktop, you’ll need to reset the positions and bars. to do
so choose Edit
? Settings ? tab reset ? Reset all settings.
4.1
The Desktop
This is the actual work area. In here you can see the coverage of the publications,
set your waypoints and see what you have selected.
To navigate on the desktop you can set your cursor to the pan mode. The cursor on
the desktop looks like a hand. You can pan the world by grabbing the world with the
left mouse button-down and move around. Another way to move around is to move
the mouse to the edges of the desktop. The cursor is changing to an arrow. Then
left-click to move.
Hint:
place the cursor in the corner of the desktop allows you to move
diagonal
To zoom in/out there are 3 buttons in the tool bar. It’s also possible to zoom in, at
any cursor mode, by right-click on the desktop and drag right-down a selection
band.
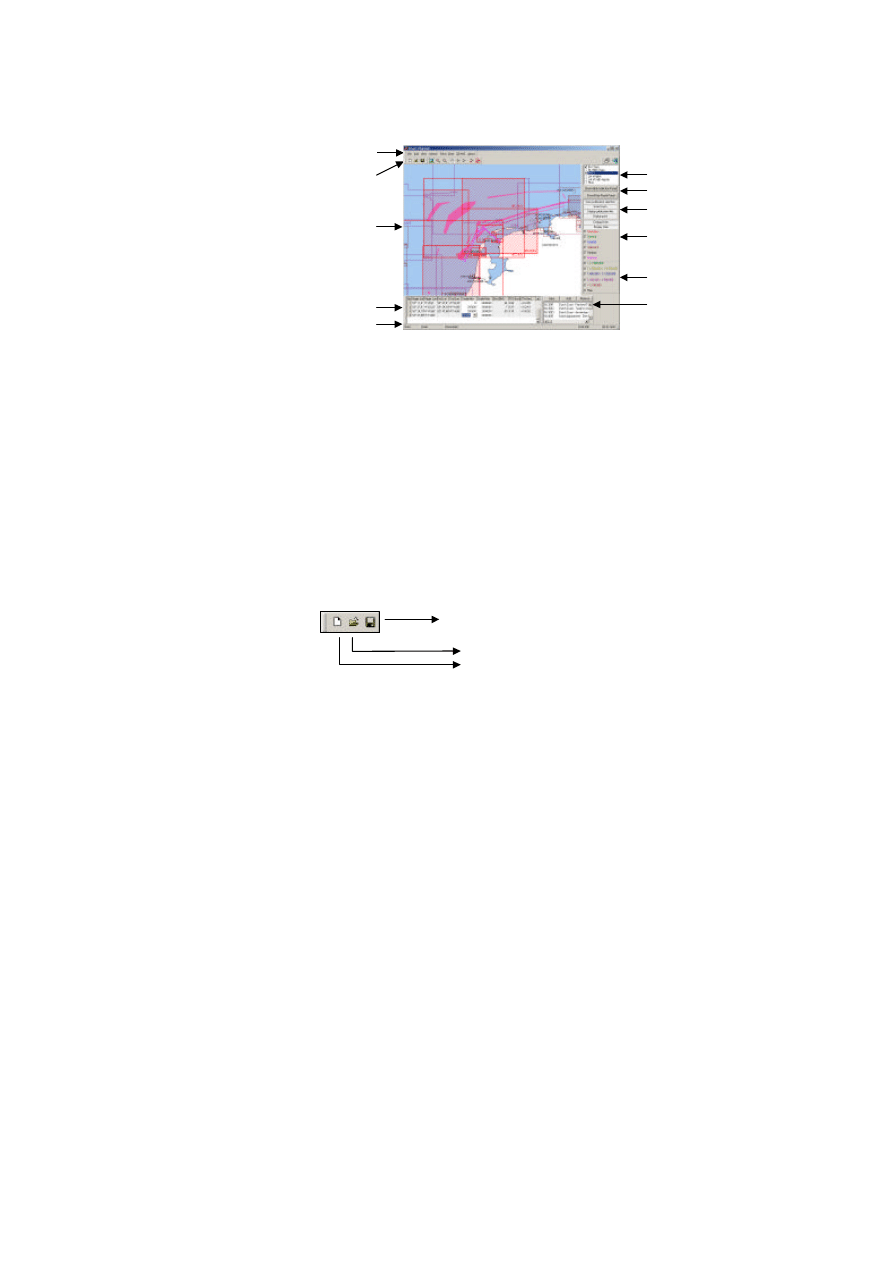
4.2
File bar
Save Voyage plan
Open saved Voyage plan
New Voyage plan
Tool bar
Menu bar
Desktop
Route panel
Status bar
Publication
panel
Show/Hide
panel
ENC view
BA view
View panel
Selection
panel
7
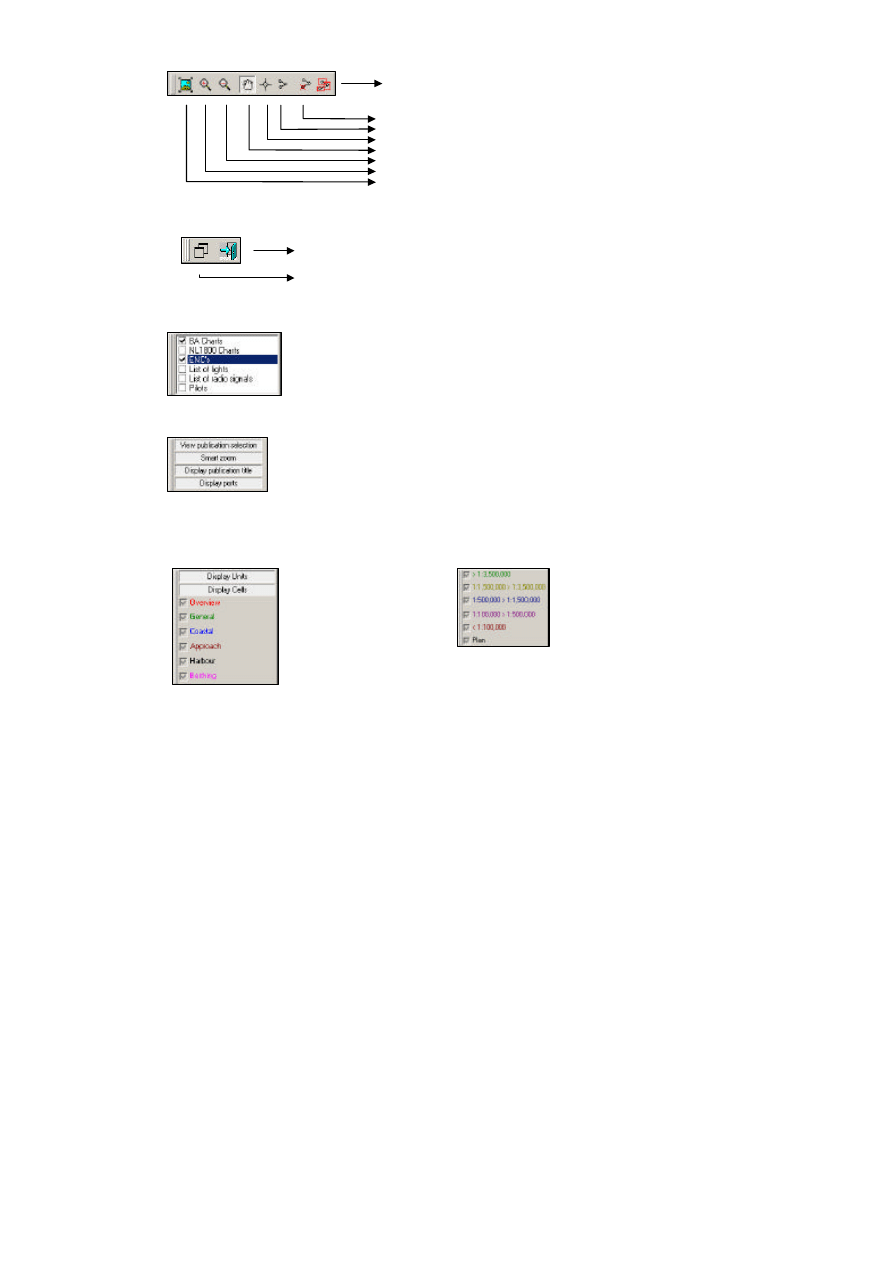
4.3
Tool bar
Calculate route
Delete last waypoint
Set cursor to route mode
Set cursor to point-select mode
Set cursor to pan mode
Zoom out
Zoom in
Expand world
4.4
Program bar
Exit program
Toggle between full screen and desktop
4.5
Publication types
Check the publications to select.
The checked publications will be visible on the Desktop.
4.6
View panel
The buttons on this panel allows the user to show/hide Items
on the desktop
If you want to be able to manage the scale layer yourself
unselect Smart zoom, else the program will show/hide layers
itself.
4.7
Layer view panels
ENC Layers
BA & NL1800 Layers
You are only allowed to manage
the layers if the Smart zoom on
the View panel is disabled.
At all times you are allowed to
show/hide ENC Unit or Cells.
note: The panels are only visible if you check the accompanying publication
8
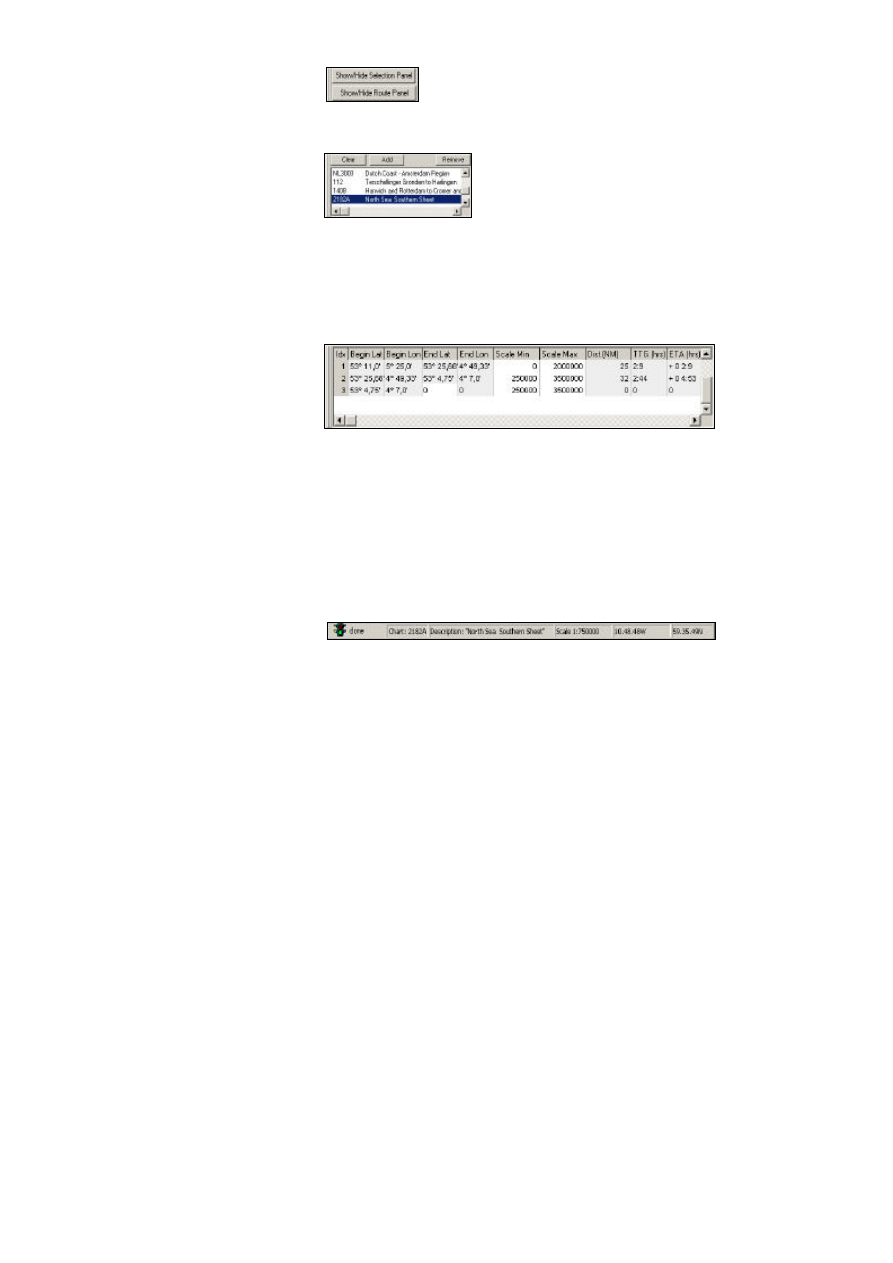
4.8
Show/Hide Panel
The buttons on the panels show/hides the accompanying
panels
4.9
Selection Panel
An overview of the selected publication in numeric order
Clear
- Clears the publication selection
Add
- Add a single publication to the
list
Remove
- Remove the selected
publication
hint:
Hold down the Control (Ctrl) Key to select more publications to remove
When selecting a publication in the list, the desktop will center to the center of the
publication and publication will be highlighted bold blue.
note:
the desktop will not zoom in/out to the extends of the selected
publication but center the selected publication
4.10 Route panel
The route panel displays all waypoints and accompanying information
If a waypoint is inserted the route panel will display the great-circle distance, TTG
between the two waypoints and the ETA over the total route.
When inserting the first waypoint the Scale min and Scale max is taken over from
the default settings. The default setting can be altered in Edit
? Settings tab Route.
The following scale min, Scale max are taken over from the previous waypoint. This
allow you to set a new default Scale min, Scale max half way the route.
hint:
Right click on the route panel to show/hide columns
note:
If a distance between 2 waypoints is bigger then 200 NM, the line
will be divided into parts of +/- 100 NM.
4.11
Status bar
If a publication is selected in the selection panel or a publication is found in a search
action, the details of the chart are displayed in the status bar.
The last two fields are displaying the coordinates of the mouse cursor.

9
4.12
Search
Search lets you to locate a port or publication, by typing a
part of the name of the port. The search function is case
insensitive.
If the right port/publication is not located you can try to
check the “search exactly” and enter the exact name of
the publication/port.
If a port is found, Chartplanner zooms into the port.
If a publication is found Chartplanner will not zoom in or out, but the desktop will be
centered to the center of the publication. The publication will be highlighted bold
blue.
10
5.0
Making a selection
5.1
Point selection
Set the cursor in Point select mode and cli ck on the desktop to make a selection of
the checked publications in the publication type panel that cover the clicked
coordinate.
5.2
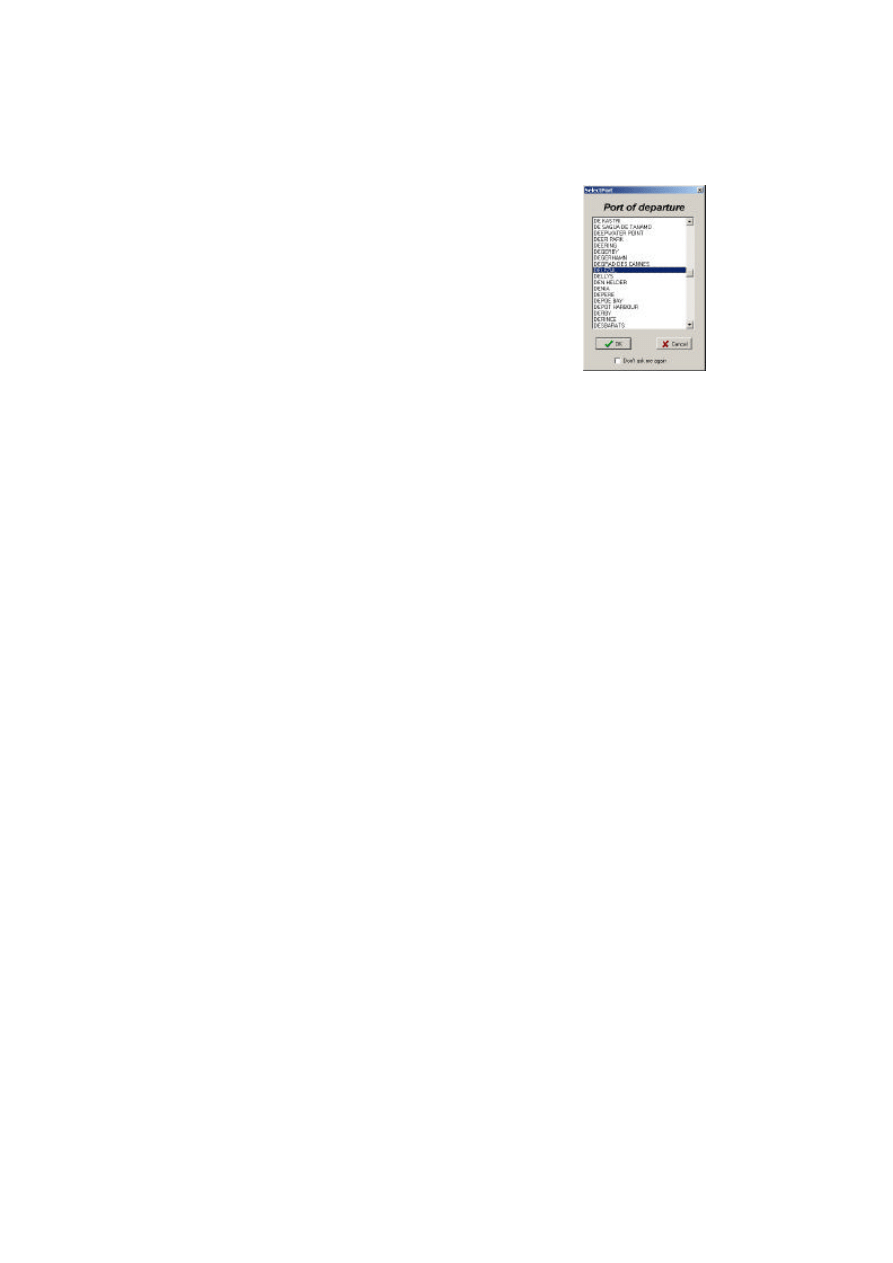
Route selection
Set the cursor in route mode allows you to set
waypoint on the Desktop. When you start a new
route a popup box is shown from that allows you yo
select a port from where you will departure. Typing
the name of the departure port in the list of the ports
will select the nearest alphabetic port. Pressing the
“OK” button, the selected port will be centered on
the screen, and the first waypoint will be set.
If you don’t want Chartplanner to show this dialog
on a new route, check the checkbox on the bottom
of the popup box. This can be undone in the Edit
?
Settings
? tab reset window.
When inserting the first waypoint, the Scale min and
Scale max is taken over from the default settings.
The default setting can be altered in Edit
? Settings ? tab Route.
The following Scale min, Scale max are taken over from the route panel. This allow
you to set a new default Scale min, Scale max half way the route.
note:
If a distance between 2 waypoints is bigger then 200 NM, the line
will be divided into parts of +/- 100 NM.
5.3
There are 3 possibilities to print your selected publications. Choose File
? Print ?
Print Selection
Selection – Only titles
Prints a list of the selected publications ordered by
publication types, numeric.
Selection – With plan titles The same as above, but now the plan/part titles are
included
Selection – Order by route Print a list of the selected publications order by the route,
numeric and publication types. Publications can cover
several waypoints but they are only showed once.

11
6.0
Advanced features
6.1
Import
Chartplanner has the capability to import publications from text fi les and saved
voyage plans. Choose File
? Import
The text file must be a plain ASCII text file. Each line can contain only one
publication title. After importing the text file you’ll get a message with the result of
the import.
6.2
Export
Chartplanner can export the publication selection in 2 way’s. To a text file and to E -
Mail. The planned route can be exported to a text file.
The export to a text file allows you to import the exported text file into other
application such as Exel and Word.
Export to a bitmap, allows you to export the current view of the Desktop to a bitmap.
This bitmap can be opened in any image editing software.
hint:
to reduce the file size of the bitmap to e.g. mail the image to someone,
open the bitmap in e.g. paint (supplied together with all window
versions), and save the bitmap as an JPG file.
6.3
Update
There are 2 ways to update Chartplanner. The easiest way is to retrieve the update
from the Internet. Choose About
? retrieve update. This uses FTP to download the
update. An update will be available once in the 3 months. Check passive transfer if
your pc is behind a firewall.
The alternate way is retrieve an update from a file. To receive the file, contact
Datema (see chapter 7.0 support)
A registered user is able to upda te Chartplanner for one year after then, after one
year chartplanner must be registered again to be able to update Chartplanner.
6.4
Electronic charts
Chartplanner is able to display the set of charts the are being hold in a permit file.
Both ARCS and EN C permits. Choose Electr. Charts.
The publication selection can be crosschecked with the permit files. Choose Electr.
Charts
? ARCS or ENC ? Crosscheck permits.
6.5
DFANS plug-in
If DFANS (Digital Folio and Notices Service) is installed on the same PC, the menu
item DFANS will be visible.
The publications in an outfit can be added in to the publication selection. Choose
DFANS
? Show outfit. Choose an outfit to add to the publication selection.
It is also possible to crosscheck the outfit with the publ ication selection.

12
7.0
Support
Zeesluizen 8
9936 HX Delfzijl
Netherlands
Tel.
(0031) 596 635252
Email: info@nauticis.com
Website: www.nauticis.co m
Wyszukiwarka
Podobne podstrony:
cas test platform user manual
CARPROG Opel ECU programmer user manual
elm327 interface viecar obd2 bluetooth scanner user manual
autel power scan ps100 user manual
INPA User manual
all100 user manual
CARPROG user manual
FX2N 485 BD User's Manual JY992 Nieznany
mb sbc tool user manual
07 Altistart48 user manual
iphone user manual pdf
PRDM 0010 Upgrade user manual UPG 0001
TK105 GPS Tracker User Manual
ATDSK1118 User Manual
FX2N 232 IF User's Manual JY992D66701
Protek 3502C USER MANUAL
Administrator User Manual
więcej podobnych podstron