
WHO Library Cataloguing-in-Publication Data
World Health Organization.
Managing newborn problems: a guide for doctors, nurses, and midwives
(Integrated management of pregnancy and childbirth)
1.Infant, Low birth weight 2.Infant, Newborn, Diseases - diagnosis 3.Infant,
Newborn, Diseases - therapy 4.Perinatal care - methods 5.Manuals I.Title
II,Series.
ISBN 92 4 154622 0
(NLM Classification: WS 420)
© World Health Organization 2003
All rights reserved. Publications of the World Health Organization can be
obtained from Marketing and Dissemination, World Health Organization, 20
Avenue Appia, 1211 Geneva 27, Switzerland (tel: +41 22 791 2476; fax: +41 22
791 4857; email: bookorders@who.int). Requests for permission to reproduce or
translate WHO publications – whether for sale or for noncommercial distribution
– should be addressed to Publications, at the above address (fax: +41 22 791
4806; email: permissions@who.int).
The designations employed and the presentation of the material in this publication
do not imply the expression of any opinion whatsoever on the part of the World
Health Organization concerning the legal status of any country, territory, city or
area or of its authorities, or concerning the delimitation of its frontiers or
boundaries. Dotted lines on maps represent approximate border lines for which
there may not yet be full agreement.
The mention of specific companies or of certain manufacturers’ products does not
imply that they are endorsed or recommended by the World Health Organization
in preference to others of a similar nature that are not mentioned. Errors and
omissions excepted, the names of proprietary products are distinguished by initial
capital letters.
The World Health Organization does not warrant that the information contained
in this publication is complete and correct and shall not be liable for any damages
incurred as a result of its use.
Printed in Hong Kong

ACKNOWLEDGEMENTS
Primary contributors:
Peter Cooper
Robert Johnson
Haroon Saloojee
Jelka Zupan
Contributors:
Julia Brothers
Atanu Kumar Jana
Joy Lawn
Indira Narayanan
Chandrakant Ruparelia
Harshad Sanghvi
Achmad Surjono
Editor:
Melissa McCormick
Editorial assistance:
Sonia Elabd
Dana Lewison
Erin Wagner
Artist:
Kimberly Battista
Graphic assistance
and layout:
Deborah Raynor
Cover design:
Máire Ní Mhearáin
Reviewers:
Youssef Al-Eissa
Deema Al Imam
Anna Alisjahbana
Saif Al-Saif
Duong Thi Cuong
Gary Darmstadt
Sylvia Deganus
A.M. Djauhariah
France Donnay
Trevor Duke
L. Haksari Ekawaty
Indarso Fatimah
Masanori Fujimura
Frances Ganges
Adenike Grange
Dasatjipta Guslihan
Petra ten Hoope-Bender
Ardi Kaptiningsih
M. Sholeh Kosim
Ornella Lincetto
Sandra MacDonagh
Viviana Mangiaterra
Marie Antonette Mendoza
Pius Okong
Kike Osinusi
Vinod K. Paul
Nicky Pereira
Chen RuJun
Suradi Rulina
Irina Ryumina
D. Setyowireni
Mamdouh Shaaban
Maryanne Stone-Jimenez
Haby Signaté Sy
Skender Syla
Ragnar Tunell
Ali Usman
Martin Weber
David Woods
John Wyatt

This guide represents a common understanding between WHO, UNFPA,
UNICEF, and the World Bank of key elements of an approach to reducing
newborn deaths and disabilities. These agencies cooperate closely in efforts to
reduce maternal and neonatal mortality and morbidity. The principles and policies
of each agency are governed by the relevant decisions of each agency’s governing
body, and each agency implements the interventions described in this document in
accordance with these principles and policies and within the scope of its mandate.
The guide has also been reviewed and endorsed by the International Pediatric
Association, the International Confederation of Midwives, and the International
Federation of Gynecology and Obstetrics.
International Pediatric
Association
International Federation of
Gynecology and Obstetrics
The financial support towards the preparation and production of this document,
provided by the Governments of Australia, Japan, and the United States of
America, is gratefully acknowledged, as is financial support received from The
World Bank. In addition, WHO’s Making Pregnancy Safer initiative is grateful for
the programme support received from the UNFPA and the Governments of The
Netherlands, Norway, Sweden, and the United Kingdom of Great Britain and
Northern Ireland.
WHO gratefully acknowledges the technical and editorial assistance provided by
staff of JHPIEGO’s Maternal and Neonatal Health Program, with funding
provided by the Maternal and Child Health Division, Office of Health, Infectious
Diseases and Nutrition, Bureau for Global Health, U.S. Agency for International
Development, under the terms of Award No. HRN-A-00-98-00043-00 and of
SOAG documents No. 497-0393 and 497-0008. WHO also acknowledges the
technical assistance provided by the Saving Newborn Lives Initiative and
BASICS II.

TABLE OF CONTENTS
Foreword
v
Preface
vii
Introduction
ix
List of Abbreviations
xiii
List of Diagnoses
xv
List of Figures
xvii
List of Tables
xix
SECTION 1: ASSESSMENT, FINDINGS, AND MANAGEMENT
Organizing Care of the Sick or Small Newborn Baby
F-1
Rapid Assessment and Immediate Management
F-5
Further Assessment and Management
F-7
Small Baby
F-23
Multiple Findings (Most often Sepsis or Asphyxia)
F-35
Breathing Difficulty
F-47
Mother with History of Uterine Infection or Fever during Labour
or after Birth, or Rupture of Membranes for More than 18 Hours
before Birth
F-55
Convulsions or Spasms
F-59
Abnormal Body Temperature
F-69
Jaundice
F-77
Lethargy and Other Non-Specific Signs
F-87
Low Blood Glucose
F-91
Feeding Difficulty
F-93
Vomiting and/or Abdominal Distension
F-99
Diarrhoea
F-107
Bleeding and/or Pallor
F-113
Swelling on Scalp
F-121
Skin and Mucous Membrane Problems
F-127
Umbilicus Red and Swollen, Draining Pus, or Foul Smelling
F-135
Eyes Red, Swollen, or Draining Pus
F-139
Birth Injury
F-145

ii
Table of contents
Birth Defects
F-151
Asymptomatic Newborn Baby of Mother with Hepatitis B,
Tuberculosis, Diabetes, or Syphilis
F-155
Mother with HIV
F-159
SECTION 2: PRINCIPLES OF NEWBORN BABY CARE
Maintaining Normal Body Temperature
C-1
Feeding and Fluid Management
C-11
Oxygen Therapy
C-25
Antibiotics
C-31
Infection Prevention
C-37
Clinical Use of Blood
C-47
Immunization
C-51
Assessing Growth
C-53
Communication and Emotional Support
C-57
Transfer and Referral
C-63
Discharge and Follow-Up
C-67
SECTION 3: PROCEDURES
Resuscitating a Baby Who Was Breathing
P-1
Measuring Body Temperature
P-5
Taking Blood Samples
P-9
Measuring Blood Glucose
P-13
Giving Injections
P-15
Establishing an Intravenous Line
P-21
Transfusing Blood
P-31
Inserting a Gastric Tube
P-33
Performing a Lumbar Puncture
P-37
Administering Rectal Paraldehyde
P-41
Draining an Abscess
P-43

iii
Table of contents
SECTION 4: APPENDIX
Record Keeping
A-1
Essential Equipment, Supplies, and Drugs
A-9
Index
A-15

iv
Table of contents

vi
Foreword

PREFACE
vii
This guide has been produced by the World Health Organization to assist
countries with limited resources in their efforts to reduce neonatal mortality
and to ensure care for newborn babies with problems due to complications of
pregnancy and childbirth, such as asphyxia, sepsis, and low birth weight or
preterm birth.
The main section of this guide is arranged by clinical signs or findings, which
facilitates early identification of illness, and provides up-to-date guidelines
for clinical management. Use of these guidelines is essential in promoting and
assessing the quality of health services and training providers and supporting
quality services through supervision and feedback on performance.
The interventions in this guide are based on the latest available scientific
evidence and the guide will be updated as new information is acquired. In
addition, the diagnostic and management guidelines in this guide are
consistent with the other WHO materials in the Integrated Management of
Pregnancy and Childbirth (IMPAC) series, including Pregnancy, Childbirth,
Postpartum and Newborn Care: A Guide for Essential Practice and
Managing Complications in Pregnancy and Childbirth: A Guide for
Midwives and Doctors. This guide is complementary to the Integrated
Management of Childhood Illness (IMCI) guidelines for care of the sick
young infant: the major illnesses emphasized in this guide originate at birth or
during the first week of life, while the illnesses covered in the IMCI
guidelines generally originate after that period.
It is hoped that this guide will be readily available whenever a doctor, nurse,
or midwife is confronted with a sick or small newborn baby. In addition, all
of the guides in the IMPAC series can be used by national ministries of health
to help ensure that countries have state-of-the-art information upon which to
base their national policy standards, pre-service training, and service delivery
guidelines.
For the guide to be fully effective, its users should also be trained in a setting
where skills can be practised. Many training packages and job aids are
available to accompany the guides in the IMPAC series.

viii
Preface

INTRODUCTION
ix
A newborn baby who is small or has a potentially life-threatening problem is
in an emergency situation requiring immediate diagnosis and management.
Delay in identification of the problem or in providing the correct management
may be fatal. This guide provides up-to-date, authoritative clinical guidelines
for use at the first referral level in low-resource settings by the doctors,
nurses, midwives, and other health care workers who are responsible for the
care of newborn babies with problems during the first week(s) of life. The
guide can also be used to identify less common conditions that require
referral to a higher level.
To effectively apply these guidelines for care of the sick or small newborn
baby, a general medical officer and nurses with skills in caring for newborn
babies should be available at the hospital 24 hours per day. In addition, basic
support systems are necessary, including:
•
Basic laboratory capabilities for measurement of haemoglobin or
haematocrit (erythrocyte volume fraction), blood glucose, and serum
bilirubin, as well as culture and sensitivity of blood, pus, and
cerebrospinal fluid;
•
Selected essential drugs, including key antibiotics such as ampicillin and
gentamicin;
•
Essential equipment and supplies, including accurate weighing scales and
a microdropper for infusions;
•
Capability to provide safe blood transfusion.
In certain settings, these requirements may not be available; this guide allows
for these situations and provides alternative methods of assessment or
management where possible. However, all health care workers and policy-
makers are encouraged to strive for wider availability of these basic standards
to enable effective care of sick and small newborn babies.
HOW TO USE THE GUIDE
The emphasis of the guide is on rapid assessment and decision-making, in
order to prioritize the sickest babies and the most urgent actions.
•
The first priority is to immediately assess all babies for emergency (life-
threatening) signs and identify those who require immediate
management.

x
Introduction
•
A further assessment, including history and a complete examination, is
then necessary to guide the health care worker in identifying appropriate
management for the specific problem(s) identified.
The main text of the guide is arranged primarily by clinical signs or findings
(e.g. breathing difficulty). Because this approach is different from most
medical texts, which are arranged by disease categories, a list of diagnoses
with the page number of the corresponding diagnosis table is provided. The
guide comprises four sections, each numbered separately and designated with
a letter code. Cross-referencing is used extensively throughout the text to
allow the reader to quickly find the relevant information in all sections of the
manual.
Section 1, Assessment, Findings, and Management (designated by the
letter “F” in page numbers), contains a short chapter used to identify those
babies at risk of dying very soon and provides initial guidance on immediate
management necessary to stabilize the baby’s condition. This section also
includes a description of the further assessment necessary to identify the
baby’s specific problem(s) and includes relevant history questions and a
complete physical examination. A table guides the health care worker through
the examination, provides guidance on initial management when necessary,
and then directs the health care worker to the most appropriate chapter(s) for
management of the specific problem(s). The following chapters, with a few
exceptions, explore each sign or finding separately.
Most chapters begin with general management (where appropriate) followed
by a differential diagnosis table that guides the health care worker to the most
probable diagnosis that is causing the problem. The findings from the history,
examination, and laboratory investigations (or other known diagnoses) are
listed separately in each table. To help the user determine the significance of
the possible findings, italics and bold text are used to distinguish between
findings: a diagnosis cannot be made if a finding listed in bold text is absent
in the baby. The presence of a finding listed in bold, however, does not
guarantee the diagnosis. The diagnosis is definitively confirmed if a finding
listed in italicized text is present. Findings in plain text are supportive
findings; their presence helps to confirm the diagnosis, but their absence
cannot be used to rule out the diagnosis.
Simplified management protocols follow the diagnosis tables. Where there
are several choices of therapy, the most effective and inexpensive is chosen.
Clear guidance on drugs and dosages, as well as alternatives, is provided.
Conditions requiring referral to a higher level are included in the examination
table and in individual chapters where appropriate.

xi
Introduction
Section 2, Principles of Newborn Baby Care (designated by the letter “C”
in page numbers), outlines the general principles of managing sick or small
newborn babies. This section includes the general principles of ongoing care,
including feeding, maintaining normal body temperature, preventing
infection, giving immunizations, and assessing growth. Other chapters
provide guidance on giving oxygen, antibiotics, and blood transfusion.
Guidance on emotional support, visitation, and discharge and follow-up is
also included.
Section 3, Procedures (designated by the letter “P” in page numbers),
describes the procedures that may be necessary in the care of the sick or small
baby. These procedures are not intended to be detailed “how-to” instructions,
but rather a summary of the main steps associated with each procedure.
Because the general principles of care are summarized in Section 2, these are
not repeated for each procedure unless specific to the procedure.
Section 4, Appendix (designated by the letter “A” in page numbers),
contains sample records and a list of essential equipment, supplies, and drugs.
An index is included and is organized so that it can be used in an emergency
situation to find relevant material quickly. The most critical information,
including diagnosis, management, and relevant procedure(s), is listed first in
bold. Other entries follow in alphabetical order. Only the pages containing
critical or relevant information are included, rather than listing every page
that contains the word or phrase.

xii
Introduction

LIST OF ABBREVIATIONS
xiii
ABO
the major human blood type system
AIDS
acquired immunodeficiency syndrome
BCG
bacille Calmette-Guérin (for immunization against tuberculosis)
CSF
cerebrospinal fluid
DPT
diphtheria, pertussis, and tetanus vaccine
F
French scale
G6PD
glucose-6-phosphate dehydrogenase
HbsAg
hepatitis B surface antigen
HBV
hepatitis B virus
HIV
human immunodeficiency virus
IM
intramuscular
IV
intravenous
KMC
kangaroo mother care
OPV
oral polio vaccine
ORS
oral rehydration solution
Rh
Rhesus
°C
degrees Celsius
µmol
micromolar/micromole
dl
decilitre
g
gram
kg
kilogram
l
litre
mg
milligram
ml
millilitre
mmol
millimolar/millimole

xiv
List of abbreviations

LIST OF DIAGNOSES
xv
Abrasion
F-132
Abscess
F-130
Anaemia of a sick or
small baby
F-119
Apnoea
F-52
Arm palsy
F-147
Asphyxia
F-44
Bilirubin encephalopathy
F-83
Birth defect
F-151
Birth mark
F-151
Birth weight, low
F-23
Blood glucose, low
F-91
Blood loss from obstetric
causes
F-119
Breathing difficulty
F-47
Caput succedaneum
F-124
Cellulitis
F-130
Cephalohaematoma
F-124
Chignon
F-124
Cleft lip or palate
F-151
Club foot
F-152
Coagulopathy
F-119
Congenital heart abnormality
F-52
Congenital syphilis
F-46
Conjunctivitis
F-142
Cut
F-132
Diarrhoea
F-107
Drug-induced lethargy
F-89
Extra finger(s) or toe(s)
F-151
Facial palsy
F-148
Feeding difficulty in small
baby or twin
F-96
Fractured clavicle
F-150
Fractured femur
F-150
Fractured humerus
F-149
Gastric irritation
F-106
Gastrointestinal malformation
or obstruction (suspected) F-105
Gastroschisis
F-152
Genetic birth defect
F-153
Haemolytic jaundice
F-81
Haemorrhagic disease of
the newborn baby
F-119
Hyperthermia
F-73
Hypoglycaemia
F-91
Hypothermia, moderate
F-72
Hypothermia, severe
F-71
Imperforate anus
F-153
Inadequate weight gain
F-96
Incorrect positioning and
attachment to breast
F-96
Intraventricular bleeding
F-66
Jaundice of prematurity
F-82
Kernicterus
F-83
Low birth weight
F-23
Low blood glucose
F-91
Meningitis
F-43
Meningomyelocoele
F-152
Mother with diabetes
F-156
Mother with hepatitis B
F-155
Mother with history of rupture
of membranes for more
than 18 hours before birth F-55
Mother with history of uterine
infection or fever during
labour or after birth
F-55
Mother with HIV
F-159
Mother with syphilis
F-157
Mother with tuberculosis
F-155
Necrotizing enterocolitis
F-104
Omphalocoele
F-152
Pallor of unknown origin
F-119
Prematurity
F-23
Prolonged jaundice
F-83
Respiratory distress syndrome
F-51
Sepsis
F-41
Skin infection
F-129
Skin tag
F-151
Small baby
F-23
Spina bifida
F-152
Subaponeurotic (subgaleal)
haemorrhage
F-123

xvi
List of diagnoses
Swallowed maternal blood
F-105
Syphilis, congenital
F-46
Tetanus
F-66
Thrush
F-131
Umbilical cord infection, local F-137
Umbilical cord infection, severe F-136

LIST OF FIGURES
xvii
SECTION 1: ASSESSMENT, FINDINGS, AND MANAGEMENT
Figure F-1
Normal resting posture of small (A) and term (B) babies
F-23
Figure F-2
Baby in kangaroo mother care position under
mother’s clothes
F-32
Figure F-3
Chest indrawing
F-47
Figure F-4
Babies with spasms of the face and limbs (A) and
opisthotonos (B)
F-60
Figure F-5
Baby under phototherapy lights
F-85
Figure F-6
Abdominal distension
F-99
Figure F-7
Moulding of the baby’s head
F-121
Figure F-8
Baby with unilateral cephalohaematoma
F-125
Figure F-9
Baby with abrasions from forceps delivery
F-132
Figure F-10
Abnormal position of arm and hand
F-145
Figure F-11
Baby unable to wrinkle forehead or close eye on
affected side
F-145
Figure F-12
Normal resting posture of a breech baby
F-146
Figure F-13
Splinting a fractured humerus
F-149
Figure F-14
Splinting a fractured femur
F-150
SECTION 2: PRINCIPLES OF NEWBORN BABY CARE
Figure C-1
Radiant warmer
C-6
Figure C-2
Incubator
C-7
Figure C-3
Encouraging the baby to attach to the breast
C-13
Figure C-4
Correct (A) and incorrect (B) attachment to the breast
C-14
Figure C-5
Expressing breast milk
C-16
Figure C-6
Feeding by cup (A), paladai (B), or cup and spoon (C)
C-17
Figure C-7
Feeding expressed breast milk by gastric tube
C-19
Figure C-8
Baby receiving oxygen via a head box
C-28
Figure C-9
Blank weight chart
C-55
Figure C-10
Example of a completed weight chart
C-56

xviii
List of figures
SECTION 3: PROCEDURES
Figure P-1
Correct position of the head for ventilation
P-2
Figure P-2
Positioning the mask and checking the seal
P-3
Figure P-3
Measuring axillary temperature
P-6
Figure P-4
Measuring rectal temperature
P-6
Figure P-5
Site for heel prick
P-12
Figure P-6
Intramuscular injection into quadriceps muscle group
P-17
Figure P-7
Using a rubber band as a tourniquet for scalp vein
P-22
Figure P-8
Immobilizing the hand
P-23
Figure P-9
Securing butterfly set in place
P-24
Figure P-10
Inserting an umbilical vein catheter
P-26
Figure P-11
Intraosseous infusion
P-29
Figure P-12
Measuring gastric tube for oral (A) and nasal (B) routes
P-34
Figure P-13
Inserting oral gastric tube
P-34
Figure P-14
Securing oral (A) and nasal (B) gastric tube in place
P-35
Figure P-15
Sitting position for lumbar puncture
P-38
Figure P-16
Lying position for lumbar puncture
P-38
Figure P-17
Site of lumbar puncture
P-39
SECTION 4: APPENDIX
Figure A-1
Clinical record of ongoing care
A-2
Figure A-2
Discharge form
A-3
Figure A-3
Referral form
A-4
Figure A-4
Feedback form
A-5
Figure A-5
Death certificate
A-7

LIST OF TABLES
xix
SECTION 1: ASSESSMENT, FINDINGS, AND MANAGEMENT
Table F-1
Immediate management of emergency signs
F-6
Table F-2
Examination of the newborn baby F-11 to F-20
Table F-3
Volumes of breast milk for a baby weighing 1.5 to
1.749 kg without major illness
F-27
Table F-4
Volumes of breast milk for a baby weighing 1.25 to
1.49 kg without major illness
F-27
Table F-5
Volumes of IV fluid and breast milk for all babies
weighing less than 1.25 kg
F-28
Table F-6
Volumes of IV fluid and breast milk for a sick baby
weighing 1.75 to 2.5 kg
F-28
Table F-7
Volumes of IV fluid and breast milk for a sick baby
weighing 1.5 to 1.749 kg
F-29
Table F-8
Volumes of IV fluid and breast milk for a sick baby
weighing 1.25 to 1.49 kg
F-29
Table F-9
Findings common to sepsis and asphyxia
F-37
Table F-10
Findings characteristic of babies who are small or have
congenital syphilis
F-37
Table F-11
Summary of decision-making pathway to distinguish
sepsis from asphyxia
F-40
Table F-12
Classification of breathing difficulty
F-49
Table F-13
Distinguishing features of convulsions and spasms
F-60
Table F-14
Differential diagnosis of convulsions or spasms
F-62 to F-63
Table F-15
Differential diagnosis of abnormal body temperature
F-70
Table F-16
Clinical estimation of severity of jaundice
F-78
Table F-17
Treatment of jaundice based on serum bilirubin level
F-79
Table F-18
Differential diagnosis of jaundice
F-80 to F-81
Table F-19
Differential diagnosis of non-specific signs
F-89
Table F-20
Differential diagnosis of feeding difficulty
F-94 to F-95
Table F-21
Differential diagnosis of vomiting and/or abdominal
distension
F-101 to F-103
Table F-22
Differential diagnosis of diarrhoea
F-109 to F-110
Table F-23
Differential diagnosis of bleeding and/or pallor
F-115 to F-118
Table F-24
Differential diagnosis of swelling on scalp
F-122
Table F-25
Differential diagnosis of skin and mucous membrane
problems
F-128
Table F-26
Classification of severity of infection of umbilicus
F-136
Table F-27
Differential diagnosis of conjunctivitis
F-141
Table F-28
Differential diagnosis of birth injury
F-147

xx
List of tables
SECTION 2: PRINCIPLES OF NEWBORN BABY CARE
Table C-1
Measuring body temperature
C-2
Table C-2
Methods for warming the baby and maintaining body
temperature
C-2 to C-5
Table C-3
Recommended incubator temperatures
C-7
Table C-4
Total daily feed and fluid volumes for babies from birth
C-22
Table C-5
Methods for administering oxygen
C-25
Table C-6
Sources of oxygen
C-29
Table C-7
Antibiotics used to treat infections described in this guide
C-32
Table C-8
Antibiotic dilutions
C-33
Table C-9
Antibiotic doses
C-34 to C-35
Table C-10
Acceptable antiseptic and disinfectant solutions
C-41
Table C-11
Guidelines for processing instruments and equipment
C-43
Table C-12
Sample cleaning schedule for the newborn special care unit
C-44
Table C-13
Suggested equipment, supplies, drugs, and fluid for
transfer of a sick or small baby
C-64

SECTION 1: ASSESSMENT, FINDINGS, AND MANAGEMENT


ORGANIZING CARE OF THE SICK OR
F-1
SMALL NEWBORN BABY
Whether babies who need care are brought to the health care facility from
home, transferred from another institution or ward, or brought from the
delivery room as a result of a complicated birth, managing their care involves
a cycle of planning, implementing, and evaluating care based on ongoing
assessment of the baby’s condition. The care that the baby receives at the
health care facility is divided into several steps, as described below.
Follow infection prevention principles and practices (page
C-37) at all times when examining and treating babies,
especially if the baby has diarrhoea or a possible infection of
the skin, eye, or umbilicus.
This guide provides for care of a sick or small baby in two situations:
•
The baby has been observed in a health care facility since birth: The
course of the problem after birth is known, and reliable information
about the baby, as well as the history of the mother, pregnancy, and birth,
are available.
•
The baby was admitted from home: There is no available or reliable
information about the baby’s condition from birth to the present time,
and/or the history of the mother, pregnancy, and birth is unavailable or
unreliable. Very often these babies will be seen at an advanced stage of
illness.
ARRIVAL, RAPID ASSESSMENT, AND IMMEDIATE MANAGEMENT
•
Instruct staff to call a health care provider as soon as a baby less than one
week old is brought to the facility. Do not let the baby wait to receive care.
•
Ensure that the admission and reception area is organized so that every
baby can be seen quickly.
•
Assess all sick or small babies before doing any of the usual
administrative procedures to admit the baby.
•
Immediately upon the baby’s arrival, assess the baby for emergency signs
that indicate that the baby is in critical condition and at risk of dying
within minutes (page F-5):
-
While looking for emergency signs, introduce yourself to the mother
and ask her (or whoever brought the baby in):

F-2
Organizing care of the sick or small newborn baby
-
What is wrong with the baby?
-
When did the problem(s) first start?
-
What are the names of the mother and baby?
-
How old is the baby?
-
Was the baby brought in from outside the health care facility?
-
Keep the baby with the mother, if possible, and allow her to be
present during the assessment and for any procedures, if appropriate.
•
Provide immediate management for any life-threatening emergency
signs, as directed in Table F-1 (page F-6), before continuing with the
further assessment.
Give priority to stabilizing the sick or small baby before
assessing and treating the underlying cause of the problem.
FURTHER ASSESSMENT AND MANAGEMENT
•
Once the baby has received immediate management, obtain the history of
the mother and the baby. Then use Table F-2 (page F-11) to complete a
thorough examination to determine the underlying problem(s), and admit
the baby (page F-21), if necessary.
•
Provide specific management for the problem(s) identified, if necessary,
following the guidelines in Table F-2 (page F-11) to determine which
chapter(s) to use.
•
Arrange for transfer and referral (page C-63), if necessary.
ONGOING CARE
In addition to specific care for the baby’s problem(s), provide general and
ongoing care.
•
Develop a general plan of care that takes into account the special needs
of the baby.
•
Monitor the baby’s progress and recovery by performing ongoing general
assessments (group assessments together to disturb the baby as little as
possible) including:

F-3
Organizing care of the sick or small newborn baby
-
respiratory rate;
-
heart rate;
-
colour;
-
temperature;
-
weight;
-
rate and volume of IV fluid;
-
frequency and volume of feeds.
•
Be prepared to change the plan of care according to changes in the
baby’s condition, determined from the findings of the ongoing general
assessments and any other specific assessments required for the
particular problem.
•
Provide emotional support to the mother and other family members
(page C-57).
DOCUMENTING CARE
•
Record the necessary treatment in a written plan of care, and
communicate this plan to the medical team and other staff involved in the
care of the baby.
•
Document any changes in the baby’s condition, and communicate them
to appropriate staff.
•
Ensure that information is communicated between on-call medical
officers and new staff on different shifts.
DISCHARGE AND FOLLOW-UP
•
Follow guidance in the individual problem chapters in determining when
to discharge the baby.
•
Plan the discharge:
-
Provide any immunizations necessary (page C-51);
-
Provide instructions for general home care;
-
Advise on breastfeeding, and ensure that the baby is feeding well.

F-4
Organizing care of the sick or small newborn baby
•
Discharge the baby (page C-67) and schedule follow-up visits, if
necessary, for specific conditions and to monitor feeding and growth.

RAPID ASSESSMENT AND IMMEDIATE MANAGEMENT
F-5
Assess every baby for emergency signs as soon as the baby arrives, regardless
of whether the baby is coming from another ward in the health care facility, is
transferred from another health care facility, or is brought from home. A few
babies may have emergency signs that indicate a problem that is so serious the
baby may die within minutes if not immediately treated. Use this chapter to
rapidly assess babies for emergency signs and provide immediate management.
Examine the baby immediately for the following emergency
signs, and provide immediate management (Table F-1, page
F-6) if found:
•
Not breathing at all, even when stimulated; gasping; or
respiratory rate less than 20 breaths per minute; OR
•
Bleeding; OR
•
Shock (pallor, cold to the touch, heart rate more than 180
beats per minute, extremely lethargic or unconscious).
RAPID ASSESSMENT
•
Place the baby on a warm surface under a radiant warmer and under good
light.
•
Immediately resuscitate the baby using a bag and mask (page P-1) if the
baby:
-
is not breathing at all, even when stimulated; OR
-
is gasping; OR
-
has a respiratory rate less than 20 breaths per minute.
•
If the baby is having a convulsion or spasm, treat any emergency
sign(s) first. Then provide initial management of the convulsion or spasm
(page F-59) before continuing with the further assessment.
IMMEDIATE MANAGEMENT
•
Weigh the baby (page C-53).
•
Establish an IV line (page P-21).
•
Provide immediate management (Table F-1, page F-6).

F-6
Rapid assessment and immediate management
•
Once immediate management has been completed, continue with the
further assessment (page F-7).
TABLE F-1
Immediate management of emergency signs
Emergency Sign
Immediate Management
• Not breathing at all, even
when stimulated; OR
• Gasping; OR
• Respiratory rate less than
20 breaths per minute
1. Resuscitate the baby using a bag and mask (page
P-1).
2. Give oxygen (page C-25) at a high flow rate.
• Bleeding
1. Stop visible bleeding, if possible (e.g. if the bleeding
is from the umbilicus, reclamp or retie the umbilical
stump; if the bleeding is from a cut or male
circumcision site, press on the bleeding site with a
sterile compress).
2. Give vitamin K
1
(phytomenadione) 1 mg IV (or IM
if an IV line has not yet been established).
3. Take a blood sample (page P-9) to type and cross-
match, and measure haemoglobin.
4. Provide general management of bleeding (page
F-114).
• Shock
If bleeding is the likely cause of shock:
1. Infuse normal saline or Ringer’s lactate 10 ml/kg
body weight over 10 minutes, and repeat once after
20 minutes if signs of shock continue. Then infuse
10% glucose at maintenance volume according to
the baby’s age (Table C-4, page C-22).
2. Immediately give a blood transfusion
(page P-31) using type O, Rh-negative
blood.
3. Give oxygen at a high flow rate (page C-25).
4. Ensure warmth (page C-1).
If bleeding is not the likely cause of shock:
1. Infuse IV fluid 20 ml/kg body weight over the first
hour, and then continue IV fluid at maintenance
volume according to the baby’s age (Table C-4,
page C-22)
.
2. Ensure warmth (page C-1).
3. Treat for sepsis (page F-41).

FURTHER ASSESSMENT AND MANAGEMENT
F-7
After examining for emergency signs (i.e. not breathing, gasping, respiratory
rate less than 20 breaths per minute, bleeding, or shock) and providing
immediate management (Table F-1, page F-6), continue to assess the baby
and make a list of findings.
•
Obtain the history of the baby and the mother (below).
•
Examine the baby completely (Table F-2, page F-11).
•
Use the findings from the history and examination to choose the most
appropriate chapter(s) in this section of the guide.
•
Complete additional examinations, if necessary, and determine the
required laboratory investigations as directed in the chapter(s) in this
section of the guide.
•
Perform appropriate laboratory investigations, and treat the baby (and/or
the mother or her partner(s), if necessary).
•
Record all information, including:
-
the findings of the history, examination, and laboratory investigations;
-
treatment given;
-
changes in the baby’s condition.
HISTORY
Review the referral notes or records of the birth, if available. Ask the
following questions about the mother and baby and use the answers, together
with the findings of the examination and laboratory investigations, to
determine the probable diagnosis.
BABY
Ask the mother (or whoever brought the baby in):
•
What is the problem? Why is the baby here?
•
What kind of care, including specific treatment, has the baby already
received?
•
How old is the baby?
•
How much did the baby weigh at birth?
•
Was the baby born at term? If not, at how many weeks gestation was the

F-8
Further assessment and management
baby born?
•
Where was the baby born? Did anybody assist the birth?
•
How was the baby immediately after birth?
-
Did the baby spontaneously breathe at birth?
-
Did the baby require resuscitation? If so, what was the length of time
before spontaneous breathing was established?
-
Did the baby move and cry normally?
•
When did the problem first start?
•
Has the baby’s condition changed since the problem was first noted? Is
the problem getting worse? If so, how rapidly and in what way?
•
Is the baby having problems feeding, including any of the following?
-
poor or no feeding since birth or after a period of feeding normally;
-
coughing or choking during feeding;
-
vomiting after a feeding.
MOTHER
•
Review the mother’s medical, obstetric, and social history.
•
Ask the mother if she has any questions or concerns (e.g. special
concerns or anxiety about breastfeeding).
•
If the mother is not present, determine where she is, what her condition
is, and whether she will be able to care for the baby, including
breastfeeding or expressing breast milk.
PREGNANCY
•
Ask the mother the following questions regarding her pregnancy:
-
What was the duration of your pregnancy?
-
Did you have any chronic diseases during the pregnancy, including
hepatitis B, tuberculosis, diabetes, or syphilis (symptomatic or
seropositive)?
-
Do you know your HIV status? If so, can you tell me?
-
Did you have any complications during your pregnancy? If so, what,
if any, treatment did you receive?

F-9
Further assessment and management
•
If the mother has hepatitis B, tuberculosis, diabetes, or syphilis,
complete the examination in Table F-2 (page F-11), and treat any
specific problem(s) the baby has. If the baby is asymptomatic (no
findings of illness), see page F-155 for appropriate treatment based on
the mother’s problem.
•
If the mother is HIV positive, complete the examination in Table F-2
(page F-11), and treat any specific problem(s) the baby has. Then see
page F-159 for appropriate treatment based on the mother’s problem.
LABOUR AND BIRTH
•
Ask the mother the following questions about her labour and birth:
-
Did you develop any complications, such as uterine infection or
fever any time from the onset of labour to three days after birth?
-
Were your membranes ruptured for more than 18 hours before birth?
-
Was the labour or birth difficult or complicated, including any of the
following?
-
fetal distress;
-
prolonged labour;
-
caesarean section;
-
instrumental vaginal delivery (e.g. forceps or vacuum
extraction);
-
malposition or malpresentation of the baby (e.g. breech);
-
any other complications.
-
Did you develop any complications after the birth?
•
If the mother had a uterine infection or fever any time from the onset
of labour to three days after birth, or rupture of membranes for more
than 18 hours before birth, continue taking the history, complete the
examination (Table F-2, page F-11), and treat any specific problem(s).
Then see page F-55 for appropriate treatment based on the mother’s
problem.

F-10
Further assessment and management
EXAMINATION
•
Continue any immediate management that was started for an emergency
sign (not breathing, gasping, respiratory rate less than 20 breaths per
minute, bleeding, or shock; Table F-1, page F-6). If the baby develops
an emergency sign during the examination, return to Table F-1 for
immediate management, and proceed with the examination once the
baby’s condition is stable.
•
Examine the baby as directed in Table F-2 (page F-11):
-
Examine the baby under a radiant warmer unless it is clear that the
baby has been overheated;
-
Allow the mother to be present during the examination;
-
If the baby has not been weighed yet, weigh the baby (page C-53),
and record the weight;
-
While talking to the mother and before undressing the baby, observe
the baby for:
-
colour;
-
respiratory rate;
-
posture;
-
movement;
-
reaction to stimuli;
-
obvious abnormalities.
-
As you proceed in the examination, explain the findings to the
mother in simple terms and point out abnormalities (page C-57).
Obtain informed consent before performing an invasive procedure;
-
A newborn baby can have more than one problem. While performing
the examination, provide only the treatment specifically listed in the
following table (i.e. after the statement “ACT NOW”). Wait until the
entire examination is complete before beginning specific
management of the baby’s problems, treating the problems
designated as priorities first.

F-11
Further assessment and management
TABLE F-2
Examination of the newborn baby
Look at
Look for
Immediate Action(s) Required and
Relevant Chapter for Treatment
after Completion of Examination
RESPIRATORY
RATE
• Respiratory rate
consistently more than
60 or less than 30
breaths per minute
• Grunting on expiration
• Chest indrawing
(Fig. F-3, page F-47)
ACT NOW: Give oxygen at a
moderate flow rate (page C-25).
For management of breathing
difficulty, see page F-47.
• Apnoea (spontaneous
cessation of breathing
for more than 20
seconds)
ACT NOW: Stimulate the baby to
breathe by rubbing the baby’s
back for 10 seconds. If the baby
does not begin to breathe
immediately, resuscitate the baby
using a bag and mask (page P-1).
For management of apnoea, see page
F-52.
The normal respiratory rate of a newborn baby is 30 to 60 breaths per minute with no chest
indrawing or grunting on expiration; however, small babies (less than 2.5 kg at birth or
born before 37 weeks gestation) may have some mild chest indrawing, and it is not
abnormal for a baby to periodically stop breathing for a few seconds. When determining the
respiratory rate, count the number of breaths taken during a full minute, as babies may
breathe irregularly (up to 80 breaths per minute) for short periods of time. If unsure of the
respiratory rate, repeat the count.
COLOUR
• Pallor
For management of pallor and
possible bleeding, see page F-113.
• Jaundice (yellow)
For management of jaundice, see
page F-77.
• Central cyanosis (blue
tongue and lips; note
that blue skin in
addition to blue tongue
and lips indicates a
very serious problem)
ACT NOW: Give oxygen at a high
flow rate (page C-25).
For management of central cyanosis,
see page F-47.
Babies born at term appear paler than preterm babies because their skin is thicker.

F-12
Further assessment and management
TABLE F-2 Cont.
Examination of the newborn baby
Look at
Look for
Immediate Action(s) Required and
Relevant Chapter for Treatment
after Completion of Examination
HEART RATE
(as determined
using a
stethoscope)
• Heart rate consistently
more than 160 or less
than 100 beats per
minute
During the examination, look closely
for other problems that could cause
an abnormal heart rate (e.g.
abnormal body temperature,
bleeding, breathing difficulty).
The normal heart rate of a newborn baby is 100 to 160 beats per minute, but it is not
uncommon for the heart rate to be more than 160 beats per minute for short periods of time
during the first few days of life, especially if the baby is distressed. If unsure of the heart
rate, repeat the count.
BODY
TEMPERATURE
• Less than 36.5 °C
ACT NOW: Begin rewarming the
baby (page C-1).
To classify and manage low body
temperature, see page F-69.
Management of a body
temperature less than 32 °C is a
priority once the examination is
complete (page F-71).
• More than 37.5 °C
To classify and manage elevated
body temperature, see page F-69.
POSTURE AND
MOVEMENTS
(observed or
history of)
• Opisthotonos (extreme
hyperextension of the
body, with the head
and heels bent
backward and the body
arched forward;
Fig. F-4B, page F-60)
During the examination, look closely
for signs of other problems that
could cause opisthotonos (e.g.
tetanus, meningitis, bilirubin
encephalopathy [kernicterus]).
ACT NOW: If the baby has a
bulging anterior fontanelle,
immediately begin treatment for
meningitis. See pages F-41 and
F-43.

F-13
Further assessment and management
TABLE F-2 Cont.
Examination of the newborn baby
Look at
Look for
Immediate Action(s) Required and
Relevant Chapter for Treatment
after Completion of Examination
POSTURE AND
MOVEMENTS
(observed or
history of)
(cont.)
• Irregular, jerky
movements of the
body, limbs, or face
(convulsion or spasm)
ACT NOW: If the baby is
currently having a convulsion or
spasm, see page F-59. If the baby
has a bulging anterior fontanelle,
immediately begin treatment for
meningitis. See pages F-41 and
F-43.
Additional management of a baby
with convulsions/spasms or a
history of convulsions/spasms is a
priority once the examination is
complete (page F-59).
• Jitteriness (rapid and
repetitive movements
that are caused by
sudden handling of the
baby or loud noises and
can be stopped by
cuddling, feeding, or
flexing a limb)
During the examination, look for
other, more specific signs. If more
specific signs are not found, see
page F-87.
The normal resting posture of a term newborn baby includes loosely clenched fists and
flexed arms, hips, and knees (Fig. F-1B, page F-23). The limbs may be extended in small
babies (less than 2.5 kg at birth or born before 37 weeks gestation; Fig. F-1A, page F-23).
Babies who were in a breech position may have fully flexed hips and knees, and the feet may
be near the mouth; alternatively, the legs and feet may be to the side of the baby (Fig. F-12,
page F-146).

F-14
Further assessment and management
TABLE F-2 Cont.
Examination of the newborn baby
Look at
Look for
Immediate Action(s) Required and
Relevant Chapter for Treatment
after Completion of Examination
MUSCLE TONE
AND LEVEL OF
ALERTNESS
• Lethargy (decreased
level of consciousness
from which the baby
can be roused only
with difficulty)
• Floppiness (weak
muscle tone; limbs fall
loosely when picked up
and released)
• Irritability (abnormally
sensitive to stimuli;
cries frequently and
excessively with little
observable cause)
• Drowsiness (sluggish)
• Reduced activity
Handle the baby carefully during the
examination to prevent injury.
During the examination, look for
other, more specific signs. If more
specific signs are not found, see
page F-87.
• Unconscious (profound
sleep; unresponsive to
stimuli; no reaction to
painful procedures)
If unconsciousness is not caused by
shock (page F-6), it is most likely
caused by sepsis or asphyxia (page
F-35). Management of the cause of
unconsciousness is a priority once
the examination is complete.
The normal newborn baby ranges from quiet to alert and is consolable when upset. The
baby is arousable when quiet or asleep.
LIMBS
• Abnormal position and
movement of limbs
(e.g. Fig. F-10, page
F-145)
• Baby’s arms or legs
move asymmetrically
• Baby cries when a leg,
arm, or shoulder is
touched or moved
• Bone is displaced from
its normal position
To evaluate further for birth injury,
see page F-145.

F-15
Further assessment and management
TABLE F-2 Cont.
Examination of the newborn baby
Look at
Look for
Immediate Action(s) Required and
Relevant Chapter for Treatment
after Completion of Examination
LIMBS
(cont.)
• Club foot (foot is
twisted out of shape or
position; e.g. heel is
turned inward or
outward from the
midline of the leg)
• Extra finger(s) or toe(s)
For management of the birth defect,
see page F-151.
SKIN
• Redness or swelling of
skin or soft tissues
• Pustules or blisters
Strictly follow infection prevention
principles (page C-37) when
handling the baby.
For management of the skin
problem, see page F-127.
• Blistering skin rash on
palms and soles
For management of the skin
problem, see page F-127.
• Cut or abrasion
For management of the cut or
abrasion, see page F-132.
• Bruise (bluish
discolouration without a
break in the skin, usually
seen on the presenting
part, e.g. buttocks in
breech presentation)
If the bruise appeared spontaneously
but there is no evidence of trauma at
birth, see page F-113 to evaluate
further for a bleeding disorder.
If the bruise is from trauma at birth,
reassure the mother that no specific
treatment is needed for the bruise
and that it will resolve spontaneously
in a few weeks.
• Birth mark or skin tag
(abnormal spot, mark, or
raised area of the skin)
For management of the birth mark or
skin tag see page F-151.
• Loss of elasticity
Treat for dehydration if there are
additional signs, such as sunken eyes
or fontanelle, or dry tongue and
mucous membranes (page C-23).

F-16
Further assessment and management
TABLE F-2 Cont.
Examination of the newborn baby
Look at
Look for
Immediate Action(s) Required and
Relevant Chapter for Treatment
after Completion of Examination
SKIN
(cont.)
• Thrush (bright red
patches on skin in
napkin area on
buttocks, often scaly in
appearance or with
small white centres)
To confirm diagnosis of thrush, see
page F-128.
Some skin conditions are common and should not cause concern as long as the baby is
otherwise normal. These include milia (white spots around the nose), typically seen on day
1 or later, and erythema toxicum (red spots with tiny white centres), seen on the face, trunk,
and back on day 2 or later. In addition, it is not abnormal for the baby’s skin on the trunk,
abdomen, and back to peel after the first day.
UMBILICUS
• Umbilicus is red,
swollen, draining pus,
or foul smelling
• Skin around umbilicus
is red and hardened
For management of the infection of
the umbilicus, see page F-135.
• Bleeding from
umbilicus
ACT NOW: Reclamp or retie the
umbilical cord, if necessary.
For management of bleeding, see
page F-113.
The normal umbilicus is bluish-white in colour on day 1. It then begins to dry and shrink
and falls off after 7 to 10 days.
EYES
• Pus draining from eye
• Red or swollen eyelids
For management of the eye problem,
see page F-139.
• Subconjunctival
bleeding (bright red
spot under the
conjunctiva of one or
both eyes)
Reassure the mother that no specific
treatment is needed and that the
problem will resolve spontaneously.

F-17
Further assessment and management
TABLE F-2 Cont.
Examination of the newborn baby
Look at
Look for
Immediate Action(s) Required and
Relevant Chapter for Treatment
after Completion of Examination
HEAD AND
FACE
• Hydrocephalus (large
head with bulging
fontanelle and widened
sutures)
Organize transfer (page C-63) and
refer the baby to a tertiary hospital or
specialized centre for surgery, if
possible.
• Bulging anterior
fontanelle
ACT NOW: If the baby has a
bulging anterior fontanelle,
immediately begin treatment for
meningitis. See pages F-41 and
F-43.
• Sunken fontanelle
Treat for dehydration if there are
additional signs, such as sunken
eyes, loss of skin elasticity, or dry
tongue and mucous membranes
(page C-23).
• Swelling on scalp that
is not restricted to the
area over the
fontanelles
For management of the scalp
swelling, see page F-121.
• Unable to wrinkle
forehead or close eye
on one side; angle of
mouth pulled to one
side (facial paralysis;
Fig. F-11, page F-145)
• Unable to breastfeed
without dribbling milk
To evaluate further for facial
paralysis, see page F-145.
The normal newborn baby’s head may be moulded from a vertex birth; this will resolve
spontaneously over a period of three to four weeks (Fig. F-7, page F-121).

F-18
Further assessment and management
TABLE F-2 Cont.
Examination of the newborn baby
Look at
Look for
Immediate Action(s) Required and
Relevant Chapter for Treatment
after Completion of Examination
MOUTH AND
NOSE
• Cleft lip (split in lip)
• Cleft palate (hole in
upper palate
connecting mouth and
nasal passages)
For management of the cleft lip or
palate, see page F-151.
• Thrush (thick white
patches on tongue or
inside mouth)
To confirm diagnosis of thrush, see
page F-128.
• Central cyanosis (blue
tongue and lips)
ACT NOW: Give oxygen at a high
flow rate (page C-25).
For management of central cyanosis,
see page F-47.
• Profuse nasal discharge
(“snuffles”)
To evaluate further for congenital
syphilis, see page F-35.
• Dry tongue and
mucous membranes
Treat for dehydration if there are
additional signs, such as loss of skin
elasticity, sunken eyes or fontanelle
(page C-23).
ABDOMEN AND
BACK
• Abdominal distension
(Fig. F-6, page F-99)
For management of the abdominal
distension, see page F-99.
• Gastroschisis/
omphalocoele (defect
of abdominal wall or
umbilicus through
which bowel or other
abdominal organs may
protrude)
For management of the gastroschisis/
omphalocoele, see page F-152.
• Spina bifida/
myelomeningocoele
(defect in back through
which the meninges
and/or spinal cord may
protrude)
For management of the spina bifida/
myelomeningocoele, see page
F-152.

F-19
Further assessment and management
TABLE F-2 Cont.
Examination of the newborn baby
Look at
Look for
Immediate Action(s) Required and
Relevant Chapter for Treatment
after Completion of Examination
WEIGHT
• Birth weight less than
2.5 kg
During the examination, look closely
for problems the baby may have due
to small size, and see page F-23 to
review special considerations for the
care of small babies.
• Birth weight more than
4.0 kg
Anticipate the need to prevent and
treat for low blood glucose (page
F-91), and examine closely for
possible birth injury.
• Not gaining weight
(proven or suspected)
To evaluate further for feeding
difficulty, see page F-93.
URINE AND
STOOL
• Passes urine less than
six times per day after
day 2
Assess feeding and/or fluid volumes
(page C-22).
• Diarrhoea (increased
frequency of loose
stools as observed or
reported by the mother;
stool is watery or
green, or contains
mucus or blood)
For management of diarrhoea, see
page F-107.
• Has not passed
meconium within 24
hours after birth
Check for imperforate anus:
• If the anus is imperforate, see page
F-153.
• If the anus is normal, see page F-
102 to determine if the baby has a
suspected gastrointestinal
malformation or obstruction.
It is normal for a baby to have six to eight watery stools per day. Vaginal bleeding in the
female newborn baby may occur for a few days during the first week of life and is not a sign
of a problem.

F-20
Further assessment and management
TABLE F-2 Cont.
Examination of the newborn baby
Look at
Look for
Immediate Action(s) Required and
Relevant Chapter for Treatment
after Completion of Examination
FEEDING
• Baby fed well at birth but
is now feeding poorly or
has stopped feeding
• Baby has not fed well since
birth
• Baby is not gaining weight
(proven or suspected)
• Mother has not been able
to breastfeed successfully
• Baby is having difficulty
feeding and is small or a
twin
For general management of the
feeding problem, see page F-93.
If the baby is small, see page F-26
for fluid and feeding management of
small babies.
• Baby is vomiting
forcefully, regardless of the
method of feeding after
every feeding, or is
vomiting bile or blood
For management of vomiting, see
page F-99.
IMMEDIATE ACTIONS ONCE EXAMINATION IS COMPLETE
•
Determine appropriate management:
-
Categorize the findings from the examination and treat priority
findings first (temperature less than 32 °C, convulsions/spasms,
unconsciousness);
-
Continue to treat emergency signs (i.e. respiratory rate less than 20
breaths per minute, gasping, not breathing, bleeding, or shock) and
continue any treatment started during the examination (i.e. “ACT
NOW”);
-
Note that most of the chapters that follow in this section explore
each sign or finding separately and lead to appropriate management
pathways. In some cases, more than one finding of illness may be
identified upon further assessment, and these “clusters” of findings
may all point to a single serious problem. If the assessment reveals
more than one finding, first see the chapter Multiple Findings
(Most Often Sepsis or Asphyxia) (page F-35) to rule out asphyxia,

F-21
Further assessment and management
sepsis, congenital syphilis, or problems due to small size, and
then use any other chapter(s) necessary;
-
Keep in mind that you may be able to treat several problems at the
same time.
•
If a specific problem is not identified and the only finding is lethargy
or another non-specific sign (i.e. drowsiness, reduced activity,
floppiness, irritability, or jitteriness), or the baby “looks ill,” see the
chapter Lethargy and Other Non-Specific Signs (page F-87).
•
Perform the following before beginning specific treatment, or as soon as
possible:
-
If the baby is less than one hour old, give eye prophylaxis
(1% silver nitrate, 2.5% polyvidone iodine solution, or 1%
tetracycline ointment);
-
Give vitamin K
1
(phytomenadione) 1 mg IM once (or IV if an IV
line has already been established) if the baby has not already been
given it.
The mother, who is constantly with the baby, may notice subtle
changes in the baby’s condition. Listen to her comments and
re-examine the baby at any time if there is concern.
NEXT STEPS
•
Review the findings with the mother and obtain informed consent before
performing additional procedures.
•
Continue any treatment already started.
•
Determine what procedures and laboratory investigations are required.
Be sure to draw enough blood at one time to perform all the necessary
investigations.
ADMITTING THE BABY TO THE HEALTH CARE FACILITY
•
If treatment of the baby requires admitting the baby to the health
care facility, ensure the following:
-
Explain the baby’s condition to the mother and the reason(s) why the
baby needs to be admitted. Answer any questions she may have;

F-22
Further assessment and management
-
Check that the baby is properly identified with a name tag on the
wrist or ankle;
-
Check that the umbilical cord is securely clamped/tied;
-
Carry out necessary administrative procedures (e.g. record keeping,
page A-1);
-
Care for the baby in the newborn special care unit, if one is
available:
-
If a newborn special care unit is not available, keep the baby
with the mother in an area that is close to the nursing station;
-
Keep babies with infections separate from babies with non-
infectious problems, and follow infection prevention practices at
all times (page C-37);
-
Admit the mother, if necessary, to keep her with the baby to
allow breastfeeding or to provide expressed breast milk (page
C-15). The mother does not have to be admitted if she is able to
stay nearby;
-
If the mother and baby are separated, help the mother to visit
the baby, if possible, and provide a comfortable chair for her;
-
If the mother is not able to visit the baby, inform her of the
baby’s condition at least twice daily.
•
Review the list of differential diagnoses again after receiving the results
of the initial investigations (e.g. blood glucose) and after observing the
baby’s response to initial treatment. Make any changes in treatment that
may be necessary.
SMALL BABY
F-23
Preterm babies (born before 37 weeks gestation) tend to have more problems
than term babies who are small (less than 2.5 kg at birth). However, because
the baby’s gestational age is not always known, this guide refers to preterm
babies and small term babies collectively as “small babies.” If the baby’s
gestational age is known, use this, when possible, to guide diagnosis and
management decisions. Remember that the more preterm or the smaller the
baby is, the more likely the baby is to have problems.
•
After completing the examination in Table F-2 (page F-11), review
relevant differential diagnosis tables carefully to determine the diagnosis
that most closely matches the baby’s findings, keeping in mind that a
small baby can have any problem that a term baby can have. Note that a
small baby:
-
may have a problem that is specific to small babies (e.g. jaundice of
prematurity) but may also have any other problem that a full-size,
term baby can have (e.g. jaundice associated with sepsis);
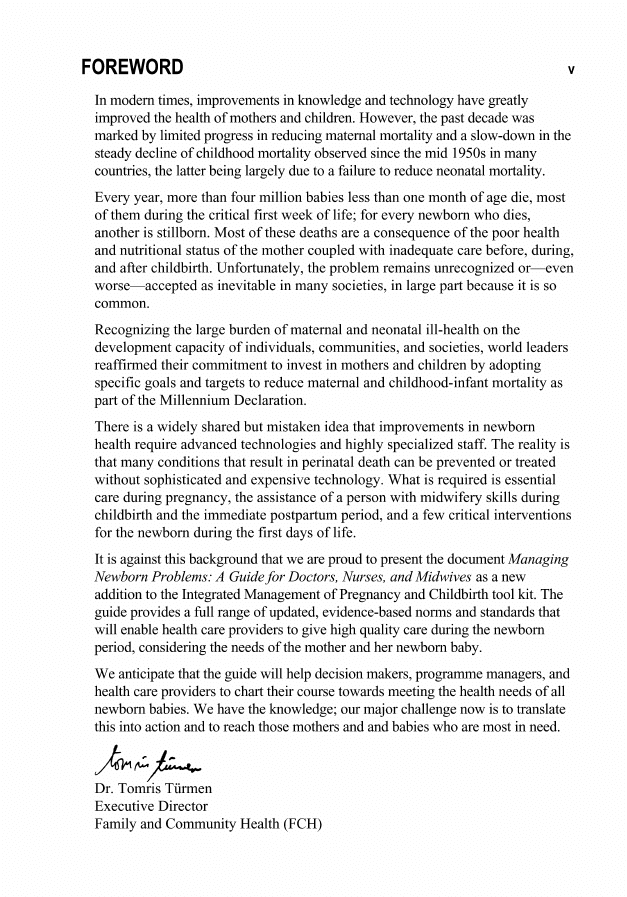
-
has a different resting posture (Fig. F-1A) than a term baby (Fig.
F-1B), and this is not necessarily an indication of a problem (e.g.
floppiness).
FIGURE F-1
Normal resting posture of small (A) and term (B) babies
•
Small babies are prone to complications. Some problems that small
babies are particularly susceptible to include:
-
feeding difficulty (Feeding difficulty is a common problem; as the
baby grows, feeding ability improves.);

F-24
Small baby
-
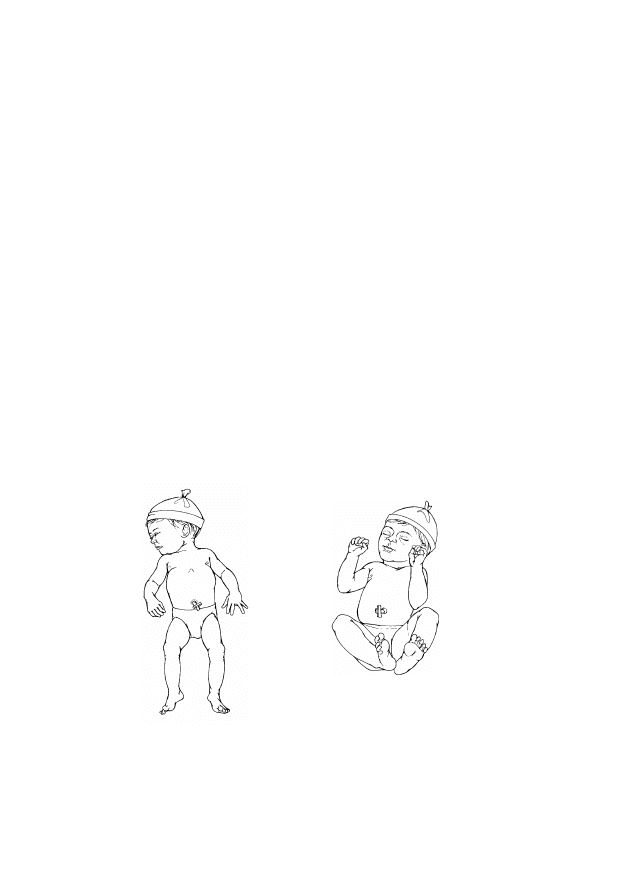
abnormal body temperature (page F-69; Kangaroo mother care
[page F-30] is the recommended method of maintaining a small
baby’s body temperature. This method of care is recommended for
babies who do not have a serious illness, and particularly for those
who weigh less than 1.8 kg.);
-
breathing difficulty (page F-47), such as respiratory distress
syndrome and apnoea;
-
necrotizing enterocolitis (page F-104);
-
jaundice of prematurity (page F-82);
-
intraventricular bleeding (page F-66);
-
anaemia (page F-119; To prevent iron deficiency anaemia, give small
babies an oral iron preparation to give elemental iron 2 mg/kg body
weight once daily from two months of age up to 23 months of age);
-
low blood glucose (page F-91).
•
Because a small baby typically has multiple findings—which may be
because the baby is small or because the baby has a more severe
problem—review the chapter Multiple Findings (Most Often Sepsis or
Asphyxia) (page F-35), looking especially for signs of sepsis or
asphyxia. Note that small babies often develop new findings during the
first days and weeks of life.
•
Regardless of what other problems they may have, all small babies
require special considerations for feeding, fluid management, and
maintenance of normal body temperature (ideally using kangaroo mother
care), which are described below. In addition, review the chapters in the
Newborn Care Principles section for general management instructions
applicable to all newborn babies.
FEEDING AND FLUID MANAGEMENT OF SMALL BABIES
GENERAL PRINCIPLES OF FEEDING SMALL BABIES
Small babies often have difficulty feeding simply because they are not mature
enough to feed well. Good feeding ability can usually be established by 34 to
35 weeks post-menstrual age. Until that time, substantial effort may be
needed to ensure adequate feeding. Provide special support and attention to
the mother during this difficult period.

F-25
Small baby
•
Explain to the mother that:
-
her breast milk is the best food for the baby;
-
breastfeeding is especially important for a small baby;
-
it may take longer for a small baby to establish breastfeeding;
-
it is usually normal if the baby:
-
tires easily and suckles weakly at first;
-
suckles for shorter periods of time before resting;
-
falls asleep during feeding;
-
pauses for long periods between suckling.
•
Have the mother keep the baby at the breast for a longer period of time
and allow long pauses between suckling, or a long, slow feed. Assure the
mother that breastfeeding will become easier once the baby becomes
bigger.
•
Have the mother follow the general principles of exclusive breastfeeding
(page C-11).
•
Ensure that the baby is fed frequently:
-
If the baby weighs 1.25 to 2.5 kg, feed the baby at least eight times
in 24 hours (i.e. every three hours);
-
If the baby weighs less than 1.25 kg, feed the baby at least 12 times
in 24 hours (i.e. every two hours);
-
Follow the guidelines in Tables F-3 to F-8 (pages F-27 to F-29) to
determine the required daily volume of feeds and/or fluid.
•
If the baby is not suckling well enough to receive an adequate volume
of milk:
-
Encourage the mother to give expressed breast milk using an
alternative feeding method (page C-14);
-
Be sure the mother always attempts to breastfeed the baby before
offering expressed breast milk, unless the baby cannot be breastfed;
-
If necessary, the mother can improve the flow of milk by expressing
a small amount of milk before allowing the baby to attach to the
breast.

F-26
Small baby
•
Ensure that the baby is receiving enough milk by assessing the baby’s
growth (page C-53).
•
If the baby is not gaining weight adequately (less than 15 g/kg body
weight per day over three days), have the mother express breast milk
(page C-15) into two different cups. Have her give the contents of the
second cup, which contains more of the fat-rich hind milk, to the baby
first, and then supplement with whatever is required from the first cup.
•
If the baby is vomiting or has abdominal distension or episodes of
apnoea or if more than 20% of the previous feed is retained in the
stomach (gastric residual) just before the next feed (when fed by
gastric tube):
-
Stop feeding. Establish an IV line (page P-21), and give IV fluid at
maintenance volume according to the baby’s weight and age (Tables
F-3 to F-8, page F-27 to F-29) for 12 hours;
-
Reassess the baby after 12 hours:
-
If the baby’s condition is improving, restart feeds, observing
carefully;
-
If the baby’s condition is not improving, continue giving IV
fluid at maintenance volume for another 12 hours. Then restart
feeds, giving the same volume as the last feed and observing the
baby carefully.
•
If the baby is being fed by gastric tube and there is an increasing
volume of gastric residuals (milk remaining in the stomach from the
previous feed), suspect necrotizing enterocolitis (page F-104).
FEED AND FLUID VOLUMES FOR SMALL BABIES
Small babies require different feed and fluid volumes based on their condition
and weight. Review the categories below to determine the appropriate total
daily fluid and feed volumes for the baby.
BABIES WITHOUT MAJOR ILLNESS
1.75 TO 2.5 KG
•
Allow the baby to begin breastfeeding (page C-11). If the baby cannot
be breastfed, give expressed breast milk using an alternative feeding
method (page C-14). Use Table C-4 (page C-22) to determine the
required volume of milk for the feed based on the baby’s age.

F-27
Small baby
1.5 TO 1.749 KG
•
Give expressed breast milk using an alternative feeding method (page
C-14) every three hours according to Table F-3 until the baby is able to
breastfeed.
TABLE F-3 Volumes of breast milk for a baby weighing 1.5 to 1.749 kg without
major illness
Day of Life
1
2
3
4
5
6
7
Feed volume every three
hours (ml/feed)
12
18
22
26
30
33
35
1.25 TO 1.49 KG
•
Give expressed breast milk by gastric tube (page C-18) every three hours
according to Table F-4.
•
Progress to feeding by cup/spoon (page C-16) as soon as the baby can
swallow without coughing or spitting.
TABLE F-4 Volumes of breast milk for a baby weighing 1.25 to 1.49 kg without
major illness
Day of Life
1
2
3
4
5
6
7
Feed volume every three
hours (ml/feed)
10
15
18
22
26
28
30
LESS THAN 1.25 KG
•
Establish an IV line (page P-21), and give only IV fluid (according to
Table F-5, page F-28) for the first 48 hours.
•
Give expressed breast milk by gastric tube (page C-18) every two hours
starting on day 3, or later if the baby’s condition is not yet stable, and
slowly decrease the volume of IV fluid while increasing the volume of
oral feeds according to Table F-5 (page F-28).
•
Progress to feeding by cup/spoon (page C-16) as soon as the baby can
swallow without coughing or spitting.

F-28
Small baby
TABLE F-5
Volumes of IV fluid and breast milk for all babies weighing
less than 1.25 kg
Day of Life
1
2
3
4
5
6
7
IV fluid rate (ml/hour or
microdrops/minute)
4
4
3
3
2
2
0
Feed volume every two
hours (ml/feed)
0
0
3
5
8
11
15
SICK BABIES
1.75 TO 2.5 KG
•
If the baby does not initially require IV fluid (according to the relevant
chapter for the baby’s problem), allow the baby to begin breastfeeding
(page C-11). If the baby cannot be breastfed, give expressed breast
milk using an alternative feeding method (page C-14). Determine the
required volume of milk for the feed based on the baby’s age (Table
C-4, page C-22).
•
If the baby requires IV fluid:
-
Establish an IV line (page P-21), and give only IV fluid (according
to Table F-6) for the first 24 hours;
-
Give expressed breast milk using an alternative feeding method
(page C-14) every three hours starting on day 2, or later if the
baby’s condition is not yet stable, and slowly decrease the volume of
IV fluid while increasing the volume of oral feeds according to
Table F-6.
TABLE F-6 Volumes of IV fluid and breast milk for a sick baby weighing
1.75 kg to 2.5 kg
Day of Life
1
2
3
4
5
6
7
IV fluid rate (ml/hour or
microdrops/minute)
5
4
3
2
0
0
0
Feed volume every three
hours (ml/feed)
0
6
14
22
30
35
38

F-29
Small baby
1.5 TO 1.749 KG
•
Establish an IV line (page P-21), and give only IV fluid (according to
Table F-7) for the first 24 hours.
•
Give expressed breast milk by gastric tube (page C-18) every three hours
starting on day 2, or later if the baby’s condition is not yet stable, and
slowly decrease the volume of IV fluid while increasing the volume of
oral feeds according to Table F-7.
•
Progress to feeding by cup/spoon (page C-16) as soon as the baby can
swallow without coughing or spitting.
TABLE F-7 Volumes of IV fluid and breast milk for a sick baby weighing 1.5
to 1.749 kg
Day of Life
1
2
3
4
5
6
7
IV fluid rate (ml/hour or
microdrops/minute)
4
4
3
2
2
0
0
Feed volume every three
hours (ml/feed)
0
6
13
20
24
33
35
1.25 TO 1.49 KG
•
Establish an IV line (page P-21), and give only IV fluid (according to
Table F-8) for the first 24 hours.
•
Give expressed breast milk by gastric tube (page C-18) every three hours
starting on day 2, or later if the baby’s condition is not yet stable, and
slowly decrease the volume of IV fluid while increasing the volume of
oral feeds according to Table F-8.
•
Progress to feeding by cup/spoon (page C-16) as soon as the baby can
swallow without coughing or spitting.
TABLE F-8 Volumes of IV fluid and breast milk for a sick baby weighing
1.25 to 1.49 kg
Day of Life
1
2
3
4
5
6
7
IV fluid rate (ml/hour or
microdrops/minute)
3
3
3
2
2
0
0
Feed volume every three
hours (ml/feed)
0
6
9
16
20
28
30

F-30
Small baby
LESS THAN 1.25 KG
•
Give feeds and fluid as described for a well baby less than 1.25 kg (page
F-27).
WEIGHT GAIN AND FEEDING AFTER SEVEN DAYS OF AGE
•
It is normal for small babies to lose weight during the first 7 to 10 days
of life. Birth weight is usually regained by 14 days of life unless the baby
has been sick.
•
Assess the baby’s growth (page C-53) to ensure that the baby is gaining
weight adequately.
•
If the baby still requires feeding using an alternative feeding method
but is on full milk feeds:
-
Increase the volume of milk in increments of 20 ml/kg body weight
per day until the baby reaches 180 ml/kg body weight of breast milk
per day;
-
Continue to increase the volume of milk as the baby’s weight
increases to maintain a volume of 180 ml/kg body weight of breast
milk per day.
•
If weight gain is inadequate (less than 15 g/kg body weight per day
over three days):
-
Increase the volume of milk to 200 ml/kg body weight per day;
-
If weight gain is inadequate for more than one week and the
baby has been taking 200 ml/kg body weight breast milk per
day, treat for inadequate weight gain (page F-96).
KANGAROO MOTHER CARE
Kangaroo mother care (KMC) is care of a small baby who is continuously
carried in skin-to-skin contact by the mother and exclusively breastfed
(ideally). It is the best way to keep a small baby warm and it also helps
establish breastfeeding. KMC can be started in the hospital as soon as the
baby’s condition permits (i.e. the baby does not require special treatment,
such as oxygen or IV fluid). KMC, however, requires that the mother stay
with the baby or spend most of the day at the hospital.
•
Ensure that the mother is fully recovered from any childbirth
complications before she begins KMC.

F-31
Small baby
•
Ensure that the mother has support from her family to stay at the hospital
or return when the baby is ready for KMC and to deal with
responsibilities at home. Discuss with the family, if possible, how they
can support the mother so she can provide KMC.
•
Explain to the mother that KMC may be the best way for her to care for
her baby once the baby’s condition permits:
-
the baby will be warm;
-
the baby will feed more easily;
-
episodes of apnoea will be less frequent.
•
Take the baby away from the mother only to change napkins (diapers),
bathe, and assess for clinical findings according to the hospital’s
schedule, or as necessary.
•
Babies can be cared for using KMC until they are about 2.5 kg or 40 weeks
post-menstrual age.
BEGINNING KMC
•
While the baby is recovering from an illness, the mother can begin to
hold the baby in skin-to-skin contact for short periods of time (one to
three hours at a time).
•
Once the baby’s condition is stable and the baby does not require special
treatment (e.g. oxygen or IV fluid), the mother can begin continuous
KMC.
•
When the baby is ready for KMC, arrange with the mother a time that is
convenient for her. Ask her to wear light, loose clothing that is
comfortable in the ambient temperature, provided the clothing can
accommodate the baby.
•
Ensure that the room is at least 25 °C.
•
While the mother is holding the baby, describe to her each step of KMC,
demonstrate them, and then allow her to go through the steps herself.
•
Clothe the baby with a pre-warmed shirt open at the front, a napkin, a
hat, and socks.
•
Place the baby on the mother’s chest:
-
Place the baby in an upright position directly against the mother’s
skin;
F-32
Small baby
-
Ensure that the baby’s hips and elbows are flexed into a frog-like
position and the baby’s head and chest are on the mother’s chest,
with the head in a slightly extended position.
•
Place the baby on the mother’s chest under the mother’s clothes
(Fig. F-2) and cover with a pre-warmed blanket:
-
Special garments are not needed as long as the mother’s clothes keep
the baby firmly and comfortably in contact with her skin;
-
Use a soft piece of fabric (about 1 square metre), folded diagonally
in two and secured with a knot. Make sure it is tied firmly enough to
prevent the baby from sliding out if the mother stands, but not so
tightly that it obstructs the baby’s breathing or movement.
•
After positioning the baby, allow the mother to rest with the baby, and
encourage her to move around when she is ready.
FIGURE F-2
Baby in kangaroo mother care position under mother’s
clothes
BREASTFEEDING
•
Have the mother attempt to breastfeed either when the baby is waking
from sleep or when awake and alert.
•
Have the mother sit comfortably, and help her with correct positioning
and attachment (page C-12), if necessary.
•
If the baby cannot be breastfed, have the mother give expressed breast
milk using an alternative feeding method (page C-14).

F-33
Small baby
DAILY LIFE FOR THE MOTHER
•
Emphasize to the mother that it is important that she wash her hands
frequently.
•
During the day, the mother can do whatever she likes: she can walk,
stand, sit, or lie down.
•
The best sleeping position for the mother during KMC is a reclining
position. If the mother’s bed is not adjustable, she can use several
pillows to prop herself up. She may also sleep on her side.
•
When the mother needs time away from the baby for hygiene or for any
other reason, either:
-
have a family member carry the baby in skin-to-skin contact while
the mother is unavailable; or
-
dress the baby, place in a warm bed, and cover until the mother or a
family member is available to carry the baby in skin-to-skin contact.
MONITORING THE BABY’S CONDITION
•
If the baby is in continuous KMC, measure the baby’s temperature
twice daily.
•
Teach the mother to observe the baby’s breathing pattern, and explain the
normal variations. If the baby stops breathing, have the mother
stimulate the baby to breathe by rubbing the baby’s back for 10 seconds.
If the baby does not begin to breathe immediately, resuscitate the baby
using a bag and mask (page P-1).
•
Teach the mother to recognize danger signs (e.g. apnoea, decreased
movement, lethargy, or poor feeding).
•
Respond to any concerns the mother may have. If the baby is feeding
poorly, determine if the mother’s technique is incorrect (page C-12), the
baby is still too immature, or the baby is becoming ill (repeat
examination, Table F-2 [page F-11], if necessary).
DISCHARGE AND FOLLOW-UP
•
When the baby is feeding well and there are no other problems requiring
hospitalization, discharge the baby (page C-67). This may be in a few

F-34
Small baby
days to weeks, depending on the initial size of the baby and other
problems the baby may have.
•
Ensure that the mother is comfortable with her ability to care for the baby
and continue KMC at home and is able to come regularly for follow-up
visits.
•
During the first week after discharge from the hospital, weigh the baby
daily, if possible, and discuss any problems with the mother. Provide
support and encouragement to the mother.
•
After the first week, see the mother and the baby twice weekly until
around 40 weeks post-menstrual age or when the baby weighs more than
2.5 kg. Weigh the baby and advise the mother to begin to wean the baby
off KMC as soon as the baby becomes less tolerant of the position.
•
Once the baby is weaned from KMC, continue to follow up monthly to
monitor feeding, growth, and development until the baby is several
months old.

MULTIPLE FINDINGS (MOST OFTEN SEPSIS OR
F-35
ASPHYXIA)
•
Keep the following points in mind regarding multiple findings:
-
A single health problem in a baby may be indicated by many signs
(e.g. a baby with asphyxia may have convulsions, poor feeding, and
breathing difficulty), while a single sign may point to many health
problems (e.g. poor feeding may be a sign of sepsis, asphyxia, or
small size);
-
Even when multiple signs point to a single problem, the signs
themselves often need to be treated; therefore, it is necessary to look
for further guidance in the chapter corresponding to each sign that
the baby has. For example, if a baby with asphyxia or sepsis is
having both breathing difficulty and convulsions, ensure that
management includes treatment for both problems.
•
Problems that typically produce multiple signs include asphyxia, sepsis,
and small size (less than 2.5 kg at birth or born before 37 weeks
gestation). Congenital syphilis, a specific kind of sepsis, may also
produce multiple findings, which are described below. Remember:
-
There is considerable overlap between the signs of asphyxia and
sepsis, yet distinguishing between them is important for their
appropriate management;
-
Babies who are small may present with multiple signs, some of
which overlap with the signs of asphyxia and sepsis;
-
Congenital syphilis is much rarer than the other three problems, even
in areas where the prevalence of sexually transmitted infections is
high.
PROBLEMS
•
More than one finding was identified upon assessment, increasing the
likelihood that the baby has a problem related to small size or has sepsis,
asphyxia, or congenital syphilis.
•
A single finding was identified upon assessment, but the baby later
developed additional signs of illness.

F-36
Multiple findings (most often sepsis or asphyxia)
FINDINGS
•
Review the findings from the general history (page F-7) and examination
(Table F-2, page F-11), looking especially for a history of:
-
Complicated or difficult labour or birth (e.g. fetal distress);
-
Prolonged labour;
-
Failure of baby to spontaneously breathe at birth;
-
Resuscitation of baby at birth;
-
Maternal uterine infection or fever any time from the onset of labour
to three days after birth;
-
Rupture of the mother’s membranes for more than 18 hours before
birth;
-
Small baby (less than 2.5 kg at birth or born before 37 weeks
gestation);
-
Positive serologic test for syphilis during pregnancy or after birth;
-
Syphilis (of the mother or partner) during pregnancy. If the mother
or her partner had syphilis during pregnancy, ask whether it was
untreated, inadequately treated, or if the treatment status is unknown.
•
Measure blood glucose (page P-13). If the blood glucose is less than
45 mg/dl (2.6 mmol/l), treat for low blood glucose (page F-91). Return
to this chapter for further evaluation if the problems persist after
treatment.
•
Categorize the findings (below).
CATEGORIZE THE FINDINGS
•
Look for the baby’s findings in the tables below, which list the findings
that are common to asphyxia and sepsis (Table F-9, page F-37) and the
findings characteristic of babies who are small or have congenital
syphilis (Table F-10, page F-37). If the baby’s findings are common to
asphyxia and sepsis, determine which of the baby’s findings are
Category A or Category B, and use this information to select appropriate
management (page F-38).

F-37
Multiple findings (most often sepsis or asphyxia)
TABLE F-9
Findings common to sepsis and asphyxia
Category A Findings
Category B Findings
• Breathing difficulty (e.g. respiratory rate more
than 60 or less than 30 breaths per minute,
grunting on expiration, chest indrawing, or central
cyanosis [blue tongue and lips])
• Failure of baby to spontaneously breathe at birth,
usually requiring resuscitation (favours asphyxia)
• Apnoea
• Convulsions
• Unconsciousness
• Abnormal body temperature since birth and not
responding to treatment, unstable temperature
after three or more normal temperature readings,
or temperature more than 39 °C not caused by
overheating (favours sepsis)
• Condition worsens rapidly and dramatically
(favours sepsis)
• Signs starting after day 4 of life (favours sepsis)
• Maternal history of uterine infection or fever any
time from the onset of labour to three days after
birth, or rupture of membranes for more than 18
hours before birth (favours sepsis)
• Lethargy or floppiness
• Drowsiness or reduced activity
• Vomiting (favours sepsis)
• Abdominal distension
• Poor or no feeding after having
fed well (favours sepsis)
• Signs starting at birth or on day 1
of life (favours asphyxia)
• Prolonged labour (favours sepsis)
• Unclean birth (favours sepsis)
• Complicated or difficult labour or
birth (fetal distress; favours
asphyxia)
TABLE F-10 Findings characteristic of babies who are small or have
congenital syphilis
Findings
Characteristic of
• Less than 2.5 kg at birth or born before 37 weeks
gestation
• Body temperature less than 36.5 °C
• Apnoea
• Respiratory distress syndrome (moderate to severe
breathing difficulty starting at birth. The baby’s
condition worsens during the first two days of life,
does not change for the next one to two days, and
begins to improve during the next four to seven days.)
• Feeding difficulty
• Floppiness
Small baby (see page F-40)
• Generalized oedema (body swelling)
• Abdominal distension (from enlarged liver and/or
spleen or from fluid in abdomen)
• Blistering skin rash on palms and soles
• Profuse nasal discharge (“snuffles”)
Congenital syphilis (see page
F-41)

F-38
Multiple findings (most often sepsis or asphyxia)
SELECTING APPROPRIATE MANAGEMENT
Keep in mind the following points when selecting appropriate management
for the baby, and particularly when differentiating between sepsis and
asphyxia:
•
Sepsis can appear any time from birth to the end of the newborn period:
-
Suspect sepsis (below) in babies with multiple findings, especially if
sepsis cannot be ruled out or another diagnosis is not certain;
-
When sepsis occurs within the first three days of life, it is usually
related to rupture of the mother’s membranes for more than 18 hours
before birth or the presence of a uterine infection or fever any time
from the onset of labour to three days after birth. If this history is
present in addition to clinical signs, suspect sepsis (below);
-
If the baby did not become ill until day 4 or later, the presence or
absence of maternal history findings no longer helps to distinguish
sepsis from other problems. However, if reliable information
about the pregnancy, birth, and postnatal period is not available
and the baby is more than three days old, suspect sepsis (below);
•
Asphyxia is associated with a history of difficult or prolonged labour or
birth (e.g. fetal distress) and/or failure of the baby to breathe
spontaneously at birth, usually requiring resuscitation. If these events
occurred, suspect asphyxia (page F-39).
•
If the baby is small, see page F-40.
•
If the baby has findings characteristic of syphilis and the mother or
her partner has a history of syphilis during the pregnancy or the
mother had a positive serologic test for syphilis during pregnancy,
suspect congenital syphilis (page F-41).
IF SEPSIS IS SUSPECTED
Review the two main bullets below, and choose the one that is more
appropriate based on the baby’s findings. See Table F-11 (page F-40) for a
summary of the decision-making pathway to distinguish sepsis from asphyxia.
•
If the baby is three days old or less and the maternal history IS
indicative of sepsis, treat for sepsis (page F-41), and treat any specific
sign (e.g. breathing difficulty).

F-39
Multiple findings (most often sepsis or asphyxia)
•
If the baby is three days old or less and the maternal history IS NOT
indicative of sepsis OR if the baby was more than three days old
when signs of illness were first noted (regardless of maternal history):
-
If the baby has two or more Category A findings OR three or
more Category B findings, treat for sepsis (page F-41), and treat
any specific sign (e.g. breathing difficulty);
-
If the baby has one Category A finding and one Category B
finding OR two Category B findings, treat any specific sign (e.g.
breathing difficulty) but do not begin treatment for sepsis. Observe
the baby for additional signs of sepsis, reassessing the baby every
two hours for 12 hours:
-
If additional signs of sepsis are found at any time during the
observation period, treat for sepsis (page F-41);
-
If no additional signs of sepsis are found during the
observation period but the initial signs have not improved,
continue observation for 12 more hours;
-
If the initial signs of sepsis improved during the observation
period, reassess the baby every four hours for an additional 24
hours. If improvement continues, the baby is feeding well, and
there are no other problems requiring hospitalization, discharge
the baby (page C-67).
IF ASPHYXIA IS SUSPECTED
Review the two main bullets below and choose the one that is more
appropriate based on the baby’s findings. See Table F-11 (page F-40) for a
summary of the decision-making pathway to distinguish sepsis from asphyxia.
•
If the baby is three days old or less and the maternal history IS
indicative of sepsis (see above), treat the baby for both asphyxia (page
F-44) and sepsis (page F-41), and treat any specific sign (e.g. breathing
difficulty).
•
If the baby is three days old or less and the maternal history IS NOT
indicative of sepsis OR if the baby was more than three days old when
signs of illness were first noted (regardless of maternal history), treat for
asphyxia (page F-44), and treat any specific sign (e.g. breathing difficulty).

F-40
Multiple findings (most often sepsis or asphyxia)
TABLE F-11
Summary of decision-making pathway to distinguish sepsis
from asphyxia
Baby’s Age and
Mother’s History
Findings More
Consistent with
Treat for
Baby three days old or less
and maternal history
suggestive of sepsis
Asphyxia
Sepsis (page F-41) and asphyxia
(page F-44)
Sepsis
Sepsis (page F-41)
Baby three days old or less
and maternal history not
suggestive of sepsis
OR
Baby became ill on day 4
or later
Asphyxia
Asphyxia (page F-44)
Sepsis
Possible sepsis (review for
presence of Category A or B
findings; Table F-9, page F-37)
IF THE BABY IS SMALL
•
If the baby is small and has findings characteristic of sepsis or
asphyxia (see Table F-9, page F-37):
-
Treat for sepsis and/or asphyxia as needed (see above), treat any
specific sign (e.g. breathing difficulty), and provide general care for
the small baby (page F-23);
-
If the baby’s findings include occasional apnoea, floppiness,
feeding difficulty, and/or breathing difficulty that is consistent
with the pattern of respiratory distress syndrome (RDS), with
no maternal history suggestive of sepsis:
-
See pages F-51 and F-52 for management of RDS and
apnoea, respectively;
-
Do not treat for sepsis unless instructed to do so in the
management section for RDS or apnoea;
-
Provide general care for the small baby (page F-23).
•
If the baby does not have findings characteristic of sepsis or asphyxia:
-
Provide general care for the small baby (page F-23);
-
Note that small babies often develop new findings during the first
days and weeks of life; return to this chapter any time the baby
shows multiple findings consistent with sepsis or asphyxia.

F-41
Multiple findings (most often sepsis or asphyxia)
IF CONGENITAL SYPHILIS IS SUSPECTED
•
If the baby has findings characteristic of syphilis OR the mother or
her partner has a history of syphilis during the mother’s pregnancy,
perform a serologic test for syphilis on the mother and baby:
-
If the mother’s or baby’s test for syphilis is positive, treat for
congenital syphilis (page F-46);
-
If the serologic test for syphilis is not possible, the mother was
not treated at least 30 days before giving birth or was treated
inadequately, or if the mother’s treatment status is unknown,
treat for congenital syphilis (page F-46).
•
If the mother had a positive serologic test for syphilis during
pregnancy, determine if the mother was treated:
-
If the mother was treated adequately and the treatment started
at least 30 days before birth, no treatment is necessary;
-
If the mother was not treated at least 30 days before giving birth
or was treated inadequately, or if the mother’s treatment status
is unknown, treat for congenital syphilis (page F-46).
MANAGEMENT
SEPSIS
•
Establish an IV line (page P-21), and give only IV fluid at maintenance
volume according to the baby’s age (Table C-4, page C-22) for the first
12 hours.
•
Take a blood sample (page P-9), and send it to the laboratory for culture
and sensitivity, if possible, and to measure haemoglobin.
•
If the haemoglobin is less than 10 g/dl (haematocrit less than 30%),
give a blood transfusion (page P-31).
•
If the baby has convulsions, opisthotonos, or a bulging anterior
fontanelle, suspect meningitis:
-
Treat convulsions, if present (page F-59);
-
Perform a lumbar puncture (page P-37);

F-42
Multiple findings (most often sepsis or asphyxia)
-
Send a sample of the cerebrospinal fluid (CSF) to the laboratory for
cell count, Gram stain, culture, and sensitivity;
-
Begin treatment for meningitis (page F-43) while awaiting
laboratory confirmation.
•
If meningitis is not suspected, give ampicillin and gentamicin IV
according to the baby’s age and weight (Table C-9, pages C-34 to C-35).
•
Assess the baby’s condition every six hours for signs of improvement:
-
If the baby’s condition is improving after three days of
treatment with antibiotics:
-
If the blood culture is negative, discontinue ampicillin and
gentamicin after five days of treatment;
-
If the blood culture is not possible or is positive, continue
ampicillin and gentamicin to complete 10 days of treatment.
-
If the baby’s condition is not improving after three days of
treatment with antibiotics:
-
If the blood culture is positive, change antibiotics according to
the results of the culture and sensitivity, and give antibiotics for
seven days after signs of improvement are first noted;
-
If the blood culture is not possible or the organism cannot be
identified, discontinue ampicillin. Give cefotaxime IV according
to the baby’s age (Table C-9, page C-34), in addition to
gentamicin, for seven days after signs of improvement are first
noted.
•
After 12 hours of treatment with antibiotics or when the baby’s condition
begins to improve, allow the baby to begin breastfeeding (page C-11). If
the baby cannot be breastfed, give expressed breast milk using an
alternative feeding method (page C-14).
•
Measure haemoglobin twice weekly during hospitalization and again at
discharge. If the haemoglobin is less than 10 g/dl (haematocrit less than
30%), give a blood transfusion (page P-31).
•
Observe the baby for 24 hours after discontinuing antibiotics:
-
If the baby is feeding well and there are no other problems requiring
hospitalization, discharge the baby (page C-67);
-
If signs of sepsis recur, repeat the culture and sensitivity, and treat
with additional antibiotics as necessary.

F-43
Multiple findings (most often sepsis or asphyxia)
MENINGITIS
•
Perform a lumbar puncture (page P-37) if not already done (see page
F-41).
•
Give ampicillin (for meningitis) and gentamicin IV according to the baby’s
age and weight (Table C-9, pages C-34 to C-35). Note that the dose of
ampicillin given for meningitis is double the dose given for sepsis.
•
Confirm the diagnosis of meningitis if the:
-
white blood cell count in the cerebrospinal fluid (CSF) is 20/mm
3
or
more if the baby is less than seven days old, or 10/mm
3
or more if
the baby is seven days or older; OR
-
culture or Gram stain of the CSF is positive.
•
After 12 hours of treatment with antibiotics or when the baby’s condition
begins to improve, allow the baby to begin breastfeeding (page C-11). If
the baby cannot be breastfed, give expressed breast milk using an
alternative feeding method (page C-14).
•
If the baby’s condition is improving after 48 hours of treatment with
antibiotics, continue antibiotics for 14 days or for seven days after signs
of improvement are first noted, whichever is longer.
•
If the baby’s condition is not improving after 48 hours of treatment
with antibiotics, repeat the lumbar puncture:
-
If organisms are seen on Gram stain of the CSF, change
antibiotics according to the organism identified, and treat for 14 days
or for seven days after signs of improvement are first noted,
whichever is longer;
-
If the organism cannot be identified, discontinue ampicillin. Give
cefotaxime (for meningitis) IV according to the baby’s age (Table
C-9, page C-34), in addition to gentamicin, for 14 days or for seven
days after signs of improvement are first noted, whichever is longer.
•
Measure haemoglobin every three days during hospitalization and again
at discharge. If the haemoglobin is less than 10 g/dl (haematocrit less
than 30%), give a blood transfusion (page P-31).
•
Observe the baby for 24 hours after discontinuing antibiotics:
-
If the baby is feeding well and there are no other problems requiring
hospitalization, discharge the baby (page C-67);

F-44
Multiple findings (most often sepsis or asphyxia)
-
If signs of sepsis recur, repeat the culture and sensitivity, and treat
with additional antibiotics as necessary.
ASPHYXIA
•
If convulsions occur, treat promptly (page F-64) to prevent worsening
of the baby’s condition.
•
Treat breathing difficulty, if present (page F-47).
•
Classify the severity of asphyxia:
-
In mild cases of asphyxia, the baby may be jittery or hyperalert, with
increased muscle tone, poor feeding, and a normal or rapid
respiratory rate. These findings typically last for 24 to 48 hours
before resolving spontaneously;
-
In moderate cases, the baby may be lethargic and have feeding
difficulty. The baby may have occasional episodes of apnoea and/or
convulsions for a few days. These problems usually resolve within
one week, but long-term neurodevelopmental problems are possible;
-
In severe cases, the baby may be floppy or unconscious and does not
feed. Convulsions may occur for several days, and severe and
frequent episodes of apnoea are common. The baby may improve
over several weeks or may not improve at all; if these babies survive,
they usually suffer permanent brain damage.
•
If the asphyxia is mild:
-
If the baby is not receiving oxygen, allow the baby to begin
breastfeeding (page C-11);
-
If the baby is receiving oxygen or otherwise cannot be breastfed,
give expressed breast milk using an alternative feeding method
(page C-14);
-
Provide ongoing care (page F-45).
•
If the asphyxia is moderate or severe:
-
Establish an IV line (page P-21), and give only IV fluid for the first
12 hours:
-
Restrict the volume of fluid to 60 ml/kg body weight for the first
day, and monitor urine output;

F-45
Multiple findings (most often sepsis or asphyxia)
-
If the baby urinates less than six times daily or produces no
urine:
-
Do not increase the volume of fluid on the next day;
-
When the amount of urine begins to increase, increase the
volume of IV fluid daily according to the progression of
fluid volumes in Table C-4, page C-22, regardless of the
baby’s day of age (i.e. for a four-day-old baby, progress
from 60 ml/kg to 80 ml/kg to 100 ml/kg, etc.; do not go
directly to 120 ml/kg on the first day).
-
Once the convulsions are controlled and the baby shows signs of
increased responsiveness, allow the baby to begin breastfeeding
(page C-11). If the baby cannot be breastfed, give expressed
breast milk using an alternative feeding method (page C-14);
-
Provide ongoing care (below).
ONGOING CARE OF BABIES WITH ASPHYXIA
•
Assess the baby every two hours:
-
If the baby’s temperature is less than 36.5 °C or more than
37.5 °C, treat for abnormal body temperature (page F-69);
-
Treat for convulsions (page F-64) or breathing difficulty (page
F-47) as necessary.
•
Encourage the mother to hold and cuddle the baby.
•
If the baby is unconscious, lethargic, or floppy, handle and move the
baby gently to prevent injury when the baby’s muscle tone is low.
Support the baby’s entire body, especially the head.
•
If the baby’s condition is not improving after three days, assess again
for signs of sepsis (Table F-9, page F-37).
•
If the baby’s condition does not improve after one week (baby
continues to be lethargic, is not breastfeeding or is feeding poorly, or is
still having convulsions) but the baby is no longer receiving treatment
at the hospital or the treatment can be continued at home, discuss
with the mother the possibility of caring for her baby at home.
•
If the baby has not had a convulsion for three days after discontinuing
phenobarbital, the mother is able to feed the baby, and there are no other
problems requiring hospitalization, discharge the baby (page C-67):

F-46
Multiple findings (most often sepsis or asphyxia)
-
Discuss with the mother the baby’s prognosis and how to deal with
the problems the baby may have at home;
-
Follow up in one week, or earlier if the mother notes serious
problems (e.g. feeding difficulty, convulsions);
-
Help the mother find the best method to feed the baby if the baby is
not breastfeeding well. If the baby is feeding slowly, have the
mother feed more frequently.
CONGENITAL SYPHILIS
•
Perform a lumbar puncture (page P-37).
•
Examine the white blood cell count in the cerebrospinal fluid (CSF) to
determine if the central nervous system (CNS) is involved (i.e. white
blood cell count in the CSF is more than 25/mm
3
):
-
If the CNS is involved or the lumbar puncture is not possible or
the CSF is bloody, give benzylpenicillin IV or IM (Table C-9,
page C-34) for 10 days;
-
If the CNS is not involved, give procaine benzylpenicillin (or
benzathine benzylpenicillin) IM (Table C-9, pages C-34 to C-35)
for 10 days. (If an IV line is already in place, give benzylpenicillin
IV [Table C-9, page C-34] for 10 days.)
•
If jaundice is present, explain to the mother that it may take up to three
months to resolve.
•
Give the mother and her partner(s) benzathine benzylpenicillin 1.8 g (2.4
million units) IM as two injections at separate sites.
•
Refer the mother and her partner(s) for follow-up to a clinic offering
services for sexually transmitted infections.
•
Observe the baby for 24 hours after discontinuing antibiotics.
•
If the baby remains well, is feeding well, and there are no other problems
requiring hospitalization, discharge the baby (page C-67):
-
Follow up in four weeks to examine the baby for growth and signs of
congenital syphilis;
-
Report the case to authorities, if required.

BREATHING DIFFICULTY
F-47
Immediately resuscitate the baby using a bag and mask (page
P-1) if the baby:
•
is not breathing at all, even when stimulated; OR
•
is gasping; OR
•
has a respiratory rate less than 20 breaths per minute.
PROBLEMS
•
The baby’s respiratory rate is more than 60 breaths per minute.
•
The baby’s respiratory rate is less than 30 breaths per minute.
•
The baby has central cyanosis (blue tongue and lips).
•
The baby has chest indrawing (Fig. F-3).
•
The baby is grunting on expiration.
•
The baby has apnoea (spontaneous cessation of breathing for more than
20 seconds).
FIGURE F-3
Chest indrawing
FINDINGS
•
Review the findings from the general history (page F-7) and examination
(Table F-2, page F-11), and use the information to classify the breathing
difficulty (Table F-12, page F-49).
•
Provide general management, below.

F-48
Breathing difficulty
GENERAL MANAGEMENT
•
Give oxygen (page C-25) at a moderate flow rate.
•
If the baby’s respiratory rate is less than 30 breaths per minute,
observe the baby carefully. If the respiratory rate is less than 20
breaths per minute at any time, resuscitate the baby using a bag and
mask (page P-1).
•
If the baby has apnoea:
-
Stimulate the baby to breathe by rubbing the baby’s back for 10
seconds;
-
If the baby does not begin to breathe immediately, resuscitate the
baby using a bag and mask (page P-1);
-
See page F-52 for additional management of apnoea.
•
Measure blood glucose (page P-13). If the blood glucose is less than
45 mg/dl (2.6 mmol/l), treat for low blood glucose (page F-91).
•
If there are any signs in addition to difficulty breathing, see Multiple
Findings (Most Often Sepsis or Asphyxia) (page F-35) to determine if
the baby’s problems are due to small size or if the baby has asphyxia,
sepsis, or congenital syphilis, and continue to treat for difficulty
breathing.
•
If the baby’s respiratory rate is more than 60 breaths per minute and
the baby has central cyanosis (even if receiving oxygen at a high flow
rate) but no chest indrawing or grunting on expiration, suspect a
congenital heart abnormality (page F-52).
•
Classify the breathing difficulty as severe, moderate, or mild (Table F-12,
page F-49), and manage accordingly.

F-49
Breathing difficulty
TABLE F-12
Classification of breathing difficulty
a
Respiratory Rate
(breaths per minute)
Grunting or Chest
Indrawing
Classification
More than 90
Present
Severe
More than 90
Absent
Moderate
60 to 90
Present
Moderate
60 to 90
Absent
Mild
a
Respiratory distress syndrome (RDS) results in breathing difficulty, including chest
indrawing and grunting, often associated with apnoea. The baby’s condition worsens
during the first two days, does not change for the next one to two days, and begins to
improve during the next four to seven days. RDS is typically seen in small babies (less
than 2.5 kg at birth or born before 37 weeks gestation) and starts within hours of birth. If a
small baby with breathing difficulty has findings consistent with this pattern, treat for
moderate breathing difficulty due to RDS (page F-51).
SPECIFIC MANAGEMENT
SEVERE BREATHING DIFFICULTY
•
Insert a gastric tube (page P-33) to empty the stomach of air and
secretions.
•
Treat for sepsis (page F-41).
•
Monitor and record the baby’s respiratory rate, presence of chest
indrawing or grunting on expiration, and episodes of apnoea every three
hours until the baby no longer requires oxygen and then for an additional
24 hours.
•
Monitor the baby’s response to oxygen (page C-29).
•
When the baby begins to show signs of improvement:
-
Give expressed breast milk by gastric tube (page C-18);
-
When oxygen is no longer needed, allow the baby to begin
breastfeeding (page C-11). If the baby cannot be breastfed, give
expressed breast milk using an alternative feeding method (page
C-14).
•
If the baby’s breathing difficulty worsens or the baby has central
cyanosis:

F-50
Breathing difficulty
-
Give oxygen (page C-25) at a high flow rate;
-
If breathing difficulty is so severe that the baby has central
cyanosis even in 100% oxygen, organize transfer (page C-63) and
urgently refer the baby to a tertiary hospital or specialized centre
capable of assisted ventilation, if possible.
•
Observe the baby for 24 hours after discontinuing antibiotics.
•
If the baby’s tongue and lips have remained pink without oxygen for at
least two days, the baby has no difficulty breathing and is feeding well,
and there are no other problems requiring hospitalization, discharge the
baby (page C-67).
MODERATE BREATHING DIFFICULTY
MODERATE BREATHING DIFFICULTY NOT DUE TO RDS
•
Establish an IV line (page P-21), and give only IV fluid at maintenance
volume according to the baby’s age (Table C-4, page C-22) for the first
12 hours.
•
Monitor and record the baby’s respiratory rate, presence of chest
indrawing or grunting on expiration, and episodes of apnoea every three
hours until the baby no longer requires oxygen and then for an additional
24 hours.
•
If the baby’s breathing difficulty does not improve or worsens after
two hours, manage for severe breathing difficulty (page F-49).
•
Monitor the baby’s response to oxygen (page C-29).
•
When the baby begins to show signs of improvement:
-
Give expressed breast milk by gastric tube (page C-18);
-
When oxygen is no longer needed, allow the baby to begin
breastfeeding (page C-11). If the baby cannot be breastfed, give
expressed breast milk using an alternative feeding method (page
C-14).
•
If the baby’s tongue and lips have remained pink without oxygen for at
least one day, the baby has no difficulty breathing and is feeding well,
and there are no other problems requiring hospitalization, discharge the
baby (page C-67).

F-51
Breathing difficulty
MODERATE BREATHING DIFFICULTY DUE TO RESPIRATORY DISTRESS
SYNDROME
•
Establish an IV line (page P-21), and give only IV fluid at maintenance
volume according to the baby’s age (Table C-4, page C-22) for the first
12 hours.
•
Monitor and record the baby’s respiratory rate, presence of chest
indrawing or grunting on expiration, and episodes of apnoea every three
hours until the baby no longer requires oxygen and then for an additional
24 hours.
•
If the baby’s condition does not stabilize after two days, manage as
for severe breathing difficulty (page F-49).
•
Monitor the baby’s response to oxygen (page C-29).
•
When the baby begins to show signs of improvement:
-
Give expressed breast milk by gastric tube (page C-18);
-
When oxygen is no longer needed, allow the baby to begin
breastfeeding (page C-11). If the baby cannot be breastfed, give
expressed breast milk using an alternative feeding method (page
C-14).
•
If the baby’s tongue and lips have remained pink without oxygen for at
least one day, the baby has no difficulty breathing and is feeding well,
and there are no other problems requiring special treatment, provide
routine care for a small baby (page F-23) until the baby is ready to be
discharged (page C-67).
MILD BREATHING DIFFICULTY
•
Give expressed breast milk by gastric tube (page C-18).
•
Monitor and record the baby’s respiratory rate, presence of chest
indrawing or grunting on expiration, and episodes of apnoea every three
hours until the baby no longer requires oxygen and then for an additional
24 hours.
•
Monitor the baby’s response to oxygen (page C-29).
•
When oxygen is no longer needed, allow the baby to begin breastfeeding
(page C-11). If the baby cannot be breastfed, continue giving
expressed breast milk using an alternative feeding method (page C-14).

F-52
Breathing difficulty
•
If the breathing difficulty worsens at any time during the
observation period:
-
If the baby has the typical pattern of RDS, treat for moderate
breathing difficulty caused by RDS (page F-51);
-
If the baby does NOT have the typical pattern of RDS, look for
signs of sepsis (Table F-9, page F-37) and treat if found (page F-41),
and manage moderate (page F-50) or severe (page F-49) breathing
difficulty as necessary.
•
If the baby’s tongue and lips have remained pink without oxygen for at
least one day, the baby has no difficulty breathing and is feeding well,
and there are no other problems requiring hospitalization, discharge the
baby (page C-67).
CONGENITAL HEART ABNORMALITY
The diagnosis of a heart abnormality is made by exclusion of other diagnoses.
•
Give oxygen (page C-25) at a high flow rate.
•
Give expressed breast milk by gastric tube (page C-18).
•
If the baby cannot tolerate feeding, establish an IV line (page P-21),
and give IV fluid at maintenance volume according to the baby’s age
(Table C-4, page C-22).
•
Organize transfer (page C-63), and refer the baby to a tertiary hospital or
specialized centre for further evaluation, if possible.
APNOEA
SMALL BABY
Small babies are prone to episodes of apnoea, which are more frequent in
very small babies (less than 1.5 kg at birth or born before 32 weeks gestation)
but they become less frequent as the baby grows.
•
Teach the mother to observe the baby closely for further episodes of
apnoea. If the baby stops breathing, have the mother stimulate the baby
to breathe by rubbing the baby’s back for 10 seconds. If the baby does
not begin to breathe immediately, resuscitate the baby using a bag and
mask (page P-1).

F-53
Breathing difficulty
•
Review the general principles of feeding and fluid management of small
babies (page F-26).
•
Encourage the use of kangaroo mother care (page F-30), if possible.
Babies cared for in this way have fewer apnoeic episodes, and the mother
is able to observe the baby closely.
•
If the apnoeic episodes become more frequent, treat for sepsis (page
F-41).
•
If the baby has not had an episode of apnoea for seven days, is feeding
well, and there are no other problems requiring hospitalization, discharge
the baby (page C-67).
TERM BABY
•
If a term baby has had only a single episode of apnoea:
-
Observe the baby closely for further episodes of apnoea for 24
hours, and teach the mother how to do so. If the baby does not have
another apnoeic episode in 24 hours, is feeding well, and has no
other problems requiring hospitalization, discharge the baby (page
C-67);
-
If apnoea recurs, manage for multiple episodes of apnoea, below.
•
If a term baby has had multiple episodes of apnoea:
-
Treat for sepsis (page F-41);
-
If the baby has not had an episode of apnoea in the past seven
days, is feeding well, and there are no other problems requiring
hospitalization, discharge the baby (page C-67).

F-54
Breathing difficulty

MOTHER WITH HISTORY OF UTERINE INFECTION OR
F-55
FEVER DURING LABOUR OR AFTER BIRTH, OR
RUPTURE OF MEMBRANES FOR MORE THAN 18 HOURS
BEFORE BIRTH
A baby born to a mother with a uterine infection or fever any time from the
onset of labour to three days after birth, or rupture of membranes for more than
18 hours before birth, is often normal at birth but can develop a problem later.
The management suggested in this chapter is intended to prevent sepsis from
occurring in a baby who does not have signs of illness at birth. If the baby has
ANY sign, follow the appropriate sign chapter. If a baby has multiple findings
of illness (e.g. breathing difficulty, vomiting, and lethargy), see the chapter
Multiple Findings (Most Often Sepsis or Asphyxia) (page F-35).
PROBLEMS
•
The baby’s mother has or had a uterine infection or fever any time from
the onset of labour to three days after birth.
•
The baby’s mother’s membranes were ruptured for more than 18 hours
before birth.
MANAGEMENT
•
If the baby is more than three days old (regardless of gestational age),
no treatment (e.g. antibiotics) or observation is needed. Explain to the
mother the signs of sepsis (e.g. Table F-9, page F-37), and ask her to
return with the baby if the baby develops any signs of sepsis.
•
If the baby is three days old or less, treat according to gestational age
(below).
GESTATIONAL AGE 35 WEEKS OR MORE (BORN LESS THAN
ONE MONTH EARLY) OR BIRTH WEIGHT 2 KG OR MORE
UTERINE INFECTION OR FEVER, WITH OR WITHOUT RUPTURE OF
MEMBRANES
•
Treat for sepsis (page F-41) with the following modifications:
-
If the blood culture is positive or if the baby develops signs of
sepsis, continue antibiotics to complete 10 days of treatment;

Mother with history of uterine infection or fever during labour or after birth,
or rupture of membranes for more than 18 hours before birth
F-56
-
If the blood culture is negative and the baby still has no signs of
sepsis after five days of treatment with antibiotics, discontinue
antibiotics;
-
If the blood culture is not possible but the baby still has no signs
of sepsis after five days of treatment with antibiotics, discontinue
antibiotics.
•
Observe the baby for 24 hours after discontinuing antibiotics:
-
If the baby remains well, is feeding well, and there are no other
problems requiring hospitalization, discharge the baby (page C-67);
-
Explain to the mother the signs of sepsis (e.g. Table F-9, page F-37),
and ask her to return with the baby if the baby develops any signs of
sepsis.
RUPTURE OF MEMBRANES WITHOUT UTERINE INFECTION OR FEVER
•
Take a blood sample (page P-9), and send it to the laboratory for culture
and sensitivity, if possible, but do not start antibiotics.
•
Observe for signs of sepsis (e.g. poor feeding, vomiting, breathing
difficulty; Table F-9, page F-37) every four hours for 48 hours.
•
If the blood culture is negative, the baby still has no signs of sepsis after
48 hours and is feeding well, and there are no other problems requiring
hospitalization:
-
Discharge the baby (page C-67);
-
Explain to the mother the signs of sepsis (e.g. Table F-9, page
F-37), and ask her to return with the baby if the baby develops any
signs of sepsis.
•
If the blood culture is positive or if the baby develops signs of sepsis,
treat for sepsis (page F-41).
•
If the blood culture is not possible, observe the baby for an additional
three days. If the baby remains well during this time, discharge the baby
(page C-67). Explain to the mother the signs of sepsis (e.g. Table F-9,
page F-37), and ask her to return with the baby if the baby develops any
signs of sepsis.

Mother with history of uterine infection or fever during labour or after birth,
or rupture of membranes for more than 18 hours before birth
F-57
GESTATIONAL AGE LESS THAN 35 WEEKS (BORN ONE MONTH
OR MORE EARLY) OR BIRTH WEIGHT LESS THAN 2 KG
•
Treat for sepsis (page F-41) with the following modifications:
-
If the blood culture is positive or if the baby develops signs of
sepsis, continue antibiotics to complete 10 days of treatment;
-
If the blood culture is negative and the baby still has no signs of
sepsis after five days of treatment with antibiotics, discontinue
antibiotics;
-
If the blood culture is not possible but the baby still has no signs
of sepsis after five days of treatment with antibiotics, discontinue
antibiotics.
•
Observe the baby for 24 hours after discontinuing antibiotics:
-
If the baby remains well, is feeding well, and there are no other
problems requiring hospitalization, discharge the baby (page C-67);
-
Explain to the mother the signs of sepsis (e.g. Table F-9, page F-37),
and ask her to return with the baby if the baby develops any signs of
sepsis.

Mother with history of uterine infection or fever during labour or after birth,
or rupture of membranes for more than 18 hours before birth
F-58

CONVULSIONS OR SPASMS
F-59
Convulsions can be due to asphyxia, birth injury, or hypoglycaemia and are
also a sign of meningitis or neurologic problems. Between the convulsions,
the baby may appear normal or may be unconscious, lethargic, or irritable.
The spasms of neonatal tetanus may superficially resemble convulsions, but
the two need to be distinguished from each other because the treatment of
tetanus differs from that of convulsions.
PROBLEMS
•
The baby is having a convulsion or spasm.
•
The baby has a history of convulsions or spasms.
FINDINGS
•
Review the findings from the general history (page F-7) and examination
(Table F-2, page F-11), and obtain the following additional information.
•
If the baby is currently having a convulsion/spasm, look for
distinguishing features (Table F-13, page F-60).
•
If the baby is not currently having a convulsion/spasm, ask the mother
(or whoever brought the baby in):
-
Can you describe the type of abnormal movements the baby had?
Were they triggered by noise or handling? (Use Table F-13, page
F-60 to differentiate between a convulsion and a spasm.)
-
Did the baby’s condition suddenly deteriorate?
-
Did the baby suddenly become pale?
-
Did you receive the complete immunization schedule for tetanus?
-
Was the birth unclean or were unclean or harmful substances (e.g.
animal dung) applied to the baby’s umbilicus?
-
Did the baby have jaundice early (on or before day 2 of life)? If so,
was the baby treated?
•
Measure blood glucose (page P-13). If the blood glucose is less than
45 mg/dl (2.6 mmol/l), treat for low blood glucose (page F-91).
•
Determine the probable diagnosis (Table F-14, page F-62).
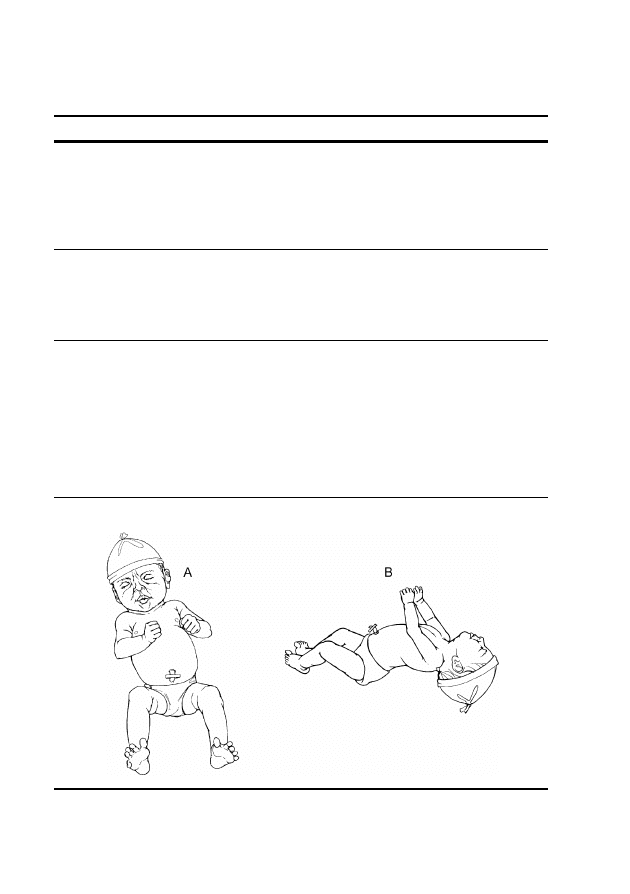
F-60
Convulsions or spasms
TABLE F-13 Distinguishing features of convulsions and spasms
Problem
Typical Findings
Generalized
convulsion
a
• Repetitive jerking movements of limbs or face
• Continuous extension or flexion of arms and legs, either
synchronous or asynchronous
• Apnoea (spontaneous cessation of breathing for more than 20
seconds)
• Baby may appear unconscious or awake but unresponsive)
Subtle
convulsion
a
• Repetitive blinking, eye deviation, or staring
• Repetitive movements of mouth or tongue
• Purposeless movement of the limbs, as if bicycling or swimming
• Apnoea
• Baby may be conscious
Spasm
• Involuntary contraction of muscles (Fig. F-4A) that lasts a few
seconds to several minutes
• Fists often persistently and tightly clenched (Fig. F-4A)
• Trismus (tight jaw; the baby’s mouth cannot be opened and the lips
may be pursed together in a “fish mouth” expression; Fig. F-4A)
• Opisthotonos (extreme hyperextension of the body, with the head
and heels bent backward and the body arched forward; Fig. F-4B)
• Triggered by touch, light, or sound
• Baby is conscious throughout, often crying with pain
FIGURE F-4 Babies with spasms of the face and limbs (A) and opisthotonos (B)
a
Note that generalized and subtle convulsions are both managed in the same way.

F-61
Convulsions or spasms
Ensure that the baby is having a convulsion or a spasm and is
not just jittery:
•
Like convulsions, jitteriness is characterized by rapid,
repetitive movements; however, in a jittery baby, these
movements are of the same amplitude and in the same
direction.
•
Like spasms, jitteriness can be precipitated by sudden
handling of the baby or by loud noises, but it is usually
stopped by cuddling, feeding, or flexing the baby’s limb.

F-62
Convulsions or spasms
DIFFERENTIAL DIAGNOSIS
TABLE F-14 Differential diagnosis of convulsions or spasms
Findings
a
Probable
Diagnosis
History
Examination
Investigations or
Other Known
Diagnoses
• Time of onset day
1 to 3
• History of maternal
diabetes
• Poor or no feeding
• Convulsions,
jitteriness, lethargy,
or unconsciousness
• Small baby (less
than 2.5 kg at birth
or born before 37
weeks gestation)
• Large baby (more
than 4 kg at birth)
• Blood glucose
less than
45 mg/dl
(2.6 mmol/l)
Low blood
glucose, page
F-91
• Mother not
immunized with
tetanus toxoid
• Poor or no feeding
after having fed
well
• Time of onset day
3 to 14
• Unclean birth
• Application of
unclean or harmful
substances (e.g.
animal dung) to
umbilicus
• Spasms
• Infection of
umbilicus
Tetanus, page
F-66
• Time of onset day 2
or later
• Convulsions or
unconsciousness
• Bulging anterior
fontanelle
• Lethargy
• Sepsis
Possible
meningitis
Treat for
convulsions
(page F-64)
and meningitis
(page F-43).

F-63
Convulsions or spasms
TABLE F-14 Cont. Differential diagnosis of convulsions or spasms
Findings
a
Probable
Diagnosis
History
Examination
Investigations
or Other
Known
Diagnoses
• Complicated or
difficult labour or
birth (fetal distress)
• Failure of baby to
spontaneously
breathe at birth
• Resuscitation at
birth
• Time of onset
within 24 hours of
birth
• Convulsions or
unconsciousness
• Lethargy or
floppiness
• Breathing difficulty
• Abnormal body
temperature
• Drowsiness or
reduced activity
• Irritability
Asphyxia or
other brain
injury
Treat for
convulsions
(page F-64) and
asphyxia (page
F-44).
• Time of onset day
1 to 7
• Sudden
deterioration of
condition
• Sudden pallor
• Convulsions or
unconsciousness
• Small baby (less
than 2.5 kg at birth
or born before 37
weeks gestation)
• Severe breathing
difficulty
Intraventricular
bleeding, page
F-66
• Time of onset of
encephalopathy
day 3 to 7
• Serious jaundice
• Late or no
treatment of serious
jaundice
• Convulsions
• Opisthotonos
• Poor or no feeding
• Lethargy or
floppiness
• Positive
Coombs test
Bilirubin
encephalopathy
(kernicterus)
Treat for
convulsions
(page F-64) and
bilirubin
encephalopathy
(page F-83).
a
The diagnosis cannot be made if a finding listed in bold is absent. The presence of a
finding listed in bold, however, does not guarantee the diagnosis. The diagnosis is
definitively confirmed if a finding listed in italics is present. Findings in plain text are
supportive findings; their presence helps to confirm the diagnosis, but their absence cannot
be used to rule out the diagnosis.

F-64
Convulsions or spasms
CONVULSIONS
INITIAL MANAGEMENT OF CONVULSIONS
•
Establish an IV line (page P-21), and give only IV fluid at maintenance
volume according to the baby’s age (Table C-4, page C-22) for the first
12 hours. If the convulsions are due to asphyxia, see page F-44 for
guidelines on fluid volume.
•
If the baby’s blood glucose was less than 45 mg/dl (2.6 mmol/l),
ensure that the baby was treated for low blood glucose (page F-91)
before continuing with management of the convulsion (below) to rule out
hypoglycaemia as the cause of the convulsions.
•
If the baby is currently having a convulsion or the baby had a
convulsion within the last hour, give phenobarbital 20 mg/kg body
weight IV slowly over five minutes:
-
If an IV line has not yet been established, give phenobarbital
20 mg/kg body weight as a single IM injection;
-
If convulsions do not stop within 30 minutes, give another dose of
phenobarbital 10 mg/kg body weight IV slowly over five minutes (or
IM if an IV line still has not yet been established). Repeat one more
time after another 30 minutes, if necessary;
-
If convulsions continue or if they recur within six hours, give
phenytoin 20 mg/kg body weight IV, noting the following:
-
Give phenytoin IV only;
-
Mix the total dose of phenytoin in 15 ml of normal saline and
infuse at the rate of 0.5 ml per minute over 30 minutes. Use only
normal saline to infuse phenytoin, as all other fluid will cause
the phenytoin to crystallize.
CAUTION
Do not use diazepam for convulsions; diazepam given in
addition to phenobarbital will increase the risk of circulatory
collapse and respiratory failure.
•
If the baby has central cyanosis (blue tongue and lips) or other signs
of breathing difficulty, give oxygen (page C-25) at a moderate flow
rate.

F-65
Convulsions or spasms
ONGOING CARE OF BABIES WHO HAVE HAD CONVULSIONS
•
Observe the baby for recurrence of convulsions, looking especially for
subtle convulsions (Table F-13, page F-60).
•
If convulsions recur within two days, give phenobarbital 5 mg/kg body
weight once daily by mouth until the baby has not had a convulsion for
seven days.
•
If convulsions recur after two days without convulsions, repeat
treatment with phenobarbital as described for initial management of
convulsions (page F-64) and again follow with phenobarbital 5 mg/kg
body weight once daily by mouth until the baby has not had a convulsion
for seven days.
•
If the baby is receiving daily phenobarbital:
-
Continue phenobarbital for seven days after the last convulsion;
-
Once phenobarbital is discontinued, observe the baby for an
additional three days.
•
Continue IV fluid at maintenance volume according to the baby’s age
(Table C-4, page C-22). If the convulsions are due to asphyxia, see
page F-44 for guidelines on fluid volume.
•
Once the baby’s condition is stable, allow the baby to begin
breastfeeding (page C-11). If the baby cannot be breastfed, give
expressed breast milk using an alternative feeding method (page C-14).
•
Provide general care for the baby:
-
Encourage the mother to hold the baby, but avoid overstimulation by
noise and excessive handling;
-
Handle and move the baby gently to prevent injury when the baby’s
muscle tone is low. Support the baby’s entire body, especially the
head;
-
Explain to the mother that the phenobarbital will make the baby very
sleepy for several days.
•
Explain to the mother that if convulsions stop and the baby feeds well by
seven days of age, recovery will probably be complete.
•
If the baby’s condition does not improve after one week (baby
continues to be lethargic, is not breastfeeding or is feeding poorly, or is
still having convulsions) but the baby is no longer receiving treatment

F-66
Convulsions or spasms
at the hospital or the treatment can be continued at home, discuss
with the mother the possibility of caring for her baby at home.
•
If the baby has not had a convulsion for three days after
discontinuing phenobarbital, the mother is able to feed the baby, and
there are no other problems requiring hospitalization, discharge the baby
(page C-67):
-
Discuss with the mother the baby’s prognosis and how to deal with
the problems the baby may have at home;
-
Follow up in one week, or earlier if the mother notes serious
problems (e.g. feeding difficulty, convulsions);
-
Help the mother find the best method to feed the baby if the baby is
not breastfeeding well. If the baby is feeding slowly, have the
mother feed more frequently.
MANAGEMENT OF SPECIFIC CONDITIONS
INTRAVENTRICULAR BLEEDING
Intraventricular bleeding is difficult to distinguish from meningitis, especially
in a baby with other problems during the first days of life. Therefore, treat for
meningitis until infection can be ruled out as the cause of convulsions.
•
Provide general management for bleeding (page F-114).
•
Treat for convulsions (page F-64).
•
Treat for meningitis (page F-43) until infection can be ruled out as the
cause of the convulsions.
TETANUS
•
Establish an IV line (page P-21), and give IV fluid at maintenance
volume according to the baby’s age (Table C-4, page C-22).
•
Give diazepam 1 mg/kg body weight IV slowly over three minutes:
-
If an IV line cannot be established, insert a gastric tube (page P-33),
and give the diazepam via the tube;

F-67
Convulsions or spasms
-
If diazepam is not available, give paraldehyde 0.3 ml/kg body
weight in arachis oil rectally (page P-41). Do not give paraldehyde
IM or IV;
-
If the spasms do not stop within 30 minutes, give another dose of
diazepam 1 mg/kg body weight IV slowly over three minutes (or
paraldehyde 0.3 ml/kg body weight rectally). Repeat one more time
after another 30 minutes, if necessary;
If the baby’s respiratory rate is less than 30 breaths per minute,
withhold diazepam, even if the baby continues to have spasms.
-
If spasms continue or if they recur, give additional diazepam
1 mg/kg body weight IV slowly (or by gastric tube if an IV line still
has not been established) every six hours.
•
If the baby has central cyanosis (blue tongue and lips) after the
spasm, give oxygen at a moderate flow rate (page C-25). Use only a
head box, as other methods of administering oxygen may cause spasms.
•
Give the baby:
-
antitetanus immunoglobulin (human) 500 units IM, if available, or
give equine tetanus antitoxin 5000 units IM;
-
tetanus vaccine (tetanus toxoid) 0.5 ml IM at a different site from the
immunoglobulin or antitoxin;
-
benzylpenicillin IV or IM (Table C-9, page C-34) for seven days.
•
Give the mother tetanus vaccine (tetanus toxoid) 0.5 ml (to protect her
and any baby she may have in the future), and ask her to return in one
month for a second dose.
•
If the umbilicus is red and swollen, draining pus, or foul smelling,
treat for infection of the umbilicus (page F-135).
ONGOING CARE OF BABIES WITH TETANUS
•
Care for the baby in a quiet, darkened room to reduce unnecessary
stimulation, but make sure the baby is not neglected.
•
Continue IV fluid at maintenance volume according to the baby’s age
(Table C-4, page C-22).
•
Give expressed breast milk by gastric tube (page C-18) between the
spasms. Start with half the volume appropriate for the baby’s age (Table

F-68
Convulsions or spasms
C-4, page C-22), and slowly decrease the volume of IV fluid while
increasing the volume of oral feeds over a period of two days.
•
If the baby has not had a spasm for two days, has received all doses of
benzylpenicillin, is feeding well, and there are no other problems
requiring hospitalization, discharge the baby (page C-67).

ABNORMAL BODY TEMPERATURE
F-69
Low body temperature (hypothermia) may be caused by exposure to a cold
environment (low ambient temperature, cold surface, or draught), or the baby
may be wet or under-dressed for age and size. Elevated body temperature
(hyperthermia) may be caused by exposure to a warm environment (e.g. high
ambient temperature, sun exposure, or overheating by an incubator or radiant
warmer). Hypothermia and hyperthermia may also be signs of illness, such as
sepsis.
PROBLEMS
•
The baby’s axillary temperature is less than 36.5 °C.
•
The baby’s axillary temperature is more than 37.5 °C.
FINDINGS
•
Review the findings from the general history (page F-7) and examination
(Table F-2, page F-11), and obtain the following additional information
to determine the probable diagnosis (Table F-15, page F-70).
•
Determine if the baby was exposed to a cold or hot environment. Ask the
mother (or whoever brought the baby in):
-
Was the baby dried after birth and kept warm?
-
Has the baby been clothed appropriately for the climate?
-
Has the baby been sleeping separately from the mother?
-
Was the baby exposed to the sun?
•
If the baby was being treated under a radiant warmer or was in an
incubator or cot in the hospital when the abnormal body
temperature was first noted, check the:
-
room temperature;
-
temperature setting on the incubator or radiant warmer;
-
actual temperature in the incubator or under the radiant warmer;
-
frequency with which the baby’s temperature was monitored.

F-70
Abnormal body temperature
TABLE F-15 Differential diagnosis of abnormal body temperature
Findings
a
Probable
Diagnosis
History
Examination
• Baby exposed to
cold environment
• Time of onset day 1
or later
• Body temperature less than 32 °C
• Breathing difficulty
• Heart rate less than 100 beats per
minute
• Poor or no feeding
• Lethargy
• Hardened skin
• Slow, shallow breathing
Severe
hypothermia,
page F-71
• Baby exposed to
cold environment
• Time of onset day 1
or later
• Body temperature 32 °C to 36.4 °C
• Breathing difficulty
• Heart rate less than 100 beats per
minute
• Poor or no feeding
• Lethargy
Moderate
hypothermia,
page F-72
• No exposure to cold
or hot environment
• Time of onset day 1
or later
• Fluctuations in body temperature
between 36 °C and 39 °C despite
being in a stable temperature
environment
• Fluctuations in temperature occurring
after three or more normal temperature
readings
Temperature
instability
Suspect sepsis
(page F-38).
• Baby exposed to hot
environment (e.g.
overwarming in
incubator or under
radiant warmer,
exposure to high
ambient
temperature)
• Time of onset day 1
or later
• Body temperature more than 37.5 °C
• Signs of dehydration (sunken eyes or
fontanelle, loss of skin elasticity, or
dry tongue and mucous membranes)
• Poor or no feeding
• Respiratory rate consistently more
than 60 breaths per minute
• Heart rate more than 160 beats per
minute
• Lethargy
• Irritability
Hyperthermia,
page F-73
a
The diagnosis cannot be made if a finding listed in bold is absent. The presence of a
finding listed in bold, however, does not guarantee the diagnosis. The diagnosis is
definitively confirmed if a finding listed in italics is present. Findings in plain text are
supportive findings; their presence helps to confirm the diagnosis, but their absence cannot
be used to rule out the diagnosis.

F-71
Abnormal body temperature
MANAGEMENT
SEVERE HYPOTHERMIA
•
Warm the baby immediately using a prewarmed radiant warmer (page
C-5). Use another method of rewarming (page C-1), if necessary.
•
Remove cold or wet clothing, if present. Dress the baby in warm clothes
and a hat, and cover with a warm blanket.
•
Treat for sepsis (page F-41), and keep the tubing of the IV line under the
radiant warmer to warm the fluid.
•
Measure blood glucose (page P-13). If the blood glucose is less than
45 mg/dl (2.6 mmol/l), treat for low blood glucose (page F-91).
•
Assess the baby:
-
Look for emergency signs (i.e. respiratory rate less than 20 breaths
per minute, gasping, not breathing, or shock) every hour;
-
Measure the baby’s temperature every hour:
-
If the baby’s temperature is increasing at least 0.5 °C per
hour over the last three hours, rewarming is successful;
continue measuring the baby’s temperature every two hours;
-
If the baby’s temperature does not rise or is rising more
slowly than 0.5 °C per hour, ensure that the temperature of the
warming device is set correctly.
•
If the baby’s respiratory rate is more than 60 breaths per minute or
the baby has chest indrawing or grunting on expiration, treat for
breathing difficulty (page F-47).
•
Assess readiness to feed every four hours until the baby’s temperature is
within the normal range.
•
If the baby shows signs of readiness to suckle, allow the baby to begin
breastfeeding (page C-11):
-
If the baby cannot be breastfed, give expressed breast milk using
an alternative feeding method (page C-14);

F-72
Abnormal body temperature
-
If the baby is not able to feed at all, give expressed breast milk by
gastric tube (page C-18) once the baby’s temperature reaches 35 °C.
•
Once the baby’s temperature is normal, measure the temperature every
three hours for 12 hours.
•
If the baby’s temperature remains within the normal range,
discontinue measurements.
•
If the baby is feeding well and there are no other problems requiring
hospitalization, discharge the baby (page C-67). Advise the mother how
to keep the baby warm at home.
MODERATE HYPOTHERMIA
•
Remove cold or wet clothing, if present.
•
If the mother is present, have her rewarm the baby using skin-to-skin
contact (page C-5) if the baby does not have other problems.
•
If the mother is not present or skin-to-skin contact cannot be used:
-
Dress the baby in warm clothes and a hat, and cover with a warm
blanket;
-
Warm the baby using a radiant warmer (page C-5). Use another
method of rewarming (page C-1), if necessary.
•
Encourage the mother to breastfeed more frequently. If the baby cannot
be breastfed, give expressed breast milk using an alternative feeding
method (page C-14).
•
Measure blood glucose (page P-13). If the blood glucose is less than
45 mg/dl (2.6 mmol/l), treat for low blood glucose (page F-91).
•
If the baby’s respiratory rate is more than 60 breaths per minute or
the baby has chest indrawing or grunting on expiration, treat for
breathing difficulty (page F-47).
•
Measure the baby’s temperature every hour for three hours:
-
If the baby’s temperature is increasing at least 0.5 °C per hour
over the last three hours, rewarming is successful; continue
measuring the baby’s temperature every two hours;

F-73
Abnormal body temperature
-
If the baby’s temperature does not rise or is rising more slowly
than 0.5 °C per hour, look for signs of sepsis (e.g. poor feeding,
vomiting, breathing difficulty; Table F-9, page F-37);
-
Once the baby’s temperature is normal, measure the baby’s
temperature every three hours for 12 hours;
-
If the baby’s temperature remains within the normal range,
discontinue measurements.
•
If the baby is feeding well and there are no other problems requiring
hospitalization, discharge the baby (page C-67). Advise the mother how
to keep the baby warm at home.
HYPERTHERMIA
Do not give antipyretic drugs to reduce the baby’s
temperature.
•
If the baby’s respiratory rate is more than 60 breaths per minute or
the baby has chest indrawing or grunting on expiration, treat for
breathing difficulty (page F-47).
•
If the hyperthermia is due to overwarming under a radiant warmer
or in an incubator:
-
Reduce the temperature setting of the warming device. If the baby is
in an incubator, open the incubator portholes until the temperature
of the incubator is within the normal range;
-
Undress the baby partially or fully for 10 minutes, then dress and
cover the baby;
-
Observe for signs of sepsis (e.g. poor feeding, vomiting, breathing
difficulty; Table F-9, page F-37) now and repeat when the baby’s
temperature is within the normal range;
-
Measure the baby’s temperature every hour until it is within the
normal range;

F-74
Abnormal body temperature
-
Measure the temperature in the incubator or the temperature under
the radiant warmer every hour, and adjust the temperature setting
accordingly;
-
Review nursing care practices to ensure that the problem does not
happen again;
-
Provide ongoing management of hyperthermia (page F-74).
•
If the hyperthermia is due to exposure to a high ambient
temperature or sun exposure:
-
Place the baby in a normal temperature environment (25 °C to
28 °C);
-
Undress the baby partially or fully for 10 minutes, then dress and
cover the baby;
-
If the baby’s temperature is more than 39 °C:
-
Sponge the baby or give the baby a bath for 10 to 15 minutes in
water that is about 4 °C lower than the baby’s current
temperature;
-
Do not use cold water or water that is more than 4 °C lower than
the baby’s temperature;
-
Measure the baby’s temperature every hour;
-
If the baby’s temperature is still abnormal after two hours, treat
for sepsis (page F-41);
-
Provide ongoing management of hyperthermia (below).
ONGOING MANAGEMENT OF HYPERTHERMIA
•
Ensure that the baby receives adequate food or fluid:
-
Allow the baby to begin breastfeeding (page C-11). If the baby
cannot be breastfed, give expressed breast milk using an alternative
feeding method (page C-14);
-
If there are signs of dehydration (sunken eyes or fontanelle, loss of
skin elasticity, or dry tongue or mucous membranes):
-
Establish an IV line (page P-21), and give IV fluid at
maintenance volume according to the baby’s age (Table C-4,
page C-22);

F-75
Abnormal body temperature
-
Increase the volume of fluid by 10% of the baby’s body weight
on the first day that the dehydration is noted.
•
Measure blood glucose (page P-13). If the blood glucose is less than
45 mg/dl (2.6 mmol/l), treat for low blood glucose (page F-91).
•
Once the baby’s temperature is within the normal range, measure the
baby’s temperature every three hours for 12 hours. If the baby’s
temperature remains within the normal range, discontinue
measurements.
•
If the baby is feeding well and there are no other problems requiring
hospitalization, discharge the baby (page C-67). Advise the mother how
to keep the baby warm at home and protect from overheating.

F-76
Abnormal body temperature

JAUNDICE
F-77
Many babies, particularly small babies (less than 2.5 kg at birth or born
before 37 weeks gestation), may have jaundice during the first week of life. In
most cases, the level of bilirubin that causes the jaundice is not harmful and
does not require treatment. However, any jaundice visible in the first 24 hours
of life should be assumed to be serious.
PROBLEM
•
The baby has jaundice.
FINDINGS
•
Review the findings from the general history (page F-7) and examination
(Table F-2, page F-11), and obtain the following additional information
to determine the probable diagnosis.
•
Ask the mother (or whoever brought the baby in):
-
Did you have a previous baby with early jaundice (on day 1 of life),
haemolytic jaundice, glucose-6-phosphate dehydrogenase (G6PD)
deficiency, or Rhesus (Rh) factor or ABO blood group
incompatibility?
-
What is your blood group and the blood group of the baby’s father?
-
Is there a family history of anaemia, enlarged liver, or removal of
spleen?
•
Estimate the severity of jaundice:
-
Observe in good daylight. Jaundice will look more severe if
observed in artificial light and may be missed in poor light;
-
Lightly press the skin with a finger to reveal the underlying colour of
the skin and subcutaneous tissue;
-
Estimate the severity of jaundice by day of life and the area of the
body where jaundice is seen (Table F-16, page F-78).

F-78
Jaundice
TABLE F-16 Clinical estimation of severity of jaundice
Age
Jaundice Visible on
Classify as
Day 1
Any visible jaundice
a
Serious jaundice
Day 2
Arms and legs
a
Day 3 and thereafter
Hands and feet
a
Visible jaundice seen anywhere on the body on day 1 or on the hands and feet in addition
to the arms and legs on day 2 is very serious and needs to be treated with phototherapy
immediately. Do not wait to begin phototherapy until the serum bilirubin level is known.
INITIAL MANAGEMENT OF SERIOUS JAUNDICE
•
Begin phototherapy (page F-84) if jaundice is classified as serious in
Table F-16.
•
Determine if the baby has the following risk factors: less than 2.5 kg at
birth, born before 37 weeks gestation, haemolysis, or sepsis.
•
Take a blood sample (page P-9), and measure serum bilirubin (if
possible) and haemoglobin, determine the baby’s blood group, and
perform a Coombs test:
-
If the serum bilirubin is below the level requiring phototherapy
(Table F-17, page F-79), discontinue phototherapy;
-
If the serum bilirubin is at or above the level requiring
phototherapy (Table F-17, page F-79), continue phototherapy;
-
If the Rh factor and ABO blood group do not indicate a cause of
haemolysis or if there is a family history of G6PD deficiency,
obtain a G6PD screen, if possible.
•
Determine the probable diagnosis (Table F-18, page F-80).

F-79
Jaundice
TABLE F-17
Treatment of jaundice based on serum bilirubin level
Age
Phototherapy
Exchange Transfusion
a
Healthy Term
Baby
Any Risk
Factor
b
Healthy Term
Baby
Any Risk
Factor
mg/dl
µmol/l
mg/dl
µmol/l
mg/dl
µmol/l
mg/dl
µmol/l
Day 1
Any visible jaundice
c
15
260
13
220
Day 2
15
260
13
220
25
425
15
260
Day 3
18
310
16
270
30
510
20
340
Day 4
and
thereafter
20
340
17
290
30
510
20
340
a
Exchange transfusion is not described in this guide. These serum bilirubin levels are
included in case exchange transfusion is possible or in case the baby can be transferred
quickly and safely to another facility where exchange transfusion can be performed. If
exchange transfusion is possible and the serum bilirubin has reached the level in this
table, send a sample of the mother’s and the baby’s blood.
b
Risk factors include small size (less than 2.5 kg at birth or born before 37 weeks
gestation), haemolysis, and sepsis.
c
Visible jaundice anywhere on the body on day 1 or on the hands and feet in addition to
the arms and legs on day 2 is very serious and needs to be treated with phototherapy
immediately. Do not wait to begin phototherapy until the serum bilirubin level is known.

F-80
Jaundice
DIFFERENTIAL DIAGNOSIS
TABLE F-18
Differential diagnosis of jaundice
Findings
a
Probable
Diagnosis
History
Examination
Investigations or
Other Known
Diagnoses
• Jaundice
developing in less
than 36 hours
• Pallor
• ABO blood group
or Rh factor
incompatibility or
G6PD deficiency
in previous baby
• Family history of
G6PD deficiency,
jaundice, anaemia,
enlarged liver, or
removal of spleen
• Serious jaundice
• Pallor
• Generalized
oedema (body
swelling)
• Male baby (a
supportive finding
for G6PD
deficiency only)
• Haemoglobin less
than 13 g/dl
(haematocrit less
than 40%)
• Positive Coombs
test
• ABO blood group
or Rh factor
incompatibility
between mother
and baby
• Positive G6PD
screen
Haemolytic
jaundice
Provide general
management for
pallor (page
F-114), if
necessary, and
treat for
haemolytic
jaundice (page
F-81).
• Time of onset day
2 to 5
• Serious jaundice
• Small baby (less
than 2.5 kg at
birth or born
before 37 weeks
gestation)
• No evidence of
other causes of
jaundice
Jaundice of
prematurity,
page F-82
• Time of onset day
2 to 7
• Serious jaundice
• Sepsis
• No evidence of
other causes of
jaundice
Jaundice
associated with
sepsis
Treat for sepsis
(page F-41) and
provide
phototherapy, if
necessary (page
F-84).
• Time of onset day
2 or later
• Serious jaundice
• Male baby
• No evidence of
other causes of
jaundice
• Positive G6PD
screen
G6PD
deficiency
Treat as for
haemolytic
jaundice (page
F-81).

F-81
Jaundice
TABLE F-18 Cont.
Differential diagnosis of jaundice
Findings
a
Probable
Diagnosis
History
Examination
Investigations or
Other Known
Diagnoses
• Time of onset of
encephalopathy day
3 to 7
• Late or no treatment
of serious jaundice
• Serious jaundice
• Convulsions
• Opisthotonos
• Poor or no feeding
• Lethargy
• Floppiness
• Positive
Coombs test
Bilirubin
encephalopathy
(kernicterus),
page F-83
a
The diagnosis cannot be made if a finding listed in bold is absent. The presence of a
finding listed in bold, however, does not guarantee the diagnosis. The diagnosis is
definitively confirmed if a finding listed in italics is present. Findings in plain text are
supportive findings; their presence helps to confirm the diagnosis, but their absence cannot
be used to rule out the diagnosis.
MANAGEMENT OF SPECIFIC CONDITIONS
HAEMOLYTIC JAUNDICE
Haemolytic jaundice in a newborn is most commonly caused by Rh factor or
ABO blood group incompatibility between the baby and mother or by G6PD
deficiency in the baby. The treatment below applies to all cases of haemolytic
jaundice, regardless of the cause.
•
If the serum bilirubin is at a level requiring phototherapy (Table F-17,
page F-79), continue phototherapy.
•
If referral for exchange transfusion is possible:
-
If the serum bilirubin is close to the level requiring exchange
transfusion (Table F-17, page F-79), the haemoglobin is less than
13 g/dl (haematocrit less than 40%), and the Coombs test is
positive, urgently refer the baby (see page F-82);
-
If the serum bilirubin cannot be measured and it is not possible to
perform a Coombs test, urgently refer the baby (see page F-82) if
jaundice started on day 1 and the haemoglobin is less than 13 g/dl
(haematocrit less than 40%);

F-82
Jaundice
-
If the baby is being referred for exchange transfusion:
-
Organize transfer (page C-63);
-
Urgently refer the baby to a tertiary hospital or specialized
centre;
-
Send a sample of the mother’s and the baby’s blood;
-
Explain to the mother why the baby has jaundice, why the
referral is required, and the treatment that the baby will receive.
•
Advise the mother:
-
If the cause of jaundice is Rh factor incompatibility, ensure that
the mother is advised regarding future pregnancies;
-
If the baby has G6PD deficiency, advise the mother about which
substances to avoid to prevent haemolysis in the baby (e.g. anti-
malarial drugs, sulfa drugs, aspirin, mothballs, fava beans).
•
If the haemoglobin is less than 10 g/dl (haematocrit less than 30%),
give a blood transfusion (page P-31).
•
If jaundice persists for two weeks or longer in a term baby or three
weeks or longer in a small baby (less than 2.5 kg at birth or born before
37 weeks gestation), treat for prolonged jaundice (page F-83).
•
Follow up after discharge, measuring haemoglobin weekly for four
weeks. If the haemoglobin is less than 8 g/dl (haematocrit less than
24%), give a blood transfusion (page P-31).
JAUNDICE OF PREMATURITY
•
If the serum bilirubin is at a level requiring phototherapy (Table
F-17, page F-79), continue phototherapy.
•
If the baby is less than three days old, observe for jaundice for 24
hours after phototherapy is discontinued.
•
If the jaundice persists for three weeks or longer, treat for prolonged
jaundice (below).

F-83
Jaundice
PROLONGED JAUNDICE
•
Discontinue phototherapy.
•
If the baby’s stools are pale or the urine is dark, organize transfer
(page C-63) and refer the baby to a tertiary hospital or specialized centre
for further evaluation, if possible.
•
If the mother tested positive for syphilis, treat for congenital syphilis
(page F-46).
BILIRUBIN ENCEPHALOPATHY (KERNICTERUS)
If severe jaundice is not managed quickly, it may damage the baby’s brain.
Initial signs of brain damage are lethargy, floppiness, and poor feeding. After a
few days, the baby may develop opisthotonos and a high-pitched cry and have
convulsions. The final stage is floppiness and poor feeding. It is difficult to
determine whether these signs are a result of the severe jaundice or because of
another disease. Therefore, always treat a baby with jaundice even if bilirubin
encephalopathy is suspected.
•
If the baby has a convulsion, manage the convulsion (page F-64).
•
If the serum bilirubin is at a level requiring phototherapy (Table F-17,
page F-79), continue phototherapy.
•
Discuss with the mother the baby’s condition and prognosis:
-
Explain the feasibility of exchange transfusion and the likely
prognosis of the baby;
-
Allow the family to decide if exchange transfusion should be
performed, if it is feasible. If the family requests exchange
transfusion, organize transfer (page C-63), and urgently refer the
baby to a tertiary hospital or specialized centre, if possible. Send a
sample of the mother’s and the baby’s blood.
•
If the baby’s condition does not improve after one week (baby
continues to be lethargic, is not breastfeeding or is feeding poorly, or is
still having convulsions) but the baby is no longer receiving treatment
at the hospital or the treatment can be continued at home, discuss
with the mother the possibility of caring for her baby at home.
•
If the baby has not had a convulsion for three days after discontinuing
phenobarbital, the mother is able to feed the baby, and there are no other
problems requiring hospitalization, discharge the baby (page C-67):

F-84
Jaundice
-
Discuss with the mother the baby’s prognosis and how to deal with
the problems the baby may have at home;
-
Follow up in one week, or earlier if the mother notes serious
problems (e.g. feeding difficulty, convulsions);
-
Help the mother find the best method to feed the baby if the baby is
not breastfeeding well. If the baby is feeding slowly, have the
mother feed more frequently.
PHOTOTHERAPY
PREPARING THE PHOTOTHERAPY UNIT
•
Ensure that a plastic cover or shield is in position. This prevents injury to
the baby in case a lamp breaks and helps to screen out harmful ultraviolet
light.
•
Warm the room where the unit is located, if necessary, so that the
temperature under the lights is 28 °C to 30 °C.
•
Switch on the unit, and ensure that all the fluorescent tubes are working.
•
Replace fluorescent tubes that are burned out or flickering:
-
Record the date the tubes were replaced, and measure the total
duration of use of the tubes;
-
Replace tubes every 2000 hours of use or after three months,
whichever comes first, even if the tubes are still working.
•
Use white linens in the cot, bassinet, or incubator, and place white
curtains around the area where the unit is located to reflect as much light
as possible back to the baby (Fig. F-5, page F-85).
GIVING PHOTOTHERAPY
•
Place the baby under the phototherapy lights (Fig. F-5, page F-85):
-
If the baby weighs 2 kg or more, place the baby naked in the cot or
bassinet. Place or keep smaller babies in an incubator;
-
Place the baby as close to the lights as the manufacturer’s
instructions allow;
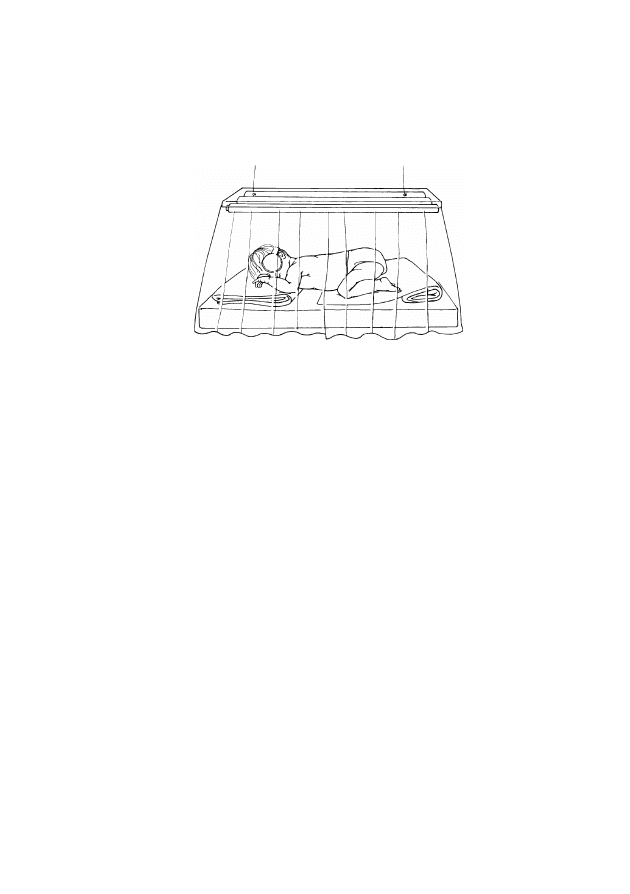
F-85
Jaundice
-
Cover the baby’s eyes with patches, ensuring that the patches do not
block the baby’s nostrils. Do not secure the patches in place with tape.
FIGURE F-5
Baby under phototherapy lights
•
Turn the baby every three hours.
•
Ensure that the baby is fed:
-
Encourage the mother to breastfeed on demand but at least every
three hours:
-
During feeding, remove the baby from the phototherapy unit
and remove the eye patches;
-
There is no need to supplement or replace breast milk with any
other type of feed or fluid (e.g. breast-milk substitute, water,
sugar water, etc.)
-
If the baby is receiving IV fluid or expressed breast milk,
increase the volume of fluid and/or milk by 10% of the total daily
volume per day (Table C-4, page C-22) for as long as the baby is
under the phototherapy lights;
-
If the baby is receiving IV fluid or is being fed by gastric tube, do
not remove the baby from the phototherapy lights.
•
Note that the baby’s stool may become loose and yellow while the baby
is receiving phototherapy. This does not require specific treatment.
•
Continue other prescribed treatment and tests:
-
Remove the baby from the phototherapy unit only for procedures
that cannot be performed while under the phototherapy lights;
-
If the baby is receiving oxygen, briefly turn off the lights when
observing the baby for central cyanosis (blue tongue and lips).

F-86
Jaundice
•
Measure the baby’s temperature (page P-5) and the temperature of the
air under the lights every three hours. If the baby’s temperature is more
than 37.5 °C, adjust the temperature of the room or temporarily remove
the baby from the phototherapy unit until the baby’s temperature is
36.5 °C to 37.5 °C.
•
Measure serum bilirubin level every 12 hours:
-
Discontinue phototherapy when the serum bilirubin level is below
the level at which phototherapy was started (Table F-17, page F-79)
or 15 mg/dl (260 µmol/l), whichever is lower;
-
If the serum bilirubin is close to the level requiring exchange
transfusion (Table F-17, page F-79), organize transfer (page C-63),
and urgently refer the baby to a tertiary hospital or specialized centre
for exchange transfusion, if possible. Send a sample of the mother’s
and the baby’s blood.
•
If the serum bilirubin cannot be measured, discontinue phototherapy
after three days.
Bilirubin in the skin rapidly disappears under phototherapy.
Skin colour cannot be used as a guide to serum bilirubin level
while the baby is receiving phototherapy and for 24 hours
after discontinuing phototherapy.
•
After phototherapy has been discontinued:
-
Observe the baby for 24 hours, and repeat the serum bilirubin
measurement, if possible, or estimate jaundice using the clinical
method (Table F-16, page F-78);
-
If jaundice has returned to or is above the level at which
phototherapy was started, repeat phototherapy for the same length
of time as originally given. Repeat this step each time phototherapy
is discontinued until the measured or estimated bilirubin stays below
the level requiring phototherapy.
•
If phototherapy is no longer required, the baby is feeding well, and there
are no other problems requiring hospitalization, discharge the baby (page
C-67).
•
Teach the mother to assess jaundice, and advise her to return if the baby
becomes more jaundiced.

LETHARGY AND OTHER NON-SPECIFIC SIGNS
F-87
Non-specific signs may be present in a baby with a serious illness. In some
cases, the mother may just think the baby “looks ill.” The most common
serious problems causing these non-specific signs are sepsis and asphyxia.
Lethargy, drowsiness, and reduced activity may also be seen after a baby has
had a convulsion. In most cases, other signs are present to indicate these
diagnoses. If any other specific clinical sign is noted in a baby in addition
to lethargy or another non-specific sign, or the baby has two or more non-
specific signs, use the chapter Multiple Findings (Most Often Sepsis or
Asphyxia) (page F-35).
PROBLEM
•
The baby has a non-specific sign, such as:
-
lethargy;
-
drowsiness;
-
reduced activity;
-
floppiness;
-
irritability;
-
jitteriness;
-
“looks ill.”
FINDINGS
•
Review the findings from the general history (page F-7) and examination
(Table F-2, page F-11), and use this information to determine the
probable diagnosis.
•
Ask the mother if she received opiate drugs for pain relief during labour
and birth.
•
Measure blood glucose (page P-13). If the blood glucose is less than
45 mg/dl (2.6 mmol/l), treat for low blood glucose (page F-91).
GENERAL MANAGEMENT
•
Allow the baby to breastfeed (page C-11). If the baby cannot be
breastfed, give expressed breast milk using an alternative feeding

F-88
Lethargy and other non-specific signs
method (page C-14).
•
Assess the baby’s muscle tone and activity at least once daily.
•
If the baby is floppy or lethargic, handle and move the baby gently to
prevent injury when the baby’s muscle tone is low. Support the baby’s
entire body, especially the head.
•
Use Table F-19 (page F-89) to determine the probable diagnosis.
•
If a specific problem still is not found:
-
Assess the baby for additional signs every two hours for the next six
hours;
-
Ensure that the baby is fed and kept warm;
-
If a specific problem is noted during the observation period,
follow instructions in the appropriate chapter;
-
If the baby seems well at the end of the observation period,
discharge the baby (page C-67), and tell the mother to bring the
baby back if a problem is suspected.

F-89
Lethargy and other non-specific signs
DIFFERENTIAL DIAGNOSIS
TABLE F-19
Differential diagnosis of non-specific signs
Findings
a
Probable Diagnosis
History
Examination
• Opiate drug given to mother
during labour or birth
• Time of onset at birth
• Lethargy
• Respiratory rate less
than 30 breaths per
minute
Drug-induced
lethargy, below
• Complicated or difficult labour or
birth (fetal distress)
• Failure of baby to spontaneously
breathe at birth
• Resuscitation at birth
• Maternal uterine infection or fever
any time from the onset of labour
to three days after birth, or rupture
of membranes for more than 18
hours before birth
• Baby looks ill
Suspected asphyxia
or sepsis, page
F-35
a
The diagnosis cannot be made if a finding listed in bold is absent. The presence of a
finding listed in bold, however, does not guarantee the diagnosis. Findings in plain text are
supportive findings; their presence helps to confirm the diagnosis, but their absence cannot
be used to rule out the diagnosis.
SPECIFIC MANAGEMENT
DRUG-INDUCED LETHARGY
•
Provide general care.
•
If the baby’s respiratory rate is less than 30 breaths per minute, give
oxygen (page C-25) at a moderate flow rate.
•
If the baby is not breathing at all, is gasping, or has a respiratory
rate less than 20 breaths per minute, resuscitate the baby using a bag
and mask (page P-1).
•
If the baby is still lethargic after six hours, suspect sepsis or asphyxia
(page F-35).

F-90
Lethargy and other non-specific signs

LOW BLOOD GLUCOSE
F-91
PROBLEM
•
The baby’s blood glucose is less than 45 mg/dl (2.6 mmol/l).
MANAGEMENT
BLOOD GLUCOSE LESS THAN 25 MG/DL (1.1 MMOL/L)
•
Establish an IV line (page P-21) if one is not already in place. Give a
bolus of 2 ml/kg body weight of 10% glucose IV slowly over five
minutes.
•
If an IV line cannot be established quickly, give 2 ml/kg body weight
of 10% glucose by gastric tube (page P-33).
•
Infuse 10% glucose at the daily maintenance volume according to the
baby’s age (Table C-4, page C-22).
•
Measure blood glucose 30 minutes after the bolus of glucose and then
every three hours:
-
If the blood glucose is less than 25 mg/dl, repeat the bolus of
glucose (above) and continue the infusion;
-
If the blood glucose is less than 45 mg/dl but is at least 25 mg/dl
at any measurement, continue the infusion and repeat the blood
glucose measurement every three hours until the blood glucose is
45 mg/dl or more on two consecutive measurements;
-
Once the blood glucose is 45 mg/dl or more for two consecutive
measurements, follow instructions for frequency of blood glucose
measurements after blood glucose returns to normal (page F-92).
•
Allow the baby to begin breastfeeding (page C-11). If the baby cannot
be breastfed, give expressed breast milk using an alternative feeding
method (page C-14).
•
As the baby’s ability to feed improves, slowly decrease (over a three-day
period) the volume of IV glucose while increasing the volume of oral
feeds. Do not discontinue the glucose infusion abruptly.

F-92
Low blood glucose
BLOOD GLUCOSE LESS THAN 45 MG/DL BUT AT LEAST 25 MG/DL
•
Allow the baby to begin breastfeeding (page C-11). If the baby cannot
be breastfed, give expressed breast milk using an alternative feeding
method (page C-14).
•
Measure blood glucose in three hours or before the next feed:
-
If the blood glucose is less than 25 mg/dl, treat as described on
page F-91;
-
If the blood glucose is still less than 45 mg/dl but at least 25 mg/dl,
increase the frequency of breastfeeding or increase the volume of
expressed breast milk given;
-
Once the blood glucose is 45 mg/dl or more on two consecutive
measurements, follow instructions for frequency of blood glucose
measurements after blood glucose returns to normal (below).
FREQUENCY OF BLOOD GLUCOSE MEASUREMENTS AFTER
BLOOD GLUCOSE RETURNS TO NORMAL
•
If the baby is receiving IV fluid for any reason, continue blood glucose
measurements every 12 hours for as long as the baby requires IV fluid. If
the blood glucose is less than 45 mg/dl, treat as described above.
•
If the baby no longer requires or is not receiving IV fluid, measure
blood glucose every 12 hours for 24 hours (two more measurements):
-
If the blood glucose is less than 45 mg/dl, treat as described above;
-
If the blood glucose remains normal, discontinue measurements.

FEEDING DIFFICULTY
F-93
Feeding difficulty is common in babies during the first days of life. The
difficulty is associated with incorrect breastfeeding technique, small size, or
illness. This chapter covers feeding difficulty in the absence of other signs of
illness. If the baby has other problems, such as breathing difficulty or
abnormal body temperature, in addition to feeding difficulty, see the
chapter Multiple Findings (Most Often Sepsis or Asphyxia) (page F-35). If
the feeding problem consists primarily of vomiting, see the chapter
Vomiting and/or Abdominal Distension (page F-99).
Small babies often have difficulty feeding; as they grow, feeding improves. If
the baby weighed less than 2.5 kg at birth or was born before 37 weeks
gestation, continue with this chapter to evaluate and treat for a specific
feeding problem(s). After addressing the problem, see page F-24 for general
principles of feeding a small baby.
PROBLEMS
•
The baby fed well at birth but now is feeding poorly or has stopped
feeding.
•
The baby has not fed well since birth.
•
The baby is not gaining weight (proven or suspected).
•
The mother has not been able to breastfeed successfully.
•
The baby is having difficulty feeding and is small or a twin.
FINDINGS
•
Review the findings from the general history (page F-7) and examination
(Table F-2, page F-11), and obtain the following additional information
to determine the probable diagnosis.
•
Ask the mother:
-
How do you feed the baby?
-
How much did the baby weigh at birth and any time afterwards?
•
Ask the mother to put the baby to her breast. Observe her breastfeeding
for about five minutes, assessing for correct positioning and attachment
(page C-12). If the baby is not ready to feed, continue with general
management (below), and observe the mother’s technique the next time
the baby is ready to feed.

F-94
Feeding difficulty
GENERAL MANAGEMENT
•
If the baby has retained feeds without coughing, choking, or
regurgitating since the first feeding after birth, continue with
differential diagnosis (Table F-20, below).
•
If the baby has been coughing, choking, or regurgitating since the
first attempt to feed, try to insert a gastric tube (page P-33):
-
If the gastric tube does not pass or the tip of the tube returns and
the baby is choking and vomiting immediately after swallowing,
the baby likely has esophageal atresia or tracheo-esophageal fistula,
and urgent surgery is necessary. Organize transfer (page C-63), and
urgently refer the baby to a tertiary hospital or specialized centre for
surgery, if possible;
-
If the gastric tube passes, confirm proper placement of the tube in
the stomach (page P-35), aspirate the stomach contents, and
continue with Table F-20 to determine the cause of the feeding
problem.
DIFFERENTIAL DIAGNOSIS
TABLE F-20
Differential diagnosis of feeding difficulty
Findings
a
Probable Diagnosis
History
Examination
• Poor or no feeding after
having fed well
• Time of onset day 1 or
later
• Maternal uterine infection
or fever any time from the
onset of labour to three
days after birth, or rupture
of membranes for more
than 18 hours before birth
• Baby looks ill
• Vomiting
• Abdominal distension
• Breathing difficulty
• Abnormal body
temperature
• Irritability or lethargy
• Convulsions or
unconsciousness
Suspected sepsis, page
F-38

F-95
Feeding difficulty
TABLE F-20 Cont.
Differential diagnosis of feeding difficulty
Findings
a
Probable Diagnosis
History
Examination
• Twin or small baby (less
than 2.5 kg at birth or
born before 37 weeks
gestation)
• Baby does not wake for
feeding, feeds slowly, and
tires quickly
• Time of onset at birth
• Breastfeeding technique
correct, but baby is not yet
ready to breastfeed
Small baby or twin,
page F-96
• Mother has not been able
to breastfeed successfully
(e.g. baby cannot latch on
to breast; baby roots
around hungrily but does
not get any milk)
• Mother’s nipples are sore
• Time of onset day 1 or
later
• Baby looks otherwise well
• Baby not well positioned
and attached during
breastfeeding
Incorrect positioning
and attachment, page
F-96
• Baby gaining less than
15 g/kg body weight per
day over three days
• Baby looks otherwise well
Inadequate weight
gain, page F-96
• Baby regurgitates some
of feeding or chokes and
coughs during feedings
• Time of onset day 1 or
later
• Split in lip or opening in
palate between mouth and
nasal passages
Cleft lip or palate,
page F-151
• Baby has coughed,
choked, and regurgitated
feeds since first feeding
• Food is returned frothy
and undigested after
every feeding
• Time of onset at birth
• Gastric tube does not pass
or tip of tube returns
• Frothy secretions from
mouth even when baby is
not being fed
Suspected
gastrointestinal
malformation or
obstruction, page
F-105
a
The diagnosis cannot be made if a finding listed in bold is absent. The presence of a
finding listed in bold, however, does not guarantee the diagnosis. The diagnosis is
definitively confirmed if a finding listed in italics is present. Findings in plain text are
supportive findings; their presence helps to confirm the diagnosis, but their absence cannot
be used to rule out the diagnosis.

F-96
Feeding difficulty
MANAGEMENT OF SPECIFIC PROBLEMS
SMALL BABY OR TWIN
•
If the baby is small, see page F-24 for general principles of feeding a
small baby.
•
If the baby is a twin, see page C-14 for information on feeding twins.
•
Once the baby is feeding well and there are no other problems requiring
hospitalization, discharge the baby (page C-67).
•
Follow up in two days to reassess feeding and weight gain.
INCORRECT POSITIONING AND ATTACHMENT
•
Note previously recorded weights, if available, and weigh the baby daily.
•
Help the mother improve her breastfeeding technique:
-
If the mother’s breastfeeding technique is correct, reassure the
mother, and continue to observe her technique during a three-day
period;
-
If the mother’s breastfeeding technique is incorrect, help the
mother to achieve the correct technique (page C-12);
-
If the baby has gained at least 15 g/kg body weight per day over
three days, reassure the mother that her milk supply is adequate and
explain appropriate feeding practices to her. If there are no other
problems requiring hospitalization, discharge the baby (page C-67);
-
If the baby has not gained at least 15 g/kg body weight per day
over three days, treat for inadequate weight gain (below).
INADEQUATE WEIGHT GAIN
Note that the management described below for inadequate weight gain
applies only to babies on full oral feeds via any method (breastfeeding or
receiving expressed breast milk using an alternative feeding method). If the
baby is receiving IV fluid and getting less than full (or no) oral feeds and
daily weight loss is more than 5%, increase the total volume of fluid by 10
ml/kg body weight for one day to compensate for inadequate fluid
administration.
•
Note previously recorded weights and weigh the baby daily.

F-97
Feeding difficulty
•
Confirm poor weight gain if the baby has gained less than 15 g/kg body
weight per day over the last three days.
•
Check for and correct or treat obvious causes of inadequate weight gain:
-
Determine if the baby is being fed frequently enough (i.e. eight times
in 24 hours), particularly at night. If the baby is being fed using an
alternative feeding method, ensure that the baby is receiving the
correct volume of feeds (Table C-4, page C-22);
-
Determine if the ambient temperature is optimal; if the ambient
temperature is too cold or too hot, the baby will utilize more
energy for temperature regulation and less for growth;
-
Look for signs of sepsis (e.g. poor feeding, vomiting, breathing
difficulty; Table F-9, page F-37);
-
Look for thrush in the baby’s mouth (Table F-25, page F-128).
•
If poor weight gain is confirmed and there are no obvious causes or
if an obvious cause was found and treated (e.g. the temperature has
been corrected for three days or thrush or sepsis has been treated for
seven days) and weight gain is still inadequate, work with the mother
for three days to increase the quantity of breast milk that the baby
receives.
•
If the average measured weight gain after three days is at least
15 g/kg body weight per day:
-
Explain appropriate feeding practices to the mother and what to
expect regarding her baby’s growth (page C-53);
-
If there are no other problems requiring hospitalization, discharge
the baby (page C-67);
-
Obtain follow-up weights weekly for one month to verify progress.
•
If the average measured weight gain after three days is less than
15 g/kg body weight per day despite the measures above:
-
Have the mother supplement breastfeeding by expressing breast milk
between feedings and giving this to the baby as a supplement, using
an alternative feeding method (page C-14), after the baby has
breastfed;
-
If the mother cannot express breast milk, give the baby 10 ml of
breast-milk substitute (page C-19) by cup/spoon (page C-16) after

F-98
Feeding difficulty
each time at the breast. Breast-milk substitute should not be used
unless it can be ensured that the substitute is:
-
available for the entire period needed (this might include some
time after discharge);
-
affordable for the health care facility as well as the family;
-
used safely;
-
prepared in a sterile manner according to instructions.
-
Continue supplementation with expressed breast milk or breast-milk
substitute until the baby’s weight gain is at least 15 g/kg body weight
per day for three consecutive days, and then decrease the
supplementary feedings to 5 ml per feed for two days:
-
If weight gain continues to be adequate (15 g/kg body weight
per day or more) for two more days, discontinue supplements
completely;
-
If weight gain becomes inadequate again (less than 15 g/kg
body weight per day), begin supplementing again with 10 ml of
expressed breast milk or breast-milk substitute per feed, and
repeat the process.
•
Monitor the baby’s weight gain for three more days. If weight gain
continues at the same or better rate, the baby is feeding well, and there
are no other problems requiring hospitalization, discharge the baby (page
C-67).
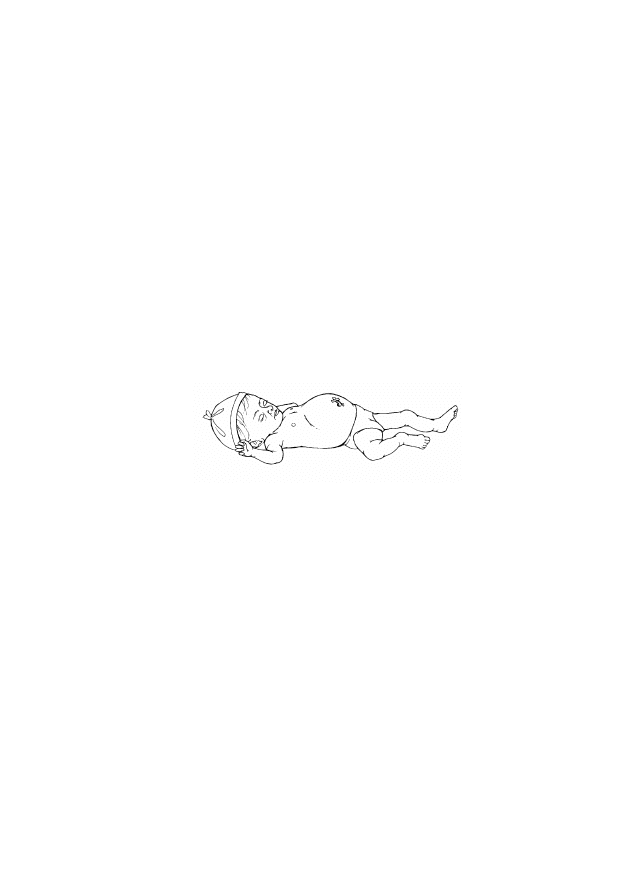
VOMITING AND/OR ABDOMINAL DISTENSION
F-99
Spitting or regurgitation of small quantities of milk after a feed is common in
a newborn baby, is usually transitory, and has no effect on growth.
PROBLEMS
•
A baby is vomiting:
-
forcefully;
-
regardless of method of feeding;
-
entire feedings after every feed;
-
bile or blood.
•
A baby has abdominal distension (Fig. F-6).
FIGURE F-6
Abdominal distension
FINDINGS
•
Review the findings from the general history (page F-7) and examination
(Table F-2, page F-11), and obtain the following additional information
to determine the probable diagnosis.
•
Ask the mother (or whoever brought the baby in):
-
Did the vomiting begin at the first feed or did it start later?
-
How long after a feeding does the baby vomit?
-
What does the vomitus look like? Is it frothy, or does it contain bile
or blood?
-
Has the baby passed meconium? Was meconium in the amniotic
fluid?
-
Are your nipples cracked or sore?

F-100
Vomiting and/or abdominal distension
•
Look for:
-
abdominal tenderness (baby cries when abdomen is gently pressed);
-
imperforate anus (if the baby has an imperforate anus, see page
F-153 for management).
GENERAL MANAGEMENT
•
Insert a gastric tube via the nasal route (page P-33):
-
If the gastric tube does not pass or the tip of the tube returns and
the baby is choking and vomiting immediately after swallowing,
the baby likely has esophageal atresia or tracheo-esophageal fistula,
and urgent surgery is necessary. Organize transfer (page C-63), and
urgently refer the baby to a tertiary hospital or specialized centre for
surgery, if possible;
-
If the gastric tube passes, confirm that the tube is properly
positioned in the stomach (page P-35), and aspirate the stomach
contents.
•
If the baby appears to be seriously ill (e.g. floppy and lethargic) or
small (less than 2.5 kg at birth or born before 37 weeks gestation),
establish an IV line (page P-21), and give IV fluid at maintenance
volume according to the baby’s age (Table C-4, page C-22).
•
Use Table F-21 (page F-101) to determine the probable cause of
vomiting and/or abdominal distension. If the cause of vomiting cannot
be determined, see page F-103.

F-101
Vomiting and/or abdominal distension
DIFFERENTIAL DIAGNOSIS
TABLE F-21
Differential diagnosis of vomiting and/or abdominal
distension
Findings
a
Probable
Diagnosis
History
Examination
Investigations or
Other Known
Diagnoses
• Time of onset day 1
or later
• Maternal uterine
infection or fever
any time from the
onset of labour to
three days after
birth, or rupture of
membranes for
more than 18 hours
before birth
• Poor or no feeding
after having fed
well
• Baby looks ill
• Vomiting
• Abdominal distension
• Breathing difficulty
• Abnormal body
temperature
• Irritability or lethargy
• Convulsions or
unconsciousness
Suspected
sepsis, page
F-38
• Poor or no feeding
• Asphyxia
• Time of onset day
2 to 10
• Floppiness or
lethargy
• Baby looks ill
• Abdominal
distension, tenderness
• Small baby (less than
2.5 kg at birth or born
before 37 weeks
gestation)
• Blood or bile in
vomitus
• Blood or mucus in
stool
• Diarrhoea
• Pallor
• Progressive signs of
ill health (temperature
instability and/or
apnoea)
• Sepsis
• Increasing
volume of
gastric aspirates
Necrotizing
enterocolitis,
page F-104

F-102
Vomiting and/or abdominal distension
TABLE F-21 Cont.
Differential diagnosis of vomiting and/or abdominal
distension
Findings
a
Probable
Diagnosis
History
Examination
Investigations or
Other Known
Diagnoses
• If mother had a
serologic test for
syphilis during
pregnancy, it was
positive
• Mother not treated
or treated
inadequately for
syphilis
• Time of onset at
birth
• Generalized
oedema (body
swelling)
• Abdominal
distension (from
enlarged liver
and/or spleen or
from fluid in
abdomen)
• Blistering skin rash
on palms and soles
• Profuse nasal
discharge
(“snuffles”)
Congenital
syphilis, page
F-46
• Has not passed
meconium within
24 hours after birth
• Baby coughing and
choking at every
feed since birth
• Time of onset day
1 to 2
• Gastric tube does
not pass or tip of
tube returns
• Increasing
abdominal
distension
• Bile in vomitus
• Dark or bloody
stools
Suspected
gastrointestinal
malformation or
obstruction,
page F-105
• Mother
breastfeeding with
cracked nipples
(time of onset day 2
or later)
• Maternal bleeding
during labour or
from episiotomy
(time of onset day
1 or 2)
• Blood in vomitus
• Dark stools
• Baby looks
otherwise well
Swallowed
maternal blood,
page F-105

F-103
Vomiting and/or abdominal distension
TABLE F-21 Cont.
Differential diagnosis of vomiting and/or abdominal
distension
Findings
a
Probable
Diagnosis
History
Examination
Investigations or
Other Known
Diagnoses
• Baby has
regurgitated feeds
since first feeding
• Time of onset day 1
• Meconium in
amniotic fluid
• Gastric tube passes
• Baby looks otherwise
well
Gastric
irritation,
page F-106
a
The diagnosis cannot be made if a finding listed in bold is absent. The presence of a
finding listed in bold, however, does not guarantee the diagnosis. The diagnosis is
definitively confirmed if a finding listed in italics is present. Findings in plain text are
supportive findings; their presence helps to confirm the diagnosis, but their absence cannot
be used to rule out the diagnosis.
CAUSE OF VOMITING NOT DETERMINED
•
Establish an IV line (page P-21), and give only IV fluid at maintenance
volume according to the baby’s age (Table C-4, page C-22) for the first
12 hours.
•
Observe the baby for 12 hours.
•
If the baby has no other signs besides vomiting after the 12-hour
period:
-
Give expressed breast milk by gastric tube (page C-18) for 24 hours;
-
If these feeds are retained, allow the baby to begin breastfeeding
(page C-11), or give expressed breast milk using an alternative
feeding method (page C-14);
-
Remove the gastric tube after two successful feeds.
•
If vomiting continues or any other signs are present (e.g. blood in
vomitus, forceful vomiting, abdominal distension), try again to determine
the cause of vomiting (Table F-21, page F-101).
•
If the cause of vomiting still cannot be determined, treat for sepsis
(page F-41).

F-104
Vomiting and/or abdominal distension
MANAGEMENT OF SPECIFIC CONDITIONS
NECROTIZING ENTEROCOLITIS
•
Establish an IV line (page P-21) if one is not already in place, and give
only IV fluid at maintenance volume according to the baby’s age (Table
C-4, page C-22) for the first five days.
•
Treat for sepsis (page F-41), and ensure that the baby is not fed for the
first five days.
•
Insert a gastric tube (page P-33) and ensure free drainage.
•
If an abdominal mass becomes palpable, it is likely that the baby has a
bowel perforation or intestinal obstruction from an abscess. Organize
transfer (page C-63), and urgently refer to a tertiary hospital or
specialized centre for surgery, if possible.
•
Measure haemoglobin daily until bleeding stops, and then measure once
more after 24 hours. If the haemoglobin is less than 8 g/dl (haematocrit
less than 24%), give a blood transfusion (page P-31).
•
Check the baby’s heart and respiratory rates every three hours for three
days after the last blood transfusion.
•
Observe the baby for five days. If, after the five-day period, abdominal
distension has decreased, there is minimal gastric aspirate, and the
baby is passing non-bloody stool:
-
Give the baby expressed breast milk by gastric tube (page C-18);
-
Begin feeding the volume of milk required on day 1, regardless of
the baby’s age (Table C-4, page C-22);
-
Once adequate volumes of milk are tolerated for 48 hours without
vomiting, allow the baby to begin breastfeeding (page C-11). If the
baby cannot be breastfed, give expressed breast milk using an
alternative feeding method (page C-14).
•
Observe the baby for 24 hours after discontinuing antibiotics:
-
If the baby’s heart and respiratory rates are stable, the baby has not
required a transfusion for at least 48 hours and is feeding well, and
there are no other problems requiring hospitalization, discharge the
baby (page C-67);

F-105
Vomiting and/or abdominal distension
-
Measure haemoglobin weekly for one month. If the haemoglobin is
less than 8 g/dl (haematocrit less than 24%), give a blood
transfusion (page P-31);
-
To prevent iron deficiency anaemia, give small babies an oral iron
preparation to give elemental iron 2 mg/kg body weight once daily
from two months of age up to 23 months of age.
SUSPECTED GASTROINTESTINAL MALFORMATION OR
OBSTRUCTION
•
Establish an IV line (page P-21), and give only IV fluid at maintenance
volume according to the baby’s age (Table C-4, page C-22).
•
If a gastric tube was inserted, keep it in place and ensure free drainage
(page P-36).
•
Organize transfer (page C-63), and urgently refer the baby to a tertiary
hospital or specialized centre for surgery, if possible.
SWALLOWED MATERNAL BLOOD
•
If vomiting is caused by blood swallowed during breastfeeding
(cracked nipples):
-
Observe the mother while she breastfeeds. Assess her technique
(page C-12) and suggest changes as necessary;
-
If breastfeeding is painful for the mother, encourage the mother to:
-
Express some breast milk (page C-15) to stimulate the milk let-
down reflex before putting the baby to her breast;
-
Begin to nurse on the side that is less sore until the let-down
occurs, then switch the baby to the affected breast;
-
Express a little milk or colostrum onto her nipples after
breastfeeding;
-
Expose her nipples to the air to prevent maceration and promote
healing;
-
If cracking is severe on only one nipple, have the mother
breastfeed on the other side exclusively for two or more days
while the affected nipple heals. During this time she can express

F-106
Vomiting and/or abdominal distension
the breast milk of the affected breast and feed this to the baby
using an alternative feeding method (page C-14);
-
If the baby is feeding well and there are no other problems requiring
hospitalization, discharge the baby (page C-67).
•
If vomiting is caused by blood swallowed at the time of birth:
-
Attach a syringe to the gastric tube and aspirate the stomach
contents;
-
Allow the baby to begin breastfeeding (page C-11). If the baby
cannot be breastfed, give expressed breast milk using an alternative
feeding method (page C-14);
-
Remove the gastric tube after two successful feeds;
-
If the baby is feeding well and there are no other problems requiring
hospitalization, discharge the baby (page C-67).
GASTRIC IRRITATION
•
Allow the baby to begin breastfeeding (page C-11). If the baby cannot
be breastfed, give expressed breast milk using an alternative feeding
method (page C-14).
•
If the baby has had two successful breastfeeds, or is feeding well using
an alternative feeding method, and there are no other problems requiring
hospitalization, discharge the baby (page C-67).
•
If the baby continues to regurgitate all feeds after 24 hours, the
problem is probably due to an abnormality of the gastrointestinal tract:
-
Establish an IV line (page P-21), and give IV fluid at maintenance
volume according to the baby’s age (Table C-4, page C-22);
-
Organize transfer (page C-63), and urgently refer the baby to a
tertiary hospital or specialized centre for further evaluation, if
possible.

DIARRHOEA
F-107
There are non-infectious causes of diarrhoea, but sepsis is the most common
cause during the newborn period.
Observe strict infection prevention practices (page C-37) at all
times when caring for any baby with diarrhoea to prevent
spreading one baby’s infection to other babies in the newborn
special care unit. Wear gloves when handling soiled napkins
and other items used to care for the baby, and carefully wash
hands (page C-38) after handling a baby with diarrhoea.
PROBLEMS
•
The baby is passing stool with increased frequency.
•
The baby’s stool is watery or green, or contains mucus or blood.
FINDINGS
•
Review the findings from the general history (page F-7) and examination
(Table F-2, page F-11), and obtain the following additional information
to determine the probable diagnosis (Table F-22, page F-109).
•
Ask the mother (or whoever brought the baby in):
-
Is the baby being fed any foods or fluid other than breast milk?
-
What does the baby’s stool look like? Is it watery or green, or does it
contain mucus or blood?
-
How frequently has the baby been passing stool?
•
Look for:
-
signs of dehydration (e.g. sunken eyes or fontanelle, loss of skin
elasticity, or dry tongue and mucous membranes);
-
signs of sepsis (e.g. poor feeding, vomiting, breathing difficulty;
Table F-9, page F-37).

F-108
Diarrhoea
GENERAL MANAGEMENT
•
Allow the baby to begin breastfeeding (page C-11). If the baby cannot
be breastfed, give expressed breast milk using an alternative feeding
method (page C-14).
•
If the mother is giving the baby any food or fluid other than breast
milk, advise her to stop giving them.
•
Give oral rehydration solution (ORS) for every diarrhoeal stool passed:
-
If the baby is able to feed, have the mother breastfeed more often,
or give ORS 20 ml/kg body weight between breastfeeds using a cup,
cup and spoon, or other device (page C-16);
-
If the baby is not feeding well, insert a gastric tube (page P-33),
and give ORS 20 ml/kg body weight by tube;
-
If prepackaged ORS is not available, make ORS as follows:
-
Use recently boiled and cooled water;
-
To 1 litre of water, add:
-
sodium chloride 3.5 g;
-
trisodium citrate 2.9 g (or sodium bicarbonate 2.5 g);
-
potassium chloride 1.5 g;
-
glucose (anhydrous) 20 g (or sucrose [common sugar] 40 g).
•
If the baby has signs of dehydration or sepsis, establish an IV line
(page P-21), and give IV fluid while allowing the baby to continue to
breastfeed:
-
If there are signs of dehydration, increase the volume of fluid by
10% of the baby’s body weight on the first day that the dehydration
is noted;
-
If the baby receives a sufficient volume of fluid to meet rehydration
and maintenance requirements and to replace ongoing losses, the use
of ORS is not necessary;
-
Assess the baby again in 12 hours:
-
If the baby is still having diarrhoeal stools, continue the
increased volume of IV fluid for an additional 24 hours;

F-109
Diarrhoea
-
If the baby has not had a diarrhoeal stool in the last 12
hours, adjust fluid to maintenance volume according to the
baby's age (Table C-4, page C-22).
•
Determine the probable diagnosis (Table F-22).
DIFFERENTIAL DIAGNOSIS
TABLE F-22
Differential diagnosis of diarrhoea
Findings
a
Probable
Diagnosis
History
Examination
Investigations or
Other Known
Diagnoses
• Maternal uterine
infection or fever
any time from the
onset of labour to
three days after birth,
or rupture of
membranes for more
than 18 hours before
birth
• Time of onset day 1
to 3
• Sepsis
Diarrhoea due
to sepsis
Treat for sepsis
(page F-41).
• Baby receiving
food/fluid other
than breast milk
• Time of onset after
other food/fluid
started
• Baby feeding well
Non-infectious
diarrhoea
Provide general
management
(page F-108).
• Baby receiving
food/fluid other
than breast milk
• Time of onset after
other food/fluid
started
• Poor or no feeding
• Baby looks ill
• Floppiness
• Lethargy
Infectious
diarrhoea
Treat for sepsis
(page F-41).
• Baby receiving
phototherapy
• Time of onset after
phototherapy started
• Loose yellow stool
Loose stool
due to
phototherapy
No treatment is
necessary.

F-110
Diarrhoea
TABLE F-22 Cont.
Differential diagnosis of diarrhoea
Findings
a
Probable
Diagnosis
History
Examination
Investigations or
Other Known
Diagnoses
• Outbreak of
diarrhoea among
other babies in
nursery
• Time of onset day
2 or later
• Watery, greenish
stools that continue
even if the baby is
not breastfed
• Blood in stool
• Vomiting
• Sepsis
• Dehydration
Nosocomial
diarrhoea of
infectious
origin, page
F-111
• Poor or no feeding
• Asphyxia
• Time of onset day
2 to 10
• Floppiness or
lethargy
• Baby looks ill
• Abdominal
distension,
tenderness
• Small baby (less
than 2.5 kg at birth
or born before 37
weeks gestation)
• Blood or bile in
vomitus
• Blood or mucus in
stool
• Pallor
• Progressive signs of
ill health
(temperature
instability and/or
apnoea)
• Sepsis
• Increasing
volume of
gastric aspirates
Necrotizing
enterocolitis,
page F-104
a
The diagnosis cannot be made if a finding listed in bold is absent. The presence of a
finding listed in bold, however, does not guarantee the diagnosis. Findings in plain text are
supportive findings; their presence helps to confirm the diagnosis, but their absence cannot
be used to rule out the diagnosis.

F-111
Diarrhoea
MANAGEMENT OF NOSOCOMIAL DIARRHOEA
•
If the diarrhoea developed while the baby was hospitalized and more
than one baby with diarrhoea from the same ward is seen within a
two-day period, suspect a nosocomial infection (page C-45).
•
Isolate the baby from other babies, if possible.
•
Treat for sepsis (page F-41).
•
Continue to provide general management for diarrhoea (page F-108).

F-112
Diarrhoea

BLEEDING AND/OR PALLOR
F-113
This chapter covers the baby who is bleeding or is found to be pale, either at
birth or any time thereafter, with or without signs of internal or external
bleeding. Pallor can be a sign of anaemia, shock, or both.
PROBLEMS
•
The baby is currently bleeding.
•
The baby has a history of bleeding.
•
The baby appears pale at birth or sometime thereafter.
FINDINGS
•
Review the findings from the general history (page F-7) and examination
(Table F-2, page F-11), and obtain the following additional information
to determine the probable diagnosis.
•
Ask the mother (or whoever brought the baby in):
-
Is there blood in the baby’s stool or urine?
-
Did you have a previous baby with haemolytic jaundice, glucose-6-
phosphate dehydrogenase (G6PD) deficiency, or Rhesus (Rh) factor
or ABO blood group incompatibility?
-
Was there any abnormal bleeding during pregnancy or labour/birth?
-
Was the baby’s umbilical cord clamped/tied correctly at birth?
-
Is the baby vomiting? If so, is there blood or bile in the vomitus?
-
Is the baby a twin? If so, is the other twin very pink or red (i.e. twin-
to-twin transfusion)?
-
Have multiple blood samples been taken from the baby?
•
Look for:
-
where the blood is coming from (e.g. umbilicus, male circumcision
site, or venepuncture site);
-
generalized oedema (body swelling);
-
abdominal tenderness (baby cries when abdomen is gently pressed);
-
jaundice.

F-114
Bleeding and/or pallor
GENERAL MANAGEMENT
BLEEDING
•
Provide immediate management for bleeding as described in Table F-1
(page F-6), if not already done.
•
If the baby is still bleeding, increase the rate of infusion of IV fluid to
infuse 20 ml/kg body weight of fluid over the first hour.
•
If there are signs of shock (e.g. pallor, cold to the touch, heart rate more
than 180 beats per minute, unconscious or nearly unconscious) or if signs
of shock develop while the baby is being assessed:
-
Infuse normal saline or Ringer’s lactate 10 ml/kg body weight over
10 minutes, and repeat once after 20 minutes if signs of shock
continue;
-
Give a blood transfusion (page P-31) immediately using type O,
Rh-negative blood.
•
Take a blood sample (page P-9), and measure haemoglobin. If the
haemoglobin is less than 10 g/dl (haematocrit less than 30%), give a
blood transfusion (page P-31).
•
Determine the probable diagnosis (Table F-23, page F-115).
PALLOR WITHOUT A HISTORY OF BLEEDING
•
If there are signs of shock (e.g. cold to the touch, heart rate more than
180 beats per minute, unconscious or nearly unconscious) or if signs of
shock develop while the baby is being assessed, establish an IV line
(page P-21), if one is not already in place, and infuse normal saline or
Ringer’s lactate 10 ml/kg body weight over 10 minutes, and repeat once
after 20 minutes if signs of shock continue.
•
Measure blood glucose. If the blood glucose is less than 45 mg/dl
(2.6 mmol/l), treat for low blood glucose (page F-91).
•
Take a blood sample (page P-9), and measure haemoglobin. If the
haemoglobin is less than 10 g/dl (haematocrit less than 30%), give a
blood transfusion (page P-31).
•
Determine the probable diagnosis (Table F-23, page F-115).

F-115
Bleeding and/or pallor
DIFFERENTIAL DIAGNOSIS
TABLE F-23
Differential diagnosis of bleeding and/or pallor
Findings
a
Probable
Diagnosis
History
Examination
Investigations or
Other Known
Diagnoses
• Time of onset day
2 to 3
• Spontaneous
bleeding from one
or more sources,
such as:
- Blood in stool or
urine
- Bleeding from
umbilicus or from
male circumcision
or venepuncture
sites
- Spontaneous
appearance of
multiple bruises
after birth, but no
evidence of
trauma
• Pallor
Haemorrhagic
disease of the
newborn baby,
page F-119
• Time of onset day
4 or later
• Findings of
haemorrhagic
disease of the
newborn baby
(above) found
on day 4 or
later
Coagulopathy,
page F-119

F-116
Bleeding and/or pallor
TABLE F-23 Cont.
Differential diagnosis of bleeding and/or pallor
Findings
a
Probable
Diagnosis
History
Examination
Investigations or
Other Known
Diagnoses
• Jaundice
developing in less
than 36 hours
• Pallor
• ABO blood group
or Rh factor
incompatibility or
G6PD deficiency
in previous baby
• Family history of
G6PD deficiency,
jaundice, anaemia,
enlarged liver, or
removal of spleen
• Serious jaundice
• Pallor
• Generalized
oedema (body
swelling)
• Male baby (a
supportive finding
for G6PD
deficiency only)
• Haemoglobin
less than 13 g/dl
(haematocrit less
than 40%)
• Positive Coombs
test
• ABO blood
group or Rh
factor
incompatibility
between mother
and baby
• Positive G6PD
screen
Haemolysis
Provide general
management for
pallor (page
F-114) and treat
for haemolytic
jaundice (page
F-81).
• Maternal history
of vaginal
bleeding during
later pregnancy
and/or labour
OR
• Problem at birth
or during
pregnancy (e.g.
umbilical cord not
clamped
immediately after
birth; twin-to-twin
transfusion)
• Pallor
• Haemoglobin
less than 13 g/dl
(haematocrit less
than 40%)
Possible blood
loss from
obstetric causes
Provide general
management for
pallor (page
F-114).

F-117
Bleeding and/or pallor
TABLE F-23 Cont.
Differential diagnosis of bleeding and/or pallor
Findings
a
Probable
Diagnosis
History
Examination
Investigations or
Other Known
Diagnoses
• Poor or no
feeding
• Asphyxia
• Time of onset day
2 to 10
• Floppiness or
lethargy
• Baby looks ill
• Abdominal
distension,
tenderness
• Small baby (less
than 2.5 kg at birth
or born before 37
weeks gestation)
• Blood or bile in
vomitus
• Blood or mucus in
stool
• Diarrhoea
• Pallor
• Progressive signs of
ill health
(temperature
instability and/or
apnoea)
• Sepsis
• Increasing
volume of
gastric aspirates
Necrotizing
enterocolitis,
page F-104
• Has not passed
meconium within
24 hours after
birth, or if stool
has been passed, it
is dark or bloody
• Time of onset day
1 to 4
• Increasing
abdominal
distension
• Bile in vomitus
Suspected
gastrointestinal
malformation or
obstruction,
page F-105

F-118
Bleeding and/or pallor
TABLE F-23 Cont.
Differential diagnosis of bleeding and/or pallor
Findings
a
Probable
Diagnosis
History
Examination
Investigations or
Other Known
Diagnoses
• Mother
breastfeeding with
cracked nipples
(time of onset day
2 or later)
• Maternal bleeding
during labour or
from episiotomy
(time of onset day
1 to 2)
• Blood in vomitus
• Dark stools
• Baby looks
otherwise well
Swallowed
maternal blood,
page F-105
• Multiple blood
samples taken
• Baby is sick or
small (less than
2.5 kg at birth or
born before 37
weeks gestation)
• Pallor
• Haemoglobin
less than
10 g/dl
(haematocrit
less than 30%)
Anaemia of a
sick or small
baby, page
F-119
• Pallor
• Haemoglobin
less than
13 g/dl
(haematocrit
less than 40%)
Pallor of
unknown
origin, page
F-119
a
The diagnosis cannot be made if a finding listed in bold is absent. The presence of a
finding listed in bold, however, does not guarantee the diagnosis. The diagnosis is
definitively confirmed if a finding listed in italics is present. Findings in plain text are
supportive findings; their presence helps to confirm the diagnosis, but their absence cannot
be used to rule out the diagnosis.

F-119
Bleeding and/or pallor
MANAGEMENT OF SPECIFIC CONDITIONS
HAEMORRHAGIC DISEASE OF THE NEWBORN BABY
•
If bleeding does not stop within three hours, treat for sepsis (page F-41).
•
Take a blood sample (page P-9) and measure haemoglobin once daily. If
the haemoglobin is less than 10 g/dl (haematocrit less than 30%), give a
blood transfusion (page P-31).
•
Provide ongoing management (page F-120).
COAGULOPATHY
•
Treat for sepsis (page F-41).
•
Take a blood sample (page P-9) and measure haemoglobin once daily. If
the haemoglobin is less than 10 g/dl (haematocrit less than 30%), give a
blood transfusion (page P-31).
•
Provide ongoing management (page F-120).
POSSIBLE BLOOD LOSS FROM OBSTETRIC CAUSES
•
Take a blood sample (page P-9) and measure haemoglobin once daily:
-
If the haemoglobin is less than 10 g/dl (haematocrit less than 30%),
give a blood transfusion (page P-31);
-
If the haemoglobin is between 10 and 13 g/dl (haematocrit
between 30 and 40%) and there are signs of shock (e.g. pallor,
cold to the touch, heart rate more than 180 beats per minute,
unconscious or nearly unconscious), give a blood transfusion (page
P-31).
•
Provide ongoing management (page F-120).
ANAEMIA OF A SICK OR SMALL BABY OR PALLOR OF
UNKNOWN ORIGIN
•
Once the baby’s condition is stable, measure haemoglobin weekly for as
long as the baby remains in the hospital. If the haemoglobin is less than
8 g/dl (haematocrit less than 24%), give a blood transfusion (page P-31).
•
Provide ongoing management (below).

F-120
Bleeding and/or pallor
ONGOING MANAGEMENT OF BABIES WITH PALLOR OR BLEEDING
•
Discontinue IV fluid unless an IV line is needed for another reason. If IV
fluid is still required, continue IV fluid and ensure that the total fluid
volume the first day (from both oral and IV sources) equals daily
maintenance volume according to the baby’s age plus an additional 10%
of the total fluid volume required for the day (Table C-4, page C-22).
Use the maintenance fluid volume for subsequent days.
•
Measure haemoglobin daily until the haemoglobin is stable for three days
and at a level not requiring transfusion, and then weekly for as long as
the baby is in the hospital.
•
Check the heart and respiratory rates every three hours until the baby’s
condition is stable.
•
If the baby’s heart and respiratory rates are stable, the baby has not required
a transfusion for at least 48 hours, is feeding well, and there are no other
problems requiring hospitalization, discharge the baby (page C-67).
•
To prevent iron deficiency anaemia, give small babies an oral iron
preparation to give elemental iron 2 mg/kg body weight once daily from
two months of age up to 23 months of age.
•
Follow up twice weekly for two weeks after discharge to monitor feeding
and growth.
•
Measure haemoglobin again in one month. If the haemoglobin is less
than 8 g/dl (haematocrit less than 24%), give a blood transfusion (page
P-31).
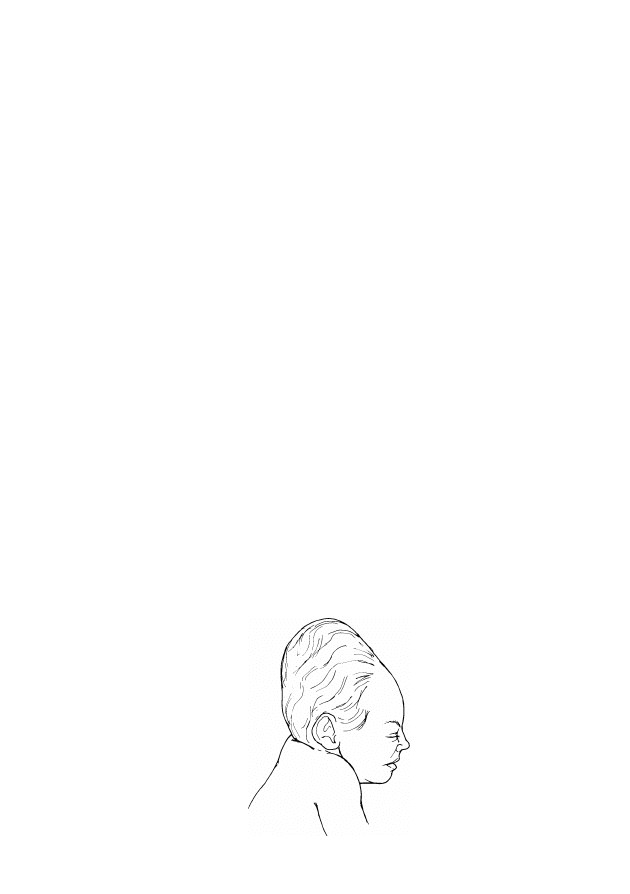
SWELLING ON SCALP
F-121
Most swellings on the baby’s scalp originating at birth are minor and resolve
spontaneously; however, subaponeurotic (subgaleal) bleeding can be life-
threatening and must be recognized and treated immediately.
PROBLEM
•
The baby has a swelling on the scalp at birth or soon thereafter.
FINDINGS
•
Review the findings from the general history (page F-7) and examination
(Table F-2, page F-11), looking especially for findings of pallor or
increased heart or respiratory or rates (consistently more than 160 beats
per minute or 60 breaths per minute, respectively).
•
Obtain the following additional information to determine the probable
diagnosis (Table F-24, page F-122).
•
Determine (feel):
-
the location and boundary of the scalp swelling;
-
if the swelling is fluctuant (feeling of free liquid) or if there is an
area within the swelling that feels spongy;
-
if the scalp is painful (baby cries when scalp is touched);
-
if there is moulding of the head (Fig. F-7) with over-riding of the
parietal bones.
FIGURE F-7
Moulding of the baby’s head

F-122
Swelling on scalp
DIFFERENTIAL DIAGNOSIS
TABLE F-24
Differential diagnosis of swelling on scalp
Findings
a
Probable Diagnosis
History
Examination
• Swelling apparent
at birth or within
two hours and
becoming more
evident during next
24 hours
• Birth by vacuum
extraction
• Asphyxia
• Swelling under entire scalp
• Spongy feel of scalp
• Baby cries when scalp is
touched
• Pallor, possibly increasing
• Heart rate more than 160 beats
per minute
• Respiratory rate consistently
more than 60 breaths per
minute
• Increasing head circumference
Subaponeurotic
(subgaleal)
haemorrhage, page
F-123
• Swelling apparent
at birth
• Swelling over presenting part
of head that is firm and not
fluctuant
• Moulding of head and over-
riding of parietal bones
• Baby looks otherwise well
Caput succedaneum,
page F-124
• Swelling apparent
within four hours
after birth
• Rounded swelling with
boundaries limited by suture
lines (Fig. F-8, page F-125)
• Fluctuance within swelling
• Baby looks otherwise well
Cephalohaematoma,
page F-124
• Swelling apparent
at birth
• Birth by vacuum
extraction
• Swelling where vacuum
extraction cup was applied
• Baby looks otherwise well
Chignon, page F-124
a
The diagnosis cannot be made if a finding listed in bold is absent. The presence of a
finding listed in bold, however, does not guarantee the diagnosis. Findings in plain text are
supportive findings; their presence helps to confirm the diagnosis, but their absence cannot
be used to rule out the diagnosis.

F-123
Swelling on scalp
MANAGEMENT
SUBAPONEUROTIC (SUBGALEAL) HAEMORRHAGE
Babies with subaponeurotic haemorrhage may have a range of
problems. Examine the baby closely for other signs, including
increasing head circumference, episodes of apnoea, or rapid
heart or respiratory rate.
•
Give vitamin K
1
(phytomenadione) 1 mg IM once (or IV if an IV line has
already been established), even if the baby received it at birth.
•
Take a blood sample (page P-9):
-
Measure haemoglobin now and again in 24 hours;
-
If the haemoglobin is less than 10 g/dl (haematocrit less than 30%)
give a blood transfusion (page P-31).
•
Observe the baby for pallor and check the heart and respiratory rates
every hour.
•
Measure the baby’s head circumference every six hours.
•
If the baby’s head circumference is increasing or there are signs of
shock (pallor, cold to the touch, heart rate more than 180 beats per
minute, unconscious or nearly unconscious), transfuse immediately with
type O, Rh-negative blood.
•
Ensure that the baby is fed:
-
Allow the baby to begin breastfeeding (page C-11);
-
If the baby cannot be breastfed, give expressed breast milk using
an alternative feeding method (page C-14);
-
If the baby cannot take enough milk by breastfeeding or using
an alternative feeding method, establish an IV line (page P-21)
and give IV fluid;
-
Ensure that the baby receives feeds and fluid at maintenance volume
according to the baby’s age (Table C-4, page C-22).
•
After the baby is stable:
-
Measure head circumference daily;

F-124
Swelling on scalp
-
Check pallor and the heart and respiratory rates every three hours;
-
Be prepared at any time to give fluid as indicated above;
-
If the haemoglobin is less than 8 g/dl (haematocrit less than 24%),
give a blood transfusion (page P-31);
-
If the haemoglobin is more than 10 g/dl (haematocrit more than
30%), measure haemoglobin two more times after three and six days,
and then weekly for as long as the baby is in the hospital.
•
Observe for jaundice (page F-77) once daily, and give phototherapy if
necessary.
•
Once the head circumference begins to decrease:
-
Continue observation until the baby is at least four days old and the
haemoglobin has remained at a level not requiring transfusion for at
least three days;
-
After the observation period, if the baby’s heart and respiratory rates
are stable, the baby is feeding well, and there are no other problems
requiring hospitalization, discharge the baby (page C-67).
CAPUT SUCCEDANEUM, CHIGNON, OR CEPHALOHAEMATOMA
•
Reassure the mother that these are not serious conditions and that they do
not require treatment. Caput and chignon resolve spontaneously after two
to three days. Cephalohaematoma (Fig. F-8, page F-125) resolves over
several weeks.
•
Do not aspirate a cephalohaematoma, even though it feels fluctuant.
•
Advise the mother to bring the baby back if the baby develops jaundice
(page F-77).
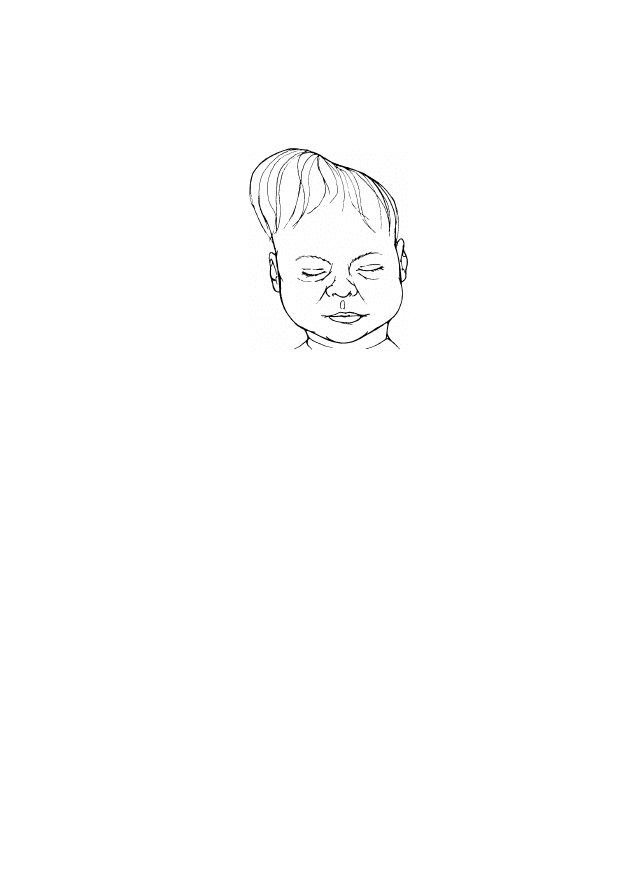
F-125
Swelling on scalp
FIGURE F-8
Baby with unilateral cephalohaematoma

F-126
Swelling on scalp

SKIN AND MUCOUS MEMBRANE PROBLEMS
F-127
Skin infections in babies are extremely contagious. Observe strict
infection prevention practices (page C-37) at all times to prevent
spreading one baby’s infection to other babies in the nursery.
Dispose of all items in direct contact with the lesions (e.g. gauze)
in a plastic bag or leakproof, covered waste container.
PROBLEMS
•
The baby’s skin or soft tissues are red or swollen.
•
The baby has pustules or blisters on the skin.
•
The baby has white patches on the tongue or inside the mouth.
FINDINGS
•
Review the findings from the general history (page F-7) and examination
(Table F-2, page F-11), and obtain the following additional information
to determine the probable diagnosis (Table F-25, page F-128).
•
Ask the mother (or whoever brought the baby in):
-
What did the lesions look like and where on the baby’s body were
they when they first appeared?
-
Have the lesions changed at all since they first appeared?
•
Look for:
-
location of lesions (e.g. in the axillae, around the umbilicus and
groin, on the palms and soles);
-
characteristics of lesions:
-
pustules (less than 1 cm in diameter) or blisters (1 cm in
diameter or more);
-
reddened skin;
-
blistering skin rash.
-
swelling on skin that is tender (baby cries when swelling is touched)
or fluctuant (feeling of free liquid in swollen area).
•
If the baby has a cut or abrasion, see page F-132.

F-128
Skin and mucous membrane problems
DIFFERENTIAL DIAGNOSIS
TABLE F-25
Differential diagnosis of skin and mucous membrane
problems
Findings
a
Probable Diagnosis
History
Examination
• Time of onset day 1 or
later
• Lesions solitary at first,
then developing into
clusters and spreading
to other areas
• Pustules or blisters
• Lesions prevalent on back of
hands, around neck, in axillae,
and around umbilicus and groin
Skin infection, page
F-129
• Time of onset day 3 or
later
• Red skin and swollen
subcutaneous tissue anywhere
on body
• Tender and/or fluctuant swelling
Cellulitis/abscess,
page F-130
• Time of onset day 3 or
later
• Bright red patches on skin in
napkin area, often scaly in
appearance or with small white
centres
Thrush in napkin
area, page F-131
• Time of onset day 3 or
later
• Thick white patches on tongue
or inside mouth
Thrush in mouth,
page F-131
• If mother had a
serologic test for
syphilis during
pregnancy, it was
positive
• Mother not treated or
treated inadequately
for syphilis
• Time of onset at birth
• Generalized oedema (body
swelling)
• Abdominal distension (from
enlarged liver and/or spleen or
from fluid in abdomen)
• Blistering skin rash on palms and
soles
• Profuse nasal discharge
(“snuffles”)
Congenital syphilis,
page F-46
a
The diagnosis cannot be made if a finding listed in bold is absent. The presence of a
finding listed in bold, however, does not guarantee the diagnosis. The diagnosis is
definitively confirmed if a finding listed in italics is present. Findings in plain text are
supportive findings; their presence helps to confirm the diagnosis, but their absence cannot
be used to rule out the diagnosis.

F-129
Skin and mucous membrane problems
MANAGEMENT
SKIN INFECTION
•
If the infection developed while the baby was hospitalized or more
than one baby with a skin infection from the same ward is seen
within a two-day period, suspect a nosocomial infection (page C-45).
•
Wearing clean examination gloves:
-
Wash the affected area(s) of skin using an antiseptic solution (Table
C-10, page C-41) and clean gauze sponges;
-
Swab the pustules/blisters with 0.5% gentian violet solution;
-
Repeat four times daily until the pustules/blisters are gone. Have the
mother do this whenever possible.
•
Observe for signs of sepsis (e.g. poor feeding, vomiting, breathing
difficulty; Table F-9, page F-37), and treat for sepsis (page F-41) if found.
•
Count the number of pustules or blisters, determine whether they cover
less or more than half of the body, and treat as described below.
FEWER THAN 10 PUSTULES/BLISTERS OR COVERING LESS THAN HALF THE
BODY WITH NO SIGNS OF SEPSIS
•
Observe the baby for five days:
-
If the pustules/blisters clear within five days and there are no other
problems requiring hospitalization, discharge the baby (page C-67);
-
If most of the pustules/blisters are still present after five days but
the baby does not have signs of sepsis, give cloxacillin by mouth
according to the baby’s age and weight (Table C-9, page C-35) for
five days.
TEN OR MORE PUSTULES/BLISTERS OR COVERING MORE THAN HALF THE
BODY WITH NO SIGNS OF SEPSIS
•
Open the white centre of a pustule using a sterile lancet. Take a specimen
of pus using a sterile cotton swab, and send it to the laboratory for
culture and sensitivity.
•
Give cloxacillin IM according to the baby’s age and weight (Table C-9,
page C-35).

F-130
Skin and mucous membrane problems
•
Assess the baby’s condition at least once daily for signs of improvement
(pustules/blisters are not spreading and are beginning to dry up and heal):
-
If the pustules/blisters are improving after three days of
treatment with antibiotics, continue cloxacillin to complete five
days of treatment;
-
If the pustules/blisters are not improving after three days of
treatment with antibiotics:
-
If the culture is positive, change the antibiotic according to the
results of the culture and sensitivity, and give the antibiotic for
an additional five days;
-
If the culture is not possible or the organism cannot be
identified, continue giving cloxacillin and also give gentamicin
according to the baby’s age and weight (Table C-9, page C-35)
for seven days.
•
Observe the baby for 24 hours after discontinuing antibiotics. If the
pustules/blisters have cleared, the baby is feeding well, and there are
no other problems requiring hospitalization, discharge the baby
(page C-67).
SKIN PUSTULES/BLISTERS WITH SIGNS OF SEPSIS
•
Treat for sepsis (page F-41), but give cloxacillin IV according to the
baby’s age and weight (Table C-9, page C-35) instead of ampicillin.
•
If the baby is already receiving antibiotics for sepsis, discontinue
ampicillin. Give cloxacillin IV according to the baby’s age and weight
(Table C-9, page C-35) in addition to gentamicin.
•
Observe the baby for 24 hours after discontinuing antibiotics. If the
pustules/blisters have cleared, the baby is feeding well, and there are no
other problems requiring hospitalization, discharge the baby (page C-67).
CELLULITIS/ABSCESS
•
If there is a fluctuant swelling, incise and drain the abscess (page P-43).
•
Give cloxacillin IM according to the baby’s age and weight (Table C-9,
page C-35).

F-131
Skin and mucous membrane problems
•
Assess the baby’s condition at least once daily for signs of improvement:
-
If the cellulitis/abscess is improving after five days of treatment
with the antibiotic, continue cloxacillin to complete 10 days of
treatment;
-
If the cellulitis/abscess is not improving after five days of
treatment with the antibiotic:
-
If the culture is positive, change the antibiotic according to the
results of the culture and sensitivity and give the antibiotic for
an additional 10 days;
-
If the culture is not possible or the organism cannot be
identified, continue giving cloxacillin and also give gentamicin
according to the baby’s age and weight (Table C-9, page C-35)
for 10 days.
•
Observe the baby for 24 hours after discontinuing antibiotics. If the
cellulitis/abscess has cleared, the baby is feeding well, and there are no
other problems requiring hospitalization, discharge the baby (page C-67).
THRUSH IN NAPKIN AREA
•
Apply nystatin cream to the lesions or swab the lesions with 0.5%
gentian violet solution at every napkin change, continuing for three days
after the lesions have healed.
•
Ensure that the napkin is changed whenever it is wet or soiled.
THRUSH IN MOUTH
•
Swab the thrush patches in the baby’s mouth with nystatin oral solution
or 0.5% gentian violet solution four times daily, continuing for two days
after the lesions have healed.
•
Have the mother put nystatin cream or 0.5% gentian violet solution on
her breasts after breastfeeding for as long as the baby is being treated.

F-132
Skin and mucous membrane problems
CUT
•
Clean the cut using gauze soaked in antiseptic solution (e.g. 2.5%
polyvidone iodine [Table C-10, page C-41]; note that other antiseptic
solutions may burn).
•
Cover the cut with a simple bandage to keep the cut clean and dry.
•
If the edges of the cut are open, pull them closed with a butterfly
bandage.
•
If there are no other problems requiring hospitalization, discharge the
baby (page C-67).
•
Explain to the mother what the signs of local infection are (e.g. redness,
heat, and swelling of the skin around the cut):
-
Ask the mother to bring the baby back if she sees signs of local
infection;
-
If signs of local infection are seen, remove the bandage and treat
with a topical antibiotic ointment three times daily for five days,
leaving the cut uncovered.
•
Have the mother return with the baby in one week to remove the
bandage, if necessary. If there is no infection, no further follow-up is
needed.
ABRASION
•
Clean the abrasion (e.g. Fig. F-9) using cotton-wool balls soaked in
antiseptic solution (e.g. 2.5% polyvidone iodine [Table C-10, page C-41];
note that other antiseptic solutions may burn).
FIGURE F-9
Baby with abrasions from forceps delivery

F-133
Skin and mucous membrane problems
•
Keep the wound clean and dry, and instruct the mother how to do so.
•
If there are no other problems requiring hospitalization, discharge the
baby (page C-67).
•
Explain to the mother what the signs of local infection are (e.g. redness,
heat, and swelling of the skin around the cut):
-
Ask the mother to bring the baby back if she sees signs of local
infection;
-
If signs of local infection are seen, treat with a topical antibiotic
ointment three times daily for five days, leaving the abrasion
uncovered.
•
Have the mother return with the baby in one week. If there is no
infection, no further follow-up is needed.

F-134
Skin and mucous membrane problems

UMBILICUS RED AND SWOLLEN, DRAINING
F-135
PUS, OR FOUL SMELLING
The umbilicus usually separates one week after birth, and the wound heals
within 15 days. Until the wound is healed, this is an important entry point for
infection, which can quickly lead to sepsis; early recognition and treatment of
an infected umbilicus are essential to prevent sepsis.
Observe strict infection prevention practices (page C-37) at all
times to prevent spreading one baby’s infection to other babies
in the nursery. Dispose of all items in direct contact with the
umbilicus or draining pus in a plastic bag or leakproof,
covered waste container.
PROBLEM
•
The baby’s umbilicus is swollen, draining pus, or foul smelling
(infected).
•
The skin around the umbilicus is red and hardened.
FINDINGS
•
Review the findings from the general history (page F-7) and examination
(Table F-2, page F-11), and obtain the following additional information
to classify the severity of the infection (Table F-26, page F-136).
•
Ask the mother (or whoever brought the baby in):
-
Were unclean or harmful substances (e.g. animal dung) applied to
the baby’s umbilicus?
-
Was the umbilicus covered (e.g. with a bandage)?
•
If there is redness and swelling of the skin around the umbilicus,
determine how far it extends beyond the umbilicus.

F-136
Umbilicus red and swollen, draining pus, or foul smelling
TABLE F-26
Classification of severity of infection of umbilicus
Findings
a
Classification
History
Examination
• Unclean birth
• Application of unclean
or harmful substances
(e.g. animal dung) to
umbilicus
• Umbilicus covered
• Umbilicus red and swollen
• Redness and swelling of skin
extending more than 1 cm
beyond umbilicus
• Umbilicus draining pus
• Foul-smelling umbilicus
• Skin around umbilicus is red
and hardened
• Abdominal distension
Severe infection of
umbilicus, below
• Umbilicus red and swollen
• Redness and swelling of skin
extending less than 1 cm
beyond umbilicus
Local infection of
umbilicus, page
F-137
a
The classification cannot be made if a finding listed in bold is absent. The presence of a
finding listed in bold, however, does not guarantee the classification. Findings in plain
text are supportive findings; their presence helps to confirm the classification, but their
absence cannot be used to rule out the classification.
MANAGEMENT
SEVERE INFECTION OF UMBILICUS
•
If the infection developed while the baby was hospitalized or more
than one baby with an infection of the umbilicus from the same
ward is seen within a two-day period, suspect a nosocomial infection
(page C-45).
•
Treat for sepsis (page F-41) but give cloxacillin IV according to the
baby’s age and weight (Table C-9, page C-35) instead of ampicillin.
•
If the baby is already receiving antibiotics for sepsis, discontinue
ampicillin. Give cloxacillin IV according to the baby’s age and weight
(Table C-9, page C-35) in addition to gentamicin.
•
If skin pustules/blisters are present, treat for a skin infection (page
F-129).
•
Provide general care as described for a local infection of the umbilicus
(page F-137).

F-137
Umbilicus red and swollen, draining pus, or foul smelling
•
Observe the baby for 24 hours after discontinuing antibiotics. If the
infection has cleared, the baby is feeding well, and there are no other
problems requiring hospitalization, discharge the baby (page C-67).
LOCAL INFECTION OF UMBILICUS
•
Wearing clean examination gloves:
-
Wash the umbilicus using an antiseptic solution (Table C-10, page
C-41) and clean gauze sponges;
-
Swab the umbilicus and the area around it with 0.5% gentian violet
four times daily until there is no more pus coming from the
umbilicus. Have the mother do this whenever possible.
•
If the area of redness and swelling extends more than 1 cm beyond
the umbilicus, treat for severe infection of the umbilicus (page F-136).
•
If the infection has cleared, the baby is feeding well, and there are no other
problems requiring hospitalization, discharge the baby (page C-67).

F-138
Umbilicus red and swollen, draining pus, or foul smelling

EYES RED, SWOLLEN, OR DRAINING PUS
F-139
Red and swollen eyes or eyes draining pus may be caused by bacteria (e.g.
gonococcus, chlamydia, staphylococcus) that are usually transmitted to the
baby at the time of birth, or the problem may be caused by chemicals (e.g.
silver nitrate eye drops) placed in the baby’s eyes just after birth. Most causes
of newborn eye problems will respond to local treatment, but gonococcal and
chlamydial infections need to be identified, as they require systemic
antibiotics.
Observe strict infection prevention practices (page C-37) at all
times to prevent spreading one baby’s infection to other babies
in the nursery. Dispose of all items in direct contact with
draining pus in a plastic bag or leakproof, covered waste
container.
PROBLEM
•
The baby’s eye(s) is red, swollen, or draining pus.
FINDINGS
•
Review the findings from the general history (page F-7) and examination
(Table F-2, page F-11), looking especially for a history of a sexually
transmitted infection in the mother. Obtain the following additional
information to determine the probable diagnosis.
•
Ask the mother (or whoever brought the baby in):
-
Were drops of silver nitrate put in the baby’s eye(s) at birth?
-
Was any other prophylactic treatment put in the baby’s eye(s)? If so,
when?
GENERAL MANAGEMENT
•
Wearing clean examination gloves:
-
Clean the eyelids using sterile normal saline or clean (boiled and
cooled) water and a clean swab, cleaning from the inside edge of the
eye to the outside edge;
-
Have the mother do this whenever possible;

F-140
Eyes red, swollen, or draining pus
-
Repeat four times daily until the eye problems have cleared.
•
Have the mother wash the baby’s face once daily (or more often, if
necessary) using clean water, and dry with a clean cloth.
•
If the problem developed while the baby was hospitalized or more
than one baby with eye problems from the same ward is seen within
a two-day period, suspect a nosocomial infection (page C-45).
EYES DRAINING PUS (CONJUNCTIVITIS)
•
Take a specimen of pus, if it can be easily obtained, using a sterile cotton
swab (take care to avoid direct contact with the baby’s eyes):
-
Smear the pus on a slide, stain the slide with Gram stain, and view
the slide under a microscope;
-
Send a sample of the pus to the laboratory for culture (including
possible gonococcus) and sensitivity;
-
Determine the probable diagnosis (Table F-27, page F-141).
•
If it is not possible to perform a Gram stain or culture and
sensitivity, see page F-143.
RED OR SWOLLEN EYES AND STICKY EYELIDS BUT NO PUS
DRAINING FROM EYES
•
If the eye problem continues for more than four days (despite the
general management described above), but there is still no pus
draining from the eyes:
-
Give erythromycin by mouth (Table C-9, page C-35) for 14 days;
-
Apply 1% tetracycline ointment to the affected eye(s) four times
daily until the eye(s) is no longer red, swollen, or sticky.
•
If pus begins to drain from the eye, see above.
•
If there are no other problems requiring hospitalization, discharge the
baby (page C-67), and have the mother continue the treatment at home.

F-141
Eyes red, swollen, or draining pus
DIFFERENTIAL DIAGNOSIS
TABLE F-27
Differential diagnosis of conjunctivitis
Findings
a
Probable
Diagnosis
History
Examination
Gram Stain
Investigation and
Culture Results
• Time of onset day
3 or later
• One eye involved
• Moderate amount
of pus
• Gram-positive
cocci in clusters
• Culture positive
for staphylococcus
Conjunctivitis
due to
Staphylococcus
aureus, page
F-142
• Mother has a
sexually
transmitted
infection
• Eye prophylaxis
either not given
or given after
first hour of life
• Time of onset day
1 or later
• Both eyes
involved
• Large amount of
pus
• Gram-negative
diplococci
• Culture positive
for gonococcus
Conjunctivitis
due to
gonorrhoea,
page F-142
• Watery discharge
from eyes at first,
then changing to
pus
• Mother has a
sexually
transmitted
infection
• Time of onset day
5 or later
• Both eyes
involved
• Small to moderate
amount of pus
• No organisms
seen on Gram
stain
• Culture negative
Conjunctivitis
due to
chlamydia,
page F-142
• Silver nitrate
drops put in eyes
at birth
• Time of onset day
1 or 2
• Both eyes
involved
• Eyes red and
swollen
• Small amount of
pus
• No organisms
seen on Gram
stain
• Culture negative
Chemical
irritation
No treatment is
necessary.
a
The diagnosis cannot be made if a finding listed in bold is absent. The presence of a
finding listed in bold, however, does not guarantee the diagnosis. The diagnosis is
definitively confirmed if a finding listed in italics is present. Findings in plain text are
supportive findings; their presence helps to confirm the diagnosis, but their absence cannot
be used to rule out the diagnosis.

F-142
Eyes red, swollen, or draining pus
MANAGEMENT OF SPECIFIC CONDITIONS
CONJUNCTIVITIS DUE TO
S. AUREUS
•
Apply 1% tetracycline ointment to the affected eye(s) four times daily for
five days. There is no need for systemic antibiotics.
•
Continue to clean the baby’s eyes and wash the baby’s face as described
under general management (page F-139).
•
If the mother and baby can stay near the health care facility, the baby
does not have to be admitted to the hospital for this treatment.
CONJUNCTIVITIS DUE TO GONORRHOEA
•
Give ceftriaxone IM (Table C-9, page C-34) in a single dose.
•
There is no need for antibiotic eye ointment.
•
Continue to clean the baby’s eyes and wash the baby’s face as described
under general management (page F-139).
•
If the mother and baby can stay near the health care facility, the baby
does not have to be admitted to the hospital for this treatment.
•
Treat the mother and her partner(s) for gonorrhoea if not already treated
(modify treatment according to local susceptibility, if necessary). Give:
-
ceftriaxone 250 mg IM as a single dose to the mother;
-
ciprofloxacin 500 mg by mouth as a single dose to her partner(s).
CONJUNCTIVITIS DUE TO CHLAMYDIA
•
Give erythromycin by mouth (Table C-9, page C-35) for 14 days.
•
After cleaning the eyes, apply 1% tetracycline ointment to the affected
eye(s) four times daily until the eyes are no longer red, swollen, sticky, or
draining pus.
•
If the mother and baby can stay near the health care facility, the baby
does not have to be admitted to the hospital for this treatment.
•
Treat the mother and her partner(s) for chlamydia if not already treated
(modify treatment according to local susceptibility, if necessary). Give:

F-143
Eyes red, swollen, or draining pus
-
erythromycin 500 mg by mouth four times daily for seven days to the
mother;
-
tetracycline 500 mg by mouth four times daily for seven days to her
partner(s) OR doxycycline 100 mg by mouth twice daily for seven
days to her partner(s).
GRAM STAIN OR CULTURE AND SENSITIVITY NOT POSSIBLE
•
If the baby is less than seven days old and has not been treated with
systemic antibiotics before, treat for conjunctivitis due to gonorrhoea
(page F-142).
•
If the baby is seven days or older and has been previously treated
unsuccessfully with systemic antibiotics, or if the baby is less than
seven days old and the problem is not resolved after 48 hours of
treatment, treat for conjunctivitis due to chlamydia (page F-142).

F-144
Eyes red, swollen, or draining pus
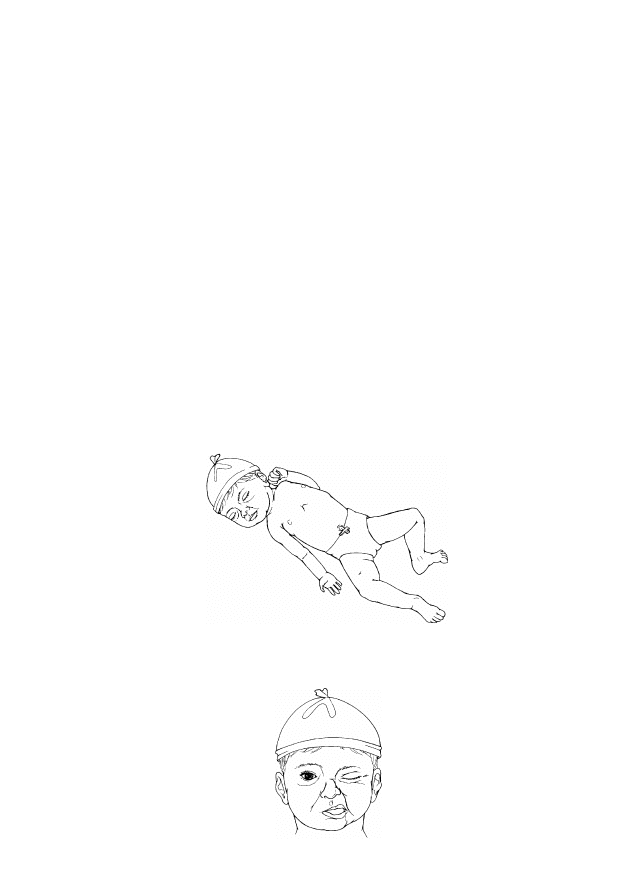
BIRTH INJURY
F-145
This chapter covers birth injuries without visible bleeding. If the baby has a
swelling on the scalp, see page F-121. If the baby is pale or bleeding, see
page F-113.
PROBLEMS
•
The baby’s arm and hand are in an abnormal position, lying limply by the
baby’s side (Fig. F-10).
•
The baby is unable to wrinkle her/his forehead, close eye on affected side
(Fig. F-11), or suckle without dribbling milk.
•
The baby’s bone (of the arm, leg, or shoulder) is displaced from its
normal position.
•
There is a swelling over the bone of the baby’s arm, leg, or shoulder.
•
The baby’s arms or legs are not moving symmetrically.
•
The baby cries when an arm, leg, or shoulder is touched or moved.
FIGURE F-10
Abnormal position of arm and hand
FIGURE F-11
Baby unable to wrinkle forehead or close eye on affected
side
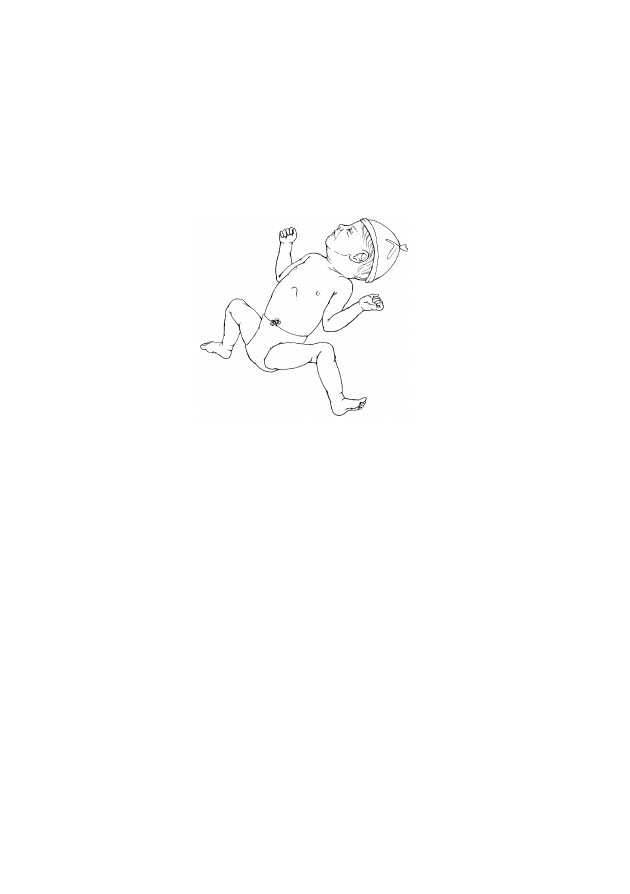
F-146
Birth injury
Note that babies who were born in a breech position may have fully flexed
hips and knees, with the feet near the mouth, or the legs and feet may be to
the side of the baby (Fig. F-12). This is the normal resting posture of the
baby after birth and is not considered a birth injury.
FIGURE F-12
Normal resting posture of a breech baby
FINDINGS
•
Review the findings from the general history (page F-7) and examination
(Table F-2, page F-11), looking especially for a history of a difficult
birth, and use the information to determine the probable diagnosis (Table
F-28, page F-147).

F-147
Birth injury
DIFFERENTIAL DIAGNOSIS
TABLE F-28
Differential diagnosis of birth injury
Findings
a
Probable Diagnosis
History
Examination
• Difficult birth
• Breech delivery
• No spontaneous arm movement
on one side
• Arm and hand lying limply by
baby’s side (Fig. F-10, page
F-145)
• Large baby (more than 4 kg at
birth)
Arm palsy (Erb or
Klumpke), below
• Difficult birth
• Trauma to face
(e.g. use of forceps)
during birth
• Unable to wrinkle forehead,
close eye on affected side, or
suckle without dribbling milk
(Fig. F-11, page F-145)
• Angle of mouth pulled to one side
Facial palsy, page
F-148
• Difficult birth
• Displacement of bone from its
normal position
• Pain (crying) when a limb or
shoulder is moved
• Lack of movement or
asymmetrical movement of a limb
• Swelling over bone
Fracture, page F-148
a
The diagnosis cannot be made if a finding listed in bold is absent. The presence of a
finding listed in bold, however, does not guarantee the diagnosis. The diagnosis is
definitively confirmed if a finding listed in italics is present. Findings in plain text are
supportive findings; their presence helps to confirm the diagnosis, but their absence cannot
be used to rule out the diagnosis.
MANAGEMENT
ARM PALSY
•
Handle the baby’s shoulder (e.g. during dressing or when mother is
breastfeeding) gently to prevent further injury, and teach the mother how
to do so.
•
For the first week, reduce pain by strapping the arm in place as described
for a fractured humerus (page F-149).

F-148
Birth injury
•
If the mother is able to care for the baby adequately and there are no other
problems requiring hospitalization, discharge the baby (page C-67).
•
Have the mother return with the baby at one week of age:
-
Check for improvement in the baby’s condition;
-
Advise passive exercises if arm movement is not yet normal.
•
Follow up in two weeks. Explain to the mother that the majority of cases
of arm palsy recover by six to nine months of age. If movement of the
arm is still limited at one year of age, permanent paralysis is likely.
FACIAL PALSY
•
If the baby cannot close the eye on the affected side, apply ointment to
that eye at least four times daily for as long as the eye does not close.
Teach the mother how to do this.
•
If the baby is having difficulty feeding:
-
Help the mother find a way to help the baby to attach;
-
If the baby is not able to breastfeed, give expressed breast milk
using an alternative feeding method (page C-14).
•
If the baby is feeding well and there are no other problems requiring
hospitalization, discharge the baby (page C-67).
•
Follow up in two weeks to verify that the palsy is resolved. Explain to the
mother that most cases of facial palsy resolve spontaneously within two
weeks. If movement of the face is still limited at one year of age,
permanent paralysis is likely.
FRACTURE
GENERAL MANAGEMENT
•
Confirm the diagnosis with X-ray, if available.
•
Handle the baby gently when moving or turning, and teach the mother
how to do so. Avoid movement of the affected limb as much as possible.
•
Immobilize the limb to reduce pain when the baby is handled (see below
for how to immobilize specific fractures).
•
If the mother is able to care for the baby and there are no other problems
requiring hospitalization, discharge the baby (page C-67).
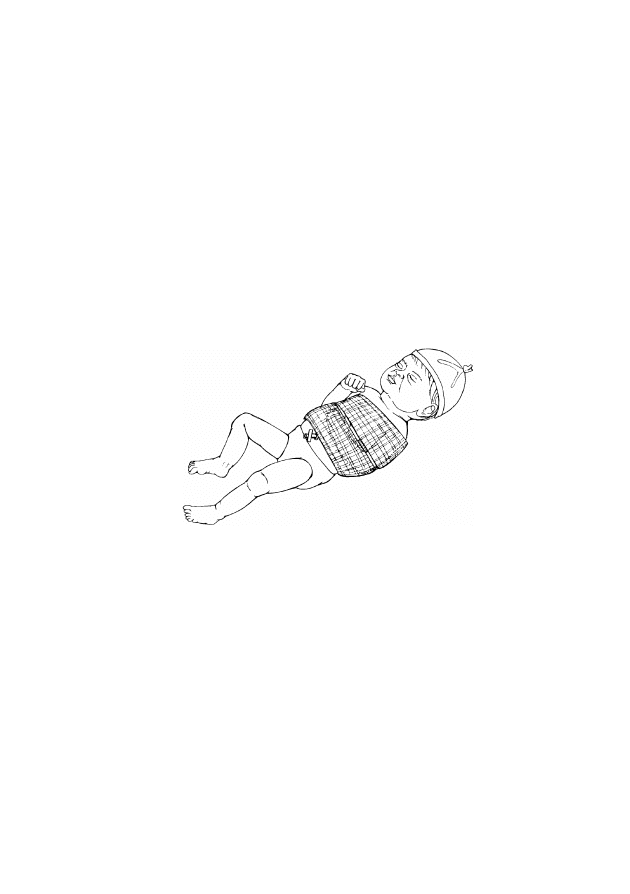
F-149
Birth injury
•
Explain to the mother that fractures will heal spontaneously, usually
without residual deformity, and that a hard swelling (callus) may be felt
over the fracture site at two to three weeks of age. This is part of the
normal healing process.
•
Follow up in one month to verify that the fracture has healed. Refer
babies with unhealed fractures or severe deformities to a tertiary hospital
or specialized centre for orthopaedic care, if possible.
FRACTURED HUMERUS
•
Place a layer of cotton batting or gauze padding between the affected arm
and the chest, from the axilla to the elbow (Fig. F-13).
FIGURE F-13
Splinting a fractured humerus
•
Strap the upper arm to the chest using a gauze bandage.
•
Flex the elbow of the affected arm to 90 degrees, and use a separate
bandage to strap the forearm across the abdomen in this position. Ensure
that the umbilicus is not covered by the bandage.
•
Check the fingers twice daily for three days (the baby does not have to be
admitted to the hospital if the mother is able to bring the baby back to the
hospital each time):
-
If the fingers become blue or swollen, remove the bandage and
rewrap it more loosely;
-
If the bandage is rewrapped, observe the fingers for blueness or
swelling for an additional three days.
•
Have the mother return with the baby in 10 days to remove the gauze
bandages.
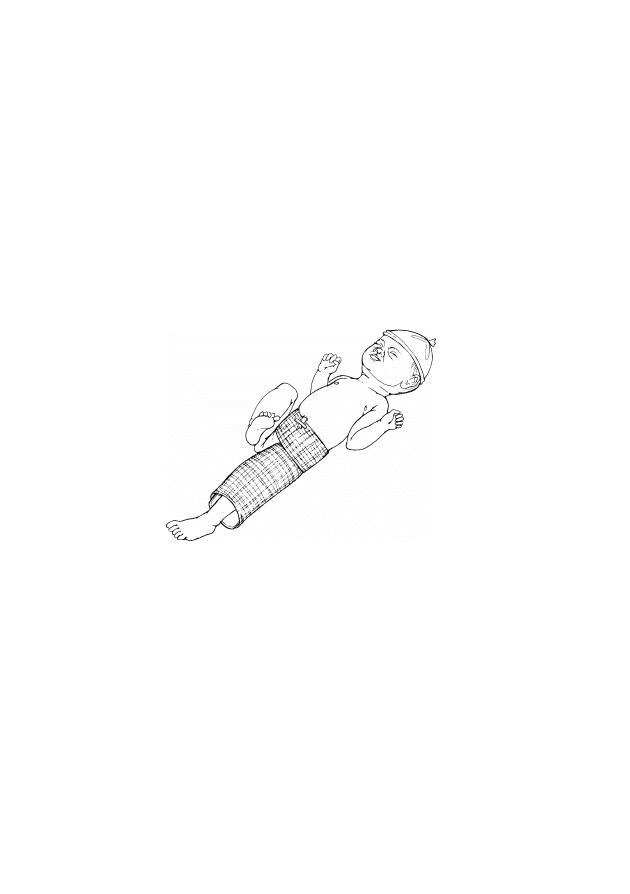
F-150
Birth injury
FRACTURED CLAVICLE
•
If moving the arm causes the baby to cry, strap the arm in place as
described for a fractured humerus (page F-149).
•
Have the mother return with the baby in five days to remove the gauze
bandages.
FRACTURED FEMUR
•
Place the baby on her/his back and place a padded splint under the baby
from the waist to below the knee of the affected leg (Fig. F-14).
FIGURE F-14
Splinting a fractured femur
•
Strap the splint to the baby by wrapping an elastic bandage around the
waist and from the thigh to below the knee of the affected leg. Ensure
that the umbilicus is not covered by the bandage.
•
Check the toes twice daily for three days (the baby does not have to be
admitted to the hospital if the mother is able to bring the baby back to the
hospital each time):
-
If the toes become blue or swollen, remove the bandage and rewrap
it more loosely;
-
If the bandage is rewrapped, observe the toes for blueness or
swelling for an additional three days.
•
Have the mother return with the baby in 14 days to remove the splint.

BIRTH DEFECTS
F-151
PROBLEMS
•
The baby has a minor birth defect (birth mark, skin tag, extra finger(s) or
toe(s), cleft lip, cleft palate, or club foot).
•
The baby has a major birth defect (spina bifida/meningomyelocoele,
gastroschisis/omphalocoele, or imperforate anus).
•
The baby has a genetic birth defect (e.g. Down syndrome).
MINOR BIRTH DEFECTS
BIRTH MARK
•
Assure the mother that most birth marks (e.g. capillary haemangioma or
Mongolian blue spot) require no special care and may disappear as the
baby gets older.
SKIN TAG OR EXTRA FINGER(S) OR TOE(S)
•
Tie off skin tags and extra digits that do not have a bony attachment.
•
If the extra digits have a bony attachment, refer the baby to a tertiary
hospital or specialized centre within a few months, if possible, for
surgery to remove the extra digits.
CLEFT LIP OR PALATE
•
Provide emotional support and reassurance to the mother (page C-57).
•
Explain to the mother that the most important thing to do at this time is to
feed the baby to ensure adequate growth until surgery can be performed.
•
If the baby has a cleft lip but the palate is intact, allow the baby to
attempt to breastfeed:
-
If the baby breastfeeds successfully and there are no other problems
requiring hospitalization, discharge the baby (page C-67). Follow up
in one week to check growth and weight gain;
-
If the baby cannot breastfeed well because of the cleft, give
expressed breast milk using an alternative feeding method (page
C-14).

F-152
Birth defects
•
If the baby has a cleft palate, give expressed breast milk using an
alternative feeding method (page C-14).
•
Once the baby is feeding well and gaining weight, refer the baby to a
tertiary hospital or specialized centre, if possible, for surgery to repair the
cleft.
CLUB FOOT
•
Provide emotional support and reassurance to the mother (page C-57).
•
Refer the baby to a tertiary hospital or specialized centre within the first
month of life, if possible, for correction of the club foot.
MAJOR BIRTH DEFECTS
SPINA BIFIDA/MENINGOMYELOCOELE
•
Provide emotional support and reassurance to the mother (page C-57).
•
If the defect is not covered by skin:
-
Cover with sterile gauze soaked in sterile, normal saline;
-
Keep gauze moist at all times, and ensure that the baby is kept warm
(page C-1).
•
Organize transfer (page C-63), and refer the baby to a tertiary hospital or
specialized centre for further evaluation or surgical care, if possible.
GASTROSCHISIS/OMPHALOCOELE
•
Provide emotional support and reassurance to the mother (page C-57).
•
Establish an IV line (page P-21), and give only IV fluid at maintenance
volume according to the baby’s age (Table C-4, page C-22).
•
Ensure that the baby does not receive anything by mouth.
•
If the defect is not covered by skin:
-
Cover with sterile gauze soaked in sterile, normal saline;
-
Keep gauze moist at all times, and ensure that the baby is kept warm
(page C-1).

F-153
Birth defects
•
Insert a gastric tube (page P-33), and ensure free drainage.
•
Organize transfer (page C-63), and urgently refer the baby to a tertiary
hospital or specialized centre for surgery, if possible.
IMPERFORATE ANUS
•
Provide emotional support and reassurance to the mother (page C-57).
•
Establish an IV line (page P-21), and give only IV fluid at maintenance
volume according to the baby’s age (Table C-4, page C-22).
•
Ensure that the baby does not receive anything by mouth.
•
Insert a gastric tube (page P-33) and ensure free drainage.
•
Organize transfer (page C-63), and urgently refer the baby to a tertiary
hospital or specialized centre for surgery, if possible.
GENETIC BIRTH DEFECTS
•
Provide emotional support and reassurance to the mother (page C-57).
•
If the baby has Down syndrome or unusual facial features, advise the
parents about the long-term prognosis, and refer the family to a
specialized centre for developmental evaluation and follow-up, if
possible.
•
Organize genetic counseling for the parents, if possible.
•
If the mother is not going to breastfeed and requests a contraceptive
method, refer her to a family planning service.

F-154
Birth defects

ASYMPTOMATIC NEWBORN BABY OF MOTHER
F-155
WITH HEPATITIS B, TUBERCULOSIS, DIABETES,
OR SYPHILIS
If a baby is born to a mother with one or more of the problems mentioned in
this chapter, there is a higher probability that the baby will develop a problem
at some time after birth, even if the baby appears entirely normal at birth.
PROBLEMS
•
The baby’s mother had or has:
-
hepatitis B;
-
tuberculosis;
-
diabetes;
-
syphilis.
MANAGEMENT
HEPATITIS B
Mothers who had acute hepatitis during pregnancy or who are carriers of the
hepatitis B virus, as demonstrated by a positive serologic test for the hepatitis
B surface antigen (HbsAg), may transmit the hepatitis B virus to their babies.
•
Give the first dose of hepatitis B vaccine (HBV) (page C-51) 0.5 ml IM
in the upper thigh (page P-15) as soon after birth as possible (preferably
within 12 hours of birth).
•
If available, give hepatitis immune globulin 200 units IM in the other
thigh within 24 hours of birth, or within 48 hours of birth at the latest.
•
Reassure the mother that it is safe for her to breastfeed her baby.
TUBERCULOSIS
•
If the mother has active lung tuberculosis and was treated for less
than two months before birth or was diagnosed with tuberculosis
after birth:
-
Do not give the tuberculosis vaccine (BCG) at birth;

F-156
Asymptomatic newborn baby of mother with hepatitis B, tuberculosis, diabetes, or syphilis
-
Give prophylactic isoniazid 5 mg/kg body weight by mouth once
daily;
-
At the age of six weeks, re-evaluate the baby, noting weight gain and
taking an X-ray of the chest, if possible:
-
If there are any findings suggestive of active disease, start full
anti-tuberculosis treatment;
-
If the baby is doing well and tests are negative, continue
prophylactic isoniazid to complete six months of treatment.
•
Delay BCG vaccine (page C-51) until two weeks after treatment is
completed. If BCG was already given, repeat BCG two weeks after the
end of the isoniazid treatment.
•
Reassure the mother that it is safe for her to breastfeed her baby.
•
Follow up in two weeks to assess weight gain.
DIABETES
Babies of diabetic mothers are at high risk for developing low blood glucose
during the first three days of life, even if they are feeding well.
•
Encourage and support early and frequent breastfeeding, at least eight
times daily, day and night.
•
If the baby is less than three days old, observe the baby until the third
day of age:
-
Measure blood glucose (page P-13) at the following times:
-
at three hours of age or on admission;
-
three hours after the first measurement and then every six hours
for 24 hours or until the blood glucose has been normal for two
consecutive days.
-
If the blood glucose is less than 45 mg/dl (2.6 mmol/l), treat for
low blood glucose (page F-91);
-
If the blood glucose has been normal for three days, the baby is
feeding well, and there are no other problems requiring
hospitalization, discharge the baby (page C-67).
•
If the baby is three days old or older and does not show signs of low
blood glucose (e.g. lethargy, jitteriness), observation is not necessary. If

F-157
Asymptomatic newborn baby of mother with hepatitis B, tuberculosis, diabetes, or syphilis
the baby is feeding well and there are no other problems requiring
hospitalization, discharge the baby (page C-67).
SYPHILIS
•
If the mother tested positive for syphilis and was treated adequately
(2.4 million units of penicillin) and the treatment started at least 30
days before birth, no treatment is necessary.
•
If the mother was not treated for syphilis, she was treated
inadequately, or her treatment status is unknown or uncertain and
the baby has no signs of syphilis (Table F-10, page F-37):
-
Give the baby procaine benzylpenicillin (or benzathine
benzylpenicillin) IM (Table C-9, pages C-34 to C-35);
-
Give the mother and her partner(s) benzathine benzylpenicillin
1.8 g IM as two injections at separate sites;
-
Refer the mother and her partner(s) for follow-up to a clinic that
offers services for sexually transmitted infections.
•
Follow up in four weeks to examine the baby for growth and signs of
congenital syphilis.
•
Report the case to authorities, if required.

F-158
Asymptomatic newborn baby of mother with hepatitis B, tuberculosis, diabetes, or syphilis

MOTHER WITH HIV
F-159
There are no specific signs or features diagnostic of HIV at birth; clinical
signs of HIV may begin appearing around six weeks of life, but the baby’s
HIV status cannot be verified by antibody testing until 15 to 18 months of
age.
PROBLEM
•
The baby’s mother is HIV positive.
MANAGEMENT
GENERAL MANAGEMENT
•
When caring for a baby of an HIV-positive mother, always:
-
Respect the confidentiality of the mother and family;
-
Care for the baby as for any other baby, paying particular attention
to infection prevention procedures (page C-37);
-
Give the baby all routine immunizations (page C-51).
•
Emphasize to the mother the importance of condom use to prevent
infection of her partner(s) and transmission of other sexually transmitted
infections.
•
Provide emotional support (page C-57).
ANTIRETROVIRAL THERAPY
Without antiretroviral therapy, 15% to 30% of babies born to known HIV-
positive mothers will be infected during pregnancy and birth, and 5% to 20%
may be infected by breastfeeding.
•
Determine if the mother is receiving or has received antiretroviral
treatment for HIV to prevent mother-to-child transmission.
•
Treat the baby according to the protocol used for the mother as per
national policy. For example:
-
If zidovudine (AZT) was given to the mother for four weeks
before birth, continue to give AZT to the baby for six weeks after
birth (2 mg/kg body weight by mouth every six hours);

F-160
Mother with HIV
-
If the mother received a single dose of nevirapine during labour
and the baby is less than three days old, immediately give the
baby nevirapine in suspension 2 mg/kg body weight by mouth;
-
Schedule a follow-up examination in 10 days to assess feeding and
growth.
FEEDING
Advise the mother regarding her feeding options, and respect and support the
mother’s choice. Allow the mother to make an informed choice about the best
feeding option for her baby. Explain to the mother that breastfeeding carries
an increased risk of transmitting HIV to the baby after birth.
•
Inform the mother about her options for feeding, the advantages, and the
risks. The mother can choose to:
-
Give replacement feeding if this is acceptable, affordable, feasible,
sustainable, and safe. Explain to the mother that replacement feeding
often carries a higher risk of infant mortality than breastfeeding,
especially if it cannot be prepared safely, is not continuously
available and affordable to the family, and there are limited facilities
and water for preparation;
-
Exclusively breastfeed until replacement feeding is feasible. It is
important that the mother stops breastfeeding once replacement
feeding is introduced;
-
Exclusively breastfeed for six months, then continue breastfeeding
while starting complementary feeding (e.g. mashed solid foods) after
six months of age.
•
Help the mother to assess her situation. Help her decide whether to
breastfeed (below) or give replacement feeding (page F-161).
MOTHER CHOOSES TO BREASTFEED
•
Support the mother’s choice.
•
Advise the mother against mixed feeding (i.e. feeding anything other than
breast milk, such as commercial breast-milk substitute, animal milks,
local porridges, tea, water, etc.). Mixed feeding may increase the risk of
both HIV transmission and illness or death from diarrhoea or other
illnesses.

F-161
Mother with HIV
•
Ensure correct positioning and attachment (page C-12) to prevent
mastitis and damage to the mother’s nipples:
-
Advise the mother to return immediately if she has any problems
with her breasts or nipples, or if the baby has any difficulty feeding;
-
If there are no other problems requiring hospitalization, discharge
the baby (page C-67);
-
Ensure a follow-up visit during the first week after discharge to
assess attachment and positioning and the condition of the mother’s
breasts;
-
Ensure that the baby receives regular follow-up visits with an
appropriate child care provider.
•
Arrange for further counselling to prepare the mother for the possibility
of stopping breastfeeding early.
MOTHER CHOOSES REPLACEMENT FEEDING
•
Support the mother’s choice.
•
Ensure that the mother understands that if she chooses replacement
feeding, she should begin complementary feeding at six months of age
while continuing to provide milk.
•
Review the guidelines for preparing and feeding breast-milk substitutes
(page C-19).
•
Allow the mother to begin preparing the replacement feed as soon as she
is able to and teach her how to feed the baby using a cup, cup and spoon,
or other device (e.g. paladai; page C-16).
•
Encourage the mother to feed the baby at least eight times daily. Teach
her to be flexible and respond to the baby’s demands.
•
Give the mother written instructions on safe preparation of the
replacement feed.
•
Explain the risks of replacement feeding and how to avoid them:
-
The baby may get diarrhoea if the mother’s hands, water, or utensils
are not clean, or if the milk stands too long before being used;
-
The baby may not grow well if:
-
too little substitute is given at each feed;
-
too few feeds are given;

F-162
Mother with HIV
-
the substitute contains too much water;
-
the baby has diarrhoea.
•
Advise the mother to seek care if the baby has any problems, such as:
-
feeding less than six times daily or taking smaller quantities;
-
diarrhoea;
-
poor weight gain.
•
If there are no other problems requiring hospitalization, discharge the
baby (page C-67);
•
Ensure a follow-up visit during the first week after discharge to assess
how the mother is coping with replacement feeding and ensure that she
receives support to provide safe replacement feeding.
•
Ensure that the baby receives regular follow-up visits with an appropriate
child care provider.

SECTION 2: PRINCIPLES OF NEWBORN BABY CARE


MAINTAINING NORMAL BODY TEMPERATURE
C-1
A baby who is sick or small (less than 2.5 kg at birth or born before 37 weeks
gestation) needs additional thermal protection and warmth to maintain normal
body temperature. These babies can become hypothermic very quickly, and
rewarming the baby can take a long time. The risk of complications and
mortality significantly increases if the thermal environment is not optimal.
GENERAL PRINCIPLES
•
Keep the baby clothed or covered as much as possible at all times,
including during procedures (e.g. when establishing an IV line, during
resuscitation):
-
Clothe the baby and cover the head with a cap or hat;
-
Wrap the baby in a soft dry cloth and cover with a blanket;
-
Uncover only parts of the body that need observation or treatment.
•
Care for a sick or small baby in a warm room (not less than 25 °C) that is
free of draughts.
•
Do not place the baby near cold objects, such as a wall or window, even
if the baby is in an incubator or under a radiant warmer.
•
Do not place the baby directly on a cold surface (e.g. place a cloth or
blanket under the baby before placing on a cold bed or examination
table), and ensure that hands are warm before handling the baby.
•
Keep the baby warm during transfer for diagnostic or treatment
procedures. Use warming devices or transfer in skin-to-skin contact
(page C-5) with the mother or another person, if possible.
•
Ensure warmth during procedures (e.g. use a radiant warmer).
•
Change napkins whenever they are wet.
•
If anything wet is applied to the skin (e.g. moistened gauze), ensure
that the baby is kept warm.
•
Avoid bathing the baby during the first six hours of life or until the
baby’s temperature is stable; delay bathing a small baby until at least the
second day of life.

C-2
Maintaining normal body temperature
MEASURING BODY TEMPERATURE
Unless directed otherwise by another chapter, measure the baby’s temperature
as often as indicated in Table C-1, below.
TABLE C-1
Measuring body temperature
Baby with
Serious
Illness
Small Baby
a
Very Small
Baby
b
Baby
Progressing
Well
Frequency of
measurements
Every hour
Twice daily
Four times
daily
Once daily
a
Small babies are less than 2.5 kg at birth or born before 37 weeks gestation.
b
Very small babies are less than 1.5 kg at birth or born before 32 weeks gestation.
METHODS FOR WARMING THE BABY AND MAINTAINING BODY
TEMPERATURE
There are five methods for warming the baby and maintaining the baby’s
temperature (Table C-2). See below for specific instructions for using each
method.
TABLE C-2
Methods for warming the baby and maintaining body
temperature
Method
Guidelines for
Selection and Use
Advantages
Risks/Disadvantages
Skin-to-skin
contact
• Appropriate for all
stable babies
• Appropriate for
rewarming a baby with
moderate hypothermia
(32 °C to 36.4 °C),
particularly when other
methods are not
available
• Not appropriate for
babies with life-
threatening problems
(e.g. sepsis, severe
breathing difficulty)
• Mother can
closely monitor
baby
• Another person
can provide
skin-to-skin
contact if the
mother is
unavailable
• Babies usually
maintain
normal body
temperature

C-3
Maintaining normal body temperature
TABLE C-2 Cont.
Methods for warming the baby and maintaining body
temperature
Method
Guidelines for
Selection and Use
Advantages
Risks/Disadvantages
Kangaroo
mother care
• Appropriate for
stabilized babies
weighing 1.5 to 2.5 kg,
but particularly
recommended for
continuous care of
babies weighing 1.5 to
1.8 kg
• Not appropriate for
babies with life-
threatening problems
(e.g. sepsis, severe
breathing difficulty)
• Not appropriate if
mother has a serious
illness or complication
from labour or birth
that prevents her from
caring for the baby
• Mother can
closely monitor
baby
• Babies usually
maintain
normal body
temperature
• Mother may not
always be available
Radiant
warmer
• Appropriate for sick
babies and babies
weighing 1.5 kg or
more
• Use to keep baby warm
during initial
assessment, treatment,
and procedures, and to
rewarm a cold baby
• Allows
observation of
baby
• Many
procedures can
be performed
while baby is
under warmer
• Baby can become
hyperthermic or
hypothermic if
temperature is not
monitored
• Baby can become
dehydrated
• Warmer is
expensive to buy
• Warmer requires
reliable source of
electricity

C-4
Maintaining normal body temperature
TABLE C-2 Cont.
Methods for warming the baby and maintaining body
temperature
Method
Guidelines for
Selection and Use
Advantages
Risks/Disadvantages
Incubator
• Appropriate for
continuous care of
babies weighing less
than 1.5 kg who are not
eligible for kangaroo
mother care
• Appropriate for babies
who have life-
threatening problems
(e.g. sepsis, severe
breathing difficulty)
• Maintains
constant
temperature
• Allows
observation of
baby
• Oxygen can
easily be
provided
• Baby can be
naked, if
necessary
• Baby can become
hyperthermic or
hypothermic if
temperature is not
monitored
• Baby can become
dehydrated
• Incubator is easily
colonized by
bacteria
• Incubator is
expensive to buy
and maintain
• Incubator requires
reliable source of
electricity
• Personnel trained to
care for baby and
clean and maintain
incubator are
required
• Mother and baby
are separated
• Incubator is more
difficult to clean
than radiant warmer
Warm room
• Appropriate for care of
babies recovering from
illness and small babies
who do not require
frequent diagnostic and
treatment procedures
• Not appropriate for
babies with life-
threatening problems
(e.g. sepsis, severe
breathing difficulty)
• Baby can become
hypothermic
• Room may be
uncomfortable for
adults

C-5
Maintaining normal body temperature
TABLE C-2 Cont.
Methods for warming the baby and maintaining body
temperature
Method
Guidelines for
Selection and Use
Advantages
Risks/Disadvantages
Other
methods
(e.g. hot
water bottles
or bricks)
• Appropriate for
emergency situations
when other methods
are not available (e.g.
during transport)
• Baby can become
hyperthermic
• Baby can be burned
by objects
• Baby can become
hypothermic if
objects are not
replaced after they
cool
• Constant
temperature is
difficult to maintain
SKIN-TO-SKIN CONTACT
•
Clothe and secure the baby as described for kangaroo mother care (page
F-30).
•
Ensure that the temperature of the room where the rewarming takes place
is at least 25 °C.
•
Measure the baby’s body temperature two hours after beginning skin-to-
skin contact unless directed otherwise by another chapter. If the baby’s
temperature is not 36.5 °C to 37.5 °C after the two hours of
rewarming, reassess the baby (Table F-2, page F-11).
RADIANT WARMER
•
Ensure that the temperature of the room where the radiant warmer (Fig.
C-1, page C-6) is used is at least 22 °C.
•
Clean the mattress and platform, and cover the mattress with a clean
linen sheet.
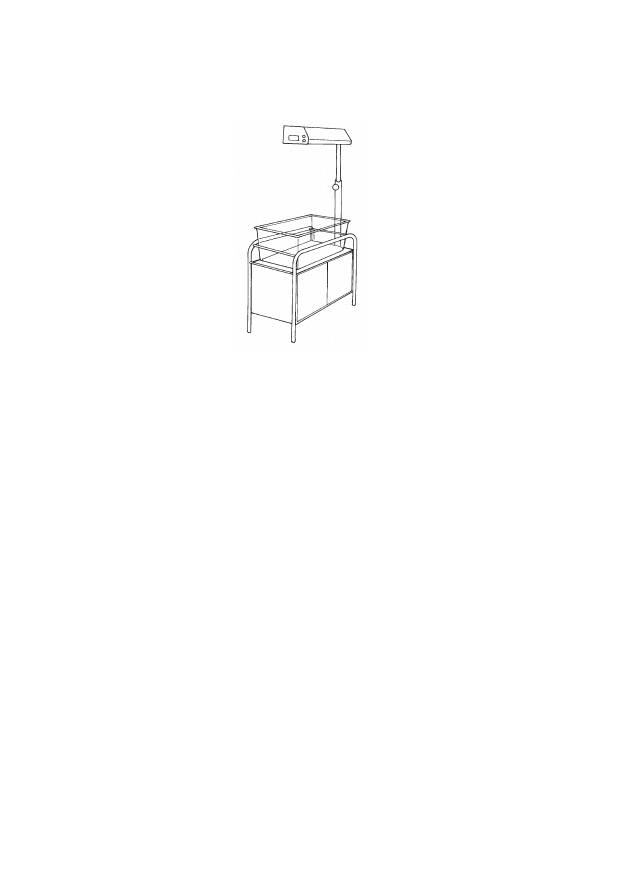
C-6
Maintaining normal body temperature
FIGURE C-1
Radiant warmer
•
Turn on the warmer and set the temperature according to the
manufacturer’s instructions (usually between 36 °C and 37.5 °C). When
it is known beforehand that a baby is to arrive in the newborn special
care unit, turn on the warmer to pre-warm the linen and mattress so that
the baby does not initially lie on a cold surface.
•
Ensure that the baby’s head is covered and the baby is clothed or covered
unless it is necessary for the baby to be naked or partially undressed for
observation or a procedure.
•
Place only one baby under each radiant warmer.
•
Turn the baby frequently while under the warmer, if possible.
•
If the baby is receiving IV fluid or expressed breast milk, increase the
volume of fluid and/or milk by 10% of the total daily volume per day
(Table C-4, page C-22) for as long as the baby is under the radiant
warmer.
•
Check the temperature of the warmer and of the room every hour, and
adjust the temperature setting accordingly.
•
Move the baby to be with the mother as soon as the baby no longer
requires frequent procedures and treatment.
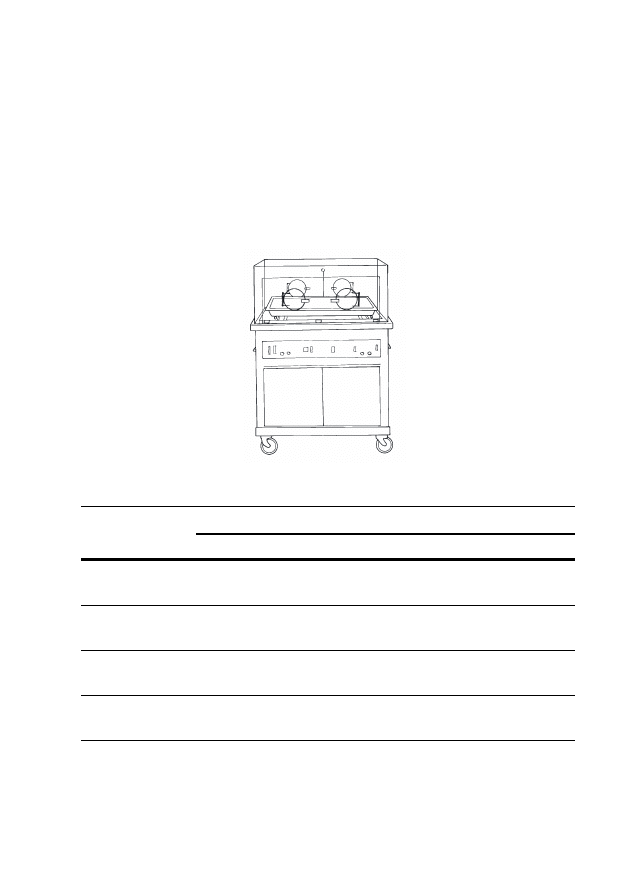
C-7
Maintaining normal body temperature
INCUBATOR
•
Determine the appropriate temperature for the incubator (Fig. C-2) based
on the baby’s weight and age (Table C-3).
•
Warm the incubator to the desired temperature before placing the baby
inside.
FIGURE C-2
Incubator
TABLE C-3
Recommended incubator temperatures
Weight of Baby
Incubator Temperature by Age
a
35 °C
34 °C
33 °C
32 °C
Less than 1.5 kg
1 to 10 days
old
11 days to 3
weeks old
3 to 5 weeks
old
More than
5 weeks old
1.5 to 2.0 kg
1 to 10 days
old
11 days to
4 weeks old
More than
4 weeks old
2.1 to 2.5 kg
1 to 2 days
old
3 days to
3 weeks old
More than
3 weeks old
More than 2.5 kg
1 to 2 days
old
More than
2 days old
a
If the incubator is single-walled, increase the incubator temperature 1 °C for every 7 °C
difference in temperature between the room and the incubator.

C-8
Maintaining normal body temperature
•
Clean the mattress and cover it with a clean linen sheet.
•
Ensure that the incubator’s water reservoir is empty; dangerous bacteria
may grow in the water and infect the baby. Leaving the reservoir dry will
not affect the function of the incubator.
•
Ensure that the baby’s head is covered and the baby is clothed or covered
unless it is necessary for the baby to be naked or partially undressed for
observation or a procedure.
•
Place only one baby in each incubator.
•
Close the hood as quickly as possible after placing the baby inside, and
keep the portholes of the incubator closed at all times to keep the
incubator warm.
•
Check the temperature of the incubator every hour for the first eight
hours, and then every three hours:
-
If the temperature of the incubator does not match the set
temperature, the incubator may not be functioning properly; adjust
the temperature setting until the desired temperature is reached
inside the incubator, or use another method to warm the baby.
•
Measure the baby’s temperature (page P-5) every hour for the first eight
hours, and then every three hours:
-
If the baby’s temperature is less than 36.5 °C or more than
37.5 °C, adjust the temperature of the incubator accordingly;
-
If the baby’s temperature remains less than 36.5 °C or more
than 37.5 °C in spite of the incubator being kept at the
recommended setting, manage for abnormal body temperature
(page F-69).
•
Move the baby to be with the mother as soon as the baby no longer
requires special care and frequent procedures and treatment.
WARM ROOM
•
Ensure that the baby’s head is covered and the baby is adequately clothed
or covered.
•
Ensure that the temperature of the room is at least 26 °C. A warm room is
often uncomfortable for adult staff and caregivers; ensure that the baby is
not neglected and that the staff and caregivers do not decrease the
temperature without providing another warming method.

C-9
Maintaining normal body temperature
•
Place the baby in a cot in the room, away from cold walls and windows,
and away from draughts.
•
Measure the temperature of the room and the baby’s body temperature
four times daily.
•
Provide additional warmth at night.
OTHER METHODS
•
Ensure that the baby’s head is covered and the baby is adequately clothed
or covered.
•
Ensure that the object (e.g. hot water bottle or brick) does not come into
contact with the baby’s skin, which could cause burns.
•
Ensure that the object is not too hot.
•
Monitor the warmth of the object and replace it before it becomes cold.

C-10
Maintaining normal body temperature

FEEDING AND FLUID MANAGEMENT
C-11
FEEDING
Ensure that the baby is fed as soon as possible after birth (within one hour if
possible) or within three hours of admission unless feeding should be delayed
because of a specific problem. If possible, admit the mother when admitting
the baby. Encourage the mother to breastfeed the baby or to give expressed
breast milk; support whichever method of feeding the mother chooses. Note
that this guide assumes that the mother is available to breastfeed or express
breast milk for her baby. If the baby is small (less than 2.5 kg at birth or born
before 37 weeks gestation), review the general principles of feeding a small
baby (page F-24).
GENERAL PRINCIPLES OF EXCLUSIVE BREASTFEEDING
•
Encourage early and exclusive breastfeeding whenever possible.
•
Explain to the mother and her family the benefits of early and exclusive
breastfeeding:
-
Breast milk contains the exact nutrients the baby needs and promotes
the baby’s development;
-
Breast milk is easily digested and efficiently used by the baby’s
body;
-
Breast milk protects the baby from infection;
-
Breastfeeding can be used as a contraceptive method (lactational
amenorrhoea method).
•
Encourage the mother to breastfeed the baby on demand, both day and
night (eight or more times in 24 hours), for as long as the baby wants.
•
Have the mother offer the second breast once the baby releases the first
breast on her/his own.
•
Advise the mother that she should not:
-
force the baby to feed;
-
interrupt a feed before the baby is done;
-
use artificial teats or pacifiers;
-
give the baby any other food or drink (e.g. commercial breast-milk
substitute, animal milks, local porridges, tea, water, etc.) other than
breast milk for the first six months of life.

C-12
Feeding and fluid management
•
Include the mother’s partner, a family member, or other support person
in discussions about breastfeeding, if possible.
•
Ensure that the mother eats nutritious food and has enough to drink.
•
Ensure that the mother can wash or shower daily, but tell her to avoid
washing or wiping her nipples before breastfeeding.
•
Explain to the mother that most medications she may be given will not
harm her baby while she breastfeeds; however, if the mother is taking
cotrimoxazole or pyrimethamine with sulfadoxine, monitor the baby for
jaundice.
•
If the mother is HIV positive, see page F-159 for guidelines to help the
mother choose the most suitable feeding method.
•
If the mother is too ill or if she chooses not to breastfeed:
-
Give the baby a breast-milk substitute (page C-19);
-
Advise the mother on how to care for her breasts:
-
Explain to the mother that her breasts may be uncomfortable for
some time, but she should avoid stimulating them. If the
mother’s discomfort is severe, she can express a small amount
of milk (page C-15) a few times a day to relieve the discomfort;
-
Advise the mother to support her breasts with a well-fitting bra
or cloth, but she should not bind the breasts tightly because this
may increase her discomfort;
-
Suggest that the mother apply a warm or cold compress to her
breasts to reduce swelling.
CORRECT POSITIONING AND ATTACHMENT FOR BREASTFEEDING
•
Ask the mother to help the baby attach when the baby seems to be ready.
Signs of readiness to suckle include opening the mouth, rooting or
searching, looking around, and moving.
•
Explain to the mother how to hold her baby during breastfeeding. She
should:
-
hold the baby in skin-to-skin contact (page C-5), if possible;
-
hold the baby’s head and body straight so that the baby faces her
breast, with the baby’s nose near her nipple;
-
support the baby’s whole body, not just the neck and shoulders.
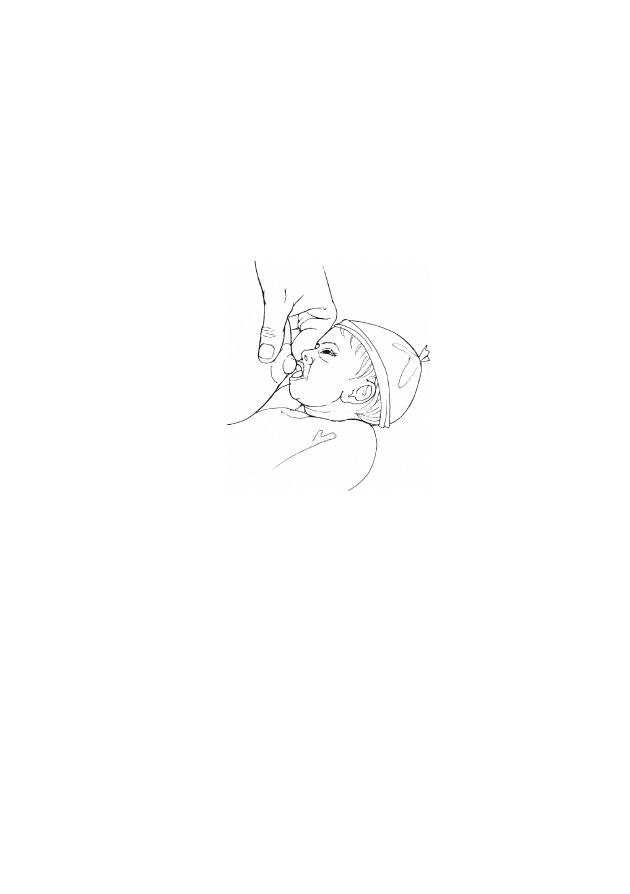
C-13
Feeding and fluid management
•
Explain to the mother how to encourage her baby to attach (Fig. C-3).
She should:
-
touch the baby’s lips with her nipple;
-
wait until the baby’s mouth is opening wide;
-
move the baby quickly onto her breast, so that the baby’s lower lip is
well below the nipple.
FIGURE C-3 Encouraging the baby to attach to the breast
•
Assess attachment on the breast and suckling. Help the mother if she
wishes, especially if she is a first time or very young mother. Signs of
correct attachment (Fig. C-4, page C-14) are:
-
baby’s chin touches the breast;
-
baby’s mouth is wide open with the lower lip curled out;
-
more of the areola is visible above than below the mouth;
-
baby suckles with slow, deep sucks and pauses sometimes.
•
If the mother’s breasts are engorged, have her express a small amount
of breast milk (page C-15) before beginning to breastfeed. This will
soften the area around the nipple so that it is easier for the baby to attach.
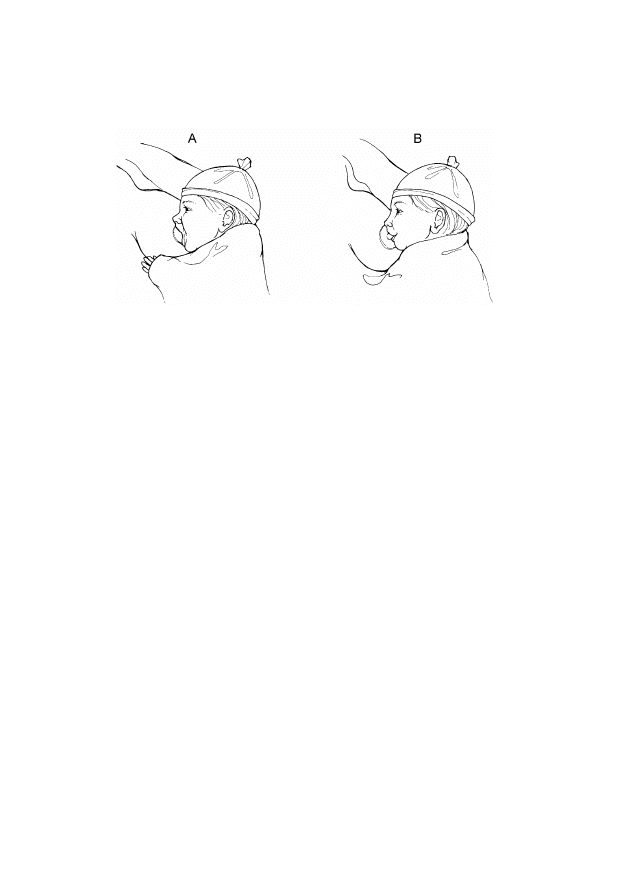
C-14
Feeding and fluid management
FIGURE C-4
Correct (A) and incorrect (B) attachment to the breast
BREASTFEEDING TWINS
•
Reassure the mother that she has enough breast milk for both babies.
•
If the babies are small (less than 2.5 kg at birth or born before 37 weeks
gestation), review the general principles of feeding a small baby (page
F-24). In addition, have the mother:
-
begin feeding one baby at a time until breastfeeding is well
established in both babies;
-
ensure that the weaker twin gets enough milk;
-
rotate at every breastfeeding the breast each baby is offered;
-
give expressed breast milk using an alternative feeding method
(below) after the initial breastfeed, if necessary.
FEEDING THE BABY USING AN ALTERNATIVE FEEDING METHOD
•
Teach the mother how to express breast milk, if necessary (page C-15).
•
Encourage the mother to express breast milk at least eight times in 24
hours.
•
Assess feeding ability twice daily, and encourage and support the mother
to begin breastfeeding as soon as the baby shows signs of readiness to
suckle unless treatment of the baby’s illness prevents breastfeeding (e.g.
the baby is receiving oxygen).
•
Record the following each time the baby is fed:

C-15
Feeding and fluid management
-
time of feeding;
-
amount and kind of milk given (e.g. expressed breast milk or breast-
milk substitute);
-
any feeding difficulty.
•
Calculate the volume of milk required according to the baby’s age
(Table C-4, page C-22).
•
Ensure that the baby is receiving enough milk by assessing the baby’s
growth (page C-53).
•
Choose the most appropriate alternative feeding method:
-
cup, cup and spoon, or other device (page C-16);
-
hand-expressing breast milk into the baby’s mouth (page C-18);
-
gastric tube (page C-18).
EXPRESSING BREAST MILK
•
Teach the mother how to express breast milk herself. The mother should:
-
obtain a clean (washed, boiled or rinsed with boiling water, and air-
dried) cup or container to collect and store the milk;
-
wash her hands thoroughly;
-
sit or stand comfortably and hold the container underneath her
breast;
-
express the milk (Fig. C-5, page C-16):
-
support the breast with four fingers and place the thumb above
the areola;
-
squeeze the areola between the thumb and fingers while
pressing backwards against the chest;
-
express each breast for at least four minutes, alternating breasts
until the flow of milk stops (both breasts are completely
expressed).
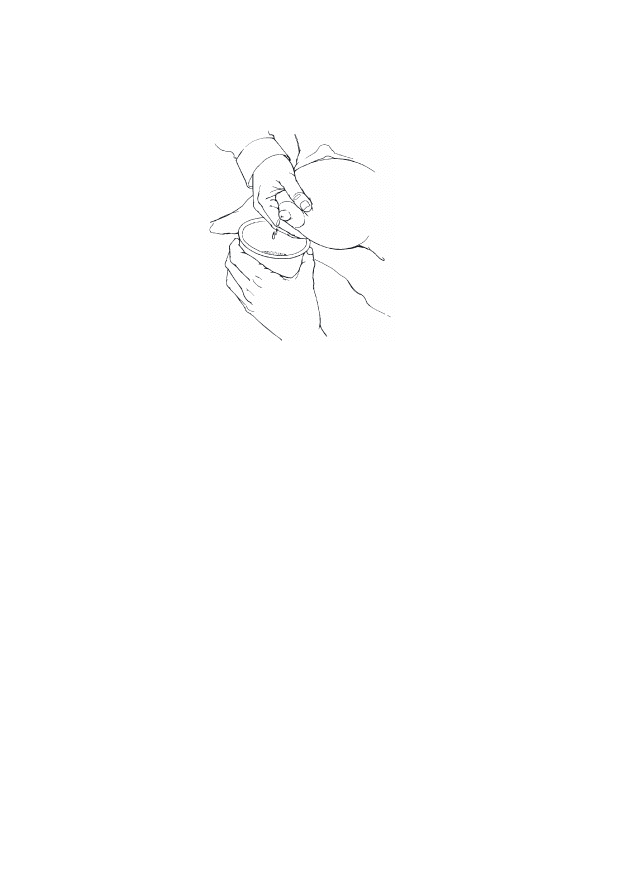
C-16
Feeding and fluid management
FIGURE C-5
Expressing breast milk
•
If the milk does not flow well:
-
ensure that the mother is using the correct technique;
-
have the mother apply warm compresses to her breasts;
-
have someone massage the mother’s back and neck.
•
If the expressed breast milk is not going to be used immediately, label
the container and either refrigerate the milk and use within 24 hours or
freeze the milk (if freezing conditions can be reliably maintained) at
–20 °C for no more than six months:
-
If a refrigerator or freezer is not available, keep the milk covered
at room temperature for up to six hours;
-
Ensure that the milk is at room temperature before giving it to the
baby:
-
Warm frozen or refrigerated milk in a warm water bath
(approximately 40 °C), but avoid overheating the milk;
-
Use the rewarmed milk promptly.
FEEDING BY CUP, CUP AND SPOON, OR OTHER DEVICE
•
Ensure that the mother can properly express breast milk (page C-15).
•
Feed the baby using a cup, a cup and spoon, or other suitable device (e.g.
paladai) (Fig. C-6, page C-17).
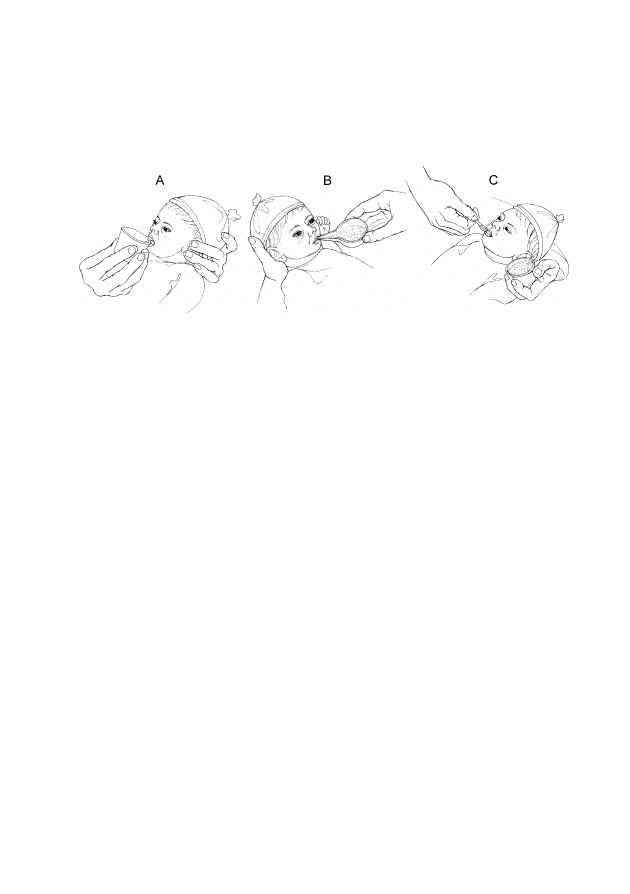
C-17
Feeding and fluid management
•
Use clean (washed, boiled or rinsed with boiled water, and air-dried)
utensils and feeding devices for each feed.
FIGURE C-6
Feeding by cup (A), paladai (B), or cup and spoon (C)
•
Feed the baby immediately after the milk is expressed, if possible. If the
baby does not consume all of the milk, store the remaining milk
according to the guidelines on page C-16 for expressed breast milk.
•
Have the mother feed the baby unless she is not available. The mother
should:
-
measure the volume of breast milk in the cup, ensuring that it meets the
required volume according to the baby’s age (Table C-4, page C-22);
-
hold the baby sitting semi-upright on her lap;
-
rest the cup (or paladai or spoon) lightly on the baby’s lower lip and
touch the outer part of the baby’s upper lip with the edge of the cup;
-
tip the cup (or paladai or spoon) so the milk just reaches the baby’s
lips;
-
allow the baby to take the milk; do not pour the milk into the baby’s
mouth;
-
end the feeding when the baby closes her/his mouth and is no longer
interested in feeding.
•
If the baby does not take the necessary volume of milk (according to
Table C-4, page C-22), have the mother encourage the baby to feed for
a longer time or feed more often.
•
Encourage the mother to begin breastfeeding as soon as the baby shows
signs of readiness to suckle.

C-18
Feeding and fluid management
•
If the baby is not feeding well using a feeding device or the mother
prefers not to use it, have the mother attempt to hand-express breast
milk directly into the baby’s mouth (page C-18).
HAND-EXPRESSING BREAST MILK INTO BABY’S MOUTH
•
Ensure that the mother can properly express breast milk (page C-15).
•
Have the mother:
-
hold the baby with the baby’s mouth close to her nipple;
-
express the breast until some drops of milk appear on the nipple;
-
let the baby smell the nipple and attempt to suck, and allow some
breast milk to fall into the baby’s mouth;
-
express more drops of breast milk after the baby swallows;
-
end the feeding when the baby closes her/his mouth and is no longer
interested in feeding.
•
Ask the mother to repeat this process every one to two hours if the baby
weighs less than 1.5 kg or every two to three hours if the baby weighs 1.5
kg or more.
FEEDING EXPRESSED BREAST MILK BY GASTRIC TUBE
•
Ensure that the mother can properly express breast milk (page C-15).
•
Insert a gastric tube (page P-33) if one is not already in place.
•
Confirm that the tube is properly positioned (page P-35) before each
feeding.
•
Encourage the mother to hold the baby and participate in feedings.
•
Determine the required volume of milk for the feed according to the
baby’s age (Table C-4, page C-22).
•
Remove the plunger of a high-level disinfected or sterile syringe (of a
size large enough to hold the required volume of milk) and connect the
barrel of the syringe to the end of the gastric tube:
-
If a high-level disinfected or sterile syringe is not available, use a
clean (washed, boiled or rinsed with boiled water, and air-dried)
syringe;
-
If a suitable syringe is not available, use any other suitable, clean
funnel that connects snugly to the gastric tube.
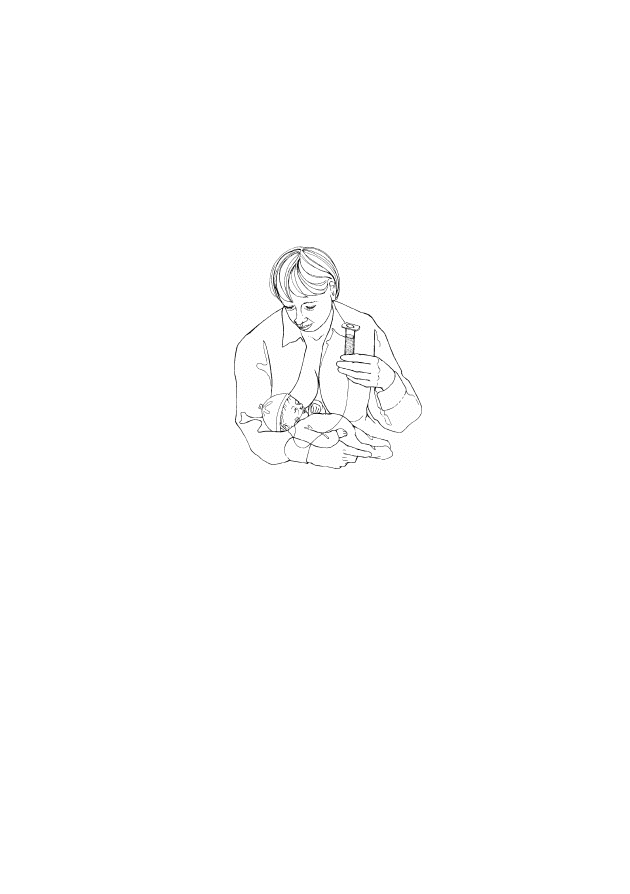
C-19
Feeding and fluid management
•
Pour the required volume of milk for the feed into the syringe with the
“tip” of the syringe pointed downward.
•
Have the mother hold the syringe 5 to 10 cm above the baby (Fig. C-7)
or suspend the tube above the baby and allow the milk to run down the
tube by gravity. Do not force milk through the tube using the plunger of
the syringe.
FIGURE C-7
Feeding expressed breast milk by gastric tube
•
Using this method, each feeding should take 10 to 15 minutes. If the flow
of milk is too fast, slightly pinch the tube below the syringe to slow
down the flow.
•
When the feeding is finished, remove, wash, and high-level disinfect or
sterilize the syringe, and cap the tube until the next feeding.
•
Progress to feeding by cup/spoon when the baby can swallow without
coughing or spitting milk. This could be in as little as one or two days, or
it may take longer than one week.
•
Replace the gastric tube with another clean gastric tube after three days,
or earlier if it is pulled out or becomes blocked, and clean and high-level
disinfect or sterilize it according to Table C-11 (page C-43).
BREAST-MILK SUBSTITUTES
•
If the mother cannot breastfeed or express breast milk, use a
commercial breast-milk substitute. (Note that the following instructions
are for the health care provider. Ensure that the mother knows how to
properly prepare the breast-milk substitute before discharging the baby.)

C-20
Feeding and fluid management
•
If the baby is small (less than 2.5 kg at birth or born before 37 weeks
gestation), use a breast-milk substitute designed for premature or small
babies.
•
Once a container of breast-milk substitute is open, use the substitute
within the recommended time according to the manufacturer’s
instructions (e.g. use liquid breast-milk substitute within four hours of
opening the container).
•
Check the expiry date of the breast-milk substitute.
•
Use aseptic technique to prepare the breast-milk substitute from liquid
concentrates or powders, using high-level disinfected or sterile utensils
and containers, and sterilized or boiled and cooled water.
•
Wash hands with soap and water.
•
Determine the required volume of milk for the feed according to the
baby’s age (Table C-4, page C-22).
•
Measure the breast-milk substitute and water, mix them, and feed the
baby using a cup, cup and spoon, or other device (page C-16). Have the
mother do this whenever possible.
•
Store remaining milk in a labelled container in a refrigerator for a
maximum of 24 hours.
•
If commercial breast-milk substitute is not available, have the mother
use a breast-milk substitute that is based on animal milk and prepared at
home (see national guidelines for correct preparation).
FLUID MANAGEMENT
•
IV fluid is given to ensure that the baby receives necessary fluid,
minimum calories, and electrolytes. Give IV fluid only if directed to do
so in a chapter in the section Assessment, Findings, and Management.
•
If the baby is small (less than 2.5 kg at birth or born before 37 weeks
gestation), see page F-24 for special considerations for fluid and feeding
management of small babies.
CHOICE OF IV FLUID
•
Give 10% glucose for the first three days of life.

C-21
Feeding and fluid management
•
On the fourth day of life, if urine output is well established, give 10%
glucose with 3 mmol/kg body weight of sodium and 2 mmol/kg body
weight of potassium:
-
It is preferable to use commercially-produced IV fluid, such as
glucose in quarter normal saline, if available. Using this fluid avoids
the risk of introducing infection by having to add electrolytes and
eliminates errors in calculations when making the solution;
-
If these premixed solutions are not available, add normal saline 20
ml/kg body weight to the required volume of 10% glucose. To
calculate the necessary fluid volume, determine the volume of fluid
required for day of life (see Table C-4, page C-22) and add 20
ml/kg body weight of normal saline, but infuse only the required
daily volume. For example:
-
For a baby who is four days old, the required daily fluid volume
is 120 ml/kg body weight;
-
Add 20 ml/kg body weight of normal saline to the 120 ml/kg
body weight of 10% glucose for a total fluid volume of 140
ml/kg body weight;
-
Infuse 120 ml/kg body weight of this mixed solution.
-
Addition of potassium to IV fluid is required when a baby cannot be
fed for a prolonged period of time. This must be done with extreme
caution because a small overdose can have serious consequences:
-
Commonly available preparations are 7.5% and 15% KCl,
which contain 1 and 2 mmol of potassium per ml, respectively;
-
While supplementing potassium, add 2 ml/kg body weight of
7.5% KCl or 1 ml/kg body weight of 15% KCl to the total
volume of IV fluid infused each day.
ADMINISTRATION OF IV FLUID
•
Use an infusion set with a microdropper (where 1 ml = 60 microdrops).
Microdroppers allow slow administration of fluid and ensure that babies
receive the volume of fluid they need. Using a standard infusion set
(where 1 ml = 20 drops) can cause dangerous fluid overload.
•
Before infusing IV fluid, check:
-
the expiry date of the fluid;

C-22
Feeding and fluid management
-
that the seal of the infusion bottle or bag is not broken;
-
that the fluid is clear and free from visible particles.
•
Calculate the rate of administration, and ensure that the microdropper
delivers the fluid at the required rate.
•
Change the IV infusion set and fluid bag every 24 hours, even if the bag
still contains IV fluid (they can be a major source of infection).
VOLUMES OF FLUID AND FEEDS DURING THE FIRST DAYS OF
LIFE
•
Determine the required volume of fluid according to the baby’s age
(Table C-4; for small babies [less than 2.5 kg at birth or born before 37
weeks gestation], see pages F-26 to F-30). Note that Table C-4
combines the volumes of IV fluid and feeds (day 1 is the day of birth).
•
Subtract the volume of feeds the baby is receiving from the total daily
volume required to determine the necessary volume of IV fluid.
•
Adjust the volume of feeds and/or fluid if directed to do so by another
chapter (e.g. if the baby is placed under a radiant warmer or is
receiving phototherapy, increase the volume of feeds and/or fluid by
10% of the total daily volume per day because of increased loss of water
from the skin).
•
Convert the total volume into ml per hour or drops per minute.
TABLE C-4
Total daily feed and fluid volumes for babies
a
from birth
Day of Life
1
2
3
4
5
6
7+
ml/kg body weight of
feeds and/or fluid
60
80
100
120
140
150
160+
a
See pages F-26 to F-30 for fluid volumes for small babies (less than 2.5 kg at birth or
born before 37 weeks gestation).
MONITORING BABIES RECEIVING IV FLUID
•
Inspect the infusion site every hour:
-
Look for redness and swelling around the insertion site of the
cannula, which indicate that the cannula is not in the vein and fluid is
leaking into the subcutaneous tissue. If redness or swelling is seen at
any time, stop the infusion, remove the needle, and establish a new
IV line (page P-21) in a different vein;

C-23
Feeding and fluid management
-
Check the volume of fluid infused and compare to the prescribed
volume;
-
Record all findings.
Solutions containing glucose can cause tissue to die and should
not be allowed to leak into subcutaneous tissue.
•
Measure blood glucose every six hours:
-
If the blood glucose is less than 45 mg/dl (2.6 mmol/l), treat for
low blood glucose (page F-91);
-
If the blood glucose is more than 105 mg/dl (6 mmol/l)
(hyperglycaemia) on two consecutive readings:
-
Change to a 5% glucose solution, if possible;
-
Measure blood glucose again in three hours.
•
Assess hydration daily:
-
If there are signs of dehydration (e.g. sunken eyes or fontanelle,
loss of skin elasticity, or dry tongue and mucous membranes),
increase the volume of fluid by 10% of the baby’s body weight on
the first day that the dehydration is noted;
-
If there are signs of overhydration (e.g. excessive weight gain,
puffy eyes, or increasing oedema over lower parts of the body),
reduce the volume of fluid by half for 24 hours after the
overhydration is noted.
•
Document in the baby’s clinical record when the baby urinates. If there is
little or no urine output in 24 hours in the absence of asphyxia,
increase the volume of fluid by 10%, as for dehydration (above).
•
Weigh the baby daily. If the daily weight loss is more than 5%,
increase the total volume of fluid by 10 ml/kg body weight for one day to
compensate for inadequate fluid administration.
COMBINING IV FLUID AND FEEDING
•
Allow the baby to begin breastfeeding as soon as the baby’s condition
improves unless directed otherwise by a chapter in the section
Assessment, Findings, and Management. If the baby cannot be

C-24
Feeding and fluid management
breastfed, give expressed breast milk using an alternative feeding
method (page C-14).
•
If the baby tolerates the feed and there are no problems, continue to
increase the volume of feeds while decreasing the volume of IV fluid to
maintain the total daily fluid volume according to the baby’s daily
requirement (Table C-4, page C-22).
•
Feed the baby every three hours, or more frequently if necessary,
adjusting the volume at each feeding accordingly.
•
Add the total volume of feeds and fluid given each day. Compare this
volume with the required daily volume, and adjust the volume that the
baby receives accordingly.
•
Discontinue the infusion of IV fluid when the baby is receiving more
than two-thirds of the daily fluid volume by mouth and has no abdominal
distension or vomiting.
•
Encourage the mother to breastfeed exclusively as soon as the baby is
receiving 100% of the daily fluid volume by mouth.

OXYGEN THERAPY
C-25
ADMINISTERING OXYGEN
•
Review the methods of administering oxygen, their instructions for use,
and advantages and disadvantages (Table C-5).
•
Continue to perform any examinations, tests, procedures, and treatment
while the baby is receiving oxygen.
•
If the baby can tolerate oral feedings, give expressed breast milk by
gastric tube (page C-18). If the baby cannot be fed, establish an IV line
(page P-21) and give IV fluid at maintenance volume according to the
baby’s age (Table C-4, page C-22).
•
Ensure that the baby does not receive too little or too much oxygen:
-
Giving too little oxygen may cause organ damage and eventual death;
-
Giving too much oxygen may damage the baby’s lungs and retinas.
This damage, however, occurs after days (rather than minutes or
hours) of excess oxygen therapy and is unlikely to occur in babies
more than 35 weeks gestation.
TABLE C-5
Methods for administering oxygen
Method
Flow and
Concentration
Advantages
Disadvantages
Nasal
prongs
• Low = 0.5 L per
minute
• Moderate = 0.5 to
1 L per minute
• High = more than 1
L per minute
• Low flow of oxygen
required
• Constant
concentration of
oxygen if applied
correctly
• Requires special
prongs for use on
newborn babies
• Requires flow-
control device that
allows low flow
• Directs cold oxygen
into baby’s lungs
Nasal
catheter
• Low = 0.5 L per
minute
• Moderate = 0.5 to
1 L per minute
• High = more than 1
L per minute
• Low flow of oxygen
required
• Constant
concentration of
oxygen if applied
correctly
• Requires flow-
control device that
allows low flow
• Directs cold oxygen
into baby’s lungs

C-26
Oxygen therapy
TABLE C-5 Cont.
Methods for administering oxygen
Method
Flow and
Concentration
Advantages
Disadvantages
Head box
• Low = 3 L per
minute
• Moderate = 3 to 5 L
per minute
• High = more than
5 L per minute
• Warms the oxygen
• Can give a high
concentration
• High flow of
oxygen required to
achieve desired
concentration
Face mask
• Low = 1 L per
minute
• Moderate = 1 to 2 L
per minute
• High = more than
2 L per minute
• Oxygen can be
administered
quickly
• Convenient for
administering
oxygen for short
periods of time
• Carbon dioxide can
accumulate if flow
rate is low or mask
is small
• Difficult to feed
baby while mask is
in place
• Difficult to keep
mask in place
Incubator
• If using a head box
inside the
incubator, see
above
• If connecting
oxygen directly to
the incubator,
follow the
manufacturer’s
instructions
• Warms the oxygen
Disadvantages of
giving oxygen
directly into the
incubator:
• High flow of
oxygen required to
achieve desired
concentration
• Difficult to
maintain oxygen
concentration when
incubator portholes
are open for care
and procedures
NASAL PRONGS
•
Use 1-mm prongs for a small baby (less than 2.5 kg at birth or born
before 37 weeks gestation) and use 2-mm prongs for a term baby.
•
Place the prongs just within the baby’s nostrils.
•
Secure the prongs in place using elastic or a piece of adhesive tape.

C-27
Oxygen therapy
•
Adjust the flow of oxygen to achieve the desired concentration.
•
Change the nasal prongs twice daily. Give oxygen using a face mask
(page C-28) while cleaning and disinfecting the prongs (see Table C-11,
page C-43), if necessary.
NASAL CATHETER
•
Use an 8-F catheter. If the 8-F catheter is too large, use a 6-F catheter.
•
Determine the distance the tube should be passed by measuring the
distance from the nostril to the inner margin of the eyebrow.
•
Gently insert the catheter into the nostril. If a gastric tube is already in
place in one nostril, insert the catheter into the same nostril that the
gastric tube is in, if possible.
•
Ensure that the catheter is correctly positioned:
-
Look into the baby’s mouth;
-
The catheter should not be visible at the back of the mouth;
-
If the catheter is visible at the back of the mouth, pull the catheter
out slowly until it is no longer visible.
•
Adjust the flow of oxygen to achieve the desired concentration.
•
Change the nasal catheter twice daily. Give oxygen using a face mask
(page C-28) while cleaning and disinfecting the catheter (see Table C-11,
page C-43), if necessary.
HEAD BOX
•
Place a head box (Fig. C-8, page C-28) over the baby’s head.
•
Ensure that the baby’s head stays within the head box, even when the
baby moves.
•
Adjust the flow of oxygen to achieve the desired concentration.
C-28
Oxygen therapy
FIGURE C-8
Baby receiving oxygen via a head box
FACE MASK
•
Place the mask over the baby’s mouth and nose.
•
Secure the mask in place using elastic or a piece of adhesive tape.
•
Adjust the flow of oxygen to achieve the desired concentration.
INCUBATOR
•
Use a head box, following the instructions for a head box (page C-27),
or connect the oxygen directly to the incubator according to the
manufacturer’s instructions.
•
Adjust the flow of oxygen to achieve the desired concentration.
SOURCES OF OXYGEN
Ensure that a source of oxygen (Table C-6, page C-29) is available at all
times. Oxygen is expensive, so use it only in situations where it is necessary,
and discontinue as soon as possible. There are three main sources of oxygen,
which are described below. The oxygen is carried from the source to the baby
by means of non-crush, plastic oxygen delivery tubing. A face mask, which
can give a high concentration of oxygen, should always be available in case
of rapid deterioration of the baby’s condition.

C-29
Oxygen therapy
TABLE C-6
Sources of oxygen
Source
Special
Considerations
Advantages
Disadvantages
Oxygen cylinder
(cylinder filled with
oxygen under high
pressure)
• Ensure that a
backup cylinder
is available in
case the first
cylinder becomes
empty
• Does not require
electricity
• Requires a
special regulator
to control the
flow of oxygen
Oxygen
concentrator
(machine that
extracts oxygen
from air)
• Ensure that a
backup oxygen
cylinder is
available in case
of electrical or
mechanical
failure
• May be less
expensive to
operate than
buying oxygen
cylinders (in the
long term)
• Built-in flow-
control device
• Requires a
reliable source of
electricity
Piped oxygen from
central storage
area to a wall
outlet
• Expensive
• Usually available
only in larger
health care
facilities
• Requires a
separate flow-
control device at
each outlet
MONITORING THE BABY’S RESPONSE TO OXYGEN
•
Use an oximeter according to the manufacturer’s instructions to ensure
that the baby receives an adequate concentration of oxygen.
•
If an oximeter is not available, monitor the baby for signs of
oxygenation by assessing whether the baby has signs of breathing
difficulty or central cyanosis (blue tongue and lips) (note that these
observations cannot differentiate between normal and excessive
concentrations of oxygen in the blood):

C-30
Oxygen therapy
Central cyanosis is a late sign that the baby is not receiving
enough oxygen. If the baby shows signs of central cyanosis,
increase the concentration of oxygen immediately and continue
until cyanosis is eliminated.
-
If the breathing difficulty is moderate to severe (see Table F-12,
page F-49), give oxygen at a moderate flow rate;
-
When the baby’s breathing begins to improve (e.g. respiratory rate
begins to move towards the normal range, grunting or chest
indrawing decreases), decrease the oxygen flow;
-
When the baby’s respiratory rate is within the normal range and
there are no other signs of breathing difficulty (e.g. chest indrawing
or grunting on expiration), remove oxygen and observe the baby for
15 minutes:
-
If the baby’s tongue and lips remain pink, do not give any
more oxygen. Observe for central cyanosis every 15 minutes for
the next hour;
-
If central cyanosis reappears at any time, give oxygen again
at the last rate given;
-
Continue to observe the baby for 24 hours after oxygen is
discontinued.

ANTIBIOTICS
C-31
CHOICE AND ADMINISTRATION OF ANTIBIOTICS
Antibiotic choice begins empirically with the selection of the drug(s) that is
most likely to be effective against the organism causing the baby’s illness. If
bacterial culture and sensitivity are possible, the results of these
investigations guide further treatment, particularly if the baby is not
responding to the empirically chosen antibiotic(s).
If bacterial culture and sensitivity are not possible and the baby is not
responding to the initial antibiotic(s), a second-line antibiotic or combination
of antibiotics is given on an empiric basis. Table C-7 (page C-32) lists the first-
line antibiotic(s) for the infections described in this guide and the second-line
antibiotic(s) to use if the baby shows no improvement (by the third day, unless
directed otherwise by a chapter in the section Assessment, Findings, and
Management) and if culture and sensitivity have not been performed. Review
Table C-8 (page C-33) for information on diluting antibiotics, and see Table
C-9 (pages C-34 to C-35) for antibiotic doses according to the baby’s age.
Note that the information provided in this chapter applies only to antibiotics
given to the baby. For information regarding dosage of antibiotics for the
mother and/or her partner (e.g. for a sexually transmitted infection), see the
appropriate chapter in the section Assessment, Findings, and Management.
ROUTE OF ADMINISTRATION
•
For sepsis, meningitis, tetanus, and congenital syphilis, give antibiotics
intravenously (IV) (page P-17):
-
Give the antibiotics, especially gentamicin and cefotaxime, slowly
over a period of at least three minutes;
-
Monitor the baby while giving IV fluids (page C-22) to ensure that
fluid overload does not occur;
-
If an IV line cannot be established immediately, give antibiotics
intramuscularly (IM) (page P-15) until an IV line is in place;
-
When the baby is recovering and an IV line is no longer needed for
another purpose, give the antibiotics IM to complete the course of
treatment.
•
For most other infections, give the antibiotics IM (page P-15). If an IV
line is needed for another purpose, however, give the antibiotics IV.

C-32
Antibiotics
TABLE C-7
Antibiotics used to treat infections described in this guide
Infection
First-Line Antibiotic(s)
Second-Line Antibiotics
Sepsis or meningitis
Ampicillin and gentamicin
Cefotaxime and gentamicin
Sepsis with infection of the
umbilicus or skin
Cloxacillin and gentamicin
Cefotaxime and gentamicin
Congenital syphilis with
central nervous system
(CNS) involvement
Benzylpenicillin
Congenital syphilis without
CNS involvement
Procaine benzylpenicillin
or benzathine
benzylpenicillin
Tetanus
Benzylpenicillin
Skin infection with 10 or
more pustules or blisters or
covering more than half the
body but without sepsis
Cloxacillin
Cloxacillin and gentamicin
Skin infection with fewer
than 10 pustules or blisters
or covering less than half
the body but without sepsis
Cloxacillin
Cellulitis
Cloxacillin
Cloxacillin and gentamicin
Conjunctivitis due to
gonorrhoea
Ceftriaxone
Conjunctivitis due to
chlamydia
Erythromycin
Mother with uterine
infection or fever, or
rupture of membranes for
more than 18 hours before
birth; asymptomatic baby
Ampicillin and gentamicin
Mother not treated for
syphilis; asymptomatic
baby
Procaine benzylpenicillin
or benzathine
benzylpenicillin

C-33
Antibiotics
TABLE C-8
Antibiotic dilutions
Antibiotic
Dilution
Ampicillin
Add 5 ml sterile water to 500-mg vial = 100 mg/ml
Benzathine benzylpenicillin
Add 5 ml sterile water to 1.8-g (2.4-million unit)
vial = 360 mg/ml (480 000 units/ml)
Benzylpenicillin
Add 5 ml sterile water to 600-mg (1-million unit)
vial = 120 mg/ml (200 000 units/ml)
Cefotaxime
Add 5 ml sterile water to 500-mg vial = 100 mg/ml
Ceftriaxone
Add 2.5 ml sterile water to 250-mg vial = 100 mg/ml
Cloxacillin for injection
Add 5 ml sterile water to 500-mg vial = 100 mg/ml
Cloxacillin for oral
administration
Add 5 ml boiled water to 125-mg bottle = 25 mg/ml
Erythromycin for oral
administration
Add 5 ml boiled water to 125-mg bottle = 25 mg/ml
Gentamicin
Use 10 mg/ml, 2-ml vial = 10 mg/ml
Procaine benzylpenicillin
Add 5 ml sterile water to 1-g (1-million unit) vial =
200 mg/ml (200 000 units/ml)

C-34
Antibiotics
TABLE C-9
Antibiotic doses
a
Antibiotic
Dose in mg
Dose in ml
Day 1 to 7
Day 8+
Day 1 to 7
Day 8+
Ampicillin for
meningitis ONLY
100 mg/kg
every 12 hours
100 mg/kg
every 8 hours
1.0 ml/kg every
12 hours
1.0 ml/kg every
8 hours
Ampicillin for
sepsis
50 mg/kg every
12 hours
50 mg/kg every
8 hours
0.5 ml/kg every
12 hours
0.5 ml/kg every
8 hours
Benzathine
benzylpenicillin
for asymptomatic
baby of mother not
treated for syphilis
75 mg/kg
(100 000
units/kg) in a
single dose
75 mg/kg
(100 000
units/kg) in a
single dose
0.2 ml/kg in a
single dose
0.2 ml/kg in a
single dose
Benzathine
benzylpenicillin
for congenital
syphilis without
CNS involvement
75 mg/kg
(100 000
units/kg)
once daily
75 mg/kg
(100 000
units/kg)
once daily
0.2 ml/kg
once daily
0.2 ml/kg
once daily
Benzylpenicillin
for congenital
syphilis without
CNS involvement
30 mg/kg
(50 000
units/kg)
once daily
30 mg/kg
(50 000
units/kg)
once daily
0.25 ml/kg
once daily
0.25 ml/kg
once daily
Benzylpenicillin
for congenital
syphilis with CNS
involvement
30 mg/kg
(50 000
units/kg) every
12 hours
30 mg/kg
(50 000
units/kg) every
12 hours
0.25 ml/kg
every 12 hours
0.25 ml/kg
every 12 hours
Benzylpenicillin
for tetanus
60 mg/kg
(100 000
units/kg) every
12 hours
60 mg/kg
(100 000
units/kg) every
12 hours
0.5 ml/kg every
12 hours
0.5 ml/kg every
12 hours
Cefotaxime for
meningitis ONLY
50 mg/kg every
8 hours
50 mg/kg every
6 hours
0.5 ml/kg every
8 hours
0.5 ml/kg every
6 hours
Cefotaxime for
sepsis
50 mg/kg every
12 hours
50 mg/kg every
8 hours
0.5 ml/kg every
12 hours
0.5 ml/kg every
8 hours
Ceftriaxone
50 mg/kg in a
single dose
50 mg/kg in a
single dose
0.5 ml/kg in a
single dose
0.5 ml/kg in a
single dose

C-35
Antibiotics
TABLE C-9 Cont.
Antibiotic doses
a
Antibiotic
Dose in mg
Dose in ml
Day 1 to 7
Day 8+
Day 1 to 7
Day 8+
Cloxacillin (oral
administration)
Less than 2 kg:
Less than 2 kg:
50 mg/kg every
8 hours
50 mg/kg every
8 hours
2 ml/kg every
8 hours
2 ml/kg every
8 hours
2 kg or more:
2 kg or more:
50 mg/kg every
8 hours
50 mg/kg every
8 hours
2 ml/kg every
8 hours
2 ml/kg every
8 hours
Cloxacillin
(injection)
Less than 2 kg:
Less than 2 kg:
50 mg/kg every
8 hours
50 mg/kg every
8 hours
0.5 ml/kg every
8 hours
0.5 ml/kg every
8 hours
2 kg or more:
2 kg or more:
50 mg/kg every
8 hours
50 mg/kg every
8 hours
0.5 ml/kg every
8 hours
0.5 ml/kg every
8 hours
Erythromycin
12.5 mg/kg
every 6 hours
12.5 mg/kg
every 6 hours
0.5 ml/kg every
6 hours
0.5 ml/kg every
6 hours
Gentamicin
Less than 2 kg:
Less than 2 kg:
4 mg/kg
once daily
7.5 mg/kg
once daily
OR 3.5 mg/kg
every 12 hours
0.4 ml/kg
once daily
0.75 ml/kg
once daily
OR 0.35 ml/kg
every 12 hours
2 kg or more:
2 kg or more:
5 mg/kg
once daily
7.5 mg/kg
once daily
OR 3.5 mg/kg
every 12 hours
0.5 ml/kg
once daily
0.75 ml/kg
once daily
OR 0.35 ml/kg
every 12 hours
Procaine
benzylpenicillin
for congenital
syphilis without
CNS
involvement
100 mg/kg
(100 000
units/kg)
once daily
100 mg/kg
(100 000
units/kg)
once daily
0.5 ml/kg
once daily
0.5 ml/kg
once daily
Procaine
benzylpenicillin
for asymptomatic
baby of mother
not treated for
syphilis
100 mg/kg
(100 000
units/kg) in a
single dose
100 mg/kg
(100 000
units/kg) in a
single dose
0.5 ml/kg in a
single dose
0.5 ml/kg in a
single dose
a
See pages C-31 to C-33 for information on route of administration and directions for
diluting antibiotics.

C-36
Antibiotics

INFECTION PREVENTION
C-37
Infection prevention is an important part of every component of care of a
newborn baby. Newborn babies are more susceptible to infections because
their immune system is immature; thus, the consequences of failing to follow
infection prevention principles are particularly devastating. Key infection
prevention practices are summarized below.
GENERAL PRINCIPLES OF INFECTION PREVENTION
Observing the infection prevention practices below will protect the baby,
mother, and health care provider from infections. They also will help prevent
the spread of infections.
•
Provide routine care of the newborn baby.
•
Consider every person (including the baby and staff) as potentially
infectious.
•
Wash hands or use an alcohol-based handrub.
•
Wear protective clothing and gloves.
•
Use aseptic technique.
•
Handle sharp instruments carefully, and clean and, if necessary, sterilize
or disinfect instruments and equipment.
•
Routinely clean the newborn special care unit, and dispose of waste.
•
Isolate babies with infections to prevent nosocomial infections.
INFECTION PREVENTION PRACTICES
PROVIDE ROUTINE CARE OF THE NEWBORN BABY
•
After the first six hours of life or after the baby’s temperature is stable,
use cotton cloths soaked in warm water to remove blood and other body
fluids (e.g. from the birth) from the baby’s skin, and then dry the skin.
Delay bathing a small baby (less than 2.5 kg at birth or born before 37
weeks gestation) until at least the second day of life.
•
Clean the buttocks and perineal area of the baby each time the baby’s
napkin is changed, or as often as required, using cotton soaked in warm,
soapy water, and then carefully dry the area.

C-38
Infection prevention
•
Ensure that the mother knows correct positioning and attachment for
breastfeeding (page C-12) to prevent mastitis and nipple damage.
PEOPLE AS SOURCES OF INFECTION
•
Locate the newborn special care unit in a low-traffic area with restricted
access.
•
Have a private room for newborn babies, if possible.
•
Ensure that staff in direct contact with newborn babies receive as many
of the following immunizations as possible:
-
rubella;
-
measles;
-
hepatitis B virus;
-
mumps;
-
influenza (yearly).
•
Do not allow personnel with skin infections or lesions to come into direct
contact with babies.
•
Do not allow staff or visitors to enter the newborn special care unit if
they have an acute infection (e.g. respiratory virus).
•
Limit the number of different individuals handling the baby.
HANDWASHING
•
Wash hands with soap and water (if hands are visibly clean, disinfect
them using an alcohol-based handrub):
-
before and after caring for a baby and before any procedure;
-
after removing gloves;
-
after handling soiled instruments or other items.
•
Instruct the mother and family members to wash their hands before and
after handling the baby.
•
To wash hands:
-
Thoroughly wet hands;

C-39
Infection prevention
-
Wash hands for 10 to 15 seconds with plain soap and running or
poured water;
-
Allow hands to air-dry or dry them with a clean paper or personal
towel.
•
An alcohol-based handrub, made from adding 2 ml of glycerine (or other
emollient) to 100 ml of 60% to 90% ethyl or isopropyl alcohol, is more
effective in cleaning hands than handwashing unless the hands are visibly
soiled. To clean hands using an alcohol-based handrub:
-
Apply enough handrub to cover the entire surface of hands and
fingers;
-
Rub the solution into hands until they are dry.
PROTECTIVE CLOTHING AND GLOVES
•
It is not necessary to wear gowns or masks when providing routine care
for newborn babies.
•
Wear protective clothing (e.g. aprons, gowns) when contact with blood
or body fluids is anticipated.
•
Wear closed-toe shoes, if possible. Do not go barefoot.
•
When gloves are required for a procedure, wear a separate pair of gloves
for each baby to avoid cross-contamination, and dispose of gloves after
contact. Use different gloves for different situations:
-
Wear sterile or high-level disinfected gloves for contact with broken
skin or for invasive procedures (e.g. lumbar puncture, umbilical vein
catheterization);
-
Wear clean examination gloves for contact with mucous membranes
or body fluids (e.g. taking a blood sample, caring for the umbilicus);
-
Wear heavy rubber or latex utility gloves for handling contaminated
items, cleaning instruments and equipment, and disposing of waste.
•
Disposable gloves are preferred, but where resources are limited, gloves
can be reused if they are:
-
decontaminated by soaking in 0.5% chlorine solution for 10 minutes;
-
washed and rinsed;

C-40
Infection prevention
-
sterilized by autoclaving (eliminates all microorganisms) or high-
level disinfected by steaming or boiling (eliminates all
microorganisms except some bacterial endospores).
•
If single-use disposable surgical gloves are reused, do not process
them more than three times because invisible tears may occur.
Do not use gloves that are cracked or peeling or have visible
holes or tears.
ASEPTIC TECHNIQUE
Using aseptic technique eliminates or reduces to a safe level the number of
microorganisms on skin, tissue, and inanimate objects.
•
Scrub hands for three to five minutes using an antiseptic soap, and rinse
with running or poured water.
•
Allow hands to air dry or dry them with a clean paper or personal towel.
•
Put on clean examination gloves.
•
Prepare the skin for procedures by washing with a swab or cotton-wool
ball soaked in an antiseptic solution (e.g. Table C-10, page C-41) in an
outward spiral motion. Repeat two more times, using a new swab or
cotton-wool ball each time, and allow to dry. If polyvidone iodine is
used, allow it to dry after applying or wait at least two minutes before
continuing with the procedure.
•
Remove examination gloves and put on high-level disinfected or sterile
gloves.
•
Use sterile or high-level disinfected instruments and equipment.
•
If there is any question about whether an item is sterile or not,
consider it contaminated.
MULTI-USE VIALS
•
Use a new, sterile needle and syringe each time medication is withdrawn
from a multi-use vial or container.
•
Store multi-use vials according to their instructions (e.g. store in a dark,
cool area or refrigerate).
•
Record on the vial the date and time it was opened, and use for up to one
month or according to the expiry date.

C-41
Infection prevention
•
Do not keep opened glass ampules so that the drug can be used for
multiple babies. The drug may not be stable, and taping ampules shut
will not prevent contamination.
•
Discard diluent solutions (e.g. sterile water or normal saline) after 24
hours.
•
Change the IV infusion set and fluid bag every 24 hours, even if the bag
still contains IV fluid (they can be a major source of infection).
ANTISEPTIC AND DISINFECTANT SOLUTIONS
Although the terms are sometimes used interchangeably, antiseptic and
disinfectant solutions (Table C-10) serve different purposes. Antiseptic
solutions are used on the skin and are usually not as strong as disinfectants.
Disinfectant solutions are used to decontaminate or high-level disinfect
instruments and equipment.
TABLE C-10
Acceptable antiseptic and disinfectant solutions
Acceptable Antiseptic Solutions
Acceptable Disinfectant Solutions
a
• 2.5% polyvidone iodine (for skin
preparation or scrub)
• 4% chlorhexidine gluconate (for skin
preparation or scrub)
• 60% to 90% ethyl or isopropyl alcohol
(for skin preparation for taking a blood
sample or establishment of an IV line)
• 0.5% chlorine bleach (for
decontamination of surfaces and high-
level disinfection of instruments)
• 2% glutaraldehyde
a
Do not use disinfectants with phenolic compounds, as they may harm newborn babies.
•
To prevent contamination of antiseptic and disinfectant solutions:
-
use only boiled water for dilution, if dilution is necessary (boil water
for 20 minutes to high-level disinfect it);
-
take care not to contaminate the mouth of the container when
pouring the solution into smaller containers;
-
empty and wash containers with soap and water and allow them to
air dry at least once weekly;
-
pour the antiseptic solution onto cotton-wool balls or gauze. Do not
dip into the solution;
-
store the solutions in a cool, dark place.

C-42
Infection prevention
INSTRUMENTS AND EQUIPMENT
SAFE HANDLING OF SHARP INSTRUMENTS
•
After use, decontaminate syringes and needles by flushing them with a
disinfectant solution (Table C-10, page C-41) three times.
•
Immediately dispose of sharps by placing them in a puncture-proof
container. Do not recap, bend, or break the needle or remove it from the
syringe. If the needle must be recapped, use the one-handed recap
method:
-
Place the cap on a hard, flat surface;
-
Hold the syringe with one hand and use the needle to “scoop up” the
cap;
-
When the cap covers the needle completely, hold the base of the
needle and use the other hand to secure the cap.
•
Dispose of the container as directed on page C-44.
INSTRUMENT PROCESSING
•
See Table C-11 (page C-43) for specific guidelines for processing
instruments to ensure that they are clean and high-level disinfected or
sterile.
•
Ensure that instruments that penetrate the skin (e.g. needles, catheters)
are adequately sterilized or high-level disinfected before use and
properly processed after use.
•
Use a disinfectant solution to wipe off equipment that does not contact
the bloodstream (e.g. stethoscope, incubator) between each use, and
particularly between use with different babies.

C-43
Infection prevention
TABLE C-11
Guidelines for processing instruments and equipment
Instrument
Processing Guidelines (after each use)
Thermometers and stethoscopes
• Wipe with a disinfectant solution
Resuscitation bag and mask
• Wipe exposed surfaces with gauze pad soaked in
disinfectant solution
• Wash with soap and water
Incubator or radiant warmer
• Wipe with a disinfectant solution daily
• Wash radiant warmer with soap and water before
using for a new baby
• Wash incubator weekly, if the same baby is still
in the incubator, and before using for a new
baby
Suction apparatus and catheter,
gastric tube, nasal prongs, nasal
catheter, syringes
• Soak in disinfectant solution for 10 minutes
• Wash with soap and water
• High-level disinfect or sterilize
Oxygen head box
• Wash with soap and water
HOUSEKEEPING AND WASTE DISPOSAL
Regular and thorough cleaning will decrease microorganisms on surfaces and
help prevent infection. Remember the following about housekeeping and
waste disposal:
•
Every newborn special care unit should have a housekeeping schedule:
-
Post the cleaning schedule in a visible area (see Table C-12, page
C-44 for a sample cleaning schedule);
-
Provide details on exactly what needs to be done and how often;
-
Educate staff regarding cleaning, and delegate responsibility.
•
Follow general guidelines for housekeeping:
-
Clean from the top to the bottom (e.g. of walls and window
coverings) so that the dirt that falls during cleaning is removed;
-
Always wear heavy rubber or latex utility gloves;
-
Ensure that a fresh bucket containing disinfectant solution is
available at all times;

C-44
Infection prevention
-
Immediately clean up spills of blood or body fluids using
disinfectant solution;
-
Wrap or cover clean linens and store them in an enclosed cart or
cabinet to prevent contamination with dust;
-
After each use, wipe off beds, tables, and procedure trolleys using
disinfectant solution.
•
Separate contaminated waste (e.g. items soiled by blood, pus, and other
body fluids) from non-contaminated waste.
•
Use a puncture-proof container for contaminated sharps, and destroy the
container when two-thirds full:
-
Add a small amount of kerosene to the container, and burn the waste
in an open area downwind from the service site;
-
If it is not possible to burn the disposal container, bury it in a site
at least 50 metres away from a water source.
TABLE C-12
Sample cleaning schedule for the newborn special care unit
Frequency
Cleaning Guidelines
Daily
• Wet-mop floors with a disinfectant and detergent solution. Do not
sweep floors or use cleaning methods that increase dust
.
• Wipe
incubators and radiant warmers with a disinfectant solution.
Between
Babies
• Wipe equipment, bassinets, examination tables, etc., with a cloth
dampened with disinfectant solution.
• Clean incubators and radiant warmers between each use, including
the mattress, with a disinfectant solution. Allow the incubator to dry
completely before placing a baby inside.
As Needed
• Clean windows, walls, lamps, chairs, and window coverings to
prevent accumulation of dust.
• Remove and destroy or clean contaminated waste containers.
• Remove and destroy the sharps-disposal container and replace with
another suitable container.
• Clean spills of blood or body fluids with a disinfectant solution.

C-45
Infection prevention
ADDITIONAL METHODS TO PREVENT INFECTION
•
Have a private room specifically for newborn babies, if possible.
•
Avoid overcrowding and understaffing.
•
Do not place two or more babies in the same cot or incubator or under
the same radiant warmer or phototherapy unit.
NOSOCOMIAL INFECTIONS
Nosocomial infections are infections that are acquired in the health care
facility. A presumptive epidemic in a newborn special care unit is defined as
finding two or more babies with the same condition (e.g. skin or eye
infection, infectious diarrhoea) at the same time. If a nosocomial infection
occurs, strict control measures should be put in place and monitored to
resolve the problem. For skin and eye infections and diarrhoea (the most
common nosocomial infections in newborn special care units), perform the
following:
•
Isolate the baby by placing the baby and her/his mother in a private
room:
-
Leave the door open, if necessary, to ensure that the baby and
mother are not neglected;
-
If a private room is not available, place all babies with the same
infection, but no other infections, in the same room.
•
When entering the room with the baby:
-
Wear clean examination gloves, and change gloves after contact
with infectious material (e.g. faecal material, gauze used to wash
pustules or blisters);
-
Wear a clean gown if contact with the baby or infectious material is
anticipated.
•
Before leaving the room:
-
Remove the gown;
-
Remove gloves;
-
Wash hands with an antibacterial soap or alcohol-based handrub;

C-46
Infection prevention
-
Avoid touching potentially contaminated surfaces or objects, and
ensure that clothing does not come in contact with potentially
contaminated surfaces or objects.
•
Restrict transfer of the baby to other areas of the health care facility
unless absolutely necessary. During transfer, maintain infection
prevention precautions.
•
Reserve non-critical care equipment (e.g. stethoscope, thermometer) for
use only with the infected baby, if possible, and carefully clean and
disinfect equipment shared among infected and non-infected babies.

CLINICAL USE OF BLOOD
C-47
Blood is transfused only for a condition that cannot be managed effectively
by other means. District health care facilities should be prepared for the
urgent need for blood transfusion. Health care facilities with newborn special
care units should keep stored blood available, especially type O, Rh-negative
blood. Splitting units of blood into smaller bags (e.g. 50 ml) suitable for
babies can help prevent wasting blood and reduces the risk of transfusing too
much blood. For the procedure of transfusing blood, see page P-31.
PRINCIPLES OF BLOOD TRANSFUSION
Principles of blood transfusion to remember include the following:
•
Transfusion is only one element of managing a problem in a baby.
•
The baby’s haemoglobin level (or haematocrit), although important,
should not be the only deciding factor in giving a transfusion. The
decision to transfuse should be supported by the need to relieve clinical
signs (e.g. active and ongoing bleeding) and prevent significant
morbidity and mortality. Note that the measured haemoglobin will not
reflect the baby’s actual clinical condition in cases of ongoing bleeding.
•
In small babies (less than 2.5 kg at birth or born before 37 weeks
gestation), the haemoglobin may gradually fall (anaemia of prematurity),
but transfusion is recommended only when the haemoglobin is less than 8
g/dl (haematocrit less than 24%) if the baby is otherwise well.
•
The volume of blood taken for laboratory tests should be minimized to
decrease “wastage” of the baby’s blood to reduce the need for
transfusion. Use of special low-volume collection tubes, if available, is
helpful.
•
If blood is not immediately available for transfusion, give crystalloid
fluid (e.g. normal saline or Ringer’s lactate) until blood can be obtained.
REDUCING RISKS OF BLOOD TRANSFUSION
•
The transfusion of blood carries the risk of:
-
viral infections, such as HIV and hepatitis;
-
bacterial infections (any blood product can become contaminated
with bacteria if it is prepared or stored incorrectly);
-
serious haemolytic transfusion reactions;

C-48
Clinical use of blood
-
graft-versus-host disease.
•
The risks associated with transfusion can be reduced by:
-
effectively selecting, deferring, and excluding blood donors;
-
screening for transfusion-transmissible infections in the blood donor
population (e.g. HIV and hepatitis; see below);
-
ensuring high quality blood-grouping, compatibility testing, storage,
and transportation of blood;
-
ensuring that the blood bank follows recommendations for safe
blood;
-
appropriately using blood;
-
establishing and maintaining quality assurance programmes.
•
Blood that is given to the baby must be cross-matched to the blood of
both the mother and the baby. When sending the baby’s blood sample for
blood-typing and cross-matching, always send a sample of the mother’s
blood, if possible.
•
In areas with a high prevalence of malaria, give prophylactic antimalarial
drugs to the baby receiving the blood.
SCREENING BLOOD FOR INFECTIOUS AGENTS
•
Screen every unit of donated blood for transfusion-transmissible
infections, using the most appropriate and effective tests, in accordance
with both national policies and the prevalence of infectious agents in the
potential blood donor population.
•
All donated blood should be screened for:
-
HIV-1 and HIV-2;
-
hepatitis B surface antigen (HbsAg);
-
Treponema pallidum antibody (syphilis).
•
Where possible, all donated blood should also be screened for:
-
hepatitis C;
-
Chagas disease (in countries where the seroprevalence is high);
-
cytomegalovirus;

C-49
Clinical use of blood
-
malaria (in low-prevalence countries when donors have travelled to
malarial areas).
•
No blood should be released for transfusion until all nationally required
tests are shown to be negative.
•
Perform compatibility tests on all blood transfused even if, in life-
threatening emergencies, the tests are performed after the blood has been
issued.

C-50
Clinical use of blood

IMMUNIZATION
C-51
GENERAL GUIDELINES
The following guidelines are general and should be harmonized with existing
national policies.
•
Vaccinate the baby at birth against tuberculosis (where prevalence is
high), poliomyelitis, and hepatitis B unless directed otherwise below.
•
Immunize the baby according to the following guidelines, regardless of
whether the baby:
-
is small (less than 2.5 kg at birth or born before 37 weeks gestation).
Immunize at the usual age (chronological age and not corrected age),
and do not reduce vaccine dose;
-
has been hospitalized for a prolonged period of time. If the baby is
still in the hospital at 60 days of age, complete a first course of
immunization (described below) and also give diphtheria, pertussis,
and tetanus (DPT) vaccine 0.5 ml IM in the upper thigh before the
baby is discharged;
-
has a clinically stable neurologic condition (e.g. brain injury);
-
was born to a mother who is HIV positive;
-
is receiving treatment with antibiotics;
-
has jaundice.
•
Be sure to use a sterile or high-level disinfected syringe and needle for
each immunization and for each baby.
TUBERCULOSIS VACCINE (BCG)
•
Give a single dose of 0.05 ml intradermally (page P-19) in the upper
portion of the left arm using a special BCG syringe.
•
In countries with a high prevalence of tuberculosis, give the BCG
immunization as soon after birth as possible, with the following exceptions:
-
If the baby is sick, give the immunization after the baby has
recovered and just before discharge from the hospital;
-
If the baby’s mother has active lung tuberculosis and has been
treated for less than two months before birth or is diagnosed
with tuberculosis after birth, see page F-155.

C-52
Immunization
POLIOMYELITIS VACCINE (OPV)
There is no risk of nosocomial spread of polio as a result of immunizing
babies with OPV.
•
Place two drops of the vaccine on the baby’s tongue.
•
Give four doses of OPV for effective protection:
-
In polio-endemic areas, give a single dose of OPV at birth or up to
two weeks after birth;
-
Regardless of whether the first dose was given at birth, give the
other three doses of OPV at 6, 10, and 14 weeks, respectively.
HEPATITIS B VACCINE (HBV)
•
Give HBV (paediatric formulation) 0.5 ml IM in the upper thigh (page
P-15). Note that the efficacy may be lower if the vaccine is injected into
the buttocks.
•
Give three doses of HBV:
-
If the baby is sick, give the first dose as soon as the baby has
recovered;
-
If the mother is known to be HbsAg positive or if perinatal
transmission is common:
-
Give the first dose shortly after birth (preferably within 12 hours
of birth);
-
Give the second and third doses at 6 and 14 weeks, respectively.
-
If the mother is known to be HbsAg negative and the baby is still
in the hospital at 60 days of age, give HBV just before the baby is
discharged;
-
In all other cases, give the first dose at six weeks and give the
second and third doses at an interval at least four weeks apart.

ASSESSING GROWTH
C-53
GENERAL PRINCIPLES
The most commonly used method for monitoring and assessing growth is
weight gain. Until breastfeeding is established, or if the baby is sick or small
(less than 2.5 kg at birth or born before 37 weeks gestation), the baby may not
gain, or may even lose, weight. Babies weighing 1.5 to 2.5 kg may lose up to
10% of their birth weight in the first four to five days after birth, and babies
weighing less than 1.5 kg may lose up to 15% of their birth weight during the
first 7 to 10 days after birth.
•
Unless the baby requires immediate drugs or fluid based on body weight,
weigh the baby at birth after the baby’s temperature has stabilized or
upon admission to:
-
identify low birth weight and anticipate problems associated with it;
-
have a reference value for monitoring growth;
-
calculate drug doses and volume of fluid to give, if necessary;
-
assess the adequacy of food and fluid intake.
•
Weigh and assess weight gain twice weekly (note that weighing on the
same two days each week establishes a routine that is easy to follow)
until the baby is gaining weight for three consecutive assessments, and
then weigh weekly for as long as the baby is in the hospital (unless
directed to do so more frequently in another chapter):
-
A minimum daily weight gain of 15 g/kg body weight per day over
three days is desirable after the initial period of weight loss;
-
After birth weight has been regained, weight gain during the first
three months of feeding should be:
-
150 to 200 g per week for babies weighing less than 1.5 kg (i.e.
20 to 30 g per day);
-
200 to 250 g per week for babies weighing 1.5 to 2.5 kg (i.e. 30
to 35 g per day).
WEIGHING TECHNIQUE
•
Use a precise and accurate scale, with 5- or 10-g increments, made
especially for weighing babies.

C-54
Assessing growth
•
Adjust/standardize the scale according to the manufacturer’s instructions.
If the manufacturer’s instructions are not available, adjust the scale
weekly or whenever the scale is moved.
•
Place a clean cloth/paper in the weighing pan.
•
Adjust the scale to zero with the cloth/paper in the pan.
•
Place the naked baby gently on the cloth/paper.
•
Wait for the baby to settle and the weight to stabilize.
•
Read the weight to the nearest 5 or 10 g.
•
Record the weight in the baby’s record and plot it on the weight chart
(below).
RECORDING WEIGHT
Figure C-9 (page C-55) is a blank weight chart that can be used to monitor
the weight of a sick or small baby. On the horizontal axis are spaces to record
the number of days after admission. The vertical axis is for the weight in
kilograms, stepped in 100-g increments and marked in 500-g increments, but
the exact weight has been left blank so that the chart can be used for any baby
irrespective of the starting weight.
If the baby’s birth weight is known, mark it as day 0. Mark the admission day
and fill in the starting weight at the appropriate level (e.g. 1.5, 2.0, 2.2 kg).
Ensure that enough space is left on the vertical axis of the chart to plot initial
weight loss. Chart the baby’s weight while hospitalized, and calculate the weight
gain/loss. See Fig. C-10 (page C-56) for an example of a completed chart.
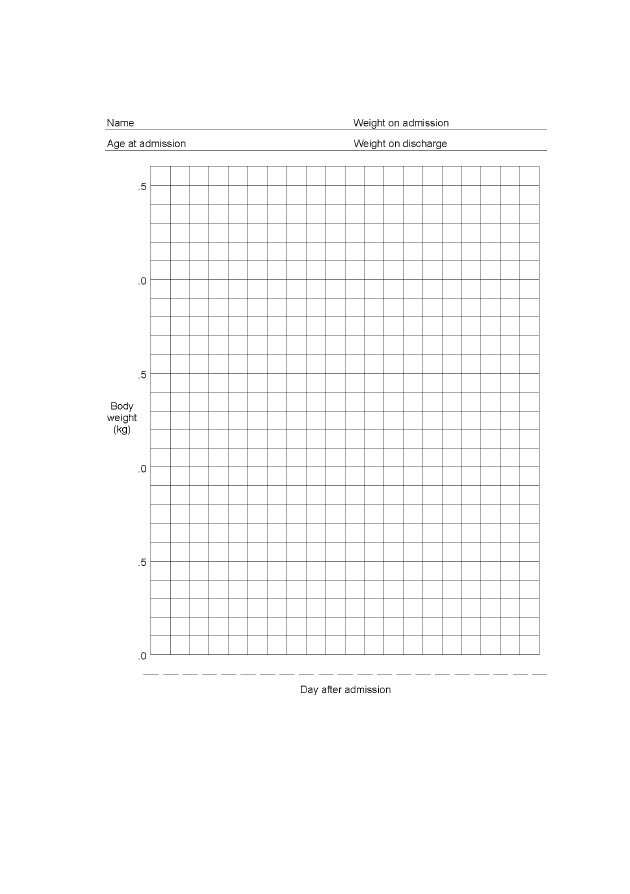
C-55
Assessing growth
FIGURE C-9
Blank weight chart
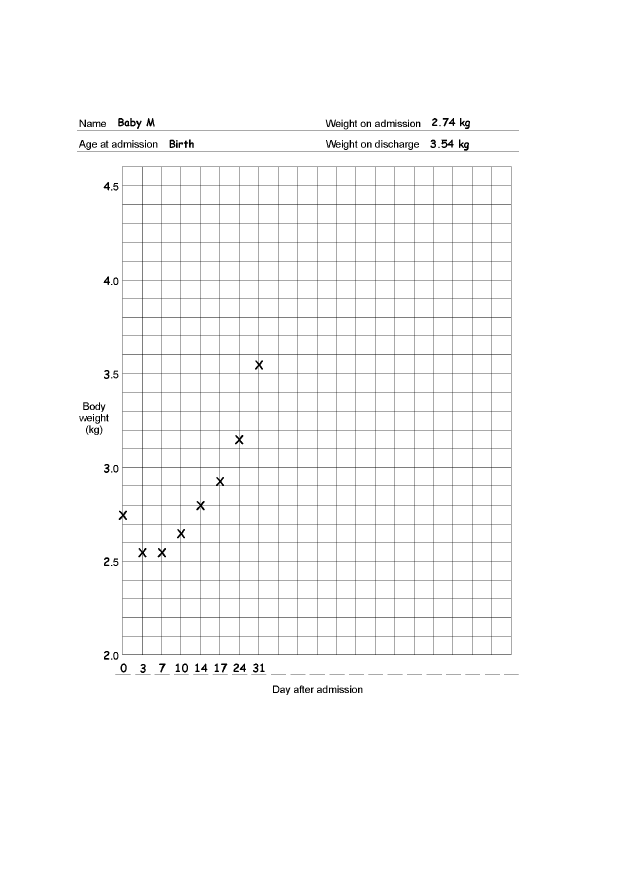
C-56
Assessing growth
FIGURE C-10
Example of a completed weight chart

COMMUNICATION AND EMOTIONAL SUPPORT
C-57
Emergency situations are often very disturbing for everyone involved and
evoke a range of emotions that can have significant consequences. The need
for the baby, whether sick or small, to be in the unfamiliar environment of a
health care facility is a stressful and emotional experience for the family,
especially the mother. In addition to the family’s fear of the baby dying, they
may have feelings of guilt, anger, and denial.
GENERAL PRINCIPLES OF COMMUNICATION
When communicating with the mother and family, remember the following:
•
Be respectful and understanding.
•
Listen to the family’s concerns and encourage them to ask questions and
express their emotions.
•
Use simple and clear language when giving the family information about
the baby’s condition, progress, and treatment, and ensure that the family
understands what you have told them. If you do not speak a language
the family understands, use a sensitive translator.
•
Respect the family’s right to privacy and confidentiality.
•
Respect the family’s cultural beliefs and customs, and accommodate the
family’s needs as far as possible.
•
Ensure that the family understands any instructions, and, if possible, give
written information to family members who can read.
•
Obtain informed consent before performing procedures, if possible.
•
Remember that health care providers may feel anger, guilt, sorrow, pain,
and frustration. Showing emotion is not a weakness.
GENERAL PRINCIPLES OF EMOTIONAL SUPPORT
EMOTIONAL AND PSYCHOLOGICAL REACTIONS
•
How each member of the family reacts to an emergency situation may
depend on the:
-
marital status of the mother and her relationship with her partner;
-
social situation of the mother/couple and their cultural and religious
practices, beliefs, and expectations;

C-58
Communication and emotional support
-
personalities of the people involved and the quality and nature of
social and emotional support;
-
nature, gravity, and prognosis of the problem and the availability and
quality of the health care services;
-
anticipated costs of health care.
•
Common reactions to newborn problems or death include:
-
denial (feelings of “it can’t be true”);
-
guilt regarding possible responsibility;
-
anger, which is frequently directed towards health care providers and
staff but often masks anger that parents direct at themselves for their
“failure”;
-
bargaining, particularly if the baby has a life-threatening condition;
-
depression and loss of self-esteem, which may be long-lasting;
-
isolation (feelings of being different or separate from others), which
may be reinforced by health care providers who avoid people who
experience loss;
-
disorientation.
EMOTIONAL SUPPORT FOR THE FAMILY
•
Do not place blame on the family if there is a question of neglect or
intervening too late.
•
Allow the parents to take a photograph of the baby, if they wish to. This
can provide great comfort to the parents, especially if they are not able to
visit the baby very often.
•
Show that you care about the baby and the family and that you respect
them:
-
Express your feelings of concern for the family and encourage them
to express their emotions, if culturally appropriate;
-
Encourage the mother to stay with her baby, and admit her, if
necessary. If the mother is not able to stay with the baby,
encourage her to visit the baby as often as she wishes. Ensure that
there are sufficient rooms available nearby so that she can establish
and maintain breastfeeding and be with her baby;

C-59
Communication and emotional support
-
Encourage the mother to take an active role in the care of her baby
and simple procedures, if possible;
-
Encourage the mother to touch and hold the baby as much and as
often as she wants;
-
If the mother is alone, identify a friend or a particular member of
the staff to support her;
-
Provide extra support and encouragement to a mother who is
expressing breast milk for a sick or small baby.
VISITATION
•
Allow and encourage visits by close family members and friends
whenever possible:
-
If the number of visitors must be limited, choose one person to act
as the representative and report to the others;
-
Encourage the family to visit the baby, but do not insist. Family
members may be reluctant to visit the baby for fear of what they will
see or because they do not want to become too attached to the baby
until they know if the baby will survive;
-
Do not equate the frequency of visiting with the quality of the baby-
parent bond or level of concern for the baby. Practical
problems—the cost of travel, the need to care for other children at
home, the mother’s need for medical treatment at a different
hospital, or responsibilities of employment or farming—can prevent
the mother and other family members from visiting.
•
Allow the baby’s sibling(s) to visit the baby unless the sibling has a
fever, signs of acute illness (e.g. acute respiratory infection), or recent
exposure to a communicable disease (e.g. chickenpox).
•
Ensure that a visiting child:
-
has contact only with her/his sibling;
-
has properly washed her/his hands;
-
is supervised at all times.

C-60
Communication and emotional support
BABY WITH NEURODEVELOPMENTAL PROBLEMS OR BIRTH
DEFECT
The birth of a baby with a neurodevelopmental problem (e.g. brain injury from
birth asphyxia or bilirubin encephalopathy) or a birth defect can be a
devastating experience for the parents and family. Reactions may vary. Having a
baby with obvious abnormalities is very distressing for parents, and in many
societies this is associated with particular stigma for the mother. Different
families have different responses and needs, and the health care staff cannot use
the same approach for all families; however, all parents are eager to obtain
information about their baby. Keep in mind the following:
•
Disbelief, denial, and sadness are normal reactions, especially if the
problem is unexpected. Feelings of unfairness, despair, depression,
anxiety, anger, failure, and apprehension are common.
•
Provide the parents with all of their options and an honest opinion of the
likely outcome. Ensure that their decisions are made with informed
consent and sufficient understanding of all the possibilities of care.
•
Provide a bed or cot in the room so that a companion can stay with the
mother if she chooses.
•
Allow the parents free access to their baby, and keep the baby with the
mother at all times, if possible. The more the parents can do for the baby
themselves, the more quickly they will accept the baby as their own.
•
Help the parents access supportive professional individuals and groups,
when possible.
•
Be willing and ready to repeat information and advice on another
occasion, as parents often cannot understand or remember all the
messages provided during the first discussion or consultation.
BABY WITH NEURODEVELOPMENTAL PROBLEMS
•
Encourage the mother to be involved with the care of her baby whenever
possible.
•
Discuss with the mother the possibility of her caring for her baby at home
once the baby no longer requires treatment or when treatment can be
continued at home.
•
Ensure that the mother has the support to have the baby receive regular
follow-up visits with an appropriate child care provider.

C-61
Communication and emotional support
BABY WITH A BIRTH DEFECT
•
Ask the mother if she would like to see and hold the baby:
-
Some mothers accept their baby immediately while others may take
longer;
-
If the mother does not want to see her baby right away, do not
force her to;
-
Allow the mother to have a companion when she sees her baby for
the first time;
-
If the baby has major deformities, try to wrap the baby in such a
way that these are covered when the mother first sees the baby;
-
Point out the normal features of the baby before discussing the
abnormalities;
-
Allow the mother and family time alone with the baby, if possible
and appropriate.
•
Explain that nobody is to blame for the abnormality. It may be helpful to
give a simple explanation of why the baby has an abnormality.
•
Explain the likely prognosis for the baby, but do not dwell on the
negative aspects of the baby’s future.
•
If the baby has a particular birth defect that can be corrected, such
as a cleft palate or club foot, explain this to the mother and reassure her.
Do not raise the mother’s hopes, however, if it is not possible to correct
the problem.
BABY WHO IS DYING OR HAS DIED
The response of each family to a baby who is dying or has died will be
different. Try to apply the following principles:
•
Allow the mother and family to be with the baby, even during
procedures, if possible and appropriate.
•
Explain what is being done to the baby and why. Involve the parents in
decision-making when considering whether further treatment is
appropriate.
•
If an informed decision has been made to stop resuscitation efforts or
if the baby’s death is inevitable, focus on providing emotional support
to the family.

C-62
Communication and emotional support
•
Encourage the mother and family to see and hold the baby after death
and for as long as they desire, if they wish.
•
Where it is the custom to name babies at birth, encourage the family and
staff to call the baby by the name they have chosen.
•
Offer the mother some mementos of the baby, such as a name tag, a lock
of hair, or a palm print, if culturally appropriate, as this may help with
the grieving process.
•
Ask the family how they will bury the baby. Even if the baby will not be
buried by the family, allow the mother (or a family member) to prepare
the baby for the funeral, if she wishes.
•
Encourage locally-accepted burial practices and ensure that medical
procedures (such as autopsies) accommodate them.
•
Help the family, if necessary, with the paperwork to register the baby’s
death if this is not done by the health care staff.
•
Arrange to see the family a few weeks after the death:
-
Answer any questions they have and help them with the grieving
process;
-
Provide written information to literate families, if possible,
especially if the condition is genetic or steps can be taken to prevent
the condition in a future pregnancy.

TRANSFER AND REFERRAL
C-63
If the baby needs to be transferred to a tertiary hospital or specialized centre,
or brought from a more peripheral facility or to a different service within the
same facility (e.g. from the delivery room to the newborn special care unit),
ensure a safe and timely transfer. It is important to prepare the baby for
transfer, communicate with the receiving or sending facility, and provide care
during transfer.
PREPARATION
•
Explain to the family the reason for transfer of the baby (page C-57).
•
Obtain informed consent for any anticipated procedures, if applicable.
•
Transfer the mother with the baby, if possible, so that she can continue to
breastfeed or provide expressed breast milk.
•
Prepare the baby for transfer:
-
Ensure that the baby’s condition is stable before transfer, if possible;
-
Give necessary treatment before transfer (e.g. treat low blood
glucose), if possible;
-
If the baby is able to feed but the mother is unable to accompany
and breastfeed the baby or the baby must be fed using an
alternative feeding method, insert a gastric tube (page P-33);
-
Ensure that the IV line, if present, is in place and secured and that
the microdropper is filled with fluid;
-
Gather essential equipment, supplies, drugs, and fluid (Table C-13,
page C-64).
•
Have a health care provider (with experience in establishing and
maintaining IV lines, resuscitating a baby, and giving drugs) accompany
the baby, if possible.
•
Ensure that the vehicle has adequate lighting and insulation to keep the
baby warm or to prevent overheating.
•
Ask a relative to accompany the baby and mother, if possible.

C-64
Transfer and referral
TABLE C-13
Suggested equipment, supplies, drugs, and fluid for transfer
of a sick or small baby
Equipment and Supplies
Drugs and Fluid
• Resuscitation bag and
mask
• Suction apparatus
• Oxygen cylinder with
flow metre and a
headbox, nasal prongs,
nasal catheter, or face
mask
• Stethoscope
• Thermometer
• Blanket
• Source of warmth
• Gastric tubes (5-F and
8-F)
• IV infusion set
• Butterfly set or
cannula
• Antiseptic solution
and cotton-wool balls
• Syringes and needles
(various sizes and
types)
• Adhesive tape
• Gloves
• Napkins (diapers)
• Food for the baby
a
• Torch and extra
batteries and bulb
• Any drug (e.g. antibiotics) the
baby is receiving if a dose is
anticipated during the trip
• IV fluid
a
If the baby is able to feed and the mother is not accompanying the baby, take
expressed breast milk.
COMMUNICATION
•
If receiving the transferred baby, request a referral form (e.g. Fig. A-3,
page A-4) with the baby’s essential information. At discharge or
following the death of the baby, send a detailed note or feedback form
(e.g. Fig. A-4, page A-5) to the referring facility.
•
If referring a baby to another facility:
-
Contact the receiving facility in advance, if possible, so they can be
prepared;
-
Confirm that the facility is able to admit the baby;
-
Give an estimated time of arrival;
-
Fill out the referral form and send it with the baby (e.g. Fig. A-3,
page A-4);
-
If the mother is accompanying the baby, inform the facility to
ensure that she will have a place to stay with the baby.

C-65
Transfer and referral
CARE DURING TRANSFER
•
Keep the baby in skin-to-skin contact with the mother or a relative. If
skin-to-skin contact is not possible, keep the baby dressed and covered.
•
If transferring the baby during cold weather:
-
Use a warming device. Keep the baby dressed and covered, and
check the temperature setting and measure the baby’s temperature
every hour;
-
If a warming device is not available, place the baby in a box with
warm water bottles:
-
Cover the bottles with a cloth and ensure that they are secured
so that they do not directly touch the baby’s skin;
-
When the water becomes cold, refill the bottles with warm water
or remove them from the box.
•
If transferring the baby during hot weather, ensure that the baby does
not become overheated.
•
Ensure that the baby receives feeds or fluid:
-
Allow the baby to breastfeed. If the baby cannot be breastfed, give
expressed breast milk by gastric tube (page C-18);
-
If the baby is receiving IV fluid:
-
Carefully monitor the rate to ensure that the baby receives the
correct volume of fluid (Table C-4, page C-22);
-
Inspect the infusion site every hour:
-
Look for redness and swelling around the insertion site of
the cannula, which indicate that the cannula is not in the
vein and fluid is leaking into the subcutaneous tissue. If
redness or swelling is seen at any time, stop the infusion,
remove the needle, and establish a new IV line in a
different vein;
-
Check the volume of fluid infused and compare to the
prescribed volume;
-
Record all findings.
•
If the baby is receiving oxygen, check the oxygen flow and tubing every
15 minutes.

C-66
Transfer and referral
•
Assess the baby’s respiratory rate every 15 minutes. If the baby is not
breathing at all, is gasping, or has a respiratory rate less than 20
breaths per minute, resuscitate the baby using a bag and mask (page P-1).
•
Stop the vehicle, if necessary, to manage problems.

DISCHARGE AND FOLLOW-UP
C-67
DISCHARGE
•
Have a written policy on discharging babies. Explain the policy to the
mother and answer any questions she may have.
•
Examine the baby and confirm that the baby meets the requirements for
discharge. Follow the specific instructions for discharge in each chapter,
if applicable.
•
In general, discharge the baby when the:
-
baby is breathing without difficulty and has no other ongoing
problems that cannot be managed on an outpatient basis;
-
baby’s body temperature is being maintained in the range of 36.5 °C
to 37.5 °C (using a method that can be continued at home if the baby
is small [less than 2.5 kg at birth or born before 37 weeks
gestation]);
-
mother is confident about her ability to care for the baby;
-
baby is breastfeeding well or the mother is confident using an
alternative feeding method;
-
baby is gaining weight.
•
Advise the mother to return with the baby immediately if the baby has
any problems (e.g. feeding or breathing difficulty, convulsions, abnormal
body temperature).
•
Ensure that the baby has received the necessary immunizations (page
C-51).
•
Give the mother a sufficient supply of drugs to complete any treatment at
home, or give a prescription for the drugs (e.g. give a three-month supply
of iron/folate supplements or a prescription for them).
•
Advise the mother on home care (normal newborn care and
breastfeeding, proper position for sleeping, danger signs, when and
where to go if danger signs occur, etc.), and give her an appointment for
a follow-up visit.
•
Discuss with the mother support systems at home or in the community,
especially if mother is adolescent, single, a first-time mother, or HIV
positive.

C-68
Discharge and follow-up
•
Complete the baby’s clinical record with discharge information,
including weight, discharge diagnosis, and the plan for follow-up.
•
Complete a discharge form (e.g. Fig. A-2, page A-3) and send a
feedback form (e.g. Fig. A-4, page A-5), if necessary, to the referring
institution or department.
•
Write a discharge letter with medical information, instructions for
treatment to be continued at home, and follow-up, if applicable.
FOLLOW-UP
•
Ensure at least one follow-up visit after discharge of babies who were
seriously ill, very small (less than 1.5 kg at birth or born before 32 weeks
gestation), or fed using an alternative feeding method at the time of
discharge. Advise the parents to ensure that the baby has regular
paediatric care after the initial follow-up visit.
•
At each visit:
-
Assess the baby for the specific problem that required follow-up and
ensure that the problem has been resolved;
-
Assess the baby’s general condition;
-
Weigh the baby and assess growth;
-
Advise on and/or manage any problems or concerns identified by the
mother;
-
Assess breastfeeding or alternative feeding, and advise the mother
on exclusive breastfeeding;
-
Reinforce parental education in newborn care and danger signs;
-
Promote the family’s continued use of the primary health care
facility;
-
Give immunizations (page C-51) if they are due, or refer the baby
and mother to the relevant service.
•
If the mother is HIV positive or the baby is likely to have long-term
problems (e.g. due to brain injury), ensure that the baby receives regular
follow-up visits with a child care provider.

SECTION 3: PROCEDURES


RESUSCITATING A BABY WHO WAS BREATHING
P-1
This chapter describes resuscitation of babies with breathing
difficulty, and is not intended for use to resuscitate babies
immediately after birth.
EQUIPMENT AND SUPPLIES
•
Newborn-size, self-inflating resuscitation bag (an adult-size bag may be
used if a bag specifically for newborn babies is not available)
•
Newborn-size mask (size 0 for a small baby [less than 2.5 kg at birth or
born before 37 weeks gestation] and size 1 for a normal size baby)
•
Suction apparatus (e.g. DeLee mucus trap)
•
Oxygen source (if available)
PROCEDURE
•
Gather necessary equipment and supplies.
•
Wash hands (page C-38).
•
Ensure that the resuscitation equipment is functioning properly. Block
the mask by making a tight seal with the palm of your hand, and squeeze
the bag:
-
If you feel pressure against your hand, the bag is generating
adequate pressure;
-
If the bag reinflates when you release your grip, the bag is
functioning properly.
•
Keep the baby wrapped or covered, except for the face and upper chest.
•
Move the baby to a firm, warm surface under a radiant warmer.
OPENING THE AIRWAY
•
Position the baby (Fig. P-1, page P-2):
-
Place the baby on her/his back;
-
Position the baby’s head in a slightly extended position to open the
airway (the neck should not be as extended as for adults). A rolled-
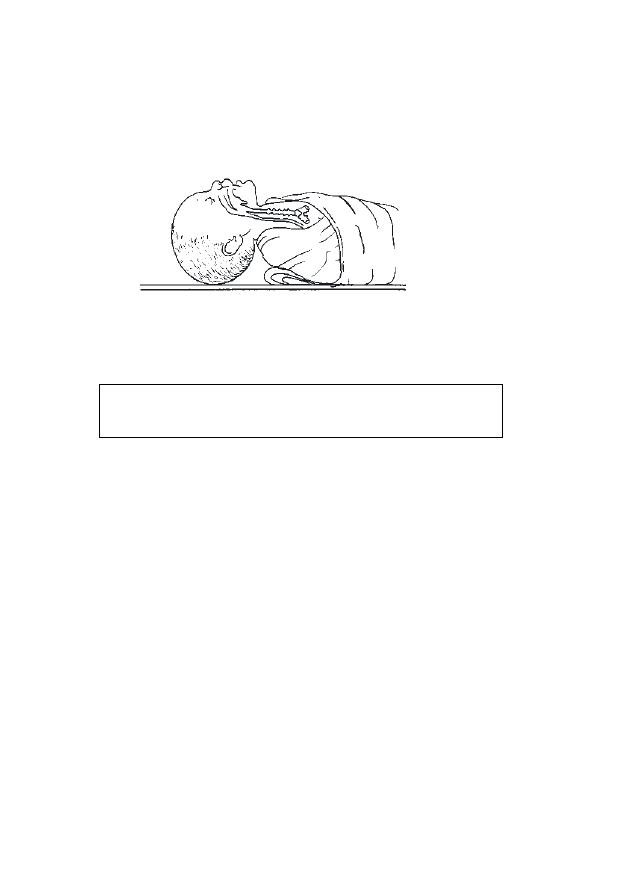
P-2
Resuscitating a baby who was breathing
up piece of cloth under the baby’s shoulders may be used to extend
the head.
FIGURE P-1
Correct position of the head for ventilation
•
If mucus or vomitus is present, clear the airway by suctioning first the
mouth and then the nostrils.
Do not suction deep in the throat as this may decrease the
baby’s heart rate.
•
If the baby is still not breathing, ventilate with a bag and mask.
VENTILATING WITH A BAG AND MASK
•
Recheck the baby’s position and ensure that the neck is slightly extended
(Fig. P-1).
•
Position the mask and check the seal (Fig. P-2, page P-3):
-
Place the mask on the baby’s face so that it covers the baby’s chin,
mouth, and nose;
-
Form a seal between the mask and the baby’s face;
-
Squeeze the bag with two fingers only (adult-size bag) or with the
whole hand (newborn-size bag);
-
Check the seal between the mask and the baby’s face by ventilating
two times and observing the rise of the chest.
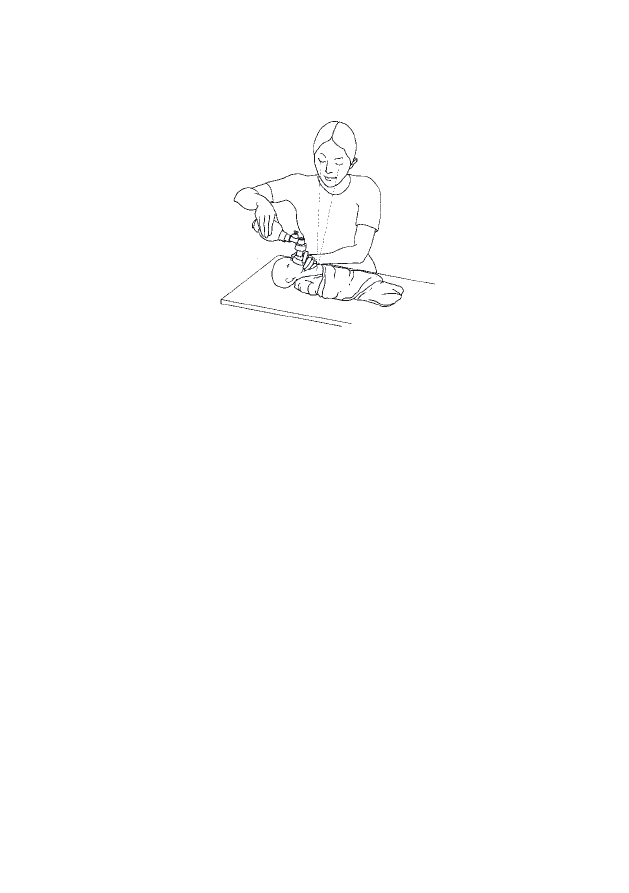
P-3
Resuscitating a baby who was breathing
FIGURE P-2
Positioning the mask and checking the seal
•
Once a seal is ensured and chest movement is present, ventilate the baby
using oxygen. If oxygen is not immediately available, begin ventilating
using room air.
•
Maintain the correct rate (approximately 40 breaths per minute) and
pressure during ventilation:
-
If the baby’s chest is rising, ventilation pressure is probably
adequate;
-
If the baby’s chest is not rising:
-
Recheck and correct, if necessary, the position of the baby
(Fig. P-1, page P-2);
-
Reposition the mask on the baby’s face to improve the seal
between the mask and the baby’s face;
-
Squeeze the bag harder to increase ventilation pressure.
•
Ventilate for one minute and then stop and quickly determine if the baby
is breathing spontaneously:
-
If the respiratory rate is normal (30 to 60 breaths per minute), stop
ventilating;
-
If there is central cyanosis (blue tongue and lips), chest indrawing,
or grunting on expiration, or the respiratory rate is 20 to 30 or
more than 60 breaths per minute, treat for breathing difficulty
(page F-47);

P-4
Resuscitating a baby who was breathing
-
If the baby is gasping or not breathing, or the respiratory rate is
less than 20 breaths per minute, continue ventilating.
•
If the baby starts crying, stop ventilating and observe the baby’s
respiratory rate for five minutes after crying stops:
-
If the respiratory rate is normal (30 to 60 breaths per minute), stop
ventilating;
-
If there is central cyanosis (blue tongue and lips), chest indrawing,
or grunting on expiration, or the respiratory rate is 20 to 30 or
more than 60 breaths per minute, treat for breathing difficulty
(page F-47);
-
If the baby is gasping or not breathing, or the respiratory rate is
less than 20 breaths per minute, continue ventilating.
•
If the baby is not breathing regularly after 20 minutes of ventilation:
-
Continue ventilation with oxygen;
-
Establish an IV line (page P-21), if one is not already in place, and
give a bolus of IV fluid 10 ml/kg body weight over 10 minutes, and
then continue IV fluid at maintenance volume according to the
baby’s age (Table C-4, page C-22);
-
Insert a gastric tube (page P-33) to empty the stomach of air and
secretions;
-
Organize transfer (page C-63), and refer the baby to a tertiary
hospital or specialized centre for further evaluation, if possible.
•
If there is no gasping or breathing at all after 20 minutes of
ventilation, or gasping but no breathing after 30 minutes of
ventilation, stop ventilating. Provide emotional support to the family
(page C-57).
CARE AFTER SUCCESSFUL RESUSCITATION
•
Keep the baby under a radiant warmer until the baby’s condition is stable.
•
Monitor the baby’s respiratory rate and look for other signs of illness
every hour for four hours and then every two hours for the next 24 hours.
•
If signs of breathing difficulty recur (respiratory rate consistently more
than 60 or less than 30 breaths per minute, central cyanosis, chest
indrawing, or grunting on expiration), treat for breathing difficulty (page
F-47).

MEASURING BODY TEMPERATURE
P-5
SUPPLIES
•
thermometer that measures temperatures as low as 35 °C (axillary
temperature)
•
thermometer that measures temperatures as low as 25 °C (rectal
temperature)
•
disinfectant solution (Table C-10, page C-41)
•
water-based lubricant
PROCEDURE
MEASURING AXILLARY TEMPERATURE
•
Gather necessary supplies.
•
Wash hands (page C-38).
•
Use a regular thermometer that measures temperatures as low as 35 °C.
•
Ensure that the thermometer is clean.
•
Keep the baby as warm as possible during the procedure (e.g. warmly
wrapped or on a warm surface).
•
Place the baby on her/his back or side.
•
Shake the thermometer until it is below 35 °C.
•
Place the tip of the thermometer high in the apex of the baby’s axilla and
hold the arm continuously against the body for at least three minutes
(Fig. P-3, page P-6).
•
Remove the thermometer and read the temperature. If the temperature is
too low to be recorded by this thermometer (less than 35 °C), measure
rectal temperature (page P-6).
•
Wipe the thermometer with a disinfectant solution after use.
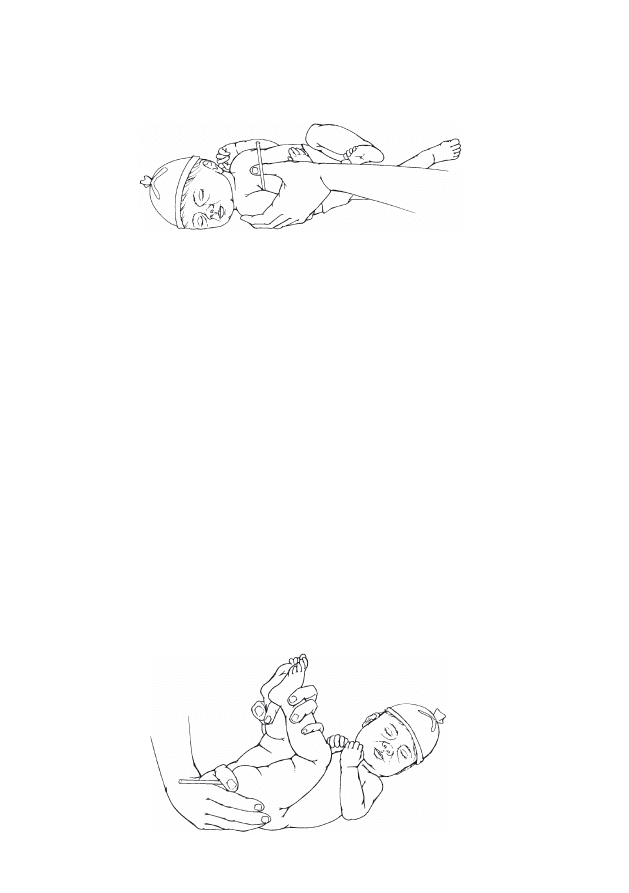
P-6
Measuring body temperature
FIGURE P-3
Measuring axillary temperature
MEASURING RECTAL TEMPERATURE
Only measure rectal temperature if the temperature is too low to be recorded
with a regular thermometer in the axilla.
•
Gather necessary supplies.
•
Wash hands (page C-38).
•
Use a thermometer that measures temperatures as low as 25 °C.
•
Ensure that the thermometer is clean.
•
Keep the baby as warm as possible during the procedure (e.g. warmly
wrapped or on a warm surface).
•
Place the baby on her/his back or side.
•
Shake the thermometer until it is below 25 °C.
•
Lubricate the thermometer using a water-based lubricant.
•
Gently grasp the baby’s ankles and hold the legs in knee-chest position
(Fig. P-4).
FIGURE P-4
Measuring rectal temperature

P-7
Measuring body temperature
•
Place the thermometer in the rectum (Fig. P-4, page P-6) to a maximum
depth of 2 cm and hold it in place for at least three minutes.
Do not leave the baby alone with the thermometer in the
rectum; any movement of the baby may result in the
thermometer perforating the rectum.
•
Remove the thermometer and read the temperature.
•
Wipe the thermometer with a disinfectant solution after use.

P-8
Measuring body temperature

TAKING BLOOD SAMPLES
P-9
Determine how much blood will be needed to perform all necessary
laboratory investigations (e.g. haemoglobin, blood glucose, serum bilirubin,
and blood type and cross-match) and take enough blood at one time for all
the tests, if possible. If only a small volume of blood is needed (e.g. for
measurement of blood glucose, serum bilirubin, or haemoglobin), use a
capillary blood sample (heel prick) if possible (page P-11). If a larger
volume of blood is needed than can be obtained from a heel prick (e.g.
when more than 1 ml of blood is needed for several laboratory investigations
or for blood culture and sensitivity), use venepuncture (below).
VENEPUNCTURE
•
Use veins in the hands and feet first. Do not use jugular or femoral
veins for routine sampling.
•
A closed system using a butterfly set and syringe ensures a sterile blood
sample to use for bacterial culture and sensitivity.
SUPPLIES
•
clean examination gloves
•
swab or cotton-wool ball soaked in antiseptic solution (Table C-10,
page C-41)
•
dry cotton-wool ball
•
sterile needle (21- to 23-gauge) or butterfly set (23- to 25-gauge)
•
sterile syringe (of appropriate size for the amount of blood needed; a
syringe is not required if only a needle is used)
•
appropriate blood collection tubes
PROCEDURE
•
Gather necessary supplies.
•
Follow principles of infection prevention (page C-37).
•
Identify the vein to be used.
•
Wash hands (page C-38), and put on clean examination gloves.
•
Prepare the skin over the vein using a swab or cotton-wool ball soaked
in antiseptic solution, and allow to dry.

P-10
Taking blood samples
•
Ensure that the blood collection tubes are within easy reach.
•
Have an assistant use her/his forefinger and thumb to gently encircle the
limb above the site selected for puncture.
NEEDLE WITH A SYRINGE OR BUTTERFLY SET
•
Attach the syringe to the needle or butterfly set tubing.
•
Insert the needle through the skin at an angle of about 15 degrees, with
the bevel of the needle facing upward.
•
Pull gently on the syringe plunger as the needle is advanced. Once
blood flows easily into the syringe or the tubing of the butterfly set, do
not advance the needle any further.
•
Take enough blood to perform all necessary laboratory investigations.
•
After blood is collected:
-
Have the assistant remove her/his finger and thumb from around
the baby’s limb;
-
Withdraw the needle from the vein, and have the assistant apply
gentle pressure to the puncture site with a dry cotton-wool ball for
several minutes to prevent bruising.
•
If an open collection tube is used, carefully recap the needle (page
C-42) and remove it from the syringe before transferring the blood into
the tube.
•
Dispose of the syringe (or clean it) and the butterfly set or needle
according to recommended infection prevention procedures (page C-42).
•
Record the volume of blood taken.
NEEDLE WITHOUT SYRINGE
A needle can be used without a syringe; however, this can be messy and is
unsterile, making this method unsuitable for culture and sensitivity. Ensure
that the needle is disposed of properly (page C-42).
•
Insert the needle through the skin at an angle of about 15 degrees, with
the bevel of the needle facing upward, until blood flows out quickly:
-
If the blood comes out very slowly, gently adjust the needle slightly
by pulling it back or pushing it in;

P-11
Taking blood samples
-
Hold the collection tubes under the needle to collect the blood, being
careful not to touch the tubes or the end of the needle.
•
Take enough blood to perform all necessary laboratory investigations.
•
After blood is collected, withdraw the needle from the vein, and have the
assistant apply gentle pressure to the puncture site with a dry cotton-wool
ball for several minutes to prevent bruising.
•
Dispose of the needle according to recommended infection prevention
procedures (page C-42).
•
Record the volume of blood taken.
CAPILLARY BLOOD SAMPLE (HEEL PRICK)
SUPPLIES
•
clean examination gloves
•
swab or cotton-wool ball soaked in antiseptic solution (Table C-10, page
C-41)
•
dry cotton-wool ball
•
sterile lancet (if a lancet is not available, use a 24-gauge needle)
•
capillary tubes or other appropriate glass collection tubes
PROCEDURE
•
Gather necessary supplies.
•
Follow principles of infection prevention (page C-37).
•
Wash hands (page C-38), and put on clean examination gloves.
•
Prepare the skin of the heel using a swab or cotton-wool ball soaked in
antiseptic solution, and allow to dry.
•
Flex the foot up towards the leg and hold it in this position with one
hand.
•
Squeeze the heel firmly enough to make it flush red (but not so much
that it turns white).
•
Puncture the skin (about 1 to 2 mm deep) firmly with a lancet:
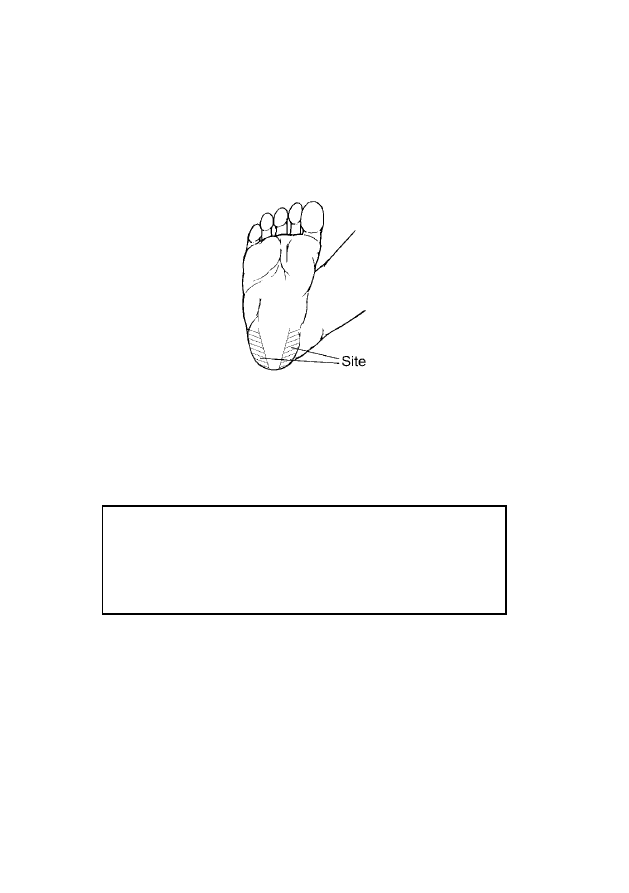
P-12
Taking blood samples
-
Aim towards the lateral or medial side of the heel (Fig. P-5);
-
Avoid the heel pad because of the risk of infection;
-
Avoid using previously used sites, if possible.
FIGURE P-5
Site for heel prick
•
Squeeze the heel gently and intermittently to enhance blood flow. Avoid
excessive squeezing and rubbing of the heel, as this will cause bruising
and dilution of blood with tissue fluid, giving an inaccurate result.
A tiny jab is more unpleasant for the baby because it will take
longer to collect the blood and requires prolonged squeezing
of the heel; in some cases, a second heel stick may be required.
Excessively deep heel sticks, however, can cause cuts,
infection, and scarring.
•
Collect blood into the tube, taking enough blood to perform all necessary
laboratory investigations.
•
After blood is collected, have an assistant apply gentle pressure to the
puncture site with a dry cotton-wool ball for several minutes to prevent
bruising.
•
Record the volume of blood taken.

MEASURING BLOOD GLUCOSE
P-13
Measure blood glucose using standard laboratory methods. If laboratory
methods are not available, use paper reagent strips that are made for
newborn babies. Note that paper reagent strips may underestimate blood
glucose by as much as 0.5 to 1.0 mmol/l.
•
Gather necessary equipment and supplies.
•
Read the instructions for the reagent strips.
•
Take a blood sample (page P-9).
•
Transfer the required volume of blood onto the reagent strip, usually in
an area at the tip of the strip, taking care to cover all the required area
with one or two drops of blood at the same time.
•
Leave the blood on the strip for the required length of time—usually 60
seconds.
•
Wipe or wash off the blood, using running water, according to the
manufacturer’s instructions.
•
Estimate the blood glucose:
-
Immediately compare the colour on the strip to a colour chart
(usually on the container of the reagent strips) to estimate blood
glucose;
-
Improve the accuracy of this method by using a reflectance metre
(supplied by the manufacturer of the reagent strips), if available, to
read the colour change on the reagent strip.
•
If the blood glucose is less than 25 mg/dl (1.1 mmol/l), confirm by
laboratory measurement, if possible.

P-14
Measuring blood glucose

GIVING INJECTIONS
P-15
INTRAMUSCULAR (IM) INJECTIONS
GENERAL PRINCIPLES
•
The sites for IM injections include the:
-
Quadriceps muscle group of the upper, outer thigh. This site is
preferred because of the small risk of giving the injection
intravenously, hitting the femur with the needle, or injuring the
sciatic nerve;
-
Gluteus muscle group in the buttock. This muscle group is difficult
to use for IM injection because of variable amounts of fat and
subcutaneous tissue and the danger of injury to the sciatic nerve and
major blood vessels in the region. If using this site, use only the
upper, outer quadrant of the muscle, and always aspirate before
injecting;
-
Deltoid muscle group. This site can be used for giving
immunizations but should not be used for giving other injections.
•
Minimize pain with injection by:
-
Using a sharp needle of the smallest diameter that will allow fluid to
flow freely (e.g. 22- to 24-gauge);
-
Ensuring that no material for injection is in the needle at the time of
insertion into the skin;
-
Using a minimal volume for injection (e.g. 2 ml or less at any single
injection site);
-
Avoiding rapid injection of material;
-
Using alternative injection sites for subsequent injections.
•
Potential complications of IM injections include:
-
inadvertent intra-arterial or intravenous injection;
-
infection from contaminated injection material;
-
neural injury (typically the sciatic nerve after injections in the
buttock);
-
local tissue damage due to injection of irritants.

P-16
Giving injections
•
Avoid these complications by:
-
selecting the safest agents for injection;
-
choosing the proper injection site;
-
establishing anatomic landmarks;
-
cleansing the skin thoroughly;
-
alternating sites for subsequent injections;
-
aspirating before injection;
-
avoiding tracking the drug into superficial tissues;
-
using a needle of adequate length to reach the intended injection site.
SUPPLIES
•
sterile 1-inch needle of the smallest size that will allow fluid to flow
freely (e.g. 22- to 24-gauge)
•
sterile syringe of the smallest size available that has adequate markings
for proper dose (e.g. 1- to 3-ml)
•
dry cotton-wool ball
PROCEDURE
•
Gather necessary supplies.
•
Wash hands (page C-38).
•
Select the site for injection.
•
Draw the material for injection into the syringe.
•
Ensure that the drug and dose are correct.
•
Grasp the centre of the target muscle between the thumb and forefinger,
if possible.
•
Insert the needle at a 90-degree angle through the skin with a single
quick motion (Fig. P-6, page P-17).
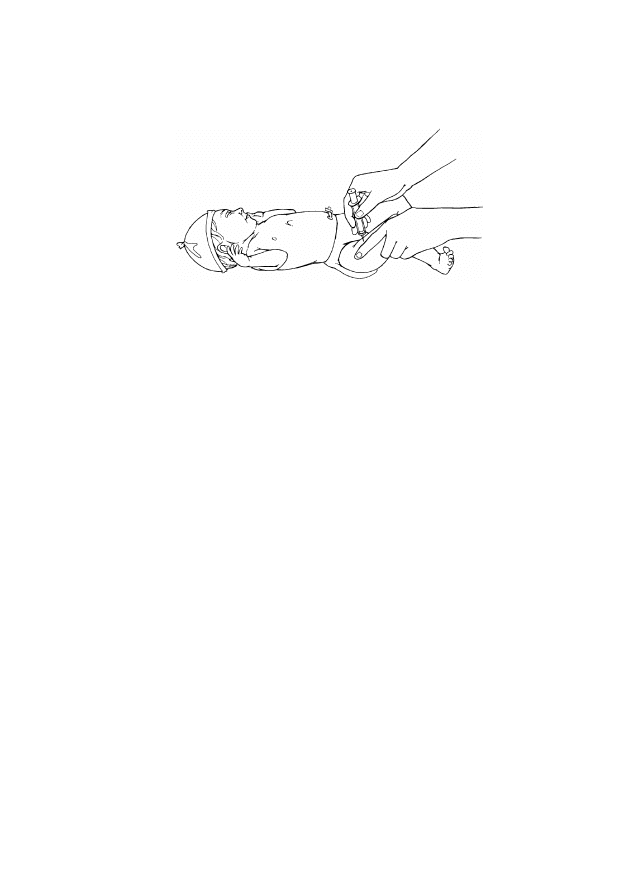
P-17
Giving injections
FIGURE P-6
Intramuscular injection into quadriceps muscle group
•
Withdraw the plunger of the syringe slightly to ensure that the tip of the
needle is not in a vein (i.e. no blood should enter the needle):
-
If the needle is in a vein:
-
Withdraw the needle without injecting the material;
-
Apply gentle pressure to the site with a dry cotton-wool ball to
prevent bruising;
-
Place a new, sterile needle on the syringe;
-
Choose a new site for injection;
-
Repeat the procedure described above.
-
If the needle is in the muscle, inject the material with steady
pressure for three to five seconds.
•
Upon completion of the injection, withdraw the needle and apply gentle
pressure with a dry cotton-wool ball.
•
Record the site of the injection, and rotate the site of subsequent injections.
INTRAVENOUS (IV) INJECTIONS
The directions in this section are for giving an IV push injection to a baby
with an IV line in place; these directions do not apply if the drug is mixed
with IV fluid in a bag and then infused.
SUPPLIES
•
swab or cotton-wool ball soaked in antiseptic solution (Table C-10, page
C-41)

P-18
Giving injections
•
two sterile 1-inch needles of the smallest size that will allow fluid to flow
freely (e.g. 22- to 24-gauge)
•
two sterile syringes of the smallest size available that have adequate
markings for proper dose (e.g. 1- to 3-ml)
•
2 ml IV fluid
PROCEDURE
•
Gather necessary supplies.
•
Wash hands (page C-38).
•
Choose the place in the IV line where an IV injection can be given
closest to the insertion site of the cannula (e.g. a valve or a soft rubber
connector).
•
Clean the port with the swab or cotton-wool ball soaked in antiseptic
solution, and allow to dry.
•
Draw the material for injection into the syringe.
•
Ensure that the drug and dose are correct.
•
If the IV fluid was infusing without problem:
-
Stop the IV infusion;
-
Insert the needle into the IV line, and inject the material slowly over
two minutes, carefully observing the area around the cannula for
swelling.
•
If there is any question as to whether the cannula is properly
positioned in the vein:
-
Stop the IV infusion;
-
Flush the IV line first with 2 ml of IV fluid, observing the area
around the cannula carefully for swelling that indicates that the
cannula has come out of the vein;
-
If the cannula is still in the vein, inject the material slowly over two
minutes, carefully observing the area around the cannula for swelling.
•
Upon completion of the injection, withdraw the needle and restart the IV
infusion.

P-19
Giving injections
INTRADERMAL INJECTIONS
Only use intradermal injection for the BCG vaccine (page C-51) and when
first administering local anaesthetic for draining an abscess (page P-43).
SUPPLIES
•
sterile 25- or 27-gauge, 5/8-inch needle
•
sterile 21-gauge, 1-inch needle
•
sterile tuberculin syringe (1-ml)
•
dry cotton-wool ball
PROCEDURE
•
Gather necessary supplies.
•
Select the site for injection.
•
Wash hands (page C-38).
•
Draw the material for injection into the syringe using the 21-gauge needle.
•
Ensure that the correct drug and dose are given.
•
Replace the 21-gauge needle with a 25- or 27-gauge needle.
•
Hold the syringe and needle almost parallel with the skin, with the bevel
of the needle facing up.
•
Pull the skin taut with one hand, and insert the tip of the needle barely
under the skin. Advance the needle slowly until the bevel of the needle
has fully entered the skin.
•
Gently point the needle upward, without repiercing the skin.
•
Inject the material with steady pressure for three to five seconds (there
will be significant resistance) and look for a blanching of the skin. The
baby will probably cry during the injection; a true intradermal injection
often burns slightly and should raise a small “bleb” under the skin that
causes the skin to pucker like the skin of an orange (peau d’orange).
•
Upon completion of the injection, withdraw the needle and apply gentle
pressure with a dry cotton-wool ball.

P-20
Giving injections

ESTABLISHING AN INTRAVENOUS LINE
P-21
•
Various sites can be used to establish an intravenous (IV) line. Common
sites used for a baby are:
-
peripheral veins on the back of the hand or top of the foot (the most
common and preferred sites);
-
veins on the forearm, the front of the elbow, or around the ankle or
knee (minimize use of the veins around the knee because there is a
greater risk of the needle coming in contact with the bone);
-
scalp veins.
•
If a peripheral IV line cannot be established quickly in an emergency
situation, use an umbilical vein catheter (page P-24) or intraosseous line
(page P-27).
PERIPHERAL IV LINE
SUPPLIES
•
clean examination gloves
•
swab or cotton-wool ball soaked in antiseptic solution (Table C-10, page
C-41)
•
sterile infusion set with IV fluid (use a microdropper if one is available)
•
sterile butterfly set or cannula (23- to 25-gauge; if the IV line is
required for a blood transfusion, ensure that the needle is large enough
[e.g. 22-gauge] so that the blood does not clot in the needle during the
transfusion)
•
adhesive strapping or thin paper tape
•
tincture of benzoin (if available)
•
rubber band (if using a scalp vein)
•
arm board (or splint)
PROCEDURE
•
Gather necessary supplies.
•
Follow principles of infection prevention (page C-37).
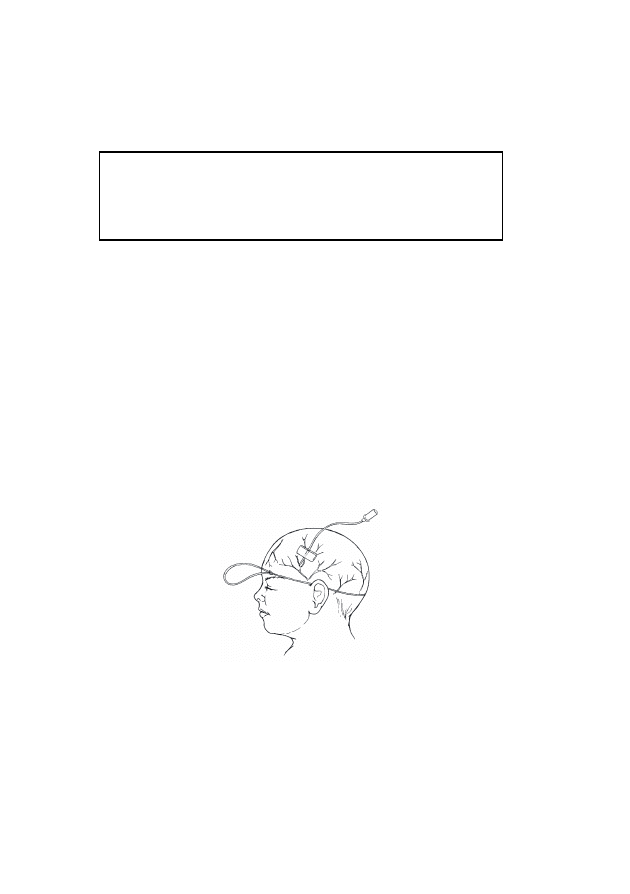
P-22
Establishing an intravenous line
•
Prepare the solution to be infused, ensuring that the entire infusion set is
filled with fluid and that there is no air in the infusion set. If a butterfly
set is used, ensure that the set is filled with IV fluid.
Air embolism can occur easily in babies. It is essential to
ensure that all components of the IV infusion set are filled with
fluid and that there are no air bubbles in the set before
beginning the infusion.
•
Wash hands (page C-38), and put on clean examination gloves.
•
Prepare the skin over the vein using a swab or cotton-wool ball soaked in
antiseptic solution, and allow to dry.
•
Have an assistant press on the skin near the vein to act as a tourniquet:
-
If using a vein on the hand, foot, arm, or leg, have the assistant
use her/his forefinger and thumb to gently encircle the limb above
the chosen site of insertion;
-
If using a scalp vein, have an assistant press over the vein below the
chosen site of insertion, or place a rubber band (as a tourniquet)
around the baby’s head (Fig. P-7).
FIGURE P-7
Using a rubber band as a tourniquet for scalp vein
•
Insert the needle at a 15-degree angle through the skin, with the bevel of
the needle facing upward:
-
If using a butterfly set, a small amount of blood will flush back into
the tubing when the vein is punctured. Do not push the needle in any
further;
-
If using a cannula:
-
Once blood fills the hub of the cannula, withdraw the needle
partially while continuing to push the cannula in;
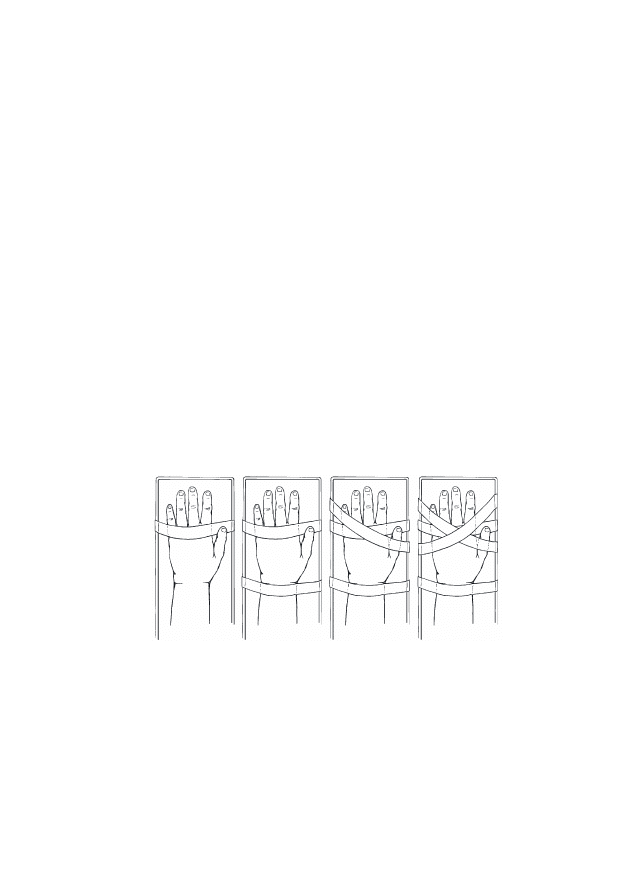
P-23
Establishing an intravenous line
-
When the hub of the cannula reaches the skin at the puncture
site, withdraw the needle completely;
-
Dispose of the needle according to recommended infection
prevention procedures (page C-42).
•
Have the assistant remove her/his finger and thumb from around the
baby’s limb (or remove the rubber band if a scalp vein was used).
•
Connect the infusion set to the cannula or butterfly set:
-
Ensure that there are no air bubbles in the infusion set;
-
Infuse fluid into the vein for a few seconds to make sure that the vein
has been successfully cannulated. The fluid should run freely, and
there should be no swelling around the site of the cannula;
-
If swelling develops around the site of infusion, withdraw the
needle from the vein and repeat the procedure using a different vein.
•
If using a vein in the hand, arm, foot, or leg, immobilize the limb (e.g.
using an arm board [or splint] and adhesive strapping or thin paper tape)
to minimize movement (e.g. Fig. P-8).
FIGURE P-8
Immobilizing the hand
•
Secure the cannula or butterfly set in position using strips of adhesive
strapping or thin paper tape (e.g. Fig. P-9, page P-24). If tincture of
benzoin is available, apply this to the skin before applying the adhesive
strapping.
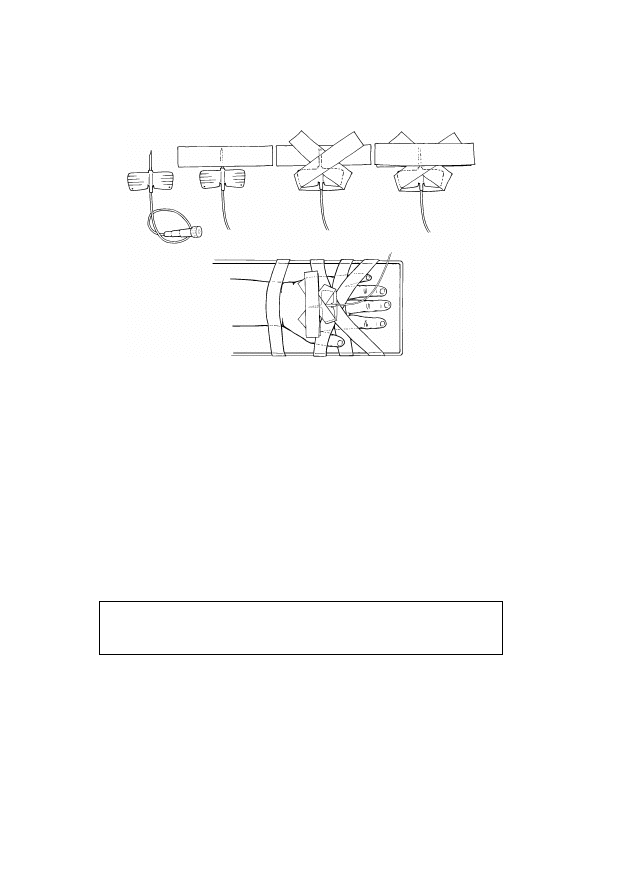
P-24
Establishing an intravenous line
FIGURE P-9
Securing butterfly set in place
•
Inspect the infusion site every hour:
-
Look for redness and swelling around the insertion site of the
cannula, which indicate that the cannula is not in the vein and fluid is
leaking into the subcutaneous tissue. If redness or swelling is seen
at any time, stop the infusion, remove the needle, and establish a
new IV line in a different vein;
-
Check the volume of fluid infused and compare to the prescribed
volume;
-
Record all findings.
Solutions containing glucose can cause tissue to die and should
not be allowed to leak into subcutaneous tissue.
•
Change the IV infusion set and fluid bag every 24 hours, even if the bag
still contains IV fluid (they can be a major source of infection).

P-25
Establishing an intravenous line
UMBILICAL VEIN CATHETER
An umbilical vein catheter is indicated only when the need for
IV access is urgent but a peripheral IV line cannot be
established quickly.
EQUIPMENT AND SUPPLIES
•
clean examination gloves
•
high-level disinfected or sterile gloves
•
high-level disinfected or sterile umbilical catheter or ordinary gastric tube:
-
if the baby weighs less than 1.5 kg, use a 3.5-F catheter
-
if the baby weighs 1.5 kg or more, use a 5-F catheter
•
sterile infusion set with IV fluid (use a microdropper if one is available)
•
sterile 5- or 10-ml syringe
•
swabs or cotton-wool balls soaked in antiseptic solution (Table C-10,
page C-41)
•
sterile drapes
•
sterile blade
•
cord tie or suture (to control bleeding)
•
sterile forceps
•
sterile suture, adhesive strapping, or thin paper tape (to secure catheter)
PROCEDURE
•
Gather necessary equipment and supplies.
•
Follow principles of infection prevention (page C-37) and aseptic
technique (page C-40).
•
Prepare the solution to be infused.
•
Wash hands (page C-38), and put on clean examination gloves.
•
Prepare the umbilicus and surrounding skin by washing in an outward
spiral motion with a swab or cotton-wool ball soaked in antiseptic

P-26
Establishing an intravenous line
solution. Repeat two more times, using a new swab or cotton-wool ball
each time, and allow to dry.
•
Remove examination gloves and put on high-level disinfected or sterile
gloves.
•
Fill the umbilical catheter with IV fluid using a closed syringe (i.e. with
the plunger completely inside the barrel of the syringe) attached to the
end of the catheter.
Ensure that air is not in the catheter and that a closed syringe
is attached to the end of the catheter; a sudden deep breath by
the baby just after the catheter has been inserted may result in
an air embolus if air is inside the catheter.
•
Place sterile drapes over the baby’s body so that only the umbilical area
is exposed.
•
Place a cord tie or suture around the base of the umbilicus to control
bleeding, and using a sterile blade, cut the cord to a length of 1 to 2 cm
(Fig. P-10A).
•
Identify the two umbilical arteries, which are thicker-walled and usually
contracted, and the single umbilical vein, which usually has a wider
opening and is found above the arteries (closer to the baby’s head; Fig.
P-10).
FIGURE P-10
Inserting an umbilical vein catheter

P-27
Establishing an intravenous line
•
Hold the catheter in one hand (applying gentle traction to the cord with
forceps in the other hand, if necessary) and insert the catheter into the
umbilical vein, guiding the catheter towards the head of the baby and to
the baby’s right side (Fig. P-10B, page P-26).
•
As the catheter is advanced, periodically apply gentle suction with the
syringe until blood flows back. Once blood flows back freely through the
catheter (usually after the catheter is inserted 5 to 7 cm), do not advance
the catheter any further.
•
If resistance is encountered while advancing the catheter, especially
in the first 2 to 3 cm, do not continue. Remove the catheter and try again.
Never force the umbilical catheter if resistance is encountered.
•
Tie the cord tie or suture around the stump of the umbilicus to hold the
catheter in place and prevent bleeding around the catheter or from one of
the arteries.
•
Remove the syringe and connect the infusion set to the catheter, ensuring
that there are no air bubbles in the set.
•
Secure the catheter with suture material or adhesive tape (Fig. P-10C,
page P-26) to prevent it from being dislodged.
•
Inspect the infusion every hour:
-
Look for redness and swelling around the umbilicus, which may
indicate infection. If redness or swelling is seen at any time, stop
the infusion and remove the umbilical vein catheter. Attempt to
establish a peripheral IV line again, and treat for infection of the
umbilicus (page F-135);
-
Check the volume of fluid infused and compare to the prescribed
volume;
-
Record all findings.
INTRAOSSEOUS INFUSION
Establishing intravenous access in a newborn baby can be difficult. In an
emergency, a good temporary alternative is the intraosseous route using the
bone marrow cavity. Fluid and drugs can be given by this route.

P-28
Establishing an intravenous line
Remove the intraosseous line as soon as other IV access is established (within
eight hours, if possible). Do not place an intraosseous line if there is infection
at the intended insertion site or if the bone is fractured. Because this
procedure is only performed in an emergency, no anaesthetic is required.
SUPPLIES
•
clean examination gloves
•
swab or cotton-wool ball soaked in antiseptic solution (Table C-10, page
C-41)
•
sterile intraosseous needle, bone marrow needle, or 22-gauge needle
•
sterile infusion set with IV fluid (use a microdropper if one is available)
•
adhesive strapping or thin paper tape
•
sterile 5-ml syringe
•
elastic bandage
•
padded splint
PROCEDURE
•
Gather necessary supplies.
•
Prepare the solution to be infused, ensuring that the entire infusion set is
filled with fluid and that there is no air in the infusion set.
•
If using a regular hypodermic needle, attach a 5-ml syringe filled with
3 ml of IV fluid, and flush the fluid through the needle.
•
Identify the insertion site (proximal end of tibia or distal end of femur):
-
The site at the proximal end of the tibia is 1 cm below and 1 cm
medial to the tibial tuberosity;
-
The site at the distal end of the femur is 2 cm above the lateral
condyle.
•
Wash hands (page C-38), and put on clean examination gloves.
•
Prepare the skin over the insertion site using a swab or cotton-wool ball
soaked in antiseptic solution, and allow to dry.

P-29
Establishing an intravenous line
•
Position the baby’s leg with the knee bent about 30 degrees and the heel
resting on the table.
•
Support the upper tibia with one hand, placed so that the hand is not
directly behind the site of insertion.
•
Hold the needle (with the attached syringe if using a hypodermic needle)
in the other hand at a 90-degree angle to the selected insertion site,
angled slightly towards the foot.
•
Advance the needle using a firm, twisting motion and moderate,
controlled force. Stop immediately when there is a sudden decrease in
resistance to the needle, which indicates that the needle has entered the
marrow cavity.
•
Once the needle is properly positioned, remove the stylet (if a bone
marrow or intraosseous needle was used) and attach the syringe.
•
Aspirate using the syringe to confirm that the needle is correctly
positioned. The aspirate should look like blood.
•
Slowly inject 3 ml of IV fluid to check for proper placement of needle:
-
Look for swelling (indicating leaking of fluid under the skin) at the
front of the leg or in the calf muscle at the back of the leg. If
swelling is seen, remove the needle and try again;
-
If it is difficult to infuse the fluid but there is no swelling in the
calf muscle, the needle may have entered the posterior bone cortex.
Withdraw the needle approximately 0.5 cm and cautiously inject IV
fluid again.
•
If no problems are detected, attach the infusion set to the needle (Fig.
P-11).
FIGURE P-11
Intraosseous infusion

P-30
Establishing an intravenous line
•
Secure the needle in place using tape, and splint the leg as for a fractured
femur (page F-150), ensuring that the elastic bandage does not interfere
with the needle or infusion set.
•
Inspect the infusion site every hour:
-
Look for redness and swelling around the insertion site of the
cannula and in the baby’s calf muscle, which indicate that the
cannula is not in the vein and fluid is leaking into the subcutaneous
tissue. If redness or swelling is seen at any time, stop the infusion,
remove the needle, and attempt to establish a peripheral IV line
again or establish a new intraosseous line at a different site;
-
Check the volume of fluid infused and compare to the prescribed
volume; flow rates may alter dramatically with changes in the
position of the leg;
-
Record all findings.
•
Remove the intraosseous needle as soon as alternative IV access is
available, and within eight hours, if possible.

TRANSFUSING BLOOD
P-31
MONITORING THE TRANSFUSED BABY
•
For each transfusion, monitor the baby at the following stages:
-
before starting the transfusion;
-
at the onset of the transfusion;
-
every five minutes for the first 15 minutes after starting the
transfusion;
-
at least every hour during the transfusion;
-
every four hours for 24 hours after completing the transfusion.
Closely monitor the baby during the first 15 minutes of the
transfusion and regularly thereafter to detect early signs of a
transfusion reaction.
•
At each of these stages, record the following information on the baby’s
chart:
-
general appearance;
-
temperature;
-
heart rate;
-
respiratory rate;
-
fluid balance (i.e. oral and IV fluid intake and urine output).
•
In addition, record:
-
the time the transfusion is started and completed;
-
the volume and type of all blood transfused;
-
the unique donation numbers of all blood transfused;
-
any adverse effects.
TRANSFUSING BLOOD
•
Review the general principles of the clinical use of blood (page C-47).
•
If an IV line is not yet in place, establish an IV line (page P-21).

P-32
Transfusing blood
•
Before beginning the transfusion, check (with a second staff member, if
possible) to ensure that the:
-
blood is the correct type for the baby, the baby’s information is
clearly marked, and the blood has been matched against the blood of
the mother and the baby. In emergency situations, use type O, Rh-
negative blood;
-
blood transfusion bag has not been opened and does not leak;
-
blood pack has not been out of the refrigerator for more than two
hours, the plasma is not pink, the red cells do not look purple or
black, and the blood is not clotted;
-
IV line is patent and the needle used is large enough (e.g. 22-gauge)
so that the blood does not clot in the needle during the transfusion.
•
Record the baby’s temperature and heart and respiratory rates.
•
Remove the protective cover from the blood bag or bottle without
touching the opening, and attach a blood infusion set.
•
Open the clamp on the tubing of the blood infusion set, allow blood to
run through to the end of tubing, and then close the clamp.
•
Detach the tubing at the infusion site and immediately attach the tubing
from the blood transfusion set.
•
Transfuse whole blood at the rate of 20 ml/kg body weight over four
hours.
•
Monitor the baby’s temperature and heart and respiratory rates, and slow
the infusion to half the rate when the baby’s vital signs begin to improve.
Do not leave a unit of blood hanging for more than four hours.
•
Use an infusion device to control the rate of transfusion, if available.
•
Ensure that the blood is flowing at the correct rate.
•
Upon completion of the transfusion, reassess the baby. If another
transfusion is required, transfuse blood at the same rate and volume.

INSERTING A GASTRIC TUBE
P-33
A gastric tube may be inserted via one nostril or the mouth. Insert the tube via
the nostril if the baby is breathing regularly, using the smallest (narrowest)
tube available. Insert the tube via the mouth if the tube is needed for drainage
of the stomach, for feeding a baby with breathing difficulty, or if only a
relatively large tube is available.
SUPPLIES
•
clean examination gloves
•
clean plastic tube or catheter appropriate for baby’s weight:
-
if the baby weighs less than 2 kg, use a 5-F tube
-
if the baby weighs 2 kg or more, use an 8-F tube
•
writing pen or flexible tape measure
•
3- to 5-ml syringe (for aspiration)
•
blue litmus paper or stethoscope
•
sterile or high-level disinfected syringe or funnel suitable for holding
breast milk (if the tube will be used for feeding)
•
cap for gastric tube (if the tube will be used for feeding)
•
adhesive strapping
•
tincture of benzoin (if available)
PROCEDURE
•
Gather necessary supplies.
•
Wash hands (page C-38), and put on clean examination gloves.
•
Estimate the required length of tube:
-
Hold the tube so that it mimics the route that it will follow once
inserted (i.e. from the mouth or the tip of the nostril to the lower tip
of the ear lobe and then to the stomach, just below the rib margin;
Fig. P-12, page P-34), and place a mark on the tube with a pen or a
piece of strapping;
-
Alternatively, estimate the distance using a flexible tape measure,
and mark the distance on the tube with a pen or a piece of strapping.

P-34
Inserting a gastric tube
FIGURE P-12
Measuring gastric tube for oral (A) and nasal (B) routes
•
Flex the baby’s neck slightly and gently pass the tube through the mouth
(Fig. P-13) or through one nostril to the required distance. If using the
nasal route:
-
If a nasal catheter is in place for administration of oxygen, insert
the gastric tube through the same nostril, if possible;
-
If the tube does not slide easily into the nostril, try the other
nostril;
-
If the tube still does not slide easily into the nostril, use the oral
route.
Never force the gastric tube into the nostril if resistance is
encountered.
FIGURE P-13
Inserting oral gastric tube
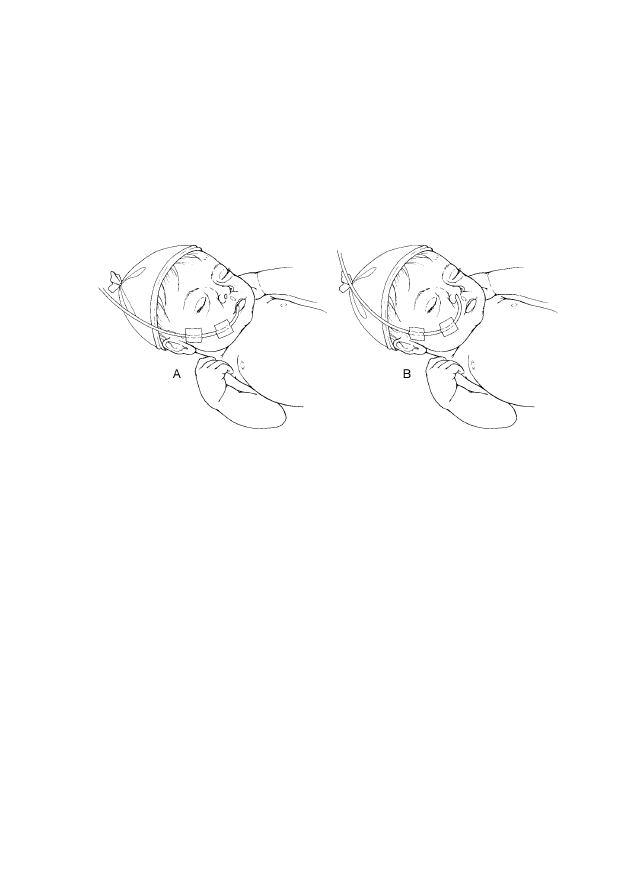
P-35
Inserting a gastric tube
•
Secure the tube in position with adhesive strapping (Fig. P-14):
-
If tincture of benzoin is available, apply this to the skin first before
applying the adhesive strapping;
-
If a nasogastric tube is used, avoid pulling the tube taut against the
nostril, as this may injure the skin.
FIGURE P-14
Securing oral (A) and nasal (B) gastric tube in place
CONFIRMING PROPER PLACEMENT OF GASTRIC TUBE
•
Confirm proper placement of the tube:
-
Fill a syringe with 1 to 2 ml of air and connect it to the end of the
tube. Use a stethoscope to listen over the stomach as air is quickly
injected into the tube:
-
If a whistling sound is heard through the stethoscope as the
air is injected, the end of the tube is correctly positioned in the
stomach;
-
If a whistling sound is not heard, the tube is not properly
positioned. Remove the tube and repeat the procedure.
-
Alternatively, test the acidity of the aspirate:
-
Note that this method is only suitable for babies more than 24
hours old or small babies (less than 2.5 kg at birth or born
before 37 weeks gestation) who are more than 48 hours old;
-
Use a syringe to aspirate some fluid, and place a drop of fluid
onto a strip of blue litmus paper:

P-36
Inserting a gastric tube
-
If the litmus paper turns pink, the fluid is acidic and the
tip of the tube is correctly positioned in the stomach;
-
If the litmus paper remains blue, the tip of the tube is not
in the correct position. Remove the tube and repeat the
procedure.
•
Replace the tube with another clean gastric tube after three days, or
earlier if it is pulled out or becomes blocked, and clean and high-level
disinfect or sterilize it according to Table C-11 (page C-43).
USING A GASTRIC TUBE FOR FEEDING OR DRAINAGE
•
If the gastric tube is inserted for the purpose of giving expressed
breast milk, see page C-18 for instructions on feeding.
•
If the gastric tube is inserted for drainage, leave the tube uncapped
and wrap clean gauze around the end, fastened with tape, to keep the tube
clean and to absorb the drainage from the stomach.

PERFORMING A LUMBAR PUNCTURE
P-37
Lumbar puncture is used to confirm the diagnosis when the baby has signs
suggestive of meningitis. Do not perform a lumbar puncture if the baby has
spina bifida/meningomyelocoele.
SUPPLIES
•
clean examination gloves
•
high-level disinfected or sterile gloves
•
sterile drapes
•
swabs or cotton-wool balls soaked in antiseptic solution (Table C-10,
page C-41)
•
spinal needle or intravenous needle (22- to 24-gauge)
•
appropriate collection tubes
•
dry cotton-wool ball
•
adhesive bandage
PROCEDURE
•
Be prepared to resuscitate the baby using a bag and mask (page P-1), if
necessary.
•
Gather necessary supplies.
•
Place the baby under a radiant warmer (page C-5), if possible, and
undress the baby only when ready to perform the procedure.
•
Follow principles of infection prevention (page C-37) and aseptic
technique (page C-40).
•
Position the baby:
-
Have an assistant hold the baby in a sitting position:
-
Position the baby so that the baby’s legs are straight and the
back is arched (Fig. P-15, page P-38);
-
Ensure that the baby’s neck is partially extended and not flexed
towards the chest, which could obstruct the baby’s airway.
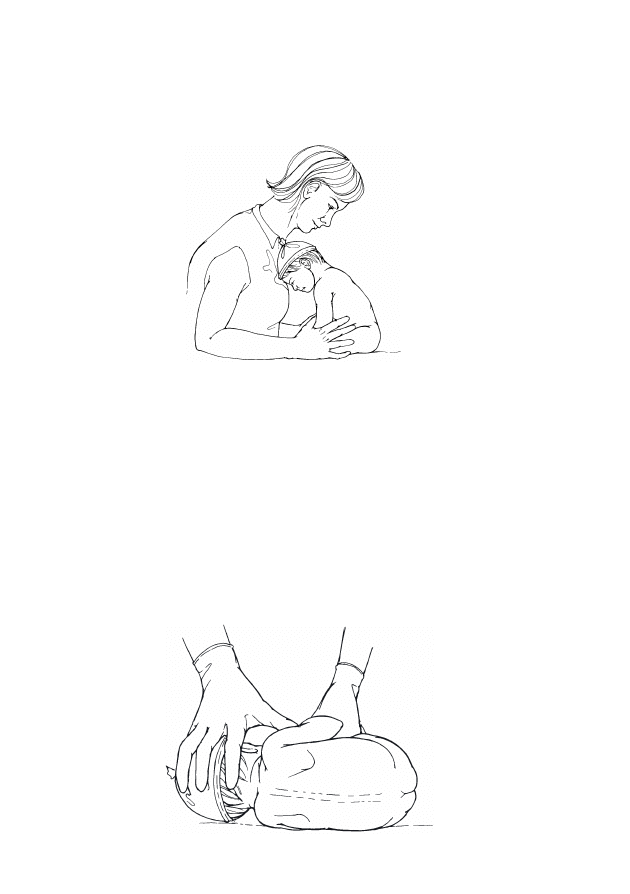
P-38
Performing a lumbar puncture
FIGURE P-15
Sitting position for lumbar puncture
-
Alternatively, place the baby on her/his side facing the assistant
(most right-handed health care providers find it easiest if the baby is
on her/his left side; Fig. P-16):
-
Position the baby so that the baby’s back is closest to the side of
the table from which the lumbar puncture will be performed;
-
Have the assistant place one hand behind the baby’s head and
neck, and place the other hand behind the baby’s thighs to hold
the spine in a flexed position;
-
Ensure that the baby’s neck is partially extended and not flexed
towards the chest, which could obstruct the baby’s airway.
FIGURE P-16
Lying position for lumbar puncture
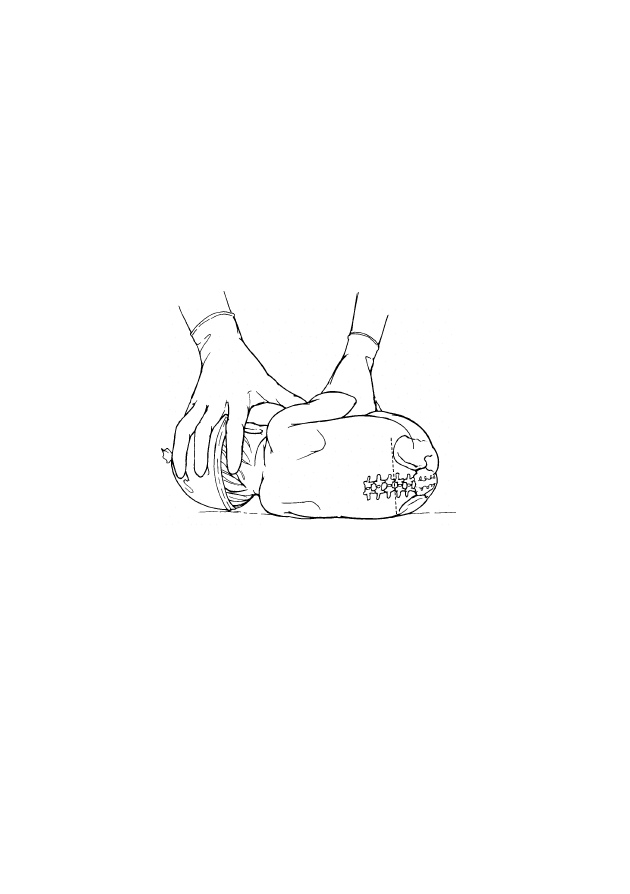
P-39
Performing a lumbar puncture
•
Wash hands (page C-38), and put on clean examination gloves.
•
Prepare the skin over the area of the lumbar spine and then the remainder
of the back by washing in an outward spiral motion with a swab or
cotton-wool ball soaked in antiseptic solution. Repeat two more times,
using a new swab or cotton-wool ball each time, and allow to dry.
•
Identify the site of the puncture between the third and fourth lumbar
processes (i.e. on a line joining the iliac crests; Fig. P-17).
FIGURE P-17
Site of lumbar puncture
•
Remove examination gloves and put on high-level disinfected or sterile
gloves.
•
Place sterile drapes over the baby’s body so that only the puncture site is
exposed.
•
Insert the needle in the midline of the vertebrae, angled towards the
baby’s umbilicus.
•
Slowly advance the needle to a depth of about 1 cm (or less if the baby is
small [less than 2.5 kg at birth or born before 37 weeks gestation]). A
slight “pop” may be felt as the needle enters the subarachnoid space.
•
If using a spinal needle, remove the stylet.
•
If bone is encountered, the needle cannot be redirected. Pull the needle
back to just beneath the skin and reinsert the needle, directing it slightly
upward while aiming for the baby’s umbilicus.

P-40
Performing a lumbar puncture
•
Collect the cerebrospinal fluid (CSF):
-
Collect about 0.5 to 1 ml (about 6 to 10 drops) of CSF in each
collection tube;
-
If CSF does not come out, rotate the needle slightly;
-
If CSF still does not come out, remove the needle and reinsert it
between the fourth and fifth lumbar processes;
-
If blood is seen in the CSF, the needle probably went through the
spinal canal and caused bleeding. If the CSF does not clear, collect
enough CSF for culture and sensitivity only.
•
After the CSF is collected, remove the needle.
•
Have an assistant apply gentle pressure to the puncture site with a cotton-
wool ball until bleeding or leakage of fluid stops.
•
Apply an adhesive bandage to the site.

ADMINISTERING RECTAL PARALDEHYDE
P-41
SUPPLIES
•
clean examination gloves
•
3-ml plastic syringe
•
sterile 1-inch needle (22- to 23-gauge)
•
paraldehyde
•
arachis (or vegetable) oil
•
water-based lubricant
PROCEDURE
•
Gather necessary supplies.
•
Wash hands (page C-38), and put on clean examination gloves.
•
Have an assistant remove the baby’s napkin and hold the baby on one
side, similar to the lying position for lumbar puncture (Fig. P-16, page
P-38).
•
Draw up 2 ml arachis oil into the syringe.
•
Attach the needle and draw up the paraldehyde 0.3 ml/kg body weight
into the same syringe.
•
Remove the needle from the syringe.
•
Lubricate the syringe with a water-based lubricant.
•
Gently insert the syringe into the baby’s rectum and advance it
approximately 3 cm.
•
Administer the drug slowly over three minutes and then slowly
withdraw the syringe.
•
Allow the baby to relax from the curled up position.
•
If the dose is passed from the rectum within the first five minutes,
repeat the dose. The majority of absorption will occur between 5 and 15
minutes after administration, so if stool is passed after this, the dose
does not need to be repeated.

P-42
Administering rectal paraldehyde

DRAINING AN ABSCESS
P-43
SUPPLIES
•
clean examination gloves
•
high-level disinfected or sterile gloves
•
swab or cotton-wool ball soaked in antiseptic solution (Table C-10, page
C-41)
•
sterile swab in glass test tube for culture
•
high-level disinfected or sterile tissue forceps
•
sterile gauze
•
sterile blade
•
sterile drapes
•
sterile 10-ml syringe
•
sterile 3-ml syringe (or other available size with adequate markings for
proper dose)
•
sterile 22-gauge needle
•
sterile 25-gauge, 5/8-inch needle
•
local anaesthetic (e.g. 0.5% lignocaine solution)
•
sterile IV fluid
PROCEDURE
•
Gather necessary supplies.
•
Wash hands (page C-38), and put on clean examination gloves.
•
Prepare the skin over and around the abscess using a swab or cotton-
wool ball soaked in antiseptic solution, and allow to dry.
•
Remove examination gloves and put on high-level disinfected or sterile
gloves.
•
Attach the 22-gauge needle to the 10-ml syringe, fill the syringe with IV
fluid, and remove the needle.
•
Place sterile drapes over the area surrounding the abscess so that only the
abscess is exposed.

P-44
Draining an abscess
•
Inject local anaesthetic around the abscess:
-
Draw the local anaesthetic into the 3-ml syringe and attach the
25-gauge needle;
-
Inject local anaesthetic intradermally (page P-19) to raise a small
“bleb” in the skin;
-
After one minute, attach the 22-gauge needle to the syringe, insert
the needle through the “bleb” in the skin, and infiltrate with local
anaesthetic the area around the abscess.
•
After waiting two minutes to allow the local anaesthetic to take effect,
make an incision over the fluctuant area of the abscess.
•
Using a sterile swab, take a sample of the pus, and send it to the
laboratory for culture and sensitivity.
•
Use high-level disinfected or sterile tissue forceps to break up the pocket
of pus.
•
Flush out the abscess with IV fluid, and leave the wound open.

SECTION 4: APPENDIX


RECORD KEEPING
A-1
There are several types of records used in the care of newborn babies. The
following records are included in this guide: general clinical record,
discharge form, referral form, feedback form, and death certificate. The
example records included are suggested for their content more than for their
format. Additional records may be used for administrative purposes. In
addition, a log book (page A-8) should be kept with basic information on
all babies admitted.
$
Ensure that the baby
=s name and identification number are correct on all
records.
$
Store clinical records according to institutional policy. Ensure that the
records can be easily retrieved for the annual statistics or special
investigations or studies.
$
Keep clinical records for at least one year unless directed otherwise by
local policy.
$
Be familiar with the requirements for country reporting of diseases
under surveillance (e.g. congenital syphilis).
$
Analyse the hospital
=s statistics every 6 or 12 months:
-
Number of babies admitted;
-
Number of babies discharged;
-
Number of babies who died;
-
Main conditions by birth weight and sex of the baby;
-
Shortages of drugs, equipment, supplies, and staff on duty.
CLINICAL RECORD
The clinical record consists of the admission record and record of ongoing
care.
$
The admission record (example not shown) should include the reason
for admission, history, previous treatment, and other information about
the mother and family. A checklist of tasks is useful.
$
The record of ongoing care (e.g. Fig. A-1, page A-2) during
hospitalization is a confidential record that is shared between the doctor
and nurses involved in the baby
=s care:
-
Keep the record near the baby;
-
Use more than one column, if necessary, for daily recording when
the baby is ill or when the baby is recovering.

FIGURE A-1
Clinical record of ongoing care
Ward
Record ID
Name and Sex
Birth Weight
Gestational Age
Diagnosis
Page #
Date
Day
Weight
Temperature
Breathing
Feeding instructions
Feeding
(see key below)
Examination
findings
Diagnostic tests
Treatment
Key for feeding: B = baby is breastfeeding. If the baby is not breastfeeding, indicate in the left column what the baby is fed (BM = expressed breast milk,
S = breast-milk substitute) and the method of feeding (C = fed by cup/spoon or other device, T = fed by gastric tube), and indicate in the right column the volume of
milk given.
A-2
Record keeping

DISCHARGE FORM
A discharge form (e.g. Fig. A-2) should include information for the parents and the health care provider who will provide
care after discharge.
FIGURE A-2
Discharge form
Number:
Date of admission:
Unit/Ward:
Family name:
Date of birth:
Age:
Birth weight:
Parents:
Address:
Reason for admission:
Admitted from:
G Home G Institution:
History of pregnancy and birth:
Onset of illness:
Hospital stay:
Instructions for home care:
Date of discharge:
Discharged:
G Home G Institution:
Discharge diagnoses:
If died, age at death:
Cause of death
(diagnosis and code):
Follow-up visit:
Where:
When:
Signature:
A-3
Record keeping

REFERRAL FORM
A referral form (e.g. Fig. A-3) includes information that should be provided with the baby when the baby and/or mother is
referred to another facility or department/unit for care.
FIGURE A-3
Referral form
Record number:
BABY name:
Birth weight:
Date and hour of birth:
Gestational age:
MOTHER name:
Age:
Address:
Who is referring:
Name:
Facility:
Accompanied by
health care worker:
Main reasons
G Emergency
for referral:
G Non-emergency
G To accompany the mother
Main reasons
G Emergency
for referral:
G Non-emergency
G To accompany the baby
Referred
Date:
Time:
Major findings (clinical and temperature):
Major findings (clinical, blood pressure, temperature, and
laboratory):
Arrival
Date:
Time:
Treatment given and time
Before referral:
During transfer:
Last (breast)feed (time):
Treatment given and time
Before referral:
During transfer:
Information given to the mother and companion about the
reasons for referral:
Information given to the mother and companion about the
reasons for referral:
A-4
Record keeping

FEEDBACK FORM
A feedback form (e.g. Fig. A-4) includes information that should be provided back to the referring facility or
department/unit following discharge or the death of the baby.
FIGURE A-4
Feedback form
Record number:
BABY name:
Weight at discharge:
Date of birth:
Age (days):
MOTHER name:
Age:
Address:
Who is referring:
Name:
Facility:
Accompanied by
health care worker:
Main reasons
G Emergency
for referral:
G Non-emergency
G To accompany the mother
Main reasons
G Emergency
for referral:
G Non-emergency
G To accompany the baby
Admission
Date:
Time:
Discharge
Date:
Time:
Diagnoses:
Treatment given:
Treatment and recommendations for further care:
Diagnoses:
Treatment given:
Treatment and recommendations for further care:
Follow-up visit: When:
Where:
Follow-up visit: When:
Where:
Preventive measures:
Preventive measures:
If death: Date:
Causes:
If death: Date:
Causes:
A-5
Record keeping

INTERNATIONAL MEDICAL CERTIFICATE OF CAUSE OF DEATH
$
If the baby dies, fill out a death certificate and send it to the authorities
according to national requirements. Use the International Classification
of Disease or other coding system used in the country. Follow the
instructions for coding.
$
Figure A-5 (page A-6) is an example of the death certificate proposed
by WHO. Each country has its own form and regulations for reporting a
death and cause of death, which determine the content of the form and
the time period within which the death must be reported. Consider
adding additional information on the baby, if necessary, to the country
death certificate.
A-6
Record keeping

FIGURE A-5
Death certificate
Cause of Death
Approximate
Interval between
Onset and Death
I
Disease or condition directly
leading to death*
Antecedent causes
Morbid conditions, if any,
giving rise to the above
cause, stating the underlying
condition last
(a)...........................................
Due to (or as consequence of)
(b)...........................................
Due to (or as consequence of)
(c)...........................................
Due to (or as consequence of)
(d)...........................................
..............................
..............................
..............................
..............................
II
Other significant conditions
contributing to the death but
not related to the disease or
condition causing it
...............................................
...............................................
* This does not mean the mode of dying, e.g. heart failure or
respiratory failure. It means the disease, injury, or complication
that caused death.
.................................
.................................
Consider collecting the following information:
III
If the deceased is a female, was she:
Antecedent causes
Morbid conditions, if any, giving rise to the
above cause, stating the underlying
condition last
Q Not pregnant
Q Not pregnant, but pregnant within 42 days
of death
Q Pregnant at the time of death
Q Unknown if pregnant or was pregnant
within 42 days of death
IV
If the deceased is an infant and less than one
month old:
What was the birth weight: .............. g
If exact birth weight not known, did the baby
weigh:
Q 2.5 kg or more
Q less than 2.5 kg
Record keeping
A-7

LOG BOOK
$
Keep a log book with the basic information on all babies admitted:
-
identification number;
-
record ID;
-
name;
-
address;
-
sex;
-
birth weight;
-
dates of admission and discharge;
-
reason for admission;
-
diagnoses at discharge;
-
condition at discharge (alive, transferred, died);
-
next follow-up visit.
$
Minimal information includes date of admission, names of the mother
and the baby, main condition, outcome (discharged home, transferred,
or died), and date. It is useful to include birth weight.
$
It may be useful to keep a separate log book of babies who died, were
transferred, or required follow-up.
A-8
Record keeping

ESSENTIAL EQUIPMENT, SUPPLIES, AND DRUGS
A-9
HEALTH CARE FACILITY’S LABORATORY FACILITIES
BIOCHEMISTRY AND HAEMATOLOGY
Supplies necessary to:
Measure blood glucose
Measure haemoglobin (or haematocrit [erythrocyte volume fraction])
Measure serum bilirubin
Perform cerebrospinal fluid cell count
Perform serologic test for syphilis
MICROBIOLOGY
Supplies necessary to perform:
Culture and sensitivity on samples of blood, pus, and cerebrospinal fluid
Gram stain
BLOOD BANK
Fresh whole blood, including type O, Rh-negative blood
Supplies necessary to perform:
Blood type and cross-match
Coombs test
NEWBORN SPECIAL CARE UNIT
NON-PATIENT-CARE AREAS
Area for preparing IV fluid and drugs
Refrigerator and/or freezer
Storage space for supplies
Torch with extra batteries and bulb
PATIENT-CARE AREAS
Blankets, bed linen, baby clothes (or cloth for wrapping), hats, and napkins
Chair for mother (comfortable for breastfeeding)
Cots for newborn babies
Facilities for handwashing
Heat source

A-10
Essential equipment, supplies, and drugs
Light source
Oxygen supply (e.g. from a cylinder, oxygen concentrator, or wall outlet) and
a flow metre allowing flow as low as 0.5 litres per minute
Room thermometer
Wall clock
EQUIPMENT
Face masks for resuscitation (sizes 0 and 1)
Incubators
IV poles
Phototherapy unit
Radiant warmers
Self-inflating resuscitation bag, newborn-size
Stethoscope
Suction apparatus
Thermometers (including a rectal thermometer that measures as low as 25 °C)
Weighing scale with 5- to 10-g increments
SUPPLIES
TUBES AND CATHETERS
Gastric tubes (3.5-F, 5-F, and 8-F) with caps
Suction catheters
Umbilical vein catheter
METHODS OF ADMINISTERING OXYGEN
Head box
Nasal catheter (6-F and 8-F)
Nasal prongs (1-mm and 2-mm)
IV LINE
Butterfly sets (22- to 25-gauge)
Cannulas (22- to 25-gauge)
IV tubing
Microdropper
Stopcocks (two-way or three-way)
INJECTIONS
Needles (21- to 27-gauge)
Syringes (1- to 10-ml)

A-11
Essential equipment, supplies, and drugs
INSTRUMENTS
Blades and handles
Forceps (e.g. artery, dissecting, tissue)
Needle holder
TESTS
Capillary tubes
Collection tubes appropriate for sample (blood, pus, and cerebrospinal fluid)
Glucose paper reagent strips
Lancet
FEEDING AND BREASTFEEDING
Breast-milk substitute for term and preterm babies
Containers for storing expressed breast milk
Cups, cups and spoons, or other devices for feeding
Utensils and containers for preparing breast-milk substitute
OTHER
Adhesive strapping or thin paper tape
Arm board
Cord ties
Cotton-wool balls
Drapes
Gauze bandage
Splints
Suture
Swabs
RECORDS
Laboratory slips
Log book
Medical records, growth charts, referral and feedback forms
Other prescribed forms
INFECTION PREVENTION
FACILITIES FOR HANDWASHING
Running/clean water
Soap and/or alcohol-based handrub
Towels

A-12
Essential equipment, supplies, and drugs
GLOVES
Clean examination gloves
Heavy rubber or latex utility gloves
High-level disinfected or sterile gloves
SKIN PREPARATION
Antiseptic solution (e.g. 2.5% polyvidone iodine, 4% chlorhexidine
gluconate, 60% to 90% ethyl or isopropyl alcohol)
WASTE DISPOSAL
Leakproof container for contaminated waste
Puncture-proof container for sharps disposal
Receptacle for soiled linens and napkins
CLEANING AND DISINFECTION
Area for cleaning and disinfecting equipment and supplies
Disinfectant solution (e.g. 0.5% chlorine bleach, 2% glutaraldehyde)
Instrument sterilizer
DRUGS
0.5% gentian violet
1% tetracycline hydrochloride ointment
10% glucose solution
Ampicillin
Antitetanus immunoglobulin (human)
Arachis (or vegetable) oil
Benzathine benzylpenicillin (or procaine benzylpenicillin)
Benzylpenicillin
Oral iron preparation
Eye prophylaxis (e.g. 1% silver nitrate, 2.5% polyvidone iodine, or 1%
tetracycline ointment)
Cefotaxime
Ceftriaxone
Ciprofloxacin
Cloxacillin
Diazepam
Gentamicin
Isoniazid
Lignocaine
Nevirapine
Normal saline (or Ringer’s lactate)

A-13
Essential equipment, supplies, and drugs
Nystatin cream
Oral rehydration solution
Paraldehyde
Phenobarbital
Phenytoin
Vitamin K
1
(phytomenadione)
Zidovudine (AZT)
VACCINES
Tuberculosis (BCG)
Diphtheria, pertussis, and tetanus (DPT)
Hepatitis B (HBV)
Poliomyelitis (OPV)
Tetanus (tetanus toxoid)

A-14
Essential equipment, supplies, and drugs

INDEX
A-15
Abdomen, assessment of, F-18
Abdominal distension
differential diagnosis, F-101 to
F-103
management, general, F-100
findings, F-99 to F-100
skin and mucous membrane
problems and, F-128
ABO blood groups
incompatibility in, F-77, F-80,
F-81, F-113
family history of, F-77
jaundice and, F-78
Abrasions, skin, F-132 to F-133
Abscess
diagnosis of, F-128
management, F-130 to F-131
incision and drainage of
procedure, P-43 to P-44
supplies, P-43
Activity, reduced, F-87
Admitting baby to hospital, F-21 to
F-22
Admitting mother to hospital, F-22
Air embolism, IV infusions and, P-22,
P-26
Alertness, level of
assessment of, F-14
Alternative feeding methods, C-14 to
C-15
by cup, cup and spoon, or other
device, C-16 to C-18
by gastric tube, C-18 to C-19
by hand-expressing breast milk into
baby’s mouth, C-18
Ampicillin
dilution of, C-33
doses, C-34
Anaemia
family history of, F-77
Anaemia (Cont.)
sick or small baby and, F-119 to
F-120
Antibiotics
choice and administration of, C-31
dilutions, C-33
doses of, C-34 to C-35
IM administration of, C-32
IV administration of, C-31
for specific infections, C-32
Antipyretic drugs, cautions with
hyperthermia, F-73
Antiseptic solutions, C-41
Anus, imperforate, F-153
Apnoea
management, F-52
in small baby, F-52 to F-53
swelling on scalp and, F-123
in term baby, F-53
Arm palsy, F-147 to F-148
Aseptic technique, C-40
antiseptic and disinfectant
solutions, C-41
Asphyxia
bleeding and/or pallor and, F-117
distinguishing from sepsis, F-35
management, F-44 to F-45
findings of, F-37
ongoing care, F-45 to F-46
suspected, F-39 to F-40
Axillary temperature
assessment of, F-12
measuring, P-5 to P-6
abnormal, F-69
Back, assessment of, F-18
BCG (tuberculosis vaccine), C-51
Benzathine benzylpenicillin
dilution of, C-33
doses, C-34

A-16
Index
Benzylpenicillin
dilution of, C-33
doses, C-34
Bilirubin, in serum
jaundice and, F-78, F-79
phototherapy and, F-86
Bilirubin encephalopathy
diagnosis of, F-81
management, F-83 to F-84
Biochemistry supplies, A-9
Birth
bleeding during, F-116, F-119
failure to breathe spontaneously at,
F-36, F-38
mother’s uterine infection or fever
after
management, F-55
baby more than three days old,
F-55
gestational age 35 weeks or
more or birth weight
2 kg or more, F-55 to
F-56
gestational age less than 35
weeks or birth weight
less than 2 kg, F-57
pallor at, F-116
resuscitation at, F-36
unclean, convulsions or spasms and,
F-62
Birth defects
birth mark, F-151
cleft lip or palate, F-151 to F-152
club foot, F-152
communication, emotional support
and, C-60, C-61
extra fingers or toes, F-151
gastroschisis, F-152 to F-153
genetic, F-153
imperforate anus, F-153
vomiting and, F-100
Birth defects (Cont.)
meningomyelocoele, F-152
omphalocoele, F-152 to F-153
skin tags, F-151
spina bifida, F-152
Birth injuries, F-145
differential diagnosis, F-147
management
arm palsy, F-147 to F-148
facial palsy, F-147, F-148
fractures, F-148 to F-150
Birth mark, F-151
Bleeding, F-113
differential diagnosis, F-115 to
F-118
management
coagulopathy, F-119
general, F-114
haemorrhagic disease of the
newborn baby, F-119
obstetric causes, F-119
ongoing, F-120
intraventricular, convulsions and,
F-66
Blisters, F-127, F-128, F-129 to F-130
Blood
clinical use of, C-477
in stool, F-102, F-115, F-117
in vomitus, F-99, F-101, F-102
swallowed maternal
diagnosis of, F-102
management, F-105 to F-106
Blood bank supplies, A-9
Blood groups. see ABO blood groups
Blood samples
procedure, P-9
about, P-9
bleeding and/or pallor and, F-113,
F-118
Blood transfusion
procedure, P-31 to P-32
monitoring, P-31

A-17
Index
Blood transfusion (Cont.)
principles of, C-47
reducing risks of, C-47 to C-48
screening for infectious agents,
C-48 to C-49
Body temperature
abnormal
differential diagnosis, F-70
management
hyperthermia, F-73 to F-75
moderate hypothermia, F-72
to F-73
severe hypothermia, F-71 to
F-72
findings, F-69
assessment, F-12
maintaining normal
general principles, C-1
methods for warming and, C-2 to
C-9
incubator, C-4, C-7 to C-8
other, C-5, C-9
radiant warmer, C-3, C-5 to
C-6
skin-to-skin contact, C-2, C-5
warm room, C-4, C-8 to C-9
measuring
procedure, P-5
axillary, P-5 to P-6
frequency, C-2
rectal, P-6 to P-7
supplies, P-5
Breast-milk substitutes, C-19 to C-20
mother with HIV and, F-160, F-161
to F-162
Breastfeeding
difficulty
differential diagnosis, F-95
general management, F-94
findings, F-93 to F-94
exclusive
general principles, C-11 to C-14
Breastfeeding (Cont.)
positioning and attachment for,
C-12 to C-14
twins, C-14
hand-expressing breast milk into
baby’s mouth, C-18
kangaroo mother care and, F-32 to
F-33
mother with HIV and, F-160 to
F-161
small baby, F-24 to F-26
Breathing difficulty
classification of, F-49
immediate management
gasping, F-5 to F-6
less than 20 breaths per minute,
F-5 to F-6
not breathing at all, F-5 to F-6
general management, F-48
apnoea
in small babies, F-52 to F-53
in term babies, F-53
congenital heart abnormality and,
F-52
mild, F-49, F-51 to F-52
moderate, F-49, F-50 to F-51
severe, F-49 to F-50
as finding of sepsis and asphyxia,
F-37
findings, F-47
resuscitating baby who was
breathing, P-1 to P-4
Breech baby
arm palsy and, F-147
normal resting posture of, F-146
Bruises/bruising
With trauma at birth, F-15
Without trauma at birth, F-115
Butterfly set
IV line placement using, P-21 to
P-24
securing placement of, P-23 to P-24

A-18
Index
Butterfly set (Cont.)
venepuncture using, P-10
Cannula
IV line placement using, P-21 to
P-24
securing placement of, P-23
Capillary blood sample
procedure, P-11 to P-12
supplies, P-11
Caput succedaneum
diagnosis of, F-122
management, F-124 to F-125
Catheters, A-10
infection prevention processing,
C-43
nasal
for oxygen administration, C-27
umbilical vein, P-25 to P-27
Cefotaxime
dilution of, C-33
doses, C-34
Ceftriaxone
dilution of, C-33
doses, C-34
Cellulitis
diagnosis of, F-128
management, F-130 to F-131
Cephalohaematoma
diagnosis of, F-122
management, F-124 to F-125
Chest indrawing, F-47
Chignon
diagnosis of, F-122
management, F-124 to F-125
Chlamydia, conjunctivitis due to
diagnosis of, F-141
management, F-142 to F-143
Choking while feeding
differential diagnosis, F-95
general management, F-94
Circumcision, blood from site of,
F-115
Clavicle, fracture of, F-150
Cleft lip or palate, F-151 to F-152
Clinical record, A-1 to A-2
Clothing
protective, infection prevention
and, C-39 to C-40
Cloxacillin
for injection
dilution of, C-33
doses, C-35
for oral administration
dilution, C-33
doses, C-35
Club foot, F-152
Coagulopathy
diagnosis of, F-115
management, F-119
Colour, assessment of, F-11
Communication
for transfer of sick or small baby,
C-64
with mother and family
about baby who is dying or has
died, C-61 to C-62
about baby with birth defects,
C-60, C-61
about baby with
neurodevelopmental
problems, C-60
general principles of, C-57
Congenital heart abnormality, F-52
Congenital syphilis, F-36, F-37
management, F-46
selection of, F-38, F-41
Conjunctivitis, F-140
differential diagnosis, F-141
management
chlamydia and, F-142 to F-143
gonorrhea and, F-142

A-19
Index
Conjunctivitis, F-140 (Cont.)
Staphylococcus aureus and,
F-142
Convulsions, F-59
differential diagnosis, F-62 to
F-63
initial management, F-64
ongoing care after, F-65 to F-66
descriptions of, F-60
findings, F-59
intraventricular bleeding and, F-66
jitteriness or, F-61
multiple findings with, F-42
tetanus and, F-66 to F-68
Coombs test
bleeding and, F-116
for jaundice, F-78
jaundice and, F-80
Coughing while feeding
differential diagnosis, F-95
general management, F-94
Cuts, in skin, F-132
Cyanosis, central, C-30, F-47
Death certificate, A-6 to A-7
Death of baby, communication,
emotional support and, C-61 to
C-62
Dehydration
diarrhoea and, F-107, F-108
IV fluid and, C-23
Diabetes, asymptomatic baby of
mother not treated for, F-156 to
F-157
Diarrhoea, F-107
differential diagnosis, F-109 to
F-110
general management, F-108
bleeding and, F-117
findings, F-107
infection prevention and, F-107
nosocomial, F-110 to F-111
Diarrhoea, F-107 (Cont.)
oral rehydration solution (ORS) for,
F-108
Diazepam
for convulsions, cautions against,
F-64
for tetanus, F-66 to F-67
Discharge
follow-up after, C-68
policy and procedures, C-67 to
C-68
of small baby, F-33 to F-34
Discharge form, A-3
Disinfectant solutions, C-41
Documenting care, A-1 to A-2, F-5
Down syndrome, F-153
Drainage
of abscess, P-43 to P-44
gastric tube for, P-36
Drowsiness, F-87
Drugs
essential supplies of, A-12 to A-13
for transfer of sick or small baby,
C-64
Dying baby, communication,
emotional support and, C-61 to
C-62
Edema. see Oedema
Emergency signs
immediate management, F-5 to
F-6
Emotional reactions, factors in, C-57
to C-58
Emotional support
baby who is dying or has died, C-61
to C-62
baby with birth defects, C-60, C-61
baby with neurodevelopmental
problems, C-60
for the family, C-58 to C-59
visitation, C-59

A-20
Index
Erb palsy, F-147
Erythromycin, for oral administration
dilution of, C-33
doses, C-35
Examination, F-10
of abdomen and back, F-18
of birth weight, F-19
of body temperature, F-12
of colour, F-11
of eyes, F-16
of feeding, F-20
of head and face, F-17
of heart rate, F-12
immediate actions after, F-20 to
F-21
of limbs, F-14 to F-15
of mouth and nose, F-18
of muscle tone and level of
alertness, F-14
of posture and movements, F-12 to
F-13
of respiratory rate, F-11
of skin, F-15 to F-16
of umbilicus, F-16
of urine and stool, F-19
Expressed breast milk
feeding, C-14 to C-15
by cup, cup and spoon, or other
device, C-16 to C-18
by gastric tube, C-18 to C-19
hand-expressing into baby’s
mouth, C-18
Expressing breast milk, C-15 to C-16
Eyelids, sticky, F-140
Eyes
assessment of, F-16
prophylaxis, F-21
red, swollen, or draining pus, F-139
differential diagnosis, F-141
general management, F-139 to
F-140
chlamydia and, F-142 to F-143
Eyes, red, swollen, or draining pus
(Cont.)
gonorrhea and, F-142
gram stain or culture and
sensitivity not possible,
F-143
Staphylococcus aureus and,
F-142
Face
assessment of, F-17
palsy of, F-147, F-148
Face mask, for oxygen administration,
C-28
advantages and disadvantages, C-26
Facial palsy, F-147, F-148
Feedback form, A-5
Feeding, C-11. see also Breastfeeding
assessment of, F-20
breast-milk substitutes, C-19 to
C-20
mother with HIV and, F-161 to
F-162
cleft lip or palate and, F-151 to
F-152
combining IV fluid and, C-23
diarrhoea and, F-107, F-108
difficulty
differential diagnosis, F-94 to
F-95
general management, F-94
findings, F-93 to F-94
inadequate weight gain and, F-96
to F-98
incorrect positioning and
attachment, F-96
small baby, F-96
twins, F-96
equipment and supplies, A-11
expressed breast milk, C-14 to C-15

A-21
Index
Feeding, expressed breast milk (Cont.)
by cup, cup and spoon, or
other device, C-16 to
C-18
by gastric tube, C-18 to C-19
hand-expressing into baby’s
mouth, C-18
gastric tube for, P-36, C-18 to C-19
mother with HIV and, F-160 to
F-162
during phototherapy, F-85
vomiting and, F-99
Feet. see Foot
Femur, fracture of, F-150
Fever during labour or after giving
birth
management, F-55
baby more than three days old,
F-55
gestational age 35 weeks or more
or birth weight 2 kg or
more, F-55 to F-56
gestational age less than 35
weeks or birth weight less
than 2 kg, F-57
in a baby with multiple findings,
F-37
Findings. see Examination; Multiple
findings
Fingers, extra, F-151
Floppiness, F-87
Fluctuant swelling
on scalp, F-121, F-122
on skin, F-127, F-128, F-130 to
F-131
Fluid
bleeding and/or pallor and, F-114,
F-120
for shock, F-2
IV (intravenous), C-20
administration of, C-21
Fluid (Cont.)
choices of, C-20 to C-21
combining feeding and, C-23
electrolytes and, C-21
monitoring babies receiving,
C-22 to C-23
volumes of fluid and feeds
during first days of life,
C-22
for transfer of sick or small baby,
C-64
Fontanelle, bulging anterior
multiple findings with, F-42
Foot, club, F-152
Fractures, F-147, F-148 to F-149
diagnosis of, F-147
general management, F-148 to
F-149
G6PD (glucose-6-phosphate
dehydrogenase) deficiency
bleeding and/or pallor and, F-116
jaundice and, F-80, F-81, F-82
Gasping
immediate management, F-5 to
F-6
Gastric irritation
diagnosis of, F-103
management, F-106
Gastric tubes
essential supplies of, A-10
feeding difficulty and, F-94, F-95
for feeding expressed breast milk,
C-18 to C-19
infection prevention processing,
C-43
inserting, P-33
procedure, P-33 to P-36
supplies, P-33
Gastrointestinal malformation or
obstruction
diagnosis of, F-102
management, F-105

A-22
Index
Gastroschisis, F-152 to F-153
Genetic birth defects, F-153
Gentamicin
dilution of, C-33
doses, C-35
Gloves
essential supplies of, A-12
protective, infection prevention
and, C-39 to C-40
Glucose, in blood
bleeding and/or pallor and, F-114
convulsions or spasms and, F-59,
F-62
IV fluid and, C-22
low
management
less than 25 mg/dl, F-91
less than 45 mg/dl but at least
25 mg/dl, F-92
measuring frequency after
normal reading, F-92
multiple findings with, F-36
measuring, P-13
Glucose-6-phosphate dehydrogenase
(G6PD)
deficiency, F-81 to F-82
bleeding and/or pallor and,
F-116
family history of, F-77, F-113
jaundice and, F-78, F-80
Gonorrhea
conjunctivitis due to, F-141, F-142
Gram stain not possible, pus draining
from eyes and, F-143
Growth, assessing
general principles, C-53
Grunting on expiration, F-47
Haematocrit
transfusion determinations and,
F-114
Haematology, supplies, A-9
Haemoglobin
level of, transfusion determinations
and, F-114
Haemolysis, F-116
Haemolytic jaundice
diagnosis of, F-80
management, F-81 to F-83
family history of, F-77
Haemorrhagic disease of the newborn
diagnosis of, F-115
management, F-119
Hand(s)
immobilizing for IV line, P-23
IV line placement in, P-22
HBV (hepatitis B vaccine), C-52
Head
assessment of, F-17
increasing circumference of, F-123,
F-124
moulding of, F-121
Head box, for oxygen administration,
C-27 to C-28
advantage and disadvantages, C-26
infection prevention processing,
C-43
Heart rate
assessment of, F-12
swelling on scalp and, F-123
Heel prick for blood sample
procedure, P-11 to P-12
supplies, P-11
Hepatitis B, asymptomatic baby of
mother not treated for, F-155
Hepatitis B vaccine (HBV), C-52
History, medical
of baby, F-7 to F-8
of labour and birth, F-9
of mother, F-8 to F-9
of the pregnancy, F-8 to F-9

A-23
Index
HIV, mother with
antiretroviral therapy and, F-159 to
F-160
feeding and, F-160 to F-162
general management, F-159
Hospital laboratory facilities
essential equipment, supplies, and
drugs for, A-9
Humerus, fracture of, F-149 to F-150
Hyperglycaemia, C-22 to C-23
Hyperthermia
diagnosis of, F-70
management, F-73 to F-75
Hypothermia
diagnosis of, F-70
management
moderate, F-72 to F-73
severe, F-71 to F-72
Ill-looking baby, F-87
Immunizations
general guidelines, C-51
hepatitis B (HBV), C-52
poliomyelitis (OPV), C-52
for staff, C-38
tuberculosis (BCG), C-51
Imperforate anus, F-153
Incubator
abnormal body temperature and,
F-69, F-73
advantages and disadvantages of,
C-26
infection prevention processing,
C-43
for oxygen administration, C-28
recommended temperatures, C-7
for warming and maintaining baby’s
body temperature, C-4, C-7
to C-8
Infection(s)
nosocomial, C-45 to C-46
diarrhoea, F-111
Infection(s) (Cont.)
eyes, F-140
skin, F-129
umbilicus, F-136
people as sources of, C-38
skin, F-128, F-129 to F-130
umbilicus
local, F-137
severe, F-136 to F-137
Infection prevention
additional methods, C-45
aseptic technique, C-40 to C-41
antiseptic and disinfectant
solutions, C-41
multi-use vials, C-40 to C-41
blood transfusion screening, C-48
to C-49
cleaning and disinfection, essential
supplies, A-12
diarrhoea and, F-107
eyes and, F-139
general principles, C-37
gloves, A-12
protective, C-39 to C-40
handwashing, C-38 to C-39
essential facilities for, A-11
housekeeping and waste disposal,
C-43 to C-44
instruments and equipment
processing guidelines, C-42 to
C-43
safe handling of sharps, C-42
IV administration sets and fluid
bags and, P-24
of nosocomial infections, C-45 to
C-46
protective clothing for, C-39
routine care practices, C-37 to C-38
skin infections in babies and, F-127
skin preparation, essential supplies
for, A-12
umbilicus and, F-135

A-24
Index
Infection prevention (Cont.)
waste disposal, essential supplies
for, A-12
Injections
essential equipment and supplies,
A-10
intradermal, P-19 to P-20
intramuscular (IM), P-15 to P-17
intravenous (IV), P-17 to P-18
International Medical Certificate of
Cause of Death, A-6 to A-7
Intraventricular bleeding
diagnosis of, F-63
management, F-66
Irritability, F-87
IV (intravenous) fluid, C-20
administration of, C-21
choices of, C-20 to C-21
combining feeding and, C-23
monitoring babies receiving, C-22
to C-23
for shock, F-2
volumes and feed during first days
of life, C-22
IV (intravenous) line
for emergency signs, F-1
essential equipment and supplies
for, A-10
establishing, P-21
intraosseous infusion, P-27
procedure, P-28 to P-30
supplies, P-28
peripheral, P-21
procedure, P-21 to P-24
supplies, P-21
umbilical venous catheterization,
P-25
procedure, P-25 to P-27
supplies, P-25
Jaundice
differential diagnosis, F-80 to
F-81
initial management, F-78
bleeding and/or pallor and, F-116
clinical estimation of severity of,
F-78 to F-79
congenital syphilis and, F-46
convulsions or spasms and, F-59
family history of, F-80, F-116
findings, F-77
swelling on scalp and, F-124
treatment based on serum bilirubin
level, F-79
Jitteriness, F-87
Kangaroo mother care (KMC), F-30 to
F-34
discharge and follow-up, F-33 to
F-34
monitoring the baby during, F-33
for warming and maintaining baby’s
body temperature, C-3
what mother needs to know, F-31 to
F-33
beginning, F-31 to F-32
breastfeeding, F-32 to F-33
daily life, F-33
Kernicterus
diagnosis of, F-81
management, F-83 to F-84
Klumpke palsy, F-147
Labour
bleeding during, F-116
complicated, difficult, or prolonged,
F-36, F-37
fever during, F-55
management, F-55
baby more than three days old,
F-55

A-25
Index
Labour, fever during (Cont.)
gestational age 35 weeks or
more or birth weight 2
kg or more, F-55 to
F-56
gestational age less than 35
weeks or birth weight
less than 2 kg, F-57
Lethargy, F-87
drug-induced
diagnosis of, F-89
management, F-89
Light, for jaundice observation, F-77
Limbs, assessment of, F-14 to F-15
Lips
blue, F-47
oxygen administration and colour
of, C-30
Liver, enlarged
family history of, F-80, F-116
Log book, A-8
Low blood glucose
management
less than 25 mg/dl, F-91
less than 45 mg/dl but at least 25
mg/dl, F-92
measuring frequency after normal
reading, F-92
Lumbar puncture
procedure, P-37 to P-40
lying position for, P-38
site of, P-39
sitting position for, P-38
supplies, P-37
Meconium
in amniotic fluid, F-47
not passing within 24 hours after
birth, F-19
Meningitis
management, F-43
suspected, F-42
Meningomyelocoele, F-152
Microbiology, essential supplies, A-9
Mother. see also Breastfeeding
noticing changes in baby’s
condition, F-21
cracked nipples, vomiting baby and,
F-102
expressing breast milk, C-15 to
C-16
with fever during labour or after
birth, F-55
baby with multiple findings and,
F-37
with rupture of membranes for more
than 18 hours before birth,
F-55
baby with multiple findings and,
F-37
tetanus immunization, baby’s
convulsions or spasms and,
F-59
with uterine infection during labour
or after birth, F-55
baby with multiple findings and,
F-37
Mouth
assessment of, F-18
thrush in, F-128, F-131
white patches on inside of, F-128
Movements, assessment of, F-12 to
F-13
Mucous membrane problems
differential diagnosis, F-128
management
thrush, F-131
Multiple findings, F-35
categorizing, F-36, F-37

A-26
Index
Multiple findings (Cont.)
management
asphyxia, F-44 to F-46
congenital syphilis, F-46
meningitis, F-43
selection of, F-38 to F-41
sepsis, F-41 to F-43
Muscle tone, assessment of, F-14
Napkin area, thrush in, F-128, F-131
Nasal catheter, for oxygen
administration, C-27
advantages and disadvantages, C-25
Nasal discharge, F-37
Nasal gastric tube, inserting, P-33
procedure, P-33 to P-36
Nasal prongs, for oxygen
administration, C-26 to C-27
advantages and disadvantages, C-25
Necrotizing enterocolitis
diagnosis of, F-101
management, F-104 to F-105
Neurodevelopmental problems, baby
with
communication, emotional support
and, C-60
Newborn special care unit
cleaning guidelines, C-44
housekeeping and waste disposal,
C-43 to C-44
non-patient-care areas
equipment and supplies, A-9
patient-care areas, A-9 to A-10
drug supplies, A-12 to A-13
equipment, A-10
furnishings, A-9 to A-10
supplies, A-10 to A-13
feeding, A-11
infection prevention, A-11 to
A-12
for injections, A-10
Newborn special care unit, patient care
areas (Cont.)
instruments, A-11
for IV lines, A-10
other, A-11
for oxygen administration,
A-10
tests, A-11
catheters, A-10
vaccine supplies, A-13
Non-specific signs
differential diagnosis, F-89
general management, F-87 to F-88
Nose. see also under Nasal
assessment of, F-18
Nosocomial infections, C-45 to C-46
diarrhoea, F-111
eyes, F-140
skin, F-129
umbilicus, F-136
Obstetric causes, blood loss from
diagnosis of, F-116
management, F-119
Oedema
generalized
bleeding and/or pallor and,
F-116
jaundice and, F-80
skin and mucous membrane
problems and, F-128
Omphalocoele, F-152 to F-153
Ongoing care, F-2 to F-3
Opisthotonos, F-12, F-60
multiple findings with, F-42
OPV (poliomyelitis vaccine), C-52
Oral gastric tube, inserting, P-33
procedure, P-33 to P-36
Oral rehydration solution (ORS)
for diarrhoea, F-108
Overhydration
IV fluid and, C-23

A-27
Index
Oximeter, C-29
Oxygen administration, C-25 to C-26
essential equipment and supplies,
A-10
methods, C-25 to C-26
monitoring baby’s response to,
C-29 to C-30
sources for, C-28 to C-29
Pain
limb movement and, F-147
swelling on scalp and, F-122
Paladai, for feeding expressed breast
milk, C-16 to C-18
Pallor
differential diagnosis, F-115 to
F-118
general management, F-119 to
F-120
findings, F-113
swelling on scalp and, F-123
without history of bleeding, F-114
Pallor of unknown origin, F-119 to
F-120
Peeling skin, F-16
Phenobarbital
cautions against diazepam with,
F-64
Phototherapy
procedure, F-85 to F-86
for early or serious jaundice, F-78
to F-79
IV fluid and feed volumes and,
C-22
preparation of unit for, F-84
Plan of care, F-2, F-3
Poliomyelitis vaccine (OPV), C-52
Posture, assessment of, F-12 to F-13
Pregnancy
diabetes during, F-156
hepatitis B during, F-155
HIV during, F-159
Pregnancy (Cont.)
medical history of, F-8 to F-9
positive syphilis test of mother
during, F-36, F-157
tuberculosis during, F-155 to F-156
vaginal bleeding during later, F-116
Prematurity, jaundice of
diagnosis of, F-80
management, F-82
Procaine benzylpenicillin
dilution of, C-33
doses, C-35
Psychological reactions, factors in,
C-57 to C-58
Pus
draining from eyes, F-139
differential diagnosis, F-141
general management, F-139 to
F-140
draining from umbilicus, F-135,
F-136
Pustules, skin, F-127, F-128, F-129 to
F-130
severe infection of umbilicus and,
F-137
Radiant warmer
abnormal body temperature and,
F-69, F-73 to F-74
infection prevention processing,
C-43
IV fluid and feed volumes and,
C-22
for warming and maintaining baby’s
body temperature, C-3, C-5
to C-6
Rashes, blistering skin, F-37
RDS (respiratory distress syndrome),
F-49
moderate breathing difficulty due
to, F-51

A-28
Index
Record keeping, A-1
clinical record, A-1 to A-2
death certificate, A-6 to A-7
discharge form, A-3
feedback form, A-5
log book, A-8
referral form, A-4
supplies, A-11
Rectal paraldehyde, administration of
procedure, P-41
supplies, P-41
Rectal temperature
measuring, P-6 to P-7
Reddened skin, F-127, F-128
local infection of umbilicus and,
F-136, F-137
Reduced activity, F-87
Referral
communication procedures, C-64
preparation for, C-63
Referral form, A-4
Regurgitating since first attempt to
feed
differential diagnosis, F-94 to
F-95
general management, F-94
Resistance, to umbilical vein catheter,
P-27
Respiratory distress syndrome (RDS),
F-49
moderate breathing difficulty due
to, F-51
Respiratory rate
assessment of, F-11
less than 30 breaths per minute,
F-47, F-48
more than 60 breaths per minute,
F-47, F-48, F-49
swelling on scalp and, F-123
Resuscitating baby who was breathing
procedure, P-1 to P-4
care after, P-4
equipment and supplies, P-1
infection prevention processing,
C-43
opening the airway, P-1 to P-2
Resuscitation of baby at birth, F-36,
F-38
Rhesus (Rh) factor
bleeding and/or pallor and, F-116
jaundice and, F-78, F-80
Ringer’s lactate
for shock, F-2
when blood is unavailable, C-47
Rupture of membranes
more than 18 hours before birth
management, F-55
baby more than three days old,
F-55
gestational age 35 weeks or
more or birth weight
2 kg or more, F-55 to
F-56
gestational age less than 35
weeks or birth weight
less than 2 kg, F-57
Saline solution
for shock, F-2
when blood is unavailable, C-47
Scalp, swelling on, F-121
differential diagnosis, F-122
management, F-123 to F-125
findings, F-121
Scalp vein
IV line placement in, P-22
Sepsis
findings, categories of, F-37
management, F-41 to F-43
selection of, F-38 to F-40

A-29
Index
Sepsis (Cont.)
diarrhoea and, F-107
jaundice associated with, F-80
Sharp instruments
safe handling of, C-42
Shock
immediate management, F-5 to
F-6
bleeding and/or pallor and, F-114
intravenous fluid for, F-2
swelling on scalp and, F-124
Sick baby
rapid assessment, F-5 to F-6
anaemia of, F-118, F-119
feeding and fluid management
1.25 to 1.49 kg, F-29
1.5 to 1.749 kg, F-29
1.75 to 2.5 kg, F-28
less than 1.25 kg, F-30
Silver nitrate drops
chemical irritation due to, F-139,
F-141
for eye prophylaxis, F-21
Skin
assessment of, F-15 to F-16
problems
differential diagnosis, F-128
management
abrasions, F-132 to F-133
cellulitis/abscess, F-130 to
F-131
cuts, F-132
infections, F-129 to F-130
thrush, F-131
findings, F-127 to F-128
Skin tags, F-151
Skin-to-skin contact
for warming and maintaining baby’s
body temperature, C-5
Small baby, F-23, F-36. see also Sick
baby
anaemia of, F-118, F-119
Small baby (Cont.)
apnoea in, F-52 to F-53
breathing difficulty in, F-49
discharge and follow-up, F-33 to
F-34
feeding and fluid management
general principles of, F-24 to
F-30
without major illness
1.25 to 1.49 kg, F-27
1.5 to 1.749 kg, F-27
1.75 to 2.5 kg, F-26 to F-27
less than 1.25 kg, F-27 to F-28
feeding difficulty, F-93, F-95, F-96
kangaroo mother care, F-30 to F-33
multiple findings with, F-36, F-37,
F-38, F-40 to F-41
weight gain and feeding after seven
days of age, F-30
Snuffles, F-37
Spasms, F-59
differential diagnosis, F-62 to
F-63
management for tetanus, F-66 to
F-68
descriptions of, F-60, F-61
findings, F-59
jitteriness or, F-61
Spina bifida, F-152
Spleen, family history of removal of,
F-80, F-116
Spontaneous bleeding. see Bleeding
Staphylococcus aureus, conjunctivitis
from, F-141, F-142
Stethoscopes
infection prevention processing,
C-43
Stool
assessment of, F-19
blood in, F-102, F-115, F-117
diarrhoea and, F-107

A-30
Index
Subaponeurotic (subgaleal)
haemorrhage, F-122, F-123 to
F-124
Sun exposure
abnormal body temperature and,
F-69
Swallowed maternal blood
diagnosis of, F-102
management, F-105 to F-106
Swelling
on scalp, F-121
differential diagnosis, F-122
management, F-123 to F-125
findings, F-121
on skin, F-127, F-128, F-136
of skin over bone, F-147
Syphilis
asymptomatic baby and, F-157
mother not treated
congenital, F-36, F-37
management, F-46
selection of, F-38, F-41
positive test of mother during
pregnancy, F-36, F-157
Syringes
essential supplies of, A-10
infection prevention processing,
C-43
Temperature. see also Body
temperature
ambient, feeding difficulties and,
F-97
Tender abdomen
abdominal distension and, F-110
bleeding and/or pallor and, F-117
diarrhoea and, F-110
vomiting and, F-101
Tender swelling on skin, F-127, F-128
Tetanus
diagnosis of, F-62
management, F-66 to F-68
Tetanus (Cont.)
ongoing care, F-67 to F-68
Thermometers
infection prevention processing,
C-43
for measuring body temperature,
P-5
Thrush
diagnosis of, F-128
management, F-131
Toes, extra, F-151
Tongue
blue, F-47
cyanosis and, C-29, C-30
white patches on, F-128
Transfer and referral
care during, C-65
communication procedures, C-64
preparation for, C-63
equipment, supplies, drugs, and
fluid for, C-64
Tuberculosis, asymptomatic baby of
mother not treated for, F-155 to
F-156
Tuberculosis vaccine (BCG), C-51
Twins
bleeding and/or pallor and, F-113,
F-116
breastfeeding, C-14
feeding difficulty, F-95, F-96
Umbilical vein catheterization
procedure, P-25 to P-27
equipment and supplies, P-25
Umbilicus
assessment of, F-16
bleeding from, F-115
red and swollen, draining pus, or
foul smelling, F-135
classification of severity of
infection, F-136
management, F-136 to F-137

A-31
Index
Umbilicus (Cont.)
unclean or harmful substances
applied to, F-62, F-136
Unconscious, F-14, F-37
Urine
assessment of, F-19
blood in, F-115
Vaccines
essential supplies of, A-13
general guidelines, C-51
hepatitis B (HBV), C-52
poliomyelitis (OPV), C-52
for staff, C-38
tuberculosis (BCG), C-51
Vaginal bleeding during later
pregnancy/birth, F-116
Venepuncture
procedure, P-9 to P-11
needle and syringe or butterfly set,
P-10
needle without syringe, P-10 to
P-11
sites, bleeding from, F-115
supplies for, P-9
Visitation, C-59
Vitamin K
1
, F-21
bleeding and, F-6
Vomiting
differential diagnosis, F-101 to
F-103
general management, F-100
gastric irritation, F-106
necrotizing enterocolitis, F-104
to F-105
suspected gastrointestinal
malformation or
obstruction, F-105
swallowed maternal blood,
F-105 to F-106
bleeding and/or pallor and, F-117,
F-118
Vomiting (Cont.)
cause not determined, F-103 to
F-104
findings, F-99
Vomitus
frothy or with bile or blood, F-99,
F-101, F-102
Warm room, C-4, C-8 to C-9
Weighing technique, C-53 to C-54
Weight
of babies receiving IV fluid, C-23
growth monitoring and, C-53
measurement at birth of, F-19
recording, C-54 to C-55
example, C-56
Weight gain
and feeding after seven days of age
in small baby, F-30
inadequate, F-93
diagnosis of, F-95
management, F-96 to F-98

A-32
Index
Wyszukiwarka
Podobne podstrony:
Essentials of Maternity Newborn and Women's Health 3132A 30 p780 781
Essentials of Maternity Newborn and Women's Health 3132A 29 p778 779
First Newborn
Essentials of Maternity Newborn and Women s Health 3132A 32 p785 808
Essentials of Maternity Newborn and Women s Health 3132A 23 p634 662
Essentials of Maternity Newborn and Women s Health 3132A 17 p428 446
Essentials of Maternity Newborn and Women s Health 3132A 16 p393 427
Sage Marlowe Newborn
Essentials of Maternity Newborn and Women s Health 3132A 21 p585 612
Essentials of Maternity Newborn and Women s Health 3132A 09 p189 207
Newborn Dipper Cover
Essentials of Maternity Newborn and Women s Health 3132A 11 p235 252
NewBorn
Essentials of Maternity Newborn and Women s Health 3132A 08 p167 188
Essentials of Maternity Newborn and Women s Health 3132A 03 p042 058
Essentials of Maternity Newborn and Women s Health 3132A 27 p769 771
więcej podobnych podstron