
www.kbcafe.com
January 21, 2002
Copyright 2002-2003 Randy Charles Morin
dotNet Threading, Part I
by Randy Charles Morin
One of my New Year wishes for this coming year was that the standard committees would
agree on threading classes for the C++ language. This limitation of the C++ language
standard means that I have to rewrite my threading library each time I start a new job with
a new company. I’ve always wished there was a standard threading library that I could use
wherever I go.
Fortunately, C# does not have this disadvantage. Right from the get go, the language
inherits an entire set of threading classes from the dotNet framework. The
“System.Threading” dotNet namespaces includes 14 utility classes, 4 exception classes, 2
structures, 6 delegates and 3 enumerations. I’ll present most of these in this article.
Intermediate Level
This article is written for the intermediate and senior C# developer. Working knowledge
of the C# programming language and dotNet framework is assumed. The article was
written with a Beta version of VS.NET and associated documentation. Changes, although
not anticipated, might occur before final release of VS.NET that invalidate portions of this
article.
Creating Threads
Creating a thread in C# is close to trivial, but not quite. The only non-trivial thing about
creating a thread is dotNet delegate-classes. Let me explain in few words what is a
delegate class. The delegate is a wrapper around a code construct in the dotNet. The code
construct could be an object instance, an instance method or a static method. Delegates
are used when you want to pass one of the three code constructs as a parameter to
another method.
When creating a new thread you have to use the ThreadStart delegate class to wrap the
instance method that will be executed in the newly created thread. The instance method
must return void and must not have any parameters.
void ThreadStart()
To create a new thread, first create a new ThreadStart object, passing the instance method
of the thread procedure in the constructor. The new delegate object is then passed to the
constructor of the Thread.
Thread thread = new Thread(
new ThreadStart(obj.ThreadStart));
You’ve now created a new thread, but the thread is not yet started. To start the thread,
you call the Thread.Start instance method.
thread.Start();
And that’s it. You have a new running thread. A complete console application that creates
a thread and outputs a couple messages to the console window is shown in Listing 1.
www.kbcafe.com
January 21, 2002
Copyright 2002-2003 Randy Charles Morin
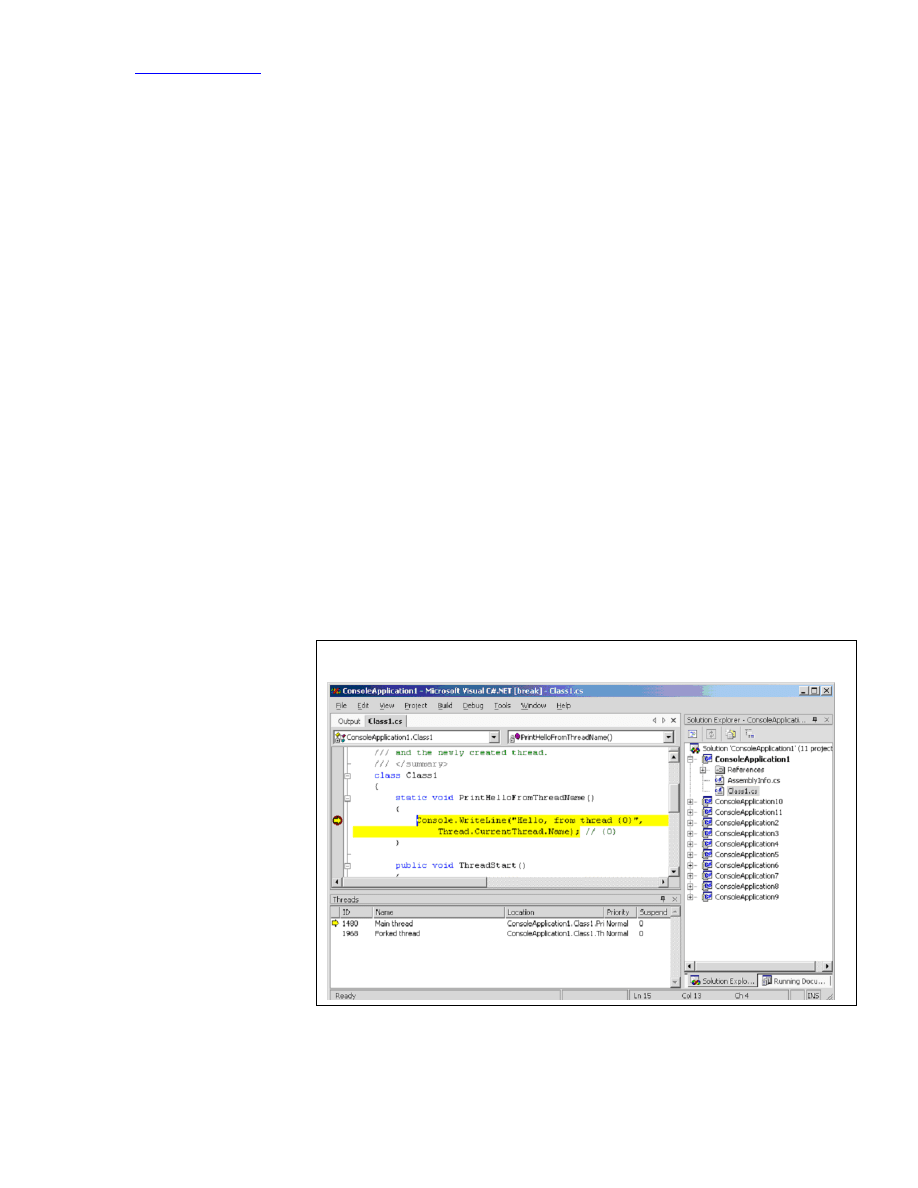
Figure 1: Named Threads in Debugger
Listing 1: Creating Threads
using System;
using System.Threading;
namespace ConsoleApplication1
{
class Class1
{
static void PrintHelloFromThreadName()
{
Console.WriteLine("Hello, from thread {0}",
Thread.CurrentThread.Name); // {0}
}
public void ThreadStart()
{
PrintHelloFromThreadName();
}
static void Main(string[] args)
{
Thread.CurrentThread.Name = "Main thread";
Class1 obj = new Class1();
Thread thread = new Thread(
new ThreadStart(obj.ThreadStart));
thread.Name = "Forked thread";
thread.Start();
PrintHelloFromThreadName();
}
}
}
A nice feature of dotNet threads, and for that matter any dotNet object, is the ability name
the object. If you name your threads, then the debugger will pick up those names and
you’ll have a much easier time debugging (see Figure 1).
The frame in the bottom left of the IDE window in Figure 1 shows all the threads in out
C# application. I set a
breakpoint in the
PrintHelloFromThread
Name static method in
Listing 1 and ran the
application. When the
application stops on
the breakpoint, I called
up the threads window
from the menu bar,
Debug | Window |
Threads. As you can
see, the Name in the
threads window of the
IDE is the same as the
name given the Thread
object in our C# code.

www.kbcafe.com
January 21, 2002
Copyright 2002-2003 Randy Charles Morin
Thread Pools
I was very impressed when I found out that the dotNet framework library included the
“System.Threading.ThreadPool” class. I was also impressed by how easy it was to use.
You need not create the pool of threads, nor do you have to specify how many consuming
threads you require in the pool. The ThreadPool class handles the creation of new threads
and the distribution of the wares to consume amongst those threads.
You can kick off a consuming thread pool by simply
invoking the ThreadPool.QueueUserWorkItem static
method.
ThreadPool.QueueUserWorkItem(
new WaitCallback(Consume), ware);
The parameters of the QueueUserWorkItem static method
are the WaitCallback delegate that wraps the instance
method used in consuming your ware and the ware that
you are passing to the method. Your consuming instance
method must return void and take one object parameter.
The ware that is passed to the QueueUserWorkItem
method will be passed into your consuming instance
method as the one object parameter.
public void Consume(Object obj)
Again, the simplicity of C# and the dotNet framework shine through. In just a few lines of
code, I’ve recreated a multithreaded consumer-producer application (see Listing 2).
Listing 2: Creating Thread Pools
using System;
using System.Threading;
using System.Diagnostics;
namespace ConsoleApplication2
{
public class Ware
{
public int id;
public Ware(int _id)
{
id = _id;
}
}
class Class1
{
public int QueueLength;
public Class1()
{
QueueLength = 0;
}
public void Produce(Ware ware)
{
ThreadPool.QueueUserWorkItem(
new WaitCallback(Consume), ware);
QueueLength++;
}
public void Consume(Object obj)
Ware
For the rest of this article I
define a ware to be an item
that is produced by the
producing thread and
consumed by a consuming
thread in the consumer-
producer design pattern.
This is a very narrow
definition of the word, but
one that suits this article.

www.kbcafe.com
January 21, 2002
Copyright 2002-2003 Randy Charles Morin
{
Console.WriteLine("Thread {0} consumes {1}",
Thread.CurrentThread.GetHashCode(), //{0}
((Ware)obj).id); //{1}
Thread.Sleep(100);
QueueLength--;
}
public static void Main(String[] args)
{
Class1 obj = new Class1();
for (int i = 0; i < 1000; i++)
{
obj.Produce(new Ware(i));
}
Console.WriteLine("Thread {0}",
Thread.CurrentThread.GetHashCode() ); //{0}
while (obj.QueueLength != 0)
{
Thread.Sleep(1000);
}
}
}
}
I added the line Thread.Sleep(100) in the Consume method to simulate the processing that
a consumer would normally have performed on the ware. If I didn’t include this Sleep’ing,
then one consumer thread could have handled all 100 wares. The additional Sleep’ing
forces the dotNet framework to create additional threads and more accurately portrays the
features of the ThreadPool class.
Synchronization Objects
The previous code contains some rather inefficient coding when the main thread cleans up.
I repeatedly test the queue length every second until the queue length reaches zero. This
may mean that the process will continue executing for up to a full second after the queues
are finally drained. Wow! I can’t have that.
OK! Maybe that’s not a good reason to change the code, but it is a convenient excuse for
me to introduce you to the System.Threading.ManualResetEvent class. Using a
ManualResetEvent object, I could trigger the main thread to complete as soon as the last
ware was consumed. I’ll do this by creating two new instance data members, a bool
WaitForComplete to tell us when the main thread is waiting to exit and a
ManualResetEvent Event object that will signal the main thread to exit (see Listing 3).
Listing 3: Using Events
private bool WaitForComplete;
private ManualResetEvent Event;
public void Wait()
{
if (QueueLength == 0)
{
return;
}
Event = new ManualResetEvent(false);
WaitForComplete = true;
Event.WaitOne();
}
public void Consume(Object obj)
{

www.kbcafe.com
January 21, 2002
Copyright 2002-2003 Randy Charles Morin
Console.WriteLine("Thread {0} consumes {1}",
Thread.CurrentThread.GetHashCode(), //{0}
((Ware)obj).id); //{1}
Thread.Sleep(100);
QueueLength--;
if (WaitForComplete)
{
if (QueueLength == 0)
{
Event.Set();
}
};
}
When the consuming thread finishes consuming a ware and detects that the
WaitForComplete is true, it will trigger the Event when the queue length is zero. Instead
of calling the while block when it wants to exit, the main thread calls the Wait instance
method. This method sets the WaitForComplete flag and waits on the Event object.
Let me test your threading prowess. The previous listing contained a race condition. Can
you find it? Take a minute or two before continuing. Tic! Tic! Tic!
Race Condition
A race condition is a bug caused by an incorrect assumption as to the timing of two
events, that is, that one event would always occur before the other.
The race condition occurs when the system shuts down. If the main thread is swapped out
in the Wait instance method between testing if the queue length is zero and setting the
WaitForComplete flag to true and then the last consuming thread exits the Consume
instance method while the main thread is in this state, the event will never be triggered. I
ran the code a few hundred times and was never able to trigger the condition. You can’t
reproduce it because the main thread should be waiting on the event object well before the
last consuming-thread exits.
Monitor and Lock
I could have arranged the code otherwise to prevent this race condition, but now I’ve
created another opportunity to introduce you to the System.Threading.Monitor class and
the lock C# construct. The monitor design pattern is most familiar to Java developers. In
Java, the synchronized keyword allowed the developer to create quick critical sections
within their code. The Java construct was often called a monitor.
The dotNet framework presents a similar class called the Monitor that implements
traditional wait and signal methods called Wait and Pulse. The C# compiler uses this
Monitor class to implement a language construct called a lock. The lock is established on
an object and while the lock is established, nobody else can acquire the lock and must wait
till the lock is freed. I used this lock construct to prevent our previous race condition (see
Listing 4).
Listing 4: Using Monitors
public void Wait()
{
lock (this)
{

www.kbcafe.com
January 21, 2002
Copyright 2002-2003 Randy Charles Morin
if (QueueLength == 0)
{
return;
}
Event = new ManualResetEvent(false);
WaitForComplete = true;
}
Event.WaitOne();
}
public void Consume(Object obj)
{
Console.WriteLine("Thread {0} consumes {1}",
Thread.CurrentThread.GetHashCode(), //{0}
((Ware)obj).id); //{1}
Thread.Sleep(100);
lock (this)
{
QueueLength--;
if (!WaitForComplete)
{
return;
}
}
if (QueueLength == 0)
{
Event.Set();
};
}
Preventing the concurrent setting and testing of the queue length and WaitForComplete
flag by two different threads removes the race condition. The lock ensures that the setting
and testing of these two variables is essentially atomic.
Join
Before dotNet, I was often asked questions about how to wait for a Win32 thread to exit.
The solution was to acquire a handle to the thread and wait on the handle. Or
alternatively, you could setup an event that was triggered at the end of the thread and wait
on that event. dotNet provides us with a simpler method of doing the same. If you call the
Thread.Join instance method, then the current thread will wait until the thread represented
by the Thread object is terminated (see Listing 5).
Listing 5: Using Join
using System;
using System.Threading;
using System.Diagnostics;
namespace ConsoleApplication7
{
class Class1
{
public void Pump()
{
for (int i=0;i<100;i++)
{
Console.WriteLine("Value {0}", i);
Thread.Sleep(1);
}
}
static void Main(string[] args)
{
Class1 obj = new Class1();
Thread pump = new Thread(
new ThreadStart(obj.Pump));

www.kbcafe.com
January 21, 2002
Copyright 2002-2003 Randy Charles Morin
pump.Start();
Thread.Sleep(500); // force the other thread
// thru a couple iterations
pump.Join(); // wait until the thread is
// completed
Console.WriteLine("Goodbye");
}
}
}
In this previous listing, the main thread creates a new thread (pump), then waits for the
thread to complete by calling the pump.Join instance method. If you run the previous
code, as is, then the output will be the numbers 0 to 99 and finally the word Goodbye. If
you remove the call to pump.Join, then the Goodbye message may be printed before the
last number. I chose to put the main thread to sleep for half a second as this displayed the
Goodbye message in the middle of the stream of numbers (when pump.Join was removed).
AutoResetEvent & Timer
Early in the article, I introduced you to the ManualResetEvent class. This class allowed
you to set and reset (signal and unsignal) the event by calling the Set and Reset instance
methods. The System.Threading.AutoResetEvent class is very similar to the
ManualResetEvent class, but when a thread waiting on the event is signaled, the one
thread is released and the event is returned to the unsignaled state. This removes the
necessity to reset the signal after a thread is signaled.
Another great class in the System.Threading namespace is the Timer class. This class
allows you to signal an event at a particular interval in time in the future. The Timer class
is implemented using a delegate callback instance method. When the Timer is signaled, the
class calls the instance method that you specified in the constructor of the Timer object.
The Timer callback can also receive a parameter object passed in the call to the Timer
constructor. Presented in Listing 6 is a small sample using the AutoResetEvent and Timer
classes.
Listing 6: AutoResetEvent and Timer Class
using System;
using System.Threading;
namespace ConsoleApplication8
{
class Class1
{
public void TimerCallback(Object obj)
{
Console.WriteLine("Timer triggered");
((AutoResetEvent)obj).Set();
Thread.Sleep(1000);
((AutoResetEvent)obj).Set();
}
static void Main(string[] args)
{
Class1 obj = new Class1();
AutoResetEvent ev =
new AutoResetEvent(false);
Timer timer = new Timer(
new TimerCallback(obj.TimerCallback),
ev, 1000, 0);
ev.WaitOne();
Console.WriteLine("Event Fired");

www.kbcafe.com
January 21, 2002
Copyright 2002-2003 Randy Charles Morin
ev.WaitOne();
Console.WriteLine("Event Fired");
}
}
}
Note that the Timer callback instance method is wrapped in a TimerCallback delegate
object. The main thread will create an AutoResetEvent object and a Timer object. The
main thread then waits on the event object. The TimerCallback instance method is called
after one second, triggering the event object. Because the event object is automatically
reset, when the main thread attempts to wait on the event again, the thread yields until the
event is signaled a second time. The TimerCallback instance method waits another second
and then signals the event a second time, releasing the main thread.
More
In the second part of this article, I will complete my discussion of the synchronization
objects and will discuss thread local storage, COM interoperability and thread states.
About the About
Randy Charles Morin is the Lead Architect of SportMarkets Development from Toronto,
Ontario, Canada and lives with his wife and two kids in Brampton, Ontario. He is the
author of the
www.kbcafe.com
website, author of Wiley’s Programming Windows
Services book and co-author of many other programming books and articles.
Wyszukiwarka
Podobne podstrony:
Cutting Threaded Rod
apache webdav ldap howto 2UUJ7DPPNH5KVRVO5ZK7CYJLMSMX5ZDM7YWCMHQ
Installation HOWTO
Belarusian HOWTO
K7s5a HOWTO
Filtr Pakietow OpenBSD HOWTO id Nieznany
Linux 2 4 NAT HOWTO
DB2 HOWTO
Linux ipchains HOWTO pl
howto 071106 pointing out the positive
PHP HOWTO
IP Masquerade HOWTO
ACPI HOWTO
Lab1 WinMobile Csharp Lab 1 Csh Nieznany
oo howto
debian apt howto pl
apache compile howto 5XKGLE4SCANB47MZHUVH4O2XTN4RDNP47G26INA
GCC HOWTO
więcej podobnych podstron