
This is an excerpt from the book
Home Storage Projects
by Paul Anthony
Copyright 2001 by The Taunton Press
www.taunton.com

✦
95
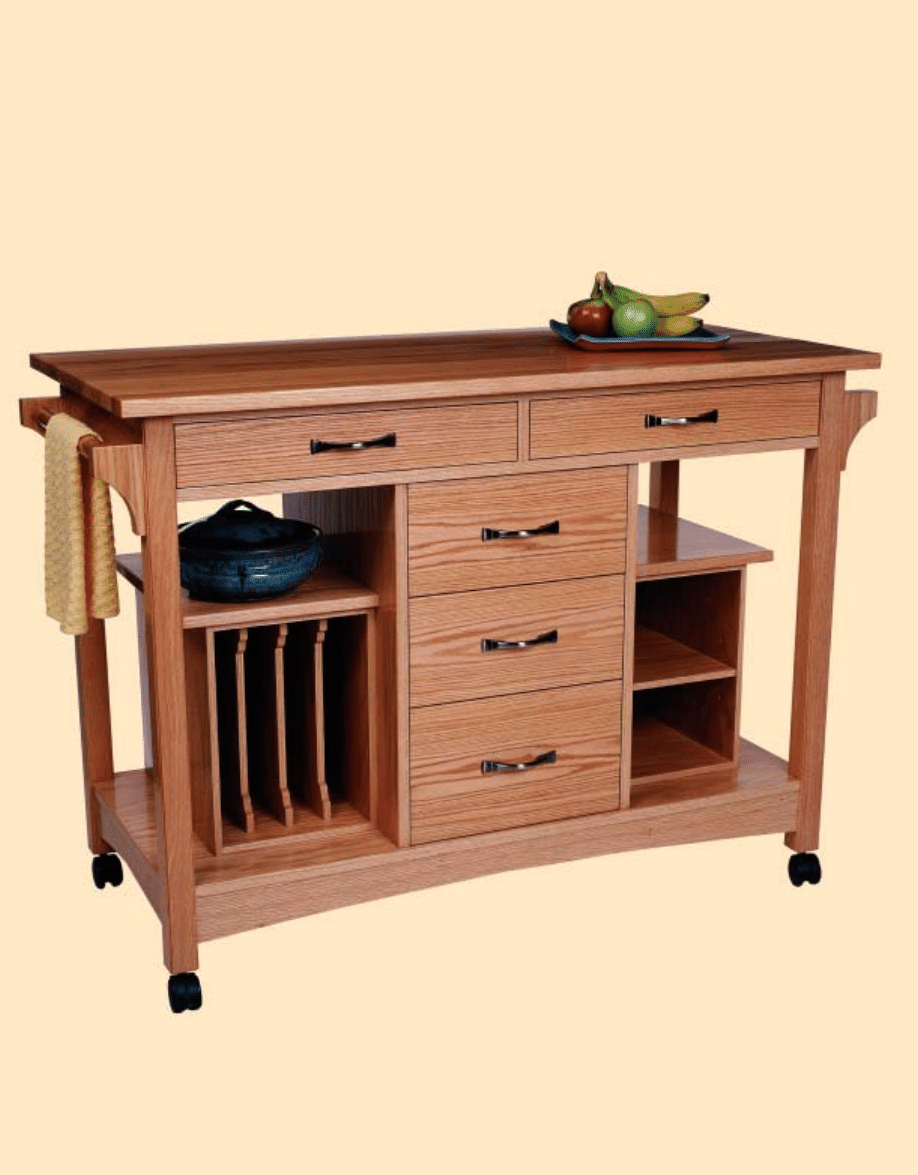
N MANY KITCHENS,
counter space is at a
premium. There just never seems to be enough,
especially when you’re cooking up a large or com-
plicated dinner. That’s when a portable kitchen
work station can really come in handy. You can
move it next to the stove or sink for an extra work
area or for a staging platform for pots and dishes.
The problem with many portable work stations
is that they typically don’t include much storage,
so when they’re not being used, they’re basically
wasting space.
I designed this oak mobile kitchen work station
to satisfy the need for both extra counter space and
extra storage. In smaller kitchens, you can roll it
against a wall when you’re not using it, and it’s acts
as a wall cabinet. In a larger kitchen, it can be left
stationed in the center of the room where it will
serve as an island. In fact, you can omit the casters if
you don’t intend to move the piece around much.
The cabinets underneath can be configured to
suit your own needs. You can make all drawers,
build a combination of drawers and closed cabinets,
or incorporate open cabinets.
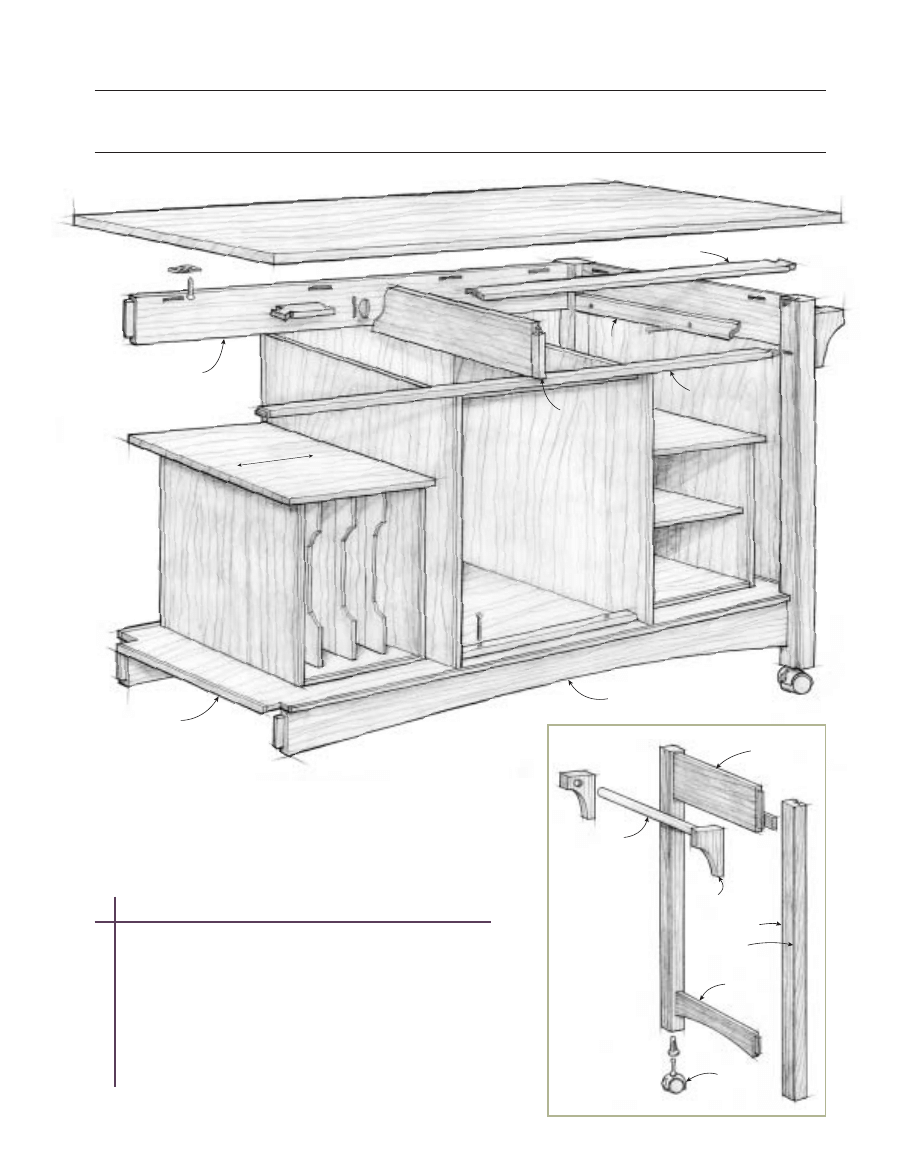
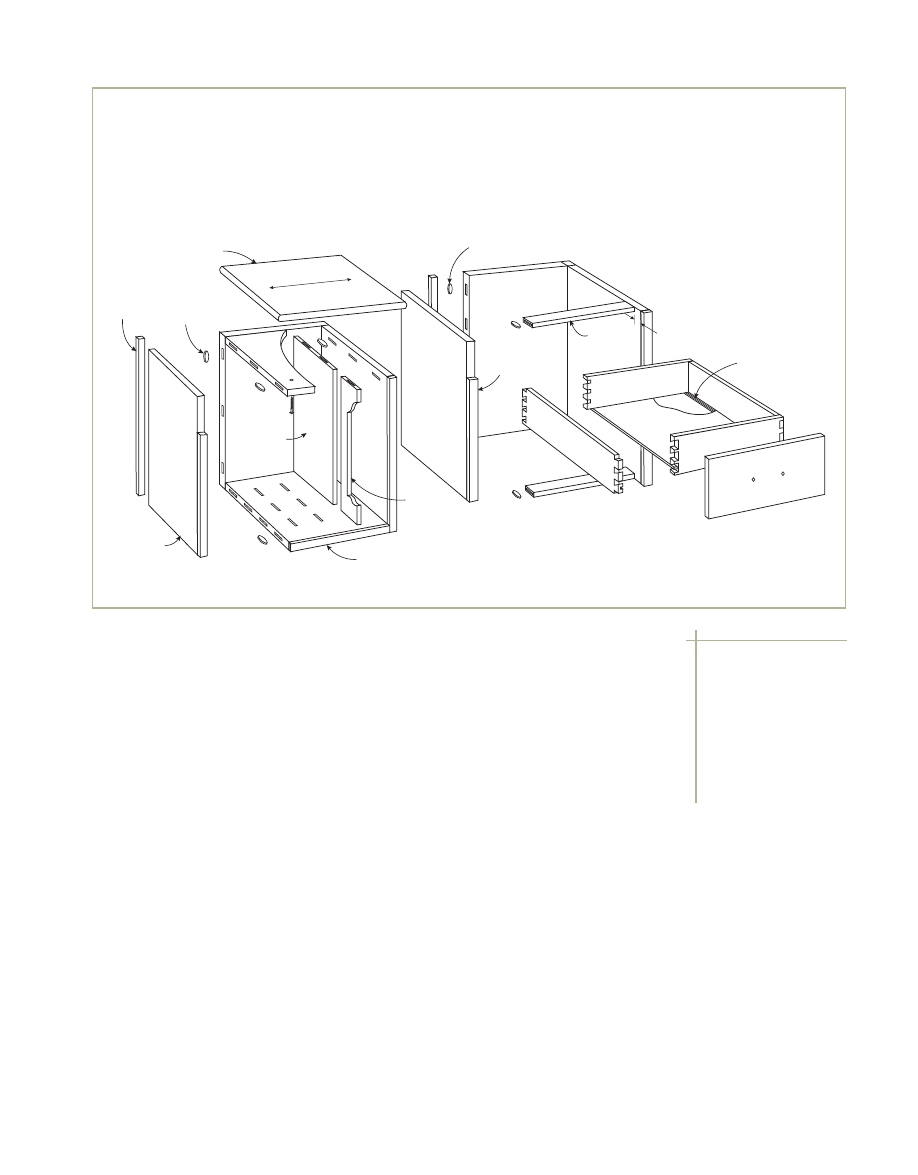
KITCHEN WORK STATION
I
Bottom rail
Rear apron
Top
Platform
Grain
Front stretcher
Drawer divider
Rail divider
Drawer shim
Top rail
The work station consists of two basic components: the carriage
and the cabinets. The carriage is the solid-wood framework of rails,
aprons, stretchers, and platform that carries the cabinets. The ply-
wood cabinets are built separately and then screwed to each other
and to the carriage platform.
KITCHEN WORK STATION
Side
apron
Bracket
Leg
Side
stretcher
Locking
caster
Rabbet,
1
/
8
''
x
1
/
8
''
Bar
✦
The top can be made from commercial butcher-block
stock if desired.
✦
The under-counter cabinets can be configured to suit your
needs. (For example, the drawer cabinet can be replaced
with open shelving or the cabinets can be faced with doors.)
✦
For a permanent island, omit the casters and extend
the leg length by 2
1
⁄
2
in.
D E S I G N O P T I O N S
T
HE CARRIAGE is the framework of
the work station and carries the top
and cabinets. It consists of the legs,
aprons, rails, and stretchers. I build it first
and then construct the cabinets indepen-
dently and install them underneath.
Constructing the
Base Carriage and Tops
The kitchen work station uses a leg-and-
apron framework that serves as a base for
the three storage units that fit inside. There
are also three tops: one on top of the unit
and two smaller tops that fit over the lower
storage compartments.
Make the tops
1.
Using roughsawn 5/4 stock, lay out the
boards for the 1-in.-thick top. Because the
top will be prominent, take care to lay out
the boards attractively (see “Composing
K I T C H E N W O R K S T A T I O N
✦
97
1
5
/
8
''
1
/
4
''
17
1
/
2
''
41
1
/
2
''
3
1
/
2
''
20
3
/
8
''
32
1
/
2
''
2
1
/
2
''
2
''
22
1
/
4
''
8
3
/
4
''
14
1
/
2
''
15
1
/
8
''
8
1
/
4
''
1
1
/
2
''
24
''
21
''
36
''
2
''
3
''
48
''
45
''
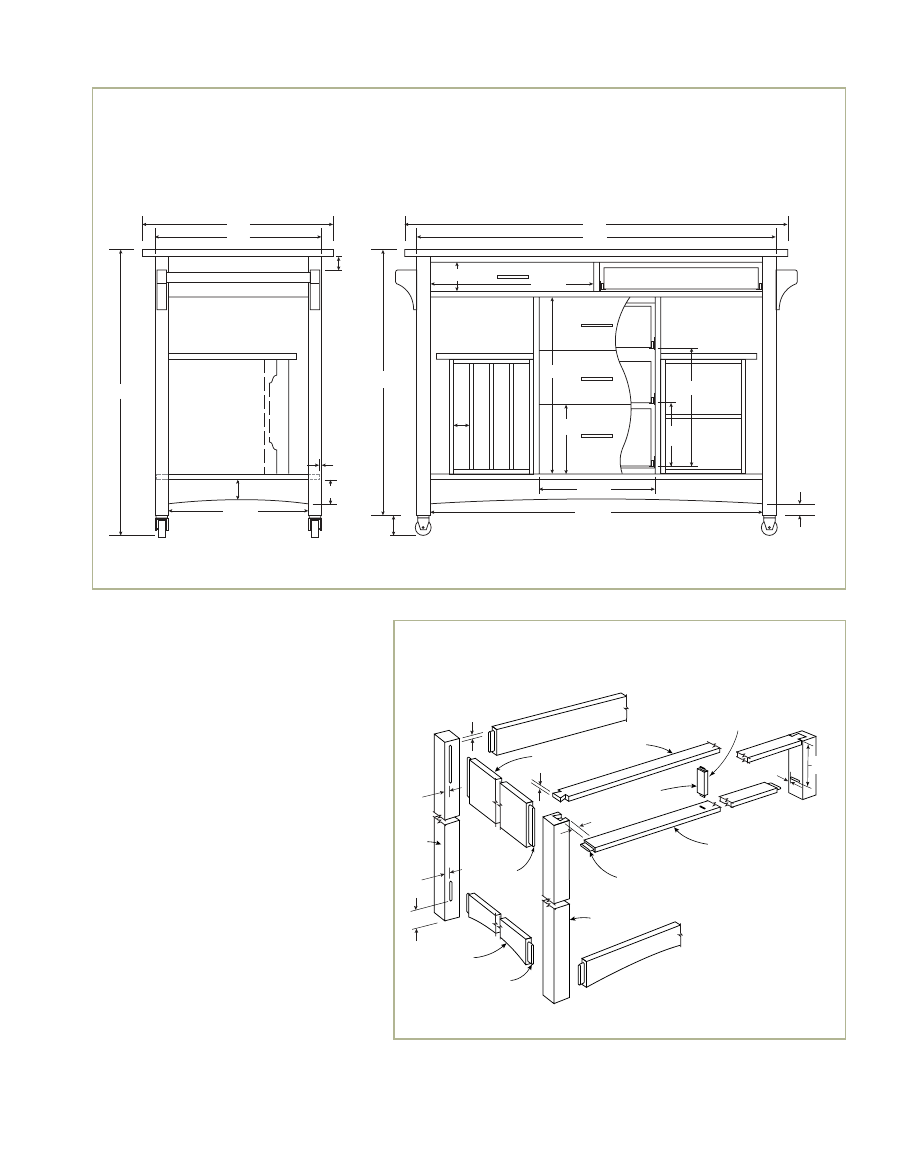
Side and Front Views
SIDE VIEW
FRONT VIEW
1
/
2
''
5
/
8
''
1
3
/
4
''
1
/
4
''
1
/
2
''
3
/
4
''
1
/
4
''
Rear
leg
Apron
Tenon
1
/
4
''
x
3
/
4
''
x 4
1
/
2
''
Stretcher
Tenon
1
/
4
''
x
3
/
4
''
x 2
1
/
2
''
Tenon
1
/
4
''
x
3
/
4
''
x 1
''
Front leg
Top rail
Bottom rail
Rail
divider
Tenon
1
/
4
''
x 1
''
x
3
/
8
''
4
1
/
2
''
Carriage Joinery

98
✦
K I T C H E N W O R K S T A T I O N
CUT LIST FOR KITCHEN WORK
Carriage
1
Top
1" x 24" x 48"
solid wood
4
Legs
1
3
⁄
4
" x 1
3
⁄
4
" x 32
1
⁄
2
"
solid wood
2
Side aprons
3
⁄
4
" x 5" x 19"
solid wood
1 Rear
apron
3
⁄
4
" x 5" x 43"
solid wood
2
Side
3
⁄
4
" x 3" x 19"
solid wood
stretchers
2
Front/
3
⁄
4
" x 3" x 43"
solid wood
rear stretchers
2
Rails
3
⁄
4
" x 1
1
⁄
2
" x 43"
solid wood
1
Rail divider
3
⁄
4
" x 1
1
⁄
2
" x 4
1
⁄
4
"
solid wood
1 Drawer
3
⁄
4
" x 4
1
⁄
4
" x 18
1
⁄
4
"
hardwood
divider
plywood
1
Platform
3
⁄
4
" x 20" x 44"
hardwood
plywood
2
Platform
1
⁄
4
" x
3
⁄
4
" x 17
1
⁄
2
"
edgings
solid wood
2
Platform
1
⁄
4
" x
3
⁄
4
" x 41
1
⁄
2
"
solid wood
edgings
4
Brackets
1
1
⁄
4
" x 2
3
⁄
4
" x 5"
solid wood
2
Bars
1
1
⁄
4
" diameter x 19"
solid wood
Cabinets
2
Cabinet
3
⁄
4
" x 17
1
⁄
4
" x 12"
solid wood
tops
2
Drawer
3
⁄
4
" x 18
7
⁄
8
" x 22
1
⁄
4
"
hardwood
case sides
plywood
1
Drawer
3
⁄
4
" x 14
1
⁄
2
" x 22
1
⁄
4
"
hardwood
case back
plywood
2
Drawer
3
⁄
4
" x 2
1
⁄
2
" x 14
1
⁄
2
" solid
wood
case braces
4 Small
1
⁄
2
" x 15
1
⁄
2
" x 14
3
⁄
8
"
hardwood
case sides
plywood
2
Small
1
⁄
2
" x 9
1
⁄
2
" x 14
3
⁄
8
"
hardwood
case back
plywood
4 Small
case
1
⁄
2
" x 15
1
⁄
2
" x 9
1
⁄
2
"
hardwood
top/bottoms
plywood
3
Small
1
⁄
2
" x 12
3
⁄
4
" x 13
3
⁄
8
"
hardwood
case dividers
plywood
1
Small
1
⁄
2
" x 15
1
⁄
4
" x 9
3
⁄
8
"
hardwood
cabinet shelf
plywood
2
Rear
3
⁄
4
" x
3
⁄
4
" x 22
1
⁄
4
"
solid wood
edgings
Cabinets
4 Rear
1
⁄
2
" x
1
⁄
2
" x 14
3
⁄
8
"
solid wood
edgings
2 Front
1
⁄
4
" x
3
⁄
4
" x 22
1
⁄
4
"
solid wood
edgings
4 Front
1
⁄
4
" x
1
⁄
2
" x 14
3
⁄
8
"
solid wood
edgings
5 Front
1
⁄
4
" x
1
⁄
2
" x 9
1
⁄
2
"
solid wood
edgings
3
Divider
1
⁄
2
" x 1
1
⁄
2
" x 13
3
⁄
8
"
solid wood
edgings
Drawers
4 Drawer
sides
1
⁄
2
" x 2
5
⁄
8
" x 18"
solid wood
4 Drawer
box
1
⁄
2
" x 3" x 19
3
⁄
8
"
solid wood
front/backs
2
Drawer
1
⁄
4
" x 18
1
⁄
4
" x 18
3
⁄
4
"
hardwood
bottoms
plywood
4
Drawer sides
1
⁄
2
" x 5
1
⁄
4
" x 18"
solid wood
2
Drawer sides
1
⁄
2
" x 7
1
⁄
4
" x 18"
solid wood
4
Drawer box
1
⁄
2
" x 5
1
⁄
4
" x 13
1
⁄
2
"
solid wood
front/backs
2
Drawer box
1
⁄
2
" x 7
1
⁄
4
" x 13
1
⁄
2
"
solid wood
front/backs
3 Drawer
1
⁄
4
" x 18
1
⁄
4
" x 12
7
⁄
8
"
hardwood
bottoms
plywood
2 Drawer
3
⁄
4
" x 2" x 17
1
⁄
2
"
hardwood
shims
plywood
2
Drawer
3
⁄
4
" x 3
7
⁄
16
" x 20
5
⁄
16
"
solid wood
fronts
2
Drawer
3
⁄
4
" x 6
11
⁄
16
" x 14
3
⁄
8
"
solid wood
fronts
1
Drawer
3
⁄
4
" x 8
11
⁄
16
" x 14
3
⁄
8
"
solid wood
fronts
Other materials
5 pair Drawer slides 18" from Woodworker’s Hardware;
item #RH501 18 ALM
5
Pulls
3"
from Woodworker’s Hardware;
item #A02378 PWT
4
Stem-type 2"
from Woodworker’s Hardware;
casters
item #JH50 SBB
12
Metal tabletop fasteners
Dimensions for all pieces with tenons include tenon length.
CUT LIST FOR KITCHEN WORK STATION
Grain for Panels”). While you’re at it, join up
the cabinet tops.
2.
Joint and thickness plane the boards;
then edge-join them together.
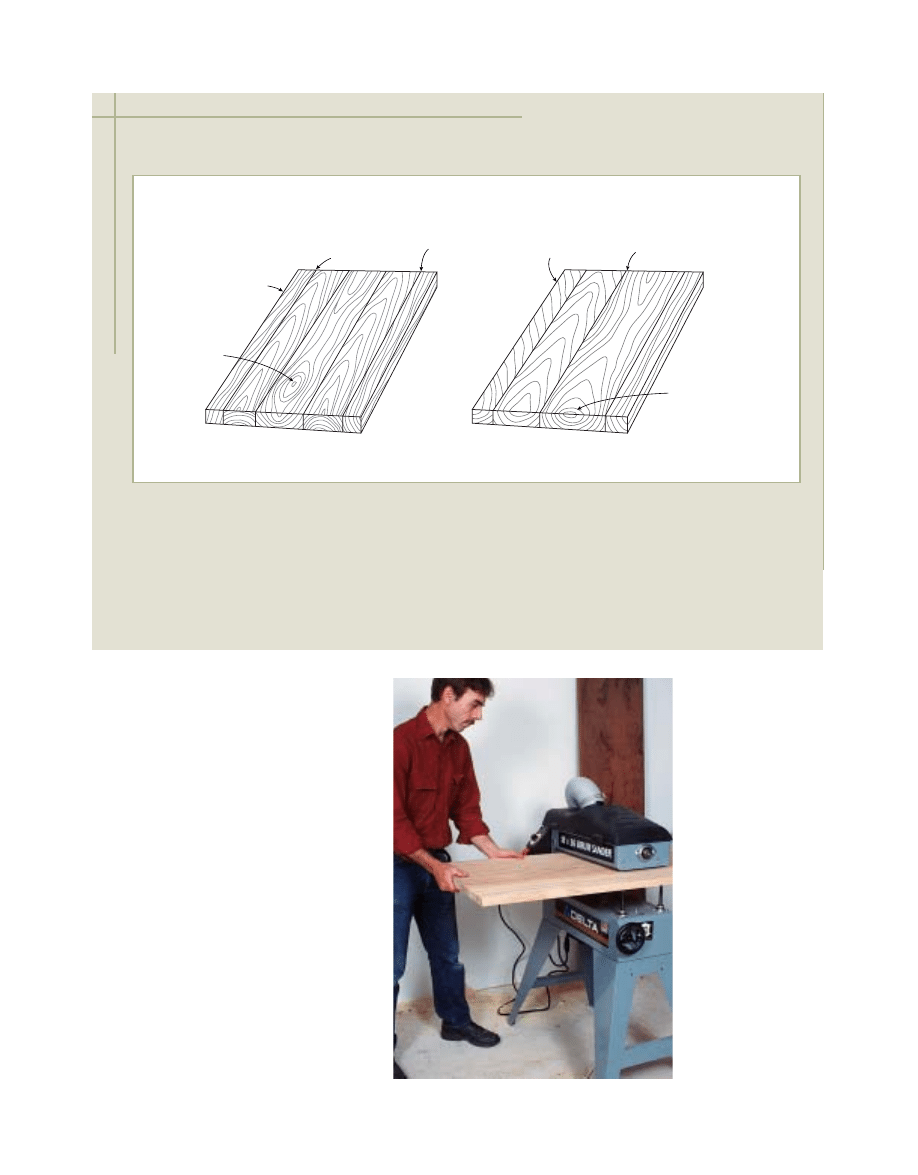
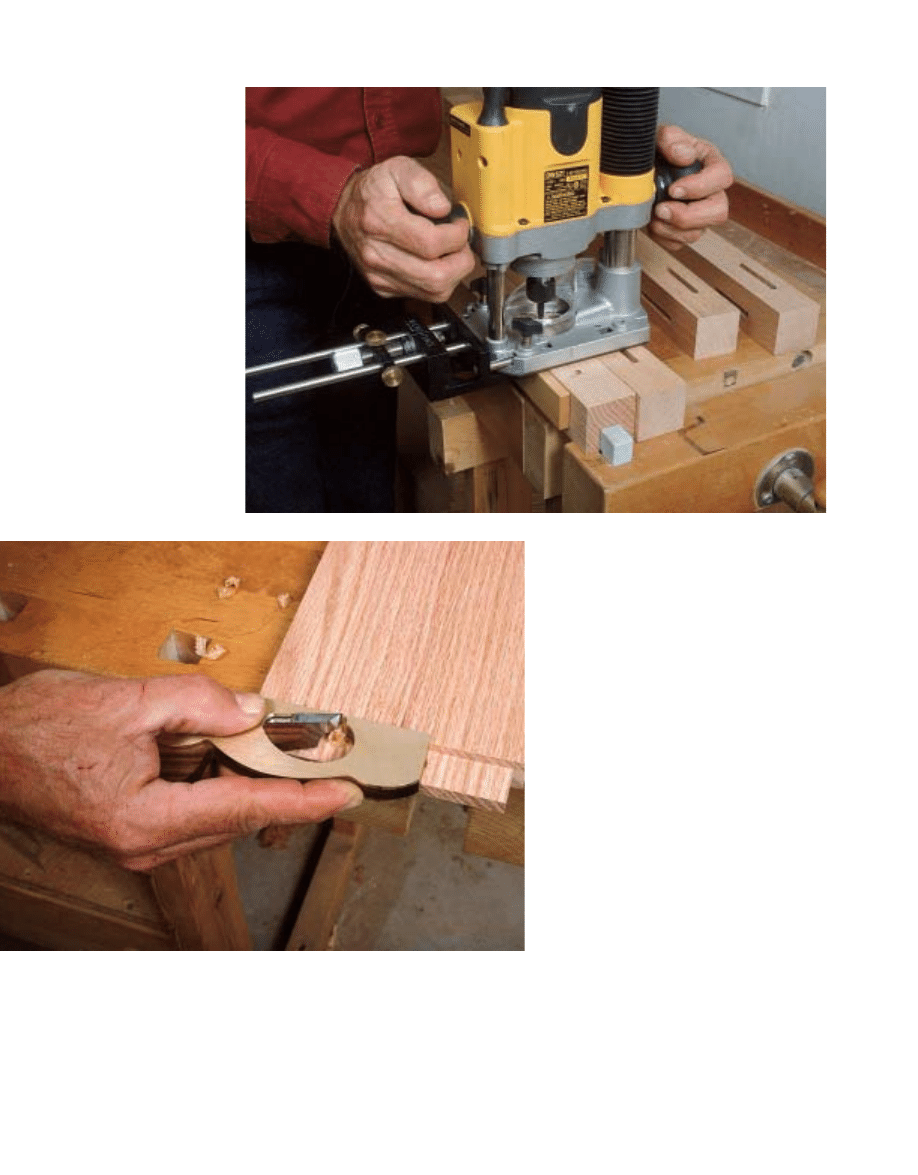
3.
Plane or belt sand the tops. If you have
access to a wide belt or drum sander, this is
the perfect application for it (see photo A).
4.
Round over the edges with a
1
⁄
8
-in.-radius
roundover bit or a handplane and sand-
paper. Don’t round over the edges of the
cabinet tops that abut the center cabinet.
Prepare the parts
1.
Lay out the stock for the parts. I used
straight-grained material for the legs, rip-
ping the pieces from the outer edges of wide
8/4 plainsawn boards.
2.
Joint, plane, and rip the pieces straight
and square; then crosscut them to length.
K I T C H E N W O R K S T A T I O N
✦
99
GOOD COMPOSITION
Straight grain to
straight grain joint
M
s
Bull's-eye
entirely on
board
Straight
grain edges
Installing a Screw
PHOTO A:
A wide
drum sander is
the perfect tool
for sanding tops.
It quickly creates
a smooth, flat
surface.
T
houghtful board layout can make all the difference in the look of a solid-wood panel.
When laying out, use long boards, sliding them against each other to create a good match
at the joints. The tips shown above are just guidelines, of course. Rip, flip, and arrange the
boards in whatever way is necessary to create the most continuous grain pattern and con-
sistent color.
C O M P O S I N G G R A I N F O R PA N E L S
Asymmetrical, unbalanced
board widths
GOOD COMPOSITION
POOR COMPOSITION
Straight grain to
straight grain joint
Matching grain
slope at joint
Board widths symmetrical
from center outward
Bull's-eye
entirely on
board
Wild grain
on edge
Wild grain to
straight grain joint
Crosscut
bull's-eye
Straight
grain edges
GOOD COMPOSITION
POOR COMPOSITION
Cut the joints
1.
Mark the legs for orientation; then lay
out the leg mortises for the aprons and
stretchers. Notice that the stretcher mortises
are set in
1
⁄
8
in. more than are the apron
mortises.
2.
Rout the mortises using an edge guide
on your router (see photo B).
3.
Lay out and rout the mortises for the
bottom rail and the rail divider. I use a shop-
made T-square to guide the router (see
photo A on p. 38).
4.
Rout the
1
⁄
8
-in. by
1
⁄
8
-in. rabbets in the
three outer edges of each leg.
5.
Saw the apron and stretcher tenons. I cut
them on the table saw using a dado head.
Aim for a snug fit in the mortises and
against the leg. If necessary, trim the tenons
with a rabbet or with a shoulder plane (see
photo C).
6.
Saw the rail and rail divider tenons for a
snug fit in their mortises.
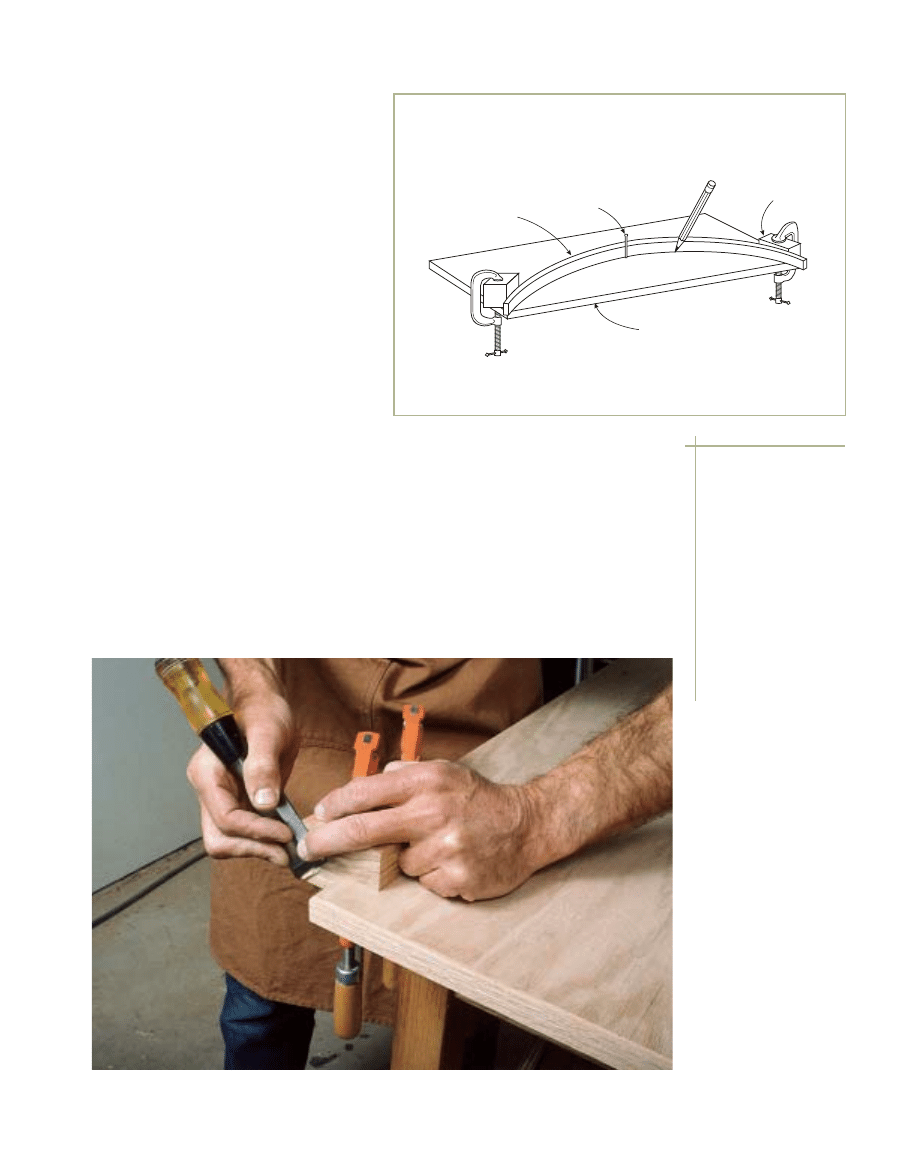
7.
Lay out the stretcher curves. You can
either use a long trammel bar as a compass
or you can trace along a thin strip of wood
pulled to the proper curvature (see “Spring-
ing a Curve”).
100
✦
K I T C H E N W O R K S T A T I O N
PHOTO B:
When
routing the leg
mortises, plunge
to full depth at
the mortise ends;
then remove the
remaining waste,
taking shallow
passes.
PHOTO C:
A shoulder plane makes neat work of trimming
tenon shoulders.
2.
Glue up the side assemblies, making sure
that the legs, aprons, and stretchers lie
flat and square to each other under clamp
pressure.
3.
Make the platform edging pieces, cutting
them slightly oversize. Then glue them to
the platform, centering each one on the
edge. Then plane, scrape, or sand the edging
flush to the plywood.
8.
Cut the stretcher curves with a bandsaw
or jigsaw; then clean up the saw marks with
a spokeshave, files, and sandpaper.
9.
Dry-assemble the bottom rail and front
stretcher to the front legs. Then lay out the
dovetails on the top rail. I use a 7-degree
angle on the dovetails and mark the shoul-
ders directly from the legs.
10.
Saw the dovetails; then trace their
shapes onto the tops of the front legs using a
sharp pencil. Align the rear of the rail with
the inner faces of the legs. I rout out the
dovetail sockets just shy of my cut lines and
then pare to them with a sharp chisel.
11.
Make the plywood drawer divider, glue
it to the rail divider, and cut the biscuit slots
for joining its rear edge to the rear apron, as
shown in the drawing on p. 96.
12.
Sand all carriage parts through 220 grit.
Round over the edges of the leg rabbets
slightly, but don’t sand the innermost edges
of the legs until after fitting the platform.
Make the platform
and assemble the carriage
1.
Dry-clamp the carriage to make sure the
joints all pull up tight and align properly.
PHOTO D:
After
jigsawing the plat-
form notches just
a hair small, pare
them to final size,
guiding a chisel
against a square
wooden block.
Thin, straight-
grained strip
Workpiece
Nail
Scrap
block
Springing a Curve
K I T C H E N W O R K S T A T I O N
✦
101
TIP
When wiping away
excess glue, use a
clean rag and replen-
ish your water often
to avoid spreading
diluted glue into the
wood grain. Alterna-
tively, you can wait
until the excess glue
turns rubbery and
then trim it off with
a sharp chisel.
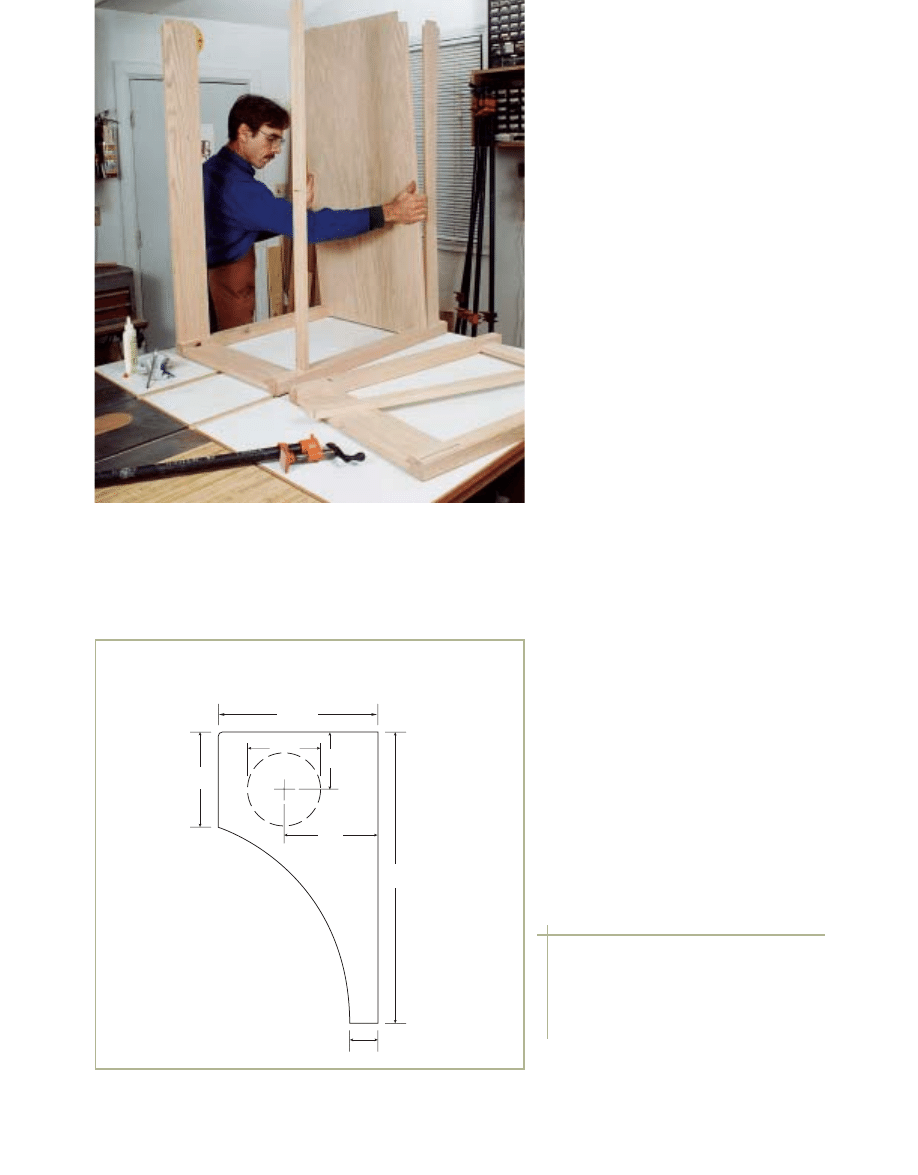
PHOTO E:
After gluing up the two side assemblies and notch-
ing the platform, glue and insert the rear apron, lower rail, and
stretchers to one side assembly. Then slip one end of the plat-
form unglued between the legs, and glue on the opposite side
assembly.
4.
Dry-clamp the bottom rail, rear apron,
and stretchers to the side assemblies.
Measure the distances between the legs; then
mark out the platform notches, carefully
measuring outward from the center of the
platform. Aim for a very snug fit between
the legs.
5.
Cut the notches. For the best fit, saw
them slightly undersize and then pare them
to your cut line (see photo D on p. 101).
When you’ve got a good fit, sand the plat-
form through 220 grit.
6.
Glue the bottom rail, rear apron, and
stretchers to the side assemblies (see photo E).
Make sure the apron is lined up with the
tops of the legs and that the stretchers are
spaced 1
1
⁄
2
in. up from the bottoms of the
legs. Raise the platform off the stretchers to
prevent glue squeeze-out from touching it.
7.
After removing the clamps, run a thin
bead of glue along the top edges of the
stretchers; then clamp the platform down.
8.
Glue and clamp the rail divider and top
rail into place.
9.
Sand the innermost corner of each leg,
rounding it slightly with 150 grit and then
220 grit.
10.
Drill the holes for the caster posts. To
guide your bit, use a block that you’ve pre-
bored on the drill press and then clamped to
the leg. The casters I used required a
29
⁄
64
-in.-
diameter hole, but first drill a test hole in
scrap to be sure.
Make the bar assembly
If you’re not equipped to turn your own
bars, you can order commercial dowel stock.
I got mine from Woodworker’s Supply (see
“Sources” on p. 172).
1.
Make the blanks for the bar brackets.
102
✦
K I T C H E N W O R K S T A T I O N
2
3
/
4
''
1
3
/
4
''
1
/
2
''
5
''
1
1
/
4
''
1
5
/
8
''
1
''
Towel Bar Bracket
TIP
To prevent marring your workpieces,
glue thick leather scraps to the faces of
pipe clamps using contact cement.
Building the Cabinets
Size the parts and cut the joints
1.
Lay out the case pieces and cut them
to size. Make sure the drawer case sides
and back will slip between the platform
and the rail and apron with just a bit of
room to spare.
2.
Mill the solid-wood edging, ripping it
from stock that you’ve planed about
1
⁄
32
in.
thicker than the plywood. The edging at the
rear of each cabinet is square in cross sec-
tion, whereas the edging at the front is
1
⁄
4
in.
thick (see “Cabinets”).
3.
Make the edging pieces. Cut each one
slightly longer than the edge to be covered.
4.
Glue the edging to the case sides, tops,
bottoms, and dividers. Make sure that
it overlaps the plywood on the ends and
both faces.
5.
Plane, scrape, or sand the edging flush to
the plywood faces. Then trim it flush at the
K I T C H E N W O R K S T A T I O N
✦
103
2.
Make a stiff paper pattern of the bracket
(see “Towel Bar Bracket”). Then trace the
shape onto the blanks.
3.
Using a Forstner or other flat-bottom bit
in a drill press, bore the
1
⁄
2
-in.-deep blind
holes to accept the bar. If your dowel stock is
1
⁄
16
in. or more undersize (mine was), use a
smaller diameter bit. Clamp the bracket
blanks to a fence to secure them while
drilling.
4.
Bandsaw the brackets to shape, sawing
just outside of the cut line. Save the offcuts.
5.
Sand to the cut line to smooth the curve.
I used an oscillating spindle sander, but
a regular drum sander in a drill press
would work.
6.
Cut the bars to length and insert them
into their holes. If a dowel is slightly over-
size, trim down the diameter with a block
plane. Then sand the bars and brackets
through 220 grit and set them aside for now.
Rear
edging
Side
#10
biscuit
Grain
Divider
Front
edging
Divider
edging
#20 biscuit
Brace
3
/
4
''
Groove,
1
/
4
''
x
1
/
4
''
Top
Front edging
Cabinets
The cabinets are built of hardwood plywood panels edged with solid wood, which is applied
to all front edges and to the rear edges of the sides. Then the pieces are joined with biscuits
to ease alignment. Drawers are installed with commercial drawer slides.
TIP
Manila folders make
great material for
small patterns. The
paper is thin enough
to cut easily but thick
and stiff enough to
trace around.
104
✦
K I T C H E N W O R K S T A T I O N
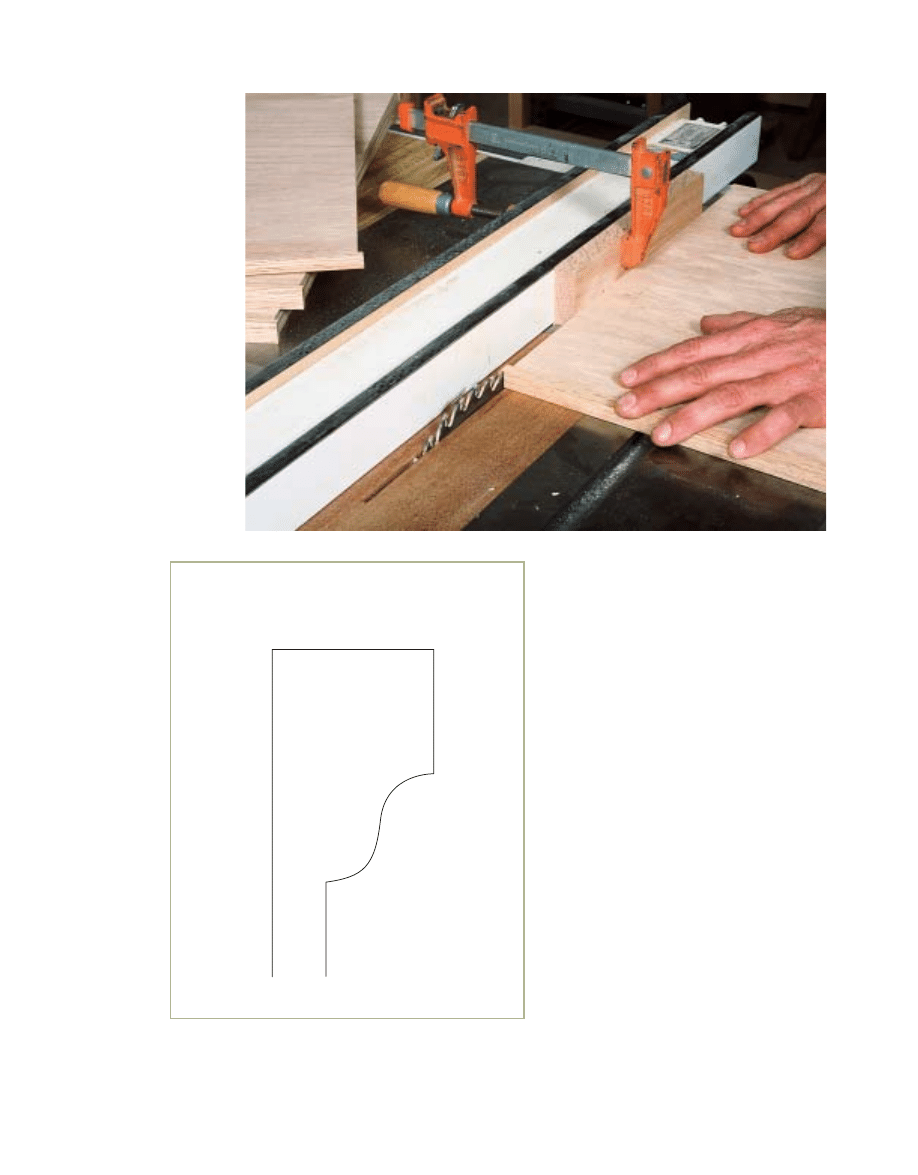
ends. I do this on the table saw using a shim
block clamped to the fence (see photo F).
6.
Make a thick paper pattern of the ogee
profile for the divider fronts (see “Divider
Profile”). Then trace the profile onto the
divider edging.
7.
Saw the profile. I cut the curved sections
with a scrollsaw and the straight sections
with a bandsaw. Clean up the straight
sections with a block plane, chisel, and
sandpaper.
8.
Make the braces for the center cabinet
and drill the shelf support holes in the sides
of the right-hand cabinet.
9.
Lay out the biscuit joints for joining the
case pieces, including the dividers. The small
cabinets take #10 biscuits and the center
cabinet takes #20 biscuits.
10.
Cut the biscuit joints. When cutting
slots into the face of a panel at the edge,
clamp scrap to the panel for joiner fence
support (see photo G). When cutting
the divider slots, prop the divider up on
1
⁄
8
-in.-thick shims to center the slots
(see photo H).
PHOTO F:
Trim
the edging flush
to the case pieces
by aligning a
shim block flush
with the outside
face of the saw-
blade teeth.
Full size
Divider Profile
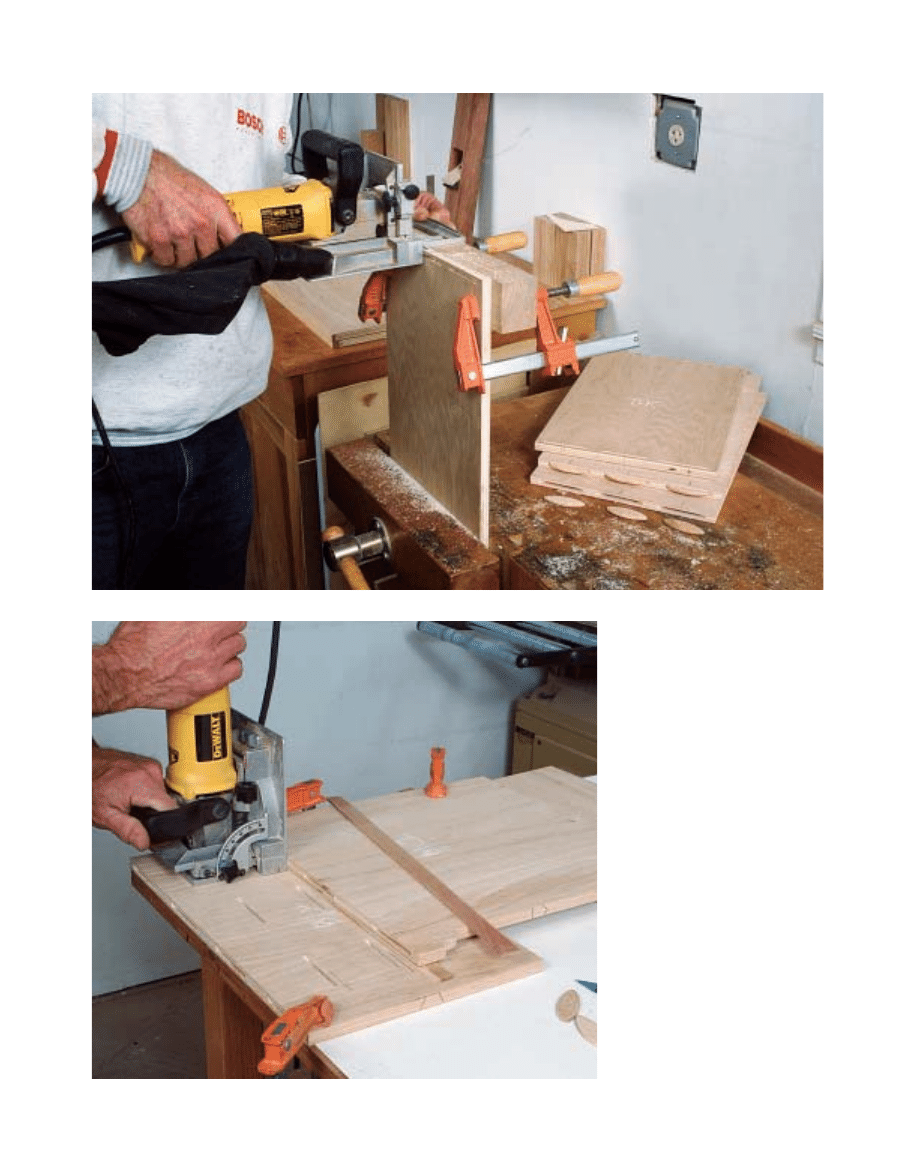
PHOTO G:
Square scrap
clamped to the case pieces
provides bearing for the
biscuit joiner fence, pre-
venting angled slots.
PHOTO H:
When cutting
biscuit joints for
1
⁄
2
-in.-thick
dividers, lay the divider on
1
⁄
8
-in.-thick shims to center
the slot in the end of the
divider. To use the divider as
a fence for cutting the case
bottom slots, as shown here,
use a
1
⁄
8
-in.-thick spacer to
offset the divider from the
joint intersection line.
K I T C H E N W O R K S T A T I O N
✦
105
106
✦
K I T C H E N W O R K S T A T I O N
the back, then the sides. Make sure all the
cabinets are square under clamp pressure.
4.
Finish-sand all surfaces that will be
exposed.
5.
Because of oak’s open grain, I next treated
the carriage and cabinets with pore filler to
ensure a smoother finish. I also installed the
case-half of each slide. It’s easiest to do all
this before installing the cabinets.
6.
Fit the drawer shims to the carriage and
screw them in place, as shown in the draw-
ing on p. 96. Then install the drawer slides
into the carriage.
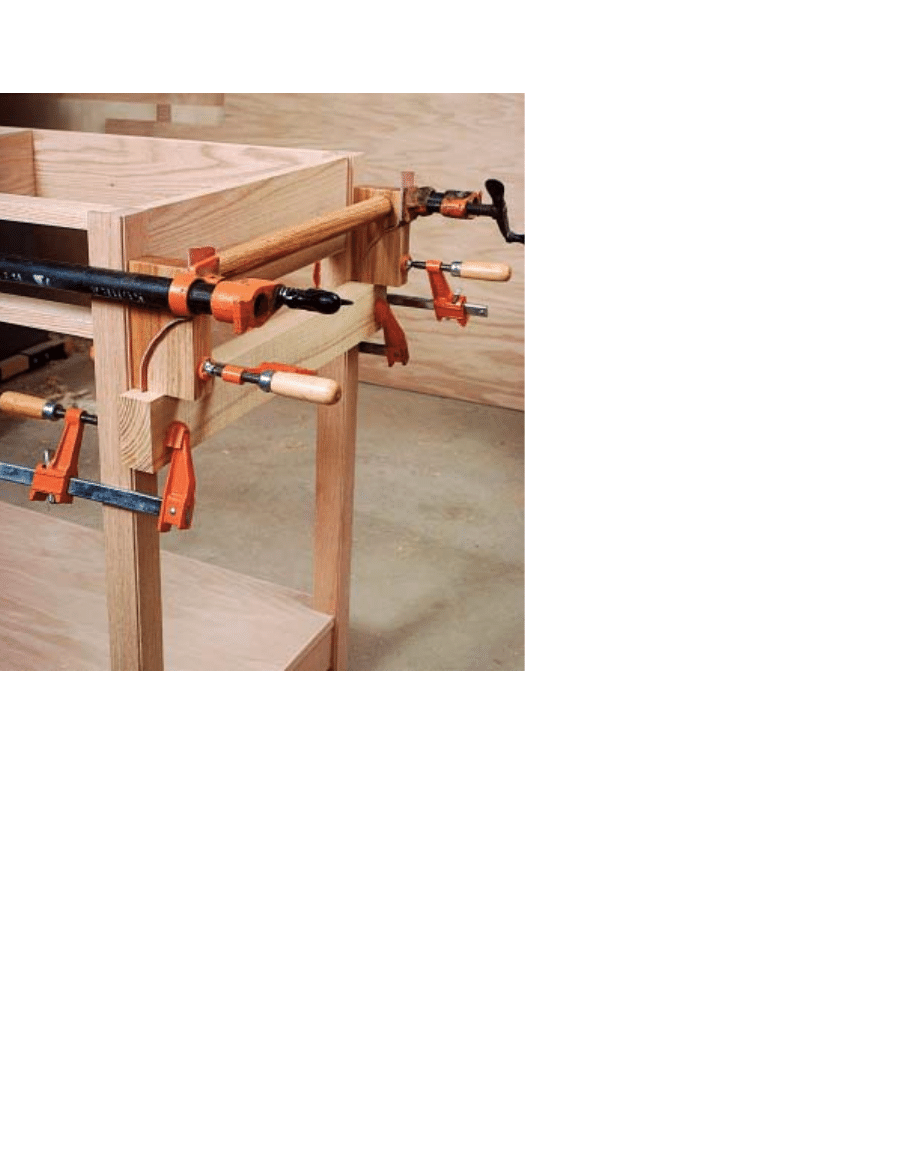
Install the bars and cabinets
1.
Spot-glue the bars into their brackets,
orienting the annular rings on the ends of
the bars parallel to the grain of the brackets
to ensure equal wood movement. Then
glue the brackets to the carriage legs
(see photo I).
2.
Install the center cabinet, insetting it
1
⁄
2
in. from the rear edge of the platform.
I screwed through the bottom braces into
the platform and then into the cabinet
sides from underneath. Next, square up
the face of the cabinet and shim any space
between the sides and the bottom rail, mak-
ing sure that the rails are square to the legs.
Then screw through the rail into the sides
(see photo J).
3.
Install the small cabinets, insetting them
1
⁄
2
in. from the rear edge of the platform.
Screw through the center cabinet sides into
the top edges of the small cabinets, and
through the platform into the cabinet sides.
Making the Drawers
Build the boxes
I made the drawer boxes from solid poplar,
dovetailing the corners. Alternatively, you
could use
1
⁄
2
-in.-thick plywood, joining the
corners with rabbet-and-dado joints (see
“Quick ’n’ Easy Drawers” on p. 77). If doing
the latter, simply subtract
1
⁄
2
in. from the
given lengths of the drawer box fronts
and backs.
PHOTO I:
To
attach the bar
brackets, set
them on a length
of thick scrap
clamped to the
legs. Clamp the
lower section of
each bracket
using the curved
offcuts. Thick
leather scraps
protect the finish.
Assemble the cabinets
1.
Sand the dividers and the inside faces of
the small cabinets, being careful not to
round over the edges.
2.
The divider cabinet would be difficult to
finish after assembly, so mask off the joints
and finish the dividers and inside faces of
the case pieces now. While you’re at it, finish
the bars and exposed faces of the brackets
too, as it’ll be difficult to brush a finish onto
them once they’re attached. Leave about
3
⁄
8
in. of raw wood at the ends of the bars for
gluing later.
3.
Glue up all three cabinets. When assem-
bling the divider cabinet, I first glue the
dividers to the top and bottom, using deep-
throat clamps at the center. Next, I attach
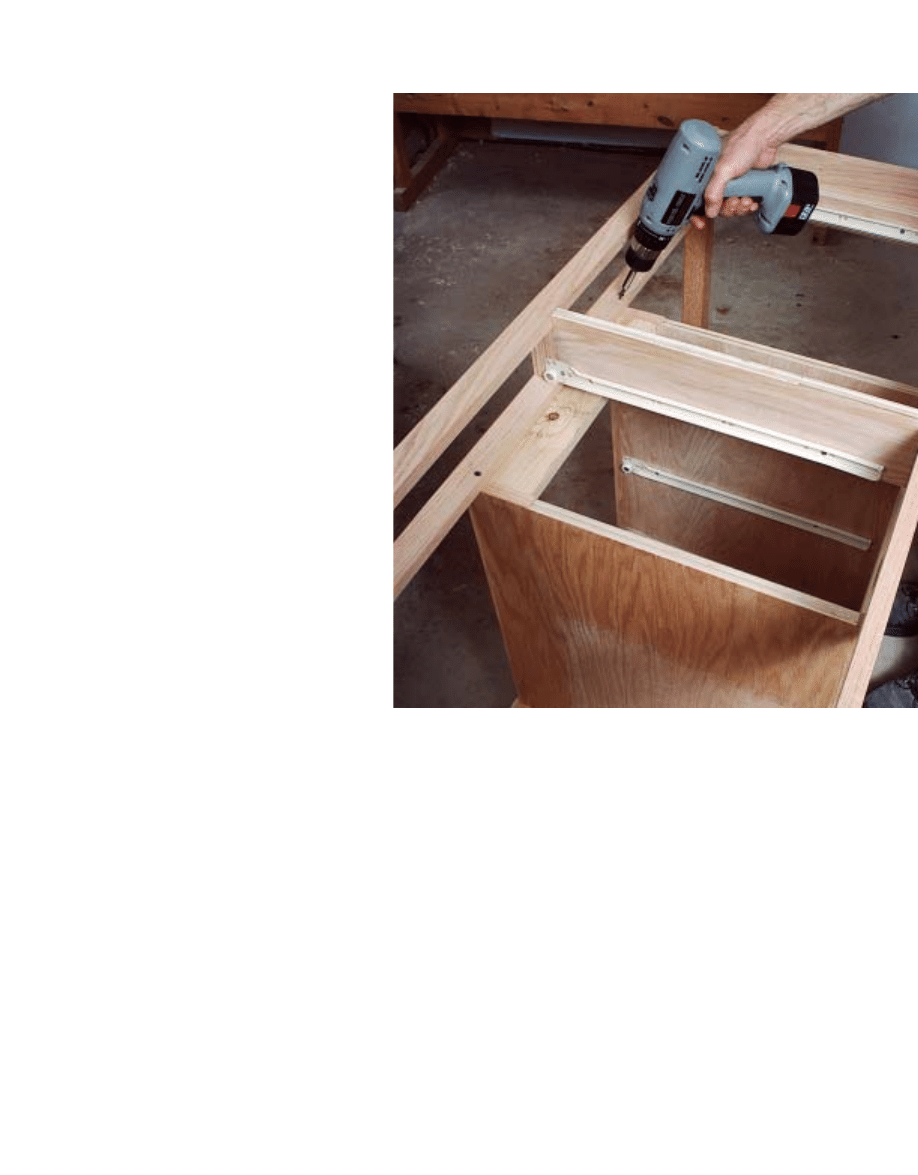
PHOTO J:
After
shimming any
space between
the lower rail and
the cabinet sides,
drill a screw clear-
ance hole through
the rail and shims.
Countersink the
holes; then screw
the rails to the
cabinet sides.
1.
Plane, rip, and crosscut the drawer box
pieces to size.
2.
Saw the bottom grooves in the sides and
box fronts, as shown in “Cabinets” on p. 103.
3.
Cut the drawer box corner joints (see
“Dovetailed Drawer Construction” on p. 113).
4.
Assemble the drawers on a flat surface
and compare the diagonals to ensure that
the boxes are square under clamp pressure.
5.
Sand the drawer boxes and ease the edges
and corners with 150-grit sandpaper.
6.
Attach the drawer slides to the drawer
boxes; then fit them into the case, making
sure that the drawer box fronts are parallel
to the front of the case and carriage.
Fit the drawer fronts
1.
Make the drawer fronts, initially sizing
them to the drawer openings; then set
them in place.
2.
Using a pencil and ruler, draw a cut line
around the edge of each drawer front to cre-
ate a gap of about
3
⁄
32
in. all around. Then
saw and plane to the cut line. Check the fit
of the fronts and then remove all of the
drawers except the bottom one.
3.
Loosely clamp the drawer front to the
bottom drawer box. Shift the front to
achieve an even gap all around; then clamp
the front tightly, remove the drawer, and
screw the front on from inside the drawer.
Repeat the procedure for the next drawer up.
4.
Because there’s no clamp access for the
top drawer in the cabinet, use double-sided
tape to hold the drawer front in place before
screwing it on.
5.
Use deep throat clamps to hold the
drawer fronts to the two carriage drawers;
then screw the fronts on with the drawers
in place.
Finishing Up
1.
Apply finish to all exposed surfaces. I
brushed on two coats of semigloss poly-
urethane, wet-sanding with 400-grit sand-
paper between coats. I sanded the final coat
with 600-grit sandpaper to remove any nibs
and then scrubbed it with 0000 steel wool
to reduce the gloss somewhat.
K I T C H E N W O R K S T A T I O N
✦
107
2.
Screw on the cabinet tops, aligning the
rear edge of each with the rear edge of the
center cabinet. Because a drill won’t fit into
the rear of the divider cabinet, I glued the
rear portion of the top to the cabinet top.
Elongate the front screw holes to allow
about
3
⁄
8
in. wood movement.
3.
Using a biscuit joiner or slot-cutting
router bit, cut the slots in the aprons and
rails to accept tabletop clips.
4.
Attach the work station top. I used com-
mercial S-shaped metal fasteners, setting
them at least
1
⁄
8
in. away from the rail and
rear apron to allow for wood movement.
5.
Attach the pulls.
Wyszukiwarka
Podobne podstrony:
Cabinet Kitchen Island
Cabinet Kitchen Face Lift
Cabinet Kitchen Pantry
Cabinet kitchen cabinet
Plan and Install Kitchen Cabinets
Kitchen Base Cabinet
(Ebooks) Diy Woodwork Plans Kitchen Cabinets
Cabinet movable kitchen island
Plan and Install Kitchen Cabinets
Cabinet Slide out kitchen bin
Cabinets Build Your Own Kitchen Cabinets
Mitre Saw Workstation
clean kitchen
Corner Buffet Cabinet(1)
lotto game kitchen
cabinetmakerupho00sher
więcej podobnych podstron