awesome powerpoint backgrounds - powerpoint to dvd tutorial - or how to play a powerpoint presentation on a home dvd player
Powered by Atomz
Translate
FREE Newsletter
E-mail a friend
about this page
Tutorial about how to convert powerpoint to dvd
This tutorial guides you through how to convert your
PowerPoint presentations to play on a home dvd player.
It's great for:
●
Showing presentations without the need for a computer
●
Distributing your slideshows to friends and colleagues
●
Unattended exhibition presentations, that automatically repeat/rewind
●
Giving your presentations more of a TV feel
●
And generally making you look more professional
●
FREE Downloadable files available at the end of the tutorial
Theory:
You would think that you could just write your powerpoint file to a DVD and it
would just work. We're sorry to report that's not the case. But we're pleased to
report that it's not that difficult. This tutorial will show you how to put your
powerpoint presentations on to a dvd in 3 easy steps.
Step One - Capture
Most powerpoint slideshows have movement and animation. We want to
preserve this animation on the dvd. For this we will used a product called
to grab the slideshow and save it to a video file. You can read more
about all the software we have used at the end of this tutorial.
Step Two - Conversion
Without getting too technical, your PC runs at a certain resolution (or quality),
http://www.powerpointbackgrounds.com/powerpoint-to-dvd.htm (1 of 14)07/10/2003 20:32:07
search
Jump . . .
mate@work.com
Enter e-mail

awesome powerpoint backgrounds - powerpoint to dvd tutorial - or how to play a powerpoint presentation on a home dvd player
DVD's run at another resolution. Therefore we need to convert the captured
video file to DVD quality. For this we will use a product called
. We will create a nice DVD menu at the same time.
Step Three - Writing the DVD
We've capture the slideshow, converted it to DVD resolution, created a nice DVD
menu, now all that is left is to write (burn) the DVD disc.
Optimizing your computer before you start:
To get the best results from Camtasia while grabbing your slideshow, keep these
points in mind:
●
Turn off any software you have running in the background. e.g. Virus
checkers. Pressing Ctrl-Alt-Del will show you what is running.
●
Run Scandisk and Defrag (Programs > Accessories > System Tools)
●
Turn off something called "graphics hardware acceleration".
●
Make sure your graphics card "drivers" are the most up-to-date
●
●
Do the capturing on your quickest PC
Quick Links:
Step 1: Capture
Step 2: Conversion
Step 3: Writing the DVD
The software used and tips to get the best results
Step by Step Powerpoint to DVD Tutorial:
Step 1: Capture
As mentioned in step 2 above, dvd has a resolution of 720x480. So we need
to capture our slideshow at a similar resolution. In our case 800x600 is a
close match to capture at, as we cannot set our PC to 720x480. Also 800x600
will scale down better than 640x480 will scale up.
http://www.powerpointbackgrounds.com/powerpoint-to-dvd.htm (2 of 14)07/10/2003 20:32:07
awesome powerpoint backgrounds - powerpoint to dvd tutorial - or how to play a powerpoint presentation on a home dvd player
1
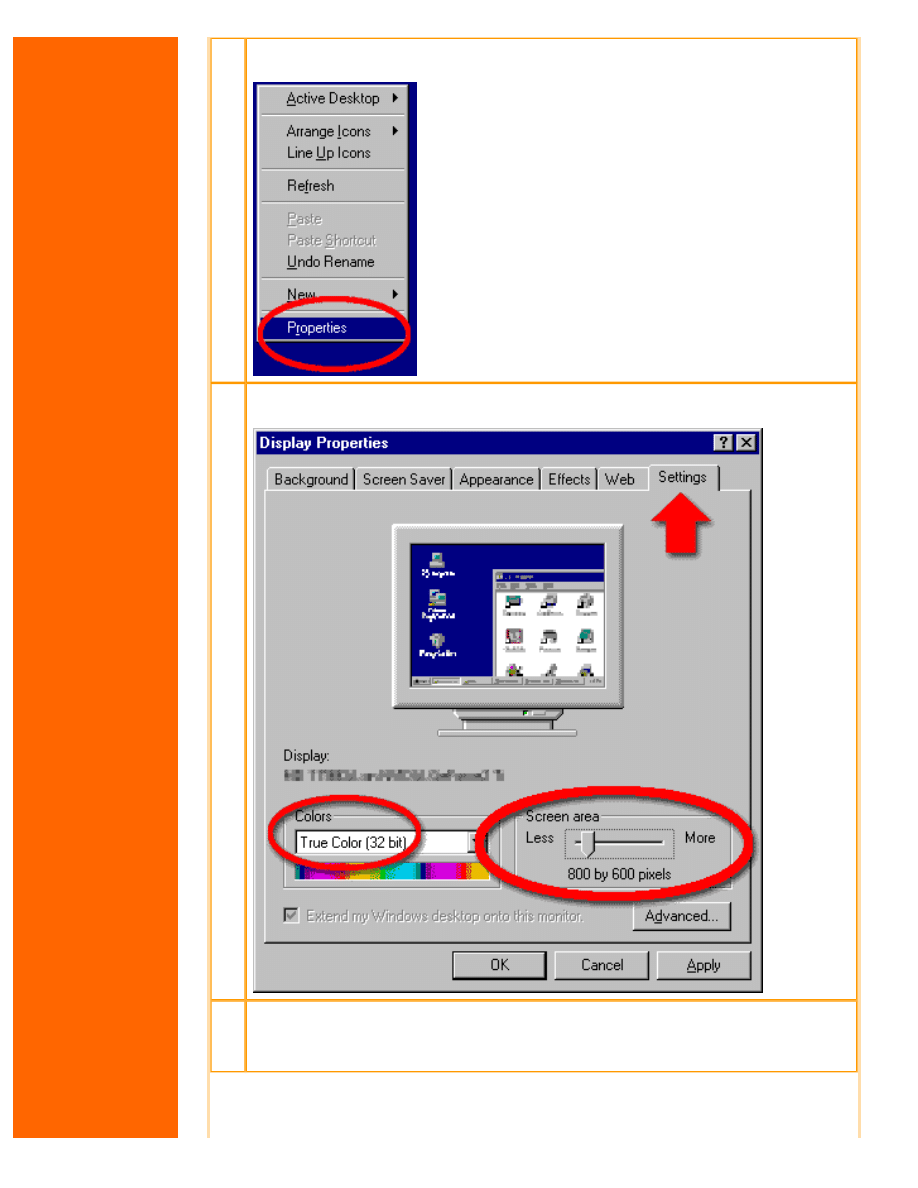
Change the desktop resolution to 800x600 by right clicking a blank area
of your desktop, choose "Properties".
2
Click the "Settings" tab, then move the "Screen Area" slider to 800x600
pixels.
3
Change the "Colors" to your highest setting. Ideally set it to (True Color)
32bit, 24bit will also work. Click "OK". Then follow your particular on-
screen instructions to finish changing the desktop resolution
http://www.powerpointbackgrounds.com/powerpoint-to-dvd.htm (3 of 14)07/10/2003 20:32:07
awesome powerpoint backgrounds - powerpoint to dvd tutorial - or how to play a powerpoint presentation on a home dvd player
4
Start Powerpoint.
Open your slideshow. We recommend having a totally blank first and last
slide, or a slide that follows your template but with no content.
5
Select the "Insert" menu and choose "New Slide", select the "Blank"
Layout from the "slide layout" on the right of your screen.
Then go to your current last slide by holding down the "CTRL" key then
press "End".
Then repeat step 5 to add a new last slide.
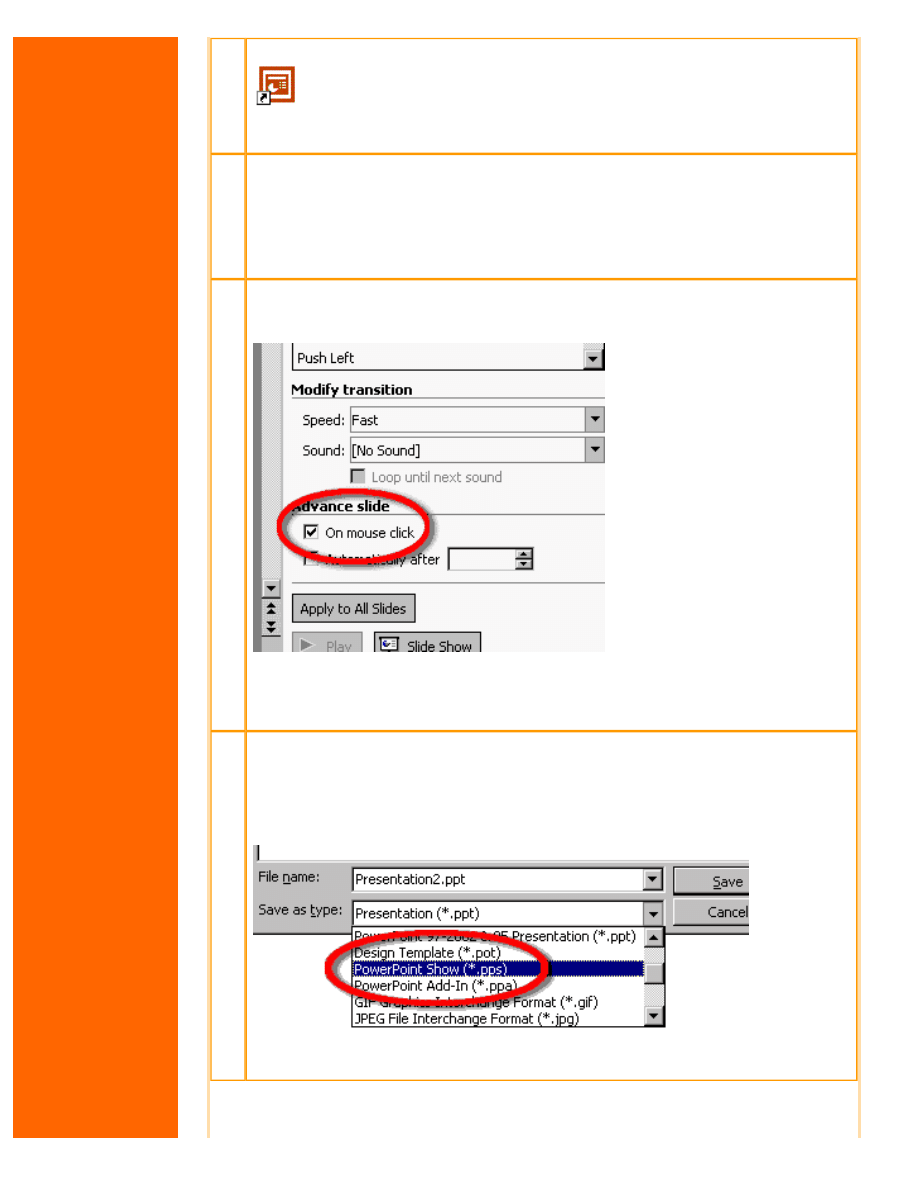
6
Go back to your first slide (CTRL-Home), and select the "slideshow"
menu, and choose "Slide Transition", make sure that "On mouse click" is
ticked.
This will make the first slide pause before we start capturing our
slideshow.
Then save your presentation. "File" > "Save"
7
To give your PC less to do while capturing your slideshow save your
presentation as a "presentation show"...
Select the "File" menu, choose "Save As...."
Change the "Save as type" to "powerpoint show (.pps)". Click "Save"
Quit out of powerpoint.
http://www.powerpointbackgrounds.com/powerpoint-to-dvd.htm (4 of 14)07/10/2003 20:32:07
awesome powerpoint backgrounds - powerpoint to dvd tutorial - or how to play a powerpoint presentation on a home dvd player
8
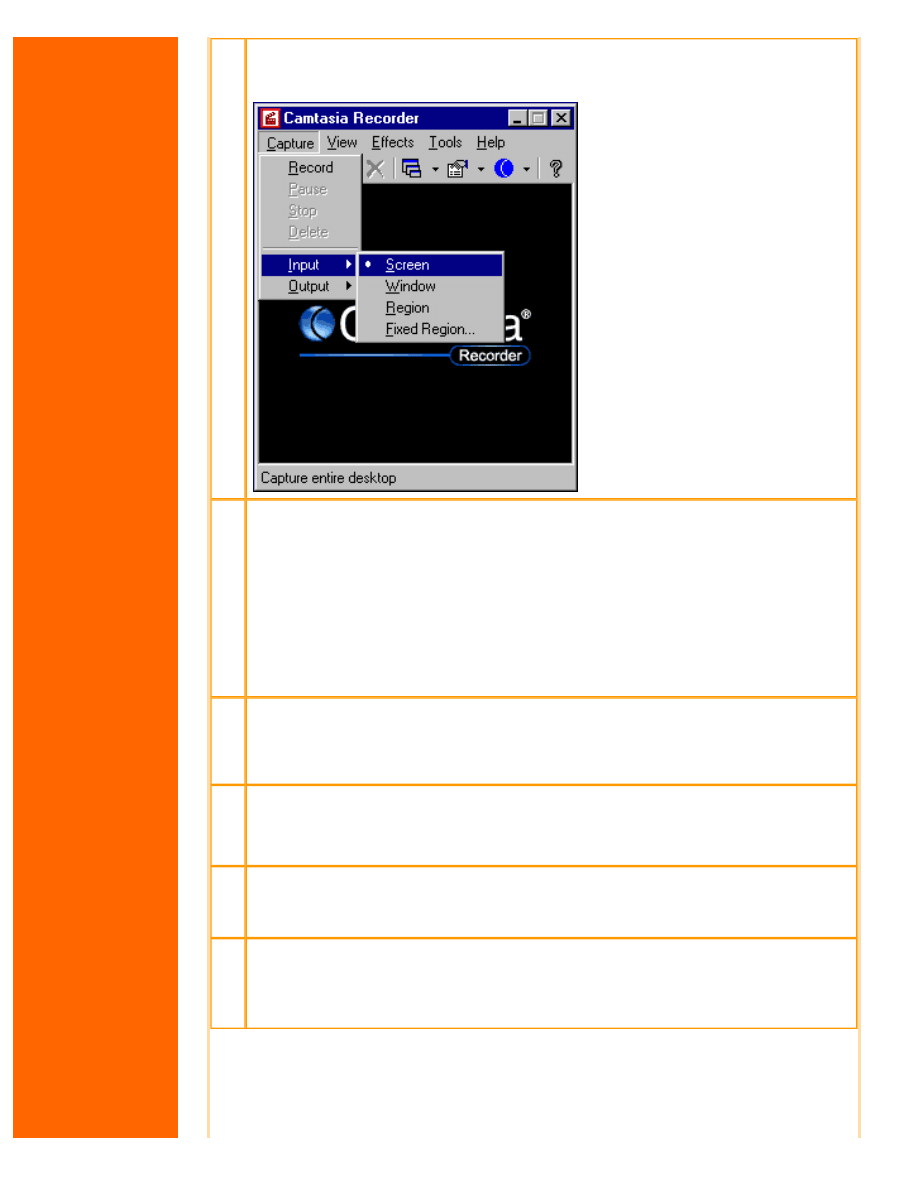
Now we are ready to capture the slide show. Start Camtasia Recorder.
Check that it is set to record the "screen" by selecting the "Capture"
menu, choose "Input" and select "Screen".
9
This step is optional, but we found it gave much better results with our
particular presentation.
In Camtasia Recorder, click "Tools", then "Options", click the "AVI" tab
along the top. On this page turn off "Auto Configure". Set the frames/sec
to 10.0
Click "Video Setup". Untick "Key Frame Every 80 frames". Click OK.
Click the "Program" tab, Then tick "Boost priority during capture". Click
OK.
10 Navigate to your powerpoint show (the .pps file from step 7) using
windows explorer or "my computer".
Double click your file e.g. mypres.pps
11 The 1st slide will be displayed until you press a key to move on to the
next slide.
Tip: We got better results if we went through the presentation once, before doing the actual
capture. This allowed the PC to cache the presentation in its memory.
12 When you press F9 Camtasia Recorder will start recording everything that
happens on the screen. When you are ready, press F9, then press the
space bar to start your presentation proper.
13 If your presentation is set to wait for a mouse click to move through each
slide, remember to give the audience time to read each slide, before
pressing the space bar to move to the next slide. One way of doing this is
to read the slide out aloud.
http://www.powerpointbackgrounds.com/powerpoint-to-dvd.htm (5 of 14)07/10/2003 20:32:07
awesome powerpoint backgrounds - powerpoint to dvd tutorial - or how to play a powerpoint presentation on a home dvd player
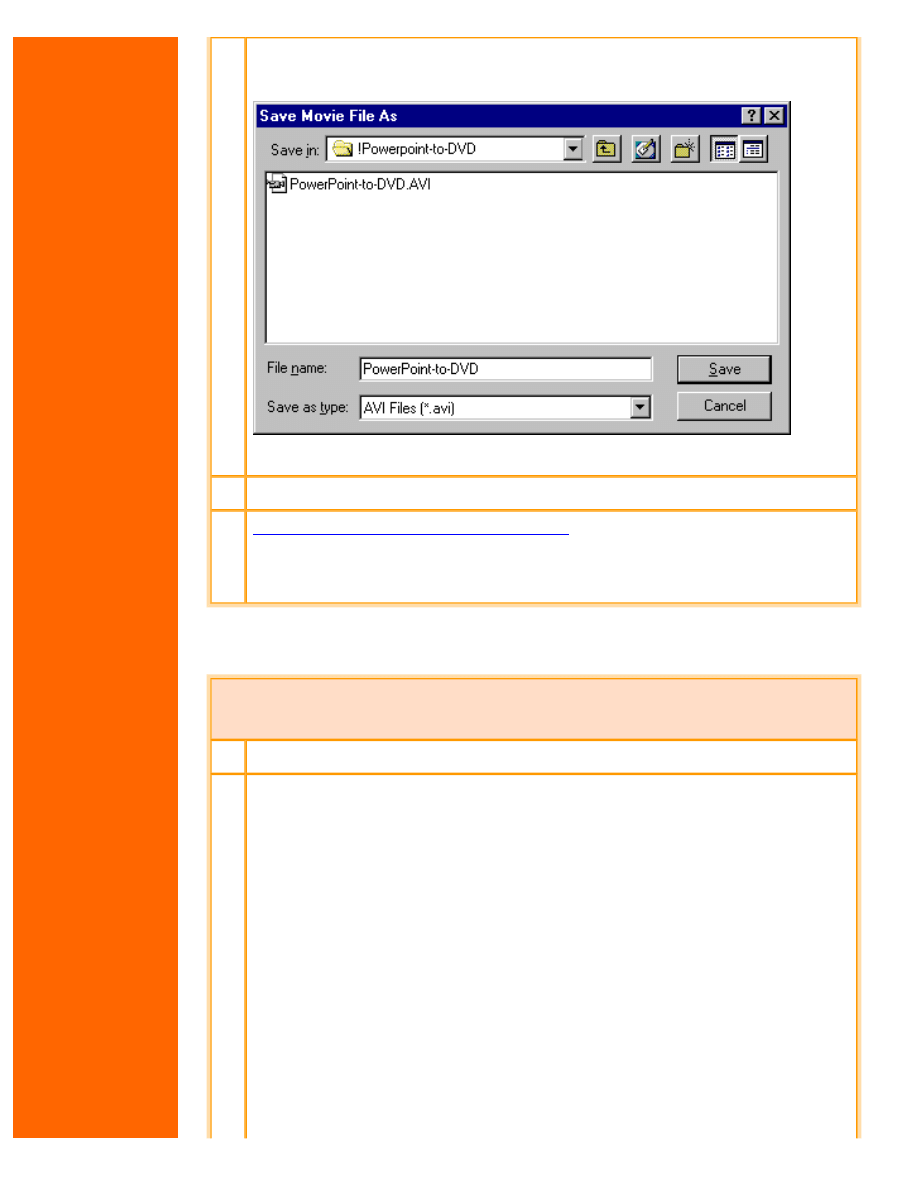
14 When you reach your last blank slide, Press F10 to tell Camtasia
Recorder to stop recording. You will be prompted to save the captured
slideshow, so choose a directory and enter a filename.
Click "Save". Camtasia will save your capture as an .AVI file.
15 That's it for Step One. We told you it was easy!
16
View what we grabbed from powerpoint
. How did we do that? We used
Camtasia Producer to save our captured video file to a flash (swf) file.
Trust us, when we say this powerpoint to flash is a very powerful
feature of Camtasia.
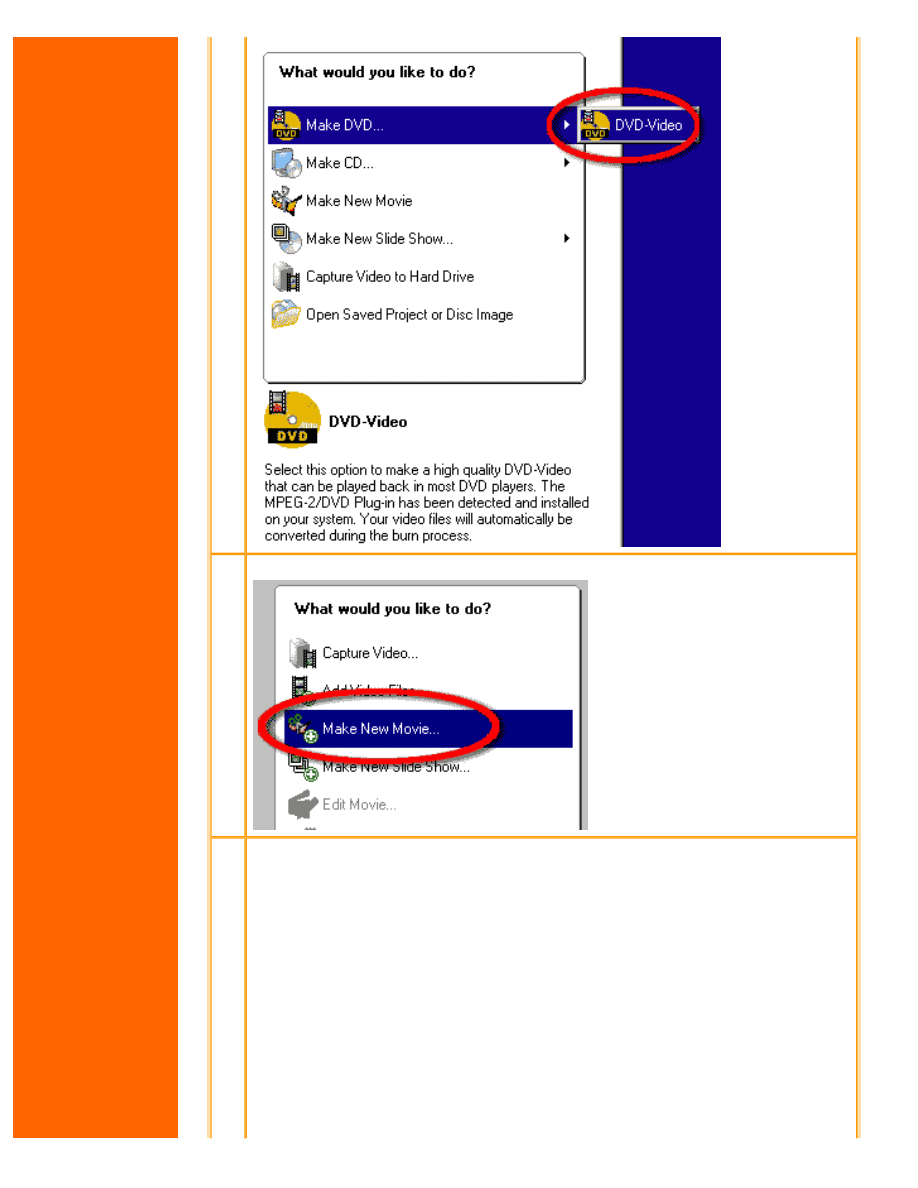
Step 2: Conversion
1
Start Nero Vision Express 2
2
Click "Make DVD" and choose "DVD-Video"
http://www.powerpointbackgrounds.com/powerpoint-to-dvd.htm (6 of 14)07/10/2003 20:32:07
awesome powerpoint backgrounds - powerpoint to dvd tutorial - or how to play a powerpoint presentation on a home dvd player
3
Click "Make New Movie
4
Click the "Browse for media" button. Navigate to where you saved the
original camtasia captured video file. Select the File and click "Open".
Nero will display an icon to represent your video clip.
http://www.powerpointbackgrounds.com/powerpoint-to-dvd.htm (7 of 14)07/10/2003 20:32:07
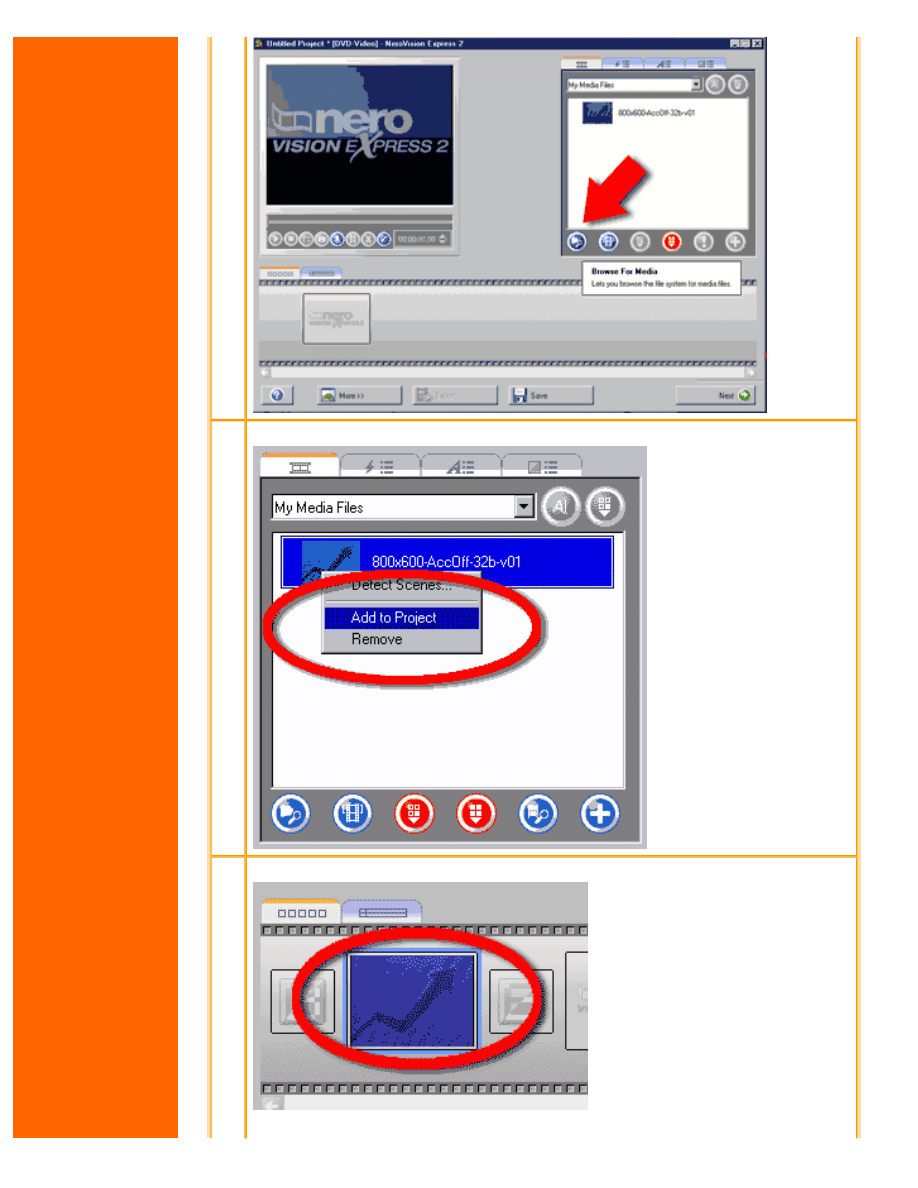
awesome powerpoint backgrounds - powerpoint to dvd tutorial - or how to play a powerpoint presentation on a home dvd player
5
Right click the newly added video clip icon and choose "Add to Project"
6
Nero will add your video to it's storyboard
You can add transitions before and after each video clip using nero if you
http://www.powerpointbackgrounds.com/powerpoint-to-dvd.htm (8 of 14)07/10/2003 20:32:07
awesome powerpoint backgrounds - powerpoint to dvd tutorial - or how to play a powerpoint presentation on a home dvd player
want to. We didn't.
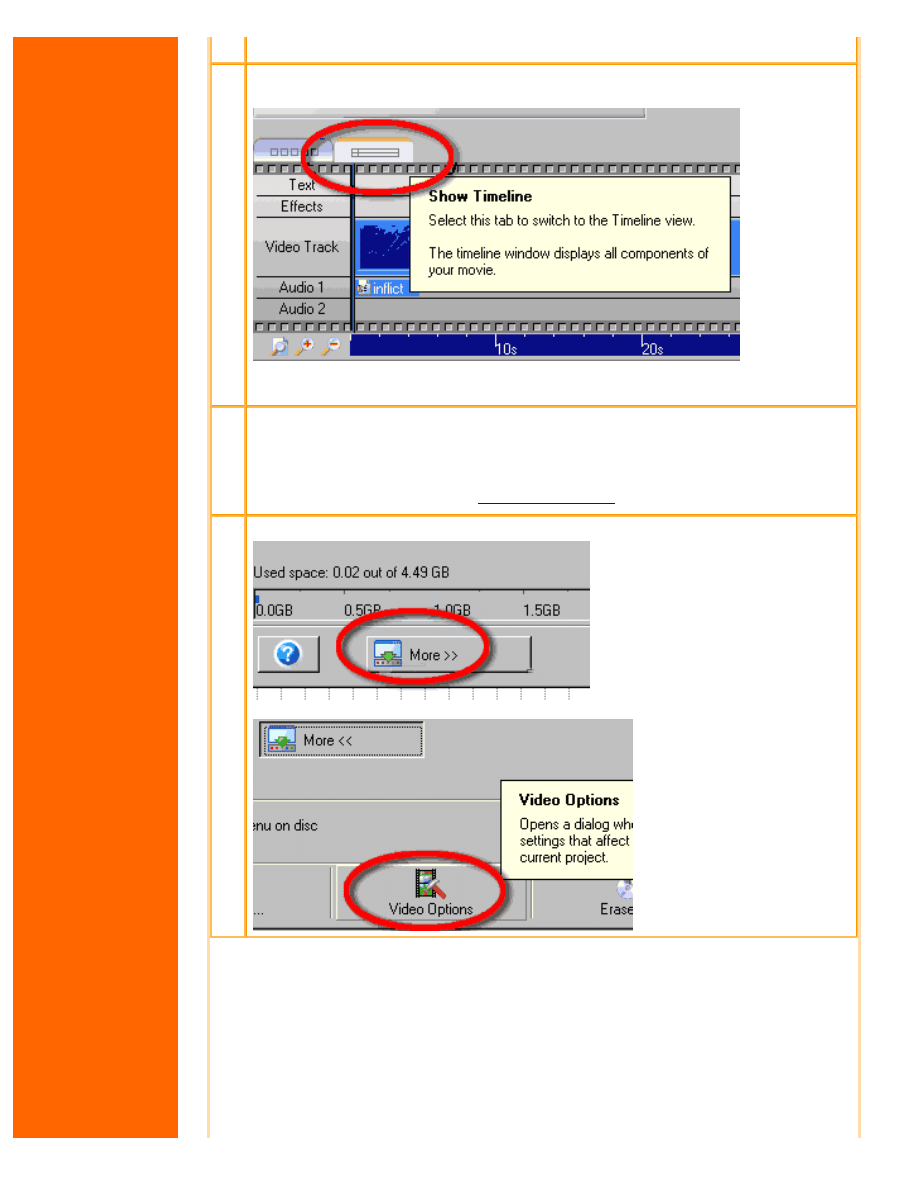
7
If you want to add any kind of soundtrack or music to your video clip, this
is the time to do it. Click the "Show Timeline" button
Then simply browse to your existing audio clip, then drag it from the
media list to the "timeline" area marked "Audio 1".
8
Click the "Next" button.
If you want to add any more powerpoint slideshows, then repeat steps 3
through 6. Obviously you will also have to capture each presentation
using camtasia by following
.
9
Click the "More>>" button
Click the "Video Options" button
http://www.powerpointbackgrounds.com/powerpoint-to-dvd.htm (9 of 14)07/10/2003 20:32:07
awesome powerpoint backgrounds - powerpoint to dvd tutorial - or how to play a powerpoint presentation on a home dvd player
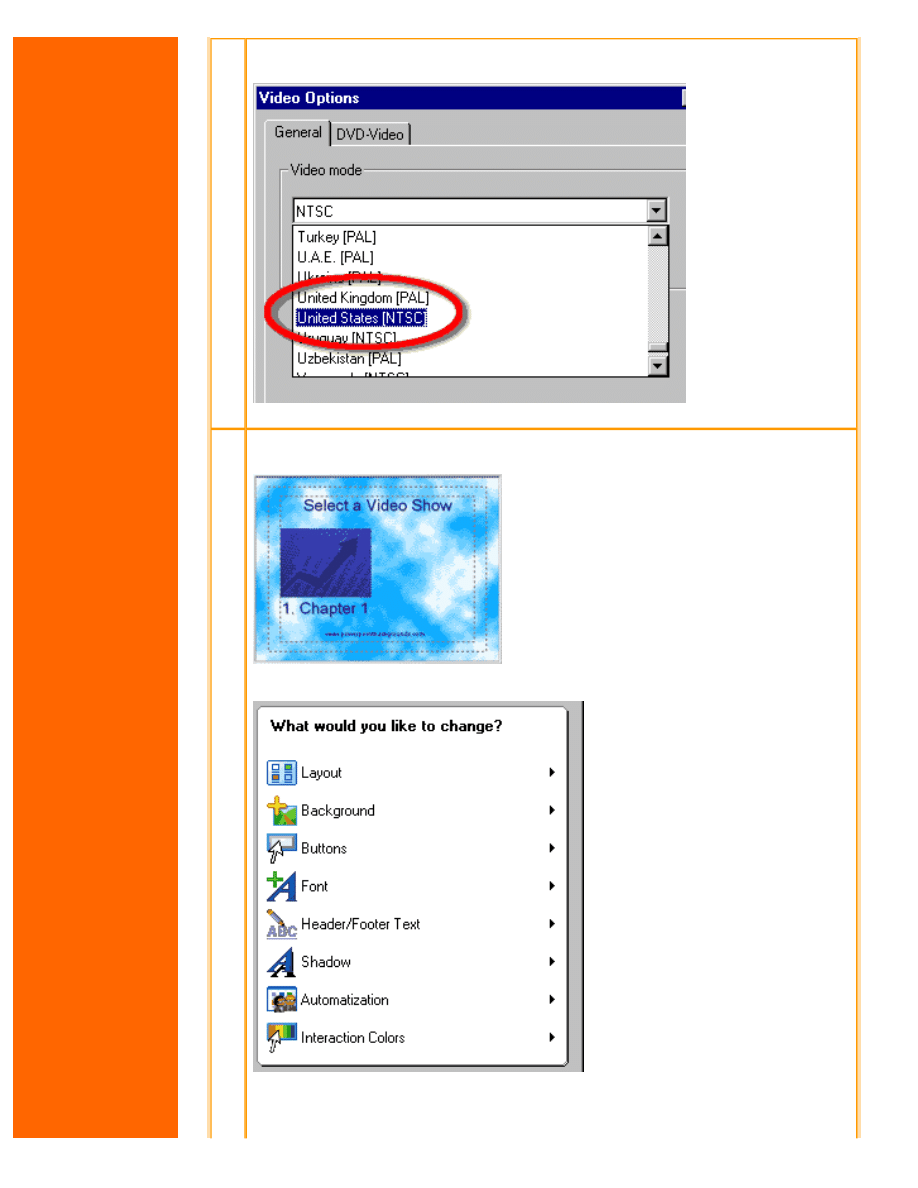
10 Change the "Video mode" to NTSC for the United States, or scroll down
the list to your country for other modes (e.g. Select PAL for the UK).
Click the "Next" button.
11 The "Create Menu" page is where you design the 1st screen people will
see when they view your DVD.
You can add backgrounds, change colors, fonts, etc. It's all fairly self
explanatory.
For our DVD creation we choose "Layout 2", a still background image, and
added a title of "Select a video show".
http://www.powerpointbackgrounds.com/powerpoint-to-dvd.htm (10 of 14)07/10/2003 20:32:07
awesome powerpoint backgrounds - powerpoint to dvd tutorial - or how to play a powerpoint presentation on a home dvd player
Click Next
12 The "Preview" screen allows you to view and test your dvd. Clicking the
Menu button on the remote control will always bring you back to this 1st
screen.
Click "Back" if you would like to change how your DVD will look or Click
"Next" to continue.
13 That's it for the conversion and the DVD menu creation.
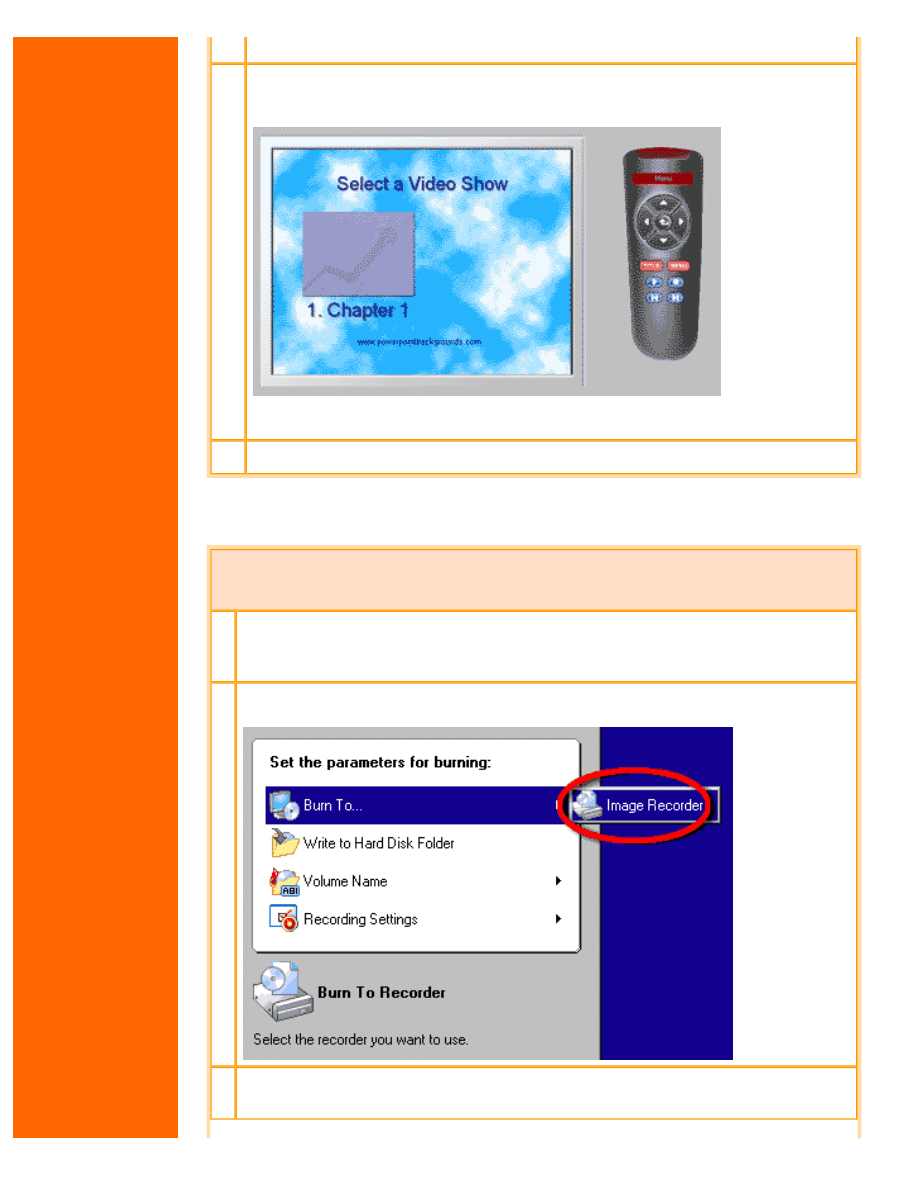
Step 3: Writing the DVD
1 You should now be on the "Burn Options" screen. This screen allows you to
decide whether to write the data to your cd-writer now, or to a Folder on
your hard disk for writing to a disk later.
2 Click "Burn To" to choose your CD or DVD writer. Select the device that
you would like to use.
3 Double check "Recording Settings" are to your liking. e.g. Turn on the
"buffer underrun protection".
http://www.powerpointbackgrounds.com/powerpoint-to-dvd.htm (11 of 14)07/10/2003 20:32:07

awesome powerpoint backgrounds - powerpoint to dvd tutorial - or how to play a powerpoint presentation on a home dvd player
4 When you are ready. Click the "Burn" button
5 Nero will start the process of converting your original powerpoint slideshow
video to a DVD compatible format. It will then write the DVD disc. It can
take quite some time. So go and get yourself a coffee.
6 If you choose the option to write the data to an "image recorder", then
nero will ask for a directory and a filename to save the "disc image".
Click "Save". The disc image can be written to a DVD at a later date.
7 Click "Save" if you want to save this dvd project to use again.
8 That's it for writing the dvd. Be sure to read this last section to get the
best results.
We used the following software:
This is a list of the software we used in putting a powerpoint presentation on to a
DVD. Although you can use other software for the capturing, conversion and
writing the dvd.
●
Powerpoint 2002 / XP by Microsoft
●
Camtasia by TechSmith
(More details - 30 day demo available for download)
http://www.powerpointbackgrounds.com/powerpoint-to-dvd.htm (12 of 14)07/10/2003 20:32:07

awesome powerpoint backgrounds - powerpoint to dvd tutorial - or how to play a powerpoint presentation on a home dvd player
●
Nero Vision Express 2 by Ahead
(More details - 30 day demo available for download)
We particularly wanted to preserve the animations and wipes in powerpoint,
that's why we opted for Camtasia. If you did not want to preserve the animations
and wipes, then you could export your powerpoint presentation as a series of still
images (bitmaps, jpgs, etc), then use Nero Vision Express to create a simple
slideshow.
We also looked at a product called
converting the original grab to a dvd format than nero. But to keep this tutorial
as easy as possible, we decided to use nero's in-built convertor. Also a lot of
people tend to have nero bundled with there cd or dvd writer. The makers of
also make DVD authoring software.
Optimizing your presentations for dvd video and TV:
The quality (resolution) of a TV is no where near as good as a computer monitor.
Keep these points in mind to get the best results.
●
Avoid putting information too close the edge of your slides, otherwise this
information may be cut off when viewed on a TV
●
Avoid very small text. A lot depends on the quality of the TV and how far
back the TV will be viewed from. Aim for no smaller than 30 point font
sizes
●
Avoid very thin lines. Aim for at least 3 point line sizes
●
Avoid certain colors. Red is notoriously bad for video
●
Avoid very skinny / lite / thin / serif fonts. Aim for Arial (sans-serif), bold
and black weights
●
Aim for dark backgrounds (dark blue), and light colored text (white /
yellow)
To download the files used in this tutorial right click the
image below, then choose "Save target as" (IE), or
"Save Link As" (Netscape).
●
The file contains the actual presentation used in this tutorial. Filesize
0.25mb
Have Fun!
http://www.powerpointbackgrounds.com/powerpoint-to-dvd.htm (13 of 14)07/10/2003 20:32:07

awesome powerpoint backgrounds - powerpoint to dvd tutorial - or how to play a powerpoint presentation on a home dvd player
Please Note: Although we have made every effort to check the files against viruses at all stages of
production. It is always wise to run a virus checker on any software before running it. By Default! cannot
accept responsibility for any loss, disruption or damage to your data or computer system which may occur
while using either either the CD-Rom or downloaded files. It is assumed that by downloading the files you
accept these conditions. Otherwise do not use the awesome powerpoint backgrounds.
We hope you liked this tutorial. As well as making such great tutorials we also
design and sell powerpoint backgrounds at
You can
a CD-Rom with 100 powerpoint backgrounds, or if you prefer
download individual sets of 10 backgrounds. See
powerpoint backgrounds
|
|
|
|
PowerPoint® are either registered trademarks or trademarks of
Corporation in the United States and/or other countries. The software
product "awesome" made by the company "
" are not affiliated, connected or associated with Microsoft Corporation.
Send email to
awesome@powerpointbackgrounds.com
with questions or comments about this web site.
Copyright © 1999-2003 "By Default!" - Last modified: September 7, 2003
http://www.powerpointbackgrounds.com/powerpoint-to-dvd.htm (14 of 14)07/10/2003 20:32:07
Document Outline
- powerpointbackgrounds.com
Wyszukiwarka
Podobne podstrony:
How To Convert A Divx File To Dvd Mpeg2
How to Present at Meetings 2001
How to Get the Most Out of Conversation Escalation
APA style How to present your paper
How to Present at Meetings 2001
How to Convert your Car to run on WATER
How To Make Great Conversation & Small Talk
Samurai Air Conditioning Compressor Conversion Project Showing how to convert your aircon compresso
12 Steps to Power Presence How to Exert John Baldoni
Dressler Larry Consensus Through Conversation How To Achieve High Commitment Decisions
How to Replace the DVD Laser of an RNS e
How to read the equine ECG id 2 Nieznany
CISCO how to configure VLAN
O'Reilly How To Build A FreeBSD STABLE Firewall With IPFILTER From The O'Reilly Anthology
How to prepare for IELTS Speaking
How To Read Body Language www mixtorrents blogspot com
więcej podobnych podstron