1
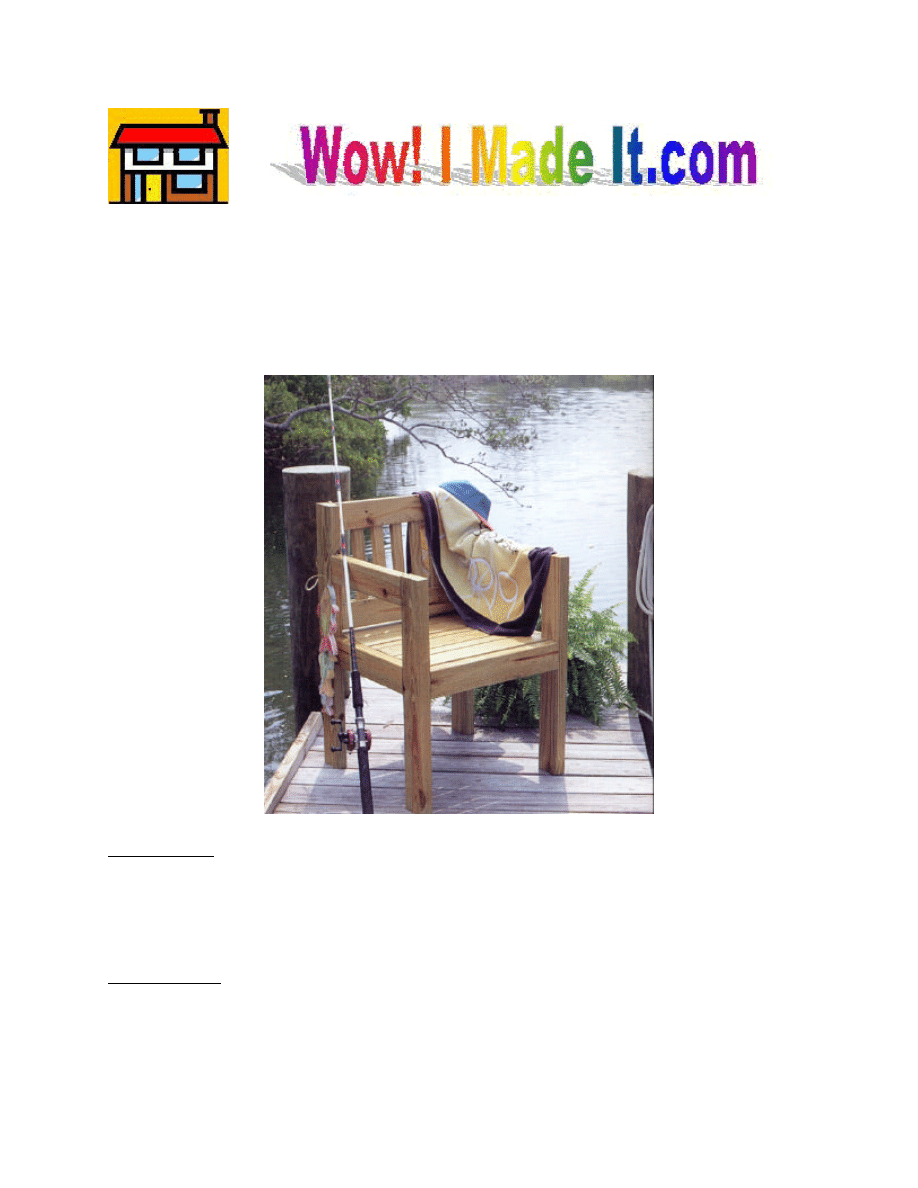
arden Arm Chair
Build two of these chairs and group them with our Garden Sofa and you’ll have a
pleasant area for backyard conversation. Or build a single chair, set our Outdoor Pine
Occasional Table next to it, and create a great place for drinking iced tea and reading a good
book. This comfortable chair is sturdy enough to withstand summer winds, too!
Materials
§ 30 linear feet of 2 x 4 pine
§ 8 linear feet of 1 x 4 pine
§ 12 linear feet of 1 x 2 pine
Hardware
§ 50 1-1/4” 3d finish nails
§ 25 2-1/2” wood screws
§ 30 3-1/2” wood screws
G
2
Cutting List
Code
Description
Qty.
Material
Dimensions
A
Horizontal Side
4
2 x 4 pine
15-1/2” long
B
Long Vertical Side
2
2 x 4 pine
35” long
C
Short Vertical Side
2
2 x 4 pine
29” long
D
Outer Seat Support
2
2 x 4 pine
20” long
E
Inner Seat Support
2
2 x 4 pine
19-1/2” long
F
Wide Slats
4
1 x 4 pine
20” long
G
Narrow Slat
2
1 x 2 pine
20” long
H
Horizontal Back
2
2 x 4 pine
20” long
I
Back Slats
7
1 x 2 pine
10” long
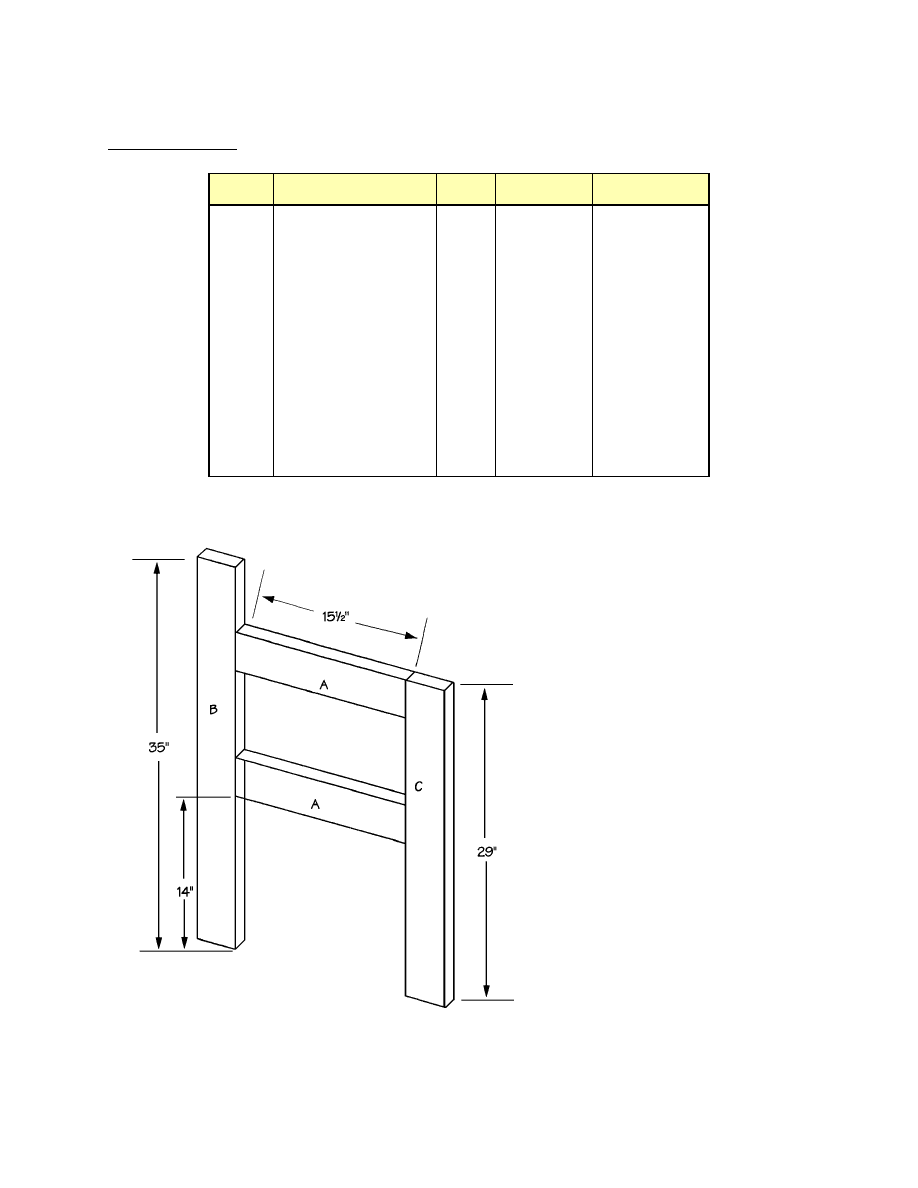
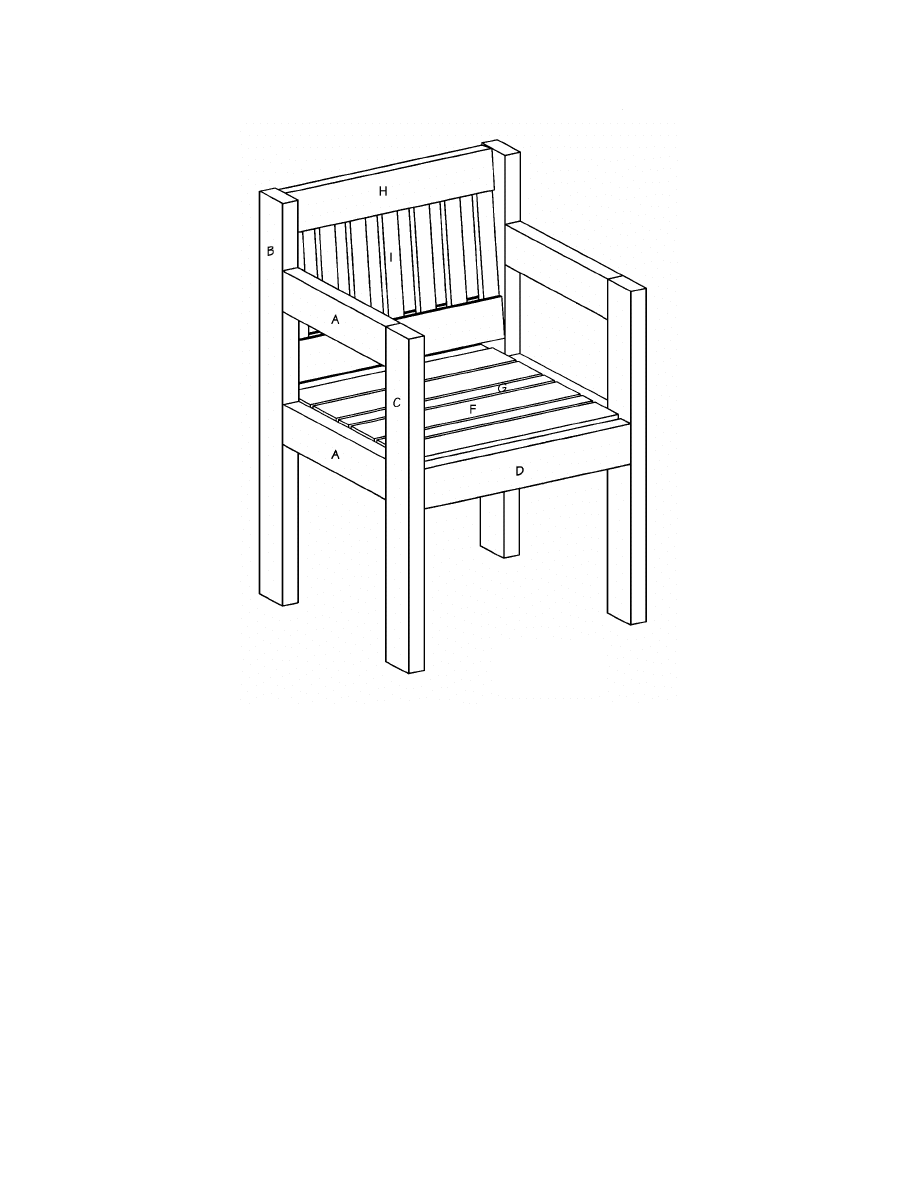
Constructing the Chair Sides
1. Cut four Horizontal Sides (A)
from 2 x 4 pine, each measuring
15-1/2 inches long.
2. Cut two Long Vertical Sides (B)
from 2 x 4 pine, each measuring
35 inches long.
3. Cut two Short Vertical Sides (C)
from 2 x 4 pine, each measuring
29 inches long.
4. Place two Horizontal Sides (A)
parallel to each other, and
between one Long Vertical Side
(B) and one Short Vertical Side
(C), as shown in Figure 1. The
top Horizontal Side (A) is
exactly even with the end of the
Short Vertical Side (C), and the
bottom Horizontal Side is 14
Figure 1
3
inches from the other end of that same Vertical Side (C), as shown in Figure 1. Apply glue to
the meeting surfaces, and screw at an angle through the edges of the Horizontal Sides (A), into
both the long and Short Vertical Sides (B and C), using two 3-1/2” wood screws on each joint.
5. Repeat Step 4 to assemble the second side.
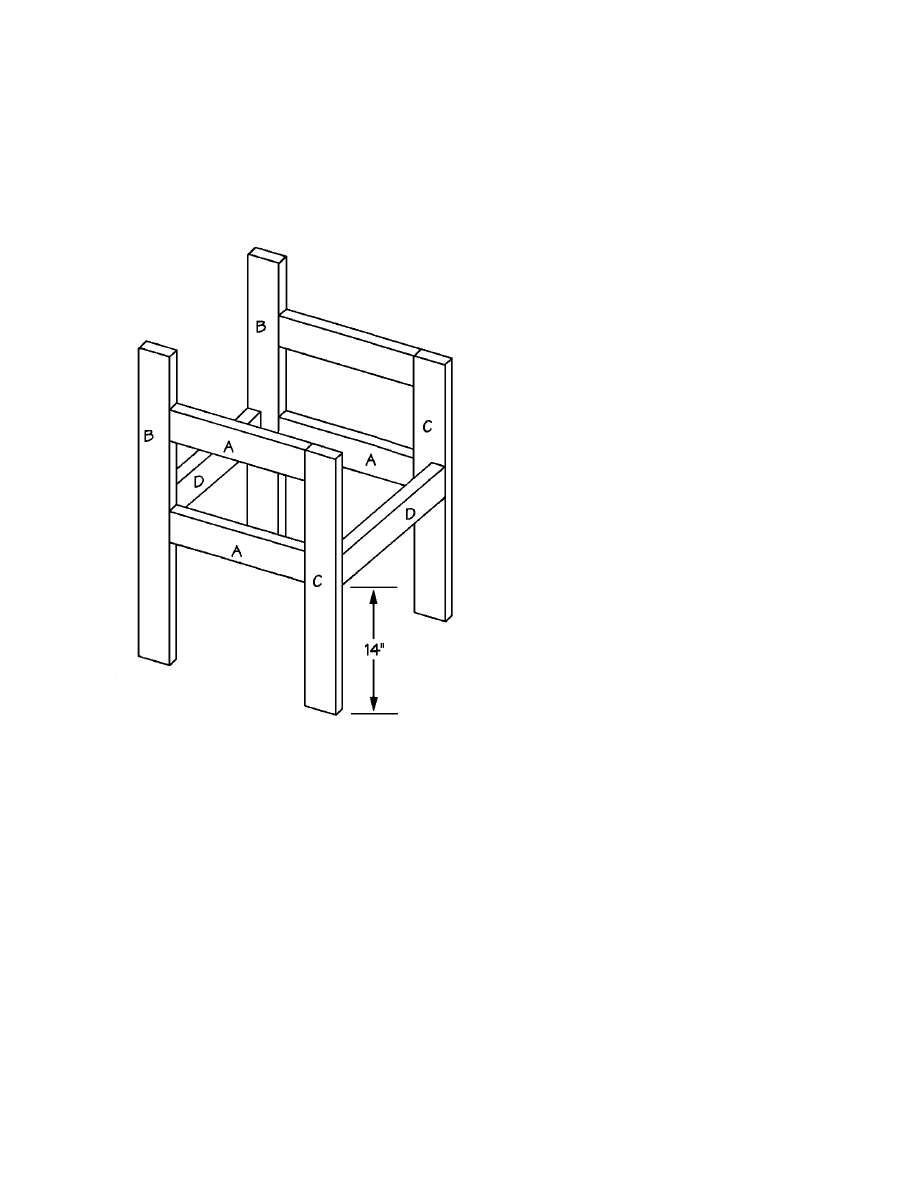
Adding the Seat
1. Cut two Outer Seat Supports (D) from
2 x 4 pine, each measuring 20 inches
long.
2. For the next step you may want to ask
for a willing helper to assist. If no one
is available (or willing), use a bar
clamp to hold the assembly while you
screw it together. Place the side
assemblies on one 35”edge, parallel to
each other and 20 inches apart. Fit
one Outer Seat Support (D) between
the two side assemblies, 14 inches
from the upper edge of the two side
assemblies. The top edge of the Outer
Seat Support (D) should be exactly
even with the top edge of the lower
Horizontal Side (B) as shown in
Figure 2. Apply glue to the meeting
surfaces, and screw through the side
assemblies into the ends of the Outer
Seat Supports (D), using two 2-1/2” wood screws on each joint.
3. Turn the assembly upside-down, and attach the remaining Outer Seat Support (D) to the
opposite side of the side assemblies, in the same manner that you used in Step 2.
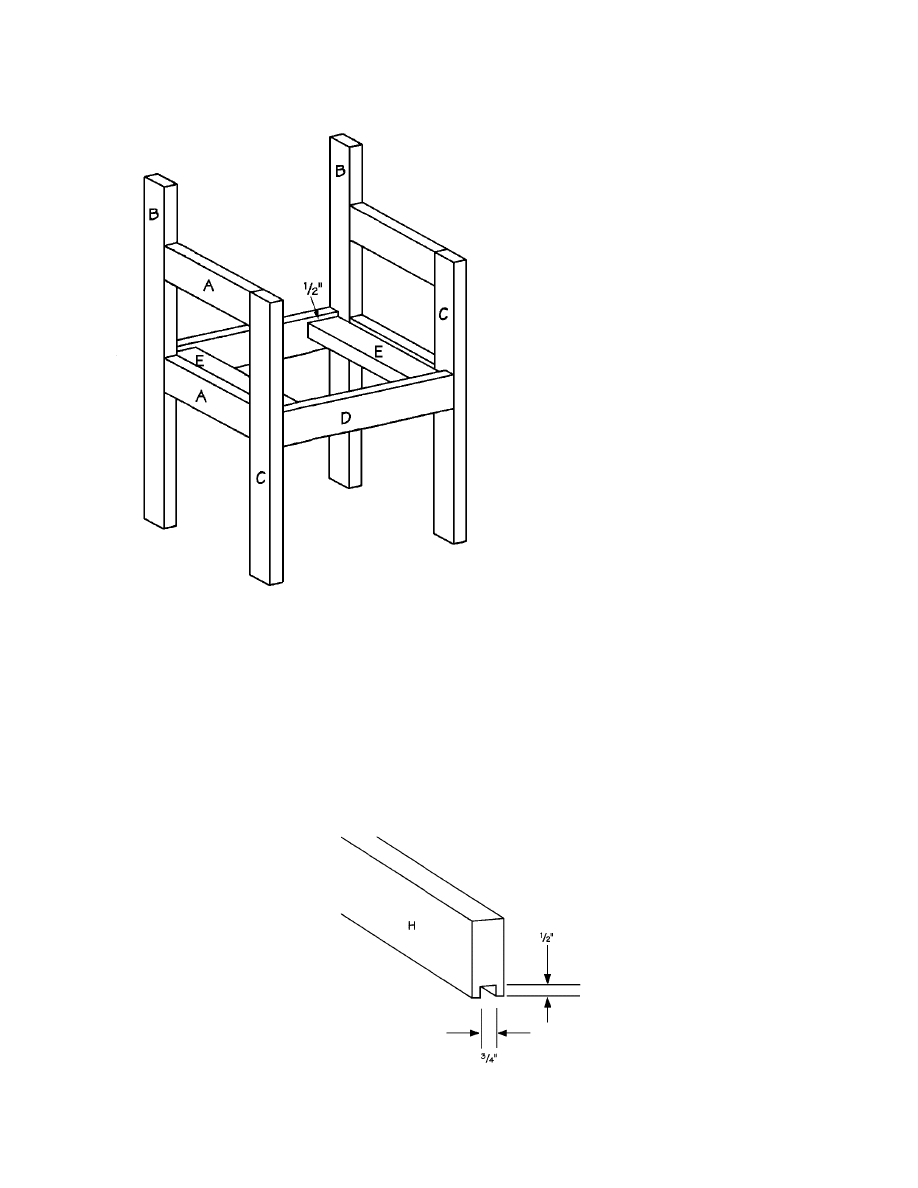
4. Cut two Inner Seat Supports (E) from 2 x 4 pine, measuring 19-1/2 inches long.
5. Fit one Inner Seat Support (E)--wide surface up--between the two Outer Seat Supports (D),
1/2-inch below the top edge of the lower Horizontal Side (B), as shown in Figure 3. Screw
through both of the Outer Seat Supports (D) into the ends of the Inner Seat Support (E) using
two 2-1/2” screws. Also screw through the lower Horizontal Side (B) into the edge of the
Inner Seat Support (E) using three 2-1/2” screws spaced evenly along the joint.
6. Repeat Step 5 to attach the remaining Inner Seat Support (E) on the opposite side of the chair.
Figure 2
4
Adding the Seat Slats
1. The chair seat is comprised of two
different widths of wood, which are
alternated. Cut four Wide Slats (F)
from 1 x 4 pine, each measuring 20
inches long.
2. Cut two Narrow Slats (G) from 1 x 2
pine, each measuring 20 inches long.
3. Begin by placing a Wide Slats (F) over
the seat support (E) on the front of the
chair. Then place a Narrow Slat (G)
next to it. Continue alternating the
Wide and Narrow Slats, ending with
two Wide Slats (F) at the back of the
seat as shown in Figure 6. Adjust the
spacing so that the slats are
approximately 3/8-inch apart. Nail
through each of the slats (F and G)
into the seat supports (E). Use two 1-
1/4” nails on each of the Wide Slats
(F), and one 1-1/4” nail on each of the
Narrow Slats (G).
Constructing the Chair Back
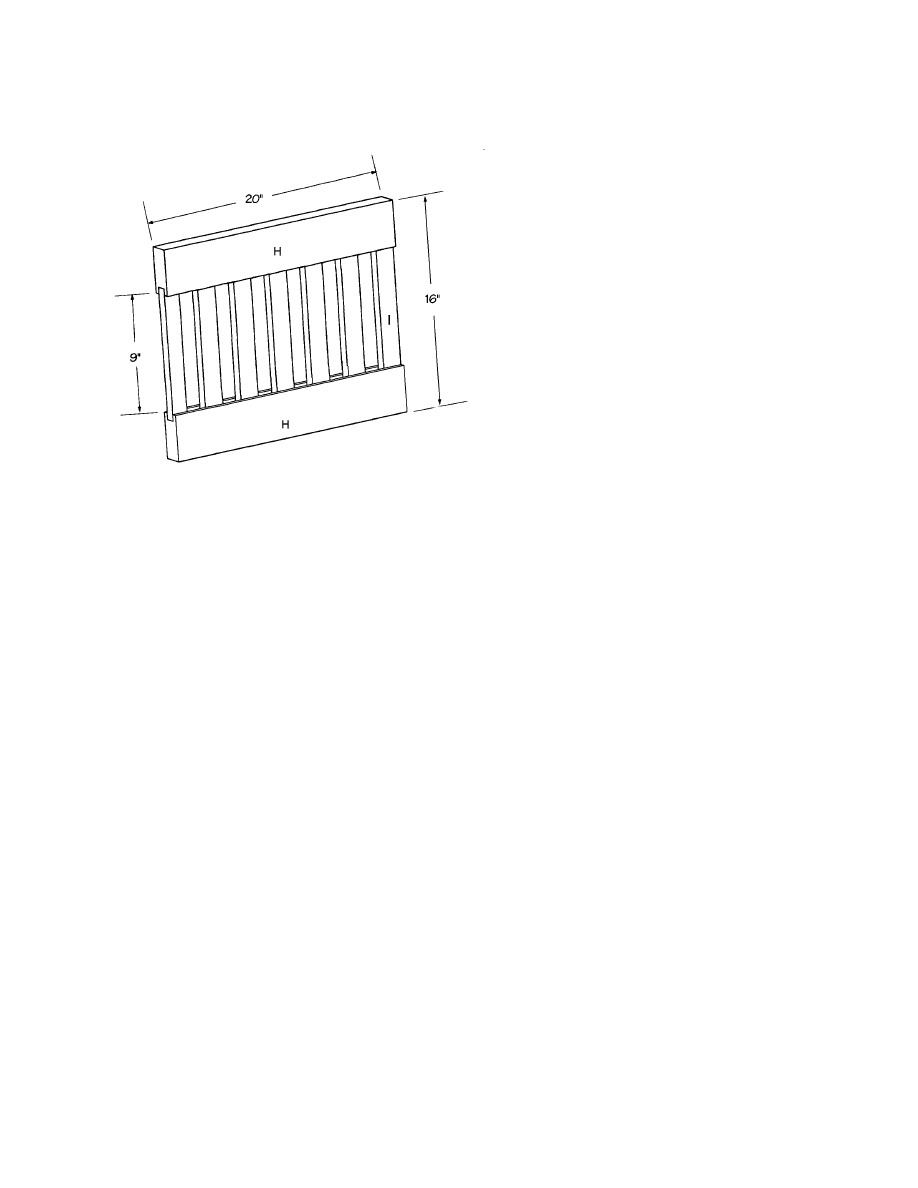
1. Cut two Horizontal Backs (H) from 2 x 4 pine, each measuring 20 inches long.
2. Cut a 3/4-inch-wide dado, 1/2-inch deep down the length of one 20” edge of each of the
Horizontal Backs (H), as shown in Figure 4.
Figure 3
Figure 4
5
3. Cut seven Back Slats (I) from 1 x 2
pine, each measuring 10 inches long.
4. Working on a level surface, place the
Horizontal Backs (H) parallel to each
other, with the dadoes to the inside, as
shown in Figure 5. Fit the ends of the
seven Back Slats (I) into the dadoes in
each of the two Horizontal Backs (H).
The spacing between the slats should
be approximately 1-1/2 inches. In fact,
we used an extra slat as a spacer.
When the Back Slats (I) are properly
fitted into the dadoes, the distance
between the two Horizontal Backs (H)
should measure 9 inches. The two
outer Back Slats (I) should be even
with the ends of the Horizontal Backs.
When the position is perfect, the overall measurements of the back assembly should be 16
inches high and 20 inches wide. Apply glue to the meeting surfaces, and secure the slats in
place by nailing through the dadoed edge of the Horizontal Backs (H) into the ends of the
Back Slats (I) using two 1-1/4” nails on each joint.
5. Now you are ready to fit the back assembly between the two sides. To make the chair more
comfortable, the back assembly is tilted at an angle--out at the top, and in at the bottom. The
tilt angle is determined by the width of the 2 x 4 on the side assemblies. The lower edge of
the back is fitted flush with the front edge of the Long Vertical Sides (B), and the upper edge
of the back is fitted flush with the outer edge of the Long Vertical Sides (B), as shown in
Figure 6. When you have the back fitted perfectly, secure the assembly with bar clamps.
Screw through the Long Vertical Sides (B) into the edges of the Horizontal Backs (H) using
two 3-1/2”screws on each joint.
Finishing
1. Fill any cracks, crevices, or screw holes with wood filler, and thoroughly sand all surfaces of
the completed chair.
2. Seal and paint or stain your chair the color of your choice.
Figure 5
6
Figure 6
Wyszukiwarka
Podobne podstrony:
Chair folding garden chair
Adirondack rocking chair krzesla
Morris Chair
Anniversary Chair krzesla
Arts and Crafts Chair
Adirondack Chair
Patio Chair and Love Seat
Kentuky Chair
A chair in the kitchen-games Kl.3, Scenariusze lekcji j. ang SP
Adirondack Chair(1) id 51566 Nieznany
Patio Chair
basic patio chair
avian flu chair text 2008
Adirondack rocking chair krzesla
Morris Chair
Anniversary Chair krzesla
chair cp
chinesepod the broken chair
więcej podobnych podstron