NOTICE GP4 02/02 GB 27/02/2002 12:42 Page 1
2
2
2
2
2
H
i,
M
y name is Geoff Crammond and if you’re
reading this, it probably means that you’ve bought
Grand Prix 4. Thanks!
G
rand Prix 4 is the latest evolution of
the Grand Prix series, which I started writing over
10 years ago. Machines and techniques have
changed a lot since then. For example, the sheer
scale of the project has increased enormously.
Over 60 man-years of effort alone have gone into
the game since Grand Prix 3 was released in 2000!
W
ith Grand Prix 4, you’ll see a huge
leap forward in the look of the game, with the
inclusion of a new graphics engine specially designed
to use all the power of modern graphics hardware
support. And for the first time we use actual GPS
survey data to make the racetracks as accurate
as possible – the same road layout, width, height,
gradient and camber, as well as the all-important
kerb shapes and profiles, should now be there
just like real life.
B
ut some things stay the same
– as always our endeavour is to produce something
that is as authentic as possible, while still being
as playable as possible. We hope that as you take
the chequered flag after winning an exhilarating and
exhausting race, you’ll agree that - like it says on
the box - nothing gets closer!
3
NOTICE GP4 02/02 GB 27/02/2002 12:42 Page 2
CONTENTS
5
4
4
4
4
4
SYSTEM REQUIREMENTS
MINIMUM :
Operating System: Windows
®
95/98/Me/XP
Processor: Intel Pentium
®
II 400 MHz or equivalent
Memory: 64 MB RAM/ Video: 16MB
Hard disk space: 500 MB free
CD-ROM drive: 4X Speed
Video: DirectX 8.0 compatible Video Card
Sound: DirectX 8.0 compatible Sound Card
DirectX: DirectX 8.0
RECOMMENDED :
Operating System: Windows
®
95/98/Me/XP
Processor: Intel Pentium
®
III 750MHz or equivalent
Memory: 128 MB RAM or more/ Video : 32MB
Hard disk space: 720 MB free
CD-ROM drive: 4X Speed
Video: DirectX 8.0 compatible 3D Card
Sound: 100% DirectX 8.0 Hardware Accelerated Sound Card with EAX Support
DirectX: DirectX 8.0
INSTALLATION
• Insert the Grand Prix 4 CD into your CD-ROM drive. If autorun is enabled,
Grand Prix 4 will take you to the Installation screen.
• Simply click on the ‘Install’ button and follow all on-screen directions.
• If autorun has not been enabled, you’ll have to double-click on the ‘My
Computer’ icon on the Windows
®
Desktop, then on the CD-ROM icon, and
then click on ‘Setup.exe’. The simulation will now install.
• Follow all on-screen instructions.
• Once Grand Prix 4 is installed it will appear in the Program Group on the
START Menu.
Loading
• Select Start > Programs > Infogrames > Grand Prix 4. The game will now load.
THIS MANUAL
This manual is structured in such a way as to introduce the game to rookie
players and to encourage them to delve deeper to get the most out of the
real simulation. If you’re a Grand Prix 3 veteran you’ll be familiar with the
basic controls and could probably get racing quite quickly, but be aware that
there are differences between Grand Prix 3 and Grand Prix 4 so you’ll find it
very worthwhile reading the manual to understand all the
simulation controls.
THE README FILE
Note that this manual will guide you through most of the Grand Prix
4 simulation but due to printing constraints may not contain the most up to
date information. For all last minute information you are advised to consult
the Readme file found on the CD (selected by clicking on View Readme in the
Program group).
4
System Requirements
4
Installation
6
Controls
7
Getting Started
17
Cockpit Controls
21
Camera Views
23
TV Director
23
GPeadia
24
Circuits on the Formula One Circus
24
The multiplayer section
26
Car handling
31
Glossary
38
Credits
39
Customer Services
NOTICE GP4 02/02 GB 27/02/2002 12:42 Page 4
GETTING STARTED
ONE LAP OF MONZA FOR ROOKIE DRIVERS
• Install and load Grand Prix 4 as explained previously. After
the opening animations, you will
be given the choice of Main
Menu, Quickrace, Quicklaps or
Gpaedia. Use Quickrace if you
want a quick blast of Grand Prix
4. But for the purposes of this
tutorial guide…
• Click on Main Menu.
For the duration of this
Quickstart tutorial, you will be
7
6
6
6
6
6
CONTROLS
Throughout this manual, you’ll see references to the Accelerator, the Brake,
Changing Gear and Steering. How these controls operate depends on your
preference of Keyboard, Joystick, Wheel, or Joypad. The default Keyboard
and Joystick driving controls are:
KEYBOARD DRIVING CONTROLS
(If you are using separate buttons for changing up or down a gear there is no
need to accelerate when changing up.)
JOYSTICK DRIVING CONTROLS
(If you are using separate buttons for changing up or down a gear do not
accelerate.)
Note: All the above driving controls can be reassigned (see page X).
OTHER KEYS
SCREEN 1 / MAIN
MENU
Auto Brakes
Auto Gears
Auto-right the Car
Indestructible
Show Best Line
Suggested Gear
Traction Control
Steering Help
Launch control
Driving Aid Keys:
F1
F2
F3
F4
F5
F6
F7
F8
F9
Enter/Return
SHIFT + Q
Esc
P
Space
R (when the game is
in the PAUSED state)
Action Keys:
Intending to Pit
Return to Pits
(Qualifying/Practice)
Leave Race
Pause
Pause
(when using Joystick)
Replay
A
Z
<,
>.
Accelerate A key + Space
Space
Accelerate
Brake
Steer Left
Steer Right
Change Up a gear
Change Down a gear
Forward
Back
Joystick Left
Joystick Right
Accelerate + Press Fire Button
Press Fire Button
Accelerate
Brake
Steer Left
Steer Right
Change Up a gear
Change Down a gear
N
O
Minus –
Plus +
CTRL + I
CTRL + J
CTRL + S
Miscellaneous Keys
See Driver Name
See Processor Occupancy
Decrease Cockpit View Angle
Increase Cockpit View Angle
PC Spec Information
Joystick On/Off
Background Sound On/Off
View Keys
Your Car Cockpit View
T-Cam View
Trackside Camera View
All On-car Camera Views
Chase View
Reverse Chase View
Car Ahead
Car Behind
Return to Your Cockpit
TV Director Mode
Right Arrow
Right arrow key a second time
Left Arrow
Page Up (Cycle through)
Page Down
Delete
Up Arrow
Down Arrow
Home
Insert
Network Keys
All Escape
to Menu Screen
SHIFT + U
Two Player Link Keys
Send Message
Host Release Control in
Menus to other player
Hang Up
CTRL + M
CTRL + R
CTRL + H
NOTICE GP4 02/02 GB 27/02/2002 12:42 Page 6
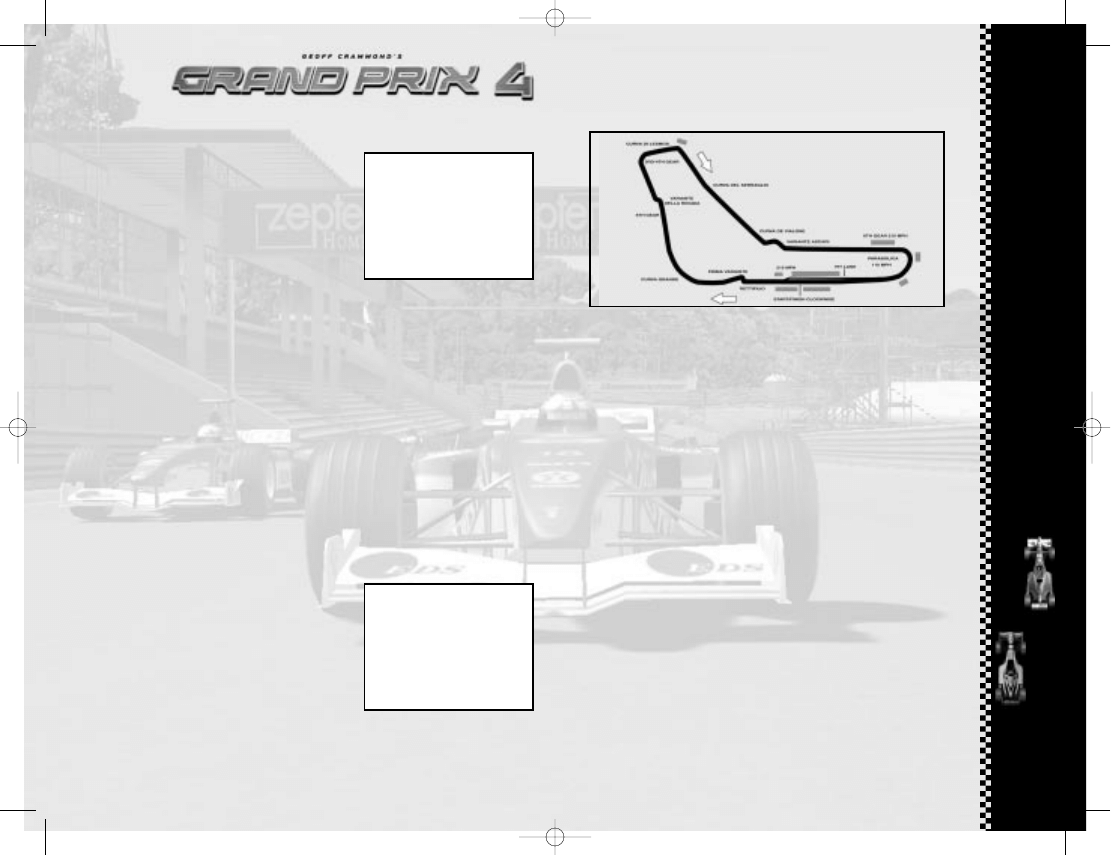
• Now check the Monza track plan below…
• Find the Start/Finish line and then run your eye clockwise
around the course until you come back to the Finish line. Check
where the pit lane joins the track so you’ll know exactly when
you’ll be on the actual racing track. Memorise the track plan
so you can anticipate what the corners will be like. As you
improve your racing skills and become more experienced, you’ll
realize just how important knowing each circuit will be to your
success.
Your car is still on its jacks in the garage.
• Select the Leave the Pits option on the LCD, using
the Throttle and Brake controls, then press the Gear Change
button. The car will come down off its jacks and you’ll see a
new LCD screen appear on the central steering wheel panel.
• Now slowly squeeze the accelerator… Your car will begin to
move forward (if it doesn’t, check that you’ve pressed F2 and
that the second symbol on the Driving Aids display is lit).
• Steer out from your pit garage and drive down the pit lane.
Remember that in race conditions, you’ll need to stick to the
pit lane speed limit of 50mph/80kph. If you want to pause the
simulation at any point, press key P (or Space if you are
driving with a Joystick, Wheel or a Joypad). Press P again to
reactivate. During this session, pause as many times as you
feel you need to, so that you can study the track plan and
anticipate what’s coming next. As you steer out of the pit
lane, join the main track, keeping on the inside of the broken
yellow line. Once on the circuit proper, the yellow line will be
replaced by a long broken white line.
• Try to keep the middle of the steering wheel lined up with the
broken white line as you progress around the circuit. This
white line is the Best Driving Line Driving Aid (F5): the
quickest possible line into and out of bends without spinning
off the track. At some point before the first bend, you
should, see a white sign with a black arrow bending to the
left, then countdown marker signs with 200 and 100. These
signs show how many metres remain before the approaching
left-hand bend.
9
8
8
8
8
8
racing under your own name.
You just need to select a team to race for and rename one of its drivers.
• Click on the Driver panel to go to the Driver
Select screen.
• In the Teams panel, one of the drivers is
already selected (the number is highlighted).
Click on the driver’s name to deselect.
• Highlight your preferred driver name and click
on Edit Names.
• Type in your name (or the name you want to
race under) and click on OK.
You are now Driver 4, racing for the Ferrari team. Your team’s badge now
appears in the background of the screen. From this screen you can also
access your individual Car Setup options and save the driver names. But for
this tutorial, simply click OK and you’ll return to the Main Menu screen. The
name you typed in will be shown as the Driver. Monza has been chosen as
the track where you’ll have your shakedown test.
• Click on the Track panel and you’ll be taken to the Track screen. A list of
the 2001 Championship Season tracks appears on the left.
• Click on Italy then select OK to return to the Main Menu.
Italy now appears in the Track panel. Now choose the kind of race you want.
• Click on the Race Type panel and select Practise.
• Click OK to return to the Main Menu. The preparations are over. It’s time
to drive!
• Click on the Drive button. You’ll see a Weather screen that details the
Current Track and Sky conditions and the Forecast chance of rain.
• Click OK to start your first practice session.
You’re now sitting in the Ferrari cockpit in the pits at Monza. As with any test
session, it’s now time to check the instruments and controls…
• Below the LCD screen on the steering wheel is
a row of nine lines. Each corresponds to a
Driving Aid designed to help you control the
car. Keys F1 to F9 turn each of these on and
off. In Rookie mode, all lights should be on
with the exception of Launch Control (F9)
which will only be on as default at the start of
a race. If they’re not, press the relevant F
key. Suggested Gear (F6) is not needed for
this session. With the Driving Aids activated,
you won’t have to worry about changing gear
or braking: this will be done automatically and all basic steering around the
circuit will also be assisted. You may crash if you stray from the racing line,
but your car will not be damaged. If you spin off the track, the car will right
itself once it has come to rest and face the right direction so you can get
on with the session.
SCREEN 2 / DRIVER
SELECT
SCREEN 3 / COKPIT
VIEW - PIT AT MONZA
NOTICE GP4 02/02 GB 27/02/2002 12:42 Page 8
straight: the Rettifilio Tribune.
• Accelerate at full speed. You’ll see the starting grid - the
spaces where the cars line up for start of the race - and a
thick solid white line across the track that marks the end of
this lap.
• As you cross the line, you’ll be starting your first flying lap:
the timer on your cockpit lap time display will start. You can
pause the game at any time to double-check the track plan –
your lap time will not be affected.
• When you complete your first flying lap, check your time and
try another lap to see if you can beat your previous time.
CONTROLLING YOUR OWN BRAKES
Although the auto-brakes you were using are effective, they’re
still a Driving Aid. To get the very best lap speeds, you’ll need
to apply your own brakes. When you feel confident you’ve
mastered steering and the racing line, try switching off the
Auto-brakes Driving Aid:
• Press F1 and check that the auto-brakes light has gone out
on the bank of green icons below the LCD. Now it’s up to you
to choose the best moment to brake as you continue lapping
Monza! The car will feel very different this time. Remember
how the brakes are operated by your choice of controller:
Keyboard : Brake = Z
Joystick : Brake = Back
CONTROLLING YOUR OWN GEARS
• When you’re ready to try controlling your own gears, stop
on a straight part of the circuit and press F2 to cancel the
Auto-gears Driving Aid.
• Now press F6 to activate the Suggested Gear Driving Aid we
left off earlier in the session. The corresponding icon will light
up on the display. You’re now in control of ALL gear changes,
but to guide you, when you see a number in the Suggested
Gear panel, that will be the gear to be in as you go into the
NEXT corner. Check the gear change method for your choice
of controller:
Keyboard : Change Up a gear = Accelerate A key + Space
Change Down a gear = Space
Joystick : Change Up a gear = Accelerate + Press Fire Button
Change Down a gear = Press Fire Button
Note: If you have separate buttons for gear changes then you
do not need to accelerate to change up.
• Practise gear changing up and down and watch the red gear
indicator.
• Try to get into neutral (N) and then accelerate. The engine will
rev and make a highpitched noise.
• Blip the accelerator and look at how the revs rise on
the digital rev counter, then select first gear BUT keep the
11
10
10
10
10
10
• This is a good spot to pause the simulation and check the Monza track plan
again: The first bend at Monza turns to the left and is followed by a sharp
right. Next is another left-right combination making up a double chicane
called the Variante Goodyear.
• Find the Prima Variante on your track plan and examine the next bend,
the Curva Grande.
This is what Formula One racing is all about: being aware of the next part of
the course and making sure you are properly prepared to drive through it.
Only by knowing what lies ahead can you optimise the line you take through
each corner.
• Reactivate the simulation by pressing P or the Space bar.
• Steer carefully around Variante Goodyear (don’t try to go too fast) - left
then right, along a short straight and left and right again. Try to follow the
broken line even though it sometimes appears to be aiming away from the
track. If you do leave the track at any time, steer back towards it (this
might be slippery on grass or gravel) to get back on the tarmac. If you have
spun and are facing the wrong way (and you still have the Auto-right the
Car (F3) Driving Aid on), don’t touch the controls. Wait for the car to right
itself and point in the correct direction.
• See how the ideal racing line takes you out of this last corner, using the
whole width of the track and taking you over to the left side of the road,
ready for the approach to the long sweeping right-hander: the Curva
Grande. You’ll probably find that you can drive quite fast through this
bend.
• Continue along the straight and go under the bridge. Just after the bridge
is a left turn.
• Press pause and have another look at the track plan. This left turn is the
first part of the Variante della Roggia: another chicane. Check how this
looks and imagine how you will drive through it.
• Now look ahead on the plan to the next three bends and try to imagine what
they will look like from the cockpit.
• Press the pause button again to continue.
• Steer through the chicane and on through the next two right hand curves
(Lesmo 1 and Lesmo 2). You’ll now face a long, downhill straight.
• Accelerate! As you’re moving, glance at the gear indicator (the red number
in the centre of the wheel display) as the car changes gear automatically.
Listen to the sound of the engine and watch the rpm indicator lights as the
gears change up and down. Get used to glancing quickly at the displays and
the mirrors as you’re travelling at speed. At the end of this straight is an
unusual chicane called the Variante Ascari. Pause, check your track plan,
analyse and memorise, reactivate the game and drive through the corners,
following the ideal racing line. The more you can commit to memory, the
easier the corners will be to drive through at speed.
• Accelerate along the straight and see if the automatic gear change will take
you into top gear (6th or 7th) before the auto-brakes slow you down for the
Curva Parabolica. As you come out of the bend, you’ll see the grand-
stands, the pits and a yellow dotted line marking the pit lane entrance.
Remember that each track has its own specific pit entrance and exit layout,
and it’s important to take a note of this as part of your race preparation.
• Keep following the broken white line. You’re now back on the start/finish
NOTICE GP4 02/02 GB 27/02/2002 12:42 Page 10
left/right controls. When you select Tyres on the LCD you
will see three tyre sets marked 0, three tyre sets marked r1,
r2, r3, three tyre sets marked q1, q2, q3 and one set marked
qr. The 0 sets are for practice. The ‘r’ tyres are the sets
allocated for the race (r1 starts the race, r2 being used at the
first pitstop etc.) but you can also use these sets in practice
if you have used up the other 0 sets. The q sets are reserved
for qualifying sessions with the exception of the one qr set
which can be used in qualifying and race.
Note: A tyre set comprises of 4 tyres. Be aware that there
are different tyre sets for different conditions: two types of
Dry – Hard and Soft and four types of wets – Intermediate,
Hard, Soft and Monsoon, and that before
you begin your qualifying sessions you will have to decide what
type of Dry tyres you are going to race on during the rest of
the race weekend
• Press the spacebar or the joystick fire button to exit the
Tyres option.
LEAVING THE PITS
When you’re ready to leave the pits, highlight this option on
the LCD, press the spacebar or fire button and the jacks will be
lowered. You can now drive out of the garage and down the pit
lane (remember the speed limit!) and re-join the circuit.
CAR SETUP OPTIONS
Select Car Setup Options from your cockpit LCD menu.
• This will take you to the Car Setup screen. First of all change
from the default track setup (which you cannot edit) to the
user selected setup where you'll be able to adjust all the
basic options for your car: Front Wing, Brake Balance, Rear
Wing, Gear Ratios and Pitstop Strategy. The Car Setup
Options screen also gives you access to all the Advanced
Setup options (Levels 1 and 2). For details on all these, see
The Car Handling Section on page 22.
• Press OK to return to the Pits Options screen.
• Press Return to Cockpit to get back to your car.
• Press the Esc key to open the Practice menu.
• Select Leave Practice to return to the Main Menu screen.
Now you can try to get a good qualifying lap time and enter
a race at Monza (you should know the track quite well by
now). This will be a ‘one-off’ Non-Championship Race.
A TIMED QUALIFYING SESSION
• From the Main Menu screen, click on the Race Type panel.
• Click on the Non-Championship Race button, then click on
OK to go back to the Main Menu.
• Click on the Drive button and you’ll be taken to the Italian
Grand Prix menu screen.
• Select Qualifying. The Track and Sky conditions and
13
12
12
12
12
12
revs up - not too much power otherwise the car may spin. The ‘1’ on the red
gear change indicator in the centre will appear, showing that you’ve
successfully selected 1st. You’ll start moving forward…
• Listen to the change in engine tone and watch your speed rise on the
mph/kph indicator.
• Accelerate away and watch the rpm indicator lights illuminate as the revs
increase. When the red light appears at the end of the set of green lights,
change up to second gear (you’ll see a ‘2’ on the display).
• Try changing up as far as fourth gear, then try changing down before a
corner by taking note of the Suggested Gear indicator.
Note: You don’t have to be braking when changing down, but you must not
be accelerating. Your car has six or seven forward gears, neutral (N), and
reverse (R). If you are in reverse, accelerate to move backwards (just like in
a real car).
DRIVING INTO THE PITS
Once you’re familiar with the Monza circuit and the basic car controls,
practise driving back into the pits.
• At any point during the lap before you want to come in, press the Return
key to let your pit crew know you’re going to come into the pits. The pit
signal on your instrument panel will light up in green, giving you the ‘all
clear’ to come in. If the pit signal is red, this means that your crew are busy
with the other team car. Do another lap before trying again.
• Drive slowly into the pit lane keeping on
the inside of the broken yellow line. The
simulation will then ‘direct’ you into the
correct bay, and the pitcrew will push your car
back into the garage. As your car is jacked up
by your crew, a Pit Options menu will appear
on your cockpit LCD allowing you to add Fuel,
change Tyres, Leave the Pits or go to
the Car Setup Options. Use the A/Z keys or
joystick Up/Down to select the option you
want from your cockpit LCD menu.
Note: Grand Prix 4 features extremely detailed Car Setup Options, ranging
from Basic to Advanced (Level 1) and Advanced (Level 2). To enjoy the
simulation to the full, you can learn much more about setting up the car for
the track conditions later in the manual.
REFUELLING
• First select the Fuel option from your cockpit LCD menu.
• Use your left/right steering control to alter the amount of fuel (in laps) to
be taken on board.
• Press the space bar or the joystick fire button to quit the Fuel menu.
TYRES
• Select Tyres from your cockpit LCD menu. The cockpit LCD will show your
available sets of tyres with the amount of laps completed on each set. At
the top of the LCD is the tyre type.
• Select using the A/Z keys or joystick Up/Down. Switch tyre type using the
SCREEN 4 / PIT
OPTIONS MENU
NOTICE GP4 02/02 GB 27/02/2002 12:42 Page 12
appear. You can choose to View Full Session Times, or go
to the Options screen (where you can alter Controls, Driving
Aids, Race Options, Graphics, Sound, Save or Exit the game)
or Continue with the Non-Championship Race.
• When you click on the Continue button, you’ll have the
option of a Pre-Race Warm Up or you can go straight to the
Race. The Pre-Race Warm Up is a chance to practise on the
circuit in full racing trim. For this Quickstart tutorial, you
will go straight to the race.
• When Race is selected, you will see side-on views of the cars
in their qualifying positions on the starting grid.
• Click on the control buttons to find your name and car, then
click OK. Again, the track, sky and weather conditions will
appear on the screen, but this time, you’ll also be given the
option to make Last Minute Changes such as altering
Pitstop Strategy, Tyre Choice (for instance, if the weather
has changed radically) and full Car Setup Options (at all 3
levels).
• Click OK when you’re ready to race.
A NON-CHAMPIONSHIP RACE
You’re now on the starting grid at Monza – somewhere between
a headline-grabbing pole position at the front of the field or on
the last row if your performance was poor (or you failed to get
a time)! Your LCD display will show the number of laps in the
race. This will be a percentage of the real race and can be
altered in the Options menu. Your pitstop strategy (No Stop,
One, Two or Three Stops) is also pre-set. Whatever your
position on the grid, you’ll be able to see the starting gantry:
five banks of five lights. Wait for the banks of lights to come
on in sequence. When all five are glowing red, watch for the
moment when they all go out. This is a random number of
seconds later.
• When the red lights go out, the race is on! The most
dangerous moment of the race, yet also the best chance to
make up places on the grid, be prepared to jostle for position
as you head for the first corner. Be extra careful when you
approach the braking area and be prepared to take evasive
action to avoid touching other cars. If you’ve selected Driving
Aid F4, you’ll be indestructible but you might still be slowed
and perhaps pushed off the track by other cars.
As you race, keep checking the cockpit display for:
• Your position = P
• The lap you are currently on = L
• The fuel left in tanks (in laps) = F
• Your water temperature = T
It’s best to choose a moment on one of the straights to carry
out these checks.
15
14
14
14
14
14
Weather screen will appear. If it’s raining, you’ll want to fit special tyres for
wet conditions. These wet tyres vary depending on whether it’s a light
drizzle, rain or very heavy rain (monsoon). Remember, you can also do this
from within the cockpit (in a pitstop) if race conditions change during a race.
• Click OK. You’ll now be taken to the Pits, but
this time, a ‘telemetric’ monitor will appear in
front of your cockpit. This lists all drivers in the
qualifying session, with your name highlighted.
Ideally, you should still be in Rookie difficulty
level and have all your Driving Aids (F1 to F8)
switched on - you’re free, of course, to deselect
one or more of them.
Check your tyres. You will see that qualifying
tyres q1, q2, q3 and qr are available plus seven
sets of the four wet types.
Note: Once you go to qualifying the Dry tyre choice (Hard or Soft) in Car
Setup screens is fixed for the rest of the race weekend. Wet tyres will always
be available however. Don’t adjust anything on the car at the moment. When
you’re ready, set off on your first qualifying session.
• Press the spacebar (or the fire button in joystick control) and the telemetric
monitor will swing out of the way and your car will lowered off its jacks.
• Using the experience you gained in the earlier session, drive away from the
pits and complete a lap. Remember, you won’t be timed until you cross the
start/finish line for the first time. As soon as you do, the lap timer in the
panel below the LCD will be triggered and your time for that
lap will be displayed when you next cross the start/finish line. The time
remaining in the qualifying session is shown on the LCD in your steering
wheel.
• When you have logged two lap times, return to the pits. (You can either
drive around to the pit lane entrance or hit SHIFT + Q to jump back to the
pits.)
• Once you are in your garage, your car will be raised on its jacks and the
monitor will appear once again in front of you showing practice times so far
– the four nearest to your times and the current pole. You can now change
the qualifying tyre set by selecting Tyres and using the left/right control.
Now you can view the other cars with Pit monitor.
Press N to put on laptimes of the other cars.
Press again, it turns it off.
Note: Qualifying tyres are only good for a limited amount of laps and the
fresher they are the more effective they are. You can now alter the setup of
your car by selecting the Car Setup Options on the LCD display. If you’re
still new to Formula One car setups, stick to the default settings of Grand
Prix 4.
• If you want to speed up the qualifying session, select the fast forward
symbol (>>) in the cockpit LCD menu.
• If you ever want to exit the session before the end, press Esc and select
Abandon Qualifying. No time will be logged and you will start the race
from the back of the grid. When time is up, the Qualifying Over screen will
SCREEN 5 / COKPIT
VIEW – PIT QUALI-
FYING SESSION
NOTICE GP4 02/02 GB 27/02/2002 12:42 Page 14
line or you see a ‘Race Over’ message. You will then be taken
to the Race Results screen.
This screen allows access to
a number of screens showing
extensive race information:
- Full Race Results Driver Race
Points
- Driver Best laps Constructor
Race Points
- Circuit Records Lap Chart
- Starting Grid
• Click on the Continue button and you’ll be taken to the
Race Completed screen. This gives you the option to Race
Again On This Circuit or to Leave the Circuit (return to
Main Menu). By now you will have seen just how different it
feels to race compared to the practice and qualifying
sessions. The big difference, of course, is the proximity of
other cars and the competitive attitude of the other drivers -
some are aggressive, others take chances, all have a real
passion to win.
WINNING THE WORLD CHAMPIONSHIP
If you have followed the Quickstart guide up to now, you
should know the Monza circuit pretty well, but winning a World
Championship means acquiring intimate knowledge of all 17
tracks on the calendar. If you undertake a Championship
Season, you’ll be entered into the 2001 championship and race
on all the tracks in the correct sequence – it’s hard work and
there are no easy answers except practice and defining the
correct car set up. You can win the World Championship in
Grand Prix 4 even at the lowest level starting with all eight
Driving Aids turned on (F1 to F8) and with the opposition on
their lowest performance level. Then, as you progress through
the season, you can begin to turn off some of the Driving Aids,
but if you do win the Championship, it will still only be at the
lowest level. To win the Championship at the highest Ace
Level, you’ll need to drive with just the Ace Level Driving Aids
on for the complete duration of the season.
COCKPIT CONTROLS
Packed into the confines of a typical Formula One car is a
wealth of information designed to help the driver extract the
best performance from his machine, to work out his race
strategy and keep an eye on the opposition. Knowing how to
use this information and acting on it in a fraction of a second
can mean the difference between winning and losing. You’ve
17
16
16
16
16
16
Pitstops
If the Pits Indicator (cockpit lower right) turns green, you’re being called
into the pits by your crew for a planned pitstop (to change tyres and refuel)
or for an unplanned pitstop to repair damage. Drive into the pits as soon as
you complete the current lap. If you want to cancel this order, press Return
and the light will go out. Similarly if you decide you want to pit, press Return
and the green Pit Indicator will light (press Return again to cancel).
Flags
At the side of the track, you may see race marshals waving different flags
at the drivers: YELLOW means NO OVERTAKING – there’s probably been a spin
or accident on, or near the track. Do not overtake. When you see a marshal
waving a GREEN flag, the yellow flag order has been cancelled – continue all
out racing! RED means stop racing immediately. BLUE means a faster car is
trying to overtake you. The cockpit has flag warning LEDs to show which of
the main flags are in force. Throughout the race, you’ll be given information
about who is achieving the fastest laps.
Pulling Out
If you ever want to leave the race at any time
press the Esc key. A menu screen will appear: if
you select the Leave race option, you can
Save the game (see below) and then return to
the Main Menu.
Saving the Game:
You can save the race at any point. Here’s how:
• Press Esc to freeze the race and access the
Race menu.
• Select the Options button.
• Click on Save to go to the Save Game screen.
Note: The Option panels allow you to change the Path and Drive on your
computer, but leave these as default for now.
• Click on Filename and name your saved game ‘Monza1’.
• When you have named the saved game, click on OK and you’ll get a
confirmation that the game is saved. If you return to this Saved Game
screen, you will see Monza1.ran in the file/directories panel. If you
select this file and look at the information panel (bottom right), you’ll see
detailed information about this specific save: ---Date saved Number of
Players Time saved Race condition (e.g. in race/in pits) Race Type Laps
completed Track Race Leader
• Click on the Cancel button to return to the Options screen.
• Click on the Back button to return to the Race screen.
• Click on Return to Cockpit to return to the race (the game will be paused
when you return to the cockpit).
• Press P to resume the race.
Finishing the Race
• Keep racing until you see the chequered flag waved over the start/finish
SCREEN 7 / RACE
RESULTS SCREEN
SCREEN 6 / SAVE
GAME SCREEN
NOTICE GP4 02/02 GB 27/02/2002 12:42 Page 16
F7 – Traction Control
This will reduce the throttle when the rear wheels spin.
F8 – Steering Help
This will help you with any basic circuit-driving manoeuvre that
requires the steering wheel to be turned.
F9 = Launch control
Form of clutch control to help provide traction for rear wheels
during the start of the race. This is only on at the start of the
race and will switch itself off. You may turn it back on during the
race but run the risk of burning out your clutch.
DRIVING AIDS AND DIFFICULTY LEVELS
The number of Driving Aids available varies with each
Difficulty Level.
OPPOSITION SPREAD
The Opposition Spread indicator displays your chosen performance
distribution among the other drivers. You can set up racing Opposition
Spread by accessing Main Menu > Options, > Race Options screen.
A flat line means all teams and drivers have the same potential
performance.
A rising line simulates 2001 performances for all drivers and teams.
A wavy Line represents a random distribution of performance for all
drivers and teams.
RPM INDICATORS
These two banks of five LEDs will light up as your revs increase and
guide you as to when to change up or down a gear. The final LED on
each bank is red: when this lights up, change up a gear; when all the
lights go out, change down a gear. Like a conventional rev counter
measuring revs per minute (rpm), the LCDs tell you at
what speed your engine is spinning when in a particular gear. Keeping
within the limits of the LCD scales will help you to change up a gear at
the right time, avoid hitting the rev limiter (a device designed to
prevent engine damage due to over-revving, for instance when
dropping down to a lower gear), as well as show you when you are using
too high a gear, losing speed in the process.
Should you be racing from any of the external on board camera views,
you will see an analogue rev counter displayed in the bottom left hand
corner of the screen. You current gear is shown in the middle of this
counter.
GEAR INDICATOR
This tells you what gear you are currently in. There are, depending on
the car you are driving, either 6 or 7 forward gears (7, 6, 5, 4, 3, 2, 1),
Neutral (N), and Reverse (R).
FLAG WARNING LIGHTS
These two sets of three flag warning lights indicate the current colour
flag in force, if any (yellow flag – no overtaking, blue flag – car trying
19
18
18
18
18
18
had a taste of racing, but now it’s time to delve a little deeper into the
cockpit and its many secrets.
DIFFICULTY LEVELS
These five lights indicate your chosen Difficulty
Level, the hardest at the top, the easiest at the
bottom:
Ace
Pro
Semi-Pro
Amateur
Rookie
The Difficulty Level affects the ability of the
opposition and also limits the number of driving aids you can switch on.
DRIVING AIDS
These eight icons show which Driving Aids are active. The higher the Difficulty
Level, the fewer of these will be switched on. Some can be turned on and off
from inside the cockpit.
F1 – Auto Brakes
The computer applies braking functions to suit the circuit but will not brake
to avoid other cars.
F2 – Auto Gears
The computer changes all the gears for you at the correct point.
F3 – Auto-right the Car
If you spin off the track, the computer will auto-right the car by pointing it in
the correct direction so you can keep racing (so long as your car is not too
badly damaged, in which case it will be craned off the track).
F4 – Indestructible
Your car will not be damaged, no matter how serious the shunt.
F5 – Ideal Line
A broken white line on the track shows the ‘best line’ around the track. Keep
the line in the centre point of the cockpit.
F6 – Suggested Gear
This cockpit indicator shows the best gear to be in as you approach the
next corner.
Ace
Pro
Semi-pro
Amateur
Rookie
F1
Auto
Brakes
F2
Auto
Gears
F3
Auto
-right
the car
F4
Indestru-
ctible car
F5
Ideal
Line
F6
Suggested
Gear
F7
Throttle
Help
F8
Steering
Help
✔
✔
✔
✔
✔
✔
✔
✔
✔
✔
✔
✔
✔
✔
✔
✔
✔
✔
✔
✔
✔
✔
✔
✔
✔
✔
✔
✔
SCREEN 8 / COKPIT
VIEW FEAT. LAP
TIME/SPLIT TIME DIS-
PLAY
NOTICE GP4 02/02 GB 27/02/2002 12:42 Page 18

intermediate timing point, you will see a new time displayed. If this
has a minus symbol, you know that you have put in a faster time.
During a race, a timed gap is shown on the LCD a little time after
you cross the Start/Finish line. This shows the time difference
between your car and the one behind and the one in front.
PITSTOP CONTROLS
Qualifying
The LCD shows Tyres, Fuel, Leave the Pits, Car Setup and
(if in the middle of a session) >> Accelerate Time
All tyres are marked with the number of laps driven on them.
Race
The LCD shows Fuel Laps + /- and Stops to Go +/-When you come into
the pits, the crew will automatically change your tyres to the next
set of selected race tyres, and refuel the car according to the current
pitstop strategy. If your race position warrants it, then you can adjust
the pitstop strategy by increasing or decreasing Fuel carried and
increasing or decreasing the number of pitstops. Use your Selector and
Controller to change these values.
Pit Strategy
In the basic Car Setup screen there is a Pitstop Strategy panel that
can be set to Automatic or Custom. Automatic will allow the computer
to set a ‘sensible’ strategy based on race length and conditions.
Custom allows you to set your own choice from None, 1 Stop, 2 Stops
or 3 Stops. The bar graphs indicate a percentage and a lap of the race
that you will stop at. Just before you enter a race, a Last Minute
Changes button (shown on the Weather > Conditions screen) allows
you to alter the Pitstop Strategy, Car Setup (and Tyre Choice) taking
into account track conditions. Your “Come into the Pits” warning light
(green) will come on as you cross the finishing/start line of the lap befo-
re you stop. Remember that you must go into the pits next time you
pass the pit lane (or cancel the call by pressing Return).
CAMERA VIEWS
You’re not limited to the cockpit view in Grand Prix 4. The
simulation allows you to access a large number of other camera
views. And if you’ve just pulled off a breathtaking overtaking
manoeuvre or want to review a spin to see just what went
wrong, you can select the replay option.
COCKPIT VIEW
Right Arrow Key
The race from the cockpit of your
car. This is your default racing view.
21
20
20
20
20
20
to overtake). If all six are flashing, look at your instruments or read the message
on the LCD.
Should you be racing from any of the external on board camera views, you will see
the track marshalls waving the flags all around the track.
DRIVER STATUS INDICATOR
This shows the car is being driven by a player.
SUGGESTED GEAR INDICATOR (F6)
If the F6 Driving Aid is on, you will see a small number here telling you what
gear you should be in before the next bend. This is an ‘intelligent aid’ and the
suggestion will vary depending on the car setup you have chosen.
DAMAGE INDICATOR
This diagram will highlight any faulty or damaged parts on the car. If any section
is lit and you can still drive the car, make your way back carefully to the pits
where the damage will be repaired.
PITS INDICATOR
This gives you the current status of your pit-to-crew communication:
Off – No pits request in force.
Green – You’ve been called in to the pits by your team (press the Return key to
cancel this order).
Green – You’ve warned your team you’re coming in to the pits (by pressing the
Return key).
Red Cross – Your pit crew are currently busy with your other team car. Stay
out. Press the Return key to inform your crew of your intention to pit. Press again
to cancel.
LCD DISPLAYS
The central steering wheel LCD shows a lot of important information, depending
on what you are doing at any given stage of the Grand Prix weekend.
During Qualifying/Practice:
Time to go – The amount of time in minutes and seconds left to complete this
part of the qualifying session.
Car – Your car number.
Runners – The number of cars on the track.
Split/Best – Your best lap time or split time.
During the Race:
XX Lap Race – The number of laps in the race.
Car – Your car number.
Runners – The number of cars on the track.
You will also receive split time information and nearest rival details.
Split Times
On each circuit, there are two intermediate timing points in addition to the
start/finish line. During practice, a ‘split’ time is shown on the LCD as you do a timed
lap. This is a time you are trying to beat at the next intermediate timing point. The
split times come from the best lap time you have achieved so far. As you cross the
SCREEN 9 / COKPIT
VIEW
NOTICE GP4 02/02 GB 27/02/2002 12:42 Page 20
REVERSE CHASE VIEW
Delete Key
View any car from the front and
slightly above.
TV DIRECTOR
INSERT KEY
TV Director mode automatically shifts the trackside views
between different cars and different camera angles. When you
press the Insert key, a ‘clapperboard’ will be displayed for five
seconds in the top right hand corner of the screen. When you
turn Director Mode off (by selecting any other view) the
clapperboard will appear with a cross through it.
REPLAY MODE
Pause Key P + R
Pause key (P) pauses the action and the R key replays the
previous action with an ‘R’ displayed on the top left of the
screen. You can change all camera views during a Replay (see
above). Use the F keys as shown on the replay icons to pause,
fast forward, rewind and frame advance the game. At the end
of the replay, the game is left in Pause mode. Either press R
again to see the replay as many times as you want, or press P
to continue with the game and return to your original position
(in your cockpit if you were racing). The length of the replay
is determined by the amount of Ram in your PC and can be
altered in the Graphics Options section up to maximum of 90
Minutes.
GP
AEDIA
GPAEDIA CONTENTS:
Setting up a formula one car
General
Introduction to Mark Hemsworth
Purpose of changing a cars set-up
Tour of a Formula One car
Qualifying
Wet race
Fast circuits
Slow circuits
22
22
22
22
22
T-CAM VIEW
Right Arrow key a second time
The race from the popular T-Cam. This is the view
often shown on the TV.
ON CAR CAMERA VIEWS
PageUp Key (Cycle through)
You can view the action from various cameras
attached to your car. The PageUp key scrolls
through a large number of views.
OTHER CAR VIEWS
Up Arrow/Down Arrow/Home
You can ‘jump’ into the cockpit of the car ahead by pressing the Up Arrow Key.
Further presses will move you forward (one car per press). In the same way,
you can move back through the field with the Down Arrow Key. The Home key
will return you to your own car.
TRACKSIDE CAMERA VIEWS
Left Arrow Key
View all the action centred on any car at any
time during the race (Use Up/Down arrow keys to
move through the field). The Right Arrow Key will
return you to your own cockpit view.
CHASE VIEW
PageDown Key
View any car from just behind and slightly
above it.
23
SCREEN 13/ CHASE
VIEW
SCREEN 14 / REVERSE
CHASE VIEW
SCREEN 12 / TRACKSI-
DE VIEW
SCREEN 10 / T-Cam
View
SCREEN 11 / On Car
Camera Views
NOTICE GP4 02/02 GB 27/02/2002 12:42 Page 22
Host a New Session: In a two player Serial link, the host has
control of both machines during setup. In a Modem link, the
host also has control of both machines but must initially wait
for the joining player to dial through.
Join an Existing Session: In a two-player link game, the
player joining the session will ‘follow’ the host, who will have
control of the menus on both computers. In a modem link
game, the player joining will dial the other player.
SESSION NAME
Click on the default name, delete and type in a session name
to identify the multiplayer game on a Network.
The Settings Button: This will take you to the Multiplayer
Settings screen and detect technical settings (Port, Baud Rate
and TCP/IP Address) for the link method you are using.
The Phonebook Button: Takes you to your phonebook. Use it
to store phone numbers for 2-player modem linked games.
Click on the Add button to enter a telephone number and name.
Click on the Add button to add numbers to your book. Up and
Down buttons allow you to scroll through your phone number
list. Other buttons allow editing or removal of numbers.
You can also Load and Save phonebook numbers (saved with a
.pho suffix).
CONNECTING
The Linking Screens: The Connect button will take you to
the Linking screen. This will implement the linkup for the
multiplayer game using the method you have selected
(Network game or Modem/Serial Cable game).
The Network Game: The Linking screen shows (in the top
panel) the players’ names, which drivers they are playing and
where they are in the game (Main Menu etc). The lower panel
shows the number of players who are Ready to Play.
The lowest panel in the Linking screen allows access to Driver
selection, Track, and Difficulty Level. All players can access
Driver Selection but Track and Difficulty Level are set by the
Host.
The Chat Button: The Chat button allows you to type in a
message to chat to other players. Type a message in the lower
panel and press the Send button to transmit). The chat
messages will appear in the central main panel of the chat
screen showing who sent the message and when.
The Options Button: This allows you access to all the game
options: setup controls, graphics, sound and race options.
The Leave Session Button: Click to leave the multiplayer
game and return to single player mode. If you are hosting the
session, then host control will migrate to the next player in the
session.
The Close Session Button: Select if you are the host and
24
24
24
24
24
Car handling
Car handling introduction
Basic car set-up
Standard car set-up
Advanced car set-up
Data logging & performance analysis
Drivers
History & data
Teams
History & data
Tracks
History & data
CIRCUITS ON THE FORMULA ONE CIRCUS
Details of each of the circuits can be found within the Gpaedia area of the game.
THE MULTIPLAYER SECTION
Select Multiplayer from the Main Menu.
Grand Prix 4 allows you to play the simulation across a number of multiplayer
connection types from Serial Cable, Modem, IPX Network and TCP/IP Network.
The top panel in this screen allows you to set up the following connections:
CONNECTION TYPE
• Serial Cable (2 players): Creates a serial cable link between two machines.
• Modem (2 players): Creates a modem connection between two machines.
• IPX Network (2 or more players)
• A local area network game.
• TCP/IP Network (2 or more players)
• A local area network game.
NUMBER TO DIAL
This allows you to enter the number to dial for a modem game.
Player Name: Enter the name that you will be known by in a network game.
Game Selection: The lower panel in this screen allows you to input the
number of players.
Two Players : Two player games can use all connection types (Serial,
Modem, IPX, TCP/IP) and allow all Grand Prix 4 race types (Quickrace,
Non-Championship Race, and Championship Season).
Two or More Players: Multiplayer games are Local Area Network only
(TCP/IP and IPX) and will only allow players to jump into the race without
needing to qualify.
SESSION SELECTION
This allows you to select whether you want to Host or Join a multiplayer session.
25
NOTICE GP4 02/02 GB 27/02/2002 12:42 Page 24
27
26
26
26
26
26
wish to end the race session.
• Click on Ready to get started. The game will wait for all players to be Ready.
The Ready message will flash to prompt you to click on it. It will flash more
intensely when everyone else is ready and waiting for you. Once everyone
has clicked on ready all other linking options will be greyed out and
unavailable to you.
Weather Screen: Once all players have clicked Ready you will be taken to
the Weather Network screen. This is similar to the standard Grand Prix 4
Weather screen but also has options for going to the Last Minute Changes
screen (and then Car Setup), to Chat or Leave the session. You also have
option to Continue/Go Back.
• Click on the flashing Ready button to indicate you are ready to race.
Last Minute Changes (Network) Screen: This summarises the weather/track
and sky conditions and has a Driver list, Pitstop Strategy settings and Tyre
choice. You can also access Car Setup from here as well as the Chat and
Leave Session options.
CAR HANDLING
INTRODUCTION
Anyone can drive a Formula One car fast. It’s easy. You get in and point it in
a straight line with your foot down hard on the throttle until you reach maxi-
mum revs in 6th gear. And there you are. Going fast. Only there aren’t many
Formula One tracks that consist of just one long straight. Drive too fast on
most tracks and you’ll end up in the first gravel trap. Which is why
professional drivers talk about being ‘quick’ rather than being simply ‘fast’ –
‘quick’ is the controlled application of speed around a race circuit. In order to
drive a Formula One car ‘quickly’ you need three things:
• A fast car.
• Knowledge of the best route around the circuit.
• The ability to operate the car at its limits. But what do we mean by these
things and how are they achieved?
A fast car is generally one with a relatively high-powered engine, low overall
aerodynamic drag and well-balanced setup of suspension, drivetrain and
aerodynamic wings. Some of these things are set by the designer and cannot
be changed but others are fully within the driver’s ability to adjust in order
to achieve greater performance from the car. The best line to take around
the circuit is determined by the layout of the corners and straights. You’ve
already had a chance to experiment and learn the lines around Monza if you
followed the Quickstart guide. More instruction on how to calculate the ideal
racing line is described in detail in the Driving Techniques section (see page
101). However, a fast car driven on the best line around the circuit will not
perform very well unless it is driven correctly and to its limits. This is an
important concept to grasp and means that it is crucial for you, the driver,
to develop your driving style and proficiency at the same time as developing
an understanding for setting up your car. The setup must suit your driving
style and equally, your driving style must suit the setup. No two drivers are
exactly the same and so their optimum setups may differ.
What’s more, it’s always possible to improve your driving style
and/or setup in order to find more speed, even if it’s only
improving a lap time by a 1000th of a second! Discovering how
to operate the car at its limits is a challenging and rewarding
process. And this is where it starts!
BASIC CAR SETUP
The only way you will succeed at the highest levels in Grand
Prix 3 is to get involved in ‘setting up’ your car for each
specific track. For now, we’ll concentrate on trying out a few
things on just one track, beginning with the Basic Car Setup.
The basic Car Setup option is available from various menus in
the game, including the cockpit LCD display. From the Main
Menu…
• Select a Practice session.
• Select Italy for the purpose of this demonstration.
• Select Drive and you will be placed in your car cockpit in the
pits at Monza. Then, from the cockpit LCD display…
• Select Car Setup on the cockpit LCD and you will be taken to
the Pits Options screen.
• Select the Car Setup button and you will be taken to the
basic Car Setup screen. You’ll see three options:
1. Basic Car Setup lets you…
• Alter the angle of the front and rear wings.
• Alter the brake balance.
• Alter your gear ratios.
• Alter your pitstop strategy.
• Create different setups for qualifying and racing.
• Create a different setup for each individual circuit.
• Load and save your setup for the each and every track.
• Load and save your setups for different weather conditions.
• Do all of the above for each and every driver.
Other Basic Car Setup options also allow you to View Other
Track details and to Copy The Setups From another track.
2. Advanced Car Setup which lets you…
…have more in-depth control of car setup by clicking on the
Advanced button at the bottom of this screen. More about
this later.
3. Inspect Vehicle which lets you…
...look at the degree of plank and tyre wear. More about this
later. As in all things, your first tentative steps may seem
daunting. Don’t worry. So long as you’ve spent enough time
enjoying the default settings and practising your driving so you
can drive fast around at least one of the tracks, you’re ready
to start tinkering with the setup of your car and start noticing
NOTICE GP4 02/02 GB 27/02/2002 12:42 Page 26
29
28
28
28
28
28
so you can compare the effect, before and after. Although
exaggerated, the procedure shown here applies in principle to
other areas of the car.
Again, we will be at Monza for this session. This is a fast track
with good long straights and fast corners, one which does not
require excessive grip in corners. Monza is known as a
low downforce track, so the rear wing which creates the
downforce that holds the car on the ground will normally be set
at a low angle.
• On the Car Setup screen, look
at the rear wing adjustment
buttons. We’re going to increase
the angle of the rear wing
significantly…
•
Click the + plus button five
times.
• Click the Save Setup button
which will take you to the Save
Setup screen.
• In the Filename panel, name the save ‘Setup1.csn’ and click
on OK to return to the Car Setup screen.
• Click on OK to return to the Pit Options screen and select
the Return to Cockpit button. You’ll now be back in your car
with your rear wing set at the new angle.
• Select Leave the Pits on the LCD and drive two laps to set
a time in the Data Logger.
• After you pass the start/finish line, press CTRL + Q to return
to the pits (or drive back if you prefer).
• Now select Car Setup from the cockpit LCD to go to the Pit
Options menu.
• Select Fetch Logged Data (you will see an indicator bar
loading in the data).
• Select View Logged Data and you’ll enter the Performance
Analysis screen.
The
Performance Analysis
screen is an extremely powerful
utility that allows you to select
laps and analyse numerous
aspects of your car/driver perfor-
mance for each lap.
• Select Lap 1 (this should be the
complete lap) and click the Save
Lap button and you’ll enter the
Save Performance screen.
• Enter a filename for the lap (Perf1.pan) and click on OK. You
have now created a lap of Performance Analysis at Monza
with a high wing angle.
a difference in performance.
BASIC CAR SETUP OPTIONS
Don’t do anything yet. Instead, have a quick look at the basic options…
Front/Rear Wing Downforce Adjust
In general terms the wings on a Formula One car push it down on the track,
creating ‘downforce’. This produces better grip and less roll, giving
better control in corners, but less speed on the straights because of greater
aerodynamic drag. You can adjust the amount of front and rear wing used by
the car, using a scale from 1 to 20. The higher the number, the more down-
force. Adjust the wings (front and rear) by clicking on the +/- buttons.
Front/Rear Brake Balance
Grand Prix cars have a low centre of gravity, centred just behind the driver.
If you brake hard at speed, the weight – and the centre of gravity – shift
towards the front of the car. Therefore, brakes must be balanced to cope with
the weight transfer during deceleration (slowing down).
You can change the brake balance of your car by altering the way in which
the front and rear brakes are applied. Remember that in the dry, it’s always
best to have more brake bias at the front than at the rear. The scale goes
from 50% to 75%. The lower the figure, the more balance is applied to the
rear of the car. Adjust the balance by clicking on the +/- buttons.
Gear Ratios
You must set the gear ratios in your gearbox to suit each circuit. This is
usually done by setting the 6th gear for the fastest possible speed along the
longest straight and then setting the lowest gear for the slowest corner. The
rest of the gears are ranged evenly between the two. Gear ratio selection is
very important. Different cogs can be fitted to the gearbox that can have a
major effect on the car’s acceleration, performance in bends and top speed.
• Twisty circuits with few long straights and plenty of chicanes need ‘short’
gearing – the cogs are closer together - for quick acceleration. The nearer
the cogs are to each other, the less work the lower gear has to do to get
to the higher gear.
• Circuits with predominantly long straights require ‘long’ gearing - the cogs
are further apart - to help the car reach a higher top speed. The further
away the cogs are from each other, the more work it has to do to get up to
the higher gears but the faster the speed in top gear. The gearbox has a
range from 1 to 64. Select +/- to change the gear ratios.
PUTTING IT INTO, PRACTICE
Now it’s time to try out some of these setup changes. Some changes you
make will make the car behave differently and you may notice significant
changes as you drive. Other changes will make more subtle differences,
resulting in a better lap time, assuming your driving was consistent each
time. Finally, changes and their effects can also be analysed using the
Performance Analysis Guide (more about this later).
A Quick Demo
To demonstrate how setup changes can affect a car, try the following exercise.
We’ll make a dramatic setup change to a rear wing setting
SCREEN 15 /CAR SET
UP - REAR WING
ADJUSTEMENT
SCREEN 16 / PERFOR-
MANCE ANALYSIS
NOTICE GP4 02/02 GB 27/02/2002 12:42 Page 28
31
30
30
30
30
30
• Now exit the screen (click on Back) and select Car Setup in the Pit
Options screen.
• Now restore the rear wing to its original setting by clicking on the – minus
symbol 5 times.
• Click on OK and then Return to Cockpit. You will now be back in your car
cockpit with your rear wing set at the original angle.
• Select Leave the Pits and drive two laps to set a time in the Data Logger,
then press CTRL + Q to return to the Pits (or drive back if you prefer), as
before.
• Now select Car Setup from the cockpit LCD to go to the Pit Options menu.
• Select Fetch Logged Data.
• Select View Logged Data to enter the Performance Analysis screen.
• Select Lap 4 (this should be the complete lap) and click the Save Lap
button to enter the Save Performance screen.
• Enter a filename for this lap (Perf2.pan) and click on OK. You have now
created a lap of Performance Analysis at Monza with a low wing angle. You
now have two saved ‘.pan’ laps (where pa- stands for Performance Analysis
and -n is the code for Monza).
• Select Perf1 and click the Copy to Background button (it will appear in the
lower panel).
• Select Perf2 and click the Copy to Foreground button (it will appear in the
lower panel).
• Click on the Graph Selected Laps button and you’ll now enter the
Performance Display screen.
• Use the drop down Graph menu (at the top of
the screen) to select Custom Graph.
• Make sure only the Speed trace is shown in
the first drop down panel for both laps (the
other three panels should show ‘None’.
The graph shows the two complete laps
with Perf2 in the foreground and Perf1 in the
background (the dotted line). Notice how the
higher rear wing angle is much slower in Speed
than the lower rear wing angle (assuming you
drove consistently through both laps!).
• If you like, adjust the X value zoom (click on the panel to increase the green
bar) to see more detail and use the +/- buttons to scan the length of the
graph.
• Now select the Map option (in the centre). This shows you the section of
the track that is being analysed on the graph. Can you work out where the
fastest straight is in Monza? Do you think you can drop the rear wing angle
further and get a faster speed? Why not try it and see? You’ll now have
some idea of what Performance Analysis is all about: trying out different
car setups, examining the results on the graph, then choosing the best
setup for that track under those conditions. Performance Analysis
covers all measurable performance data, it simulates real Formula One
circuit details and is a powerful aspect of the game. More information on
recording data follows later in the manual.
SCREEN 17 / PERFOR-
MANCE DISPLAY
GLOSSARY
Active Suspension Software controlled method of automatically
pitching the suspension for specific bends.
Aerodynamics The force that comes into play when the
car has picked up speed. Wings mounted upside down give
negative lift and hold the car down.
Angle of Slip The angle between the direction of the wheels
(front and rear) and the direction of travel.
Anti-Roll Bar
Forms part of the suspension assembly
and helps to support the car when cornering, by resisting the
tendency for the body to roll.
Apex or Clipping Point The nearest point a car gets to the
inside of a curve in an ideal racing line.
Balance The degree to which a car has understeer or oversteer
in a corner.
Brake Balance The bias of braking power between the front
and rear tyres.
Braking Distance The distance between the point where
braking starts and ends.
Bump Damper An energy absorbing device, fitted between the
wheel and car body, which resists upward movement by the
wheel.
Camber Slight upward curve to the centre of race track.
Camber Angle Camber angle is designed to make a tyre
work as effectively as possible when a car is going through a
corner. Negative camber is applied so that when fully stressed
a tyre will be as close to perpendicular as possible.
Castor Angle Castor gives greater responsiveness and stability
to the front wheels. The larger the castor angle, the heavier the
steering and more stable the front end.
Centre of Gravity The position within the car around which
all the mass is gathered. The lower the centre of gravity, the
greater the downforce.
Chicane A sharp ‘S’ bend that reduces speeds by forcing drivers
to drive through in single file.
Damper Forms part of the suspension system and absorbs the
energy that is produced when the spring is compressing or
extending. Damper force increases with speed (heave, roll and
pitch velocity).
Downforce The force which pushes the car downward allowing
the vehicle to ‘grip’ the road surface.
Drag Resistance to forward motion of the car. Can be caused by
aerodynamic resistance or mechanical resistance.
Electronic Control Box Contains, among other information,
the Driver aids software and settings, (traction control, active
suspension etc.) The Electronic Control Boxes are frequently
inspected by the FIA following a race to test for illegal driving
aids being used by constructors.
NOTICE GP4 02/02 GB 27/02/2002 12:42 Page 30
33
Skidblock See Plank, The.
Springs The springs form part of the suspension assembly and
are the main means of supporting the car.
Stewards Decision In the event of a breach of FIA rules, a
stewards enquiry is normally called. The party in question is
called before the ‘Steward of the Meeting’ who issues a
‘Stewards Decision’ with accompanying fine/disciplinary action,
if relevant.
Super Licence A licence required by all drivers, competitors
and officials participating in a Formula One Championship.
Suspension travel The distance through which the moving
parts of the suspension travel in relation to the fixed parts.
Telemetry System Multi-function system that measures all
aspects of car and driver performance.
Tifosi Italian Fans.
Time Penalties Should the stewards choose to impose a time
penalty the offending driver must, in normal circumstances,
proceed to the designated area and remain there until a speci-
fied time period has passed, after which the driver may rejoin
the race.
Torque The amount of thrust driving through from the engine
to the wheels.
Traction The ability of the rear tyres to grip the track surface
and cause the car to accelerate.
Traction Control An electronically-controlled clutch allowing
the car to accelerate as fast as possible without losing traction
and the wheels spinning. This system was outlawed in the ‘94
and reintroduced during the 2001 season.
Turn-in The point on the track where the driver starts to steer
the car into a corner.
Tyre Blankets Special electric blankets placed over tyres just
before a start to keep them up to racing temperature.
Understeer Understeer is characterised by the front end of
the car losing grip. This gives the rear of the car a tendency to
carry straight on, through a corner.
Wings Devices fitted to the front and rear of the car which
produce aerodynamic downforce. This allows faster cornering
speeds. The rear wing also produces significant aerodynamic
drag.
32
32
32
32
32
FIA Federation Internationale de l’Automobile. The motor racing sport’s
governing body.
Getting a Tow Another term for ‘slipstreaming’, gaining speed by sitting
behind a rival car prior to overtaking.
Ground Effect Now outlawed by FIA but in the period 1980 to 1982 virtually all
cars were built in this way. The car had an underbody shaped like an inverted
wing which almost sucked the car on to the track and gave tremendous grip.
Increase the Lock For some tight hairpins, such as Loews in Monaco, the
car steering lock is increased to take the bends faster albeit to the detriment
of the tyres.
Logged data chart Graphical method of displaying information which has
been recorded during a lap. Also known as Performance Analysis.
Outbrake To brake very late into a corner when dicing with a rival car.
Oversteer Oversteer is characterised by the rear end of the car losing grip,
giving the car a tendency to spin.
Packers Packers form part of the suspension assembly and adjust the
position at which the bump rubbers become loaded.
Paddock The parking area behind the pits where all the equipment, trucks
and spare cars are kept by the teams.
Parc Fermé The area where cars are isolated after a race finishes. Only
officials may touch the vehicles for an hour after the finish. Some engines
may be ‘sealed’ for later inspection.
Plank, The A 10mm plank running down the length of the underside of
all Formula One cars. This addition following the ’94 Imola Grand Prix, means
that the ride height of the car must be sufficient to avoid the plank
‘grounding’. This results in less downforce and therefore lower speeds,
particularly round dangerous corners.
Points System The points awarded for finishing a Grand Prix are as follows:
1st = 10 points, 2nd = 6 points,
3rd = 4 points, 4th = 3 points,
5th = 2 points and 6th = 1 point.
Rebound damper An energy absorbing device fitted between wheel and car
body which resists downward movement by the wheel.
Refuelling Refuelling is an essential part of race strategy. The less fuel a
car holds, the faster it can travel, but this will result in the need for more
time-consuming pit stops to refuel.
Responsive handling The car responds quickly to steering, acceleration and
braking inputs from the driver, allowing very accurate manoeuvres.
Rev limiter A device which limits the RPM of the engine to a preset value.
This is used in the pit lane to keep the car speed within the pit lane speed
limit.
Ride height The height of the car floor, above the ground, measured from
the wheels. 168
Rumble Strip The bobbly, coloured strip on the edge of the track which
serves as a warning to the driver to transgress no further.
Run Off Track A stretch of track close to a dangerous section of the circuit,
that gives the driver an escape route if things go wrong, e.g. the driver loses
control of the car.
Shunt A knock from the car behind you.
NOTICE GP4 02/02 GB 27/02/2002 12:42 Page 32
35
34
34
34
34
34
NOTICE GP4 02/02 GB 27/02/2002 12:42 Page 34

37
36
36
36
36
36
NOTICE GP4 02/02 GB 27/02/2002 12:42 Page 36
39
38
38
38
38
38
infogrames@telerom.co.il
Country
• Österreich
-
-
-
PC:
+32 (0)2 72 18 633
Gamecube:
0900
10800
+31 (0)40 24 466 36
09:30 to 17:00 Monday to Friday (except Bank Holidays)
+44 (0)161 8278060/1
09:30 to 17:00 Monday to Friday (except Bank Holidays)
+44 (0)161 827 8060/1
-
Soluces:
0892 68 30 20
(0,34
€/mn) (24h/24)
3615 Infogrames
(0,34
€/mn)
Technique:
0825 15 80 80
(0,15
€/mn Du lundi au samedi de 10h-20h non stop)
Infogrames France / Euro Interactive
Service Consommateur
84 rue du 1
er
mars 1943
69625 Villeurbanne Cedex
Technische:
0190 771 882
Spielerische:
0190 771 883
301 601 88 01
-
--
+44 (0)161 827 8060/1
-
351 21 460 85 83/89 50
351 21 460 85 88
+34 91 747 03 15
+34 91 329 21 00
13:00 till 15:00 helgfri måndag till fredag
08-6053611
-
Technische:
0900 105 172
Spielerische:
0900 105 173
• Belgie
• Danmark
• Suomi
• France
• Deutschland
• Greece
• Italia
• Nederland
• Norge
• Portugal
• España
• Sverige
• UK
• Schweiz / Suisse
http://www.de.infogrames.com
helpdesk@nl.infogrames.com
(PC only)
http://www.playstationcommunity.be
helpline@uk.infogrames.com
helpline@uk.infogrames.com
support@fr.infogrames.com
http://www.fr.infogrames.com
http://www.de.infogrames.com
info@gr.infogrames.com
info@it.infogrames.com
http://www.infogrames.it
helpdesk@nl.infogrames.com
(PC only)
http://www.playstationcommunity.nl
helpline@uk.infogrames.com
apoiocliente@pt.infogrames.com
stecnico@es.infogrames.com
support@segaklubben.pp.se
helpline@uk.infogrames.com
http://www.de.infogrames.com
(
€
1,24 pro Minute) Täglich 14.00 bis 21.00 Uhr
(mit Ausnahme von Feiertagen)
(2,50 CHF/Min) Täglich 14.00 bis 21.00 Uhr
(mit Ausnahme von Feiertagen)
lunes a viernes de 9,00 -14,00 / 15,30-18,30 h
de 2ª a 6ª, entre as 10:00 e as 17:00
09:30 to 17:00 Monday to Friday (except Bank Holidays)
Open Maandag t/m Vrijdag 9.00 tot 17.30
Open Maandag t/m Vrijdag 9.00 tot 17.30
Infogrames Games Customer Service Numbers
Telephone
Fax
Hints & Cheats:
09067 53 50 10
*
*24 hours a day / 75p/min
Technical Support:
0161 827 8060/1
09:30 to 17:00 Monday to Friday
(except Bank Holidays)
+ 972-9-9712611
16:00 to 20:00 Sunday - Thursday
• Israel
SIMERGY
Game Design & Programming:
Geoff Crammond
PERFORMANCE ANALYSIS
& TEST DRIVING: David Surplus
FOR MICROPROSE
STUDIO MANAGER & EXECUTIVE
PRODUCER: Nick Court
PRODUCER: Phil Gilbert
SOFTWARE ENGINEERING MANAGER:
Nick Thompson
ART DIRECTOR: Andy Cook
LEAD PROGRAMMER: Gareth Jones
PROGRAMMING:
Neil Alford - Jalea Clements -
Neil Duffield - Julian Foxall -
Steve Haggerty - Matt Patterson -
Duncan Rooth - Tim Round -
Jeremy Sallis - Nick Thompson -
Jason Turner
AUDIO SYSTEMS, PROGRAMMING,
& ADDITIONAL SOUND DESIGN
Nigel Brown
LEAD ARTIST: Andy Cook
ARTISTS: Pete Austin -
Carl Edwards - Maff Evans -
Eddie Garnier - Lisa Godwin -
Jeffrey Miranda - Greg Shill -
David Smith
ADDITIONAL ARTWORK:
Halli Bjornsson - Noel Uche
TRACK REFERENCE SURVEYS:
Norman Surplus
AUDIO PRODUCER: John Broomhall
ORIGINAL MUSIC: James Hannigan
ADDITIONAL LOCATION
RECORDING: Pete Guppy
MOTION CAPTURE STUDIO
MANAGER: Tony Wills
MOTION CAPTURE ARTISTS:
Dave Hingley - Andrew Lee -
Rob Millington - Mick Sheehan
ALL MOTION CAPTURE
UNDERTAKEN WITH THE KIND
ASSISTANCE OF THE ORANGE
ARROWS FORMULA ONE TEAM.
CREDITS
GPAEDIA VIDEO PRODUCTION
FEATURING: Mark Hemsworth
SCRIPT: Mark Hemsworth
Ossi Oikarinen - Andy Cook
SOUND & ORIGINAL MUSIC:
John Broomhall
CAMERA: Matthew Grant
EDITING: Matthew Grant -
Andy Grierson
DIRECTED BY: John Broomhall -
Andy Cook
PRODUCED BY: Phil Gilbert
THANK YOU...
John Cook - Laura McNamara -
Andy Rogers of Jemlar
(www.jemlar.com) - Nvidia
Logitech - Steinberg Software for
audio production systems
SPECIAL THANKS GO TO
the Orange Arrows Formula One
Team for all their help during the
development of this product
OFFICE MANAGER:
Christine Upham
ADMINISTRATION ASSISTANT
Pat Edwards
INFOGRAMES EUROPE
VP RACING LABEL:
Arthur Houtman
VP EUROPEAN MARKETING:
Larry Sparks
CORE GAMES MARKETING
DIRECTOR:
Franck Heissat
MARKETING MANAGER:
Cyril Voiron
PRODUCT MANAGER:
Jerome Delziani
LICENSING: Guillemette Tronel
DESIGN STUDIO:
Michel Mégoz - Rose-May Mathon
MARKETING COORDINATION:
Cecile Gillet - Jenny Clark -
Marie-Emilie Requien -
Catherine Esteoule
LOCALIZATION:
Sylviane Pivot - Fabien Roset -
Riddoch Heather - Christelle Dozoul
CERTIFICATION & PLANNING
SUPPORT GROUP (CPSG):
Jean-Marcel Nicolai -
Rebecka Pernered - Emilie Balivy -
Caroline Fauchille - Jérôme Di Tullio
SOFTWARE FUNCTIONALITY
TESTING MANAGER: Olivier ROBIN
SOFTWARE FUNCTIONALITY
TESTING TEAM: Bruno TRUBIA -
Stéphane BRION
GAMEPLAY EVALUATION SERVICE
MANAGER: Dominique MOREL
GAMEPLAY EVALUATION SERVICE
TEAM: Emmanuel DESMARIS -
William JAULAIN - Yann SCHIED
ENGINEERING SERVICES
MANAGER:
Philippe LOUVET
COMPATIBILITY LAB
CO-ORDINATOR:
Emeric POLIN
PRE-MASTERING CO-ORDINATOR:
Stéphane ENTERIC
TESTERS:
Gerard BARNAUD - Guillaume CURT
- Stéphane DIREMSZIAN -
David ERCHOFF-COSTET -
Fabien FAURE -
Olivier GENOUX - Pascal GUILLEN
Christophe LAMOUR -
Regis PHILIBERT
PC:
+31 (0)40 23 93 580
GameCube:
0909
0490444
+31 (0)40 24 466 36
NOTICE GP4 02/02 GB 27/02/2002 12:43 Page 38
Wyszukiwarka
Podobne podstrony:
BECKER GRAND PRIX 00 2
PONTIAC GRAND PRIX 1988 2005
Niekorzystny termin Grand Prix w Gorzowie
Ljung zastąpi Protasiewicza w Grand Prix
Scenariusz jasełek Grand Prix
Będzie nowy podział Grand Prix
Andersen zastąpi Warda w Grand Prix
Grand Prix Simon Ings
Grand Prix 2012
Speedway Grand Prix Challenge Goričan ( Chorwacja ) 29 09 2012 Godz 19 00
Lawrence Trent The modern Grand Prix Attack
Grand Prix Simon Ings
Baku Grand Prix 2014 Heavily Annotated Game OCR, 54s
Levy J Grand Russian Fantasie
więcej podobnych podstron