(Level 3 - Intermediate)
Exercises for Level 3 • 1
The Art of Improvisation
Version 1.0 – 8/22/2000
… Creating real-time music through jazz improvisation …
*Level 4: Strong*
by
Bob Taylor
Author of Sightreading Jazz, Sightreading Chord Progressions
©2000 Taylor-James Publications

THE ART OF IMPROVISATION LICENSE AGREEMENT
BY INSTALLING OR USING “THE ART OF IMPROVISATION” (THE "PRODUCT"), THE INDIVIDUAL OR ENTITY
LICENSING THE PRODUCT ("LICENSEE") IS CONSENTING TO BE BOUND BY AND IS BECOMING A PARTY TO
THIS AGREEMENT. IF LICENSEE DOES NOT AGREE TO ALL OF THE TERMS OF THIS AGREEMENT, LICENSEE
MUST NOT INSTALL OR USE THE PRODUCT.
1. LICENSE GRANT. Taylor-James Publications, Inc. (Taylor-James) grants Licensee a non-exclusive and non-transferable license
to reproduce and use for personal or internal business purposes the electronic version (Acrobat book) of the Product, provided any
copy must contain all of the original proprietary notices. This license does not entitle Licensee to receive from Taylor-James any hard-
copy documentation, technical support, telephone assistance, or enhancements or updates to the Product. Licensee may redistribute
this product on a NON-PROFIT, NON-COMMERCIAL basis, provided all original proprietary notices are included in Product.
Licensee may NOT customize the Product in any way without first obtaining express written permission from Taylor-James.
2. RESTRICTIONS. Except as otherwise expressly permitted in this Agreement, Licensee may not: (i) modify or create any derivative
works of the Product, including translation or localization; (ii) redistribute, encumber, sell, rent, lease, sublicense, or otherwise transfer
rights to the Product; or (iii) remove or alter any trademark, logo, copyright or other proprietary notices, legends, symbols or labels in
the Product.
3. TERMINATION. Without prejudice to any other rights, Taylor-James may terminate this Agreement if Licensee breaches any of
its terms and conditions. Upon termination, Licensee shall destroy all copies of the Product.
4. PROPRIETARY RIGHTS. Title, ownership rights, and intellectual property rights in the Product shall remain in Taylor-James
and/or its suppliers. Licensee acknowledges such ownership and intellectual property rights and will not take any action to jeopardize,
limit or interfere in any manner with Taylor-James or its suppliers' ownership of or rights with respect to the Product. The Product is
protected by U.S. copyright. Licensee agrees, at its expense, to defend and hold Taylor-James and its affiliates harmless from any and
all costs, damages and reasonable attorneys' fees resulting from any claim that Licensee's use of the Product has injured or otherwise
violated any right of any third party or violates any law.
5. DISCLAIMER OF WARRANTY. The product is provided free of charge and on an "as is" basis, without warranty of any kind,
including without limitation the warranties that it is free of defects, merchantable, fit for a particular purpose or non-infringing. The
entire risk as to the quality and performance of the product is borne by licensee. Should the product prove defective in any respect,
licensee and not nullsoft or its suppliers or resellers assumes the entire cost of any service and repair.
This disclaimer of warranty constitutes an essential part of this agreement. No use of the product is authorized hereunder except under
this disclaimer.
6. LIMITATION OF LIABILITY. To the maximum extent permitted by applicable law, in no event will taylor-james or its suppliers or
resellers be liable for any indirect, special, incidental or consequential damages arising out of the use of or inability to use the product, including,
without limitation, damages for loss of goodwill, work stoppage, computer failure or malfunction, or any and all other commercial damages or
losses, even if advised of the possibility thereof, and regardless of the legal or equitable theory (contract, tort or otherwise) upon which the claim
is based. In any case, taylor-james’ entire liability under any provision of this agreement shall not exceed in the aggregate the sum of the fees
licensee paid for this license (if any) and fees for support of the product received by taylor-james under a separate support agreement (if any),
with the exception of death or personal injury caused by the negligence of taylor-james to the extent applicable law prohibits the limitation of
damages in such cases. Some jurisdictions do not allow the exclusion or limitation of incidental or consequential damages, so this exclusion and
limitation may not be applicable. Taylor-james is not responsible for any liability arising out of content provided by licensee or a third party that
is accessed through the product and/or any material linked through such content.
7. MISCELLANEOUS. (a) This Agreement constitutes the entire agreement between the parties concerning the subject matter
hereof. (b) This Agreement may be amended only by a writing signed by both parties. (c) If any provision in this Agreement should
be held illegal or unenforceable by a court having jurisdiction, such provision shall be modified to the extent necessary to render it
enforceable without losing its intent, or severed from this Agreement if no such modification is possible, and other provisions of this
Agreement shall remain in full force and effect. (d) A waiver by either party of any term or condition of this Agreement or any breach
thereof, in any one instance, shall not waive such term or condition or any subsequent breach thereof. (e) The provisions of this
Agreement which require or contemplate performance after the expiration or termination of this Agreement shall be enforceable
notwithstanding said expiration or termination. (f) Licensee may not assign or otherwise transfer by operation of law or otherwise this
Agreement or any rights or obligations herein except in the case of a merger or the sale of all or substantially all of Licensee's assets to
another entity. (g) This Agreement shall be binding upon and shall inure to the benefit of the parties, their successors and permitted
assigns. (h) Neither party shall be in default or be liable for any delay, failure in performance (excepting the obligation to pay) or
interruption of service resulting directly or indirectly from any cause beyond its reasonable control. (i) The relationship between
Taylor-James and Licensee is that of independent contractors and neither Licensee nor its agents shall have any authority to bind
Taylor-James in any way. (j) Taylor-James may change the terms of this Agreement from time to time. By continuing to use the
Product beyond a period of 30 days after notice of such change has been provided on a public website of Taylor-James or its affiliate
for the first time, Licensee signifies its consent to the revised terms.

Level 4 - Strong
Level 4 - Strong
Level 4 - Strong
Level 4 - Strong
4.1 Push vs. Pull in Improvisation
4.3 Building Intensity in Solos
4.4 Lowering Intensity in Solos
Intensity in BRIDJJ Transcribed Solos
4.7 Creating Double-Time Material
Double-Time in BRIDJJ Transcribed Solos 237
Using Triplets in Double-Time
4.15 Humming or Singing while Playing

4.28 Pentatonic and Blues Riffs
Basic Development Combinations
Combining Development Techniques
4.29 Using Development Combinations
4.30 Building Tritone Substitutions
4.31 New Resolutions for V Chords
4.32 Resolving to a Related Minor Chord 256
Example: Bridge of “Cherry Key”
Example: First Half of “Giant Stops”
4.37 Minor ii-V and V-i Chains
Turnarounds and Inserted Chords
4.39 Inserting Stepwise Chords
Chord Substitutions in Jazz Standards
Variation #2: Altered Minor Blues
Variation #3: Another Altered Minor Blues 264
Variation #4: Another Bird Blues
Static Playing: Avoiding ii-V-Is
Style and Rhythmic Transitions
4.45 Solo Endings and Transitions
Step 2: Outline the Form and Chords

Rhythm: Double-Time and Half-Time
Development: More Melodic Development 285
Chord Progressions: Variations on ii-V-I’s 287
4 Performance: Group Interaction


Django Reinhardt Jimmy Blanton Oscar Pettiford
Lionel Hampton Stuff Smith Stephane Grappelli Gene Krupa Billie
Holiday Dizzy Gillespie Fats Navarro Charlie Parker
*Level 4 — Strong
*Level 4 — Strong
*Level 4 — Strong
*Level 4 — Strong*
As a Strong Improviser, you’ve paid your dues in practice and concerts.
You have the skills and tools to handle solos over most kinds of chord
progressions. At Level 4, you can take rhythms and expression to new
heights, using rhythmic development and special effects to enhance
your solos. You can analyze ideas of great improvisers and adapt them
effectively in your solos. At this level, your performance skills keep you
in demand as a respected soloist. May the strong get stronger
Sonny Stitt Don Byas J. J. Johnson Bud Powell
Thelonious Monk Kenny Clarke Max Roach Buddy Rich
Ella Fitzgerald Miles Davis Chet Baker Paul Desmond


(Level 4 — Strong)
4A:
Soundscapes
• 229
229
229
229
4A: Soundscapes
4A: Soundscapes
4A: Soundscapes
4A: Soundscapes
In this chapter you’ll learn:
•
About Soundscapes
•
Intensity in Solos
•
Artists and Styles
•
Conservative Improvisation
“soundscape” is like a visual map or landscape of your music. When you balance
high and low, fast and slow, heavy and light, and rough and smooth in your
music, you can create patterns of sound that are much more than just notes
filling space. Your sound patterns can flow together to create a vivid musical landscape.
About Soundscapes
Painting with Sound
Painting with Sound
Painting with Sound
Painting with Sound
Artists pick up brushes or other tools and create with them. As an improviser you
choose melodic and rhythmic tools and essentially “paint with sound.” With this sound-
painting approach, you can concentrate on beauty, variety and meaningful direction in
your solo, so it adds up to a work of art.
So, what makes an interesting landscape? In painting or photography a beautiful
landscape is easy to appreciate. In music, a soundscape can be beautiful but hard to
describe in words. Here are some common elements in landscapes and soundscapes:
Landscapes (Art)
Soundscapes (Music)
Angular lines, contours
Intervals and contours
Smooth & rough surfaces
Smooth/rough expression; legato/staccato articulations
Hard vs. soft objects Loud and soft dynamics
Dense or empty texture
More notes or fewer notes
As you use your musical tools of improvisation, work to create beautiful soundscapes.
That raises the goal from simply surviving chord changes to creating a work of art.
Visualizing What You Play
Visualizing What You Play
Visualizing What You Play
Visualizing What You Play
Creating soundscapes depends on how well you can see musical shapes and objects (see
also Ranges and Neighborhoods in Chapter 2B: Melodic Shapes. Here are the basic steps:
1
See the starting note and the first part of the shape you want to play.
2
Hear the starting note and shape.
3
Play the starting note and shape.
This is SHAPE (See, Hear, And Play Expressively).
A

230
230
230
230 • 4A:
Soundscapes
(Level 4 — Strong)
4.1 Push vs. Pull in Improvisation
4.1 Push vs. Pull in Improvisation
4.1 Push vs. Pull in Improvisation
4.1 Push vs. Pull in Improvisation
When we improvise we instinctively think of pushing out a stream of notes to fill up the
musical space, until something interesting emerges. But this pushing approach has
natural weaknesses – it seems like you’re at the “back of the train,” pushing things
along. When you use a pulling approach to improvisation, interesting things start to
happen – it’s like being at the “engine” of the train, with a clear view of what’s ahead.
Some of the differences between pushing and pulling are described below.
Pushing (weak):
•
It’s hard to see where you’re headed.
•
You change directions too often.
•
You’re not sure when a motif, phrase, or solo is really completed.
•
You get higher density but lower creativity.
Pulling (strong):
•
You see musical shapes and objects.
•
You do more with the notes at hand, instead of just pushing ahead for “new” notes.
•
You see where and how to end ideas and phrases.
•
You use silence more effectively: more often, longer, and in a variety of places.
•
Expression becomes a vital part of your playing instead of an afterthought.
To “pull” ideas,
1
Visualize the first part of the idea.
2
Get a secure start on the pitch and rhythm of the idea.
3
Work through the idea, visualizing as you go.
4
Pull towards a clean and interesting ending.
Remember the shapes you create so you can develop them later. With practice, you’ll
find that the pulling approach can open new creative possibilities for you.
Exercise 4.1
Pulling Improvisation Ideas
4.2 Variety Within a Tune
4.2 Variety Within a Tune
4.2 Variety Within a Tune
4.2 Variety Within a Tune
One of the keys to beauty in improvisation is a healthy amount of variety (see Chapter
1D: Rhythmic Variety and Chapter 1F: Developing with Motifs and Phrases.
One aspect of variety is how you handle the type of tune you’re playing. For example,
the typical way to improvise in a fast swing tune is to play a lot of eighth-notes. While
you can still play interesting solos that way (John Coltrane’s Giant Steps solo worked
well), you might miss the wealth of variety in other approaches. Below are common
tune styles and the most common approaches players take in soloing on those tunes.
Also described are some unusual approaches that can add variety to your solos.
Ballads
Common:
Slow quarters and 8ths, long notes, mostly soft
Unusual:
Double-time & triple-time (see Chapter 4B), triplet ties,
rough expression, intensity

(Level 4 — Strong)
4A:
Soundscapes
• 231
231
231
231
Latin
Common:
Legato quarters, even 8ths
Unusual:
Triplets, offbeat ties, groups of 5 or 7 (Chapter 5C)
Slow swing
Common:
8ths, many downbeat accents
Unusual:
Double-time and triple-time, rhythmic variations (see
Chapters 5C and 5D)
Med. swing Common:
8ths w/ simple syncopations
Unusual:
Double-time, triplet variations
Up swing
Common:
Lots of eighth-notes
Unusual:
Quarter-notes, offbeat ties, consec. dotted quarters
Exercise 4.2
Variety in Rhythmic Styles
Intensity in Solos
Intensity is the process of turning up the heat in a solo to build to a high point. Here are
some guidelines on understanding and using intensity effectively:
•
Don’t confuse intensity with interest. Suspense, subtlety, and economy can build
interest in a solo even without typical intensity. The main goal is interest, not just
intensity.
•
Be careful with higher, faster, and louder. These elements can build intensity in a
solo but can also kill the interest in a solo if you overdo them.
•
Be ready to pounce on intensity when the time is right. It’s frustrating for the
listener when a great opportunity presents itself and you leave it hanging without
building some intensity.
4.3 Building Intensity in Solos
4.3 Building Intensity in Solos
4.3 Building Intensity in Solos
4.3 Building Intensity in Solos
While intensity should often rise and fall by small amounts in your solo, occasionally
you’ll want to build the intensity to a higher level. This can be triggered by your own
solo ideas or by something the group plays. Remember: When the time is right to build,
you’ll sense it, and you must be ready to play your ideas quickly and effectively.
Otherwise, it’s an opportunity missed.
Below are some basic ways to build intensity in solos. You can also combine them for
even more intensity.
•
Repetition. If a motif is interesting enough, repeat it several (or many) times.
•
Development. Vary a motif slightly over repetitions.
•
Louder dynamics. Go suddenly loud, or crescendo.
•
Riffs. Use short, repeated patterns that are dense & quick (see Riffing in Chapter 4D:
More Development).
•
High range. Gradually develop an idea and make it climb in range. Or, sustain an
idea in a high range.
•
Held note. You can hold out a high note for intensity; you can also add expression,
alternate fingerings, or a trill to it.
•
Accelerating. You can move from slower to faster rhythms (see Stepping Through
Rhythms in Chapter 5C: Rhythmic Freedom).
•
Burning and wiggling (see Using Rubato in Chapter 5C: Rhythmic Freedom).

232
232
232
232 • 4A:
Soundscapes
(Level 4 — Strong)
•
Special effects (see Chapter 4C: Special Effects).
•
Harmonic intensity -- outside (Chapters 5A and 5B).
Exercise 4.3
Building Intensity
4.4 Lowering Intensity in Solos
4.4 Lowering Intensity in Solos
4.4 Lowering Intensity in Solos
4.4 Lowering Intensity in Solos
After reaching high intensity in your solo, you usually lower the intensity gradually. But
you can also lower intensity suddenly, or occasionally lower the intensity where there
was no high intensity before, as long as your group lowers the intensity with you.
Below are some basic ways to lower the intensity in solos. You can also combine them
for less intensity.
•
Longer rests – use unpredictable entrances
•
Less density – use care with selecting each note
•
Lower range – keep the melody line flowing
•
Slower rhythms – keep them interesting
•
Softer dynamics – balance with the group
•
Longer notes with expression
Exercise 4.4
Lowering Intensity
Intensity in BRIDJJ Transcribed Solos
Intensity in BRIDJJ Transcribed Solos
Intensity in BRIDJJ Transcribed Solos
Intensity in BRIDJJ Transcribed Solos
Below are selected places in BRIDJJ transcribed solos where intensity is built or
lowered. The solos are in Chapters 2J, 3J, and 4J.
1) Bass solo, “Precious Caboose” (Chapter 2J)
•
Motif in m57-58 is developed in m59-60; upper range of bass is used.
•
m61-64 lowers the intensity: the range gradually goes down, and the density
decreases.
2) Trumpet solo, “Precious Caboose” (Ch. 2J)
•
m1-14 is mellow to match the delicate background.
•
m15-18 builds range; at the high point the rhythm repeats downbeats.
•
m18-24 transfers energy to the low range; double-time 16th-note passages are
divided by longer rests.
•
m37-41 repeats F# and G for 4 bars, with rhythmic variations and alt.
fingerings, then resolves to G#.
•
m47 wiggle starts energy; m48 rest stops the energy; m49 jump-starts with
double-time.
•
m53-57 builds range, then holds a high note with alternate fingerings before
ending on highest note.
3) Trumpet solo, “Deja Blue” (Ch. 3J)
•
m1-9 gradually increases density; m6-9 gradually increases range.
•
m9-12 lowers range and intensity.

(Level 4 — Strong)
4A:
Soundscapes
• 233
233
233
233
•
m30-35 builds intensity (similar to m53-57 in “Precious Caboose” solo).
4) Trumpet solo, “Where’s Waldis?” (Ch. 3J)
•
m45-50 lowers range to the bottom limit of the trumpet.•
m51-52 builds
range after a rest; m53-56 repeats Bb and A many times.
•
m57-64 gradually lowers intensity.
5) Flugelhorn solo, “I Think I’ll Keep Her” (Ch. 4J)
•
m5-6 has low intensity with long, low notes.
•
m31 lowers intensity with a dotted half-note.
•
m57-61 builds intensity with long, high notes.
6) Guitar solo, “Beat the Rats” (Ch. 4J)
•
m1-26 is lower in density but uses high range and varied rhythms for interest.
•
m27 to the end increases the density.
•
m45 uses consecutive offbeats to add energy.
•
m51-54 accelerates rhythms in a riff, more intense.
•
m71-72 uses rough expression.
•
Overall: many color tones, non-harmonic tones, and “outside” passages.
Artists and Styles
As you listen to jazz recordings it’s good to recognize different approaches to
soundscapes. The artists listed below don’t play exclusively in the styles listed, but there
are many recordings available on which they do.
Density: Heavy
Piano - Art Tatum, McCoy Tyner, Gonzalo Rubalcaba
Sax - John Coltrane, Michael Brecker, James Carter
Trumpet - Woody Shaw, Wynton Marsalis, Wallace Roney
Guitar - Allan Holdsworth, John McLaughlin
Bass - Jaco Pastorius, John Pattitucci
Density: Light
Piano - Bill Evans, Count Basie
Sax - Paul Desmond, Stan Getz
Trumpet - Miles Davis, Chet Baker, Wynton Marsalis
Range Extremes
Piano - Lennie Tristano (lower)
Sax - John Coltrane, Michael Brecker, James Carter
Trumpet - Arturo Sandoval, Wynton Marsalis
Bass - Jaco Pastorius (harmonics)
Strong Expression
Piano - Lennie Tristano (lower range), Chick Corea
Sax - Michael Brecker, James Carter, Joshua Redman
Trumpet - Wynton Marsalis, Clark Terry
Guitar - Allan Holdsworth, John McLaughlin
Bass - Jaco Pastorius, John Pattitucci, Christian McBride

234
234
234
234 • 4A:
Soundscapes
(Level 4 — Strong)
Conservative Improvisation
Some situations, such as casuals or recording sessions for light jazz, call for more
conservative improvisation. Here are some soundscape elements to focus on:
•
Light density
•
Lower intensity
•
Careful and subtle expression
•
Restraint with non-harmonic tones or complicated rhythms
Recording Sessions
Recording Sessions
Recording Sessions
Recording Sessions
In recording sessions with light improv, you may want to plan out where the solo peaks,
and where give and take is necessary with other instruments. In some cases, accuracy is
as important (or more important) than coming up with fresh ideas. And once in a while,
you might as well just write something out instead of improvising. But when you need
to improvise something meaningful in a limited space, SHAPE becomes more
important than ever.
Casuals
Casuals
Casuals
Casuals
In a casual gig, improv can range from light to occasionally full-bore. Here are some
points to consider about jazz casuals and improvisation:
•
Keep solos short, such as two choruses for faster tunes, one or two for medium
tunes, and one or one-half for ballads.
•
Keep most tunes short – not everyone needs to solo on every tune. Exception –
when the crowd is dancing and really getting into a high-energy tune, go ahead and
stretch things out.
•
Keep the mood of the piece intact. Your solo shouldn’t draw attention to itself;
instead, it should flow with the rest of the song.
•
Develop solo ideas simply and carefully. There may be a lot of jazz newcomers at
the gig who might be annoyed at complicated solos, but who would be intrigued by
thoughtful solo development.
•
Concentrate on group textures and interactions during each song (see Chapter 4F:
Group Interactions).
Chapter Review
1) A soundscape is like a musical landscape that you paint with sound.
2) You can get variety in a tune by emphasizing unusual rhythmic styles.
3) You can build intensity in a solo through repetition, development, louder dynamics,
riffs, high range, held high notes, accelerated rhythms, burning and wiggling, special
effects, and outside playing.
4) You can lower intensity in a solo through longer rests, less density, lower range,
slower rhythms, softer dynamics, and longer notes with expression.
5) Conservative improvisation can be valuable in situations that call for light or
controlled jazz, such as recording sessions or casuals.

(Level 4 — Strong)
4B:
Double-Time and Half-Time
• 235
235
235
235
4B: Double-Time and Half-Time
4B: Double-Time and Half-Time
4B: Double-Time and Half-Time
4B: Double-Time and Half-Time
In this chapter you’ll learn:
•
About Double-Time and Feel
•
Double-Time Transitions
•
Double-Time Material
•
Triple-Time Feel
•
Half-Time Feel
laying double-time passages can add excitement and intensity to your solo
melodies, while half-time can be a creative switch from the normal rhythmic flow.
This chapter explains how to use double-time, half-time, and triple-time.
About Double-Time and Feel
Technically, double-time and double-time feel are two different things. Double-time feel is
when you start playing twice-as-fast rhythms, as if the tempo were going twice as fast,
even though the measures and chords go by at the same speed. In contrast, true double-
time makes the chord progression go by twice as fast, but this shrinks the actual form of
the tune. To avoid changing the form, double-time feel is used more often than true
double-time in jazz improvisation.
Important: When this chapter discusses “double time,” it means double-time feel, not
true double-time. Also, triple-time is used for triple-time feel, and half-time is used for
half-time feel.
Psychology of Double-Time
Psychology of Double-Time
Psychology of Double-Time
Psychology of Double-Time
Perhaps no other jazz improv technique can be as exciting or disappointing as double-
time. On the positive side, double-time has many possibilities and challenges. A good
double-time passage at the right time can energize and lift a solo, and leave the audience
wanting more. On the other hand, bad double-time can pretty much ruin a solo.
Here are some common double-time pitfalls to avoid:
•
Jumping headlong into and out of double-time, without graceful transitions
•
Using predictable and uninteresting contours
•
Repeating the same double-time material in each solo
•
Playing double-time passages with a shaky rhythmic feel or stiff articulations
•
Ending double-time passages awkwardly or abruptly
The topics in this chapter help you gain control of double-time and explore some of its
many possibilities.
P

236
236
236
236 • 4B:
Double-Time and Half-Time
(Level 4 — Strong)
Double-Time Transitions
4.5 Going into Double-Time
4.5 Going into Double-Time
4.5 Going into Double-Time
4.5 Going into Double-Time
To go smoothly from the original tempo into double-time, follow these steps:
1
Make sure you feel the quarter-note pulses in the original tempo securely. (You
don’t have to play quarter-notes, but you must be able to find them.)
2
Quickly imagine straight eighth-notes at the same tempo. In a swing tune, it takes
some practice to imagine straight eighth-notes.
3
These straight eighth-notes become the quarter-notes of the new double-time.
4
In the new double-time, work for active rhythms. Many players try only eighth-
notes in the new tempo, missing a lot of rhythmic possibilities.
Steps 2 and 3 help you solidify the transition into double-time. With practice, you’ll get
the double-time feel quickly without worrying about the steps. You can drift in and out
of double-time during a solo, as long as it’s smooth and not overused.
Exercise 4.5
Going Into Double-Time
4.6 Coming Out of Double-Time
4.6 Coming Out of Double-Time
4.6 Coming Out of Double-Time
4.6 Coming Out of Double-Time
To return from double-time to the original tempo, follow these steps.
1 Quickly imagine your current double-time quarter-notes as 8th-notes of the original
tempo. If the style is swing, stretch out the eighth-notes so they become swing 8ths.
2
In the new tempo, work for active rhythms to re-establish the original feel. If the
tune is swing, be sure to play accurate swing rhythms with the correct triplet
subdivisions.
With practice, you can move in and out of double-time whenever it feels right.
Exercise 4.6
In and Out of Double-Time
Double-Time Material
4.7
4.7
4.7
4.7
Creating Double-Time Material
Creating Double-Time Material
Creating Double-Time Material
Creating Double-Time Material
Here are some good ways to create interesting material for double-time feel:
1) Use the suggestions in Using Flexible Scales in Chapter 1A: The Virtual Practice Method
to generate double-time ideas.
2) Avoid predictable scale contours and repetitive ideas.
3) Begin on (or emphasize) active rhythms or tones.
4) Use contour patterns of 3 eighth-notes in 4/4 time.
5) Mix some chromatic notes with the scale tones to slow down the contours.
6) Mix in one or more riffs (see Chapter 4D).

(Level 4 — Strong)
4B:
Double-Time and Half-Time
• 237
237
237
237
Multiplying by 2
Multiplying by 2
Multiplying by 2
Multiplying by 2
You can get started with double-time practice by creating an interesting one- or two-bar
idea at an easy tempo. For example, try a flexible scale with a few skips and maybe a
slight rhythm variation. Then play the same idea exactly twice as fast to turn it into
double-time. Once that idea is comfortable, transpose it to other keys – first at the
original tempo and then at the double-time tempo. As you progress through new ideas,
gradually introduce wider skips, non-harmonic tones, and different rhythms to add spice
to your double-time ideas.
Practicing Double-Time Fills
Practicing Double-Time Fills
Practicing Double-Time Fills
Practicing Double-Time Fills
One way to begin working with double-time is to play a short double-time fill during a
one- or two-bar rest. For example, start at a slower tempo, rest for two beats, and play
eight 16th-notes (two beats) and a downbeat note. At first, you should work on short
phrases of 8th-notes with smaller contours. After you’re comfortable with basic fills, try
these ideas:
•
Rest a bar and play a bar of 16th-notes
•
Rest two bars and play two bars of 16ths.
•
Vary the rhythms, mixing eighths and 16ths.
Work for pitch and rhythm accuracy as you go; then gradually boost the tempo each
time until you can handle reasonably fast double-time passages.
Expanding Your Reach
Expanding Your Reach
Expanding Your Reach
Expanding Your Reach
When you can play phrases accurately and confidently at faster tempos, expand the
length and contour of each double-time phrase. You can also transcribe and play
double-time material from CDs, but don’t rely too much on imitation. You’ll be amazed
at how much mileage you can get just from flexible scales and chromatic notes. Here are
some additional points to keep in mind with double-time playing:
•
You’ll need split-second timing and quick reflexes.
•
Be securely locked into the tempo. The rhythm section must play steady time, and
you must be able to hear them clearly and work with them.
•
Use melodic and rhythmic development in your double-time material and
remember SHAPE.
•
Use sequences and patterns in your double-time material.
As you play long double-time passages, the soundscape becomes very detailed and low-
level, something like flying a spacecraft at high speeds along a planet’s surface. You
become very involved in the shapes, contours, colors, and changes of direction as you
create fast double-time material.
Exercise 4.7
Using Double Time Material
Double-Time in BRIDJJ Transcribed Solos
Double-Time in BRIDJJ Transcribed Solos
Double-Time in BRIDJJ Transcribed Solos
Double-Time in BRIDJJ Transcribed Solos
Below are some double-time passages in the transcribed BRIDJJ solos in Chapter 4G:
Analyzing Solos, Level 4. If you have the BRIDJJ CD, you can check the CD timings and
follow along with the recording.

238
238
238
238 • 4B:
Double-Time and Half-Time
(Level 4 — Strong)
Measure #s
Tune
m17-22,61-63
I Think I’ll Keep Her (piano)
m6-14, 19-24,
I Think I’ll Keep Her (flugelhorn)
29-30, 37-42, 50-56
m11-16, 29-32, 43-48
Three and Me (flugelhorn)
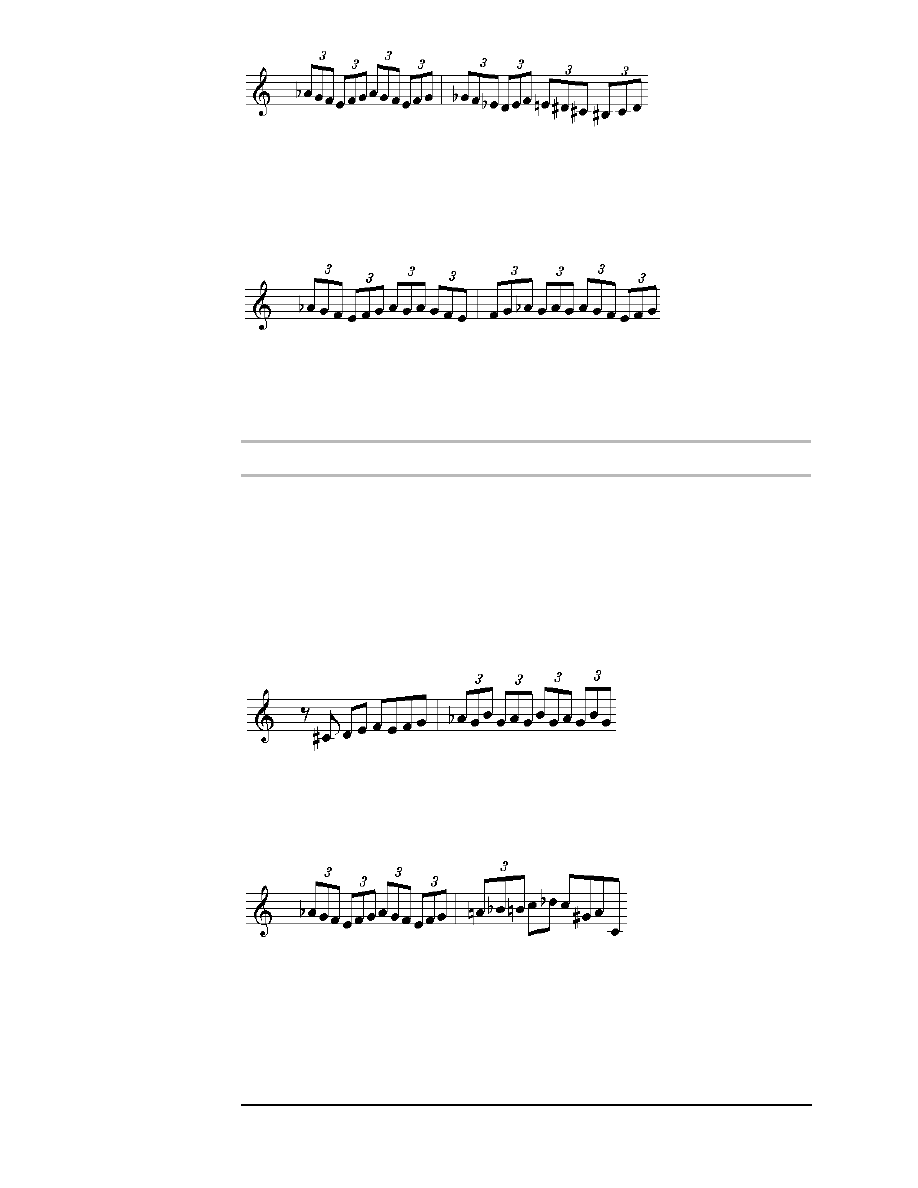
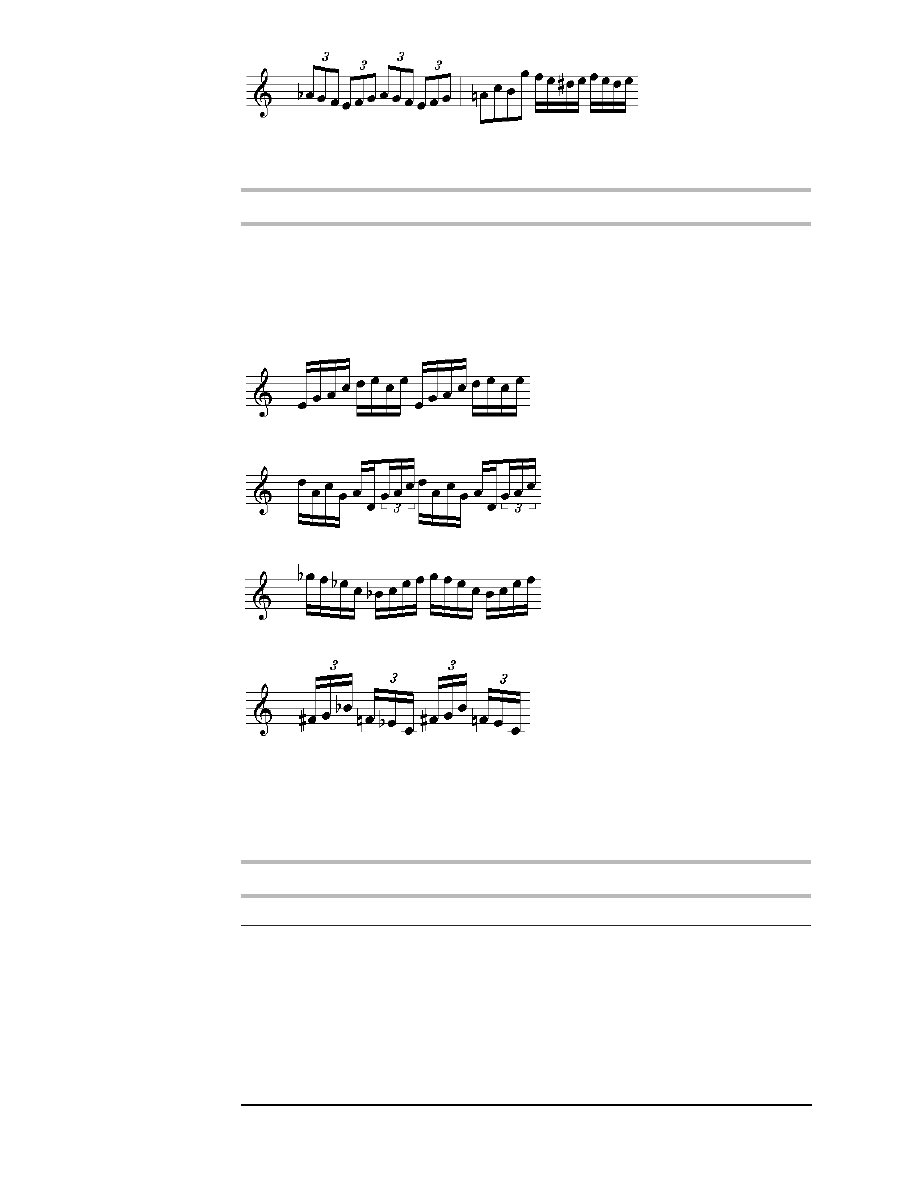
Using Triplets in Double-Time
Using Triplets in Double-Time
Using Triplets in Double-Time
Using Triplets in Double-Time
Instead of simply converting quarter-notes to eighth-notes for double-time, you can
emphasize eighth-note triplets in the double-time. This sounds like the basic pulse is
going three times as fast (four quarter-notes to 12 eighth-note triplets). You can mix
eighth-notes and eight-note triplets in the double-time passages for variety.
Triple-Time Feel
4.8
4.8
4.8
4.8
Using Triple-Time Feel
Using Triple-Time Feel
Using Triple-Time Feel
Using Triple-Time Feel
Triple-time feel is not three times as fast as the original feel; it’s twice as fast as double-
time, which makes it four times as fast as the original feel. If the original tempo is 60,
double-time is 120, and triple-time is 240. Triple-time works best in ballads or slow
blues, after you’re into double-time. If the tempo of the triple-time is very fast, play
easier ideas and consider patterns, sequences, and riffs.
Once you establish triple-time, you can switch among triple-, double-, and single-time
feels as you like. The switching process is similar to going in and out of double-time, as
described earlier in this chapter.
Another way to give the feeling of triple-time is to repeat eighth-note triplets and then
establish a new pulse of quarter-notes based on the speed of those triplets. For details
on how to do this, see Using Triplet Pulses in Chapter 5E: Rhythmic Pulses.
Exercise 4.8
Using Triple Time
Half-Time Feel
4.9
Half-time feel is less common than double-time, but it can be very effective. You
can go in and out of half-time, and your group can follow you or stay in the old tempo.
In half-time feel, the chords go by at the same rate, but it feels like half as many bars are
played. Half-time feel is also used quite often in the rhythm section to introduce a tune
or at the start of a solo.
To go into half-time, follow these steps:
1
Concentrate on half-notes in the original tempo.
2
Imagine them as quarter-notes of the new tempo.
3
In the new tempo, play varied rhythms to get the new half-time feel. In swing tunes,
play accurate swing rhythms with correct triplet subdivisions.
To return from half-time back to the original faster tempo, follow these steps:
1
Concentrate on 8th-notes in half-time tempo.

(Level 4 — Strong)
4B:
Double-Time and Half-Time
• 239
239
239
239
2
Imagine those 8th-notes as the new quarter-notes of the original fast tempo.
3
In the new tempo, use active rhythms to re-establish the original feel. In a swing
tune, be sure to play accurate swing rhythms with the correct triplet subdivisions.
Exercise 4.9
In and Out of Half-Time
Chapter Review
1) Double-time feel (or double-time) means playing twice as fast but leaving the
chords in their original locations.
2) To switch to a double-time feel,
A) Feel secure quarter-note pulses (orig. tempo).
B) Imagine straight 8th-notes (same tempo).
C) Think of straight 8th-notes as the quarter-notes of the new double-time tempo.
D In the new tempo, use active rhythms to establish the new double-time.
3) To return to single-time, reverse the process.
4) Get double-time material from the suggestions in Using Flexible Scales in Chapter 1A:
The Virtual Practice Method. Mix in chromatic notes and slow down the contours.
You can also get double-time ideas from recorded solos.
5) Multiplying short ideas by two and practicing short fills helps you build double-time
skills and ideas.
6) Triple-time feel is four times as fast as the original feel (twice as fast as double-time
feel).
7) To shift to half-time feel,
A) Think of half-notes in the original tempo.
B) Imagine the half-notes as the quarter-notes of the new slower tempo.
C) In the new tempo, work for varied rhythms to establish the new half-time feel.
Expressions
Expressions
Expressions
Expressions
*See some good picture -- in nature; if possible; or on canvas hear a page of the best music; or
read a great poem every day. You will always find a free half hour for one or the other; and at the
end of the year your mind will shine with such an accumulation of jewels as will astonish even
yourself. Henry Wadsworth Longfellow
*Thinking is the hardest work there is, which is the probable reason so few engage in it. Henry
Ford
*It isn't what you know that counts, it's what you think of in time. Benjamin Franklin
*The only thing worse than being talked about is not being talked about. Oscar Wilde
*Strange how much you've got to know before you know how little you know. Dr. Samuel Johnson

240
240
240
240 • 4C:
Special Effects
(Level 4 — Strong)
4C: Special Effects
4C: Special Effects
4C: Special Effects
4C: Special Effects
In this chapter you’ll learn about:
•
Wind Instrument Effects
•
Trumpet Effects
•
Saxophone Effects
•
Trombone Effects
•
Keyboard Effects
•
Guitar Effects
•
Bass Effects
pecial effects are unusual sounds you play that add an extra dimension to your
playing. Sometimes you can get great results by adding an effect to just one or two
notes, or by repeating the same special effect as you develop a motif. You can also
combine special effects in many ways; be sure to experiment on your instrument.
Note: Although there are many possible electronic effects, this chapter deals just with
acoustic effects.
Wind Instrument Effects
This section discusses special effects common to the sax, trumpet, and trombone.
4.10 Bends
4.10 Bends
4.10 Bends
4.10 Bends
A bend is moving a pitch down (or sometimes up), usually by less than a half-step.
Sometimes it helps to press one or more valves or keys as you bend, to get a more
controlled sound. Practice bends in these ways:
•
Play a note, bend it fast or slow, and return to it.
•
Play a note and bend it, but don’t return to the note.
•
Play a note, then use multiple bends up or down.
•
Bend all the way to the next regular note.
For an example of bends on the BRIDJJ CD, listen to timings 6:11-6:16 (flugelhorn
solo) of “Three and Me.”
Exercise 4.10
Using Bends
4.11 Falls and Glissandos
4.11 Falls and Glissandos
4.11 Falls and Glissandos
4.11 Falls and Glissandos
A fall is moving a pitch downward so the actual pitches are vague. Practice falls in these
ways:
•
Play a short or a long fall.
•
Fall after holding a note, or just after the attack.
•
Continue the phrase after falling to the low note.
•
Attach a glissando (see below) to the end of a fall.
S

(Level 4 — Strong)
4C:
Special Effects
• 241
241
241
241
A glissando is like a fall that goes up instead of down. Practice glissandos in these ways:
•
Play a short or long glissando.
•
Gliss after holding a note, or just after the attack.
•
Continue the phrase after glissing to the low note.
•
Attach a fall to the end of a glissando.
For a glissando on the BRIDJJ CD, listen to timings 5:41-5:42 (flugelhorn solo) of
“Three and Me.”
Exercise 4.11
Using Falls and Glissandos
4.12 Growls (Flutters)
4.12 Growls (Flutters)
4.12 Growls (Flutters)
4.12 Growls (Flutters)
To “growl” a note, you use a flutter-tongue technique. You can practice this by
breathing out “hoooo” and forcing the tongue against the roof of the mouth. Practice
growls in these ways:
•
Start the growl on the attack of a note.
•
Hold a note, then begin the growl.
•
Growl on a held note, then play the note normally.
•
Combine a growl with a bend or fall.
4.13 Half-Sounds
4.13 Half-Sounds
4.13 Half-Sounds
4.13 Half-Sounds
The pitch of a “half-sound” is usually somewhat vague. It can be a surprising effect
when it’s used well. To produce a half-sound you press valves or keys halfway down. To
emphasize a half-sound, play it as a longer note or the highest note in a phrase.
You can also play multiple half-sounds in a row, repeating or varying the pitch. With
practice, you can even tune up multiple half-sounds so they sound something like a
recognizable tune. This is most effective in softer passages. And you can go from half-
sound to full-sound to create a kind of sliding effect.
With practice, you can play half-sounds that are actually quarter-tone pitches, in-
between the half steps. Quarter-tones expand the chromatic scale, up or down.
4.14 Air and Keys
4.14 Air and Keys
4.14 Air and Keys
4.14 Air and Keys
Occasionally in a softer passage you can simply blow air through the instrument without
playing a note. As you do this, you can vary dynamics, wiggle keys or valves, move the
slide, or change the basic pitch of the air-stream.
This creates a sense of mystery or surprise, and it’s usually done in a ballad or free jazz
piece, or at the end of a tune. But it can lose its appeal if it’s done too often.
4.15 Humming or Singing while Playing
4.15 Humming or Singing while Playing
4.15 Humming or Singing while Playing
4.15 Humming or Singing while Playing
When you hum or sing at the same time you play a note, the note takes on an unusual
sound. For best effect, the sound should be under control, with half the emphasis on a
good vocal pitch and half on the played pitch. To practice the basic concept away from
your instrument, try whistling and singing at the same time. You can hum/play on an
entire phrase or just a few exposed notes.
Here are some variations on humming while playing:
•
Hum the same pitch that you play.
242
242
242
242 • 4C:
Special Effects
(Level 4 — Strong)
•
Hum a different pitch than the one you play, such as a major third or a fourth away.
You can practice this by accurately whistling and singing the interval together, away
from your instrument.
•
Play a regular note, then hum it as you hold it.
•
Change the hummed pitch as you hold the played pitch, or change the played pitch
as you hold the hummed pitch.
Exercise 4.15
Growling, Half-Sounds, Air/Keys, and Humming
4.16 Circular Breathing
4.16 Circular Breathing
4.16 Circular Breathing
4.16 Circular Breathing
Circular breathing is the process where you keep a sound going while you sneak a
breath. To do this, you puff out the cheeks to get an extra reservoir of air, then quickly
breathe in through the nose as you expel the air from the cheeks. It usually takes quite a
bit of practice to get the sound to stay smooth during the breath. Circular breathing is
usually used on a long note or to hook two long phrases together. It can also be used
for riffing (see Chapter 4D: More Development).
But don’t use circular breathing just because you can do it, or just to get an audience
reaction. Use it only when your improv ideas really call for it.
4.17 Alternate Fingerings
4.17 Alternate Fingerings
4.17 Alternate Fingerings
4.17 Alternate Fingerings
An alternate fingering produces the same basic note as the regular fingering, but the
altered note is slightly out of tune (less than a quarter-tone away from the regular-
fingered pitch). This out-of-tune sound is what gives the alternate fingering its spice.
An alternate note is usually played directly after a regular note, for maximum contrast. If
you play an alternate note instead of a regular note, the listener usually just hears it as
being slightly out of tune. When you tongue the altered note it stands out more; when
you just finger it, it’s more subtle. You can try out your own combinations of
tongued/not-tongued.
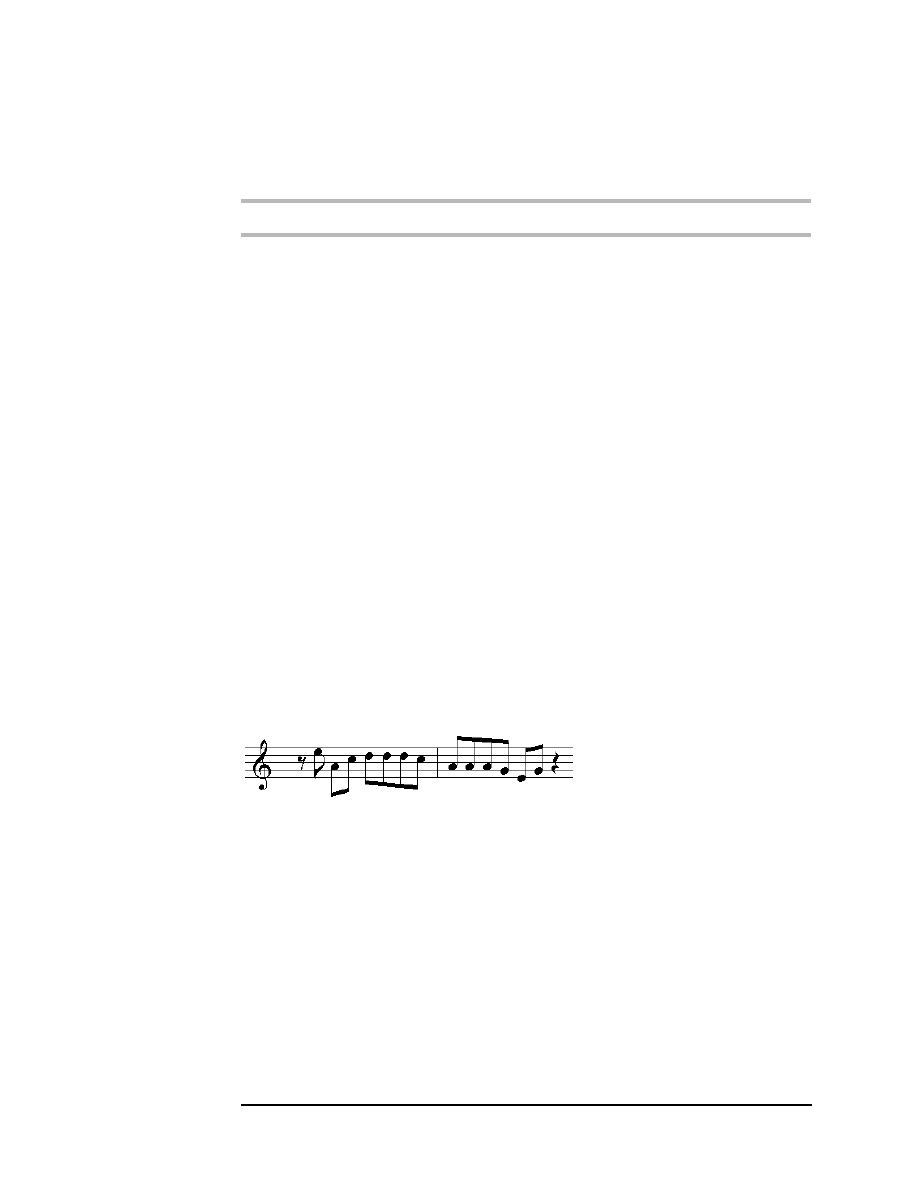
You can include alternate fingerings for several different notes in a phrase. With
practice, you can insert altered notes wherever you need to, at a moment’s notice. The
example below shows several alternate-fingered notes (underlined) in a phrase.
=
=
Example 4.17 - Phrase with regular and alternate-fingered notes
For examples of trumpet alternate-fingerings on the BRIDJJ CD, listen to timings 2:05-
2:08 of “Precious Caboose” and 2:44-2:45 of “Where’s Waldis?”
Alternate fingerings for trumpet are shown in the table below. The pitches in the table
below start with the F# on the first space of the treble clef and extend to the G above
high C. In some cases, there may be multiple alternates for higher pitches; the more
valves pressed, the stronger the trill sounds. (Read columns downward.)
Pitch Reg.
Alt.
Pitch Reg.
Alt.
(Level 4 — Strong)
4C:
Special Effects
• 243
243
243
243
F#
2
1+2+3
F#
2
2+3
G
0
1+3
G
0
1+3
Ab
2+3
(no alt)
Ab
2+3
1
A
1+2
3
A
1+2
2
Bb
1
1+2+3
Bb
1
1+2+3
B
2
1+3 B
2
1+2
C 0
2+3
C
(high) 0
2+3
C#
1+2
1+2+3
C#
2
1+2
D
1
1+3
D
0 or 1
1+3
Eb
2
2+3
Eb
2
2+3
E
0
3 or 1+2*
E
0
1+2
F
1
1+3
F
1
1+3
Alternate (Altissimo) Fingerings for Saxophone
Alternate (Altissimo) Fingerings for Saxophone
Alternate (Altissimo) Fingerings for Saxophone
Alternate (Altissimo) Fingerings for Saxophone
Alternate fingerings for saxophone are found in various method books. For altissimo
(very high range) fingerings, see
http://ourworld/compuserve.com/homepages/martin_carter/
At the site, download the SaxTutor program for Microsoft Windows® for a view of
altissimo fingerings.
Alternate-Fingered Trills
Alternate-Fingered Trills
Alternate-Fingered Trills
Alternate-Fingered Trills
The alternate-fingered trill is dramatic, especially in the upper register. To play an
alternate-fingered trill, you quickly alternate between a note’s regular fingering and its
altered fingering. You don’t tongue each new note in the trill; you just wiggle the valves
or keys. It sounds like a cross between tonguing and trilling.
To add variety, you can play a series of alternate trills that go up or down a scale or
arpeggio. Each trill should last a quarter-note or longer. This requires some practice to
execute cleanly, especially with shorter lengths like quarter-notes.
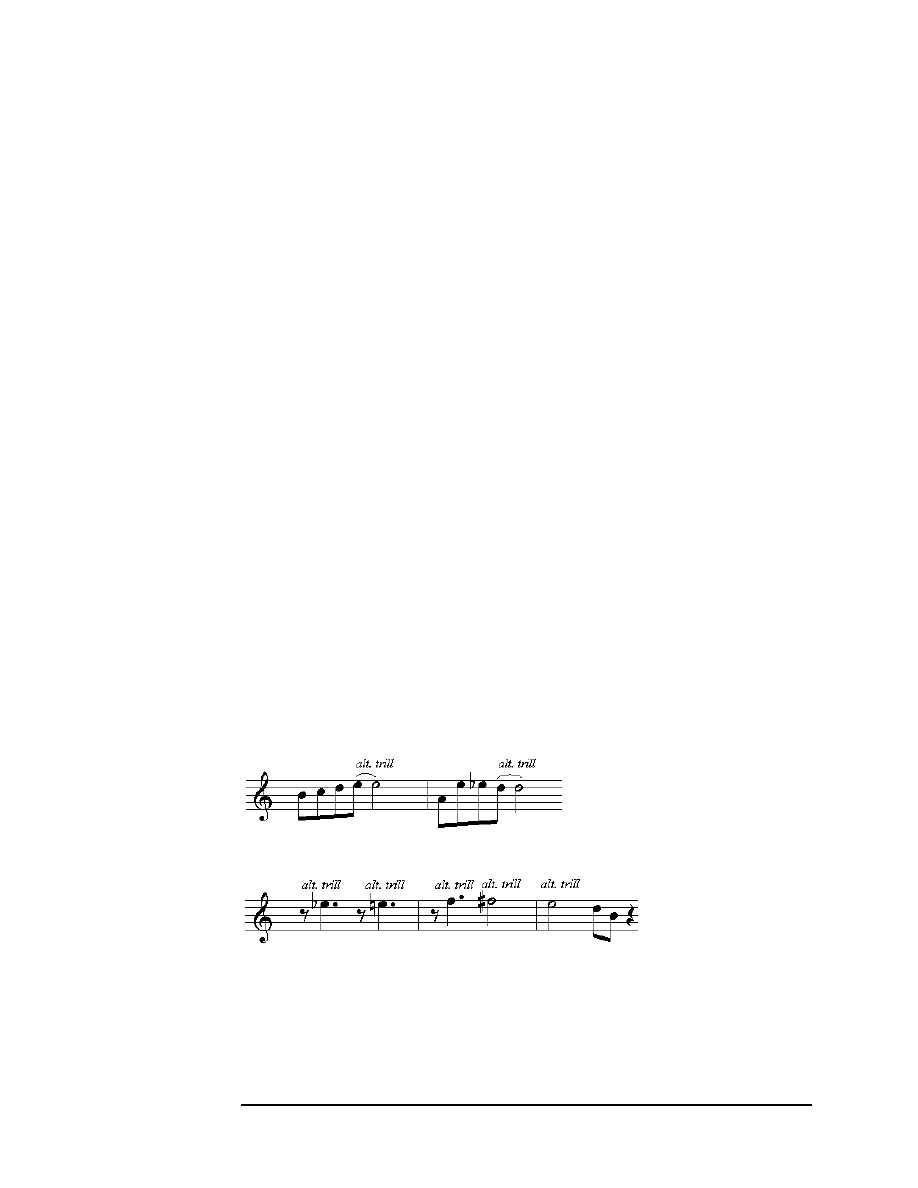
In the first example below, trilled pitches go up with various rhythms. In the second
example, trilled pitches go up or down with constant rhythms.
Example 4.17a - Alternate-fingered trills, ascending
Example 4.17b - Alternate-fingered trills, ascending/descending
If a note has no alternate fingering or the alternate fingering is tricky, you can use a
regular trill instead of the alternate-fingered trill. If an alternate fingering is too close to
the original pitch (and no other alternate fingering works), you can wobble the alternate
pitch with your lips or breath.

244
244
244
244 • 4C:
Special Effects
(Level 4 — Strong)
For an example of alternate-fingered trills on the BRIDJJ CD, listen to timings 1:44 to
1:55 (trumpet solo) of “Beat the Rats.”
Exercise 4.17
Alternate Fingerings
Trumpet Effects
4.18
4.18
4.18
4.18
This section covers:
•
Double- and triple-tonguing
•
Using mutes
•
Lip trills (shakes)
•
Pedal tones
•
Walking bass lines
Double- and Triple-Tonguing
Double- and Triple-Tonguing
Double- and Triple-Tonguing
Double- and Triple-Tonguing
Double-tonguing and triple-tonguing are much more common in classical music than in
jazz. Still, you can occasionally use these tonguing methods when the accompaniment is
sparse, or in free improvisation, or in interaction with another soloist. Lester Bowie uses
these effects wisely in his playing.
Double-tonguing can also be used for articulating very fast passages, as an alternative to
the “doo-dul” tonguing of 8th-notes. Wallace Roney does this well.
Using Mutes
Using Mutes
Using Mutes
Using Mutes
The most commonly used mutes are the cup, plunger, and harmon. Each mute lends a
characteristic sound that colors the mood of your improvisation. You can also use other
effects, such as growls, bends, and half-sounds with a mute. When using a mute, you
need to be miked well, or have the rhythm section play quieter.
The harmon mute can be used without the stem for cool jazz, or with the stem for
“wah-wah” sounds (hand covering and uncovering the stem).
Lip Trills (Shakes)
Lip Trills (Shakes)
Lip Trills (Shakes)
Lip Trills (Shakes)
To play a lip trill, alternate two notes of the same fingering, using air and lip tension.
The trill can be slow or fast, wide or narrow. Low range uses wide trills; higher range
uses wide or narrow trills.
Pedal Tones
Pedal Tones
Pedal Tones
Pedal Tones
A pedal tone is one that is below the bottom range of the horn. You can use regular or
half-valve fingerings for pedal tones, depending on what works best.
Common places for pedal tones are the ending of a tune, softer passages, or cadenzas.
As much as possible, play each pedal tone in tune and with a good tone. You can also
use pedal tones in walking bass lines.
Walking Bass Lines
Walking Bass Lines
Walking Bass Lines
Walking Bass Lines
If you haven’t played a walking bass line on the trumpet, you’re missing an unusual
experience. You can accompany the bass player’s walking notes during or outside your
solo. For basics on creating walking bass lines, see Rhythm Section Techniques in Level 1.
In trumpet bass lines, you can play regular pitches (from low F# to about middle G) or
pedal tones (below low F#) or both kinds. If you switch between regular and pedal
notes, make the transitions smooth.

(Level 4 — Strong)
4C:
Special Effects
• 245
245
245
245
Exercise 4.18
Trumpet Effects
Saxophone Effects
4.19
4.19
4.19
4.19
This section covers overtones/split notes, altissimo playing, and “thunks.”
Overtones/Split Notes
Overtones/Split Notes
Overtones/Split Notes
Overtones/Split Notes
You can play two notes at once (a main note and an overtone above it) by loosening the
embouchure just enough. This can be done for one note or a phrase. Be sure to get a
balanced sound between the two notes.
Altissimo
Altissimo
Altissimo
Altissimo
Altissimo is the extreme upper range of the sax, above the regular fingerings (see
Alternate Fingerings). To use altissimo effectively,
•
Play the notes in tune with a good sound.
•
Use dynamics, including soft altissimo notes.
•
Don’t just climb up the scale to altissimo and then climb down; use other
approaches as well, such as starting in altissimo or skipping up to it.
Thunks
Thunks
Thunks
Thunks
A thunk is made when you blow air and finger a low, staccato note with a loose
embouchure. You can switch from high range to low thunks; or play chromatic thunks.
James Carter and Joshua Redman use this effect well in solos.
Exercise 4.19
Saxophone Effects
Trombone Effects
4.20
4.20
4.20
4.20
This section covers alternate positions and slides (glissandos).
Alternate Positions
Alternate Positions
Alternate Positions
Alternate Positions
Alternate positions are like alternate fingerings for trumpet, except that the positions are
better in tune on trombone. Using alternate positions helps you play faster and more
easily in the upper register. You can also play a note slightly out of position for effect.
Slides
Slides
Slides
Slides
The trombone plays the smoothest glissandos or slides of any wind instrument. Long
slides are common, but small slides are often under-used. When you slide up or down a
half-step or less, you can mix quarter-tones with chromatic notes. You can also
combine slides with growls, double-tonguing, or triple-tonguing for effect.
Exercise 4.20
Trombone Effects

246
246
246
246 • 4C:
Special Effects
(Level 4 — Strong)
Keyboard Effects
4.21
4.21
4.21
4.21
This section covers:
•
Clusters
•
Tremolo
•
Block chords
•
Hammering
•
Using strings and pedals
•
Piano bass lines
•
Wide glissandos
Clusters
Clusters
Clusters
Clusters
Clusters are groups of notes that are half-steps (or sometimes whole-steps) apart. They
can be used to spice up chords or melody lines, such as in the Thelonious Monk style.
They can also be used as percussive effects, especially with many notes at once.
Experiment with one-hand or two-hand clusters. For gentler clusters, play them in the
upper range or include only white keys or only black keys. For more intense clusters,
mix white and black keys, or play more notes (use a horizontal hand or forearm).
Tremolo
Tremolo
Tremolo
Tremolo
Tremolo is like a wide trill; it builds intensity or suspense. The most common tremolo
interval is the octave; you can also play tremolos with smaller intervals or with chords.
As you work with tremolos, pay close attention to dynamic subtleties.
Block Chords
Block Chords
Block Chords
Block Chords
Block chords (or locked chords) are played in both hands at once, with the same or
similar voicings for each new chord. Each chord follows a right-hand melody. This
lends a traditional swing feeling to the solo. Masters of block chords include Red
Garland, Erroll Garner, Wynton Kelly, and George Shearing
Hammering
Hammering
Hammering
Hammering
Hammering is the technique of rapidly attacking one key with two index fingers (it can
also be done by rotating between the thumb and fingers one and two). The idea is to get
the maximum speed of clean attacks. With hammering, you can start and stop on one
key, or extend it by going up or down chromatically or by wider intervals.
Hammering is
also effective in the middle of a full passage, instead of isolated by rests.
Using Strings and Pedals
Using Strings and Pedals
Using Strings and Pedals
Using Strings and Pedals
Although you can actually play melody lines on the strings by touching them with your
fingertips, strings are usually played to set up a rhythmic accompaniment vamp (as done
by Chick Corea). In this case, you rapidly alternate between plucking and touching one
or two strings to set up the vamp. Make sure the texture is light enough so the strings
can be heard, such as in a duet or trio. The sustain and soft pedals are effective in solo
passages or where the accompaniment is light.
Piano Bass Lines
Piano Bass Lines
Piano Bass Lines
Piano Bass Lines
Playing bass lines on the piano is most effective in a solo or duet situation, or when
everyone drops out during a piano solo. Some highly unusual and effective bass lines
can be created, especially with different rhythms (triplets, accelerating / decelerating

(Level 4 — Strong)
4C:
Special Effects
• 247
247
247
247
notes, 3 against 4, etc.). For basic ideas on creating walking bass lines, see Rhythm Section
Techniques in Level 1.
Wide Glissandos
Wide Glissandos
Wide Glissandos
Wide Glissandos
Wide glissandos have been overused so much by some players that they can tend to
sound stale to the rest of us. To make a wide glissando more effective:
•
Play it up more often than down.
•
Use it in the middle of a solo, not at the finish.
•
Follow it with a continuous idea.
•
Use it rarely.
Gonzalo Rubalcaba uses wide glissandos effectively.
Exercise 4.21
Keyboard Effects
Guitar Effects
4.22
4.22
4.22
4.22
This section covers:
•
Bends
•
Tremolo
•
Muted strumming
•
Guitar harmonics
•
Playing in octaves
Bends
Bends
Bends
Bends
Bends can be slow or fast (fast bends are like a wide vibrato), or repeated several times
from the same pitch. After a bend you can continue with a note that’s near the pitch
where the bend finished.
Tremolo
Tremolo
Tremolo
Tremolo
Notes in a tremolo chord can gradually change as you continue the tremolo; this builds
intensity. Related to tremolo is quick strumming, where you play chords with 16th-note
patterns, somewhat in a flamenco style. See also Tremolo in Piano Effects above.
Muted Strumming
Muted Strumming
Muted Strumming
Muted Strumming
Muted (soft) strumming is an interesting technique for quieter passages or
accompanying solos (especially bass players) in duets or trios. Jim Hall uses this effect
quite well.
Guitar Harmonics
Guitar Harmonics
Guitar Harmonics
Guitar Harmonics
Harmonic notes are played by pressing a string halfway down. These usually work best
in a soft setting, at the end of a phrase or solo. You can play a single harmonic, or try
octaves or triads. More difficult but effective is playing a melody line with harmonic
notes. In a melodic line you can ascend from high regular tones into harmonics; the
result dramatically extends the range of the melody.

248
248
248
248 • 4C:
Special Effects
(Level 4 — Strong)
Playing in Octaves
Playing in Octaves
Playing in Octaves
Playing in Octaves
The technique of playing simultaneous octaves was made popular by guitarist Wes
Montgomery. As you play a melody line in octaves (melody line plus an octave above or
below), keep in mind basic principles such as melodic development, contours, intervals,
and fills. You can also interject some chords between phrases of octave notes.
Exercise 4.22
Guitar Effects
Bass Effects
4.23 Harmonics
4.23 Harmonics
4.23 Harmonics
4.23 Harmonics
You can play bass harmonics as single pitches or as a melody line. You can also play
several harmonics together as a chord, or one at a time as an arpeggio.
Chords
Chords
Chords
Chords
To play chords on the bass, you need to approach the bass more like a guitar. A five-
string bass is easier for playing chords. In addition to soloing with occasional chords,
you can use chords in a bass pattern behind other soloists.
Bowed Notes
Bowed Notes
Bowed Notes
Bowed Notes
On acoustic bass, you can play notes with a bow. Bowed notes can be accompaniment
notes, such as roots of a chord or 1-3 or 1-5 combinations. You can also play them in
solo melodies, but it takes a lot of practice to play bowed solos, especially at faster
speeds. Christian McBride plays great bowed/plucked solos.
Other Effects
Other Effects
Other Effects
Other Effects
Here are some other effects for the bass:
•
Slides - Use them as pickups or after notes; use chord slides; slide up or down
•
Twangs and slaps - You can twang or slap strings, or slap the bass itself (acoustic).
•
Wide vibrato - like an out-of-control sound when it’s done unevenly.
Exercise 4.23
Bass Effects
Chapter Review
1) Special effects can be used alone or in combinations, but shouldn’t be distracting.
2) Wind instrument effects include bends, falls, growls, half-sounds, air and keys,
humming, circular breathing, and alternate fingerings.
3) Trumpet effects: double/triple-tonguing, using mutes, pedal tones, walking bass.
4) Saxophone effects include overtones and split notes, altissimo playing, and thunks.
5) Trombone effects include alternate positions and slides, plus some trumpet effects.
6) Keyboard effects: clusters, tremolo, block chords, hammering, strings and pedals,
and glissandos.
7) Guitar effects: bends and vibrato, tremolo, muted strumming, harmonics, tuning
effects, and octaves.
8) Bass effects include harmonics, chords, slides, twangs and slaps, wide vibrato, and
bowed notes.

(Level 4 — Strong)
4D:
More Development
• 249
249
249
249
4D: More Development
4D: More Development
4D: More Development
4D: More Development
In this chapter you’ll learn about:
•
Using Quotes
•
Riffing
•
Basic Development Combinations
his chapter covers some interesting melodic development techniques, such as
using quotes from other tunes and developing with up-tempo riffs. It also
explains development combinations that can add variety to your solos.
Using Quotes
A quote happens when you play all or part of the melody of a well-known song in your
solo. The quote can be as silly as “Three Blind Mice” or as hip as a quotation from a
great artist’s solo, or anything in between. It can also be transposed to fit any key.
Quotes can be fresh, entertaining material if you handle them well; otherwise, they
sound predictable or forced. The idea is to pleasantly surprise the listener. The quote
should spring naturally out of a idea in your solo (see Quoting Naturally below).
The following guidelines can help you with quotes:
1) Keep the quote short. The listener should say, “Hey, wasn’t that ...?” not “OK,
that’s enough!”
2) Know the quote well (intervals, pitches, rhythms).
3) Don’t repeat the same quote in the same tune (but you can vary the quote).
4) Draw from many types of music (folk, pop, rock, children’s, classical, etc.).
5) Generally, you should play quotes sparingly.
6) The easiest tunes for using quotes are ones with simple progressions, such as blues,
modal tunes, and tunes that don’t modulate. On simple tunes you can sometimes
play some rather long quotes.
Quoting Naturally
Quoting Naturally
Quoting Naturally
Quoting Naturally
Probably the worst quoting mistake is having a favorite quote you must play in a tune.
When you do play it, chances are it will sound stiff or predictable because it doesn’t
relate well to what you played just before. Instead, use quotes that grow out of your
own melodic ideas. That way, you play the quote because it fits, not because you’re
forcing it to belong.
To prepare for using quotes in your solos, you should:
•
Memorize the melodies to many different tunes, from many different styles.
•
Practice the tunes with slightly different rhythms.
•
Be able to play the tunes in just about any key.
If you pay close attention to the intervals and rhythms you play (or someone else plays)
during your solo, something may remind you of a well-known song you can quote.
Then when you play the quote, it sounds like it fits with what you’re playing.
T

250
250
250
250 • 4D:
More Development
(Level 4 — Strong)
4.24 Varied or Partial Quotes
4.24 Varied or Partial Quotes
4.24 Varied or Partial Quotes
4.24 Varied or Partial Quotes
Some of the best quotes are varied (altered rhythm or pitches), or partial (notes left out
of the original). With imagination, you can come up with many variations of an original
quote. Varied quotes leave the audience in more suspense, letting you use quotes more
frequently. A varied quote of “Three Blind Mice” is shown below. It slightly varies the
rhythm and pitches of the original.
==== ====== =========
Example 4.24 - Varied quote of “Three Blind Mice”
For some humor in your solo, you can change some notes in the quote to non-
harmonic (“wrong”) pitches. Another useful technique is to blur the rhythm of the
quote, playing it in a rubato style (see Using Rubato in Chapter 5C: Rhythmic Freedom).
Exercise 4.24
Using Varied Quotes
Quotes on the BRIDJJ CD
Quotes on the BRIDJJ CD
Quotes on the BRIDJJ CD
Quotes on the BRIDJJ CD
Below are quotes played in the BRIDJJ “Beat the Rats” CD. The quotes in these solos
were not pre-planned; the quotes in the main tune melodies (marked by asterisks) were.
Most of the quotes on the CD are varied. As you listen to these quotes, start a little
before each timing so you get the context of how the quote fits into the solo.
CD Track
Timing
Quote
“Deja Blue”
4:27-4:37
**Peter Gunn
“Beat the Rats”
1:30-1:33
Autumn in New York
“I Think I’ll Keep Her”
1:00-1:09
**Whistle While You Work (5:45-5:55)
3:38-3:41
How Are Things in Glocca Morra?
3:52-3:56
St. Thomas
5:23-5:28
Twilight Zone
“Three and Me”
5:16-5:19
Anything Goes
“Precious Caboose”
2:11-2:15
Satin Doll
“Where’s Waldis?”
1:48-1:51
Surrey With the Fringe on Top
2:20-2:22
I Love Lucy
Riffing
A riff is a short, fast motif you repeat several times. Riffs can add energy and variety to
solo, if they aren’t overused. Generally, eighth-note riffs should be played at least at a
tempo of quarter-note = 240; eighth-note triplets at least at quarter-note = 180; and
sixteenth-notes at least at quarter-note = 120.
An example riff and its repetition are shown below. The riff can be repeated several or
many times. This riff works best at quarter-note = 180 or faster.
(Level 4 — Strong)
4D:
More Development
• 251
251
251
251
etc.
======= ……………
You can also play riffs that aren’t in strict tempo (Off-Tempos and Burning in Chapter 5C:
Rhythmic Freedom).
4.25 Two-Part Riffs
4.25 Two-Part Riffs
4.25 Two-Part Riffs
4.25 Two-Part Riffs
A two-part riff is a riff made from a two-part motif. These riffs are harder to invent, but
they can add even more energy to a melody. The two parts should be far enough apart
in pitch so they are heard as separate.
….......... ===== ...…...... =====
Example 4.25 - Two-part riff and repetition
..........….. ======= ........…......... =======
Example 4.25a - Another two-part riff and repetition
Exercise 4.25
Creating Riffs
4.26 Changing a Riff
4.26 Changing a Riff
4.26 Changing a Riff
4.26 Changing a Riff
For variety, you can change a riff repetition slightly. Even a slight change can produce
extra energy and interest. Here are some ways to vary riffs:
•
Change individual pitches
•
Sequence the riff
•
Insert notes into the riff
Below is a riff that changes individual pitches. The first repetition is exact; the second
changes one note; the third changes two notes. The changed notes produce expanded
intervals.
..................
............…... …...............
Repetition 1 Repetition 2 Repetition 3
Example 4.26 - Changing pitches in riff repetitions; expanded intervals
Next is an example of sequencing. The second and third repetitions are transposed
down a whole-step each (a half-step down from the last note of the riff).
252
252
252
252 • 4D:
More Development
(Level 4 — Strong)
...….......... ............…... .…..................
Repetition 1 Repetition 2 Repetition 3
Example 4.26a - Sequencing a riff.
And here’s an example of inserting notes. This example inserts two notes (**) at the
start of the first repetition and 4 at the second; the effect is to displace the riff.
* *...............……..... * * * * .....…...........
Repetition 1 Repetition 2
Example 4.26b - Inserting notes into riff repetitions
Exercise 4.26
Changing Riffs
4.27 Riff Transitions
4.27 Riff Transitions
4.27 Riff Transitions
4.27 Riff Transitions
Riffs are usually better with smooth transitions before and after. Here are some
transition techniques:
•
Get into the riff smoothly
•
Get out of the riff smoothly
•
Hook two riffs together
To get into a riff, make the last intro note and the first note of the riff close in pitch:
Intro Riff
Example 4.27 - Getting into a riff
Next is an example of getting out of a riff. The first exit note is close to the last riff
note, and in this example the rhythms slow down somewhat.
..................... .…………….................
Repetition 1 Exit: reverse contour, slow rhythms
Example 4.27a - Exiting a riff
And here’s an example of hooking two riffs together. There is a brief transition between
the riffs, and the second riff is higher in pitch or faster, to build intensity.
(Level 4 — Strong)
4D:
More Development
• 253
253
253
253
Repetition 1 Transition, new riff ……
Example 4.27b - Hooking two riffs together
Exercise 4.27
Riff Transitions
4.28 Pentatonic and Blues Riffs
4.28 Pentatonic and Blues Riffs
4.28 Pentatonic and Blues Riffs
4.28 Pentatonic and Blues Riffs
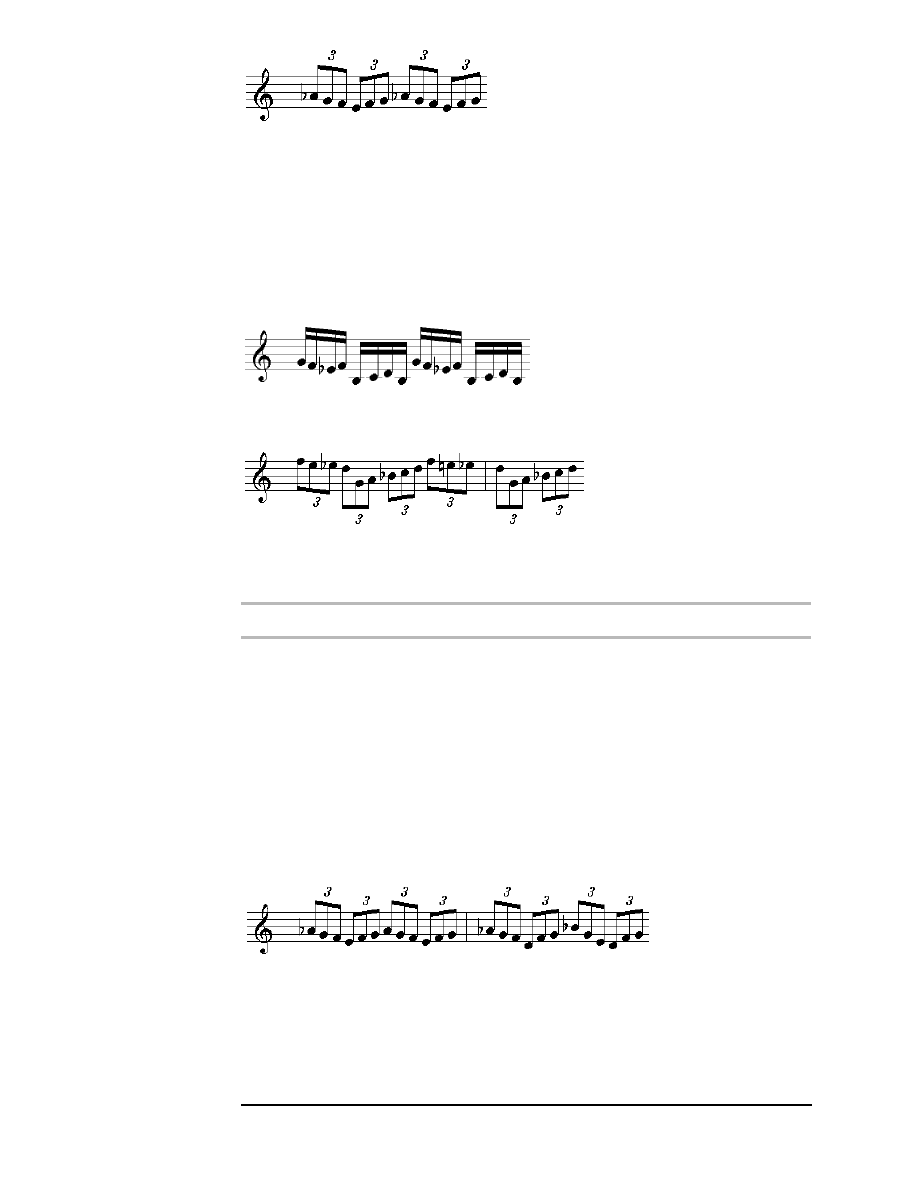
Pentatonic and blues riffs can be an exciting technique as long as they’re not overdone
(some players seem to be fixated on them). Make sure they fit naturally into your overall
ideas as a way to build intensity. Below are some examples; each one can be repeated
several times:
Example 4.28a - Pentatonic riff and repetition
Example 4.28b - Pentatonic riff and repetition
Example 4.28c - Blues riff .... and repetition
Example 4.28d - Blues riff ...... and repetition
You can also vary one or more pitches in blues or pentatonic riffs so they take on
additional color.
Exercise 4.28
Pentatonic and Blues Riffs
Basic Development Combinations
You can play some very interesting ideas by using combined development, which means
developing a motif in two ways at once.
Combining Development Techniques
Combining Development Techniques
Combining Development Techniques
Combining Development Techniques
Combine any two of the techniques below to develop a motif. Items 1 through 5 work
in pairs; if you choose both members of a pair (such as adding notes and omitting
notes) apply one technique to the first part of the motif and the other to the end.
254
254
254
254 • 4D:
More Development
(Level 4 — Strong)
1) Expanding intervals
1a)
Shrinking intervals
2) Adding notes
2a)
Omitting notes
3) Augmenting rhythms
3a)
Compressing rhythms
4) Slow-to-fast rhythms
4a)
Fast-to-slow rhythms
5) Diatonic sequence
5a)
Transposed sequence
6) Semi-sequence
7) Inverting the contour
8) Fragmenting
9) Displacing
10) Converting to a riff
4.29 Using Development Combinations
4.29 Using Development Combinations
4.29 Using Development Combinations
4.29 Using Development Combinations
You can combine these development techniques in many different ways. Below are a
sample motif and a few of its development combinations.
Example 4.29 - Original motif Example 4.29a - Displacing, transposing
Example 4.29b - Compress, invert
Example 4.29c - Expanding intervals, omitting notes
See also Chapter 5E: More Development Combinations.
Exercise 4.29
Development Combinations
Chapter Review
1) A quote is all or part of the melody of a well-known song played in your solo.
2) A varied quote changes the melody of a well-known song in your solo.
3) A riff is a short, fast, motif (one- or two-part) that is repeated several times.
4) You can repeat a riff exactly or change it by altering pitches, sequencing, or
inserting notes in repetitions.
5) Riff transitions are effective when you enter the riff smoothly, exit smoothly, or
hook two riffs together.
6) You can combine two different development techniques in a motif or phrase.
(Level 4 — Strong)
4E:
Variations on ii-V-I’s
• 255
255
255
255
4E: Variations on ii-V-I’s
4E: Variations on ii-V-I’s
4E: Variations on ii-V-I’s
4E: Variations on ii-V-I’s
In this chapter you’ll learn about:
•
Tritone Substitutions
•
Going from the V to a New I
•
ii-V-I Chains
•
ii-V and V-I Chains
•
ii-V-I Variations in Jazz Standards
any jazz tunes have chord progressions that modulate (change keys) or use ii-V-
I’s in different ways. This chapter discusses common modulations and ii-V-I
variations so you can recognize them in chord progressions and use them in
your solos.
Tritone Substitutions
Just as you can simplify ii-V-I’s, you can also spice them up with tritone (augmented
4th) substitutions.
4.30 Building Tritone Substitutions
4.30 Building Tritone Substitutions
4.30 Building Tritone Substitutions
4.30 Building Tritone Substitutions
A tritone substitution occurs when you use a bII chord instead of a V, creating a ii-bII-I
progression. For example, in the key of C the ii-bII-I progression would be Dm to Db7
to CMa7. These chords move down by half-steps – a strong chord movement. Because
the substitute bII is a tritone away from the V, using the bII is called a tritone
substitution. You can substitute a ii-bII-I wherever you see a written II-V-I.
Tritone substitution favors dominant alterations (b5, +5, b9, +9). For example::
Dm7
G7 (play a Db7)
CMa7
b9 +5 b5
Example 4.30 - Tritone substitution: ii-bII-I (Dm7-Db7-CMa7) over ii-V-I
You can also use “opposite” tritone substitution: when the actual chords are ii-bII-I,
you can use II-V-I instead, as in the example below.
Dm7
Db7 (play a G7)
CMa7
Example 4.30a - Opposite tritone substitution:. ii-V-I (Dm7-G7-CMa7) over ii-bII-I
Exercise 4.30
Using Tritone Substitutions
M

256
256
256
256 • 4E:
Variations on ii-V-I’s
(Level 4 — Strong)
Going from the V to a New I
A dominant chord (V) usually resolves up a 4th to the root chord (I or i), such as G7 to
CMa7, or G7 to Cm. This resolves the built-in energy of the dominant chord. But a
dominant chord can also resolve to certain other chords besides the root chord.
4.31 New Resolutions for V Chords
4.31 New Resolutions for V Chords
4.31 New Resolutions for V Chords
4.31 New Resolutions for V Chords
A dominant chord can also resolve to a I chord that is:
•
Down a 1/2 step (such as G7 to F#Ma)
•
Up or down an augmented 4th (G7 to C#Ma)
By using a different dominant resolution, it sounds like you modulate to a new key; the
new I chord is unexpected but sounds good. Below are chord progressions for each of
these dominant resolutions.
Em7 A7 | AbMa7
ii V
new I, key of Ab
Example 4.31 - V resolves down 1/2 step
Cm7 F7
| BMa7
ii V
new I, key of B
Example 4.31a - V resolves up an augmented fourth
Exercise 4.31
Resolving Dominant Chords to Other I Chords
4.32 Resolving to a Related Minor Chord
4.32 Resolving to a Related Minor Chord
4.32 Resolving to a Related Minor Chord
4.32 Resolving to a Related Minor Chord
A dominant chord can also resolve to a related minor chord (a minor chord in the key
of the major I):
•
Up a whole step, going to the minor vi (such as G7 to Am in C Major)
•
Down a minor third, going to the minor iii (such as G7 to Em in C Major)
Resolving to the minor vi or iii chord makes the progression sound like it’s switching to
minor. A tug between major and minor can give welcome variety to the progression.
Exercise 4.32
Dominant to Related Minor Chords
ii-V-I Chains
4.33
Some tunes “chain” consecutive ii-V-I progressions together to modulate to a I
chord in a distant key – one with several more (or fewer) sharps or flats. Any ii-V-I’s
can be used in a chain; they sound good because of the strong chord movements (up a
4th). The example below chains ii-V-I’s together. It begins with a ii-V-I in the key of C
Major then adds ii-V-I’s in E Major, F Major, and B Major.
Dm7
G7
| CMa7 | F#m7B7 | EMa7

(Level 4 — Strong)
4E:
Variations on ii-V-I’s
• 257
257
257
257
(ii-V-I in C -----------------------) (ii-V-I in E ----------------)
Gm7
C7
| FMa7 | C#m7
F#7| BMa7
(ii-V-I in F ------------------------) (ii-V-I in B ---------------)
Example 4.33 - Eight-measure progression using arbitrary ii-V-I chains
Exercise 4.33
Writing ii-V-I Chains
4.34 Parallel ii-V-I’s
4.34 Parallel ii-V-I’s
4.34 Parallel ii-V-I’s
4.34 Parallel ii-V-I’s
Although any ii-V-I’s can be chained together, usually the ii of each ii-V-I moves up or
down by a constant interval. This makes the ii-V-I’s sound like they are related to each
other in a parallel way. Examples of parallel ii-V-I progressions are shown below.
Chain Intvl.
First ii-V-I
Second ii-V-I
1/2-step up
Dm7-G7-CMa7 |
Ebm7-Ab7-DbMa7
1/2-step down
Dm7-G7-CMa7 |
C#m7-F#7-BMa7
1-step up
Dm7-G7-CMa7 |
Em7-A7-DMa7
1-step down
Dm7-G7-CMa7 |
Cm7-F7-BbMa7
Fourth up
Dm7-G7-CMa7 |
Gm7-C7-FMa7
Using parallel ii-V-I’s, a tune can modulate to any key. You can use this technique to
add your own chords when the original progression stays on a single chord for a while.
Example: Bridge of “Cherry Key”
Example: Bridge of “Cherry Key”
Example: Bridge of “Cherry Key”
Example: Bridge of “Cherry Key”
The bridge (B) section of “Cherry Key” uses a chain of ii-V-I’s. Starting in B Major,
each ii-V-I moves down a whole-step. Instead of F Major for the last two bars, the tune
uses a ii-V (Cm to F7) to get back to the original key of Bb Major.:
C#m
| F#7
| BMa6
| •/•
|
(ii-V-I in B ---------------------------------------------------------)
Bm
| E7
| AMa6
| •/•
|
(ii-V-I in A ---------------------------------------------------------)
Am
| D7
| GMa6| •/•
|
(ii-V-I in G ---------------------------------------------------------)
Gm
| C7
|Cm
|F7
|
(ii-V in F ---------------------------
(ii-V in Bb ---------------)
Example 4.34 - Bridge to “Cherry Key”
Exercise 4.34
Modulating w/ Parallel ii-V-I Chains

258
258
258
258 • 4E:
Variations on ii-V-I’s
(Level 4 — Strong)
ii-V and V-I Chains
4.35 ii-V Chains
4.35 ii-V Chains
4.35 ii-V Chains
4.35 ii-V Chains
Some tunes chain ii-V progressions then resolve to a I chord. Any ii-V’s can be used;
they work well because of the strong movement (up a 4th) of each ii-V. The example
below chains several ii-V’s. It begins with a ii-V in the key of C Major, adds a ii-V in Db
Major, then ends with a ii-V-I in E Major.
Dm7
G7
| Ebm7
Ab7
|F#m7 B7
| EMa7
(ii-V in C -------)
(ii-V in Db --)
(ii-V-I in E ----------)
Example 4.35 - Using arbitrary ii-V chains
You can also simplify a ii-V by playing only the I or ii scale across both chords.
Parallel ii-V’s
Parallel ii-V’s
Parallel ii-V’s
Parallel ii-V’s
Like ii-V-I chains, ii-V’s often move up or down by a constant interval, creating a
parallel movement.
Chain Interval
Example
1/2-step up
Dm7-G7, Ebm7-Ab7
1/2-step down
Dm7-G7, C#m7-F#7 (the V and ii are an augmented 4th apart)
1-step up
Dm7-G7, Em7-A7
1-step down
Dm7-G7, Cm7-F7 (circle of fourths)
4th up
Dm7-G7, Gm7-C7 (the V and ii are on the same pitch)
Exercise 4.35
Modulating with Parallel ii-V Chains
4.36 V-I Chains
4.36 V-I Chains
4.36 V-I Chains
4.36 V-I Chains
An alternative to the II-V chain is the V-I chain. The V-I chain usually begins with a ii-
V-I so each V chord will be in the “even-numbered” position (such as the second chord
in a bar, or the only chord in an even-numbered bar). As with II-V’s, the V-I’s can be
random or parallel. You can also play a single scale for each V-I.
The example below uses consecutive V-I progressions to modulate from C Major to F#
Major to Bb Major.
Dm7
G7
| CMa7 C#7 | F#Ma7 F7 | BbMa7
(ii-V-I in C ------------)
(V-I in F# ------) (V-I in Bb)
Example 4.36 - Modulating with V-I chains
Example: First Half of “Giant Stops”
Example: First Half of “Giant Stops”
Example: First Half of “Giant Stops”
Example: First Half of “Giant Stops”
The first half of the tune “Giant Stops” uses two chains of V-I progressions (the first
one is D7-GMa, Bb7-EbMa). Each chain begins on the V halfway through a bar, after
starting the bar on a major chord.
BMa
D7
| GMa Bb7
| EbMa| Am D7
|

(Level 4 — Strong)
4E:
Variations on ii-V-I’s
• 259
259
259
259
(V- I in G --)
(V- I in Eb ----------)
GMa
Bb7| EbMa
F#7
| BMa |Fm
Bb7 ||
(V- I in Eb--)
(V- I in B------------)
Example 4.36a - V-I chains in “Giant Stops” tune
Exercise 4.36
Modulating with Parallel V-I Chains
4.37 Minor ii-V and V-i Chains
4.37 Minor ii-V and V-i Chains
4.37 Minor ii-V and V-i Chains
4.37 Minor ii-V and V-i Chains
Minor ii-V progressions can be chained together to modulate. The example below
modulates from C minor to Db minor to E minor. The ii chords are m7-5 in quality;
this gives the feeling of minor ii-V progressions, even though the minor i chord is not
actually played.
Dm7-5 G7-9| Ebm7-5 Ab7+9 | F#m7-5 B7-9| Em7
(ii-V in C min) (ii-V in Db minor) (ii-V-i in E minor -----)
Example 4.37 - Modulating with minor ii-V chains
Minor V-i progressions can also be chained together to modulate to other keys. The
example below modulates from C minor to F# minor to Bb minor.
Dm7-5
G7-9
| Cm7 C#7+9 | F#m7 F7
| Bbm7
(ii-V-i in C minor ----)
(V-i in F# min) (V-i in Bb minor--)
Example 4.37a - Modulating with minor V-i chains
Exercise 4.37
Using Minor ii-V and V-i Chains
Chapter Review
1) A V chord can resolve to a new I chord by moving down a half-step, or up or down
an augmented 4th.
2) A V chord can also resolve to a substitute I chord, such as the vi or iii.
3) ii-V-I progressions can be chained together to modulate to another key. The
interval between each progression can be random or parallel.
4) ii-V progressions and V-I progressions can be chained together to modulate to
another key.
5) V-I progressions usually start in an even-numbered position (halfway through a bar
if there are two chord per bar, or on an even-numbered bar if one chord per bar).
6) Consecutive major, minor, or dominant chords can be used to modulate quickly.

260
260
260
260 • 4F:
Chord Substitutions
(Level 4 — Strong)
4F: Chord Substitutions
4F: Chord Substitutions
4F: Chord Substitutions
4F: Chord Substitutions
In this chapter you’ll learn about:
•
Turnarounds and Inserted Chords
•
Chord Substitutions in Jazz Standards
•
Altered Blues
•
Static Playing: Avoiding ii-V-Is
ust as you can vary ii-V-Is in a tune, you can insert and substitute chords to increase
the harmonic interest. The two main substitution methods discussed in this chapter
are turnarounds and inserted chords. And once you get the knack of substituting
chords, sometimes it’s helpful to know when not to substitute them.
Turnarounds and Inserted Chords
A turnaround is a way to add chords to a progression so you get back to (“turn around”
to) a starting place. Turnarounds are often used to add variety in the last two bars of a
blues, which are two bars of the I chord, followed by another bar of the I chord when
the blues repeats back to the beginning bar.
4.38 Blues Turnarounds
4.38 Blues Turnarounds
4.38 Blues Turnarounds
4.38 Blues Turnarounds
To figure out the chords to add in a blues turnaround, follow the steps below.
1
In the last two bars, mark these spots as places where you need to add chords:
•
Beat 3 of bar 11
•
Beat 1 of bar 12
•
Beat 3 of bar 12
In a C blues, the last two bars look like this (the blanks indicate added chords):
||: C7 __ | __ __ :|| C7 (bar 1)
2
Find a chord for the last slot. This should be a dominant (V) chord that moves
strongly to the C7 (I) chord in bar 1. Good choices are G7 (up a 4th to C7), or Db7
(down 1/2 step to C7), or F#7 (up a #4 to C7). Let’s pick G7 for now:
| C7
__
| __ G7
:|| (C7)
3
Find a chord for the third slot. It should move strongly to the G7 chord; let’s pick
Dm7 for now (up a 4th to G7):
| C7
__
| Dm7
G7
:|| (C7)
4
Find a chord for the second slot. It should move strongly to the Dm chord; let’s
pick A7 for now (up a 4th to Dm7):
J
(Level 4 — Strong)
4F:
Chord Substitutions
• 261
261
261
261
| C7
A7
| Dm7 G7
:|| (C7)
The turnaround is now complete.
Turnaround Variations
Turnaround Variations
Turnaround Variations
Turnaround Variations
Below are some common turnarounds for a C blues. They use strong dominant chord
movements.
1. | C7
A7
| Dm7 Db7 :|| (C7)
2. | C7
Eb7
| Dm7 G7
:|| (C7)
3. | C7 Eb7
| Dm7 Db7 :|| (C7)
4. | C7 A7
| Ab7 G7 :|| (C7)
5. | C7
A7
| Ab7 Db7 :|| (C7)
6. | C7 A7
| Dm7 Db7 :|| (C7)
Example 4.38 - Common turnaround examples in C
You can also use a V-I progression to fill the second and third slots of the turnaround.
In this case, there would not be a strong movement from the third to fourth chord, but
the other movements are strong.
7. | C7 Db7
| F#Ma7
G7
:|| (C7)
8. | C7 E7
| AMa7
G7
:|| (C7)
9. | C7 F7
| Bbmi7 Db7
:|| (C7)
10. | C7
F#7
| BMa7
G7
:|| (C7)
11. | C7 Bb7
| Ebmi7
Db7
:|| (C7)
Example 4.38a - Turnarounds with arbitrary V-I progressions
Exercise 4.38
Using Turnarounds
4.39 Inserting Stepwise Chords
4.39 Inserting Stepwise Chords
4.39 Inserting Stepwise Chords
4.39 Inserting Stepwise Chords
You can insert a melodic pattern between harmonically distant chords. Each new
sequence of the pattern is based on the next note up or down the scale (chromatic or
diatonic). This fills in the gap between two chords that are a third or a fourth apart. In
the first example below, the original chords are C7 & F7; the inserted chords are D7,
Eb7, and E7, forming a stepwise bridge going up.
C7 (D7
Eb7
E7)
F7

262
262
262
262 • 4F:
Chord Substitutions
(Level 4 — Strong)
Example 4.39 - Adding stepwise arpeggios, going up
In the next example, the original chords are C7 and A7; the inserted chords are B7 and
Bb7, which form a chromatic bridge going down.
C7
(B7
Bb7)
A7
Example 4.39a- Adding chromatic arpeggios, going down
Exercise 4.39
Inserting Chromatic Chords
Chord Substitutions in Jazz Standards
4.40
4.40
4.40
4.40
The chart below describes the ii-V-I variations in several of the standards in 200
Standard Tunes. The bars with the variations are indicated by line-number, bar-number
(L2m3 = line 2, third bar). Compare the chart to the tunes in the 200 Standard Tunes
section, then try the exercise.
Tune
Variation
Bars
A Night in 2-Kneesia
Minor ii-V-i
L2m3-4, L3m1-3
Dom. down 1/2
L1m1-6
Dom. up a #4
L4m4-L1m1
Tritone subst.
L5m1-L6m1,L7m2-L8m1
Air-Again
Parallel ii-V-i’s
L3m2-L5m4
Minor ii-V-i
L5m4-L1m1, L7m4-L1m1
ii-V chain
L6m1-L7m2
I Remember Yews
ii-V
L1m2, L6m2, L7m2
Dom. up a #4
L2m2-3
ii-V-I chain
L3m2-L6m1
Minor ii-V-i
L6m4-L7m1
Turnaround
L8m3-4
Half Nails, Son
ii-V’s
L1m3-4
ii-V chain
L2m3-4
Turnaround
L4m3-4
Joysprinkles
Dom. up a #4
L1m4-L2m1
ii-V-I, modulate
L2m4-L3m1, L4m4-L5m1
ii-V chain
L3m4-L4m2
Turnaround
L8m3-4
Exercise 4.40
Finding ii-V-I Variations

(Level 4 — Strong)
4F:
Chord Substitutions
• 263
263
263
263
Altered Blues
4.41
4.41
4.41
4.41
You can insert chords in a blues progression, creating an altered blues
progression. There are many variations of altered blues, but most variations follow the
guidelines of inserting chords and using turnarounds.
Below are some altered blues progressions in C, with explanations of the inserted
chords. The progressions use turnarounds and variations on ii-V-Is.
Variation #1: Bird Blues
Variation #1: Bird Blues
Variation #1: Bird Blues
Variation #1: Bird Blues
This altered blues is called “Bird” blues, because it was often used by Charlie Parker
(nicknamed “Bird”).
| C7
| Bm7 E7
| Am7 D7
|Gm7 C7|
1
2
3
4
| F7
| Fm7
| Em7
| A7
|
5
6
7
8
| Dm7
|G7
|Em7 A7
|Dm7 G7
||
9
10
11
12
Example 4.41 - “Bird” blues in C
Bars 2 - 4: Goes around the circle of 4ths to get to the F7 in bar 5. From bar 2 to 5,
each chord goes up a 4th.
6: Switches to minor.
7 - 10:
Goes around circle of 4ths to get to G7 in bar 10. The Fm7 in bar 6 moves
smoothly to the Em7 in bar 7. (Em7 in bar 7 is also a substitute for CMa7.)
11 -12:
Typical 2-bar turnaround w/ circle of 4ths.
Variation #2: Altered Minor Blues
Variation #2: Altered Minor Blues
Variation #2: Altered Minor Blues
Variation #2: Altered Minor Blues
This minor blues has several ii-V’s and a turnaround.
| Cm
| Dm7b5 G7
| Cm
| Gm7 C7 |
1
2
3
4
| Fm7
| Fm7 Bb7 | EbMa7
| Ebm7 Ab7|
5
6
7
8
| Dm7b5
| Db7+9
| Cm7 A7b9
| Ab7 G7
||
9
10
11
12
Example 4.41a - Altered minor blues
Bar 4:
ii-V-i to Fm7 in bar 5.
6 - 7:
ii-V-I to EbMa7.
8 - 9:
ii-V in key of DbMa, but bar 9 is Dm. The V chord (Ab7) moves up a
#4th to the Dm7b5.
9 -11:
A tritone substitution (ii-bII-I) in minor.
11 -12:
2-bar turnaround with downward chromatic movement from A7b9 to G7.
The Ab7 remains dominant for variety.

264
264
264
264 • 4F:
Chord Substitutions
(Level 4 — Strong)
Variation #3: Another Altered Minor Blues
Variation #3: Another Altered Minor Blues
Variation #3: Another Altered Minor Blues
Variation #3: Another Altered Minor Blues
This minor blues uses a long chain around the circle of fourths, starting in bar 6.
| Cm
| Dm7b5 G7
| Cm | F#7 |
1
2
3
4
| Fm7
| Em7 A7
| Dm7 G7
| Cm7 F7
|
5
6
7
8
| Bbm7 Eb7| Abm7 Db7 | Cm7 | F#7 ||
9
10
11
12
Example 4.41b - Another altered minor blues
Bar 4:
#4 chord (F#7) resolves down a half-step to the minor iv chord in bar 5.
6 - 10:
Long chain of ii-V’s, starting down a half-step from the minor iv, ending at
the minor i chord in bar 11.
12: Simple turnaround of one chord: the #4 that resolves to the minor i chord in bar 1.
This gives the listener a rest after the long chain. The F#7 was also used in bar 4, a
similar location.
Variation #4: Another Bird Blues
Variation #4: Another Bird Blues
Variation #4: Another Bird Blues
Variation #4: Another Bird Blues
This blues starts on the bii, starting a long chain.
| C#m7 F#7| Bm7
E7
| Am7 D7
| Gm7 C7
|
1 2
3
4
| F7
| Fm7 Bb7
| EbMa7
| Ebm7 Ab7|
5 6
7
8
| DbMa7
| Dbm7 Gb7 | CMa7 Bb7
|EbMa7 Ab7
9
10
11
12
Example 4.41c - A different “Bird” blues
Bars 1 - 4: Goes around the circle of 4ths starting with bar 1. The beginning C#m7 is
an interesting contrast to the original C7.
6 - 7:
Switches to F minor, then uses a ii-V-I to go to Eb Major.
8 - 9:
Switches to Eb minor, then uses a ii-V-I to go to Db Major (like taking
bars 6 and 7 down a step).
10-11:
Switches to Db minor, then uses an altered ii-V-I (Dbm7 to Gb7 to CMa7)
to get back to C Major. The CMa7 in bar 11 and the F7 in bar 5 give us the
only real clues that this blues is actually in C.
11-12:
A 2-bar turnaround designed to get to the C#m7 in bar 1. It goes around
the circle of 4ths from Bb to C# (same as Db).
Exercise 4.41
Writing Blues Variations

(Level 4 — Strong)
4F:
Chord Substitutions
• 265
265
265
265
Static Playing: Avoiding ii-V-Is
4.42
4.42
4.42
4.42
Some tunes or solos suggest an open feeling – perhaps a single chord vamp or a
blues. That’s when static playing can be valuable. In static playing, you avoid outlining ii-
V-Is in your solo to reduce the harmonic energy.
Using ii-V-Is is somewhat like creating harmonic “tides” of push and pull in the music.
When you eliminate the ii-V-I’s, the focus shifts towards your rhythms, expression, and
development. In static playing you can still use a few non-harmonic tones and even play
outside a little, as long as you don’t imply ii-V-Is. Staying away from ii-V-Is eliminates
that “tidal pull” of harmony.
Here are some examples of note patterns to avoid in static playing (in C Major):
D-F-A-B-G (ii-V); D-B-G-C (V-I); F-E (4 to 3, like G7 to C)
Exercise 4.42 Static Playing
Chapter Review
1) A turnaround is a special way to add chords to a progression so that you get back to
(“turn around” to) a certain starting place.
2) To fill in a turnaround progression, work backward from the final resolution chord.
3) Two common ways to add chords to a progression are chromatically and around
the circle of 4ths.
4) You can create altered blues progressions by substituting ii-V’s, V-I’s, and
turnarounds.
5) Static playing (avoiding ii-V-Is) can be helpful to draw attention away from
harmony and towards the basic key, style, rhythms, and expression in a solo.

266
266
266
266 • 4G:
Group Interaction
(Level 4 — Strong)
4G: Group Interaction
4G: Group Interaction
4G: Group Interaction
4G: Group Interaction
In this chapter you’ll learn about:
•
Interaction Ideas
•
Ensemble Texture
•
Solo Formats
•
Playing in Duets and Trios
•
Gig Survival
uestion: When is a jazz group greater than the sum of its parts? Answer: When the
group interacts musically. As you learn to interact with your group, your solos can
take on new dimensions.
Interaction Ideas
One of the most enjoyable challenges for the soloist is learning to interact musically
with the members of the group. Good interaction can take a solo beyond its borders,
making it an exciting group experience.
Communicating in Solos
Communicating in Solos
Communicating in Solos
Communicating in Solos
Contrary to what some players think, the soloist is not the only one who is playing
important ideas. The other members can greatly inspire the soloist, or in some cases can
even join in as multiple soloists.
A successful solo is like a conversation among the group members. The soloist leads the
discussion, and the group members are like the supporting actors who feed the leader
ideas. When members of the group hear interesting ideas from the soloist (or from the
other members), they can react in any of these ways:
1) Let the idea go by. This by helps the idea stand out, but does not necessarily build
communication. Even when you let it go by, someone else may be communicating
with it, so you’ll get your turn soon. Remember: the soloist may be in the middle of
his or her own development and may play something even more interesting in a few
seconds.
2) Play against the idea. For example, if the idea uses offbeats, play against it with
downbeats, or vice versa; if the idea is ascending, play descending, etc.
3) Play under the idea, such as repeated tones, pedal notes, drum rolls, etc. This
simplifies the rhythm or chords and draws attention to the soloist and can enhance
a solo that’s building intensity.
4) Copy the idea (explained below).
5) Alter or develop the idea (explained below).
Important: The group can use any or all of the above methods at the same time. It’s
not necessary for all members to copy or play against at the same time; variety makes an
effective engine behind the soloist.
Q

(Level Four — Strong)
4G:
Group Interaction
• 267
267
267
267
When and How to Copy
When and How to Copy
When and How to Copy
When and How to Copy
Whether and how to copy a soloist’s idea are ongoing decisions made with split-second
timing. Here are the basic choices for imitation:
1) Copy the whole idea. This works best with shorter ideas. But don’t overdo it;
conversing with a soloist is not an imitating contest, it’s communication.
2) Copy part of the idea (the most intriguing part, or the part you can manage to hear
and play accurately). Remember: you can copy one or more pitches, but don’t forget
about copying part of the rhythm (such as a triplet group or offbeat).
3) Alter or develop the idea. This is the most subtle way to communicate - you take a
few notes of the idea, alter them and play them back. This leaves the door open for
more twists and turns and tends to pull the audience into the conversation. You can
play a sequence or semi-sequence on the original idea, or augment the rhythm.
The more the soloist and group members respond, the farther the communication goes.
This can be exciting when it occurs naturally and isn’t forced. But too many groups get
in the habit of conversing too long on a single idea (like talking too long on a limited
subject). Unless the idea is developing well, it’s usually better to create a short (or very
short) conversation and be ready to develop the next exciting idea. Remember: the next
idea could be something the group just played; the soloist isn’t always the originator.
Style and Rhythmic Transitions
Style and Rhythmic Transitions
Style and Rhythmic Transitions
Style and Rhythmic Transitions
One of the most exciting events in a tune is when the entire rhythmic style changes
unexpectedly for one or more bars. For example the feel could change from bossa to
samba, from ballad to double-time swing, from swing to funk, etc. You can trigger this
with a rhythmic idea, or someone else can trigger it.
However, too often the style shifts feel forced, predictable, or unsteady. Here are two
common misconceptions about style shifts:
Misconception #1: The whole group needs to shift styles.
Fact #1: It’s OK to have one or more players not join in the shift sometimes (unless
the shift is a radical one). For example, half the group could shift to double-time while
the other half stays is single-time.
Misconception #2: The shift needs to happen as quickly as possible, preferably all at
once.
Fact #2: The style shift can build gradually, with one player joining at a time so the
intensity builds. (And yes, sometimes it is cool when everyone shifts styles at once.) For
ways to create rhythmic shifts, see Chapter 5D: Rhythm Pulses.
Interaction on the BRIDJJ CD
Interaction on the BRIDJJ CD
Interaction on the BRIDJJ CD
Interaction on the BRIDJJ CD
This section describes some of the locations in solos on the BRIDJJ CD “Beat the
Rats” where obvious musical interaction occurs, between soloist and band, or among
the band members. The interactions happened on the spot during the recording; they
were not pre-planned.
Deja Blue
1:26-1:33 Bass plays consecutive downbeat quarter-notes in solo; guitar then comps
with quarter-notes; drums then play accented roll, on beat 4.
2:26
Drums and bass kick into quarter-note triplets; guitar solo imitates and
shifts to eighth-note triplets with contours of 2.

268
268
268
268 • 4G:
Group Interaction
(Level 4 — Strong)
Beat the Rats
3:03
Guitar distorts at end of solo, drums follow with a strong kick.
I Think I’ll Keep Her
2:35-2:44
Bass fills with eighth-note triplets with contours of 2; piano solo follows at
2:37; drums follow at 2:44.
5:45-5:57
Keyboards and drums fill behind long, held high notes in trumpet.
Barney Meets Godzilla
:47-:48
Trumpet fill notes at :47 answered by piano at :48.
2:25-2:28
Dotted quarters in trumpet solo are picked up by the drums at 2:27, then
the guitar at 2:28.
2:40-2:47
While trumpet holds alternate-fingered trill in high register, guitar fills with
a repeated rhythmic pattern.
4:10-4:12
Guitar figure of 8th-note triplets picked up by drums at 4:12.
7:27-7:29
Trumpet wiggle answered by percussive piano chord at 7:29.
Precious Caboose
1:52-1:55
Trumpet quarter-note triplets answered by drums, from 1:54-1:55.
2:27-2:29
Trumpet trill answered by drum roll.
2:32-2:33
Trumpet and bass simultaneously play eighth-note triplets.
3:29-3:34
Bass solo plays offbeat quarters from 3:29-3:31; guitar answers from 3:31-
3:34.
Overall
During trumpet and bass solos, smooth switching between guitar comping
and piano comping. This creates a light and interesting background.
Where’s Waldis?
2:36-2:38 Trumpet plays sparse chromatic fills; drums imitate rhythm.
3:03-3:05 Trumpet repeats high notes several times, piano adds strong fill.
6:02-6:52 Guitar and piano trade and vary 2-bar rhythmic pattern
Ensemble Texture
Background Riffs
Background Riffs
Background Riffs
Background Riffs
Background riffs can sometimes add excitement behind solos, but they must not
interfere with the solo. The riffs can be pre-planned, or they can develop out of
something that happens during a solo. Below are some ideas of how to use background
riffs:
1) During a rhythm section solo, the horn(s) can play a simple repeated background
riff.
2) During latin or fusion drum solos, the bass can play a repeated pattern over one or
two chords.
3) The keyboard or guitar can intersperse motifs in a bass solo and sometimes during
a drum solo.

(Level Four — Strong)
4G:
Group Interaction
• 269
269
269
269
Multiple Soloists
Multiple Soloists
Multiple Soloists
Multiple Soloists
Occasionally, two or more soloists can play at once. Trading bars is a safer alternative,
but simultaneous soloing can be effective if the players use space, timing, and
development wisely. Here are some tips:
1) Have the second soloist wait for a bar or so after the first soloist starts. Try to keep
an active musical conversation going.
2) For shorter durations, have two soloists play together. Make sure the rhythms are
solid.
3) Keep listening for where to build and end the solo.
You can get into multiple soloing by practicing jazz duets and learning how to give and
take with ideas.
Solo Formats
Usually, a soloist improvises uninterrupted for several choruses. But there are many
other solo formats to use; for variety, try any of the techniques below.
Half-Chorus Solos
Half-Chorus Solos
Half-Chorus Solos
Half-Chorus Solos
In ballads or tunes with longer solo choruses, it’s often a good idea for one soloist to
take the first half of the chorus and another soloist the second half. This also lends
contrast to a feature piece; a secondary soloist can take half a solo, allowing one and a
half (or more) choruses for the featured soloist.
4.43 Trading Bars
4.43 Trading Bars
4.43 Trading Bars
4.43 Trading Bars
Trading bars is where two or more soloists divide up the chord progression and play
short solos. Usually, each player takes four bars (called “trading 4’s”). Other common
trading lengths are eight bars, two bars, or 12 bars if the tune is a blues. Trading is
usually done with the drums (horn, drums, guitar, drums, bass, drums, etc.) or around
the group (piano, horn, bass, drums, etc.). The trading continues for several choruses as
soloists repeat the order until trading is finished.
Here are some guidelines for successfully trading bars:
1) Clearly signal when trading is to start. Specify the kind of trading (with drums, or
around the group) and how many bars to trade. Anyone who wants to be left out of
the trading should signal that.
2) Be ready for your turn; don’t be unprepared.
3) Try to develop on the ideas the previous soloist just played, when appropriate.
4) Clearly signal when it’s time to end trading and return to the tune melody. Don’t let
the trading go on too long.
Sometimes, brief quotes from other tunes can be effective during trading (see Using
Quotes in Chapter 4D: More Development).
"
Exercise 4.43
Trading Bars in Solos
4.44 Stop-Time Solo Fills
4.44 Stop-Time Solo Fills
4.44 Stop-Time Solo Fills
4.44 Stop-Time Solo Fills
You can build solo fills into the structure of the tune melody. These are most effective
as stop-time fills, where everyone drops out during the fill except the soloist. This builds

270
270
270
270 • 4G:
Group Interaction
(Level 4 — Strong)
suspense well, but it requires clean and imaginative playing on each fill. Here are some
suggestions for playing stop-time fills:
•
Use double-time frequently (see Practicing Double-Time Fills in Chapter 4B: Double-
Time and Half-Time).
•
Use interesting rhythms.
•
Develop ideas from previous fills.
A good example of playing many stop-time fills is Wynton Marsalis’ solo on Buggy Ride
on the CD “Joe Cool’s Blues.”
Exercise 4.44
Playing Stop-Time Solo Fills
4.45 Solo Endings and Transitions
4.45 Solo Endings and Transitions
4.45 Solo Endings and Transitions
4.45 Solo Endings and Transitions
The end of your solo leaves a lasting impression on the audience. Some do’s and don’ts
for ending solos:
•
Don’t end your solo in the middle of the progression, unless you’re intentionally
(and clearly) doing a half solo.
•
Don’t commit to another solo chorus unless you can feel momentum or new ideas
spurring you on. Likewise, if some good intensity is building, don’t bail out on the
solo too soon.
•
For variety, try extending your solo a few bars into the next soloist’s progression.
•
At the start of your solo, try to pick up on the last idea of the previous solo for a
smooth transition.
The group should always know which is the last solo, and someone should signal the
immediate return to the melody to avoid annoying delays. During solos, you can look
around and see who else wants to solo later or who wants to skip a solo.
Exercise 4.45
Using Solo Endings and Transitions
Playing in Duets and Trios
When you play in duets or trios, there’s a new set of challenges and opportunities. The
basic jazz functions are now handled by two or three people instead of four or more. In
duets and trios, the priorities are:
1) Melody (horn, vocalist, or chord instrument)
2) Chords (piano, guitar, vibes, etc.)
3) Bass (acoustic or electric bass, or chord instrument)
4) Drums
Notice that chord instruments can play melody, chords, and bass. Duets almost always
include chord instruments, but usually don’t include drums.
Instrument Combinations
Instrument Combinations
Instrument Combinations
Instrument Combinations
Some typical instrument combinations for duets and trios are listed below.
Duets:

(Level Four — Strong)
4G:
Group Interaction
• 271
271
271
271
•
Chords and bass
•
Horn and chords
•
Vocalist and chords
•
Two chords. This is usually piano and guitar, piano and vibes, or two pianos. The
piano can occasionally fill in the bass line.
Trios:
•
Chords, bass, and drums.
•
Horn, chords, and bass.
•
Two chords and bass.
•
Horn, bass, and drums (for advanced players. In this combination, the horn player
has a more chordal responsibility.
Switching Roles
Switching Roles
Switching Roles
Switching Roles
One of the best ways to keep a duet or trio sounding fresh and interesting is for the
players to occasionally switch roles in the music. Here are some examples:
•
Running bass. Instead of walking with quarter-notes, the bass “runs” with faster
rhythms. This is like a double melody (see below).
•
Horn held notes and trills. A horn player can hold out harmony background notes,
or trill on the held notes. The held notes shouldn’t compete or conflict with the
melody player or soloist.
•
Bass chords. These can be played behind the tune melody or behind solos.
•
Bass lines in other instruments. The chord instrument can sometimes fill in with a
walking bass line. (See also Trumpet Effects in Chapter 4C: Special Effects).
•
Percussive effects. One or two players can play staccato notes behind the soloist, or
all players can play staccato notes or patterns together. In the latter case, it’s vital to
keep a solid sense of time.
•
Double melodies (counterpoint). Two melodies can be played during the tune
melody or during solos.
Time and Form
Time and Form
Time and Form
Time and Form
Because many duets and trios don’t have drums, it’s very important for each player to
be accurate with the tempo and confident with rhythms. You can still take rhythmic
chances, but every “liberty” should be compared against a solid framework of rhythm
and form. This is especially true when players switch roles for a while (see Switching Roles
above). Players should always know exactly where they are in the tune form.
Gig Survival
There are many kinds of jazz gigs, from free jazz to stiff casuals. No matter what the
gig, it’s a good idea to fit in well with the band (especially if you’ve never met them) and
the audience. Here are some survival tips:
1) Prepare for the gig, physically and mentally. Get all the details straight (time,
location, dress, method and timing of payment, etc.).

272
272
272
272 • 4G:
Group Interaction
(Level 4 — Strong)
2) Be sure you understand the kinds of music you’ll be playing; listen to examples
beforehand.
3) Treat the gig professionally. You can always turn down a loser gig the next time, but
people form opinions of your playing and professionalism on each gig.
4) Listen closely to the styles the other soloists use. Your solo and background ideas
should fit in smoothly.
5) Resist the temptation to go overboard or grab too much spotlight. Focus on the
group sound and direction, not just your own ideas. On casuals, generally avoid
harmonically “outside” playing.
6) Play solid rhythms and strong motifs. In short or conservative solos, you don’t have
time for a lot of notes, but you do have time for a lot of meaning.
7) Know tunes, know styles, know chord progressions. You can never be too
prepared.
8) Be on top of solo entrance, dynamics, and expression. These elements tend to set
you apart from other players, especially when solo space is limited on the gig.
9) Play intelligent backgrounds. When the time is right, playing a subtle and effective
background behind another soloist can expand your role in the group.
10) Watch and listen for road signs and endings. Be ready for shortened solos, cuts,
segues, special endings, etc. The last thing you want is to be the only player to “miss
the train.”
Chapter Review
1) Group interaction depends on everyone accurately hearing the musical ideas.
2) Basic ways to communicate in solos are:
A) Play something against (contrary to) the idea.
B) Play under the idea (background).
C) Copy the idea.
D) Alter part of the idea.
3) For variety in solo formats, try half solos, trading bars, background riffs, multiple
soloists, solo fills, and effective solo endings and transitions.
4) Style shifts by one or more players can increase the variety in the tune.
5) Common duet combinations: a) chords and bass, b) horn or vocalist and chords,
and c) two chords.
6) Common trio combinations: a) chords, bass, and drums, b) horn (or vocalist),
chords, and bass, c) two chords and bass, and d) horn, bass, and drums.
7) In duets or trios, players can sometimes switch basic roles.
8) Accurate time and form are essential in duets and trios, especially with no drums.
9) Professionalism and musical sensitivity on a gig increases your demand as a soloist.
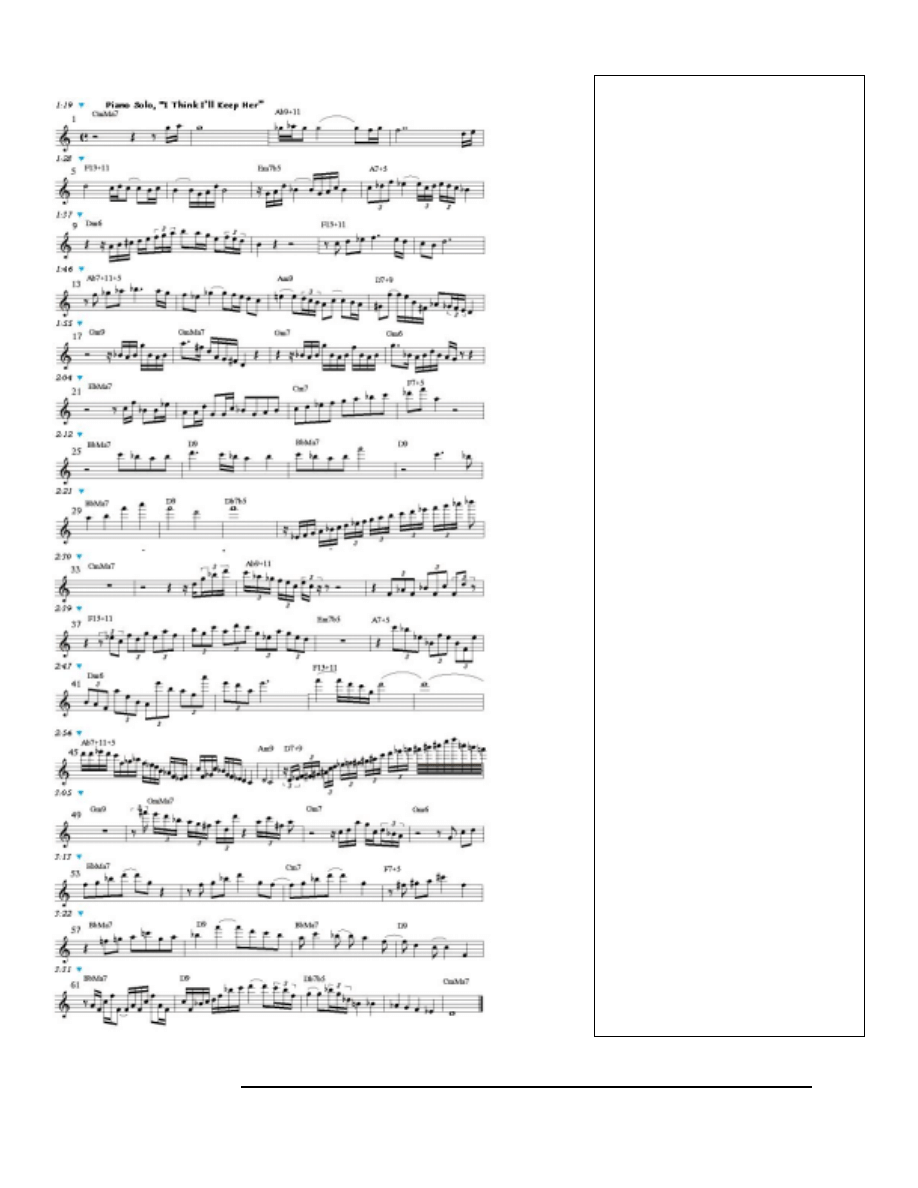
(Level Four — Strong)
4H:
Analyzing Solos – Level 4
• 273
273
273
273
4H: Analyzing Solos – Level 4
4H: Analyzing Solos – Level 4
4H: Analyzing Solos – Level 4
4H: Analyzing Solos – Level 4
Comments for Piano Solo,
Comments for Piano Solo,
Comments for Piano Solo,
Comments for Piano Solo,
“I Think I’ll Keep Her”
“I Think I’ll Keep Her”
“I Think I’ll Keep Her”
“I Think I’ll Keep Her”
*m1-2 Motif borrowed from end of
flugelhorn solo.
*m1-4 Downward sequences, varied
displacements.
*m6
Notes added to motif; developed
in m7-8.
*m13-14 Sequence of m11-12
*m14
Notes added to motif; developed
in m15-16.
*m17-18 Expanding intervals.
*m19-20 Displacement, m17;
shrink/expand intervals.
*m21-22 Descending diatonic sequence.
*m25-26 Varied quote, “Whistle While
You Work.”
*m27
Expanded intervals of motif in
m25.
*m28
Augmentation of motif in m25.
*m31
“Burning” (Chapter 5C:
Rhythmic Freedom)
*m36
3 against 2 triplet motif
borrowed from bass fill.
*m37-42 Development of motif in m36.
*m38-43 4 against 3 triplets contours.
*m41 Wide
intervals.
*m43-47 Long, double-x, long
*m48 Diminished-whole-tone
scale,
burning.
*m53
Motif displaced in m54-56.
*m56
Chromatic semi-sequence, m54.
*m61
2nd half of bar is displacement
of first half.
*m63
Semi-sequence triplets from
previous bar.
*m63-65 Lowering the intensity.
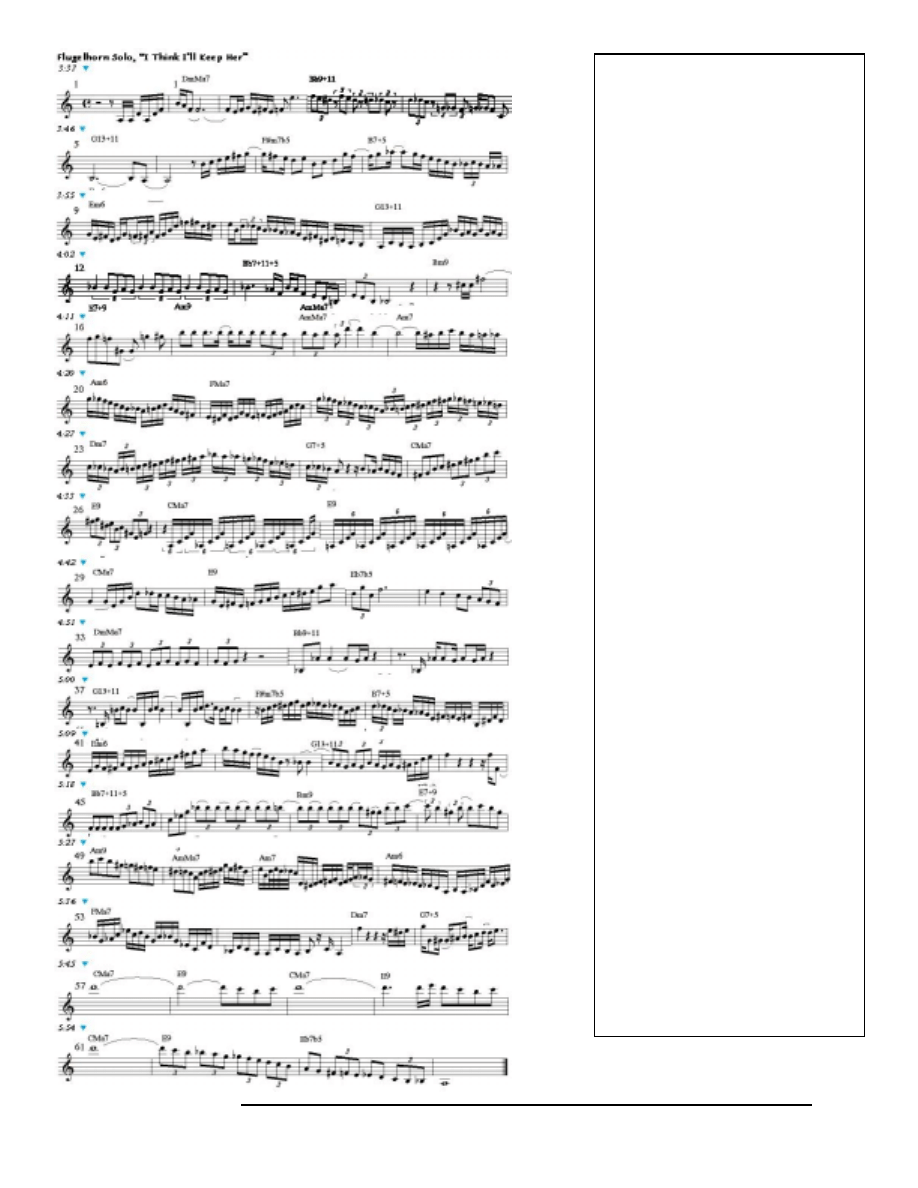
274
274
274
274 • 4H:
Analyzing Solos – Level 4
(Level 4 — Strong)
Comments for Flugelhorn Solo,
Comments for Flugelhorn Solo,
Comments for Flugelhorn Solo,
Comments for Flugelhorn Solo,
“I Think I’ll Keep Her”
“I Think I’ll Keep Her”
“I Think I’ll Keep Her”
“I Think I’ll Keep Her”
*m0-1
Varied quote, “How Are Things
in Glocca Morra.”
*m3
Contour groups of 3 triplets and
triplet rest.
*m4
Semi-sequence of m3
*m6-8 Quote, “St. Thomas.”
*m8-11 Double-time passage.
*m11-13 Riff w/ variations
*m16 In E7 chord, G is #9, F is b9,
G# is 3.
*m20-24 Double-time.
*m22-24 3-against-4 riff
*m25-26 Downbeat color, non-harmonic
tones.
*m27-28 Two-part riff.
*m31-32 Release; long note and
descending line.
*m36
Rhythmic variation of motif in
m35.
*m38-41, 50-54 Double-time.
*m42
Growl and riff.
*m44 Downward octave rip.
*m46-48 Shifted quarter-note triplets
(beat 2).
*m47-49 Quote, “Twilight Zone.”
*m53-54 Linked semi-sequences, outside.
*m56 Consec.
offbeats.
*m57-61 “Whistle While You Work.”
*m62-63 Rubato, desc. line; lower
intensity.
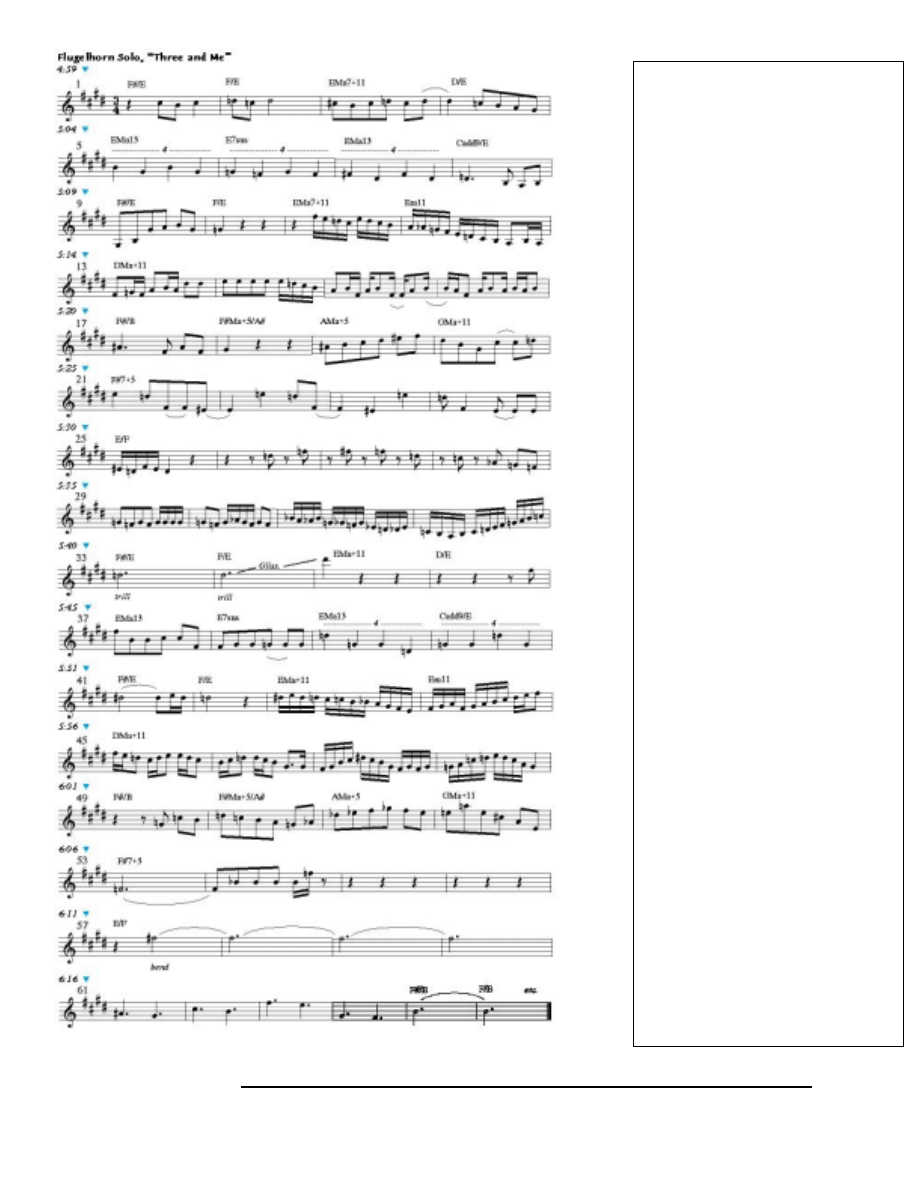
(Level Four — Strong)
4H:
Analyzing Solos – Level 4
• 275
275
275
275
Comments for Flugelhorn Solo,
Comments for Flugelhorn Solo,
Comments for Flugelhorn Solo,
Comments for Flugelhorn Solo,
“Three and Me”
“Three and Me”
“Three and Me”
“Three and Me”
*m2-3 Displacements of motif in m1.
m5-7
4-against-3 brackets; linked semi-
sequences.
m11-16 Double-time.
m15-16 Varied quote, “Anything Goes.”
m21-24 4 against 3; motif repeats with
slight rhythmic variations.
*m25
Alternating minor and major 3
rd
in key of D.
*m26-28 Consecutive offbeat 8
th
-notes.
*m29-30 Variations on G and F pitches.
*m31 Transposed
sequences.
*m31-32 Double-time passage.
*m33
Non-harmonic tone, trilled and
glissed.
*m36-38 Offset 8
th
-note pairs.
*m39-40 4-against-3 brackets.
**m43-48
Double-time passage.
*m44-46 2 against 3; groups of two 16ths
and an 8
th
in a descending
diatonic pattern.
*m48
Transposed sequences of
beginning of m47.
*m49-54 Outside playing (Chapters 5A
and 5B) starting in the key of the
previous transposed sequence
(key of C).
*m50-51 Use of +5 tones in major chords.
*m54
Abruptly short articulations.
*m57-60 Long bend, indiscriminate tones.
*m61-64 Only use of dotted quarters in
solo.
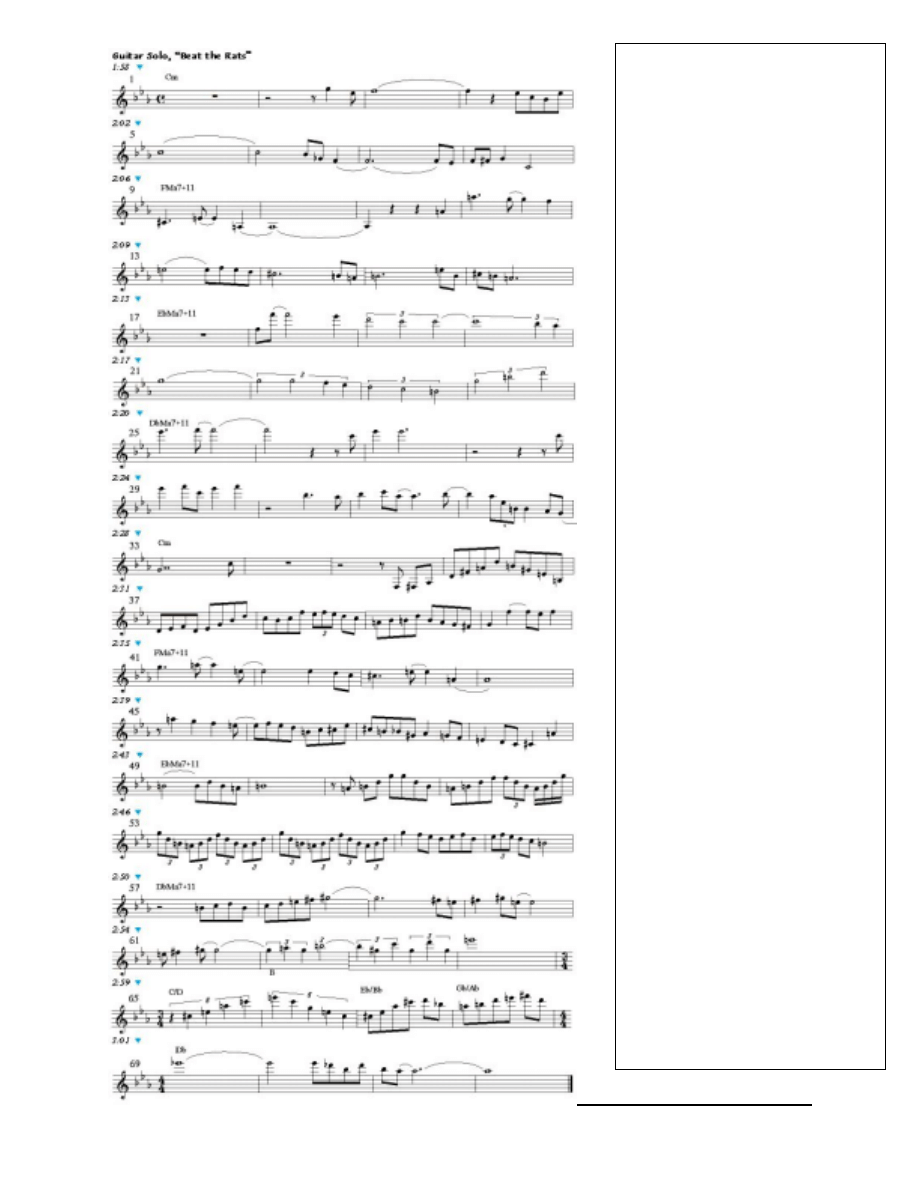
276
276
276
276 • 4H:
Analyzing Solos – Level 4
(Level 4 — Strong)
Comments for Guitar Solo,
Comments for Guitar Solo,
Comments for Guitar Solo,
Comments for Guitar Solo,
“Beat the Rats”
“Beat the Rats”
“Beat the Rats”
“Beat the Rats”
*m6-7 Compare m2-5: rhythmic
variations, compressed long
notes.
*m9,14,16 AMa chord over FMa;
produces a #5 (C#). See also
m43, 48.
*m11-16 Winding octave fill, downwards
*m13-14 Unequal compression of m12-
13.
*m18-22 Octave fill, descending.
*m18-25 Half-note triplets and ties give a
free-floating feeling.
*m23-24 GMa chord over EbMa;
produces a #5 (B). See also m49-
56.
*m27,29 Downbeat emphasis (after
floating feeling)
*m33
Hitting the root and pausing
(after numerous polychords).
*m35-36 DMa and EMa chords over Cmi.
*m36
Descending EMa over Cmi;
pulling sequence with ascending
DMa chord.
*m41,43 Similar motif in m9.
*m45 Consecutive
offbeats.
*m51-54 Two-part riffing.
*m52
Displacement, eighth-note early
(only 7 notes in prev. motif).
*m53
Compression of eighth-notes
into eighth-note triplets.
*m57-64 A Harmonic Minor over DbMa,
with natural 7 (G#) emphasized.
*m62-64 Expanding intervals.
*m65-66 5-note brackets over 3/4; AMa
over C/D, then CMa over B.
*m67
AMa chord, then Bb Ma chord,
over Eb/Bb.
*m67-68 3 against 4, pentatonic 6-note
contours of eighth-notes.
*m68
DMa chord over Gb/Ab.

(Level Four — Strong)
4J:
Transcribing Solos
• 277
277
277
277
4J: Transcribing Solos
4J: Transcribing Solos
4J: Transcribing Solos
4J: Transcribing Solos
In this chapter you’ll learn about:
•
Basic Transcription Skills
•
Step 1: Select a Solo
•
Step 2: Outline the Form and Chords
•
Step 3: Sketch the Rhythm
•
Step 4: Add Pitches and Expression
ranscribing (writing down) a recorded solo should be a great exercise for your ear, not
just an exercise in frustration. This chapter shows how to transcribe solos without
“banging your ear against the wall.”
Here are the basic steps to follow in order to transcribe a recorded solo (single-line melody):
1
Outline the form of the solo and divide it into choruses and bars on your music paper.
2
If you have the chords to the solo, write them in above the empty bars on your paper.
If you don’t have the chords, transcribe them from the recording.
3
Sketch the rhythms in the solo accurately.
4
Add the pitches and expression (articulations, accents, effects, rubato) to the rhythmic
sketch.
If you’re already skilled in writing rhythms and melodies, go to Step 2: Outlining the Form and
Chords below. Otherwise, read Basic Transcription Skills below.
Basic Transcription Skills
Transcription requires the musical skills listed below. If you are currently weak in any of
these skills, you may want to improve them before you start transcribing solos.
•
Dividing and organizing music into choruses.
•
Recognizing chords (if no lead sheet). You should be able to identify the chord root
(usually in the bass) and type (major, minor, or dominant).
•
Recognizing pitches and intervals. Perfect pitch is not required, but good relative pitch
is essential.
•
Notating rhythms correctly. To practice rhythmic notation, you can sing or play a
familiar tune, such as Twinkle, Twinkle, Little Star, into a tape recorder with your own
“jazzed-up” rhythms. Then play back the tape and write down the exact rhythms for
what you recorded. Play the rhythms you wrote and see if they match the recording.
Step 1: Select a Solo
4.46
4.46
4.46
4.46
Here are ideas for selecting a solo to transcribe:
•
It should fit your current transcription skills.
•
It should be interesting and pose challenges to you.
•
If the recording is a tape, it should be clear enough so you can hear the notes you will
transcribe.
T

278
278
278
278 • 4J:
Transcribing Solos
(Level 4 — Strong)
•
If you have a lead sheet (melody and chords) of the tune being improvised on, this can
save you time in finding out the chord progression for the solo.
Start simple. For example, the Miles Davis trumpet solo on “So What” from the “Kind of
Blue” CD is simple melodically and rhythmically but is quite interesting. Also, the recorded
solo should be on cassette tape or CD; phonograph recordings are difficult to work with.
Another approach is to transcribe a solo for which you already have a written transcription
in a book. Look back at the book version only when you get stuck.
Exercise 4.46
Selecting a Solo
Step 2: Outline the Form and Chords
Outlining the form of the solo in advance helps you get the right number of bars in your
transcription. If you have a lead sheet of the tune, copy the chords above empty bars on
your music paper, making sure you include repeats and road signs.
If you don’t have a lead sheet, listen to the solo once all the way through. If it’s too long,
decide how much of it you want to transcribe. Then follow these steps:
1
Find the meter (4/4, 3/4, etc.). This is usually the same as the original tune’s meter.
2
Determine how many bars are in each complete chorus of the solo. Write four empty
bars on each staff of music paper, with a double bar at the end of each section. Most
tunes will use eight-bar sections; blues tunes use 12-bar sections.
4.47 Transcribing the Chords
4.47 Transcribing the Chords
4.47 Transcribing the Chords
4.47 Transcribing the Chords
So why do you need to transcribe the chords to the solo if you’re just trying to copy the solo
melody? Transcribing the chords helps in these ways:
•
The chords can help you better determine some of the more difficult pitches in the solo
later on.
•
When the solo is finished, you can better appreciate how the soloist’s melody works
against the chord progression of the tune.
•
It’s good ear training.
To transcribe the chords of a tune, follow these steps:
1
Transcribe the bass line for the first solo chorus as well as possible. (The bass line may
be more clear in the melody section than in the solos). These bass notes will usually
indicate the roots of the chords you’re trying to transcribe. Find strong dominant
movements, such as up a 4th, down a half-step, etc.
2
Determine the quality (major, minor, dominant) of each chord in the chorus. Use a
keyboard for this.
3
Find any b5, +5, b9, or +9 dominant alterations.
4
When you finish the chords for an entire chorus (including the bridge, if any), copy
these chords to the remaining choruses in the solo. Occasionally the chords may change
from chorus to chorus, but at least you’ll have basic chords at your disposal.

(Level Four — Strong)
4J:
Transcribing Solos
• 279
279
279
279
Exercise 4.47
Outlining the Form and Chords
Step 3: Sketching the Rhythms
4.48
4.48
4.48
4.48
After you have the chord progression ready, you need to write a rhythmic sketch of
the solo, chorus by chorus. In some places, the rhythms and pitches in the solo may be
obvious enough that you can go ahead and write the actual notes down. However, there will
likely be many spots where a rhythmic sketch will definitely speed up the transcription
process.
The steps below show how to create rhythmic sketches.
1
Find and mark the exact beat or offbeat where the soloist’s phrase starts. Write any
necessary rests before the start of the phrase.
2
Find and mark the exact beat or offbeat where the soloist’s phrase ends (followed by a
silence or longer note).
3
Listen to the rhythm in the phrase until you can hum it accurately.
4
In light pencil, write down the rhythm you hear. Use diamonds for longer notes (whole-
notes or half notes) and slash marks for faster notes. Write each sketch note so it
matches the contour (not exact pitch) of the melody.
5
Repeat steps 1 through 4 for each phrase in the solo. When you finish, go back and
check your sketch so it accurately fits the rhythms you hear.
6
If a phrase seems to have a strange rhythm, the soloist may have been using rubato (or
made a mistake). In this case, mark where the phrase begins and ends, count the
number of pitches you hear, and write “rubato” over the phrase.
Exercise 4.48
Sketching the Rhythms
Step 4: Adding Pitches and Expression
4.49
4.49
4.49
4.49
Once your rhythmic sketch is complete, you will have heard the solo enough to be
familiar with its pitches. To add the pitches for the solo,
1
Change rhythm notes in your sketch to actual pitches. Use a keyboard or other
instrument if necessary. Contours in the rhythm sketch will help.
With pitches that are difficult to hear, try these steps:
2
Find the top and bottom pitches of the contour first, as these are often easier to hear.
Next, find the pitches that occur on beats 1 and 3, if possible.
3
See if the missing notes fit with the current chord symbol in the tune. If not, they may
be part of an added or outside chord.
4
If you have a variable-speed tape recorder, tape the recording at half-speed to help you
hear the notes better. Half-speed notes sound an octave lower than normal speed.

280
280
280
280 • 4J:
Transcribing Solos
(Level 4 — Strong)
When you have finished adding the pitches for the transcription, mark the following types
of expression in the solo:
•
Strong or unusual accents
•
Unusual articulations
•
Dynamics and effects
Exercise 4.49
Adding Pitches and Expression
Chapter Review
1) The basic transcription skills you need are:
A) Organize the solo into bars and choruses.
B) Recognize the chords, if necessary.
C) Recognize pitches and intervals.
D) Notate rhythms correctly.
2) The steps in transcribing a recorded solo are:
A) Select a recorded solo on CD or cassette.
B) Outline the form and chords of the solo.
C) Sketch the rhythm figures in the solo.
D) Add the pitches and indicate any significant expression or effects in the solo.
Expressions
Expressions
Expressions
Expressions
*The more intellectual people are, the more originality they see in other men. To commonplace
people all men are much alike. Blaise Pascal
*It is not sufficient to know what one ought to say, but one must also know how to say it. Aristotle
*There is nothing so easy but that it becomes difficult when you do it with reluctance. Terence Heauton
Timorumenos
*To know how to hide one's ability is great skill. Rochefoucauld
*The winds and waves are always on the side of the ablest navigators. Gibbon
*Nothing ever happens but once in this world. What I do now I do once for all. It is over and gone,
with all its eternity of solemn meaning. Carlyle
*Don't talk to me about a man's being able to talk sense; everyone can talk sense -- can he talk
nonsense?
William Pitt the Elder

(Introduction)
Exercises for Level 4
•
281
281
281
281
Exercises for LEVEL 4
Exercises for LEVEL 4
Exercises for LEVEL 4
Exercises for LEVEL 4
Melody: Soundscapes
Exercise 4.1
Pulling Improvisation Ideas
Basic __/__/__ ( )
Medium __/__/__ ( ) Challenge __/__/__ ( )
❏
*Basic:
Choose a major or minor key and “pull” a two-bar phrase. Start and end securely; use an
interesting shape.
❏
**Medium:
Same as Basic; use a 4-bar phrase.
❏
***Challenge:
Same as Basic; use a 6- or 8-bar phrase.
❏
>More:
Same as Basic; A) don't pause between keys - connect to the next root and proceed; B) play 2
octaves on each key; C) both A and B
❏
A
Play-Along:
Aebersold Vol. 1 – circle of 4ths – 4 bars per chord
Exercise 4.2
"
Variety in Rhythmic Styles
Basic __/__/__ ( )
Medium __/__/__ ( ) Challenge __/__/__ ( )
❏
*Basic:
Choose a ballad play-along recording. Use the table in 4.2 for ideas in rhythmic variety.
❏
**Medium:
Same as Basic; choose a latin, slow swing, or medium swing tune.
❏
***Challenge:
Same as Basic; choose an up-tempo latin or swing tune.
❏
>More:
Same as Basic; A) don't pause between keys - connect to the next root and proceed; B) play 2
octaves on each key; C) both A and B
❏
A
Play-Along:
Aebersold Vol. 1 – circle of 4ths – 4 bars per chord
Exercise 4.3
"
Building Intensity
Basic __/__/__ ( )
Medium __/__/__ ( ) Challenge __/__/__ ( )
❏
*Basic:
Repeat an interesting idea several times; vary it slightly after several repetitions.
❏
**Medium:
Build intensity by gradually developing an idea; make it louder, higher, or both.
❏
***Challenge:
Experiment with techniques in Part 5: accelerating, burning, wiggling, special effects, or outside.
❏
>More:
Same as Basic; A) don't pause between keys - connect to the next root and proceed; B) play 2
octaves on each key; C) both A and B
❏
A
Play-Along:
Aebersold Vol. 1 – circle of 4ths – 4 bars per chord
Exercise 4.4
"
Lowering Intensity
Basic __/__/__ ( )
Medium __/__/__ ( ) Challenge __/__/__ ( )
❏
*Basic:
Play a dense idea for two bars, then develop it by inserting longer rests or playing fewer notes.
❏
**Medium:
Same as Basic; use a lower range and softer dynamics.
❏
***Challenge:
Same as Basic; use slower rhythms and long notes with expression.

282
282
282
282 •
Exercises for Level 4
(Introduction)
❏
>More:
Same as Basic; A) don't pause between keys - connect to the next root and proceed; B) play 2
octaves on each key; C) both A and B
❏
A
Play-Along:
Aebersold Vol. 1 – circle of 4ths – 4 bars per chord
Rhythm: Double-Time and Half-Time
Exercise 4.5
"
Going Into Double-Time
Basic __/__/__ ( )
Medium __/__/__ ( ) Challenge __/__/__ ( )
❏
*Basic:
Using a metronome setting of quarter-note = 100, play swing eighth-notes for 4 bars, then shift
to double-time feel for 4 bars. Use any scale notes; ascending, descending, or mixed contours.
❏
**Medium:
Same as Basic; quarter-note = 120.
❏
***Challenge:
Same as Basic; quarter-note = 140.
❏
>More:
Same as Basic; A) don't pause between keys - connect to the next root and proceed; B) play 2
octaves on each key; C) both A and B
❏
A
Play-Along:
Aebersold Vol. 1 – circle of 4ths – 4 bars per chord
Exercise 4.6
"
In and Out of Double-Time
Basic __/__/__ ( )
Medium __/__/__ ( ) Challenge __/__/__ ( )
❏
*Basic:
Using a metronome setting of quarter-note = 100, play swing eighth-notes for two bars. Shift to
double-time feel for two bars, then shift back to single-time for the next two bars.
❏
**Medium:
Same as Basic; quarter-note = 120.
❏
***Challenge:
Same as Basic; quarter-note = 140.
❏
>More:
Same as Basic; A) don't pause between keys - connect to the next root and proceed; B) play 2
octaves on each key; C) both A and B
❏
A
Play-Along:
Aebersold Vol. 1 – circle of 4ths – 4 bars per chord
Exercise 4.7
"
Using Double Time Material
Basic __/__/__ ( )
Medium __/__/__ ( ) Challenge __/__/__ ( )
❏
*Basic:
Create four bars of steady double-time eighth-notes (two bars in the original, slower tempo).
❏
**Medium:
Same as Basic; create eight bars of double-time eighth-notes.
❏
***Challenge:
Play the longest stream of eighth-notes at the fastest tempo you’re OK with; go as far you can
with no breaks or errors.
❏
>More:
Same as Basic; A) don't pause between keys - connect to the next root and proceed; B) play 2
octaves on each key; C) both A and B
❏
A
Play-Along:
Aebersold Vol. 1 – circle of 4ths – 4 bars per chord

(Introduction)
Exercises for Level 4
•
283
283
283
283
Exercise 4.8
"
Using Triple Time
Basic __/__/__ ( )
Medium __/__/__ ( )
❏
*Basic:
Write several simple motifs and convert them to triple-time.
❏
**Medium:
Play a two-bar motif in slow single-time (quarter-note about 60); convert it to double-time (one
bar), then triple-time (half a bar).
❏
>More:
Same as Basic; A) don't pause between keys - connect to the next root and proceed; B) play 2
octaves on each key; C) both A and B
❏
A
Play-Along:
Aebersold Vol. 1 – circle of 4ths – 4 bars per chord
Exercise 4.9
"
In and Out of Half-Time
Basic __/__/__ ( )
Medium __/__/__ ( )
❏
*Basic:
At quarter-note = 200, play swing eighth-notes for two bars. Then go to half-time feel for one
long bar (two original bars) and back to single-time for the next two bars.
❏
**Medium:
Same as Basic; use quarter-note = 240.
❏
>More:
Same as Basic; A) don't pause between keys - connect to the next root and proceed; B) play 2
octaves on each key; C) both A and B
❏
A
Play-Along:
Aebersold Vol. 1 – circle of 4ths – 4 bars per chord
Expression: Special Effects
Exercise 4.10
"
Using Bends
Basic __/__/__ ( )
Medium __/__/__ ( ) Challenge __/__/__ ( )
❏
*Basic:
Play long, slow bends on random chromatic notes; work for control and intonation.
❏
**Medium:
Play quick bends on notes in a flexible scale; some bends go up, some down.
❏
***Challenge:
Add bends to notes in standard jazz tunes or other familiar tune melodies .
❏
>More:
Same as Basic; A) don't pause between keys - connect to the next root and proceed; B) play 2
octaves on each key; C) both A and B
❏
A
Play-Along:
Aebersold Vol. 1 – circle of 4ths – 4 bars per chord
Exercise 4.11
"
Using Falls and Glissandos
Basic __/__/__ ( )
Medium __/__/__ ( ) Challenge __/__/__ ( )
❏
*Basic:
Playing a flexible scale, occasionally using falls to skip down.
❏
**Medium:
Same as Basic; use glisses to skip up.
❏
***Challenge:
Add falls and glisses to standard tunes or other familiar melodies.
❏
>More:
Same as Basic; A) don't pause between keys - connect to the next root and proceed; B) play 2
octaves on each key; C) both A and B
❏
A
Play-Along:
Aebersold Vol. 1 – circle of 4ths – 4 bars per chord
Exercise 4.15
"
Growling, Humming, Air/Keys, and Half-Sounds

284
284
284
284 •
Exercises for Level 4
(Introduction)
Basic __/__/__ ( )
Medium __/__/__ ( ) Challenge __/__/__ ( )
❏
*Basic:
Play a flexible scale; growl some notes.
❏
**Medium:
Same as Basic; hum some notes.
❏
***Challenge:
Combine growling, humming, air, and key sounds in a longer passage.
❏
>More:
Same as Basic; A) don't pause between keys - connect to the next root and proceed; B) play 2
octaves on each key; C) both A and B
❏
A
Play-Along:
Aebersold Vol. 1 – circle of 4ths – 4 bars per chord
Exercise 4.17
"
Alternate Fingerings
Basic __/__/__ ( )
Medium __/__/__ ( ) Challenge __/__/__ ( )
o *Basic:
Memorize and play all alternate fingerings on your instrument.
o **Medium:
Play all alternate-fingered trills on your instrument, from slow to fast.
o ***Challenge:
Play a flexible scale; use alternate fingerings on repeated pitches, then add alternate-fingered trills
on some pitches.
❏
>More:
Same as Basic; A) don't pause between keys - connect to the next root and proceed; B) play 2
octaves on each key; C) both A and B
❏
A
Play-Along:
Aebersold Vol. 1 – circle of 4ths – 4 bars per chord
Exercise 4.18
"
Trumpet Effects
Basic __/__/__ ( )
Medium __/__/__ ( ) Challenge __/__/__ ( )
❏
*Basic:
On a flexible scale, use occasional double-tonguing or triple-tonguing on repeated or new
pitches.
❏
**Medium:
Play an octave’s worth of pedal tones (below low F#) with good sound and intonation. Use real
or fake fingerings.
❏
***Challenge:
On a C blues progression, play a walking bassline.
❏
>More:
Same as Basic; A) don't pause between keys - connect to the next root and proceed; B) play 2
octaves on each key; C) both A and B
❏
A
Play-Along:
Aebersold Vol. 1 – circle of 4ths – 4 bars per chord
Exercise 4.19
"
Saxophone Effects
Basic __/__/__ ( )
Medium __/__/__ ( ) Challenge __/__/__ ( )
❏
*Basic:
Slowly play all the split notes in a chromatic scale, then play a familiar melody adding a few split
notes.
❏
**Medium:
Experiment with thunk notes, then use some in a flexible scale or melody.
❏
***Challenge:
Learn as many altissimo notes as you can, then create melodies that switch between altissimo
and regular range.
❏
>More:
Same as Basic; A) don't pause between keys - connect to the next root and proceed; B) play 2
octaves on each key; C) both A and B
❏
A
Play-Along:
Aebersold Vol. 1 – circle of 4ths – 4 bars per chord

(Introduction)
Exercises for Level 4
•
285
285
285
285
Exercise 4.20
"
Trombone Effects
Basic __/__/__ ( )
Medium __/__/__ ( )
❏
*Basic:
Learn and play alternate positions for all notes that have them.
❏
**Medium:
Play a flexible scale and add slides that go up, down, and both.
❏
>More:
Same as Basic; A) don't pause between keys - connect to the next root and proceed; B) play 2
octaves on each key; C) both A and B
❏
A
Play-Along:
Aebersold Vol. 1 – circle of 4ths – 4 bars per chord
Exercise 4.21
"
Keyboard Effects
Basic __/__/__ ( )
Medium __/__/__ ( ) Challenge __/__/__ ( )
❏
*Basic:
Experiment with any of these effects: clusters, tremolo, hammering, strings and pedals, wide
glissandos.
❏
**Medium:
Create smooth piano bass lines for blues and other progressions.
❏
***Challenge:
Fill a familiar melody with block chords.
❏
>More:
Same as Basic; A) don't pause between keys - connect to the next root and proceed; B) play 2
octaves on each key; C) both A and B
❏
A
Play-Along:
Aebersold Vol. 1 – circle of 4ths – 4 bars per chord
Exercise 4.22
"
Guitar Effects
Basic __/__/__ ( )
Medium __/__/__ ( )
❏
*Basic:
Experiment with any of these effects: bends, tremolo, muted strumming.
❏
**Medium:
Experiment with guitar harmonics and playing melodies in octaves.
❏
>More:
Same as Basic; A) don't pause between keys - connect to the next root and proceed; B) play 2
octaves on each key; C) both A and B
❏
A
Play-Along:
Aebersold Vol. 1 – circle of 4ths – 4 bars per chord
Exercise 4.23
"
Bass Effects
Basic __/__/__ ( )
Medium __/__/__ ( )
❏
*Basic:
Experiment with any of these effects: slides, twangs, slaps, wide vibrato.
❏
**Medium:
Experiment with bass chords and bass harmonics.
❏
>More:
Same as Basic; A) don't pause between keys - connect to the next root and proceed; B) play 2
octaves on each key; C) both A and B
❏
A
Play-Along:
Aebersold Vol. 1 – circle of 4ths – 4 bars per chord
Development: More Melodic Development
Exercise 4.24
"
Using Varied Quotes

286
286
286
286 •
Exercises for Level 4
(Introduction)
Basic __/__/__ ( )
Medium __/__/__ ( )
❏
*Basic:
Choose an easy tune and play it as several varied quotes.
❏
**Medium:
Choose a jazz standard you know and play the first part of it as a varied quote.
❏
>More:
Same as Basic; A) don't pause between keys - connect to the next root and proceed; B) play 2
octaves on each key; C) both A and B
❏
A
Play-Along:
Aebersold Vol. 1 – circle of 4ths – 4 bars per chord
Exercise 4.25
"
Creating Riffs
Basic __/__/__ ( )
Medium __/__/__ ( ) Challenge __/__/__ ( )
❏
*Basic:
Play a simple riff; repeat it a few times.
❏
**Medium:
Create a two-part riff and repeat it several times.
❏
***Challenge:
Create and repeat another simple riff and another two-part riff.
❏
>More:
Same as Basic; A) don't pause between keys - connect to the next root and proceed; B) play 2
octaves on each key; C) both A and B
❏
A
Play-Along:
Aebersold Vol. 1 – circle of 4ths – 4 bars per chord
Exercise 4.26
"
Changing Riffs
Basic __/__/__ ( )
Medium __/__/__ ( ) Challenge __/__/__ ( )
❏
*Basic:
Create a riff and change a few notes on the riff repetitions.
❏
**Medium:
Create a riff and sequence two riff repetitions.
❏
***Challenge:
Create a riff and insert notes into the riff repetitions.
❏
>More:
Same as Basic; A) don't pause between keys - connect to the next root and proceed; B) play 2
octaves on each key; C) both A and B
❏
A
Play-Along:
Aebersold Vol. 1 – circle of 4ths – 4 bars per chord
Exercise 4.27
"
Riff Transitions
Basic __/__/__ ( )
Medium __/__/__ ( ) Challenge __/__/__ ( )
❏
*Basic:
Play a simple melody line and create a riff from the end of the line.
❏
**Medium:
Play a riff and transition into a melody.
❏
***Challenge:
Play a riff, add transition material, and hook into a second riff.
❏
>More:
Same as Basic; A) don't pause between keys - connect to the next root and proceed; B) play 2
octaves on each key; C) both A and B
❏
A
Play-Along:
Aebersold Vol. 1 – circle of 4ths – 4 bars per chord
Exercise 4.28
"
Using Pentatonic and Blues Riffs
Basic __/__/__ ( )
Medium __/__/__ ( ) Challenge __/__/__ ( )
❏
*Basic:
Create a pentatonic riff (minor or major) and transpose it into 12 keys.
❏
**Medium:
Same as Basic; create a blues riff.

(Introduction)
Exercises for Level 4
•
287
287
287
287
❏
***Challenge:
Combine a pentatonic and blues riff into a longer riff; try in several keys.
❏
>More:
Same as Basic; A) don't pause between keys - connect to the next root and proceed; B) play 2
octaves on each key; C) both A and B
❏
A
Play-Along:
Aebersold Vol. 1 – circle of 4ths – 4 bars per chord
Exercise 4.29
"
Development Combinations
Basic __/__/__ ( )
Medium __/__/__ ( )
❏
*Basic:
Create a motif and use the development combinations above.
❏
**Medium:
Same as Basic; use three other development combinations.
❏
>More:
Same as Basic; A) don't pause between keys - connect to the next root and proceed; B) play 2
octaves on each key; C) both A and B
❏
A
Play-Along:
Aebersold Vol. 1 – circle of 4ths – 4 bars per chord
Chord Progressions: Variations on ii-V-I’s
Exercise 4.30
"
Using Tritone Substitutions
Basic __/__/__ ( )
Medium __/__/__ ( )
❏
*Basic:
Write the ii-bII-I progression for each key.in the circle of 4ths.
❏
**Medium:
Write a chromatic progression down from C (C, B, Bb, A, etc.). Think of every other chord as a
bII, then do an “opposite” tritone substitution for each bII chord.
❏
>More:
Same as Basic; A) don't pause between keys - connect to the next root and proceed; B) play 2
octaves on each key; C) both A and B
❏
A
Play-Along:
Aebersold Vol. 1 – circle of 4ths – 4 bars per chord
Exercise 4.31
"
Resolving Dominant Chords to Other I Chords
Basic __/__/__ ( )
Medium __/__/__ ( )
❏
*Basic:
Resolve each dominant chord around the circle of fourths to two major chords (not up a
fourth).
❏
**Medium:
Think of each chord in the circle of 4ths as a dominant chord. Name the two related minor
chords that each dominant chord could resolve to.
❏
>More:
Same as Basic; A) don't pause between keys - connect to the next root and proceed; B) play 2
octaves on each key; C) both A and B
❏
A
Play-Along:
Aebersold Vol. 1 – circle of 4ths – 4 bars per chord
Exercise 4.32
"
Dominant to Related Minor Chords
Basic __/__/__ ( )
Medium __/__/__ ( )
❏
*Basic:
Around the circle of 4ths, create ii-v’s that resolve to the minor vi chord.
❏
**Medium:
Same as Basic; resolve to minor iii.

288
288
288
288 •
Exercises for Level 4
(Introduction)
❏
>More:
Same as Basic; A) don't pause between keys - connect to the next root and proceed; B) play 2
octaves on each key; C) both A and B
❏
A
Play-Along:
Aebersold Vol. 1 – circle of 4ths – 4 bars per chord
Exercise 4.33
"
Writing ii-V-I Chains
Basic __/__/__ ( )
Medium __/__/__ ( )
❏
*Basic:
Write an arbitrary, four-bar ii-V-I chain that includes these chords somewhere in the
progression: A7, Ebm7, and GMa7.
❏
**Medium:
Same as Basic; pre-select any three chords to include.
❏
>More:
Same as Basic; A) don't pause between keys - connect to the next root and proceed; B) play 2
octaves on each key; C) both A and B
❏
A
Play-Along:
Aebersold Vol. 1 – circle of 4ths – 4 bars per chord
Exercise 4.34
"
Modulating w/ Parallel ii-V-I Chains
Basic __/__/__ ( )
Medium __/__/__ ( )
❏
*Basic:
Write a parallel ii-V-I chain that starts with a Cm7 and ends up in E Major.
❏
**Medium:
Same as Basic; pre-select your own starting and ending chords.
❏
>More:
Same as Basic; A) don't pause between keys - connect to the next root and proceed; B) play 2
octaves on each key; C) both A and B
❏
A
Play-Along:
Aebersold Vol. 1 – circle of 4ths – 4 bars per chord
Exercise 4.35
"
Modulating w/ Parallel ii-V Chains
Basic __/__/__ ( )
Medium __/__/__ ( )
❏
*Basic:
Write a parallel ii-V chain of seven total chords that starts with Am7 and ends up in Bb Major.
Hint: You may want to work backwards from the final ii-V-I.
❏
**Medium:
Same as Basic; pre-select your own starting and ending chords.
❏
>More:
Same as Basic; A) don't pause between keys - connect to the next root and proceed; B) play 2
octaves on each key; C) both A and B
❏
A
Play-Along:
Aebersold Vol. 1 – circle of 4ths – 4 bars per chord
Exercise 4.36
"
Modulating w/ Parallel V-I Chains
Basic __/__/__ ( )
Medium __/__/__ ( )
❏
*Basic:
Write a parallel V-I chain of seven total chords that starts with F#m7 and ends up in D Major.
Hint: You may want to work backwards from the final ii-V-I.
❏
**Medium:
Same as Basic; pre-select your own starting and ending chords.
❏
>More:
Same as Basic; A) don't pause between keys - connect to the next root and proceed; B) play 2
octaves on each key; C) both A and B
❏
A
Play-Along:
Aebersold Vol. 1 – circle of 4ths – 4 bars per chord
Exercise 4.37
"
Using Minor ii-V and V-I Chains

(Introduction)
Exercises for Level 4
•
289
289
289
289
Basic __/__/__ ( )
Medium __/__/__ ( ) Challenge __/__/__ ( )
❏
*Basic:
Create a chord progression of four bars with a minor ii-V chain.
❏
**Medium:
Same as Basic; use a minor V-i chain.
❏
***Challenge:
Same as Medium; also use a minor ii-V chain, and go for 8 bars.
❏
>More:
Same as Basic; A) don't pause between keys - connect to the next root and proceed; B) play 2
octaves on each key; C) both A and B
❏
A
Play-Along:
Aebersold Vol. 1 – circle of 4ths – 4 bars per chord
Exercise 4.38
"
Using Turnarounds
Basic __/__/__ ( )
❏
*Basic:
Write a 2-bar turnaround for each key.
❏
>More:
Same as Basic; A) don't pause between keys - connect to the next root and proceed; B) play 2
octaves on each key; C) both A and B
❏
A
Play-Along:
Aebersold Vol. 1 – circle of 4ths – 4 bars per chord
Exercise 4.39
"
Inserting Chromatic Chords
Basic __/__/__ ( )
❏
*Basic:
Around the circle of 4ths, insert chromatic chords between each key.
❏
>More:
Same as Basic; A) don't pause between keys - connect to the next root and proceed; B) play 2
octaves on each key; C) both A and B
❏
A
Play-Along:
Aebersold Vol. 1 – circle of 4ths – 4 bars per chord
Exercise 4.40
"
Finding ii-V-I Variations
Basic __/__/__ ( )
Medium __/__/__ ( )
❏
*Basic:
Find as many tritone substitutions as you can in 200 Standard Tunes.
❏
**Medium:
Find chains (ii-V-I, ii-V, V-I) in tunes.
❏
>More:
Same as Basic; A) don't pause between keys - connect to the next root and proceed; B) play 2
octaves on each key; C) both A and B
❏
A
Play-Along:
Aebersold Vol. 1 – circle of 4ths – 4 bars per chord
Exercise 4.41
"
Writing Blues Variations
Basic __/__/__ ( )
Medium __/__/__ ( ) Challenge __/__/__ ( )
❏
*Basic:
Transpose the chords for Variation #1 into two different keys.
❏
**Medium:
Transpose the chords for Variations #2 and 3 into another key.
❏
***Challenge:
Write your own variation of Bird Blues.
❏
>More:
Same as Basic; A) don't pause between keys - connect to the next root and proceed; B) play 2
octaves on each key; C) both A and B
❏
A
Play-Along:
Aebersold Vol. 1 – circle of 4ths – 4 bars per chord

290
290
290
290 •
Exercises for Level 4
(Introduction)
Exercise 4.41
2
"
Static Playing
Basic __/__/__ ( )
Medium __/__/__ ( )
❏
*Basic:
Create a static melody of eighth-notes in each major key around the circle of 4ths.
❏
**Medium:
Same as Basic, in all dominant and minor keys.
4 Performance: Group Interaction
Exercise 4.43
Trading Bars in Solos
Basic __/__/__ ( )
Medium __/__/__ ( )
❏
*Basic:
In a blues, trade 4-bar solos w/ a friend.
❏
**Medium:
Same as Basic; trade 4-bar solos for one chorus and 2-bar solos for the next.
❏
>More:
Same as Basic; A) don't pause between keys - connect to the next root and proceed; B) play 2
octaves on each key; C) both A and B
❏
A
Play-Along:
Aebersold Vol. 1 – circle of 4ths – 4 bars per chord
Exercise 4.44
"
Playing Stop-Time Solo Fills
Basic __/__/__ ( )
Medium __/__/__ ( )
❏
*Basic:
On a play-along recording, mute or turn off volume every 2 bars; play solo fills.
❏
>More:
Same as Basic; A) don't pause between keys - connect to the next root and proceed; B) play 2
octaves on each key; C) both A and B
❏
A
Play-Along:
Aebersold Vol. 1 – circle of 4ths – 4 bars per chord
Exercise 4.45
"
Using Solo Endings and Transitions
Basic __/__/__ ( )
Medium __/__/__ ( )
❏
*Basic:
Extend a solo a few bars into the next chorus; make the ending solid.
❏
**Medium:
Start a solo by developing the last idea played by the previous soloist.
❏
>More:
Same as Basic; A) don't pause between keys - connect to the next root and proceed; B) play 2
octaves on each key; C) both A and B
❏
A
Play-Along:
Aebersold Vol. 1 – circle of 4ths – 4 bars per chord
Analysis: Transcribing Solos
Exercise 4.46
"
Selecting a Solo
Basic __/__/__ ( )
❏
*Basic:
Select a recorded solo to transcribe.
Exercise 4.47
"
Outlining the Form and Chords
Basic __/__/__ ( )
Medium __/__/__ ( )

(Introduction)
Exercises for Level 4
•
291
291
291
291
❏
*Basic:
Outline the form for the tune.
❏
**Medium:
Same as Basic; transcribe the chords.
Exercise 4.48
"
Sketching the Rhythms
Basic __/__/__ ( )
❏
*Basic:
Sketch the rhythms for the tune.
Exercise 4.49
"
Adding Pitches and Expression
Basic __/__/__ ( )
Medium __/__/__ ( )
❏
*Basic:
Using the guidelines in section 4.41, add the pitches for the tune.
❏
**Medium:
Same as Basic; add expressions.

292
292
292
292 •
Exercises for Level 4
(Introduction)
Document Outline
- The Art of Improvisation
- Thelonious Monk Kenny Clarke Max Roach Buddy Rich
- 4A: Soundscapes
- 4B: Double-Time and Half-Time
- 4C: Special Effects
- 4D: More Development
- 4E: Variations on ii-V-I’s
- 4F: Chord Substitutions
- 4G: Group Interaction
- 4H: Analyzing Solos – Level 4
- 4J: Transcribing Solos
- Exercises for LEVEL 4
Wyszukiwarka
Podobne podstrony:
(Sheet Music) Theory Bob Taylor Jazz Improvisation Book 200 Standards Bb
aas0117(0) Jazz Improvisation Tips
Jazz Bass Book Notation
Chapter 3 The Jazz Piano Book
Scales for Jazz Improvisation
Jazz Techniques Improvising & Arranging
Daniel Coyle the little book of talent 52 tips for improving your skills
Jazz melody building in improvisation chordal, turning, passing notes
Manuale di Improvvisazione Jazz di Marc Sabatella
Pat Martino Jazz Book (gitara)
The Vanilla Book Chord Changes to Jazz Standards
forex analiza techniczna (e book www zlotemysli pl ) DK3ZOOPY4OOL2LNDIKQIOV6NQ566VKSXSPJLABQ
Encyclopedia Biblica Vol 2 Jerusalem Job (book)
natto improvement fermentation
Jim Hall at All About Jazz
acc book details 080702 132000
E Book Wprowadzeni do teorii automatow jezykow i obliczen
więcej podobnych podstron