www.eastonbike.com
Easton
Seat Post
C
ongratulations! You have just purchased the best seat post
available. To ensure the best performance and longest service
life from your seat post, please read and carefully follow these
installation instructions.
CAUTION!
All Easton seat posts should be installed by a qualified bicycle
mechanic.
Easton assumes no liability for products which are
improperly installed.
WARNING!
Failure to follow these instructions can result in seat post fail-
ure. Seat post failure can lead to loss of control of the bicycle
and result in serious personal injury or death.
1. Before you start
• Check seat tube for sharp edges — both where the post enters
the seat tube and along the seat tube clamping slot. Remove any
sharp edges with 320/400 grit sandpaper.
Sharp edges can create stress risers on the seat post, which could
result in seat post failure.
• Check for correct fit. Seat posts are available in many diameters.
Sizing is critical! Consult your local professional bicycle dealer to
make sure you have purchased the correct diameter post for your
frame.
Seat posts are designed to fit seat tubes with compatible inner
diameters. Incorrect mating of the seat post and seat tube can
cause seat post failure.
2. Installation of seat post
• Carbon Quills: DO NOT apply grease to carbon quills. Also,
clean any existing grease from the inside of the seat tube prior
to installation.
• Aluminum Quills: DO apply a small amount of grease to aluminum
quills prior to insertion. This will ensure that the quill does not
freeze and lock into the seat tube over time.
• Insert the seat post into the seat tube.
Do not use a rotating motion. Scratches on the seat post can
cause stress concentrations that could result in seat post failure.
• The seat post must be inserted into the seat tube a MINIMUM of
70 mm (2.75 inches) for proper post life. However, many frames
require more than the minimum 70 mm insertion. The seat post
must be inserted deep enough into the frame to ensure that the
bottom of the seat post extends past the bottom edge of the top
tube (see Figure 1).
Failure to insert the seat post far enough into the frame could
result in seat post failure.
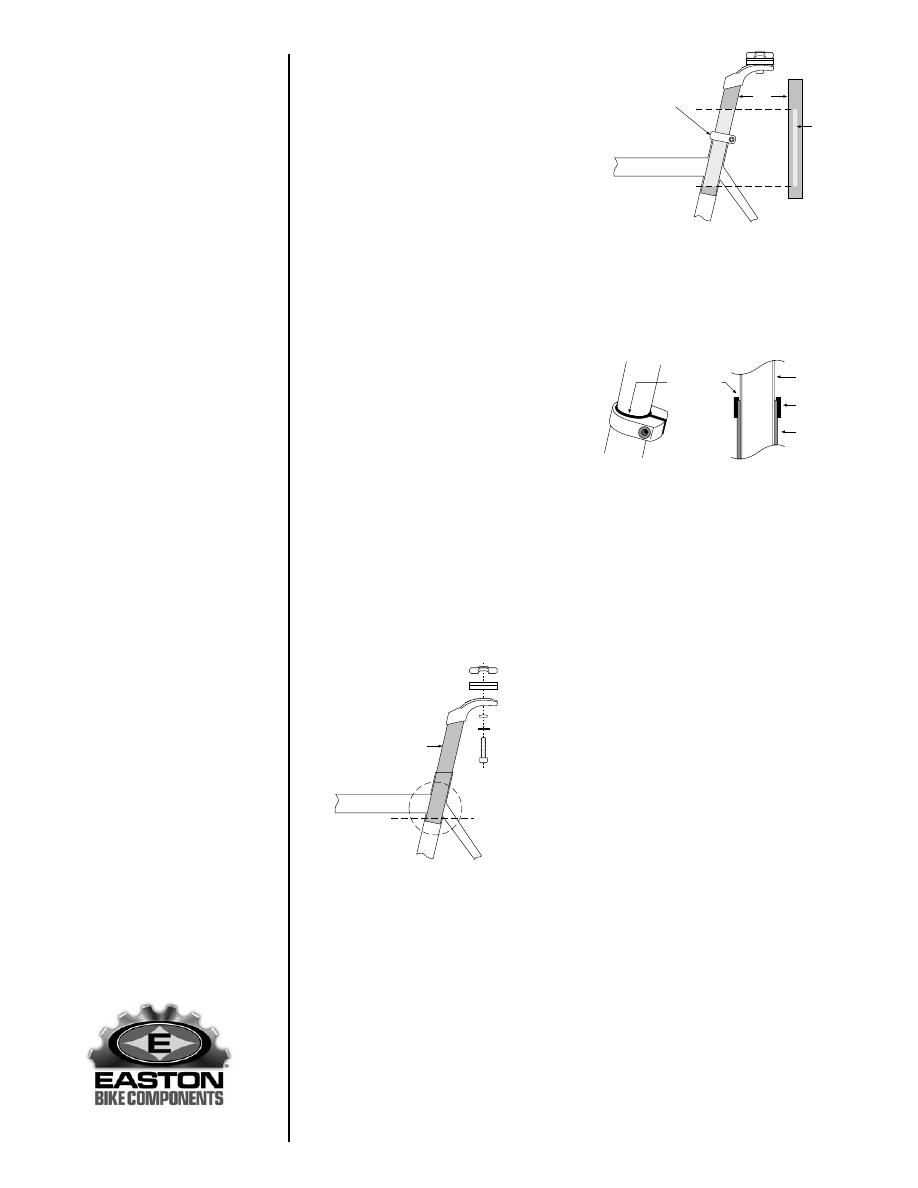
FIGURE 1
Top clamp
Cradle
Radius washer
Washer
Clamp bolt
Top tube
Quill
Seat post must be
inserted to below
tube intersection
IMPORTANT: Easton carbon seat posts are constructed with Relief
Area Design
TM
(RAD), a patented Easton design feature. The relief
area is a flattened section of the seat post quill that protects the
post from being pinched when the seat tube collar is tightened
(see Figure 2). Because the relief area does not extend the full
length of the quill, it is important to make sure that your seat tube
collar is positioned within the relief area. If you insert the post too
far into the seat tube, you may clamp down on an unrelieved area
of the quill.
Clamping the seat post in an unrelieved area of the quill could
damage the quill and result in seat post failure. Over-tightening
the seat post collar could damage the seat post quill and result in
seat post failure.
Seat post collar
must clamp on the
relief-area pro-
tected part
of the quill
Quill
Relief area
(front view)
FIGURE 2
Top tube
• Before tightening the seat tube collar, make sure that the upper lip
of the collar does not touch the seat post (see Figure 3).
If the collar lip touches the seat post, the post could be damaged
during tightening, which could result in seat post failure.
• Tighten the seat tube collar bolt.
Recommended torque is 60
in-lbs (6.72 Nm). Maximum torque must not exceed 75 in-lbs
(8.4 Nm).
FIGURE 3
There must be
a gap between
the collar and
the seat post
Seat post
Collar
Bicycle
seat tube
3. Installation and adjustment of saddle
• The saddle rail slots are designed for saddles with standard
7 mm rails.
• Put a small amount of grease on the threads of the saddle
clamp bolt.
• Adjust the seat angle first, then the fore-aft position.
• Torque the saddle clamp bolt to 100 in-lbs (11.2 Nm).
IMPORTANT: Recheck bolt torque after 50 to 75 miles of riding.
Incorrect clamping of the saddle clamp bolt can lead to seat post
failure.
4. Maintenance
Seat posts must be maintained and inspected frequently and closely.
In particular:
• Inspect for dents, bends, deep scratches or gouges before each
ride. If any are visible, do not use the bicycle until the seat post
has been replaced. Seat posts may be severely weakened even if
no damage is visible.
• Replace any deeply scratched or gouged posts immediately.
Destroy any seat post you replace for safety reasons.
Scratches on the seat post can cause stress concentrations that
could result in seat post failure.
After a major impact or accident, even if no dents, bends or
scratches are visible, have a dealer inspect the seat post before
using the bicycle.
WARRANTY
This EASTON product is warranted to be free of defects in materials
and workmanship for five (5) years from date of purchase. Warranty
is for the original owner only and proof of purchase is required. This
warranty is in lieu of all other warranties. ANY IMPLIED WARRANTIES
OF FITNESS FOR A PARTICULAR PURPOSE OR WARRANTIES
OF MERCHANTABILITY ARE LIMITED TO THE DURATION OF THE
EXPRESSED WARRANTY. Depending on individual state laws, the
above exclusion may not apply to you. This warranty gives you spe-
cific rights. You may have other legal rights depending on the state
in which you reside.
Please consult the Contact Us page of the Easton web site
(www.eastonbike.com) for warranty contact information. Select U.S.
Dealers or International Distributors depending on your location.
Wyszukiwarka
Podobne podstrony:
EASTON Wheels EN Instrukcja
Bestway Zamek Dmuchany PL EN Instrukcja
Daewoo ERF 100 [Instruction EN] Instrukcja obsługi
Daewoo ERF 33 M [Instruction EN] Instrukcja
Bestway Zamek Dmuchany PL EN Instrukcja
Daewoo FR 331 [Instruction EN] Instrukcja
Budzik Versa wielkość karty kredytowej instrukcja EN
instrukcja bad makro wg pn en iso
Instrukcja obslugi EN
Honda CB 750 Seven Fifty Instrukcja EN
Blaupunkt CR5WH Alarm Clock Radio instrukcja EN i PL
Instrukcja Obslugi Audi A4 S4 Cabriolet en
instrukcja obslugi do Nokia CR 115 EN
Instruction 106B Trousers EN
Instrukcja 9000 vnr En
LTSpice instrukcja EN
Instrukcja PSR S970S770 Firmware Installation EN
Budzik Versa wielkość karty kredytowej instrukcja EN
instrukcja bad makro wg pn en iso
więcej podobnych podstron