51 31 000
Removing and installing front windscreen
Note:
To bond windshield:
Adhesives for cold and hot working are permitted.
Remove interior rearview mirror,
refer to 51 16 060.
If necessary, remove rain sensor,
refer to 61 35 175.
Remove both sun visors and counter supports,
refer to 51 16 080.
Remove both panels for front roof pillar,
refer to 51 43 201.
Remove front lid,
refer to 41 61 000.
Remove both gutter strips on windshield,
refer to 51 31 030.
Remove both windshield wiper arms,
refer to 61 61 100.
Cold processing:
Comply with instructions on gluing windows,
refer to 51 31 ...
Warm processing:
Open aluminum membrane at rear end of glue cartridge.
Heat glue cartridges to 80
°
C for one hour in oven (sourcing
reference: BMW Parts Service).
Comply with instructions on gluing windows,
refer to 51 31 ...
RA Removing and installing front windscreen
BMW AG - TIS
04.05.2007 19:04
Issue status (01/2005) Valid only until next CD is issued
Copyright
Page - 1 -

Note:
Cover front side panels with protective covers.
Lower front headliner slightly.
Remove connector (windshield heating).
Partially remove seal and let it hang down.
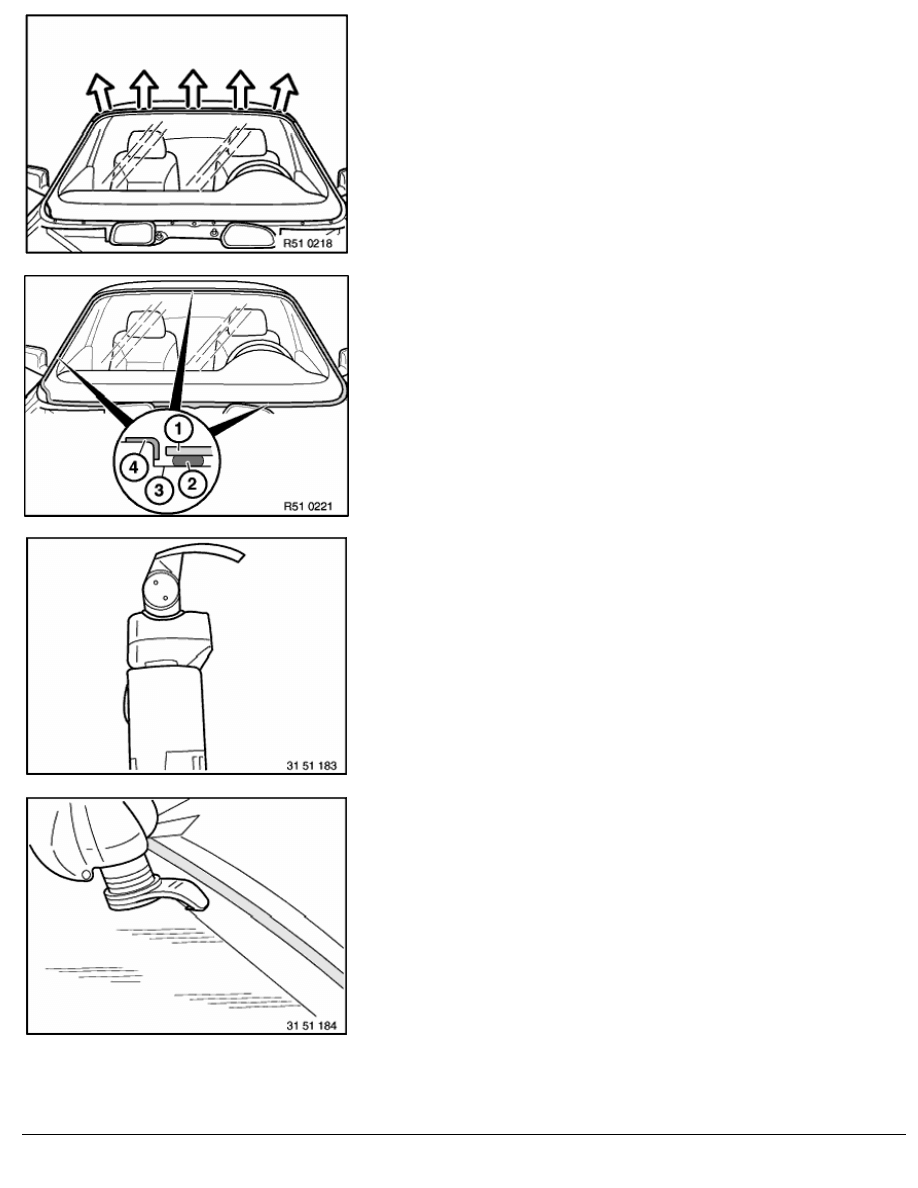
Lift out expanding rivets and pull finisher (1) upwards to remove.
Seal hose connection for windshield wash nozzles on hood lid.
RA Removing and installing front windscreen
BMW AG - TIS
04.05.2007 19:04
Issue status (01/2005) Valid only until next CD is issued
Copyright
Page - 2 -
Caution!
Seal is reinforced with aluminum strip.
Turning carefully, wind seal out (windshield breakage).
Mask body all around with fabric adhesive tape (e.g. Tesa).
1.
Windshield
2.
Glue bead
3.
Body aperture
4.
Fabric adhesive tape
Fit knife (24 mm blade length, sourcing reference: BMW Parts
Service) to the tool.
Note:
If necessary, resharpen knife with machine running.
Carefully insert knife between body and windshield.
RA Removing and installing front windscreen
BMW AG - TIS
04.05.2007 19:04
Issue status (01/2005) Valid only until next CD is issued
Copyright
Page - 3 -
Guide handle of knife parallel to windshield.
Cut through glue bead all around and as close as possible to
windscreen glass.
1.
Body aperture
2.
Glue bead
3.
Knife
4.
Windshield
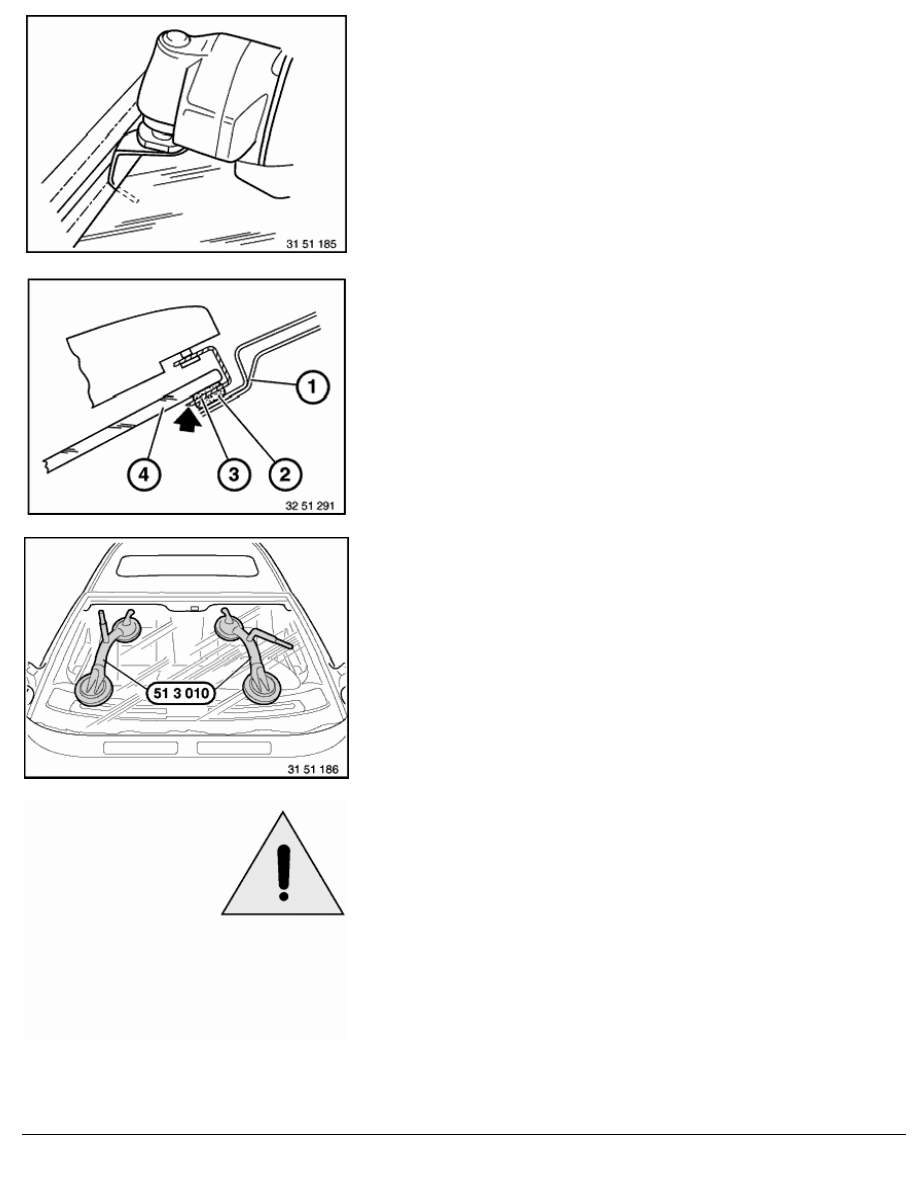
Lift out the windscreen using special tool 51 3 010.
Pull off adhesive masking tape all around.
Caution!
In order to guarantee long-term corrosion protection, it is
absolutely essential to touch up damage to paintwork
(scratches or large-surface damage),
refer to 51 31 ...
RA Removing and installing front windscreen
BMW AG - TIS
04.05.2007 19:04
Issue status (01/2005) Valid only until next CD is issued
Copyright
Page - 4 -
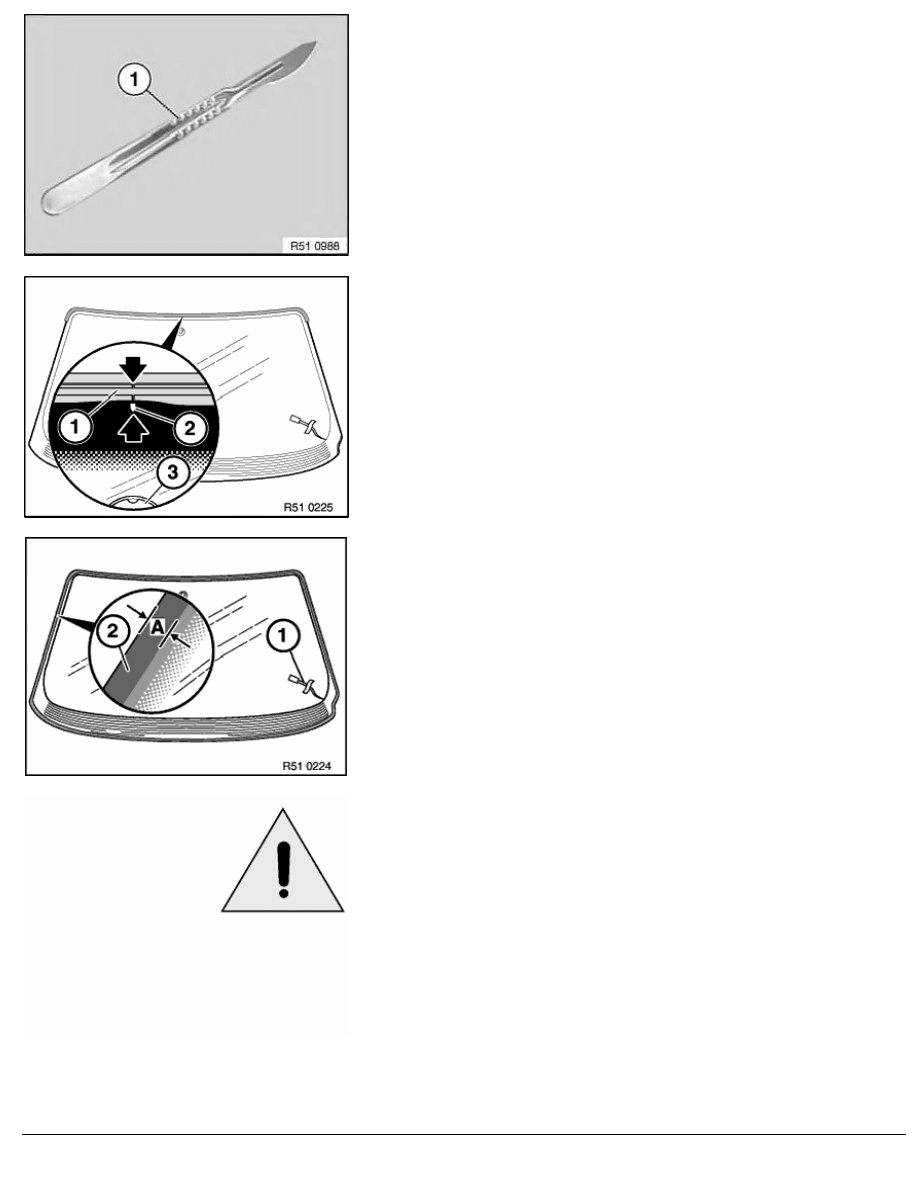
When reusing the windshield:
Remove glue residue on windshield
with a scalpel (1) for heavy-duty applications
to approx. 0.5 mm.
Fit seal (1) to top of windshield and press into place.
Note:
Seal (1) and windshield are marked in the center (2).
3
Mirror base
Secure cable (1) (windshield heating) with glue tape.
Treat windshield in glued area (A) with materials approved by
BMW (repair kit, sourcing reference: BMW Parts Service),
refer to 51 31 ...
(A) = 21 mm
Note:
Note specified ventilation time!
Caution!
The basic filler must have hardened!
Treat body in adhesive area with BMW-approved materials (repair
kit, sourcing reference: BMW Parts Service),
refer to 51 31 ...
Note:
Note specified ventilation time!
RA Removing and installing front windscreen
BMW AG - TIS
04.05.2007 19:04
Issue status (01/2005) Valid only until next CD is issued
Copyright
Page - 5 -
Immediately before installing windshield,
remove glue residue in body cutout to approx. 0.5 mm thickness.
To avoid damaging paintwork in body cutout,
carefully remove glue residue with a scalpel.
Caution!
Clean freshly cut residual glue bead with 2-propanol or glass
activator only;
do not, under any circumstances, use Sika bonding agent
205/5.
Installation of spacer buffers:
Two different spacer buffers are fitted. Keep exactly to the
installation position (risk of broken windshield).
1
Square spacer (height stop, wind noises)
2
Semicircular spacer buffer (spacing for adhesive bead)
(A) 3.8 mm
Caution!
Wind noises may result if measurement (A) is not 3.8 mm.
Version with slide/tilt sunroof:
Stick square spacer (1) at distance (A) to center, near water
drainage bore (2), for
slide/tilt sunroof on left/right.
(A) 5 mm
Model without sliding/tilting sunroof:
Attach square spacer (1) to center of cavity (2).
Note:
The water drainage bore is located here in models fitted with
sliding/tilting sunroofs, see one work step previously.
RA Removing and installing front windscreen
BMW AG - TIS
04.05.2007 19:04
Issue status (01/2005) Valid only until next CD is issued
Copyright
Page - 6 -
Caution!
To avoid breaking windshield:
Before sticking on new spacer buffers,
remove remains of old spacer buffers completely.
Stick on semicircular spacer buffers (1) "outside" in moulding
(2) on left/right.
3
Expanding foam tape
Note:
Expanding foam tape (3) over gap between sound insulation
and cowl panel must be fitted from left to right, fit if necessary.
In direction of travel, left:
Stick on semicircular spacer buffers (1) "center/outside" between
bores (2).
Note:
Attach semicircular spacer buffer (1) to end of metal
radius (3).
4
Expanding foam tape
In direction of travel, right:
Stick on semicircular spacer buffers (1) "center/outside" between
bores (2).
Note:
Attach semicircular spacer buffer (1) to end of metal
radius (3).
4
Expanding foam tape
Attach semicircular spacer buffer (1) "centrally" at distance (A) on
right side (left side in direction of travel) at same height as bore
(2).
(A) 25 mm
3
Expanding foam tape
RA Removing and installing front windscreen
BMW AG - TIS
04.05.2007 19:04
Issue status (01/2005) Valid only until next CD is issued
Copyright
Page - 7 -
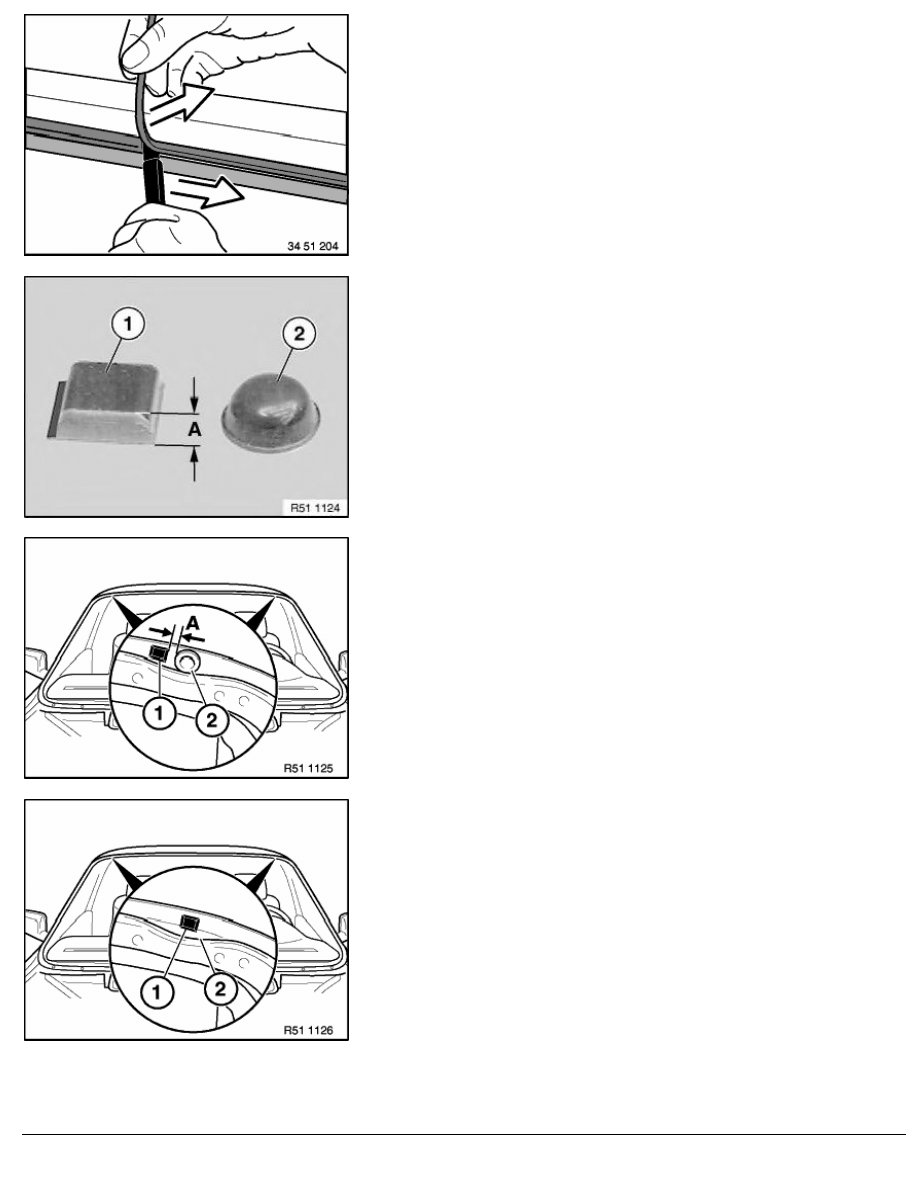
Cut nozzle to size.
Dimensions:
(A) 7 mm
(B) 10
-1
mm
Note:
For an even application of adhesive bead:
Use a cartridge gun (operated pneumatically or electrically,
sourcing reference: BMW Parts Service).
Check expiration date of glue!
If necessary, apply a test bead before gluing.
Cartridge must be held perpendicularly to the windscreen glass.
Note:
Approx. 1 1/4 adhesive cartridges are required for the
windshield.
Effect of differing adhesive quantities:
Insufficient adhesive:
Excessive adhesive:
Windshield positioned too
low in body cutout
Windshield positioned too
high in body cutout
Stresses may occur (risk of
broken windshield)
Wind noise may occur
Shape of glue bead:
(A) 7 mm
(B) 10
-1
mm
Caution!
Apply adhesive bead swiftly (and uniformly) and install
windshield. Maximum skin formation time of adhesive is
10 minutes.
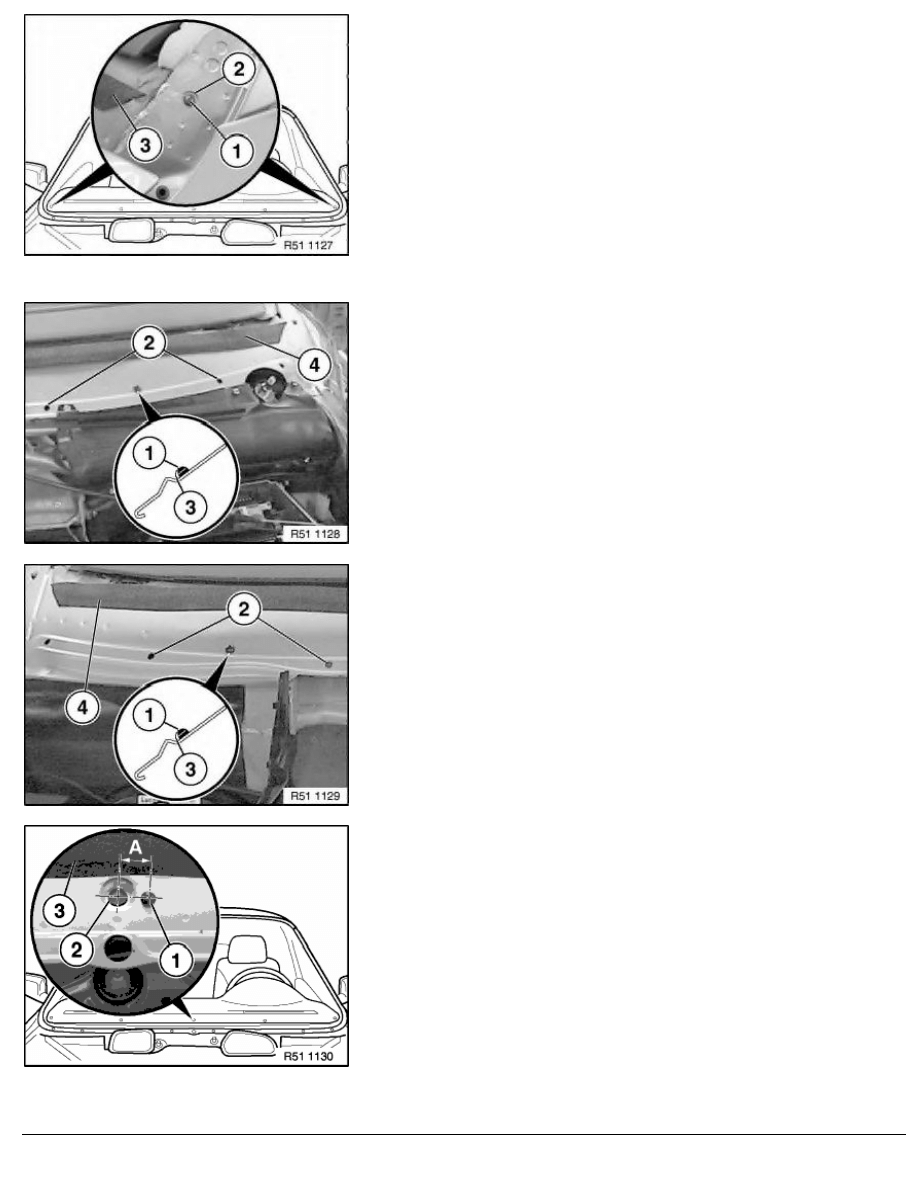
Maintain distance (X) to edge of windshield,
refer to measurement (A) to (C) in next work step.
RA Removing and installing front windscreen
BMW AG - TIS
04.05.2007 19:04
Issue status (01/2005) Valid only until next CD is issued
Copyright
Page - 8 -
Maintain the distance (A) of the upper glue bead to the gasket,
(B) at side and (C) bottom along the windshield edge.
Caution!
To ensure that the water drainage channel of the slide/tilt
sunroof is not sealed with adhesive,
proceed as follows:
In corners of seal at top and
at break in sealing lip,
continue drawing adhesive bead uniformly.
Maintain distance (B) at side and (C) at bottom along edge of
windshield.
(A) 1 mm
(B) 2 mm
(C) 4 mm
Note:
Adhesive area for plastic adhesive tapes (1) must be free of
grease and dust.
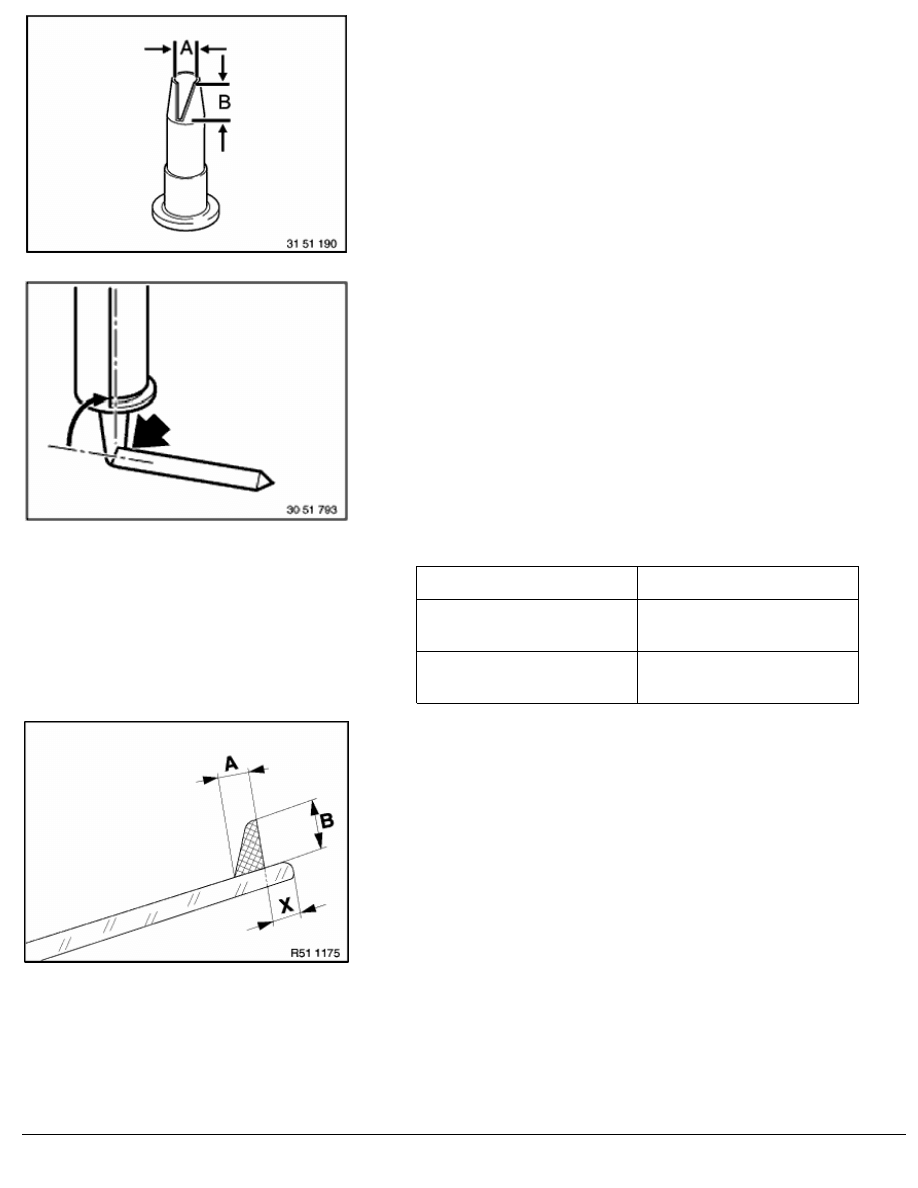
Attach two yellow plastic adhesive tapes (1) (Tesa)
to roof at a distance (A) from outer corners.
Length: 400 mm
Width: 50 mm
(A) 250 mm
Using special tool 51 3 010,
first position windshield at top,
align evenly at sides,
then install at bottom and press into position.
Press windshield upwards until seal contacts
roof uniformly.
Secure windshield in this position on top with two yellow plastic
adhesive tapes (1) (Tesa).
Preload on top of windshield to prevent wind noise:
RA Removing and installing front windscreen
BMW AG - TIS
04.05.2007 19:04
Issue status (01/2005) Valid only until next CD is issued
Copyright
Page - 9 -
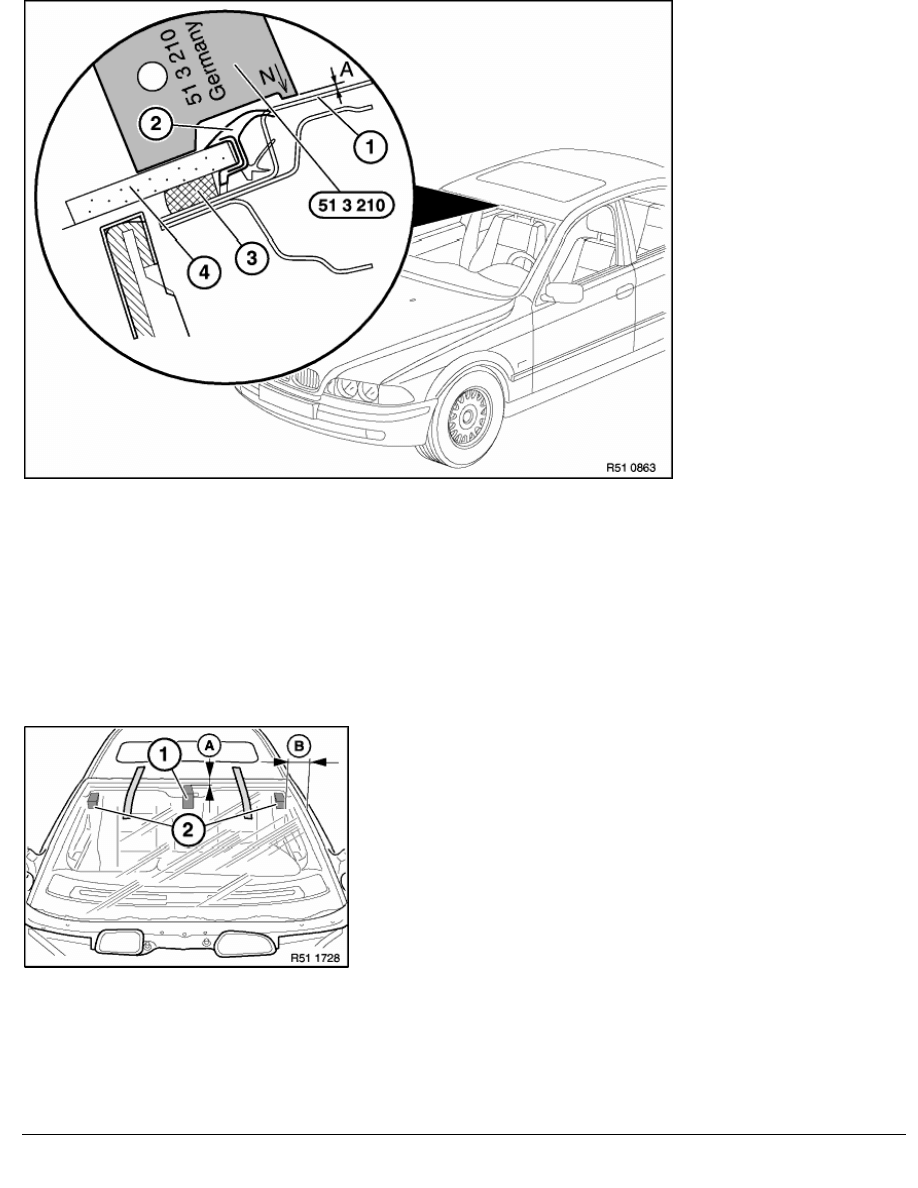
When installing windshield (4), check that it is lower with respect to roof outer skin panel (1). This is the only way of
ensuring sufficient pretension between the sealing lip (2) and the roof (prevention of wind noise). Check installation
position of windshield (4) in middle of vehicle with special tool 51 3 210; a clearance (A) is permitted.
Dimensions:
Standard windows = designation "N":
(A) = 0 - 1.5 mm
Anti-theft windows = designation "S":
(A) = 0 - 0.6 mm
Pretension is generated with special tool 51 3 130 (three HR
foam blocks).
1 piece (1): 40 x 70 x 70 mm (W x H x D)
2 pieces (2): 40 x 30 x 70 mm (W x H x D)
Position of HR foam blocks:
HR foam block (1), middle, at distance (A) from top.
HR foam blocks (2), distance (A) from top, distance (B) at side.
(A) 100 mm
(B) 100 mm
RA Removing and installing front windscreen
BMW AG - TIS
04.05.2007 19:04
Issue status (01/2005) Valid only until next CD is issued
Copyright
Page - 10 -
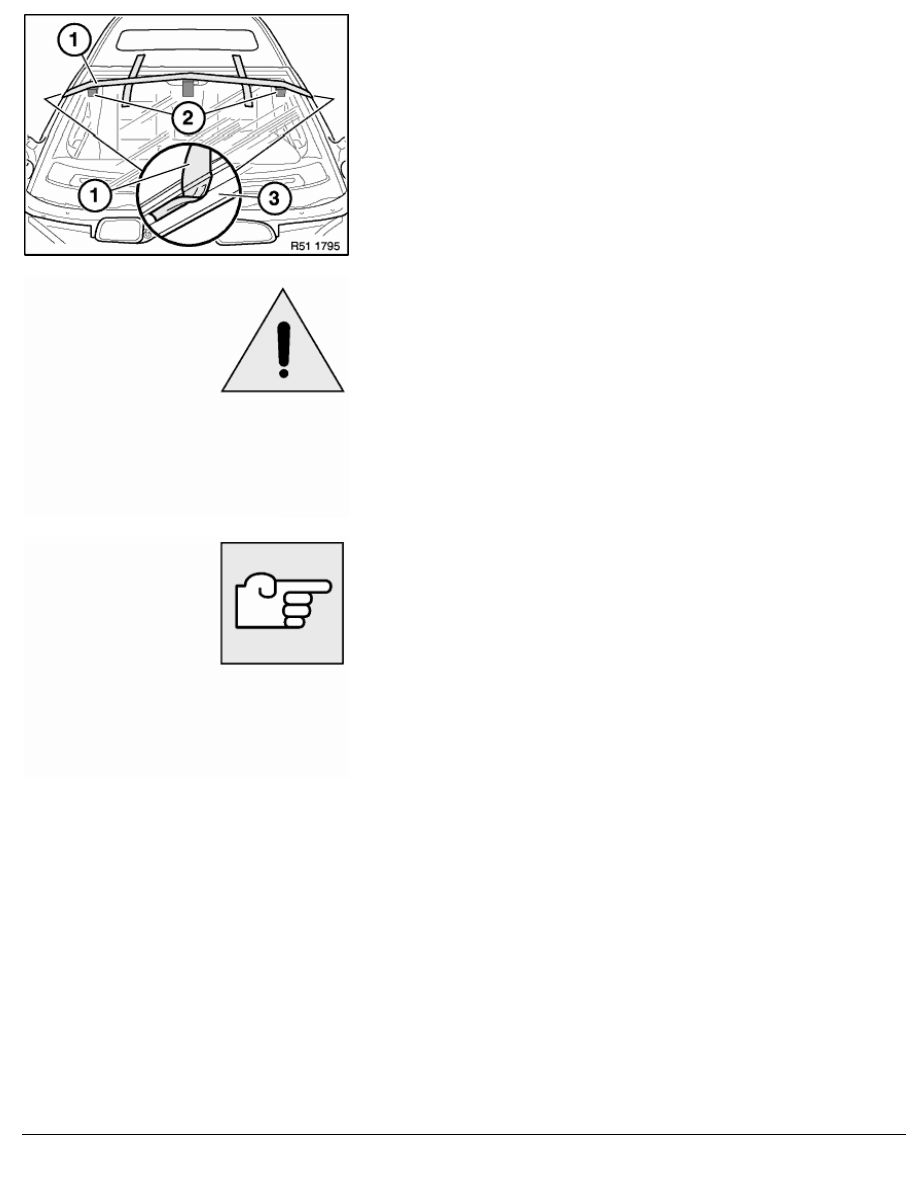
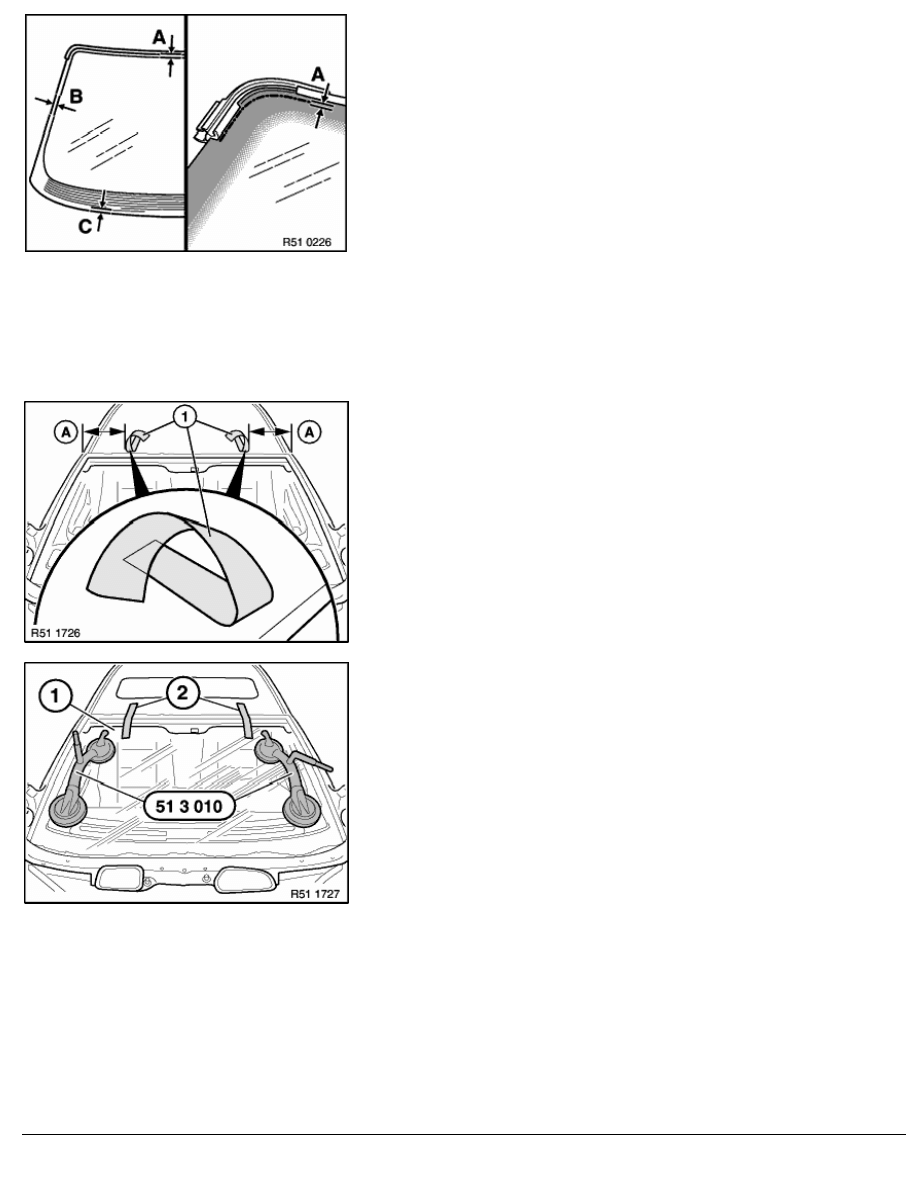
Open both front doors.
Secure HR foam blocks (2) with plastic adhesive tape (1) (Tesa).
Pretension windshield with plastic adhesive tape (1) (Tesa) until it
is correctly positioned at top (refer to two work steps before).
Note:
Do not stick plastic adhesive tape (1) above A-pillar
finisher (3) or ITS head airbag.
Caution!
Remove contamination caused by residual adhesive
immediately with Sika remover 208 (sourcing reference: BMW
Parts Service).
Do not press out windscreen glass again for this purpose.
Hardened glue can only be removed by machine.
Assemble car.
After the hardening time, remove support and adhesive tape.
Note:
Locate leakage:
(A) by spraying water underneath sealing lips
(B) with an ultrasonic leak detector
(sourcing reference: BMW Parts Service)
If necessary, seal off leakage with corresponding nozzle.
RA Removing and installing front windscreen
BMW AG - TIS
04.05.2007 19:04
Issue status (01/2005) Valid only until next CD is issued
Copyright
Page - 11 -
Wyszukiwarka
Podobne podstrony:
maglownica Removing and installing rack and pinion steering
6190 Removing and installing engine compartment lower panel
Plan and Install Kitchen Cabinets
9 Guidelines for Fiber Optic Design and Installation
0622 Removal and installation of control unit for airbag seat belt tensioner Model 126 (from 09 87)
0620 Removal and installation of control unit for airbag seat belt tensioner Model 126 (to 08 87)
G 2 0 DOHC ECTS Removal and Installation doc
Fences Types and Installation of Wooden Fence Posts
Mac OS X 10 3 Panther Info (Burn and Install Instruction) choose Disk Copy burn Image install
Removal and installation of interior temperature sensor Heating, ventilation Model 126 A To 06 81,
left and right front wheel brake hoses
transmission removal and installation at
Plan and Install Kitchen Cabinets
Windows 10 A Complete User Guide Learn How To Choose And Install Updates In Your Windows 10!
więcej podobnych podstron