The
Instructor
Mark Dvoretsky
Battle of the Heavy Pieces
Schlechter-Lasker
5th Match Game
Vienna/Berlin 1910
The classic game we now present for your inspection has already been reprinted
many times. I would like to compare the annotators’ opinions (some quite
radically different), and add some analysis of my own.
But the point is not just the correction of errors in analysis. What I value most
of all, in examining other people’s analysis, is that they are able to present an
overall picture of the struggle, and to describe the problems (some purely
chess-related, others psychological) facing the players. Variations are chiefly
required in order to demonstrate or to illustrate the author’s point of view.
This was precisely the approach used by the famous Russian player and trainer,
Pyotr Romanovsky, when commenting on this game for his book, "Middlegame
- Positional Play" - a work which, although it has indeed been translated into
English, has somehow escaped the notice of the entire English-speaking world.
So it will be mostly Romanovsky’s conclusions I shall cite here - even though I
may have to disagree with some of them.
The game’s opening stage is not very interesting, so we’ll hurry past it:
1. e4 e5 2. Nf3 Nc6 3. Bb5 Nf6 4. 0-0 d6 5. d4 Bd7 6. Nc3 Be7 7. Bg5 0-0 8.
de
8. Bxc6 Bxc6 9. de de (9... Nxe4 10. Nxe4 Bxe4 11. Bxe7 Qxe7 12. ed Qxd6
13. Qxd6 cd 14. Nd4+/= - Schlechter) 10. Qxd8 Bxd8 11. Nxe5 Bxe4 12.
Bxf6?! Bxf6 13. Nd7 Bxc3 14. Nxf8 Bxb2 15. Rab1 Ba3 (unclear - Keres) 16.
Nd7 f6!?-/+.
8. ... Nxe5
8. .. de 9. Re1 intending Bxc6 (Schlechter)
9. Bxd7
9. Nxe5 Bxb5 10. Nxf7? Qd7 (Schlechter)
9. ... Nfxd7 10. Bxe7 Nxf3+
10... Qxe7 11. Nd4 intending f4 (Schlechter)
11. Qxf3 Qxe7 12. Nd5 Qd8 13. Rad1
Better 13. Qc3 - Schlechter
The Instructor
file:///C|/Cafe/Dvoretsky/dvoretsky.htm (1 of 7) [11/4/2000 5:16:15 PM]
13. ... Re8 14. Rfe1 Nb6 15. Qc3 Nxd5 16. Rxd5
16. ed leads to too much simplification (Schlechter)
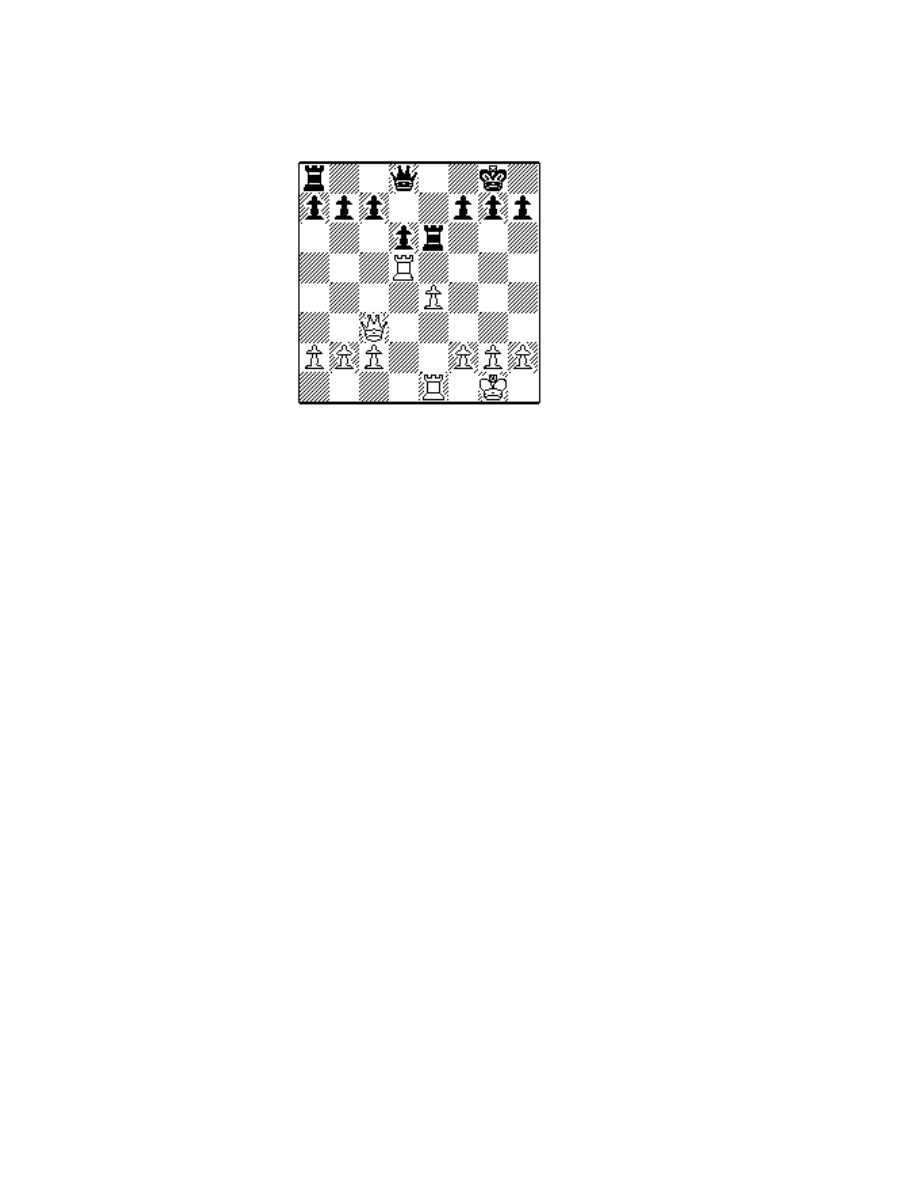
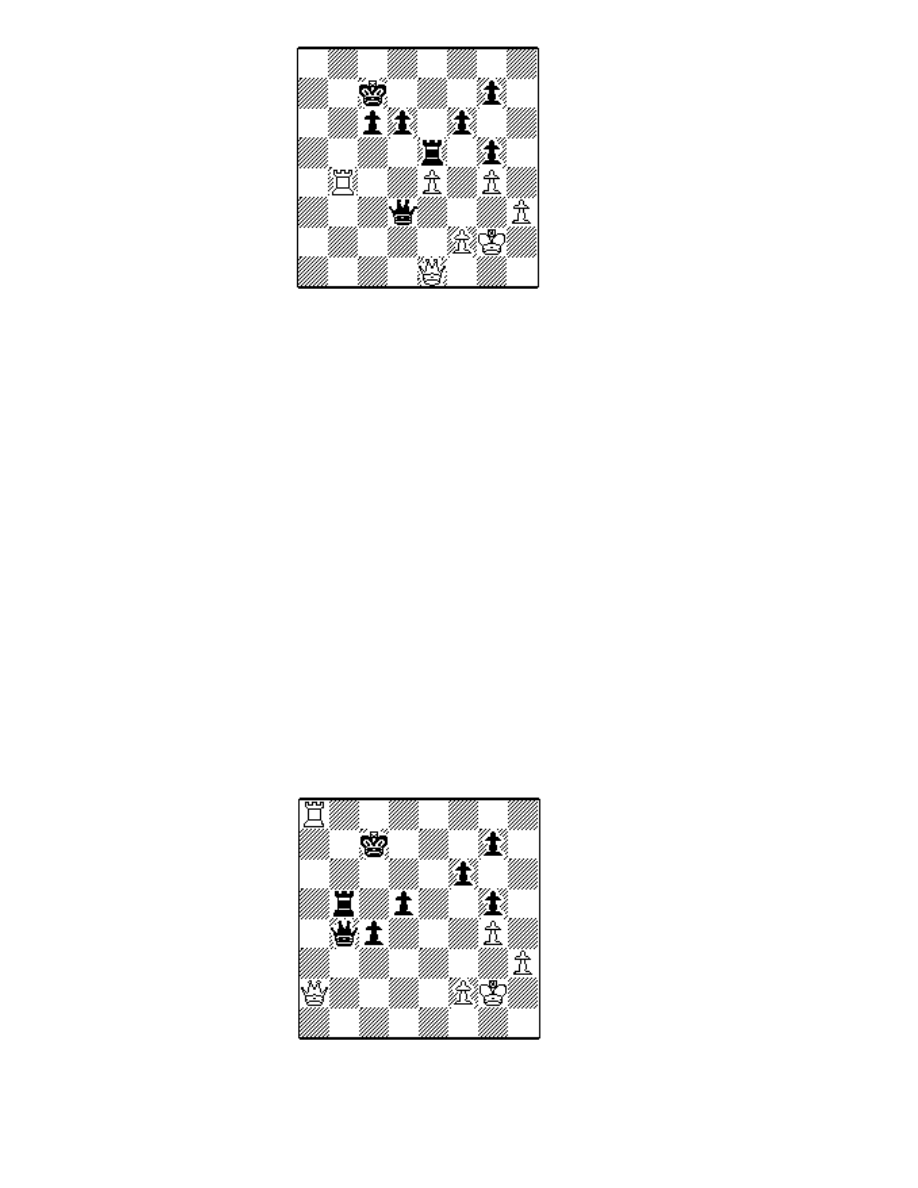
16. ... Re6 = (See Diagram)
17. Rd3 Qe7 18. Rg3 Rg6
18... f5? 19. Qb3 - Schlechter
19. R1e3 Re8 20. h3 Kf8 21. Rxg6 hg
"Can we aver that either side has any
advantage here? Of course not. In fact,
many players would be willing to shake
hands and take a draw at this point.
The position teeters on the verge of an
endgame - and this line remains uncrossed
for many moves." (Romanovsky)
Here it should be noted that, in the above-cited book, Romanovsky spends a
great deal of time examining positions with only rooks and queens on the
board, even going so far as to label these positions "the fourth stage of a chess
game". These positions feature both endgame and middlegame tendencies; their
chief difficulty lies in deciding which features are currently the more
significant. Should one centralize the king (as in an endgame), or shelter it (as
in the middlegame); should one create pawn weaknesses for an attack that may
never happen, and so on.
The game under discussion is an excellent illustration of this problem. Lasker
treated the position as an endgame, gradually outplaying his opponent; but at
the very end, he briefly lost his concentration, and fell under a mating attack.
22. Qb4 c6
"22... b6 would have led to a serious queenside weakening after 23. Qa4 a5 24.
Qc6." (Tarrasch)
23. Qa3 a6 24. Qb3 Rd8 25. c4
"From an endgame standpoint, the c-pawn would have been better left at c2.
The weakness of Black’s d6-pawn proves illusory." (Romanovsky)
25. ... Rd7 26. Qd1 Qe5 27. Qg4 Ke8
"Using rear lines of communication, Lasker carefully moves his king closer to
the center and the queenside. In the endgame, of course, the king is better
placed near the main group of his pawns, which is the only spot from which an
attack may be launched. Meanwhile, Black also undertakes a plan of stirring up
queenside play. This also resolves another issue: giving the king the
responsibility for the defense of the pawn at d6 frees the queen from this task.
On g8 or f8, of course, the king stands more securely than it does at c7 -
although here, too, it is hard to get at him. There aren’t a lot of pieces
remaining on the board, and Black’s queenside pawn chain is quite sturdy."
(Romanovsky)
The Instructor
file:///C|/Cafe/Dvoretsky/dvoretsky.htm (2 of 7) [11/4/2000 5:16:15 PM]

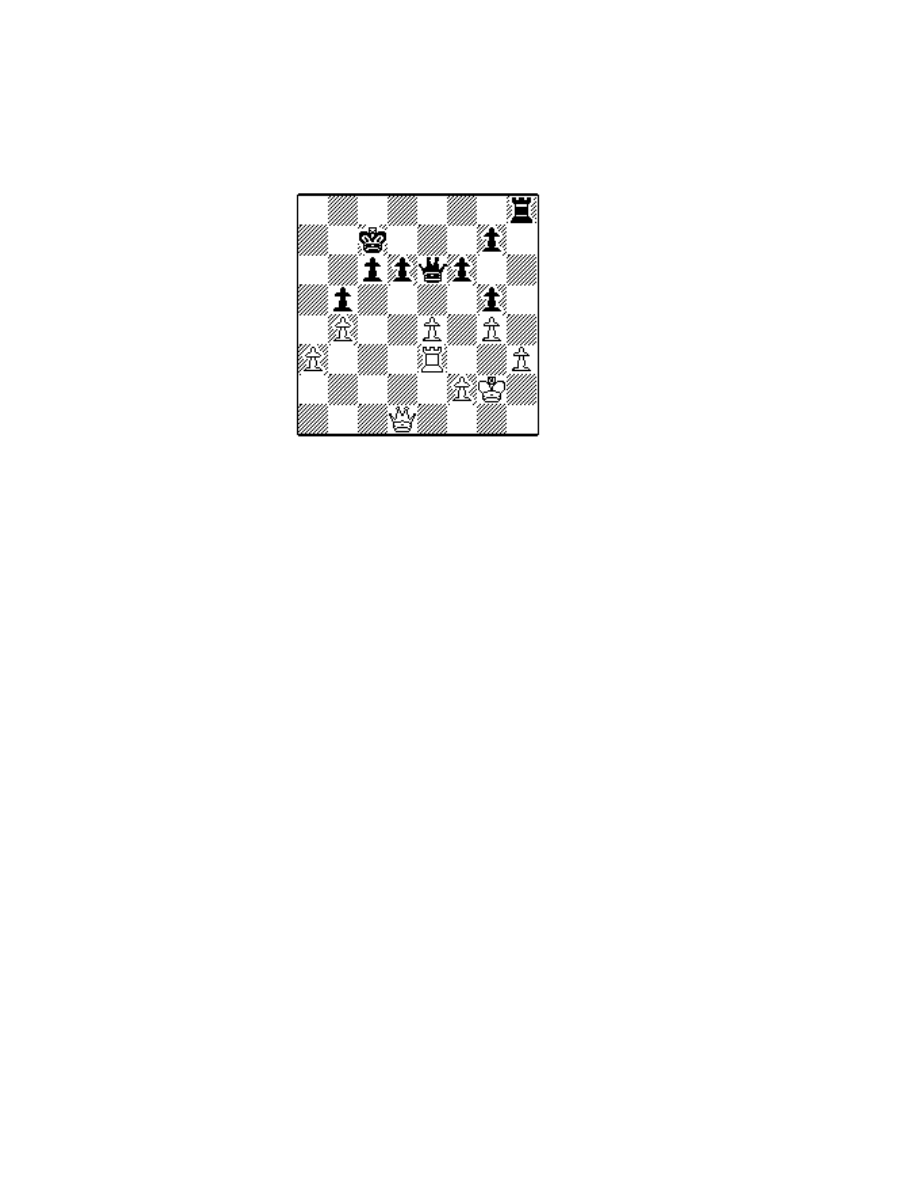
28. Qe2 Kd8 29. Qd2 Kc7 30. a3 Re7 31. b4 (See Diagram)
31. ... b5!
"Very boldly and energetically played - as
one should expect from a great master.
Although this move does open up the king’s
position, at the same time, the White
a-pawn is rendered backward. And Black
hopes, at some point, to create a passed
pawn of his own, by advancing the c-pawn."
(Tarrasch)
"Black aims for a position in which the
trade of queens will favor him. This allows
him greater freedom of action, since White
will have to avoid an endgame. The bad side of this move is that the king’s
pawn cover will be somewhat loosened. But it’s still a long way to the endgame
- that is, if Black can reach one." (Romanovsky)
Before defining the pawn structure on the queenside, it would have been
advisable to have first improved his position on the kingside, by ..g6-g5, ..f7-f6,
and perhaps ..Re8. However, White would have responded to 31..g5 with 32.
Qd1, followed by 33. a4.
32. cb
Evidently, Schlechter has decided to show his powerful opponent that there is
still a middlegame on the board. However, White must be careful as well. In
view of the weak pawn at a3 and the possibility of ..c6-c5, the rook endgame is
quite unacceptable for him." (Romanovsky)
32. Qd3? Qa1+ 33 Kh2 Qa2! (33..Qc1? 34 cb ab 35. Qd4 - Dvoretsky) 34. c5
dc 35. bc Rd7 36. Qc3 Qd2! 37. Qe5+ Kb7-/+ (Romanovsky).
But this evaluation is wrong. White continues 38. Qxg7 (taking the pawn
without playing Qe5+ first is even more exact) 38... Qxf2 39. Rf3 Qxc5
(39..Qa2 40. Qc3!? or 40. Rf6!?) 40. Rxf7 Rxf7 41. Qxf7+ Kb6 42. Qf6!?, and
White at least stands no worse. Instead of 32...Qa1+, a stronger move is 32...
f6=/+.
32. ... ab 33. g3 g5! 34. Kg2 Re8 35. Qd1!
(Intending 36. a4) 35. Qa2?! Qe6 Romanovsky.
35. ... f6!
35... Ra8 36. Qh5, with counterplay (Tarrasch).
36. Qb3?
White could not bring himself to play 36. a4!?, in view of 36... ba 37. Qxa4
Kb7, when 38. Ra3 results in a hard rook endgame for him after 38... Qxe4+
39. Kh2 Qd4! 40. Qa6+ Kc7 41. Qa7+ Qxa7 42. Rxa7+ Kb6 43. Rxg7 Re4
(Romanovsky). This variation shows the point of the fine prophylactic move
35... f6! However, the sacrifice of the e4-pawn was hardly necessary; with
The Instructor
file:///C|/Cafe/Dvoretsky/dvoretsky.htm (3 of 7) [11/4/2000 5:16:15 PM]
something like, say, 38. Qc2!?, White maintains good counterchances.
The text has no point, and only loses time for White. Viorel Bologan’s
suggested 36. Qh5! was stronger, preventing Black’s plan of Qe6 and Rh8, and
preparing to exchange the h-pawn if the occasion presents itself.
36. ... Qe6 37. Qd1 Rh8 38. g4 (See Diagram)
"White again weakens his position, refusing
- quite rightly - to play 38. Qg4. Anything
but an endgame!" (Romanovsky)
38. ... Qc4
A self-confident queen invasion. Black
should undoubtedly have preferred 38...Ra8,
to quash forever White’s chief - in fact,
probably only - counterchance: the advance
of the a-pawn. But perhaps Lasker, seeing
no clear way to strengthen his own position,
decided to provoke Schlechter into this
bayonet attack, banking on he fact that it
requires a pawn sacrifice." (Romanovsky)
And indeed, after 38...Ra8 39. Qc2, how is Black to strengthen his position? I
think that Lasker played the best move.
39. a4!?
"White might never get another chance. Black will soon discover that
defending an exposed king, even against a comparatively small number of
pieces, is no easy task." (Romanovsky)
"A pawn sacrifice rich with opportunity: after 39. Qf3 Re8 40. Qf5 Re5 (40...
Qf7 - Dvoretsky) 41. Qh7 Qf7 or 41. Qg6 Qg8, White has a difficult game."
(Schlechter)
Tarrasch maintained the opposite opinion:
"White begins to panic at the implacable improvement of his opponent’s
position, and bets everything on one card, sacrificing a pawn for attacking
chances. This continuation should have cost him the game, even if it did give
him some chances. There were as yet no grounds for despair: all his weak spots
(at a3, e4 and h3) were quite sufficiently defended by the rook; and as long as
he avoided the exchange of queens, he might have continued play with a clear
conscience."
Tarrasch is quite obviously right: a strategy of passive defense was quite
appropriate in these circumstances. Continue: 39. Qe1 Re8 40. Kg1, and I can
find no clear way to strengthen Black’s position. Any further pawn advance
will lead to the creation of weaknesses in his own camp.
In any event, if White had to play a3-a4, then it should have been done earlier,
on move 36, when it would not have required a pawn sacrifice.
39. ... Qxb4?
The Instructor
file:///C|/Cafe/Dvoretsky/dvoretsky.htm (4 of 7) [11/4/2000 5:16:15 PM]
"No worse is 39...Ra8 40. ab Qxb5 41. Qb3 Ra1! 42. Rd3 Kb6, and if 43. Rxd6
(43. Qc3 Qe5! 44. Rd4 Rd1, or 44. Qxe5 de 45. Rd7 Ra7! - Dvoretsky), then
43... Qf1+ 44. Kg3 Qg1+, and wins. Lasker, however, hastens to win material,
since there is no immediately visible threat to his king." (Romanovsky)
41. Qb3? in Romanovsky’s line is a bad choice, allowing counterthreats to the
White king. One might suggest 41. Rc3! instead, for example, preparing 42.
Qd5 or 42. Qb3 (41... Qxb4 42. Rxc6+).
The strongest move, however, was one that went unnoticed by the
commentators: 39... Rb8!-/+, bringing the rook in with an attack on the weak
pawn at b4.
Taking the pawn at once allows White to create dangerous counterthreats.
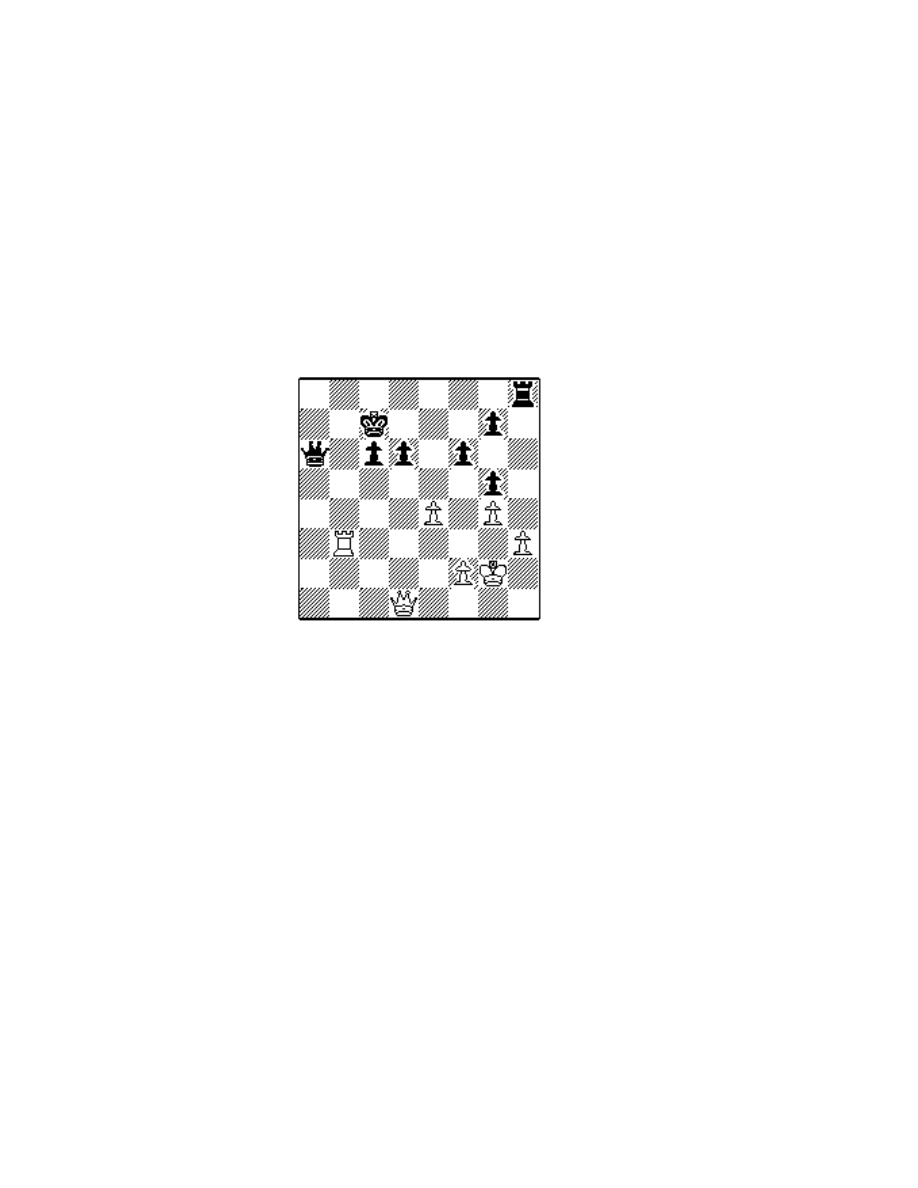
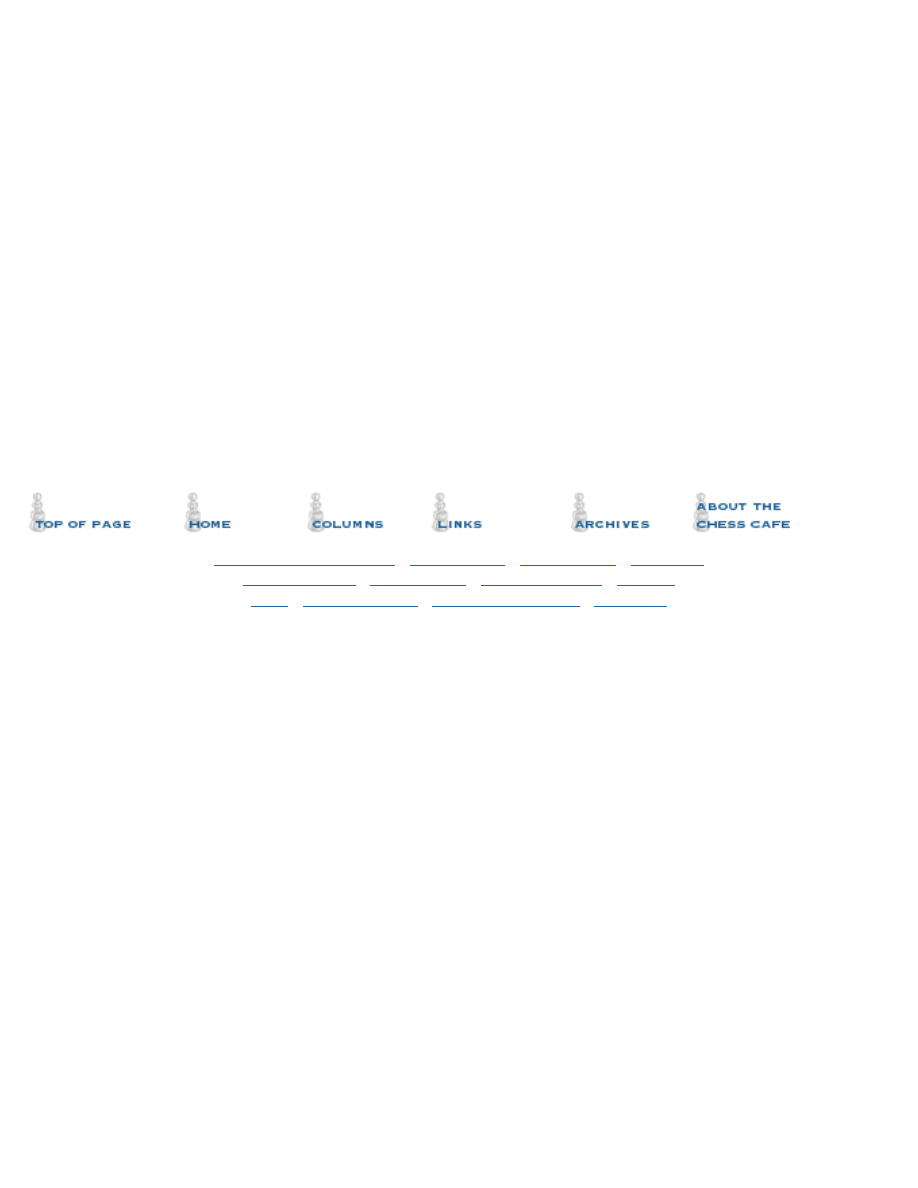
40. ab Qxb5 41. Rb3 Qa6 (See Diagram)
42. Qd4?
Intending Qb4 and Ra3.
But Schlechter missed the strongest line,
again pointed out by Bologan: 42. Rb4!,
with the plan of 43. Qb3 or 43. Ra4 (43.
Rb1 or b2 are apparently equivalent). For
instance, on 42... c5 43. Ra4 Qb7 44. Qa1
Kb8 42. Qa2! Re8 46. f3, White has the
extremely unpleasant threat 47. Ra3. Black
would apparently have to repeat moves with
42... Qa3 43. Rb3 Qa6 44. Rb4.
42. ... Re8!
An excellent maneuver which Schlechter apparently underestimated. From e5,
the rook will assist with the defense and simultaneously create counterthreats
against the e-pawn.
43. Rb1 Re5 44. Qb4 Qb5
44... Rb5 45. Qc4
45. Qe1 Qd3 46. Rb4
Intending 47. Qa1 (See Diagram)
The Instructor
file:///C|/Cafe/Dvoretsky/dvoretsky.htm (5 of 7) [11/4/2000 5:16:15 PM]
46. ... c5?!
46... Rb5 (Capablanca) 47. Ra4 Rb1 48.
Qa5+ Kd7 49. Qf5+ (Romanovsky).
46... Ra5! (intending Ra3) 47. Rb3 Qxb3
48. Qxa5+ Kb7 (48..Qb6 - Schlechter) 49.
Qd8 Qe6 50. f3 d5 51. ed cd 52. Qa5 Qd7
53. Qb4+ Kc7 54. Qd4. "The queen
endgame is certainly not simple, and it is
not clear whether Black could win it. Lasker
was unsure of this; and since he quite
underestimated White’s chances, he decided
that he was within his rights to try for
more." (Romanovsky)
47. Ra4 c4 48. Qa1 Qxe4+ 49. Kh2
Black has won a second pawn, but the open position of his king assures his
opponent sufficient counterplay.
49. ... Rb5 (intending Qe5+) 50. Qa2 (intending Rxc4+ or Ra7+) 50. ... Qe5+
50... Rb3?? 51. Qxb3 Qf4+ 52. Qg3+- (Schlechter).
51. Kg1 Qe1+ 52. Kh2?!
Better 52. Kg2 - Romanovsky.
52. ... d5 53. Ra8
Intending 54. Qa7+; if 53. Ra7+ Rb7.
53. ... Qb4
Black only gets a repetition of moves after 53... Qe5+ 54. Kg1 (54 Kg2 Qe4+
55. f3? Qd4-+ - Capablanca).
54. Kg2 (54. Qa6? Qd6+) (See Diagram)
54. ... Qc5?
On Lasker’s suggested 54... Rb8 there
follows 55. Qa7+ Rb7 56. Qe3 Qd6, and
now not 57. Qe8 (hoping for 57..Qd7? 58
Qf8! threatening 59. Qc5+), in view of 57...
d4!, threatening to exchange queens
(Dvoretsky), but 57. Rg8 (or 57 Re8) 57...
d4 58 Qe4, maintaining a dangerous attack
(Schlechter).
Schlechter suggested 54... Rb7!?
Vadim Zvjagintsev offered the most solid
solution: 54... c3!? - White must reckon with the possible queen check at e4.
The most likely outcome here would be a draw after, for instance, 55. Re8 Rb8
56. Qa7+ Rb7 57. Qa8 Rb8 58. Qa7+.
The Instructor
file:///C|/Cafe/Dvoretsky/dvoretsky.htm (6 of 7) [11/4/2000 5:16:15 PM]
55. Qa6 Rb8?
Another bad line is 55... Rb7 56. Qe6 Rb8 57. Qf7+ (Schlechter). The only
saving chances lay in sacrificing the queen for the rook by 55... Qb6!? 56. Qc8+
Kd6 57. Ra6 Qxa6 58. Qxa6+ Kc5 (Capablanca), or 55... c3!? 56. Rc8+ Kd7
57. Rxc5 Rxc5 (Lasker).
56. Ra7+ Kd8 57. Rxg7 Qb6 58. Qa3 Kc8
And Black resigned, in view of 59. Qf8+ Qd8 60. Qc5+; nor was 58... Qb4 59.
Qa7 any improvement.
"The whole endgame can serve as an instructive example of underestimating
the force of middlegame ideas in a battle of the heavy pieces. Strictly speaking,
Lasker made only one error - but a highly significant one: he let himself get
carried away by the ideas of the endgame." (Romanovsky)
Translated by Jim Marfia
Copyright 2000 Mark Dvoretsky. All rights reserved.
[
] [
]
[
] [
]
] [
Copyright 2000 CyberCafes, LLC. All Rights Reserved.
"The Chess Cafe®" is a registered trademark of Russell Enterprises, Inc.
The Instructor
file:///C|/Cafe/Dvoretsky/dvoretsky.htm (7 of 7) [11/4/2000 5:16:15 PM]
Document Outline
- Local Disk
Wyszukiwarka
Podobne podstrony:
Mark Dvoretsky The Instr5
Mark Dvoretsky The Inst16
Mark Dvoretsky The Inst30
Mark Dvoretsky The Inst14
Mark Dvoretsky The Inst11
Mark Dvoretsky The Instru
Mark Dvoretsky The Instr9
Mark Dvoretsky The Instr8
Mark Dvoretsky The Inst29
Mark Dvoretsky The Inst17
Mark Dvoretsky The Inst13
Mark Dvoretsky The Inst28
Mark Dvoretsky The Inst25
Mark Dvoretsky The Inst18
Mark Dvoretsky The Inst21
Mark Dvoretsky The Instr4
Mark Dvoretsky The Inst20
Mark Dvoretsky The Instr6
Mark Dvoretsky The Inst26
więcej podobnych podstron