
The Instructor
The
Instructor
Mark Dvoretsky
Training with Grandmasters
“Every missed opportunity to play better - even in a
drawn game, or a difficult game to win - is your loss.
That is why it is necessary for you to return again
and again to study your oversights, regardless of how
the game turned out.” - Garry Kasparov
In the days of my youth, the nation’s leading grandmasters
frequently gave simultaneous exhibitions against young
Moscow players. I always loved to participate in these,
perhaps first and foremost because of the understandable
urge to acquire one more famous grandmaster’s scalp. But
there was another reason: the games played in those
exhibitions, or at least episodes from them, usually proved
educational. The ideas I discovered in them, etched solidly
into memory, would later prove useful to me in tournament
games. This form of training is undoubtedly useful for young
players.
Truth be told, I remember hardly any occasion in a simultaneous exhibition
(either the normal kind, or with clocks on a small number of boards) where it
was the grandmaster’s decision that revealed anything to me. It was my own
discoveries and omissions that I learned the most from. No surprise there. The
simul-giver, after all, has no time to give serious consideration to his moves,
and therefore plays superficially; while his opponent will occasionally be able
to penetrate deeply into the position, and guess its secrets. And, on the whole,
each of us is inclined to concentrate on his own thoughts, plans, discoveries and
side tracks - absorbing others’ experience is psychologically much more
difficult.
I’d like to offer some examples of my participation in
simultaneous displays, and, with their assistance, to show
file:///C|/Cafe/Dvoretsky/dvoretsky.htm (1 of 13) [01/08/2002 7:50:52 AM]
The Instructor
what point of view the chessplayer must take in considering
games he has played, in order to extract useful information
from them. Here, perhaps, it would be useful to recall an
aphorism of Kozma Prutkov: “When you throw a stone into
the water, pay attention to the ripples that spread out from it;
otherwise, it’s nothing but empty entertainment.”
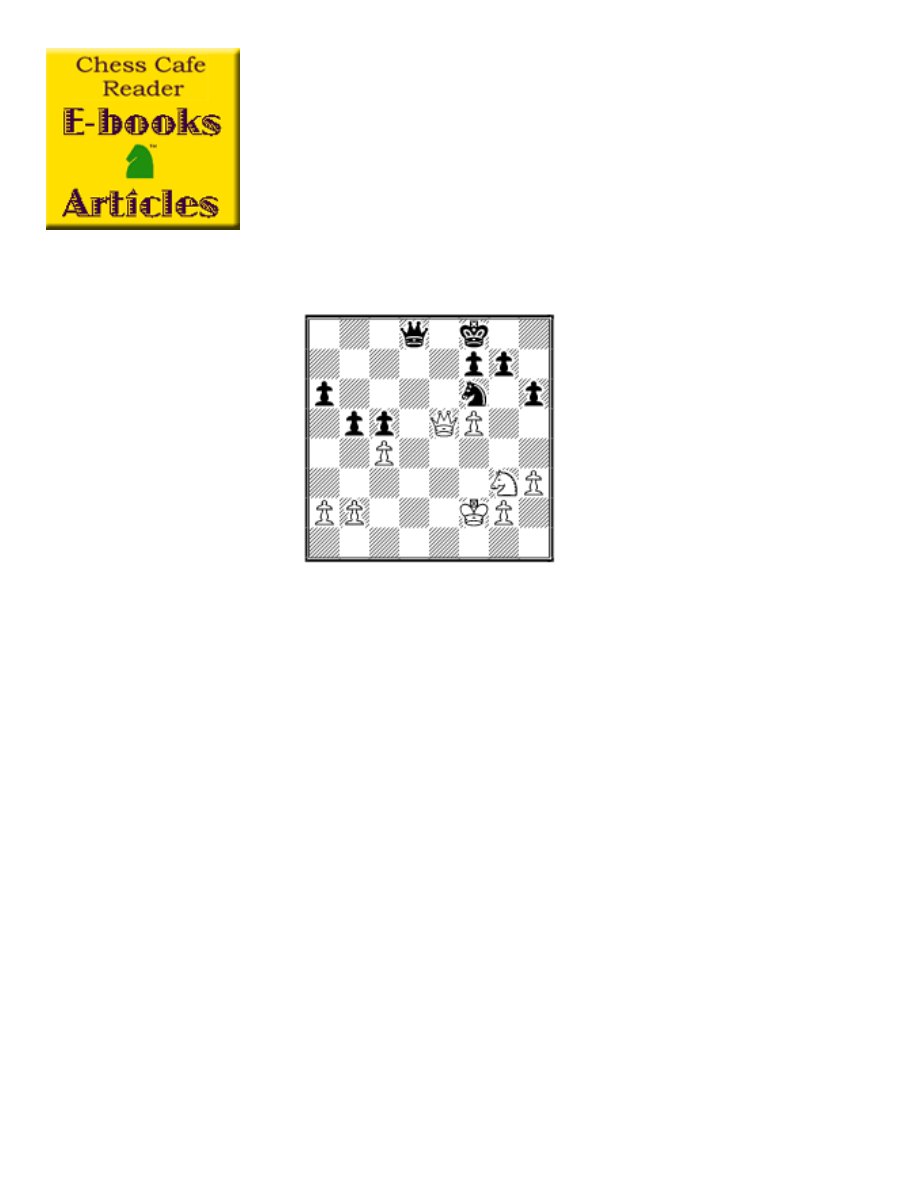
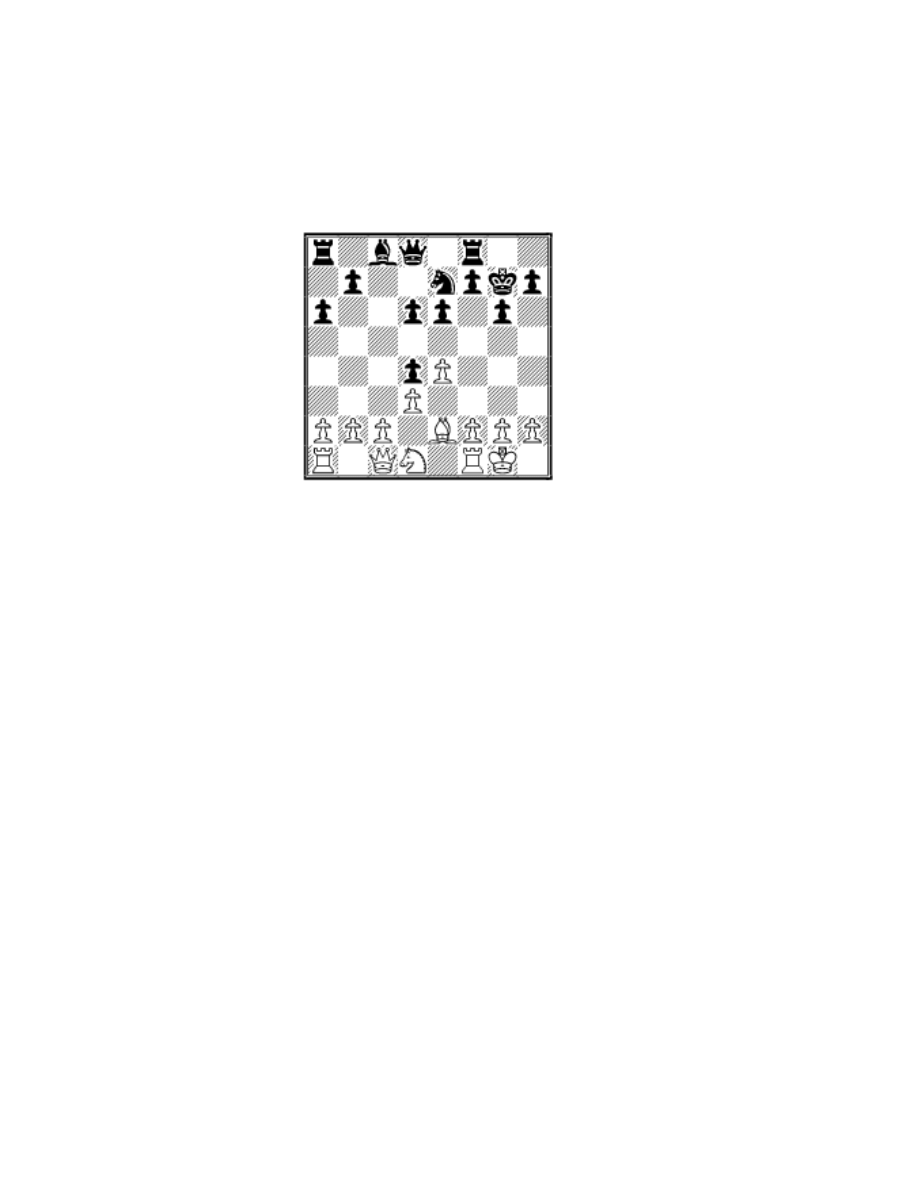
Bronstein – Dvoretsky Moscow 1963
29...Qd2+ 30 Ne2 Nd7! 31 Qc7
Ke7
Note that neither White’s nor
Black’s queen can give a single
check. Conclusion: A knight
placed next to the king
provides secure shelter
against queen checks. This
was the first game in which I
encountered this technique, which I was to employ
frequently later on.
Here, White should choose either the careful 32 Qb7
Qxb2 33 Qxa6 b4, with a significantly inferior position, or
sacrificing a pawn to create a passed pawn, with 32 cb!? ab
33 Qb7 Qxb2 34 a4. However, Bronstein committed the
sort of awful oversight so common in simuls: 32 Kf3??,
and lost quickly after 32...Qd3+ 33 Kf2 Qxf5+ 34 Ke3
Qe6+ 35 Kf2 Qxc4.
Botvinnik - Dvoretsky Moscow 1964
1 g3 Nf6 2 Bg2 g6 3 e4 d6 4 Ne2 Bg7 5 0-0 0-0 6 d4
c5?! 7 c3
7 dc!?
7...Nc6 8 h3 Qc7 9 Be3 Rd8 10 Nbd2
file:///C|/Cafe/Dvoretsky/dvoretsky.htm (2 of 13) [01/08/2002 7:50:52 AM]
The Instructor
White has an obvious space advantage. To avoid a
positional squeeze, I resolved to undertake a central
diversion, figuring that, even if it led to the loss of a pawn,
I would have definite compensation in the open lines.
10...cd 11 cd d5 12 e5 Ne4 13 Nxe4
Another good line was 13 Nb3 f6 14 f3 Ng5 15 Bxg5 fg 16
Qd2, with advantage to White.
13...de 14 Qc2 Bf5 15 g4 Be6 16 Bxe4
Both players missed the strong positional move 16 Nf4!
16...Rac8 17 Qa4!?
17 Rac1
17...Qd7! (threatening
...Nxe5) 18 Qa3 h5
The sacrifice on g4 is incorrect:
18...Bxg4? 19 Bxc6 Rxc6 20 hg
Qxg4+ 21 Ng3 h5 22 Qxe7.
19 f3?!
The positional exchange
sacrifice with 19 gh!? Bxh3 20 hg was worth considering.
19...hg 20 hg Bxg4! 21 Rf2
Botvinnik judged the position after 21. Bxc6 Rxc6 22. fg
Qxg4+ 23. Kf2 Rc2 too dangerous. Simulgivers, on the
whole, tend to avoid such adventures.
21...Bf5 22 Bxf5 Qxf5 23 Kg2
file:///C|/Cafe/Dvoretsky/dvoretsky.htm (3 of 13) [01/08/2002 7:50:52 AM]

The Instructor
23...f6?
Having played an excellent
opening, White, by his
uncertain play thereafter, found
himself in an inferior position.
The text move looked
completely natural to me,
attacking the enemy center, and
bringing the inactive darksquare
bishop into the game.
But when I showed the game to GM Simagin the following
day, and got to the move f7-f6, he stopped me, and asked in
surprise:
- Why are you weakening your king position, and giving
White counterplay? Can’t you play anything else here, but
this?
- Well, what should I do instead?, I asked.
- Look at the “holes” in White’s position on the light
squares. Your knight dreams of reaching them - replied
Simagin; and he proposed a move which, I admit, never
entered my head: 23...a5!! Black’s knight obtains an
excellent transfer point at b4, from which he threatens to
invade at c2, d3 or d5.
No further comment is needed here. Such episodes become
fixed in memory for a long time, increasing a chessplayer’s
positional understanding.
24 Qb3+ Kf8 25 ef Bxf6 26 Rh1 Nxd4 27 Nxd4 Rxd4!
27...Bxd4 28 Rh7 Bxe3 29 Qxe3 is dangerous.
28 Rh7
file:///C|/Cafe/Dvoretsky/dvoretsky.htm (4 of 13) [01/08/2002 7:50:52 AM]

The Instructor
On 28 Bxd4? Bxd4 29 Re2 (29 Qxb7 Qg5+ 30 Kh3
Rc4!) 29...Qg5+ 30 Kf1 (30 Kh3 Kg7) , the quickest
decisive line is 30...Rc1+ 31 Re1 Qd2!
28...Rd5 29 Qxb7
This complex position offers equal chances to both sides, as
the further course of the game confirmed.
29...Kg8 30 Rh3 Rc2 31 Qb8+ Kf7 32 Rh7+ Ke6 33 Qb3
Rxf2+ 34 Kxf2 g5 35 Rh5 Qg6 36 Rh Qf5?!
(36...Qd3) 37 Rd1 Qe5 38 Rxd5?! (38 Kf1!) 38...Qxd5 39
Qxd5+ Kxd5 40 Bxa7 Bxb2 41 Be3 e5 42 Bxg5 e4 43 f4
Bc1 44 Ke2 Kc6 45 Kd1 Bxf4, draw.
In my study of the classic works, I took note of how often
they differed in their treatment of one and the same
question of chess strategy. Thus: Aron Nimzovich
generally played to exploit weak squares in the enemy
position; while Richard Reti, by contrast, often mounted an
attack on the most solidly defended enemy point,
attempting first to weaken, and then to destroy it, thereby
bringing down the enemy’s entire defense. For example,
after 1. Nf3 d5, Nimzovich developed his bishop to b2, in
order to control the weakened dark squares (first and
foremost, e5). Reti would play to break up the d5 strong
point with c2-c4, and attack it again by developing his
bishop to g2.
Fortunately, I already had enough sense to avoid getting
into foolish arguments, such as who’s right, or whose
strategy is superior. I understood that, depending upon the
particular circumstances, one would give preference to one
strategy or the other - or that one might sometimes need to
combine them. Nevertheless, Nimzovich’s ideas were
closer, more understandable to me, and I often used them. I
first employed a Reti-style plan - that is, a logical attack on
file:///C|/Cafe/Dvoretsky/dvoretsky.htm (5 of 13) [01/08/2002 7:50:52 AM]

The Instructor
the most highly fortified spot in the enemy camp - in a
game played as part of a clock simultaneous.
Vasiukov – Dvoretsky Moscow 1965
1 e4 e6 2 d4 d5 3 Nc3 Bb4 4 e5 Ne7 5 a3 Bxc3+ 6 bc c5 7
a4 Nbc6 8 Nf3 Qa5 9 Bd2 Bd7 10 Be2
10 Bb5 later became popular.
10...c4
10...f6 was preferable, since now White has the strong
knight maneuver 11 Ng5! h6 12 Nh3 0-0-0 13 Nf4 Kb8 14
0-0 Nc8 (14...g6 was better) 15 Nh5! Rhg8 16 Bg4!, when
Black has no active play (Kavalek - Uhlmann, Manila
Interzonal 1976).
11 0-0 f6 12 ef!? gf 13 Re1
Theory recommends that White play for restriction by 13
Nh4!? 0-0-0 14 Bh5, to which Black usually responds by
sacrificing a pawn with 14...Ng6!?
13...0-0-0 14 Bf1 Ng6
Black achieved an excellent position in Suetin - Uhlmann,
Berlin 1967, with 14...Nf5 15 Qc1 h5 16 Qa3 Rdg8 17
Rab1 Nd818 Rb4 Bc6.
15 g3 Nce7
Now White must think about the maneuver ...Nf5-d6-e4.
16 Bc1 Nf5 17 Bg2
17 Bh3 was more logical, when, as I recall, I was
considering the positional pawn sacrifice 17...Nd6!? 18
Bxe6 Ne4 19 Bxd7+ Rxd7.
file:///C|/Cafe/Dvoretsky/dvoretsky.htm (6 of 13) [01/08/2002 7:50:52 AM]
The Instructor
17...h5
Black intends to hit the
foundation of White’s kingside
defense, the pawn at g3, with
everything he’s got. First, he
will play h7-h5-h4xg3; then
comes Nf5-d6-e4 and f6-f5. The
pawn at f5 supports the knight
at e4, and also prepares to
attack g3, by moving one more step forward.
18 Ba3 Qa6
It’s important to hold the d6 square for the knight.
19 a5 h4 20 Bc5 hg 21 hg Nd6 22 Nd2 f5! 23 Bxd6
Otherwise, the knight will turn up on e4.
23...Qxd6 24 a6?! b6 25 Qf3?!
A typical simul one-mover: White creates the threat of 26
Nxc4. The immediate 25 Nxc4 dc 26 Qf3 (hoping for
26...Qb8? 27 Rxe6!) is refuted by 26...Rdg8! But 25 f4 or
25 Nf3 was stronger.
25...Qc7!
Now the threat is neutralized, and White can no longer stop
f5-f4.
26 Reb1 f4 27 Rb4 fg 28 fg Rdf8 29 Qe3
file:///C|/Cafe/Dvoretsky/dvoretsky.htm (7 of 13) [01/08/2002 7:50:52 AM]
The Instructor
The g3-pawn has been turned
into a serious weakness. The
knight goes to f5, to attack it yet
again; and if necessary, the
rooks can join in the assault,
too, via the g-file.
29...Ne7!
Black’s plan - triumphant! He
has a strategically won position.
30 Rf1 Nf5 31 Qf4 Qxf4 32 Rxf4 (32 gf Rhg8 or
32...Ne3) 32...Nxg3 33 Rxf8+ Rxf8 34 Bf3 Kc7 35 Kg2
Nf5 36 Kf2 b5 37 Rb1 Kb6 38 Ra1 Bc8 39 Nf1 e5 40 de
Nh4 41 Nh2 Nxf3 42 Nxf3 Bg4 43 Kg3 Bxf3 44 Rf1 Kxa6
45 Rxf3 Rxf3+ 46 Kxf3 Kb6 47 Kf4 Kc7 48 Kf5 Kd7
White resigned.
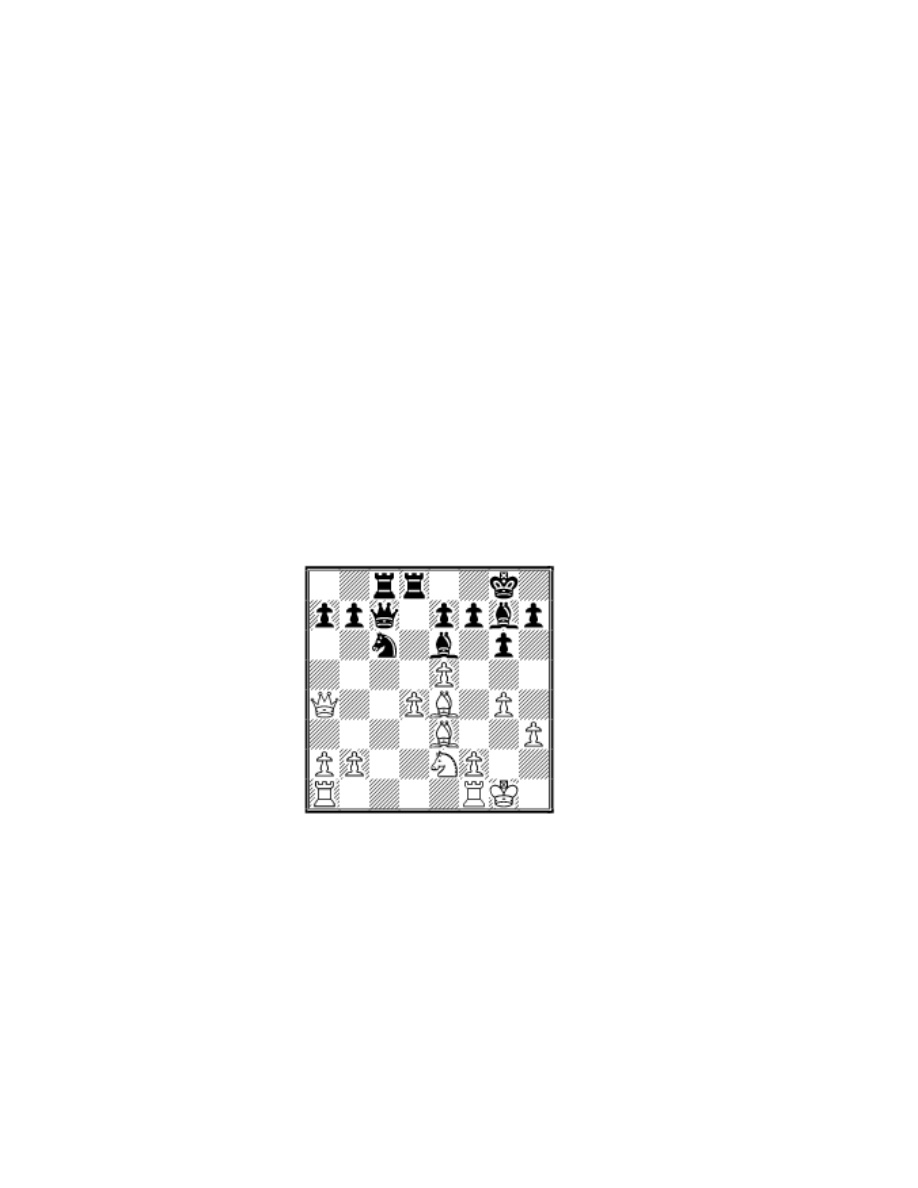
Probably my most memorable game was beating a World
Champion in a clock simultaneous.
Petrosian – Dvoretsky Moscow 1965
1 e4 c5 2 Nf3 e6 3 Nc3 Nc6 4 Bb5 Nge7 5 0-0 a6 6 Be2!?
An odd move. Why bring the bishop out to b5, then? In
order to provoke the knight into developing at e7, instead of
f6? I don’t think the knight stands any worse here.
6...d6 7 d3 g6 8 Bg5
8 d4 deserved consideration. After Black has set himself on
developing the bishop to g7, it would make sense for White
to play on the weakness of the d6-pawn by opening the d-
file.
8...Bg7 9 Qc1 Nd4 10 Bh6 0-0
file:///C|/Cafe/Dvoretsky/dvoretsky.htm (8 of 13) [01/08/2002 7:50:52 AM]
The Instructor
It would make no sense to complicate the game by
10...Bxh6 11 Qxh6 Nxc2 12 Rac1 Nd4 13 Qg7 Rg8 14
Qxh7.
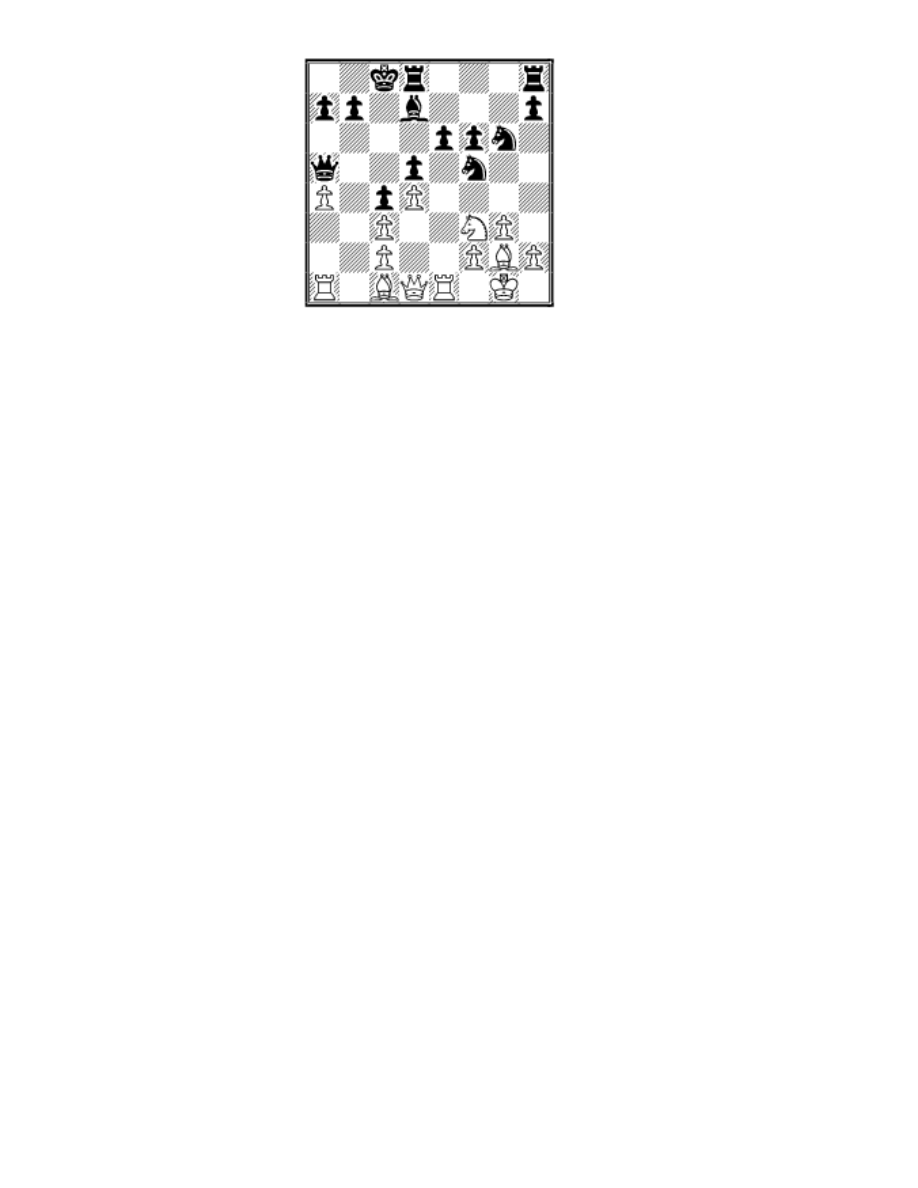
13 Nxd4 cd 12 Bxg7 Kxg7 13 Nd1
The standard plan in such
positions is to reconfigure the
pawns on dark squares: e6-e5,
f7-f6, etc. But I chose a better
line, by the process of
“prophylactic thinking” (for, I
believe, the first time in my
life). What does White want to
play here? Probably f2-f4; but
Black should also consider
queenside pawn moves. The c2-c3 break is useless, as long
as Black can easily support the d4 square. But c2-c4 has a
point: White rids himself of the backward pawn at c2,
thereby strengthening the queenside, which is where I
would like to develop my own attack.
13...b5! 14 c4?! (I guessed right!) 14...bc 15 Qxc4 e5
Black has opened the b- and c-files, and will soon occupy
them with his rooks.
16 f4 Be6 17 Qb4 Rc8 18 Nf2 Nc6 19 Qd2
Again, we employ prophylactic thinking. White would
probably love to get rid of his bad bishop by playing 20
Bg4 - the reply ..f7-f5, in the absence of a bishop at g7,
weakens the kingside. For example, 19...Qa5?! 20 Qxa5
Nxa5 21 fe de 22 Bg4!? (22 Rfc1!?) 22...f5 23 ef gf 24 Bf3,
with mutual chances.
19...ef! 20 Qxf4 Ne5
file:///C|/Cafe/Dvoretsky/dvoretsky.htm (9 of 13) [01/08/2002 7:50:52 AM]
The Instructor
Black has effected a favorable transformation of the
position. By somewhat weakening his pawn structure, he
obtains the excellent square e5 for his knight. His opponent
now has no time for 21 Bg4, since he must parry the
threatened rook incursion at c2.
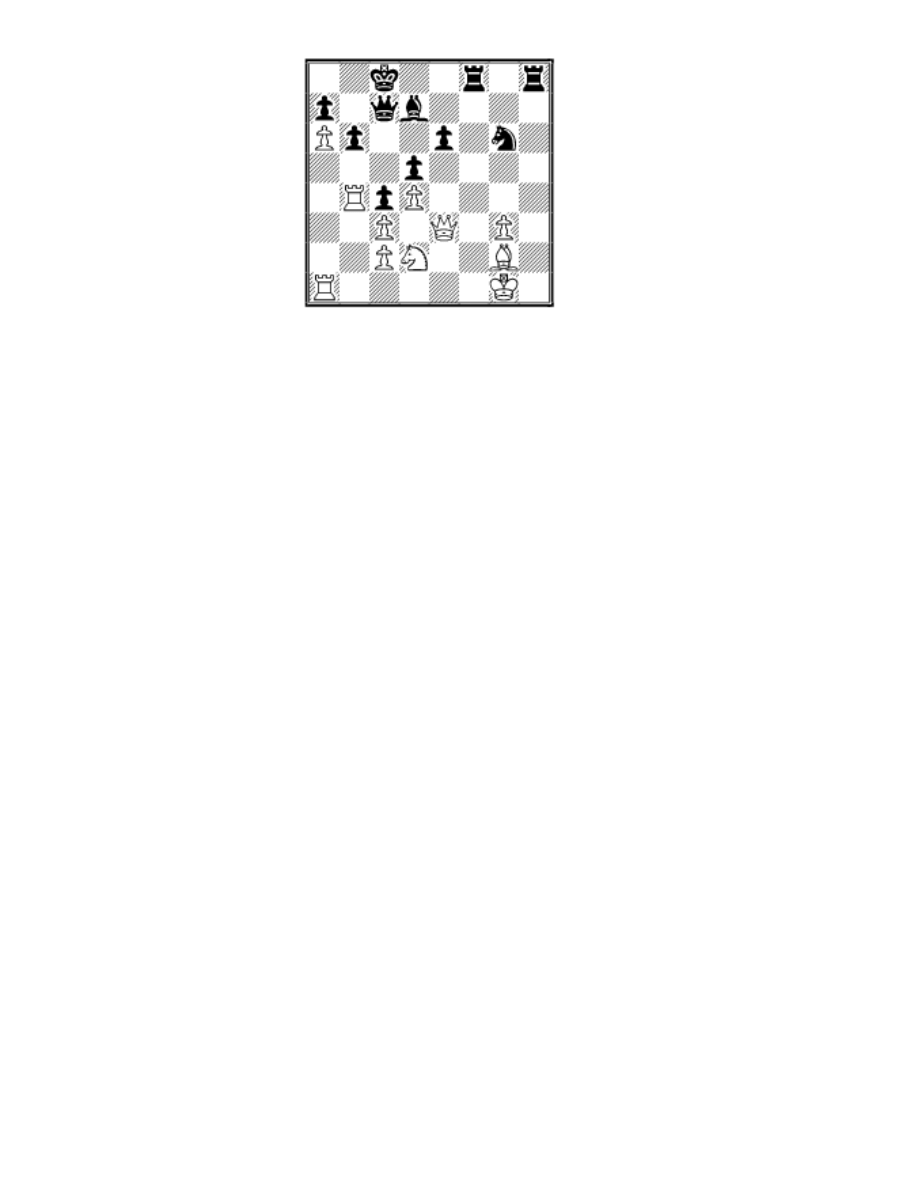
21 Rfc1 Qb6 22 Qd2
I shall comment on the final stage of this game, first, as I
then understood it.
22...Rxc1
Black exploits the fact that the
enemy rook is tied to the
defense of the a-pawn.
23 Qxc1 Rc8 24 Qd2 Rc5 25
Bd1 Rb5!
It’s important to induce the
move b2-b3, weakening the dark squares and reducing the
White bishop’s activity still further. My opponent has no
choice, since the pawn sacrifice 26 Bb3 Bxb3 27 ab Rxb3
does nothing to alleviate his position.
26 b3 Rc5 27 Rc1?
Seeking simplification, Tigran
Petrosian overlooks a tactical
nicety.
27...Rxc1 28 Qxc1 Qa5!
The decisive fork! This wins a
pawn, and with it, the game.
29 Kf1 Qxa2 30 b4?
file:///C|/Cafe/Dvoretsky/dvoretsky.htm (10 of 13) [01/08/2002 7:50:52 AM]

The Instructor
A standard “simul blunder” in a lost position.
30...Qxf2+!
White resigned. A good positional game!
About two decades later, searching for suitable lesson
material, I returned to this encounter with Petrosian. As a
trainer, my interest at that time was in the problem of
defending a difficult position and exploiting the advantage
achieved. Looking at the concluding moves from this point
of view, I saw that my actions were hardly above reproach,
for they offered my opponent the chance to obtain
counterplay.
Return to the second-last diagram. From a positional
standpoint, the move a6-a5 is good for Black. The fact that
he never found the time to play it does not speak well of the
technical mastery of the Black player. True, as the game
went, the absence of a pawn from a5 was in my favor, since
it allowed me the decisive move 28...Qa5!; but that was
almost accidental.
Instead of exchanging rooks, Black could have played
22...a5!?; and if 23 b3, then either 23...Qb4 or 23...Rc5 (the
immediate 22...Rc5 would be met by 23 b4). 23 a3 is
strongly met by 23...Rb8 or 23...Rc5, followed by 24...Rb8
(24 b4 ab 25 ab Rb5).
But why is 22...Rxc1 bad, when White has to recapture
with the queen? That’s just it: he doesn’t. Instead, he
should have given serious consideration to 23 Rxc1!? Bxa2,
except that instead of 24 b3? Bxb3 25 Rb1 a5, he should
continue 24 Ng4!
file:///C|/Cafe/Dvoretsky/dvoretsky.htm (11 of 13) [01/08/2002 7:50:52 AM]
The Instructor
Mate is threatened, which Black
cannot prevent by 24...f6? in
view of 25 Qh6+ Kg8 26
Nxf6+! Rxf6 27 Rc8+. After
24...Nxg4 25 Bxg4, the
disappearance of the e5-knight,
which had cemented Black’s
position, allows White chances
to exploit the weakness of the
doubled d-pawns. 25...Rb8 is
met by 26 b4!; and if 25...Bb3, 26 Ra1, intending 27 Qa5.
After 25...Be6 26 Bxe6 fe 27 h3, the Black king is too
exposed.
I believe the only real way to try for the win would have
been to refuse the exchange of knights by 24...Nd7!,
followed by 25...Be6. Would that have been an easy
decision?
But if 22...Rxc1!? and 22...a5!? are nevertheless of roughly
equal value, then the next move, 23...Rc8?! is a serious
inaccuracy. If it’s a good idea to induce the weakening
move b2-b3, then better to do so at once by 23..Rb8! A
possible continuation was 24 b3 Rc8 25 Qd2 a5 26 Rc1
Qb4! Black would have to lose time later on the maneuver
Rc8-c5-b5-c5, and this delay would have given his
opponent some counterchances.
After 23...Rc8?! 24 Qd2 the move 24...Rc5 looks right. On
24...a5 25 Bd1 (intending 26 Bb3) 25...Rc5, Black must
consider 26 h3! Rb5 27 Bb3!? Bxb3 (a more dangerous
path was 27...a4! 28 Bxe6 Rxb2) 28 ab Rxb3 29 Qxa5
Qxa5 (29...Rxb2 30 Qxb6 Rxb6 31 Ra4) 30 Rxa5
Nxd3 (30...Rxb2 31 Rd5 draws) 31 Nxd3 (31 Ra3!?)
31...Rxd3 32 Rd5.
file:///C|/Cafe/Dvoretsky/dvoretsky.htm (12 of 13) [01/08/2002 7:50:52 AM]
The Instructor
Back to the game: instead of the losing 27. Rc1?, White had
to try 27 b4!? (here’s where the absence of a black pawn on
a5 matters) 27...Rc3 28 Rb1, intending 29 a4. 28...a5 29 b5
Ra3 30 Rb2 poses no threat to him. After 28...Ra3 White has
a choice between 29 Rb2 and 29 Bb3; the latter move
involves a small trap: 29...Bxb3 30 ab Nc6? 31 Ng4! If Black
tries the prophylactic 30...h5, White could consider the
maneuver 31 Nh3!? Although White’s position remains
shaky, he could still fight on.
Copyright 2002 Mark Dvoretsky. All rights reserved.
Translated by Jim Marfia
This column is available in
Chess Cafe Reader
format. Click
for more
information.
[
] [
]
[
]
] [
Copyright 2002 CyberCafes, LLC. All Rights Reserved.
"The Chess Cafe®" is a registered trademark of Russell Enterprises, Inc.
file:///C|/Cafe/Dvoretsky/dvoretsky.htm (13 of 13) [01/08/2002 7:50:52 AM]
Document Outline
- Local Disk
Wyszukiwarka
Podobne podstrony:
Mark Dvoretsky The Instr5
Mark Dvoretsky The Inst30
Mark Dvoretsky The Inst14
Mark Dvoretsky The Inst11
Mark Dvoretsky The Instru
Mark Dvoretsky The Instr9
Mark Dvoretsky The Instr8
Mark Dvoretsky The Inst29
Mark Dvoretsky The Inst17
Mark Dvoretsky The Inst13
Mark Dvoretsky The Inst28
Mark Dvoretsky The Inst25
Mark Dvoretsky The Inst18
Mark Dvoretsky The Inst21
Mark Dvoretsky The Instr2
Mark Dvoretsky The Instr4
Mark Dvoretsky The Inst20
Mark Dvoretsky The Instr6
Mark Dvoretsky The Inst26
więcej podobnych podstron