Going Digital
-
A Guide To Digital Photography
Kris Butler
Stephen Canning
Robert Cooper
© Copyright ACD Systems 2003

Going Digital -
A Guide To Digital Photography
This informative guide is intended to provide an introduction to
digital photography for those who are new to it or those who wish
to learn a bit more about it.
This guide was written by staff writers at ACD Systems, makers of
ACDSee, the world’s most popular software forviewing, managing,
enhancing and sharing your digital photos.
More great information on this subject can be found in the ACD
Systems Digital Imaging Community:
www.acdsystems.com/English/Community/index.htm
In the ACD Systems Digital Imaging Community you’ll find photo
tips, software tips, contests and more.

Benefits of Digital Photography
Thinking about taking the leap to digital photography? While film
photography still has some benefits, digital photography has gotten
easier and more cost effective than ever. Here’s a few of the ben-
efits you’ll enjoy by adding a digital camera to your photographic
repertoire:
No Film
That’s right, once you have made your investment, you get to for-
get about the continuing cost of film, as well as the perpetual con-
cern that the roll will run out at the wrong time. Memory cards do
fill up as well, but they can be changed much quicker and if you run
out of space you can always delete a few shots that aren’t that
great anyway.
Instant Previews
Share the moment that you just captured right away. By looking at
the preview screen on your camera, you immediately know whether
the shot has worked out or not. Is uncle Ted’s head partially cut off
because he’s so tall? Or...is the shot over/underexposed? Plus, if
you run out of space and haven’t got another empty memory card
around, your preview screen lets you scroll through all the images
on your card and delete some bad shots to make room for a few
more.
New Sharing Options
When you switch to digital photography, a whole new set of elec-
tronic sharing options open up to you. With the right image man-
agement software, such as ACDSee, you can choose to send images
by e-mail, share them for free on the SendPix™ photo hosting
server, or if you are quite computer savvy and have you own Web
site, generate HTML photo albums for quick Web posting.
Environmental Benefits
Without traditional developing, the use and disposal of photographic
chemicals is reduced substantially.
Print Savings
When you go digital you can pick and choose the photos you’d like
to print. So, while digital prints can be more expensive than tradi-
tional prints, you don’t pay for prints you don’t want, and typically
spend significantly less on prints.

License to Experiment
With the savings mentioned above, you no longer have to worry
about paying for shots that don’t work out, so you can experiment
to your heart’s content!
At-Home Printing Convenience
In addition to getting your digital shots printed through traditional
labs, there are many home printers that provide brilliant quality.
With a fairly modest investment in a high quality inkjet printer, you
can literally have prints within minutes of taking a shot. Also, soft-
ware packages like ACD FotoSlate let you print out great album
sheets (no cutting) or professional-style portrait sheets just like the
ones you get at the studios.
Video Clips
Many digital cameras now come with the ability to take short video
clips, usually of a minute to 2 in length. If you pick up a larger
memory card (a good idea anyway), then you should be able to
take several clips on a card. Video clips can be a lot of fun and in
many cases if they are compressed well enough, they can even be
shared with friends by e-mail.
These are just the most prominent benefits of digital photography.
As you get into it and become familiar with your camera and soft-
ware, you’ll be constantly surprised by the change in the way you
think about photos and in the amount of new and convenient things
you can do.

Getting the Right Camera
Buying a digital camera? Here are the key areas to consider when
making your move from film to digital.
Resolution
Measured in megapixels, resolution is one of the most important
elements of your purchase. If you never print anything besides 4" x
6" pictures, a 2 megapixel camera should serve you just fine. How-
ever, if you like to or would like to have the option to enlarge your
pictures to 5"x7", 8"x10" or larger, consider a 3, 4 or 5 megapixel
camera.
Basically, bigger is better when it comes to megapixels, although
when shooting at higher resolution you will need more storage
capacity as your image file sizes will be significantly larger.
One note - “file resolution,” sometimes called “interpolated resolu-
tion” is manipulated by the camera’s software and the numbers
associated with it do not accurately reflect actual “sensor resolu-
tion”. Sensor resolution is what ultimately determines image quality
and the ability to make enlargements, so be sure you’re comparing
“effective resolution” when shopping for a camera or you may not
get what you are really looking for.
Lenses
Most mid-level and higher digital cameras have great zoom lenses.
On digital cameras, zooms are measured by their magnification
factor – 2x, 3x, etc. For comparison purposes, it’s often easier to
ask what the 35mm equivalent is as the magnification measure-
ments don’t specify what size lens it is that’s zooming.
For instance, a 2x zoom lensee could mean a 28mm-56mm zoom, a
35mm-70mm zoom, or a 50mm-100mm zoom (expressed in 35mm
equivalents). These lenses would all have different properties, so
it’s worth asking a few questions in this area to be sure you under-
stand what you’re getting.
Exposure Modes
Will the basic “automatic” mode suit your needs? Do you need shut-
ter priority for sports? Aperture priority for portraits? Be sure to
look at what exposure modes you’ll have on the camera you buy as
there’s a real range of available features in this area, even on cam-
eras of similar prices.

Batteries
Digital cameras gobble batteries compared to film cameras, so give
some thought as to whether you want the convenience of standard
AA batteries or whether you’d prefer a camera with a special re-
chargeable battery pack. Take note that you’ll want at least one
back up battery if the camera comes with a rechargeable battery
pack and doesn’t take standard batteries.
Shutter Lag
Unless you’re spending a LOT of money, your digital camera will
have more of a lag than your film camera between when you press
the shutter release button and when the picture is taken. If you
take sports shots or other action shots, try out a few cameras to
make sure you’ll be happy with the responsiveness of the camera
when shooting.
Memory Cards
The card that comes with your camera will be too small...period.
Most cameras ship with an 8MB or 16MB card, while a 32MB card is
the smallest you would want to have to be able to store a reason-
able number of medium resolution images. Take this into consider-
ation when purchasing and keep in mind that you’ll want a larger
card right away, so you won’t have to stay near to your computer to
download your photos when your card fills up.
File sizes will vary considerable depending on your camera’s resolu-
tion capabilities and the quality settings you choose. However, in
general, using the small memory card shipped with your camera will
limit you to taking the about the equivalent of a single roll of 24 to
36 photos at medium quality before you run out of space. The in-
vestment in a larger card, preferably a 64MB card or larger is defi-
nitely worth it.
Size
Digital cameras with very similar features come in a real range of
sizes, from ones as small as cigarette packs to ones as big as
35mm SLR (single lens reflex) cameras, which can be as bulky as a
shoe box when packed with lenses attached. Compact size usually
comes with a higher price tag, so give some thought in this area
before making a decision. Definitely consider a smaller camera if
you think its size will make it more likely that you’ll bring it with you
on outings.
Good luck shopping for your new camera!

Optical vs. Digital Zoom
When it comes to digital cameras, not all zooms are created equal.
There are two distinct varieties: optical zoom and digital zoom.
Optical zoom works in much the same way as a zoom lens on a
traditional camera, by magnifying an image before it is recorded as
pixels. Digital zoom, on the other hand, magnifies the image after it
is recorded as pixels by cropping the shot to include only the area
you have zoomed to and magnifying the pixels in that area. This
means that fewer pixels are used to represent your image, resulting
in lower resolution.
Owners of digital cameras can achieve the same effect with more
creative control by taking photographs without the zoom and then
later cropping them in an image editing program such as
ACDSystems' FotoCanvas.
The safest bet when thinking of getting a digital camera or upgrad-
ing your current one is to ignore the quoted digital zoom capabilities
and concentrate on the maximum optical zoom available. Also, find
out whether or not zoom lenses can be fitted as attachments.

Digital Video Clips
Digital video capture is a feature that now appears on the majority
of mid-level to high-end digital cameras. While you won't be creat-
ing feature films on your digital camera anytime soon, video clips
can be a lot of fun, so here are some of the main things to consider
when looking at cameras with digital video capture:
Resolution
Common resolutions are 160x120, 320x240 and 640x480. If you're
going to be viewing your video clips exclusively on your computer,
320x240 should be adequate, while you could consider 640x480 if
you are going to view your video clips on TV. However, if this is your
objective, you will likely be better served by a digital camcorder.
Sound
Most cameras with video capture now also capture sound as well,
although check to make sure this is the case before purchase if it is
a high priority for you.
File Formats
Common file formats for video clips include MPEG, AVI and
QuickTime. Any of these formats should be fine for most users. If
you are looking for more flexibility in file formats, consider getting a
camera that offers a choice of more than one capture format.
Length
Clip length is often the weakest point for video capture on digital
cameras. The majority of cameras allow you to take clips that range
between 30 seconds to 2 minutes, depending on resolution and the
memory available on your memory card. A limited number of cam-
eras, however, allow you to shoot continuously until your memory
card fills up. Either way, be prepared to invest in a couple of large
memory cards (128 MB and up) if you intend to shoot anything
more than a couple of short video clips at a time.fs
Want to easily add funky effects and set your music to video? Check
out ACD VideoMagic! VideoMagic let's you create great productions
from your own video clips that look just like professional music
videos… automatically.

Printing at Home
So you want to start printing your digital photos at home? You're in
luck! The availability of high quality, low cost home printing solu-
tions has never been better. Let's have a closer look at the printers
you can use in your own digital darkroom.
Printers
Inkjet printers have advanced to a point where their quality rivals
that of even the most expensive high-end color laser printers, at a
fraction of the price. There are several general categories of inkjet
printers now available:
Conventional Inkjet Printers
These printers offer high quality at a low price, but may not have
the same level of support for printing images that inkjet "photo
printers" do.
Inkjet Photo Printers
These printers include features created specifically for photo print-
ing. Some of these features include:
· Memory card slots
· Direct printing from memory cards
· Preview screens
· Support for traditional photo size sheets (i.e. 4"x6"). Some print-
ers will even accept cost-effective rolls of 4" photo paper.
· Wireless support for digital cameras.
If you're purchasing a photo printer, the best values are usually in
the printers that do not offer all of the above features. Think about
how you print your images and purchase accordingly. For instance,
if you don't have a separate card reader, getting card reader sup-
port in your printer is a great idea. However, most users like to look
at their images on their computer prior to printing, so a preview
screen and wireless support on your printer may be unnecessary.
Compact Printers
Typically, compact printers are simply a variation of photo printers,
optimized either for portability (for business travelers) or for a cer-
tain print size (such as the 4"x6" printers available). Typically, these
printers do not support the functionality and flexibility that full size
printers do. This means that these printers are generally not a good
choice as your one and only printer unless you have a very specific
reason for needing a compact printer.

InkJet Photo Papers
Confused by the wide variety of papers for your inkjet printer? Let's
take a step back and review all the different types available.
Plain Paper
Also known as copy paper or "20lb bond" this paper is, for the most
part, rather unsuitable for inkjet prints. It's sometimes acceptable
for text prints, but never for photos.
Plain paper is generally not pure white, so colors don't look good
and its extremely thin, so ink often bleeds through the sheet. Also,
because it's quite porous, the ink seeps into the paper (rather than
sitting on the surface) and images are not vibrant or crisp.
Inkjet Paper
Sometimes known as "presentation" paper, this paper offers much
more vibrant color printing. It's great for color charts and graphs,
but prints less than vibrant color photos. Also, it is typically much
thinner than photo paper and will not stand up well to handling.
Inkjet Photo Paper
This paper is designed to look and feel much like traditional photo-
graphic paper. It is either glossy or a very smooth matte finish.
These finishes are unique in that they are super-smooth, and yet
just porous enough that they hold the ink. If you've ever printed an
inkjet print on a non-inkjet sheet of glossy paper, you (like me)
realized that it's a bad idea when the print smeared as soon as you
touched it.
Prices on inkjet paper varies from manufacturer to manufacturer,
but generally the price is based on how white the paper is, how
thick it is, and what size package you buy. Make sure that you
sample some different sheets as papers from different manufactur-
ers have quite variable characteristics – colors can actually look
very different from paper to paper.

Traditional Print Labs
Not ready to give up the quality and convenience of a traditional
print lab? Do you prefer the quality of traditional prints? If so, don’t
let either of these considerations keep you from getting into digital
photography.
Although these services are not always widely advertised, many
traditional photo labs and photo counters now offer the quality and
service for digital that you’ve become used to for film.
For example, many labs now will let you bring in a CD, Zip disk or
memory card with your digital images on them. They will then un-
load the photos from your storage medium and print them on the
same equipment used for your film prints. With the great quality of
today’s digital cameras you’ll have a hard time telling the difference
between these prints and film prints (unless you’re a professional
with a magnifying glass).
Some labs charge a premium for these services, although these
charges are usually more than made up for by the fact that you’ll
only be getting your best shots printed. Another benefit of tradi-
tional prints is that they are typically more resistant to fading than
inkjet prints.
So, if concern about changing to a new and uncertain way of print-
ing is giving you second thoughts about going digital, simply con-
sider this information and ask a few questions at your print lab next
time your in, you’ll probably find the answers reassuring and be one
step closer to the fun and convenience of digital photography.

Scanner Types
Looking to buy a scanner? Well, your timing is great, because there
have never been so many low priced, high quality scanners avail-
able. Here's a rundown of some of the basic types of scanners.
Photo Scanners
There are some great new scanners that typically scan images up to
4"x6" or 5"x7". These are fun and compact devices that work great
if all your photos are these sizes and you never scan 8.5"x11" docu-
ments.
Traditional Flatbed Scanners
Like the photo scanners, but larger, a regular flatbed scanner can
handle up to 8.5"x 11" originals, making it suitable for a variety of
uses. If you scan a lot of documents, legal size (8.5"x14") scanners
and scanners with automatic document feeders are also available.
Many flatbed scanners have optional negative and slide adapters.
Unfortunately, except for negative/slide adapters at the high end of
the price spectrum, the quality is typically not very good from these
add-on devices.
Transparency Scanners
"Transparency" in this case refers to both negatives and slides.
Because of the small size of negatives, this is one area where reso-
lution and quality make a huge difference. Typically, with this type
of scanner, you get what you pay for, so don't expect to get a great
transparency scanner unless you're prepared to spend some serious
money. For photographers who don't have a lot of negatives or
slides to scan, you may be better off paying to have your scans
done and put onto CD at your photo lab.
Whatever type of scanner you're looking for, the best thing you can
possibly do is to find a store where you can test out the scanners
you're looking at. Take some of your own photos with you and try
out the scanner. As they say, the proof is in the pudding and by
scanning your own images and examining the resulting scans, you'll
quickly find out whether a particular scanner will meet your needs.

Scanners: Resolution and Bit Depth
Trying to figure out what the different technical specifications of
various scanners actually mean? Read on and we'll discuss the two
most important elements to consider when you purchase.
Resolution
Resolution on scanners is measured by the amount of dots per inch
a scanner can capture. For most uses, a 600 dpi scanner is suffi-
cient. This amount of resolution will allow you to scan original pho-
tos and print them out at a high resolution. If you want to be able
to crop or enlarge your images after scanning and still maintain
sufficient resolution for high quality printing then a 1200 dpi scan-
ner will be a better choice. If you are going to perform extreme
enlargements of scans then a 2400 dpi scanner is definitely worth
considering.
If you are scanning negatives, definitely look to get the highest
resolution you can afford. Because of the small size of negatives,
you need quite high resolution (at least 2400 dpi) to be able to
enlarge images to the size you will want to print them out and
maintain the quality of the image. When comparing scanner resolu-
tions, focus on the "optical resolution" and not on the "enhanced" or
"interpolated" resolutions that are quoted.
Bit Depth
Bit depth refers to the amount of color information that a scanner
captures when it performs the scan. A 24-bit scanner is able to
capture 8 bits of information for each of the red, green and blue
color channels, resulting in over 16 million color variations that the
device can capture. Many scanners are now 36-bit and higher. All
things being equal, higher bit depth is better, although unless you
are a professional user, it's rare that you'd actually need more than
24-bit color depth.
Other Considerations
Dynamic range is a specification that is not often referred to, but is
a measurement of the range of different tones a scanner can cap-
ture. In practical terms, this shows up in the amount of detail a
scanner can capture in the lightest and darkest areas of a scan. If
you are buying a high-end scanner, it's best to find out about the
dynamic range of the scanners you're considering and get the high-
est dynamic range you can afford.

Speed is also a consideration when purchasing a scanner. Simply
put, some scanners are faster than others, which can be a big con-
sideration if you're going to be scanning lots of images.
While it may seem challenging to wade through the technical speci-
fications of various scanners to figure out which one is best for you,
it's well worth it as the efforts will pay off handsomely in the results
you'll get in image quality.

Photo Editing Software
Want to get creative with your digital photos? Modern photo editing
software gives the ability to enhance images and create digital
works of art.
If you're a beginner looking at editing your photos, some of the key
features you'll want to access in your software include:
RedEye Reduction
Possibly the most common editing task undertaken by photogra-
phers, this allows you to remove the annoying redeye effect that
often occurs with flash photography. Software such as ACD
FotoCanvas makes this task extremely quick to perform.
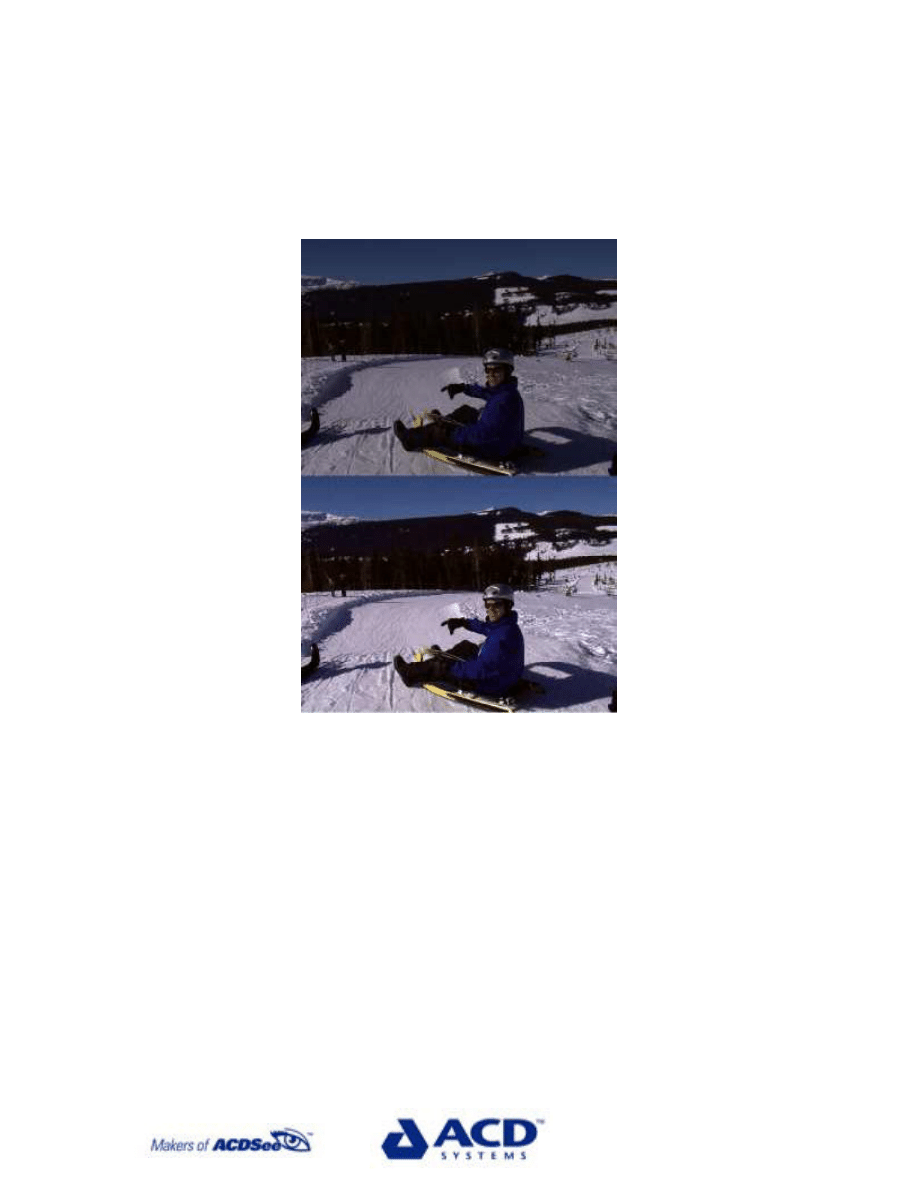
Rotation
An image editor will perform custom rotations to whatever degree
you require, allowing you to align shots that may have been taken
at slightly the wrong angle (see sample below).
Cropping
This will allow you to cut away the clutter in a photo to help compo-
sition and lend a bold, dynamic quality to the main subject.
Clipping
Clipping tools allow you to remove all background areas and isolate
a part of your image (see sample).
Touching Up
Tools such as the paintbrush or clone tool will let you remove virtu-
ally any spots or unwanted items in an image (i.e. power lines cut-
ting through a beautiful sunset photo.
Exposure and Contrast Control
If your shots are a little light or a little dark, they can be fixed in
moments.
Color Correction
If your images have a color "cast" to them, such as a blue cast from
fluorescent light, you can quickly give them a more natural tone.
When shopping for a photo-editor, look for a good balance between
cost, usability and complexity. If you're a professional, you'll likely
want a very high-end tool. If you're a hobbyist, however, you may
find that a less expensive, easier-to-use tool is just right for you.
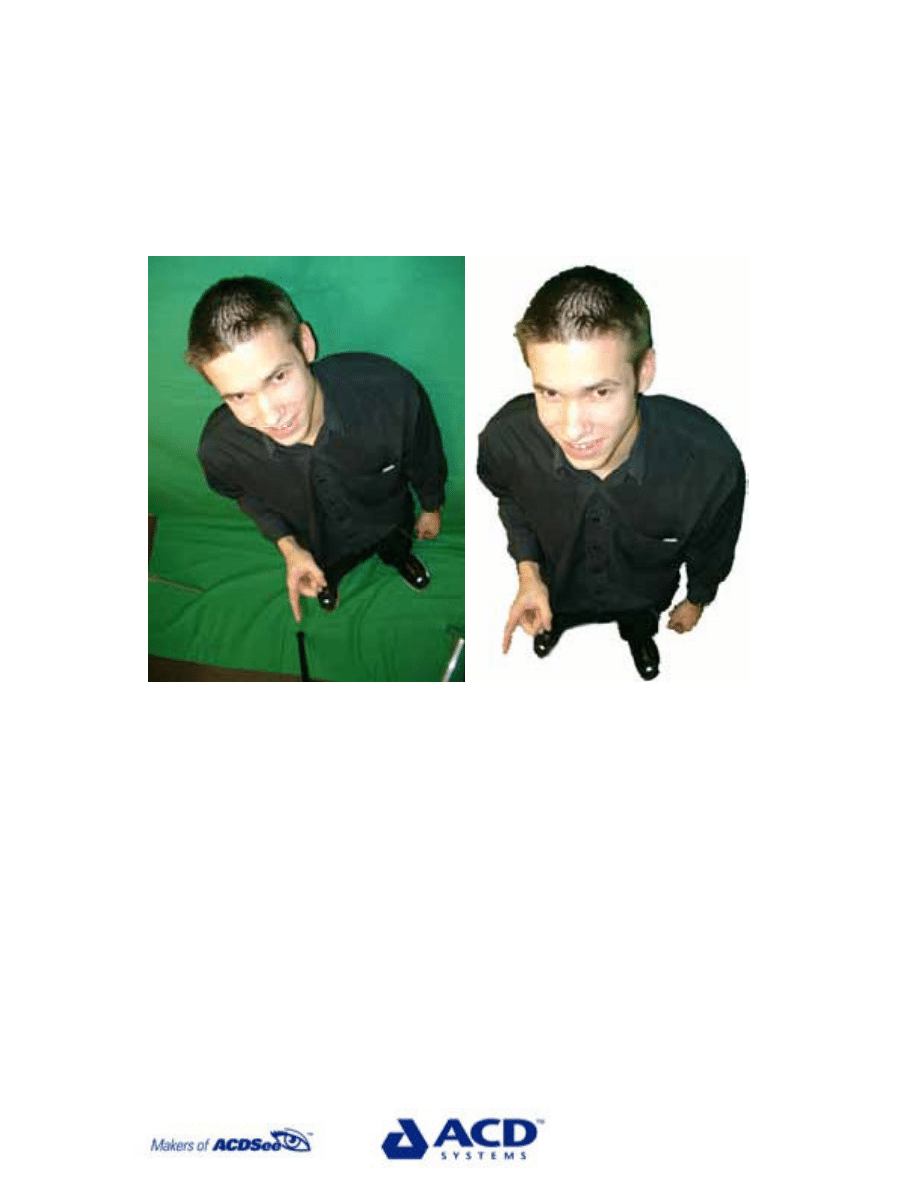
The sample below shows the effects of clipping, cropping and rotat-
ing on an image.

RedEye Reduction
One of the greatest things about moving to digital photography is
that you have the opportunity to fix pictures in a very efficient man-
ner after you take them. Sure, film images can be touched up, but
this is usually a practice restricted to professionals and dedicated
enthusiasts with at-home darkrooms. Likewise, prints made from
film can be scanned and then electronically adjusted, but the scan-
ning process is time-consuming and cumbersome unless you spend
a lot more money to get a specialized slide/negative scanner. When
you've got a digital camera, the process of fixing flawed images is
quick, relatively painless and a lot less expensive for just about any
kind of problem, including the most frustrating ones like redeye.
We've all gotten prints back from the developer in which some of
the best shots show our family and friends looking a bit crazed due
to redeye. Without the ability to fix the problem the photos are
really just junk because they are so unattractive. Here are the
things you need to know to avoid the problem in the first place and
to fix it later if need be.
Low Light and RedEye
To start with, redeye typically happens in low-light conditions. This
is because our pupils open wider to let in more light and thus reflect
back enough light from a flash to show the color of all the blood
vessels inside our eyes. There is no avoiding this biological fact.
That means that to avoid redeye you need to shine additional light
on your subject before photographing them in low-light conditions.
For most owners of late-model cameras that will simply mean re-
membering to turn on the redeye reduction function. This function
sets your camera to emit a burst of flash immediately prior to the
actual flash for the photo. The result is that your subject's irises
constrict and not enough light is reflected back from inside their
eyes to show redness.

RedEye Camera Function
There are a couple of potential drawbacks of using your anti redeye
function. First, you can lose some of the spontaneity of the moment
because people notice that you are taking a picture. Second, when
taking posed shots, unless you let your subjects know about the
pre-flash, they will often move just after the initial flash, but before
the picture is really taken. This can cause frustration for both the
subjects and the photographer as photos need to be taken over. In
the first case, the best thing to do is remember that spontaneous
shots with redeye will need fixing and that a little less spontaneity
may be just as good. In the second case, simply try to remember to
let the people in your shot know about the pre-flash, so they won't
start to move too quickly. An alternative solution, if it is appropriate,
is simply to improve the overall light levels by switching on some
lights.
Even when keeping all of these things in mind, it is likely you'll still
end up with redeye affected shots occasionally. Make sure to take a
close look at all the photos from each event on your computer be-
fore printing them. If you just browse through them quickly you
may miss a redeye photo that appears later when showing your
friends. A good way to check them over before printing or web
sharing is to flip though them one at a time while zoomed in at 200
to 250%. To avoid having to zoom in on each one separately, use
ACDSee's Zoom Lock function under the Zoom menu in the view
window.
Fixing RedEye
If you notice photos with redeye, the easiest next step is to fix
them using the automatic tools provided in ACDSee's built-in photo
editor. From ACDSee's view window, click Editor in the main
toolbar; this will launch your editor. Then, zoom in far enough so
that you can easily make edits to the eye areas and click Redeye in
the bottom toolbar. Doing so should bring up the tool options
toolbar; if it doesn't, go to the View menu and put a check next to
Tool Options so they appear. Now, when you hover your mouse over
the photo a set of crosshairs will appear. Click and hold above and
to the left of the affected area and as you drag over it, it will be
highlighted by an ellipse. At this point, you simply need to select the
right eye color, adjust the shade to match reality, click apply, then
save your changes if you're satisfied.
Once you have performed the operation a couple of times it only
takes about 30 seconds per eye and you don't even need an ad-
vanced medical degree. So if you have two or three affected photos
per event, we're talking a couple of minutes to fix them before
sharing them with your family and friends.

Cropping
Cropping, or removing unwanted clutter or plain old dead space
from photos is one of the most commonly performed tasks in digital
imaging.
This is so because it is quick and easy to do and many photos can
benefit from it. Try as most of us do to only get what we want in
our photos, we often end up with too much foreground or back-
ground, not to mention unseemly objects like garbage cans and
telephone poles.
Most image editing programs offer easy tools to crop images, often
represented by two right angles intersecting. It is usually just a
matter of dragging a box over the photograph that you want to
keep and excluding the areas that you want to crop away.
In ACDSystems' FotoCanvas you can fine-tune the box using
handles on each of the sides and then just double-click within the
box to perform the crop.
However, keep in mind that you are cropping away pieces of the
photo. This means that if you want to print your cropped photo at
the same size as the original, it will have to be "stretched" to a
lower resolution. Once you have cropped a photo, the only way to
regain the information you have cut away is to use the "Undo" but-
ton to reverse the action, so don't forget to save a backup copy
before cropping. Cropping can be good for isolating a single subject
in a photograph, getting rid of static areas of a single color or di-
recting attention to details within the image.

Batch Exposure Adjustments
One of the great things about getting into digital photography over
traditional photography is that it becomes easy for anyone to do
what in the past could only be done by those with access to dark
rooms. Adjusting the exposure of images is a great example of this.
Getting exposure just right, every time is one of the greatest chal-
lenges of photography. That's why there are almost always a few
photos from any event that could have been exposed better.
Whether we forgot to use the flash or take a couple of steps to the
left for a better angle of light doesn't matter afterwards except as a
guide for the future. What's most important is improving the look of
these problem photos so they don't go to waste and can be shared
with friends and family with pride.
Thankfully, with an image management program like ACDSee, en-
tire batches of poorly exposed photos can be fixed quickly using the
batch exposure adjustment tool. Here's how to do it in ACDSee in
three simple steps:
1. In the main, file-browsing window, open a folder and select all
the problem photos in it. This can be done by holding down the Ctrl
key and selecting images with a single click.
2. Click the Edit button in the main toolbar and choose Exposure
from the drop-down toolbar that appears.
3. Using the selections provided in the Exposure dialog box, you can
now decide if you'd like ACDSee to perform all the adjustments
automatically or let decide on the first one and use that as the stan-
dard. You can also choose to replace the original files or send the
new files to a different folder.
Typically, I choose to decide on the first image myself. This is usu-
ally as simple as confirming that I like the automatic adjustments
ACDSee has made. If I want something different, it's as easy as
adjusting three slide selectors for black, white and gamma levels
and watching as the photo changes in response. I also usually re-
place the bad originals because they just clutter the folder.
That's it. Really poorly exposed photos may need to be edited indi-
vidually, but this simple operation will fix the majority of photos.
Good luck and remember, the more you think about getting good
exposure in the first place, the fewer photos you'll have to fix.

What Is An Image Browser?
Do you find yourself frustrated locating photos on your computer
and keeping track of them? You're in good company! With the onset
of consumer level scanners and digital cameras that have
revolutionalized our use of photos, image browsers like ACDSee
have become vital tools.
Here are some of the most important functions that image browsers
such as ACDSee perform:
Viewing/Browsing
Operating systems like Windows were not originally developed to
make it easy to quickly view images. An image browser is created
specifically so it's easy to access your images and browse through
them, much like an interactive photo album. ACDSee lets you view
your images very quickly, either as thumbnails (small images) or as
full screen images that you can browse through more quickly than
flipping through a traditional album.
Managing
Managing can be anything from renaming images to organizing
directories to creating encrypted archives. If you're not using an
image browser and have a lot of photos, by now you'll have wasted
a lot of time searching for them. By managing and organizing your
images with an image browser, you'll save hours of time by having
your images in logical, consistent order.
Acquiring
Acquiring involves getting images from a camera, scanner or some
other external source. Image browsers like ACDSee include easy-to-
use "acquire" functions that allow you to bring images straight into
your digital workflow from various devices.
Enhancing
Enhancing can range from fixing red-eye to removing spots from
your images or restoring older photos. ACDSee provides quick edit-
ing functions to help with your most common enhancement tasks.
Sharing
Sharing typically includes e-mail, photo hosting and/or html (web
page) album creation. In ACDSee, it's easy to share images in a
number of ways. You can e-mail photos directly from ACDSee,
share images online for free via SendPix™or automatically create
optimized html albums.

Printing
Most image browsers support at least basic printing and ACDSee
goes one better with options for printing contact sheets. Additional
print modules or "plug-ins" such as ACD's FotoSlate gives you print-
ing tools that allow you to make the kind of prints traditionally done
only by professionals. It lets you print professional portrait pages
and beautiful album pages while saving money by maximizing the
use of your photo paper.

Organizing Photos
Is your collection too big to find photos fast simply by browsing
thumbnails? Want to find those special photos in your big collection
faster than ever before, without spending ages meticulously orga-
nizing all your photos with unique file names, descriptions and a
well-thought-out folder structure? Who doesn’t, right? Find out how
you can with ACDSee 5.0.
One of the core benefits of an image management program like
ACDSee is that you can browse thumbnails extremely fast to get a
quick look at your collection and find the particular pictures you are
looking for. But as fast as thumbnail browsing can be, once you
have more than a few hundred photos, finding that special one
you’re thinking of can become a chore. This is especially the case if,
like many of us, you haven’t taken the time to build a logical folder
structure, rename all your images and add unique descriptions that
can be searched on later.
While ACDSee still provides the ability to do all those things, it now
includes a much faster way of organizing your photos called “Cat-
egories.” This function lets you create categories for filing photos
that make sense to you and that you can easily browse. You can
then assign multiple images at a time to various categories without
creating duplicates as you would if you created new folders and
copied images from other folders into them.
Also, unlike the Favorites function, which allows you to create fold-
ers filled with shortcuts to images, thus avoiding creating dupli-
cates, Categories lets you see the contents of more than one cat-
egory at a time. Being able to assign multiple photos to multiple
categories and then browse more than one category at a time, all
without creating duplicates can lead to serious savings in both time
and disk space for anyone with a moderate to large collection. And,
if you’re snap happy with your digital camera like we are, you know
that the volume of photos can pile up really fast.

Saving Time with Contact Sheets
Whether you're just getting into digital photography or have been
doing it for a while, if you like to print your photos then using con-
tact sheets can be a great way to save time when sifting through
them later. While contact sheets can provide some benefits to elec-
tronic browsing, there are many other ways to organize and view
images to save time, so their main benefit is still in being able to
see quickly exactly what pictures are in a given collection of prints.
At this point you may be thinking, "OK, that's all great, but what are
contact sheets anyway, and why are they called that?"
Before the dawn of digital photography (less than 10 years ago) a
contact sheet was simply a series of negative-size images on a
single sheet of photographic paper exposed with the negatives held
tightly against it, thus the "contact." Contact sheets were used to
organize and find images without searching collections one photo at
a time. Today, like much photographic terminology, "contact sheet"
has been adopted in the digital photography world for similar rea-
sons, despite there being no negatives or contact involved.
Of course, as with most digital equivalents to film photography,
there are a few additional and useful things you can do with digital
contact sheets using a program like ACDSee. Here are some things
to think about when making your own contact sheets:
1. Match Size: It's best to make your contact sheets the same size
as the prints you're making so they can be kept together easily.
2. Orient Properly: For quick browsing, the images on your con-
tact sheet should be oriented in the same way as the majority of
your prints. This will most often mean being able to look at your
contact sheet with the long edge up.
3. Include Image Info: The contact sheet option in most digital
imaging software will let you include additional information such as
file name, dimensions, date and so on. Including this can be very
useful for finding and assessing the files again later if, for example,
you want to make enlargements.
ACDSee lets you include info from any file property or metadata
field, which is great, but it won't all fit in and it also won't be any
use if you can't remember what it is later. So, give some thought to
what information would be most useful to you and then remember
to include it for all the contact sheets you make. To choose what
specific image information to include in your ACDSee contact
sheets, click the "Edit caption text..." button in the "Thumbnail
caption options."

Photo Hosting Sites
Want to share your photos with friends without having to send e-
mail attachments? Photo hosting sites can help make this an easy
and cheap (or free) thing to do!
What is photo hosting?
Photo hosting sites typically exist as online albums or communities
where you can display your images. While some of these sites cost
money to use, many others are free of charge. The free ones are
often part of photo-processing sites or are included with a software
purchase (such as the SendPix photo hosting service, included free
with ACDSee).
How does it work?
The use of photo hosting sites usually follows a process something
like this:
1) Sign up for the site
2) Upload your photos
3) Provide access to your images by giving your friends and family
a Web site address (and possibly a password) where they can go
and view the photos.
The benefits of photo hosting sites include being able to share lots
of images without the limitations of e-mail, such as mailbox size
restrictions. While it can be difficult to send more than a few images
at a time via e-mail, most photo hosting sites allow for quite a few
photos per album and often multiple albums. On SendPix, for ex-
ample, you can have as many as 50 photos per album and there is
no limit to the number of albums you can post.

Canned Slide Shows
Entertainment value and pure convenience have made the slide
show feature of most image viewers perhaps the most popular
feature of digital imaging software. While this is great, it is possible
to go one step better with relative ease and make an even bigger
impression by creating your own "canned" slide shows.
The term "canned" means a few things. First, it means that the
slide show can be run on its own without the benefit of the software
that made it in the first place. This, in turn, means that it can be
shared over the Internet or burned onto CD and distributed. It also
usually means that it is accompanied by some combination of text,
sound and transition effects, so that it generally stands on its own
as a presentation. That's not to say that most slide shows include
the level of detail someone would get if you were there explaining
every photo to them, but rather that they will usually be more en-
tertaining to your audience than simply viewing one photo after
another.
You can give canned slide shows a try by simply downloading a trial
version of FotoAngelo using the link provided below. Once you have
your copy, the easiest thing to do is to use FotoAngelo as a plug-in
to ACDSee (it also works as a stand-alone product). Do this by
selecting a series of photos in ACDSee and clicking the Create but-
ton in the main toolbar and FotoAngelo in the drop-down toolbar
that appears.
You can select multiple images in ACDSee by single-clicking images
once while holding the
Ctrl key down. If you want all the images in
a folder simply press Ctrl + A. Or, if you'd like to select images
from multiple folders, first set up a new folder, then copy images
from your other folders into it.
For super-quick results, all you have to do from here to create a
canned slide show is add a music file to the properties of the first
image and leave the rest of the options on their default settings. Do
this by highlighting the first image at the top if the list on the right
in the main window and clicking Image Properties. Then select an
audio file using the Select File function under Slide Properties and
leave the rest of the options as is (MP3, WAV and MID formats all
work). The average popular song is 3 to 4 minutes long, so with the
default timing left at 5 seconds per picture, 1 song should be good
for up to 80 photos.

After making your song choice, just click OK in the Image Proper-
ties dialog box and then Create in the main window and in moments
you'll have your own canned slide show. Once you see how easy it
is, you may just be inspired to start adding text to your images
along with choosing additional songs and deciding on individual
transition effects. Happy canning!

Web Sharing Photos
One of the great benefits of getting into digital photography is the
ability to share images quickly and free on the Web. The two main
methods for doing this are by e-mail or on a photo-hosting Web site
such as ACD Systems' SendPix and both of these can be done right
from ACDSee.
Another method when you'd like to share a large collection of im-
ages is an instant messenger chat session and ACDSee can help
you prepare images for this, too. Sophisticated Internet users may
also build their own Web sites to display images and ACDSee in-
cludes an HTML album generator to assist in this, but for most of us
the first three methods do the trick nicely.
Since sharing images by e-mail and the SendPix photo hosting ser-
vice is so easy using ACDSee, below is a series of things to think
about for best results rather than step-by-step sharing instructions.
Also included at the bottom are hints on sharing via an instant mes-
senger chat session.
Hints on Using ACDSee to Share by E-mail:
1. Think About Your Recipients: With the amount of junk mail
and viruses out there a lot of people are paranoid about receiving
messages with attachments or from unknown sources and will often
just delete any such e-mail that comes in.
Therefore, when you want to share images with someone or a
group of people via e-mail think about what type of computer user
they are and whether they will recognize and trust e-mail from you
that has attachments. If you are sending images to a group of busi-
ness associates you don't correspond with regularly, you may find
many of your e-mails simply deleted.
2. Notify Your Recipients: To avoid having your e-mailed images
deleted, try sending a preliminary message out stating that you
intend to share images with them via e-mail and asking if this is
OK. Also, let your recipients know they may receive multiple mes-
sages with the same subject line from you and that it is not a virus
but simply how ACDSee avoids bounce backs. "Bounce backs" are
error messages stating that your e-mail didn't go through.

When sending images, bounce backs are common because many
people with free or inexpensive e-mail accounts are not allowed to
receive anything but small messages and more than a couple of
images will often exceed the limit, meaning your message and im-
ages won't get through. However, ACDSee avoids these bounce
backs by figuring out the allowable limit and segmenting your im-
ages into separate packages that are under the limit.
3. Confirm They Got Your Photos: Whether you're simply shar-
ing with family and friends or with business associates, it helps to
confirm your images were received, so everyone knows what you're
talking about when you refer to the images in a later e-mail.
Hints on Using ACDSee to Share by SendPix:
1. Provide a Context: When sharing images with SendPix, rather
than attachments your recipients will get an e-mail with a link to
your album on the SendPix photo-hosting server. To give them a
chance to understand what the images are all about and why you
sent them, take advantage of the option to include a personalized
message in the notification e-mail they'll receive.
Another great way to provide a context for your images is to give
them appropriate names. These names appear when the thumbnail
preview of each image is clicked on for a larger view.
2. Explain How to Save Individual Images: Out of the many
images you send, and you can up to 50 per album with no album
limit, your recipients will probably want to save a few. Help them
out with this by including some instructions for saving. These can be
included in the personalized message you can add to the album
notification and link.
Images can be saved as follows: Click an image thumbnail in
SendPix to see a larger view, then click that larger view to see the
image at full size. Right-click the full-size image and choose "Save
Picture As..." from the Windows context menu. Choose a destination
folder and click "Save."
Hints on Sharing A Large Collection Using An Instant
Messenger:
1. Zip Your Images: If you'd like to share a large collection of
photos over the Internet and make it as convenient as possible for
your friends and family to get the photos onto their computers, then
attaching a zip file or other type of archive file to an instant mes-
sage is the way to go.

To create a zip file in ACDSee, select all the images you want and
click Manage in the main toolbar and Archive in the drop-down
toolbar that appears. Then simply click Create in the dialog box that
appears and within moments you'll have a zip file ready to go.
2. Open an Instant Messaging Account: Try MSN Instant Mes-
senger, ICQ, or an account with some other popular and free instant
messaging system. E-mail your friends and family and see what
kind of accounts they are using and/or get them to sign up for an
account with the same service and add each other to your buddy
lists.
The reason there are no (or generous) file size transfer restrictions
on these accounts is that when transferring files, your computer
becomes the server and does all the work without passing addi-
tional bandwidth costs onto your instant messenger.
3. Start a Chat Session and Choose the File Transfer Option:
From this point you'll just have to sit back and wait for the transfer
to be complete (though you can continue chatting). This shouldn't
take too long provided your zip file isn't totally enormous and you
aren't using a really slow connection.
Thanks for taking the time to read Going Digital - A Guide to Digital
Photography. To learn more about digital imaging and digital pho-
tography, please visit our Digital Imaging Community.
Also, check out our award-winning selection of products at
Document Outline
- Going Digital - A Guide To Digital Photography
- Introduction
- Benefits of Digital Photography
- Getting the Right Camera
- Optical vs. Digital Zoom
- Digital Video Clips
- Printing at Home
- InkJet Photo Papers
- Traditional Print Labs
- Scanner Types
- Scanners: Resolution and Bit Depth
- Photo Editing Software
- RedEye Reduction
- Cropping
- Batch Exposure Adjustments
- What Is An Image Browser?
- Organizing Photos
- Saving Time with Contact Sheets
- Photo Hosting Sites
- Canned Slide Shows
- Web Sharing Photos
Wyszukiwarka
Podobne podstrony:
Russian and Chinese Methods of going from Communism to?moc
[Mises org]Murphy,Robert Study Guide To Human Action A Treatise On Economics
Robert Silverberg Roma Eterna Getting To Know The Dragon
Nora Roberts Dream Trilogy 01 Daring To Dream
Daniel Ali Robert Spencer Inside Islam A Guide for
Robert P Murphy Study Guide to the Theory of Money and Credit
Business Summaries Rich Dad s Guide To Investing (Robert Kiyosaki & Sharon L Lechter)
Howard, Robert E Breckenridge Elkins The Road To Bear Creek
Robert Axelrod The complexity of cooperation 1997
cooperation
Meyer Stephenie Intruz [rozdział 1]
meyer ogólnie o zmierzchu część2, Stephenie Meyer, Saga Zmierzch
Metoda Butlera
cooperative award
Maid Butler Character Sheet
ESTUARY ENGLISH; IS ENGLISH GOING COCKNEY
więcej podobnych podstron