SURROUND
SOUND
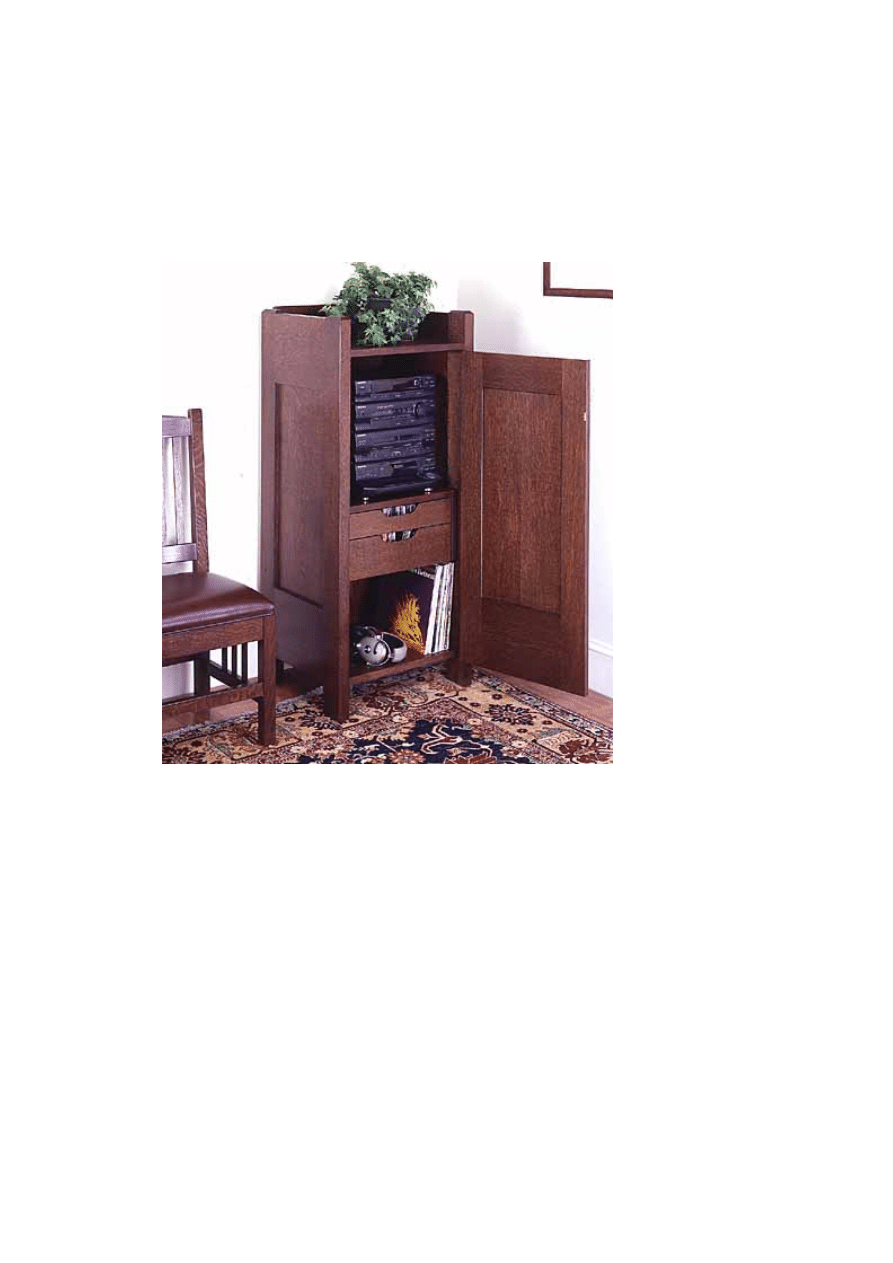
Furniture for your stereo.
Our cabinet stores modern stereo components neatly out of sight. With the door shut, it looks like a
traditional Arts & Crafts hutch.
There is a staggering variety of stereo systems available
today, and depending on your finances and your level of
enthusiasm in these matters, you can spend hundreds or
thousands of dollars on equipment. For serious
audiophiles, the sleek, black cases of stacked stereo
components are the only way to go. But most of us would
rather shut the works behind closed doors and concentrate
on the music.
Our Arts & Crafts style cabinet is a perfect home for a basic
stereo system. It easily accommodates a receiver, CD and
tape players. And although high-technology audio
components are the preferred means for many people to
play music today, we kept in mind that many others are
loathe to give up their vinyl collections. For that reason we
have provided space for a turntable on top and a shelf for a

modest LP collection as well. There are also two drawers,
one for tapes and one for CDs. In keeping with traditional
Arts & Crafts pieces, we used quarter-sawn white oak for
the cabinet. If you have trouble locating quarter-sawn oak
where you live, one mail-order supplier is Talarico
Hardwoods, RD 3, Box 3268, Mohnton, PA 19540; 610-
75-0400.
7
Building The Case
Rip and crosscut stock for the case rails and
shelves, but leave each workpiece a bit oversize,
so you can trim the glued-together panels to
finished dimension after the glue has set. Joint
the edge of each workpiece straight and square,
and lay out the joining-plate slots spaced
approximately 6 in. on center. Hold the plate
joiner and the workpiece tightly to the surface of
the workbench, and cut the slots (Photo 1).
Cut joining-plate slots in the boards’
edges. The plates keep the boards
aligned while they are being glued and
clamped.
Spread glue in the slots, along the edges of the
workpieces and on the joining plates (Photo 2).
Position the plates and assemble a panel. Clamp
the panel to pull the joints tight, then check that
the panel is flat. Next, glue up the 1/2-in.-thick
stock for the side and door panels. It's not a good
idea to use joining plates to align the joints on
these thinner panels because the plate joint may
be visible after the panel is finished.
To ensure a properly bonded joint, apply
glue to the joining-plate slots, the board
edges and the joining plates.
Prepare the rest of the stock for the case parts.
Rip, crosscut and joint all parts to finished
dimension, including the previously glued-up
panels. Label each part to indicate the face side
and orientation in the case. Lay out the mortises
in the case side stiles by clamping the stiles
together, then mark across their edges (Photo 3).
Lay out the mortises in the case stiles by
clamping the workpieces together, and
mark across them using a square.
Use a plunge router with a 1/2-in.-dia. up-cutting
bit and an edge guide to cut the mortises (Photo
4). Clamp two stiles together before routing to
provide a stable surface for the router, and cut the
mortise in two or three passes.
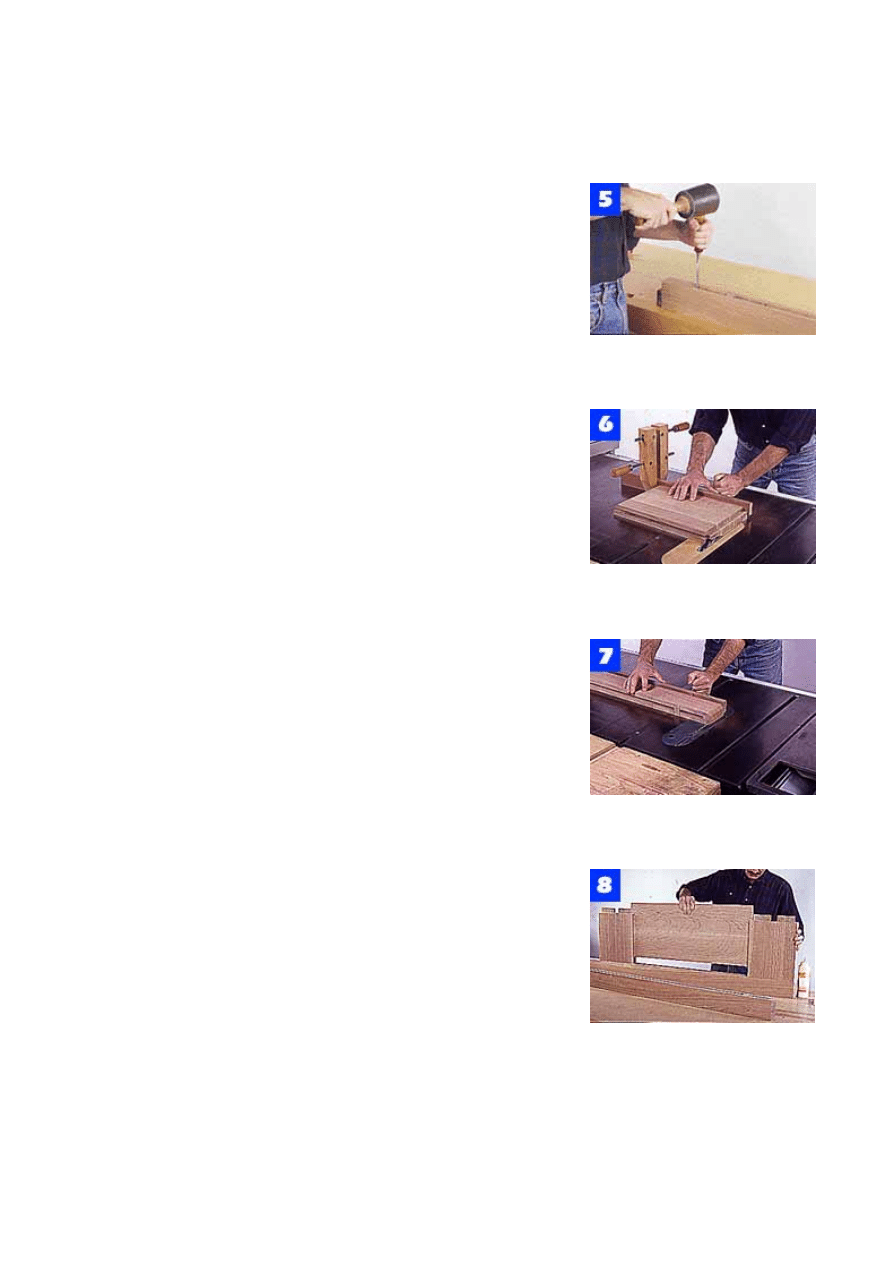
Clamp two stiles together to form a base
for a plunge router, and cut the stile
mortises using a spiral up-cutting bit.
While you have the router out, readjust its depth
of cut, and cut the panel grooves in the stile
edges. Readjust the router again to cut the panel
grooves in the side rails, and then chop the ends
of the mortises square using a chisel (Photo 5).
With a stile held securely to the bench,
use a chisel and mallet to cut the rounded
ends of each mortise square.
Install dado blades in the table saw and cut the
tenons on the side rails. Since the rails are quite
wide, the tenons are divided into two separate
pieces. Begin by cutting one wide tenon on each
end of the rails (Photo 6). Cut the tenons slightly
oversize, and then pare them smooth with a
razor-sharp chisel. Divide each tenon into two
sections by making a rectangular cutout in the
center using a handsaw and chisel.
With a clamp on the miter gauge serving
as a workpiece stop, cut the side rail
tenons with dado blades in the table saw.
Next, set the table saw blade to cut a 45-degree
bevel, and cut the chamfered ends on the side
stiles (Photo 7). Use the miter gauge to guide the
work. Test fit the joints for each case side and
make adjustments as necessary. Sand the side
panels with 120-, 150-, 180- and 220-grit
sandpaper before assembly.
Set the table saw blade to 45 degrees,
place a stile against the miter gauge, and
cut the chamfer on each edge of the stile.
To assemble a cabinet side, spread glue in the
stile mortises and on the rail tenons, then join the
rails to one stile. Slide the panel into position
(Photo 8), but be sure not to get any glue on the
panel's edge or its groove. Now you can place the
second stile in position and clamp the assembly.
Assemble the case sides by applying glue
only to the mortises and tenons, not in the
anel groove or on the panel edge.
p
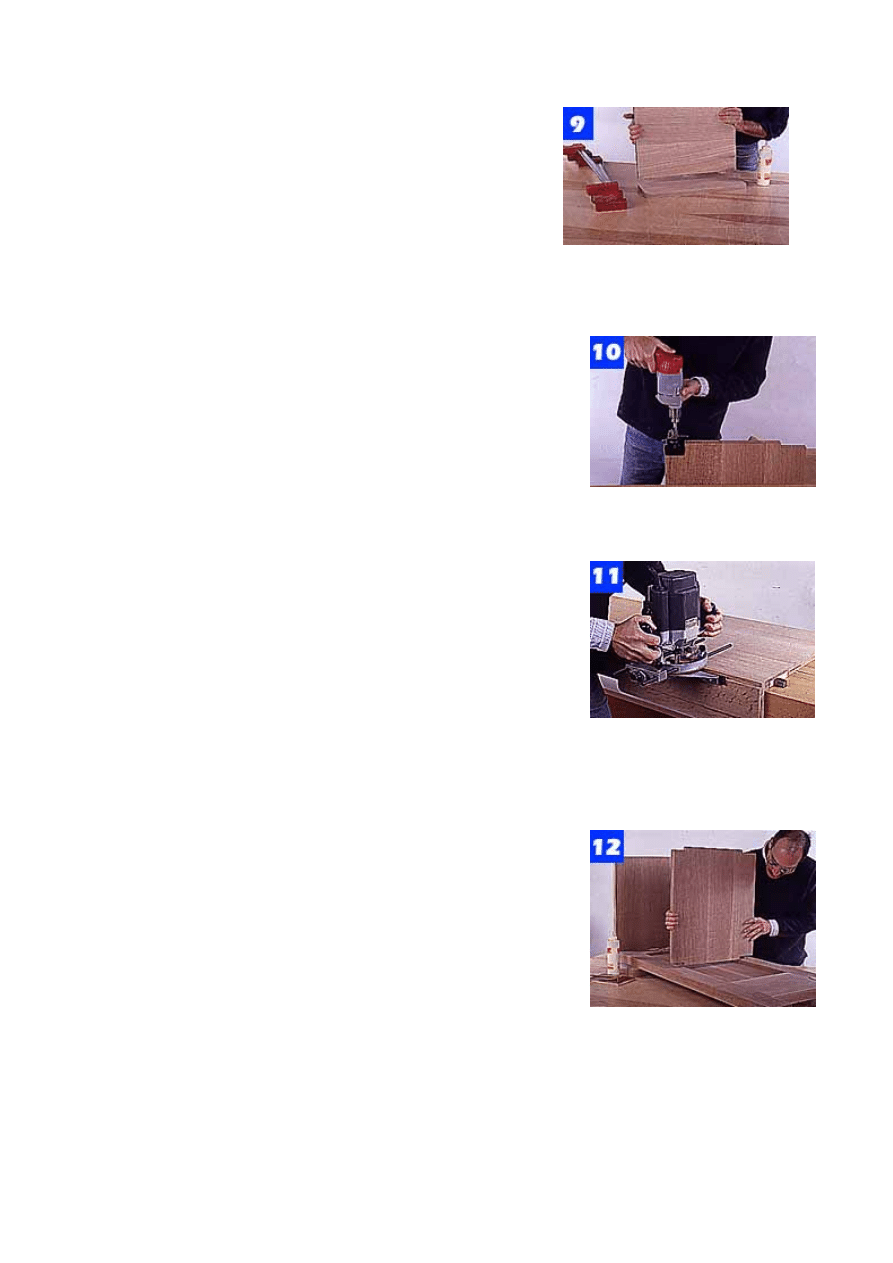
Cut the rounded top corners on the back rail using
a sabre saw. Mark the locations of the joining-
plate slots in the rail and top shelf, and then cut
the slots. Dry assemble the two pieces (Photo 9).
Next, spread glue in the slots, on the plates and
on the edge of the glue joint, and clamp the two
parts together.
After you have cut the joining-plate slots
in the top shelf and back rail, test fit the
pieces, then glue and clamp them
together.
Cut out the notches in the middle shelf, mark the
position of the shelf dowel holes, and then use a
doweling jig to bore the holes (Photo 10). When
you've completed this, bore matching holes in the
case side stiles. Finish laying out the joining-plate
slots in the bottom shelf and case sides, then cut
the slots. Clamp a straightedge to the sides to
position the plate joiner.
Make the center case shelf, cut the
notches in its ends, and bore the holes in
the notches using a doweling jig.
Next, use the router and edge guide to cut the
rabbet along the back edge of the top rail/shelf
assembly (Photo 11) and along the back edges
of the case sides. Use a chisel to square the
rabbet ends. Mark the hinge mortise outlines on
the case, and cut the outline using a chisel and a
marking gauge. Pare the mortise to depth with a
chisel. If you plan to set a turntable on the top
shelf of the case, you should bore a hole through
the shelf for a wire grommet. (See the materials
list for grommet information.) The grommet we
used requires a 1 3/4-in.-dia. hole.
Using the router with an edge guide,
make two or three passes, and cut the
rabbet on the top rail/shelf assembly.
To assemble the case, spread glue in the plate
slots, dowel holes and on the dowels and plates,
then join the shelves to one of the case sides
(Photo 12). Take care not to get any glue on the
portion of the middle shelf that abuts the side
panels. The panels must be free to expand and
contract seasonally, and a glue bond will cause a
panel to crack when this happens. With a helper,
position the other side over the ends of the
shelves, and then clamp the assembly. Compare
opposite diagonal measurements on the case to
check for square, then let the glue cure.
Apply glue to the slots, dowel holes,
joining plates and dowels, then assemble
the shelves to one case side.
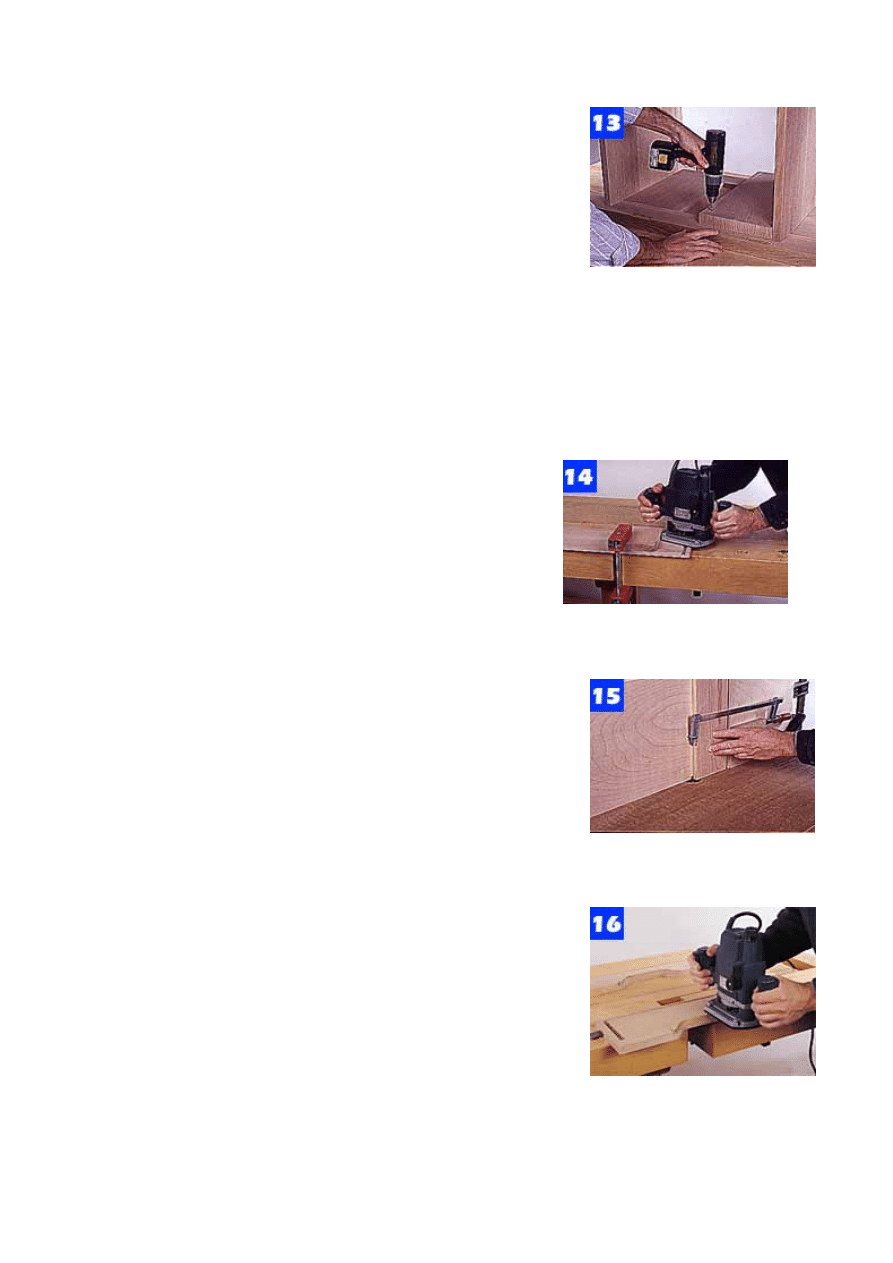
Glue together two pieces of 3/4-in.-thick plywood
to form the drawer blocking, then glue a solid oak
strip to the block as a facing. Note that the grain
on the facing should run horizontally to match the
drawer faces. Screw the blocking to the case side
(Photo 13).
Cut a piece of 1/2-in.-thick oak plywood to size for
the case back, then lay out the position of the
vent-grille cutout. Drill clearance holes at the
corners of the cutout, and use a sabre saw to
remove the waste. Fasten the grille to the back
with escutcheon pins, and remember to bore a 1
1/2-in.-dia. hole in the back for power cord
access. Finally, screw the back to the case.
The drawer blocking is made from two
pieces of plywood with solid oak facing.
Screw the blocking to the case side.
Making Drawers
Rip and crosscut the drawer parts. Install a
dovetail bit in the router, and set the router to
make a 1/4-in.-deep cut. Cut the dovetail dado in
the drawer sides and the stopped dado in the
drawer face (Photo 14).
Clamp each drawer front to the
workbench, and then use a router and
dovetail bit to cut the dovetail dadoes.
Clamp a tall fence to the router table, and clamp a
backup block to each drawer side and back when
you cut the dovetail on these parts (Photo 15).
The backup block--rather than the workpiece--
tears out when it exits the bit.
Next, use a router and edge guide to cut the
drawer bottom grooves in the drawer sides and
the stopped groove in the drawer face.
Cut the drawer side’s dovetail in the router
table. Clamp a backup block to the side,
then move the side over the bit.
After marking the curved cutout on the drawer
faces, make the cuts with a sabre saw. Use a
router and cove bit to shape the edge of the
cutout (Photo 16).
Next, apply glue to the mating parts of the drawer
joints, and then slide the parts together--you
should not need to clamp the assembly. Now rip
and crosscut the plywood bottom panels and
screw each bottom to the drawer back.
Cut out the profile on the top edge of each
drawer front. Next, use the router to cut
the cove along the edge.
Install drawer slides in the case and drawer rails
on the drawers, using screws only in the slides'
positioning slots. Adjust the slides so the drawers
move smoothly and the drawer faces have a 1/16-
in.-wide margin on all edges. Install the remaining
screws.
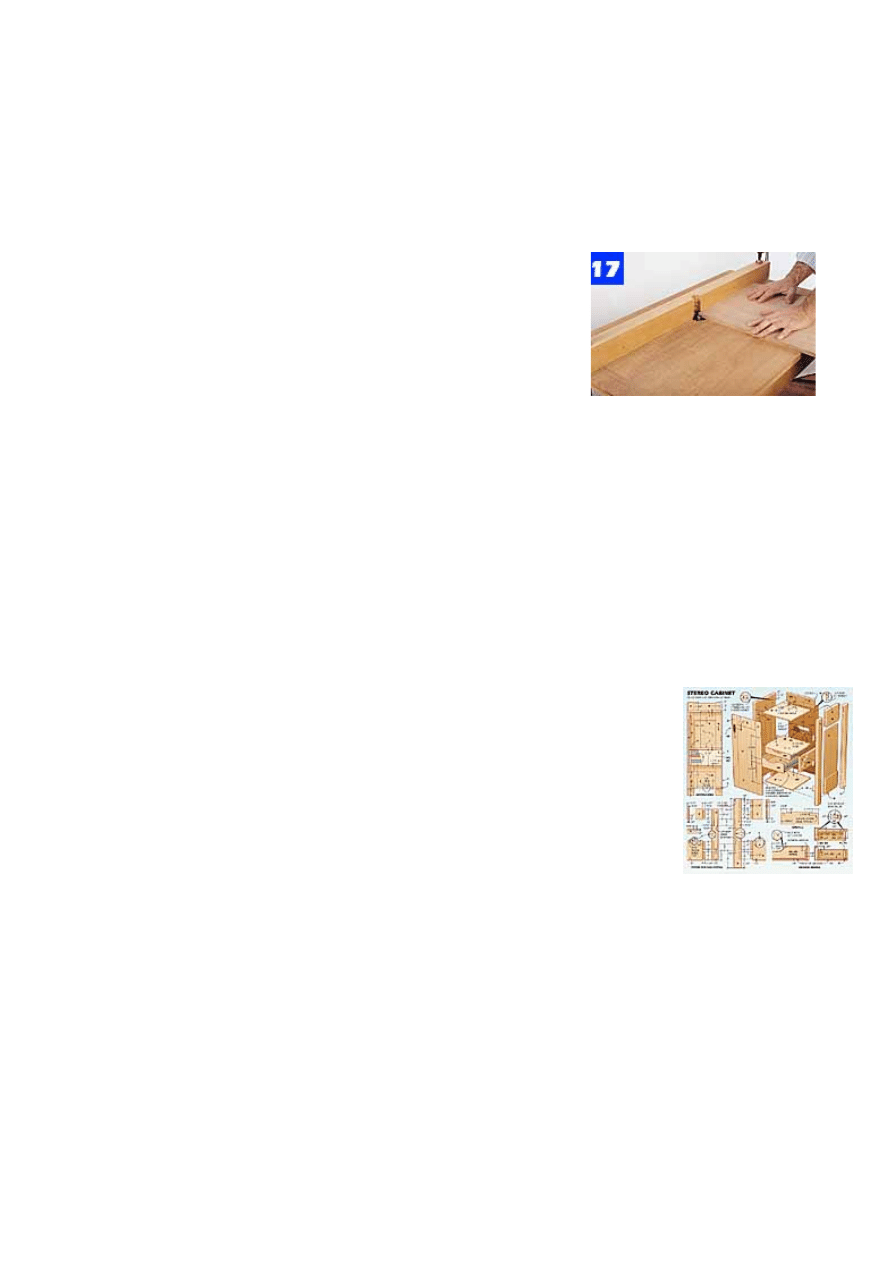
The cabinet door is built in essentially the same
way as the rest of the cabinet. Keep in mind,
however, that the panel groove is only 3/8 in.
wide, so you must cut a shallow rabbet around
the inside edge of the panel. To do this, use a
straight bit in the router table, and push the panel
slowly over the bit (Photo 17). Cut the cross-grain
rabbets first, then cut the rabbets along the grain.
Any small amount of grain that is torn out while
cutting across the grain will then be removed.
Like the drawers, the door is installed on the case
with a 1/16-in.-wide space on all four sides.
Transfer the locations of hinge mortises to the
door edge, and then cut the mortises using the
same techniques you used on the case. Mount
the door pull and catch. The pull shown in the
photo has been discontinued, however, a pull that
looks similar to it is specified in the materials list.
Install a straight bit in the router table, and
then slide the door panel over the bit to
cut the rabbet on the inside panel edges.
For staining, remove the door, drawers, back and all
hardware. Sand all parts as you did the side panels. We
stained our cabinet with water-soluble aniline dye-based
stain (Brown Mahogany, Item No. W1370, Woodworker's
Supply, 1108 N. Glenn Rd., Casper WY 82601; 800-645-
9292).
This water-soluble stain is more resistant to sunlight fading
than other aniline stains, but it will raise the grain--the water
in the stain makes wood fibers on the surface stand up,
giving the surface a fuzzy texture. To prevent this, wipe the
wood surfaces with a lightly dampened sponge, and let all
the pieces dry--this will raise the surface fibers. Next, gently
sand off the raised fibers using 220-grit sandpaper, then
apply the stain.
To finish the cabinet, apply three coats of Waterlox
Transparent according to the manufacturer's directions.
When the last coat is dry, burnish the surface with 4/0 steel
wool, and polish it with a soft cloth. Complete the project by
reassembling all the pieces and installing the cabinet
hardware.

MATERIALS LIST—STEREO CABINET
Key
No.
Size and description (use)
A
4
1 3/4 x 3 3/4 x 54" white oak (stile)
B
4
1 3/4 x 10 x 15" white oak (rail)
C
2
1/2 x 13 1/2 x 30 5/8" white oak (panel)
D
2
1 x 3 7/16 x 44 7/16" white oak (stile)
E
1
1 x 4 15/16 x 15 1/2" white oak (rail)
F
1
1 x 10 x 15 1/2" white oak (rail)
G
1
1/2 x 14 x 30 5/8" white oak (panel)
H
1
1 x 6 x 20" white oak (rail)
I
1
1 x 19 x 20" white oak (shelf)
J
1
1 x 18 3/8 x 21 1/4" white oak (shelf)
K
1
1 x 18 3/8 x 20" white oak (shelf)
L
1
1/2 x 22 x 45 1/2" plywood (back)
M1
2
3/4 x 9 1/4 x 17 5/8" plywood (blocking)
M2
2
3/4 x 1 x 9 1/4" white oak (edge band)
N1
1
3/4 x 3 1/2 x 18 3/8" oak (drawer face)
N2
1
3/4 x 5 5/8 x 18 3/8" oak (drawer face)
O1
2
1/2 x 2 3/4 x 16 3/4" maple (drawer side)
O2
2
1/2 x 4 7/8 x 16 3/4" maple (drawer side)
P1
1
1/2 x 2 1/4 x 17" maple (drawer back)
P2
1
1/2 x 4 3/8 x 17" maple (drawer back)
Q
2
1/4 x 16 1/4 x 17" plywood (drawer bottom)
R
2
3/4" No. 6 rh woodscrew
S
as reqd.
1" No. 6 rh woodscrew
T
4
2 1/2" No. 8 fh woodscrew
U
as reqd.
No. 20 plate
V
as reqd.
3/8"-dia. x 2" wood
W*
3
1 5/8 x 3" butt
X1**
1
door pull
X2*
1
door catch
Y**
2
pair 16-in. drawer slides (Accuride 3037)
Z1**
1
vent grille
Z2
as reqd. 1/2" escutcheon pin
Z3**
1
oak grommet
*Hinge (No. 106HI) and catch (No. 141CD3) available from
Whitechapel Ltd., P.O. Box 136, Wilson, WY 83014; 800-468-
5534.
**Drawer slide (No. 32813), vent grille (No. 62661), door pull
(No. 62935) and grommet (No. 62372) available from Rockler
Woodworking and Hardware, 4365 Willow Dr., Medina, MN
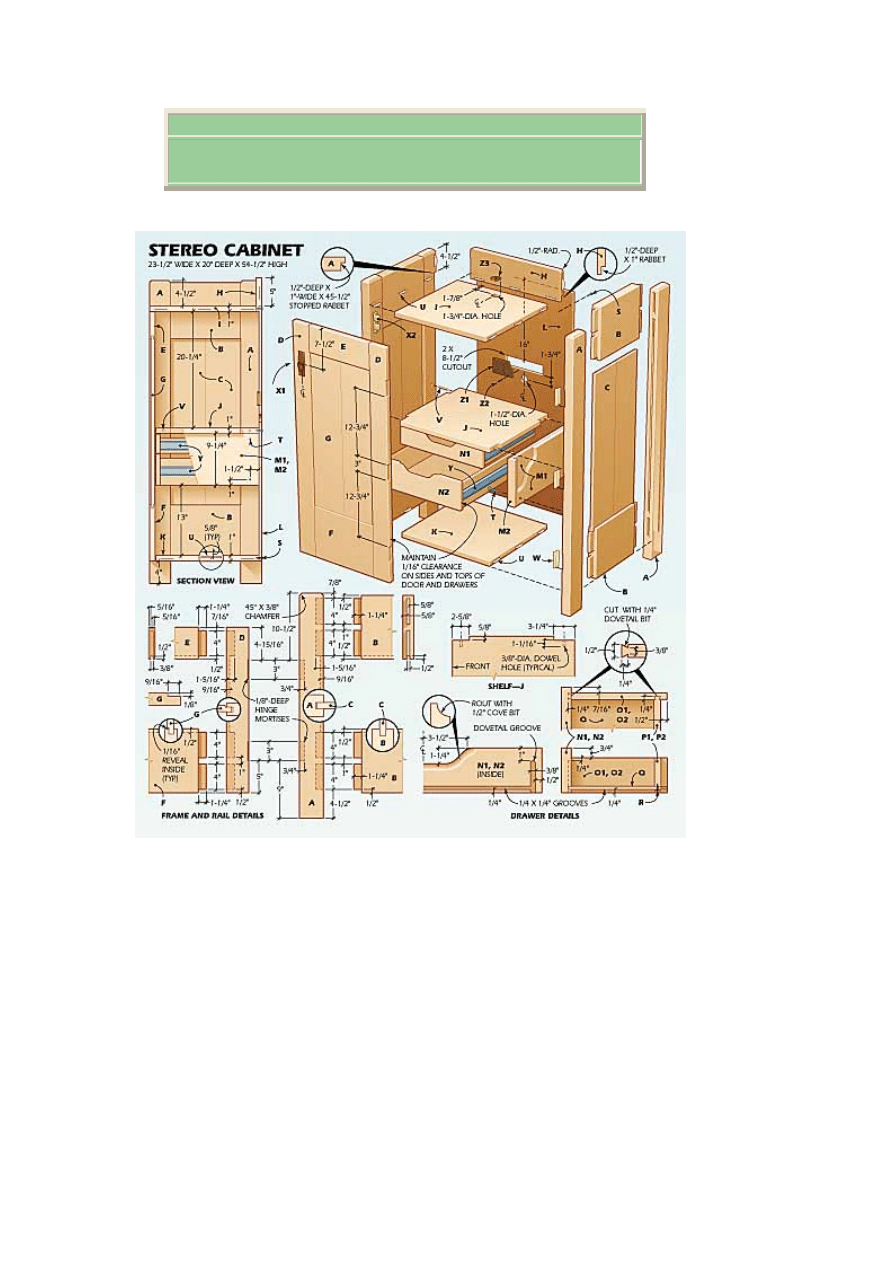
55340; 800-279-4441.
Note: All plywood to be veneer- or MDF-core with oak face veneers.
Wyszukiwarka
Podobne podstrony:
PANASONIC SA AK15 Hi Fi
Hi Fi komendium wiedzy
Hi Fi dzisiaj id 201192 Nieznany
316 K Wzmacniacz mocy Hi Fi
60 100W Hi Fi Power Amplifier
Hi Fi mierzone w decybelach watach
Hi Fi ?ranczak analiza
Hi Fi
Wzmacniacz mosfet 25 W Hi Fi
677 Hi Fi System Professional
Power 400 Watts Hi Fi High End Audio Power Amplifier
PANASONIC SA AK15 Hi Fi
676 Hi Fi Loudespeaker System
Nuty Hi Fi
Hi Fi
Hi Fi Bujaj się TAK
więcej podobnych podstron