C
on
te
nt
s
Introduction
7
WorkingwithCubeBeads
8
AboutCubeBeads|ToolsandMaterials|FinishingTips
AbouttheProjects|AbouttheStitches|BeadMath
PROJECTS
1BRACELETS
17
SquaresDancing|Technique:Right-angleweave
18
HerringboneClassic|Technique:Ladderstartforherringbonestitch 21
PeyotePatterns|Technique:Peyotestitch
25
WillowBranch|Technique:St.Petersburgdoublechain
28
SunburstMedallion
31
2EARRINGS
35
Ladder&Loops|Technique:Two-needleladder
36
BrickStitchGeometrics|Technique:Brickstitch
38
WillowLeaves
42
RussianDrops
44
Evergreens
46
LightHearts
49
SpanishFans
53
3NECKLACES
57
CheckeredCollar
58
RainbowLariat
60
RussianWaltz
63
ChainofChevrons
66
4RINGS
69
PeyoteBands
70
ChinaPrincess
72
Medallion
75
5DECORATIVEPENDANTS
79
MalteseCross
80
WingedStar
83
Snowflakes
86
StaroftheEast
91
Author’sGallery
94
Technique
Cube Bead Stitching
29
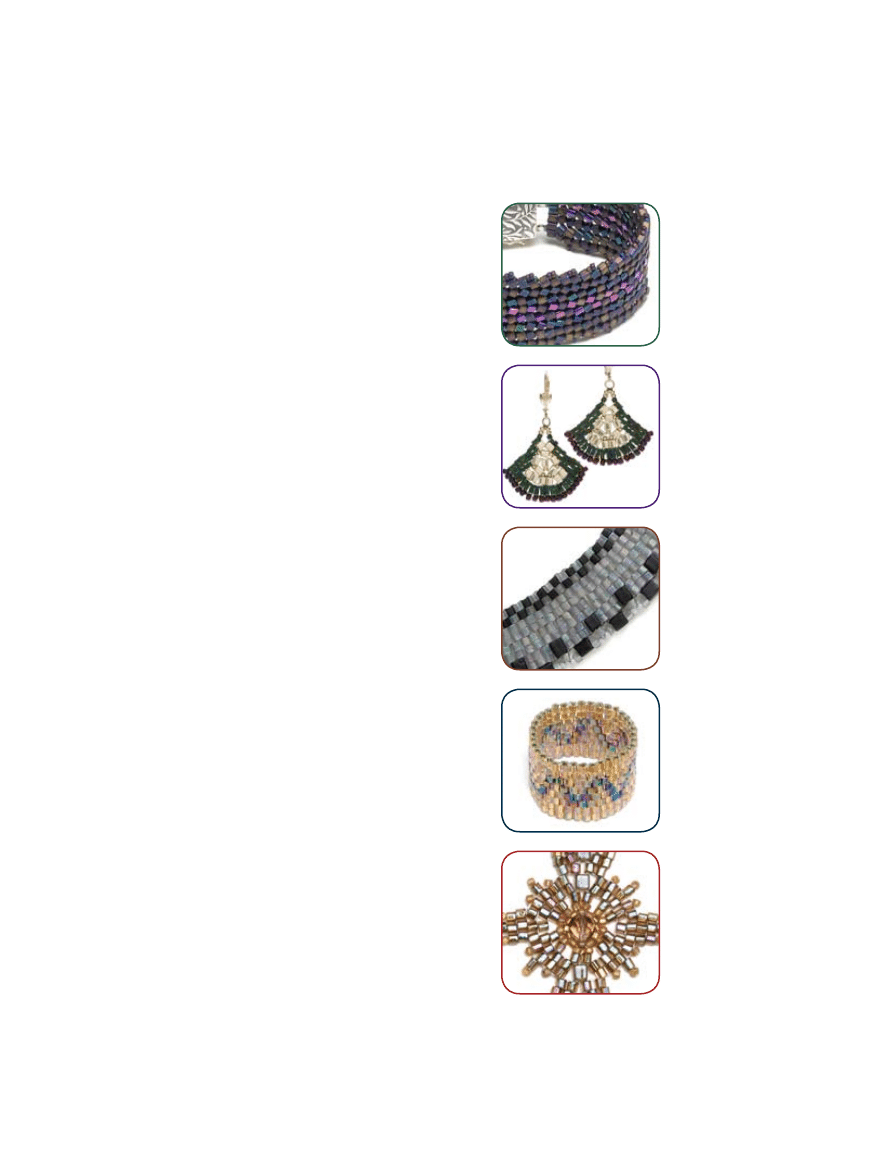
W
illo
w
B
ra
nc
h
In this piece, two chains of St. Petersburg stitch mirror each other. At the center of the pattern is a large
cube bead that ties the chains together as you pass through the cube from both sides. The Willow Leaf
earrings on page 42 use a similar technique and make great matching earrings.
When it’s created with round seed beads, this stitch tends to fold up along the center line. The cubes
help it hold its shape. This can be a delicate bracelet made with 1.5 mm cubes and 3 mm centers, or
you can beef it up by pairing 2 mm and 4 mm cubes.
MaTerials
•about303mmcubesin
metallicorcontrastingcolor
•14g1.5mmmattegray
cubebeads
•about60110seedbeadsto
match3mmcubes
•Toggleclasp
•Beadingthread
•2#10beadingneedles
st.Petersburgdoublechain
The St. Petersburg double chain is two simple chains in a symmetrical
relationship, joined at their center by one or several beads. (To see a
simple chain, look at the Rainbow Lariat project on page 60.)
sTeP1
The first step in St. Pete is to arrange two
beads alongside two previous beads to form a box.
I call the two beads pulled alongside the return beads
(shown in blue in fig. 1). In this example, you would
pick up six beads, and count to the fourth and third
beads away from the needle. Go through the fourth
and third beads again, in the same direction as before,
and align the last two beads you picked up against the
previous two beads, creating a box of four beads.
sTeP2
Next you will add a bead before you go back into the same bead you just
exited so the thread does not just pull through. I call this bead the turnaround bead
(in blue, fig. 2). Go back through two beads, and then go through two more beads
below the box. This allows the center bead, which is usually double the size of the
smaller beads, to fit into the space you’ve made.
sTeP3
Pick up the center bead (in blue, fig. 3), and go through the two return beads.
This completes one sequence, which you will continue to repeat on the first side.
sTeP4
On the second side, you will follow the same steps, except instead of
adding a center bead, you will go through the center bead of the first side [fig. 4].
When I’m teaching this stitch, I usually have my students alternate the sequence, as
in the instructions for this bracelet project, so they have the experience of putting
the two sides together. However, if your work is going well and you wish to work
faster, you can complete an entire side of the double chain, adding the center
beads along the way, then come back to where you left off to finish the other side.
Remember to go through the center beads that are already in the first side.
Bracelets
W
illo
w
B
ra
nc
h
Notice the difference
when the bracelet is made
with 1.5 mm and 3 mm cubes
(left) or 2 mm and 4 mm
cubes (right).
FiG.2
FiG.3
FiG.4
FiG.1
28
Cube Bead Stitching
47
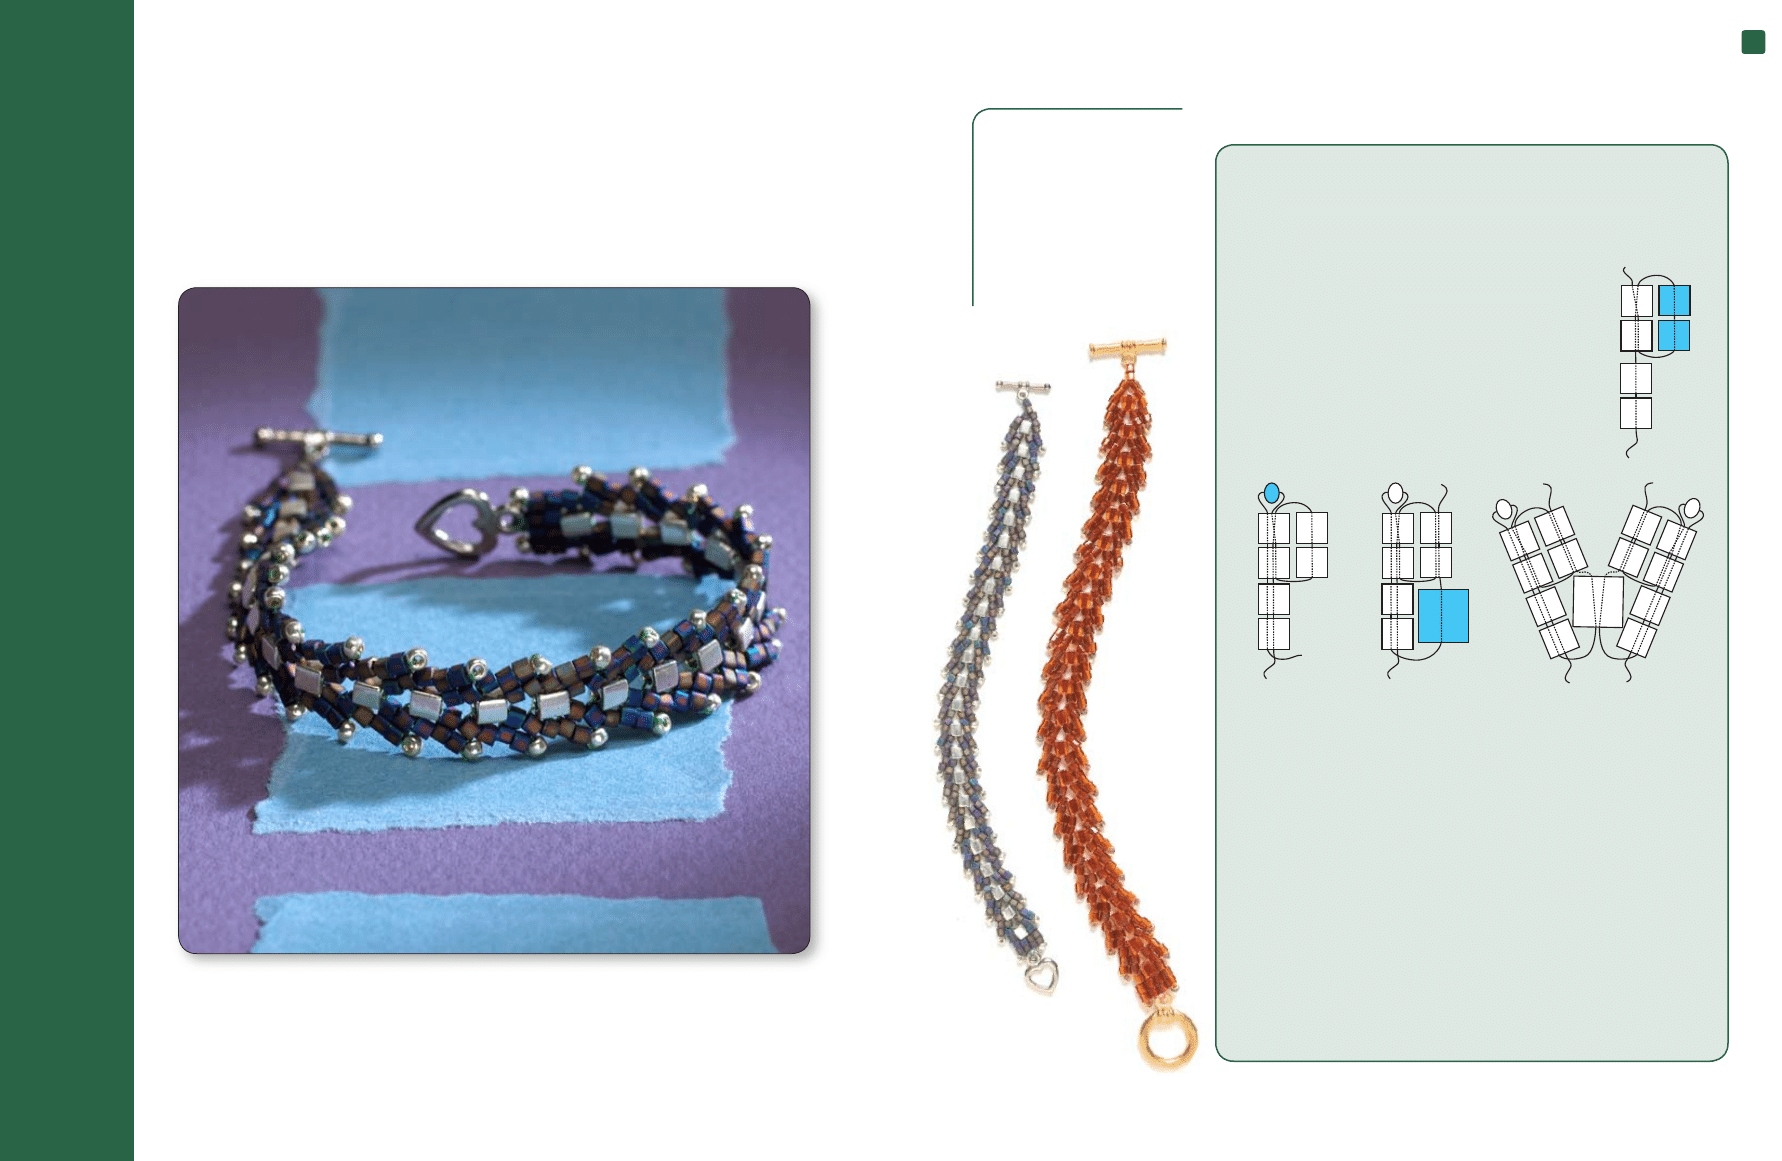
Ev
er
gr
ee
ns
This is the project that sparked many of the designs in this book. I had made a St. Petersburg double
chain bracelet with matte metallic green cubes, and the edge kept making me think that these beads
and this stitch would make a great Christmas tree. It took many tries to get to these earrings, and they
were the starting point for much creativity.
This use of St. Petersburg double chain spreads the two simple chains apart to insert several 3 mm
cubes. You’ll want to make these on a flat surface and you will definitely need a strong thread like
Power Pro because you will be putting a lot of tension on it. You may need to “manhandle” the beads
a bit to get them to lie in place until you can draw the tension up.
Worked in Christmas colors, these are fun earrings to wear at holiday events or to give as gifts, but
you can make them in other colors like ivory and wear them year-round. Make a larger decorative
evergreen with 2 mm and 4 mm cubes, and consider adding a sterling silver star to its peak.
Materials
•123mmcubebeads
•951.5mmcubebeads
•36110seedbeads
•2smallsolderedjumprings
•Pairofearringfindings
•strongbeadingthreadsuch
asPowerProorFireline
•2#10beadingneedles
steP1
Fold 1 yd. (.9 m)
of thread in half, and attach
the loop with a lark’s head
knot to a jump ring. Thread
a needle on each end.
steP2
Firstside
With one thread, pick up
two 110 seed beads and
seven 1.5 mm cube beads.
Go through the fourth and
third cubes from the needle
again to form a box of four
beads. Pick up an 110, and
go back up four of the beads
above it. Pick up a 3 mm,
and go down through the
two return beads.
steP3
Pick up five
1.5 mms. Go back through
the fourth and third beads
again as before. Pick up an
110, and go back through
the four beads above it.
*
Pick up two 3 mms. Go
through the first 3 mm
again in the same direction
and down through the two
return beads [a]. Adjust the
two 3 mms so they lie next
to each other.
steP4
Repeat Step 3 to
finish the first side [b].
steP5
secondside
With the remaining thread,
repeat Step 2, but use the
3 mm already in the work
instead of adding a new one.
steP6
Repeat Step 3, but
use the second 3 mm you
added on the first side [c].
steP7
Repeat Step 3
again to the
*
. Pick up a
3 mm and go up through
the 3 mm on the opposite
side, back down the 3 mm
just picked up, and down
through the two return
beads just made [d]. Adjust
the row of three 3 mm
cubes to fit side by side,
and tighten the slack. This
finishes the second side.
steP8
Bottom
With either thread, pick up
an 110, and go back up the
two return beads. Pick up
two 1.5 mms, and go up the
previous set of return beads
[e], then back down the
two beads just picked up.
This fastens the four beads
together.
steP9
Repeat Step 8.
steP10
Pick up an 110,
and go back up only one of
the cubes above it[f]. Pick
up a 1.5 mm, and go up
through the adjacent pair
of 1.5 mms and the 3 mm
in the center above [g]. You
have attached the new cube
to the adjacent cube in the
previous row.
a
b
c
d
e
f
Softer colors such
as spring green
and silver work for
year-round wear.
46
tiP
“Up” and “down” in these
instructions refer to the
direction of the work when the piece
is turned in its wearable direction;
that is, up is toward the ear.
earrings
ev
er
gr
ee
ns
Cube Bead Stitching
59
Materials
(for a 16-in./41 cm collar)
• 14 g 1.5 mm cube beads in
matte ivory
• 14 g 1.5 mm cube beads
in gold
• about 50 4 mm cube beads
in dark gold metallic
• about 50 3 mm cube beads
in dark gold metallic
• about 50 150 seed beads in
dark gold
• Clasp (chain, optional)
• Beading thread
• #10 beading needle
tiP
You can review the
basics of peyote
stitch on page 26.
steP 1
Thread a needle
with 2 yd. (1.8 m) of thread.
Pick up one 3 mm, four
ivory cube beads, one
gold cube bead, one ivory
cube, one gold cube, and
one ivory cube. Go back
through the fifth and sixth
beads from the needle [a].
Pick up two ivory cubes,
and go back through the
3 mm. Leaving a 12-in.
(30 cm) tail, align the beads
side by side, and turn so
your thread is coming out
the right side of the work.
steP 2
Pick up two ivory
cubes, skip over the 3 mm,
and go through the next two
ivory cubes [b]. Pick up two
ivory cubes, skip two ivory
cubes, and go through the
ivory/gold pair. Turn.
steP 3
Pattern
Work in the bead pattern
shown [c], following these
simple rules: When you are
working from the inside
edge, always pick up an
ivory/gold pair in the reverse
order from the previous pair.
The second pair you pick up
will be ivory.
When you have added and
gone back through three
pairs along the outer edge,
pick up a 4 mm. Go up into
the third ivory pair along
the bottom edge, then up
through the pair in the next
row up. Turn, go down
the adjacent pair, and on
through the pair you came
out before you picked up
the 4 mm bead [c]. You
are now back where you
came out the work. Pick up
a 3 mm, and continue the
pattern [d], treating the
3 mm as you would a pair
of ivory cubes. Continue this
pattern until you reach the
desired length, ending after
a row in which you have
picked up a 3 mm in order
to match the ends.
Note: Keep the work pulled
together tightly as you go.
If you see space or thread
between the beads, your
tension is too loose. Pulling
on the first two beads of the
previous row will take up
the slack. Check the tension
regularly. If your work tends
to be loose, take up the
slack before you turn the
work to do another row.
steP 4
Finishing the lower edge
End the main part of the
collar after you have picked
up a 3 mm and worked
back through it. Coming
down out the end 3 mm,
pick up an ivory cube, a
150, and an ivory cube.
*
Go through the 4 mm. Pick
up an ivory cube, a 150, and
an ivory cube. Go up into
the next 3 mm, up and then
right down through the two
pair above it, down through
the 3 mm, the last ivory you
picked up, and the 150 [e].
Pick up an ivory cube, and
repeat from
*
until you have
finished the edge.
steP 6
Sew half a clasp
onto each end.
a
b
c
d
e
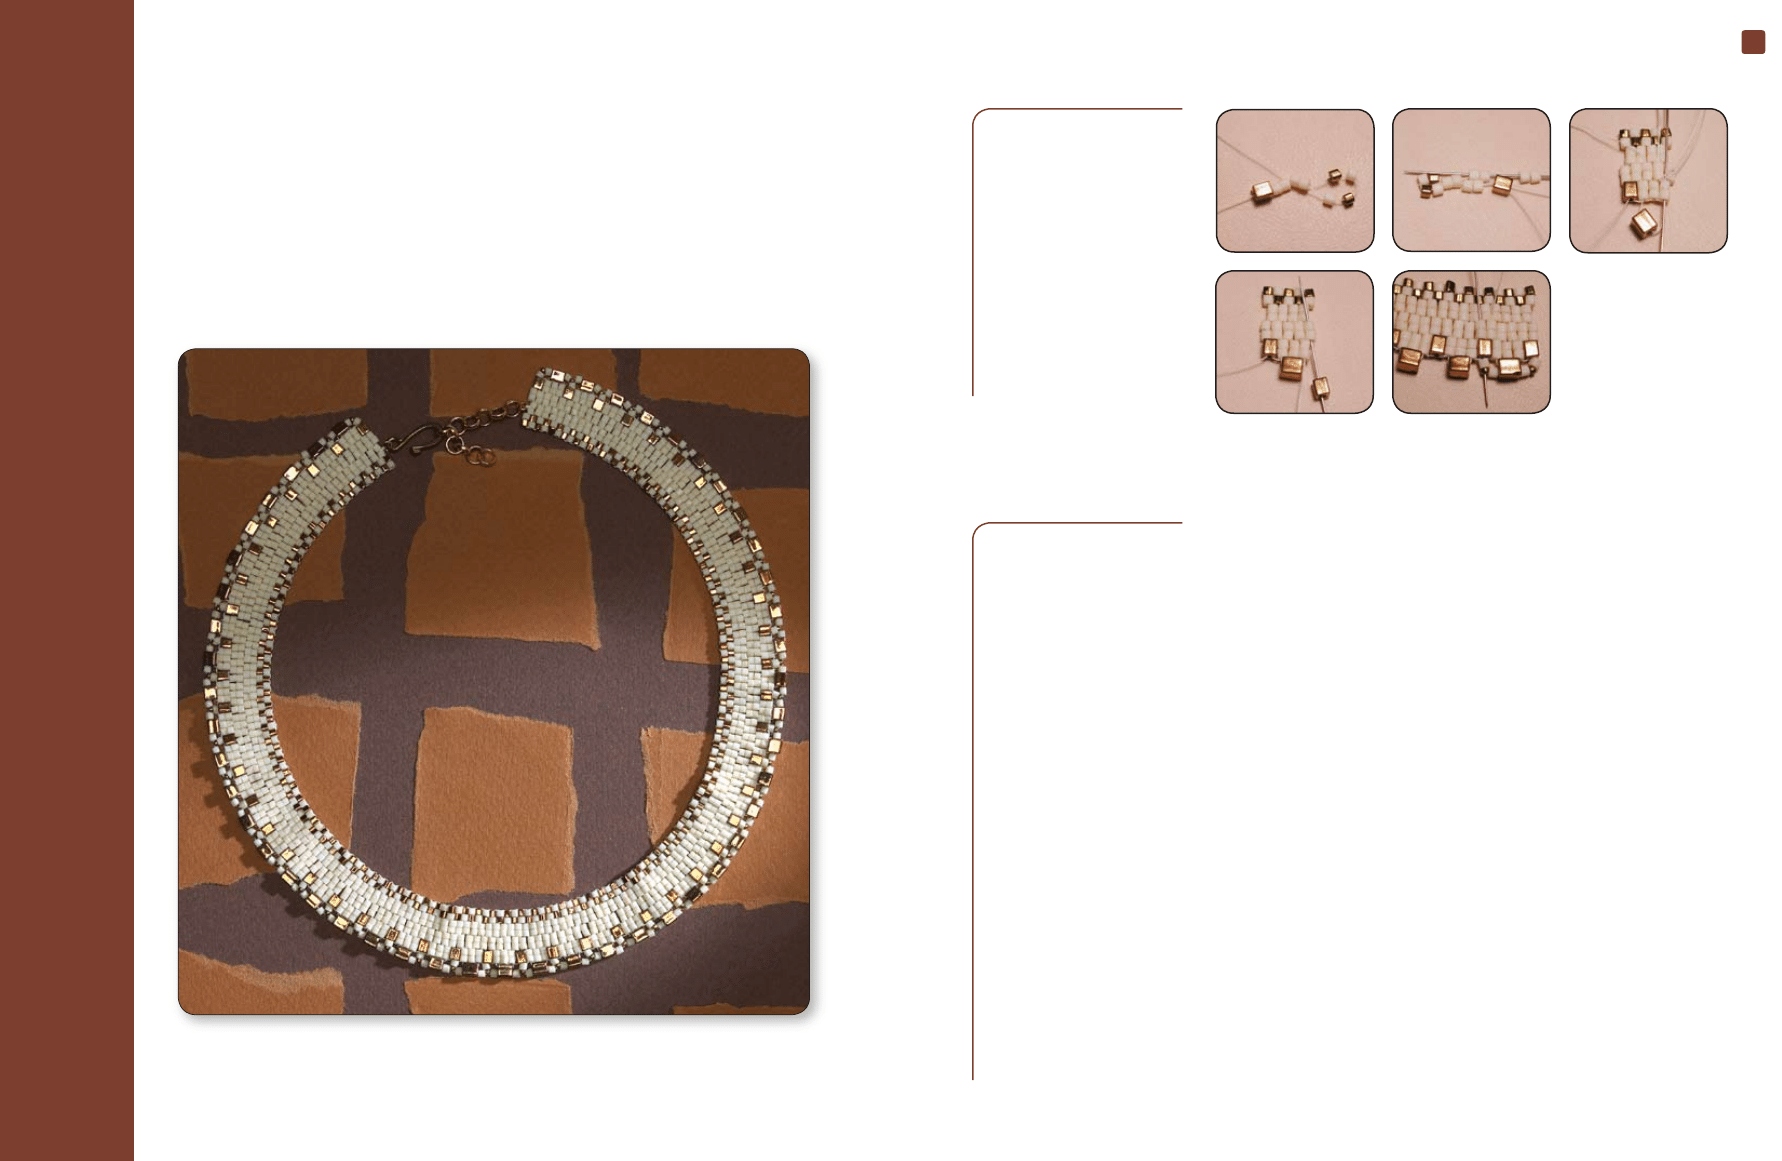
I love bead collars. They frame the face in such a gentle, beautiful way and accent the neck. My
interest in ancient Egypt led me to experiment with them early on, but I was disappointed that my
early versions looked like part of a costume. It was a collar in Bead&Button magazine that started me
in the right direction. I began working with two-drop peyote and found that a slight adjustment to the
bottom was enough to make even a cube bead construction bend nicely around the base of the neck.
This is an elegant-looking piece of jewelry, and it’s surprisingly simple to make. You may be able to
follow these easy instructions even if you have little or no experience with peyote stitch. I’ve made
these narrow collars in metallic green with light green accents, bronze-lined turquoise with silver
accents, silver-lined peridot with navy accents—they all look just great.
C
he
ck
er
ed
C
ol
la
r
Wearing collars
Collars are flattering, and not only
on a long, thin neck. If they fit
properly, anyone can wear one.
Just be sure to make the collar
long enough. The inside edge
should fit just at the point where
your neck starts to slope upward,
but not tight enough to create a
“neck muffin-top.” Try to make
the beadwork long enough to
go all the way around the neck
and meet in the back. Although
I sometimes make collars with
an adjustable chain extension
because I don’t know who is
going to buy them, I prefer them
with no gap at the back.
The round shape of a collar
softens a pointed chin and a
square jaw. Wear your bead collar
under a collared shirt with just
the front showing. Or wear it with
a strapless top or an open neck in
a V, round, square or sweetheart
shape. Avoid tops that touch the
collar, as they detract from its
shape and effect.
58
tiP
I used a short length of
chain for half of the clasp
to make the length slightly adjustable.
C
he
ck
er
ed
C
oll
ar
Necklaces
Document Outline
Wyszukiwarka
Podobne podstrony:
BranchAndBound
Effect of long chain branching Nieznany
multicolored cube
Artistic Wire Green or Magenta Single Spiral Bead Necklace & Earrings
la twins bead
bead embell btn
Martial Arts Aikido Roots And Branches
bead stained glass bracelet
Decor System Katalog Cube fasety
2009 Nissan Cube
Bizuteria z drutu Beading Bead Crochet With Wire
Borg Cube 1
Butterfly Bead Wirework Bracelet
(CRAFTS) Beading russian bead and crochet magazine 1
Eni Oken tutorial Fat wrap bead(1)
bead mandala ring
RUBIK'S CUBE
Borg Cube 2
Norse 3 STRAND Glass Bead Necklace
więcej podobnych podstron