
Thank you
for taking the time to register and download
this months free downloadable WOOD PLAN. As a special
thanks we would like to offer you
25% off
the following
plans to complete your Patio suite.
To redeem your 25% discount just enter
APRILFREE
in the coupon code box when
ordering your plans. See below. Offer expires May 10th, 2003.
-WOOD STORE Team
http://woodstore.woodmall.com/patiochair.html

http://www.woodonline.com
DOWNLOADABLE
ONLINE WOODWORKING PLANS
®
Page 1 of 11
DP-00131
©Copyright Meredith Corporation 2001
Out-And-About
Patio Table & Planter
TM
Page 2 of 11
Patio Planter
5
/
32
" shank hole,
countersunk
on bottom
3
1
/
8
" half lap
5
/
32
" shank hole,
countersunk
on bottom
TRIM BOARD
DETAIL
3
1
/
8
"
R=1
1
/
2
"
3
1
/
8
"
3
1
/
8
" half lap
#8 x
5
/
8
" F.H.
wood screw
2
1
/
2
" deck screw
2
1
/
2
"
6"
6"
2
1
/
2
"
3
/
4
"
5
/
32
" shank holes,
countersunk
2
1
/
2
" deck screw
5
/
32
" shank hole,
countersunk
EXPLODED VIEW
A
H
E
E
G
C
G
G
G
J
J
J
I
I
3
/
4
" gap
2
1
/
2
" deck screw
H
F
B
1
/
8
" pilot holes 1" deep
D
F
G
1
1
/
4
" deck screw
Location of
side panel
C
D
#8 x
5
/
8
" F.H.
wood screw
7
/
64
" pilot hole
1
/
4
" deep
1
/
8
" round-overs
5
/
32
" shank hole, countersunk
1
1
/
4
" deck screw
25
1
/
2
"
K
K
K
K
A
G
K
K
TM
Page 3 of 11
PARTS VIEW
C
3"
3"
4"
Dadoes
3
/
4
" deep on inside face
2"
22
1
/
2
"
2"
2"
2"
2"
3
/
4
"
3
/
4
"
3
/
4
"
4"
2"
2"
2"
2"
2"
19
1
/
2
"
D
Dadoes
3
/
4
" deep on inside face
1
1
/
2
"
1
1
/
2
"
3
/
4
"
3
/
4
"
3
/
4
"
B
2"
2"
1"
R=
3
/
4
"
4
1
/
8
"
1
1
/
2
"
4"
2"
2"
2"
19
1
/
2
"
Dadoes
3
/
4
" deep on inside face
3
/
4
"
3
/
4
"
1
1
/
2
"
3
/
4
"
R=1
1
/
2
"
A
3"
3"
4"
2"
1"
R=1"
4
1
/
8
"
5
/
32
" shank hole,
countersunk on outside face
2
3
/
4
"
Dadoes
3
/
4
" deep
on inside face
2"
26
1
/
2
"
1"
2"
5
3
/
4
"
2"
2"
2"
2"
3
/
4
"
3
/
4
"
3
/
4
"
TM
Page 4 of 11
E
E
E
E
F
F
F
F
1
1
/
2
x 9
1
/
4
x 96" Cedar (2x10)
1
1
/
2
x 5
1
/
2
x 72" Cedar (2x6)
CUTTING DIAGRAM
3
/
4
x 9
1
/
4
x 96" Cedar (1x10)
H
K
K
K
H
H
H
3
/
4
x 9
1
/
4
x 96" Cedar (1x10)
J
J
J
K
3
/
4
x 7
1
/
4
x 96" Cedar (1x8)
C
B
D
I
B
A
A
G
G
G
G
G
G
G
G
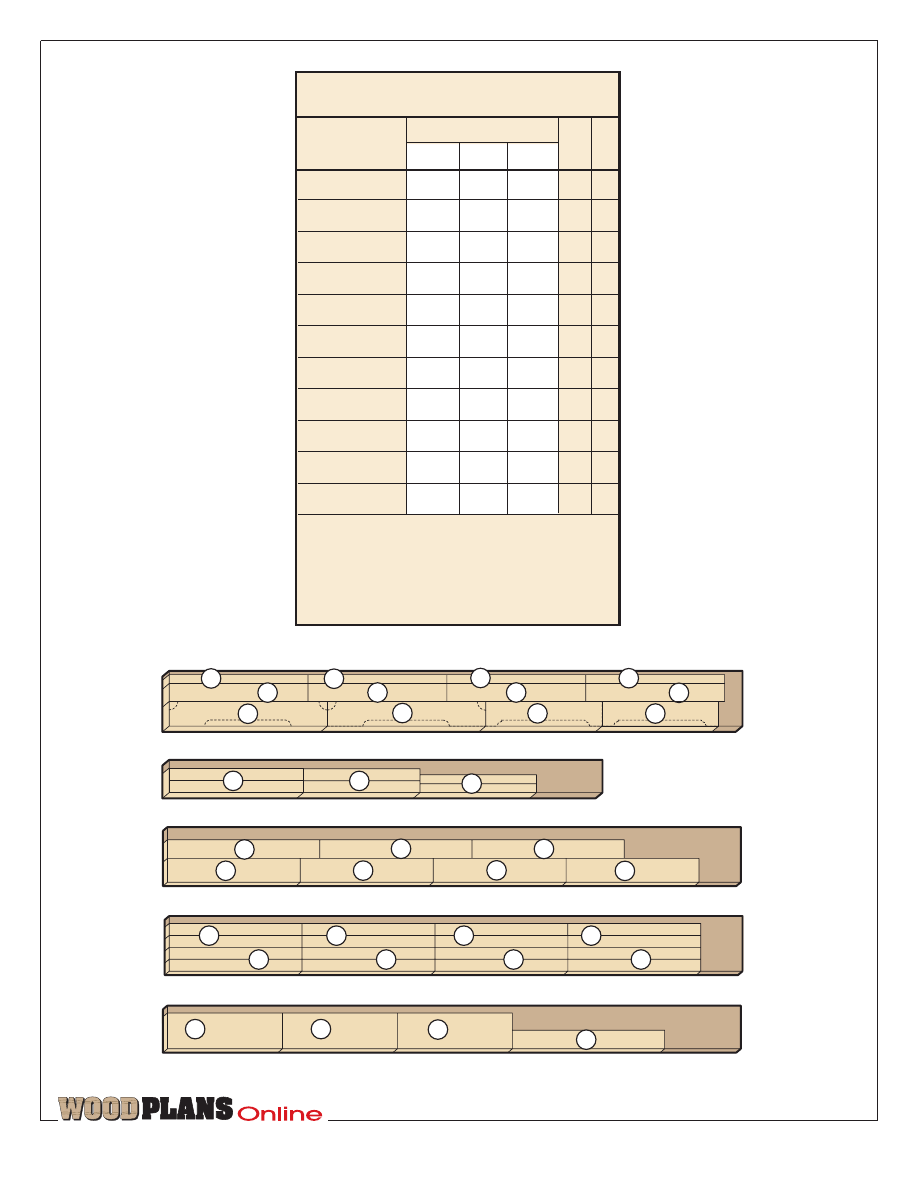
Part
TABLE
Bill of Materials
Matl.
Qty
.
T
W
L
Finished Size
A feet
1fi"
4¤"
26fi"
C
2
B feet
1fi"
4¤"
19fi"
C
2
C top rails
1fi"
2"
22fi"
C
2
D top rails
1fi"
2"
19fi"
C
2
E uprights
1fi"
3"
23‹"
C
4
F uprights
1fi"
1fi"
23‹"
C
4
G slats
‡"
2"
22‹"
C
16
H slats
‡"
4"
22‹"
C
4
I cleats
1fi"
1fi"
19fi"
C
2
J shelf boards
‡"
6"
19fi"
C
3
K top trim
‡"
3¤"
25fi"
C
4
Material Key:
C-cedar
Supplies:
1‹" deck screws, 2fi" deck screws,
#8
×
fl" flathead wood screws, red and green enam-
el paint, clear exterior finish.

TM
Page 5 of 11
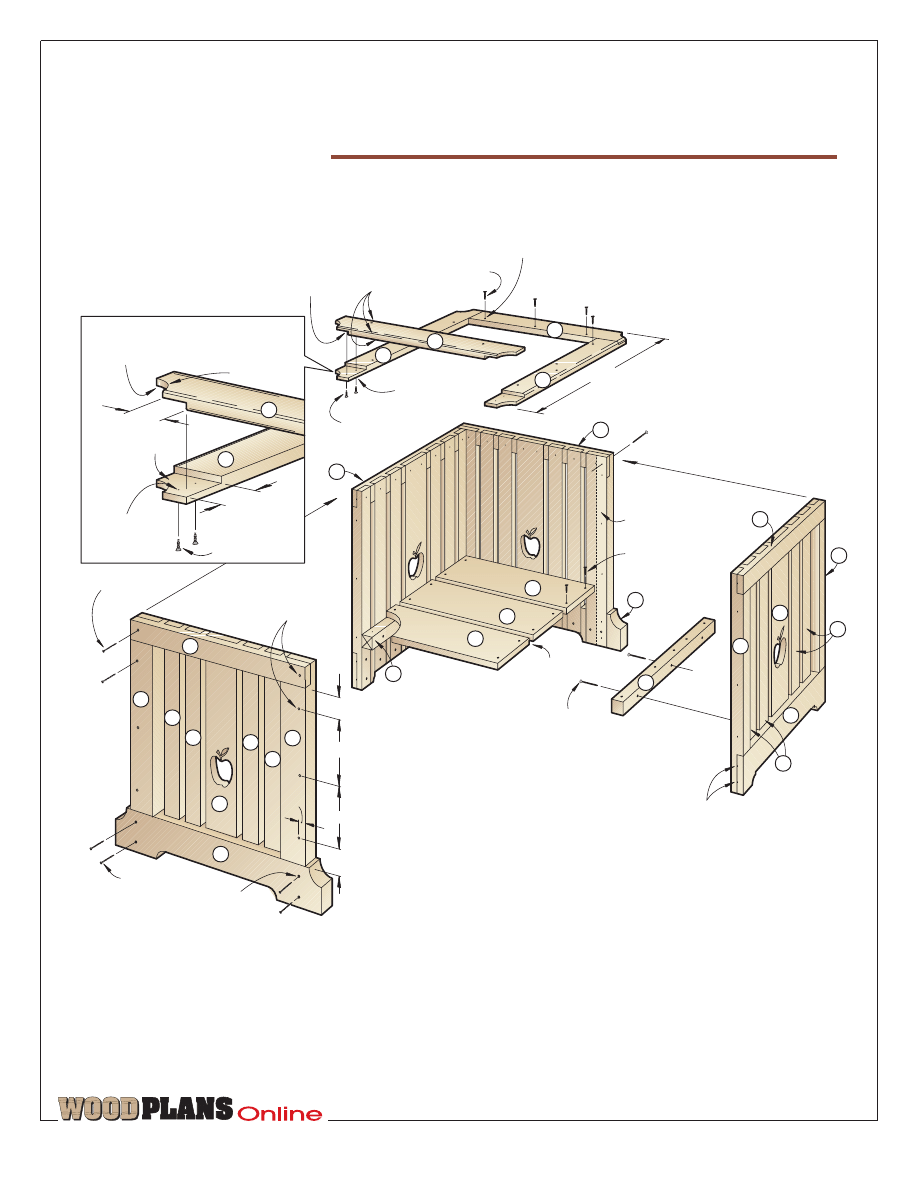
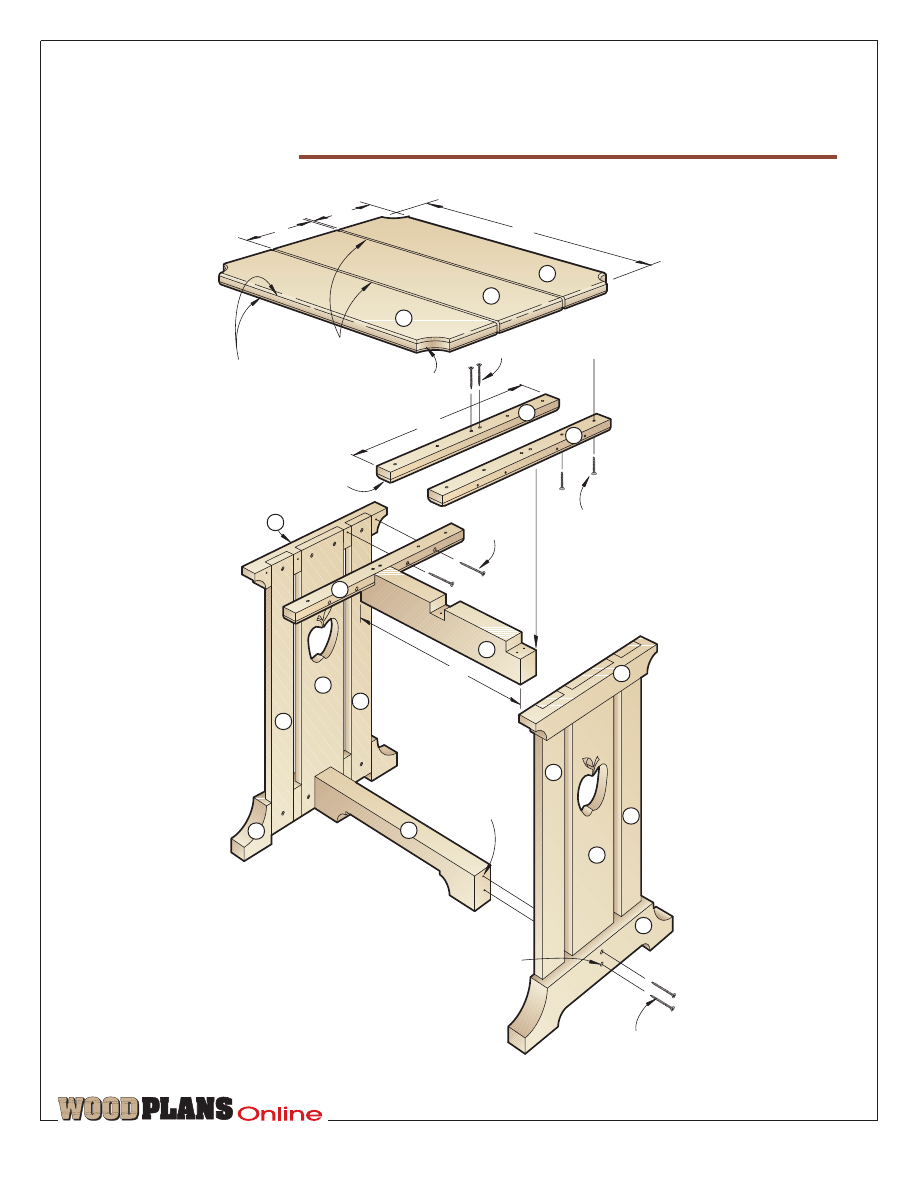
Clamp the side frames between the two end frames, and drive screws to
hold the assemblies together.
Start with planter side
and front frames
1
Cut the feet (A, B), top rails (C,
D), uprights (E, F), and slats (G, H)
to the sizes listed in the Bill of
Materials. (We used cedar.)
2
Using the dimensions on the Parts
View drawing on page 3, mark the
dado locations on the feet (A, B)
and top rails (C, D). Using the same
drawing for reference, mark the
radiused outlines on both feet.
Using your tablesaw fitted with a
dado blade and stop, cut the ‡"-
deep dadoes on all eight pieces.
Take your time when marking and
cutting for correctly spaced dadoes.
3
Mark the locations, and cut mat-
ing half-lap joints across both ends
of the uprights (E, F).
4
Transfer the full-size apple pat-
tern on page 11 to the center slats
(H), 10‹" from the top end of each
where shown on the Frames draw-
ing. Drill a blade-start hole, and
scrollsaw the patterns to shape.
Sand the edges of the cutouts.
5
Cut the bottom edges of the feet
(A, B) to shape. Use a drum sander
to sand the radii smooth.
6
Paint the apple cutouts in the
center slats (H). To do this, brush
the surfaces around and inside the
apple cutouts with lacquer. The lac-
quer minimizes the wicking of the
paint to the surrounding wood.
Brush on red and green high-gloss
exterior enamel paint. After the
paint has dried, sand the lacquer off
the surrounding surfaces.
Assemble and connect
the four frames
1
Glue and screw each of the four
frames together in the configura-
tion shown on the Frames drawing.
When assembling each frame, keep
the bottom ends of the slats (G, H)
flush with the top of the cutout on
the bottom side of the feet (A, B).
Wipe off the excess glue with a
damp cloth.
2
Clamp the side frames between
the front and back frames. Drill
countersunk mounting holes
through the front and back frames
and into the side frames, where
shown on the Exploded View draw-
ing. Use a framing square to check
for square and to locate the holes
so they’re centered in the uprights
(F). Drive the screws.
Note: The shelf allows you to raise
or lower your potted plant for the
best viewing height. In our
planter, we positioned the shelf so
the top of the pot was about level
with the top of the planter.
3
Cut the shelf cleats (I) and shelf
boards (J) to size.
4
To locate the shelf for the planter,
measure down from the top edge of
the planter the height of your
flower pot plus ‡", and make a
mark on each side frame upright
(F). Next, lay the planter on its side,
position the top edge of one cleat
(I) even with the marked lines on
two of the uprights (F). Drill
mounting holes and screw the cleat
in place. Repeat for the second
cleat on the opposite side of the
planter. Then, screw the shelf
boards (J) to the cleats, leaving ‡"
between each board.
The top trim completes
the construction
1
Cut the top trim boards (K) to
size. Fit your tablesaw with a dado
blade, and cut mating half-lap joints
in each. See the Trim Board detail
accompanying the Exploded View
drawing for reference.
2
Glue and screw the trim boards
together, checking for square. Mark
a 1fi" radius on each corner, and
cut and drum-sand them to shape.
3
Rout a ¤" round-over on all but
the bottom inside edge of the trim-
board frame, where shown on the
Exploded View drawing.
4
Center, then glue and screw the
frame to the planter base.
5
Finish-sand the entire planter, and
add a quality exterior finish. It’s
critical to get a good seal on the
bottom of the feet (those parts that
come in direct contact with the
ground or patio). Recoat the
planter annually.
TM
Page 6 of 11
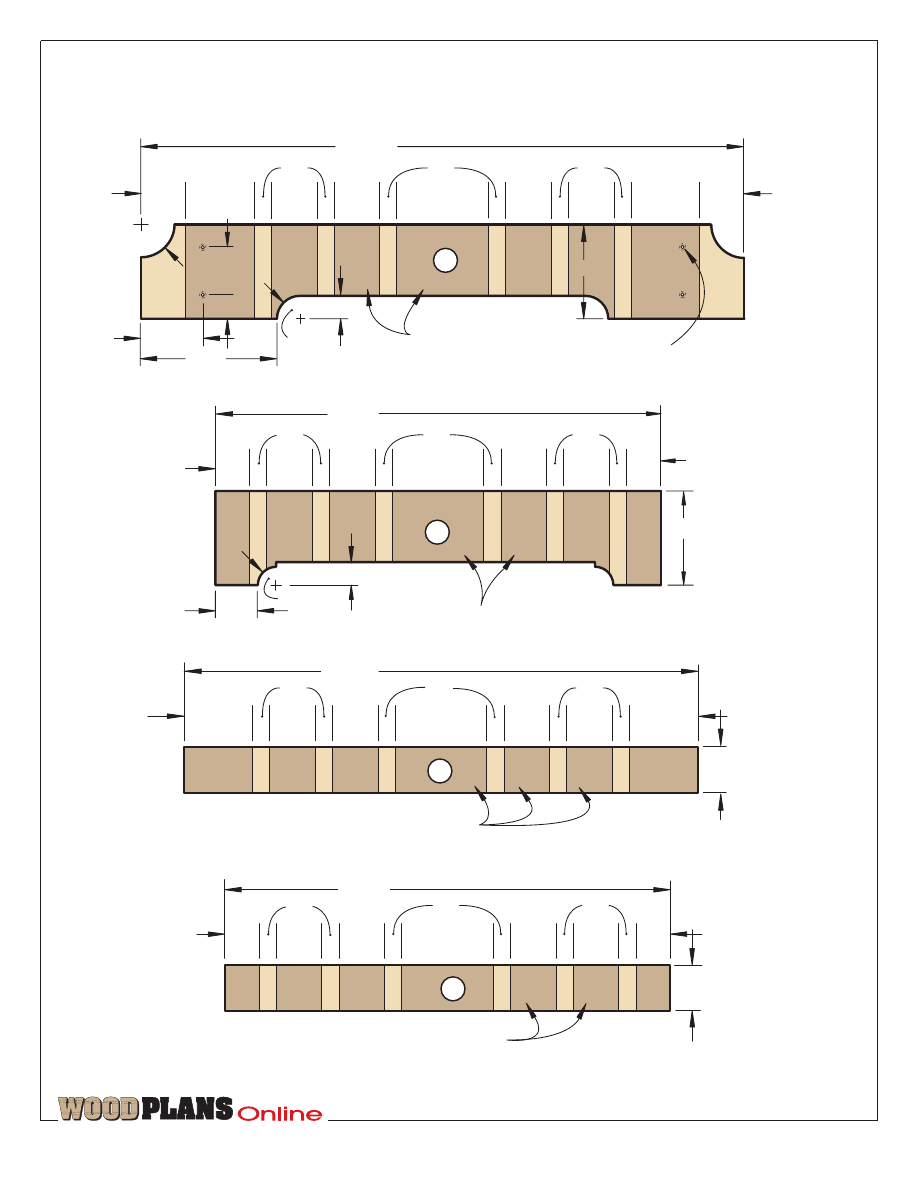
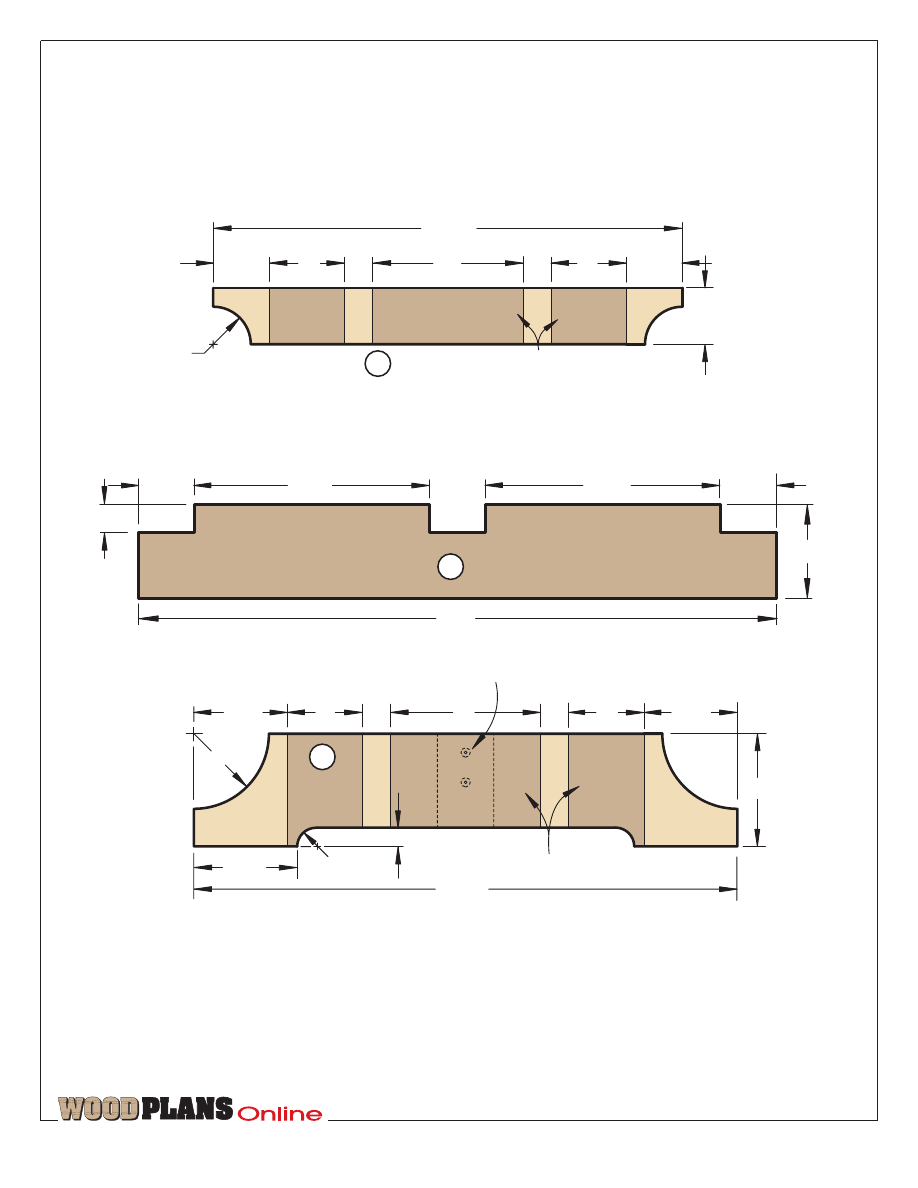
2" rabbet
3
/
4
" deep
4
1
/
8
" half lap
5
/
32
" shank hole,
countersunk
1
/
8
" pilot hole
1
/
2
" deep
2" half lap
4
1
/
8
" half lap
END FRAME
(Viewed from the back)
SIDE FRAME
23
1
/
4
"
26
1
/
2
"
23
1
/
4
"
5
/
32
" shank hole,
countersunk on
back side
19
1
/
2
"
1
1
/
4
" deck screw
1
1
/
4
" deck screw
1
1
/
4
" deck screw
1
/
8
" pilot hole
1
/
2
" deep
4
1
/
8
" half lap
19
1
/
2
"
10
1
/
4
"
FRAMES
G
E
G
G
G
B
F
G
H
F
G
G
G
C
D
E
H
A
TM
Page 7 of 11
Patio Table
G
A
D
E
C
C
D
EXPLODED
VIEW
2
1
/
2
" deck screw
5
/
32
" shank hole,
countersunk
1
/
8
" pilot hole
1" deep
17"
16"
1
1
/
4
" deck screw
2
1
/
2
" deck
screw
F
B
2" deck screw
24"
5
3
/
4
"
6"
1
/
4
" gaps
R=1
1
/
2
"
1
/
4
" round-overs
all outside edges
I
I
1
/
4
" round-over
all bottom edges
A
I
G
H
B
C
C
TM
Page 8 of 11
PARTS VIEW
17"
3
/
4
"
1
1
/
2
"
1
1
/
2
"
1
1
/
2
"
6
1
/
4
"
6
1
/
4
"
TOP CROSSMEMBER
2
1
/
2
"
3
/
4
"
4"
2"
2
1
/
2
"
2
1
/
2
"
3
/
4
"
2"
2
7
/
8
"
1
/
2
"
Dadoes
3
/
4
" deep on inside face
14
1
/
2
"
R=2"
5
/
32
" shank hole, countersunk on outside face
FOOT
R=
1
/
2
"
3"
12
1
/
2
"
2"
4"
2"
Dadoes
3
/
4
" deep
on inside face
1
1
/
2
"
1
1
/
2
"
3
/
4
"
3
/
4
"
1
1
/
2
"
R=1"
TOP RAILS
F
A
B

TM
Page 9 of 11
CUTTING DIAGRAM
1
1
/
2
x 7
1
/
4
x 48" Cedar (2x8)
3
/
4
x 5
1
/
2
x 96" Cedar (1x6)
3
/
4
x 7
1
/
4
x 96" Cedar (1x8)
B
D
G
H
I
A
A
C
C
D
F
E
G
Part
TABLE
Bill of Materials
Matl.
Qty
.
T
W
L
Finished Size
A feet
1fi"
3"
14fi"
C
2
B top rails
1fi"
1fi"
12fi"
C
2
C slats
‡"
2"
20‹"
C
4
D slats
‡"
4"
20‹"
C
2
E lower
crossmember
1fi"
2fi"
17"
C
1
F upper
crossmember
1fi"
2fi"
17"
C
1
G top boards
‡"
5‡"
24"
C
2
H top center
board
‡"
6"
24"
C
1
I cleats
‡"
1fi"
16"
C
3
Material Key:
C-cedar
Supplies:
1‹" deck screws, 2" deck screws, 2fi"
deck screws, red and green enamel paint, clear
exterior finish.
Clamp the top boards together using spacers for even
gaps, then screw the base to the bottom of the top.

The purchase of these plans does
not transfer any copyright or other
ownership interest in the plans, the
design, or the finished project to the
buyer. Buyer may neither reproduce
the plans for sale nor offer for sale
any copies of the finished project.
Produced by Marlen Kemmet
Project Design: James R. Downing
Illustrations: Jamie Downing; Lorna Johnson
Graphic Design: Jamie Downing
Photographs: Hetherington Photography
©Copyright Meredith Corporation 2001
TM
Page 10 of 11
Using a construction procedure sim-
ilar to that of the planter and chair,
build the patio table shown here.
See the Parts View on page 8 for
parts A, B, and F. Also see the Bill of
Materials on page 9 for part sizes.
Finally, review the Cutting Diagram
for laying out the pieces.
¿
D
C
1
1
/
4
" deck screw
12
1
/
2
"
14
1
/
2
"
1
1
/
4
" deck screw
5
/
32
" shank hole,
countersunk
1
/
8
" pilot hole
1
/
2
" deep
20
1
/
4
"
7
3
/
8
"
SIDE FRAME
B
A
C
TM
Page 11 of 11
E
TABLE BOTTOM CROSSMEMBER
FULL-SIZED END PATTERN
A
TABLE FOOT
FULL-SIZED END PATTERN
fi
‹
‡
1"
SCALE
To ensure full-sized patterns are correct
size, your printer should be set to print
at 100% (not fit to page). Measure full-
sized patterns to verify size.
APPLE
FULL-SIZE
PATTERN
Centerlines

http://www.woodmall.com
®
Thanks for your order!
Now that you've got a detailed plan to
build that perfect project, visit the WOOD
MALL for the internet's largest source for
woodworking tools and accessories.
The WOOD MALL offers:
• Over two dozen woodworking-related stores
• More than 50,000 tools & accessories
• 24-Hour shopping
• Special sales & closeouts
• Nearly 40 tool comparison charts
•
FREE
monthly woodworking seminar
Visit Today!
http://www.woodmall.com
Like no other magazine, WOOD helps you make the most of your shop time ...
takes your skills to the next level. Every issue of WOOD is jam-packed with ...
• Smart tips, tricks, secrets and shortcuts that save you time, effort and money
• Valuable tool reviews with at-a-glance information charts that give you helpful
product comparisons • Giant full-size pattern pull-outs • Crystal-clear step-by-
step instructions, exploded diagrams, finishing secrets and techniques for that pro-
fessional look – everything you need to bring out your woodworking genius!
2 years (14 issues) just $44
SAVE $39.30
off single-copy rate!
1 year (7 issues) just $26
SAVE $15.65
off single-copy rate!
Payment Enclosed
Bill Me
My Name
(please print)
_____________________________________________________
Address ______________________________________ Apt. #__________________
City____________________________ State _________ Zip____________________
Canadian Orders: Fill in the form above. Your rate will be 1 year (7 issues) for $41 – SAVE $14.65, or 2 years (14 issues) for $67 – SAVE
$44.30. Prices include postage; 7% GST or 15% HST is added. #12348 2887 RT
U.S. and Canadian subscribers: You also may order by credit card. Call toll free 1-800-374-9663 weekdays from 7 a.m. to 10 p.m. Central
Time; Saturdays, 8 a.m. to 3 p.m.; Sundays, 9 a.m. to 3 p.m.
Other International Orders: 2 years for $89 U.S. or 1 year for $49 U.S.; prices include postage. To order by credit card call 515/246-6952
during the same hours as listed above (toll charged). Or complete this form; mail with US funds to: WOOD® Magazine, P.O. Box 37439,
Boone, IA. 50037-0439 USA.
Your Money-Back Guarantee: You must be satisfied with your subscription or
you can get a refund for all unmailed issues.
WOOD® Magazine is published 7 times a year. Savings are based on $5.95 U.S., $7.95 Canadian single-copy rate.
The first issue mails in 8-12 weeks. Subscription prices subject to change. 4HMF
Fill out information below and mail to: WOOD
®
Magazine P.O. BOX 37439, Boone, IA. 50037-0439
or Subscribe Online at
http://www.woodmagazine.com/subscript
Current issue not shown
Wyszukiwarka
Podobne podstrony:
Patio Table and Chairs(1)
Patio Table and Chairs(2)
Patio Table and Chairs(2)
Patio Table and Chairs(1)
Bench Patio Table and Chairs(2)
Bench Patio Table and Chairs(1)
patio wall planter
Planter Patio Planter
Plantene opis
planter bench
OBLICZANIE POWIERZCHNI PLANTACJI WIERZBY ENERGETYCZNEJPRZY POMOCY PROGRAMU PLANTENE
523, PlanTestowMoj, Punkty funkcyjne
planter bench plan
Planter Bench another
Planters Cocktail
planter box 2
planter box
więcej podobnych podstron