
RECOMMENDED PRACTICE
D
ET
N
ORSKE
V
ERITAS
DNV-RP-C202
BUCKLING STRENGTH OF SHELLS
OCTOBER 2002
Since issued in print (October 2002), this booklet has been amended, latest in April 2005.
See the reference to “Amendments and Corrections” on the next page.

Comments may be sent by e-mail to rules@dnv.com
For subscription orders or information about subscription terms, please use distribution@dnv.com
Comprehensive information about DNV services, research and publications can be found at http://www.dnv.com
, or can be obtained from DNV, Veritas-
veien 1, N-1322 Høvik, Norway; Tel +47 67 57 99 00, Fax +47 67 57 99 11.
© Det Norske Veritas. All rights reserved. No part of this publication may be reproduced or transmitted in any form or by any means, including pho-
tocopying and recording, without the prior written consent of Det Norske Veritas.
Computer Typesetting (FM+SGML) by Det Norske Veritas.
Printed in Norway by GCS AS.
If any person suffers loss or damage which is proved to have been caused by any negligent act or omission of Det Norske Veritas, then Det Norske Veritas shall pay compensation to such person
for his proved direct loss or damage. However, the compensation shall not exceed an amount equal to ten times the fee charged for the service in question, provided that the maximum compen-
sation shall never exceed USD 2 million.
In this provision "Det Norske Veritas" shall mean the Foundation Det Norske Veritas as well as all its subsidiaries, directors, officers, employees, agents and any other acting on behalf of Det
Norske Veritas.
FOREWORD
DET NORSKE VERITAS (DNV) is an autonomous and independent foundation with the objectives of safeguarding life, prop-
erty and the environment, at sea and onshore. DNV undertakes classification, certification, and other verification and consultancy
services relating to quality of ships, offshore units and installations, and onshore industries worldwide, and carries out research
in relation to these functions.
DNV Offshore Codes consist of a three level hierarchy of documents:
— Offshore Service Specifications. Provide principles and procedures of DNV classification, certification, verification and con-
sultancy services.
— Offshore Standards. Provide technical provisions and acceptance criteria for general use by the offshore industry as well as
the technical basis for DNV offshore services.
— Recommended Practices. Provide proven technology and sound engineering practice as well as guidance for the higher level
Offshore Service Specifications and Offshore Standards.
DNV Offshore Codes are offered within the following areas:
A) Qualification, Quality and Safety Methodology
B) Materials Technology
C) Structures
D) Systems
E) Special Facilities
F) Pipelines and Risers
G) Asset Operation
ACKNOWLEDGEMENT
This Recommended Practice is developed in close co-operation with the offshore industry, research institutes and universities.
All contribution are highly appreciated.
CHANGES
Editorial changes have been made.
This DNV Offshore Code is valid until superseded by a revised version. Possible amendments between reprints will be published
in DNV Offshore Codes Amendments and Corrections available at http://www.dnv.com. Amendments and Corrections is nor-
mally revised in April and October each year. When reprinted, revised Offshore Codes will be forwarded to all subscribers.

Recommended Practice DNV-RP-C202
3
October 2002
D
ET
N
ORSKE
V
ERITAS
CONTENTS
Introduction .............................................................4
Buckling strength of shells ........................................4
Working Stress Design ..............................................4
Symbols and Definitions............................................4
Buckling modes .........................................................6
Stresses in Closed Cylinders ...................................8
General.......................................................................8
Stresses ......................................................................8
Buckling Resistance of Cylindrical Shells............10
Stability requirement................................................10
Characteristic buckling strength of shells ................10
3.3
Elastic buckling strength of unstiffened curved
panels.......................................................................10
3.4
Elastic buckling strength of unstiffened circular
cylinders...................................................................11
Ring stiffened shells ................................................12
Longitudinally stiffened shells.................................14
Orthogonally stiffened shells ...................................15
Column buckling .....................................................15
Torsional buckling ...................................................16
3.10
Local buckling of longitudinal stiffeners and ring
stiffeners ..................................................................17
Unstiffened Conical Shells.....................................19
Introduction .............................................................19
Stresses in conical shells..........................................19
Shell buckling ..........................................................20
Amended April 2005
see note on front cover
4
Recommended Practice DNV-RP-C202
October 2002
D
ET
N
ORSKE
V
ERITAS
1. Introduction
1.1 Buckling strength of shells
This RP treats the buckling stability of shell structures based
on the load and resistance factor design format (LRFD).
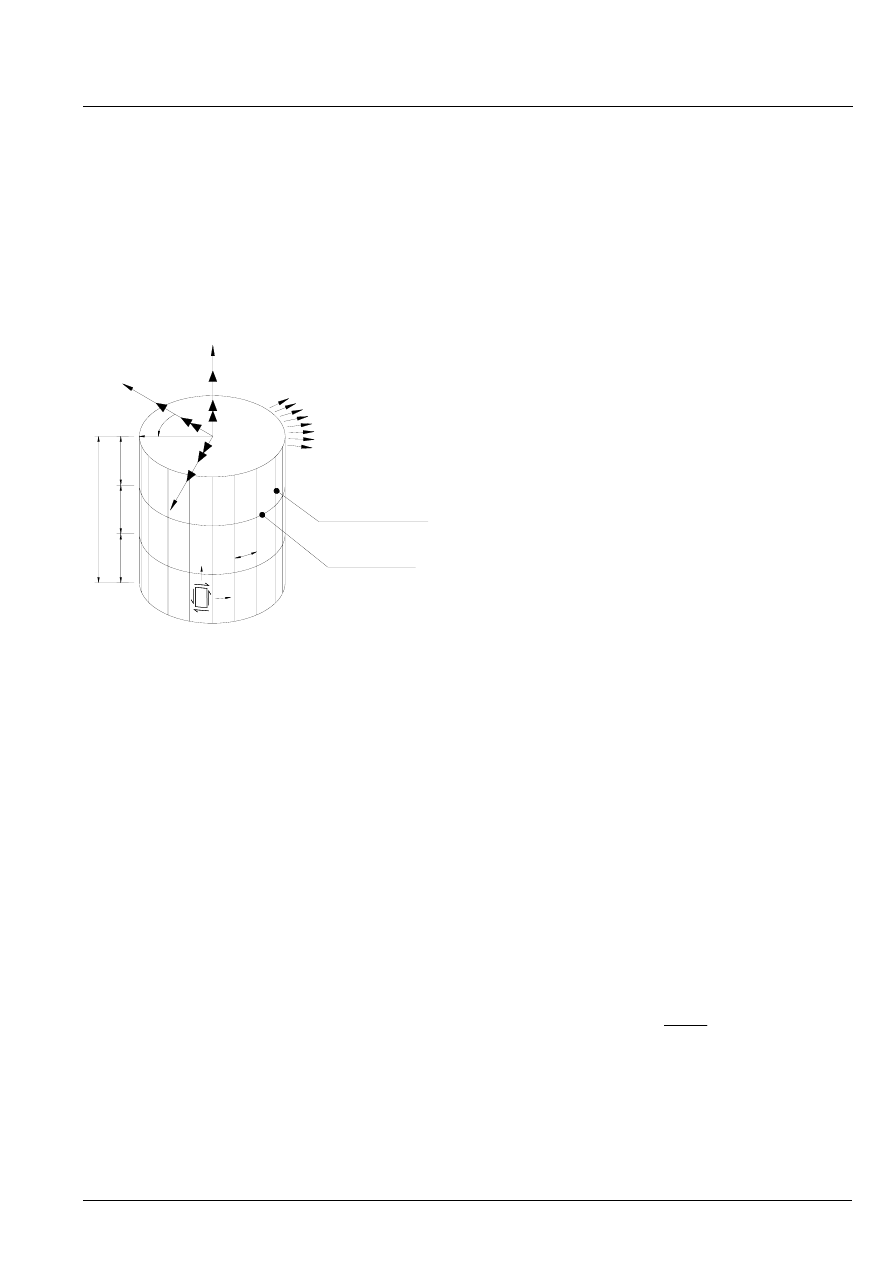
Chapter 2 gives the stress in closed cylinders. Chapter 3
treats the buckling of circular cylindrical steel shells, see
Figure 1.1-1. The shell cylinder may be stiffened by
longitudinal stiffeners and/or ring frames.
r
s
RING FRAME
LONGITUDINAL
STIFFENER
L
l
2
1
X
l
l
N
T
Q
1
θ
M
1
M
2
Q
2
σ
x
σ
h
τ
P
Figure 1.1-1 Stiffened cylindrical shell
It is assumed that the edges are effectively supported by ring
frames, bulkheads or end closures.
Stiffened circular cylindrical shells have to be dimensioned
against several buckling failure modes. The relevant modes
are defined in Section 1.3. To exclude local buckling of
longitudinal stiffeners and rings, explicit requirements are
given in Section 3.10
In Table 1.3-1 reference is made to recommended methods
for buckling analysis with respect to different buckling
modes. The methods are to be considered as semi-empirical.
The reason for basing the design on semi-empirical methods
is that the agreement between theoretical and experimental
buckling loads for some cases has been found to be non-
existent. This discrepancy is due to the effect of geometric
imperfections and residual stresses in fabricated structures.
Actual geometric imperfections and residual stresses do not
in general appear as explicit parameters in the expressions
for buckling resistance. This means that the methods for
buckling analysis are based on an assumed level of
imperfections. This level is reflected by the tolerance
requirements given in DNV OS-C401; Fabrication and
Testing of Offshore Structures.
The recommended methods for buckling analyses may be
substituted by more refined analyses or model tests taking
into account the real boundary conditions, the pre-buckling
edge disturbances, the actual geometric imperfections, the
non-linear material behaviour, and the residual welding
stresses.
Chapter 4 treats the buckling of unstiffened conical shells.
1.2 Working Stress Design
This Recommended Practice is written in the load and
resistance factor design format (LRFD format) to suit the
DNV Offshore Standard DNV-OS-C101. This standard
makes use of material- (resistance) and loadfactors as safety
factors.
DNV-RP-C202 may be used in combination with working
stress design format (WSD) by the following method:
For the formulas used in DNV-RP-C202, including eq. 3.1.3,
use a material factor
γ
M
=1.15. The utilisation checks should
be made using a modified permissible usage factor
η
p
=1.15
βη
0,
see DNV-OS-C201 Sec. 2 Table E1 for
η
0
and
Sec. 5 Table C1 for
β.
1.3 Symbols and Definitions
1.3.1 Symbols
The following symbols are used and may not have a specific
definition in the text where they appear:
A
cross-sectional area of a longitudinal stiffener
(exclusive of shell flange)
A
c
cross sectional area of complete cylinder section;
including longitudinal stiffeners/internal
bulkheads if any
A
f
cross sectional area of flange (=bt
f
)
A
R
cross-sectional area of a ring frame (exclusive of
shell flange)
A
Req
required cross sectional area (exclusive of
effective plate flange) of ring frame to avoid
panel ring buckling
A
w
cross sectional area of web (=ht
w
)
C reduced
buckling
coefficient
C
1
coefficient
C
2
coefficient
E
Young's modulus = 2.1
⋅10
5
N/mm
2
G
shear modulus,
(
)
ν
+
=
1
2
E
G
I
moment of inertia of a longitudinal stiffener
(exclusive of shell flange)
I
c
moment of inertia of the complete cylinder
section (about weakest axis), including
longitudinal stiffeners/internal bulkheads if any
Amended April 2005
see note on front cover
Recommended Practice DNV-RP-C202
5
October 2002
D
ET
N
ORSKE
V
ERITAS
I
po
polar moment of inertia
I
R
effective moment of inertia of a ring frame
I
sef
moment of inertia of longitudinal stiffener
including effective shell width s
e
I
t
stiffener torsional moment of inertia (St. Venant
torsion).
I
z
moment of inertia of a stiffeners neutral axis
normal to the plane of the plate
I
h
minimum required moment of inertia of
ringframes inclusive effective shell flange in a
cylindrical shell subjected to external lateral or
hydrostatic pressure
I
x
minimum required moment of inertia of
ringframes inclusive effective shell flange in a
cylindrical shell subjected to axial and/or bending
I
xh
minimum required moment of inertia of
ringframes inclusive effective shell flange in a
cylindrical shell subjected to torsion and/or shear
L
distance between effective supports of the ring
stiffened cylinder
L
c
total cylinder length
L
H
equivalent cylinder length for heavy ring frame
M
Sd
design bending moment
M
1, Sd
design bending moment about principal axis 1
M
2, Sd
design bending moment about principal axis 2
N
Sd
design axial force
Q
Sd
design shear force
Q
1,Sd
design shear force in direction of principal axis 1
Q
2,Sd
design shear force in direction of principal axis 2
T
Sd
design torsional moment
2
2
L
ν
1
rt
L
Z
−
=
, curvature parameter
2
2
ν
-
1
rt
=
Z
l
l
, curvature parameter
2
2
s
ν
1
rt
s
Z
−
=
, curvature parameter
a Factor
b flange
width,
factor
b
f
flange
outstand
c Factor
e
distance from shell to centroid of ring frame
exclusive of any shell flange
e
f
flange
eccentricity
f
ak
reduced characteristic buckling strength
f
akd
design local buckling strength
f
E
elastic buckling strength
f
Ea
elastic buckling strength for axial force.
f
Eh
elastic buckling strength for hydrostatic pressure,
lateral pressure and circumferential compression.
f
Em
elastic buckling strength for bending moment.
f
ET
elastic buckling strength for torsion.
f
E
τ
elastic buckling strength for shear force.
f
k
characteristic
buckling
strength
f
kc
characteristic
column buckling strength
f
kcd
design column buckling strength
f
ks
characteristic buckling strength of a shell
f
ksd
design buckling strength of a shell
f
r
characteristic material strength
f
T
torsional buckling strength
f
y
yield strength of the material
h web
height
h
s
distance from stiffener toe (connection between
stiffener and plate) to the shear centre of the
stiffener.
i radius
of
gyration
i
c
radius of gyration of cylinder section
i
h
effective radius of gyration of ring frame
inclusive affective shell flange
k
effective length factor, column buckling
l
distance between ring frames
l
e
equivalent
length
l
ef
effective width of shell plating
l
eo
equivalent
length
l
T
torsional
buckling
length
p
Sd
design
lateral
pressure
r shell
radius
r
e
equivalent
radius
r
f
radius of the shell measured to the ring flange
r
r
radius
(variable)
r
0
radius of the shell measured to the neutral axis of
ring frame with effective shell flange, l
eo
s
distance between longitudinal stiffeners
s
e
effective
shell
width
t shell
thickness
t
b
thickness
of
bulkhead
t
e
equivalent
thickness
t
f
thickness
of
flange
Amended April 2005
see note on front cover
6
Recommended Practice DNV-RP-C202
October 2002
D
ET
N
ORSKE
V
ERITAS
t
w
thickness
of
web
w
initial out-of roundness
z
t
distance from outer edge of ring flange to centroid
of stiffener inclusive effective shell plating
α, α
A
coefficients
α
B,
α
C
coefficients
β
coefficient
δ
0
initial
out-of-roundness
parameter
γ
M
material factor
η coefficient
⎯λ
reduced column slenderness
⎯λ
s
reduced shell slenderness
⎯λ
T
reduced torsional slenderness
µ
Coefficient
θ
circumferential co-ordinate measured from axis 1
ρ
Coefficient
ν
Poisson's ratio = 0.3
σ
a,Sd
design membrane stress in the longitudinal
direction due to uniform axial force
σ
h,Sd
design membrane stress in the circumferential
direction
σ
hR,Sd
design membrane stress in a ring frame
σ
hm,Sd
design circumferential bending stress in a shell at
a bulkhead or a ringframe
σ
j,Sd
design equivalent von Mises’ stress
σ
m,Sd
design membrane stress in the longitudinal
direction due to global bending
σ
x,Sd
design membrane stress in the longitudinal
direction
σ
xm,Sd
design longitudinal bending stress in a shell at a
bulkhead or a ringframe
τ
Sd
design shear stress tangential to the shell surface
(in sections x = constant and
θ = constant)
τ
T,Sd
design shear stress tangential to the shell surface
due to torsional moment
τ
Q,Sd
design shear stress tangential to the shell surface
due to overall shear forces
ξ coefficient
ψ coefficient
ζ coefficient
1.3.2 Definitions
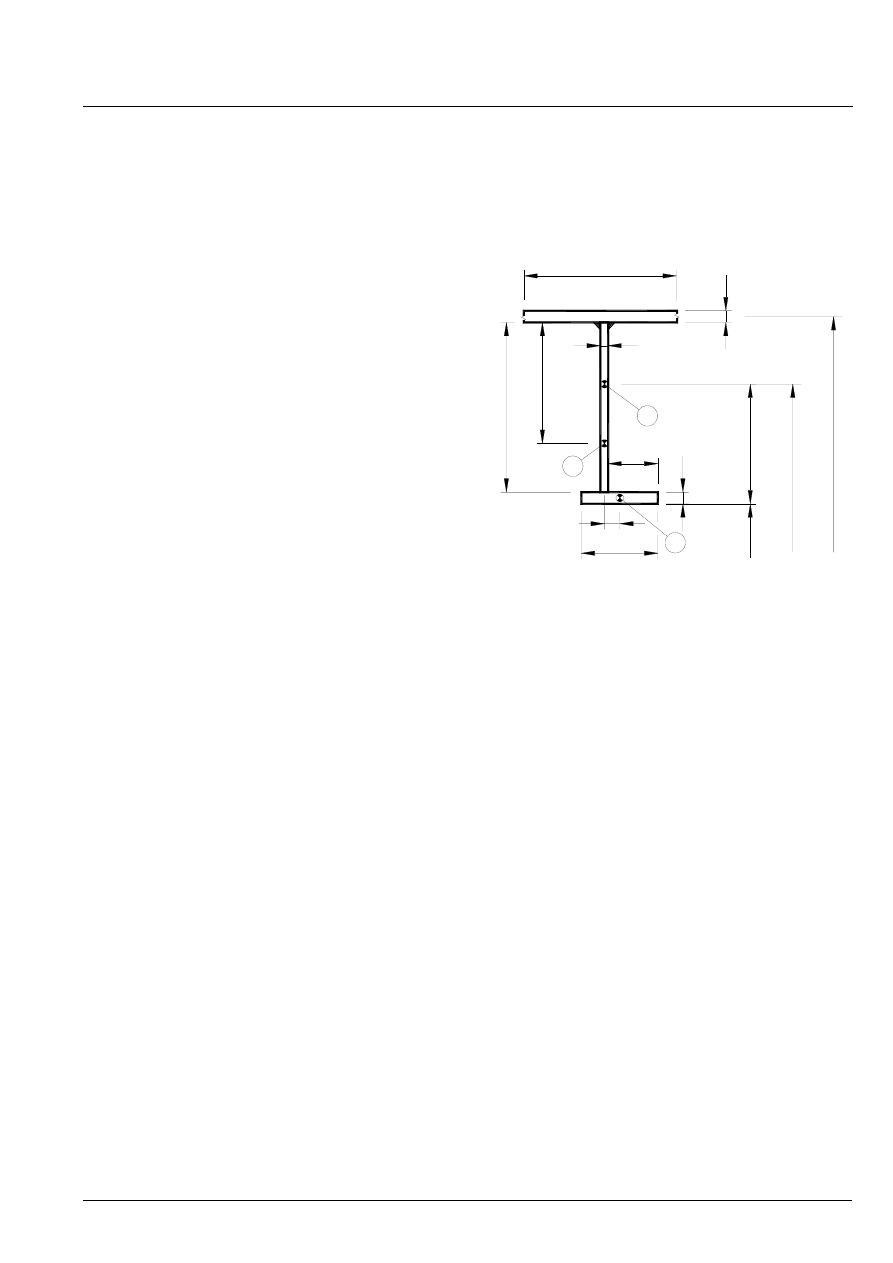
A general ring frame cross section is shown Figure 1.2-1,
A
Centroid of ring frame with effective shell flange,
l
eo
B
Centroid of ring frame exclusive any shell flange
C
Centroid of free flange
A
B
t
w
e
t
z
t
f
e
b
C
f
h
t
eo
r
r
r
f
0
b
f
l
Figure 1.3-1 Cross sectional parameters for a ring frame
1.4 Buckling modes
The buckling modes for stiffened cylindrical shells are
categorised as follows:
a) Shell buckling: Buckling of shell plating between rings/
longitudinal stiffeners.
b) Panel stiffener buckling: Buckling of shell plating
including longitudinal stiffeners. Rings are nodal lines.
c) Panel ring buckling: Buckling of shell plating including
rings. Longitudinal stiffeners act as nodal lines.
d) General buckling: Buckling of shell plating including
longitudinal stiffeners and rings.
e) Column buckling: Buckling of the cylinder as a
column.
For long cylindrical shells it is possible that interaction
between local buckling and overall column buckling
may occur because second order effects of axial
compression alter the stress distribution calculated from
linear theory. It is then necessary to take this effect into
account in the column buckling analysis. This is done
by basing the column buckling on a reduced yield
strength, f
kc
, as given for the relevant type of structure.
f) Local buckling of longitudinal stiffeners and rings.
Section 3.10
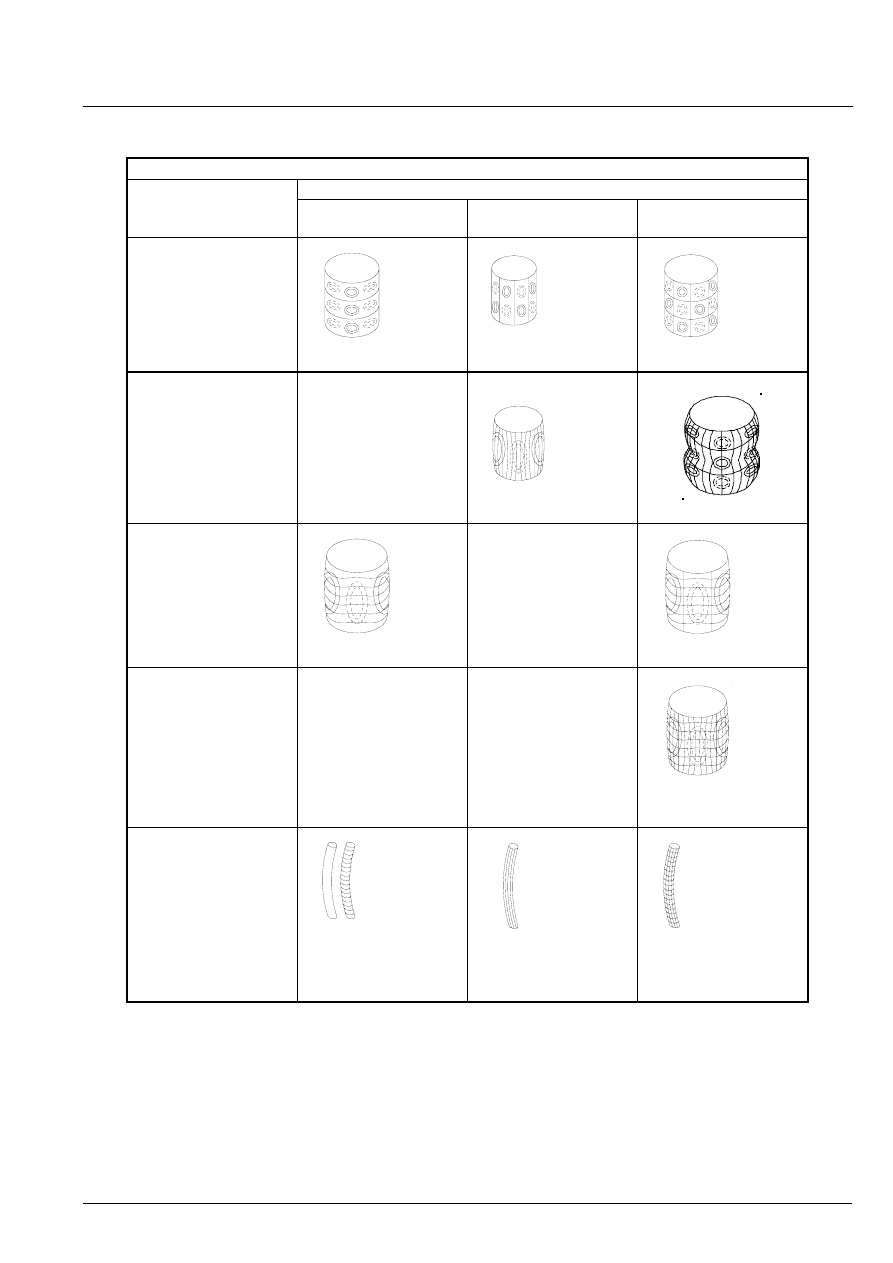
The buckling modes and their relevance for the different
cylinder geometries are illustrated in Table 1.3-1
Amended April 2005
see note on front cover
Recommended Practice DNV-RP-C202
7
October 2002
D
ET
N
ORSKE
V
ERITAS
Table 1.4-1 Buckling modes for different types of cylinders
Type of structure geometry
Buckling mode
Ring stiffened
(unstiffened circular)
Longitudinal stiffened
Orthogonally stiffened
a) Shell buckling
Section 3.4
Section 3.3
Section 3.3
b) Panel stiffener buckling
Section 3.6
Section 3.7
c) Panel ring buckling
Section 3.5
Section 3.7
d) General buckling
Section 3.7
e) Column buckling
Section 3.8
Section 3.8
Section 3.8
Amended April 2005
see note on front cover
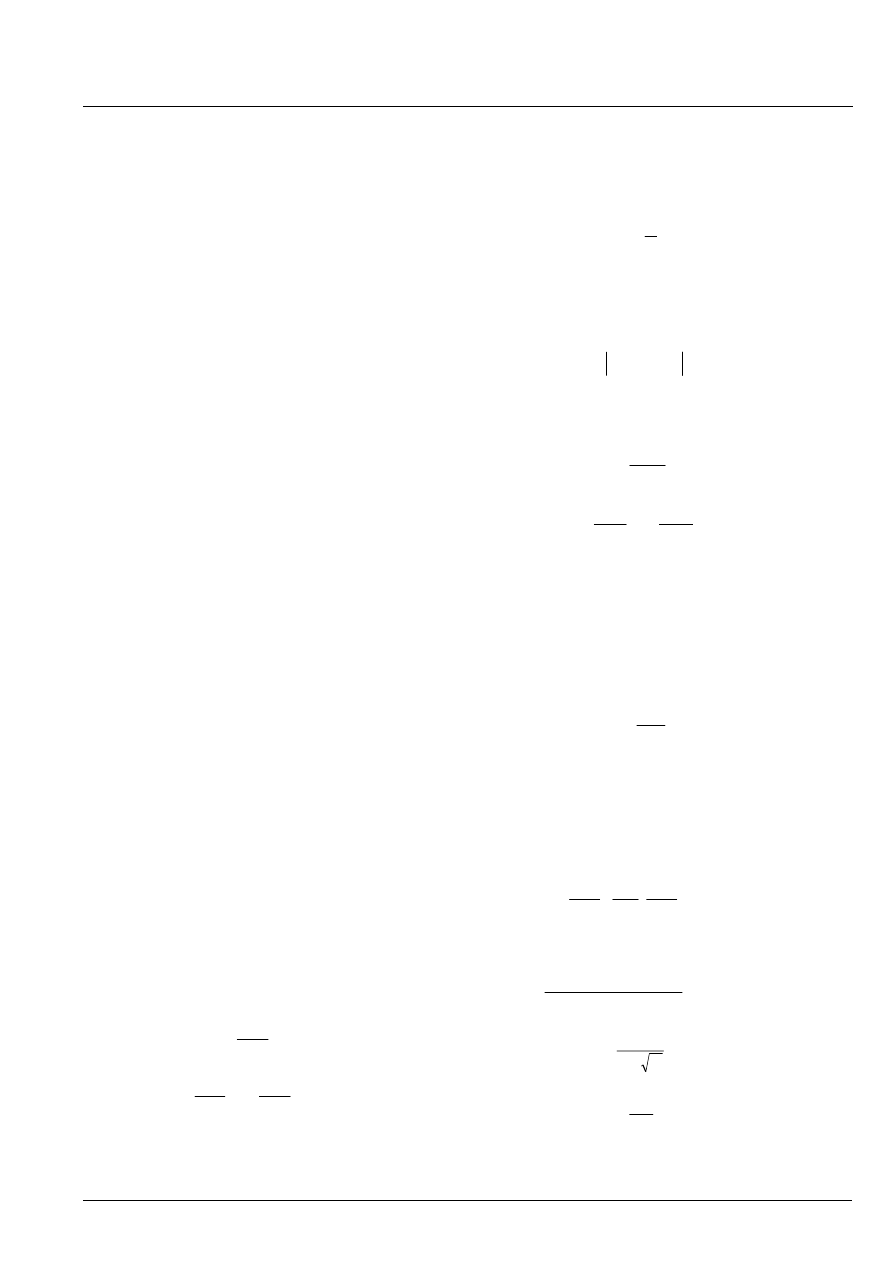
8
Recommended Practice DNV-RP-C202
October 2002
D
ET
N
ORSKE
V
ERITAS
2. Stresses in Closed Cylinders
2.1 General
The stress resultants governing the stresses in a cylindrical
shell is normally defined by the following quantities:
N
Sd
= Design axial force
M
Sd
= Design
bending
moments
T
Sd
=
Design
torsional
moment
Q
Sd
= Design shear force
p
Sd
=
Design
lateral
pressure
Any of the above quantities may be a function of the axial
co-ordinate x. In addition p
Sd
may be a function of the
circumferential co-ordinate
θ, measured from axis 1. p
Sd
is
always to be taken as the difference between internal and
external pressures, i.e. p
Sd
is taken positive outwards.
Actual combinations of the above actions are to be
considered in the buckling strength assessments.
2.2 Stresses
2.2.1 General
The membrane stresses at an arbitrary point of the shell
plating, due to any or all of the above five actions, are
completely defined by the following three stress components:
σ
x,Sd
= design membrane stress in the longitudinal
direction (tension is positive)
σ
h,Sd
= design membrane stress in the circumferential
direction (tension is positive)
τ
Sd
= design shear stress tangential to the shell surface
(in sections x = constant and
θ = constant)
2.2.2 Longitudinal membrane stress
If the simple beam theory is applicable, the design
longitudinal membrane stress may be taken as:
Sd
m,
Sd
a,
Sd
x,
σ
σ
σ
+
=
(2.2.1)
where
σ
a,Sd
is due to uniform axial force and
σ
m,Sd
is due to
bending.
For a cylindrical shell without longitudinal stiffeners:
t
r
π
2
N
σ
Sd
Sd
a,
=
(2.2.2)
cosθ
t
πr
M
sinθ
t
πr
M
σ
2
Sd
2,
2
Sd
1,
Sd
m,
−
=
(2.2.3)
For a cylindrical shell with longitudinal stiffeners it is
usually permissible to replace the shell thickness by the
equivalent thickness for calculation of longitudinal
membrane stress only:
s
A
t
t
e
+
=
(2.2.4)
2.2.3 Shear stresses
If simple beam theory is applicable, the membrane shear
stress may be taken as:
Sd
Q,
τ
Sd
T,
τ
Sd
τ
+
=
(2.2.5)
where
τ
T,Sd
is due to the torsional moment and
τ
Q,Sd
is due to
the overall shear forces.
t
r
π
2
T
τ
2
Sd
Sd
T,
=
(2.2.6)
cosθ
t
r
π
Sd
2,
Q
sinθ
t
r
π
Sd
1,
Q
Sd
Q,
τ
+
−
=
(2.2.7)
where the signs of the torsional moment and the shear forces
must be reflected. Circumferential and longitudinal stiffeners
are normally not considered to affect
τ
Sd
.
2.2.4 Circumferential membrane stress
For an unstiffened cylinder the circumferential membrane
stress may be taken as:
t
r
Sd
p
Sd
h,
σ
=
(2.2.8)
provided p
Sd
is constant (gas pressure) or a sine or cosine
function of
θ (liquid pressure).
For a ringstiffened cylinder (without longitudinal stiffeners)
the circumferential membrane stress midway between two
ring frames may be taken as:
⎟
⎟
⎠
⎞
⎜
⎜
⎝
⎛
−
+
−
=
Sd
x,
σ
ν
t
r
Sd
p
1
α
ζ
α
t
r
Sd
p
Sd
h,
σ
(2.2.9)
where
0
ζ
but
,
2β
sin
2β
Sinh
sinβ
Coshβ
cosβ
Sinhβ
2
ζ
≥
+
+
=
(2.2.10)
t
r
1.56
β
l
=
(2.2.11)
t
A
α
eo
R
l
=
(2.2.12)
Amended April 2005
see note on front cover
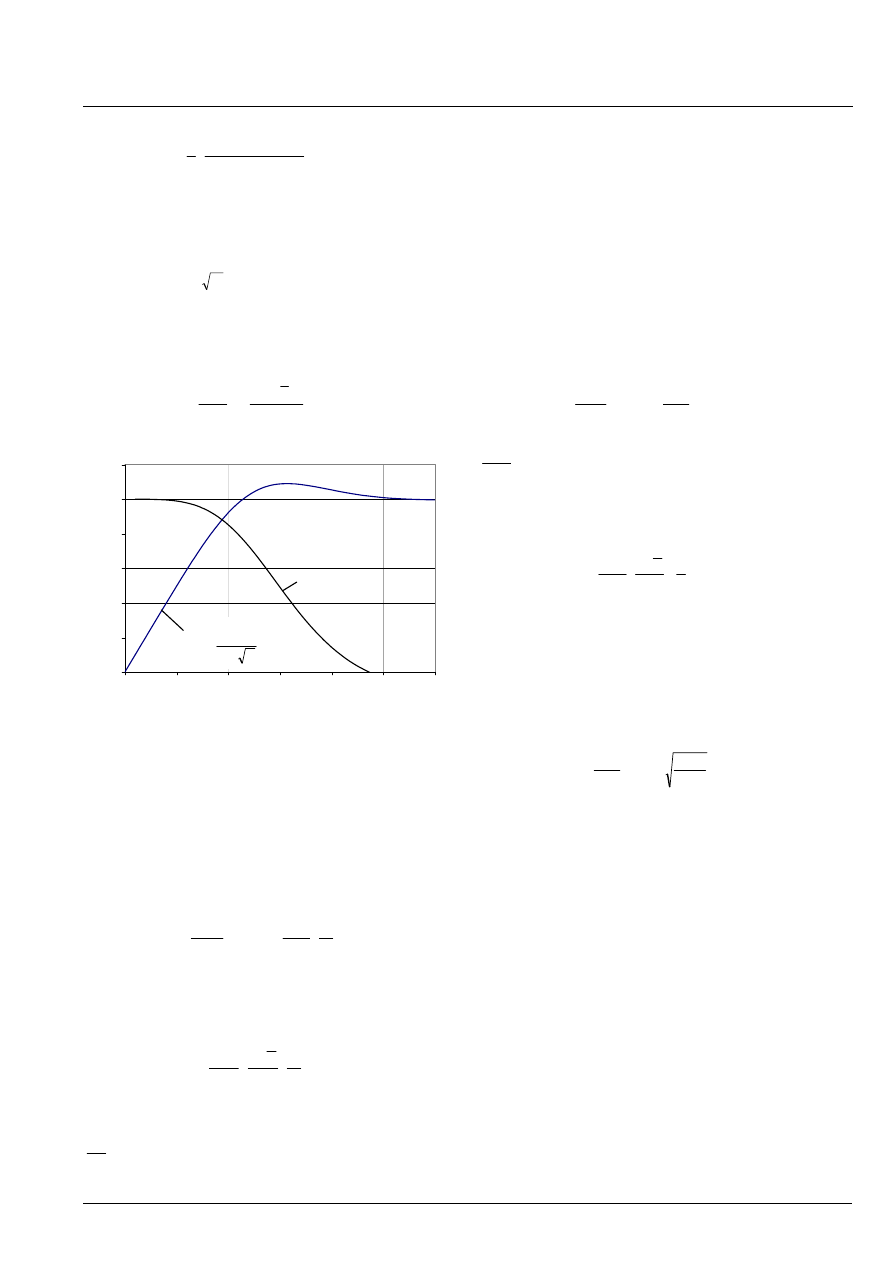
Recommended Practice DNV-RP-C202
9
October 2002
D
ET
N
ORSKE
V
ERITAS
⎟⎟
⎠
⎞
⎜⎜
⎝
⎛
+
−
=
2β
sin
2β
Sinh
2β
cos
2β
Cosh
β
eo
l
l
(2.2.13)
ζ and l
eo
may also be obtained from Figure 2.2-1.
For simplification of the analysis the following
approximation may be made:
l
l
=
eo
or
t
r
56
.
1
eo
=
l
whichever is the smaller.
For the particular case when p
Sd
is constant and
σ
x,Sd
is due to
the end pressure alone, the above formula may be written as:
⎟⎟
⎟
⎟
⎟
⎠
⎞
⎜⎜
⎜
⎜
⎜
⎝
⎛
+
⎟
⎠
⎞
⎜
⎝
⎛ −
−
=
1
α
ζ
2
ν
1
α
1
t
r
p
σ
Sd
Sd
h,
(2.2.14)
0.0
0.2
0.4
0.6
0.8
1.0
1.2
0.0
0.5
1.0
1.5
2.0
2.5
3.0
β
Figure 2.2-1 The parameters l
eo
and
ζ
2.2.5 Circumferential stress in a ring frame
For ring stiffened shells the circumferential stress in a ring
frame at the distance r
r
(r
r
is variable, r
r
= r
f
at ring flange
position and r
r
= r at shell) from the cylinder axis may be
taken as:
⎟⎟
⎠
⎞
⎜⎜
⎝
⎛
+
⎟⎟
⎠
⎞
⎜⎜
⎝
⎛
−
=
r
Sd
x,
Sd
Sd
hR,
r
r
α
1
1
νσ
t
r
p
σ
(2.2.15)
For the particular case when p
Sd
is constant and
σ
x,Sd
is due to
the end pressure alone, the above formula can be written as:
r
Sd
Sd
hR,
r
r
α
1
2
ν
1
t
r
p
σ
⎟
⎟
⎟
⎟
⎠
⎞
⎜
⎜
⎜
⎜
⎝
⎛
+
−
=
(2.2.16)
For longitudinally stiffened shells
α should be replaced by
t
A
R
l
in eq. (2.2.15) and (2.2.16).
2.2.6 Stresses in shells at bulkheads and ring stiffeners
2.2.6.1 General
The below stresses may be applied in a check for local
yielding in the material based on a von Mises’ equivalent
stress criterion. The bending stresses should also be
accounted for in the fatigue check, but may be neglected in
the evaluation of buckling stability.
2.2.6.2 Circumferential membrane stress
The circumferential membrane stress at a ring frame for a
ring stiffened cylinder (without longitudinal stiffeners) may
be taken as:
Sd
x,
Sd
x,
Sd
Sd
h,
νσ
α
1
1
νσ
t
r
p
σ
+
+
⎟⎟
⎠
⎞
⎜⎜
⎝
⎛
−
=
(2.2.17)
In the case of a bulkhead instead of a ring, A
R
is taken as
( )
ν
-
1
t
r
b
, where t
b
is the thickness of the bulkhead. For the
particular case when p
Sd
is constant and
σ
x,Sd
is due to the
end pressure alone, the above formula can be written as:
⎟
⎟
⎟
⎟
⎠
⎞
⎜
⎜
⎜
⎜
⎝
⎛
+
+
−
=
2
ν
α
1
2
ν
1
t
r
p
σ
Sd
Sd
h,
(2.2.18)
2.2.6.3 Bending stress
Bending stresses and associated shear stresses will occur in
the vicinity of “discontinuities” such as bulkheads and
frames. The longitudinal bending stress in the shell at a
bulkhead or a ring frame may be taken as:
2
Sd
h,
Sd
Sd
xm,
ν
1
3
σ
t
r
p
σ
−
⎟⎟
⎠
⎞
⎜⎜
⎝
⎛
−
=
(2.2.19)
where
σ
h,Sd
is given in (2.2.17) or (2.2.18).
The circumferential bending stress in the shell at a bulkhead
or a ring frame is:
Sd
xm,
Sd
m,
h
νσ
σ
=
(2.2.20)
ζ
rt
56
.
1
e0
l
Amended April 2005
see note on front cover
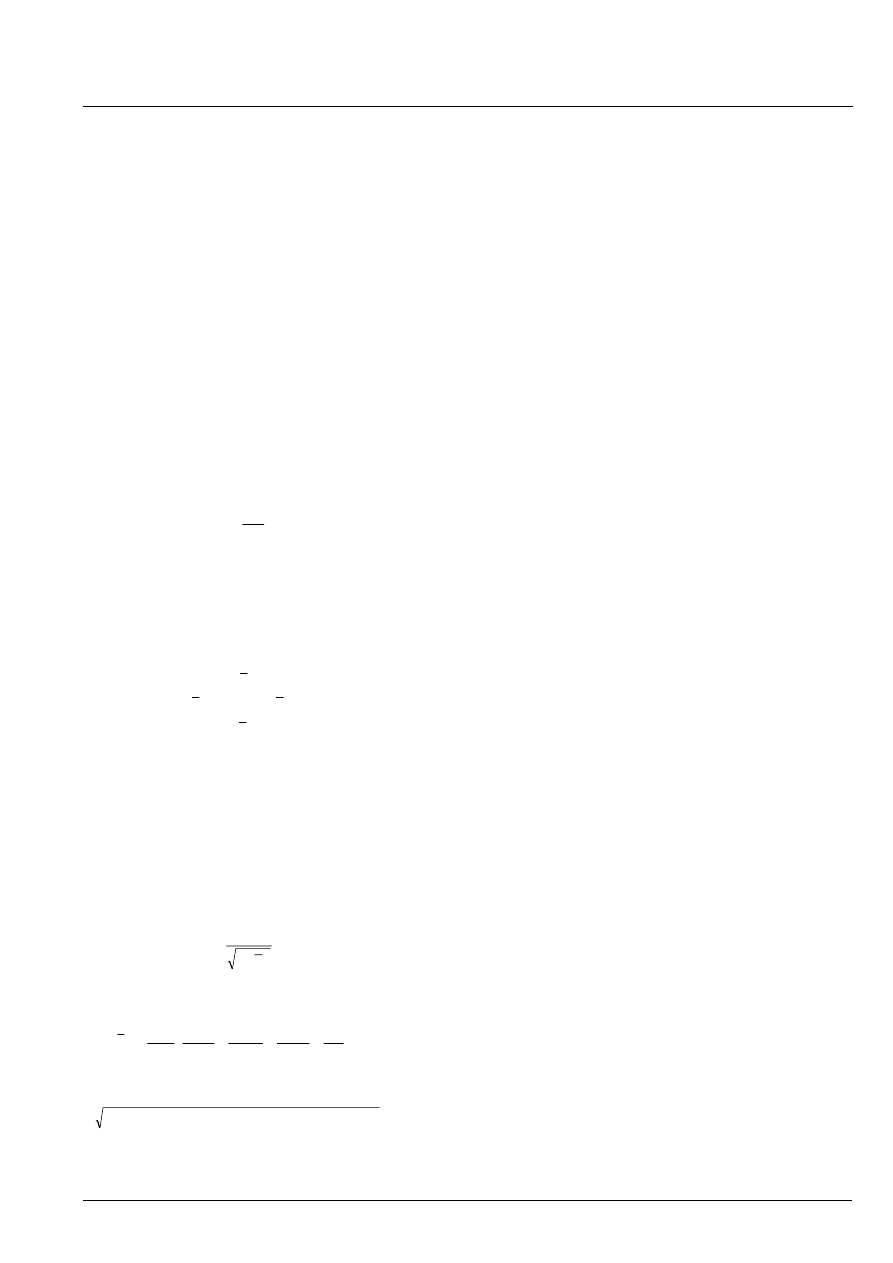
10
Recommended Practice DNV-RP-C202
October 2002
D
ET
N
ORSKE
V
ERITAS
3. Buckling Resistance of Cylindrical Shells
3.1 Stability requirement
The stability requirement for shells subjected to one or more
of the following components:
-
axial compression or tension
-
bending
-
circumferential compression or tension
-
torsion
-
shear
is given by:
ksd
Sd
j,
f
σ
≤
(3.1.1)
σ
j,Sd
is defined in Section 3.2
and the design shell buckling
strength is defined as:
M
ks
ksd
γ
f
f
=
(3.1.2)
The characteristic buckling strength, f
ks
, is calculated in
accordance with Section 3.2.
The material factor,
γ
M,
is given as:
1.0
λ
for
1.45
γ
1.0
λ
0.5
for
λ
0.60
0.85
γ
0.5
λ
for
1.15
γ
s
M
s
s
M
s
M
>
=
≤
≤
+
=
<
=
(3.1.3)
Shell structures may be subjected to global column buckling.
Evaluation of global column buckling is found in Section
3.8.
3.2 Characteristic buckling strength of shells
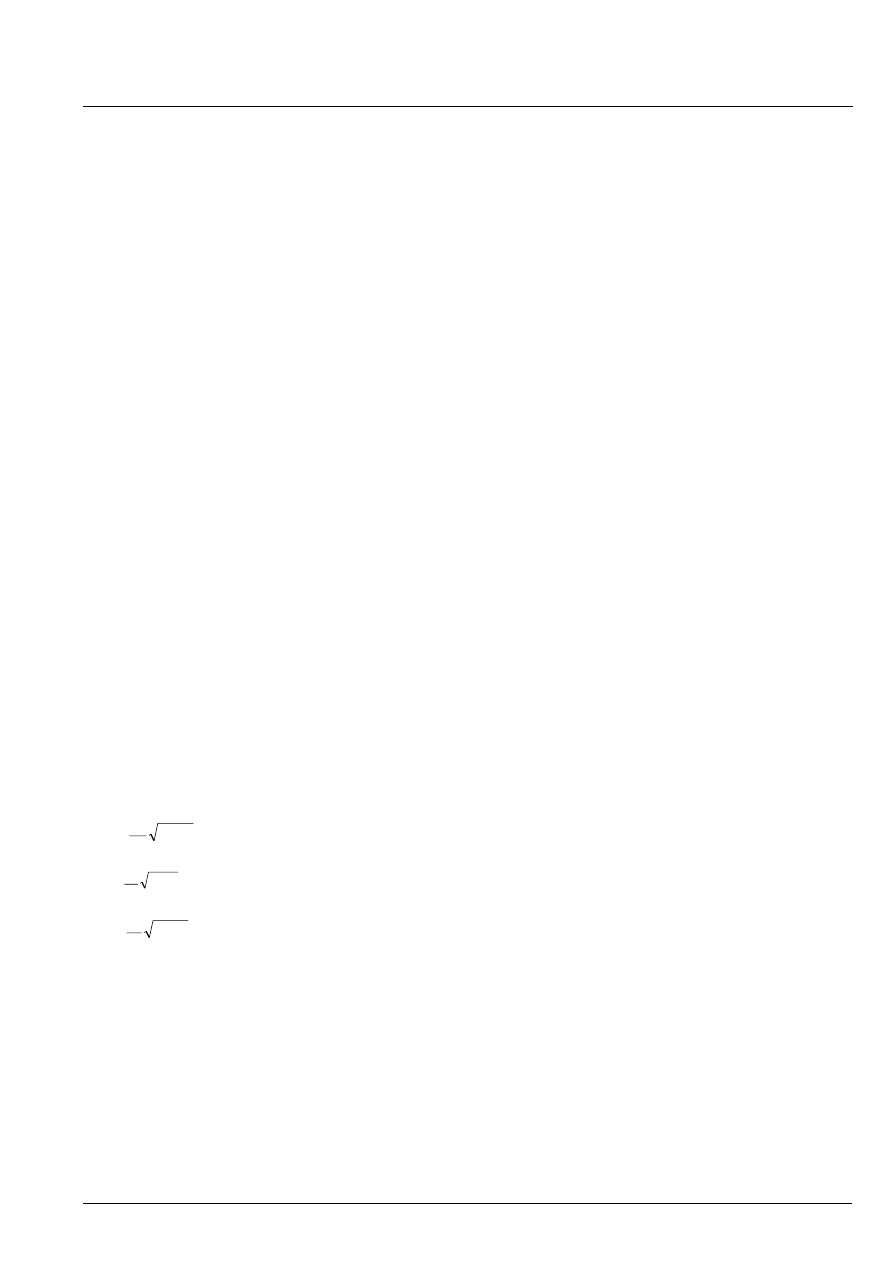
The characteristic buckling strength of shells is defined as:
4
s
y
ks
+
1
f
f
λ
=
(3.2.1)
where
⎥
⎦
⎤
⎢
⎣
⎡
+
+
+
=
Eτ
Sd
Eh
Sd
h0,
Em
Sd
m0,
Ea
Sd
a0,
Sd
j,
y
2
s
f
τ
f
σ
f
σ
f
σ
σ
f
λ
(3.2.2)
(
) (
)
2
Sd
2
Sd
h,
Sd
h,
Sd
m,
Sd
a,
2
Sd
m,
Sd
a,
Sd
j,
3
τ
σ
σ
σ
σ
σ
σ
σ
+
+
+
−
+
=
(3.2.3)
⎩
⎨
⎧
<
≥
−
=
0
σ
if
0
σ
if
σ
0
σ
Sd
a,
Sd
a,
Sd
a,
Sd
a0,
(3.2.4)
⎩
⎨
⎧
<
≥
−
=
0
σ
if
0
σ
if
σ
0
σ
Sd
m,
Sd
m,
Sd
m,
Sd
m0,
(3.2.5)
⎩
⎨
⎧
<
−
≥
=
pressure
net
ext.
0,
σ
if
σ
pressure
net
internal
0,
σ
if
0
σ
Sd
h,
Sd
h,
Sd
h,
Sd
h0,
(3.2.6)
σ
a,Sd
= design axial stress in the shell due to axial forces
(tension positive), see eq. (2.2.2)
σ
m,Sd
= design bending stress in the shell due to global
bending moment (tension positive), see eq. (2.2.3).
σ
h,Sd
= design circumferential stress in the shell due to
external pressure (tension positive), see eq (2.2.8),
(2.2.9), or (2.2.14). For ring stiffened cylinders
shall only stresses midway between rings be used.
τ
Sd
= design shear stress in the shell due to torsional
moments and shear force, see eq. (2.2.5).
f
Ea
, f
Em
, f
Eh
and f
E
τ
are the elastic buckling strengths of
curved panels or circular cylindrical shells subjected to axial
compression forces, global bending moments, lateral
pressure, and torsional moments and/or shear forces
respectively, where:
f
Ea
= elastic buckling strength for axial force.
f
Em
= elastic buckling strength for bending moment.
f
Eh
= elastic buckling strength for hydrostatic pressure,
lateral pressure and circumferential compression.
f
E
τ
= elastic buckling strength for torsion and shear
force.
These may be calculated in accordance with Section 3.3 to
3.7 taking the appropriate buckling coefficients into account.
3.3 Elastic buckling strength of unstiffened curved
panels
3.3.1 General
This section deals with buckling of shell plate between
stiffeners.
The buckling mode to be checked is:
a) Shell buckling, see Section 3.3.2.
3.3.2 Shell buckling
The characteristic buckling strength is calculated from
Section 3.2.
The elastic buckling strength of curved panels with aspect
ratio l/s > 1 is given by:
Amended April 2005
see note on front cover
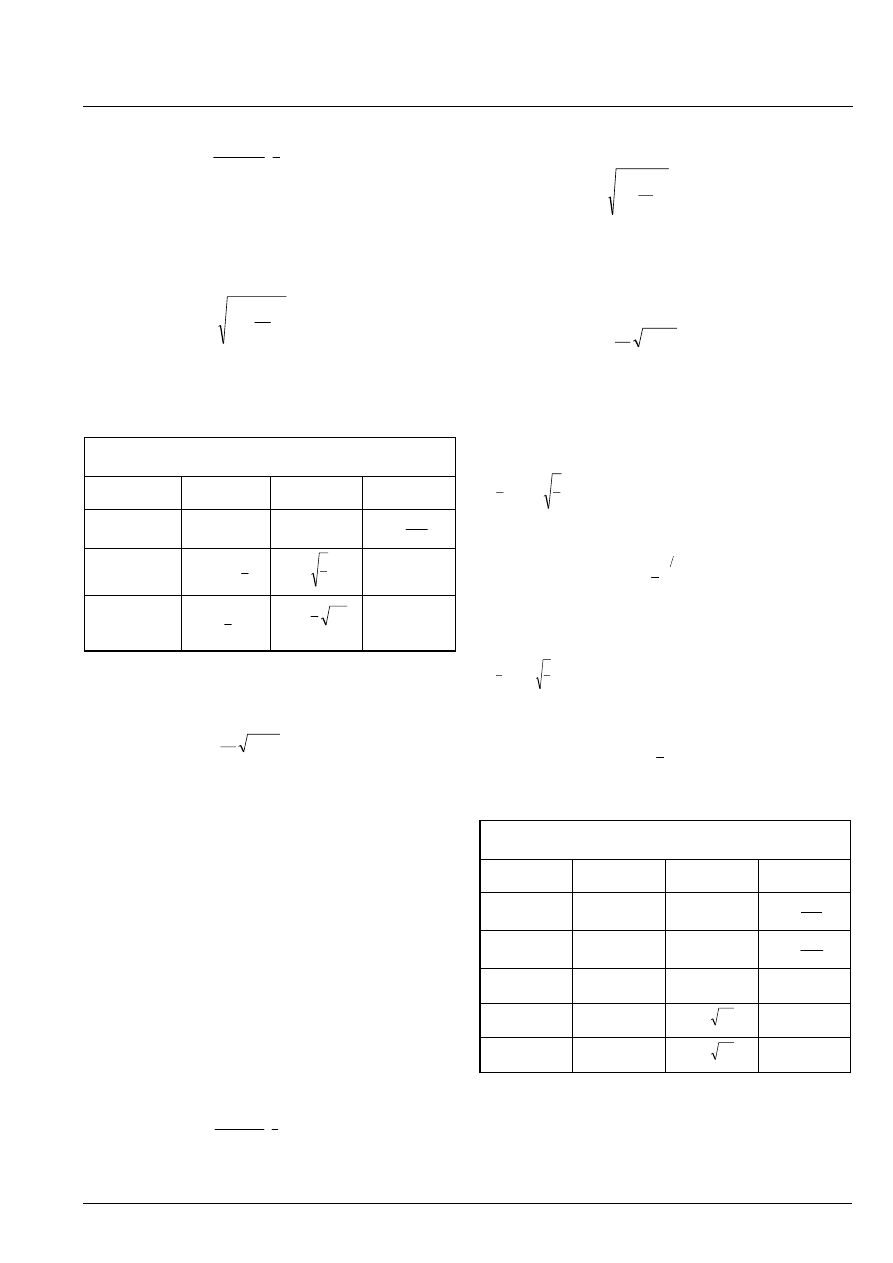
Recommended Practice DNV-RP-C202
11
October 2002
D
ET
N
ORSKE
V
ERITAS
2
2
2
E
s
t
)
-
12(1
E
C
f
⎟
⎠
⎞
⎜
⎝
⎛
=
ν
π
(3.3.1)
A curved panel with aspect ratio l/s < 1 may be considered as
an unstiffened circular cylindrical shell with length equal to
l, see Section 3.4.2.
The reduced buckling coefficient may be calculated as:
2
ψ
ρξ
+
1
ψ
=
C
⎟⎟
⎠
⎞
⎜⎜
⎝
⎛
(3.3.2)
The values for
ψ, ξ and ρ are given in Table 3.3-1 for the
most important load cases.
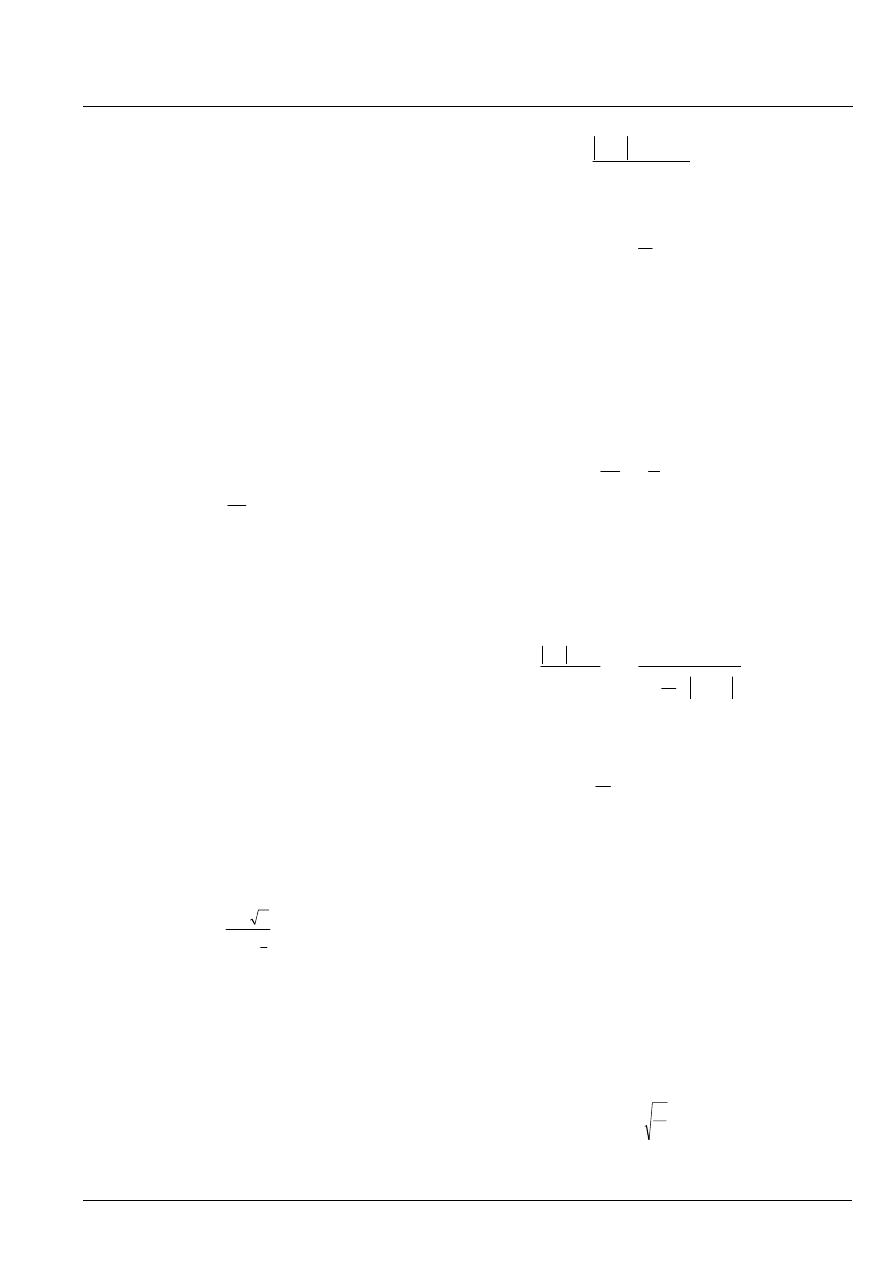
Table 3.3-1 Buckling coefficient for unstiffened
curved panels, mode a) Shell buckling
ψ
ξ
ρ
Axial stress
4
0 702
.
Z
s
0 5 1
0 5
.
.
+
⎛
⎝⎜
⎞
⎠⎟
−
r
150t
Shear stress
2
s
4
34
.
5
⎟
⎠
⎞
⎜
⎝
⎛
+
l
3/4
s
Z
s
856
.
0
l
0.6
Circumferential
compression
2
2
s
1
⎥
⎥
⎦
⎤
⎢
⎢
⎣
⎡
⎟
⎠
⎞
⎜
⎝
⎛
+
l
s
Z
s
04
.
1
l
0.6
The curvature parameter Z
s
is defined as:
2
2
s
ν
-
1
rt
s
=
Z
(3.3.3)
3.4 Elastic buckling strength of unstiffened
circular cylinders
3.4.1 General
The buckling modes to be checked are:
a) Shell buckling, see Section 3.4.2.
b) Column buckling, see Section 3.8.
3.4.2 Shell buckling
The characteristic buckling strength of unstiffened circular
cylinders is calculated from Section 3.2. The elastic buckling
strength of an unstiffened circular cylindrical shell is given
by:
2
t
)
2
ν
-
12(1
E
2
π
C
E
f
⎟
⎠
⎞
⎜
⎝
⎛
=
l
(3.4.1)
The reduced buckling coefficient may be calculated as:
2
ψ
ρξ
+
1
ψ
=
C
⎟⎟
⎠
⎞
⎜⎜
⎝
⎛
(3.4.2)
The values for
ψ, ξ and ρ are given in Table 3.4-1 for the
most important load cases.
The curvature parameter Z is defined as:
2
2
ν
-
1
rt
=
Z
l
l
(3.4.3)
For long cylinders the solutions in Table 3.4-1 will be
pessimistic. Alternative solutions are:
• Torsion and shear force
If
t
r
3,85
r
>
l
then the elastic buckling strength may be
calculated as:
2
3
Eτ
r
t
E
25
,
0
f
⎟
⎠
⎞
⎜
⎝
⎛
=
(3.4.4)
• Lateral/hydrostatic pressure
If
t
r
2,25
r
>
l
then the elastic buckling strength may be
calculated as:
2
Eh
r
t
E
25
,
0
f
⎟
⎠
⎞
⎜
⎝
⎛
=
(3.4.5)
Table 3.4-1 Buckling coefficients for unstiffened
cylindrical shells, mode a) Shell buckling
ψ
ξ
ρ
Axial stress
1
l
Z
702
.
0
0 5 1
0 5
.
.
+
⎛
⎝⎜
⎞
⎠⎟
−
r
150t
Bending 1
l
Z
702
.
0
0 5 1
0 5
.
.
+
⎛
⎝⎜
⎞
⎠⎟
−
r
300t
Torsion and
shear force
5.34
4
/
3
Z
856
.
0
l
0.6
Lateral
pressure
1)
4
l
Z
04
.
1
0.6
Hydrostatic
pressure
2)
2
l
Z
04
.
1
0.6
NOTE 1: Lateral pressure is used when the capped end axial force due to
hydrostatic pressure is not included in the axial force.
NOTE 2:Hydrostatic pressure is used when the capped end axial force due
to hydrostatic pressure is included in the axial force.
Amended April 2005
see note on front cover
12
Recommended Practice DNV-RP-C202
October 2002
D
ET
N
ORSKE
V
ERITAS
3.5 Ring stiffened shells
3.5.1 General
The buckling modes to be checked are:
a) Shell buckling, see Section 3.4.2.
b) Panel ring buckling, see Section 3.5.2.
e) Column buckling, see Section 3.8.
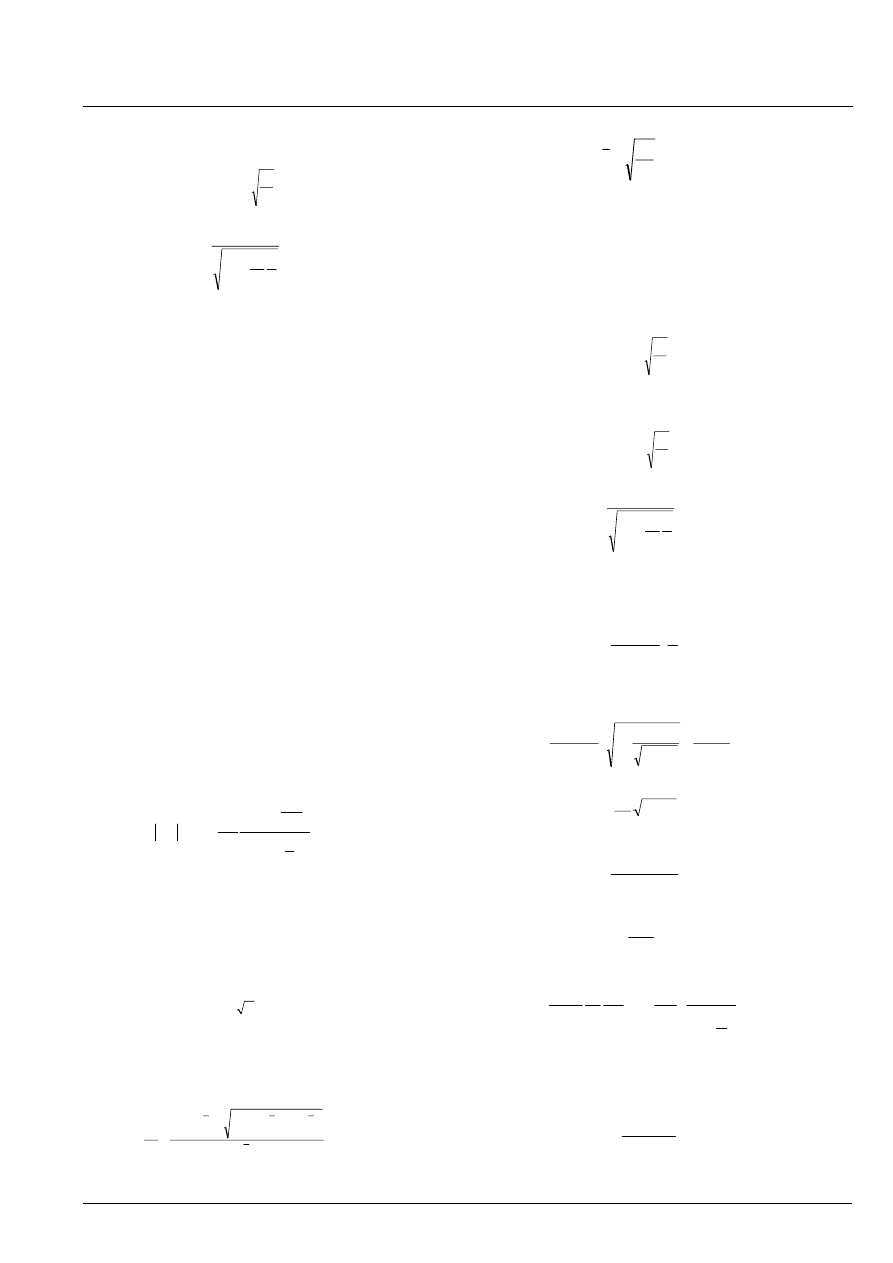
3.5.2 Panel ring buckling
The rings will normally be proportioned to avoid the panel
ring buckling mode. This is ensured if the following
requirements are satisfied.
3.5.2.1 Cross sectional area.
The cross sectional area of a ring frame (exclusive of
effective shell plate flange) should not be less than A
Req
,
which is defined by:
t
06
.
0
Z
2
A
2
Req
l
l
⎟⎟
⎠
⎞
⎜⎜
⎝
⎛
+
≥
(3.5.1)
3.5.2.2 Moment of inertia
The effective moment of inertia of a ring frame (inclusive
effective shell plate flange) should not be less than I
R
, which
is defined by:
h
xh
x
R
I
I
I
I
+
+
=
(3.5.2)
I
x
, I
xh
and I
h
are defined in eq.(3.5.5), (3.5.7) and (3.5.8), (see
also Sec. 3.5.2.7), the effective width of the shell plate flange
is defined in Sec. 3.5.2.3.
3.5.2.3 Effective width
The effective width of the shell plating to be included in the
actual moment of inertia of a ring frame shall be taken as the
smaller of:
r
t
12
1
rt
1.56
ef
+
=
l
(3.5.3)
and
l
l
=
ef
(3.5.4)
3.5.2.4 Calculation of I
x
The moment of inertia of ring frames inclusive effective
width of shell plate in a cylindrical shell subjected to axial
compression and/or bending should not be less than I
x,
which
is defined by:
(
)
l
E
500
4
0
r
A
α
1
t
Sd
x,
σ
x
I
+
=
(3.5.5)
where
t
s
A
α
A
=
(3.5.6)
A = cross sectional area of a longitudinal stiffener.
3.5.2.5 Calculation of I
xh
The moment of inertia of ring frames inclusive effective
width of shell plate in a cylindrical shell subjected to torsion
and/or shear should not be less than I
xh
, which is defined by:
l
t
Lr
L
r
Ε
τ
I
0
5
/
1
0
5
/
8
Sd
xh
⎟
⎠
⎞
⎜
⎝
⎛
⎟
⎠
⎞
⎜
⎝
⎛
=
(3.5.7)
3.5.2.6 Simplified calculation of I
h
for external pressure
The moment of inertia of ring frames inclusive effective
width of shell plate in a cylindrical shell subjected to external
lateral pressure should not be less than I
h
, which is
conservatively defined by:
⎥
⎥
⎥
⎥
⎥
⎦
⎤
⎢
⎢
⎢
⎢
⎢
⎣
⎡
⎟⎟
⎠
⎞
⎜⎜
⎝
⎛
−
+
=
Sd
R,
h
r
2
0
0
t
2
0
Sd
h
2
f
r
z
E
3
5
.
1
E
3
r
r
p
I
σ
δ
l
and
Sd
hR,
r
2
f
σ
>
(3.5.8)
The characteristic material resistance, f
r
, shall be taken as:
• For fabricated ring frames:
f
r
= f
T
• For cold-formed ring frames:
f
r
= 0.9f
T
The torsional buckling strength, f
T
, may be taken equal to the
yield strength, f
y
, if the following requirements are satisfied:
• Flat bar ring frames:
y
W
f
E
t
0.4
h
≤
(3.5.9)
Amended April 2005
see note on front cover
Recommended Practice DNV-RP-C202
13
October 2002
D
ET
N
ORSKE
V
ERITAS
• Flanged ring frames (e
f
= 0, for e
f
≠ 0 see section 3.10):
y
W
f
E
t
1.35
h
≤
(3.5.10)
r
h
f
E
10
h
7
b
y
+
≥
(3.5.11)
Otherwise f
T
may be obtained from section 3.9.
z
t
is defined in Figure 1.3-1. For
σ
hR,Sd
see section 2.2.5 and
for p
Sd
see section 2.1.
The assumed mode of deformation of the ring frame
corresponds to ovalization, and the initial out-of-roundness is
defined by:
θ
δ
2
cos
w
0
=
(3.5.12)
r
005
.
0
0
=
δ
(3.5.13)
Alternatively the capacity of the ring frame may be assessed
from 3.5.2.7.
3.5.2.7 Refined calculation of I
h
for external pressure
If a ring stiffened cylinder, or a part of a ring stiffened
cylinder, is effectively supported at the ends, the following
procedure may be used to calculate required moment of
inertia I
h
. For design it might be recommended to start with
equation (3.5.8) to arrive at an initial geometry. (The reason
is that I
h
is implicit in the present procedure in equations
(3.5.23) and (3.5.27)).
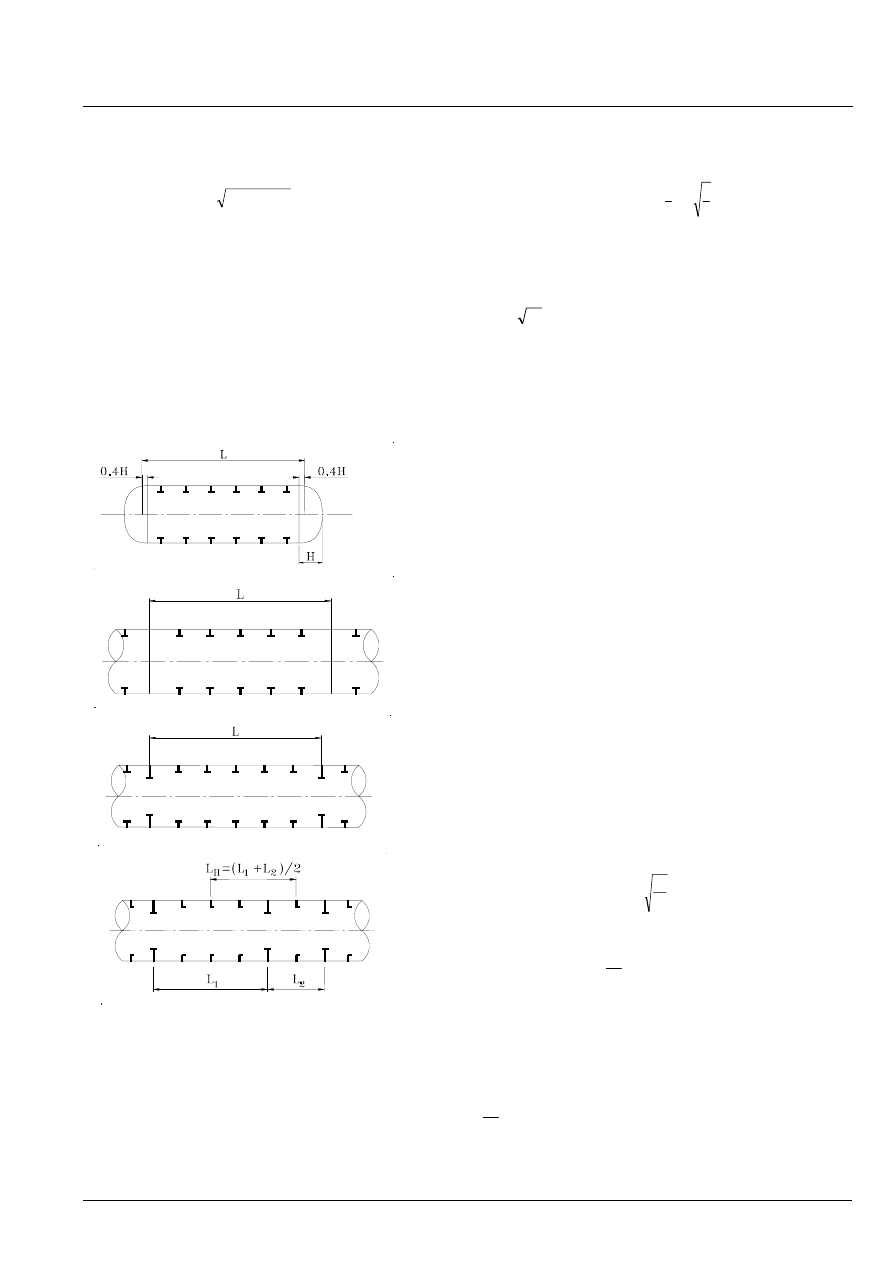
When a ring stiffened cylinder is subjected to external
pressure the ring stiffeners should satisfy:
⎟
⎠
⎞
⎜
⎝
⎛ −
⎟⎟
⎠
⎞
⎜⎜
⎝
⎛
+
≤
2
1
r
t
A
1
r
t
f
75
.
0
p
2
eo
R
f
M
k
Sd
ν
γ
l
(3.5.14)
where
p
Sd
= design external pressure
t =
shell
thickness
r
f
= radius of the shell measured to the ring flange, see
Figure 1.2-1.
r =
shell
radius
l
eo
=
smaller
of
rt
56
.
1
and l
A
R
= cross sectional area of ring stiffener (exclusive
shell flange)
f
k
is the characteristic buckling strength found from:
2
λ
2
2
λ
4
2
2
λ
µ
1
2
λ
µ
1
r
f
k
f
−
⎟
⎠
⎞
⎜
⎝
⎛
+
+
−
+
+
=
(3.5.15)
where
E
r
f
f
λ
=
(3.5.16)
The values for the parameters f
r
, f
E
and
µ may be taken as:
The characteristic material strength, f
r
, may be taken equal to
the yield strength, f
y
, if the following requirements are
satisfied:
• Flat bar ring frames:
y
W
f
E
t
0.4
h
≤
(3.5.17)
• Flanged ring frames (e
f
= 0, for e
f
≠ 0 see section 3.10):
y
W
f
E
t
1.35
h
≤
(3.5.18)
r
h
f
E
10
h
7
b
y
+
≥
(3.5.19)
Otherwise f
r
should be set to f
T
. f
T
may be obtained from
section 3.9.
2
2
2
1
E
L
t
)
-
12(1
E
C
f
⎟
⎠
⎞
⎜
⎝
⎛
=
ν
π
(3.5.20)
where
(
)
⎟
⎟
⎟
⎠
⎞
⎜
⎜
⎜
⎝
⎛
+
−
+
+
+
=
B
α
1
B
α
B
α
+
1
L
Z
0.27
1
α
1
B
α
1
2
1
C
(3.5.21)
2
2
L
1
t
r
L
Z
ν
−
=
(3.5.22)
( )
3
h
2
B
t
I
1
12
α
l
ν
−
=
(3.5.23)
t
eo
R
A
α
l
=
(3.5.24)
⎟
⎠
⎞
⎜
⎝
⎛
−
⎟⎟
⎠
⎞
⎜⎜
⎝
⎛
−
=
2
1
1
C
C
1
r
r
i
z
1
2
eo
f
2
h
0
t
ν
δ
µ
l
l
(3.5.25)
0.005r
0
δ
=
(3.5.26)
t
A
I
i
eo
R
h
2
h
l
+
=
(3.5.27)
Amended April 2005
see note on front cover
14
Recommended Practice DNV-RP-C202
October 2002
D
ET
N
ORSKE
V
ERITAS
z
t
= distance from outer edge of ring flange to centroid
of stiffener inclusive effective shell plating, see
Figure 1.2-1.
L
2
Z
27
.
0
1
2
C
+
=
(3.5.28)
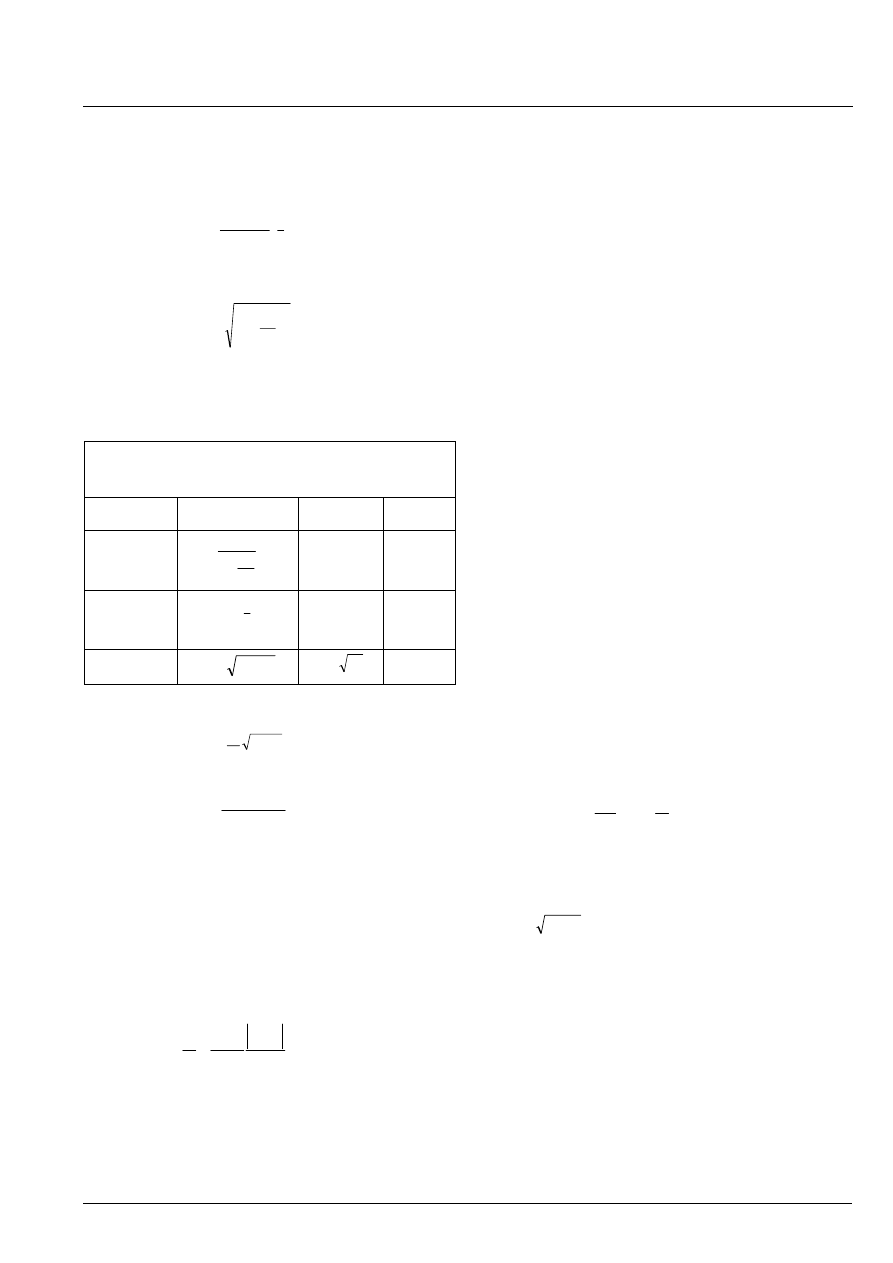
L = distance between effective supports of the ring
stiffened cylinder. Effective supports may be:
• End closures, see Figure 3.5-1a.
• Bulkheads, see Figure 3.5-1b.
• Heavy ring frames, see Figure 3.5-1c.
The moment of inertia of a heavy ring frame has to comply
with the requirement given in section 3.5.2.2 with I
x
, I
xh
and
I
h
defined in eq. (3.5.5), (3.5.7) and (3.5.8) and with l
substituted by L
H
, which is defined in Figure 3.5-1d.
a.
b.
c
d.
Figure 3.5-1 Definition of parameters L and L
H
3.6 Longitudinally stiffened shells
3.6.1 General
Lightly stiffened shells where
t
r
3
t
s >
will behave basically
as an unstiffened shell and shall be calculated as an
unstiffened shell according to the requirements in Section
3.3.2.
Shells with a greater number of stiffeners such that
r/t
3
s/t
≤
may be designed according to the requirements
given below or as an equivalent flat plate taking into account
the design transverse stress, normally equal to p
Sd
r/t.
The buckling modes to be checked are:
a) Shell buckling, see Section 3.6.2
b) Panel stiffener buckling, see Section 3.6.3
e) Column buckling, see Section 3.8.
3.6.2 Shell buckling
The characteristic buckling strength is found from Section
3.2 and the elastic buckling strengths are given in 3.3.2.
3.6.3 Panel stiffener buckling
3.6.3.1 General
The characteristic buckling strength is found from Section
3.2. It is necessary to base the strength assessment on
effective shell area. The axial stress
σ
a,Sd
and bending stress
σ
m,Sd
are per effective shell width, s
e
is calculated from
3.6.3.3.
Torsional buckling of longitudinal stiffeners may be
excluded as a possible failure mode if the following
requirements are fulfilled:
• Flat bar longitudinal stiffeners:
y
W
f
E
t
0.4
h
≤
(3.6.1)
• Flanged longitudinal stiffeners:
6
.
0
T
≤
λ
(3.6.2)
If the above requirements are not fulfilled for the
longitudinal stiffeners, an alternative design procedure is to
replace the yield strength, f
y
, with the torsional buckling
strength, f
T
, in all equations.
T
λ
and f
T
may be found in section 3.9.
Amended April 2005
see note on front cover
Recommended Practice DNV-RP-C202
15
October 2002
D
ET
N
ORSKE
V
ERITAS
3.6.3.2 Elastic buckling strength
The elastic buckling strength of longitudinally stiffened
cylindrical shells is given by:
2
2
2
E
t
)
-
12(1
E
C
f
⎟
⎠
⎞
⎜
⎝
⎛
=
l
ν
π
(3.6.3)
The reduced buckling coefficient may be calculated as:
2
ψ
ρξ
1
ψ
C
⎟
⎠
⎞
⎜
⎝
⎛
+
=
(3.6.4)
The values for
ψ, ξ and ρ are given in Table 3.6-1 for the
most important load cases.
Table 3.6-1 Buckling coefficients for stiffened
cylindrical shells, mode b) Panel stiffener
buckling
ψ
ξ
ρ
Axial stress
t
s
A
1
α
1
e
C
+
+
l
Z
702
.
0
0.5
Torsion and
shear stress
1/3
C
3
/
4
α
s
82
.
1
34
.
5
⎟
⎠
⎞
⎜
⎝
⎛
+
l
3/4
Z
856
.
0
l
0.6
Lateral
Pressure
(
)
C
α
1
1
2
+
+
l
Z
04
.
1
0.6
where
2
2
1
t
r
Z
ν
−
=
l
l
(3.6.5)
( )
3
sef
2
C
t
s
I
1
12
α
ν
−
=
(3.6.6)
A
= area of one stiffener, exclusive shell plate
I
sef
= moment of inertia of longitudinal stiffener
including effective shell width s
e
, see eq. (3.6.7).
3.6.3.3 Effective shell width
The effective shell width, s
e
, may be calculated from:
y
f
Sd
x,
Sd
j,
ks
f
s
e
s
σ
σ
=
(3.6.7)
where:
f
ks
= characteristic buckling strength from Section 3.3.2
/ 3.4.2.
σ
j,sd
= design equivalent von Mises stress, see eq. (3.2.3).
σ
x,Sd
= design membrane stress from axial force and
bending moment, see eq. (2.2.1)
f
y
=
yield
strength
3.7 Orthogonally stiffened shells
3.7.1 General
The buckling modes to be checked are:
a) Shell buckling (unstiffened curved panels), see Sec.
b) Panel stiffener buckling, see Sec. 3.6.
c) Panel ring buckling, see Sec. 3.7.3
d) General buckling, see Sec. 3.7.4
e) Column buckling, see Sec. 3.8
3.7.2 Shell buckling
The characteristic buckling strength is found from
Section 3.2 and the elastic buckling strengths are given in
Section 3.3.2.
3.7.3 Panel ring buckling
Conservative strength assessment following Section 3.5.2.
3.7.4 General buckling
The rings will normally be proportioned to avoid the general
buckling mode. Applicable criteria are given in Section 3.5.
3.8 Column buckling
3.8.1 Stability requirement
The column buckling strength should be assessed if
y
f
E
2,5
2
c
i
c
kL
≥
⎟
⎟
⎠
⎞
⎜
⎜
⎝
⎛
(3.8.1)
where
k =
effective
length
factor
L
C
= total cylinder length
i
C
=
C
C
/A
I
= radius of gyration of cylinder section
I
C
= moment of inertia of the complete cylinder section
(about weakest axis), including longitudinal
stiffeners/internal bulkheads if any.
A
C
= cross sectional area of complete cylinder section;
including longitudinal stiffeners/internal bulkheads
if any.
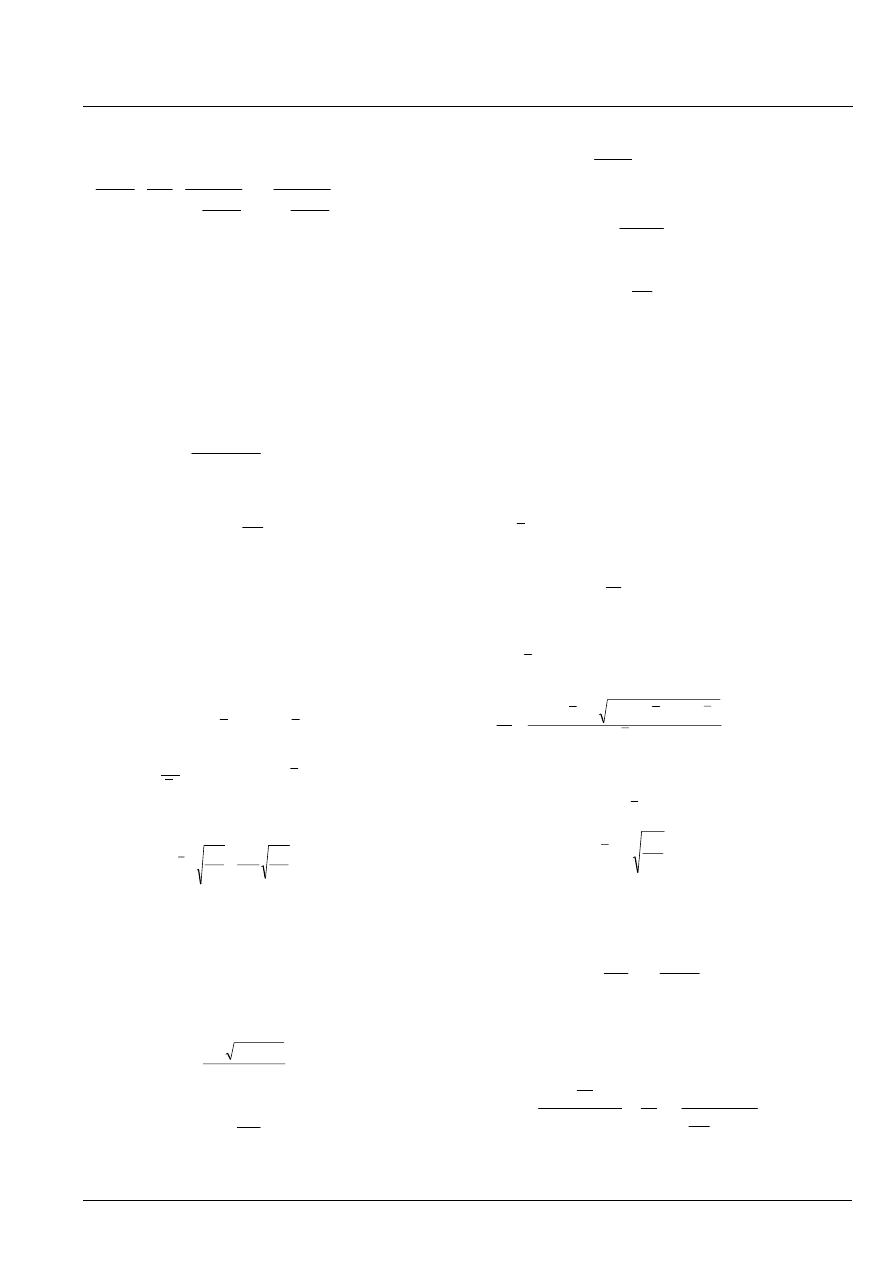
The stability requirement for a shell-column subjected to
axial compression, bending, circumferential compression is
given by:
Amended April 2005
see note on front cover
16
Recommended Practice DNV-RP-C202
October 2002
D
ET
N
ORSKE
V
ERITAS
1
0.5
2
E2
f
Sd
a0,
σ
1
Sd
m2,
σ
2
E1
f
Sd
a0,
σ
1
Sd
m1,
σ
akd
f
1
kcd
f
Sd
a0,
σ
≤
⎥
⎥
⎥
⎥
⎥
⎥
⎥
⎦
⎤
⎢
⎢
⎢
⎢
⎢
⎢
⎢
⎣
⎡
⎟⎟
⎟
⎟
⎟
⎟
⎠
⎞
⎜⎜
⎜
⎜
⎜
⎜
⎝
⎛
−
+
⎟⎟
⎟
⎟
⎟
⎟
⎠
⎞
⎜⎜
⎜
⎜
⎜
⎜
⎝
⎛
−
+
(3.8.2)
where
σ
a0,Sd
= design axial compression stress, see eq. (3.2.4)
σ
m,Sd
= maximum design bending stress about given
axis, see eq. (2.2.3)
f
akd
= design local buckling strength, see Section 3.8.2
f
kcd
= design column buckling strength, see eq. (3.8.4)
f
E1
,f
E2
= Euler buckling strength found from eq. (3.8.3):
2
,
1
i
,
c
A
2
i
c,
L
i
k
i
c,
EI
2
π
Ei
f
=
⎟
⎠
⎞
⎜
⎝
⎛
=
(3.8.3)
M
kc
kcd
γ
f
f
=
(3.8.4)
γ
M
= material factor, see eq. (3.1.3)
f
kc
= characteristic column buckling strength, see eq.
(3.8.5) or (3.8.6).
3.8.2 Column buckling strength
The characteristic buckling strength, f
kc
, for column buckling
may be defined as:
1.34
for
f
]
28
.
0
0
.
1
[
f
ak
2
kc
≤
−
=
λ
λ
(3.8.5)
1.34
for
f
9
.
0
f
ak
2
kc
>
=
λ
λ
(3.8.6)
where
E
ak
f
c
i
π
c
kL
E
f
ak
f
λ
=
=
(3.8.7)
In the general case eq. (3.1.1) shall be satisfied. Hence f
ak
may be determined (by iteration of equations (3.1.1) to
(3.2.6)) as maximum allowable
σ
a0,Sd
(
σ
a,Sd
) where the actual
design values for
σ
m,Sd
,
σ
h,Sd
and
τ
Sd
have been applied.
For the special case when the shell is an unstiffened shell the
following method may be used to calculate f
ak
.
2a
4ac
b
b
f
2
ak
−
+
=
(3.8.8)
2
Ea
2
y
f
f
1
a
+
=
(3.8.9)
Sd
h,
Eh
Ea
2
y
σ
1
f
f
2f
b
⎟⎟
⎟
⎠
⎞
⎜⎜
⎜
⎝
⎛
−
=
(3.8.10)
2
y
2
Eh
2
sd
h,
2
y
2
Sd
h,
f
f
σ
f
σ
c
−
+
=
(3.8.11)
M
ak
akd
γ
f
f
=
(3.8.12)
σ
h,Sd
= design circumferential membrane stress, see eq.
(2.2.8) or (2.2.9), tension positive.
f
y
= yield strength.
γ
M
= material factor, see eq. (3.1.3).
f
Ea
, f
Eh
= elastic buckling strengths, see Section 3.4.
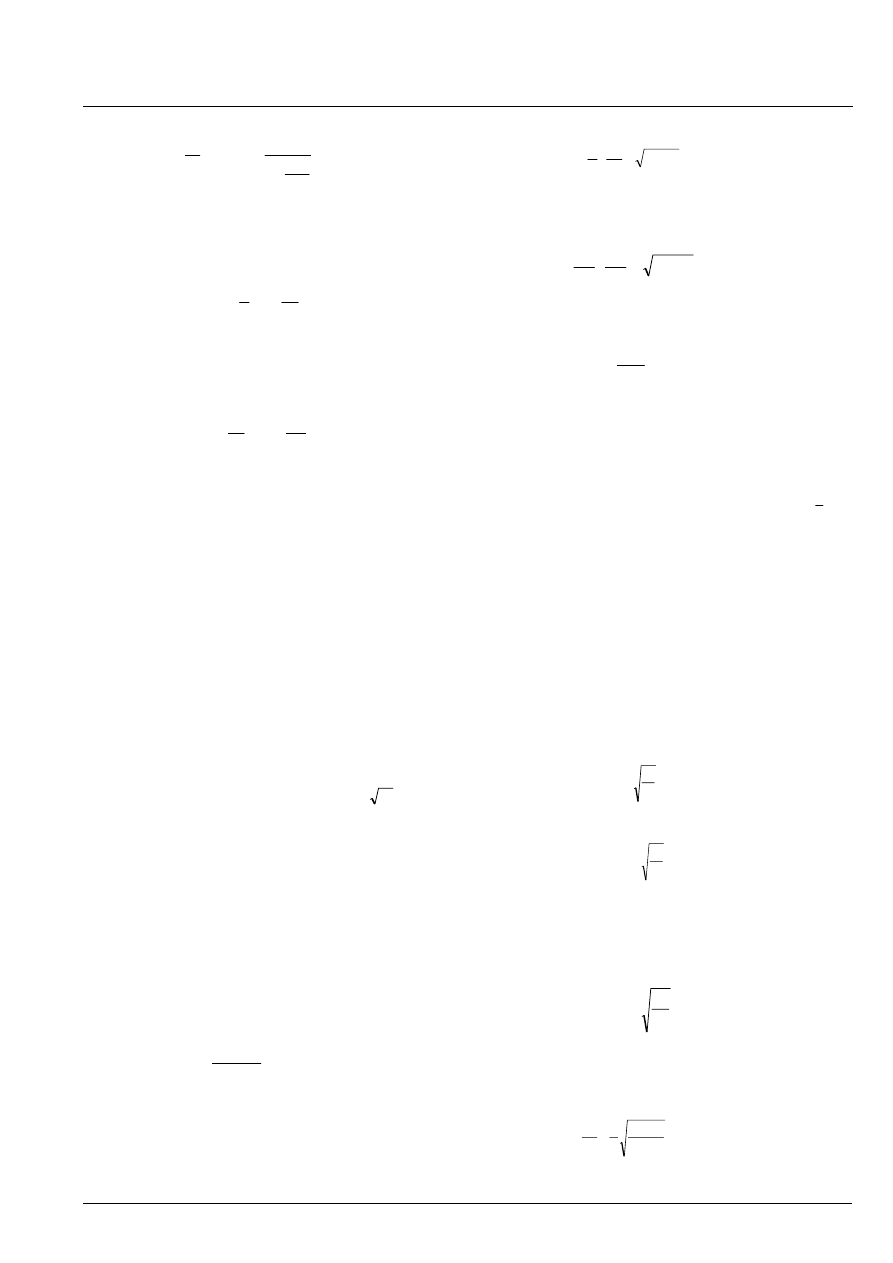
3.9 Torsional buckling
The torsional buckling strength may be found from:
• if
6
.
0
λ
T
≤
:
0
.
1
f
f
y
T
=
(3.9.1)
• if
6
.
0
λ
T
>
:
(
)
2
T
2
T
2
2
T
2
T
y
T
λ
2
λ
4
λ
µ
1
λ
µ
1
f
f
−
+
+
−
+
+
=
(3.9.2)
where:
(
)
6
.
0
λ
35
.
0
µ
T
−
=
(3.9.3)
ET
y
T
f
f
λ
=
(3.9.4)
Generally f
ET
may be found from:
2
T
po
z
2
s
2
po
t
ET
I
I
Eh
π
I
GI
β
f
l
+
=
(3.9.5)
For L and T stiffeners
f
ET
may, when eqs. (3.10.4) and
(3.10.5) are satisfied, be found from:
2
T
f
W
z
2
2
W
f
W
f
2
W
f
W
ET
A
3
A
EI
π
h
t
G
A
3
A
A
t
t
A
β
f
l
⎟
⎠
⎞
⎜
⎝
⎛
+
+
⎟
⎠
⎞
⎜
⎝
⎛
+
⎟⎟
⎠
⎞
⎜⎜
⎝
⎛
+
=
(3.9.6)
Amended April 2005
see note on front cover
Recommended Practice DNV-RP-C202
17
October 2002
D
ET
N
ORSKE
V
ERITAS
W
f
f
2
f
2
f
z
A
A
1
A
e
b
A
12
1
I
+
+
=
(3.9.7)
For flat bar ring stiffeners
f
ET
may be found from:
2
w
ET
h
t
G
r
h
2
.
0
β
f
⎟
⎠
⎞
⎜
⎝
⎛
⎥⎦
⎤
⎢⎣
⎡ +
=
(3.9.8)
For flat bar longitudinal stiffeners f
ET
may be found from:
2
w
2
T
ET
h
t
G
h
2
β
f
⎟⎟
⎠
⎞
⎜⎜
⎝
⎛
⎥
⎥
⎦
⎤
⎢
⎢
⎣
⎡
⎟⎟
⎠
⎞
⎜⎜
⎝
⎛
+
=
l
(3.9.9)
β =
1.0,
or may alternatively be calculated as per eq.
(3.9.10)
A
f
= cross sectional area of flange
A
W
= cross sectional area of web
G =
shear
modulus
I
po
= polar moment of inertia =
∫
dA
r
2
where r is
measured from the connection between the
stiffener and the plate
I
t
= stiffener torsional moment of inertia (St. Venant
torsion)
I
z
= moment of inertia about centroid axis of stiffener
normal to the plane of the plate
l
T
= for ring stiffeners:
distance (arc length) between tripping brackets.
l
T
need not be taken greater than
rh
π
for the
analysis;
for longitudinal stiffeners:
distance between ring frames
b =
flange
width
e
f
= flange eccentricity, see Figure 1.3-1
h =
web
height
h
s
= distance from stiffener toe (connection between
stiffener and plate) to the shear centre of the
stiffener
t =
shell
thickness
t
f
=
thickness
of
flange
t
W
=
thickness
of
web
0.2
C
0.2
3C
β
+
+
=
(3.9.10)
where:
• for longitudinal stiffeners
(
)
η
1
t
t
s
h
C
3
w
−
⎟⎟
⎠
⎞
⎜⎜
⎝
⎛
=
• for ring frames
(
)
η
1
t
t
h
C
3
w
0
−
⎟⎟
⎠
⎞
⎜⎜
⎝
⎛
=
e
l
and
ks
Sd
j,
f
σ
η
=
(3.9.11)
σ
j,Sd
may be found from eq. (3.2.3) and f
ks
may be calculated
from eq. (3.2.1) using the elastic buckling strengths from
Sections 3.3.2 or 3.4.2.
Ring frames in a cylindrical shell which is not designed for
external lateral pressure shall be so proportioned that the
reduced slenderness with respect to torsional buckling,
T
λ
,
is not greater than 0.6.
3.10 Local buckling of longitudinal stiffeners and
ring stiffeners
3.10.1 Ring stiffeners
The geometric proportions of ring stiffeners should comply
with the requirements given below (see Figure 1.2-1 for
definitions):
• Flat bar ring frames:
y
w
f
E
t
4
.
0
h ≤
(3.10.1)
• Flanged ring frames:
y
W
f
E
t
1.35
h
≤
(3.10.2)
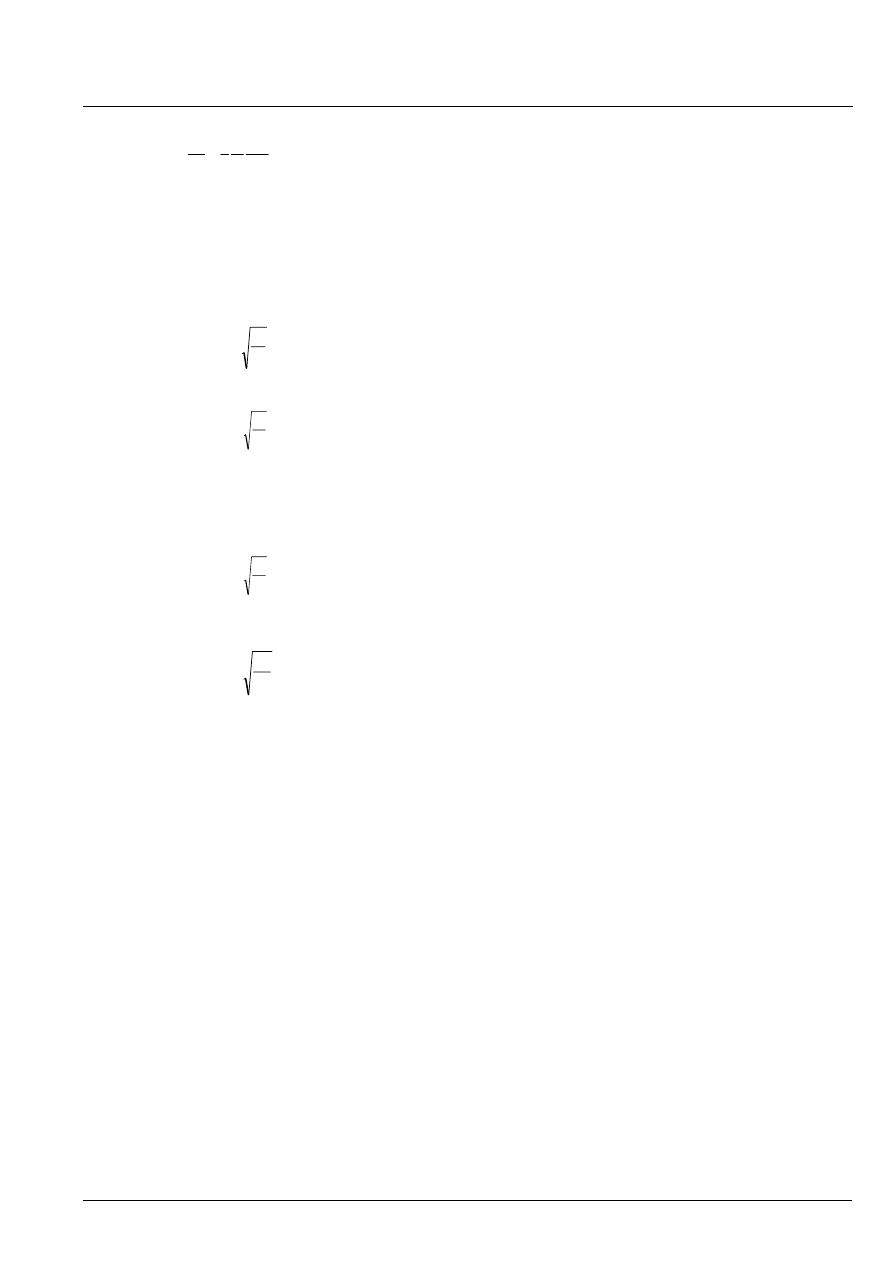
If the requirements in eqs. (3.10.1) and (3.10.2) are not
satisfied, the characteristic material resistance f
r
shall be
taken as f
T
(where f
T
is calculated in accordance with Section
3.9).
y
f
f
f
E
0.4t
b
≤
(3.10.3)
where:
b
f
= flange outstand
y
f
w
f
w
f
A
h
E
A
r
3
2
t
h ≤
(3.10.4)
Amended April 2005
see note on front cover
18
Recommended Practice DNV-RP-C202
October 2002
D
ET
N
ORSKE
V
ERITAS
f
w
f
w
f
A
A
h
r
3
1
t
e ≤
(3.10.5)
3.10.2 Longitudinal stiffeners
The geometric proportions of longitudinal stiffeners should
comply with the requirements given below (see Figure 1.3-1
for definitions):
• Flat bar longitudinal stiffeners:
y
w
f
E
t
4
.
0
h ≤
(3.10.6)
• Flanged longitudinal stiffeners:
y
W
f
E
t
1.35
h
≤
(3.10.7)
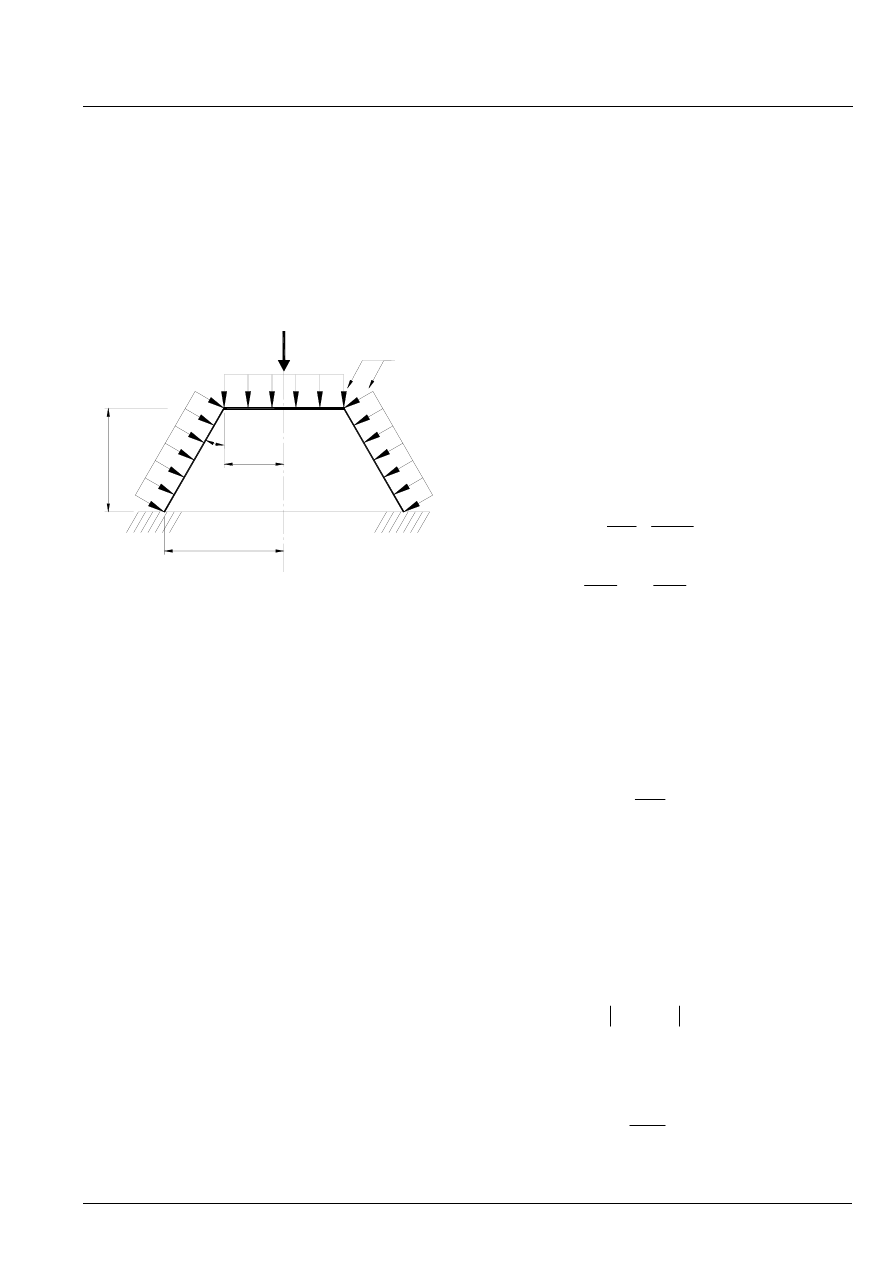
If the requirements in eqs. (3.10.6) and (3.10.7) are not
satisfied, the characteristic material resistance f
r
shall be
taken as f
T
(where f
T
is calculated in accordance with Section
3.9).
y
W
f
E
t
1.35
h
≤
(3.10.8)
y
f
f
f
E
0.4t
b
≤
(3.10.9)
Amended April 2005
see note on front cover
Recommended Practice DNV-RP-C202
19
October 2002
D
ET
N
ORSKE
V
ERITAS
4. Unstiffened Conical Shells
4.1 Introduction
This chapter treats the buckling of unstiffened conical shells,
see Figure 4.1-1.
Buckling of conical shells is treated like buckling of an
equivalent circular cylindrical shell.
N
Sd
p
Sd
r
1
r
2
l
α
Figure 4.1-1 Conical shell (force and pressure shown is
negative)
4.2 Stresses in conical shells
4.2.1 General
The loading condition governing the stresses in a truncated
conical shell, Figure 4.1-1, is normally defined by the
following quantities:
N
Sd
= design overall axial force exclusive of end
pressure
M
1,Sd
= design overall bending moment acting about
principal axis 1
M
2,Sd
= design overall bending moment acting about
principal axis 2
T
Sd
= design overall torsional moment
Q
1,Sd
= design overall shear force acting parallel to
principal axis 1
Q
2,Sd
= design overall shear force acting parallel to
principal axis 2
p
Sd
=
design
lateral
pressure
Any of the above quantities may be a function of the co-
ordinate x along the shell generator. In addition p
Sd
may be a
function of the circumferential co-ordinate
θ, measured from
axis 1. p
Sd
is always to be taken as the difference between
internal and external pressures, i.e. p
Sd
is taken positive
outwards.
The membrane stresses at an arbitrary point of the shell
plating, due to any or all of the above seven actions, are
completely defined by the following three stress components:
σ
x,Sd
= design membrane stress in the longitudinal
direction
σ
h,Sd
= design membrane stress in the circumferential
direction
τ
Sd
= design shear stress tangential to the shell surface
(in sections x = constant and
θ = constant)
The loading condition and axes are similar as defined for
cylindrical shells in Figure 1.1-1.
4.2.2 Longitudinal membrane stress
If simple beam theory is applicable, the longitudinal
membrane stress may be taken as:
Sd
m,
Sd
a,
Sd
x,
σ
σ
σ
+
=
(4.2.1)
where
σ
a,Sd
is due to uniform axial compression and
σ
m,Sd
is
due to bending.
For a conical shell without stiffeners along the generator:
e
Sd
e
Sd
Sd
a,
t
r
2
N
t
2
r
p
σ
π
+
=
(4.2.2)
θ
π
θ
π
cos
t
r
M
sin
t
r
M
σ
e
2
Sd
2,
e
2
Sd
1,
Sd
m,
−
=
(4.2.3)
where
t
e
= t cos
α
4.2.3 Circumferential membrane stress
The circumferential membrane stress may be taken as:
e
Sd
Sd
h,
t
r
p
σ
=
(4.2.4)
where
t
e
= t cos
α
4.2.4 Shear stress
If simple beam theory is applicable, the membrane shear
stress may be taken as:
Q,Sd
T,Sd
Sd
τ
τ
τ
+
=
(4.2.5)
where
τ
T,Sd
is due to the torsional moment and
τ
Q,Sd
is due to
the overall shear forces.
t
r
π
2
T
τ
2
Sd
Sd
T,
=
(4.2.6)
Amended April 2005
see note on front cover

20
Recommended Practice DNV-RP-C202
October 2002
D
ET
N
ORSKE
V
ERITAS
sinθ
t
r
π
Q
cosθ
t
r
π
Q
τ
Sd
2,
Sd
1,
Sd
Q,
+
−
=
(4.2.7)
where the signs of the torsional moment and the shear forces
must be reflected.
4.3 Shell buckling
4.3.1 Buckling strength
The characteristic buckling strength of a conical shell may be
determined according to the procedure given for unstiffened
cylindrical shells, Section 3.4.
The elastic buckling strength of a conical shell may be taken
equal to the elastic buckling resistance of an equivalent
unstiffened cylindrical shell defined by:
α
cos
2
r
r
r
2
1
e
+
=
(4.3.1)
α
cos
e
l
l
=
(4.3.2)
The buckling strength of conical shells has to comply with
the requirements given in Section 3.4 for cylindrical shells.
In lieu of more accurate analyses, the requirements are to be
satisfied at any point of the conical shell, based on a
membrane stress distribution according to Section 4.2.
Amended April 2005
see note on front cover
Document Outline
- Introduction
- Stresses in Closed Cylinders
- Buckling Resistance of Cylindrical Shells
- Stability requirement
- Characteristic buckling strength of shells
- Elastic buckling strength of unstiffened curved panels
- Elastic buckling strength of unstiffened circular cylinders
- Ring stiffened shells
- Longitudinally stiffened shells
- Orthogonally stiffened shells
- Column buckling
- Torsional buckling
- Local buckling of longitudinal stiffeners and ring stiffener
- Unstiffened Conical Shells
Wyszukiwarka
Podobne podstrony:
Evaluating interface strength of calcium phosphate sol
Greg Bear Strenght of stones
Annmarie Mckenna The Strength Of Three
spinoza, benedict de the ethics 4 of human bondage or the strength of the emotions
Levin, cross the strength of weak ties you can trust
Strength of British English accents in altered listening conditions
Coming Out of Shells
Friedkin A test of structural features of Granovetter s strength of weak ties theory
Andrew Jackson Strengthening of American Nationalism doc
The Silent Strength of Stones Nina Kiriki Hoffman
cohen the strength of weak ties summary
Bond strength of binary
Effect of Kinesio taping on muscle strength in athletes
Buckling of Rail Car Tank
Kinesiotherapy is the application of scientifically?sed exercise principles?apted to enhance the str
więcej podobnych podstron