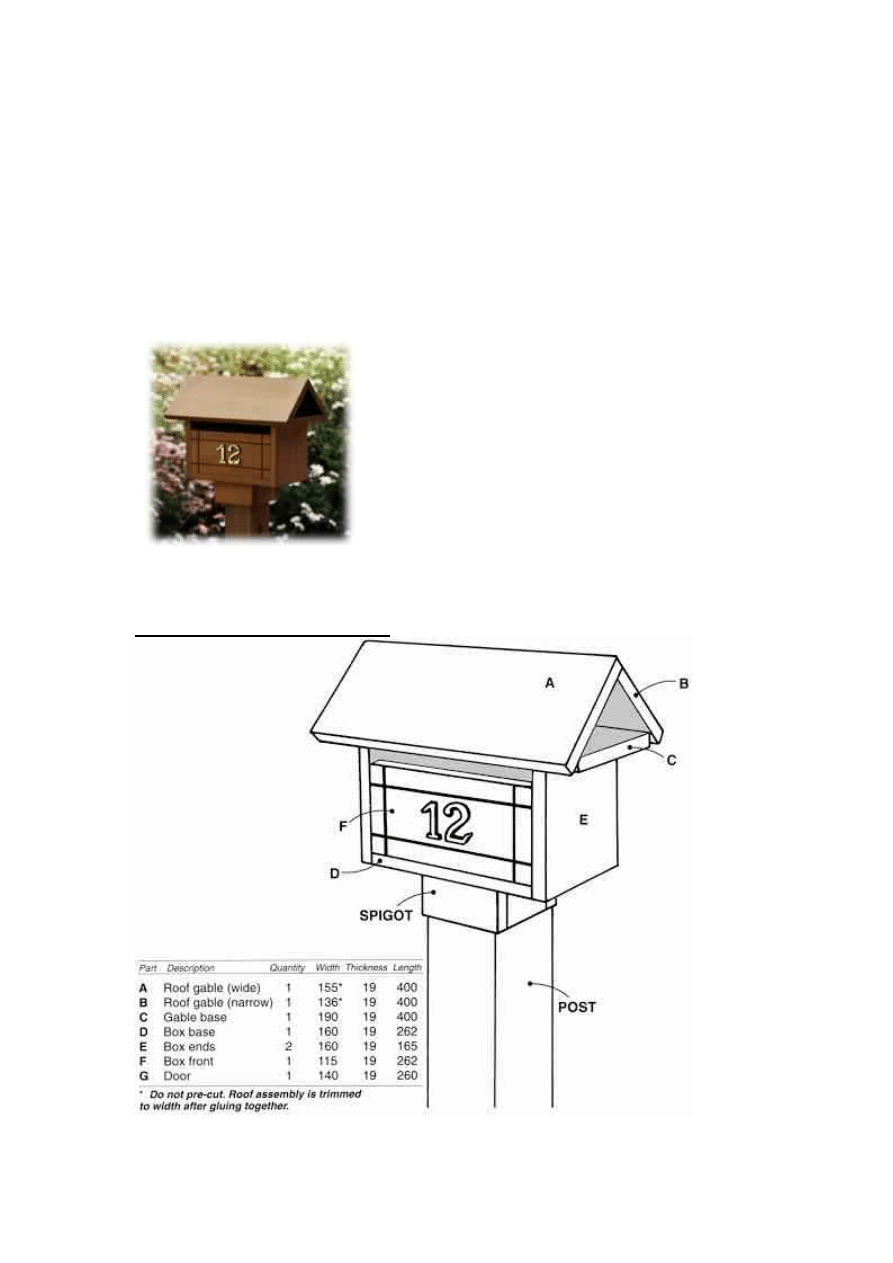
Wooden Letter Box
This letter box appeals because of its simple, yet effective design. The roof overhang protects
your mail from the weather, and the gable opening is large enough for most newspapers.
Because letter boxes usually occupy a prominent position in the garden, you may feel that it is
worthwhile to use good quality timber and take extra care in its construction.
This is a good project for the inexperienced woodworker, and makes use of the Triton
Workcentre's ability to rip and crosscut accurately. Bevel-cutting in the crosscut mode is also
necessary, and is explained in detail.
Component Specifications
All dimensions are in mm.

Tool Requirements
1. ESSENTIAL Triton Workcentre and your power saw; Bevel Cutting Platform ; Electric drill
and 6mm Triton Woodbit (or 1/4" dowelling bit and use 1/4" dowel); hammer; nail punch;
square; measuring tape; sandpaper.
1. USEFUL Length gauge on workstops; clamps to hold workpieces while gluing.
Construction Details
Material Shopping List
1. WOOD A durable timber is essential for something which will be outside in all weathers.
Dressed treated pine is often available; other durable timbers depend on local availability.
We used Western Red Cedar, which is both widely available, and attractive.
Shop for: 190 x 19 -1 @ 1.2m
1 @ 1.5m
Two small lengths of 6mm hardwood dowel are used for the hinges - about 150mm in total
length is more than sufficient.
2. FASTENING We used both Selleys waterproof resorcinol glue and 25mm x 2mm
galvanised nails to ensure our box remained solid. If screws are used they should be brass or
stainless steel, in countersunk holes. An alternative glue is two-pack waterproof epoxy.
3. OTHER Small knob or handle for the door; cupboard catch or small hasp or staple; post or
fence mountings as required. A letter box is also a convenient place to have a house or lot
number displayed.
4. FINISHING It is desirable that a quality outdoor finish or paint is used. If you wish to show
the grain of your timber one of the UV stabilised exterior finishes such as Cabot's Clearcoat
will give good results.
General Points
1. Readers of broadsheet newspapers may like to make the gable section a little longer (you
would need to purchase a longer length than 1.2m for the gable components); however, note
that a 235mm saw limits to 450mm the length of bevel that can be crosscut in the Workcentre.
Do not attempt the bevel cut without firmly nailing the workpiece down as described in Step 3.
2. As letter box locations and their mounting requirements vary widely, determine what
mounting system you will use before finally assembling the box - for example drilling holes for
coach screws in the base. On our example we used a hollow "spigot" of cedar to mount the
box on to a square post.
1
With the Workcentre in the crosscut mode trim off the rough ends of your material and
then cut
three pieces (A, B, C) to 400mm from the 1.2m length. (Note: timber is usually
supplied a little oversize; if your piece is less than 1212mm long, cut it into three equal pieces,
not forgetting to allow for the thickness of the saw kerfs.)
A length gauge fitted to your workstops helps to maintain accuracy.
2
Measure, mark and cut from the remaining material: 2 pieces (D,F) at 262mm, 1 piece (G)
at 260mm, and 2 pieces (E) at 165mm. The remaining offcut can be used to make a mounting
spigot, for post mounted letter boxes.
3
A 45 degree bevel now has to be cut on both long edges of one of the roof pieces cut in
Step 1. This will form the gable base of the letter box, (component C) on which the pitched
roof rests. A bevel cutting platform is necessary for this. Ensure that a test cut and score line
are made exactly as in the instructions. If you already have a platform, set your saw to 45
degrees and, if necessary, make test cuts on scrap to check the accuracy of your angle.
Remove the platform from your Workcentre.
4
The piece to be bevelled is nailed to the
bevel cutting platform for each cut, as it would
be unsafe to try and hold it in place by hand.
Place the edge to be bevelled 5mm away
from the edge of the score line, and parallel to
it (see Figure 1).
Partially drive in two small nails to hold the
workpiece in place. Place the nails well in
from the ends so that the nail holes will be
hidden inside the roof space when the box is
assembled, and leave the nail heads
protruding to aid in removal.
5
Place the platform back on the
Workcentre table (you will have to lift the saw
chassis bearings out of the channels each
time to allow the platform to slide underneath.
Make sure that all the bearings are back in
the channels before cutting!).
Check by eye that the angled blade is going
to cut in ' approximately the right place - the
finished size is not absolutely critical - and
make the cut.
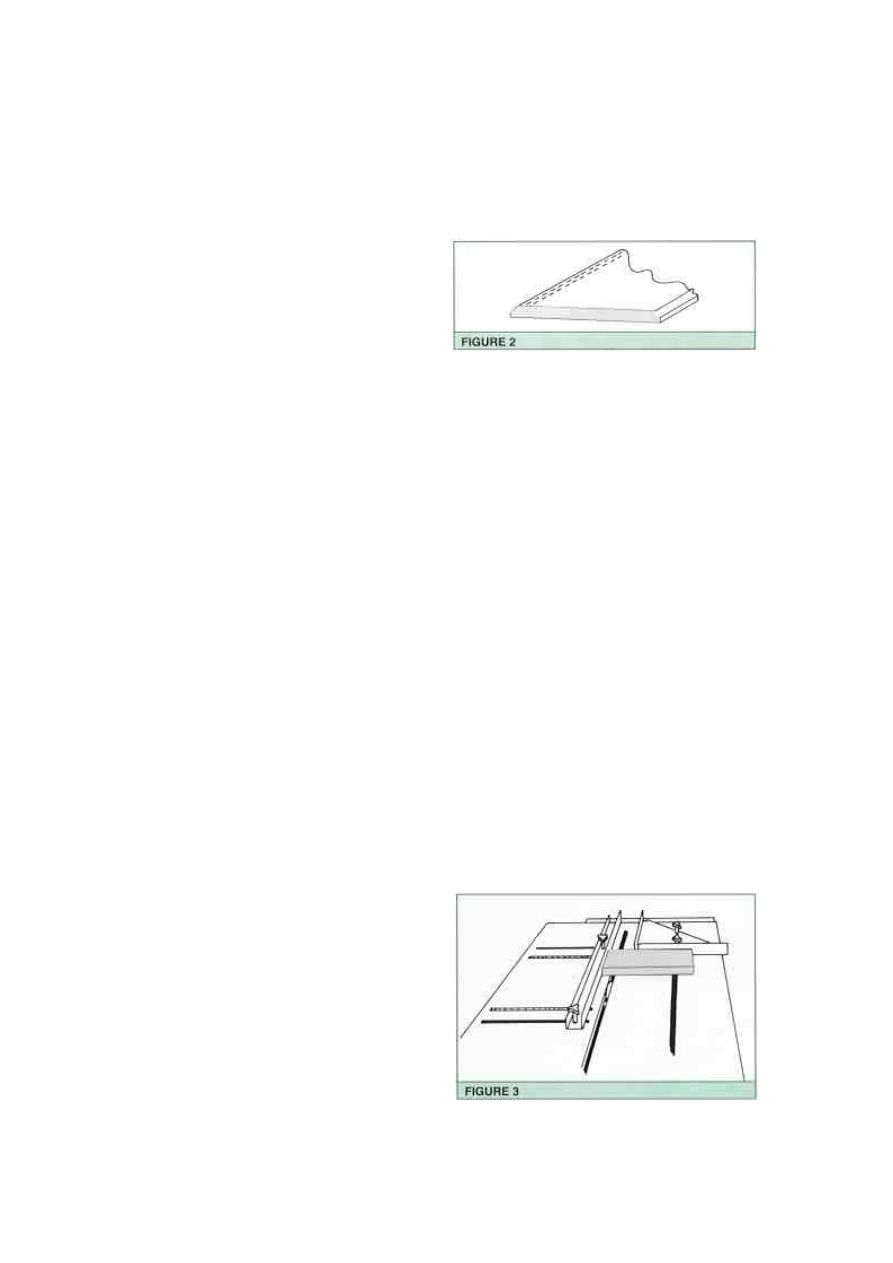
Ideally, the resulting bevel should not go all
the way through the thickness of the material,
because that would leave a thin, sharp edge
vulnerable to damage. The desired shape is
as shown in Figure 2. Do not worry if you end
up with a sharp edge, however, as you can
rip a fraction off later, if necessary.
6
After the first cut is made, lift the saw chassis out of the bearing channels at one end, and
remove the platform. Using a block of wood to lever against, remove the nails, turn the
workpiece around and renail the other long side in the same position, the same distance from
the score line.
Replace the platform, re-engage the saw chassis bearings, and make the second cut.
Remove the completed workpiece and set the Workcentre up in the tablesaw mode, with the
blade square to the table.
7
Set the fence to 160mm and rip one of the 262mm long pieces, (for the box base D)
andboth 165mm long pieces (box ends E) to 160mm wide. Reset the fence to 140mm and rip
the 260mm long piece for the door (G). Set the fence at 115mm and rip the remaining 262mm
long piece to width for the front (F).
8
If desired, decorative grooves can now be
made in components F and G. Remove the
riving knife and safety guard, and lower your
saw so that only about 2mm of the sawblade
is visible above the table. Set the fence to,
say, 25mm and pass components F and G
over the blade with each edge in turn against
the fence.
When grooving across the narrow dimension,
you may like to use the protractor to steady
the workpiece and to help hold the short edge
square against the fence. Figure 3 shows the
procedure.

Plan the position of the knob or handle on the
door before making the grooves, in case you
want to alter the suggested 25mm inset.
SAFETY NOTE:
This type of grooving cut prevents fitting of the safety guard. Although the blade is buried in
the material during the cutting it is fully exposed before and after the cut.
DO NOT TRAIL YOUR FINGERS BEHIND THE WORKPIECE.
9
The body of the box can now be glued and nailed together. Fit together both box ends (E)
overlapping the box base (D), with the front (F) between them. Ensure the box is square, and
leave to dry.
Also glue the two parts of the roof (A) and (B) together at the ridge with a butt joint, and
strengthen with nails or screws. The finished width of this assembly is trimmed later, when the
glue is dry.
Do not fit the top (gable base C) at this stage as access to the inside of the roof is still
required.
10
The next step is to fit the hinged door
(G). The door is hinged from the top so that
gravity will always close the door if it is left
open accidentally. Our hinge was made from
two short pieces of 6mm dowel, as follows.
Drill the upper side edges of the door (G) on
the centreline 10mm down from the top edge
(see Figure 4).
Use a 6mm woodbit and drill about 50mm
deep into the door. It is important that your
drilling is straight. A drill press helps, or ask
someone to sight your hand drill from the side
to ensure that you don't drill off line.
Drill the corresponding holes in the sides of
the box 14mm down from the top; if your
material is 19mm thick, then the centre of the
holes should be 9.5mm in from the front edge
of the box, so the door will close flush. Test fit
the door, which should have about 2mm
clearance at the bottom and 4mm at the top
to allow it to pivot. Do not push the dowel
pieces fully home or you will have difficulty
removing the door again.
Fit the catch or latch of your choice at this
stage.
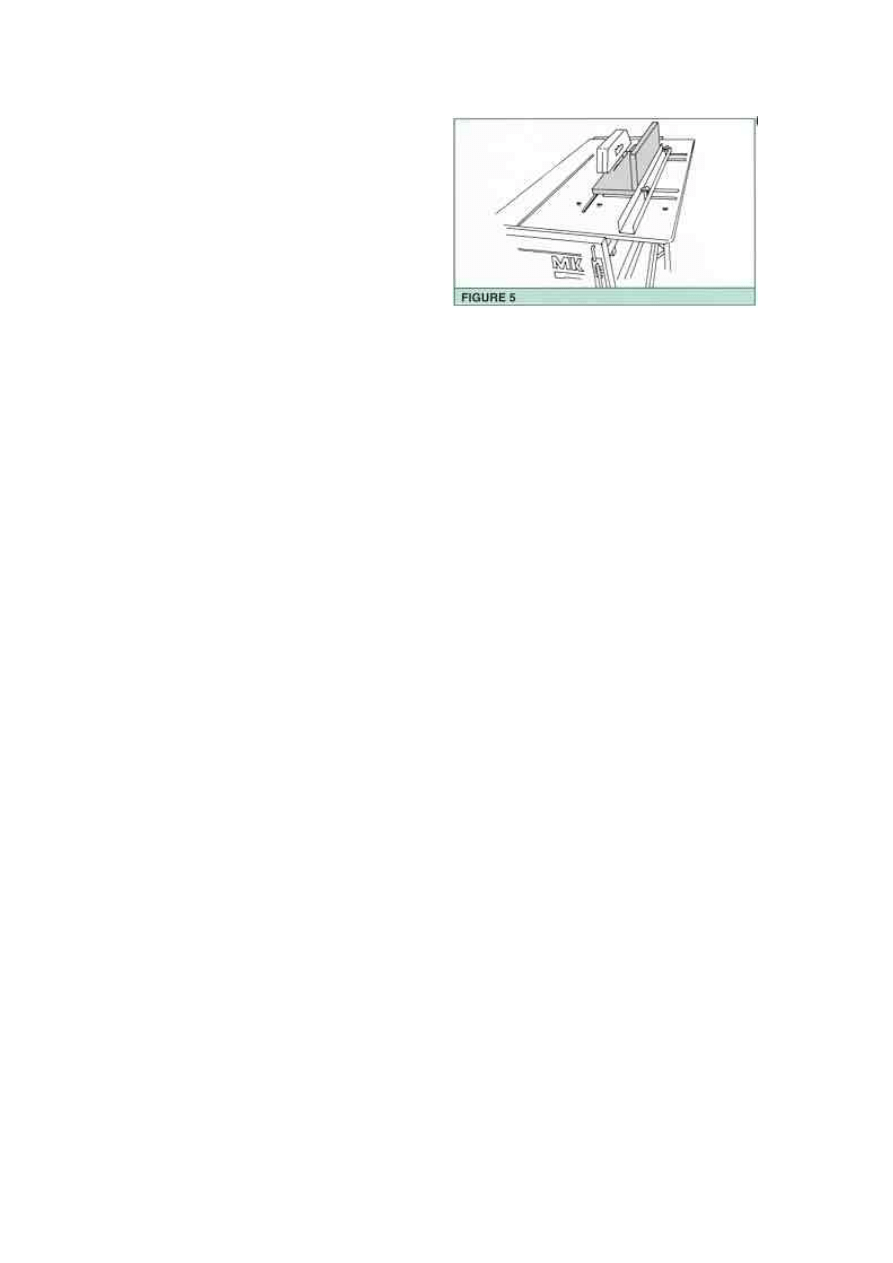
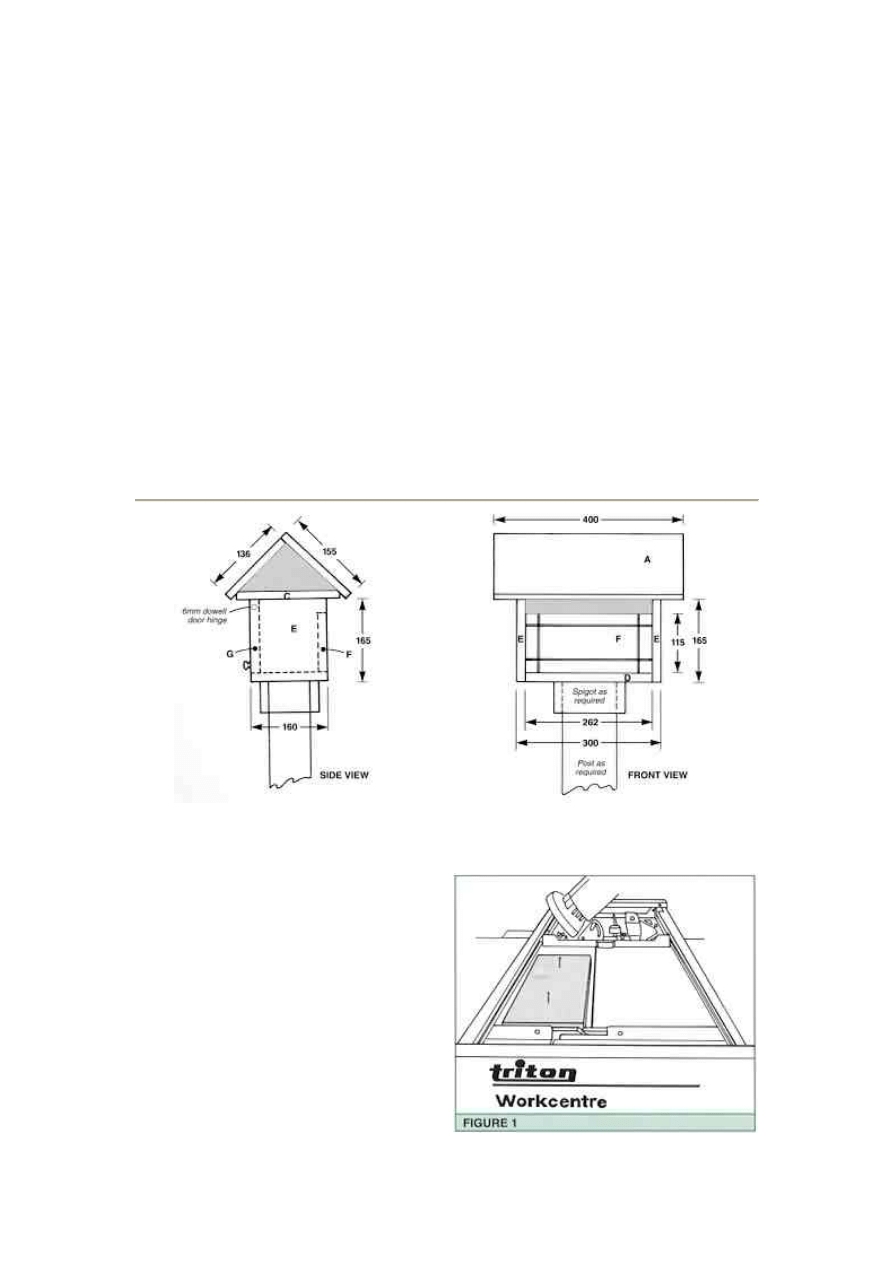
11
Place the assembled roof pieces over
the gable base (C) and check that the
specified distance from the ridge (155mm)
will just overlap the bevels. Too great an
overhang will partly cover the posting slot. If
all is well (i.e. you didn't cut too much off the
width when you were bevel cutting) then set
the fence to 155mm and rip both sides of the
roof to width (see Figure 5).
12
Coat both the inside and outside of the roof gable, both sides of the gable base (C),
and the inside of the box, with the finish of your choice before assembling the box any further.
However, be careful not to apply finish on the surfaces which are still to be glued (the
bevelled edges of the gable base C, the bottom inside edges of the roof itself, and the top
edges of the box).
13
Make provision for the mounting of your letter box at this stage. Our hollow spigot for
post mounting was simply made from pieces of scrap cedar ripped to 60mm wide, and butt-
jointed (glued and nailed) into a hollow box-shape which in i turn was screwed to the
underside of the letter box, drilling and countersinking from inside the box. The lengths of the
long sides of the spigot were 128mm, and the short sides were 90mm long. This then simply
fits over a standard 90 x 90 treated pine post, and is secured with a single large screw
through the back of the spigot into the post.
14
The letter box can now be finally assembled 1with glue and nails. Fit the door, and
drive the dowels a short distance into the door. Coat the last 19mm of the dowels with glue
and fully tap them home; this ensures that the door will rotate on the dowels rather than have
the dowels rotating in the sides of the box. If any dowel is left protruding it can be trimmed off
later with a small handsaw and sanded flush.
15
Fit the gable base (C), ensuring it overlaps evenly at the sides and ends. Glue and nail
it into place onto the box ends (E). Fill these nail holes and the nail holes left from the
bevelling operation with a suitable putty if you wish. Coat the bevels with glue and carefully
lower the roof into place, ensuring that it sits squarely, and leave to dry. When dry, turn the
box upside down and carefully drive in two angled nails on each side up through the
underside of the gable base C into the roof, for further security.
16
The box is now fully assembled, and all that
remains is to scrape and sand away any
excess glue, putty any nail holes and fine-sand the outside surfaces. Add at least two coats of
your chosen finish and when dry, fit the knob or handle and your house number if desired. A
cupboard catch will act as a door stop as well as holding the door shut; if you are using a
hasp and staple then you may wish to add a small wooden stop block to the inside base, to
prevent the door from being pushed inwards.
You should now have a well-made and durable letter box you will be proud to display to all
who pass.
Wyszukiwarka
Podobne podstrony:
letter box image
Wooden Box
davenport lyons letter
BHP E LETTER specjalisty ds bhp 2006 2008(1)
picket window box
inforaml letter
christmas box
Back To School Letter
lined portrait letter narrow
DiagLab UkładKrzepnięcia 2 BOX
Mail Smart Mailbox(Inteligentne skrzynki pocztowe)
horse creep box
Ortopedia Egzamin 2012 BOX
Outlook to Unix Mailbox
gift box a p
więcej podobnych podstron