1
1
1
2
2
2
3
3
4
3
2
1
1
2
3
4
5
1
2
3
8
7
8
BEADING BASICS: STITCHES
|
2006
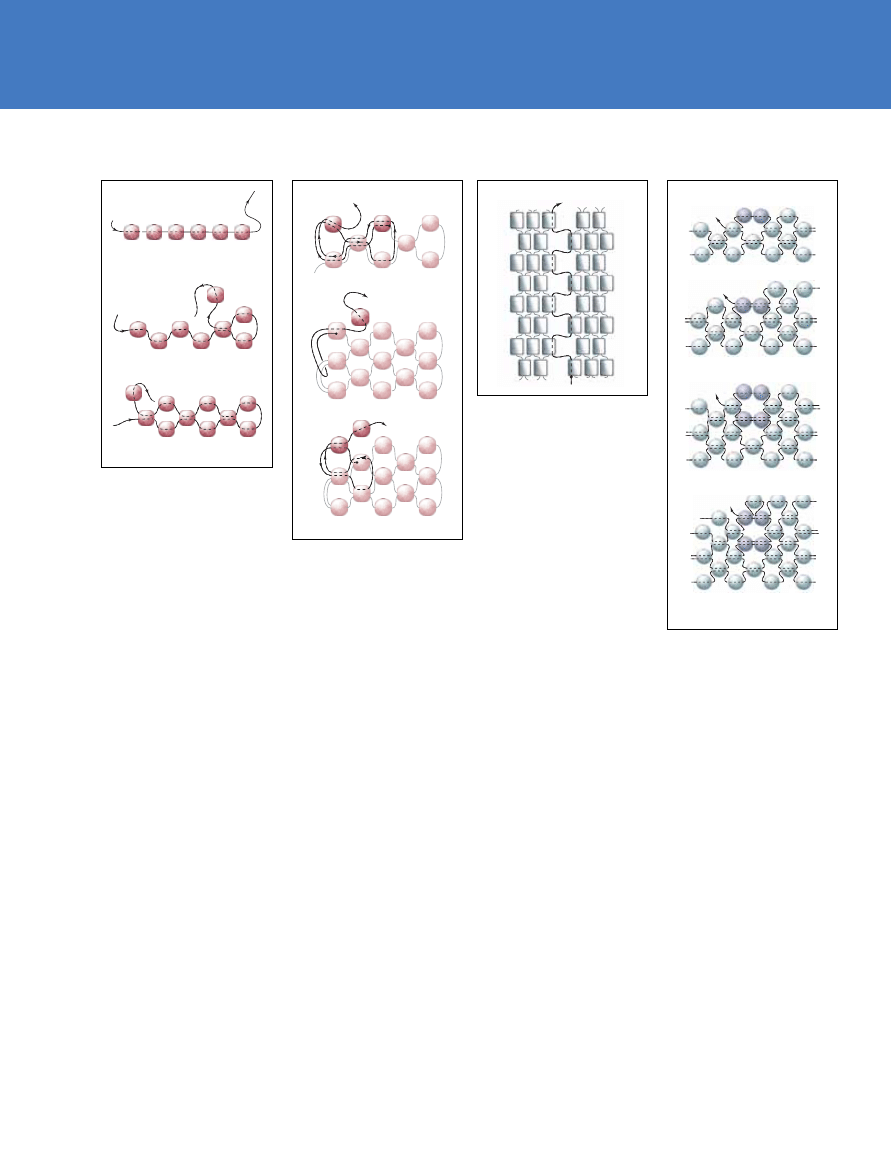
Peyote Stitch Basics
Flat, even-count peyote
1 Pick up an even number
of beads. These beads
become the first two rows.
2 To begin row 3, pick up a
bead, and go through the
second bead from the end.
(As you stitch, every other
bead drops down half a
space to form row 1.) Pick
up a bead, and go through
the fourth bead from the
end. Continue across the
row. End by going through
the first bead picked up.
To count peyote rows,
count the edge beads in a
zigzag pattern.
3 To start row 4 and all
other rows, pick up a bead,
and go through the last
bead added on the previous
row. To end a thread,
weave through the work in
a zigzag path several times
to secure the tail. Begin a
new thread the same way,
exiting the last bead added
in the same direction to
resume.
Flat, odd-count peyote
1 Begin as for flat, even-
count peyote, but pick up
an odd number of beads.
Work row 3 as in even-
count, stopping before
adding the last two beads.
Work a figure 8 turn at
the end of row 3 as shown:
String the next-to-the-last
bead (#7), and go through
#2, then #1. String the last
bead (#8), and go through
#2, #3, #7, #2, #1, and #8.
This will position you to
start row 4.
2 You can work this turn
at the end of each odd-
numbered row, but this
edge will be stiffer than the
other. Instead, in subsequent
odd-numbered rows, string
the last bead of the row,
then loop through the edge
thread immediately below.
Go through the last bead to
begin the new row.
3 Stitch the turn at the end
of even-numbered rows as
shown.
Zipping up or joining
flat peyote
To join two sections of a flat
peyote piece invisibly, match
up the two pieces so the
edge beads fit together. “Zip
up” the pieces by zigzagging
through the up-beads on
both edges.
Gradual increase
1 The gradual increase
takes four rows. At the
point of the increase, pick
up two thinner beads. Go
through the next up-bead.
2 On the second row of the
increase, when you get to
the two thinner beads,
stitch through them as if
they were one bead.
3 On the third row, place
two regular-sized beads
over the two thinner beads.
4 On the fourth row, go
through the first increase
bead, pick up a bead, and
go through the second
increase bead. Continue
across the row.
1
2
3
4
1
2
3
1
2
3

knot
Round 1
Round 2
Round 4
Round 3
BEADANDBUTTON.COM
9
Gradual decrease
1 The gradual decrease
takes four rows. At the
point of the decrease, go
through two up-beads.
2 On the second row of the
decrease, put two thinner
beads in the open space,
and go through the next
up-bead.
3 On the third row, go
through the two thinner
beads as if they were
one bead.
4 On the fourth row,
pick up one bead, and go
through the next up-bead.
Rapid increase
1 At the point of the
increase, pick up two beads
instead of one. Go through
the next bead.
2 When you reach the two
beads on the next row, go
through the first bead, add
a bead, and go through the
second bead.
Rapid decrease
1 At the point of the
decrease, go through two
beads on the previous row.
2 On the next row, when
you reach the two-bead
space, pick up one bead.
Two-drop peyote
Work two-drop peyote
stitch the same as basic
peyote, but treat pairs of
beads as if they were
single beads.
1 Start with an even
number of beads divisible
by four.
2 Pick up two beads (stitch
1 of row 3), skip two beads,
and go through the next
two beads. Repeat across
the row.
Tubular or circular
even-count peyote
1 Pick up an even number
of beads to equal the
desired circumference.
Knot the thread to form a
ring, leaving some slack.
2 Put the ring over a form if
desired. Go through the first
bead to the left of the knot.
Pick up a bead, skip a bead
on the previous round, and
go through the next bead.
Repeat around until you’re
back at the start.
3 Since you started with an
even number of beads, you
need to step up to be in
position to start the next
round. Go through the first
beads on rounds 2 and 3.
Pick up a bead, and go
through the second bead
on round 3; continue.
4 If you begin with an odd
number of beads, you won’t
need to step up. The beads
form a continuous spiral.
4
1
2
3
1
2
3
1
2
2
1
2
1
Wyszukiwarka
Podobne podstrony:
Peyote stitch
Peyote Stitch Bail Patterns
bead&button pearls add pizazz to a peyote stitch bangle
Basics Bead Stitch Orientation
Stitch Two Bead Peyote
Stitch Odd Count Two Bead Peyote
Brick Stitch or Flat Peyote Graph Paper (for Oval Seed Beads)
Brick Stitch or Flat Peyote Graph Paper
Cross Stitch DMC Chocolate time XC0165
2009 11 17 arduino basics
Pattern Peyote Little Mouse Amulet
LV Basics I (2)
Excel VBA Course Notes 1 Macro Basics
Pattern Peyote Tiny Ladybug Earrings
CATIA V5 Training Basics
AT2H Basics Hindu Culture Part 2
AT2H Basics Education in Ancient India
Basics I
więcej podobnych podstron