
1
©
H
O M E
C
O M P O S T I N G
W
HAT
I
S
C
OMPOSTING
?
Composting is controlling the natural decay of organic matter in a moist,
aerobic (oxygen-demanding) environment. Tiny organisms (mainly
bacteria, fungi, and protozoa) break down garden and landscape trim-
mings to create a valuable product called compost—a dark, crumbly,
earthy-smelling form of decomposed organic matter.
By composting, you
control the natural decomposition process by provid-
ing the right conditions for composting critters to convert yard trimmings
into a product that can be returned to your landscape and garden.
W
HY
S
HOULD
I M
AKE
C
OMPOST
?
Composting is a practical and convenient way to handle yard trimmings.
It is easier and cheaper than bagging or removing them from your prop-
erty. The compost created from trimmings enriches your soil and plants.
If you have a garden, a lawn, trees, shrubs, or even houseplants, you have
a use for compost.
Compost improves your soil. When added to soil, compost breaks up
heavy clay soils, helps sandy soils retain water and nutrients, and releases
essential nutrients. Compost also contains beneficial microscopic organ-
isms that build up the soil and make nutrients available to plants. Improv-
ing your soil is the first step towards growing healthy plants.
W
HAT
C
AN
I C
OMPOST
?
Organic trimmings from your garden and landscape such as fallen leaves,
grass clippings, flowers, and the remains of garden plants make excellent
compost. Kitchen scraps, such as fruit and vegetable peels and trimmings,
crushed eggshells, tea bags, coffee grounds and filters can also be
composted. Woody yard trimmings can be run through a shredder for
composting, mulching, or for creating paths and walkways.
R
ECYCLING
Y
ARD
T
RIMMINGS
:
Information Leaflet 48 Rev. May 1996
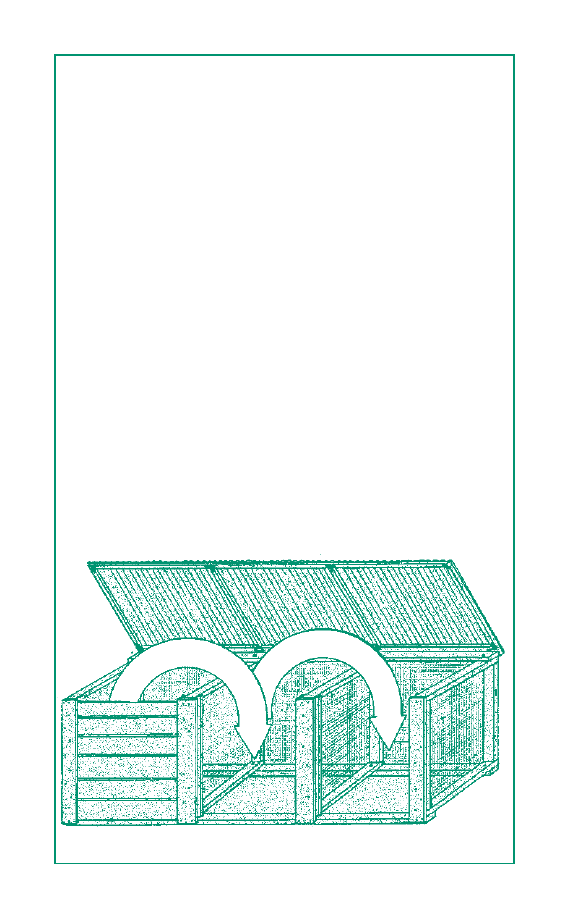
2
Three-bin wooden turning unit.
Organic materials that should not be added to your compost pile include
meat, bones, and fatty foods (such as cheese, salad dressing, and leftover
cooking oil), and pet litter. Most pests, such as weeds, diseased or insect-
infested plants, are destroyed in "fast" composts where the temperature in the
center reaches 120
°
to 140
°
F and the organic wastes are efficiently mixed
into the center of the pile.
H
OW
C
AN
I U
SE
C
OMPOST
?
Mix compost with soil to enrich the flower and vegetable garden, use it to
improve the soil around trees and shrubs, or use it as a mulch. Screen
compost by separating the larger particles and any uncomposted materials
from the finer ones and add it to the potting mix for houseplants (no more
than one-quarter to one-third by volume of the potting mix should be
compost) or use as a topdressing for lawns. For potting mixes, compost
should make up no more than one-fourth to one-third of the volume of the
mix. Compost “tea” can be made by soaking compost in a burlap or
cheesecloth sack steeped in water. The weak nutrient solution can be given
to young plants.
B
UILDING
A C
OMPOST
P
ILE
There are no set rules when building a compost pile. It is important that you
site your compost pile on a level surface. This will reduce the chances for
nutrients to runroff. Pay attention to the “Essentials” (see panel 4) and use
good judgment and common sense. The following two recipes should help
you create a “fast” or “slow” compost pile.

3
"Fast" Compost Recipe
A fast compost is labor intensive and requires a lot of turning. This method
can produce compost in a couple of months or less. Consider using a
"turning" unit that offers easy access to the organic materials. Units may be
constructed of wood, wood and wire, or concrete blocks.
Ingredients
Greens and Browns (shredded)
Water
Garden soil (optional)
Pitchfork
Tarp or cover (optional)
Hotbed thermometer
Start your pile with a layer of browns. Next, add a layer of greens. If the
greens are not very fresh, sprinkle in some blood meal or cottonseed meal,
poultry manure, or other nitrogen source. Sprinkle the materials with water
if they are dry. Mix the two layers together so the microorganisms can feed
on them together. Since microorganisms are present on all compost pile
ingredients, it may not be necessary to add garden soil. However, adding a
layer of garden soil, old compost or manure to each brown-green layer will
introduce more critters to speed up the process.
Continue adding and mixing layers of greens and browns until you fill the
bin or run out of materials. Make the top of the pile slanted to the center to
catch rainfall. At times you may want to cover your pile with a plastic
covering or tarp to regulate the amount of moisture entering your pile. The
cover should not rest on the pile because it may cut off oxygen.
Periodically check the moisture content of your pile. The compost should
feel damp, and you should be able to squeeze out a drop or two of liquid.
Checking the temperature and using a calendar are two methods of monitor-
ing your compost pile to help you judge when it should be turned.
1. Temperature. Using a hotbed (or long-stemmed) thermometer, check the
interior temperature of your pile at least 12 inches from the surface. It
should peak between 90
°
-140
°
F. When the temperature begins to fall, or
when it reaches 140
°
F, turn the pile. Take materials from the outer edges
and top of the pile and place them at the base and middle of the new pile;
those from the middle should be on the outside edges and top of the new
pile. (If you use a two- or three-bin unit, the yard wastes should be moved to
the second bin.)
Continue monitoring the temperature in the pile. The temperature will rise
again as long as there is still undecomposed material that needs to be broken
down. Once your turning causes no rise in temperature, your compost is
probably ready. Compost will be dark, crumbly, and will no longer look like
the original materials. (For three-bin units, move the compost to the third
bin.)
continued on panel 6
Surface Area
The more surface area the microorganisms have to work on,
the faster the materials will decompose. You can increase
the surface area of your yard trimmings by chopping them up with a
a shovel or running them through a shredding machine or
lawnmower.
Volume
A large compost pile will insulate itself and hold in the heat
created by the tiny organisms. Piles smaller than 3' x 3' x
3' (27 cubic feet) have trouble holding this heat, while piles larger
than 5' x 5' x 5' (125 cubic feet) prevent enough air from reaching
the center of the pile to reach the microbes. In addition, turning a
large pile is a chore. If your pile is large, you’ll have to turn it more
often. If the pile is small, you will get a good batch of compost
during warm months.
Moisture & Aeration
The microbes in your compost pile need a certain amount
of water and air to survive. Microbes function best when
the materials are about as moist as a wrung-out sponge and are
provided with plenty of air. Too much moisture will force out the air
and suffocate the microorganisms. Too little moisture will slow
down decay. Whenever you add water, be sure to mix the material
to distribute the moisture evenly.
Turning or aerating the materials in your pile supplies oxygen to the
composting critters. A lack of oxygen in a compost pile can lead to
odor problems. Ammonia and methane gases are produced when
organic materials are allowed to undergo anaerobic (without oxy-
gen) decay. Anaerobic decomposition also leads to the production
of chemical compounds that are toxic to plants. Organic matter
allowed to decompose anaerobically (for example, "composting" in
closed garbage bags) should be exposed to air for several days to
complete the composting process and to destroy any plant toxic
compounds.
Temperature & Time
As a result of the decomposition process, a compost pile
may heat up to 140
°
F or higher. The intensity depends on
the amount of nitrogen in the materials. The time required to
produce compost depends on the kind and coarseness of the materi-
als, volume of the pile, and availability of moisture and air. It can
take a month, a year, or longer.
Biology
The compost pile is a hodgepodge of microscopic critters.
Bacteria, the most numerous and effective decomposers,
are the first to break down plant tissues. Fungi and protozoa soon
join the bacteria. Somewhat later in the cycle, centipedes, milli-
pedes, beetles, and earthworms do their parts to continue the
decomposition process.
Materials
Many items in your refrigerator or growing in your yard are
potential food for tiny decomposers. Organic materials
contain carbon and nitrogen—nutrients that provide energy and
growth to the microorganisms.
All organic materials have a ratio of carbon to nitrogen (C:N) in their
tissues (see Table 1). Leaves, straw, and sawdust are high in carbon,
while grass clippings, manures, and vegetable scraps are higher in
nitrogen. It helps to think of these materials as “greens” and
“browns.” Greens such as grass clippings, are high in nitrogen.
Browns such as leaves or sawdust, contain high amounts of carbon.
These C:N ratios are significant because the tiny decomposers need
about 1 part of nitrogen for every 30 parts of carbon in the organic
material. If the ratio is greater than 30:1, nitrogen will be lacking
and materials will decompose more slowly.
Be aware that anything organic will decay (as long as it’s organic, the
critters will eat it); however, it may take a long time to make compost
when the C:N ratio is too high. For example, a pile made solely of
sawdust, will take years to decay. Adding more greens, such as grass
clippings or vegetable scraps, will speed up decay and produce
compost in less time. Experiment to find the right combination of
materials for your compost pile.
Table. 1 Average Carbon to Nitrogen Ratios for Organic Materials
Greens
Pig manure
5-7:1
Poultry manure (fresh)
10:1
Alfalfa or sweet clover hay
12:1
Vegetable scraps
12-20:1
Poultry manure w/litter
13-18:1
Coffee grounds
20:1
Grass clippings
12-25:1
Cow manure
20:1
Horse manure
25:1
Horse manure with litter
30-60:1
Browns
Leaves
30-80:1
Cornstalks
60:1
Straw
40-100:1
Bark
100-130:1
Paper
150-200:1
Sawdust
400:1
Wood chips
800:1
T
HE
E
SSENTIALS
OF
C
OMPOSTING
4
5

6
2. Calendar. Turn your compost pile every three to five days. While
turning can speed up the composting process, it also releases heat into the
air. Turn a pile less often during cold weather. Use the “look and touch”
technique to see if your compost is ready: if the material is dark, crumbly
and unrecognizable from the original materials you added to the pile, you
have compost.
If your pile does not heat up, you may need to add water or more nitrogen.
Refer to Table 2 to help you learn how to improve the efficiency of the
composting process.
Table 2. Troubleshooting guide for efficient composting
Symptoms
Problems
Solution
Rotten odor
Not enough air;
Turn pile; add coarse, dry
pile too wet
materials (straw, corn
stalks, etc.)
Ammonia odor
Too many greens
Add browns (straw,
(excessive nitrogen/
paper, or sawdust).
lack of carbon)
Low pile
Too small; not
Make pile larger; add water
temperature
enough air or
while turning pile; mix in
moisture; few greens;
nitrogen sources (grass
or cold weather
clippings, manure, or a
synthetic fertilizer, such as
10-10-10); or insulate pile
with a layer of straw or
plastic.
High pile
Too large; not enough
Reduce pile size; turn
temperature
air
pile.
Pests-rats,
Meat or fatty food
Remove meat and fatty foods
raccoons, insects
scraps in pile
from pile; cover with a
layer of soil or sawdust;
build an animal-proof
compost bin.
"S
LOW
" C
OMPOST
R
ECIPE
Slow composting is the least labor- and time-consuming way to compost; it
is ideal for people who do not have a large amount of yard trimmings to
compost all at once. This method can take from six months to two years or
longer to produce compost, so be patient. The bins or containers can be
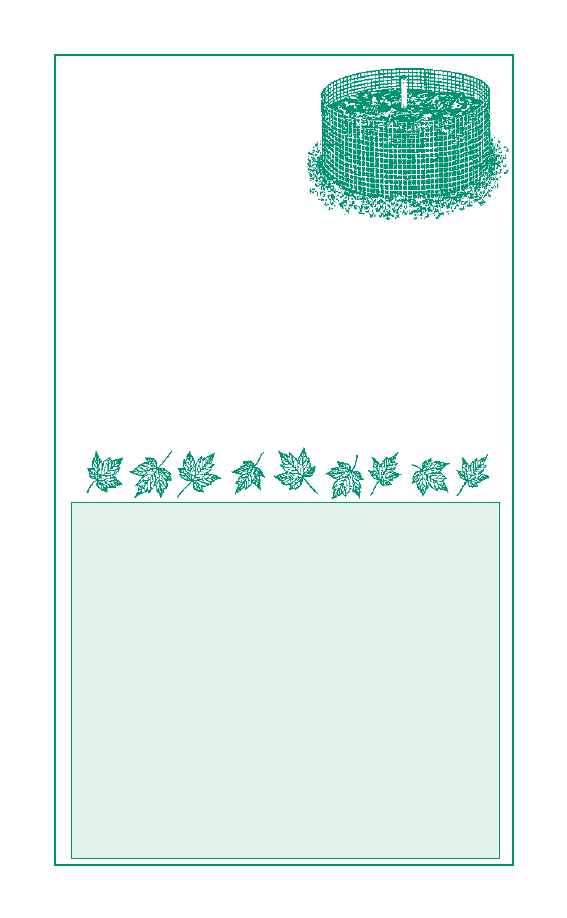
7
made of old wooden pallets stood on
their ends in a square or open square
and nailed or tied together. A chicken
wire cage supported by three or four
wooden stakes will also work well. A
standard-sized garbage can with eight or
more slots in the sides of the can for
ventilation and five in the bottom for
drainage can also be used. Elevate your
bin a foot off the ground or start your
pile with a three- to six-inch layer of
small twigs or chopped corn stalks to improve air movement and drainage.
If you choose not to use a container, cover the heap with a layer of yard
trimmings or soil to prevent moisture loss.
The ingredients are the same as those for a "fast" compost. Add greens and
browns to your pile whenever they become available. Turn the pile
occasionally to mix the materials together to prevent the materials from
clumping together and to avoid anaerobic decomposition. You will know
that your materials are decaying without oxygen by the foul odor: a telltale
sign for you to turn the pile. Look for ready-to-use compost near the bottom
of the pile.
RECYCLING YARD TRIMMINGS BY
MULCHING AND SOIL INCORPORATION
Yard trimmings such as leaves, grass clippings, and pine straw
make excellent mulches for the landscape or vegetable garden.
Mulches provide the following benefits:
• conserve moisture,
• help control weeds,
• moderate soil temperatures by making the soil cooler
in the summer and warmer in the winter,
• reduce soil compaction, improve soil structure, and
add nutrients, and
• prevent soil erosion.
Shred large leaves and twigs with a lawnmower or shredder
before using them. A mechanical grinder or chipper is needed
for large limbs and stumps. Some local utilities, public works
departments, and tree service companies will grind large
Woven wire fencing unit.
8
materials for you. Check with your local government for
recommendations.
A two- to three-inch layer of mulch is adequate for woody
plants. Apply the mulch at least to the dripline of the tree,
although the root system can extend two to three times the
crown spread of the plant. Keep mulch away from the main
trunk of the plant to keep the bark dry. When using grass
clippings, use less than a two-inch layer to prevent matting.
Mulches made of chipped branches and trunks can also be
used in animal pens, garden paths, and along fence rows to
suppress weed growth.
SOIL INCORPORATION
Vegetable scraps, kitchen scraps (excluding meat, bones,
and fatty foods), and other yard trimmings (especially
diseased or insect-infested plants) can be spread in a layer in
the garden and buried or tilled with a rotary tiller. Cover
organic materials with
at least 8 to 12 inches of soil. These
organic materials will decompose, releasing nutrients and
improving the structure of your soil.
Organic materials can also be buried with a posthole digger
near the drip line of trees or shrubs and in small garden
spaces.
Printed on recycled paper with soy ink
2313
Prepared by Robert F. Polomski, Extension Consumer Horticulturist, Depart-
ment of Horticulture, Clemson University
Special thanks to the Seattle Engineering Department and Seattle Tilth
Association for granting Clemson University Cooperative Extension Service
permission to reproduce portions of their material.
The Clemson University Cooperative Extension Service
offers its programs to people of all ages, regardless of race, color, sex, religion, national origin, or
disability and is an equal opportunity employer.
Clemson University Cooperating with U.S. Department of Agriculture and South Carolina
Counties. Issued in Furtherance of Cooperative Extension Work in Agriculture and Home
Economics, Acts of May 8 and June 30, 1914
Wyszukiwarka
Podobne podstrony:
Home Composting
A GARDEN FOR PALNA CHILDREN'S HOME
(Gardening) Growing Herbs At Home
Home Composting
(gardening) Disease Prevention in Home Vegetable Gardens
Garden Design Magazine Planning A Home Greenhouse
Garden Compost Bin id 185940 Nieznany
Garden Compost Bin
(Gardening) Beneficial Insects In The Home Garden
Herbs and Spices for the Home Garden h 221
(Gardening) Blackberries And Raspberries In Home Gardens
(gardening) Composting and peat free gardening
(gardening) Composting
Home and Garden Force Field
Backyard Composting Recycling A Natural Product
więcej podobnych podstron