Home Garden
Apr. 2002
HG- 41
Published by the College of Tropical Agriculture and Human Resources (CTAHR) and issued in furtherance of Cooperative Extension work, Acts of May 8 and June
30, 1914, in cooperation with the U.S. Department of Agriculture. Andrew G. Hashimoto, Director/Dean, Cooperative Extension Service/CTAHR, University
of Hawaii at Manoa, Honolulu, Hawaii 96822. An Equal Opportunity / Affirmative Action Institution providing programs and services to the people of Hawaii without
regard to race, sex, age, religion, color, national origin, ancestry, disability, marital status, arrest and court record, sexual orientation, or veteran status.
CTAHR publications can be found on the Web site <http://www2.ctahr.hawaii.edu> or ordered by calling 808-956-7046 or sending e-mail to ctahrpub@hawaii.edu.
T
o protect the äina, many people practice the three
Rs of conservation. They recycle aluminum cans,
paper, and glass. They reuse paper as scratch pads and
line garbage pails with plastic grocery bags. Some re-
duce their use of energy and materials through energy
conservation and careful maintenance to make things
last.
Apply the three Rs to yard trimmings and leftover
food, and you have composting—an economical way to
reduce solid waste, reuse organic materials, and recycle
nutrients as a soil conditioner. Composting is about be-
ing good caretakers of our environment.
It’s in the bag
In order to estimate how much you threw out last week,
gather one day’s garbage from your household. Weigh
on a bathroom scale or estimate by comparing to a known
weight, like a 20-pound sack of rice. Multiply by seven,
and you have the amount of garbage produced by your
household each week.
Look at what’s in your garbage.
Any recyclable plastic or aluminum
containers or old newspapers? Take
these to be recycled. See any food
stuff – banana peels, fuzzy leftovers,
coffee grounds – or yard trimmings?
These materials are easy to compost.
When you remove the recyclables, 20
pounds of garbage is often reduced
to as little as 5 pounds.
Imitating nature
Composting is a process by which
organic materials (such as branches,
leaves, and fruits) biologically decom-
pose under controlled conditions.
More simply, compost is the result of humans imi-
tating nature’s disposal system.
When vegetation dies or falls off trees in forests and
fields, insects, worms, and bacteria eat it. They leave
behind small loose particles called humus. Humus binds
soil particles together into larger aggregates, or grains,
that allow water and air to enter the soil more easily.
Humus also contains important nutrients in forms plants
can easily use for healthy growth and reproduction.
Mixed with soil, compost improves the soil’s tilth.
That is, it makes the soil looser, or lighter, which makes
water, oxygen, carbon dioxide, and minerals more avail-
able to plants. Compost improves root penetration and
makes the soil easier to work. Compost conserves water
by helping the soil retain it better.
Because it is made from decomposed organic mate-
rial from many sources, compost contains many of the
nutrients plants require (although not always enough to
sustain intense commercial production). Compost has
even been known to reduce the inci-
dence of certain soil-borne diseases
that have devastating effects on plant
health and productivity, perhaps be-
cause the beneficial soil microbes
added in compost outcompete the
pathogenic organisms.
How it works
A balance of five essential ingredi-
ents is the key to rapid, trouble-free
composting. If you maintain a pile
with the correct balances of moisture,
air, and carbon and nitrogen contents
of the raw materials, then decompos-
ing organisms—insects, worms, bac-
teria, and fungi—will do the rest.
HG-41, continuing the CTAHR General Home Garden Series, was first published as Instant Information Series 21, October, 1996.
Backyard Composting
Recycling a Natural Product
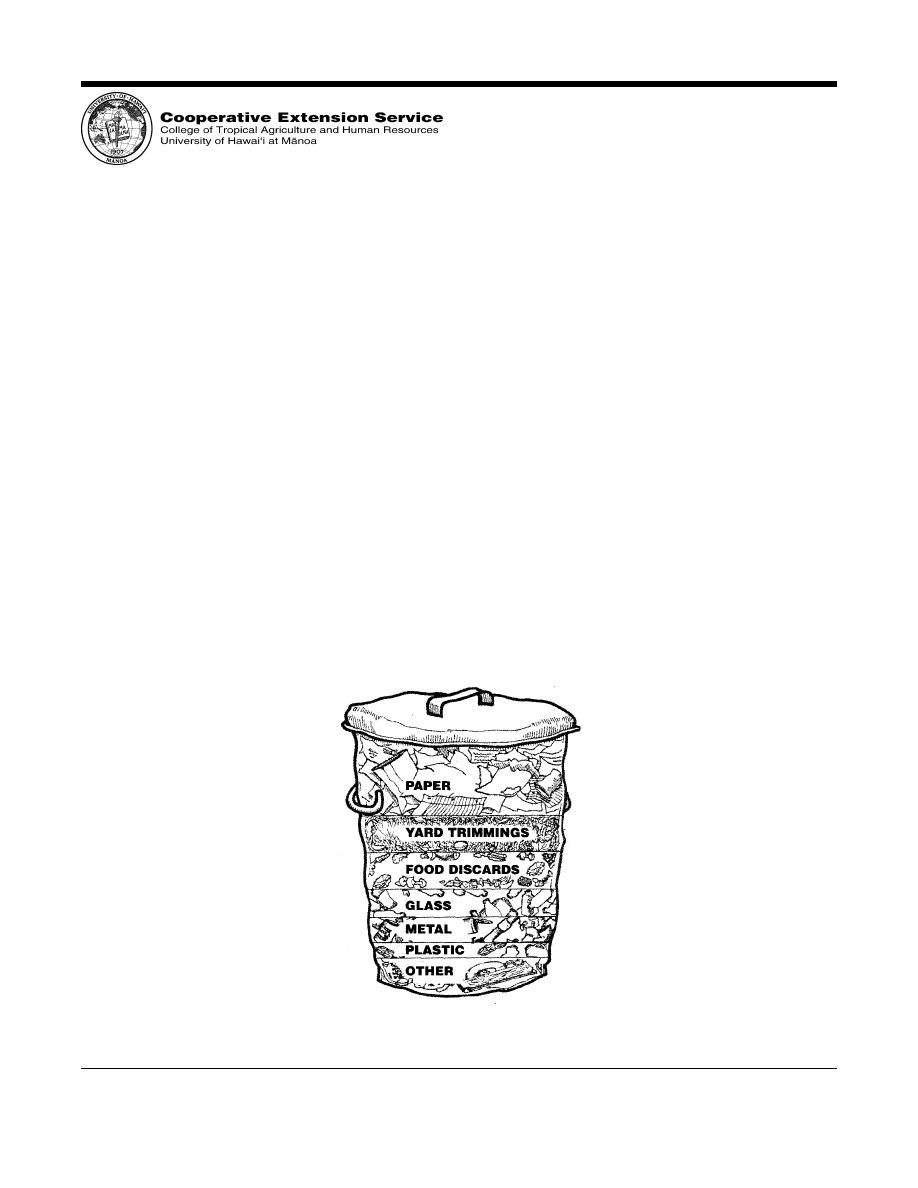
Often, over half of home
wastes are compostable.

HG-41
Backyard Composting
CTAHR — Apr. 2002
2
Water is required by all living things, including
decomposers. The compost pile should be moist, but not
too wet. A bad odor may indicate that excess moisture is
inhibiting decomposition.
Oxygen is essential to most decomposers. Oxygen
cannot circulate well if the pile is too tight, too big, or too
wet. If the pile is soaked with water, most decomposers
die and composting is taken over by a few “specialists”
that can live without air. Anaerobic decomposition—de-
tected by its swampy odor—is slow and inefficient.
Carbon is abundant in most organic materials and
is broken down by decomposers to create food-energy.
However, other nutrients are needed for carbon to be
readily eaten. Wood and paper are examples of materi-
als that are high in carbon but may be deficient in other
nutrients and thus slow to decompose.
Nitrogen is required by decomposers in relatively
large quantities. It is a major ingredient in protein, a basic
building block of life. Without sufficient nitrogen in your
compost pile to assist digestion of carbon-rich materi-
als, decomposition goes very slowly. Green leaves and
grass clippings are examples of nitrogen-rich materials.
Decomposing organisms produce heat by their ac-
tivity. This heat in turn energizes them, and the whole
process goes faster. Heat also helps kill disease organ-
isms and weed seeds. The speed of composting varies,
but at some point the center of the pile should feel hot or
very warm to the touch. More mass (a bigger heap), more
water, more air, or more nitrogen may be needed to get
the process going.
A well managed pile can produce compost in about
two or three months.
Getting started
A proper surface is important. Compost is easier to turn
when piled on concrete or another hard surface, but
worms and other beneficial organisms from the soil will
have a harder time reaching the pile. Level ground is
also a good surface.
The dimensions of the pile, as a rule of thumb, should
be at least 3 feet high by 3 ft wide by 3 ft long to maintain
sufficient heat in its interior. If the pile is too large, air
has trouble getting to the center. Maximum recommended
size is 5 ft high by 5 ft wide, with no limit to the length.
The appropriate location for a compost pile is a shady
area protected from wind (to prevent it from drying out).
Protect the pile from heavy rain by covering it with a
plastic sheet, or make it under a roof. Build it where it
can’t be flooded.
Have a protected area to store finished compost if it
isn’t going to be used immediately. Avoid mixing
undecomposed materials with finished compost.
Choose a composting method
Set-ups for a compost pile range from simple to elaborate.
Basic compost heap—Simply pile and mix the com-
post materials on the ground. Cover the pile when it rains
to prevent it from getting too wet or losing nutrients to
leaching. Turn the heap regularly (every week or two).
Building the pile over a layer of scrap plastic pipes drilled
with holes allows for air penetration from below and
reduces the need for turning.
Compost pit—Pits are ideal for composting mate-
rials consisting mostly of food scraps. Dig a hole in the
ground, add the materials, mix with soil in the hole, and
refill the hole with at least 8 inches of soil. Fallow areas
of your garden are good places for compost pits.
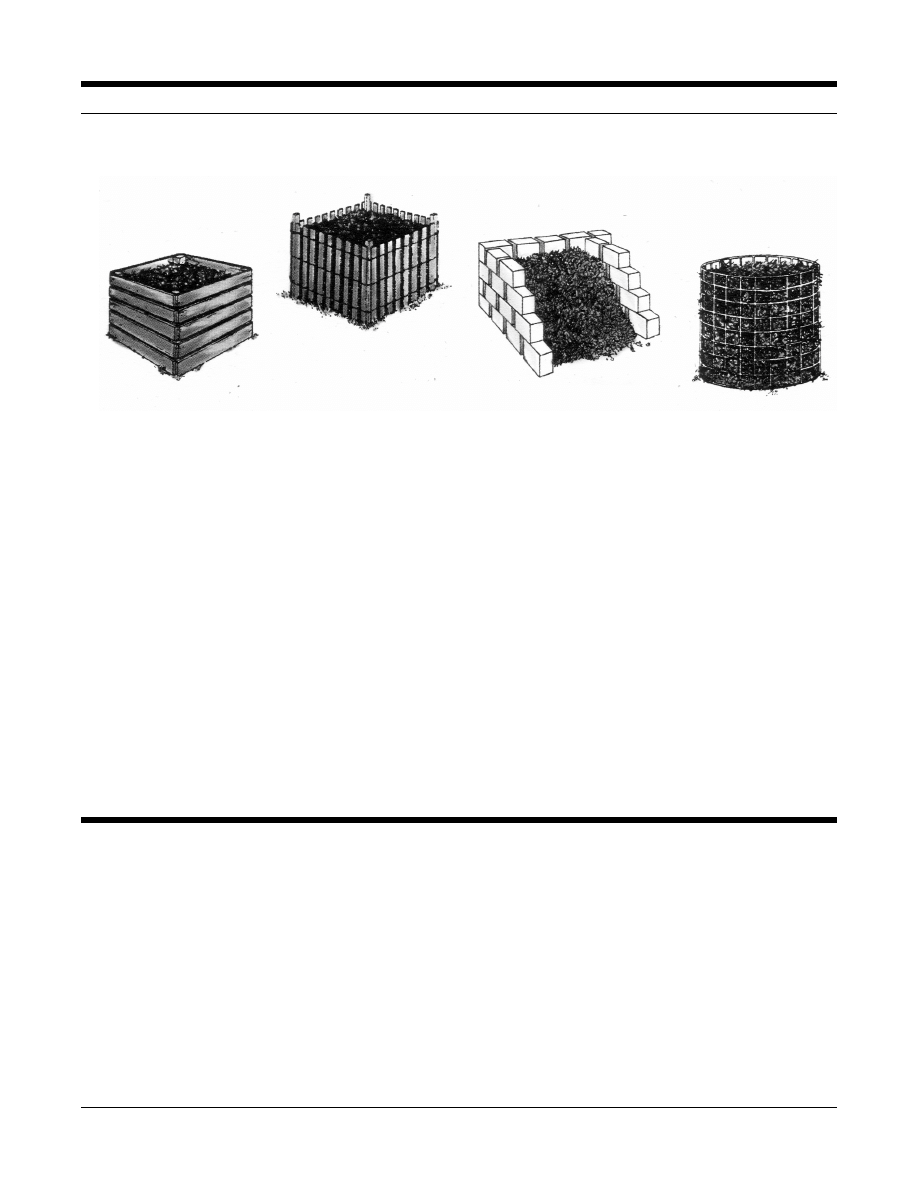
Holding units—Bins help to contain the compost
heap, keep it out of sight, and can make it easier to turn.
They can be made of concrete blocks, wire mesh, or
wood (although wood may lead to termite problems). If
the bin is a movable type, it can be lifted from the pile
and placed next to it when it is time for turning; just
shovel the heap back into the empty bin. Old garbage
cans can be used as holding units if they have enough
large holes to allow air to circulate and holes in the bot-
tom to allow water to drain.
Turning units—Some commercial composting
units feature rotating barrels that make mixing the pile
easier and reduce the use of shovels or forks for turning.
Another way to make turning easier is to build two or
three adjacent holding units. The first is filled with the
new pile. When the pile is turned, it is shifted into the
next bin. By the third turning, the pile is usually on its
last month of decomposition.
What to compost
Organisms that decompose organic materials to form
compost depend on a “diet” of carbon and nitrogen.
Fresh, green materials are rich in nitrogen, and so are
animal manures. Just as plants need nitrogen to grow,
decomposers need nitrogen to fuel the decomposition
process. Grass clippings are rich in nitrogen, and wood
chips are a carbon source. The key to making a compost
3
HG-41
Backyard Composting
CTAHR — Apr. 2002
pile is to combine nitrogen-rich materials with carbon
sources in the right proportions, with the right amount
of moisture, and adequate aeration.
Building a compost pile
This simple recipe for making a compost pile should
produce ready-to-use compost in a few months.
1. Accumulate enough materials for a pile at least 2 x
2 x 2 ft; or even better, to make a 3-ft cube.
2. Shred or chop the materials to 1–2 inches in size to
expose more surface area for faster decomposition.
3. Start the pile with a 4–6 inch thick base of carbon-
source materials (dead leaves, wood chips, shredded
paper, etc.). Moisten. Add a 2–3 inch layer of nitrogen-
rich materials. Food scraps may make up part of this
layer. Continue to alternate and mix layers of nitrogen-
rich materials with carbon sources, adding water as
needed. The pile should be about 3–4 ft high or, if in a
bin, not more than 4–5 ft high. Close the bin or cover
the pile with a plastic sheet.
4. Inoculate a new pile, if desired, by sprinkling a small
amount of topsoil or compost between layers. Some
composters believe this speeds the process by “seed-
ing” the new pile with decomposing organisms.
5. Monitor moisture content; test by feeling a handful
of compost and squeezing it as you would a sponge. It
should feel moist without yielding more than a few drops
of liquid. If the pile is too wet, turn it to allow air in and
improve drainage. If the pile is too dry, water it and turn it.
6. Periodically check the temperature in the pile’s in-
terior. A compost thermometer is helpful, but you can
estimate the temperature by touch. It should peak be-
tween 120
°
and 160
°
F (hot to the touch). When the tem-
perature begins to drop, turn the pile and rotate materi-
als from the outer and top parts of the pile toward the
base and middle; move the more composted middle part
to the outer part of the pile. For easy turning, use a gar-
den fork to shift the compost to a second bin; the mate-
Materials OK to use
Nitrogen-rich materials
Grass clippings
Seaweed and aquatic plants (washed to remove salt)
Fruit and vegetable trimmings
Kitchen scraps like coffee grounds, egg shells, leftover
bread, rice, etc.
Fresh, leafy garden trimmings
Carbon sources
Chipped trees
Twigs, small branches from trees and shrubs (chopped)
Sawdust (from untreated wood)
Stems of fibrous grasses
Palm fronds (chopped or shredded)
Newspaper or white paper (shredded)
Undesireable materials
May contribute pests (weeds, plant diseases)
when inadequately composted
Weedy, persistent plants
Diseased plants
Human health hazard
Dog or cat feces, used kitty litter
May attract flies, rats, animals
Oils
Dairy products
Meat or bones of animals, poultry, fish
Are not biodegradable
Metals, glass
Rubber, plastics
Some examples of compost enclosures

HG-41
Backyard Composting
CTAHR — Apr. 2002
4
rial at the top will now be at the bottom. In the process,
you are aerating the pile, and you can add water if the
pile seems to be dry.
7. Continue to monitor the temperature in the pile. It
should heat up again. After the temperature peaks, turn
the pile once more. You may note that white molds de-
crease over time, insect populations will change, and ben-
eficial worms become abundant as the compost matures.
8. The process is completed when the pile does not
generate any more heat. When the pile is cool and the
compost has aged for another four weeks, it should be
finished. The pile should be much smaller than its origi-
nal size, and the original materials should no longer be
recognizable. The compost should be dark, loose (crum-
bly), and without any strong or unpleasant odor.
9. Use the compost to mix into the soil or to make com-
post tea to use for watering crops, seedlings, and starts.
Spread compost on your lawn and under shrubs, flow-
ering plants, vegetables, and trees.
Helpful hints
•
Chop or shred leaves, twigs, and other materials to
speed composting. Smaller pieces of organic mate-
rial “cook” faster than larger pieces because more of
the material surface is exposed.
•
A compost pile needs the right mix of materials to
decompose quickly. When building the pile, try to
have at least one part nitrogen-rich materials for ev-
ery two to three parts carbon sources. You may need
to experiment with different materials and proportions
to develop enough heat for rapid decomposition.
•
If there is not enough nitrogen-rich material, sprinkle
small amounts of commercial nitrogen fertilizer be-
tween layers. (Note: these fertilizers are concentrated;
use sparingly.)
•
Balance moisture and aeration to develop heat; too
much of either results in a “cold,” inactive pile. The
hotter the pile, the faster the composting process. Tem-
perature of an actively composting pile normally range
from 120 to 150
°
F. Higher temperatures (140–160
°
F)
kill harmful pathogens, insects, and weed seeds. Avoid
turning the pile too often, because the heat is lost
whenever the pile is turned. Turn it immediately, how-
ever, if an odor develops; the smell should fade away.
Alternatives to composting
You can reuse organic materials in your yard in other ways.
People practice “passive” composting when they pile up
organic materials but don’t turn the pile. Without turn-
ing, the pile will be “cooler” and much slower to decom-
pose. The materials break down eventually, and com-
post can be removed from the bottom of the pile. This
method may not kill weed seeds and plant pathogens,
and the pile may attract insect and animal pests.
To fertilize your lawn, leave nitrogen-rich grass clip-
pings in place after mowing. Mow “high”—clippings
should be less than one-third of the grass blade—and
mow so as to spread the clippings evenly across the lawn.
Mulching is similar to composting but requires less
effort. Chipped or shredded organic materials such as
lawn clippings, leaves, pine needles, shrubs, and trees
can be spread on the soil surface around your plants.
Mulch controls weeds, keeps moisture in the soil, and
reduces soil erosion.
Compost Pile Troubleshooting
Symptoms
Likely problems
Solutions
Offensive odor
Insufficient aeration
Turn and “loosen” pile
Ammonia odor
Too much nitrogen
Add carbon-source materials
Pile doesn’t heat up
Insufficient nitrogen
Add nitrogen-rich materials
Pile too wet
Turn, add dry carbon sources, protect from rain
Pile too dry
Turn, sprinkle with water
Pile too small
Add more materials
Pile attracts flies, animals
Inappropriate materials
Don’t use meats, oils; remove attracting materials
or rotate them to center of pile and cover pile with
carbon-source materials.
Wyszukiwarka
Podobne podstrony:
Skeletal Rearrangements in natural products synthesis
Natural Products do koła
(gardening) Recycling Yard Trimmings Home Composting
Natural variations detected in the isotopic composition of copper possible applications to archeolo
Barwniki naturalne i syntetyczne w żywności
Product presentation XC100FC
~$Production Of Speech Part 2
Systemy teoretyczne socjologii naturalistycznej – pozytywizm, ewolucjonizm, marksizm, socjologizm pp
Product presentation easyControl
Natura 2000
4 Gen prom opt źródła naturalne
Wykład nr 5 podstawy decyzji producenta
Naturalne trucizny
Naturalne źródła węglowodorów i ich pochodne
Wykład XI Rodzina jako naturalne środowisko wychowawcze
Przepisy na naturalne kosmetyki, porady makijażowe
więcej podobnych podstron