
VoIP with FreeSWITCH
Talk Soft
FreeSWITCH is a powerful and versatile telephony platform that can scale from a softphone to a PBX and
even to a carrier-class softswitch.
By Michael S. Collins
Mateusz Radek, Fotolia
Open source projects have lowered the barrier to entry into telephony for hobbyists and businesses alike. The
popular Asterisk PBX tool, for instance, is a high-functioning and low-budget telephony alternative that has
proven disruptive in the world of business telephone systems [1]. Perhaps the most disruptive software of all,
however, comes in the form of the scalable softswitch library called FreeSWITCH.
The FreeSWITCH website [2] says that it can be used as a "simple switching engine, a PBX, a media
gateway, or a media server to host IVR applications."
True to that chameleon-like description, FreeSWITCH has appeared in production environments as a telco
switch, in numerous business scenarios as a PBX, as a softphone for laptop users, and even as a voice routing
engine for the OpenSim project.
Additionally, you can deploy FreeSWITCH as an application or use it as a library (libfreeswitch) that can be
embedded in third-party software. This double identity is similar to the relationship between cURL
(application) and libcurl (library).
FreeSWITCH has been used in some exotic scenarios; however, those new to telephony applications are best
served starting out with FreeSWITCH in its default configuration as a SOHO PBX. Although you might find
the numerous FreeSWITCH configuration files and settings overwhelming, in a short time, you will
appreciate the power and flexibility of this versatile telephony tool.
Installing FreeSWITCH
As of this writing, the current, stable version of FreeSWITCH is 1.0.4, which can be downloaded from the
project website [3], or you can use the Subversion repository to install the latest version. Unlike many
projects, the SVN trunk is extremely stable, so it might be convenient for you simply to use the latest trunk.
In any case, the FreeSWITCH developers have made it very easy to update to the latest trunk, even if you
have installed from the latest stable version. Some pre-compiled binaries are known to exist; however, I
recommend compiling from source.
Talk Soft
1

First, unpack and install the source. In this example, I will download into /usr/src and install from there:
tar zxvf freeswitch-1.0.4.tar.gz
cd freeswitch-1.0.4
./configure
make install
I recommend getting the sound files:
make cd-sounds-install
make cd-moh-install
FreeSWITCH comes with and can handle sound files at 8, 16, 32, and 48kHz sampling rates. Few, if any,
telephony systems - open source or proprietary - can do the kinds of things FreeSWITCH can do with calls at
multiple sampling rates.
The installation will take some time, so feel free to chain the commands together with the && operator.
When the process is complete, you will have a basic FreeSWITCH installation. Because it is handy to have
the two main FreeSWITCH executable files available in the bin path, I use symlinks:
ln -s /usr/local/freeswitch/bin/freeswitch /usr/local/bin/freeswitch
ln -s /usr/local/freeswitch/bin/fs_cli /usr/local/bin/fs_cli
To launch the application, enter freeswitch, and use the fs_cli utility to access the command line of any
FreeSWITCH server to which you have access, even if it is on another server. At first, you'll see quite a bit of
debug/log information, but don't worry about errors or warnings at this point.
Your New Softswitch
The first basic command is version, which displays the version of Free-SWITCH you are running, including
the SVN revision. The status command shows information about your instance of FreeSWITCH, including
uptime and the number of currently active sessions. Another basic command is the self-descriptive help.
To exit FreeSWITCH, type fsctl shutdown or use the shortcut command ... (three periods).
If you have a sound card or headset on your system then try this:
load mod_portaudio
After several debug lines, you'll see +OK when the module is loaded. Now list the PortAudio devices
available on your system:
pa devlist
API CALL [pa(devlist)] output:
0;Built-in Microphone;2;0;i
1;Built-in Input;2;0;
2;Built-in Output;0;2;r,o
3;Logitech USB Headset;0;2;
4;Logitech USB Headset;1;0;
The i and o are next to the currently selected input and output devices. To change the input device, use the pa
indev command with the device number,
pa indev #x
where x is the number of the input device. The output device can be changed with the pa outdev command. In
my setup, I'll use device 4 as output and device 5 as input.
Talk Soft
2
If you have the MOH (music on hold) files installed, this command will make a call to the MOH extension
and send the MOH to the PortAudio output device:
pa call 9999
If you hear music, it was a successful call. If not, make sure the MOH files were installed properly. Hang up
with the pa hangup command.
To make sure both input and output devices are working, do an echo test:
pa call 9996
Now when you speak into the input device, your voice should be echoed to the output device. The pa hangup
command disconnects.
As you can see, it is possible to use Free-SWITCH and PortAudio to create a simple softphone. In this way,
you will be able to use any codec that your FreeSWITCH installation supports - and there are some very high
quality codecs available - without installing a softphone client.
Connecting a SIP Phone
The most common way to use Free-SWITCH is with a SIP phone. A physical handset is often called a hard
phone, whereas a software-based phone is appropriately called a softphone. Numerous types of hard phones
are available from manufacturers. Softphones come in both proprietary and FLOSS varieties. A popular free -
but not open source - softphone is X-Lite from CounterPath [4], which is available for Linux, Mac OS X, and
Windows. Even if your FreeSWITCH server runs on Linux, your softphones can run on any operating system,
as long as they are SIP compliant.
Session Initiation Protocol
SIP is a TCP/IP-based Application Layer protocol used for multimedia sessions over the Internet. The
text-based protocol is similar to HTTP, with requests and responses, header fields, encoding rules, and status
codes. In addition to VoIP, SIP is used in instant messaging, online gaming, and distribution of streaming
multimedia.
To begin, download X-Lite for your desktop or laptop operating system and perform a default install.
(Installing a softphone on the same system that is running FreeSWITCH is not recommended; however, in
many cases, it will work for the sake of testing.)
Now launch X-Lite and open the SIP Account Settings menu by clicking the Show Menu button. (The button
is the small down-arrow at the top of the phone, just left of center.)
Only one SIP account is available in X-Lite, so click on it then click the Properties button. As shown in
Figure 1, fill in the fields and use 1234 as the password for extension 1000.
Talk Soft
3
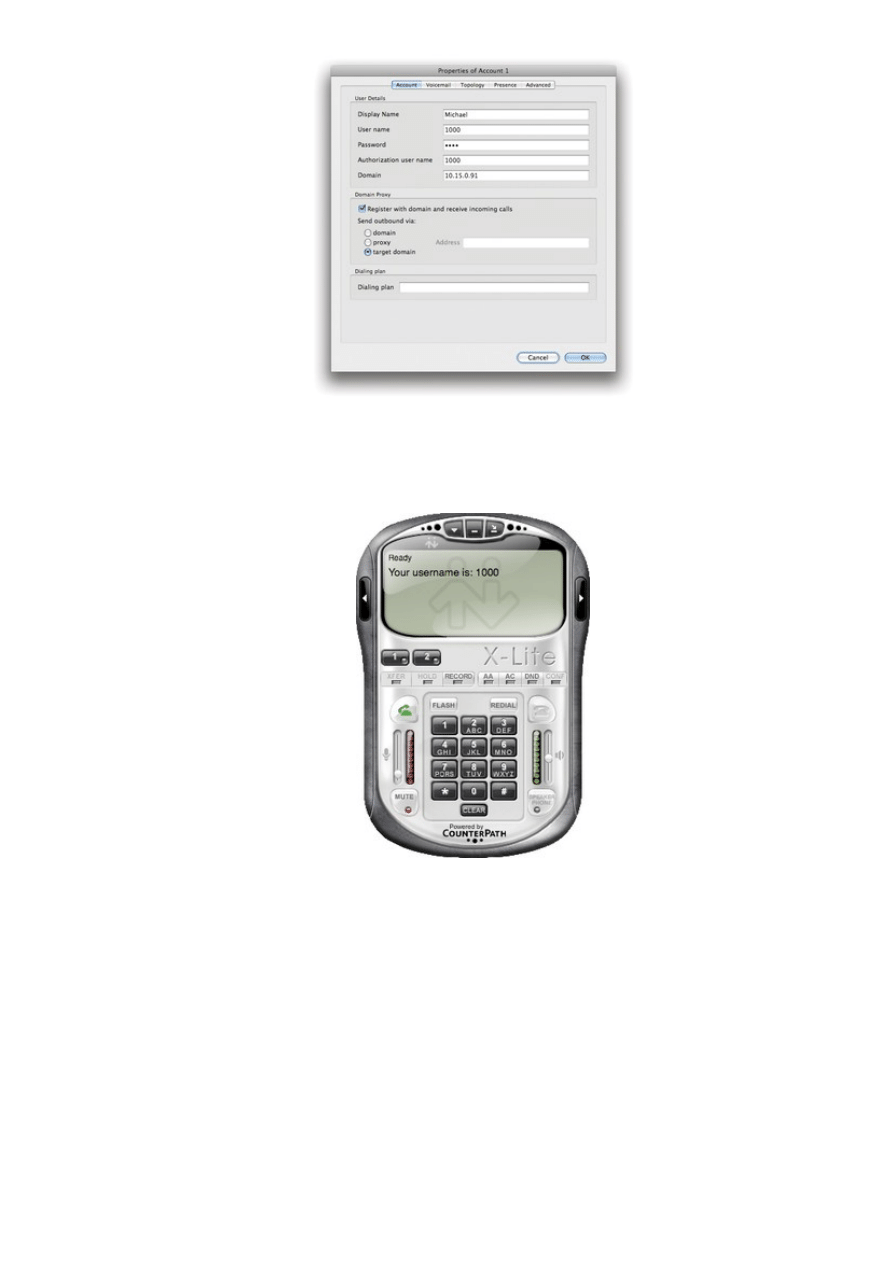
Figure 1:
The X-Lite SIP account configuration screen.
Next, clear out the Dialing plan field because it is not needed with FreeSWITCH. Now click OK then Close,
and the phone will attempt to register. Figure 2 shows a successful registration.
Figure 2:
A successfully registered X-Lite client.
To make a test call, dial 9999 and click the green button to send. In a few moments you should hear music on
hold. Figure 3 shows a call in progress to extension 9999.
Talk Soft
4

Figure 3:
An X-Lite client calling extension 9999.
To shut down FreeSWITCH, use the fsctl shutdown (...) command.
Configuration Highlights
The default FreeSWITCH configuration has many features. Table 1 shows Dialplan highlights, and Table 2
shows some of the more important files and subdirectories in the FreeSWITCH configuration.
The default install will create a directory named /usr/local/freeswitch/conf, which I'll refer to as $CONF. All
config files are XML and can include other XML files.
Talk Soft
5

The top of this XML tree is $CONF/freeswitch.xml, which includes various XML files that in turn include still
more XML files. This arrangement allows you to make changes to the FreeSWITCH configuration without
sifting through a particularly large file.
FreeSWITCH as a Daemon
To start FreeSWITCH as a daemon, use the -nc (no console) command-line argument:
freeswitch -nc
FreeSWITCH will report that it is backgrounding and will give the process ID (PID). To stop Free-SWITCH,
simply execute freeswitch -stop at the Linux prompt. For now, leave FreeSWITCH running and use the fs_cli
command to connect: You will be greeted with a brief welcome message and a CLI prompt and perhaps some
debug messages on the screen. To turn down the debug level, type:
/log info
This will restrict log messages to the INFO level and lower and keep you from being inundated with debug
information.
All commands to the fs_cli program begin with a slash, so type /help to see a list of available commands.
Anything else typed at the fs_cli prompt will be sent to the FreeSWITCH server, with one exception: The
ellipsis (...) will not shut down FreeSWITCH from fs_cli; rather, it exits the fs_cli program. Instead of
shutting down FreeSWITCH from within fs_cli, exit the program and then issue the freeswitch -stop
command at the Linux prompt.
Just let FreeSWITCH continue to run in the background while you set up a new user and modify the Dialplan.
Adding a New SIP User
FreeSWITCH comes with 20 users predefined, but if you want to add more, just two steps modify the
configuration:
Add a user entry in $CONF/directory/default/
•
Modify the Dialplan to allow the new user to be called
•
To add a new user named "Katherine" with extension number 1500, change directory into
$CONF/directory/default and make a copy of 1000.xml:
cp 1000.xml 1500.xml
In an editor, open 1500.xml, replace 1000 with 1500, and change the effective_caller_id_name to Katherine.
Your new file should look similar to Listing 1.
Listing 1:
New User 1500.xml
01 <include>
02 <user id="1500" mailbox="1500">
03 <params>
04 <param name="password" value="$${default_password}"/>
05 <param name="vm-password" value="1500"/>
06 </params>
07 <variables>
08 <variable name="toll_allow" value="domestic,international,local"/>
09 <variable name="accountcode" value="1500"/>
10 <variable name="user_context" value="default"/>
11 <variable name="effective_caller_id_name" value="Katherine"/>
12 <variable name="effective_caller_id_number" value="1500"/>
Talk Soft
6

13 <variable name="outbound_caller_id_name" value="$${outbound_caller_name}"/>
14 <variable name="outbound_caller_id_number" value="$${outbound_caller_id}"/>
15 <variable name="callgroup" value="techsupport"/>
16 </variables>
17 </user>
18 </include
Now open $CONF/dialplan/default.xml and locate the Dialplan entry (or "extension") named
Local_Extension. In the line
<condition field="destination_number" expression="^(10[01][0-9])$">
those familiar with regular expressions will recognize that ^(10[01][0-9])$ means "match exactly four digits -
of which the first two are 10, the next one is 0 or 1, and the last one is any digit from 0 to 9 - and store the
matched value in the variable $1." Put more simply, it matches anything from 1000-1019, inclusive.
To add the new user Katherine at extension 1500, use the pipe character, which is a logical OR:
<condition field="destination_number" expression="^(10[01][0-9]|1500)$">
Now launch the fs_cli program and then type reloadxml or press F6. The new extension is now ready for use.
The best way to test it is to set up a softphone (or a hard phone, if you have one) as 1500 with FreeSWITCH.
In your X-Lite client, open the SIP account settings and change the display name to Katherine and the User
name and Authorization user name fields to 1500 before saving the settings. Your client will momentarily say
registering and then will say Ready in the display. Now you can make calls from your new extension. If you
have a second phone, you can register it as 1000 and use it to call 1500.
Outside the Local Switch
One advantage of VoIP is that you can make free or very low cost phone calls on the Internet. FreeSWITCH
can route calls to and from the Internet, even if it is behind a NAT device. NAT devices cause all sorts of
trouble for SIP calls; however, FreeSWITCH does a good job of working around these issues.
In many cases, the default configuration will work without any changes. A simple test is to call the
FreeSWITCH public conference server. The SIP URI of this server is sip:888@conference.freeswitch.org,
and the default Dialplan will connect your phone if you simply dial 9888.
If your call is successful, you will hear a text-to-speech (TTS) voice announce your caller ID name or number.
If you are the only person in the conference, you will also hear a recording saying so.
To call the conference with PortAudio, enter:
pa call sip:888@conference.freeswitch.org
A number of service providers offer connection services to give you access to and from the public switched
telephone network (PSTN) or simple SIP accounts. FreeSWITCH uses the concept of "gateways" to establish
connections to these service providers. Gateways are used for outbound registrations to providers. If you
already have a SIP provider, you will want to use the settings for that provider. The FreeSWITCH wiki has
sample configurations for a number of providers [5]. In this example, I will show you how to set up a gateway
for iptel.org, which offers free SIP accounts.
First, create an account on the iptel.org website [6] and note your username and password. Next, create a new
file called iptel.org.xml in $CONF/sip_profiles/external. Be sure to put your username and password in the
appropriate fields. The file should look like Listing 2.
Listing 2:
Setting Up a Gateway for a SIP Account
01 <include>
Talk Soft
7

02 <gateway name="iptel"> <!-- used in dialstrings -->
03 <param name="username" value="YOUR_USERNAME_HERE"/>
04 <param name="realm" value="iptel.org"/>
05 <param name="password" value="YOUR_PASSWORD_HERE"/>
06 <param name="proxy" value="sip.iptel.org"/>
07 </gateway>
08 </include>
Now save the file, then at the Free-SWITCH prompt, issue the command:
sofia profile external restart reloadxml
"Sofia" is the name of the SIP library [7] used by FreeSWITCH and is also the name of the command to
perform SIP-related functions. (Just type sofia to see the syntax.) The above command tells FreeSWITCH to
restart the external profile after reloading the XML data. The reloadxml is optional; however, if you've made
changes to the XML data (by creating or editing a file), you will want those changes loaded when restarting
the profile.
To see whether your system registered with iptel.org, issue the command:
sofia status
If your registration was successful, you will see a line like the following:
iptel gateway sip:myusername@sip.iptel.org REGED
The REGED state means that the gateway is successfully registered to the provider. If you see FAIL_WAIT,
then most likely you have a configuration problem.
The last step to receiving calls is to allow incoming calls in the Dialplan. The default configuration has a
"public" Dialplan context that treats incoming calls from the Internet as inherently untrusted.
First you need to allow calls to your new iptel.org user, then you need to specify where to route those calls. To
do so, create a new file called $CONF/dialplan/public/00_inbound_iptel.xml (or make a copy of the example
file named 00_inbound_did.xml). It should look like Listing 3.
Listing 3:
00_inbound_iptel.xml
01 <include>
02 <extension name="iptel-inbound">
03 <condition field="destination_number" expression="^(YOUR_IPTEL.ORG_USERNAME)$">
04 <action application="set" data="domain_name=$${domain}"/>
05 <action application="transfer" data="9999 XML default"/>
06 </condition>
07 </extension>
08 </include>
Be sure to specify your iptel.org username in the regular expression. Your username is the destination
number. (Destination numbers are not restricted to numeric characters.)
The call is routed to the extension specified in parameters that are fed to the transfer application.
In my case, I routed to the MOH extension for the sake of testing. Also, you can route to your SIP phone. If
you are registered as 1000, then the transfer destination is 1000 XML default. Save the file and then go to the
FreeSWITCH prompt and press F6 (or type reloadxml) at the FreeSWITCH prompt.
To receive a call on your new account, you will need someone to make a SIP call to your new iptel.org SIP
URI. In a pinch, you can test with PortAudio. At the FreeSWITCH prompt type:
pa call sip:myusername@sip.iptel.org
A successful call will ring the destination extension.
Talk Soft
8

High-Quality Codecs
Traditional telephone calls are of marginal sound quality and mobile phone calls are worse. FreeSWITCH
delivers high-quality, voice-quality calls with free and open source codecs. The CELT [8] open source codec
is high quality and lossless.
Also included with FreeSWITCH are the Siren [9] codecs from Polycom. These high-quality codecs are
closed source but royalty free. The default configuration loads the Siren codecs.
To load the CELT codec, issue the load mod_celt command.
One thing to keep in mind is that higher quality codecs could expose limitations in your headset equipment.
Most newer headsets and those that are listed as "Skype certified" will generally perform well with the higher
quality codecs. Personally, I use a Logitech Clear Chat Pro USB headset with good success.
For testing, I recommend making a call to a friend who also has Free-SWITCH installed.
To start, make a PSTN or mobile phone call, then hang up and immediately make a call with a high-quality
codec. With the use of PortAudio, it is easy to test. First, edit $CONF/autoload_configs/portaudio.xml. Locate
the line <param name="sample-rate" value ="8000"/>, change the value to 48000, and save the file.
At the FreeSWITCH prompt issue these commands:
reloadxml
reload mod_portaudio
Now make a call to your friend or call the FreeSWITCH conference:
pa call 9888
The audio quality should be much better, especially if you have a fast Internet connection. FreeSWITCH
conferences can mix calls of any codec and any sampling rate. In fact, you can call in to the Free-SWITCH
conference via the PSTN by dialing +1-213-799-1400 and compare the difference between the high-quality
VoIP codecs and the low quality of the PSTN.
Where to Go Next
This brief introduction to FreeSWITCH barely scratches the surface of what this open source software can do.
One way to put FreeSWITCH to practical use is presented by IBM's Rob Smart, who wrote a tutorial called
"Home VOIP system using FreeSwitch and a Linksys 3102 voice gateway" [10] on how to set up
FreeSWITCH as a home communications server in the UK.
A vibrant and growing community offers support to newcomers and veterans alike, so join this community
and continue learning about the amazing possibilities of VoIP.
INFO
[1] "How does FreeSWITCH compare to Asterisk?"
http://www.freeswitch.org/node/117
[3] FreeSWITCH downloads:
http://www.counterpath.com/x-lite.html
http://wiki.freeswitch.org/wiki/SIP_Provider_Examples
[7] Sofia-SIP library:
http://sofia-sip.sourceforge.net
http://www.polycom.com/company/about_us/technology/siren_g7221/index.html
[10] FreeSWITCH tutorial:
http://robsmart.co.uk/2009/06/02/freeswitch_linksys3102
Talk Soft
9
Document Outline
Wyszukiwarka
Podobne podstrony:
2009-09-20 Inf- ćwiczenia 1, 5 rok, 1 semestr, informatyka
2009 09 11 232327
2009 09 11 223732
2009 09 12 005407
NWCA Karta katalogowa 2009 09 (PL) i
2009 09 11 231132
2009 09 12 003757
2009 09 wietrznica A program szkolenia
2009 09 11 223252
2009 09 Wykład 2 Samoindukcja
2009 09 12 003006
2009 09 11 215229
2009 09 11 222520
SIMR-AN1-EGZ-2009-09-01-rozw
2009 09 11 222505
2009 09 11 234136
2009 09 11 215758
2009 09 11 222330
2009 09 13 3075 37 (2)
więcej podobnych podstron