Woodware Designs -- Wooden Pallet Computer Desk -- Freebie
copyright 2004
Pallet Computer Desk
●
Introduction
Often you can get old wooden pallets for the asking as it costs businesses money to throw them
away. Knocking them apart takes time and the quality of the recycled wood is usually very poor.
Still the price is right and the pieces are short enough to fit in your old car.
This poor wood can be made into a solid, good looking computer desk. The construction is very
similar to our wood worker's bench detailed under 'Freebies' on our web site.
You rip the wood into slats and drill holes for threaded rods thought each piece. You then bolt
and glue the stacks together into solid panels. You trim the panels and assemble them with lag
bolts and blocks of wood. You smooth the outer surfaces with a hand plane or belt sander.
You spend a lot of time salvaging the wood and ripping the pieces but the finished desk is so
solid it can last for 75 years. It even makes a good workbench after your student days are over.
One word of warning, some pallet wood is treated with anti-rot chemicals. Never work with
wood that is has a greenish tint or smells like creasolt (dark brown stain). The dust put into the air
when these woods are cut could be harmful to your health.
Here are three drawings, a photograph, and construction hints for free. This is all the information
http://www.charm.net/~jriley/pallet.html (1 of 11)12/03/2005 19:24:40

Woodware Designs -- Wooden Pallet Computer Desk -- Freebie
you need to build this desk. It is a freebie just for visiting our site.
If you like our fun Freebies, remember we can only keep this Web site open if we sell our
Stress Computer Furniture Plans
or you follow our ad links and make purchases from our
sponsors. Thank you.
Be sure to following the safety instructions that came with your power tools. Just before using
them stop and think. Am I standing or reaching in a awkward way? Is the scrap and tools in the
way? Is the work under good control?
●
Sketches and Photo
Here are three drawings. You can get them by e-mail with this
.
1.
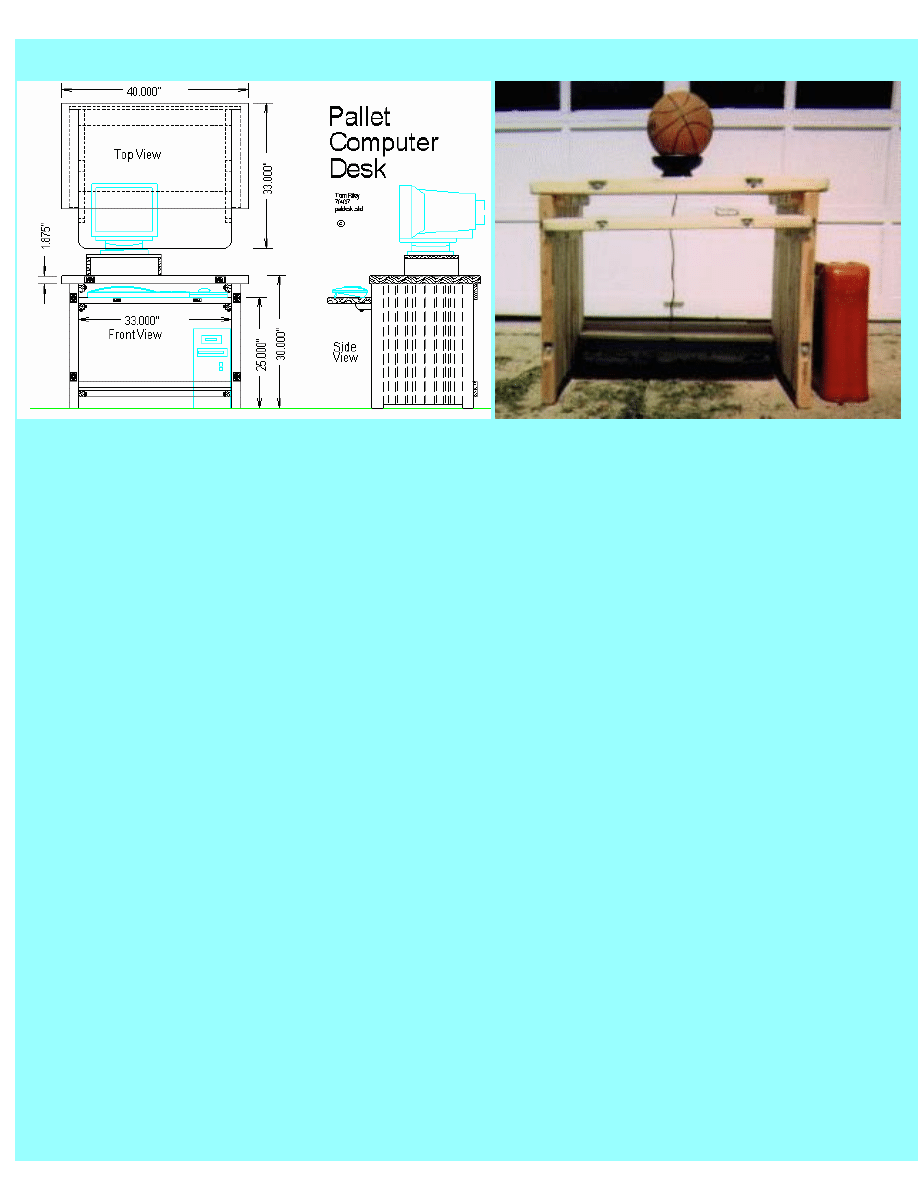
Pallet Computer Desk
At the start of this note is a three view drawing of this desk. Note that it is made of four
solid panels made by bolting long, thin boards together with threaded rod. The panels are
then bolted together with threaded rods.
2.
Pallet Computer Desk Photo
Above is a photo of the prototype for this desk. The basketball and the gas can are shown
to give you an idea of the size.
http://www.charm.net/~jriley/pallet.html (2 of 11)12/03/2005 19:24:40
Woodware Designs -- Wooden Pallet Computer Desk -- Freebie
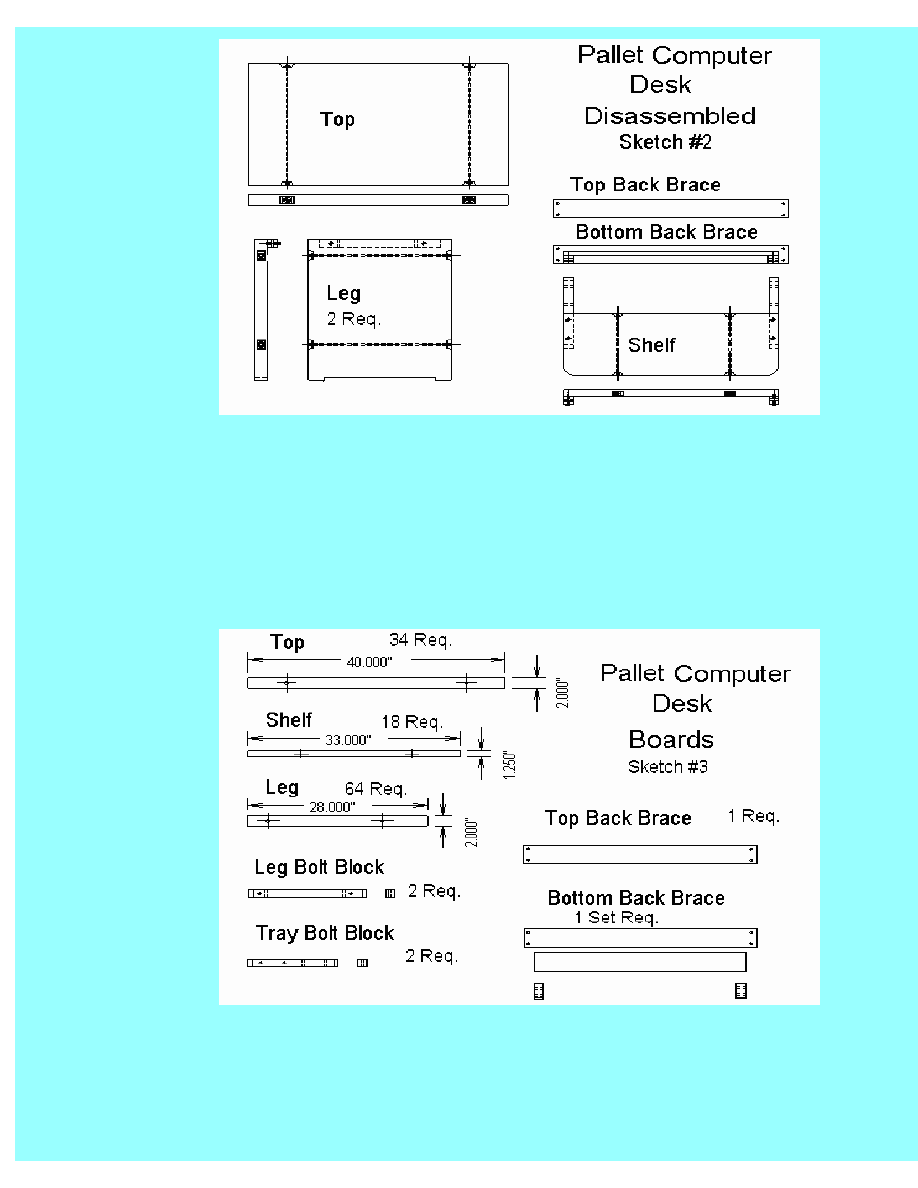
3.
Disassembled -- Sketch #2
This sketch shows all the pieces as they look when disassembled for travel. Although they
are heavy, they can fit behind the front seat of the type of old cars commonly owned by
students. The panels are the Top, two Legs, the keyboard shelf, the top back brace, and the
bottom back brace. The bottom back brace is 'T' shaped and forms a small shelf.
4.
Boards -- Sketch #3
This sketch shows all the board that you must cut to make this desk. It is best to rip the
http://www.charm.net/~jriley/pallet.html (3 of 11)12/03/2005 19:24:40

Woodware Designs -- Wooden Pallet Computer Desk -- Freebie
boards as long as your can from your material and trim the entire panel off after you have
glued it up.
●
Materials
You can build this desk with the following inexpensive materials:
1.
Wood
All the wood was recycled from wooden pallets used for shipping by industry and from
through out pieces of furniture.
2.
Hardware
1. 6 -- 24 inch by 5/16 threaded rods -- $10.50
2. 12 -- 3/8 flat washers -- $ .50
3. 52 -- 5/16 flat washers -- $ 2.00
4. 12 -- 5/16 nuts -- $ .50
5. 2 -- 12 inch by 1/4 threaded rods -- $ 2.50
6. 4 -- 1/4 flat washers -- $ .25
7. 4 -- 1/4 nuts -- $ .25
8. 36 -- 2.5 inch by 5/16 lag bolts -- $ 12.00
9. 8 -- 1-1/4 inch by #8 flat head wood screws -- $ .75
3.
Other Materials
1. 16 oz -- Wood Glue -- $4.00
4.
Omissions and Contingencies
Allow %15 for tax, sandpaper etc. -- $ 5.75
5.
Total -- $ 39.00
Well the price is right.
●
Tools Required
You will need the following tools:
http://www.charm.net/~jriley/pallet.html (4 of 11)12/03/2005 19:24:40

Woodware Designs -- Wooden Pallet Computer Desk -- Freebie
1.
Saw
Access to a table saw is best, but the job can be done with a radial arm saw, or a circular
saw.
2.
Drill
A drill and bits to drill a lot of .5 inches holes in wood.
3.
Work Bench
This work is best done on a proper work bench with a wood vice. You can do the work on
saw horses or even an old picnic table but you must be careful to clamp the wood well.
4.
Hammer
You need a heavy claw hammer. Assorted other hammers and pry bars may also be
helpful.
5.
Wrench
A socket wrench works best.
6.
Chisel
A common carpenters chisel but it must be sharp.
7.
Plane or Belt Sander
If you want a smooth top you will need a plane with a sharp blade. If you do not have a
plane now you can use a belt sander or leave it rough and promise to smooth it later.
●
Construction Notes
1.
Getting Wood
This desk is intended to be made from recycled wood. The wood can come from shipping
pallets, discarded furniture, or construction site waste. The prototype was made from 5
five pallets and two pieces of discarded furniture.
http://www.charm.net/~jriley/pallet.html (5 of 11)12/03/2005 19:24:40

Woodware Designs -- Wooden Pallet Computer Desk -- Freebie
In my neighborhood, large trash is placed out at the curb once a month. I have often found
this a good source of wood.
Scrap plywood can be cut into strips and used in this desk. This produces an interesting
effect if mixed in with the other wood. The edge of the plywood is very difficult to plane,
so it is best not to use plywood strips in top and keyboard shelf.
You can mix two-by and one-by material and even half inch slats. You can mix hard wood
and soft wood. You can even use some painted wood intentionally leaving thin colored
lines. Whatever looks good is good.
As recycled wood is generally of poor quality, you will need to collect a good amount
before starting work on the desk. You will be left afterwards with a good supply of
kindling wood.
2.
Taking Pallets Apart
Pallets are strongly nailed together. It takes some practice to take the apart without
cracking the wood.
Cut a good supply of scrap wood blocks. Two by Four stock about ten inches long works
well.
Do not beat directly on the pallet wood with a hammer. Always place a short block of
wood across the grain and beat on you scrap block.
Also use the blocks to hold the pallet up off the floor, so that you can drive the pallet
pieces down. This is less likely to split the pieces than prying the up.
Any time a nail head comes up high enough to get the hammer claw on it, stop beating
and pull out the nail. Again use scrap to protect the good wood. You will have to turn the
pallet over many times.
Carefully save the nails in an old coffee can. You will reuse a few but this is mainly to
keep the nails out of people's tires.
3.
Best Ends
When you have a good pile of wood, go though the pieces and cut off one end square.
This gets give you a reference end and lets you inspect the wood.
http://www.charm.net/~jriley/pallet.html (6 of 11)12/03/2005 19:24:40

Woodware Designs -- Wooden Pallet Computer Desk -- Freebie
You can often save a piece that is spilt at the end by working glue into the crack.
Also sort the wood for length, saving the longest pieces for the top. Save your very best
pieces for front edge of the top and shelf and good pieces for all the outside edges.
4.
Best Edges
If you have a plane and work bench, go though the pieces again planing one edge straight
and smooth. This gives you a reference edge for cutting and will make smoothing the
finished top much easier.
It will be much easier to get a beautiful flat surface on the top if it is free of all but the
smallest knots. Put your best wood in the top and put the best edges up.
5.
Cutting Strips
Cut the wood into strips the correct width. The top and legs are the same width but the
shelf is thinner. This is easy on a table saw but can be done with other power saws and a
fence. Be sure to clamp the work well and set the saw depth properly so that you do not
cut the support. Take your time with this step.
6.
Drilling Holes
Select three good pieces for use as drill patterns. Mark them with a 'P' and mark the top
and reference end. Layout the holes for the treaded rods. The rods should be about 1/4 the
way in from the ends of the finished panels. Drill small holes, just big enough for a scribe,
straight through the patterns.
Drill the rest of the strips using the patten and only the pattern to mark each one. Be
careful to always have the reference end in the same direction and the best edge up. The
holes should be a very loose fit on the threaded rods.
Lay out the strips with the good edge up to be sure you have enough. Be certain that you
have enough strips to fill up the rods with plenty to spare. The stack compresses at least an
inch when clamped down and you do not want the bold heads to stick out. You can drill
out the patterns for use as soon as you are sure that you are through with them.
You may want to trim the second ends now or wait until after the panels are glued up. It is
very hard to get all the pieces straight during gluing so plan on trimming them afterwards
if you can.
http://www.charm.net/~jriley/pallet.html (7 of 11)12/03/2005 19:24:40

Woodware Designs -- Wooden Pallet Computer Desk -- Freebie
You may wish to build the feet into the leg panels but cutting the two outside slats one
inch longer than the body of the panel. When glued you can trim only the upper edge and
the feet. The bottom edge between the feet will be a little uneven but this does not show.
7.
Chiseling Nut Recesses
Choose good pieces for the front and back of each panel. Two by material a good choice
here. If all you have is one-by or thinner material, then glue several strips together.
With a shape carpenter's chisel, cut out a neat pocket around the hole large enough to
easily handle the washer. If all you have is one straight chisel, you can make the
rectangular recesses shown in the drawings with slopped ends.
The recess must be deep enough to completely contain the nut, two washers, and two full
treads on the end of the rod. Make them as beep as you can without cutting though the
slats.
8.
Gluing Up
This is a good use for cheap glue. Also use up any old bottles of glue you have laying
around. The glue area is large and the treaded rods supply most of the strength.
Lay out all your slats for a panel. Be sure they have the reference ends the say way and the
best edge up.
Place one large washer, one small washer, and a nut on two threaded rods. Stick them
through the front piece with the rods pointing up. Tack nail or clamp the piece so that the
rods do not fall back through the holes and you stack up the slats on them. Apply a thin
coat of glue to each surface and thread the pieces one at a time over the rods. Be sure to
keep the reference end in the same direction.
Before you place the outside edge piece on, place washers and bolts on the rods and pull
them down. You will probably need to back them off and place one more slat on the stack.
If you can just barley get the nuts started with the outside pieces in place then you have
the right number of slats.
Lay the panel down and tap the slats as straight as you can with a hammer and block of
wood. Check the square. If the panel is way out of square then you may need to take the
back nuts off so slats will move around more.
Pull the nuts down evenly, a turn here and a turn there. Some glue, but not too much,
http://www.charm.net/~jriley/pallet.html (8 of 11)12/03/2005 19:24:40

Woodware Designs -- Wooden Pallet Computer Desk -- Freebie
should run from the cracks. If you have some long clamps, place them at the very ends of
the panel and pull them down too.
In the end you should have two threads showing at each rod end. The end of the rod must
not stick our of the recess. If the rods stick out then you need to get in one more thin slat
before the glue drys.
The leg panels should be the same width and just a little narrower than the top panel. If
you have a hack saw and file, you may want to shorten the leg panel rods by .5 inch.
The keyboard tray is make the same way but uses 1/4 inch rods and thinner slats. You do
need to trim this panel after the glue is dry.
I like to scrape off excess glue with a putty knife when it is gummy about twenty minute
after the glue up.
9.
Trimming Panels
If you have a circular saw it is easy to trim the panels after gluing. Simply measure them
carefully and clamp on a straight edge for the saw.
You can trim the keyboard shelf with a table or radial arm saw. It is the most important to
be trimmed properly.
Be extremely careful that you know exactly where the rods are when trimming.
10.
Bolting Blocks
Cut two-by stock into two-by-two bolting blocks. You will need four long ones for the
legs and short scraps for the bottom back brace. Predrill the blocks for the lag bolts.
11.
Back Braces
Cut two pieces five inches or wider for the back braces. This is a good use for scarp
plywood. These need to be three inches longer than the trimmed keyboard shelf.
Also cut a bottom shelf the same width as the keyboard shelf. Assemble the bottom brace
in a 'T' with the shelf and the bolt blocks. Use nails and glue. Use additional nailing blocks
if the shelf is made of plywood.
12.
Final Assembly
http://www.charm.net/~jriley/pallet.html (9 of 11)12/03/2005 19:24:40

Woodware Designs -- Wooden Pallet Computer Desk -- Freebie
Attach the bolt blocks to the inside of the leg panels and the keyboard shelf with glue, lag
bolts, and washers. Drill pilot holes and always use a washer with any bolt against wood.
Be very sure that the bolt blocks are even against the trimmed end and square the the front
edge. it is particularly important that the keyboard shelf blocks be exactly their same
width ad the shelf at their extended ends.
Lay the top out upside down. Center the keyboard shelf on it. Install one leg panel with
lags but no glue but do not tighten the bolts completely. Check that it is square to the front
of the top.
Install the second leg panel using the keyboard shelf as width gauge. Again use no glue
and leave the bolts a little loose.
Cut scrap blocks to hold the keyboard tray up the right amount and install the back set of
lag bolts.
Screw the top back brace in place. Again not glue. Be sure that the legs are square before
putting in the second set of screws. If you cannot push things around to get them square
then loosen the lag bolts.
Install the bottom back back brace with lags and screws, but no glue. Check the square of
the legs.
Turn the desk over and install the second set of lag bolts supporting the keyboard shelf. Be
sure that the shelf is parallel to the top.
Tighten all the lag bolts.
13.
Planing
The top will be much nicer if planed. This is not difficult if the top does not have too
many knots and you have the tools to keep the plane blade sharp. You will probably need
to place a heavy tool box on the bottom shelf while planing.
You can take a belt sander to the top if you prefer.
14.
Finish Optional
Finish for this desk is completely optional. You may do nothing at all and simply let the
http://www.charm.net/~jriley/pallet.html (10 of 11)12/03/2005 19:24:40

Woodware Designs -- Wooden Pallet Computer Desk -- Freebie
wood take color with age. You can stain the whole thing or you could even paint it. It is
up to you.
●
Conclusion
Congratulations, you have complete a good, solid computer desk largely from recycled materials.
You desk could easily be in use as a workbench a hundred years from now.
We need a picture of your desk with your name on our Web Site. This will show students
everywhere that they can build their own low-stress computer furniture.
Thanks again for visiting our Web site.
Woodware Designs, jriley@charm.net
http://www.charm.net/~jriley/pallet.html (11 of 11)12/03/2005 19:24:40
Document Outline
Wyszukiwarka
Podobne podstrony:
Desk pallet computer desk
Computer Desk
Desk Door & Legs Computer Desk
Typing Stand Computer Desk
wb288 Computer Desk
Desk Door & File Computer Desk (2 File)
Cardboard Computer Desk
Computer Desk(1)
Computer Desk(2)
Desk Door & Legs Computer Desk, Corner
Corner Study Center Computer Desk(2)
Desk Armoire Student Computer Desk
Desk Door & Look Down Computer Desk
Corner Study Center Computer Desk(1)
Desk Door & File Computer Desk (1 File)
Desk Computer Workstation
Desk Stand Up Computer Desk
Darmowa wyszukiwarka - HELP DESK, Ulepszanie Chomika, Wyszukiwarki
więcej podobnych podstron