
Woodware Designs -- Typing Stand Computer Desk -- Freebie
Copyright 2005
Typing Stand Computer Desk
When you first experiences the discomfort of Repetitive Strain Injury, it is a big help to reduce stress on
your hands immediately. You need a simple, low-stress desk that you or a friend can build quickly. It
must be adjustable so that you can work out the exact dimensions that are right for you. Later on you can
build a pretty desk to take its place.
The Typing Stand Computer Desk is this desk. It is based on the simple typing stand that was held a
typewriter in so many offices for so many years. It can be made in one afternoon from a single sheet of
plywood and some scrap lumber in one afternoon. It can get you some relief today. You can also adjust
the keyboard height, the monitor height, the keyboard to monitor distance, and mouse left or right by
moving a few bolts and screws. You can find the layout that is just right for you.
We even have an exercise on our Web Site to help you find just the right dimensions for you. It is
. You can customize this desk for your exact needs in a couple hours working with a friend. If you
are under a doctor's or physical therapists care, follow any instructions they give you very carefully.
You can buy all the materials for this desk at your local home store. Have the plywood sheet cut there so
it can be easily carried in nearly any car.
http://www.charm.net/~jriley/tstand.html (1 of 10)12/03/2005 19:18:55
Woodware Designs -- Typing Stand Computer Desk -- Freebie
We also have a slightly larger version of this desk that is on casters. The cost of the materials is slightly
higher, but it features roll-around convenience, room for a printer, and a pull-out keyboard. This version
is handy in a rec room or if you want to quickly roll the computer into a storage area. You can get these
drawings by asking for the roll-around version in the text box.
If you like our fun Freebies, remember we can only keep this Web site open if we sell our
or you follow our ad links and make purchases from our sponsors. Thank
you.
●
Download the Detailed Drawings
This free design includes four detailed sketches.
us with this little form for the detailed drawing.
http://www.charm.net/~jriley/tstand.html (2 of 10)12/03/2005 19:18:55

Woodware Designs -- Typing Stand Computer Desk -- Freebie
1.
Desk Construction
You can make this desk by:
1. Downloading the drawings and this text.
2. Studying this information and locating the materials.
3. Purchasing all the materials locally.
4. Having the plywood cut.
5. Hand cutting and drilling the small pieces.
6. Gluing up parts.
7. Assembling the desk.
8. Finishing all pieces
2.
Discussion of Sketches
After you download the sketches, these notes will help you understand them more completely.
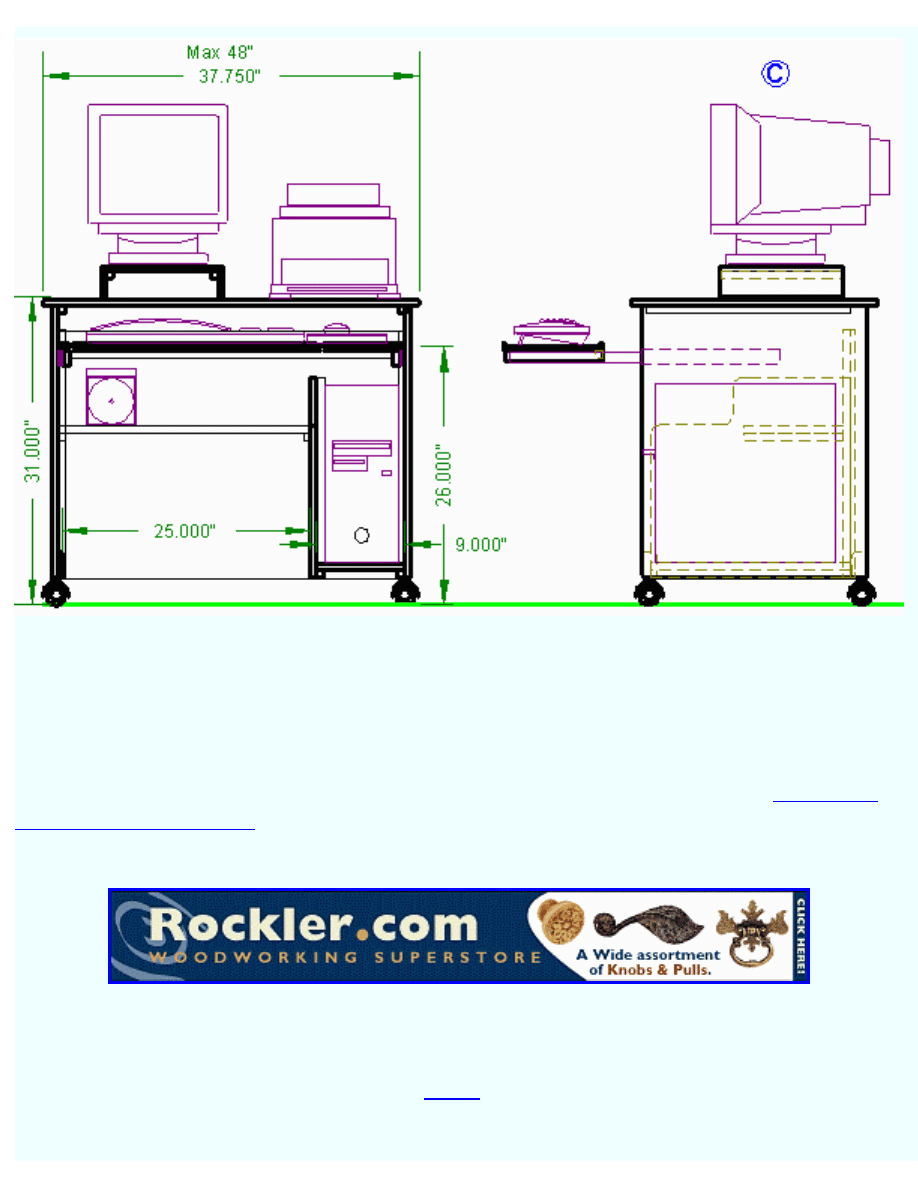
1.
Typing Stand Computer Desk
The front view shows the desk with the mouse on the users right and the computer in the
tower position. The monitor sits on a small stand that can be made to the height you need.
The keyboard shelf is shown at 26 inches high which puts it near most people's laps but
you can set it at any height you need. The width is shown at 25 inches which allows the
desk to be made from a single sheet of plywood but does not provide room for most
printers.
The side view shows the center of the keyboard 20 inch out from the monitor face. This
can be easily adjusted by the length of the keyboard support arms. The desk sits on simple
feet but you can shorten the sides and add casters if you like. The back and internal shelf
help stiffen the desk so that it feels solid.
2.
Typing Stand Commuter Desk, Top View, Sketch #2
This sketch is shows the desk as a small nearly square top with a long keyboard shelf
mounted well out from the front. The keyboard shelf is longer than the table top to allow
room for the mouse. The keyboard shelf may extend either to the right of left depending
on the side you need the mouse.
http://www.charm.net/~jriley/tstand.html (3 of 10)12/03/2005 19:18:55

Woodware Designs -- Typing Stand Computer Desk -- Freebie
3.
Typing Stand Computer Desk, Plywood Layout, Sketch #3
This sketch shows the layout of the desk pieces on one 4-by-8 foot by 1/2 inch plywood.
The top is double thick. Dimensions for first three cuts are shown. These cuts can be made
at the home center so that you can easily get the materials home.
4.
Typing Stand Computer Desk, Stick Pieces, Sketch #4
These are the pieces of wood need for the desk. Most are used as screw blocks to hold the
plywood pieces together. They can be purchased as molding or (much cheaper) be cut
from scrap wood if you have a power saw.
3.
Materials
This Desk is made from a single sheet of 1/2 inch plywood and a few sticks of wood. The parts
are assembled with glue, wood screws, bolts, and brads.
1.
Wood
Plywood:
■
1 -- Fir, .50 in., A/C, 4x8 feet, $24.00 each -- $24.00
( 15/32 in. thick plywood is OK )
Molding:
■
12 ft -- Pine, .75 by .75 inches, $.37/ft -- $ 4.44
( .5 by .75 stock is acceptable, or cut them from scrap lumber)
■
6 ft -- Pine, .25 quarter round, $.35/ft -- $ 2.10
Wood Subtotal: $30.54
2.
Hardware
■
4 -- Feet -- $ 2.20
■
100 -- Screw, flat head, #8 1 inch -- $ 3.20
■
4 -- machine Bolts, 1/4 inch, 1.5 inches long -- $ .40
■
4 -- 'T' Nuts, 1/4 -- $ .75
■
4 -- Flat Washers, 1/4 -- $ .20
http://www.charm.net/~jriley/tstand.html (4 of 10)12/03/2005 19:18:55

Woodware Designs -- Typing Stand Computer Desk -- Freebie
■
4 -- Finder Washers, 1/4 -- $ .75
■
1 box -- Brads, 5/8 inch -- $ 1.00
■
8 oz. -- Woodworker's Glue -- $ 3.80
Hardware Subtotal: $12.30
3.
Finish:
■
1 qt. -- Paint, oil based -- $ 7.00
Finish Subtotal: $ 7.00
4.
Omissions and Contingencies (~20%)
( Tax, sand paper, etc.) $10.16
5.
Estimate Total Cost $60.00
This is only an estimate (made in the August 1998). The price may vary in your area. We save
some money on the prototype by cutting all the screw blocks from scrap wood.
4.
Tools
This desk was designed to be build using only a few hand tools that a student or home owner
might have, purchase at reasonable cost, or borrow. These tools are all useful for general around-
the-house maintenance and can fit in a tool box.
1. Electric Drill, 3/8 chuck
2. Screw Mate bit for #8 screws -- $6.20 new
3. Miter Box and hand saw -- under $20.00 new
4. Tri-Square
5. Screw drivers
6. Hammer and small nail set
You will also need sand paper, paint brushes. etc. It would be nice to have a block plane and a
four-in-hand rasp.
5.
Building Your Desk
http://www.charm.net/~jriley/tstand.html (5 of 10)12/03/2005 19:18:55

Woodware Designs -- Typing Stand Computer Desk -- Freebie
This is your desk and you can build it to suit your likes and needs.
1.
Your Custom Heights
Work out the best height for the monitor and keyboard for your personal needs. The
exercise
on our Web Site shows how to do this in detail. The basic idea is to
find the arrangement that is least stressful for you. The keyboard shelf will probably be
just above you lap.
Also decide if you want the mouse on the left or right side. You may also want to cut
squares of scrap wood a little bigger than you mouse pad to raise the mouse up by about
one inch.
2.
Casters?
Before starting you might want to consider if you want to put casters on this desk. If you
do then you will need to shorten the length of the sides by the height of the casters. Four
blocks are shown to thicken the desk sides for the caster mounts.
3.
Cutting the Plywood
Sketch #2 shows the plywood lay out with the first three cuts shown. The dimensions for
these cuts make allowance for the saw blade width of future cuts. It is simplists to have
these cut made at the plywood supplier and so that you can easily bring the pieces home.
The rest of the cuts can be made with any fine toothed saw. A jig saw working against a
straight edge does well and can handle the cut outs at the bottom of the sides. For the
prototype we used a plywood blade in a radial arm saw and a jig saw.
4.
Gluing the Top
The top consist of two pieces of plywood glued together. Cut the two pieces as close as
you can to exactly the same size. Glue the two 'C' sides together and clamp and weight the
top while it sets.
When the glue gets gummy (about 20 minutes) scrape off the excess with a putty knife.
Pretty up the edge with a block plane, rasp, saw, or sand paper.
5.
Building the Sides
The two sides have the all the screw blocks glued and screwed to them. Later the back and
http://www.charm.net/~jriley/tstand.html (6 of 10)12/03/2005 19:18:55

Woodware Designs -- Typing Stand Computer Desk -- Freebie
shelf can be screwed to the blocks without glue so that the desk can be taken apart. The
shelf screw blocks can be set at any convenient height. The back screw blocks should be
set in so that the back is flush with the side edge.
The four foot block simply thicken the bottom of the sides so that it thick enough for feet
or casters. The blocks are glued and bradded on and may be placed on the inside or the
outside of the sides.
6.
Assembling the Base
<
Glue and brad a strip of wood the the back of the shelf to serve as a back stop and to
stiffen the shelf.
Drill pilot holes for the screws and install the back and shelf without glue. Place the top on
the floor with the best side down and the best edge forward. Carefull center the base
upside down on the top and attache it with screws only.
7.
Building the Keyboard Shelf
Cut two pieces of quarter round to match the length of the keyboard shelf. Cut the head off
one of the brads and use it as a drill bit. Careful drill pilot holes for brads every six inches
along the quarter round. Glue and grad the quarter round to the front and back of the
keyboard shelf.
Glue the two pieces of each keyboard shelf support arm together. When gummy, scrap off
excess glue. When dry flatten the area where the keyboard shelf will set. Drill two holes
and install the 'T' bolts in these supports.
8.
Installing the Keyboard Shelf
Clamp or temporally screw the keyboard support arms to the sides of the desk. Play with
the height and distance in until you have the keyboard height and monitor to keyboard
distance you need. Mark the 'T' bolt holes and drill them for the 0.25 inch bolts. You may
drill a hole pattern in the side if you want some adjustment capability.
Attach the arms with the bolts, flat washers, and finder washers. Finder washers are
simply large washers that spread the force over a larger area of the wood.
Set the keyboard shelf on the support arms. Decide if you want a left or right mouse and
screw it in place with four screws. Do not glue it as you may want to change the mouse
http://www.charm.net/~jriley/tstand.html (7 of 10)12/03/2005 19:18:55

Woodware Designs -- Typing Stand Computer Desk -- Freebie
position later.
9.
Building the Monitor Stand
If you need the monitor to be higher than the desk top you may build a small monitor
stand to raise it slightly. The height you need may depend on the type of glasses you wear
but you neck must be at a comfortable angle.
The sides of the stand can be any width you need and are better made from scrap boards
rather then the plywood pieces shown.
6.
Finishing
You may finish your desk any way you like. You can simply paint the desk if plan to use it only
for a short time or you can do a little better job on the finishing. We recommend:
❍
Disassemble the desk.
❍
Fill the Plywood Edges
❍
Sand
❍
Prim with thinned shellac
❍
Sand with fine paper
❍
Paint with oil based enamel
❍
Sand with fine paper
❍
Paint with a second coat of enamel
The plywood edges require special attention. Fill and seal all the exposed plywood edges with the
following steps:
1. Insert splinters of wood and glue into all open spaces. These should be loose fits and not
forced in. Do not cut them off until after the glue is dry and then use a sharp knife.
2. Rough sand all edges. Round off the outside plys very slightly.
3. Fill visible edges with wood putty. Force the material hard into the exposed edge with a
putty knife.
4. Fine sand all edges.
5. Seal the edges with sealer, thinned shellack, or thinned paint.
6. Let dry completely
7. Sand again with fine paper.
First fill all visible holes with glue and wood splinters. Toothpicks work well. Let dry and sand
with course paper over a wooden block. Fill with wood putty (I like the powder you mix with
http://www.charm.net/~jriley/tstand.html (8 of 10)12/03/2005 19:18:55

Woodware Designs -- Typing Stand Computer Desk -- Freebie
water). Let this dry thoroughly and sand again. Seal with a thinned coat of shellac. Sand again
and refill. Sand again, seal again, and sand with fine sand paper. In the process you can round the
edges of the plywood a little bit. The edges are now ready to be painted.
Priming the wood with thinned shellac help seal the wood, and helps the paint both to stick and to
cover more area.
Two coats of oil based enamel should last for many years.
7.
Completion
All that is left is to reassemble the desk, and install the computer cables.
1.
Cabling
are given in our Web
page under 'Freebies'. The tie wrap mounts described there will help to keep cables neat
and out of the way. The remote power switch is much easier to use than several hard-to-
find switches.
Conclusion
Thanks again for using a Woodware Computer Furniture Plans. We very much want to know how you
are getting along with your project and would be happy to answer any questions by email.
If you send us a picture of your finished desk, we would be happy to put it on our web page. We need
pictures of desks with real people standing beside them.
●
Return to Woodware Designs main page.
●
Return to the book project page.
●
http://www.charm.net/~jriley/tstand.html (9 of 10)12/03/2005 19:18:55

Woodware Designs -- Typing Stand Computer Desk -- Freebie
Woodware Designs, jriley@charm.net
http://www.charm.net/~jriley/tstand.html (10 of 10)12/03/2005 19:18:55
Document Outline
Wyszukiwarka
Podobne podstrony:
Desk Stand Up Computer Desk
Computer Desk
Desk Door & Legs Computer Desk
wb288 Computer Desk
Desk pallet computer desk
Desk Door & File Computer Desk (2 File)
Cardboard Computer Desk
Computer Desk(1)
Computer Desk(2)
Desk Door & Legs Computer Desk, Corner
Corner Study Center Computer Desk(2)
Desk Armoire Student Computer Desk
Desk Door & Look Down Computer Desk
Corner Study Center Computer Desk(1)
Desk Door & File Computer Desk (1 File)
Desk Wooden Pallet Computer Desk
Desk Computer Workstation
Computerspieler Jargon
więcej podobnych podstron