
69
In This Chapter
6
Designing Levers
In this tutorial, you start with a lever inserted from the
parts library, and then you refine the design. You use
many of the design options available in AutoCAD
®
Mechanical 6. You also create a drawing detail and add
some dimensions.
■
Using the library to insert a part
■
Preliminary settings: snap
configuration
■
Creating construction lines
■
Creating additional construction
lines
■
Creating a contour and applying
a fillet
■
Creating a contour and
trimming projecting edges
■
Cross-hatching the lever
■
Dimensioning the lever
■
Creating a detail and additional
dimensions

70
|
Chapter 6
Designing Levers
Key Terms
Term
Definition
construction lines
Lines, which are infinite in both directions or rays, which are infinite starting at a
point that can be inserted into the drawing area. You use construction lines to
transfer important points (for example, center points of holes) into other views or
drawing areas.
construction geometry
A line or an arc created with construction lines. Using construction geometry in
2D drawings helps define the shape of a contour.
detail
A portion of a design drawing that cannot be clearly displayed or dimensioned in
the overall representation (surface texture symbols) but can be enlarged to show
the details.
distance snap
To give the dimensions in a drawing a uniform appearance, Power Dimensioning
and Automatic Dimensioning enable automatic insertion of the dimension line at
a defined distance from the object being dimensioned. While dragging the
dimension line dynamically, you will find that it remains “fixed” and is highlighted
in red as soon as the required distance to the object being dimensioned is
reached.
library
A feature that makes it possible to store parts such as blocks and drawings in a
library. For every inserted part, an icon can be created. The icon is put in the
display section on the right side of the dialog box along with an assigned name.
Power Command
A collective term for the Power Copy, Power Recall, Power Edit, Power
Dimensioning, Power Erase, and Power View commands.
Power Dimensioning
Power Dimensioning is a very useful tool for generating linear, radial and diameter
dimensions, which minimizes the number of the individual actions required while
generating a dimension. Power Dimensioning selects the type of linear dimension
(horizontal, vertical, or aligned), based on the selected point, and the dimensions
of the drawing can have a uniform style using the distance snap.

Extending the Design
|
71
Extending the Design
First, you start a new drawing template with ISO standard. Then you load the
initial drawing using the Library.
To open a template
1
Open a new drawing.
Menu
File ➤ New
Command
NEW
The AutoCAD Today dialog box opens.
2
In the Today dialog box, in the section My Drawings, choose the tab Create
Drawings and select the template am_iso.dwt.
This opens a new drawing template. Now you insert the drawing from the
library.
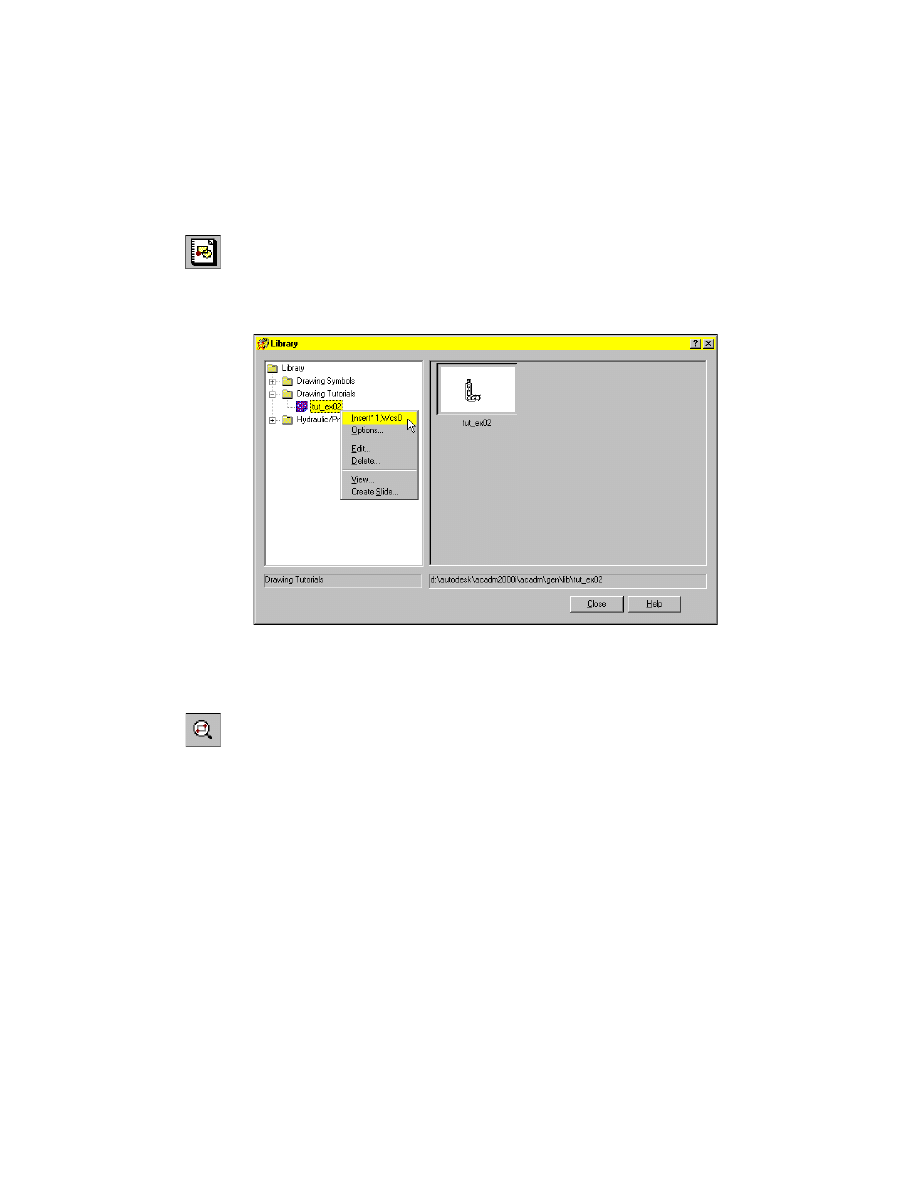
Using the Library to Insert Parts
Insert the required part from the library.
72
|
Chapter 6
Designing Levers
To insert a drawing from the library
1
Start the Library.
Menu
Insert ➤ Library
Command
AMLIBRARY
2
Double-click the tut_ex03 file in the Library, or select Insert from the context
menu.
3
Respond to the prompt as follows:
Specify insertion point:
Specify any point in the drawing
4
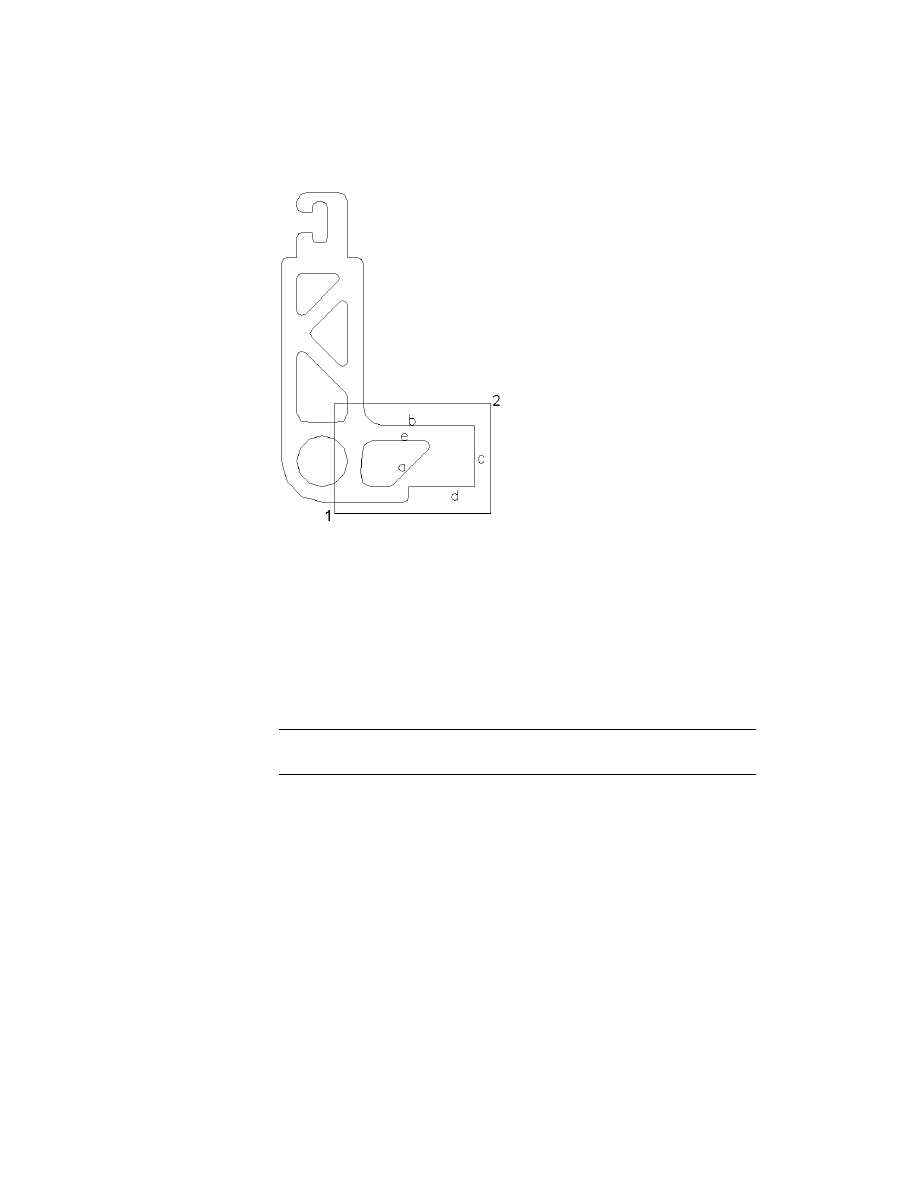
Start the Zoom Window command, responding to the prompt.
Menu
View ➤ Zoom ➤ Window
Command
ZOOM
Specify first corner:
Specify first corner (1)
Specify opposite corner:
Specify opposite corner (2)
Extending the Design
|
73
Save your file under a different name or to a different directory to preserve
the original tutorial file.
Preliminary Settings: Snap Configuration
In addition to the AutoCAD snap, Mechanical snap options, like arc radial,
arc tangent, and so forth are available. You also have four different snap set-
tings, which can be configured separately for a quick switch to a different
snap setting. For example, you can use different snap settings for detailing or
general design.
NOTE
The snap defaults can be set in the Mechanical Options dialog at the
Preferences tab.
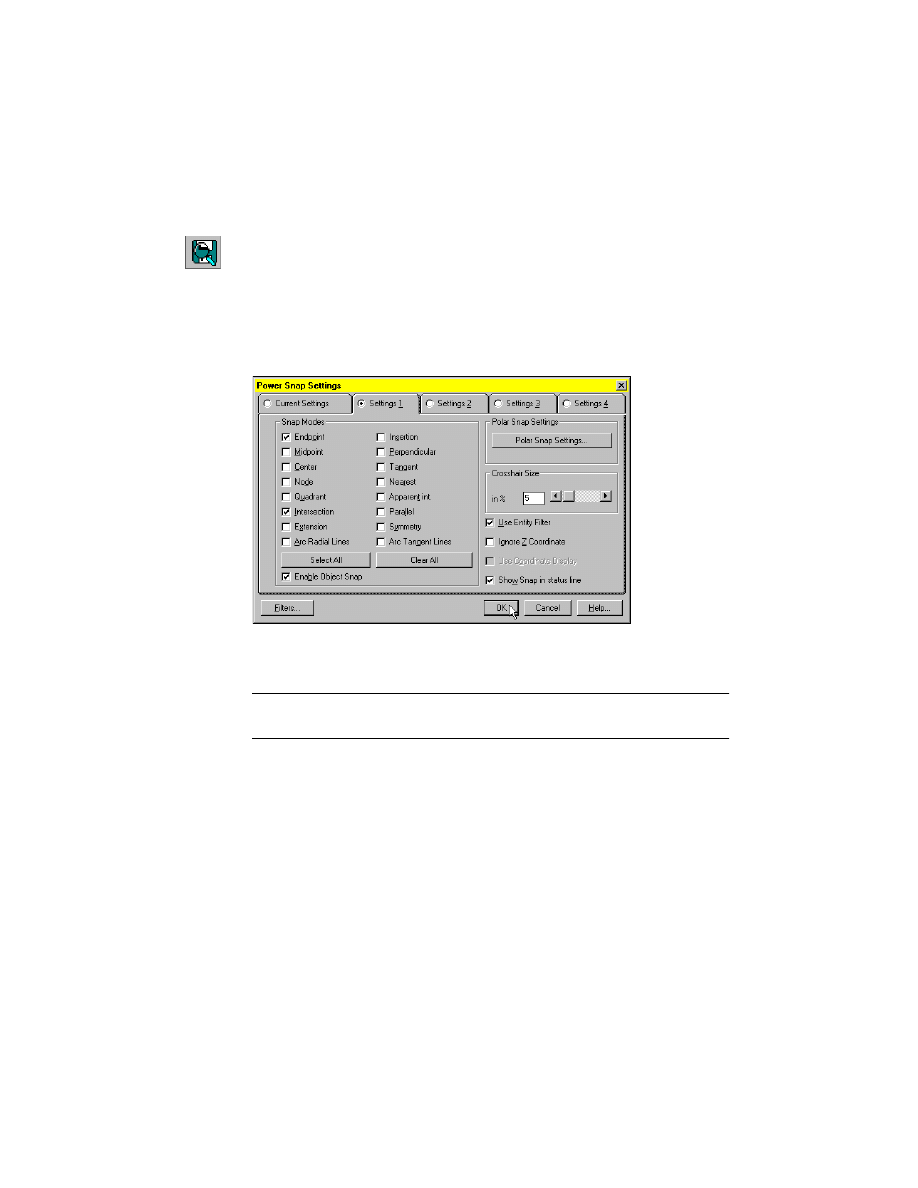
Before starting the design, you should define the object snaps, which you will
use in later operations.
74
|
Chapter 6
Designing Levers
To configure the Power Snap settings
1
Start the Power Snap settings.
Menu
Assist ➤ Draft Settings ➤ Power Snap Settings 1-4
Command
AMPOWERSNAP
2
In the Power Snap Settings dialog box, specify:
Setting 1:
Endpoint, Intersection
Setting 2:
Endpoint, Center, Quadrant, Intersection, Parallel
Setting 3:
Perpendicular
3
After configuring the settings, activate Setting 1, and choose OK.
Save your file.
NOTE
Within a command, the various object snap functions are also accessible.
Hold down the
SHIFT
key, and right-click.
Creating Construction Lines (C-Lines)
Construction lines are very useful when you start your design process. With
their help, you draw some kind of a design grid with your defined values for
distance and angles. After generating the design grid, you simply trace your
contour with the contour layer.
Now insert the construction lines, which will help with the drawing of con-
tour lines.
Extending the Design
|
75
To create construction lines
1
Start the Draw Construction Lines command.
Menu
Design ➤ Construction Lines ➤ Draw Construction Lines
Command
AMCONSTCRS
If you have started the command using the menu, the Construction Lines
dialog box opens. If you started the command directly using the toolbar or
the command line, you can skip step 2.
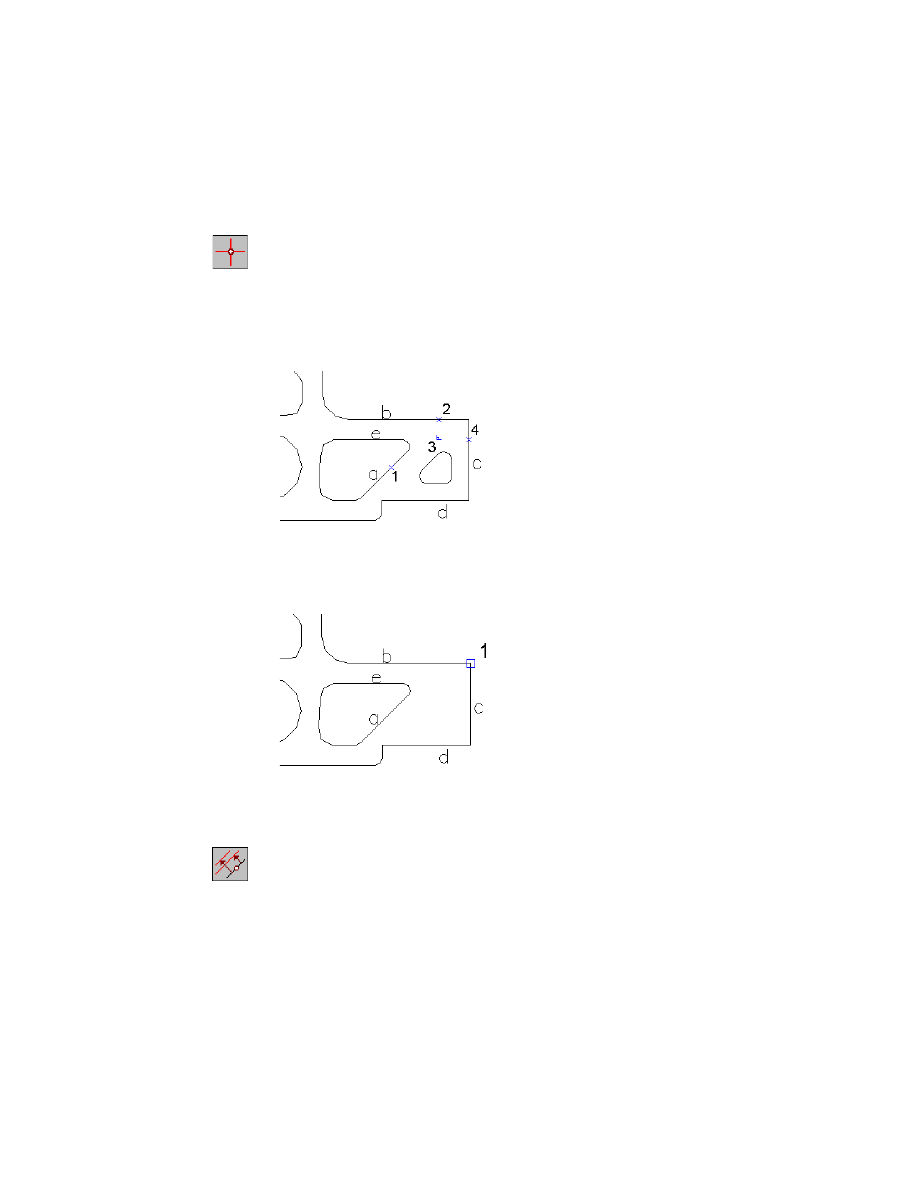
2
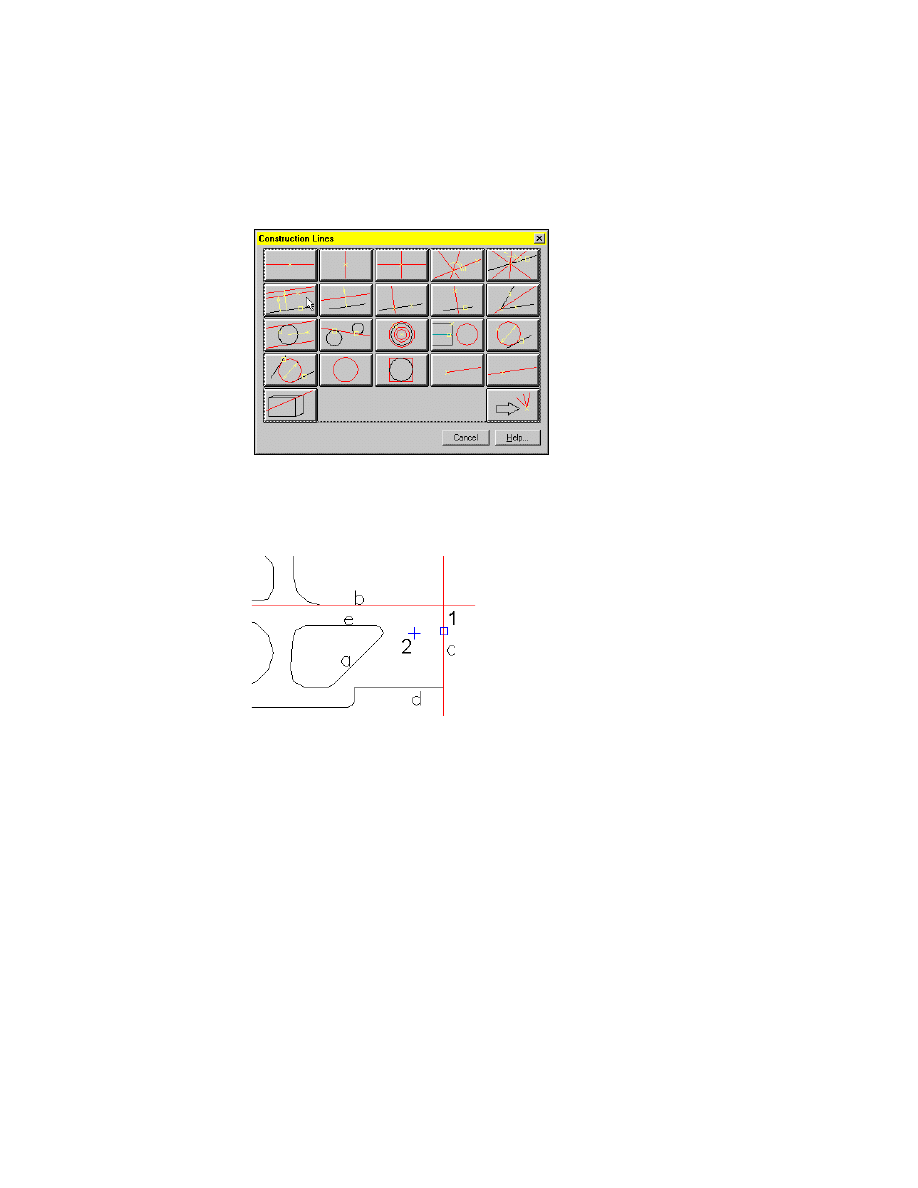
In the Construction Lines dialog box, choose the Cross icon.
3
Respond to the prompts as follows:
Specify insertion point:
Specify the intersection of line b and line c (1)
Specify insertion point:
Press
ENTER
4
Next, draw two lines parallel to the vertical and horizontal lines of the con-
struction line cross.
5
Start the Draw Construction Lines command.
Menu
Design ➤ Construction Lines ➤ Draw Construction Lines
Command
AMCONSTPAR
If you started the command using the menu, the Construction Lines dialog
box is displayed.
76
|
Chapter 6
Designing Levers
6
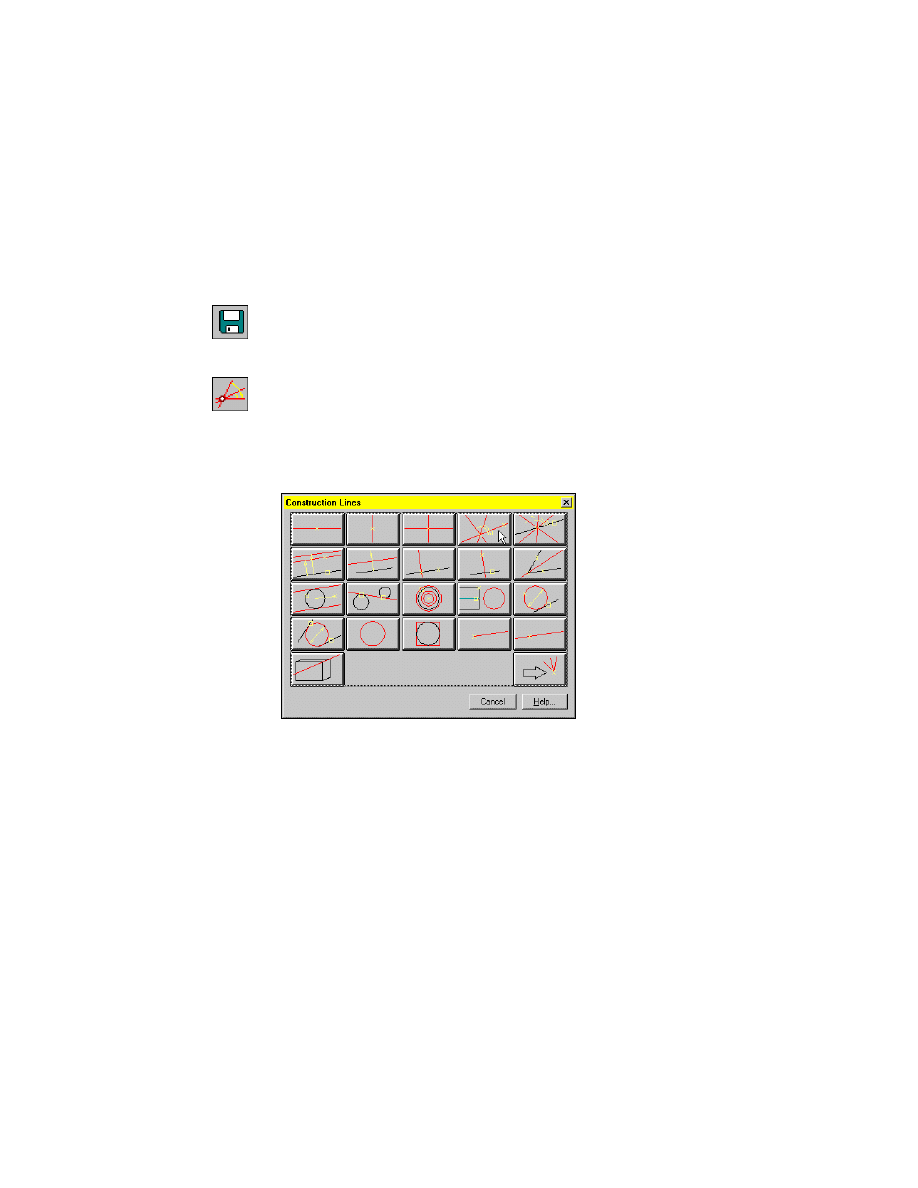
In the Construction Lines dialog box, choose the Parallel with Full Distance
icon.
7
Respond to the prompts as follows:
Select line, ray or xline:
Select line c (1)
Specify insertion point or Distance (xx|xx|xx..) <10|20|30>:
Enter 3|9
Specify point on side to offset:
Specify a point to the left of line c (2)
8
Insert the second set of parallel lines, and respond to the prompts as follows:
Select line, ray or xline:
Select line b
Specify insertion point or Distance (xx|xx|xx..) <3|9>:
Enter 4.5|9.5
Specify point on side to offset:
Specify a point below line b
9
Press
ENTER
.
Save your file.
Extending the Design
|
77
Creating additional C-Lines
AutoCAD Mechanical offers a choice of C-line options.
To create additional construction lines
1
Activate snap setting 2.
Menu
Assist ➤ Draft Settings ➤ Power Snap Configuration 2
Command
AMPSNAP2
2
Start the Draw Construction Lines command.
Menu
Design ➤ Construction Lines ➤ Draw Construction Lines
Command
AMCONSTHB
If you started the command using the menu, the Construction Lines dialog
box is displayed.
3
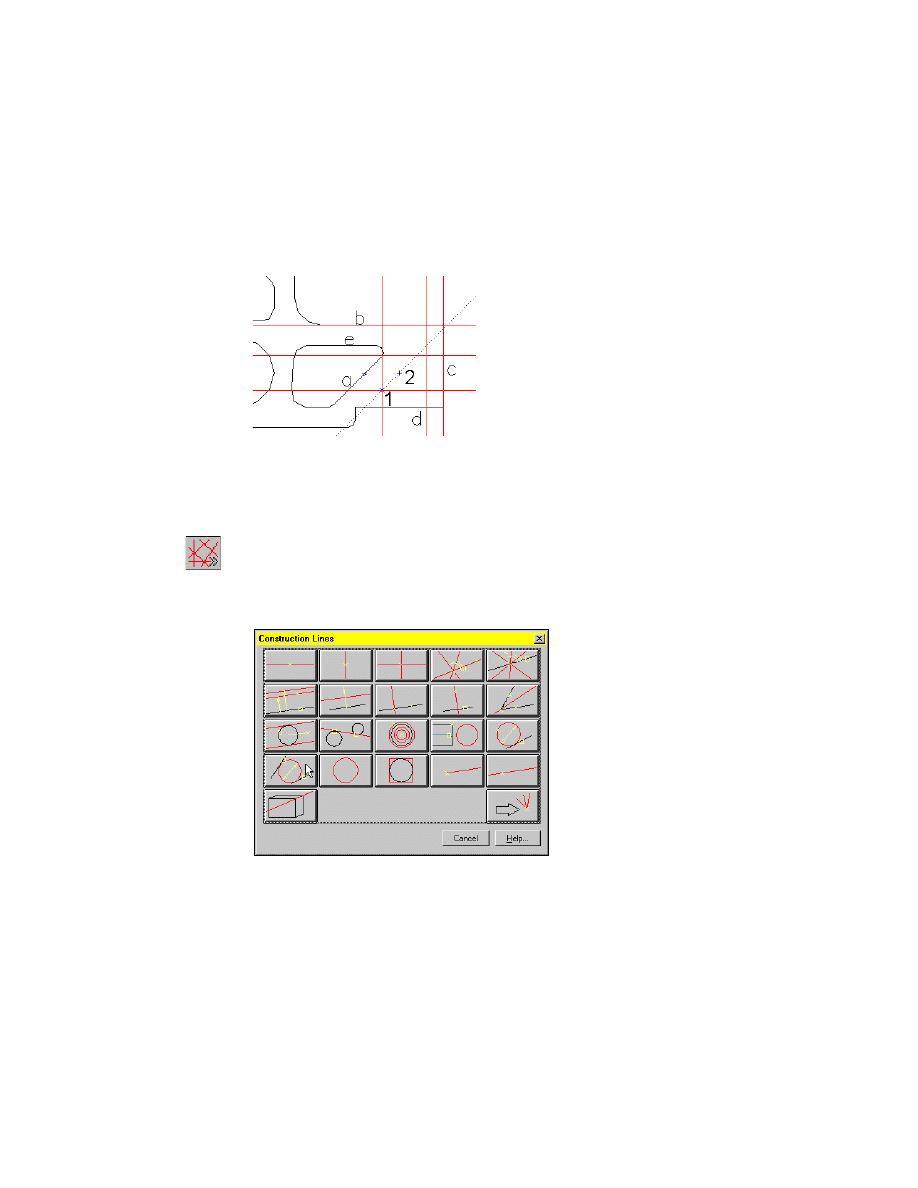
In the Construction Lines dialog box, choose the Two Points or Angle icon.
78
|
Chapter 6
Designing Levers
4
Respond to the prompts as follows:
Specify first point:
Select the first point (1)
Specify second point or Angle (xx|xx|xx..) <30|45|60>: Move the cursor over line a
and then back to the rectangle. When the Parallel symbol appears, click (2).
5
Press
ENTER
to finish the command.
Now, you draw tangential circles between the diagonal C-line and the right
vertical line and lower horizontal line of the rectangle.
6
Start the Draw Construction Lines command.
Menu
Design ➤ Construction Lines ➤ Draw Construction Lines
Command
AMCONSTKR
7
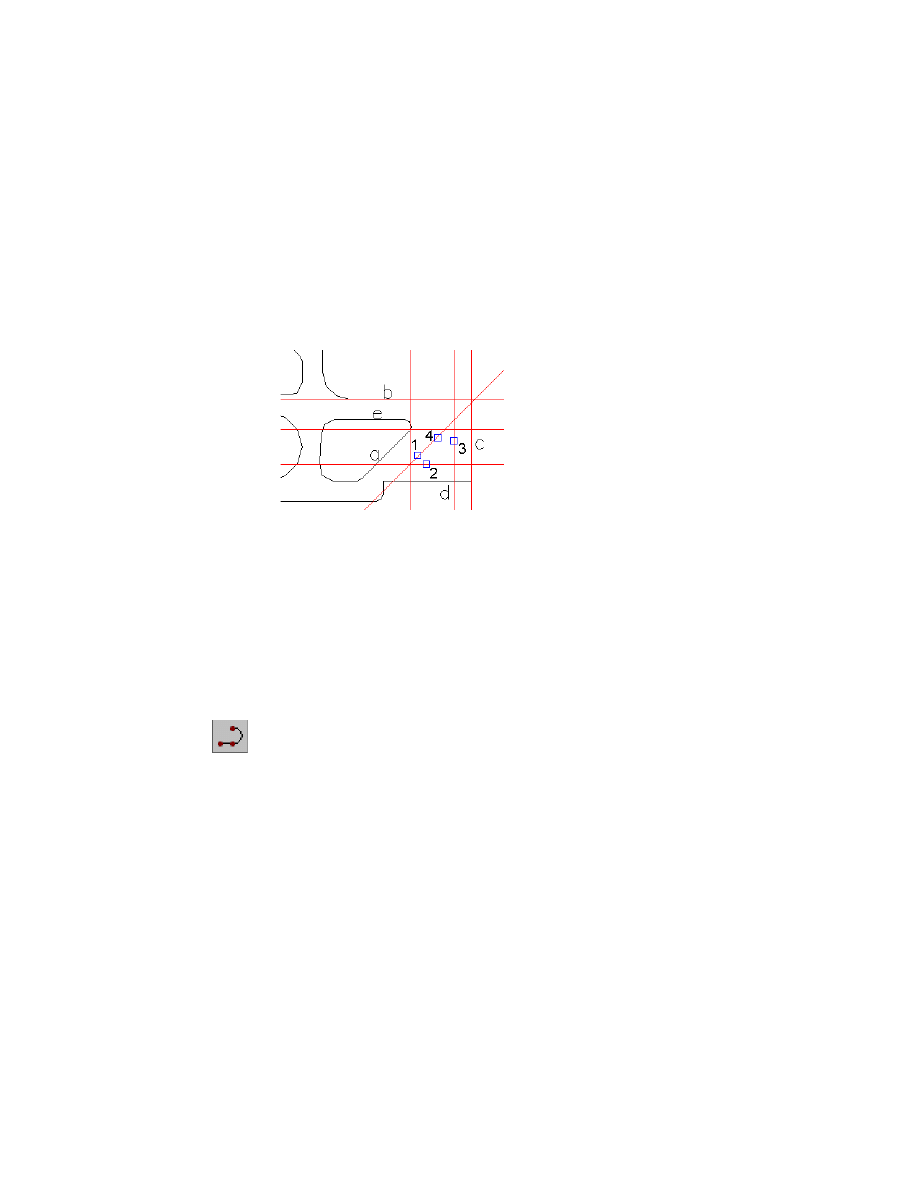
In the Construction Lines dialog box, choose the Circle Tangent to 2 Lines
icon.
Extending the Design
|
79
8
Draw the two circles by responding to the prompts as follows:
Select first tangent:
Select tangent point (1)
Select second tangent:
Select tangent point (2)
Specify diameter:
Enter 2
Select first tangent:
Select tangent point (3)
Select second tangent:
Select tangent point (4)
Specify diameter <2>:
Enter 2
9
Press
ENTER
to end the command.
All construction lines have been inserted, and the contour can be generated.
Save your file.
Creating a Contour and Applying a Fillet
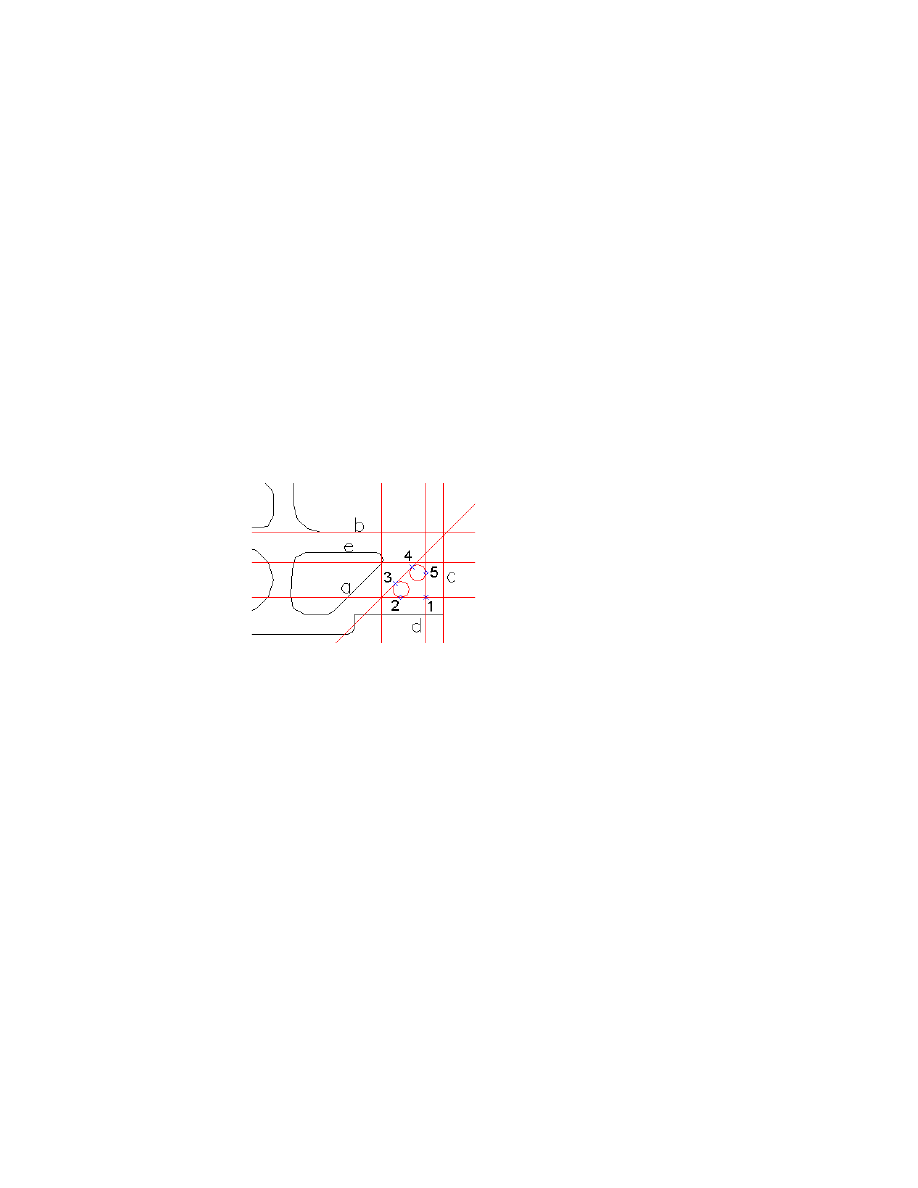
Now, you connect the two tangential circles with the right part of the rect-
angle, to build a filleted triangle.
To create and edit a contour
1
Start the Polyline command.
Menu
Design ➤ Polyline
Command
PLINE
80
|
Chapter 6
Designing Levers
2
Create the contour by responding to the prompts as follows:
Specify start point:
Specify the intersection point (1)
Specify next point or [Arc/Halfwidth/Length/Undo/Width]:
Specify next point (2)
Specify next point or [Arc/Close/Halfwidth/Length/Undo/Width]:
Enter A
Specify endpoint of arc or [Angle/CEnter/CLose/Direction/Halfwidth/Line/
Radius/Second pt/Undo/Width]:
Specify next point (3)
Specify endpoint of arc or [Angle/CEnter/CLose/Direction/Halfwidth/Line/
Radius/Second pt/Undo/Width]:
Enter L
Specify next point or [Arc/Close/Halfwidth/Length/Undo/Width]:
Specify next point (4)
Specify next point or [Arc/Close/Halfwidth/Length/Undo/Width]:
Enter A
Specify endpoint of arc or [Angle/CEnter/CLose/Direction/Halfwidth/Line/
Radius/Second pt/Undo/Width]:
Specify next point (5)
Specify endpoint of arc or [Angle/CEnter/CLose/Direction/Halfwidth/Line/
Radius/Second pt/Undo/Width]:
Enter CL
Now, erase the C-Lines. You can erase all C-lines by calling one command.
Extending the Design
|
81
3
Erase all C-Lines.
Menu
Modify ➤ Erase ➤ Erase all Construction Lines
Command
AMERASEALLCL
NOTE
You can switch construction lines on and off temporarily by choosing
Assist > Layer / Layergroup > Construction Line On/Off.
4
Apply a fillet to the corner of the triangle.
Menu
Modify ➤ Fillet
Command
AMFILLET2D
5
Respond to the prompts as follows:
(Dimension mode:OFF)(Trim mode) Current fillet radius = 2.5
Select first object or [Polyline/Setup/Dimension] <Setup>:
Press
ENTER
6
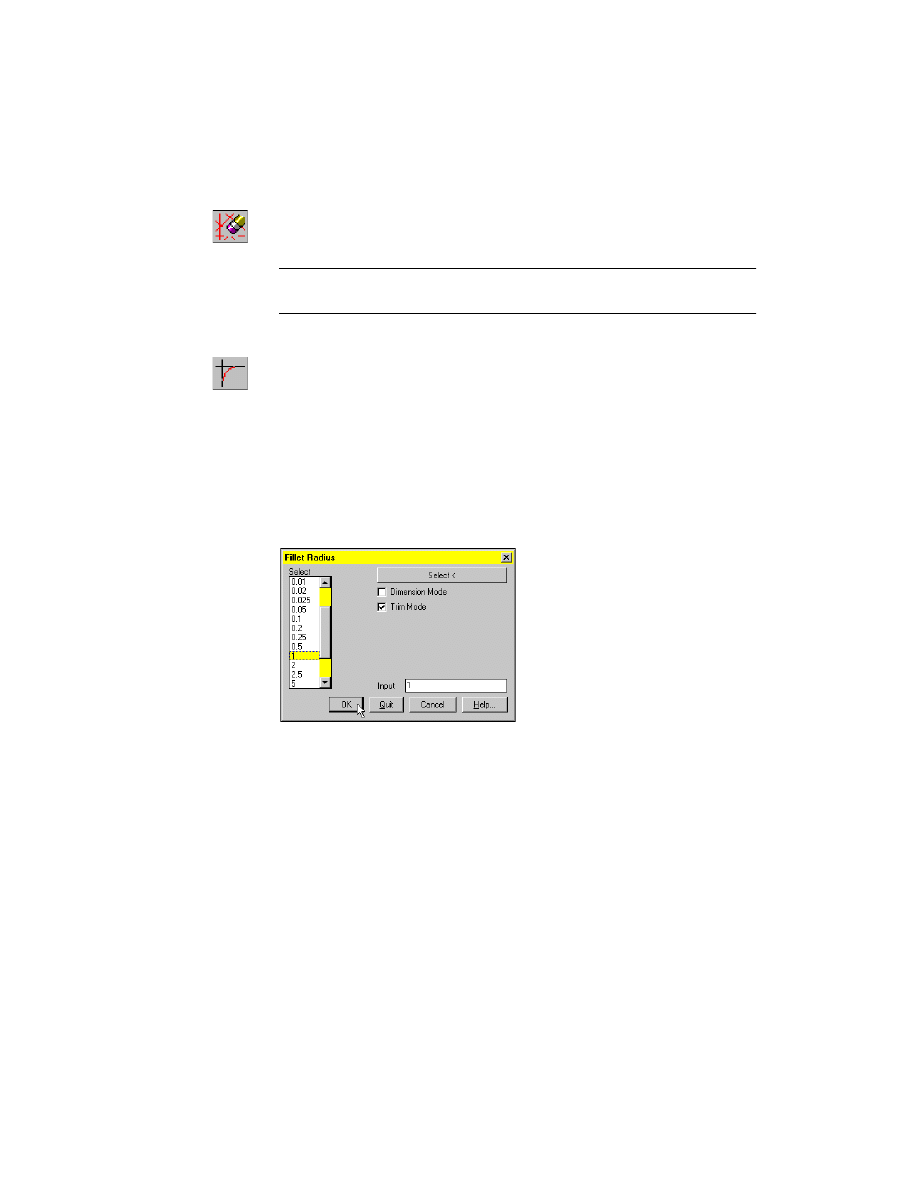
In the Fillet Radius dialog box, specify:
Input:
1
Trim Mode:
On
Choose OK.
82
|
Chapter 6
Designing Levers
7
Respond to the prompts as follows:
(Dimension mode:OFF)(Trim mode) Current fillet radius = 1
Select first object or [Polyline/Setup/Dimension] <Setup>:
Enter P
Select polyline:
Select a point on the polyline near the corner
8
Press
ESC
to cancel the command.
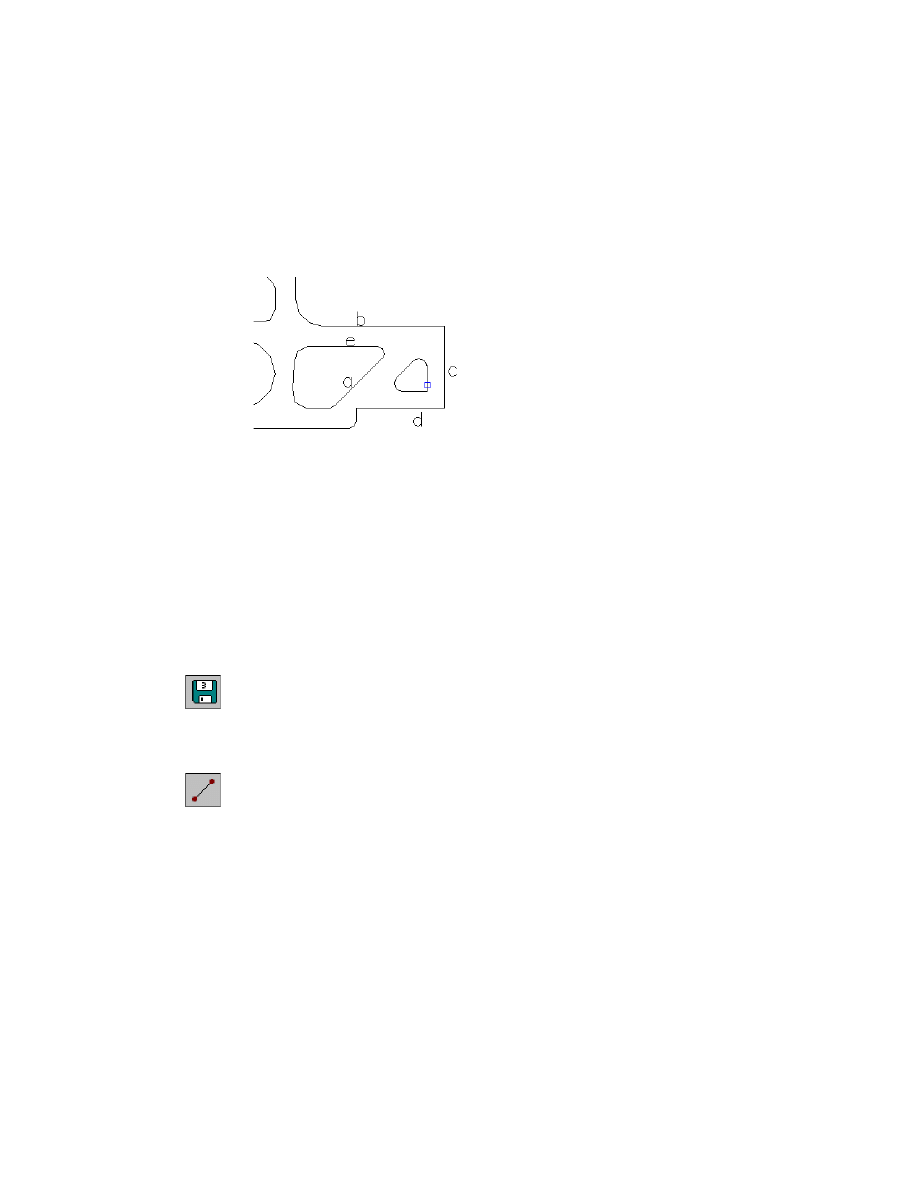
The triangular contour is complete.
Save your file.
Creating a Contour and Trimming Projecting
Edges
Now, you create another part of the contour and trim projecting edges.
To create and edit a contour
1
Activate Power Snap Setting 3 command.
Menu
Assist ➤ Draft Settings ➤ Power Snap Configuration 3
Command
AMPSNAP3
Next, insert the next contour.
2
Start the Line command.
Menu
Design ➤ Line
Command
LINE
Extending the Design
|
83
3
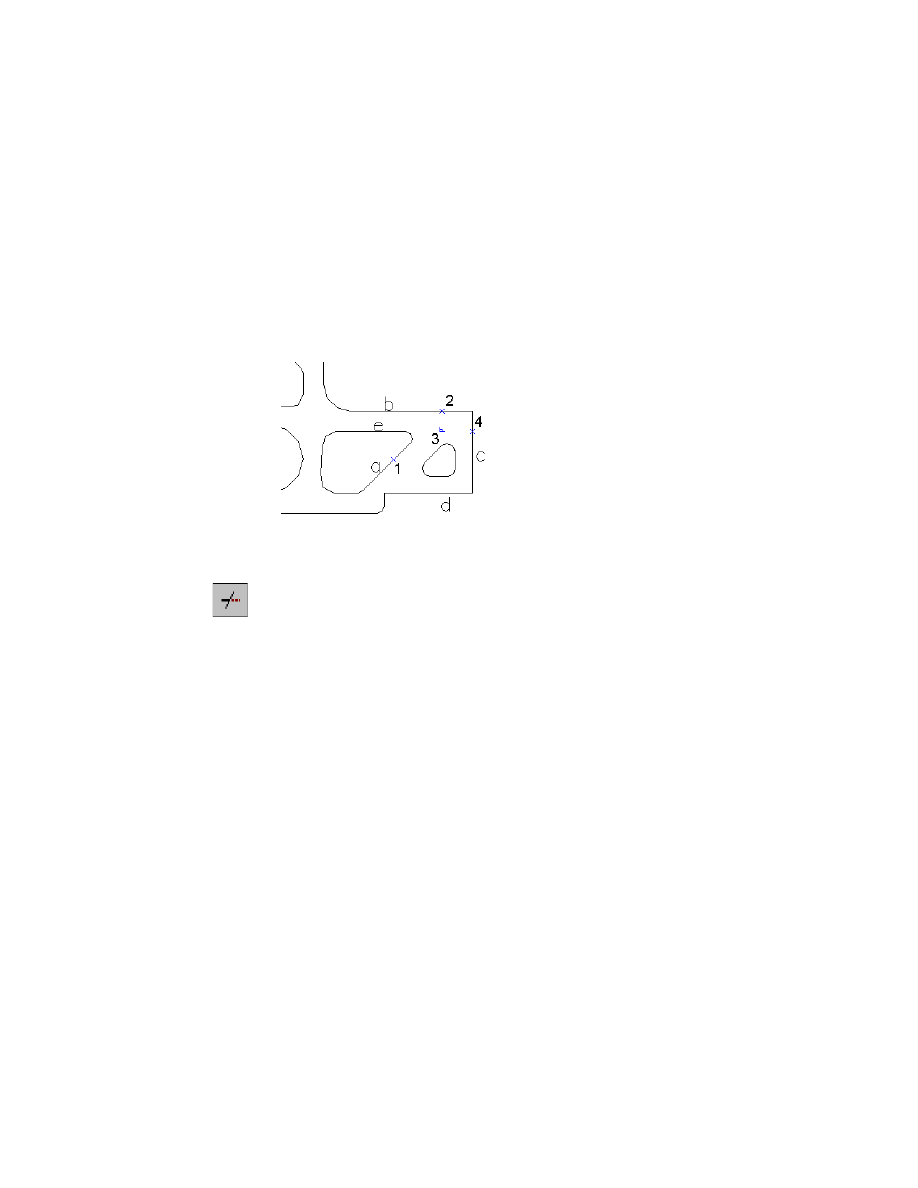
Respond to the prompts as follows:
Specify first point:
Hold down the
SHIFT
key, right-click, and choose Intersection
_int of:
Select line a (1)
and:
Select intersection on line b (2)
Specify next point or [Undo]:
Hold down the
SHIFT
key, right-click, and choose
Perpendicular. Then trace over line e, and click the perpendicular point (3)
Specify next point or [Undo]:
Drag the cursor to the right, crossing over line c, and select intersection point (4)
Specify next point or [Close/Undo]:
Press
ENTER
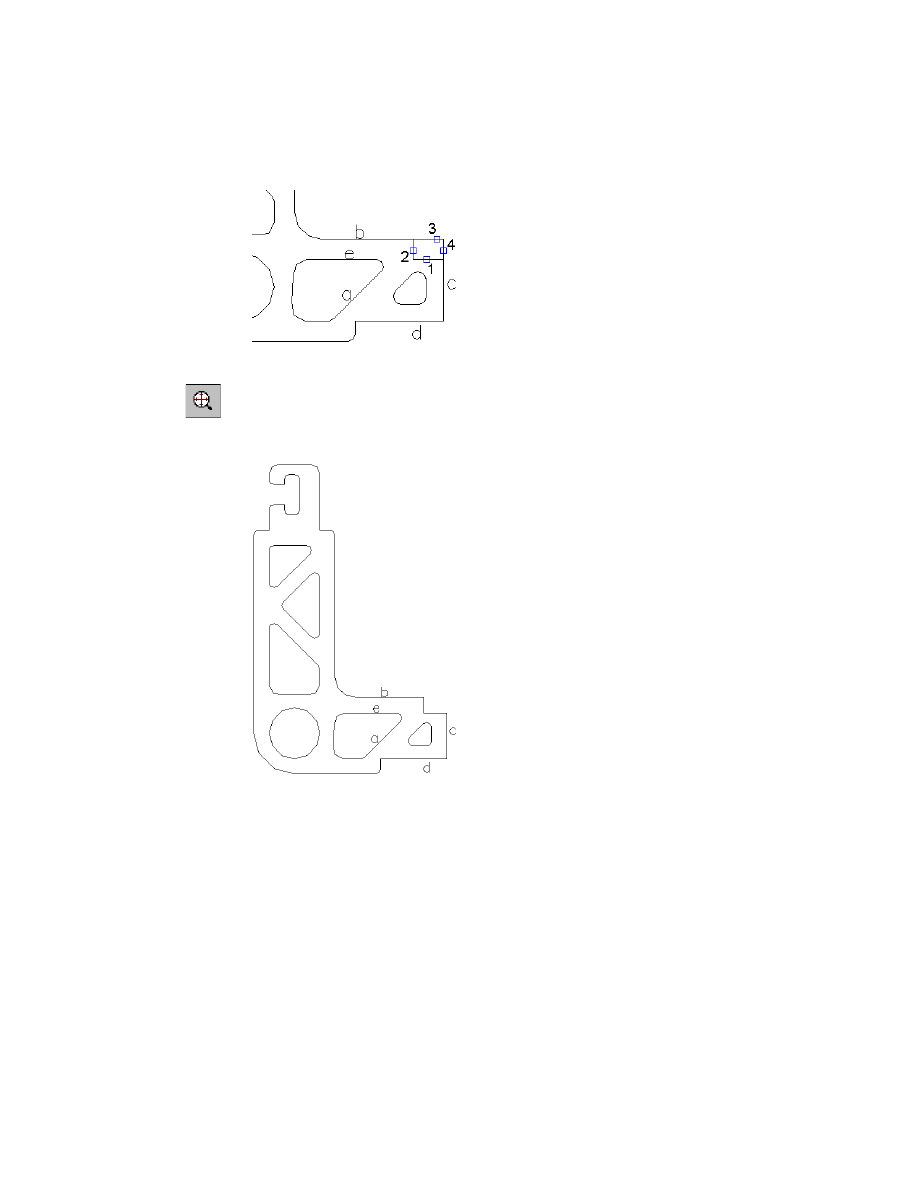
Now, trim the projecting edges at the upper edge of the lever.
4
Start the Trim command.
Menu
Modify ➤ Trim
Command
TRIM
5
Respond to the prompts as follows:
Current settings: Projection = UCS, Edge = None
Select cutting edges:
Select Objects:
Select cutting edge (1)
Select Objects:
Select cutting edge (2)
Select Objects:
Press
ENTER
Select object to trim or shift-select to extend or [Project/Edge/Undo]:
Select object to trim (3)
Select object to trim or shift-select to extend or [Project/Edge/Undo]:
Select object to trim (4)
Select object to trim or shift-select to extend or [Project/Edge/Undo]:
Press
ENTER
84
|
Chapter 6
Designing Levers
6
Zoom to the extents of the lever.
Menu
View ➤ Zoom ➤ Extents
Command
ZOOM
The contour is complete and looks like this:
Save your file.
Cross-Hatching the Lever
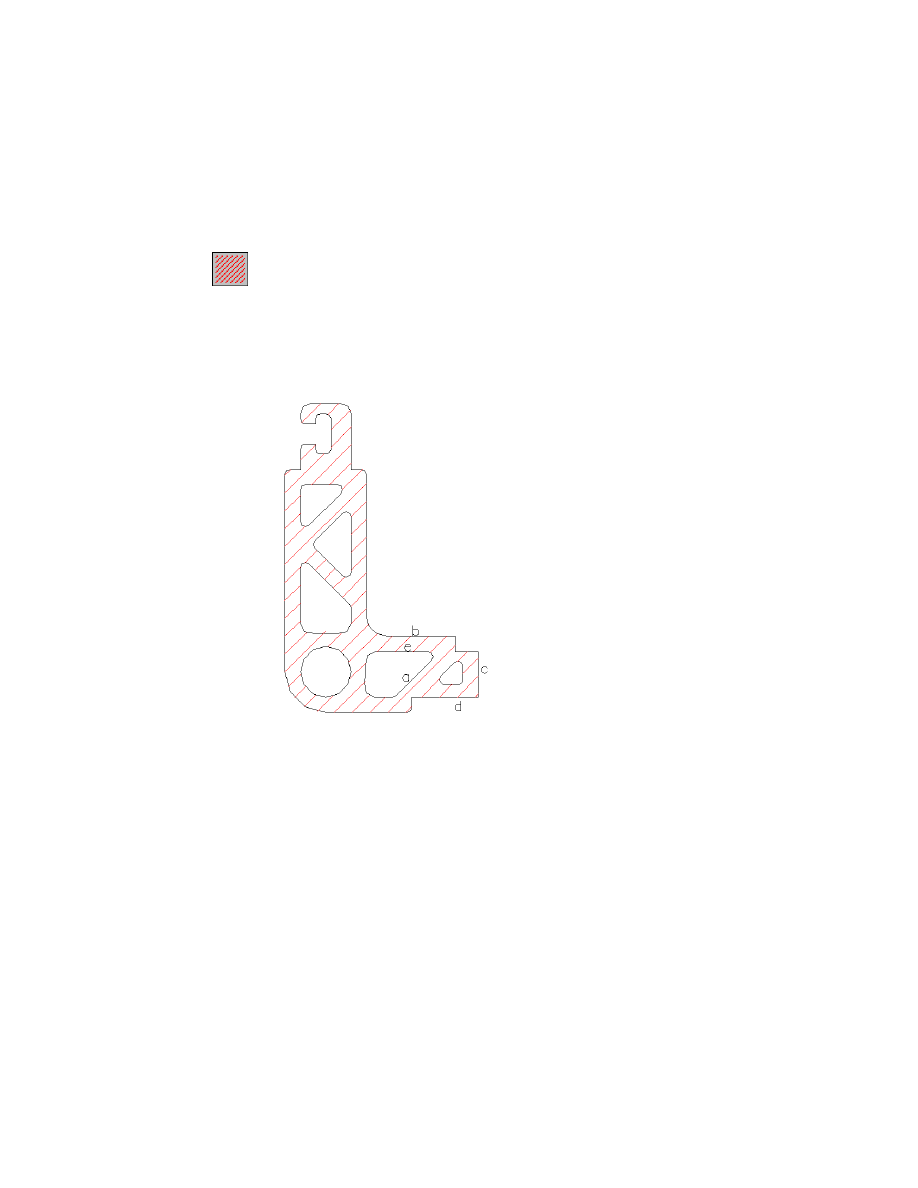
Cross-hatching is easy with AutoCAD Mechanical. Just choose one of the pre-
defined cross-hatching styles, and click a point within the contour to be
hatched.
Extending the Design
|
85
To hatch a contour
1
Start the Hatch command, using an angle of 45 degrees and 2.5 mm / 0.1
inch spacing.
Menu
Design ➤ Hatch ➤ Hatch 45 deg. 2.5mm/0.1 inch
Command
AMHATCH_45_2
2
Respond to the prompt as follows:
Select additional boundary or point in area to be hatched or [Select
objects]:
Click a point inside the contour (outside the cutouts)
The lever is hatched. It looks like this:
Save your file.
Dimensioning the Lever
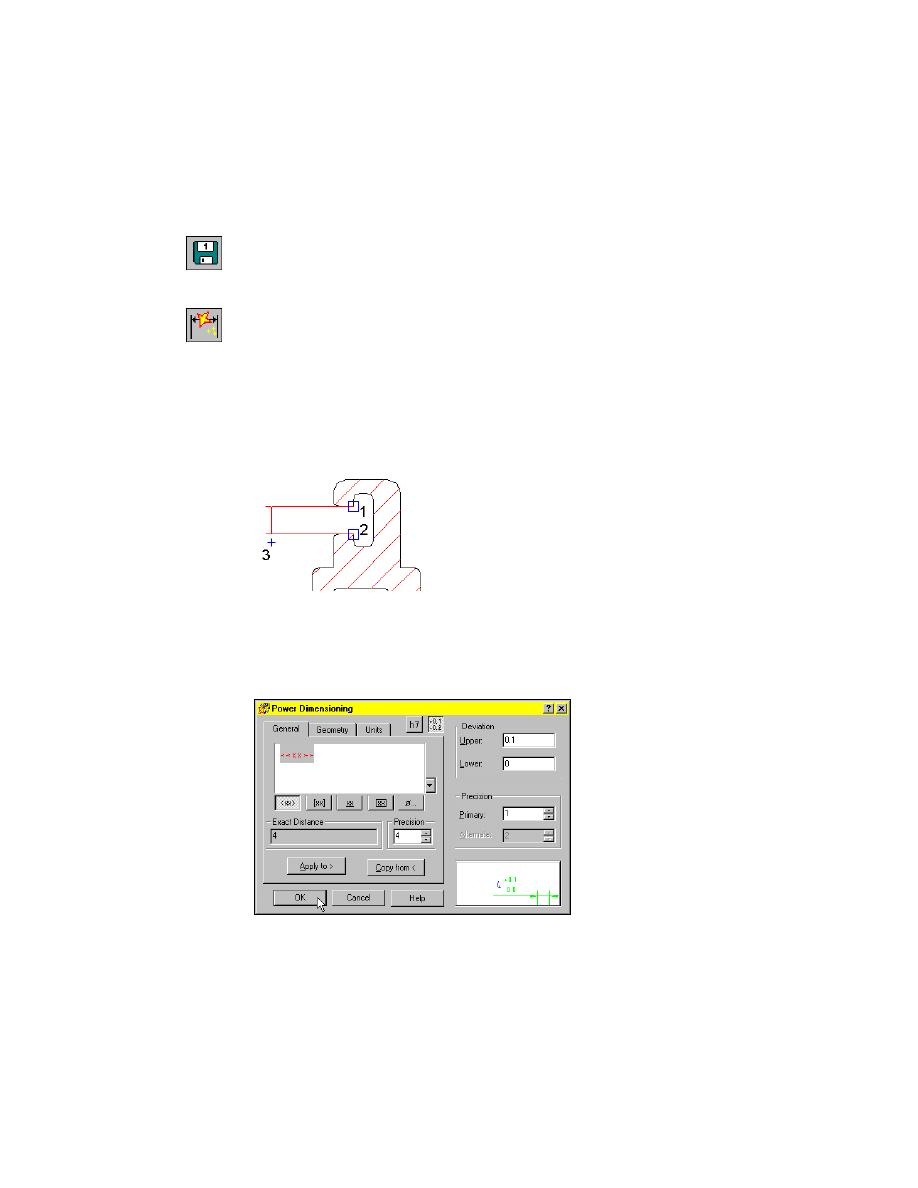
Now, dimension the lever, using the Power Dimensioning command.
86
|
Chapter 6
Designing Levers
To dimension a contour
1
Start the Power Snap Setting 1 command.
Menu
Assist ➤ Draft Settings ➤ Power Snap Configuration 1
Command
AMPSNAP1
2
Start the Power Dimensioning command.
Menu
Annotate ➤ Power Dimensioning
Command
AMPOWERDIM
3
Respond to the prompts as follows:
(SINGLE) Specify first extension line origin or [Angular/Options/Baseline/Chain/
Update] <Select>:
Select the first corner point of the lever opening (1)
Specify second extension line origin:
Select the second corner point (2)
Specify dimension line location or [Options/Pickobj]:
Drag the dimension line to the left until it is highlighted in red, and left-click (3)
4
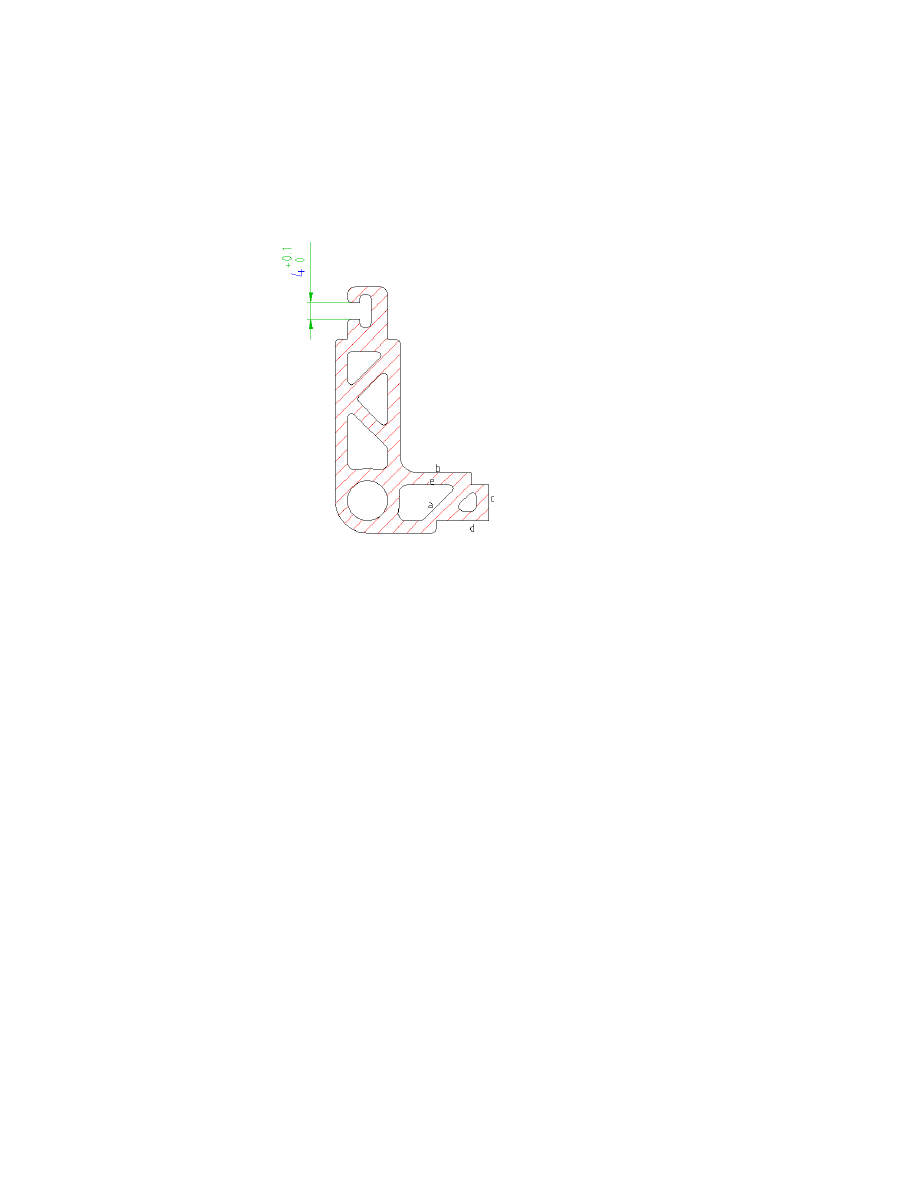
In the Power Dimensioning dialog box, click the Add Tolerance icon and
specify:
Deviation: Upper:
0.1
Deviation: Lower:
0
Precision: Primary:
1
Choose OK.
Extending the Design
|
87
5
Press
ENTER
twice to finish the command.
The lever looks like this:
Save your file.
Creating a Detail and Additional Dimensions
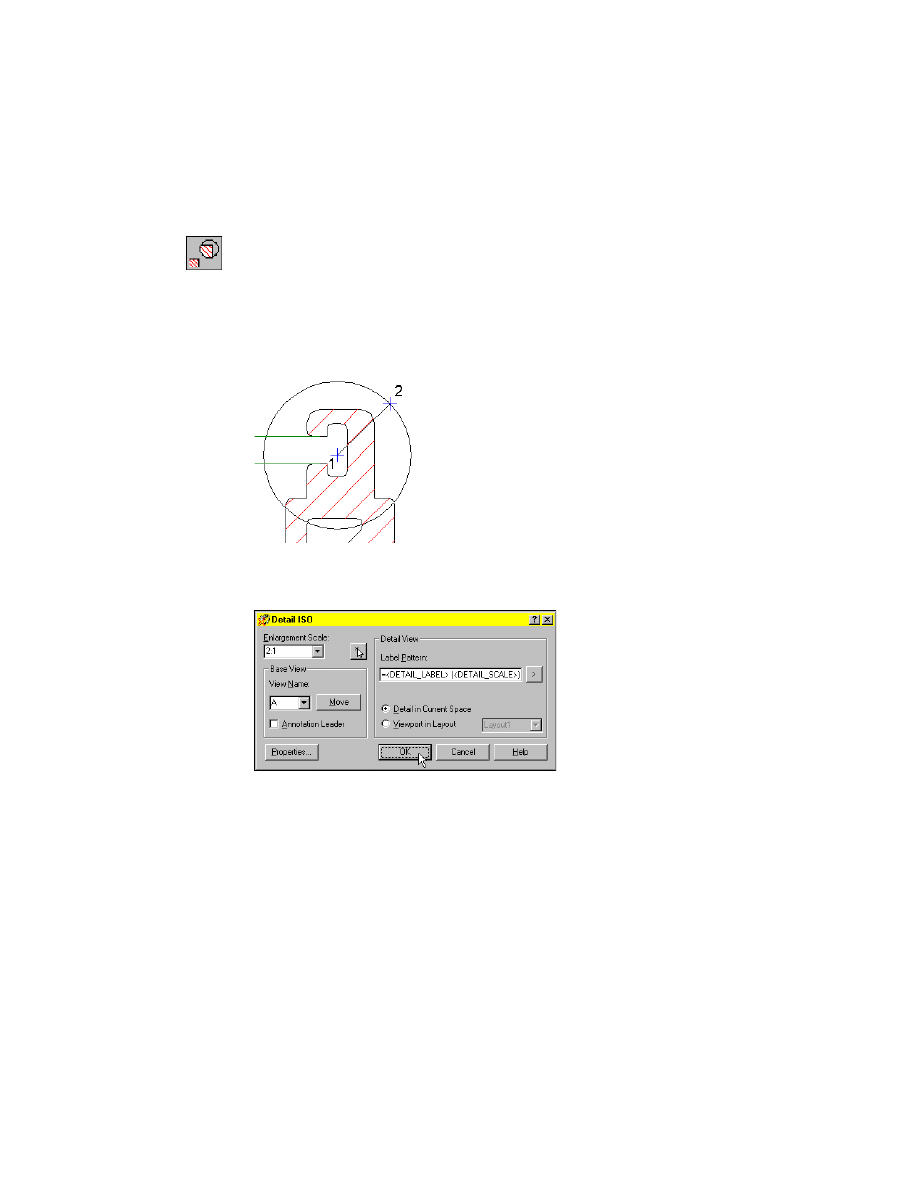
Now, define a detail of the upper part of the lever.
88
|
Chapter 6
Designing Levers
To create a detail
1
Start the Detail command.
Menu
Design ➤ Detail
Command
AMDETAIL
2
Respond to the prompts as follows:
Center of circle or [Rectangle/Object]:
Click a point in the center of the area to be detailed (1)
Specify radius or [Diameter]:
Drag the radius to the appropriate size and click (2)
3
In the Detail dialog box, specify:
Detail View:
Detail in Current Space
Extending the Design
|
89
4
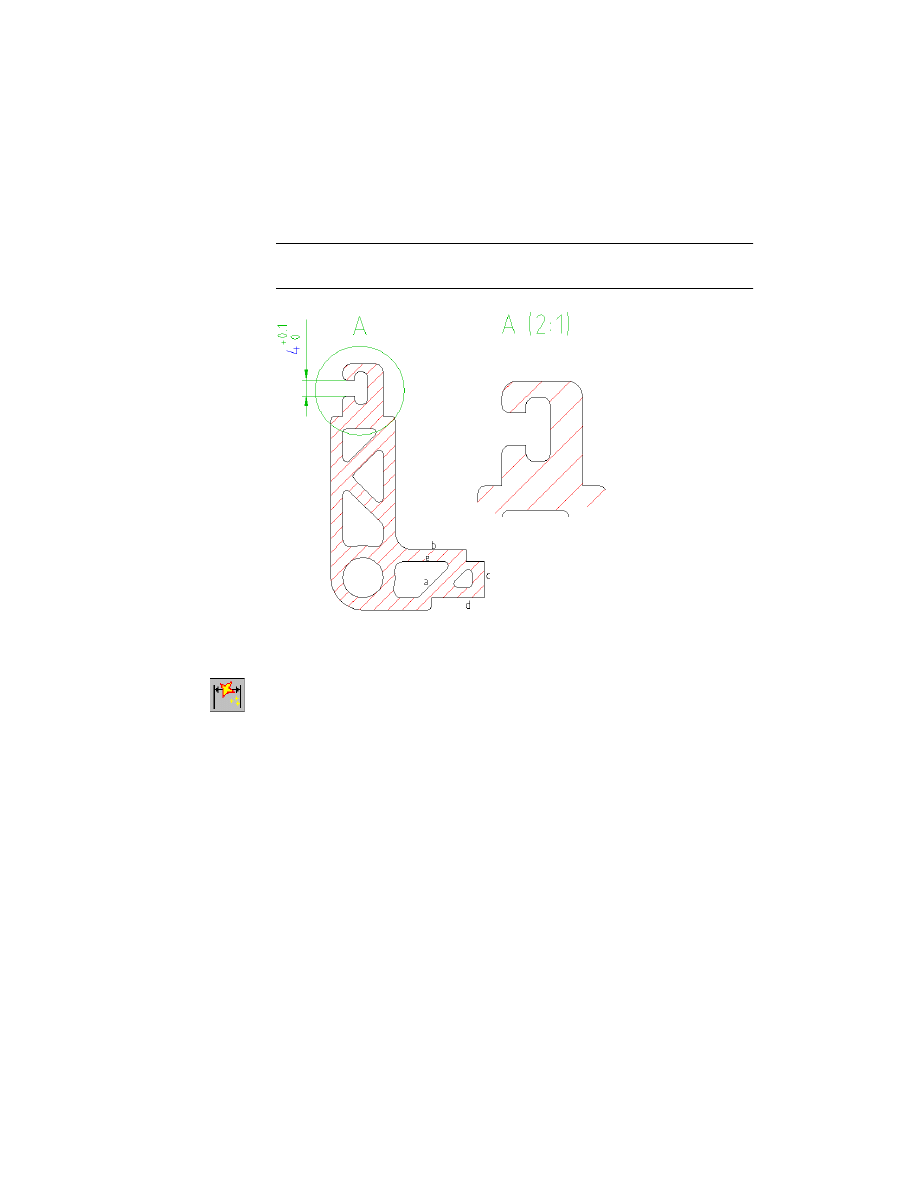
Choose OK, and respond to the prompts as follows:
Place the detail view:
Select a location to the right of the lever
NOTE
Some entities such as dimensions and symbols are automatically fil-
tered out in the detail function.
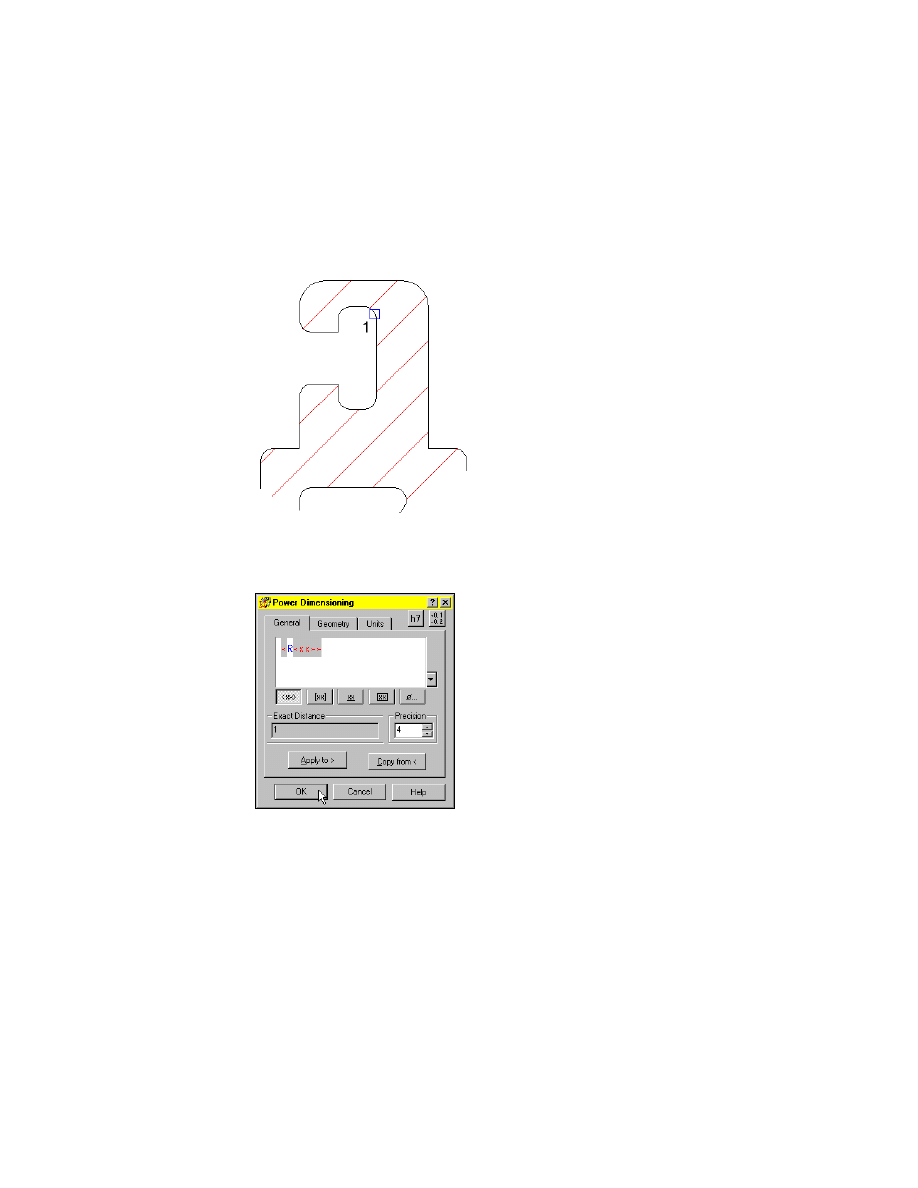
Now, add a dimension to the detail.
5
Start the Power Dimensioning command.
Menu
Annotate ➤ Power Dimensioning
Command
AMPOWERDIM
90
|
Chapter 6
Designing Levers
6
Respond to the prompts as follows:
(SINGLE) Specify first extension line origin or[Angular/Options/Baseline/Chain/
Update] <Select>: Press
ENTER
Select arc, line, circle or dimension:
Select the radius (1)
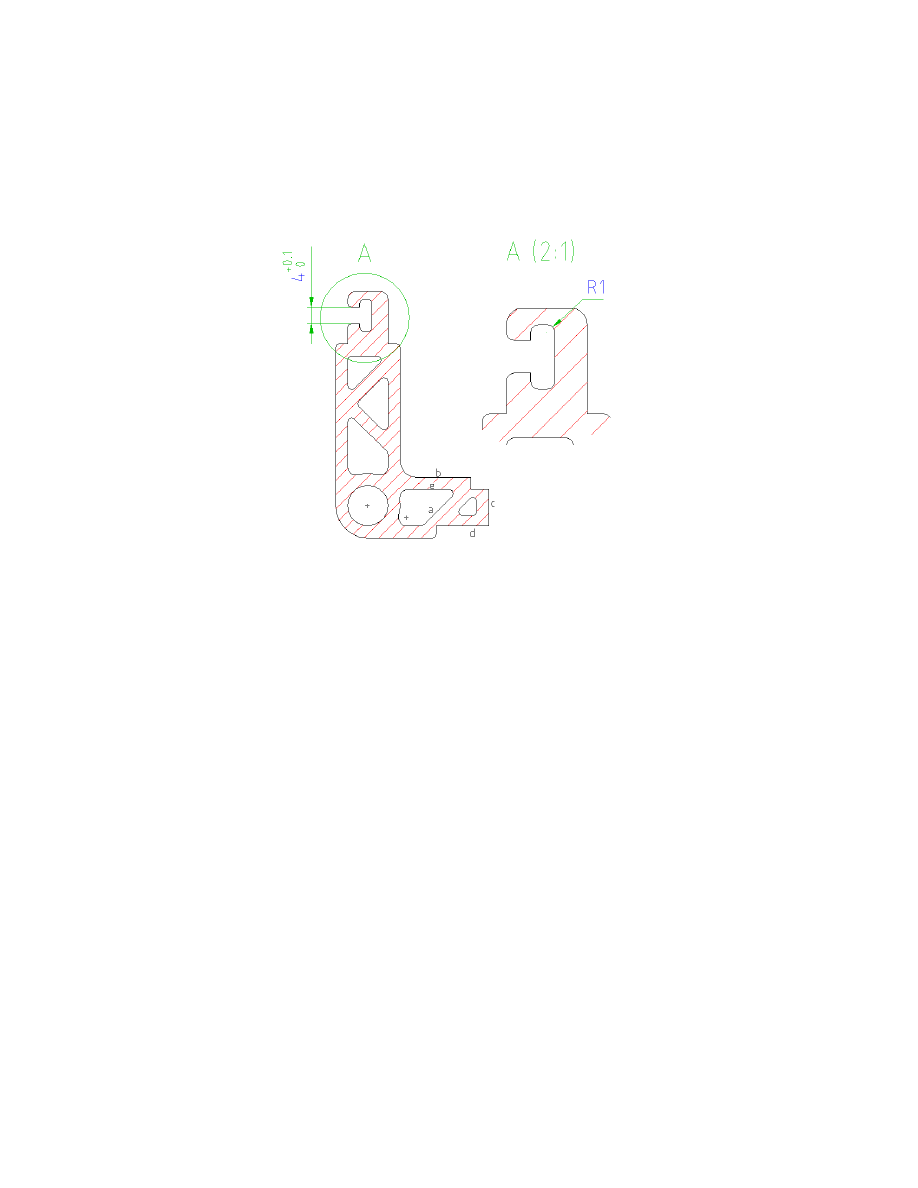
7
Select an appropriate position for the dimension.
8
In the Power Dimensioning dialog box, click the tolerances button to deac-
tivate the tolerances and choose OK.
Extending the Design
|
91
9
Press
ENTER
twice to finish the command.
Now, your lever looks like this:
The Power Dimensioning command recognizes the different scale area. If you
dimensioned the radius in the original drawing, the dimension value would
be the same. The text height is also the same, as related to the standard.
This is the end of this tutorial chapter.
Save your file.

92
Wyszukiwarka
Podobne podstrony:
Ch6 Levers
ch6 030702
CH6
Ch6 E4
Ch6 Pgs219 242
ch6
ch6
cisco2 ch6 focus B5BPVOCQFZHFLVQCHJBGE44PTKTAEUAFQWKNNWQ
Beginning smartphone development CH6
cisco2 ch6 vocab IWY4ZIDR4ERMF3TLNEL6RP6FA7AK2SQL7RQWQBY
ch6
Ch06 Levers
Ch6 E7
ch6 zajzzv3woe5iy6niljqfqtsxijfkp7hzz7zp5wi ZAJZZV3WOE5IY6NILJQFQTSXIJFKP7HZZ7ZP5WI
Ch6 Parametric Sketches
Ch6 SocialImplicationsOfForestEnergyProduction
Ch6 E2
Ch6 E6
Ch6
więcej podobnych podstron