
On Your Side by Charles Matthews, 3-dan
Page 1 sur 138
On Your Side
5 October 2000
Charles Matthews
3-dan takes a sideways look at the Go openings.
Index:
1. Framework Foundations ................................................................................2
2. Approach on the Open Side ...........................................................................7
3. Anti-Framework Measures ........................................................................... 12
4. The Yardstick and the Wedge ....................................................................... 17
5. The Modern Wedge .................................................................................... 22
6. Adding Asymmetry ..................................................................................... 28
7. Shimamura's Formation .............................................................................. 34
8. 9 Dans at Play........................................................................................... 39
9. Introducing the Chinese Style ...................................................................... 45
10.
Chinese: Open Side Approach................................................................... 50
11.
Chinese: Lower Side Plays........................................................................ 55
12.
Chinese: Staying Light............................................................................. 61
13.
Chinese: Reduction Plays ......................................................................... 66
14.
The Anti-Chinese Plan.............................................................................. 71
15.
Anti-Chinese: One-Point High Pincer .......................................................... 76
16.
Ch'ung Am Research ............................................................................... 82
17.
Boldly Enclosing ..................................................................................... 88
18.
Kobayashi's Formation............................................................................. 93
19.
Kobayashi: Distal Approach ...................................................................... 99
20.
Takagi's Extension .................................................................................104
21.
Anti-Kobayashi: Double Approach.............................................................108
22.
Anti-Kobayashi: Outside Contact ..............................................................113
23.
Anti-Kobayashi: Extra Star ......................................................................118
24.
Iwata's Formation..................................................................................123
25.
Empty Corner and 5-3 ............................................................................128
26.
Empty Corner and 3-3 ............................................................................134
On Your Side by Charles Matthews, 3-dan
Page 2 sur 138
1. Framework Foundations
I want to launch this new series of articles on the opening in Go by explaining
something about the study of positions on the side. It is quite uncommon to take one
side as the explicit unit; usually people discuss full board openings, or the highly-
developed theory of corner openings.
Given knowledge of only ten corner openings, several hundred side openings that
combine them can be constructed. Initially this might convince anyone that it is a bit
futile to aim for knowledge of side openings. There are however some very simple
examples, such as this one, that occur frequently in contemporary professional play.
Before dismissing their study, one should have a look at the normal tools. It has been
said that corner openings sharpen one's Go, because their close study demands
understanding of shape and special tactics, as well as judgements comparing
territory and influence. What corresponds on the sides?
One has to marshal, not just concrete examples, but a battery of techniques, to
discuss sensibly even one side at a time. Firstly there is some rather dogmatic
material, which can be divided into the proper handling of extensions, and the priority
to be given to plays in the corner versus plays on the side. There is the idea of
balance in Go, between territory and influence, third line and fourth line plays, and
generally jam today and jam tomorrow. Then there is application of the general
strategic theory of Go - frameworks and weak groups, aji and miai, and so on. This is
essential for progress anyway, and examples restricted to one side are simplifications
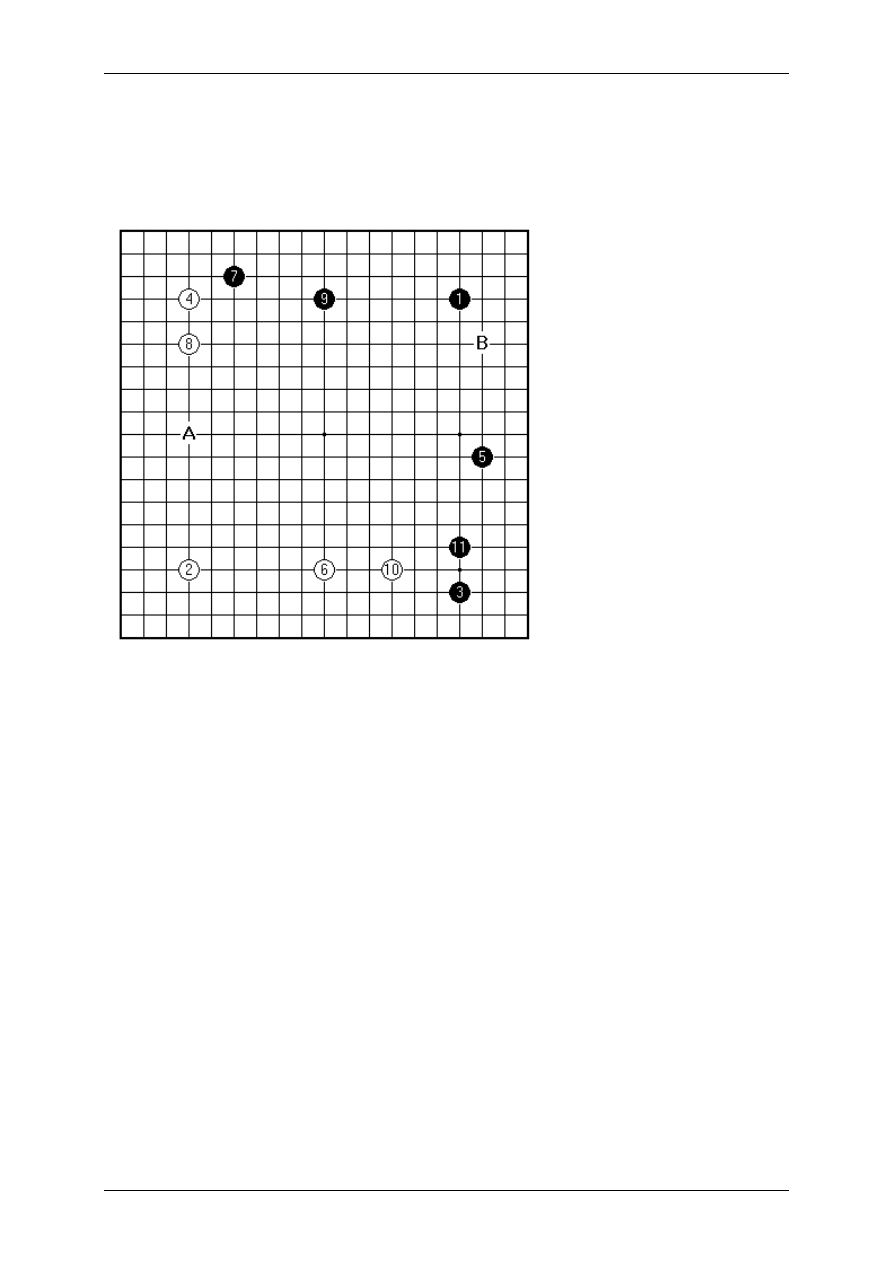
(whether in a good or bad sense). Modern Go uses the 4 -4 points in the corner
intensively, and can hardly be understood at all without talking in these terms. In the
example given Black plays very directly for a framework on the lower side; the side is
still open to invasion by White, but finding how to think about that depends on
developing a feeling for direction of play. Finally there are remarks based on the
actual size of the 19x19 board - again these are deeply implicated in the most basic
contemporary 4 -4 openings.
The fact is that in competent amateur play matters are often effectively settled on the
sides, the corners being a matter of standard knowledge, and all-out central fighting
avoided because of its genuine difficulty. In restricting to one side, one naturally
On Your Side by Charles Matthews, 3-dan
Page 3 sur 138
assumes first that it is the main arena deserving current attention. Of course one
ultimately has to look at all four sides, and develop a whole board vision. In the
examples that are given it will probably help to imagine the other corners occupied at
4-4 points, as so often in pro play, giving one or two full board openings. Just as with
corner openings, there is the problem of understanding the out-turn in the overall
context; but it should be less vexed, at least if one learns to question which side is
most urgent, in parallel with acquiring actual patterns.
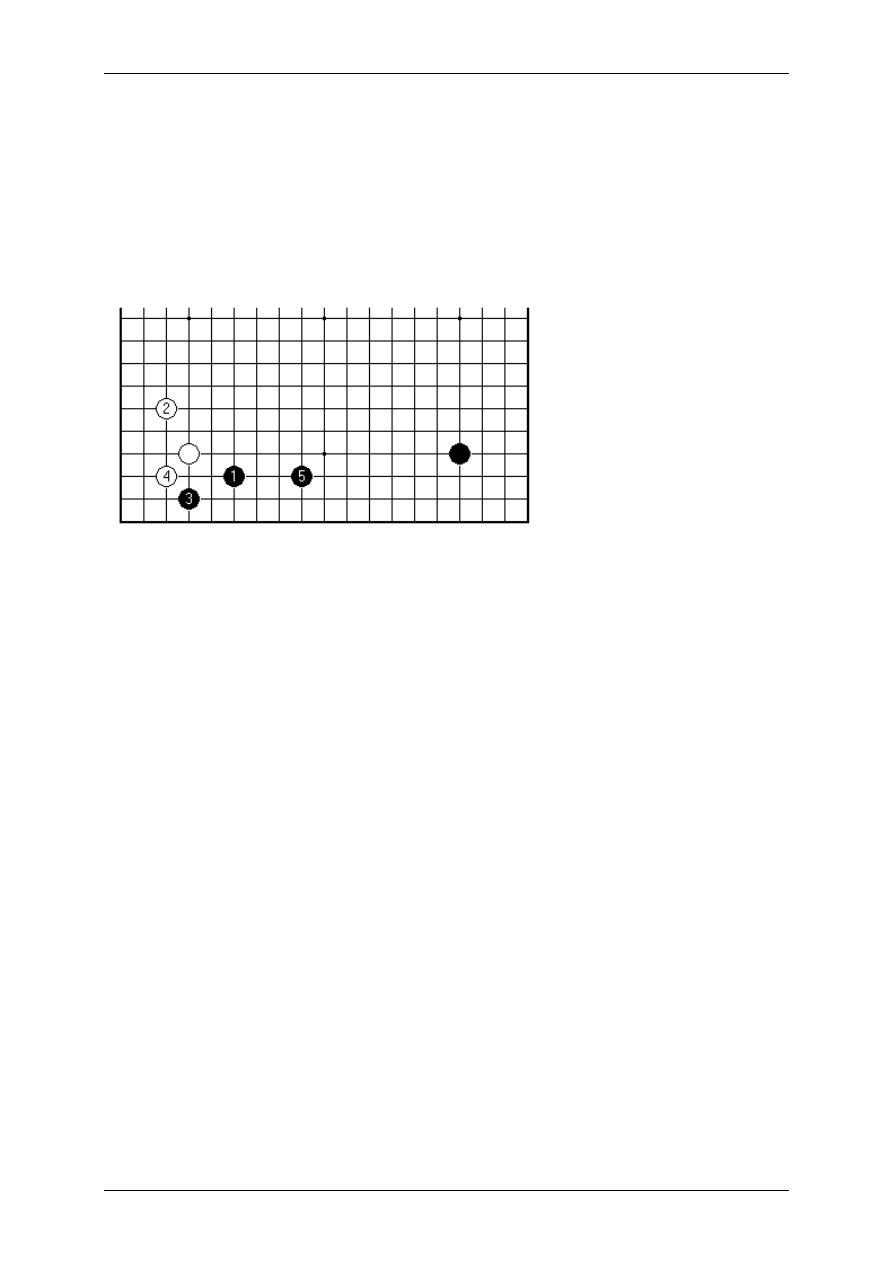
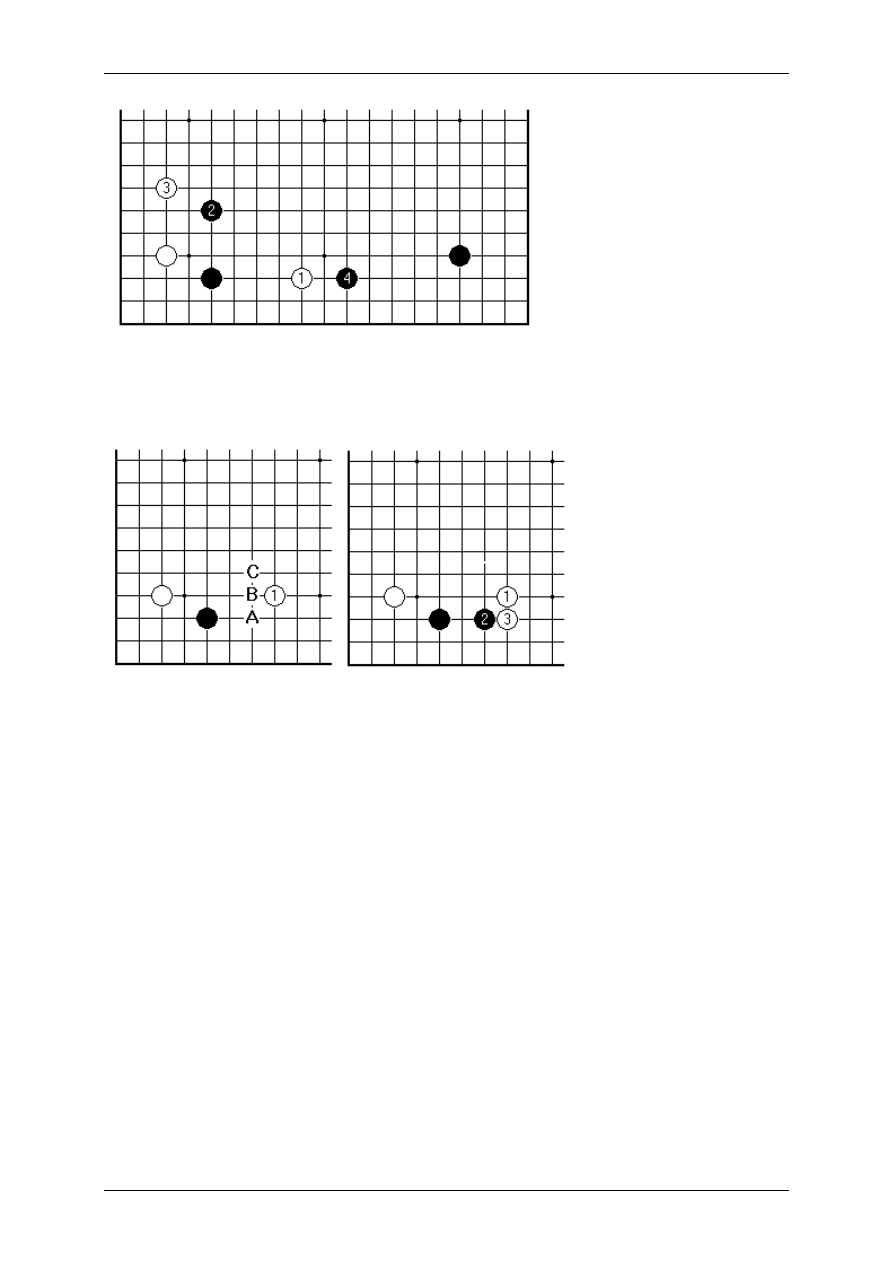
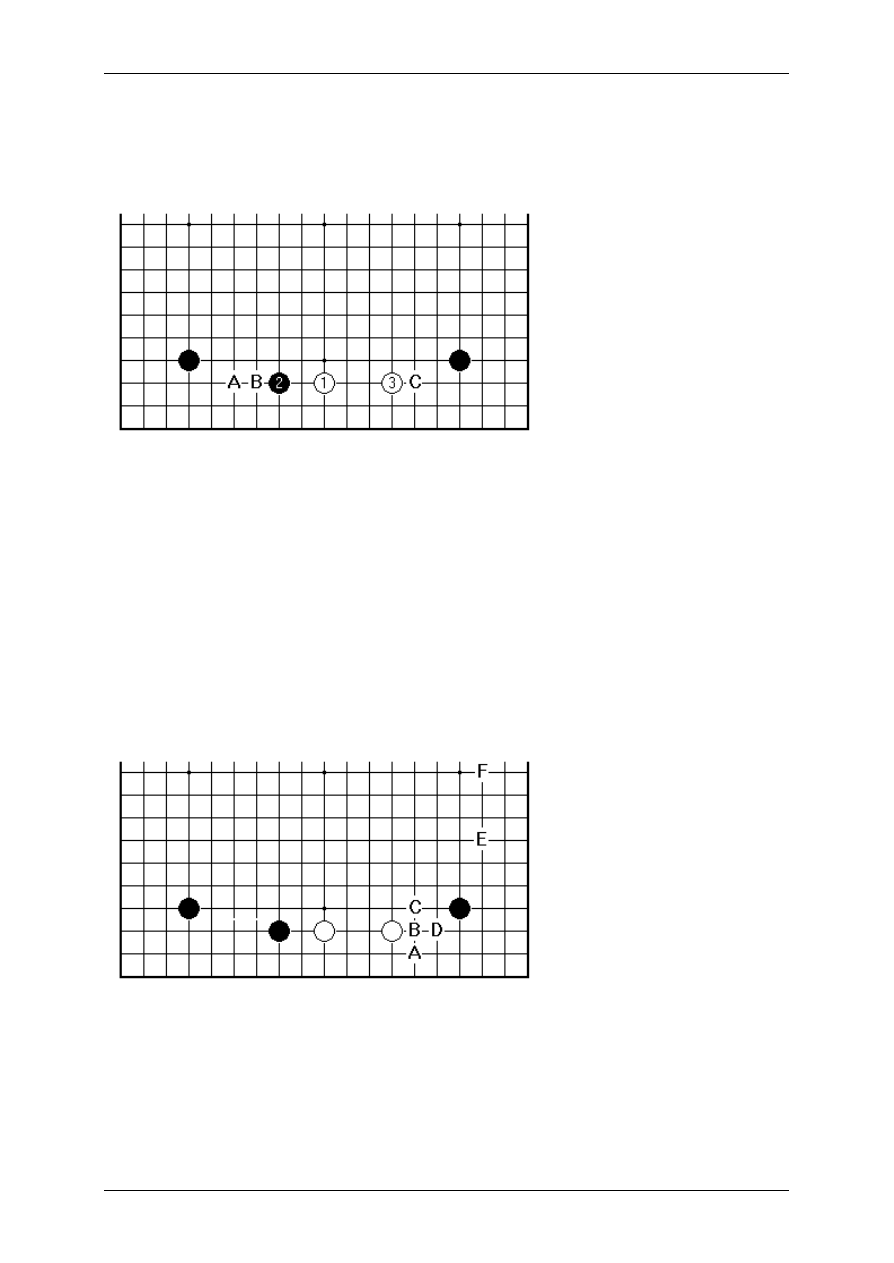
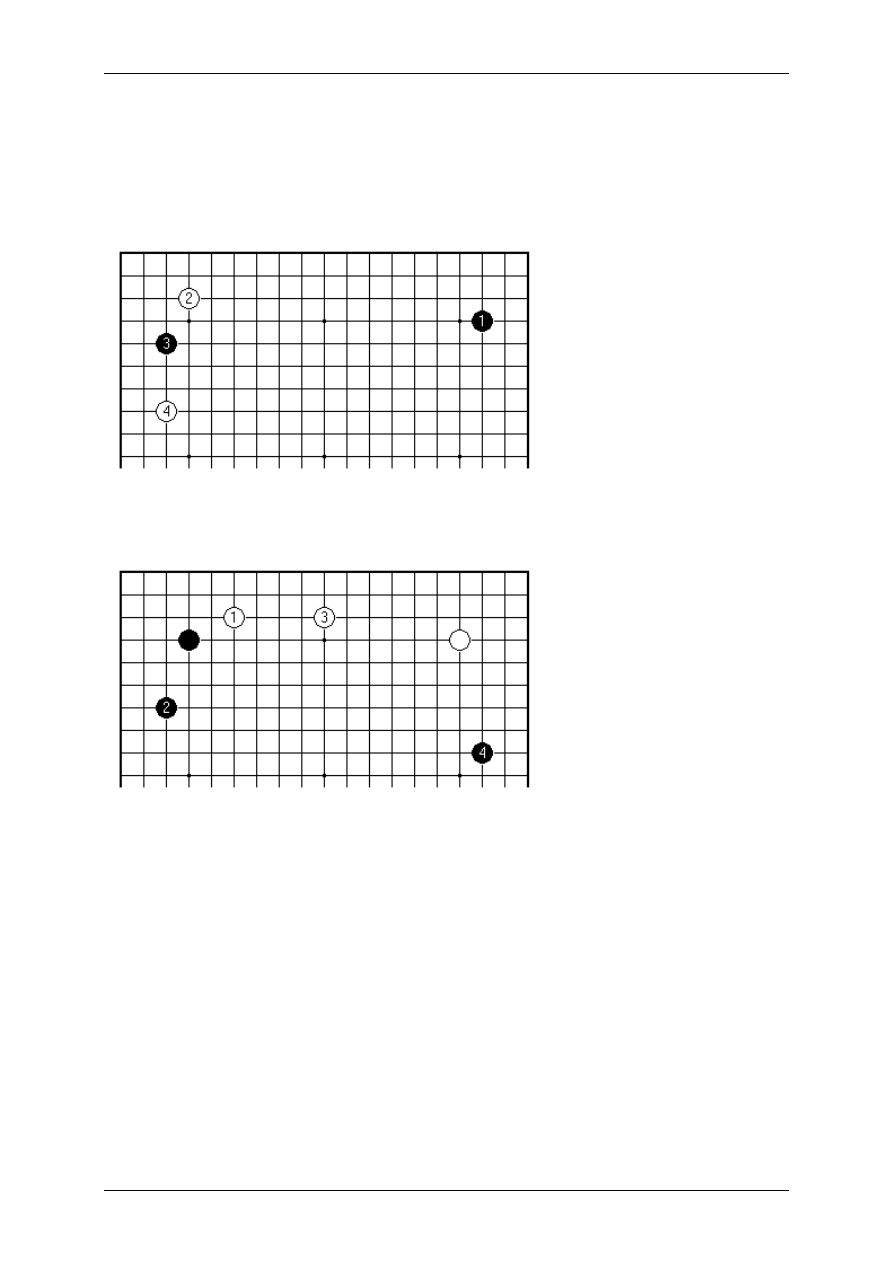
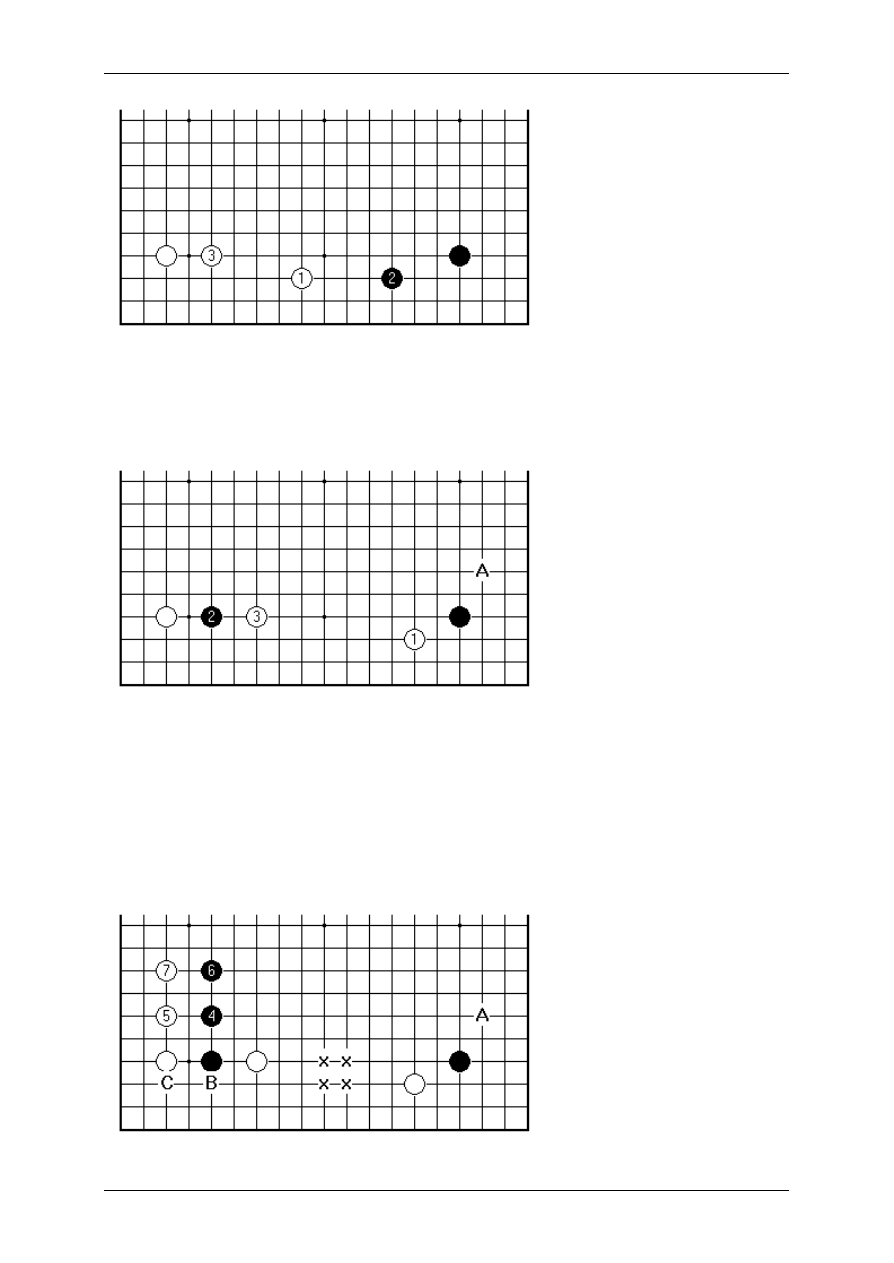
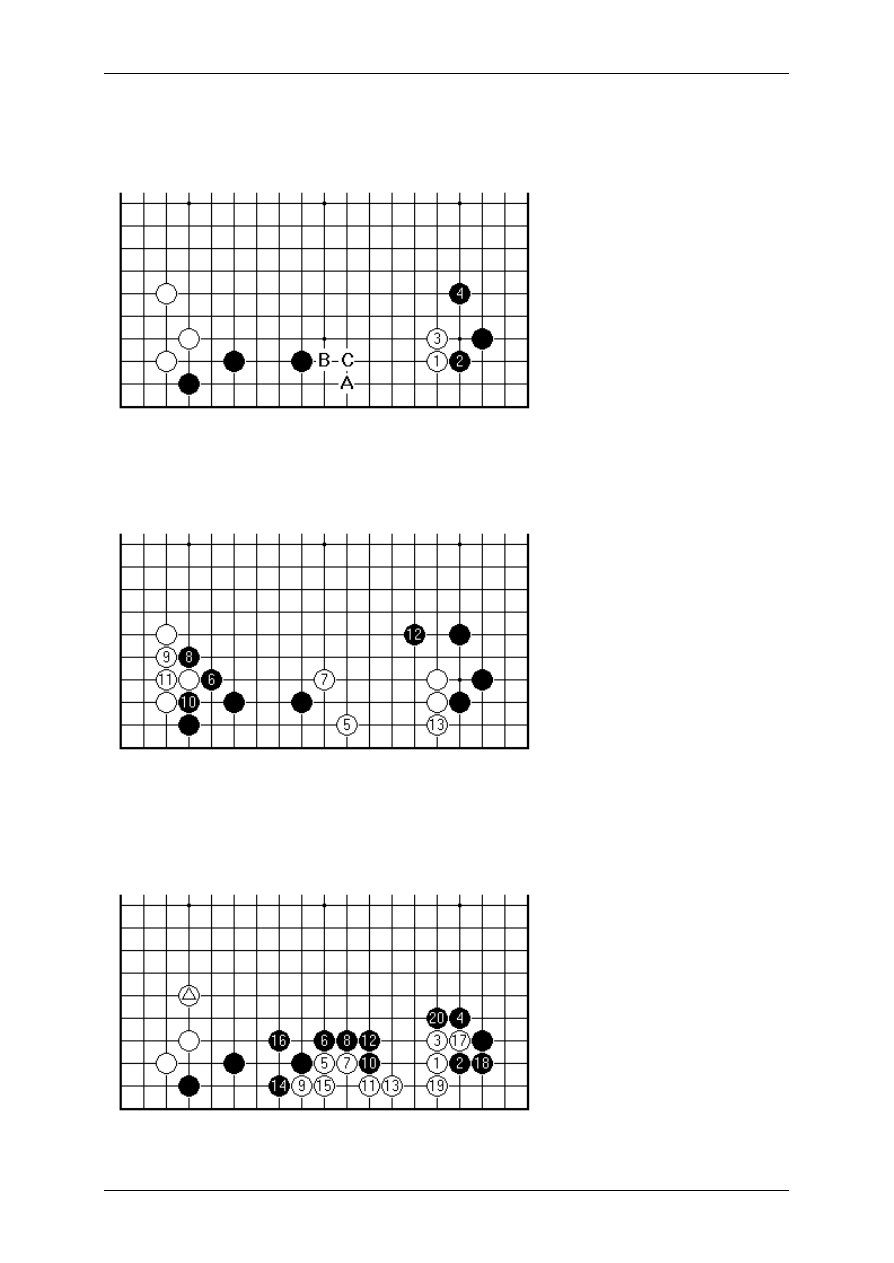
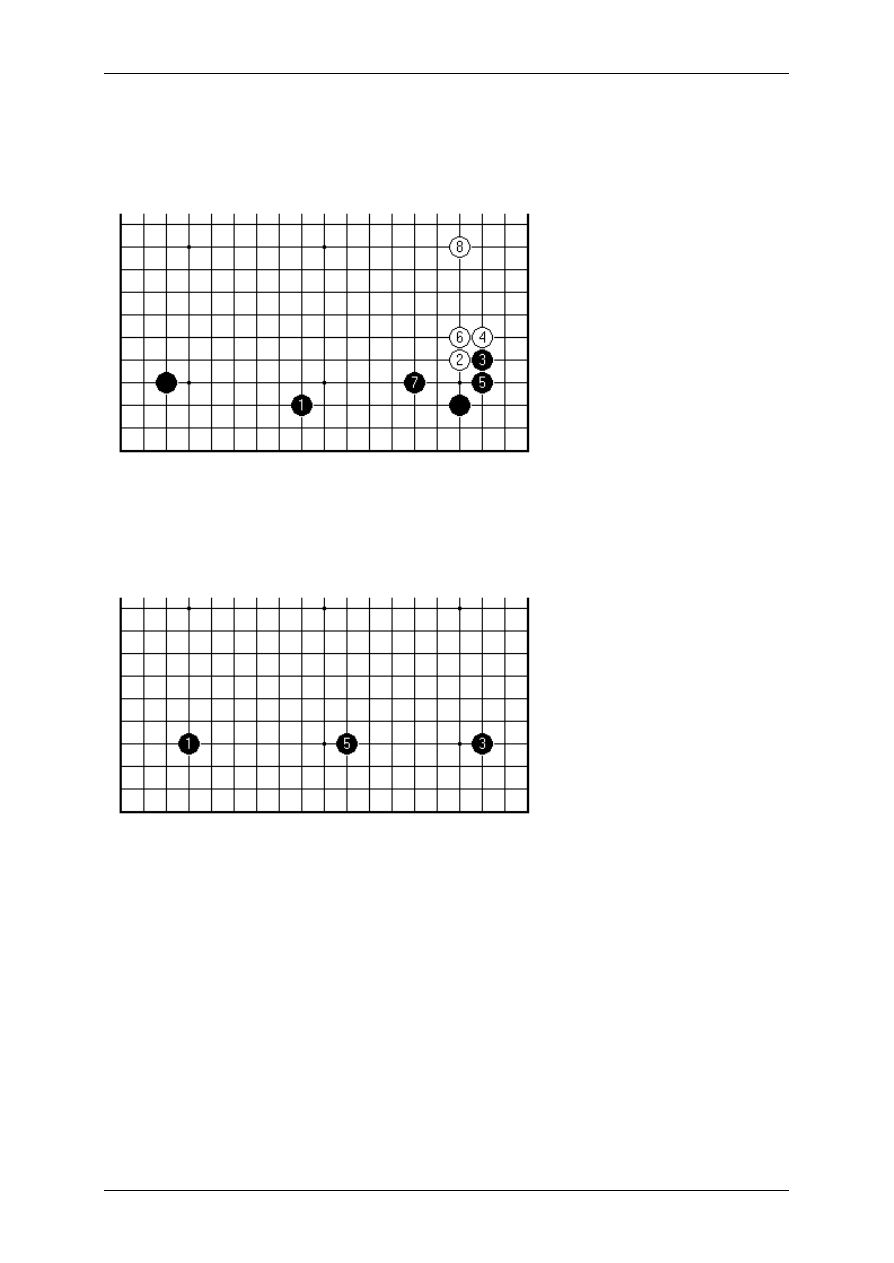
Returning then to the example given, it is one of a number of ways of playing out a
side where 4-4 points face off against each other.
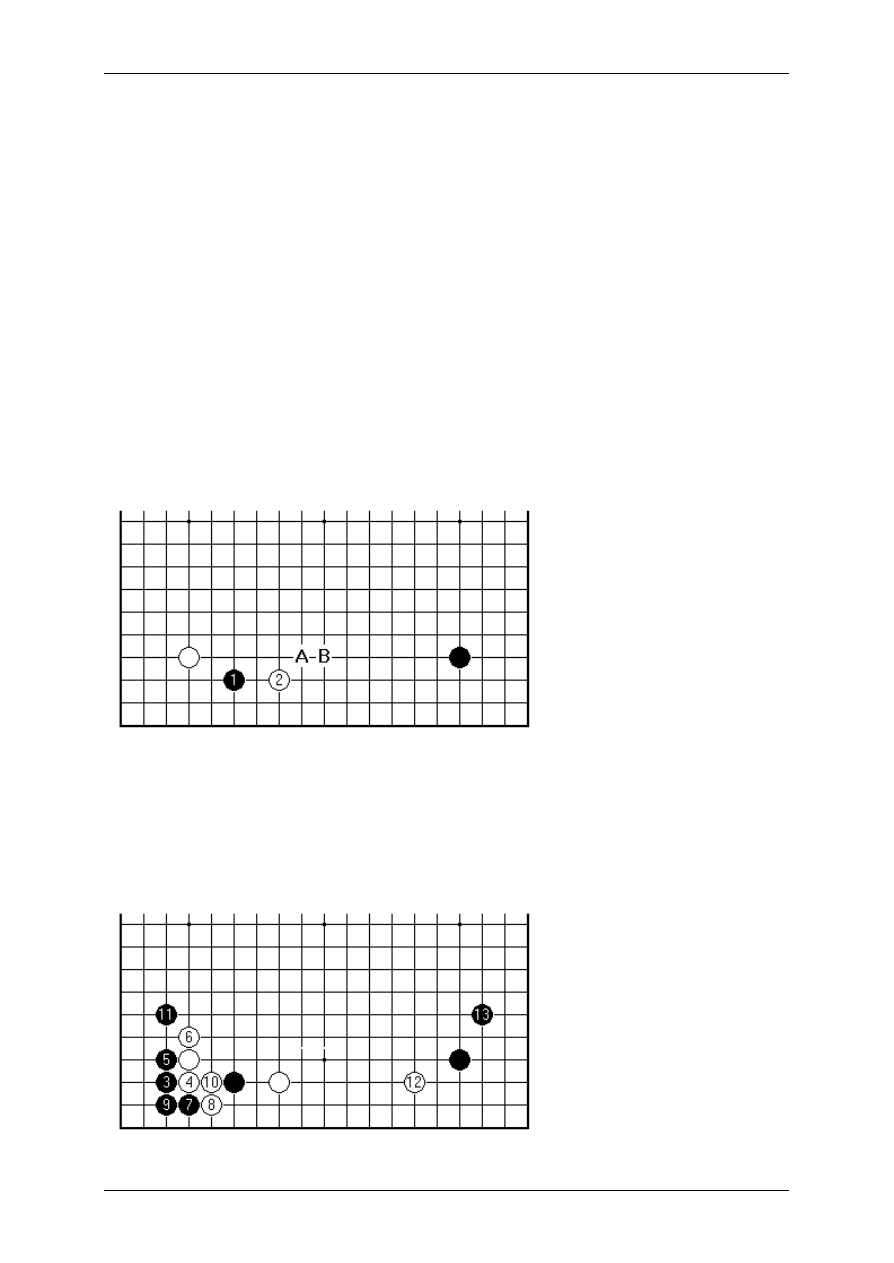
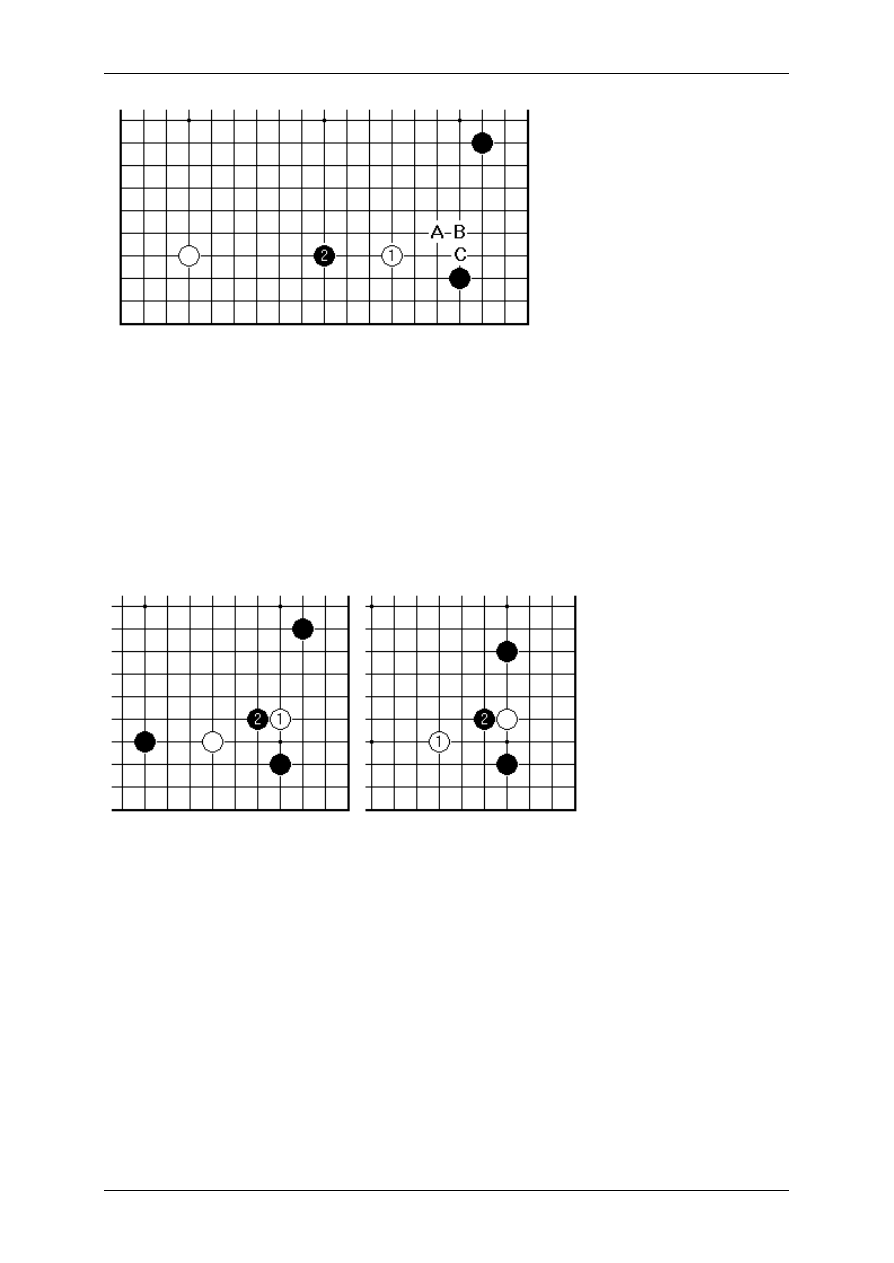
Compared with the family of positions like this one (where 3 might be also at A, B or
C), Black has done the maximum possible to settle a group in the left-hand corner.
The gap remaining on the side is six lines wide, rather than five.
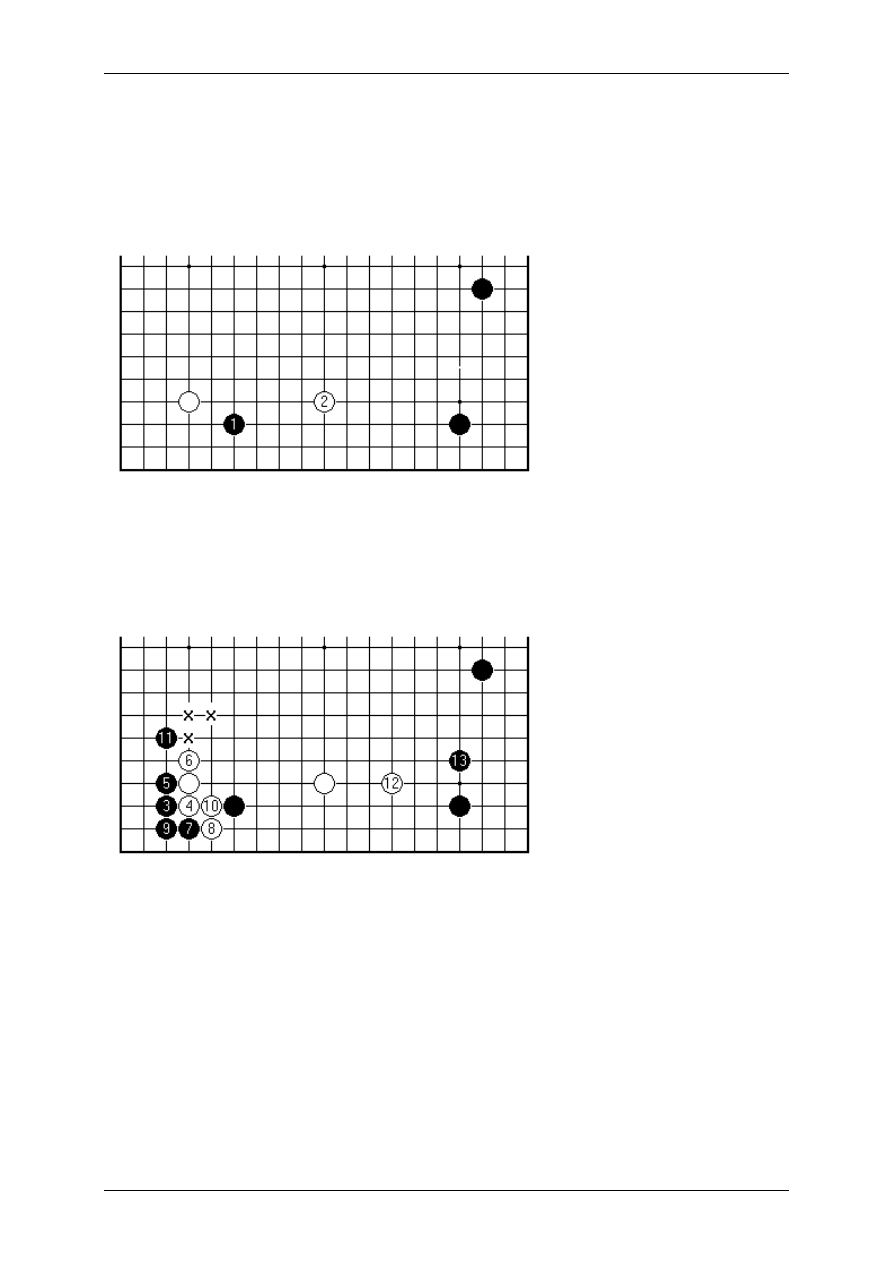
It is certainly possible for Black to play 1 in a different style, not as an approach move
in the le ft corner, but as an extension to 1 here. Then White 2 restricts the scale of
the framework possible for Black, and Black 3 is urgent to support Black 1.
On Your Side by Charles Matthews, 3-dan
Page 4 sur 138
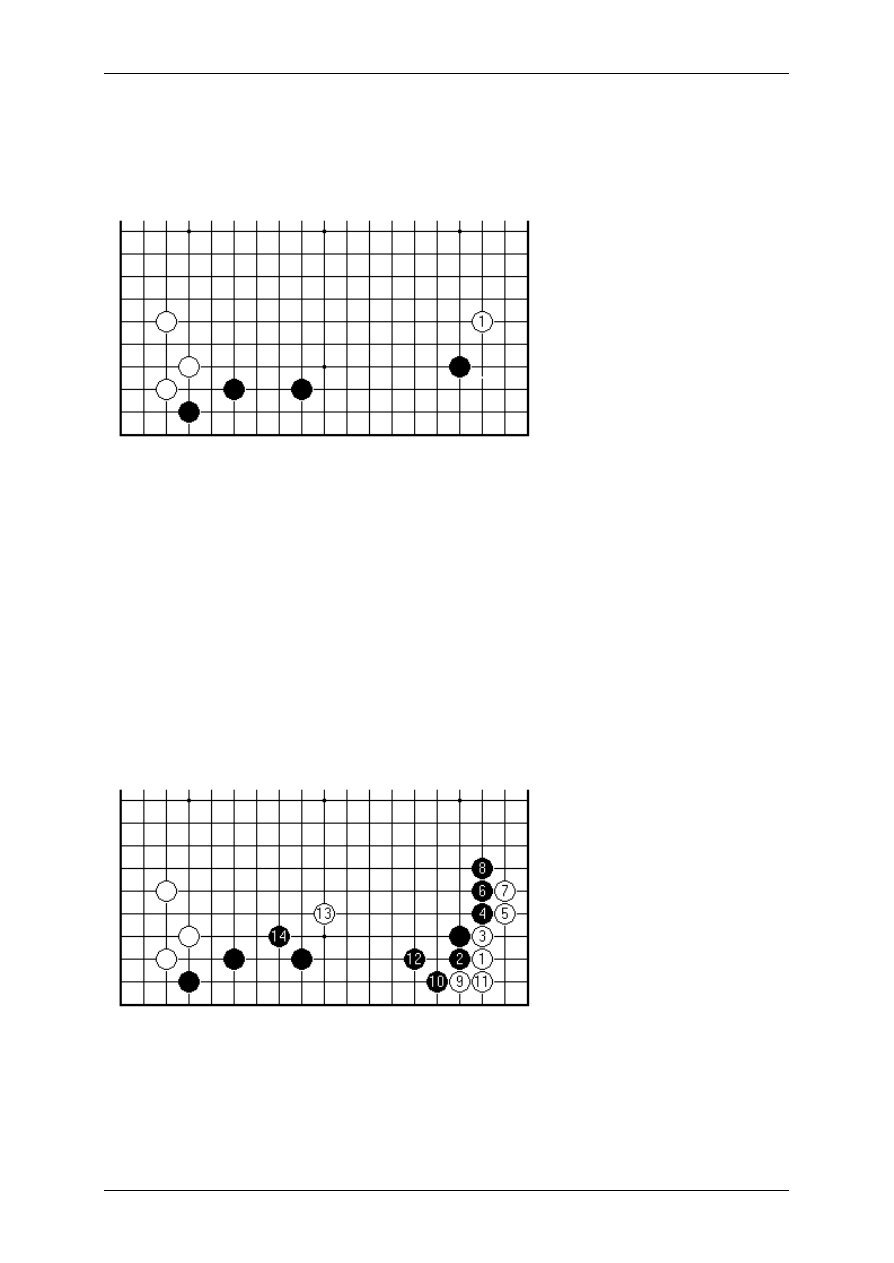
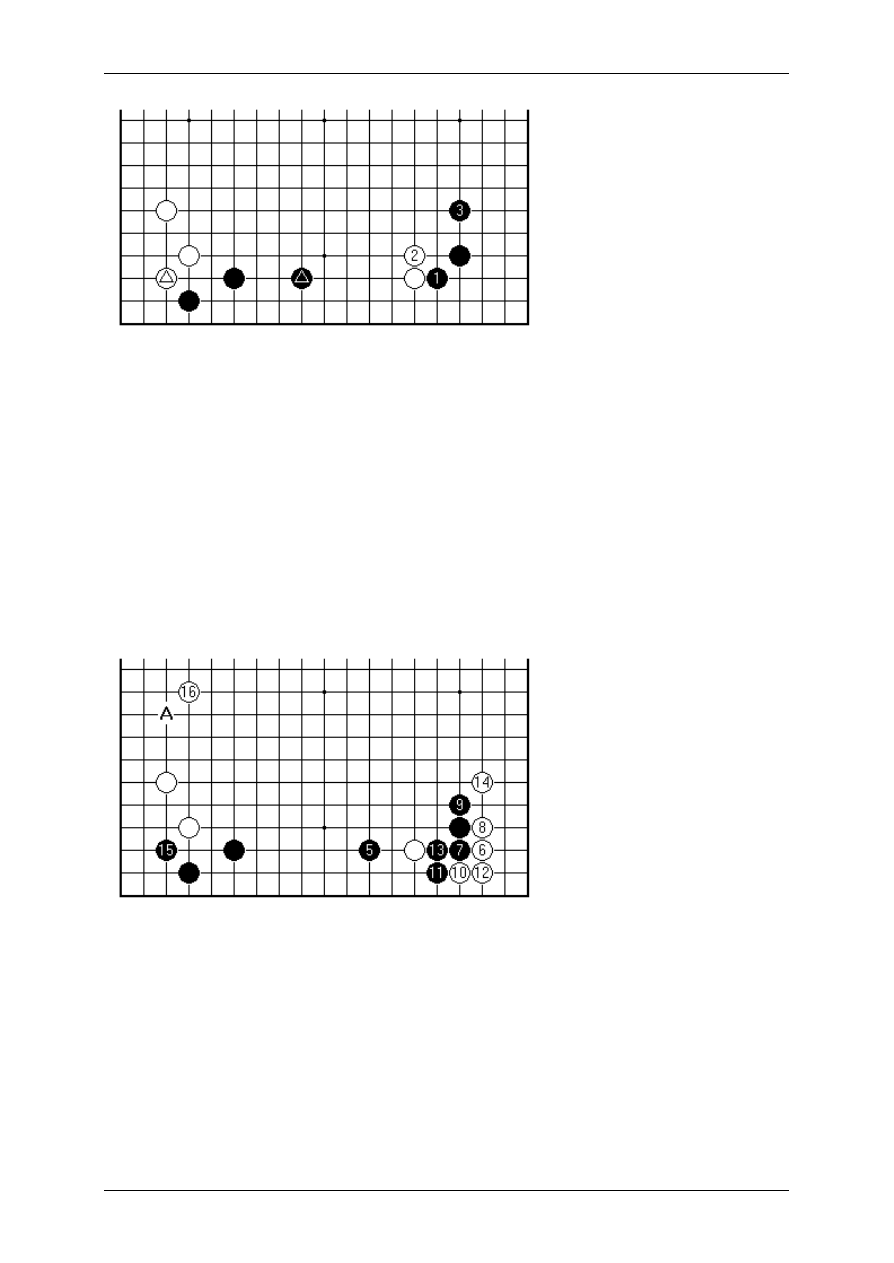
The effect of Black's choice is seen if White invades at 1 here. Black can play at 2
without feeling any concern for the left-hand part of the formation. After 5 White has a
weak group still, and Black makes territory in the right corner with a clear conscience.
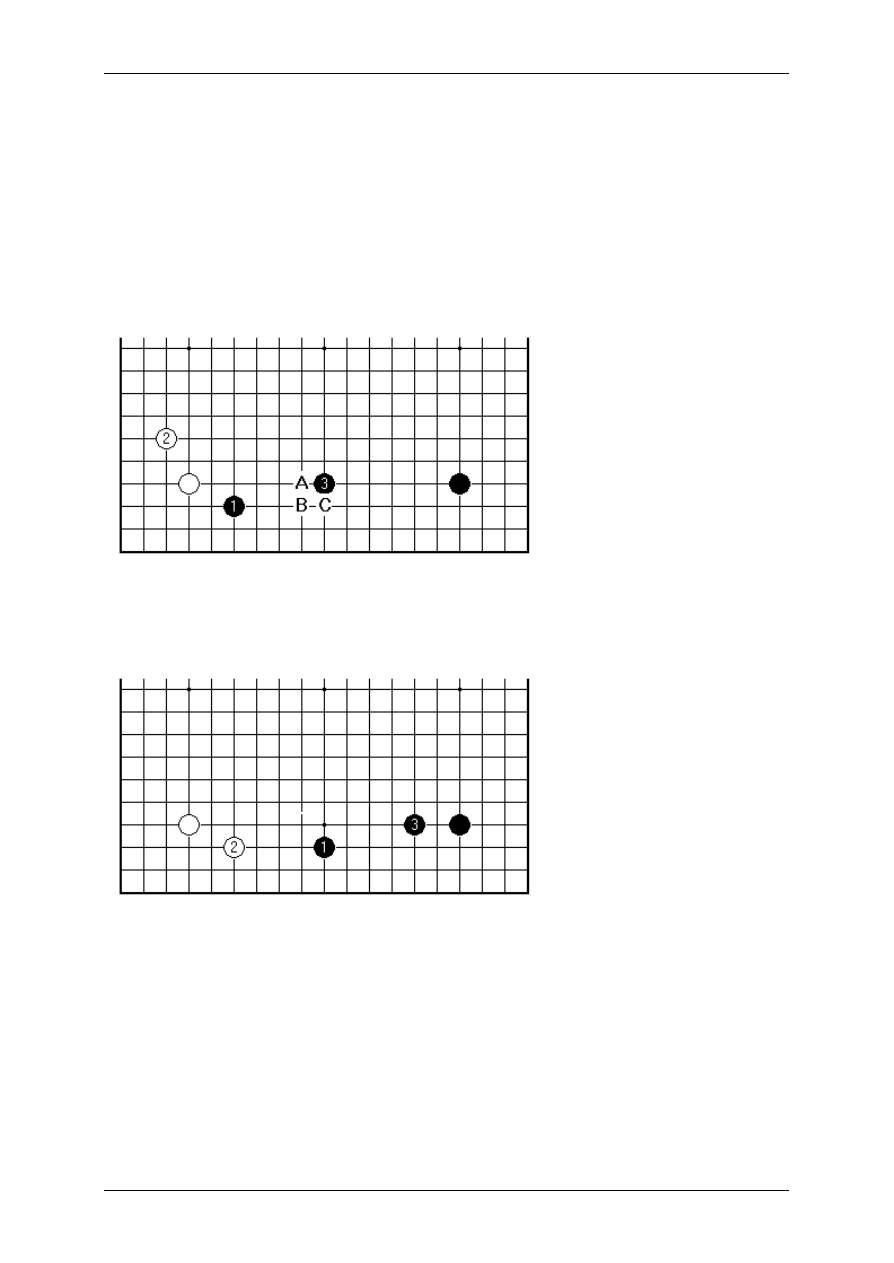
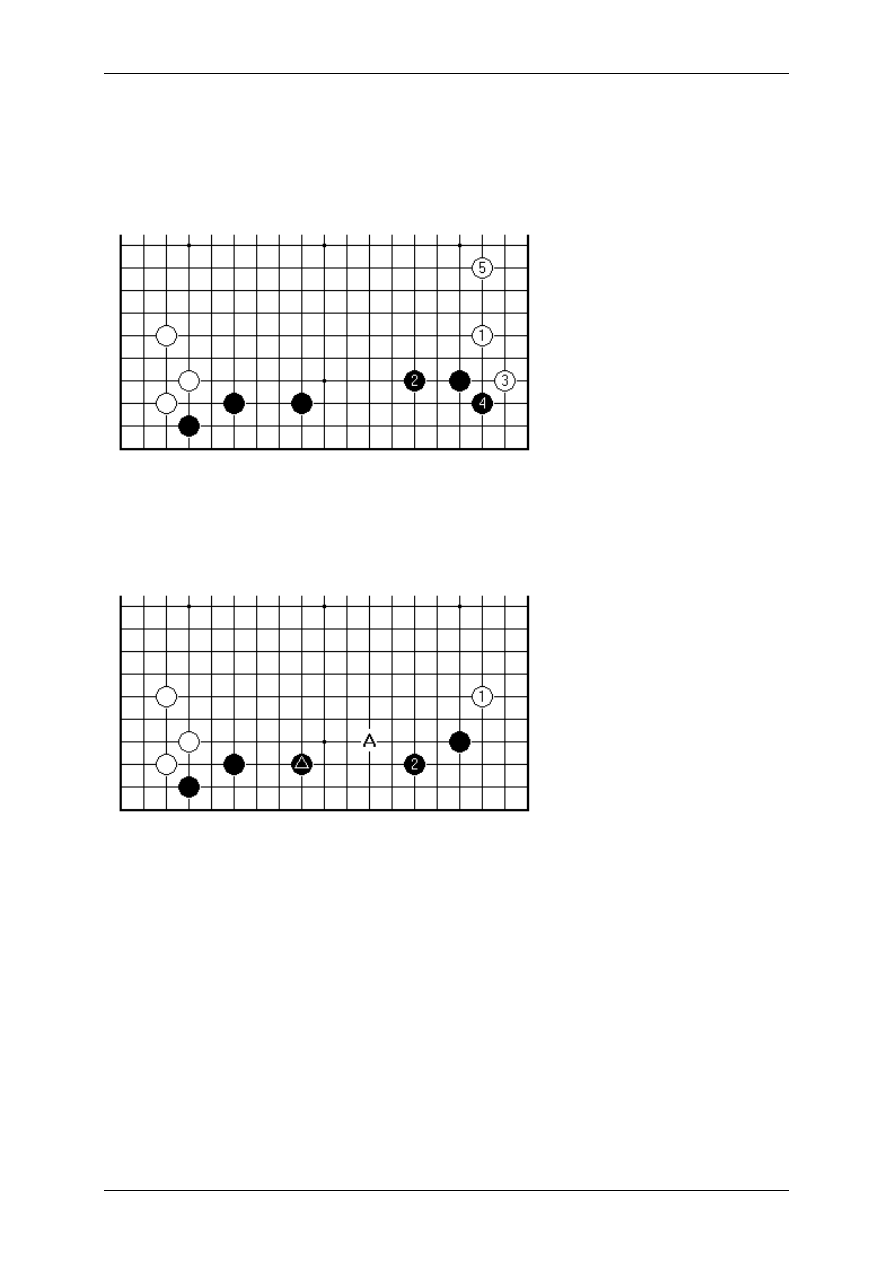
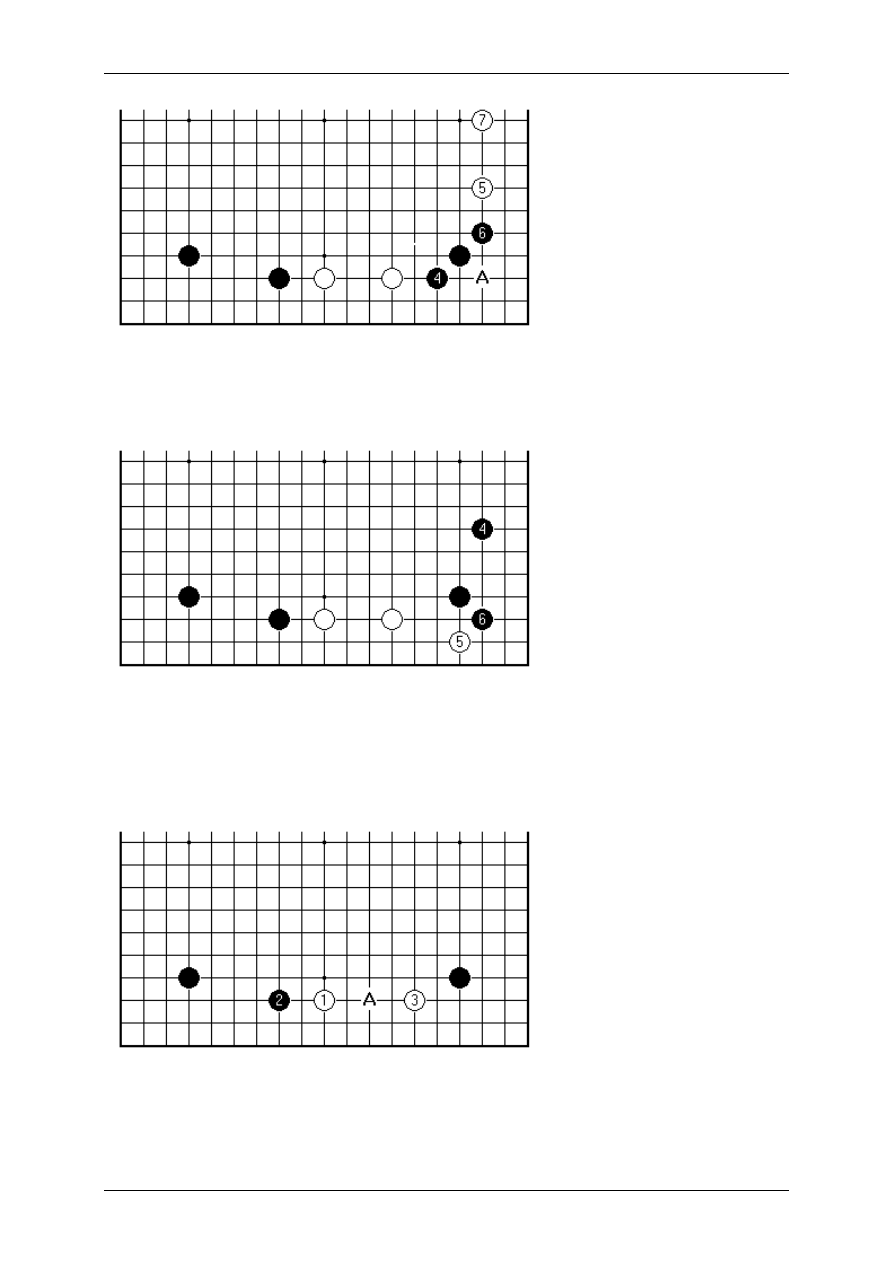
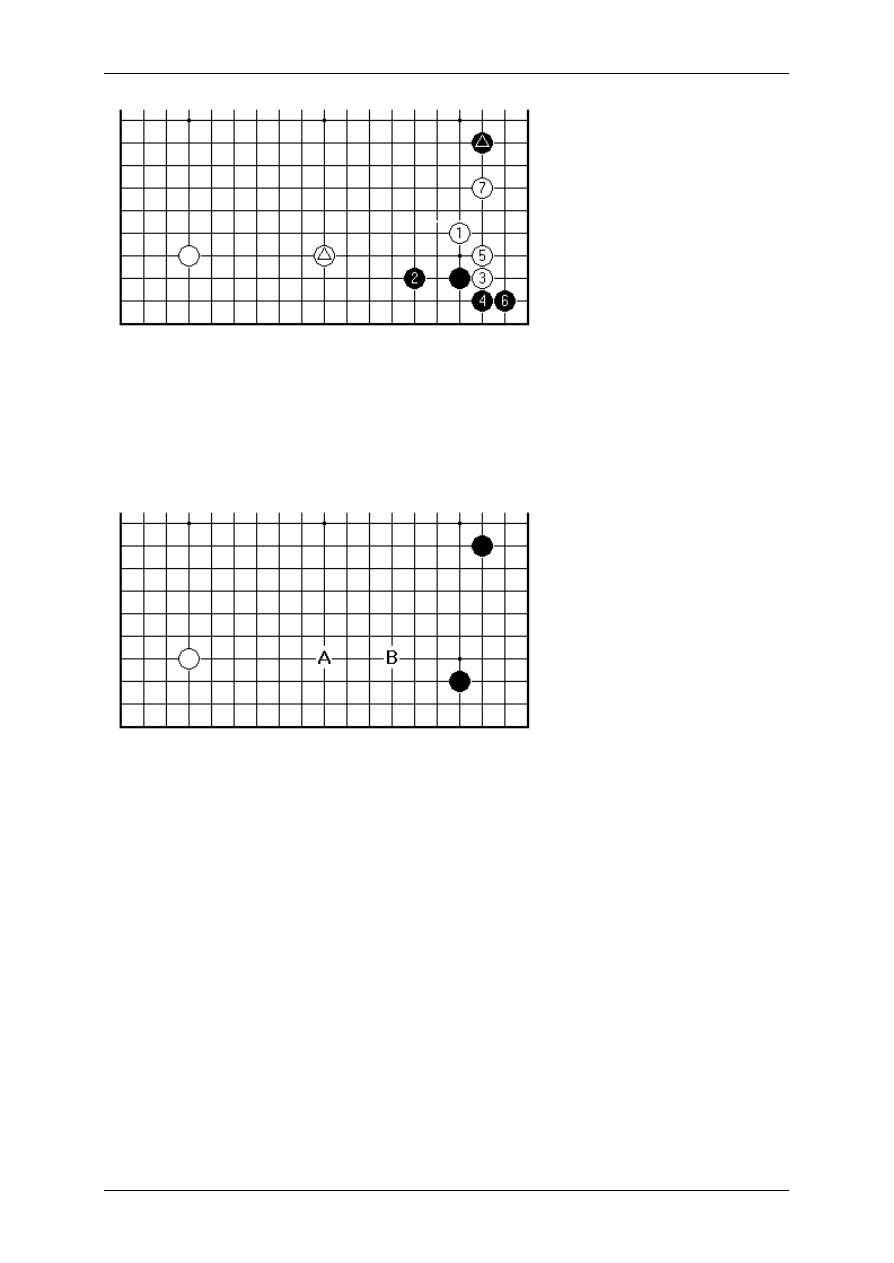
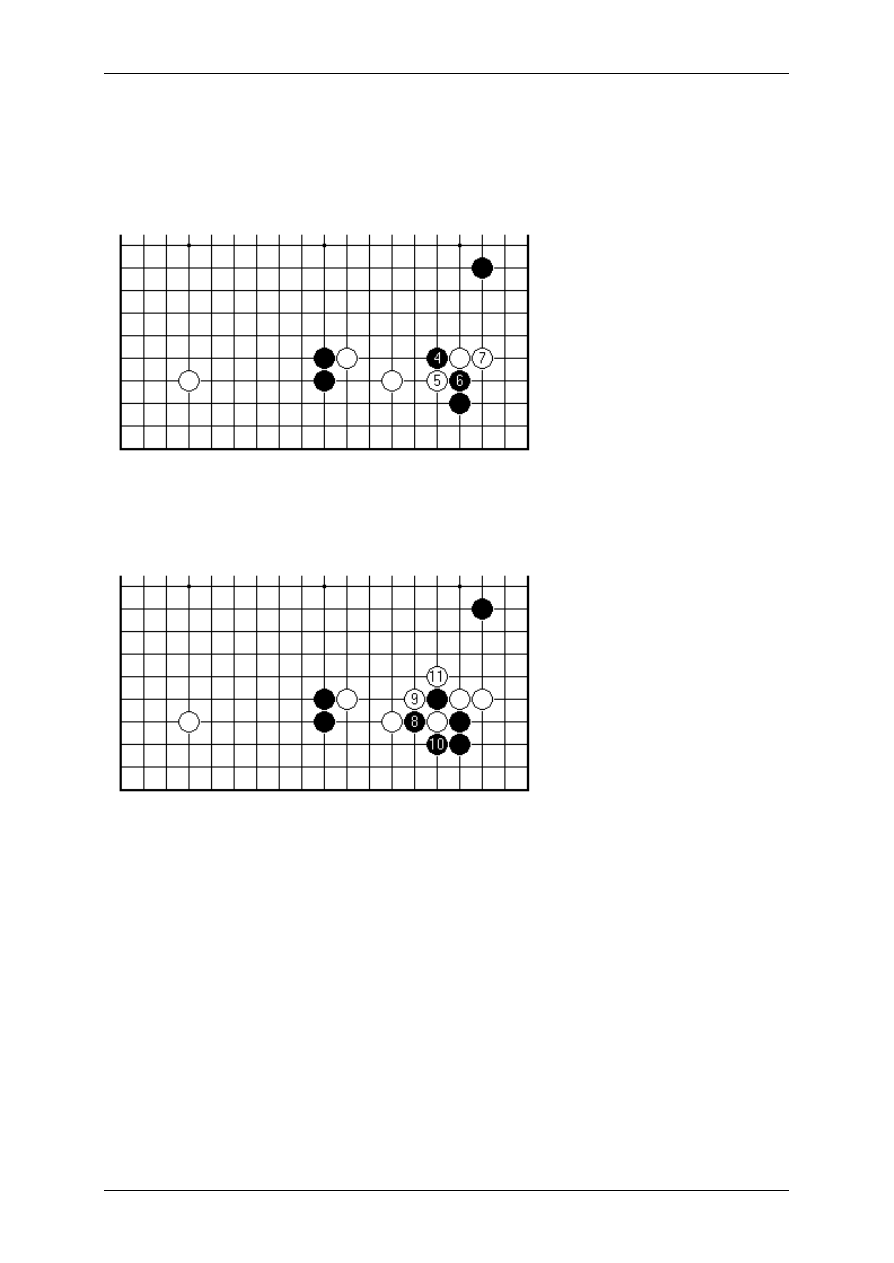
It is more interesting for White to come in with a conventional approach move. If
White plays 1 Black should forbid White the slide into the corner at A, by playing 2.
With 5 White tries to make a base, but now Black 6 shows how much Black gains
from White's relative weakness and the lack of symmetry along this side. It may be
that White hopes to gain later by invading at B, but for the present White needs to
defend the existing side group. Black has made good use of first play in this part of
the board.
Of course, if you make a framework, you hope your opponent can't gain an
advantage by invading it at once. If that isn't true - well, it sounds like the case that
your opponent has some existing strength, and by invading can destroy potential
territory at the same time as giving you problems with your own weak group(s). Then
you should play more solidly. However the normal situation is that frameworks aren't
immediately invaded. There is some middlegame theory about playing invasions "just
in time", one play ahead of an ideal consolidation.
On Your Side by Charles Matthews, 3-dan
Page 5 sur 138
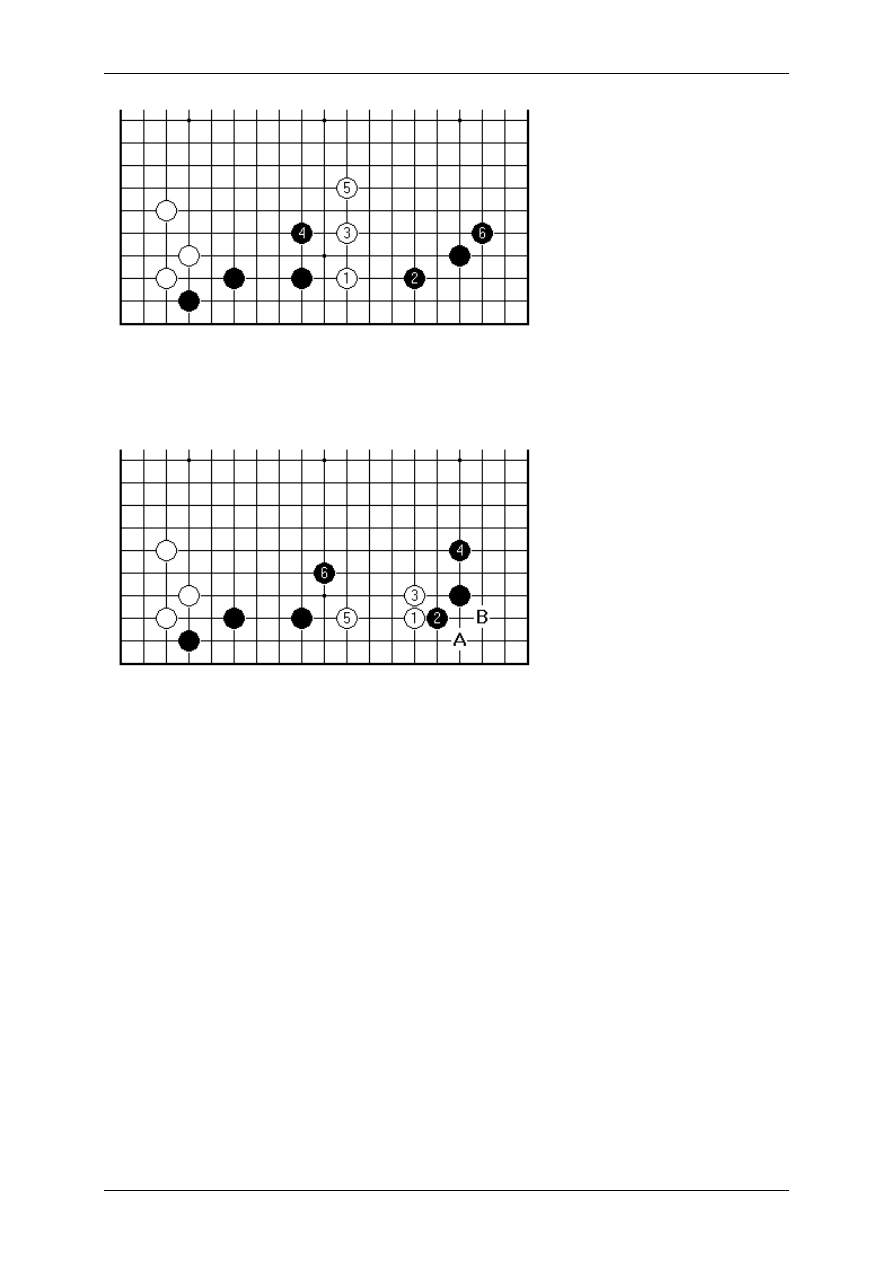
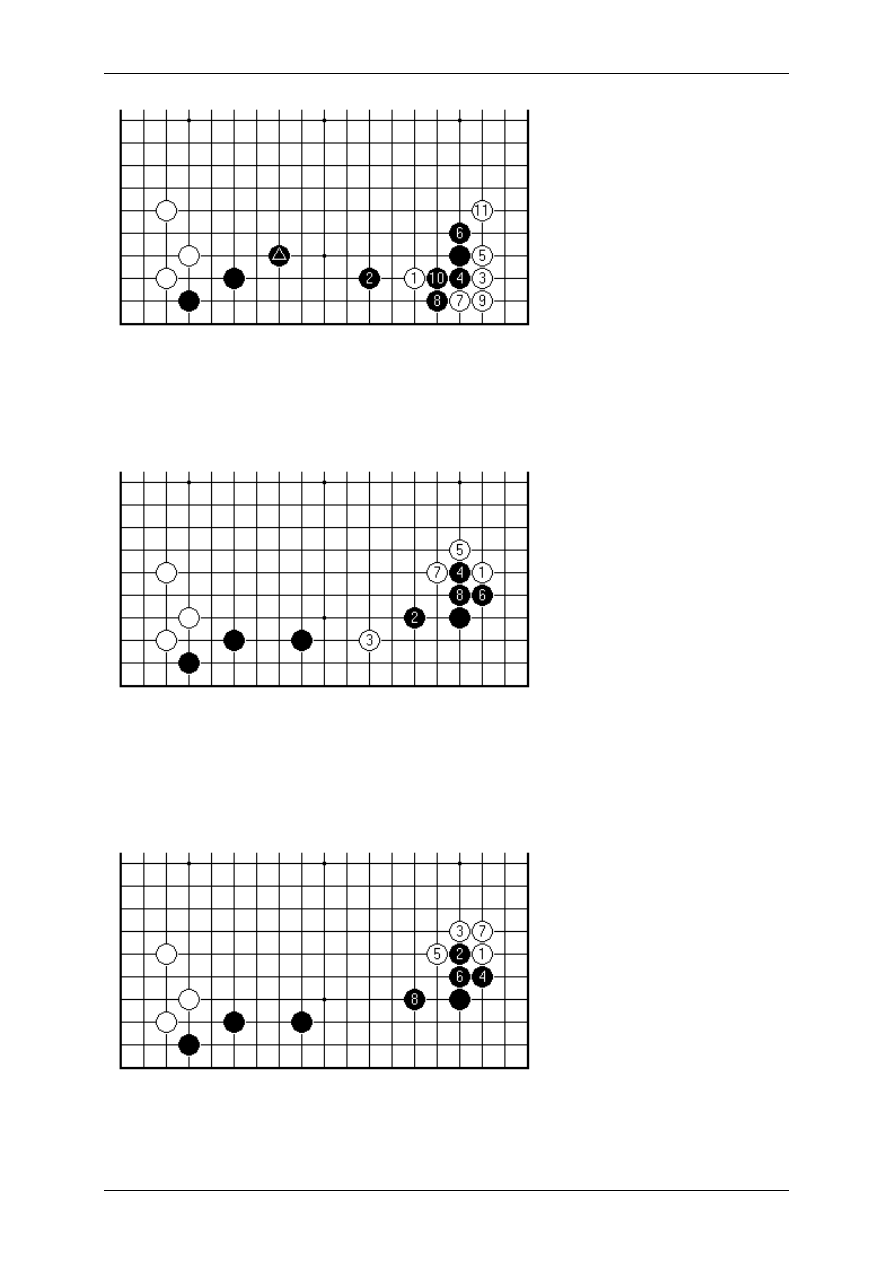
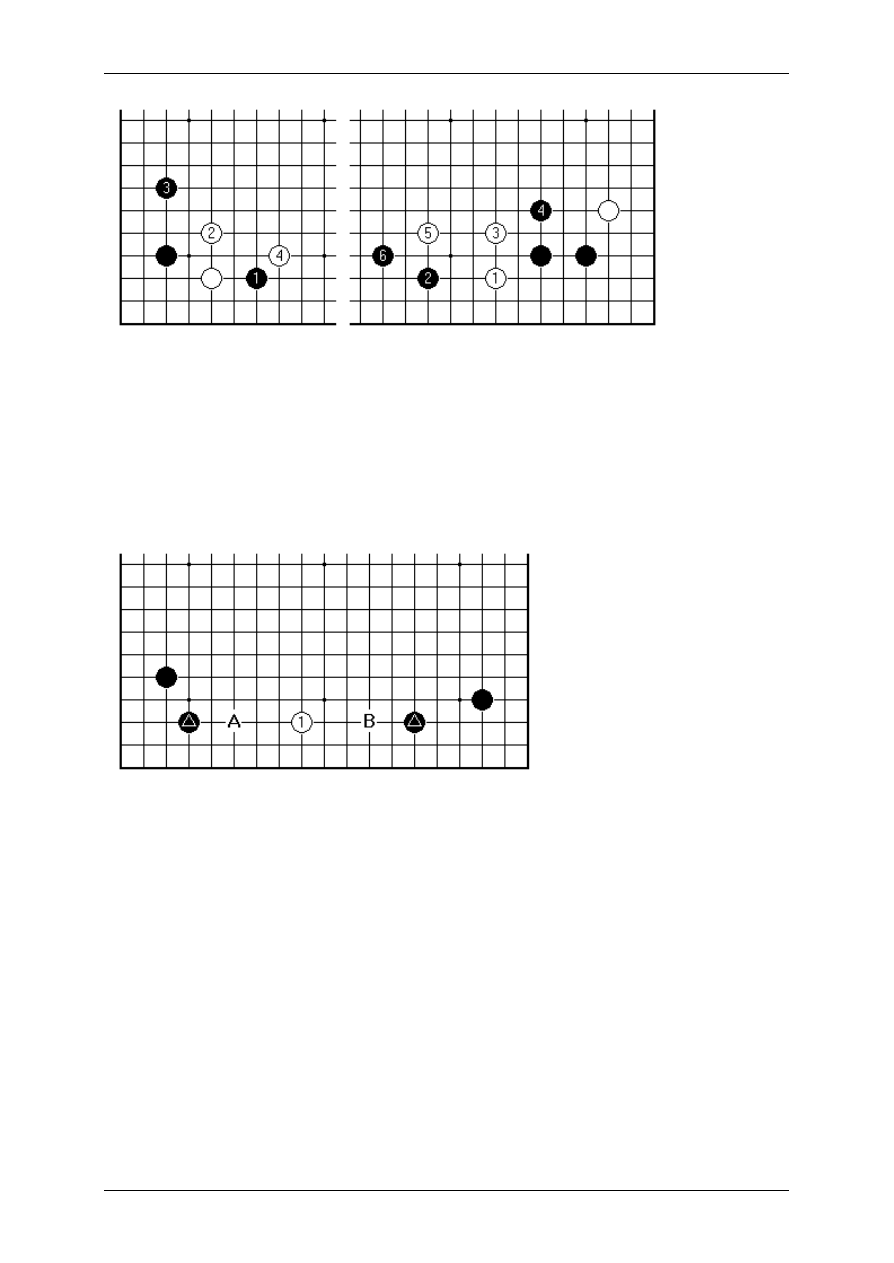
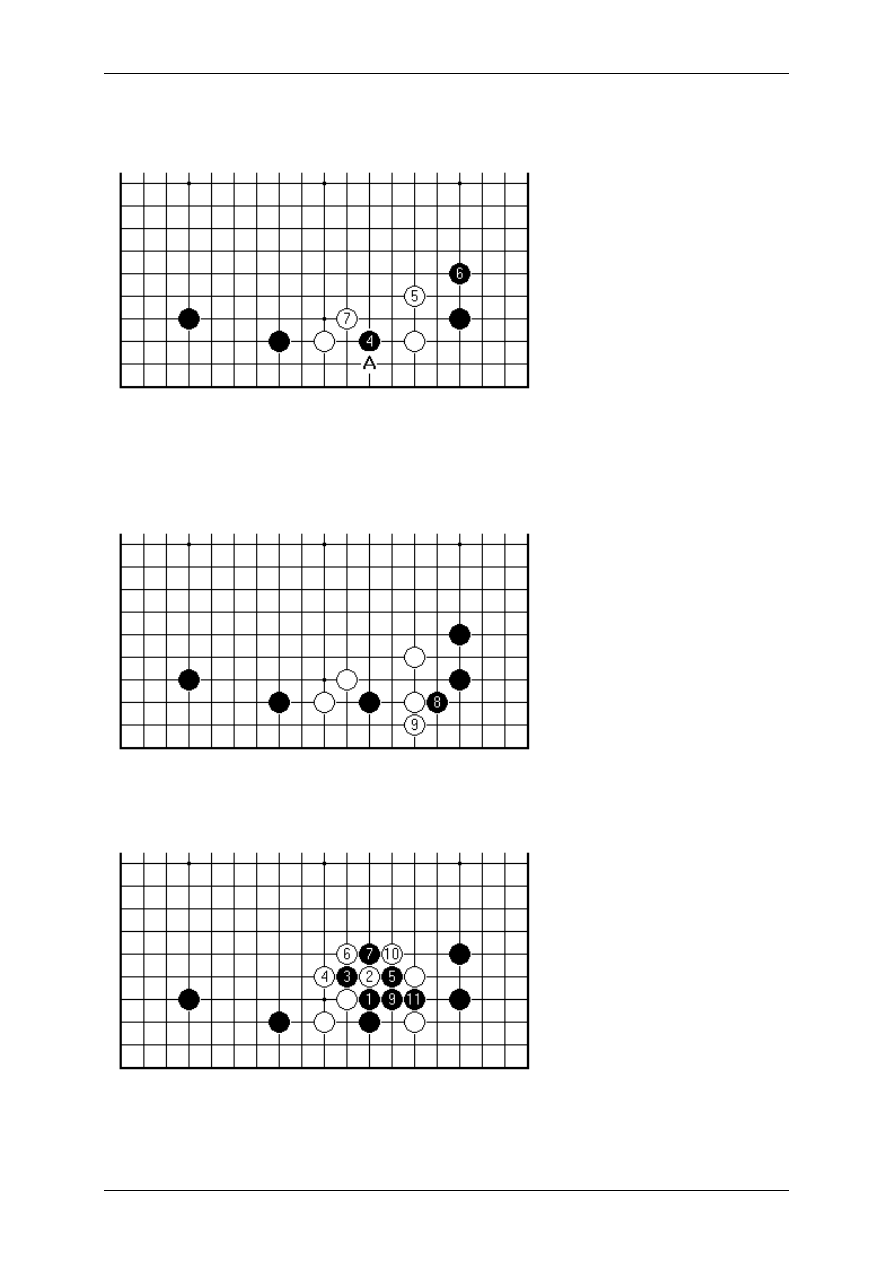
Let's look at ways in which this framework may expand towards secure territory. This
is one relatively conservative plan. Black seems to have about 40 more points than
White here, with four more stones.
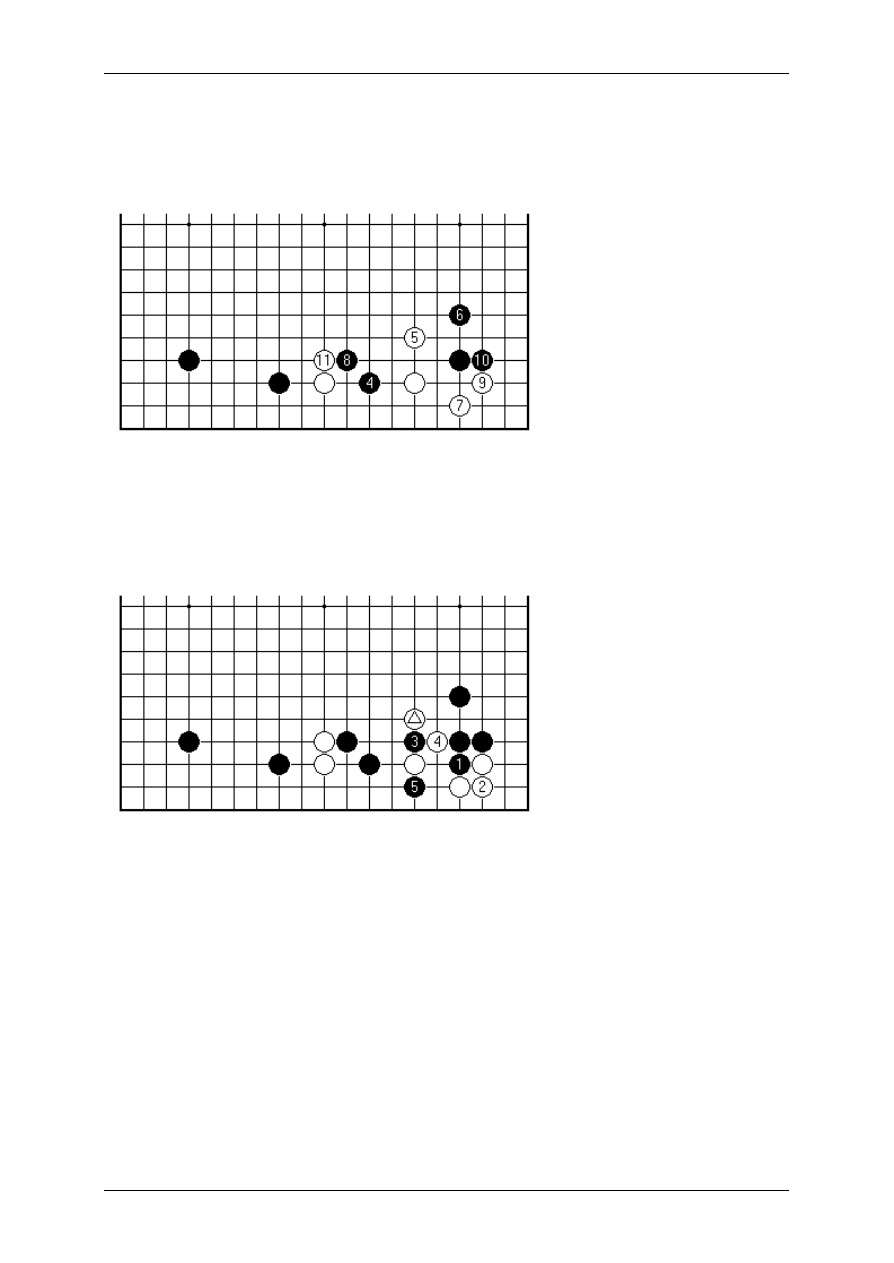
It is probably possible to debate endlessly the security of the territory. When White
invades this way Black has the luxury of good shape after 10, the marked stone
having ended up on a good point.
In this case Black may take about 55 more points than White, with five more stones.
On Your Side by Charles Matthews, 3-dan
Page 6 sur 138
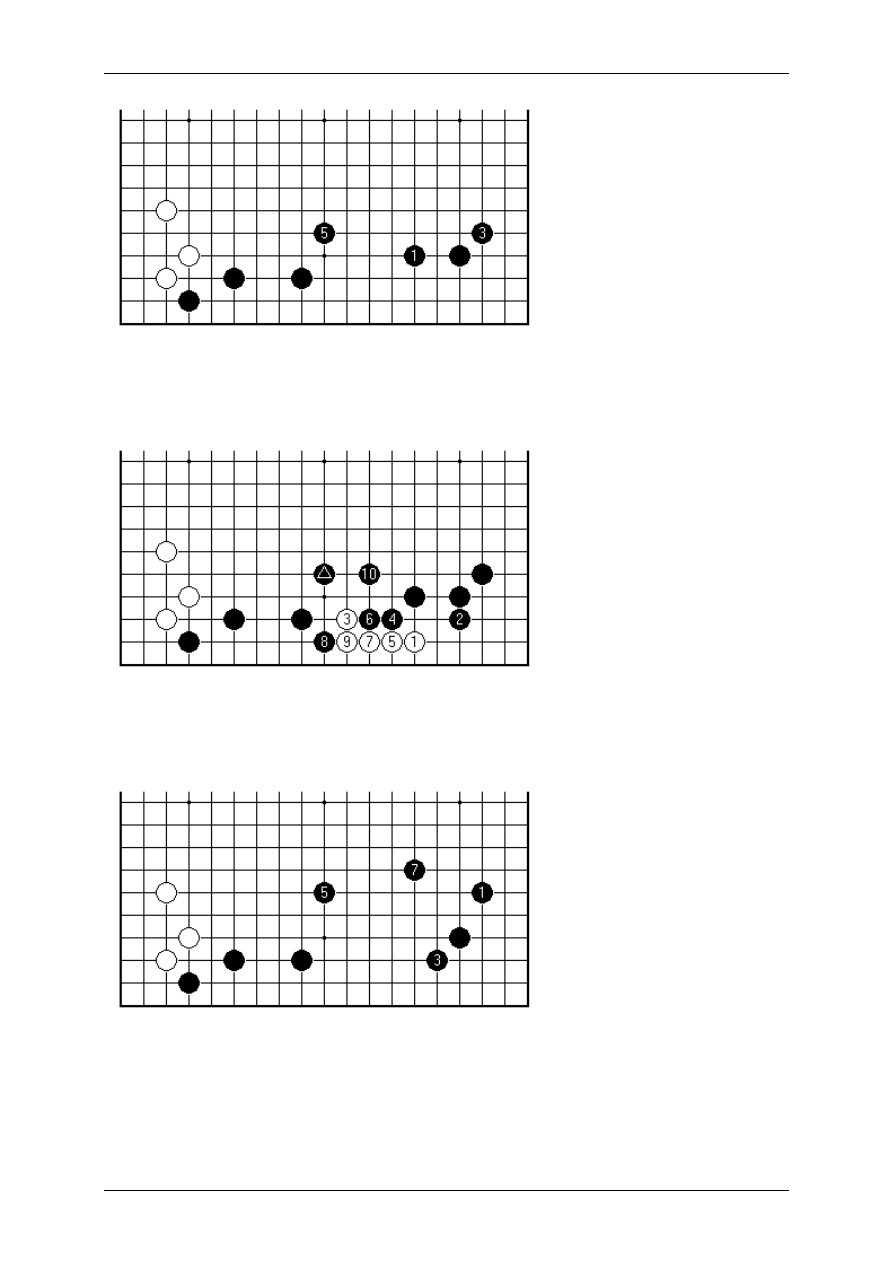
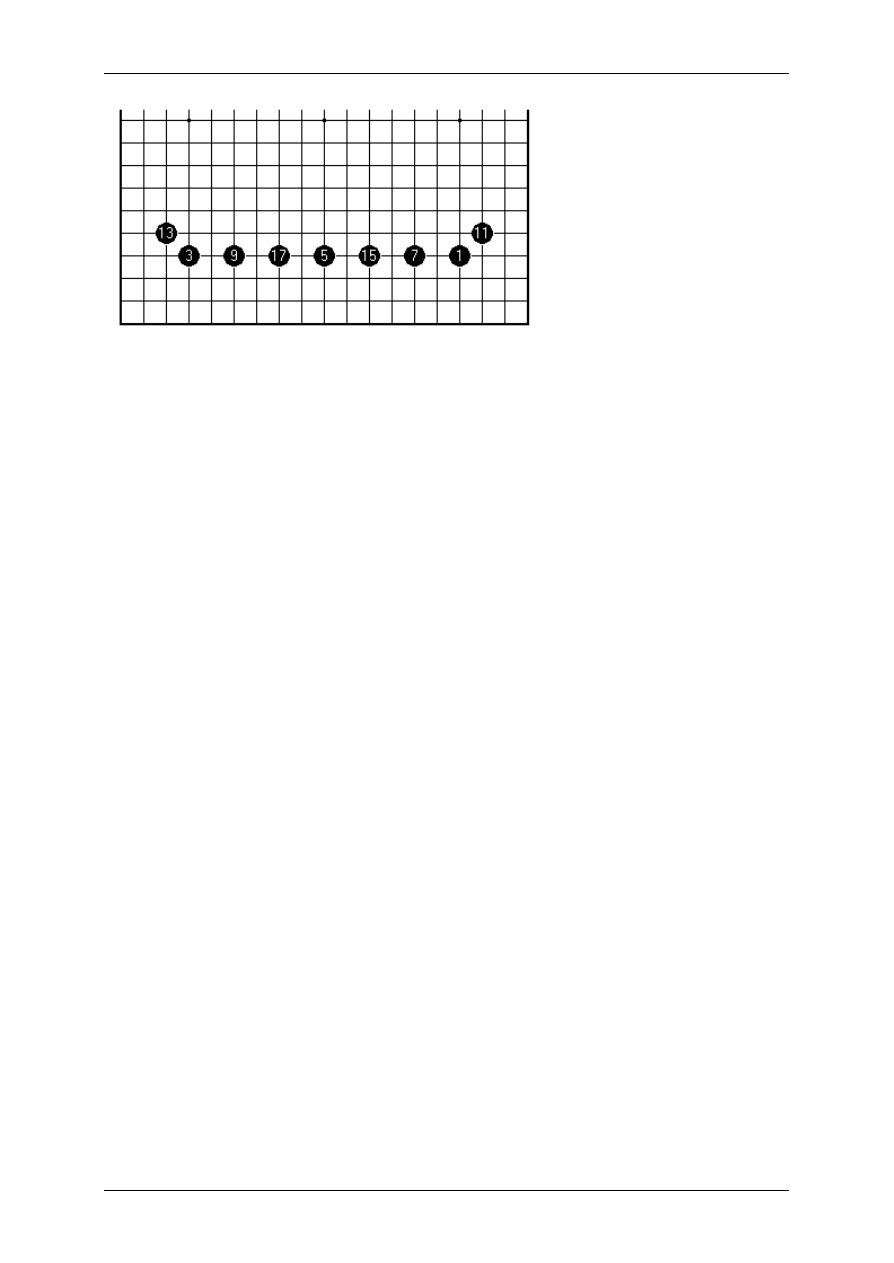
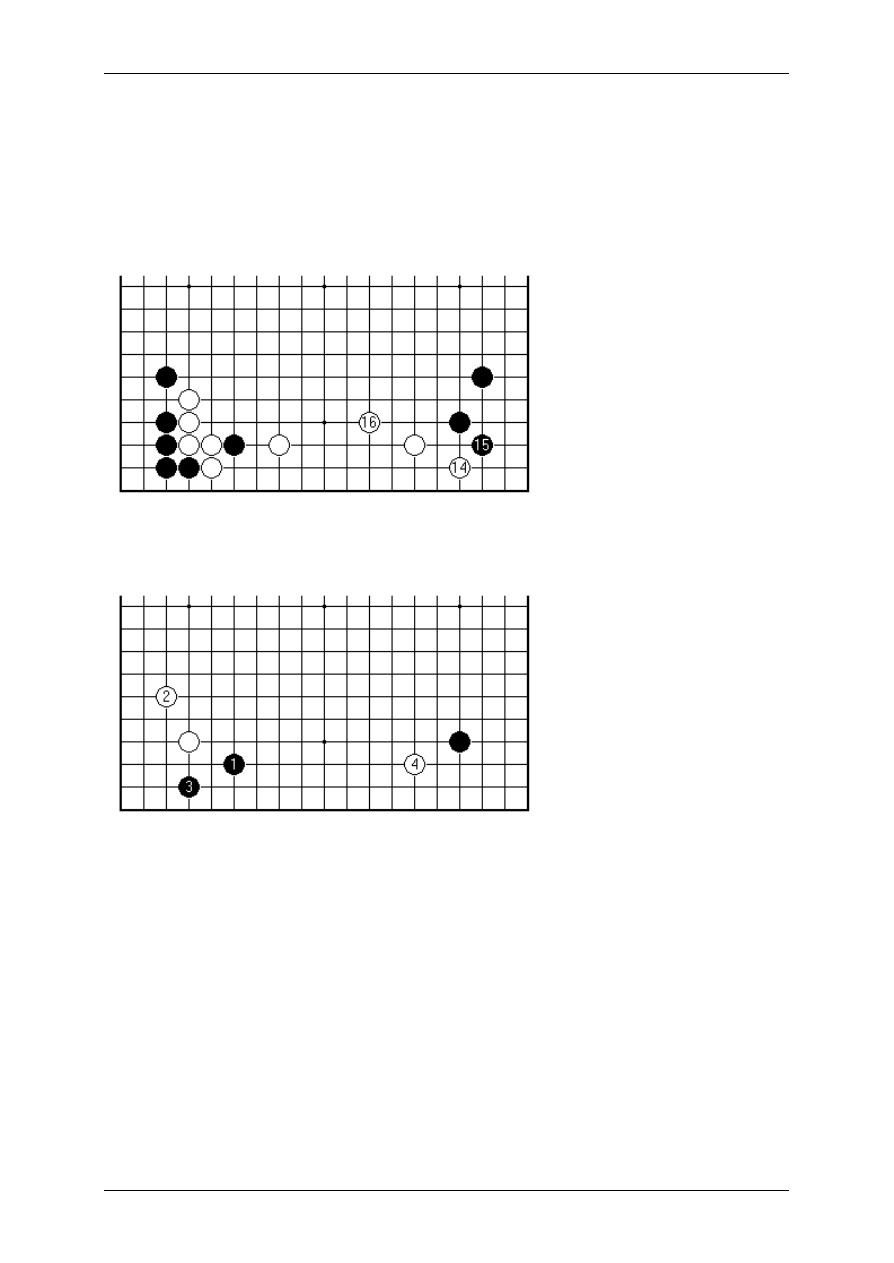
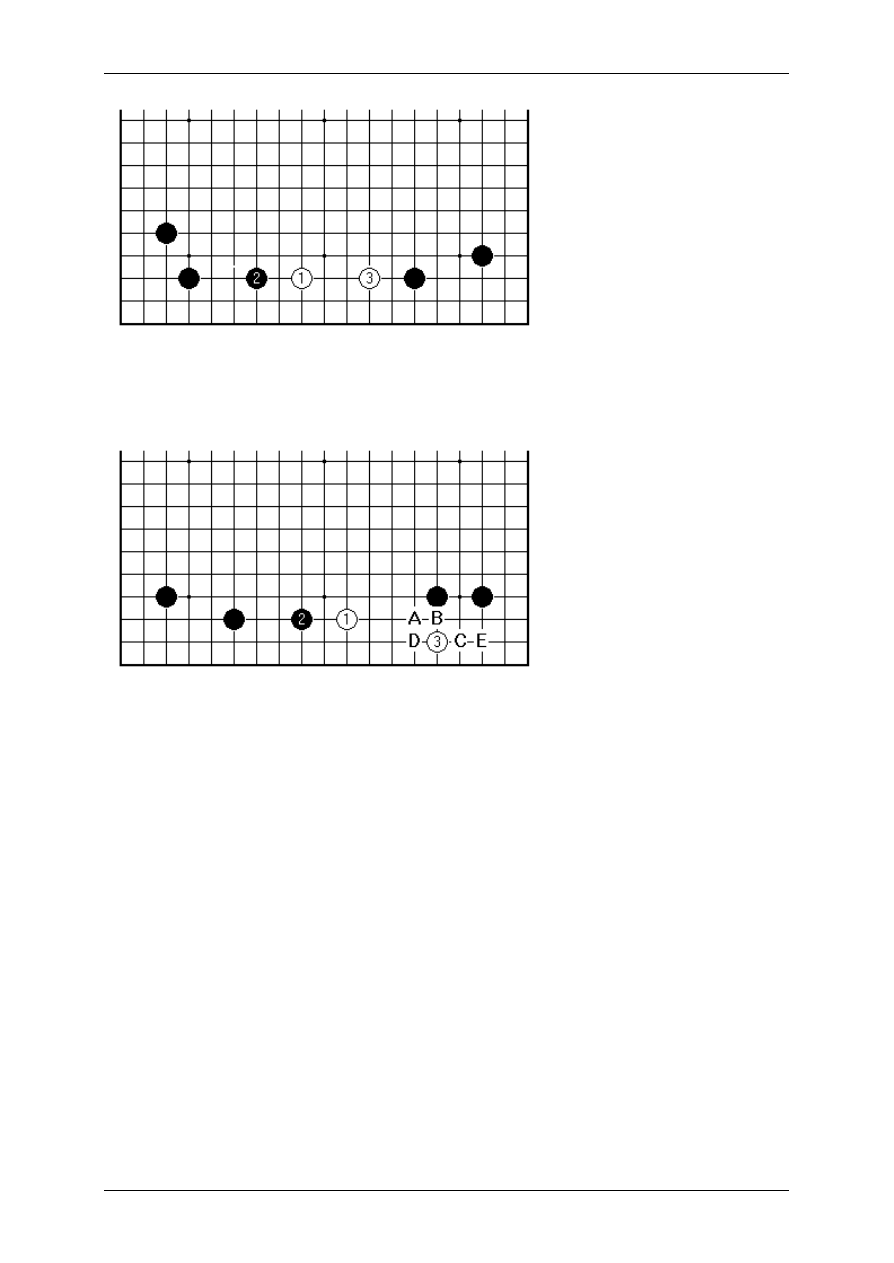
For comparison, this is a famous kind of framework, that has been turned into a 63
point side, at a cost of nine plays. Now 15 and 17 here seem to be lesser plays than
those that came before, and Black also deserves something for outside influence. It
is rather foolish anyway to talk of frameworks as secure territory, until you know more
about the direction of middlegame fighting, which may suddenly cause a n
unsuccessful sequence to blossom into a serious invasion.
But surely there is enough to the counting to show the trend. Frameworks that
potentially add 10 or 11 points per extra stone are ambitious. Of course the opponent
will intervene at some point: framework play on a sufficiently grand scale forces the
opponent's hand, and one will see attempted invasions or reduction plays.
Perhaps there is a helpful analogy with Monopoly. There investing in railway stations
offers a limited synergy and a strict ceiling on upgrading your assets; the real money
is in laborious property development, houses and hotels offering increasing returns.
In something of the same way, framework play goes beyond strictly cumulative
construction of territory. Most frameworks, and just about all of those that are easy to
handle, are based on initial claims along the sides of the board.
In conclusion the example under discussion seems to be a sound enough start to a
framework. The group Black builds on the left is strong enough to take care of itself,
as a kind of sheet anchor; and though it is rooted firmly on the third line, the
framework as a whole can eventually expand into the centre.
On Your Side by Charles Matthews, 3-dan
Page 7 sur 138
2. Approach on the Open Side
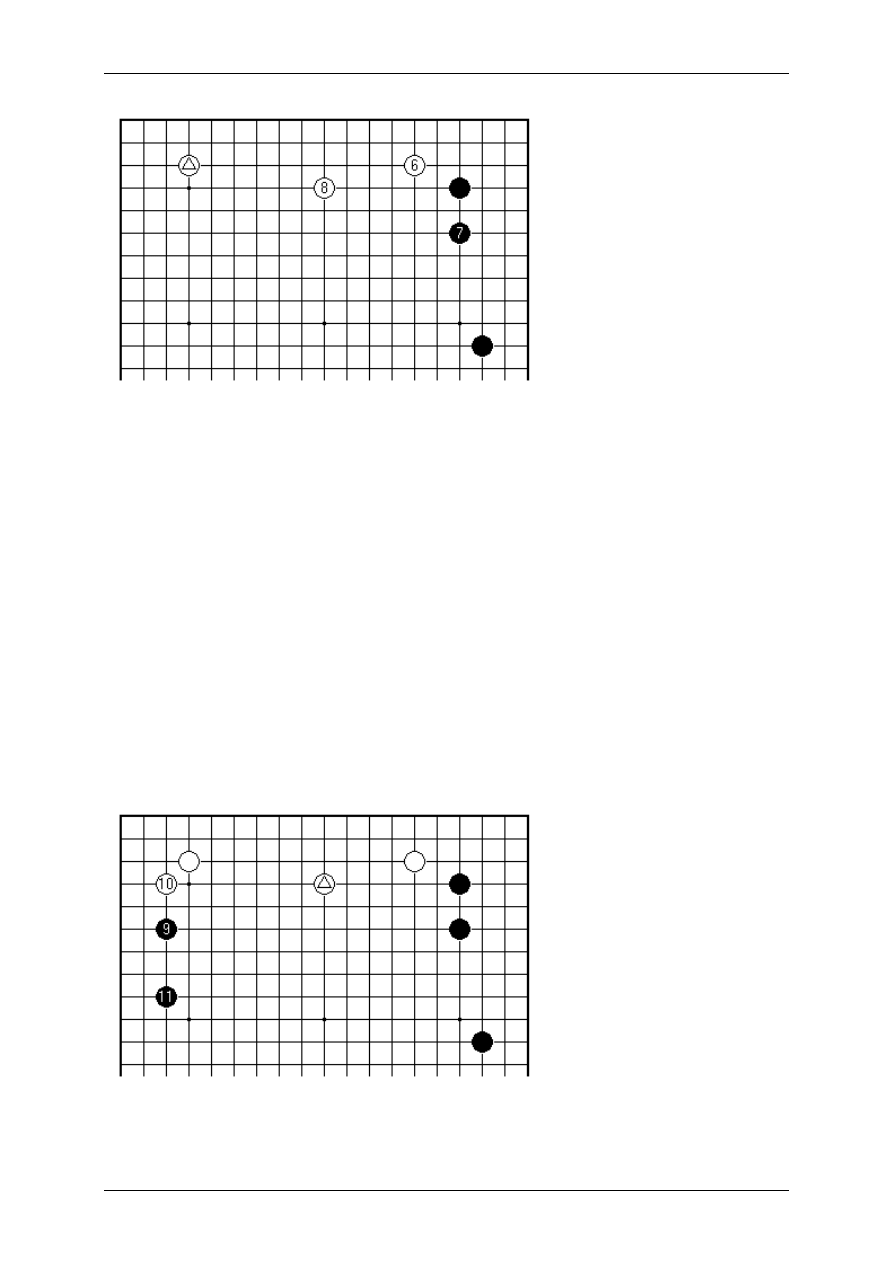
In the set-up introduced last time, the normal idea is for White to approach the right-
hand corner from the outside, or open side.
As we know, Black is forming a framework on the lower side. A conventional way of
thinking about White's job is to regard the priority as limiting the framework, before
anything else. The logic applies, not just here, but to a broad range of situations.
Some of the reasons:
Black cannot make a large territory with just one more play here;
White has no really good play inside the framework (see examples in the first part);
Once White has established a group on the right side the framework becomes a
definite target, and an invasion may succeed in splitting off a weak group from
Black's formation;
Why make life hard on yourself?
To play this way is to go to the other extreme. White's moves aren't bad at one level:
they don't lack a basic shrewdness of approach. As a recipe for winning Go,
however, they are strange. There is no sign of a refutation of Black's strategy. It is
more like White forcing Black to play well. A rough count might give both players 15
points of definite territory on this side. But White 13 now appears as a group started
On Your Side by Charles Matthews, 3-dan
Page 8 sur 138
in the middle of nowhere. This is a panicky response to the thought that your
opponent might possibly make some side territory.
Has White had already made a mistake? By challenging Black immediately, White
seems to imply that is the case. But there is no reason to believe this.
If White can get this kind of result it isn't so bad. Black's formation is quite efficient,
but on the other hand it still needs one more play to become solid territory. White has
influence on the left and right sides, which must be worth something in the overall
position.
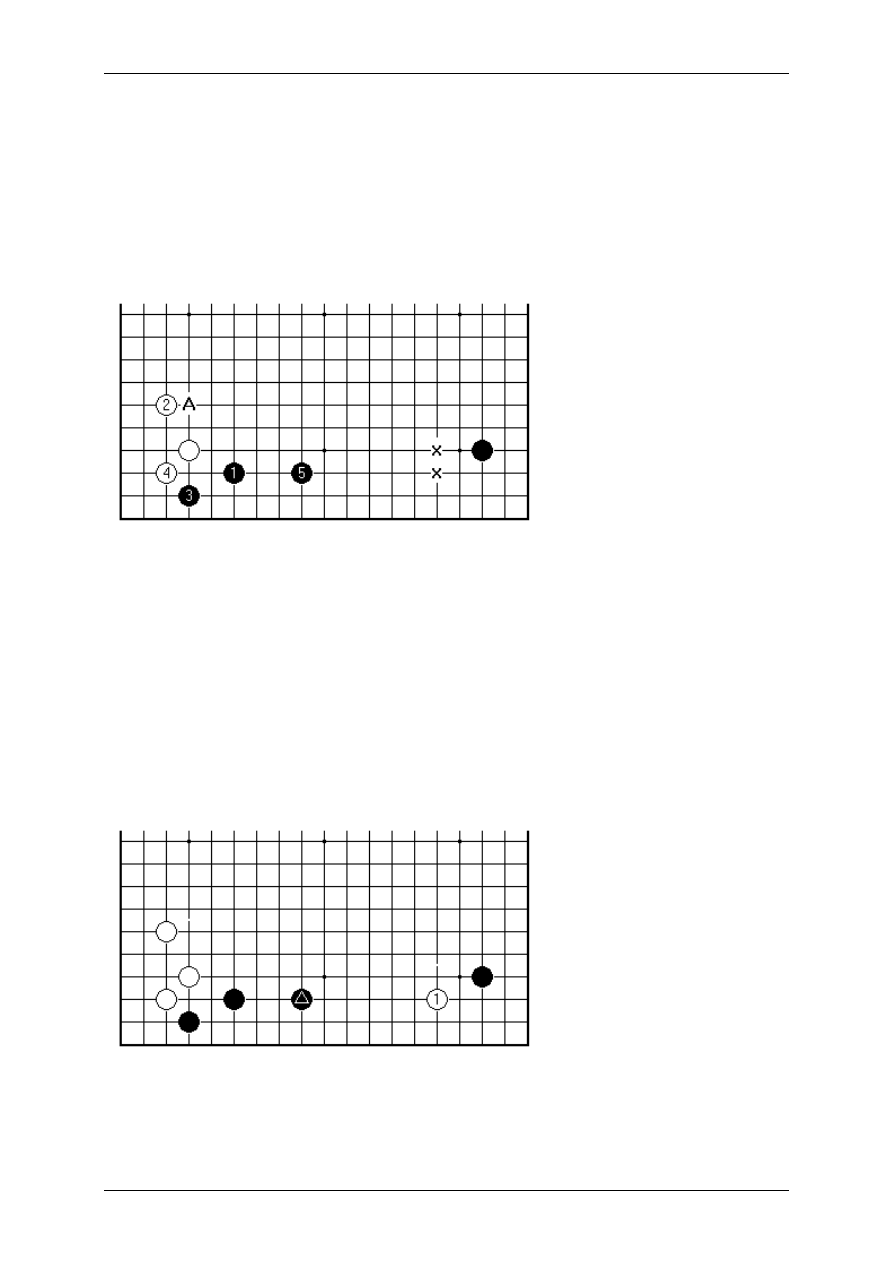
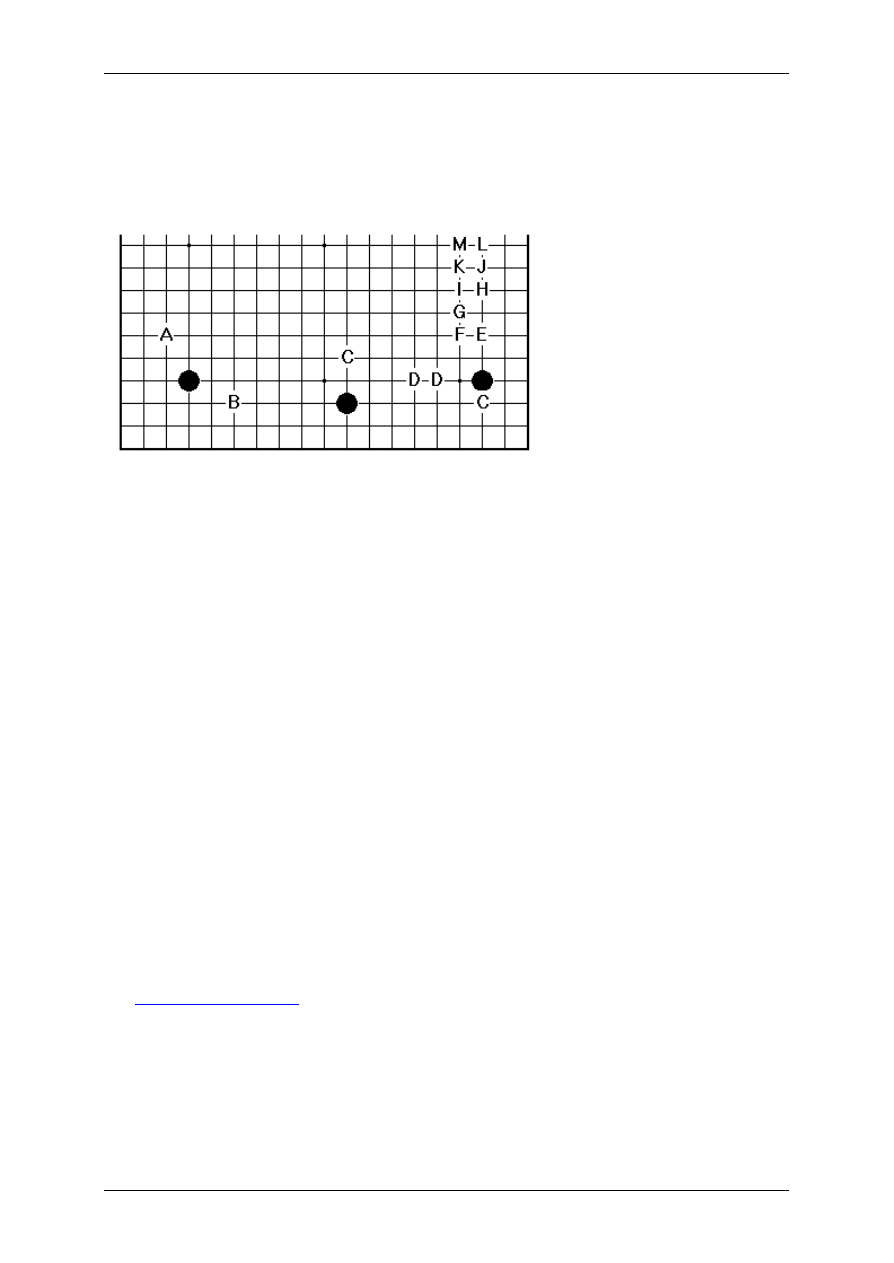
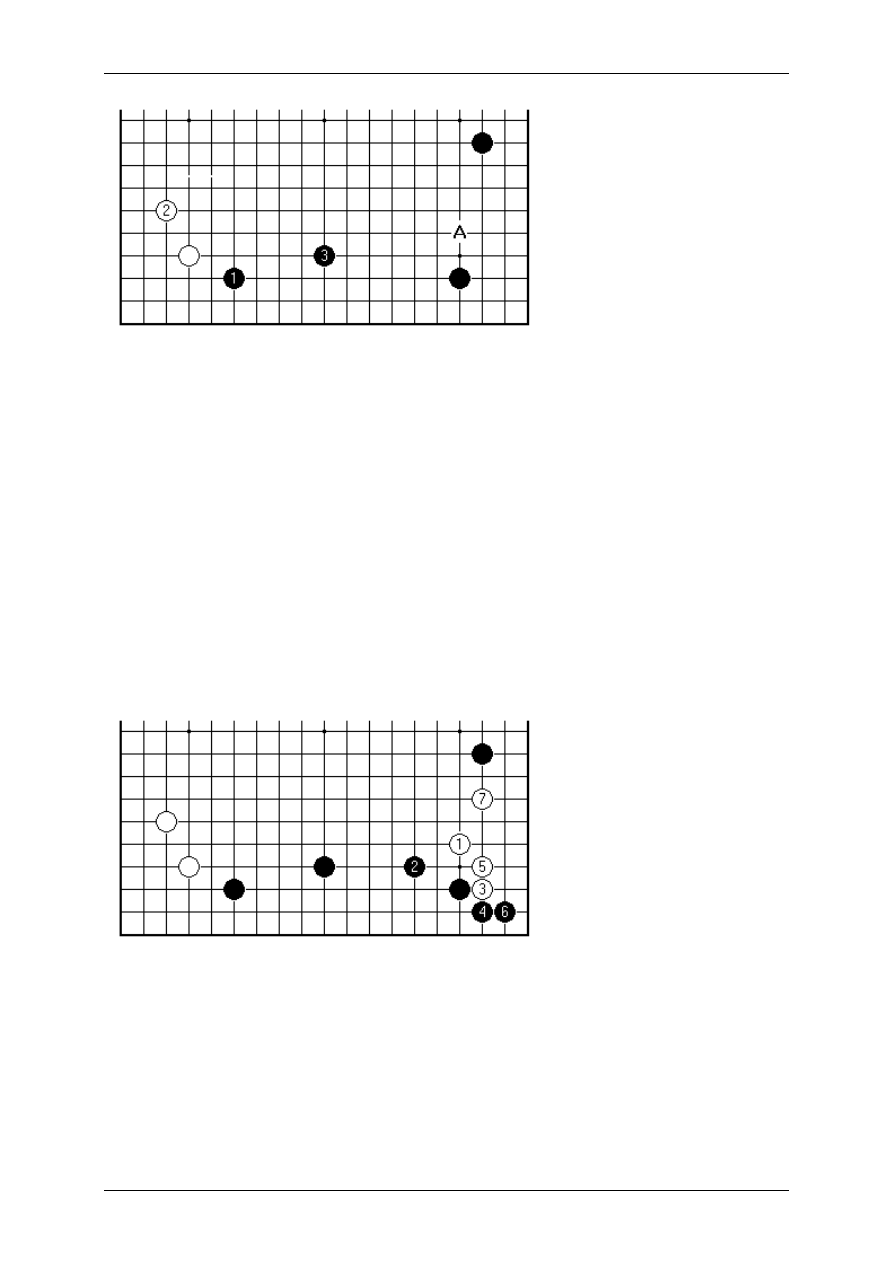
What about Black's answer? How about this way of playing Black 2? This appears to
contradict one of the basic teachings about balance. However, it is in the territorial
style of Ma Xiaochun, number two player in China, so beware of calling it intrinsically
bad.
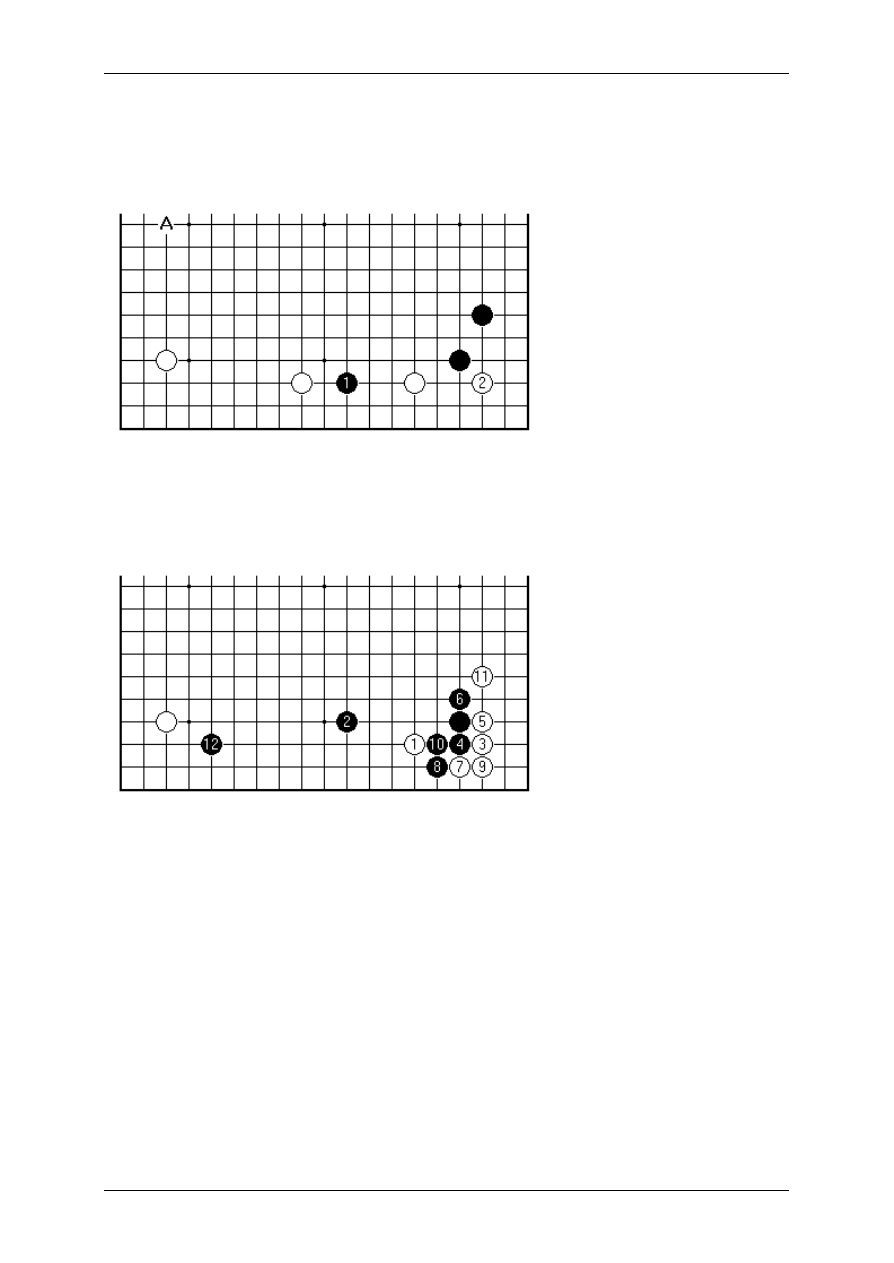
Since the marked black stone is on the third line, the normal idea is to play Black 2
on the fourth line, to elevate Black's position as a whole. As shown, Black might finish
off the position with A, considerably later in the game, which does a kind of up-down
alternation.
Let's expand on this point.
On Your Side by Charles Matthews, 3-dan
Page 9 sur 138
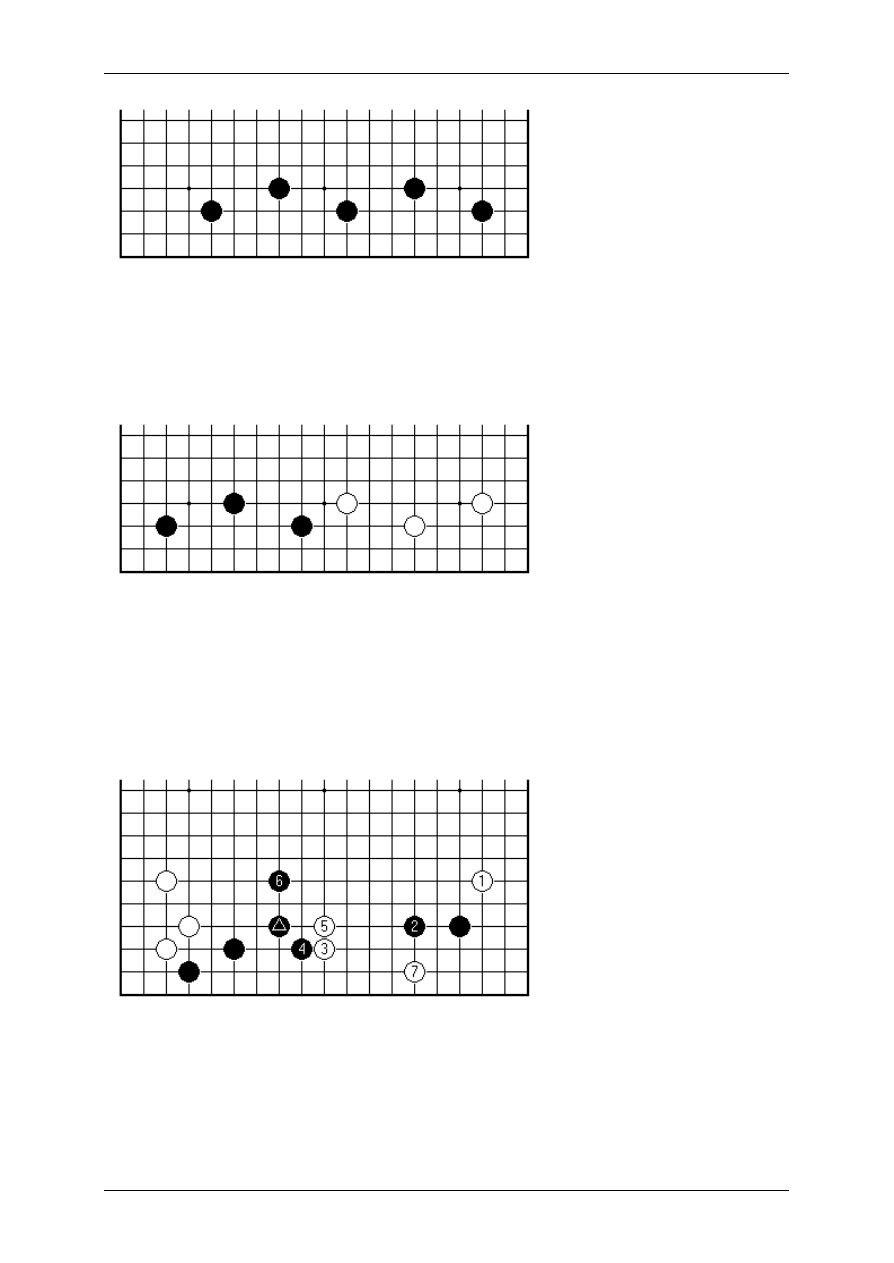
When people talk about third line/fourth line balance, they usually have in mind
something like this sort of M-shaped formation. If all the black stones were on the
third line, that would be unambitious in terms of territory, and also "low" (lacking in
central influence). However if they were all on the fourth line, the territory would be
relatively insecure.
For smaller-scale formations, the inverted V or "tent" (three black stones on the left)
tends to work better than the V (white stones on the right), which may suffer erosion
of territory at the less well-anchored ends.
However, these basic patterns do undergo modification according to context, and
don't by any means exhaust the subject. Here are a couple of further sample
positions to try to clarify the balance concept.
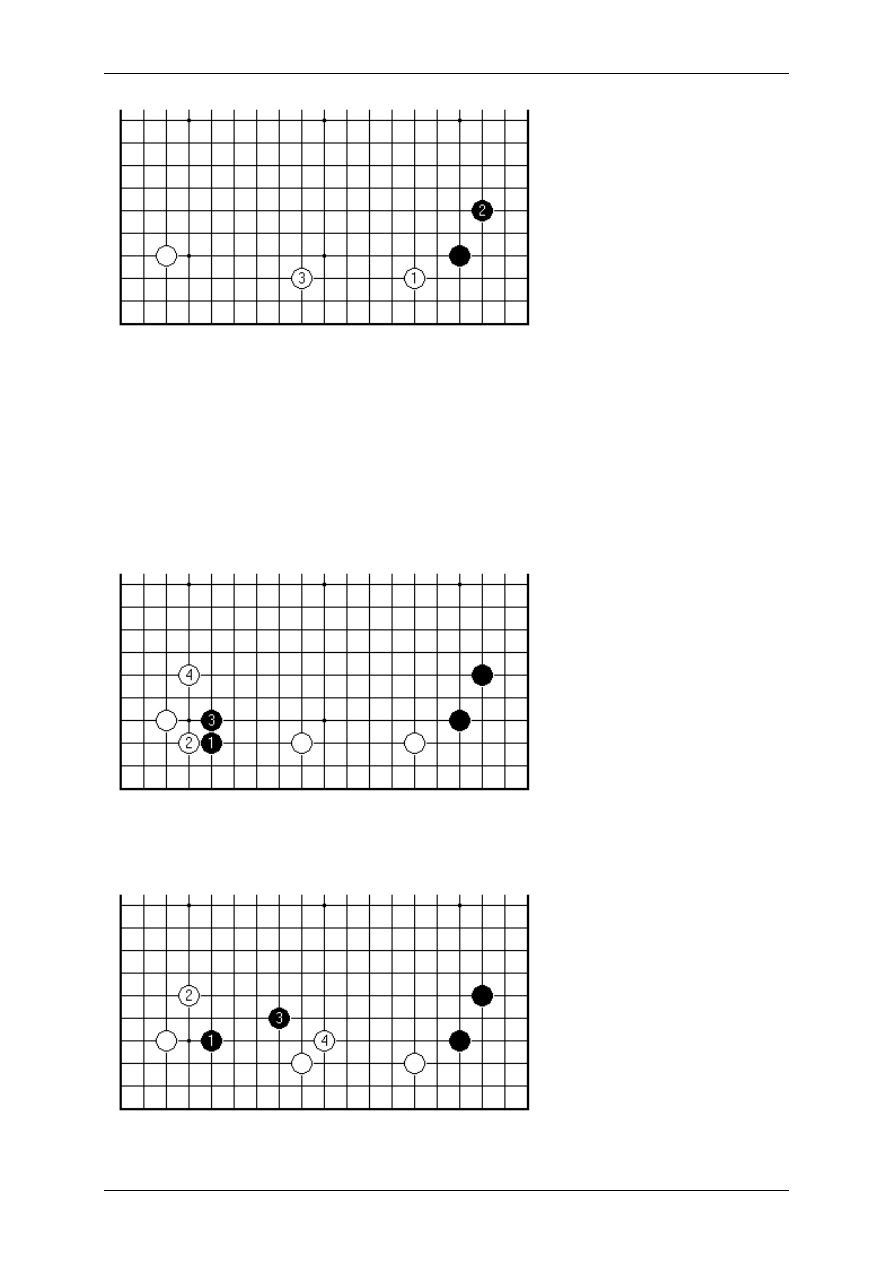
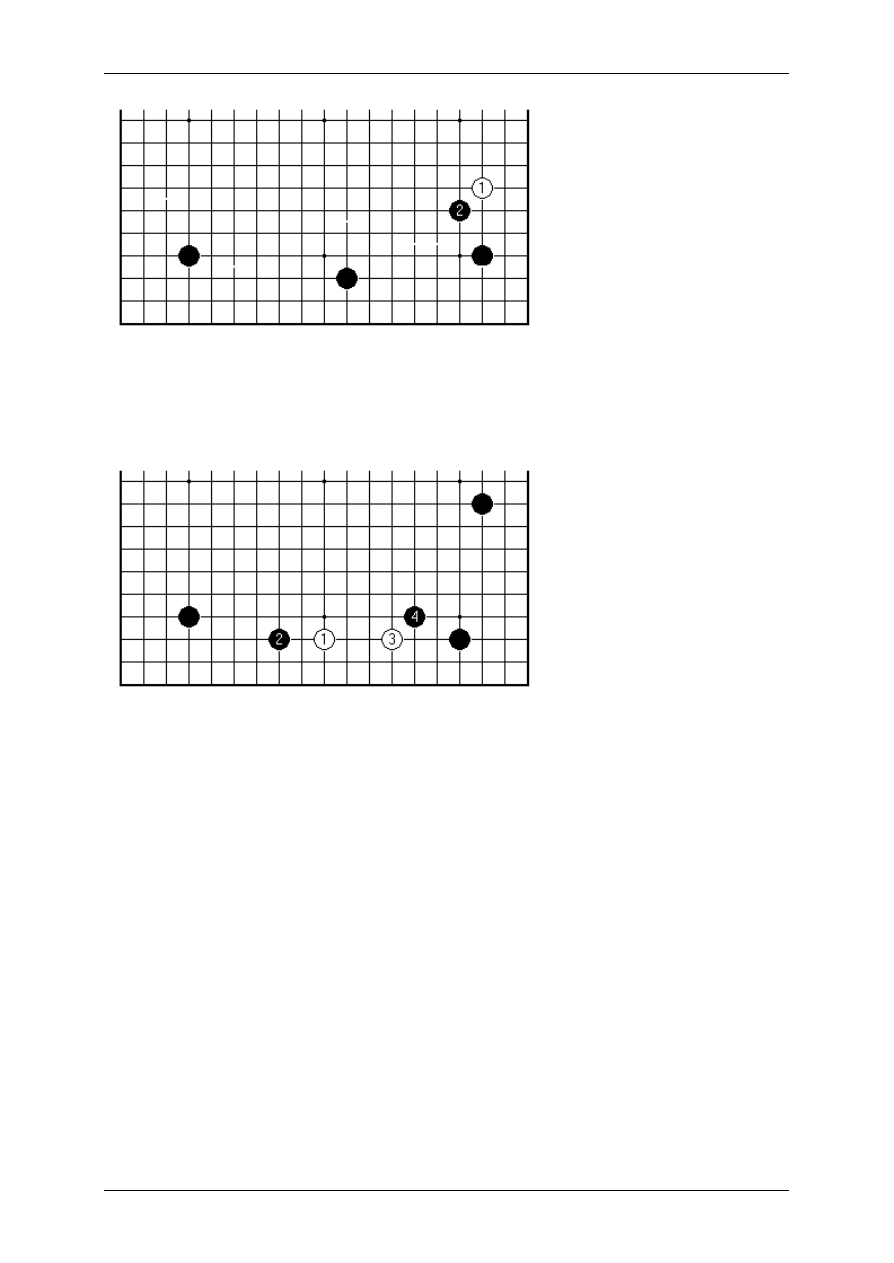
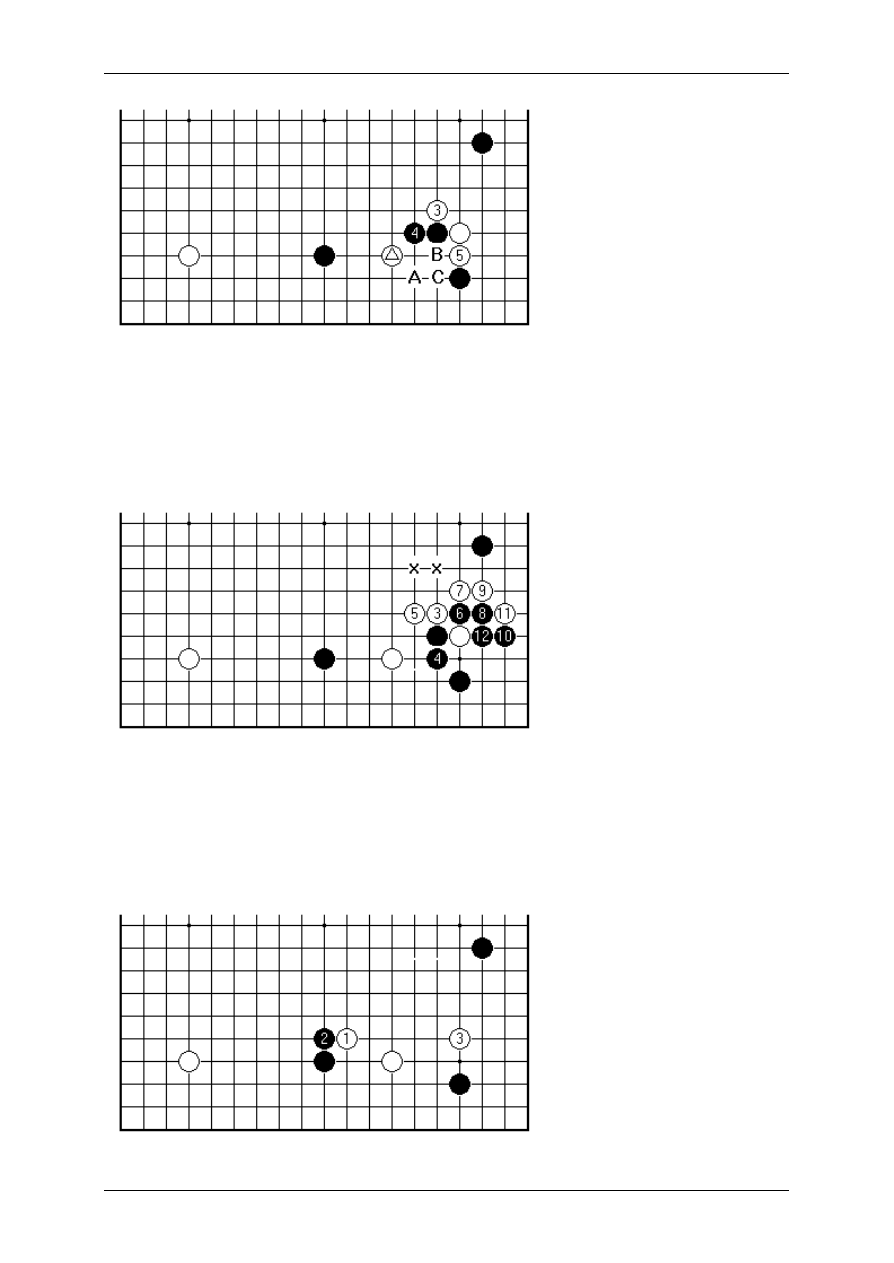
In this case Black has varied by placing the marked stone on the fourth line. Now it
appears that Black 2 on the fourth line is possibly unbalanced (too loose). White can
come in at 3, and up to 7 sets Black's right-hand group floating. Black 2 o n the third
line would be in fine attacking focus, in this case.
On Your Side by Charles Matthews, 3-dan
Page 10 sur 138
If on the other hand White approaches the corner this way, the marked black stone
can end up looking better balanced than it would on the third line.
But in our case Black's left-hand formation is on the low side.
Therefore Black 2, on the fourth line, is in order. It is quite true that White could
invade immediately at 3. If Black reacts passively then White may have a chance to
weaken the right-hand corner. Black 4 and 6, the attach-block pattern, are a positive
manoeuvre. White is going to be very busy in the near future, trying to hold things
together. Neither of Black's groups should get into trouble.
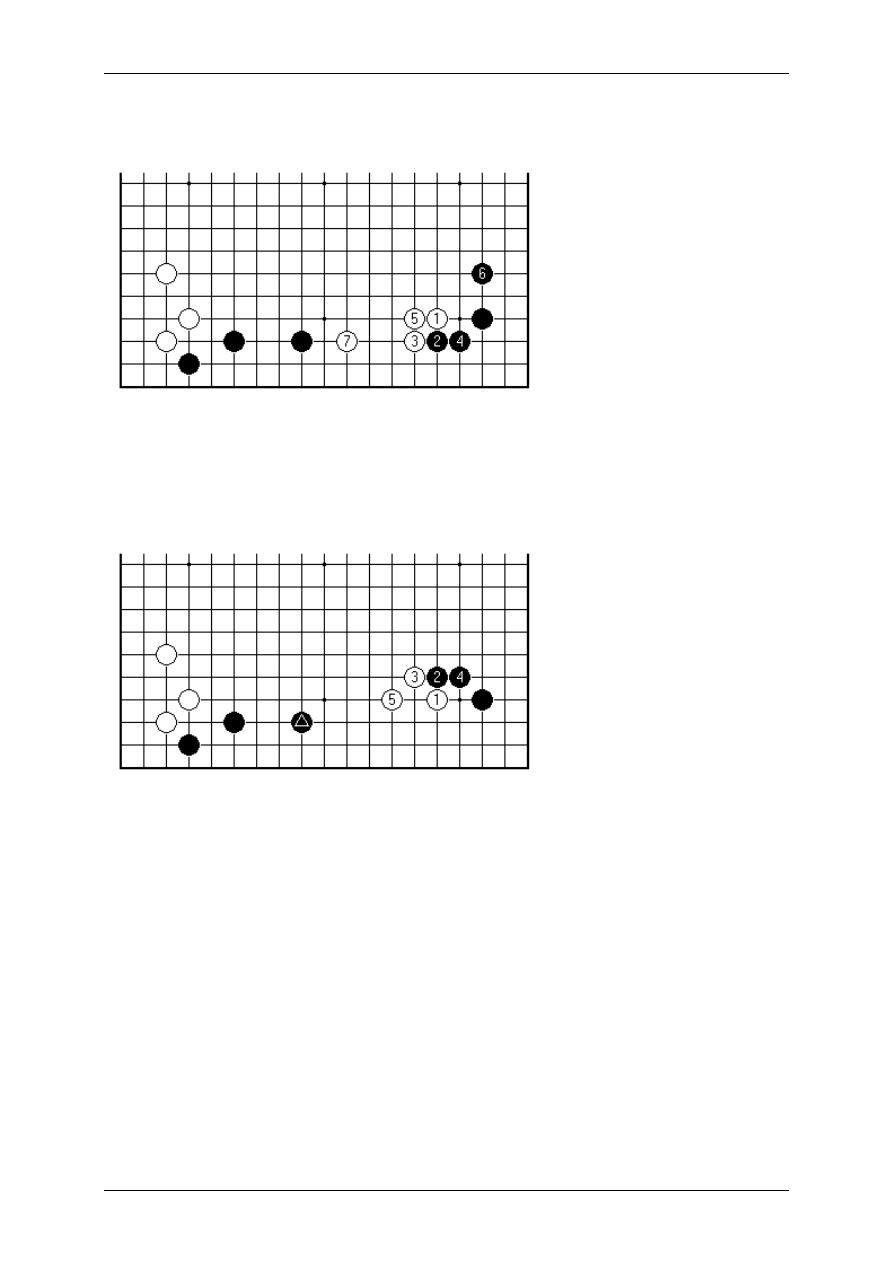
In fact it has often been seen in professional play, for Black to play attach-block
immediately White approaches from the outside. There are other choices for 7; but

On Your Side by Charles Matthews, 3-dan
Page 11 sur 138
Black 8 is always the key point of Black's shape. This way of thinking by Black is
theoretically sound, both as far as strengthening the framework on its edges goes,
and for the feeling of balance along the lower side.
This sort of early fight promises Black plenty of chance to gain the initiative.
This variation developed by top Korean players shows a White effort to keep matters
more fluid across the lower side. White A, Black B is White's prerogative here (Black
shouldn't block directly and allow White to peep at B).
On Your Side by Charles Matthews, 3-dan
Page 12 sur 138
3. Anti-Framework Measures
It is largely a matter of taste whether in the early stages of the game to play for
territory, or for influence (expressed either as frameworks or solid positions that are
hardened against future fighting, so-called thickness). Professional Go shows great
respect for territory, cash in hand. One reason is that pros can defend very skilfully.
Amateurs do not, which is one explanation why amateur dan players often
systematically overestimate frameworks.
So far these articles have looked at a typical framework on the side, from the point of
view of the player building it. It is quite possible for the other player to prevent this
framework arising in the first place.
There are two different ideas that you might use for that. You can choose a different
type of corner opening, applying a pincer. Pincer openings must sometimes be
played, in order to develop a 4 -4 point in the correct direction. Or you can treat the
corner differently, leaving the opening unfinished. This is a technique that is often
seen in professional play; we discuss how it relates to the miai concept.
When Black approaches with 1, White 2 announces the intention of denying Black
control of the lower side. Currently this pincer is popular, as a re those at A and B
also. In each of these cases Black has a simple way to play, invading the corner at
the 3-3 point. This is in fact a peaceful plan, and leads to settled positions. Black can
also choose more complex variations, by playing a second approach to the 4-4 point
from the other side, or simply by jumping out with 1.
On Your Side by Charles Matthews, 3-dan
Page 13 sur 138
This is the standard continuation up to 11, when Black invades the corner. Evidently
it is now Black who takes secure territory. At 12 White has the initiative. The whole
board situation ought to be taken into account at this point. If White decides to
continue on the lower side, the approach at 12 makes a framework fo r White. It could
be somewhat unreasonable for Black to pincer now, given the strength of White's
position to the left; White would probably choose a variation jumping out from 12, and
the whole lower side might become a fighting area.
Therefore this end result may arise, White 16 taking into account balance exactly as
was explained in the previous part.
The second idea comes from a considered analysis of breakaway variations
(Japanese tenuki, literally "omitting a move"). In this case White leaves the normal
progression in the left-hand corner in a state of suspense, to play 4.
There really needs to be an adequate motivation for plays like this, above and
beyond simply being "busy". The idea that one can put something over on the
opponent by leaving unfinished business all round the board is a temptation that
must be resisted. It seems to peak at around 1 kyu level. The lesson is much the
same as budgetary control, on first getting a credit card. Simply deferring
responsibilities and debts isn't a successful way of dealing with them.
On Your Side by Charles Matthews, 3-dan
Page 14 sur 138
In this case there is a clear explanation for White's behaviour. The exchange of the
white marked stone for the black marked stone in this position is a minus for White. It
was already seen in the first article of this series that Black is now ideally placed to
attack, with 1 and 3. Therefore it occurs to White, to postpone that exchange.
This is proper reasoning, consistent with an intention on White's part to prevent Black
making the lower side into a framework. If White really wishes to approach the right-
hand corner on the "inside", within the potential side framework for Black, it would be
better not to play out the left-hand corner first.
So much for the basic concept, showing "transmission" from one corner to the
adjacent one. There remains the other issue: survivability. How much damage will
White take in the left-hand corner?
In this concrete variation Black plays the pincer 5 to take the initiative and return to
the left corner. It takes an effort to look at this position objectively. "Always pincer" is
just as bad a guide to play as "never pincer". Look, Black has a framework once
more! Yes, but White has the territory in the right-hand corner.
Black 15 is a very big point. It is a typical multi-purpose play:
it is worth 15 points or so in territory alone;
On Your Side by Charles Matthews, 3-dan
Page 15 sur 138
it removes the base from White's two stones, leaving them weak and almost without
eye space;
it also makes sure of eye space for Black's two stones, which in turn devalues a
potential white invasion on the lower side.
White really must answer, with a play at 16 for balance, or A for a definite base on
the side. Success? Well, anyway, not abject failure. White would probably want to
control the top left corner already, to feel happy with this result. Black's framework
seems to require two further plays to become really substantial.
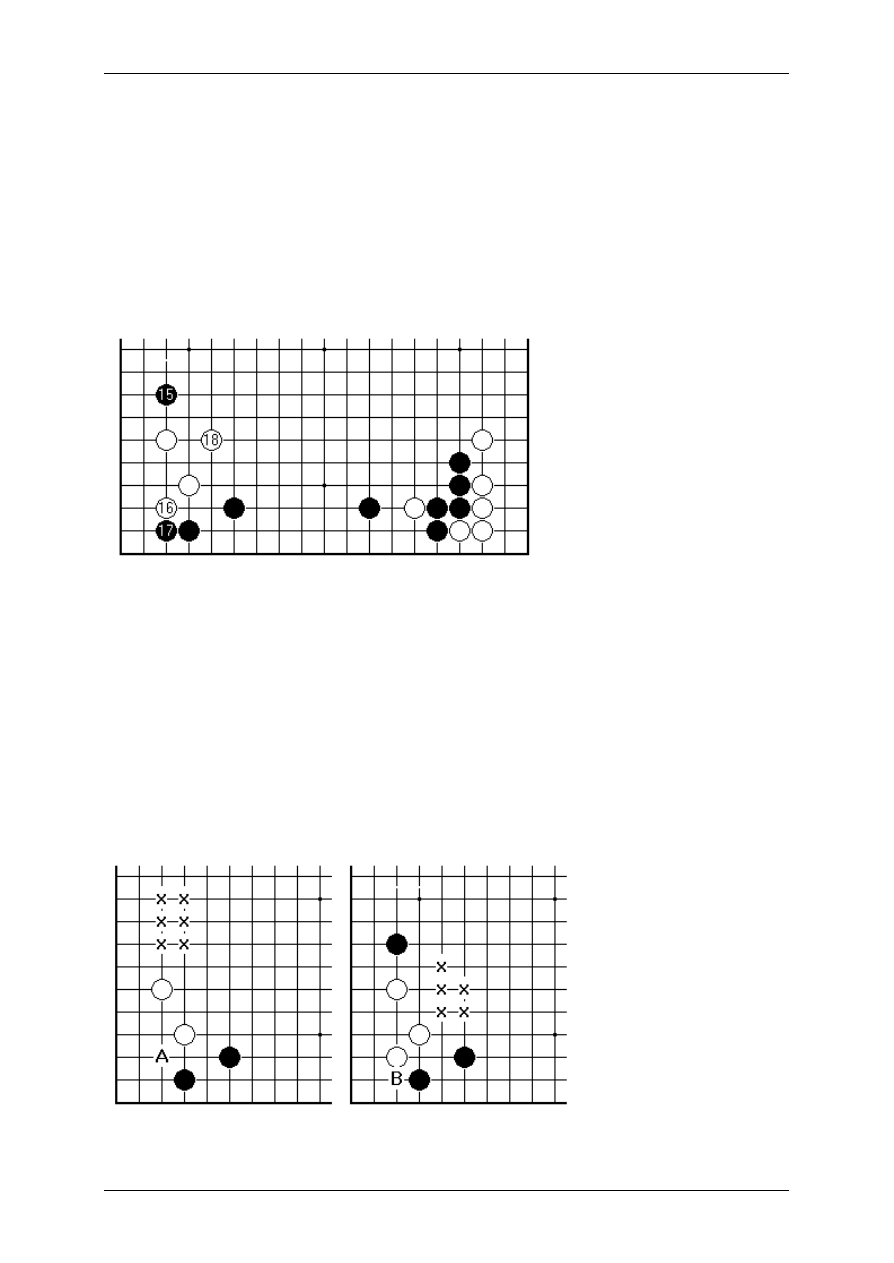
This would be Black's other idea for putting White under pressure. Black 17 is a key
point but when White jumps out at 18 Black needs a play on the left side to reinforce
15, before anything else.
Does it seem that Black is thwarting White's intentions here, rather than the other
way around? Actually White is showing flexibility, while Black is simply and
consistently pushing ahead with a set plan. When does "lateral thinking" yield to
"high-concept" Go, to steal a term from Hollywood? Normally ideas in Go do not work
in their original form, but in a second phase that depends on the opponent's
response; so you might say that the burden of proof is on the player who has the
whole game mapped out. One thing to bear in mind: in a symmetrical position it's
only the first player who can afford an inflexible plan.
On Your Side by Charles Matthews, 3-dan
Page 16 sur 138
The point here is really the mechanism by which White manages to shore up the
defence of the left corner, once having lost the initiative on the right. The Japanese
term miai means, roughly speaking, having a pair of good options open: "I can play
this way or that way". Sometimes there is an identifiable pair of points: "if she goes
there I'm going here, and vice versa". So one talks of a "pair of miai".
In this example we can indicate the miai concept in action at least twice. Firstly (left-
hand diagram) White thinks of a play at A, and a play somewhere in the area of the
'x' points, as miai. If Black plays at A White extends up the left side, if Black obstructs
the left side White plays A. Then, once Black has gone down the second of those
roads and we have the right-hand diagram, White still has to react adequately to
Black pressure. Once more point B is in miai relation with the whole area of 'x' points.
If Black plays in the centre, White quite gratefully plays B. If Black attacks White's
base with B, White must at all costs not be shut in, but must escape to the centre.
Then Black has to defend the single stone on the left side, while White's group isn't
so very weak.
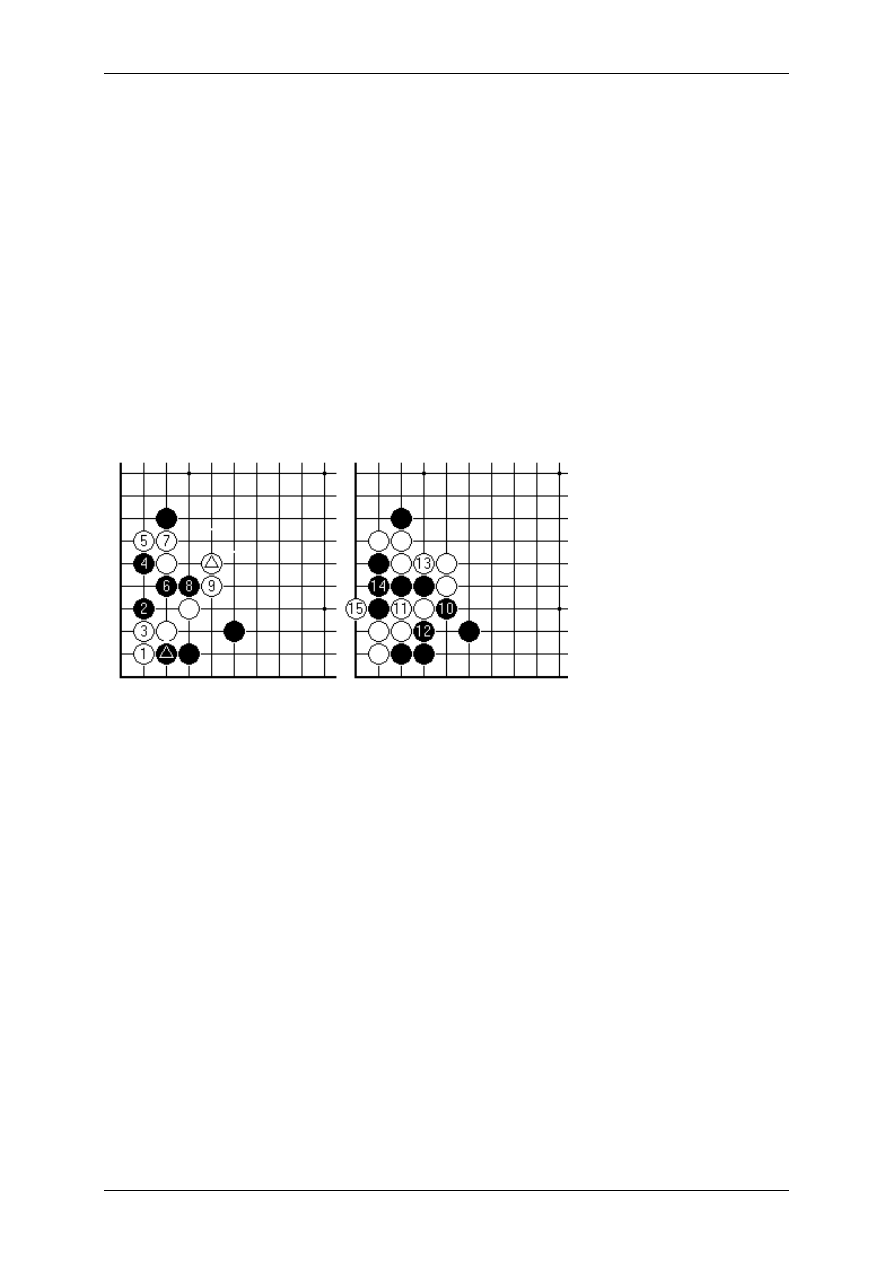
A tactical note to back up that assertion: Black 2 following White 1 is an implicit idea
once Black has pushed into the corner (marked black stone). Provided White has the
marked stone in the centre in place, White is just strong enough to resist 4 with 5.
As a bit of intellectual apparatus for playing Go, the miai concept is extremely useful.
That's something often concealed by a restrictive version quoted as "points P a nd Q
are miai if Black P, White Q and Black Q, White P are completely fair exchanges not
giving either player advantage". This definition is what people have in mind when
translating miai as "equivalent points". It does on occasion present itself in that
fashion, for example P and Q two endgame plays each worth eight points.
What we have been looking at here is one-sided miai - White's point of view only - as
an explanation of defence in a position where one doesn't mind if the opponent plays
first.
On Your Side by Charles Matthews, 3-dan
Page 17 sur 138
4. The Yardstick and the Wedge
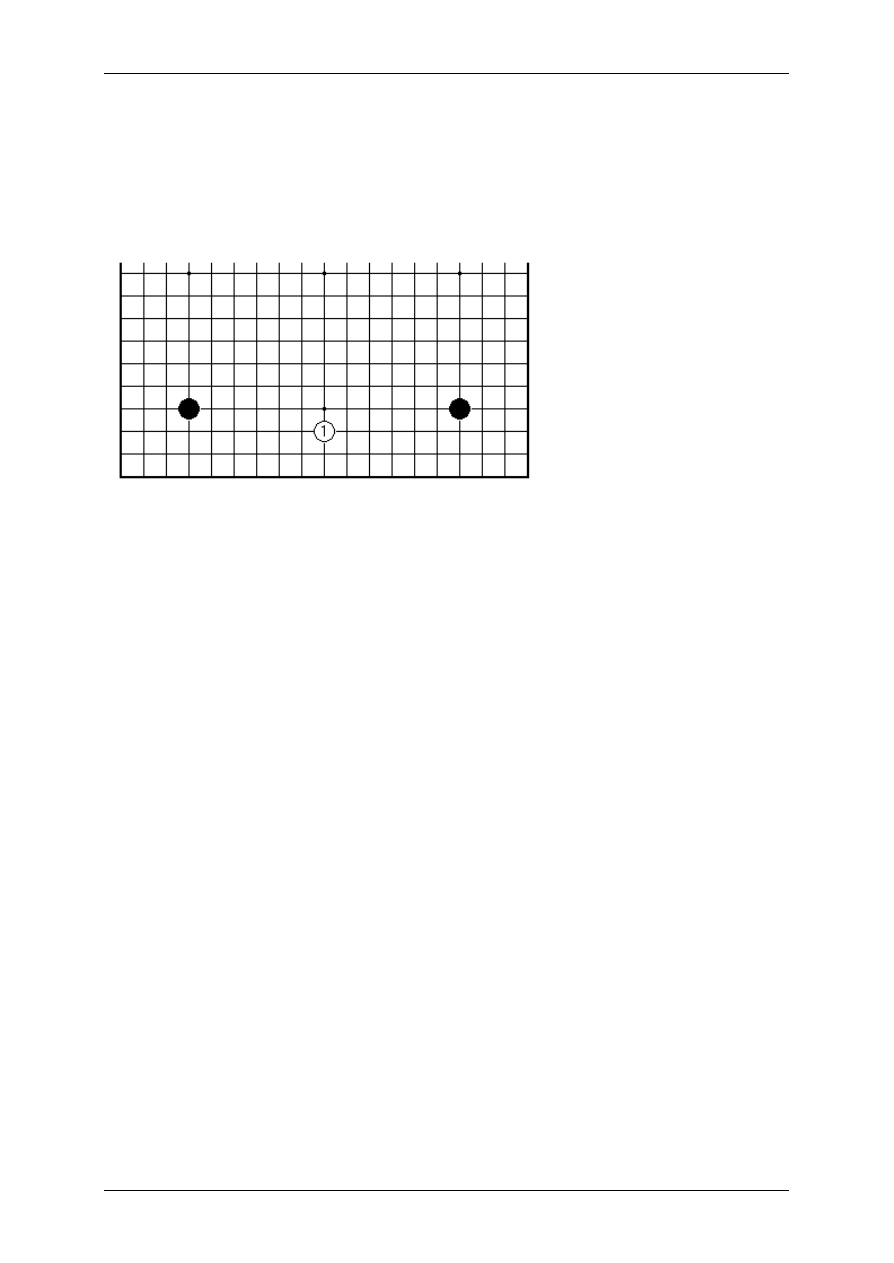
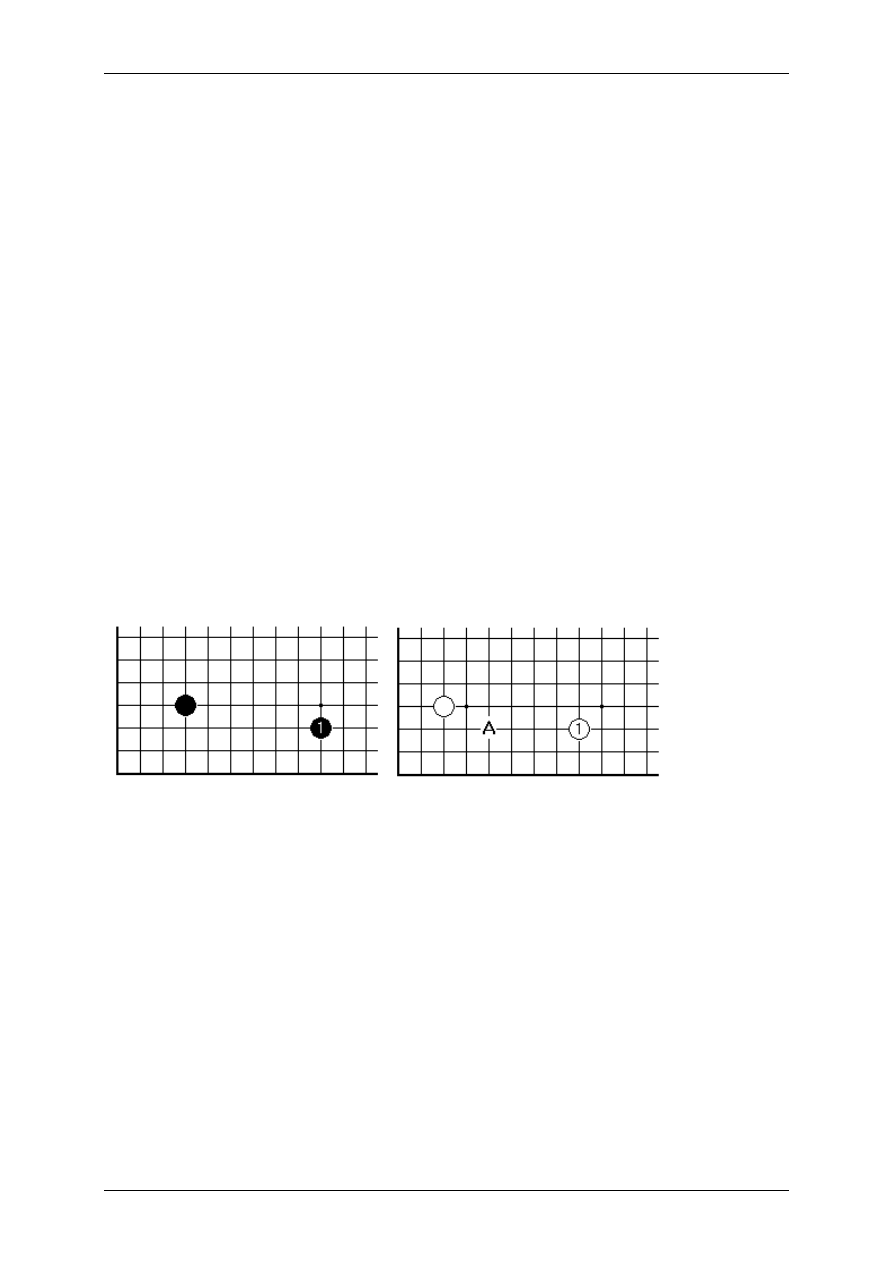
The basic unit that gives the correct feeling of scale to the sides of a Go board is the
two-point extension, played on the third line.
Here "two-point" refers to the two-line gap between the black stones. Extending in
this way is the common way to build a group on the side that has a base (some
amount of eye space). There are plenty of other standard extensions, which may
involve plays on the second and fourth lines too. But the two -point extension is
unrivalled for steadiness.
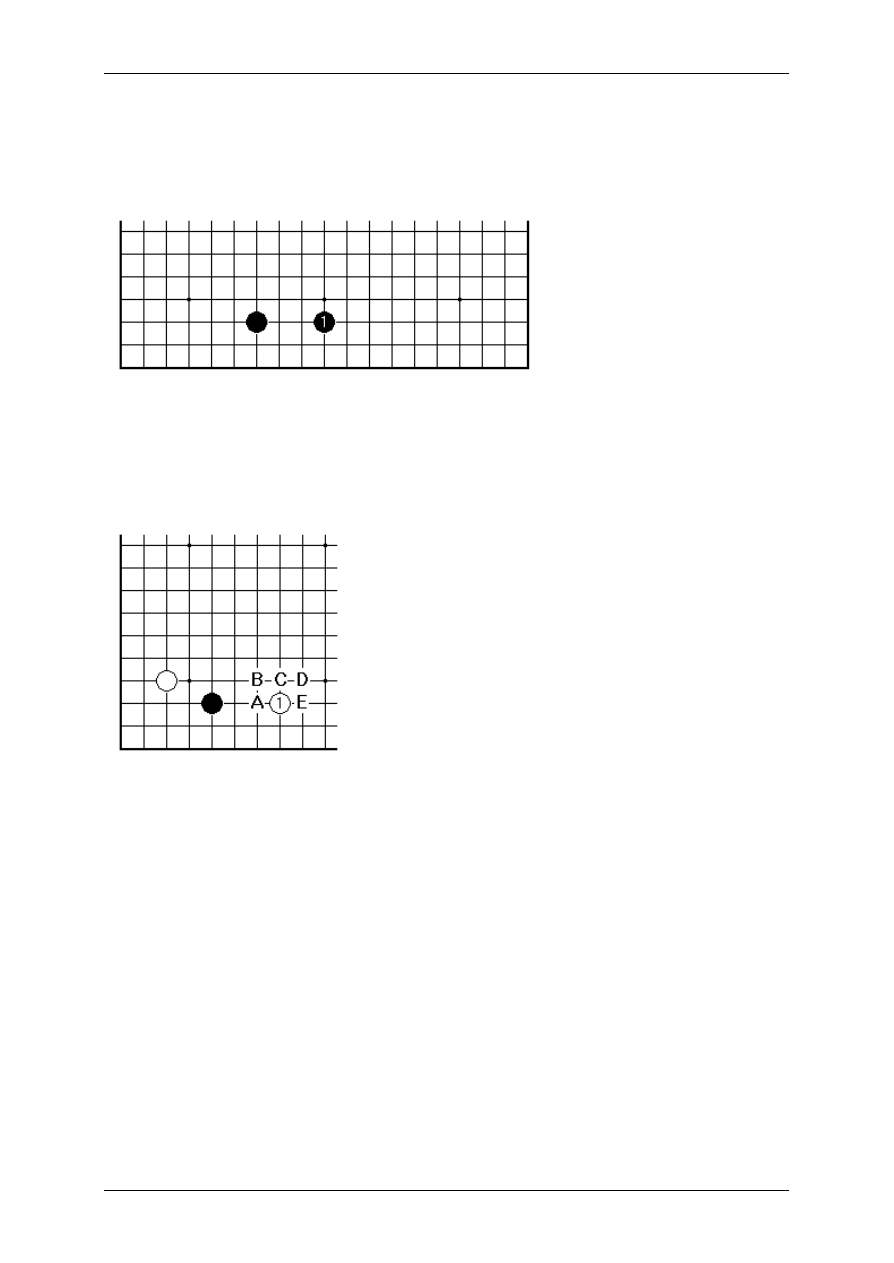
The first use we'll show o f the use of the two-point extension as a yardstick is to
clarify the pincer concept. White 1 here deprives Black of the two-point extension. It,
together with any of the adjacent plays A to E, is a pincer play against the black
stone. If White plays one of A to E, and Black responds anyway at 1, a local contact
fight breaks out (in case of A, C and E Black is playing in contact, in cases B and D
as an angle play but then White will add A to B or E to D). These fights are going to
be unfavourable to Black in the opening, for reasons we'll see in a moment.
On Your Side by Charles Matthews, 3-dan
Page 18 sur 138
If however White puts safety first and plays White 1 as shown, four lines away from
Black, that doesn't constitute a pincer. Black and White both make two-point
extensions. Now Black can turn to the left side.
A pincer play can be considered to involve some strategic risk. What are the potential
benefits? If Black plays passively White may get this kind of result. Judged in terms
of territory Black's group in the left corner and the two white groups are in balance.
But White has done much better when you look at overall position. For example,
White's group on the lower side is well placed to impede Black's plans for the right
corner 4-4 point.
It is axiomatic that developing on both sides is an advantage. Corner openings
often lead to one player having two side groups, that aren't as stable as these; in that
case the trade for the corner territory may be judged fair. But two well-established
side groups will be worth more than a smallish corner.
On Your Side by Charles Matthews, 3-dan
Page 19 sur 138
This would be the recognised way for Black to handle the side, with the white pincer
becoming weak. If this result is fair, it is easy to recognise how much White gains in
the previous diagram.
Going back now to contact fights that Black may initiate after a pincer, how about
Black A, B or C? In fact Black A is bad. In line with what was just discussed, the
reason can be seen this way: the pincer stone White 1 is a potential target for attack.
The logic of attack and defence in Go is that contact fights are the resource of the
defender, to gain some strength. Therefore the attacker should steer clear of them.
Of the other plays, Black at B is a marginal idea, researched by professionals in the
1950s. Black at C is the pick of the bunch (though it may lead to some complex
variations). With it Black heads for the centre one line ahead of White. If both players
push up, it should be the case that Black will have first chance to play on the left side,
to attack White's corner stone.
On Your Side by Charles Matthews, 3-dan
Page 20 sur 138
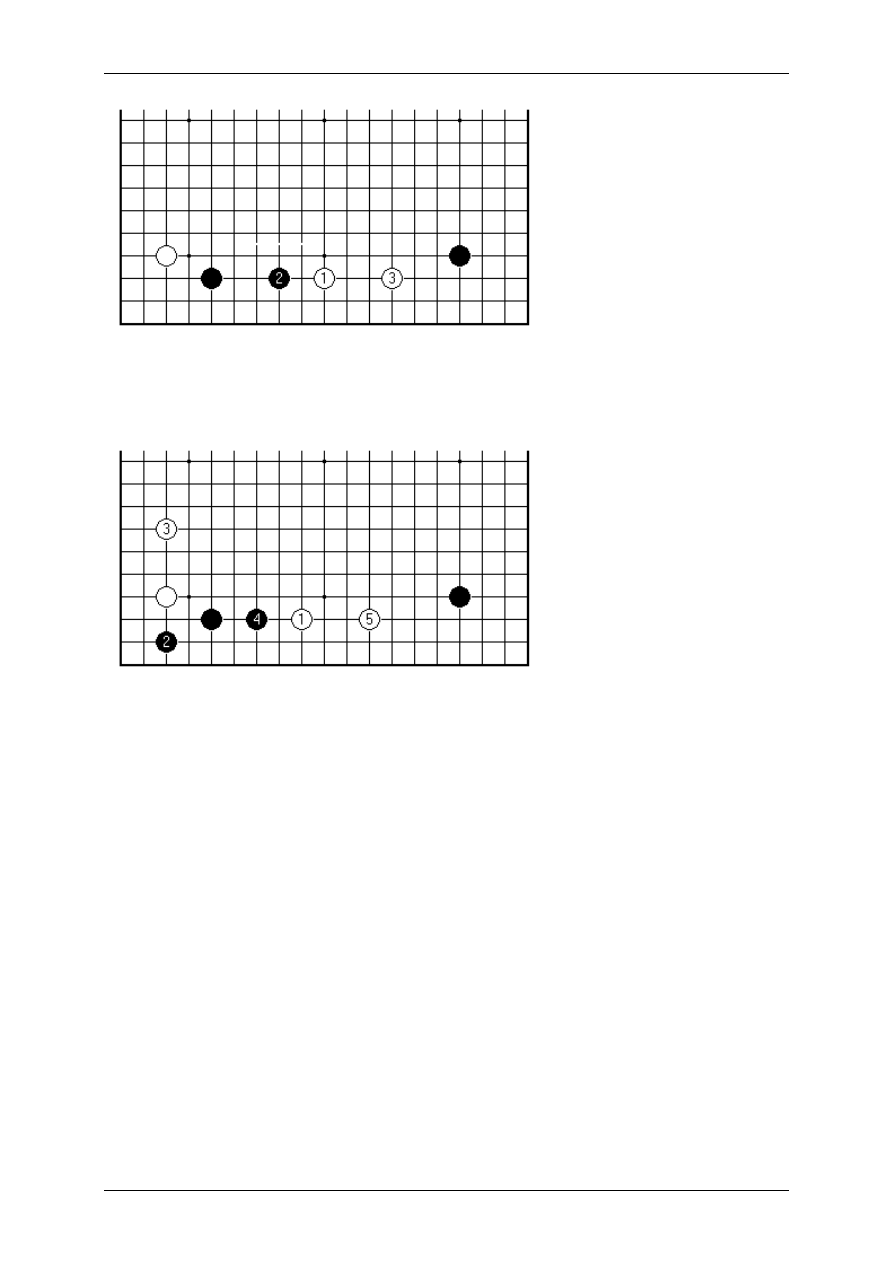
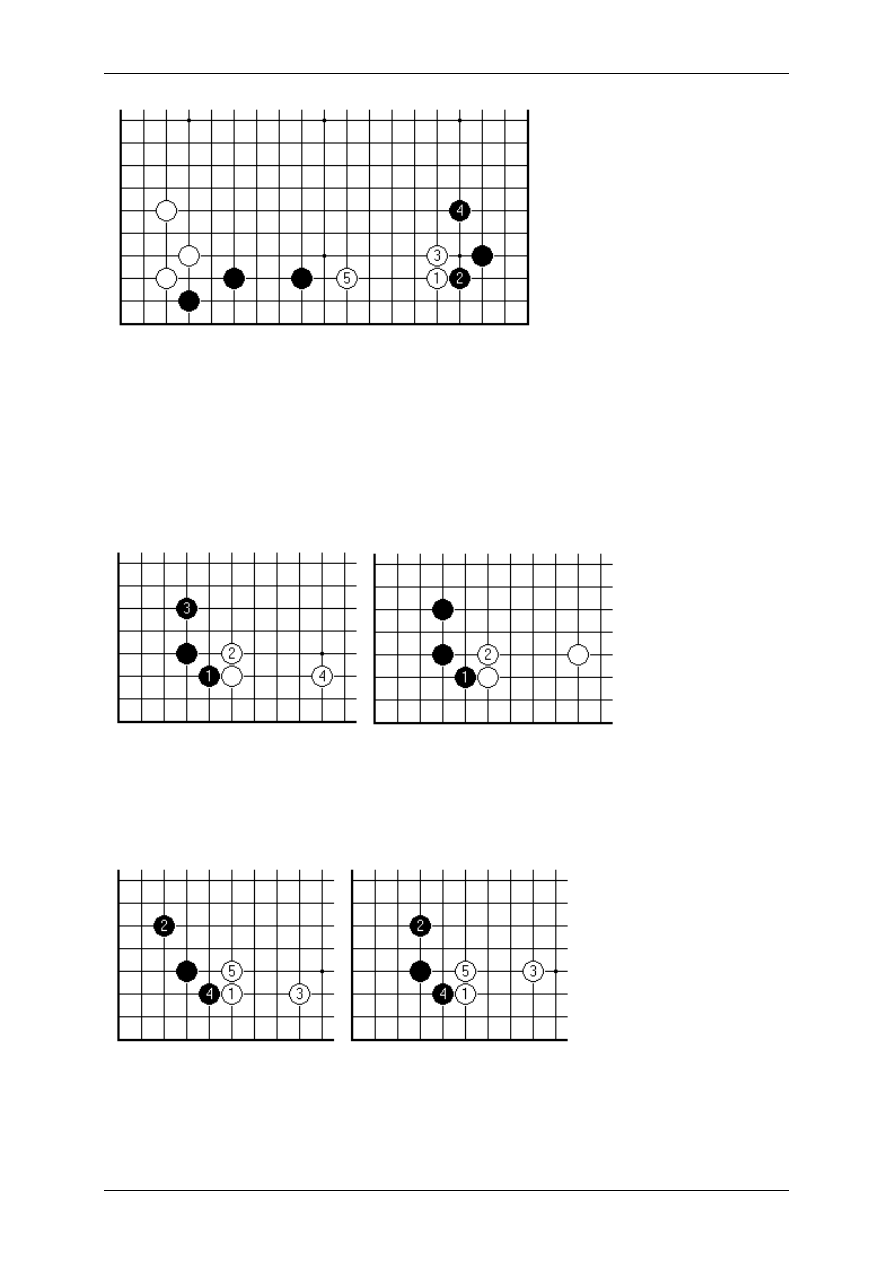
The two-point spacing also distinguishes the close pincers from the restrained ones.
In the left-hand diagram Black 1 is the most forceful pincer, but after 2 and 3 the
counterattack White 4 is good. The right-hand diagram shows the two-point pincer
Black 2, with which Black can handle both sides in a relaxed fashion. Here the one-
point pincer can lead to trouble.
Combining the wish to develop with a two-point extension on the side, and the miai
concept introduced in the previous article, one comes to the wedge.
There are nine clear lines between the marked black stones. This is the minimum
spacing for a White p lay such as 1. White 1 counts as a wedge because it sets up the
miai of plays next at A or B. Since Black is strong in this part of the board White can
be happy simply to build a group with a base, while preventing Black's complete
occupation of the side.
On Your Side by Charles Matthews, 3-dan
Page 21 sur 138
When Black plays 2, White 3 becomes a very urgent play. After that Black may attack
White's group from various directions, but White should be able to defend without
undue difficulty.
Where there are fewer than nine lines to work with, the wedge may still be possible,
but as a more complex tactic. The working assumption is that contact fights are best
avoided, if possible. In this case there are eight free lines. White 1 sets up miai of a
two-point extension to the left, and the slide to 3. There are now a number of ways
Black could try to take advantage, since White's position is "thin", a trifle over-
stretched. White with skilful play ought to be able to weather the storm. Another
possible sequence replaces 3 by the angle play at A. After Black B, White 3, Black C
it would be time for White to jump out from 1 into the centre. Later White would take
interest in connecting at D, to stabilise the group, and leave interesting potential for a
follow-up at E.
When there are ten or more free lines, you have the luxury of choosing between
more than one possible wedge play in that space. The wedge is an essential tool to
deal with broad frameworks, in playing on the sides.
On Your Side by Charles Matthews, 3-dan
Page 22 sur 138
5. The Modern Wedge
With the ever-greater use of 4-4 points in the opening, it is a most natural question
"how do you play against two on a side?" The Two Stars (Japanese nirensei)
formation with 4-4 points in adjacent corners has, since the 1980s, become popular
with White as well as Black.
The wedge play by White, symmetrically placed between the corners, is a
fundamental idea. (There are other possible wedges one to the left and right, in line
with what was said in the previous article, the separation between the black stones
being eleven lines.) Despite this having been a common play for at least 65 years in
professional Go, the resulting variations are by no means all worked out, and just a
taster can be given here.
It isn't necessarily wrong for White to approach either corner instead, but there is
plenty to be learned from this, the modern wedge as we shall style it. In fact from a
strategic point of view this is a most deceptive situation.
As everyone should know, the 4-4 point can be invaded at the 3-3 point - but if White
does this prematurely Black will build early influence for a good result along the side.
The wedge play 1 guarantees White a group on the side with a base, which would be
well placed to neutralise that Black influence if White later got round to either 3 -3
invasion. So far, so good.
The potential of the two 3-3 invasions will then hang around in the game for a while.
How long? There's the rub. We get here a sniff of the Japanese concept of aji.
Literally "taste" or possibly "smell", think "aftertaste" as in "lingering", or "air
freshener" as in "old cigarette smoke in your curtains". Because we start in a
symmetrical position you may think you can get away with the restricted version of
the aji concept explained as "thinking of the two 3-3 invasions as miai". That is, White
reasons that Black can't defend both corners with a single play, so says, "no hurry, I
get established on the side, you defend one, I invade the other". The problem is that,
as soon as we get further action on this side, it becomes considerably harder to see
this as a real mechanism. So, it's a half-truth, part of the picture with aji. The full-
blown aji concept takes quite some digestion. (To give it in summary, you need to
take on board two main points: (a) aji relates not just to potential to invade or live, but
for example potential to cut, or any other tactical element such as breaking a ladder
On Your Side by Charles Matthews, 3-dan
Page 23 sur 138
or making a ko threat; and (b) in high-flown language, aji is part of modality-handling,
namely a prospectus of possibilities, and by the nature of Go is the major partner,
forcing plays (kikashi in Japanese), or prospectus of necessities, being normally
auxiliary. Well, you did ask.)
Next, what? - we clearly need some concrete variations to get our teeth into after that
excursion into blue-sky theorising. Something like this diagram, supposing Black
plays here first (the urgency of first play here will be less than for some other typical
opening plays). Black pushes from a chosen side with 2 (maybe B, conceivably A)
and White extends to 3 (traditional) or C (modernistic).
Black's choice amongst A, B or 2 requires the taking of a view. While A defends the
corner best (now the usual invasion at 3-3 for White expects a ko only for life),
anyone can see that is at a cost of less pressure on White 1. Play B strikes a
balance, and 2 has the most punch, while regarding the left-hand corner aji as
secondary for the moment. Well, Black also wants to do something to shore up the
other corner, so turning the screws on White may manage that in an "attack the best
form of defence" way.
If we get therefore to this position, Black might continue with any of A to F. Of these
A, B and C try directly for corner territory; White will get settled and look towards the
open left-hand corner. Black D and E are the main line choices, and the provocative
F was seen a while ago in pro games (if White invades at or near E, Black C is a
good fighting shape).
On Your Side by Charles Matthews, 3-dan
Page 24 sur 138
This is the old main variation. There is corner aji left at A, still; so there was
dissatisfaction in the ranks (not, I think, that you could get all 9 dans to agree;
Fujisawa Shuko seems to like 4).
So now Cho Hun-hyun, the brilliantly lucid Korean number 2 (displaced only by his
pupil Lee Chang-ho), comes down in favour of 4 played this way. If 5 and 6 happen
Black has efficient shape (and White can still be invaded on the lower side at some
stage). Black has too the option of playing elsewhere with 6, in line with Cho's rapidly
developing style.
The other way to play, stretching the white extension to 3, has become the standard
idea in recent years. What White is doing here is creating further aji in the position,
namely allowing Black to invade at A. What with two open corners already, this is a
On Your Side by Charles Matthews, 3-dan
Page 25 sur 138
dynamic situation and you shouldn't be surprised that the variations aren't completely
explored.
Nowadays this sort of thing is the most frequent development. Black accepts the
challenge and plunges in at 4 immediately. White surrounds Black with 5 and 7. The
major branch would be White 5 at A, which is a sacrificial tactic to get White
connected either along the second or fourth line, leading to acceptable results.
Black now could force with 8, doing quite a lot for corner safety but not completely
cleaning up the problem.
A reason for Black to hesitate before doing that is the fact that the single black stone
isn't really dead yet. Yes, you guessed, it has aji. If you don't respect your own good
On Your Side by Charles Matthews, 3-dan
Page 26 sur 138
aji - lurking possibilities - you are going to botch many positions. There is this ko-
related sequence (White 8 at 3 assumes White backs down from cutting and fighting
the ko). And doubtless plenty more where that came from. Black has to bear this all
in mind before doing anything round the edges of White's position.
If White tries to get the jump on Black by putting in 7 as a slide into the corner, that
opens a whole new can of worms. There is no real reason for Black to submit with 8
at the 3 -3 point 9. Therefore there are fighting variations, set off by what is effectively
cheek on White's part. As shown here White has some corner profit, and the other
white group will move out into the centre in parallel with Black 4 and 8.
I'd like to finish by pointing out one of many things that goes on in this sort of position.
As a trade-off for allowing White the 3-3 point in the right corner, there is the shape
feeling that the marked white stone is misplaced. This becomes visible once Black
has played 1 for 2. There is a quite well masked combination cut with 3 and 5, which
has to be taken into account in the later fighting. So, an extra piece of aji.

On Your Side by Charles Matthews, 3-dan
Page 27 sur 138
Should therefore White plan to answer Black 1 with 2 as here instead? That would
leave the corner with more eye shape, assuming the worst came to the worst and it
was cut off later. Well, tell me whether the aji of a White play at A later is a big deal,
and I'll try to give you a straight answer ... after Black 3 is exchanged for White 4 this
is a less serious invasion point. The forcing play 3 interacts with the aji on the right
side. And yes, if you don't find this complex you don't understand what's going on.
On Your Side by Charles Matthews, 3-dan
Page 28 sur 138
6. Adding Asymmetry
If you're interested in historic Go, you'll notice that the early Japanese games from
the classic period initiated by Honinbo Sansa (strong also at shogi) bear no
resemblance to anything discussed so far.
For example, in this game from 1669 the first two corners are occupied at 3-4/4-3
points. This style continued in use for three centuries.
This game from China, played in the same decade, starts with 4-4 points in place.
That was the custom in China until around the beginning of the 20th century. The
game started with diagonally-opposite corners occupied by a pair of Black resp.
White stones, so that every side had the initial formation considered in part 1 of this
series. The opening plays (yes, White started) seen here aren't something we've
considered, but the basic narrative, White lays out a framework, Black limits it, should
sound familiar.
There is no right or wrong to be discussed here, but issues of taste certainly enter.
Japanese Go cut the umbilical cord from the Chinese tradition around the period
(early 17th century) when the country was closed to the outside world by the
Tokugawa shoguns. The Japanese masters, organised into four major "houses" or
competing academies with state support, played superbly controlled Go starting with
an empty board; while the Chinese players saw no reason to vary their initial set-up
that led invariably to sharp games.
On Your Side by Charles Matthews, 3-dan
Page 29 sur 138
One can speculate endlessly on national characteristics, but perhaps poetry can
make the point. The well-known haiku form has irregular lines of length 5/7/5 counted
by syllable; Chinese classical poetic forms show up as rectangles on the page, with
lines of equal length and one character per syllable. Japanese taste is said to run to
the asymmetric. What is perhaps less well known is the origin of the haiku form as
the opening three lines of the renga or team poem, with further blocks 7/7 and 5/7/5
contributed by a group of poets sitting in a circle. Each successive five-line block was
to make up a poem complete in its own terms, until a fixed number, say 100, had
been completed. The initial haiku sets the scene, though the whole renga doesn't
make narrative sense if you read it though. (A bit like TV soap operas that add up
only when taken a small portion at a time.)
Can one equate Go openings with poetic seedings? Isn't Go a competitive activity?
The answer to that is surely: and you think poetry isn't? You can't have been reading
your Harold Bloom. The other answer is that Go masters are taken to be artists as
well as sportsmen. Your plays can "cap" the opponent's in Go, without the need to
sweep them aside.
Be all that as it may, the Japanese are fiercely appreciative of their innovation of 3-4
point opening plays, adding asymmetry and freedom to the game. (Old Chinese Go
curiously had empty corners in three-stone handicap games, with the handicap
stones set up at two diagonally-opposite 4-4 points plus the 10-10 point.) From our
point of view the addition of the asymmetric 3 -4 points makes for a four-fold increase
in the number of basic side patterns, to a realistic repertoire.
Let's get immediately to discussion of how the 3-4 point differs from the 4-4, in
relation to extensions along the side. The extension Black 1of five lines, from the 4-4
point to the middle of the side, is a routine play, just as likely to be used as plays
closer to the corner. On the other hand the extension White 1, of the same length,
was traditionally considered inferior to the corner enclosure at A. The basic teaching
is "corner before side".
If you had to choose one of the dogmatic principles of Go that has been undermined
by developments in the modern game, this would be it. If White doesn't play A Black
may. Black, however, is then playing into a ready-made pincer set up by White 1.
White may be able to take advantage - this is not so different from the situation in
which White decides to approach Black's 4-4 point in the left-hand diagram "from the
inside". The working assumption is that these frameworks cannot simply be negated.
On Your Side by Charles Matthews, 3-dan
Page 30 sur 138
By way of concrete example we can give this, the so-called mini-Chinese formation.
White 1 and 3 treat the side as a whole, making a large if loose framework. White 3
makes nice balance on the side. The mini-Chinese has been high fashion in top level
Go for a couple of years no w. It may seem perverse to introduce it before the
Chinese style, of which it is a cut-down version, and which figured so prominently in
Go in the 1970s. However there will be time enough to get onto that, and anyway the
historical warrant for the mini-Chi nese is impeccable, played as it was by Dosaku. It
has been around for a long time as a strategy for White in a two -stone handicap
game.
To deal with the basics of the mini-Chinese, Black's approach at 1 here isn't so good.
White will make territory on the left while attacking, after 4.
On Your Side by Charles Matthews, 3-dan
Page 31 sur 138
It is better for Black to come in one line higher. In the next article in this series we'll
look more closely at the choice of approach move in comparable situations. White 2,
3 and 4 are appropriate shapes in this formation. Black retains some options at the 3-
3 point in the left-hand corner.
If Black invades like this in the "outer" sector of White's framework, White has an
easy way to cope by invading the corner with 2. In current practice, assuming White
occupies the top left corner, Black's common idea is first of all to wedge on the side
with A.
Naturally enough the success of the mini-Chinese conception has led to counter-
strategies. This pincer Black 2 is one idea, after which Black takes over the side as a
framework. While White 3 is the first thought, White may also look at a double
approach (White 3 at 11).
On Your Side by Charles Matthews, 3-dan
Page 32 sur 138
To avoid that development, White can play 1 this way. The trouble is that then Black
2 becomes good. White 3 can be seen as necessary to prevent the isolation of White
1. However Black is then left with the initiative. White has a good formation, but no
grand strategy.
To close with, a slice of typical contemporary Go. Suppose Black 2 is played
immediately as an approach in the left-hand corner (this is most likely to happen with
colours reversed, as a combative plan for White). That point was a key position in the
mini-Chinese, so, applying reasoning introduced in an earlier article, Black may play
there before tackling the right-hand corner. Now White gets a chance to play a
double approach at A. Despite a very long history, the jury is still out on double
approach variations to the 4-4 point. In amateur Go White might expect to gain
advantage that way, considering the right-hand corner alone.

On Your Side by Charles Matthews, 3-dan
Page 33 sur 138
White 3 as shown, on the other hand, looks at the side as whole. It is a close pincer,
favoured by the great Otake Hideo 9 dan. This isn't chaotic fighting at all (yet): White
is leaving the right-hand corner unsettled for the moment, but you can read that as
flexibility. The pincer in question isn't well covered in joseki books, but professional
practice makes 4 to 7 the most likely continuation. White now has territory on the left.
To compensate Black will think of attacking on the side at a point such as one of
those marked 'x'. White has plenty of resources in such a fight. White B is a big play
aiming at expanding the corner, using the erstwhile pincer stone as a sacrifice. Black
often puts in the play at C first to foresta ll it. White can respond to a pincer counter-
attack by playing at A for good overall position, as well as by dodging into the corner
at the 3 -3 point to take further territory. Black's problem will be to consolidate a
framework on the side with much remaining potential (aji, to use the term introduced
last time) in White's stones.
On Your Side by Charles Matthews, 3-dan
Page 34 sur 138
7. Shimamura's Formation
There is a formation on the side that is very natural for us to look at next. It is a close
cousin of the mini-Chinese introduced in the previous article, and close in spirit also
to the initial position from the first article of the series, where we came in as it were. It
doesn't share the glamour currrently attached to the mini-Chinese, but has been
handled by top pros, and has the great virtue for the purpose of instruction that there
is one thing about it that every player should know.
This is the formation (in which 2 might be at A instead) that seems to have been
introduced into top-level play by Shimamura Toshihiro (1912-1991) 9 dan in 1978. In
any case he was an early adopter of this pattern, as of the Chinese style. A Nihon Ki-
in stalwart, at his peak from 1955 to 1960, and who won 15 titles, he should be
remembered for something in these forgetful days. His nickname was "tarnished
silver" because of his low-key style of play. I suspect that in the era of consumer
electronics it might have been "brushed aluminium" for unobtrusiveness.
If White does nothing here Black will soon enough enclose the right-hand corner with
another play, probably on the fourth line for balance. The question that concerns us
is how White might approach the right-hand corner at one of the 'x' points. Which is
better?
If you judge by professional games, White always approaches on the third line as
here. The approach one line higher isn't seen. When such a clear-cut rule appears to
hold, it is definitely worth following up. It is quite rare to have a guideline of this sort,
On Your Side by Charles Matthews, 3-dan
Page 35 sur 138
especially one that is close to being of pure "yardstick" type - depends mostly on the
seven-line separation between the marked stone and the right-hand corner.
One convincing variation is this, where Black responds to the high approach with the
most common opening procedure 2, 4 and 6. Then White 7 is an under-powered
extension. According to a Go proverb that we'll give a thorough outing in a moment,
White should extend one line further than that. Black's stones on the side are ideally
placed in that sense: White's correct extension would be a contact play.
The other main variation here is Black playing 2 on the outside of White's approach
stone. This corner opening becomes a trade of influence, and can continue on an
ever-grander scale as both player push on up into the centre. White's problem is this
context is that the marked black stone is at an ideal distance to nullify the effects of
White's influence. It isn't going to come under attack because of the stable group
Black has built to support it. Therefore White will be the loser in this position.
On Your Side by Charles Matthews, 3-dan
Page 36 sur 138
The proverb "from a two-stone wall extend three" is perfectly illustrated by one likely
continuation. Here White 1 and 3 form the said wall, and White 5 is the
recommended three-point extension, counting as usual the gap. This formation is
considered ideal for White, considering the efficiency of stones. Certainly, if you
compare it with the diagram before last, Black has less territory and White room for
more (whether White can be invaded is a second-order question); and White can of
course hold back 5 for security to a two-point extension and still seemingly be doing
no worse.
Knowing the proverb is one thing, knowing how to bring it to bear is another. Black
can for example understand it as defining an ideal shape that one shouldn't give to
the opponent. This will then persuade Black that the plays 1 in both of these
diagrams are counter-productive, of more help to White than Black.
It is however rather harder to judge Black 4 in the left-hand diagram. White 3 was an
idea being tried out by the world's top players around 1992-3. After White 5 it may
appear that White 3 is misplaced; but the likes of Cho Chikun and Ma Xiaochun know
On Your Side by Charles Matthews, 3-dan
Page 37 sur 138
all that. Looking at the overall position it may be that Black 4 is too much help to
White, in developing this group. Certainly Black 4 in the right-hand diagram has been
considered poor, in general, for a long time.
Returning to our theme, it is interesting that leading players differ on White's next
play. White A has been played by Lee Chang -ho, by common consent the world's
number one. B is common, and C leads to some unexpected analysis.
Here White's plays 5 and 13 on the second line are the personal, highly territorial Lee
Chang -ho trademark. Black's groups have more developed shape, and he ended
being able to take the initiative. (Black was Chang Soo-Young, the game was from
the 1992 Kiseong League, Lee being 5 dan at the time).

On Your Side by Charles Matthews, 3-dan
Page 38 sur 138
This is an early example (Honinbo League 1980) of the contact play B for White 5,
played by Ishida Yoshio against Cho Chikun. The positions of Black 4 and the
marked white stone were no doubt taken into account. In this case White lives on a
small scale, while Black takes outside influence.
While the contact play B seems to have become the accepted way for White, dissent
is heard from Fujisawa Shuko, now on the sidelines as a tournament player but
highly influential as a coach. In a book he discounts the importance, after the plain
extension C (marked stone), of the invasion point D. Instead he points out some
deep-lying aji in Black's position. After White 1, White 3 at 7 meets Black 4 at 3, a
combination known to many amateurs. But White 3 as shown is ferocious, intending
to leave Black with the two cutting points marked 'x'. Black would have to tread very
carefully in the fighting. Shuko argues that the marked white stone is therefore
correctly placed, and that Black's invasion at D can be treated as a side issue.
On Your Side by Charles Matthews, 3-dan
Page 39 sur 138
8. 9 Dans at Play
While I have every intention of sticking to the original aim of these pieces, of looking
at ways to play on one side of the board, it seems too self-denying never to include
whole games. Besides it turns out that we have touched upon all the main elements
of theory mentioned in the initial article. It therefore might be reasonable to look at
some real life material, to see how far we have travelled.
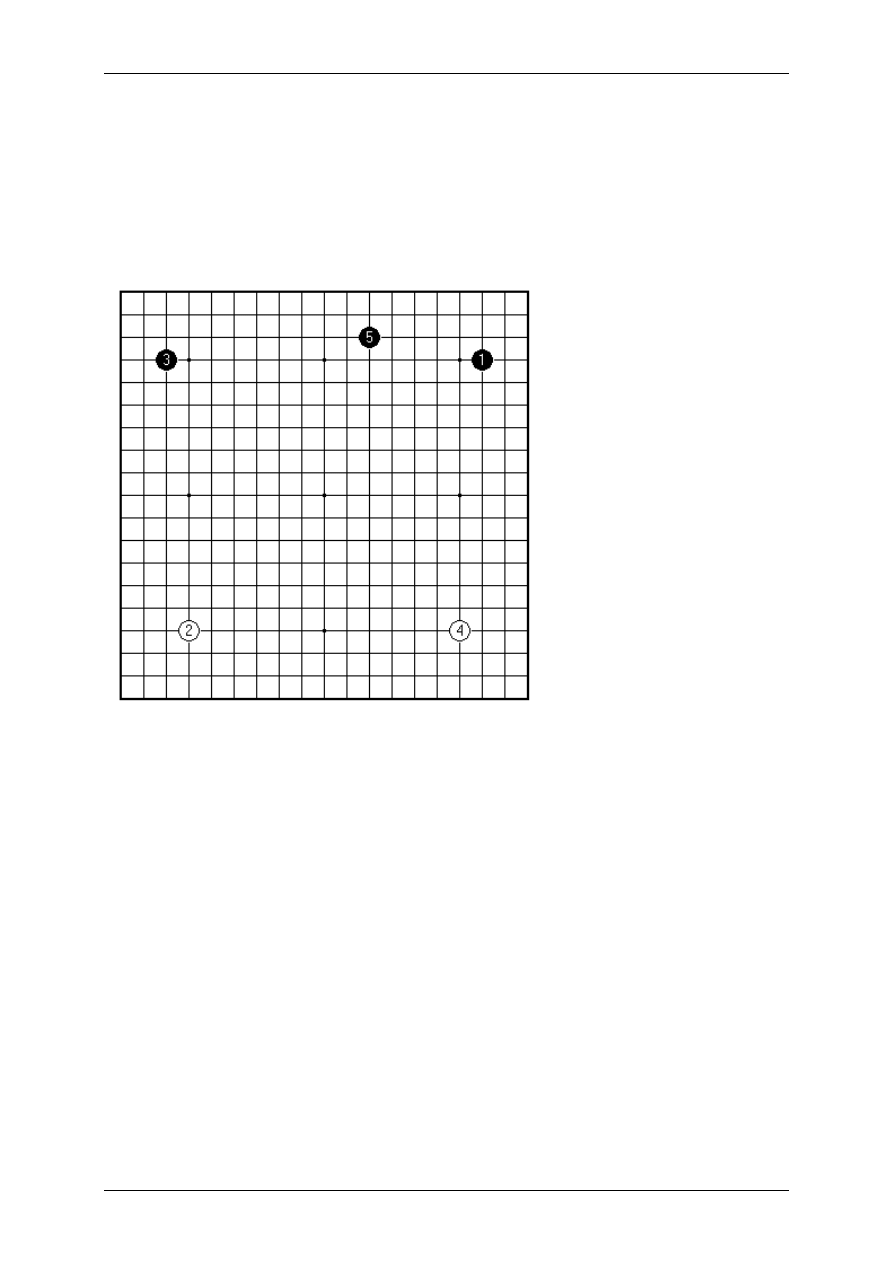
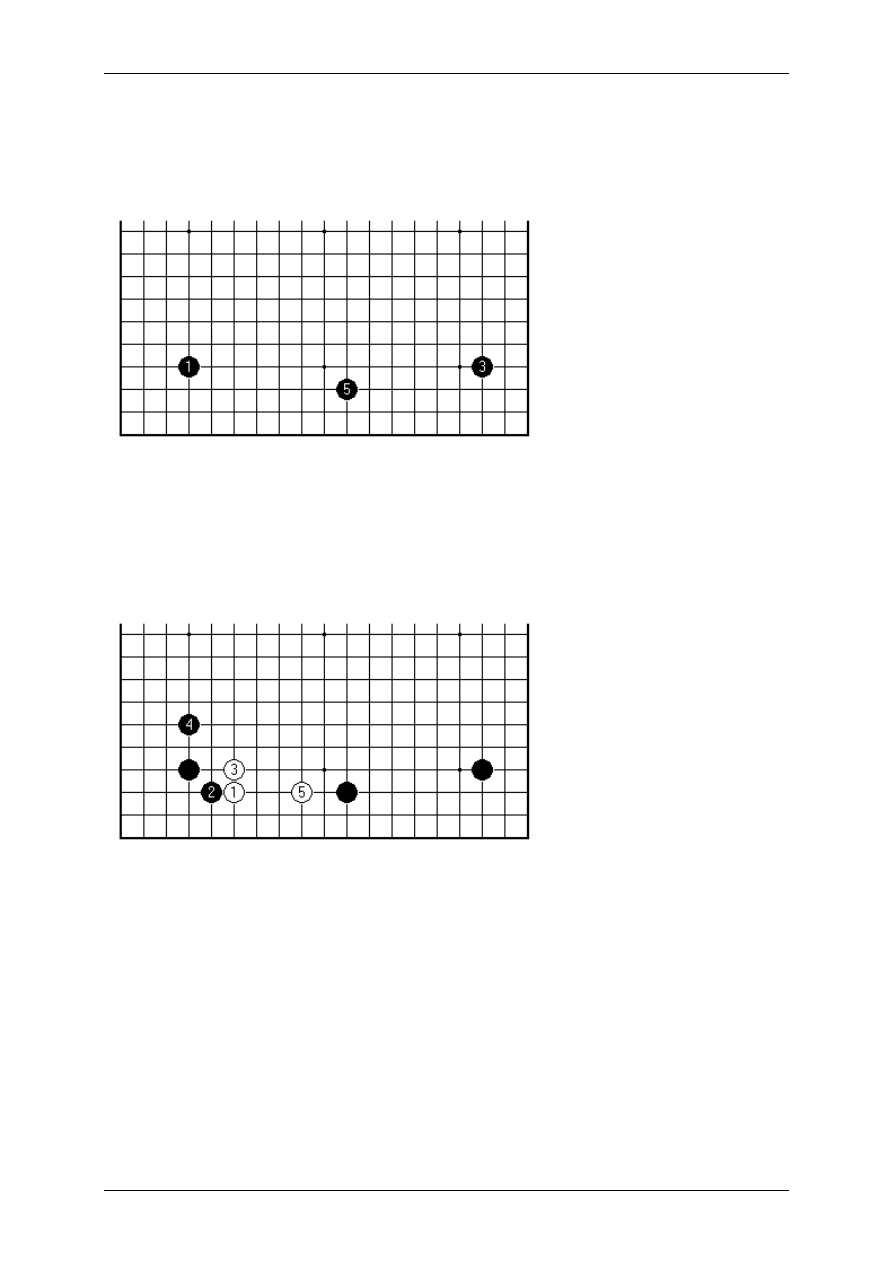
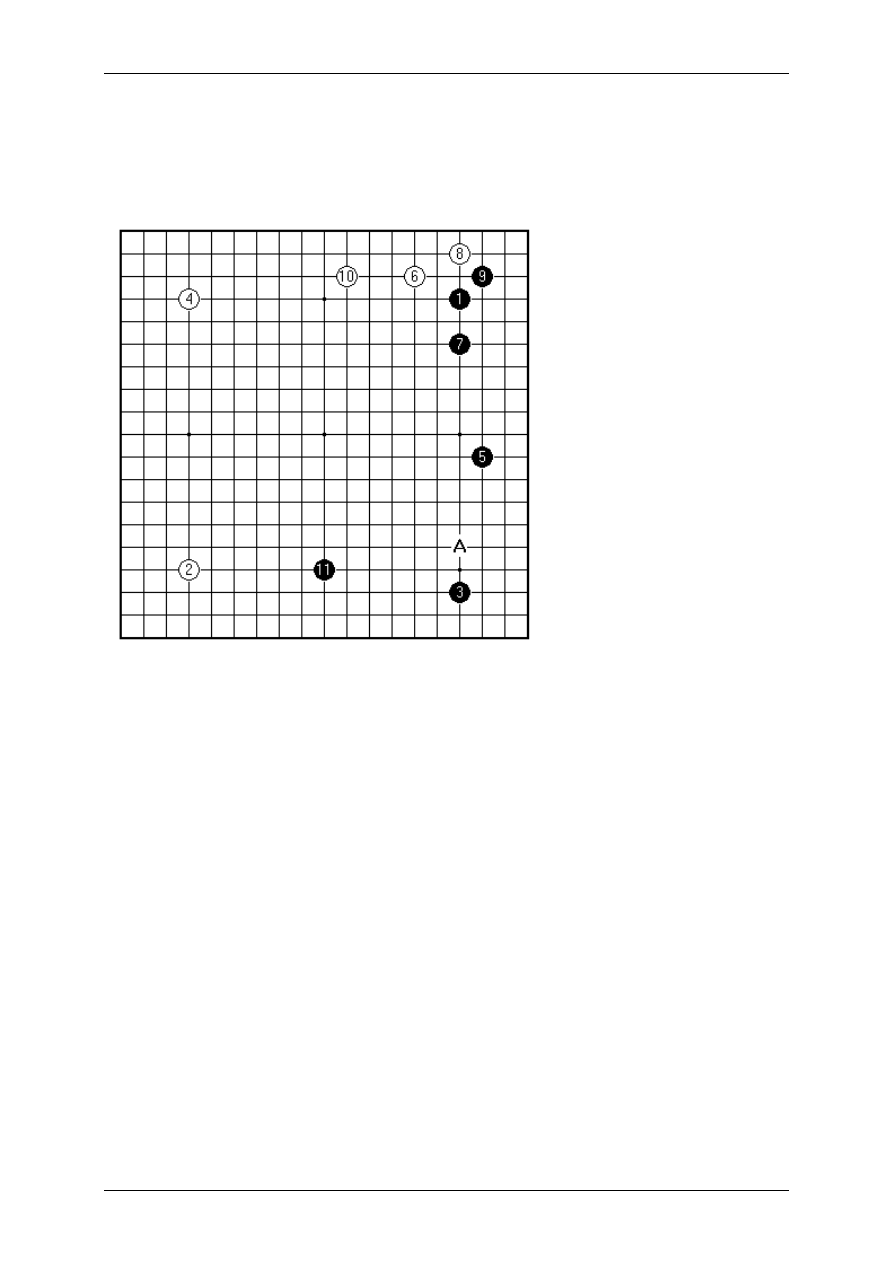
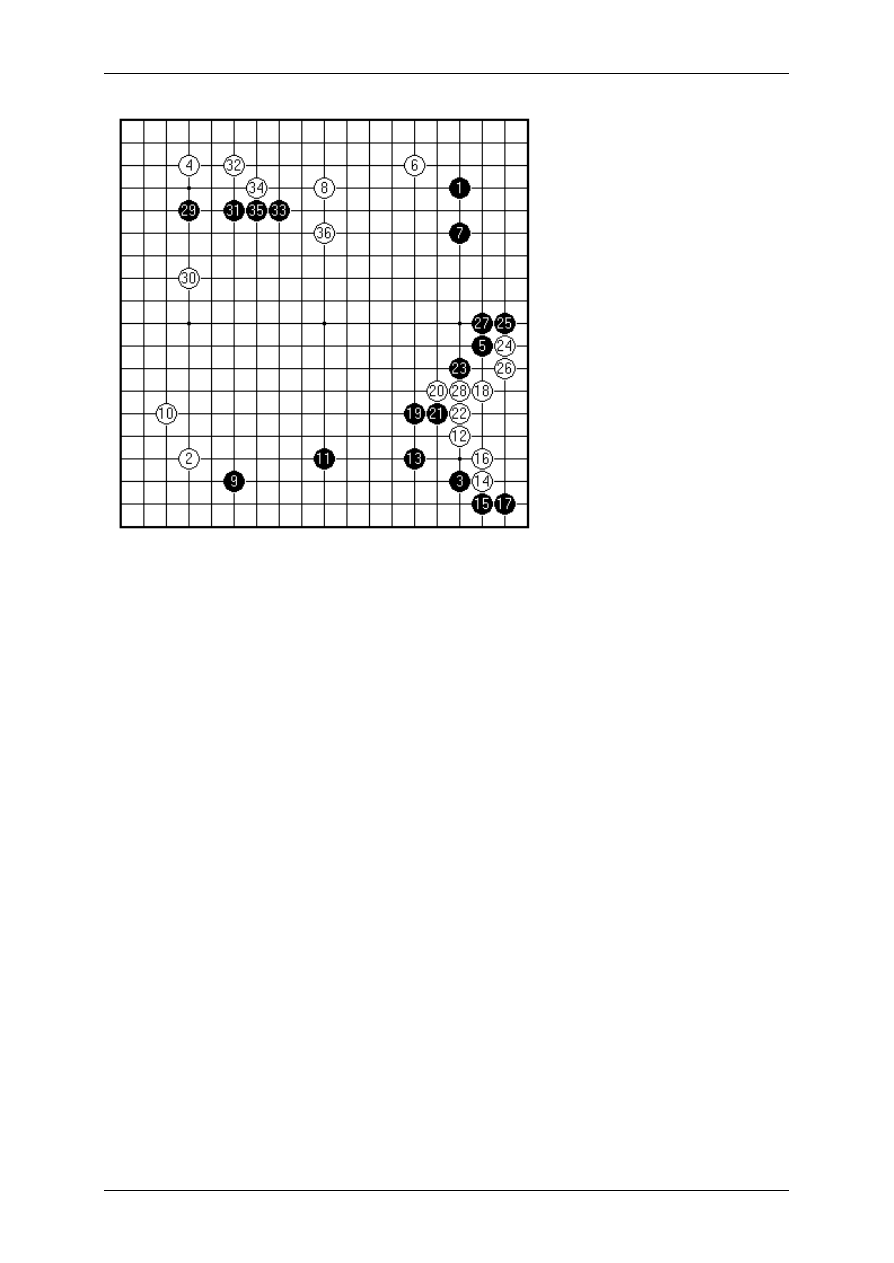
This is a game with an unorthodox opening. You could even call it a one-off: Black 5
is unusually placed. See for a moment if you can understand its meaning.
The players were Miyamoto Yoshihisa (Black) of the Kansai Ki-in (which split from
the larger Nihon Ki-in nearly half a century ago), less well known to Western players
than his brother and author Miyamoto Naoki; and Ishida Akira (White), co-author with
James Davies of the excellent "Attack and Defense", one of the many genuinely
strong players who never make it into the charmed circle of major title holders. The
game is from 1996, in a knockout round to reach the final eight in the Tengen
tournament. Both players are 9 dans.
On Your Side by Charles Matthews, 3-dan
Page 40 sur 138
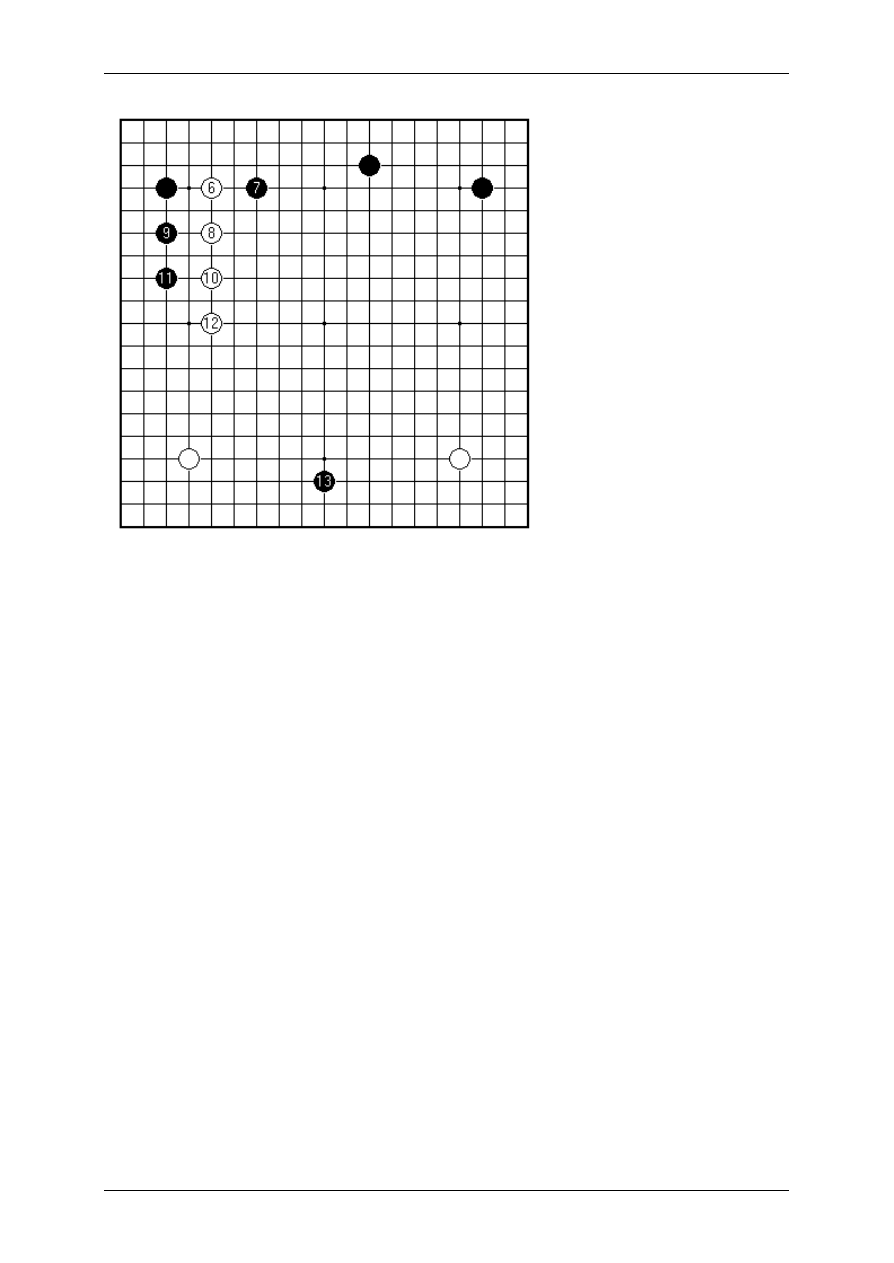
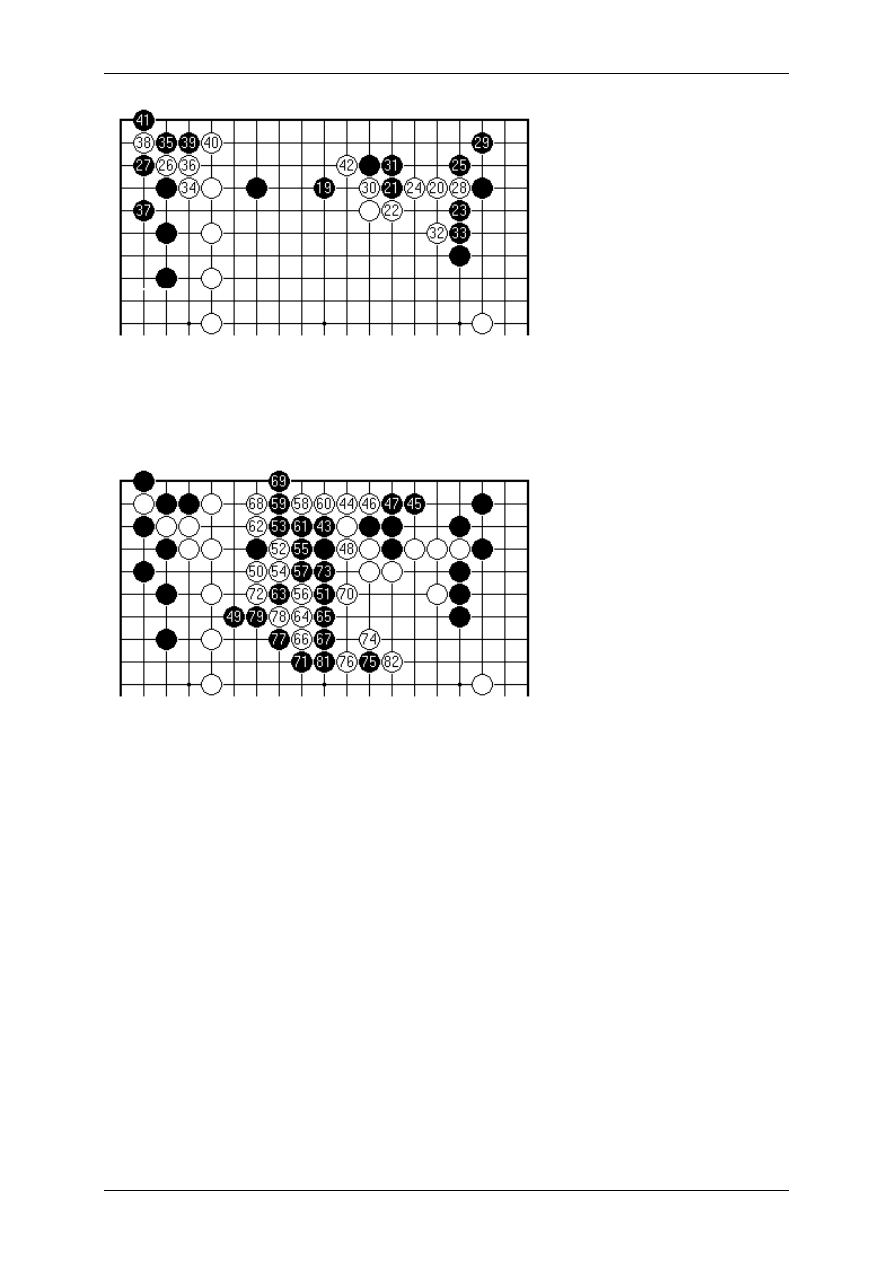
Black's idea is the tight pincer 7 when White approaches the top left corner. That is,
after Black 7 the stone played as Black 5 appears to be in good balance on the side.
White's reaction is to jump out three times with 8, 10 and 12. These plays give Black
territory in the upper left. They will also form a helpful background when and if
White gets round to invading the top right. Since there are two definite gaps there
(between 7 and 5, between 5 and 1) White need not rush. The play 12 has the
particular effect of creating central influence for White. By adding this one stone,
White ensures that the group will not be too weak in the foreseeable future; but also
changes the weather in the rest of the game. Exactly how we shall have to discuss.
Black 13 is the now-familiar wedge. The question arises, how White should react to
it.
On Your Side by Charles Matthews, 3-dan
Page 41 sur 138
There is an imperfectly-suppressed complaint amongst some earnest students of
modern Go openings, along the lines that anything can be explained with enough
hindsight. A term like 'central influence', it may appear, can be deployed to prove
whatever one chooses.
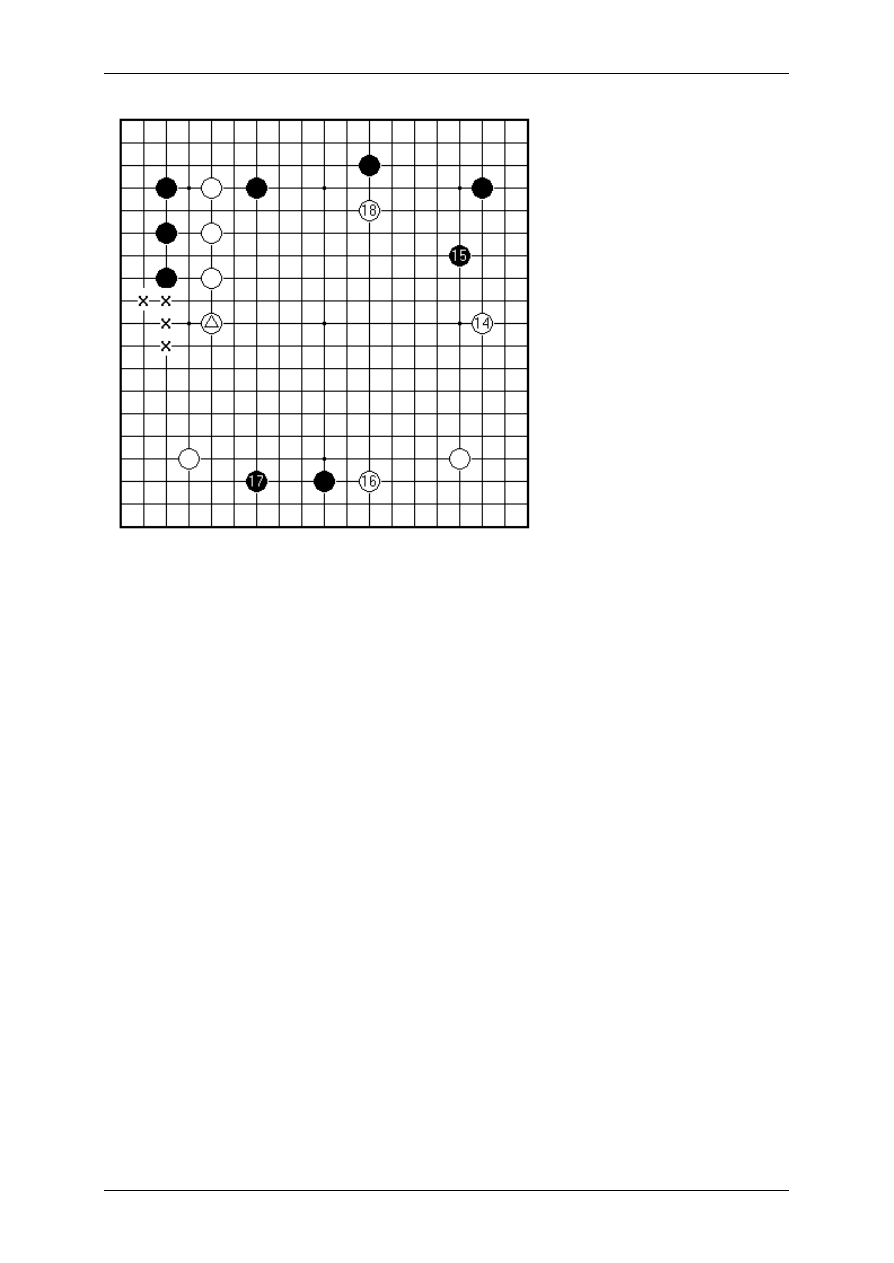
That's by no means fair, but does correspond to some of the growth pains of
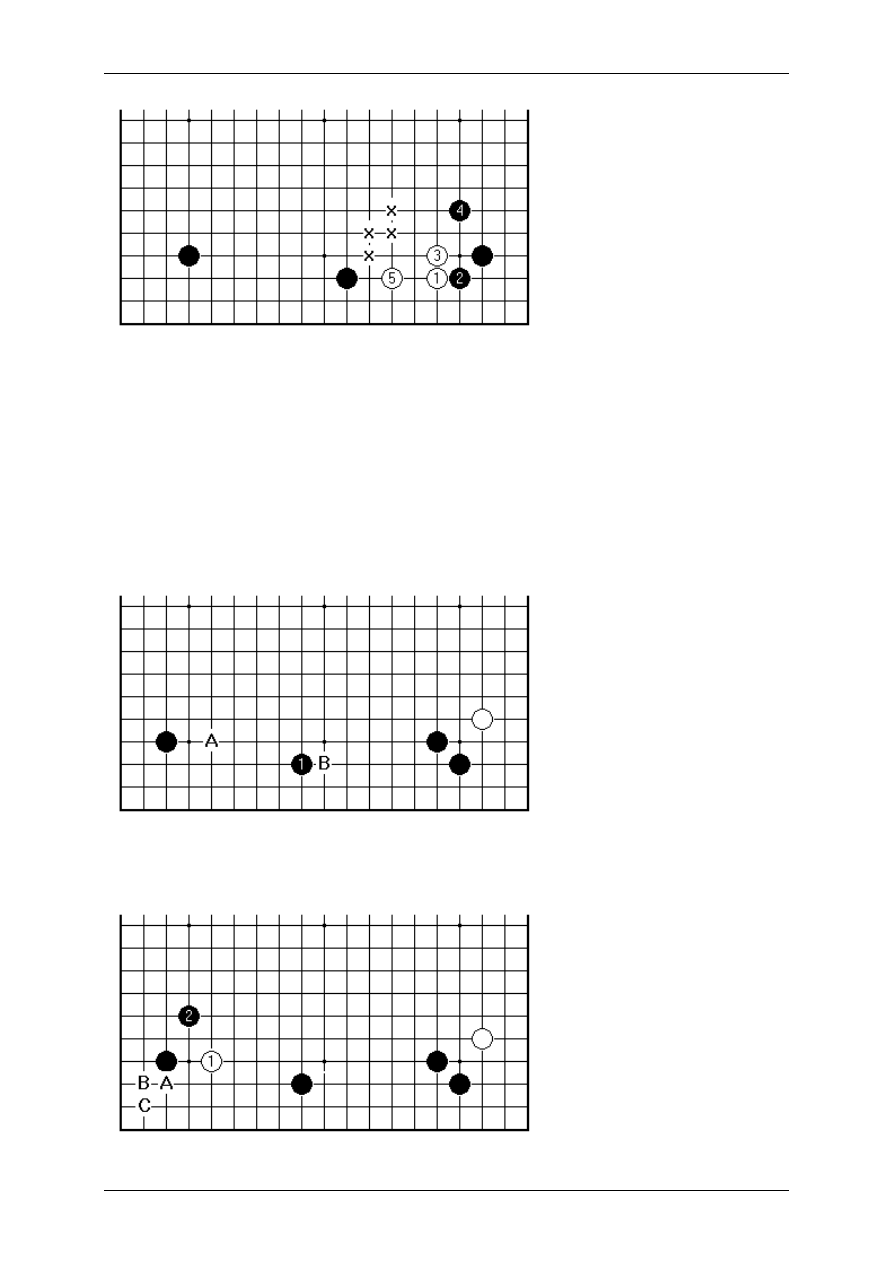
concept formation in Go. If you thought that the central influence of the marked white
stone meant that White was going to build up a framework in the lower left, you'd be
hard pressed to account for White's behaviour in the next few plays. White 16
indicates that White wishes to devalue the whole lower left corner - to leave it as an
area where neither player can achieve a great deal. Instead White emphasises the
lower right corner. White 14 limits Black's framework. If you wanted as White to play
constructively in the lower left, you'd spend time wondering about a play at one of the
'x' points, to shut off the side. These plays, however, don't have an enormous effect
on Black.
I agree that it's a hard road from having the effect of central influence pointed out, to
being able to handle it competently in the myriad situations that come up in real
games. That doesn't make commentary vacuous. You only have to try yourself to
achieve the effects that 9 dan pros make without apparent effort, to see that none of
it comes for free. A strong friend of mine is fond of the analogy of the swan
swimming, where the hard work is all below the surface.
On Your Side by Charles Matthews, 3-dan
Page 42 sur 138
All attention is now on the upper side. White goes into action, probing for
weaknesses. Up to 42 White seems to have found enough to work with; but one
should note how patient both players are, in the way of preparing the ground and
leaving few defects.
A major fight breaks out (White 80 is at 63). Black's play is criticised in the Kido
Yearbook (43 should be 48, 51 should be 52, 75 is bad). It should at least be clear
that once White has found an opening on the top side, the white stones to the left find
their purpose in life as back-up in the fighting.
It might be absurd to write off Black's experimental opening on the basis of one
game, but one can say that in this instance White did find enough defects to work up
a good attack, while Black took around 40 points in the two corners.
On Your Side by Charles Matthews, 3-dan
Page 43 sur 138
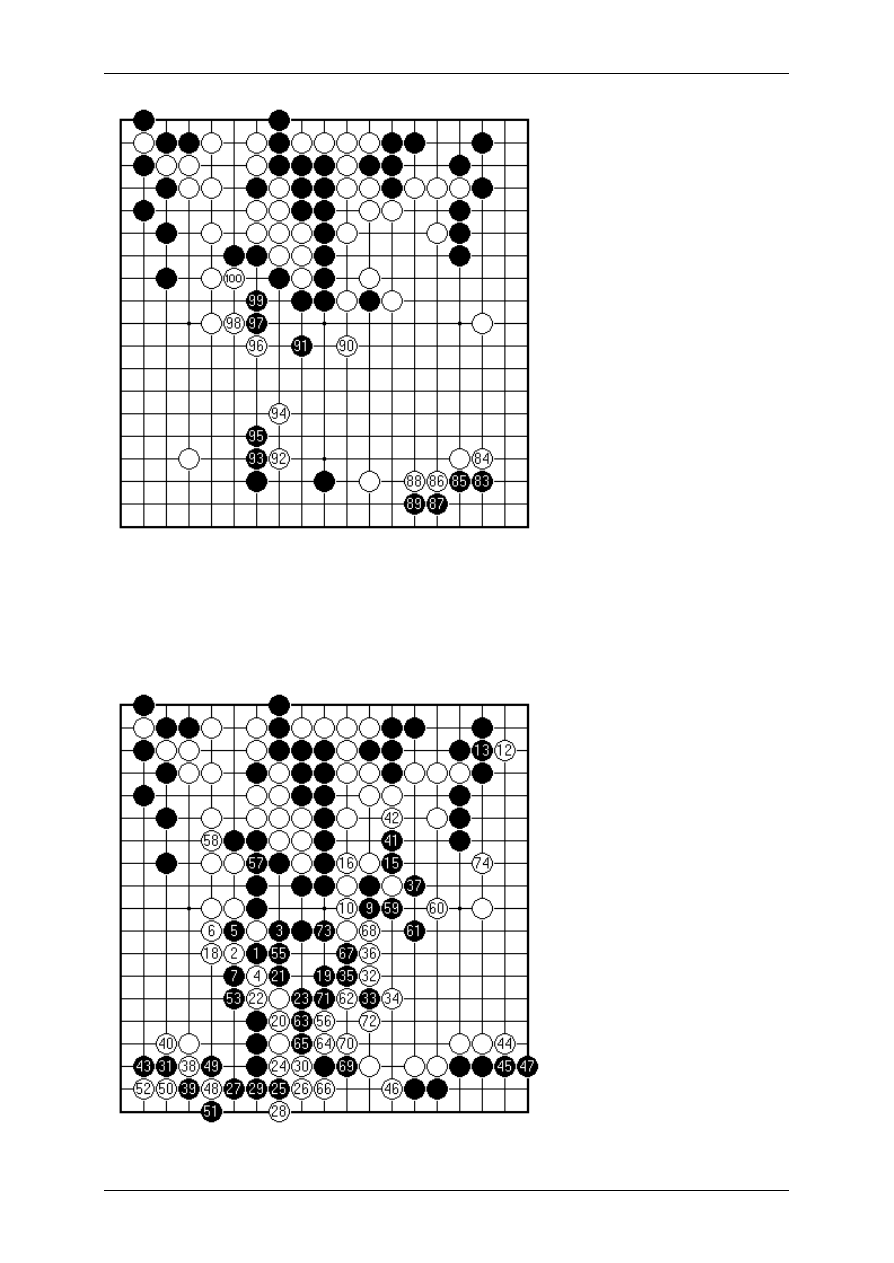
Attention switches to the lower side as Black invades with 83. White on the other
hand has no intention of letting Black off the hook in the centre. White 92 is a typical
idea of roundabout attack: apparently directed against Black's group on the lower
side, which isn't so weak, its follow-up at 94 aims squarely at netting Black's big
dragon (as the Chinese say).

On Your Side by Charles Matthews, 3-dan
Page 44 sur 138
The rest of the game. Black resigned at White 174. Ko captures at 105/96: 108, 111,
114, 117, 154. White made it look quite simple to convert a good attacking position
into a victory. The flurry of ko captures after 108 doesn't appear to have been a
serious attempt by White to win there. The threats 109 and 115 by Black are the sort
that can cost points later, and White presumably enjoyed seeing Black having to
resort to them. When the game ends the black stones in the upper right centre are
hanging by a thread.
White didn't in fact at any point press the main attack. The turning point was White
124, cutting Black apart on the lower side. White ended up being able to take profit in
several directions. The resignation may surprise some. There is one area of the
board, the lower left side, which is genuinely hard to count. Leaving it out of
consideration White might be ten points ahead on the board, with komi on top of that.
That is, we assume for purposes of argument that the one problematic area will give
Black no more points than White in the end. It is really no coincidence that this is the
part of the board flagged already in the third diagram as intended by White not to be
significant for either player.
On Your Side by Charles Matthews, 3-dan
Page 45 sur 138
9. Introducing the Chinese Style
The Chinese style is a formation of three stones on one side that has established
itself over the past 25 years of professional Go as a major opening.
The characteristic play in the Chinese is 5 here, on the side. The combination of 3
and 5, the so-called 'Chinese enclosure', has by now been studied in depth.
Compared to a normal enclosure of the right-hand corner, it relates in a more obvious
way with the 4-4 point in the left-hand corner. This order 1 -3-5 is usual - the Chinese
style developed concurrently with the fashion to start the game on a 4-4 point - but 3 -
1-5 is seen too.
Playing the Chinese enclosure means that Black can restrict White to an inefficient
extension 5, if White enters the framework at 1 here.
On Your Side by Charles Matthews, 3-dan
Page 46 sur 138
If White plays a low approach to the other corner, the available extension on the third
line, to 5, provides too small a base. Therefore White in practice would look to play at
one of the 'x' points. It is, however, poor strategy for White to create a weak group
like this. Black can expect to build up the framework to the left by attacking it.
If you play the Chinese, your opponent will take two other corners. That means that
you are nailing your flag to the mast, devoting yourself to cultivating a single
framework, much more so than with (say) the mini-Chinese. In the early days White
too experimented with the Chinese formation, but now it is generally seen as a
strategy for Black. The history is quite tangled.
A century ago this use of the Chinese enclosure was common enough. If Black made
the enclosure at A first, White would have a perfect wedge at B.
On Your Side by Charles Matthews, 3-dan
Page 47 sur 138
White normally came in at 1 here. After Black 2 White tended to leave the stone
played to its own devices, relying on Black not being able to capture it on a large
scale. The sequence White A, Black B, White C remains as aji in the corner, so there
is some justification.
Kitani Minoru tried the Chinese enclosure in a top match in 1959 (Honinbo Final
game 3, against Takagawa). Black 7 makes a balanced formation along the side.
This was after earlier experiments by Go Seigen and Kitani with plays at 1, in
positions where the right-hand corner was already conventionally enclosed.
In the 1961 Amateur Honinbo tournament, Harada, one of the Big Four recognised
top amateurs in Japan, played this 1-3-5 formation. Now called the 'high' or 'revised'
Chinese, it enjoyed a tremendous vogue from its introduction in pro play in 1974.
These days the original 'low' Chinese is more popular once more, perhaps because it
appeals to territorial players while the influence-seekers adopt purely 4-4 point
openings.
The scene then does really move to China. Chen Zude, now the doyen of Chinese
professional Go, was looking for a flexible and convincing strategy for a match
against the formidable Kajiwara Takeo 9 dan. This search is described in the
Yutopian book Beauty and the Beast, as Chen prepared for the deadly serious
business of a China-Japan "friendship" encounter. After games in 1965 the pattern
went underground for a while, surfacing in the 1968 Nihon Ki-in Championship
played by Shimamura, and noted at the time as a "souvenir from China" after
On Your Side by Charles Matthews, 3-dan
Page 48 sur 138
another friendship tour. Kajiwara often played the Chinese enclosure in other
contexts. It took another five years after that for it really to hit the headlines,
becoming high fashion in 1973. The major source in English, The Chinese Opening
by Kato, is a translation of a Japanese book from 1977, and therefore covers only a
fraction of the professional research on this opening.
To explain in broad terms White's ways of dealing with the Chinese: there is a
progression from left to right, and showing increasing complexity, as indicated by
the labels in this diagram.
White approaches from the open side at A.
White approaches at B. In this case Black plays to steal White's base. White tries to
settle the weak group, Black tries to build up the Chinese enclosure into a larger or
more secure framework by attacking it.
White caps at C (centre). This is a reduction manoeuvre suitable for a large-scale
game in which both players have big frameworks. Black will normally choose to
defend the Chinese enclosure, but White has a useful play at the other C point, at 3-3
in the right-hand corner, with the aim of leaving some aji.
White comes in at one of the points D. There are many well-explored variations.
White plays at one of the points E to M. Assuming a White 4 -4 stone in the top right
corner, as we look at it, this is now the most common strategy. These plays are
prolific of innovations. A safe idea is simply to play M. Next White plays G, allowing
Black to enclose the corner. If White starts at G Black can pincer at M, and the fun
really begins.
We'll look in greater detail at all of this as the series continues. Judging by games on
the
Go Teaching Ladder
, the Chinese styles (low and high) are enormously popular
still amongst amateurs.
For the moment, something that sticks out like a sore thumb from the previous
diagram. Not to be needlessly mysterious, here's an explanation.
On Your Side by Charles Matthews, 3-dan
Page 49 sur 138
What about White 1 here? It seems not to be chosen by pros, and one can look for a
reason. Eventually they get round to trials of all the reputable possibilities in a
position. Black 2 is a very good play in this case, certainly. White by pushing moves
against it will only help to build up Black's right corner.
Exactly that relationship with the Chinese enclosure has been seen in very many
recent games featuring the mini-Chinese. As we show it, the mini-Chinese Black has
created stretches up the right-hand side of the board. That then forms, with the Black
4-4 point in the left corner, an example of what my colleague John Fairbairn insists
on calling the 'Sideways Chinese'. Be that as it may, this is currently most modish.
White plays the wedge at 1, reasonably enough (the alternate wedge o ne to the right
may be no better). Then Black 4 is ideally placed. There is no real problem for White
to settle the group, but if Black thereby consolidates the right corner it may prove
expensive.
On Your Side by Charles Matthews, 3-dan
Page 50 sur 138
10.
Chinese: Open Side Approach
Here's a typical whole -board view of a game opening displaying the Chinese style,
introduced in the previous article of this series.
White approaches the upper right corner from the open side, and plays it out
according to a common pattern. Black plays 7 on the fourth line for good balance with
5. Black's formation on the right side is beginning to look efficient.
When it comes to playing 11 on the lower side, Black reveals the basic conception
behind the Chinese style. Why is Black 11 not played at A, to enclose the corner?
Because White could then play at 11, leaving Black concentrated on one side of the
board (and without a significant store of completely secure territory). Another kind of
balance that ought to be borne in mind relates to spreading out over the whole
available area on the 19x19 board. Putting it another way, with Black A already in
place, Black at 5 is one of a number of big points you could choose, b ut not obviously
the biggest.
Therefore you can say that Black is committed to a play like 11 from the outset,
leaving White free to come into the corner at A. This provides the distinctive problem
of the Chinese style. The open side approach White 6 anticipates that White will want
to play at or near A in entering Black's framework, rather than between the stones 1
and 5. White must choose the correct moment to contest the corner, before (perhaps
just before) Black consolidates there.
On Your Side by Charles Matthews, 3-dan
Page 51 sur 138
The open side approach is therefore commended as perfectly sound strategy. White
must plan on later dealing with Black's framework, but has time to build a competing
zone of influence. This lack of early panic about the opponent's prospects is
characteristic of the cool detachment of professionals. It has to be said that the
tentative methods of the first phase of Chinese style games showed nothing of the
sort. In the absence of a good estimate of the value of the framework, White tended
to get stuck in as soon as possible. Perhaps 1975, a year in which dozens of top
games featured the Chinese, was the turning point, as the possible strategies started
to be set in some order.
White, as I say, has a little time to look around. With the marked white stone in the
top left, it is natural enough for White to play this way across the top side. The
formation is now sometimes known as the Kobayashi style, and we'll come across it
later, but strictly speaking Kobayashi Koichi's name attaches to it as a way for Black
to develop. In this sort of position it was seen as a plan for White years before that
came up. (This phenomenon of cross-dressing, Black borrowing White's typical
plans and vice versa, is quite important for the history of opening theory in Go, and
little remarked upon.)
In that case the game might continue this way. The top left corner has become a
significant area - if White encloses it, White's formation across the top side is very
On Your Side by Charles Matthews, 3-dan
Page 52 sur 138
good. Black's more distant pincer at 9 is the most common choice in this position. If
Black plays closer than that, White will pincer and the marked white stone is going to
turn out to be very usefully placed. White 10 keeps matters simple. Black 11 is
perfectly natural to settle in this area, a highly advisable preliminary before trying to
trim White's top side framework. After that White has a free hand to deal with the
lower side of the board.
Returning to the lower side as a unit, might not Black pla y 1 here? Indeed Black
might.
That would give White a chance to pincer, as with 2. White here gets an opportunity
to play on a scale at least as grand as Black.
For after the 3-3 invasion Black 3, White can play 12 to control Black's holdings on
the right, and then use the plays at the 'x' points to build a large-scale framework
across the lower side.
It has to be said, though, that while plans of this kind have been seen in top level
games, they haven't been so popular recently.
On Your Side by Charles Matthews, 3-dan
Page 53 sur 138
Therefore White should perhaps be content to allow Black to finish the framework on
the lower side. White cannot put off invading at A for ever. In fact the moment might
be imminent.
The way of thinking behind White 2 is worth a thought. White starts one step behind
in the game. If both sides build frameworks it is hard to see White getting ahead.
White is compensated by komi, but this will normally not be enough if White has to
pick unfavourable fights just to keep in the game. White 2 is the sort of measured
play that recognises the difference between the two players' tasks. Consistent with
the open side approach, White aims simply to make the left side of the board an area
in which Black can't achieve very much.
And so does White now invade the lower right? I don't want to be a tease, but are
you ready for the discussion of how that would go? It involves, in some of the
variations, special techniques and less common shapes. In a word, it's back to
business as usual for corner openings.
I do offer the best-known way to play. Black 2 looks to build up the lower side. White
is happy up to 7 to secure a small base for the invading group. Further attempts to
pressure White can be expected from Black.
On Your Side by Charles Matthews, 3-dan
Page 54 sur 138
Here then is a hypothetical opening on the whole board, with both sides adhering to
conventional methods. There is still little e nough in the way of secure territory (Black
has a chance to invade later between 6 and 8, as White has between 9 and 11).
White's group in the lower right has settled, at the cost of answering a number of
Black's plays. In contrast Black's group in the upper left is running out in search of
security, but also seeking an active role in fighting. White is planning to develop
territory between 10 and 30. If White attacks it overconfidently, it may turn out to be
useful back-up for an invasion on the left side.
On Your Side by Charles Matthews, 3-dan
Page 55 sur 138
11.
Chinese: Lower Side Plays
Speaking as we were of the Chinese-style opening pattern, which is the 'lower' side is
conventionally determined.
This is the normal view Black has of the board, with first play at 4-4 top right (as is
customary in Japan and Korea). White 6 is representative of the numerous possible
lower side plays that have been tried.
White's idea is to pre-empt the expansion of Black's framework at the point that has
special meaning (see last time). There is the same kind of relationship between
White 6 as played, and a later invasion by White at B, as there is between White's
open side approach on the upper side and a subsequent invasion at 11. That is,
White can take an early view on the two gaps in Black's right-side formation, above
and below, and act accordingly in occupying a side. After Black 11 it looks like a
choice between White A, for a very large-scale game, and White B to keep Black's
framework to within reasonable proportions by securing a small base for a group
within it.
On Your Side by Charles Matthews, 3-dan
Page 56 sur 138
Could White challenge Black in the lower right corner directly, rather than play 10,
which might come hard to those grudging their opponent any territory at all? Early
research on the Chinese threw up the sober play 2 in answer to White 1 here. After 7
the black marked stone is still making a 100% contribution, cramping the new white
group. On the other hand the white marked stone is 'out of focus' - harder to say what
exactly it has achieved.
Instrumental in developing the theory of the Chinese enclosure seems to have been
the realisation that the points A and B here can in a certain way be treated as miai.
In the variation given at the outset, White gets both of them. White is then
constrained to play in a particular style, to suit the 4-4 points. In fact from the mid-
1980s precisely that style, which you could call Takemiya-with-White, became
increasingly popular in professional play. It is more subtle than Takemiya-with-Black,
the more recognisable 'cosmic' style of early framework play of maximum breadth.
That is however exactly what you'd expect: White's task is initially uphill work.
Therefore, as I say, there is scope for the interesting twists White A Black B, where
Black plays to prevent the framework being pegged so far back to the right, and also
White B Black A, the characteristic through-the-looking-glass pincer of the Chinese.
On Your Side by Charles Matthews, 3-dan
Page 57 sur 138
To emphasise the point, White 1 here is a transgressive play, according to
conventional thinking. White is supposed to approach a 4-3 point in the corner from
the other direction, say at B. Starting at 1 is therefore an imaginative idea , based on
the whole board situation - White is indicating contentment with the position after
Black at B, White at 2.
At this point Black can play from the right in other ways, to try for the corner but with
extra efficiency. Black's positive answer at 2 may date from 1983; it has certainly
become accepted. White is constrained to develop a group while outnumbered. The
candidate plays at A, B and C have all been studied in depth.
Choice B would be the one coming naturally to the informed player. With 1 and 2 as
shown in the left-hand diagram we are wading towards firmer ground. The position in
the right-hand diagram is the main line of the 'Magic Sword' corner opening.
On a historical note White 1 there is the innovation of Fujisawa Hosai 9 dan from a
match game against Go Seigen in 1952. [Attribution is wrong in the recent book
Essential Joseki by Rui Naiwei (Yutopian), which is a shame since Fujisawa's career
was effectively broken by the unsuccessful effort to knock Go off his perch.]
On Your Side by Charles Matthews, 3-dan
Page 58 sur 138
Continuing, with 3 and 5 following the Magic Sword pattern, this is all going to plan
for White. Black A next is the Magic Sword main line, but surely too easy on White
here. Therefore Black will spend time pondering B and C, sharper options discarded
these days in the Sword. White is pleased, in fact, with this trend; the marked white
stone is for sacrifice here, and Black is stretching to find a good way to play. Black 4
is perhaps questionable.
Black chooses 4 instead, to make more of the position. This lets us out of the Magic
Sword rut. It is one thing to realise that context changes everything in Go, something
else again to implement that flexibility. This variation gets into the new edition of the
Ishida Joseki Dictionary (sorry, Japanese only for the foreseeable future). White has
allowed Black the corner, and needs an honest move at one of the 'x' points to make
shape round here.
On Your Side by Charles Matthews, 3-dan
Page 59 sur 138
Innovation rolls on, however, especially in the Korean powerhouse of goal-directed
research. Here's an astonishing Cho Hun-hyun idea, reported in the third volume of
Lee Chang-ho's Novelties (the first two volumes are available now in English
translation from Yutopian). Play White 1 first, presumably getting the answer 2,
before coming in at 3.
The intention is to mix it after Black plays 4. The warlike 5 and 7 are a concerted
attempt to isolate Black's corner, the heart, as you will recall, of Black's intended
grand framework.
Black can't go down this road with 8. White 9 sets up a well-known tactic for
confinement. The physicist Richard Feynman used to say that giving identifiable
things their own names does nothing special; but the case of concept formation in Go
seems to contradict that, and the Victor Chow term 'ko lock' for plays like 9 seems a
useful addition.

On Your Side by Charles Matthews, 3-dan
Page 60 sur 138
Extending up with Black 8 is also a relative failure. White leaves the cutting point at
A behind, since 11 can be sacrificed in a couple of interesting ways. Black 14 to close
down the corner gives White a free hand on the outside with 15 and 17.
This is given as the correct continuation (in the actual game White missed 15). Black
is in trouble because the corner group is dead as it stands, while White can escape
on both sides.

On Your Side by Charles Matthews, 3-dan
Page 61 sur 138
12.
Chinese: Staying Light
One of Black's aims in playing the Chinese style is surely to hustle White early into
middlegame positions.
White's idea here has already been seen. Black may already have a stone at or near
A. In playing immediately for a small base White emphasises settling a group early.
This is a sound plan, but there are others. A great deal is known in this context about
plays either that vary at 5, to aim for alternate leverage on the corner space, or jump
out earlier at 3 into the centre.
What these have in common is their 'light' quality: effects are achieved by not
fussing about the fate of individual stones. In a sense White is taking up Black's
challenge, responding with normal middlegame techniques.
White 5 after 3 at the 3-3 point in the corner is a fundamental idea of light play.
Since Black 6 at 7 is a bad idea, the continuation shown is nearly inevitable. White
has lived neatly, and can later jump out at A. This isn't however considered to be a
mainline variation. It would be very handy for White to play out the corner in this way,
at some point in the middlegame. Do it too early, though, and Black's overall position
can start to look very solid. That is the same strategic tension as limits use of a 3 -3
invasion behind a 4-4 point.
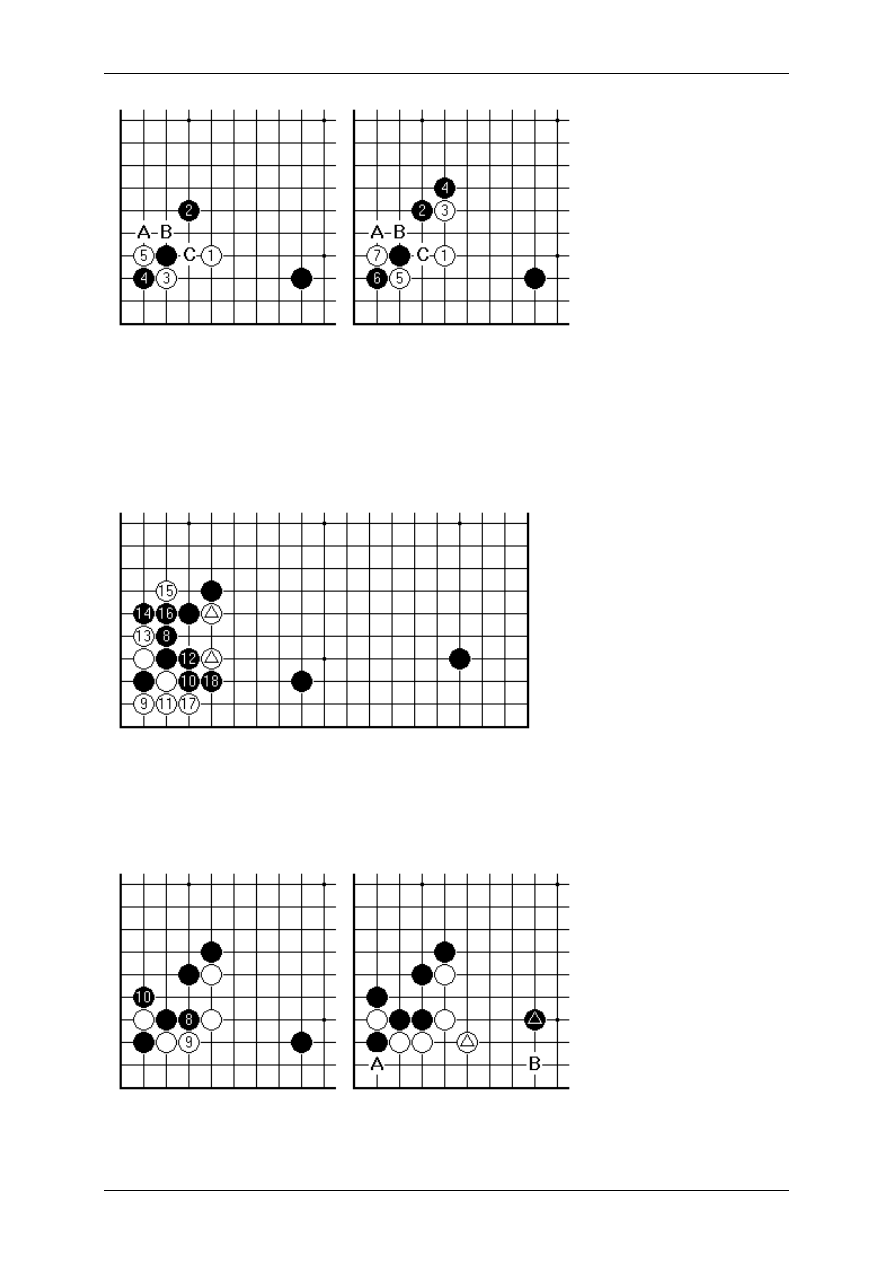
On Your Side by Charles Matthews, 3-dan
Page 62 sur 138
Moving through the normal tactical repertoire, the next idea that should be tried is the
cross-cut 5 after 3 at the 3-3 point. Black answers A, B and C (left-hand diagram) are
somewhat constrained: Black can't expect a great result if White can break through
on the side with B. It was realised that White's idea is more effective if White first
exchanges 3 for 4 (right-hand diagram). This has an impact on Black's response at A,
to which White B becomes a good answer.
This therefore is one standard continuation. White does better in living in the corner
than previously. Notice that White plays 17, not because it is intrinsically good - it
weakens the two marked stones - but because a Black play here would actually
threaten the corner.
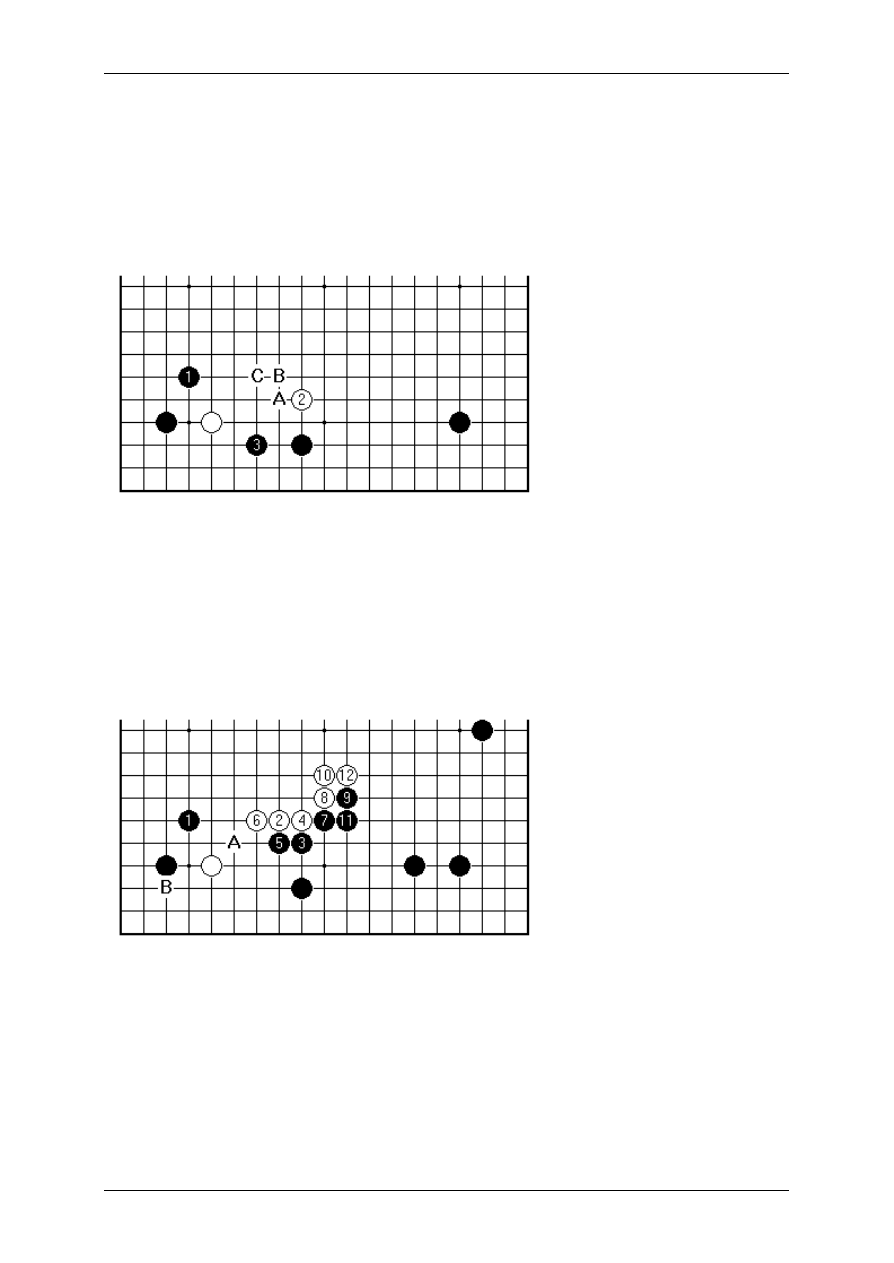
On Your Side by Charles Matthews, 3-dan
Page 63 sur 138
If Black exchanges 8 for 9, White can be content. However it goes after that, Black
has put the two-stone chain including 8 into bad shape. Black 10 immediately is
safest, but White's problem of making shape on the outside has become simplified.
When Black plays the high Chinese formation, as in the right-hand diagram where
the marked black stone is on the fourth line, the slide at B is very attractive for White,
so that simply making the hanging connection (marked white stone) should be
enough, making miai of A and B.
Another idea that prevailed in the early days of the Chinese is that White should jump
out into the centre, for example with 2 here. The possibilities in the corner remain,
and that takes the pressure off White as far as being immediately disconnected is
concerned. It isn't clear that these plans have stood the test of time. Black 3 is a
good answer to 2 as shown. There are also White A, aiming next to press Black
down to the right; White B which is a one -off from a top match; and White C, which I
have tried myself (Matthew Cocke 5 dan's idea of Black 3 seems to be good enough
in answer).
This choice of 2 was played by Ishida in game 3 of the 1973 Meijin match against Rin
Kaiho. The shape was unusual enough to stretch the Go lexicon - 'large leap' was
suggested, from a Chinese term. Ishida's approach to Go is noted for its rationality,
as contrasted with the traditional artistic ambitions. The game sequence shown here
simply aims to control Black's framework to the right. White isn't concerned about
Black at A while the chance to play at B remains.
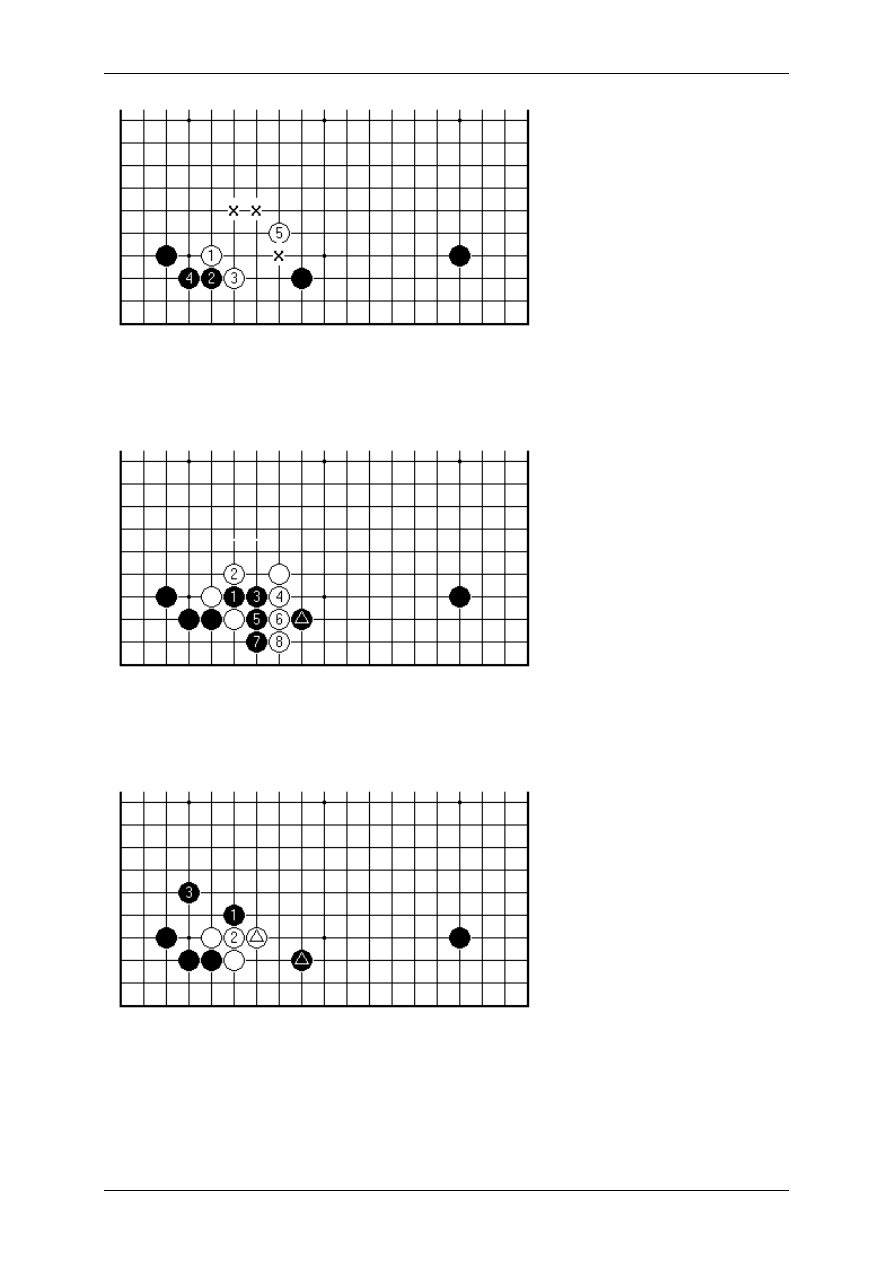
On Your Side by Charles Matthews, 3-dan
Page 64 sur 138
A different idea for Black, now rare, is to play in contact with 2. At 5 White has a
number of good plays, the other 'x' points being candidates too. The key thing is to
develop shape that defends by indirect means the cut next to White 1 and 3.
That is, Black 1 here is a big failure. White 2 and so on are an example of the
'driving' manoeuvre. They leave Black wondering why the marked stone was ever
played.
What White at all costs must avoid is a rigid adherence to the set patterns. For
example the hanging connection with the marked white stone is bad. It is easy for
Black to attack as shown. One cannot simply ignore nearby stones such as the
marked black one. They must somehow be factored into the plan. White has ended
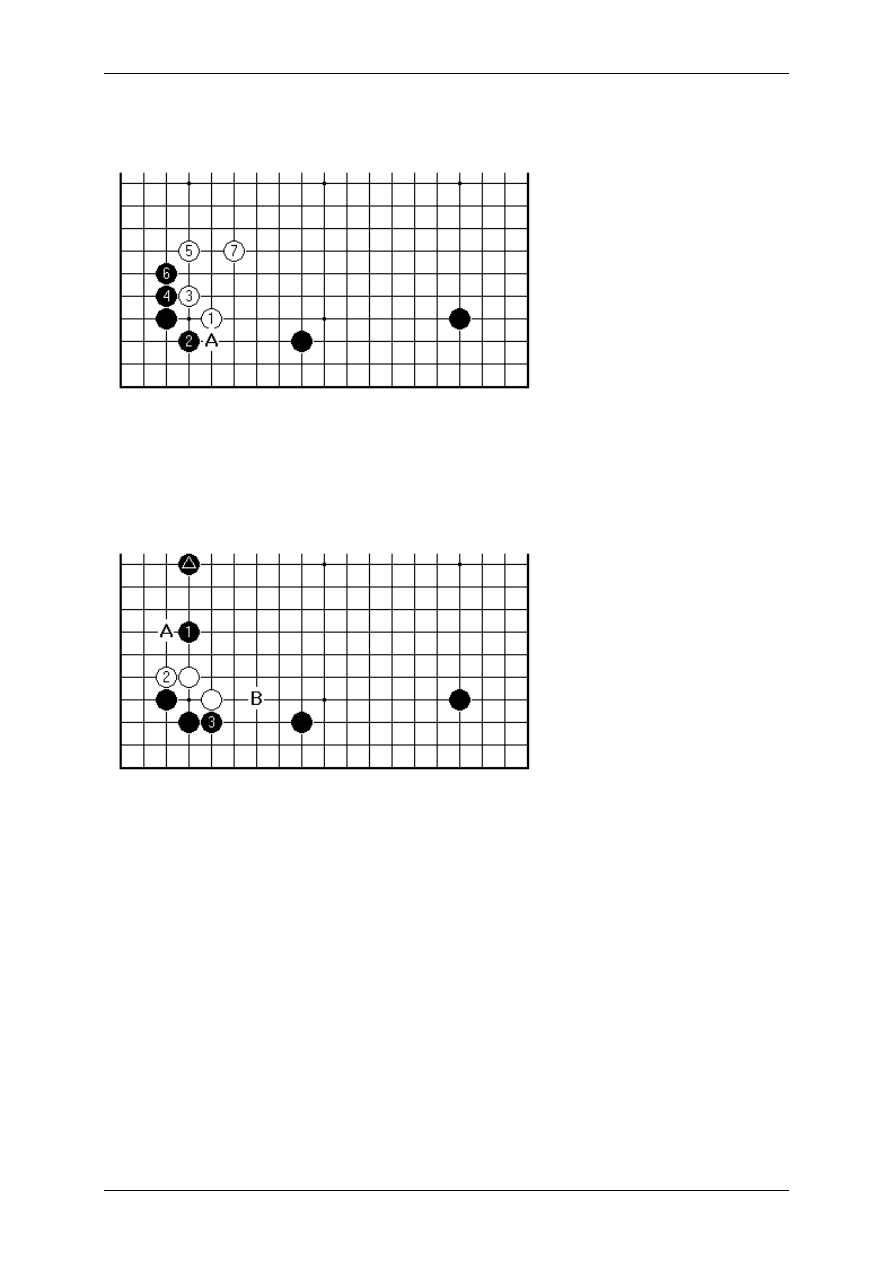
On Your Side by Charles Matthews, 3-dan
Page 65 sur 138
up with a heavy group - one that is hard to defend. Normally making a heavy group
signifies unskilful play of the stubborn persuasion.
Black's second string attack is in fact this quiet diagonal play at 2. White isn't going
to answer at A, which would amount to the same as having approached at A in the
first place, a heavy play as was seen in the first part on the Chinese. White 3 is
recognised as correct in this case, and White makes shape in the centre (7 is seen
also one to the right).
In 1998 some of the big beasts of the Go jungle started to disturb the peace by
attacking forcefully from the direction of 1, when backed up by a stone such as the
marked one. After 2 and 3 White has resources at A and B, but is still in danger of
forming a heavy group. There seems no end in sight for the debate over how the
game should go, when White comes close in to the Chinese framework.
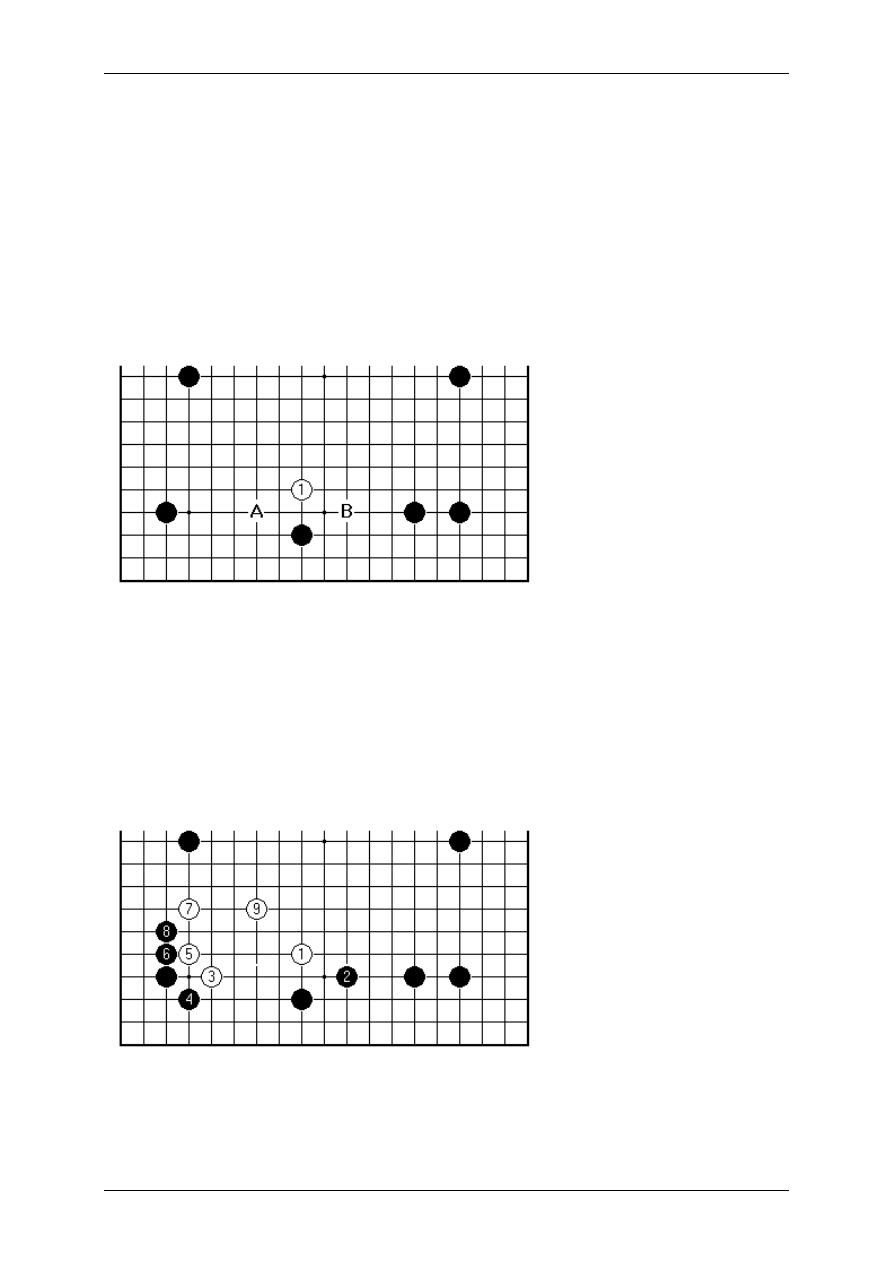
On Your Side by Charles Matthews, 3-dan
Page 66 sur 138
13.
Chinese: Reduction Plays
It has been noted already that the Chinese style poses a problem of timing for
consolidation, and invasion. If White allows Black's development of the side to
continue unhindered, the game may become a framework contest on the grand
scale.
It is almost never seen in high-level Go that a game divided into two frameworks
proceeds directly to the endgame. One side eventually leaps in. You may construe
that as an act of aggression, but forming a weak group where your opponent is
already strong will always lead into a few plays meeting a stiff defensive tariff.
Defensive skill is a non-negotiable requirement to become strong. In a well-fortified
framework such as this one, in which Black invested six plays before White replied,
the capping play at 1 is a good choice. According to a proverb on shape, Black
considers answering at A or B, in knight's move relation to the capped stone.
White 1 is a soft play. If White cannot afford to concede Black some territory, having
played five times on the concealed half of the board, something has gone badly
wrong. The main point is to avoid a bad quarter of an hour, as the French put it,
trying to resuscitate an attempted invasion that intruded too deeply.
If Black answers on the right side, White seems not to have trouble making shape. If
the order were changed to White 3, Black 4, White 1, Black's answer at 2 might look
too passive.
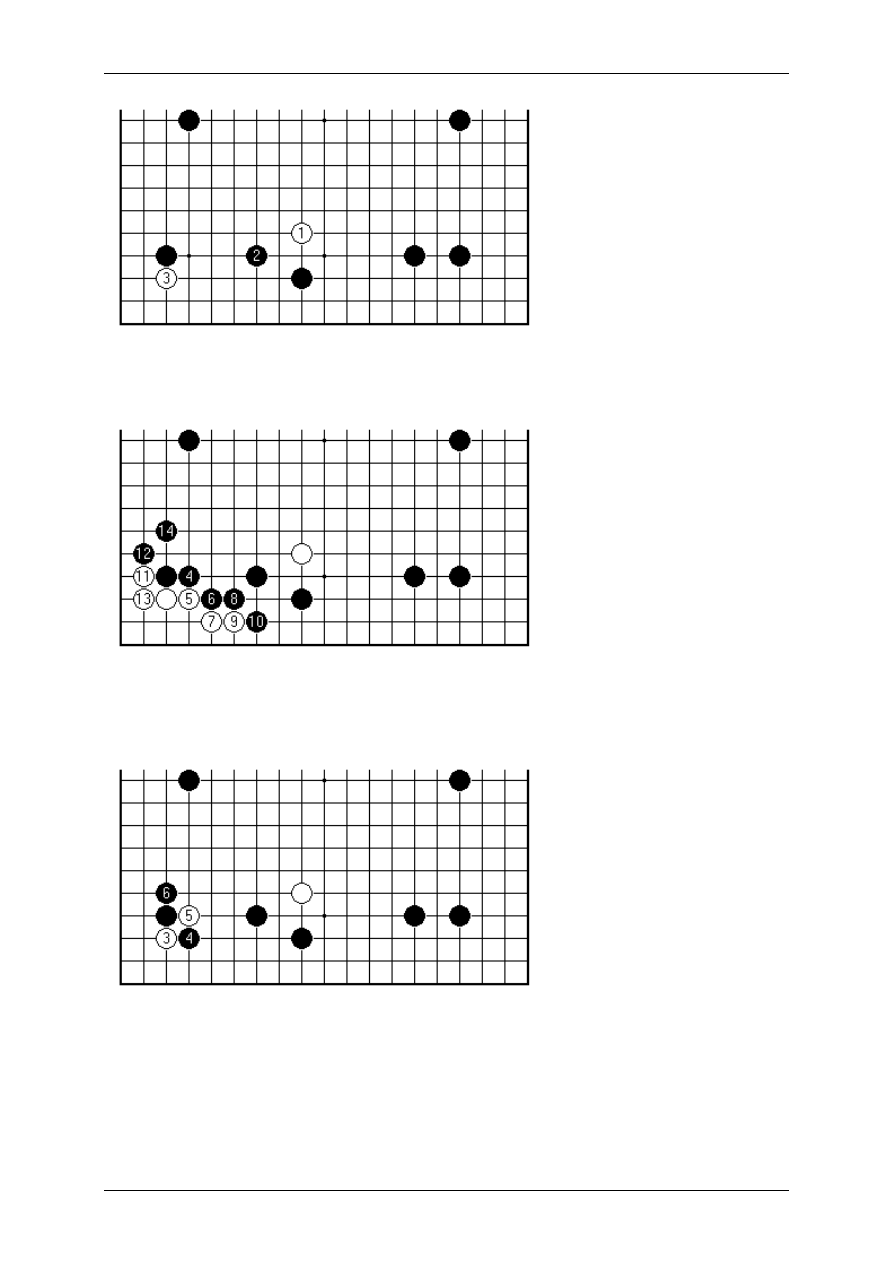
On Your Side by Charles Matthews, 3-dan
Page 67 sur 138
If Black answers on the other side, it is interesting to pay immediate attention to the
left-hand corner with 3. To a professional this is an orthodox piece of technique.
Black 4 this way looks far too easy-going. After 5 we have transposed to an ordinary
3-3 invasion sequence. In practice Black 8 would be at 9 instead, for more active
shape, but anyway the whole direction seems wrong.
Black 4 here is the expected answer in the early stages of the game. When White
cuts at 5 to gain position, anything less than Black 6 in answer looks timid.
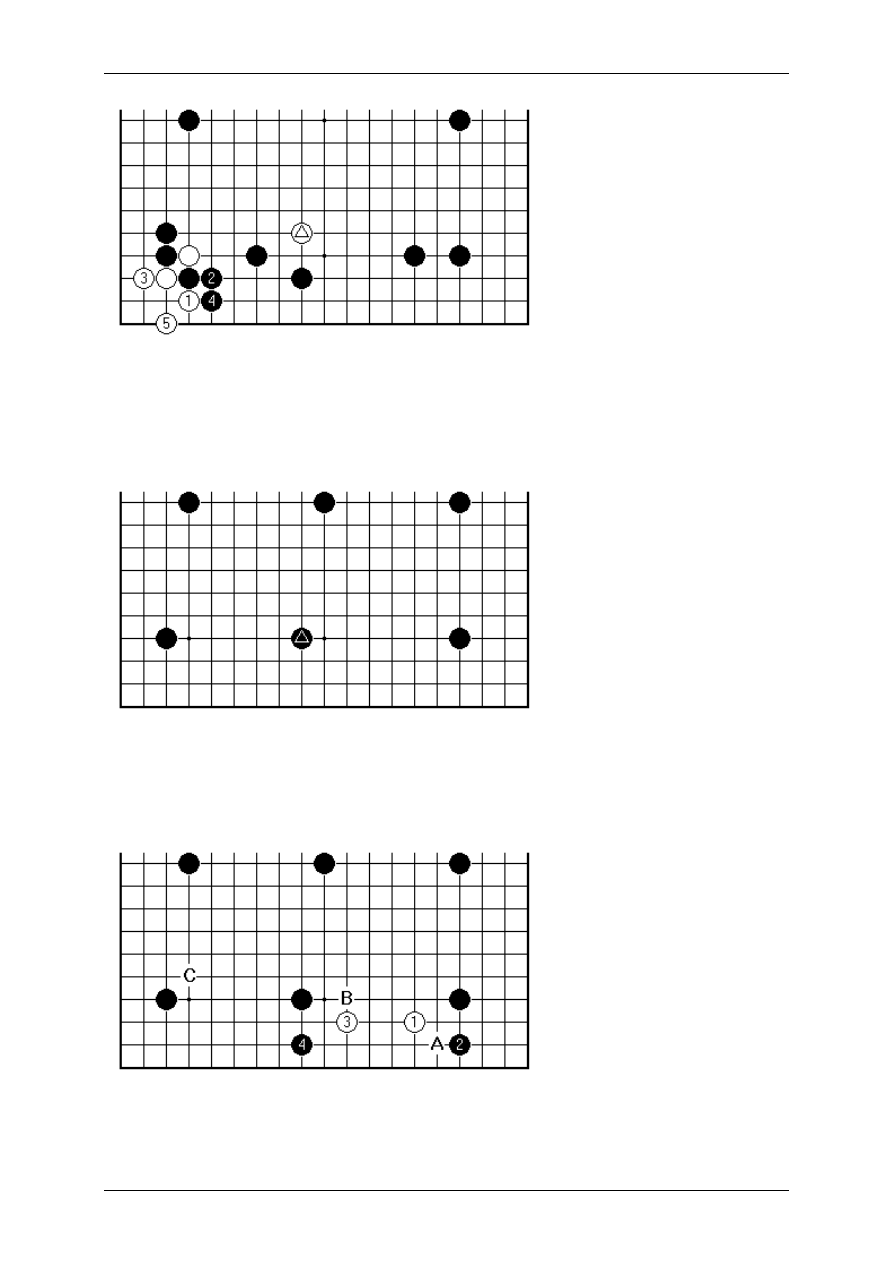
On Your Side by Charles Matthews, 3-dan
Page 68 sur 138
Therefore White has the later chance to construct a small live group in the corner
(the notorious tripod group). For the moment White has to consider how to develop
from the triangled capping stone - the fishing expedition (technically a probe) in the
corner has come up with something, so the appropriate way of thinking is to count in
50% of the gain. At present that can probably be matched elsewhere.
The use of the capping play against the low Chinese formation brings into focus an
advantage of playing high (marked stone). This position is actually from one of my
games at the 2000 World Amateur (Black was Jose Chacon 4 dan of Mexico). We
had the benefit of professional commentary afterwards, from Sonoda Yuichi 9 dan.
I came in at 1 - the logic is simply to start in the largest open space. Now common is
Black A, White B. My opponent had his own ideas, and after 4 I was on my own.

On Your Side by Charles Matthews, 3-dan
Page 69 sur 138
Sonoda's comment was that Black 4 could well be at C. Naturally that would allow
White at 4, but is consistent with Black's emphasis on the centre.
Having done something for the group on the right with 5 and 7, I came in with 9. By
professional standards this is an overplay. Black's answer at 10 is interesting, and
Sonoda said he understood the thinking behind it. Now White will not be able to pull
any stunts in the left-hand corner. The group started by 9 will have to put together
some shape without access to the 3-3 point.
The consensus was that Black let himself down here with 12 (should be at A, a
combination seen in pro Go). In a sense, if Black anyway wants to play 16 separating
White, the chance also to connect along the edge to 14 is an overlap of effort. White
15 is ordinary good shape. White 17, however, is something a little bit special: a low-
velocity shot that yet hits home hard. After it Black is short of a plan, and White has
successfully erased the black framework, secure black territory having been cut back
to the low end of the value of five net plays. The pro verdict was that Black's slacking
off after the early base-stealing effort allowed White to claim a result here.
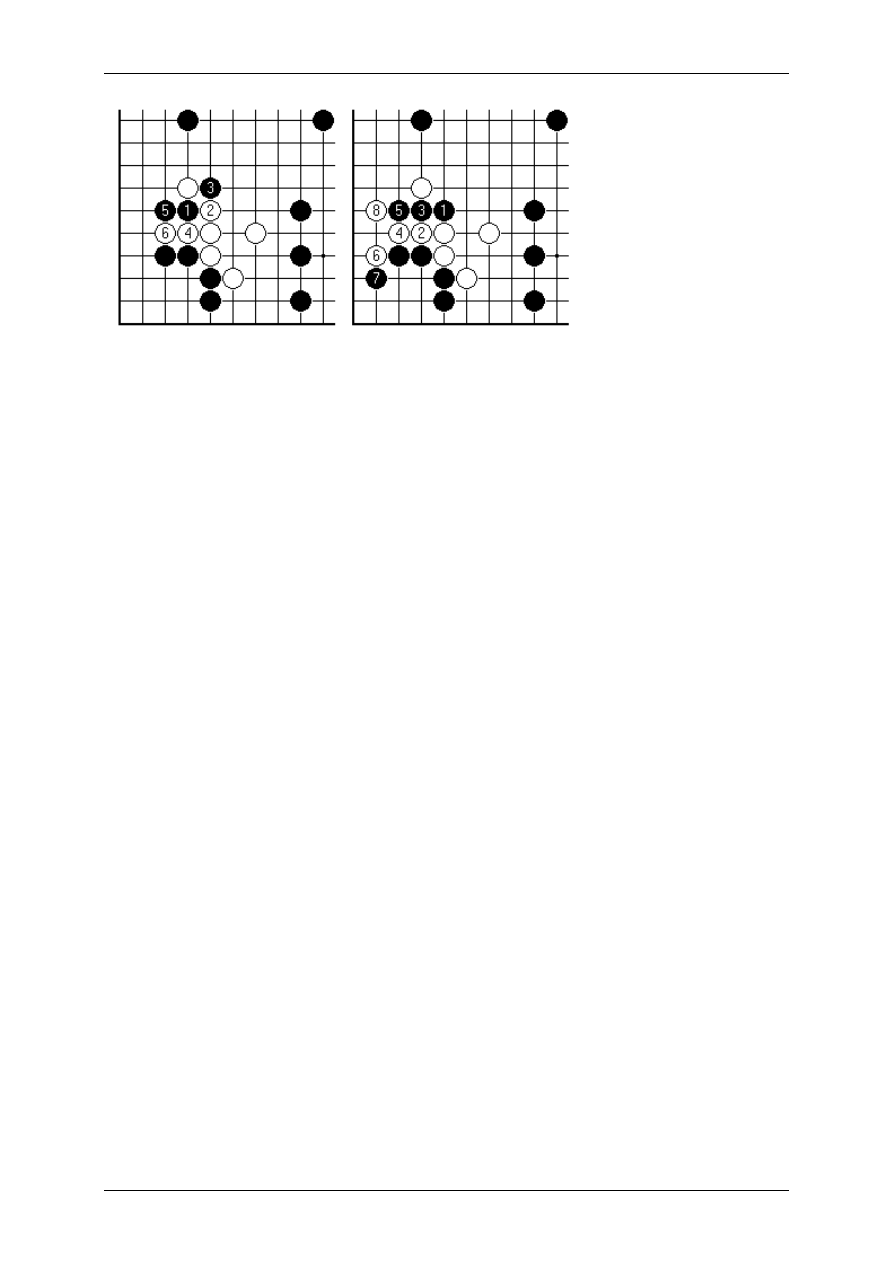
On Your Side by Charles Matthews, 3-dan
Page 70 sur 138
To clarify that point about White 17, another soft move in a harsh world, here are two
parallel failed attempts by Black to cut off the white stone. In either case the black
corner will suffer, or the cutting stones end up worse than useless. Black 12 and 14
of the previous diagram are potentially bad shape, so that Black shouldn't provoke
such fights. What these variations actually prove is that White has resilient shape, so
that any future black attack must be more carefully conceived.
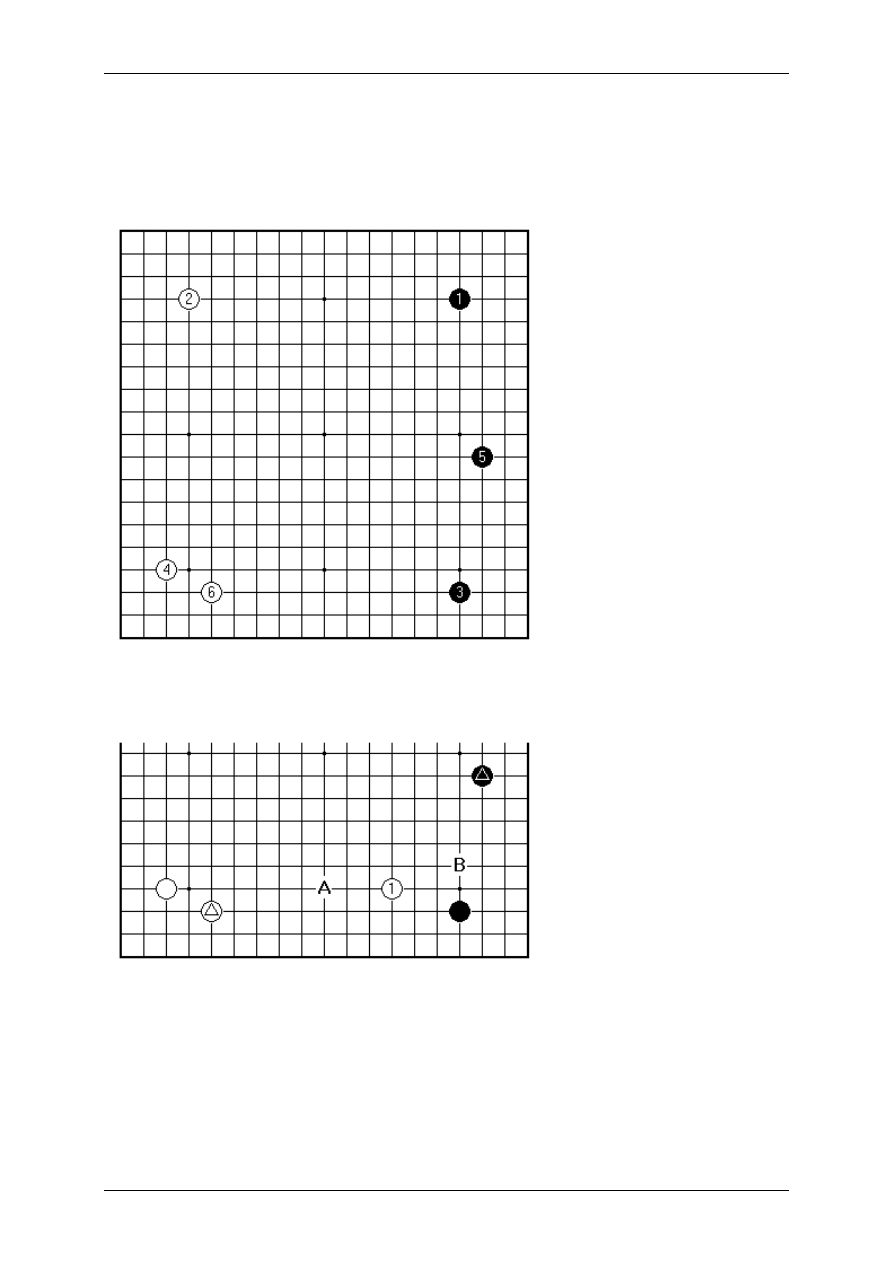
On Your Side by Charles Matthews, 3-dan
Page 71 sur 138
14.
The Anti-Chinese Plan
White can make initial plays that devalue, or at least cast a shadow on, Black's
subsequent construction of a Chinese formation.
White 4 here should make Black pause for thought. White's enclosure with 6 is
particularly well placed to limit the expansion of Black influence on the lower side.
If for example White has the chance to play 1 here, creating what amounts to a pair
of miai points at A and B (see the article "Chinese: Lower Side Plays"), the marked
white stone will be well placed in support whichever Black chooses. From Black's
point of view, however, only the answer at B works well with the marked black stone,
allowing White A and a framework with good balance.
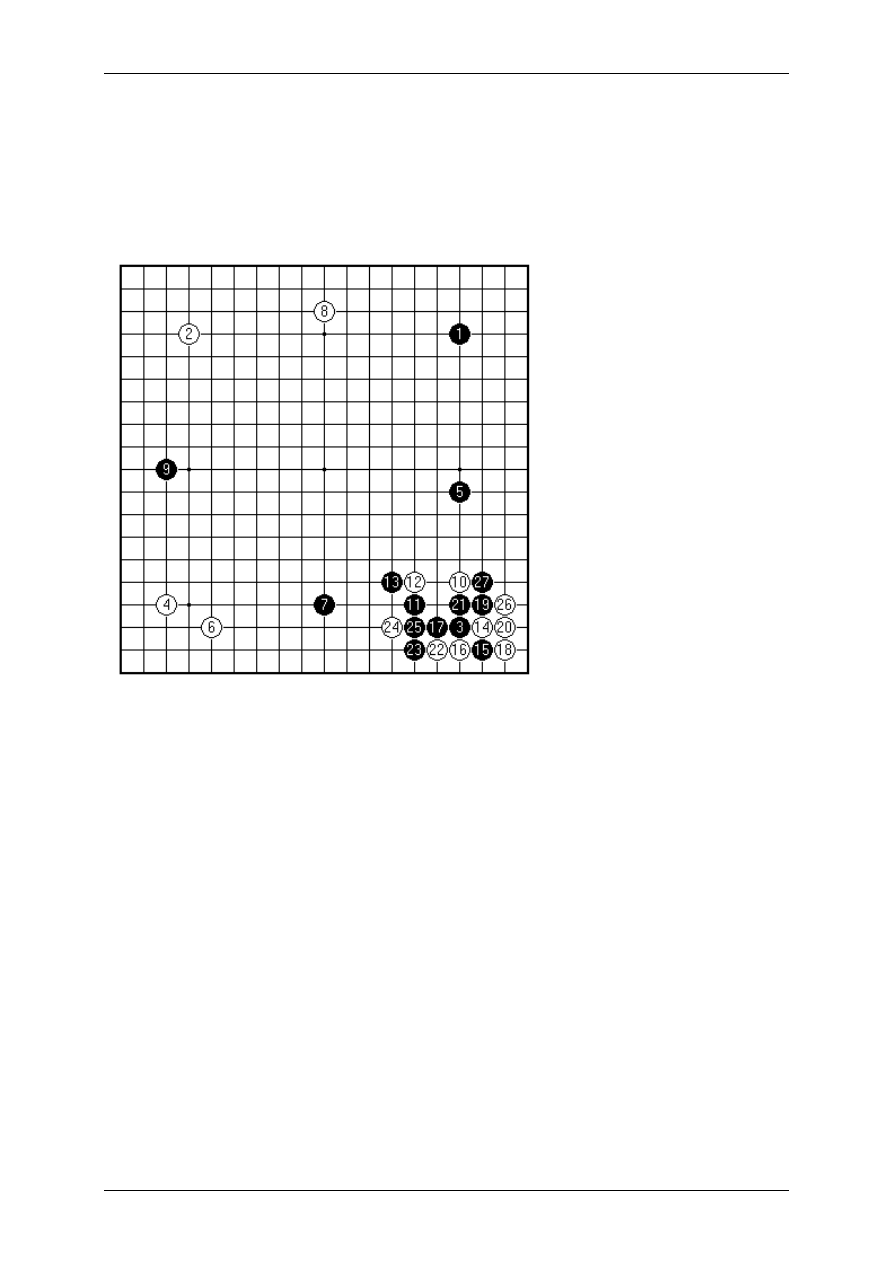
On Your Side by Charles Matthews, 3-dan
Page 72 sur 138
This reasoning is perhaps not conclusive. The idea that Black shouldn't play the
Chinese against White's starting formation has been around for 25 years, and in
professional play Black 5 is normally an approach in the lower left corner instead. A
clear-cut condemnation of playing the Chinese in this position, as bad for Black,
would step outside the professional niceties. I therefore consider myself fortunate to
have had an explanation in terms from Sonoda 9 dan while I was in Japan.
Sonoda-sensei showed me this variation, laid out in a few seconds. The lower right
sequence has appeared already ("Staying Light"). The verdict was that in this
position the white fortification in the lower left is really very well positioned, an ideal
corner enclosure.
The reasoning can be placed as an issue of co-ordination. One may accept some
poor co-ordination of one's own forces and compensate by fighting - this is an aspect
of the openings that comes into play as you look further, for example at 5-3 points.
For the opponent's forces to appear specially well co-ordinated is however always a
misfortune.
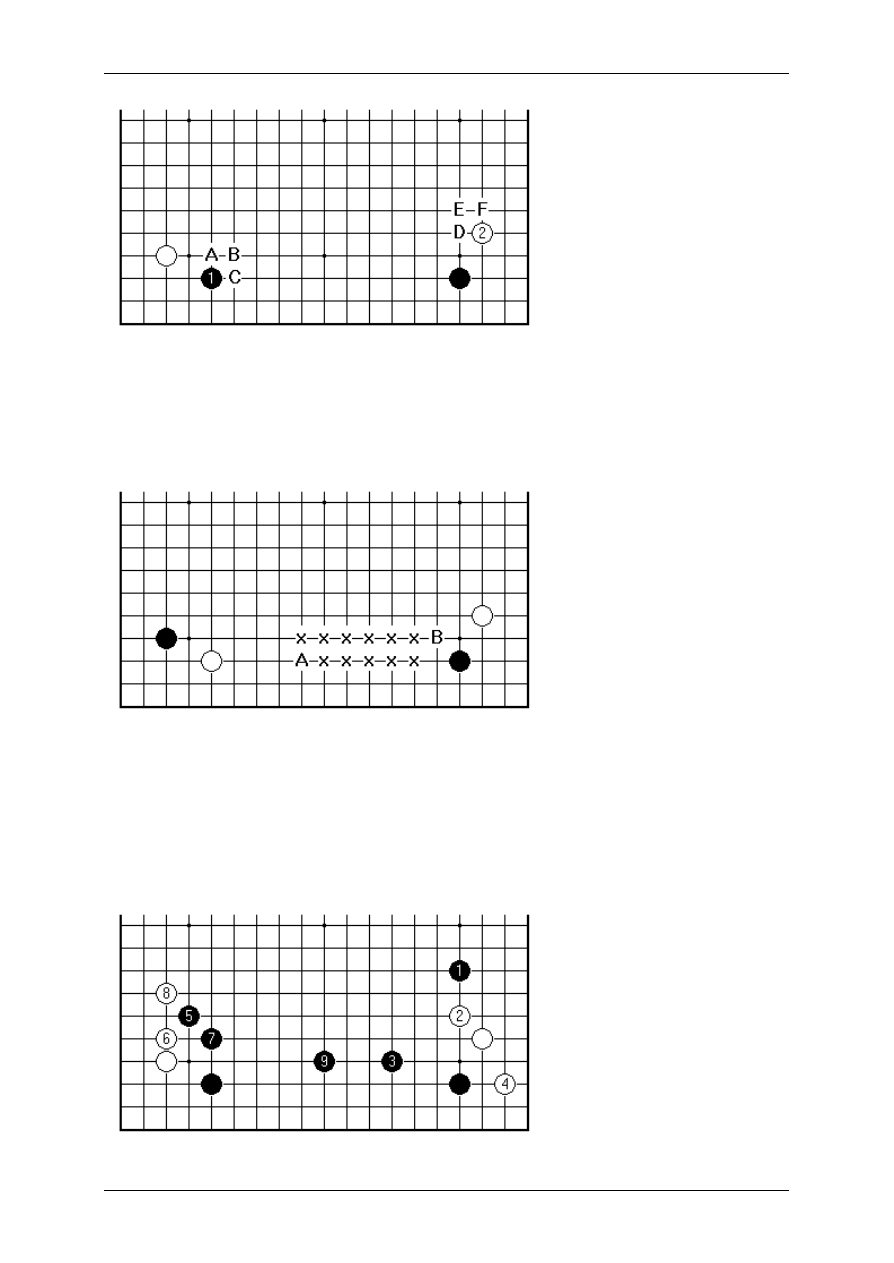
On Your Side by Charles Matthews, 3-dan
Page 73 sur 138
Therefore there is a call to study sides of this kind, where Black 1 approaches White
(possibly at A, B or C instead). White 2 (or one of D, E, F) is natural to thwart the
Chinese formation, and in any case is a very big point. In a sense this type of position
is more open to freedom of choice of variation than any seen so far. A huge range of
corner openings could in principle appear.
Our Anti-Chinese side bears a superficial resemblance to the celebrated Shusaku
side shown here, in which the colours of the stones in the left-hand corner are
interchanged. Features common to the two will naturally be shallow. In both cases
the lettered points form a zone of potential double-purpose plays, which affect both
corners. In the Shusaku case the points A and B (the famous Shusaku diagonal for
Black) act as a pair of miai - if Black rushes to pincer at A, White can press Black
down with B.
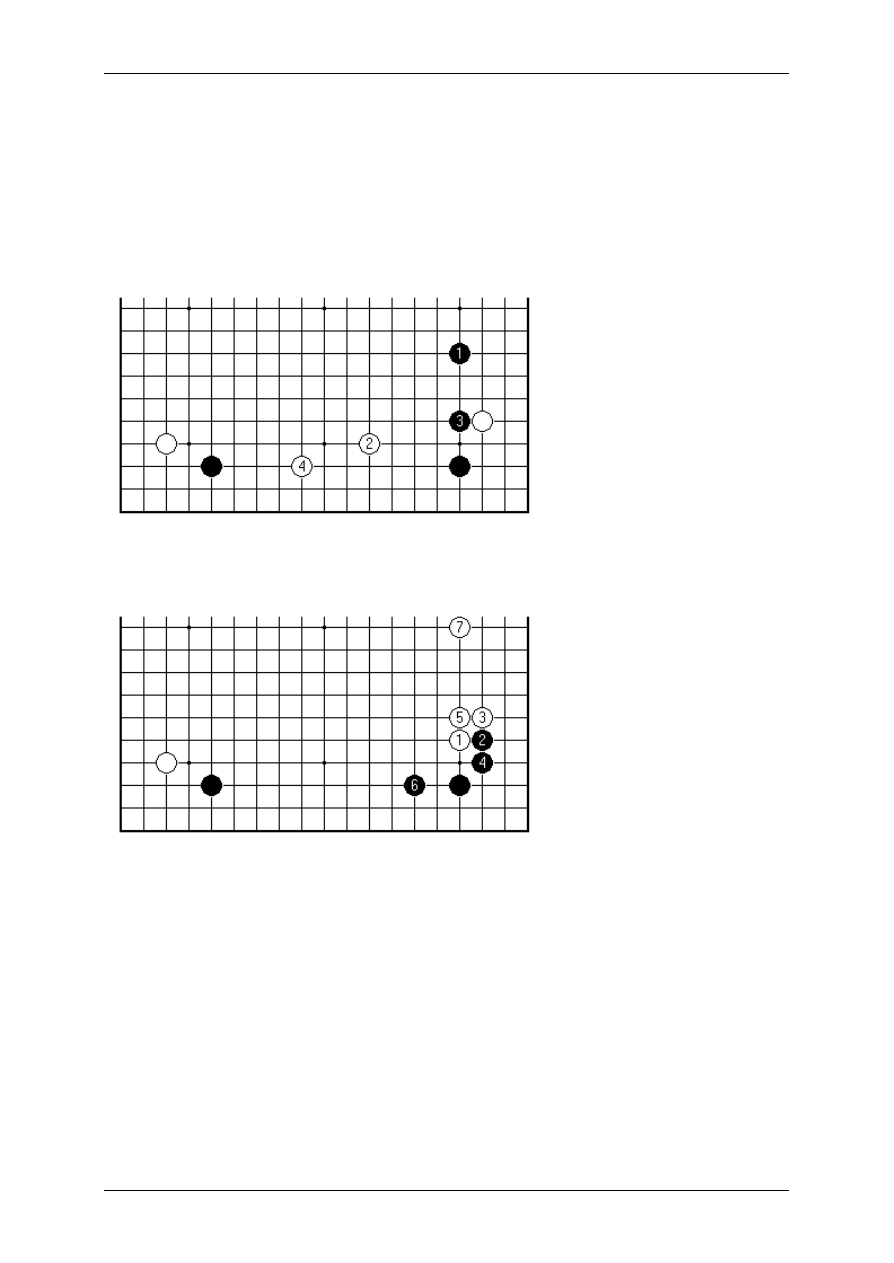
On Your Side by Charles Matthews, 3-dan
Page 74 sur 138
Back with the Anti-Chinese, thinking in terms of double-purpose plays can still lead to
some fruitful ideas on direction, and hypothetical variations. Firstly Black applies a
pincer in the right-hand corner, rather than playing directly in the 'zone'; this plan is
adopted in the modern treatment of the Shusaku side too.
Assuming White plays it safe in choice of corner variation with 2 and then 6, Black
can build a very satisfactory framework up to 9, establishing good co-ordination
between the corners. Here White has been too passive.
Therefore White often tries for control of the zone, like this, at the cost of giving up
the right-hand corner.
That there are differences that count between the two side formations can be seen
when we look at White approaching high in the right-hand corner. This is a normal
plan in the Anti-Chinese case. It makes it easy for Black to play the common opening
to 6. After that Black can take the initiative, probably playing in another part of the
board. Seeking rapid development in that way is the style applied with such great
success by Kobayashi Koichi, who held the Kisei title from 1986 to 1993. The point is
that the lower side becomes an area in which White can't achieve so much. If Black
wanted to create a framework there immediately, Black 6 would be played on the
fourth line.
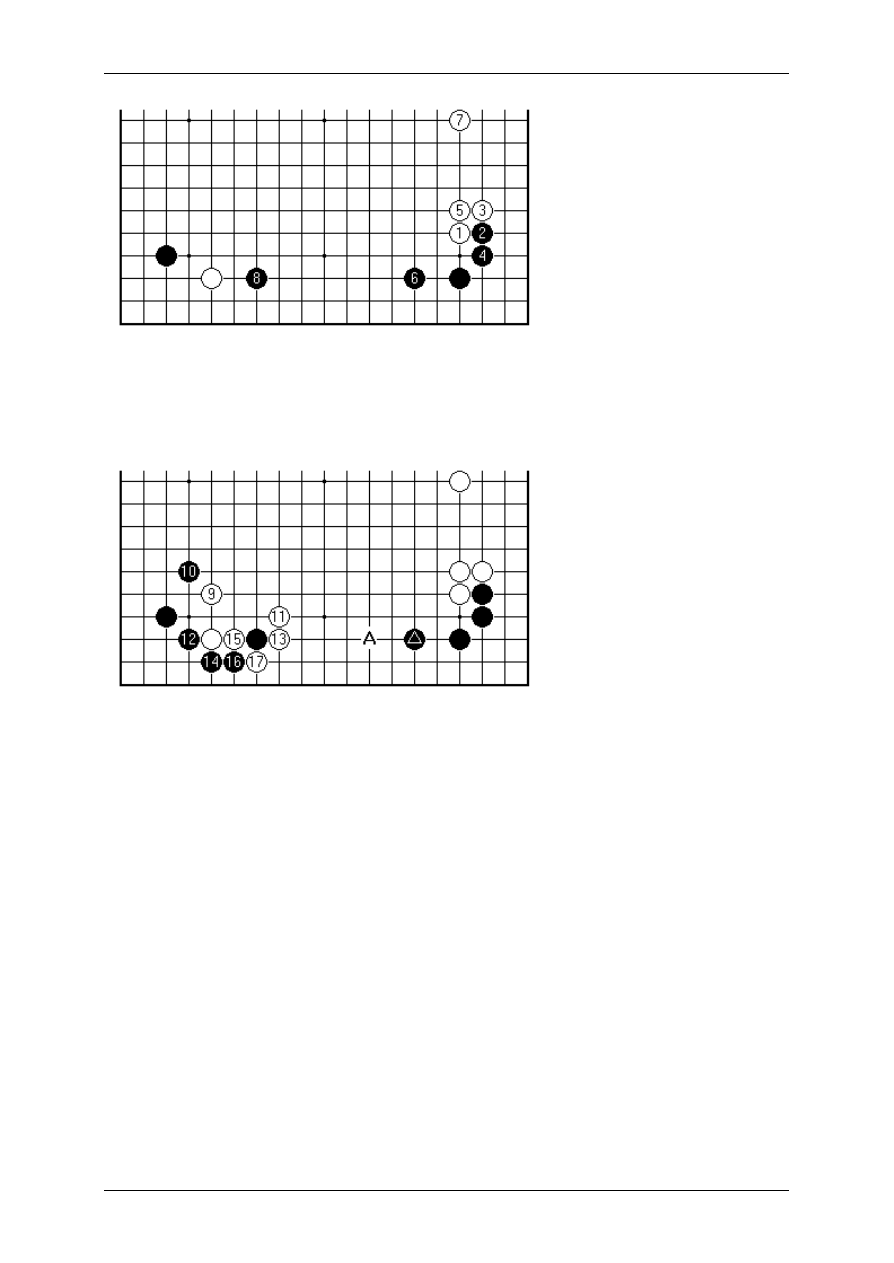
On Your Side by Charles Matthews, 3-dan
Page 75 sur 138
In contrast, the sort of Shusaku side formed with the high approach 1 here is a rare
combination in pro play (the order in which White's approach plays are made is in
fact usually the other way round, i.e. right corner then left corner, but may lead to the
same position). The continuation up to 8 is excellent for Black.
This is a normal way for the left-hand corner to be played out, but the result is poor
for White. Black has taken territory in both corners and retained the initiative. A
subsequent white play at A, towards the low, solid marked stone, has little enough
effect on Black, who reaps the benefits here of superior co-ordination.
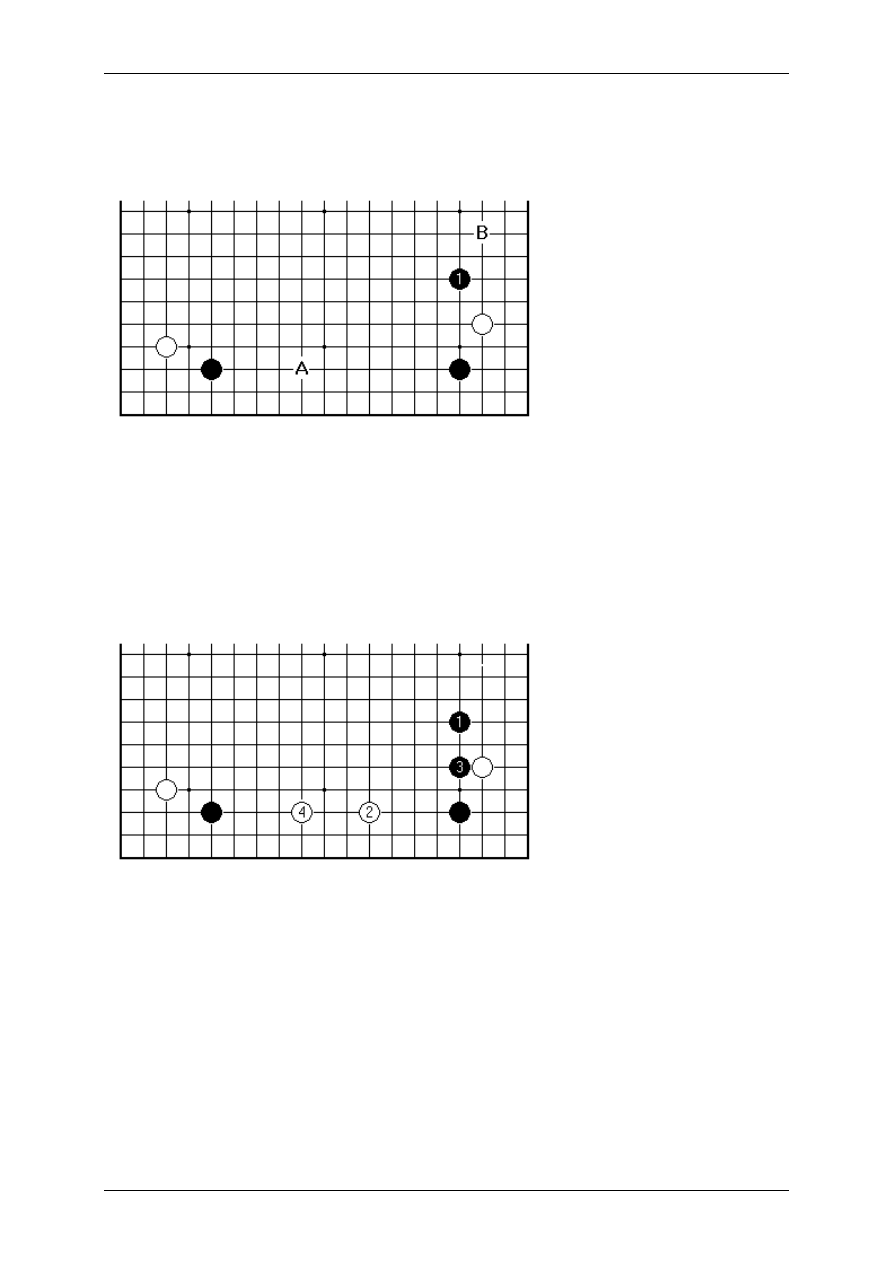
On Your Side by Charles Matthews, 3-dan
Page 76 sur 138
15.
Anti-Chinese: One-Point High Pincer
We'll look at further concrete variations from the position introduced last time.
Here there are very many ways to play. Black will emphasise the right-hand corner.
An exchange such as Black A, White B is very peaceful, but it seems that Black isn't
trying to make anything out of first move advantage in playing that way. A pincer such
as Black 1 is natural. The real difficulty of codifying opening theory in Go is illustrated
by the variations here: I have come across three dozen, looking at Black and White
playing once only, many of them in Chinese games. All of the regular pincers, plus
the Shusaku diagonal, have been tried by Black. We'll follow just one line, worked out
in the 1980s.
Since White's intention is usually to give up the right-hand corner with 2 and 4,
Black's choice of pincer makes sense. White 4 is an ideal pincer, but Black 3 is very
severe: it is unusual for White to ignore the pincer played as 1, because Black 3 is so
good.
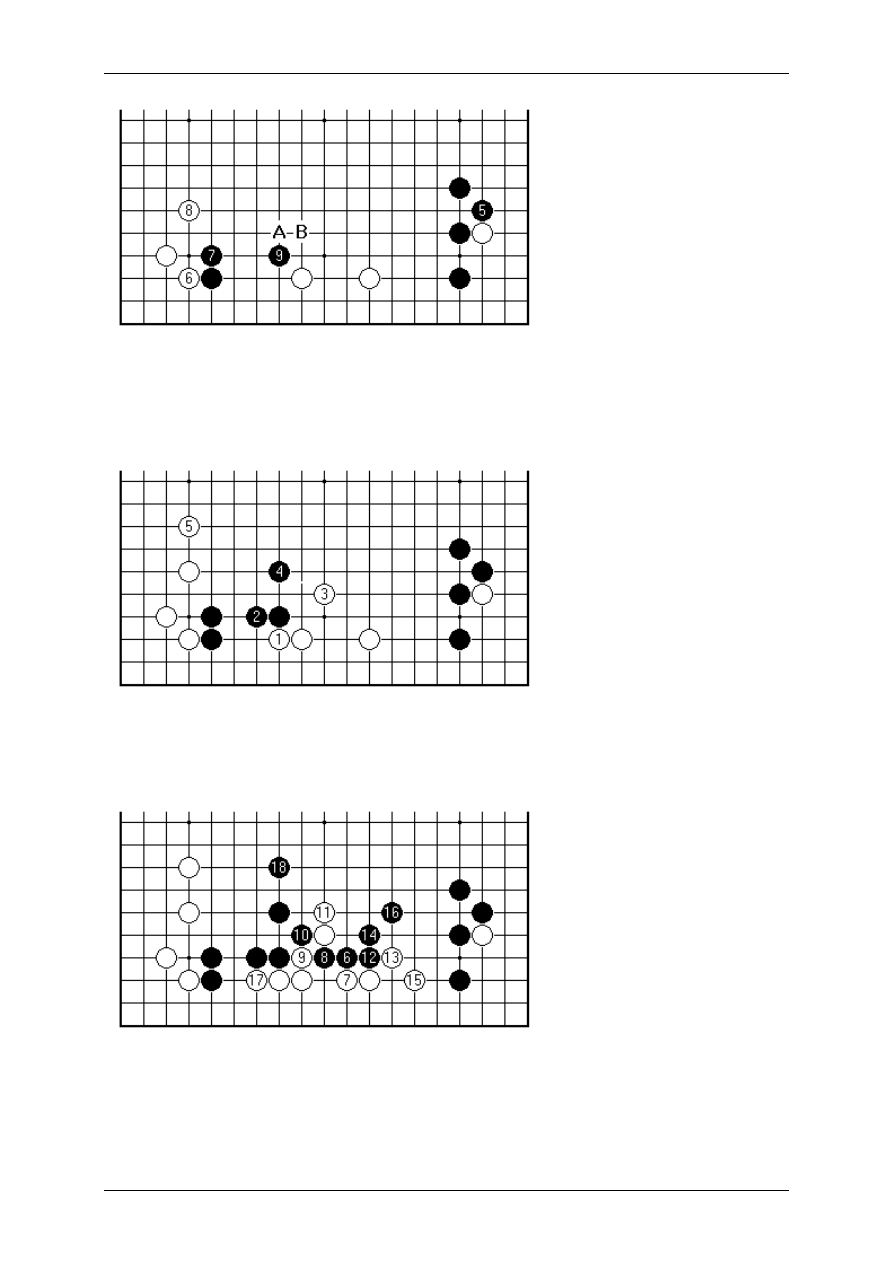
On Your Side by Charles Matthews, 3-dan
Page 77 sur 138
Now Black 5 to secure a large corner shows professional attitude. It is also known
for Black to play in the left-hand corner at this point, to mitigate the coming attack.
With 6 and 8 White makes Black a target. If Black 9 is at A, White can play B for good
shape (Hirano 1p-Tei Meiki 2p Kisei 1984).
The game Shirashi 9p against Sakata 9p from the 1981 Honinbo League continued
this way. White 5 guards against Black cutting across the knight's move below. The
corners are now settled, while Black's group on the side lacks a base.
Now Black took advantage of the gap in White's shape, leading to the cut with 8 and
10. After 18 White ran out with the two stones in the centre, in Sakata style.
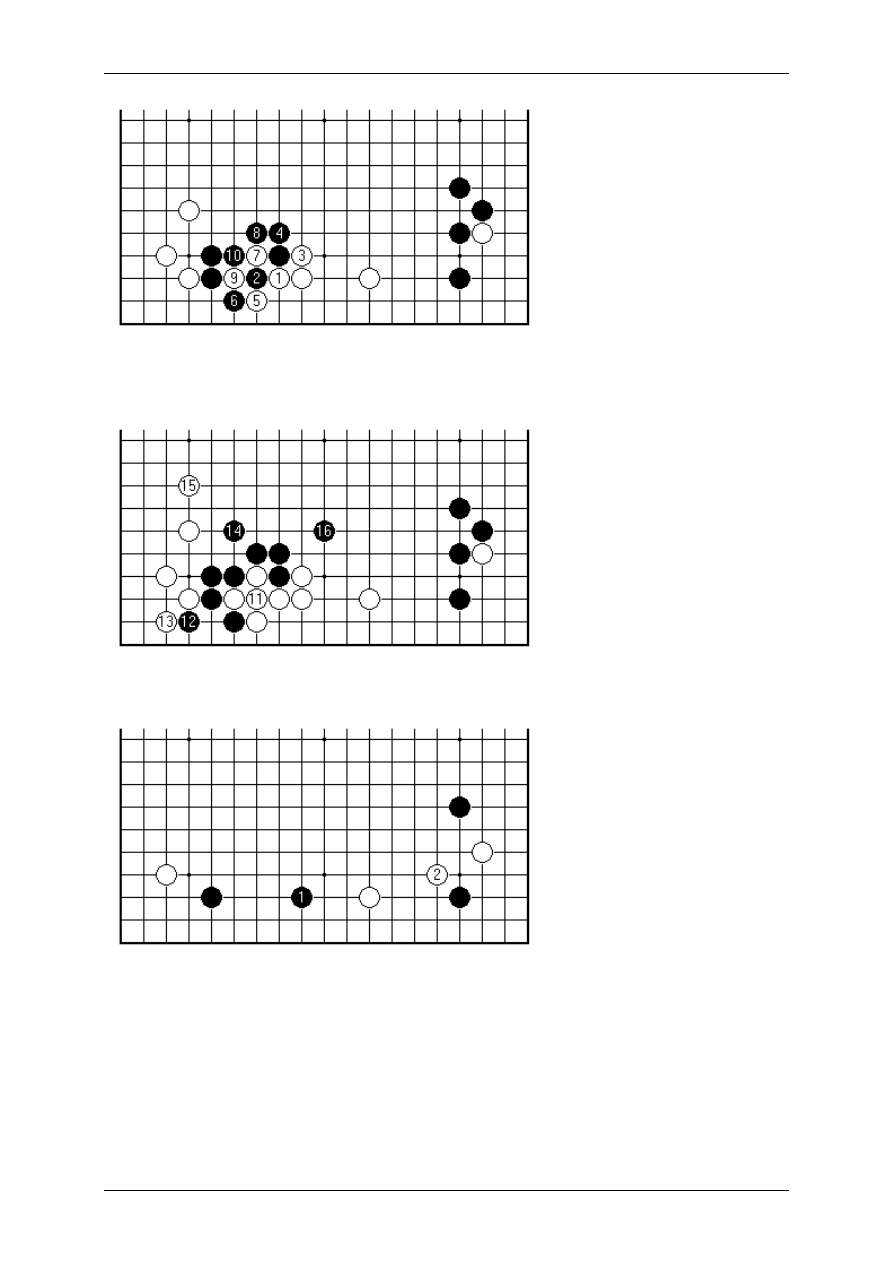
On Your Side by Charles Matthews, 3-dan
Page 78 sur 138
In an earlier game also involving Sakata (Black Rin 9p, 1981 JAA Cup) Black had
blocked at 2.
The result is certainly not bad for White.
In a number of games Black has therefore reacted with 1, rather than submit to the
exchange of advantages. This allows White a free hand to play 2. Now the question
will be, is the black pincer stone well placed? If White builds influence that stone may
look too close to it, if on the other hand a fight breaks out it might come in handy.
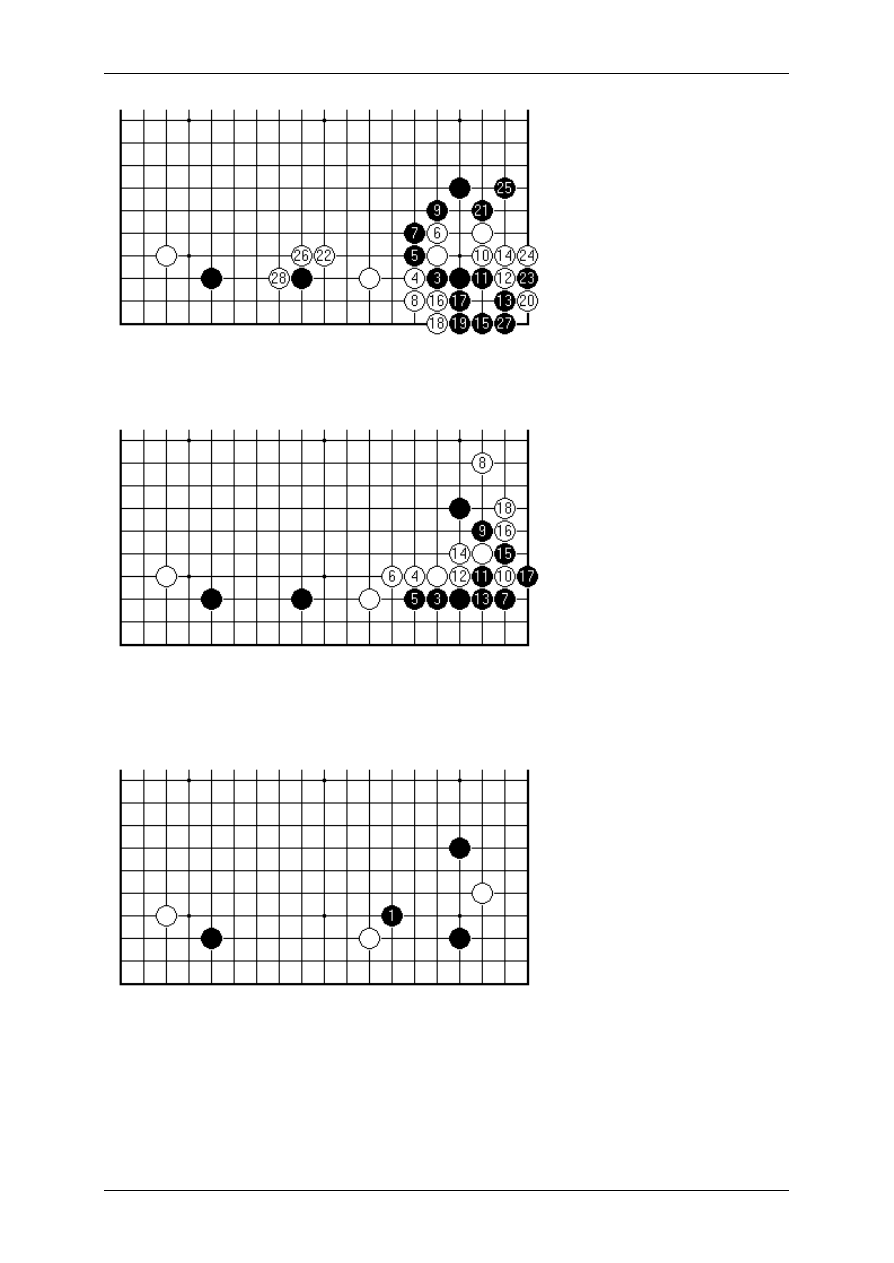
On Your Side by Charles Matthews, 3-dan
Page 79 sur 138
In this Chinese game from 1989 both White 4 and Black 5 are potentially overplays,
and the fight in the corner became complicated with an implicit ko fight.
The following year in the Tianyuan tournament Cao Dayuan played the more
orthodox White 4 to build influence. Black used tactics to make the corner very
strong, but was left with weak stones on the outside.
A final idea for Black came from top Korean Seo Pong-su. Black plays 1 to stir up an
early fight. He tried this in games in 1990/1.
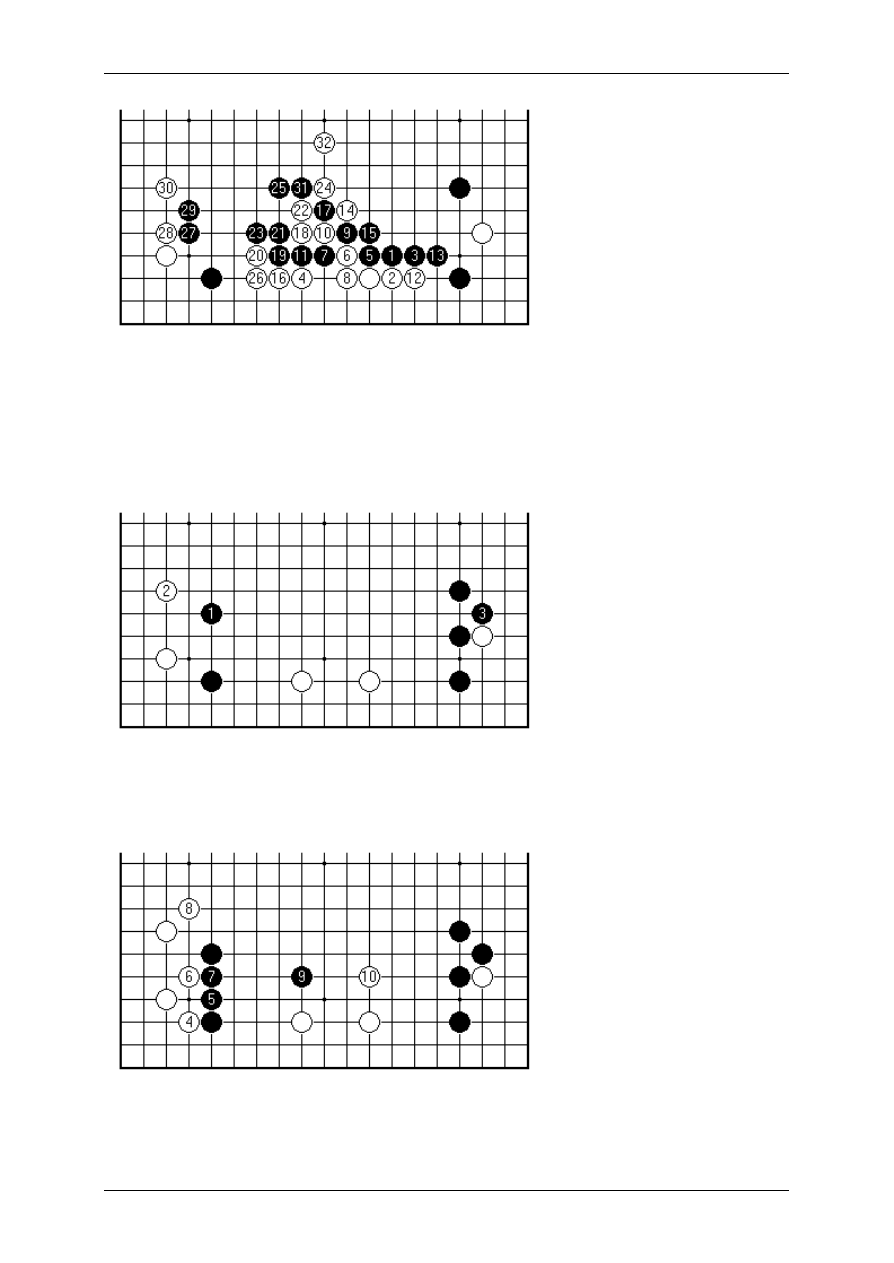
On Your Side by Charles Matthews, 3-dan
Page 80 sur 138
This is from the second outing, an international match against Cao Dayuan of China.
(TV Asia Cup 1991). Black does succeed in the aim of making the lower side a
fighting area. White however isn't obviously in trouble here (and went on to win).
While it is more than rash to draw conclusions in these matters, it does seem that
Black ought seriously to consider helping the left-hand corner in this variation.
The objection to Black jumping out at 1 first before playing 3 is presumably that
White takes territory, for which Black has no attacking compensation (because the
white group on the side is very stable).

On Your Side by Charles Matthews, 3-dan
Page 81 sur 138
This is how it went in Cho Chikun - Sakata in the 1980 Kisei. Black 9 becomes
possible, and then Black played elsewhere. This is in any case a plan with greater
dynamic possibilities.
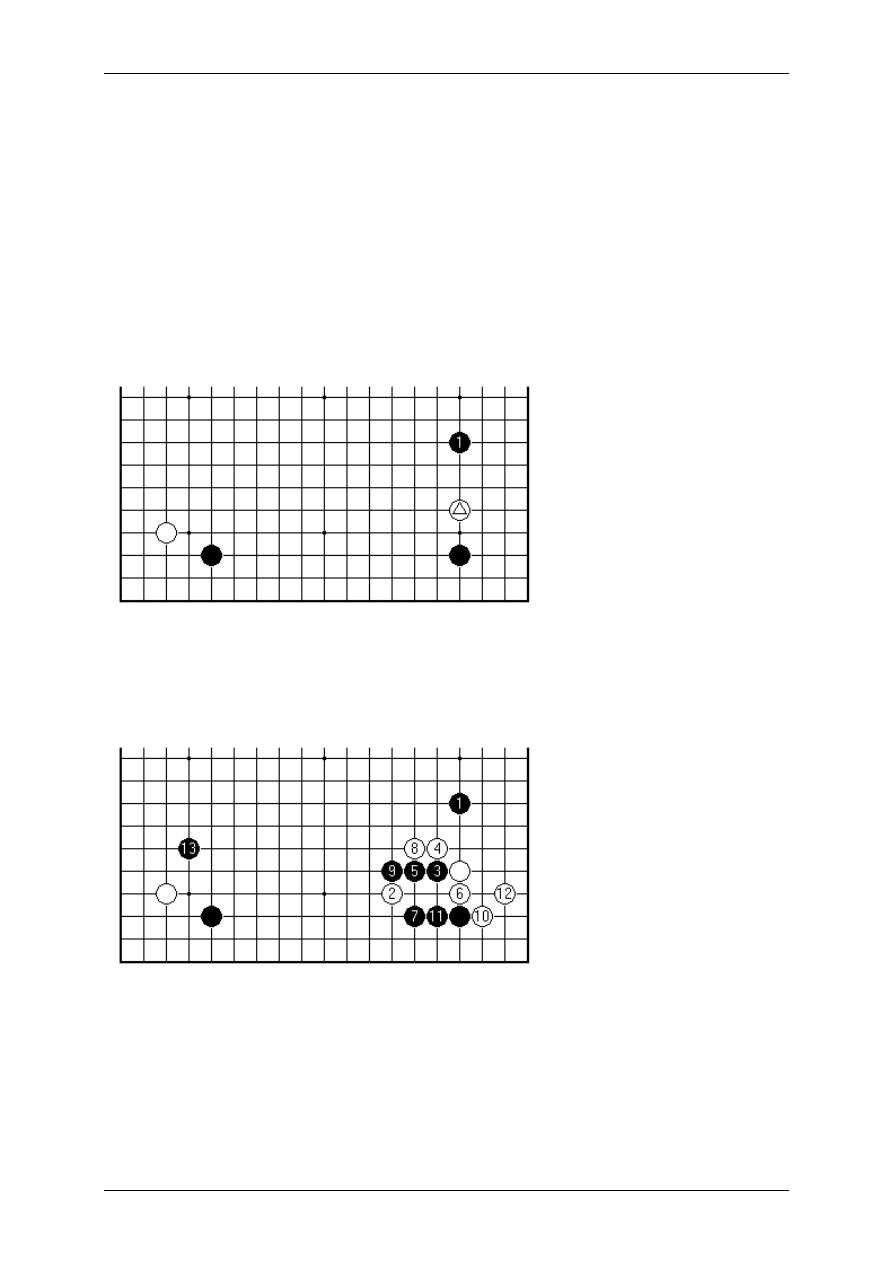
On Your Side by Charles Matthews, 3-dan
Page 82 sur 138
16.
Ch'ung Am Research
Ch'ung Am is the name of a well-known high school in Seoul. It is also the title of a
research group of younger professionals who have done much to build up the
reputation of Korean baduk as the home of the secret opening weapon. From its
founding in 1988 around Yi Ch'ang-ho ( Lee Chang-ho - see John Fairbairn's list of
Korean names) it was supposed to be a covert operation in the international Go
rivalry that was brewing. Innovation on the scale achieved couldn't be kept
permanently under a bushel, and a recent three-volume work from the Korean Baduk
Association publishes a thousand pages of detailed analyses. Astonishingly the
group of contributors, said to be the third 'wave' of Ch'ung Am researchers, are all
under sixteen years of age.
We'll look at Black's effort to play forcefully in the Anti-Chinese, when White plays
the high approach (marked stone) in the right-hand corner. The two-point high pincer
(aka the Magic Sword) shown as Black 1 is a natural choice, considering that it is
backed up by a Black stone in the top right.
The Magic Sword has been the great beneficiary of developments in openings over
the past two decades, while the standing of other complex corner sequences has
fallen back. The professional way, however, is still to consider its merits case by
case, in given overall contexts. In this setting the Magic Sword came to prominence
in 1990 in some important games. In March of that year it was played by Cho Hun-
hyeon against Seo Pong-su in the Wangwi title match in Korea, leading to this
position.
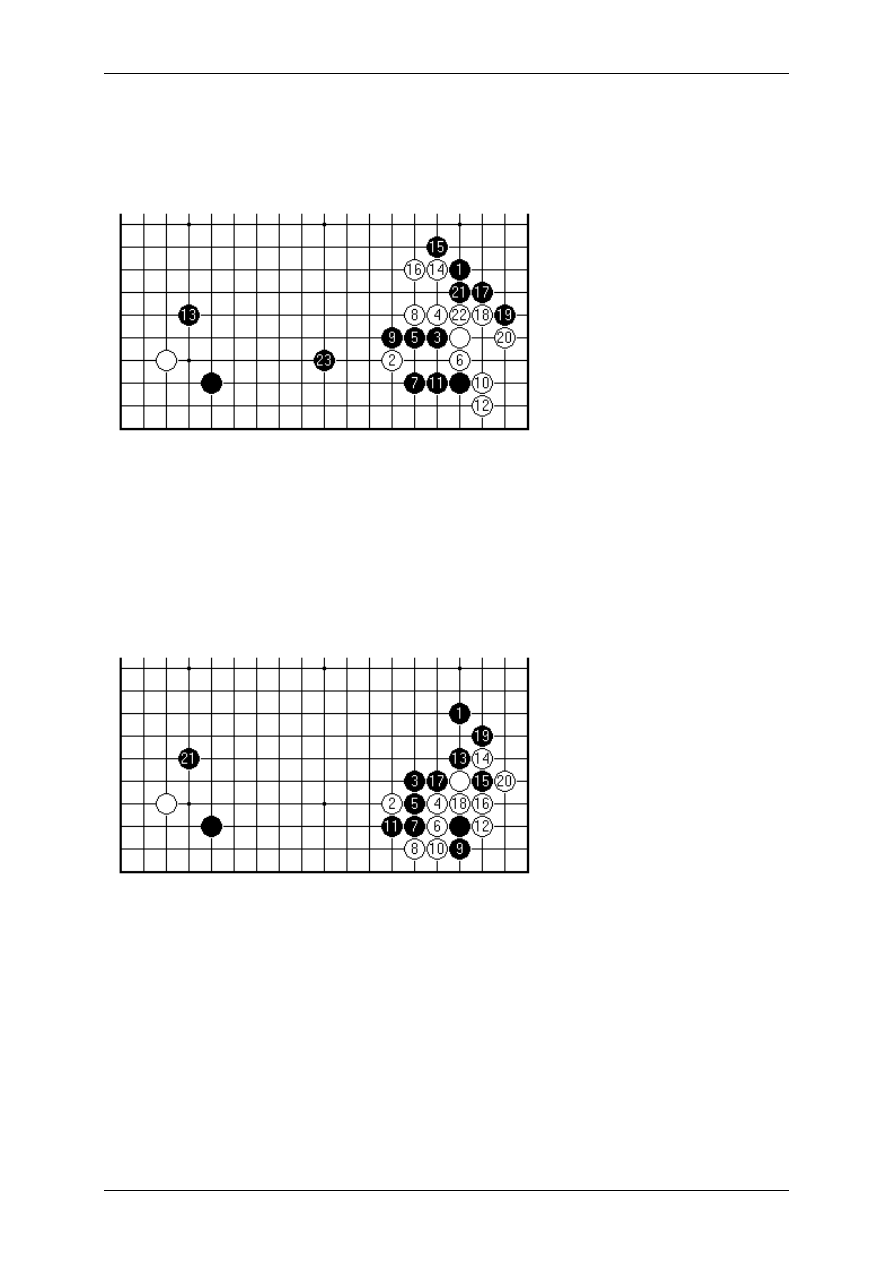
On Your Side by Charles Matthews, 3-dan
Page 83 sur 138
The sequence in the right-hand corner is the mainline variation. White is settled, so
the question is how Black can develop from there. The lower and right sides typically
become miai in a rather loose sense: Black could do with a play in both areas. Black
13 is the most powerful available play.
In June of that year Kobayashi Koichi played the same way against Cho Chikun in
game 3 of the Honinbo match. Cho played 12 in the corner in the sharper, more
territorial way. This variation leaves moot the cutting point at 22 (if Black cuts there a
ladder arises). White 12 as shown does more to undermine Black's group on the
lower side. This goes some way to explaining the sequel. White ignores 13, which
one is normally advised not to do, and reinforces on the right. Black plays in hope of
developing on both sides, coming back to 23. White then attacked on the right,
leading to a close game.
Then in July the Fujitsu international brought together Rin Kaiho and Kobayashi
Koichi in the semi-final. Rin tried the influence-oriented play 3, an invention of
Kajiwara Takeo 9 dan, Kobayashi's old preceptor from the Kitani dojo. Complexities
arise as Black seeks the best way to sacrifice two stones in the corner, but the
framework plan up to 21 is evident.
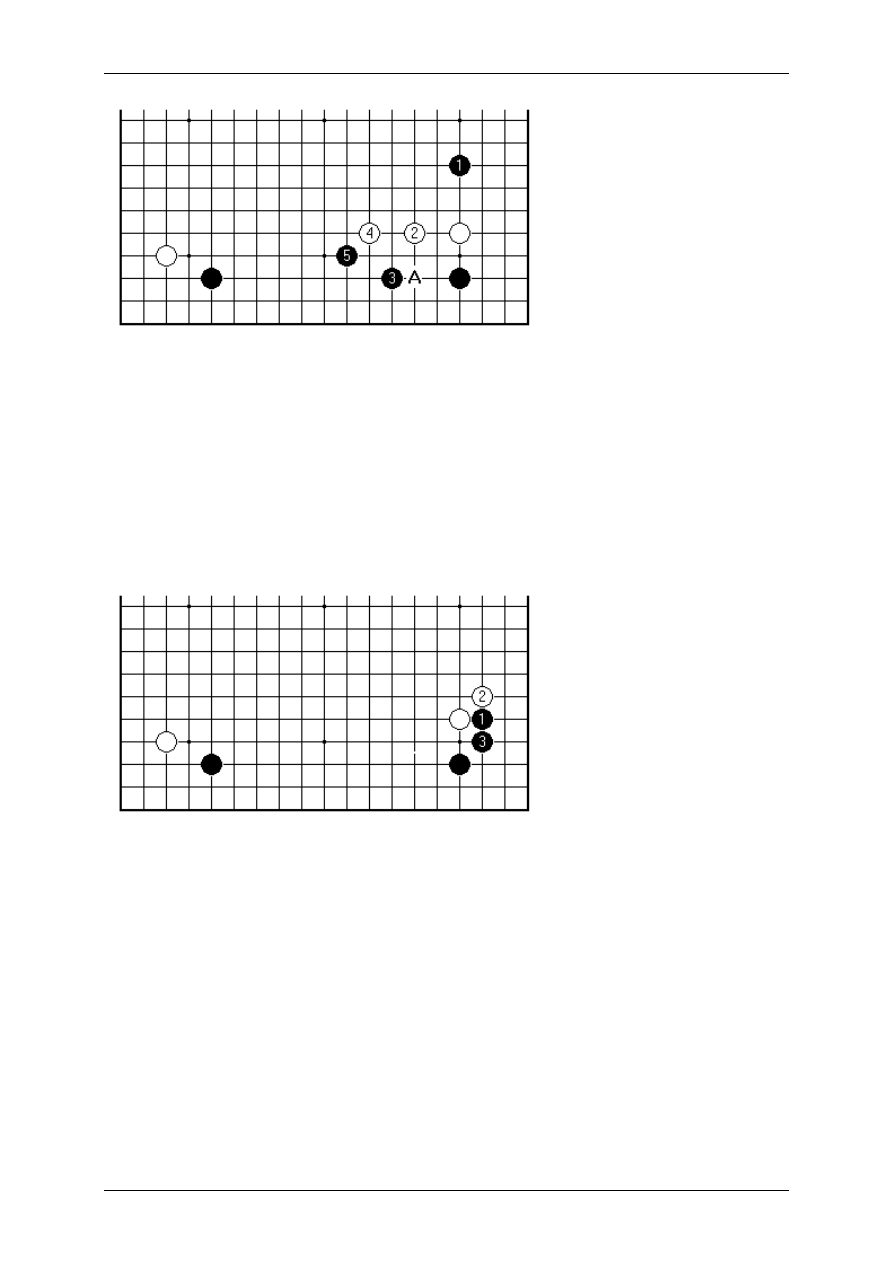
On Your Side by Charles Matthews, 3-dan
Page 84 sur 138
After that this pattern seemed to be put to one side, and one can ask why. Analysis
of Yang Yilun (Whole Board Thinking in Joseki vol.2) suggests that White 2 here is to
be preferred. Simply jumping out with 2 and 4 has advantages if White intends to
attack on the right side next. It is also more respectful of Black's potential framework
on the lower side, avoiding being cut simply in order to play one line deeper. There is
a more subtle point: Black should choose 3 rather than A, in order to get up to the
fourth line with 5 for balance. This however leaves weaknesses that White may
exploit in later fighting. (The plays 2 to 5 occurred in the same Fujitsu event in the
third place playoff Kobayashi-Cho Hun-hyeon, but in a game where Black had a 3-4
point top right.)
The orthodox inside contact play Black 1 here is back in fashion, anyway, being
played by Chang Hao of China against Kudo Norio of Japan in the 1998 Tengen-
Tianyuan international. This constitutes a victory of sorts for the Nihon Ki-in steady
style.
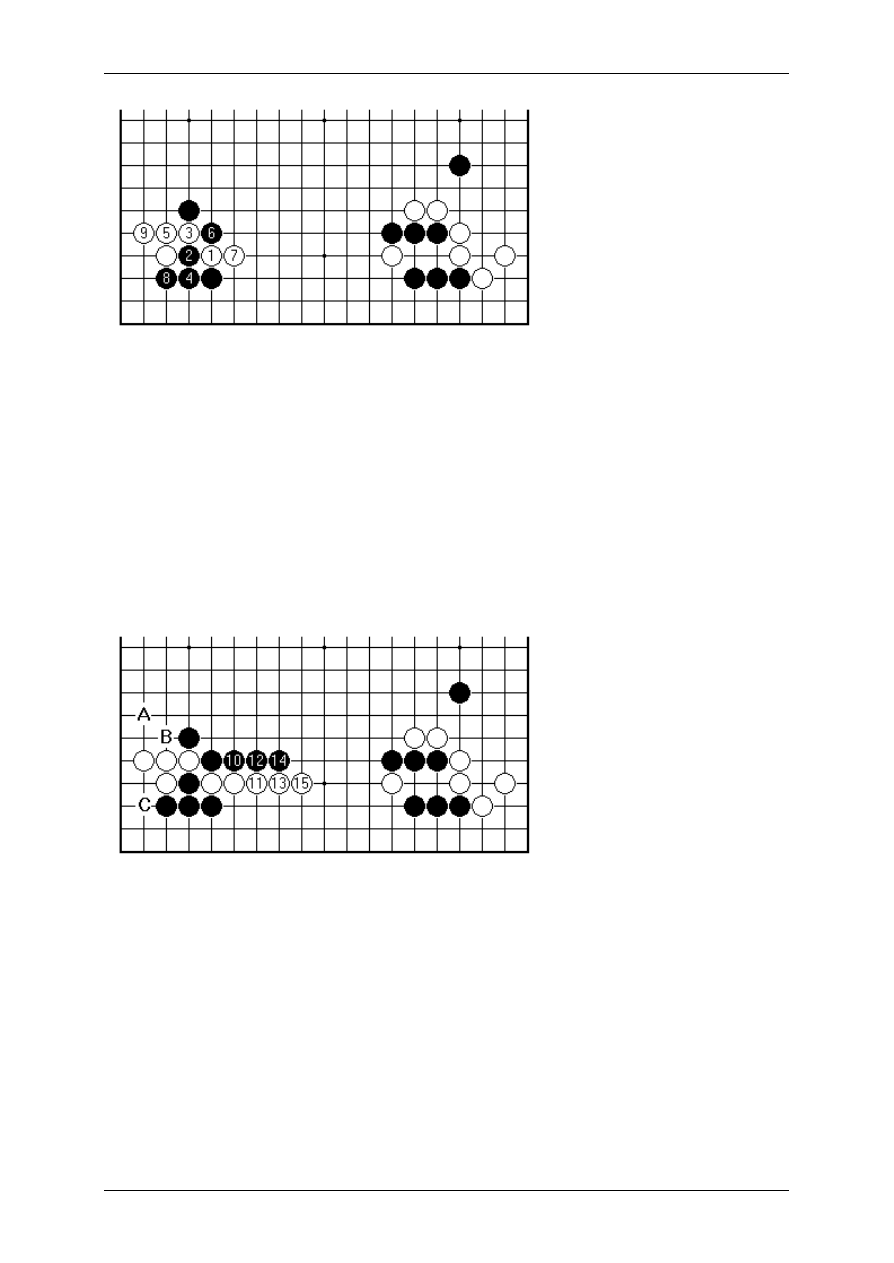
On Your Side by Charles Matthews, 3-dan
Page 85 sur 138
One would have to pour considerably more rain on the parade of a hungry young pro
with a sharp position to analyse, to make it lose its savour. So, returning to the
Wangwi game Cho -Seo that started it all, this was the continuation in the left-hand
corner. We get a lesser-known version of the taisha (great slope): White must
contest Black's framework plan, so 1 seems compulsory. Then 5 at 6 would simplify
matters - but the requisite ladder is broken by Black's stone top right, so it's into the
main tangle of variations. The taisha is called the 'joseki of 1000 lines', and there is
really no need to brand that as hyperbole.
White 9 has the meaning that White will try to live quickly on the edge. The best way
White can currently help 1 and 7, swimming in Black influence, is to reduce the
impact of double-purpose plays near Black 6.
Pushing along with 10, 12, 14 is a typical Black option. Now A is the interesting
Ch'ung Am concept, Black B is the actual game, with White surviving. Anyone can
see that C is a key point for the eye shape of both, but here it is too slow for Black.
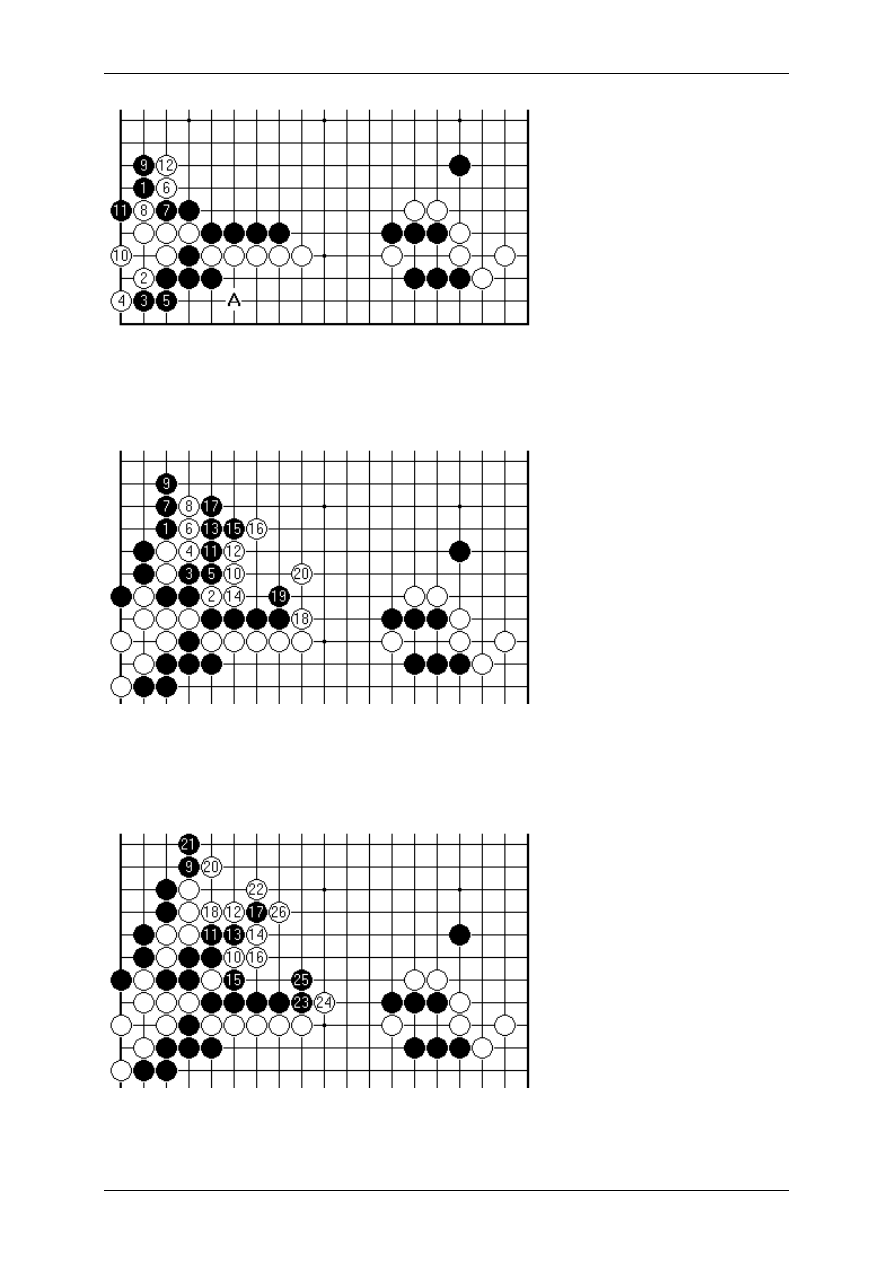
On Your Side by Charles Matthews, 3-dan
Page 86 sur 138
There is little choice once White is shut in. Up to 12 White doesn't have time to fight
a capturing race with Black by playing at A. Prospects must be sought on the outside.
This is a an ultra-hard case of what I called a 'skin fight' in Teach Yourself Go .
This is a typical variation. Black 1 and 9 are natural plays, but the position is radically
unstable. Black 11 is a way to avoid being squeezed into bad shape (which would
make White 18 ever more powerful); but ends in failure as White 20 nets the key
stones. Backtracking, it seems that Black 9 is at fault.
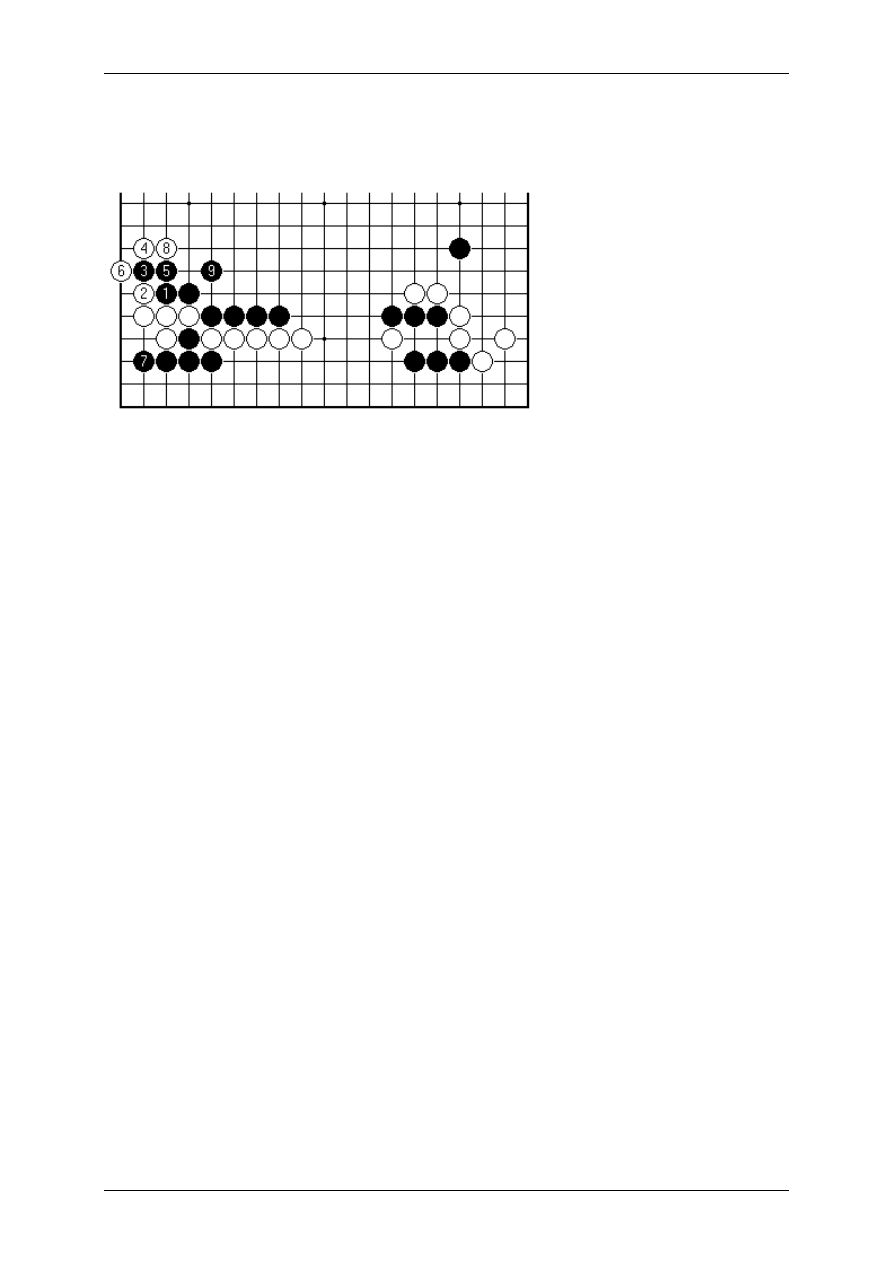
On Your Side by Charles Matthews, 3-dan
Page 87 sur 138
This is given as an alternate, tight-rope walking continuation (19 connects). The
number of unresolved issues of life -and-death on the lower side is growing by the
minute.
With that rather considerable burden to be borne in mind, the game continuation by
Black might be thought to have compromised in the direction of practicality. With 1
and 3 Black gave White the option to sneak out with 4 and 6; by playing 3 before 1
Black would have forced White into cutting at 5 instead. Hindsight is of course a great
leveller.
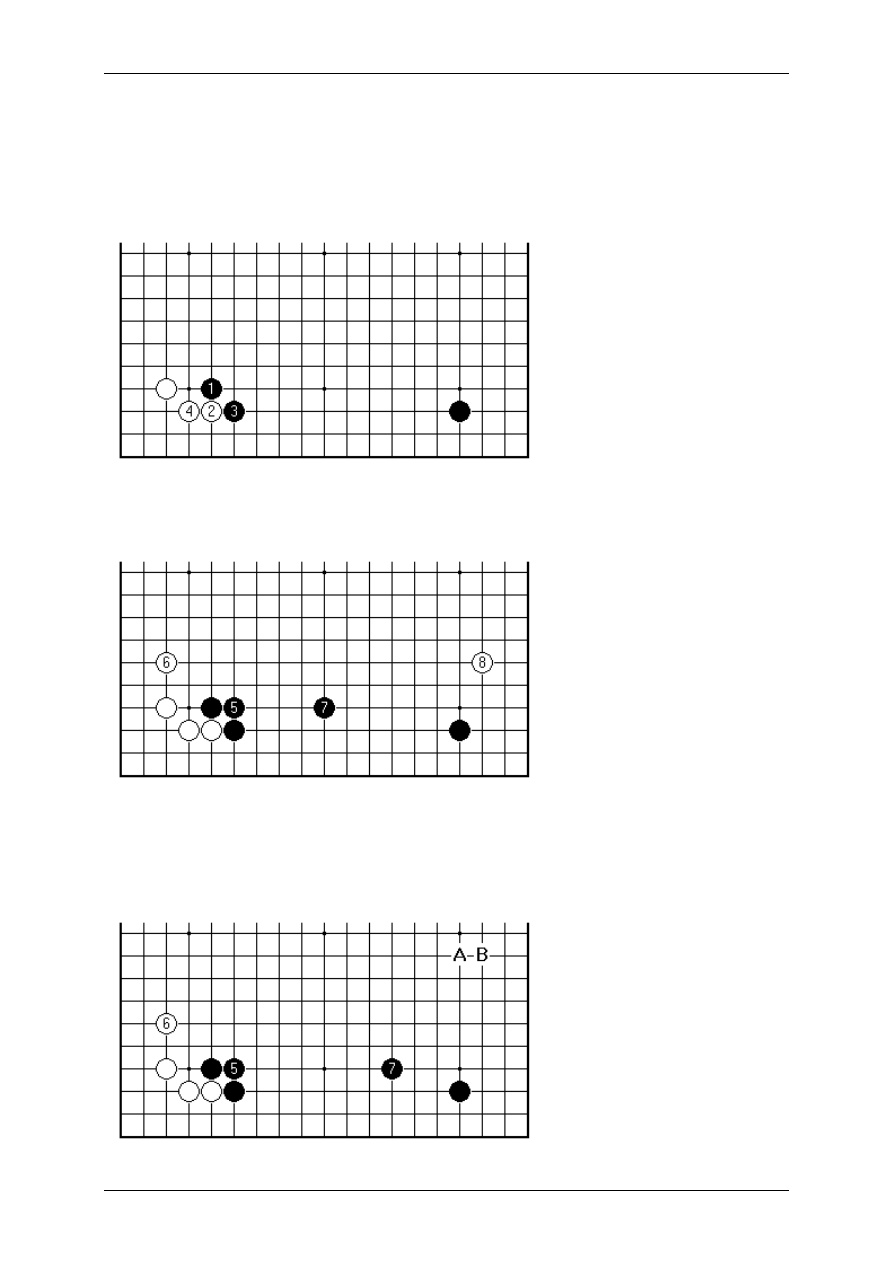
On Your Side by Charles Matthews, 3-dan
Page 88 sur 138
17.
Boldly Enclosing
Another path in the Anti-Chinese opens up when Black makes a high approach.
White can take the opportunity to play out the corner, instead of making a
corresponding approach on the right.
So far so good for White. There are now a number of ways in which Black can try to
develop this side as a whole.
Completing the corner opening this way, with Black 7 played high for balance, is an
orthodox idea for Black, giving rise to a position similar in spirit to the Kobayashi
Koichi formation mentioned earlier. Now White 8 is usual, played one line more
distant from the corner to avoid severe pincers.
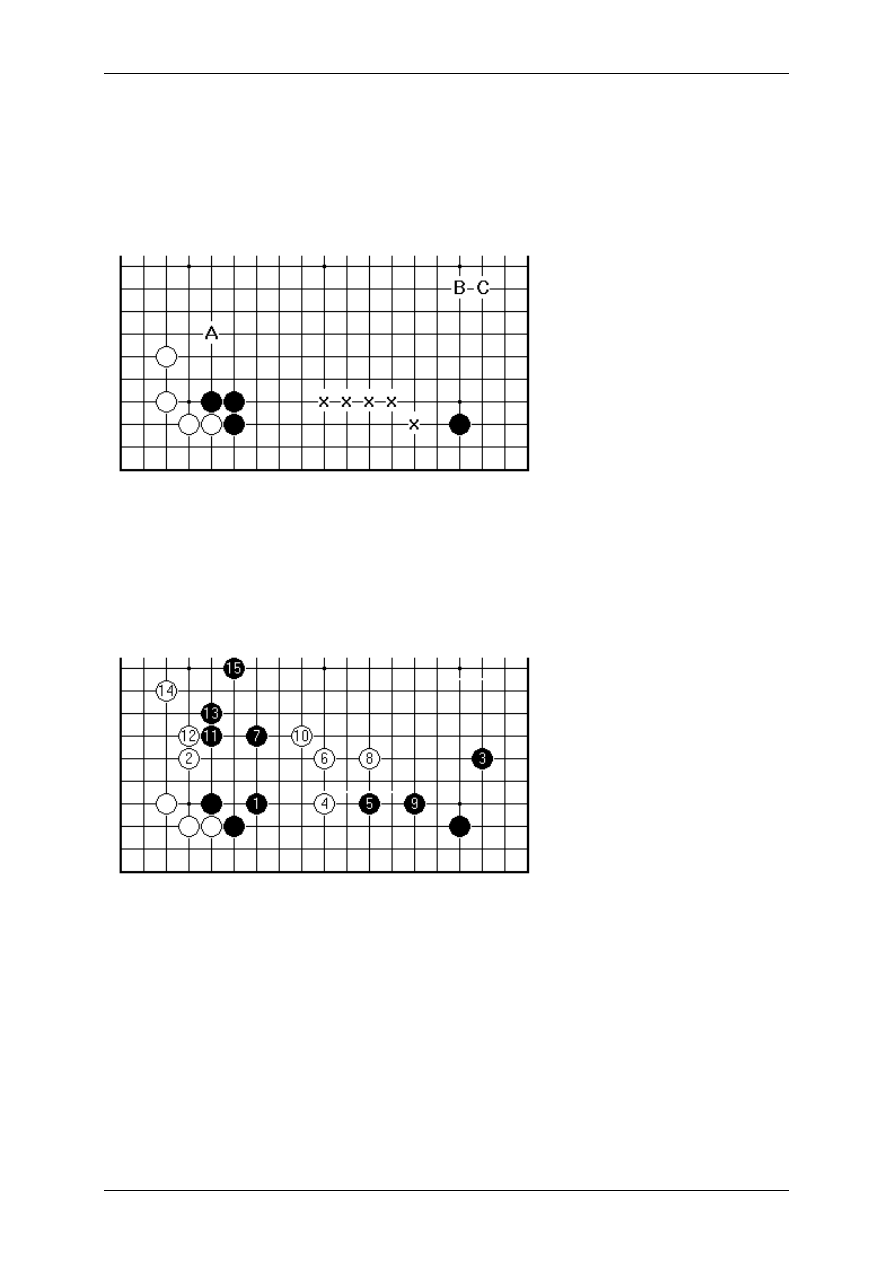
On Your Side by Charles Matthews, 3-dan
Page 89 sur 138
Black 7 here make look curious, but it's another orthodox continuation. Black is
anticipating a Chinese enclosure next at A or B, after which the whole framework will
look well organised. Therefore White's natural idea is a wedge play at or near B. The
positioning of Black 7 affects the corner - White wants to keep a safe distance, Black
takes care not to become overconcentrated there. Early fighting on the lower side
may be postponed while White gives priority to moves on the right.
Other plays here include A (Fujisawa Shuko v. Kobayashi Koichi in the 1987 Meijin
League), and Chinese enclosures at B and C. These all leave very open positions, in
which White has a choice of invasion points such as those marked by 'x'. Clearly
White would like to target the Black stones to the left, but since they can run out to A
in reasonable shape there is no one obvious plan, and White would also like to
control the growth of Black's right-hand corner territory.
A different tack is to use the hanging connection 1 and enclose with 3. In this
Chinese game from 1987 Nie Weiping as White made the light invasion at 4. Both
players acquire some territory, and a weak group to mind.
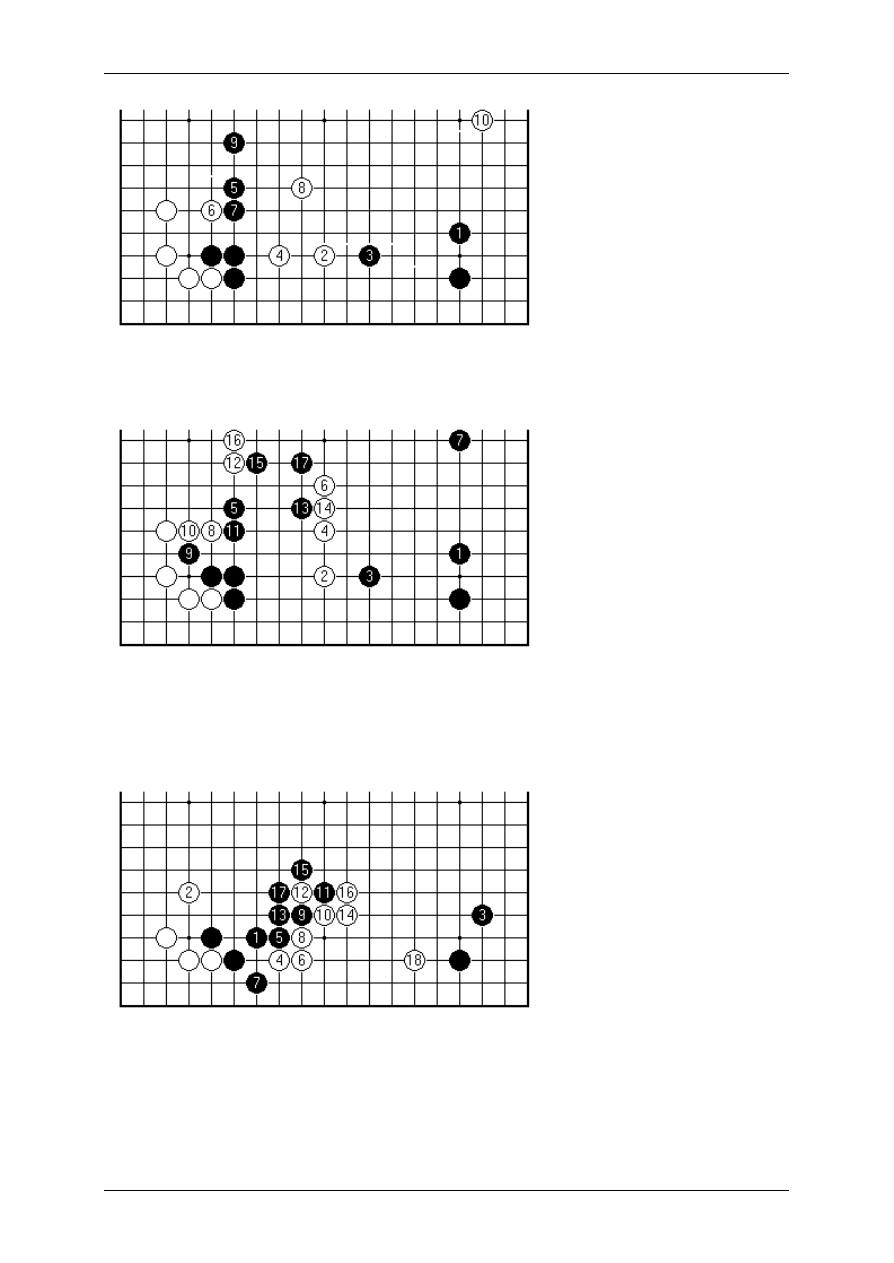
On Your Side by Charles Matthews, 3-dan
Page 90 sur 138
A few weeks before in the Tengen in Japan a game Ishigure-Awaji had gone like
this.
Shortly after those games appeared this one (Fujisawa Shuko-Rin Kaiho in the Oza).
A new pattern of fighting was emerging in which Black switched away from the left
and changed horses in mid-stream, enclosing the right-hand corner conventionally
rather than persisting with the Chinese style.
This idea reached centre stage when Kato Masao played it against Kobayashi Koichi
in game 3 of the Kisei match early in 1988. Black 3, the tightest ordinary enclosure,
makes sense if Black is going to push the fighting rightwards with 9 and 11. Go World
53 comments that 4 is better than the wedge halfway between 4 and 18.
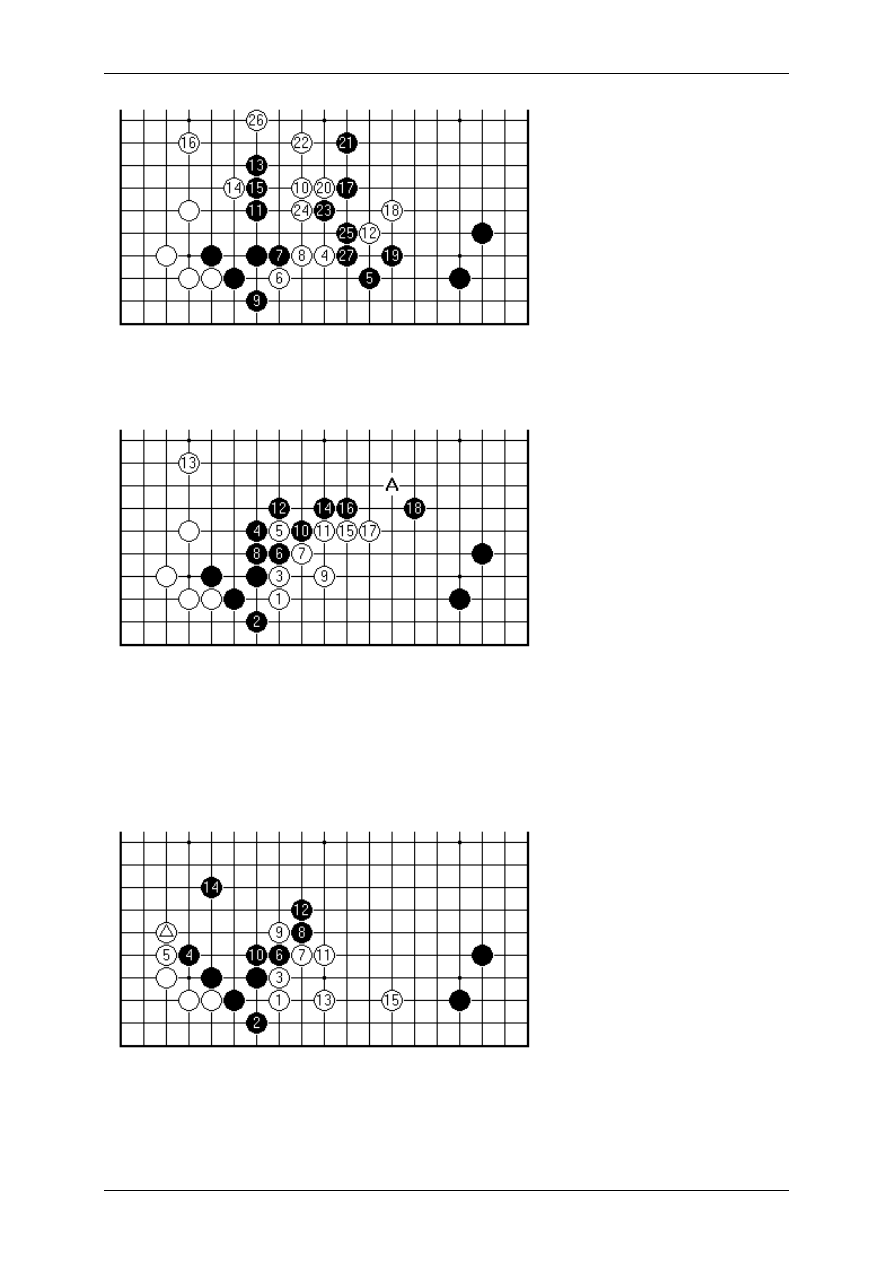
On Your Side by Charles Matthews, 3-dan
Page 91 sur 138
Later that year the pattern was fought over again (Hashimoto Shoji-Rin Kaiho in the
Judan), turning into a sharp early dispute over shape. A close game ensued.
Back again in a top match in 1989, this happened in Game 2 of the Meijin final Awaji
Shuzo -Kobayashi Koichi. A pushing battle developed as Black allowed White to play
3. (Locally speaking 18 should be A instead - commentary in Go World 58). Often a
trial in one of the high-profile series of two-day games settles the theory of a pattern,
on the board or in analysis afterwards. There are a couple more games to report from
1991.
This is from the Chinese promotion tournament, with the marked white stone played
conventionally on the third line for solidity. Another game Hashimoto -Goto in the
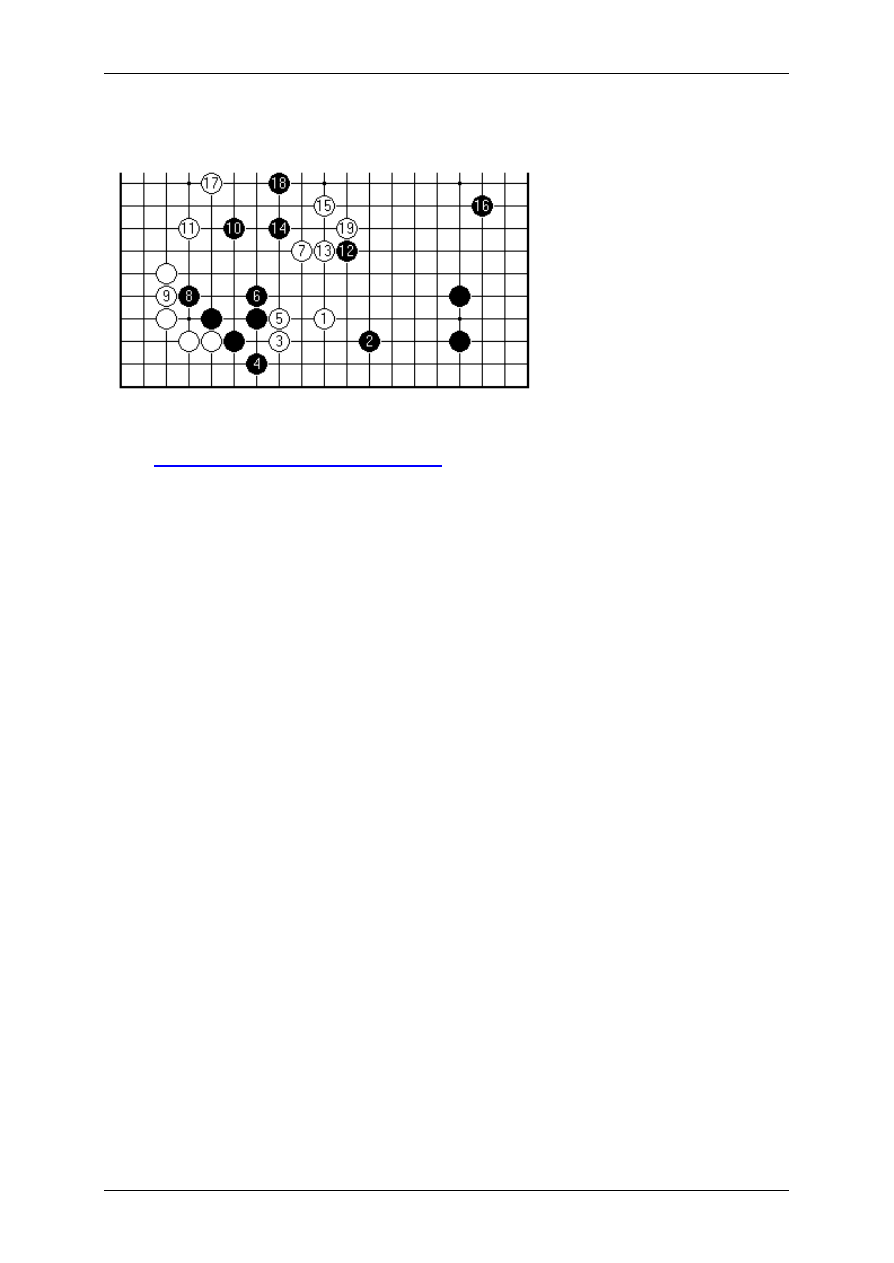
On Your Side by Charles Matthews, 3-dan
Page 92 sur 138
Gosei reprised the Kato -Kobayashi opening, which might therefore have become
definitive.
I have a personal interest in this side pattern, having reached it as Black in Game 2
of my
British Championship match in 1997
against Matthew Macfadyen. This is how it
went, the setting being indeed not an Anti-Chinese but a much rarer diagonal
opening. Our amateur fighting is given without comment, beyond saying mistakes
later in the game were much more heinous. Matthew's predilection is for database-
busting obscure patterns, and so my good start in this game was a minor victory for
side-based thinking.
Summing up on the Anti-Chinese, it has become a mainstream opening
encompassing many distinctive ideas. Since the Kisei match in 1978, when Black's
stubborn plan of continuing with the Chinese as normal was championed
unsuccessfully by Kato Masao in the most public possible arena against the brilliance
of Fujisawa Shuko, the Anti-Chinese has looked like a very useful way for White to
counter Black's first line of thinking.
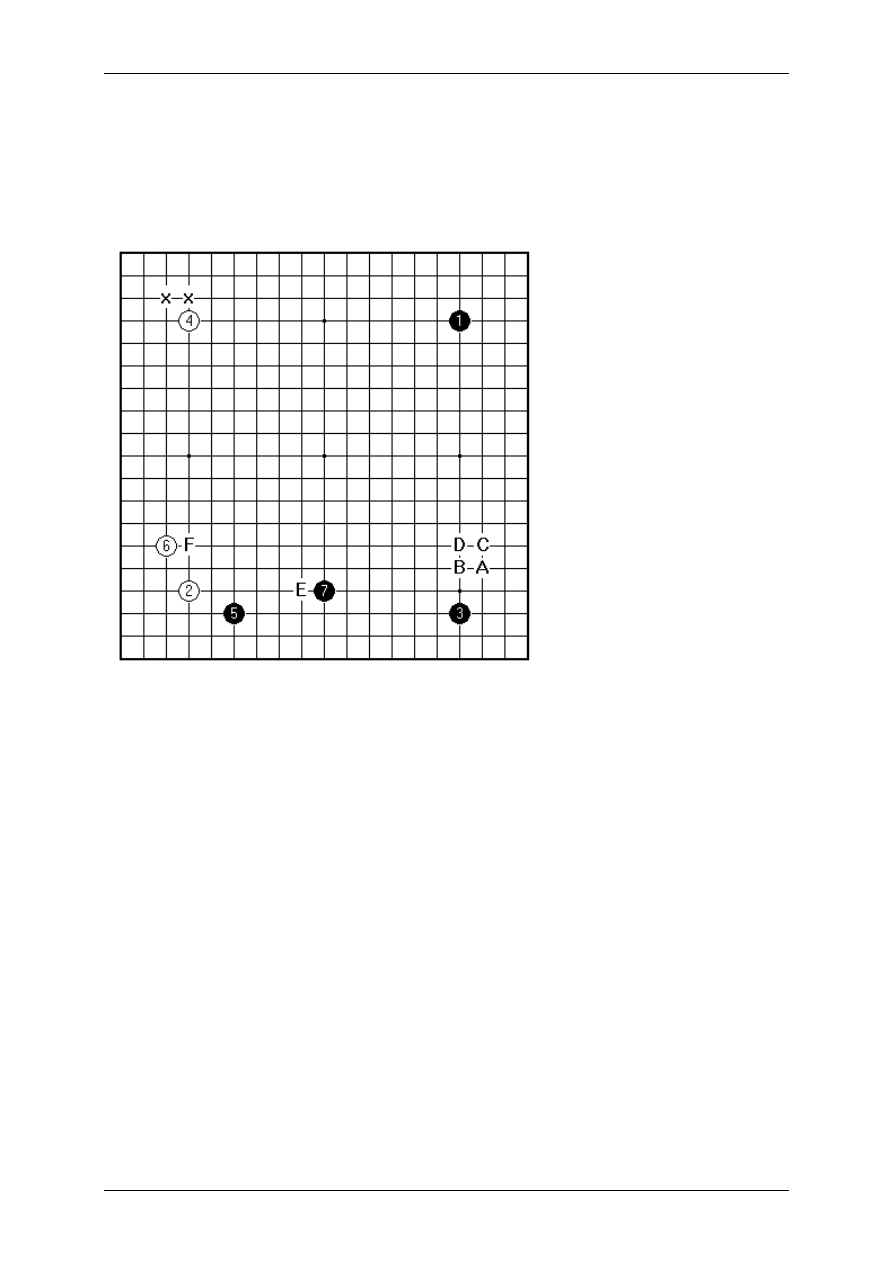
On Your Side by Charles Matthews, 3-dan
Page 93 sur 138
18.
Kobayashi's Formation
The Chinese formation doesn't suit everyone's Go temperament. An important
development was the vigorous style that has Kobayashi Koichi's name attached to
it.
Black spreads out along the lower side, assuming a White 4-4 point in the lower left
corner. After that a black enclosure such as A becomes ideal, and it is therefore
natural for White 8 to contest the lower right. A serious theoretical debate raged over
the best point (out of A, B, C, D) during the 1980s. Now C is the standard play, while
D is still seen, in line with the '21st centur y' style promulgated in a best-selling book
by Go Seigen.
In fact there is a cluster of openings here. In increasing order of relevance to the
lower right corner: White might have occupied the upper left at one of the 'x' points;
White 6 might be at F; Black 7 might be at E. This complex was seen in a string of
top matches in the 1980s, often but not always involving Kobayashi. His brand name
attached to the formation can have done it no harm at all, since he was at his most
impressive in the same period. (The 'later' Kobayashi style is Black 5 at A, leaving an
obvious big point around 7 that White is normally quick to take.)
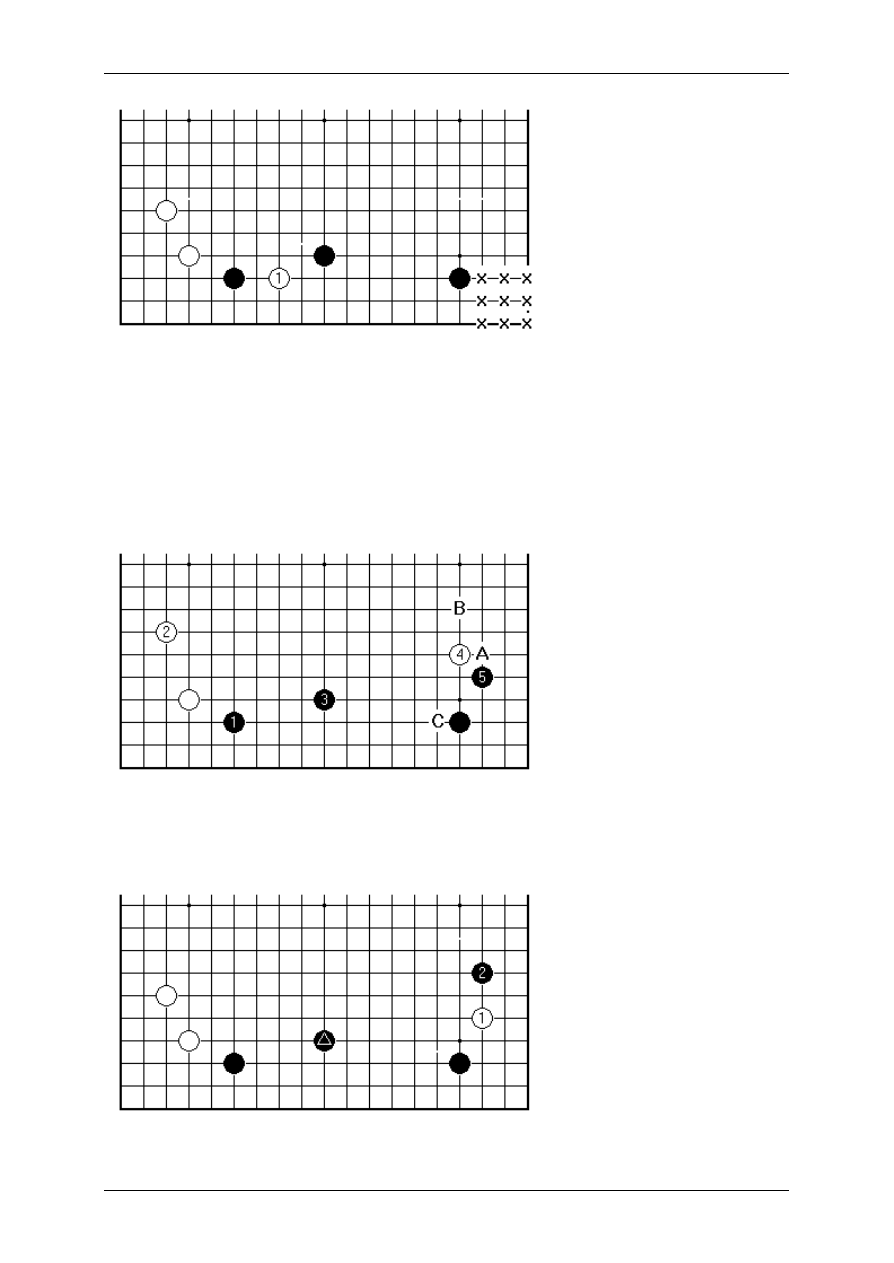
On Your Side by Charles Matthews, 3-dan
Page 94 sur 138
From a theoretical stance, the 'x' points of eye space in the right-hand corner have an
important role in stabilising the black framework across the side. White can invade at
1. How hard Black can fight back is conditioned by the state of the longer extension
to the right. That in turn is affected by how well the right-hand corner is anchored.
Therefore how close White can approach the right-hand corner may be seen as a
crux. The popularity of the Kobayashi formation rests on the conclusion that White
does best to play with restraint there.
An early game with the pattern (Rin-Shimamura Kisei 1978) went like this. White now
played away, with Black A White B coming later. This is a light way to play, aiming at
White C.
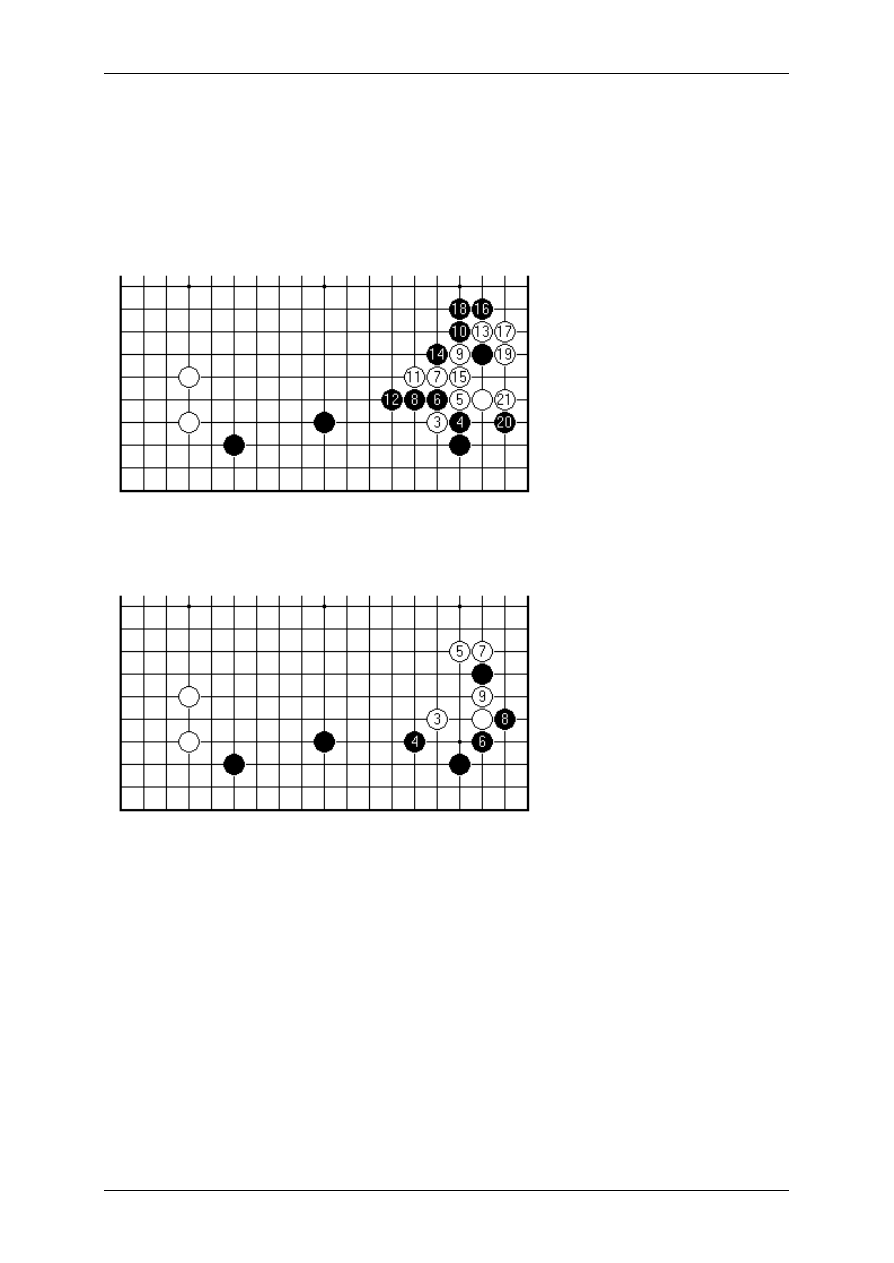
On Your Side by Charles Matthews, 3-dan
Page 95 sur 138
It is perhaps in line with professional instincts to consider first the low approach White
1 here. When White is most concerned with immediate life, recourse to this play is
natural. Because of the presence of the marked black stone, Black looks to play the
tightest pincer at 2. White's choice of variation is now constrained: many of the
standard 'book' lines will run into trouble as the fighting spreads. Calling the tune for
the opponent and trying for maximum plays were two of the traits in the Kobayashi
style that propelled him to the top.
This is how it went in Kobayashi-Takemiya from the 1980 Honinbo League (which
Takemiya won).
In 1982 in the deciding fifth game of the Tengen match it was Kataoka-Kato, and the
typical corner-taking plays Black 6 and 8 were seen. Black takes the initiative here
as well as territory. This variation seems more than adequate for Black. (Kataoka
won the game by half a point.)
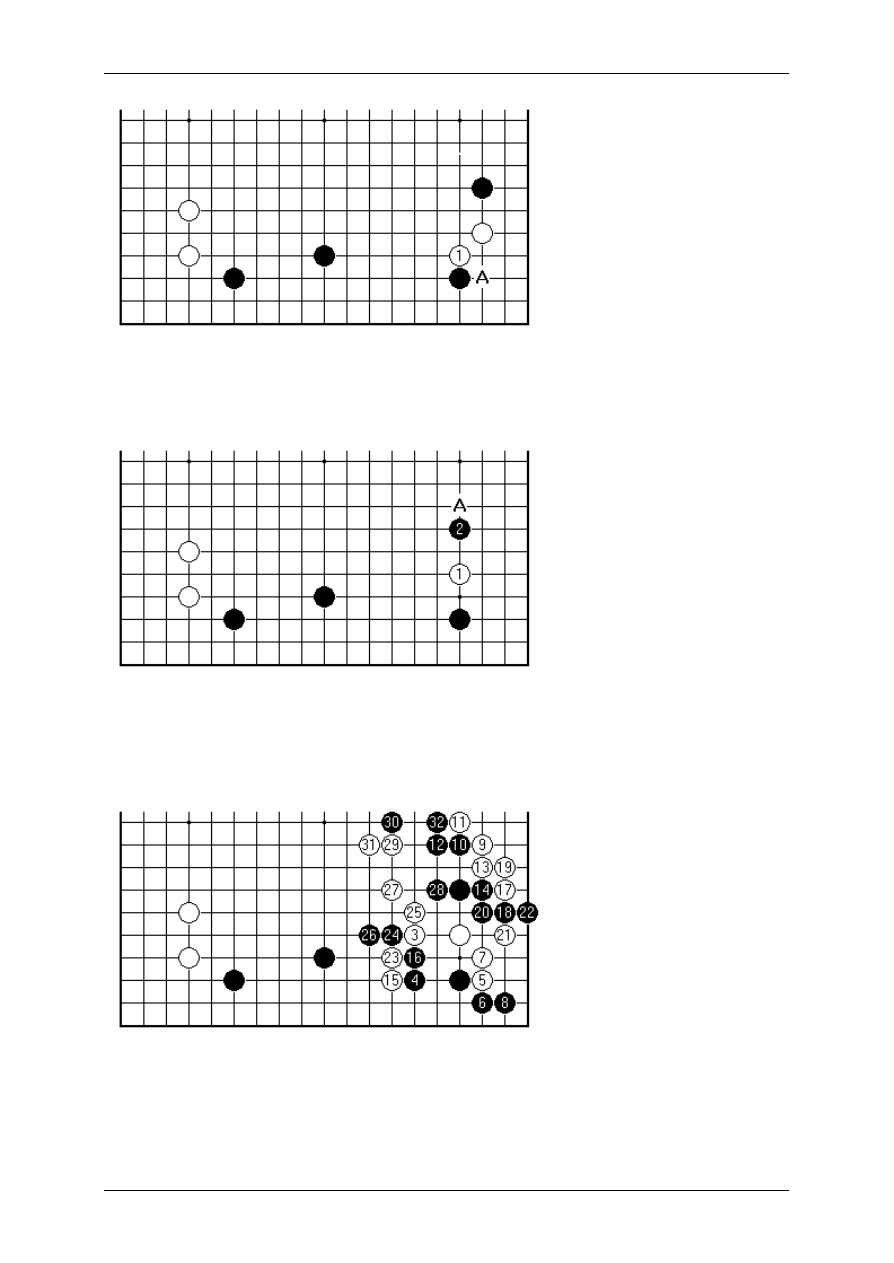
On Your Side by Charles Matthews, 3-dan
Page 96 sur 138
According to Yang Yilun (Whole Board Thinking in Joseki vol.1), White 1 here is
correct in this type of position, because Black A in answer to deny White the corner
is a doubtful play.
From the perspective of amateur Go, the high approach White 1 here is common. In
early games of Cho Chikun the severe pincer at Black 2 was played. Theoretical
attention has also been given to the Magic Sword pincer at A. (Black 2 was once
known as the Magic Dirk, by the way, at least by British players.)
This is Cho-Otake from the 1981 Kakusei, with a big fight starting as White refuses
the quiet option of 5 at 26.
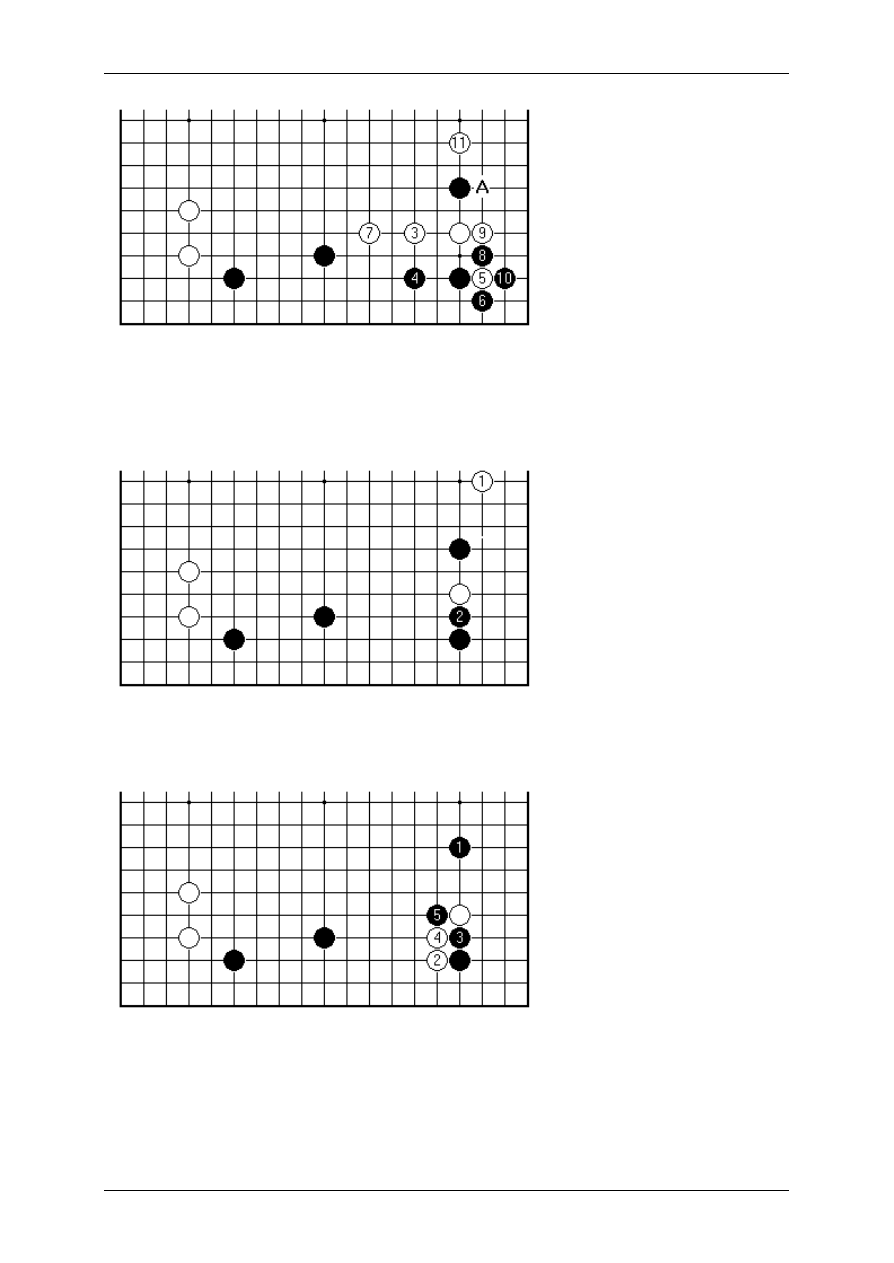
On Your Side by Charles Matthews, 3-dan
Page 97 sur 138
Later that year in Cho-Shiraishi (Honinbo League) it was more peaceful since Black
considered it good enough to allow White to connect under later at A. (The meaning
of White 5 is to prevent a counter-strike with Black at 9, minimising the loss if Black
gives up the pincer stone.)
In a Chinese game from 1985 White played 1 here to take up position on the right
side, whereupon Black (Cao Dayuan) took the corner with the solid butting play 2.
If Black plays the Magic Sword, White has a much broader range of variation. White
2 here is the most hair-raising choice. Chinese star Yu Bin played both sides of this
line in 1996.
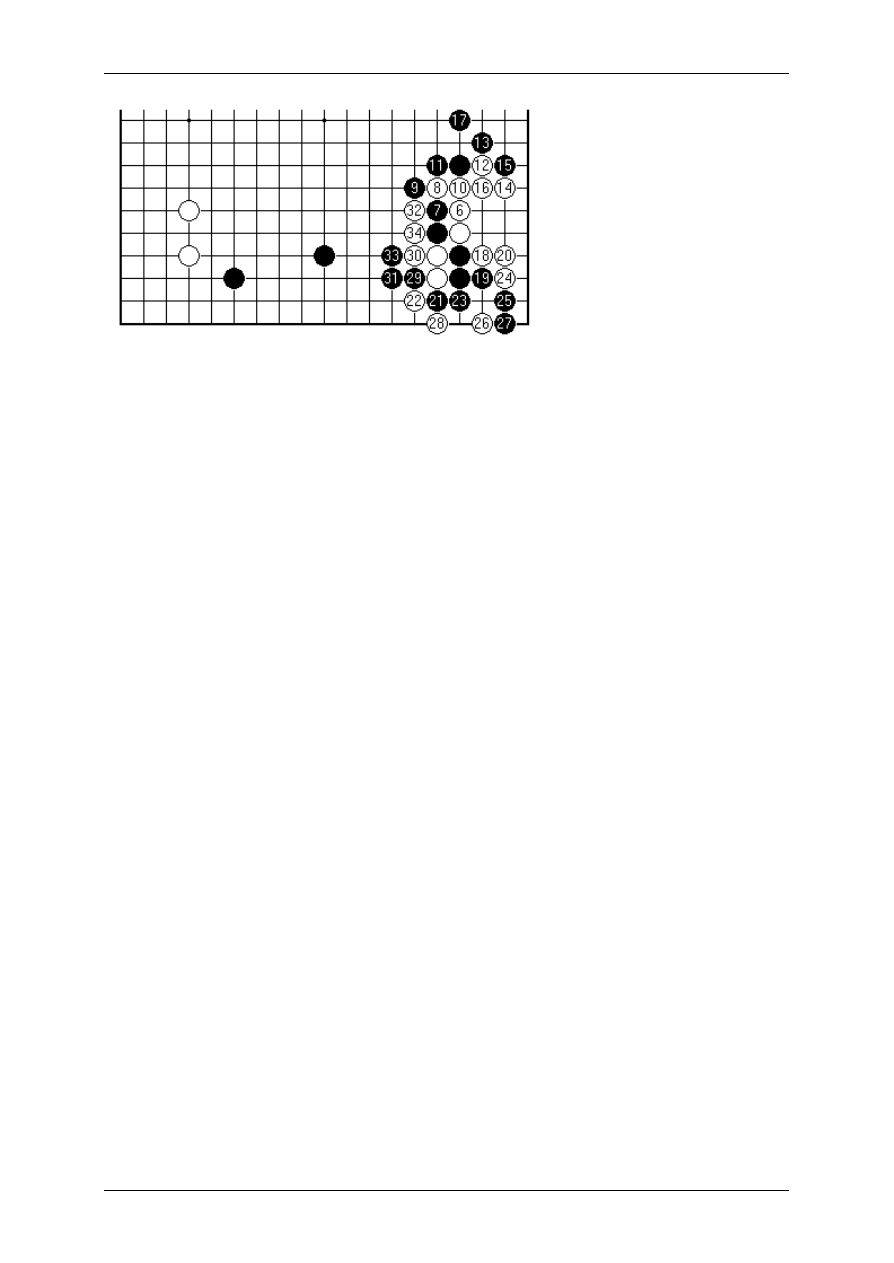
On Your Side by Charles Matthews, 3-dan
Page 98 sur 138
When he held Black it went this way, with Black taking influence and sacrificially
rescuing the corner. More analysis is in the books of Yang Yilun and Go Seigen, but
that is surely not yet definitive.
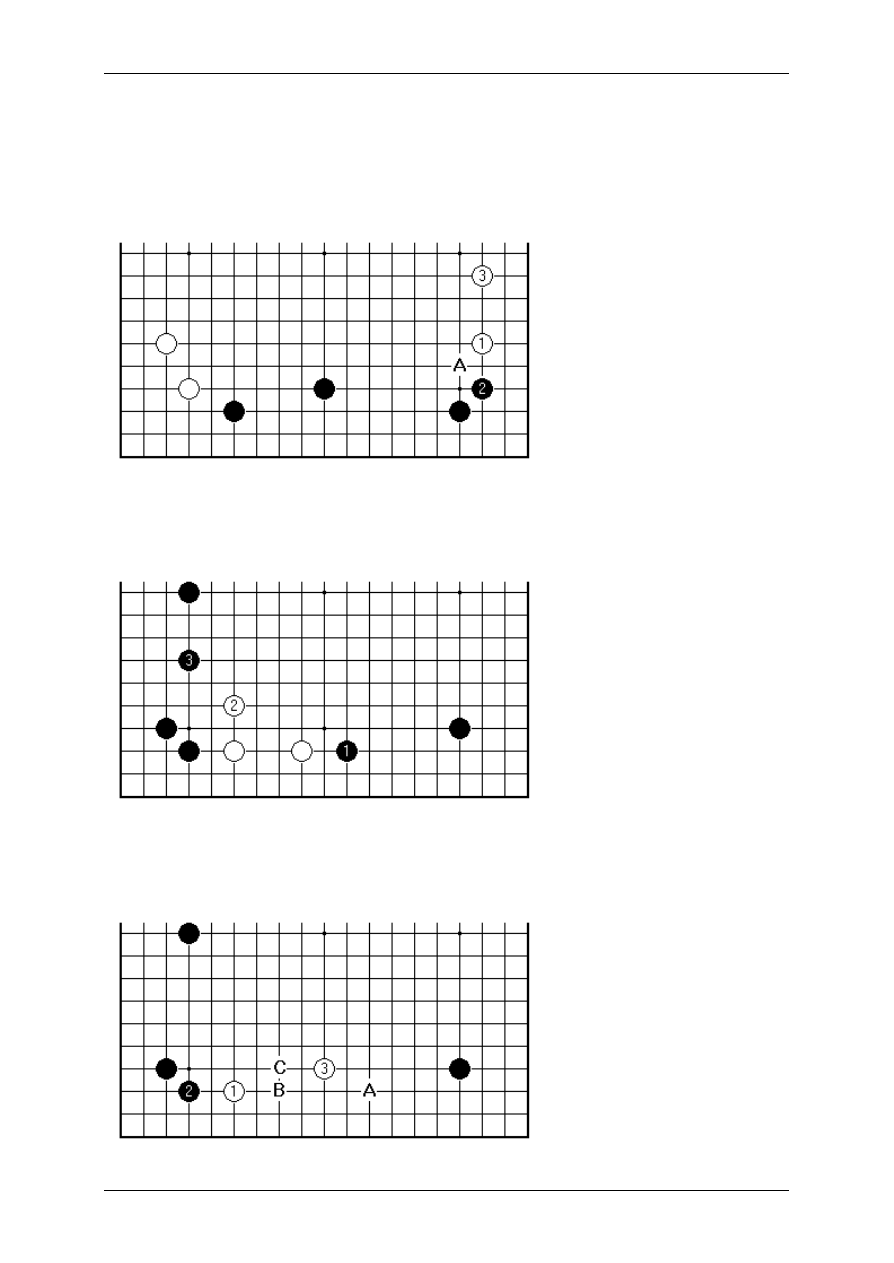
On Your Side by Charles Matthews, 3-dan
Page 99 sur 138
19.
Kobayashi: Distal Approach
Nowadays the most orthodox way for White to deal with the Kobayashi formation is to
play the restrained, two-point low approach (large knight's move approach). A
steady accumulation of theory attaches to this play.
If Black simply takes the corner with 2, White is free to play at 3, which is certainly a
reasonable plan. Black has another popular choice at A, with a more direct eye on
building up the lower side framework.
Black can continue with 1 here, immediately or in the near future. Then 2 becomes
the key point - if White doesn't occupy it, Black can play at 2 for an excellent attack
that builds up the framework.
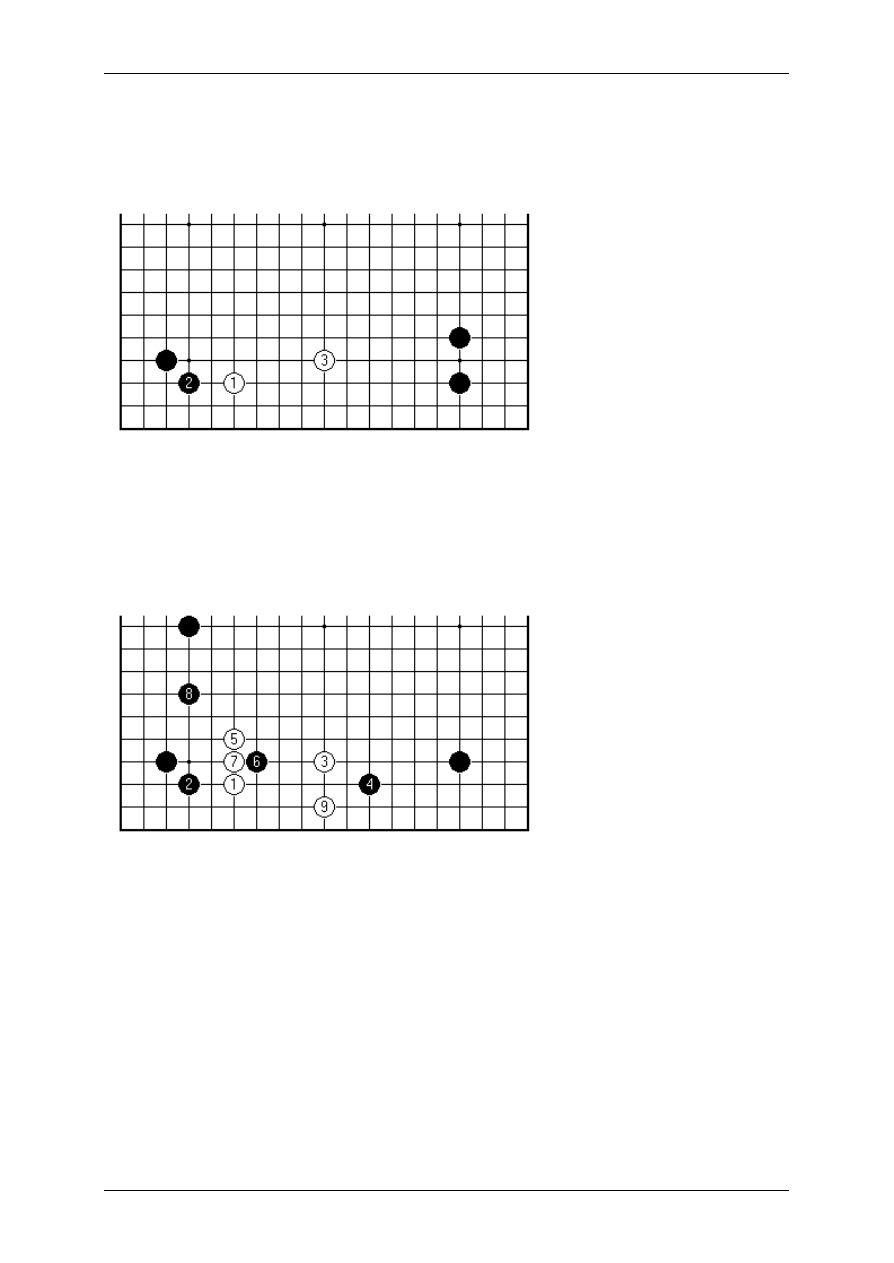
On Your Side by Charles Matthews, 3-dan
Page 100 sur 138
Extending back as far as 3 was played by Cho Chikun (game 2 of the 1986 Kisei
match) against Kobayashi Koichi himself. Not in fact a new move, it had appeared in
the Shinjin-O match 18 months before. It is rather natural for Black to answer at A,
but B and C have been tried more recently.
As long ago as 1949 Go Seigen had tried extending back to 3 this way in a game
against Sugiuchi. There is however a puzzle about this shape. It is not an idea that
would occur to anyone adhering to what you could call the infantryman's theory: that
groups established inside an opponent's large-scale framework have a first duty to
hold a piece of ground. According to that logic, extending on the third line would be
correct.
The new book Jungsuk in Our Time from the Korean Baduk Association addresses
the variation, giving this line. The comment, that 3 is more modern and centre-
oriented, is a little throwaway. White is certainly aiming at 5, building influence while
setting up an invasion of Black's framework. The idea behind Black 6 is to retain the
initiative - i.e. to prevent White dealing lightly with this side and moving elsewhere. It
is argued that White 9 becomes required. In any case White 3 invites some complex
developments.
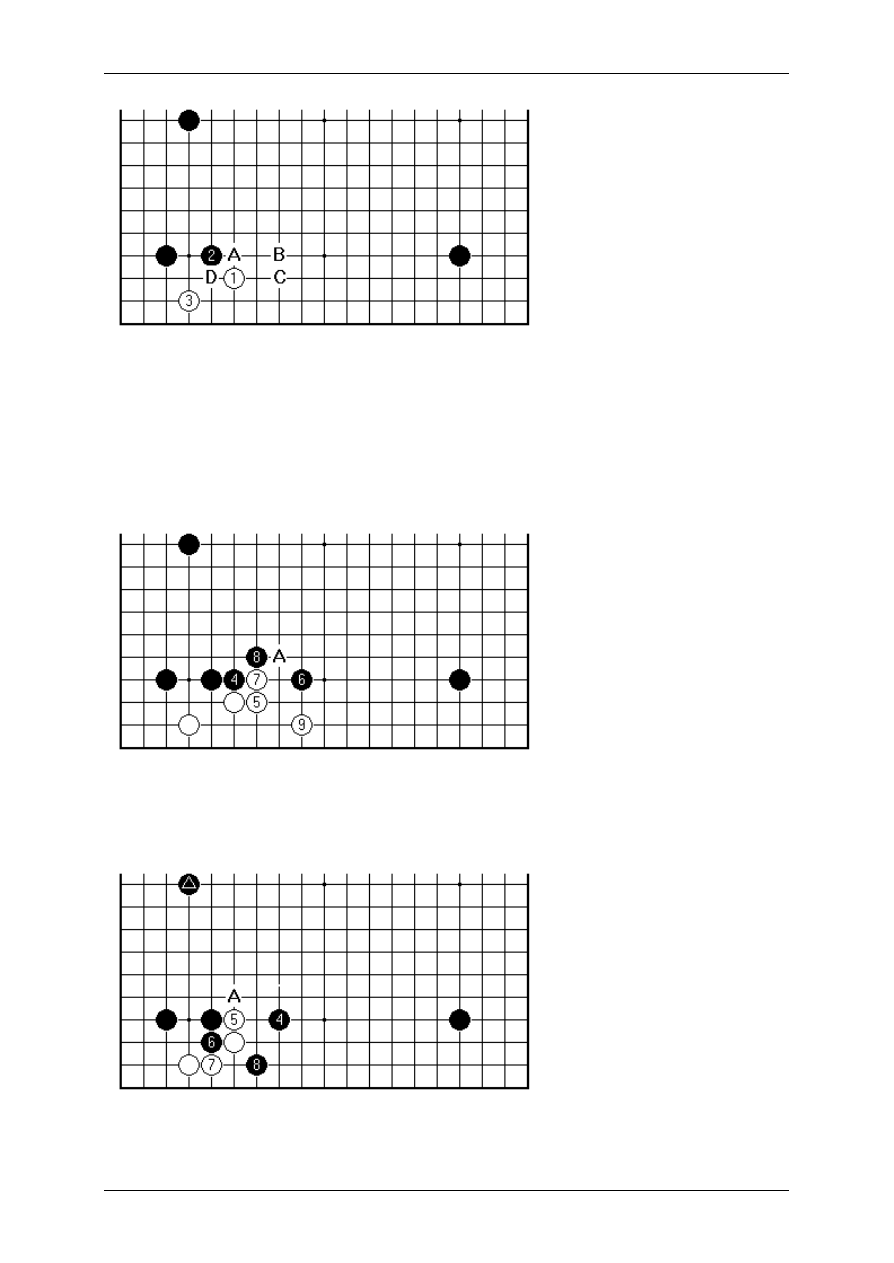
On Your Side by Charles Matthews, 3-dan
Page 101 sur 138
If Black instead plays the shoulder hit 2, White 3 sliding to the second line is the
usual answer. Now Black tries A, B or C. These variations have been subject to
constant revision, in a tussle over defects in White's shape.
(White 3 at A, Black at D is also known, ending up with a position the same as after
White 1 at A, Black at D, White at 1. Then Black typically pincers to prevent White
establishing a base on the side.)
For example this has been common in recent Chinese games. White reacts
cautiously to the covering play 6, which on the face of it is a stretch for Black. Cutting
at A is postponed while White settles with 9.
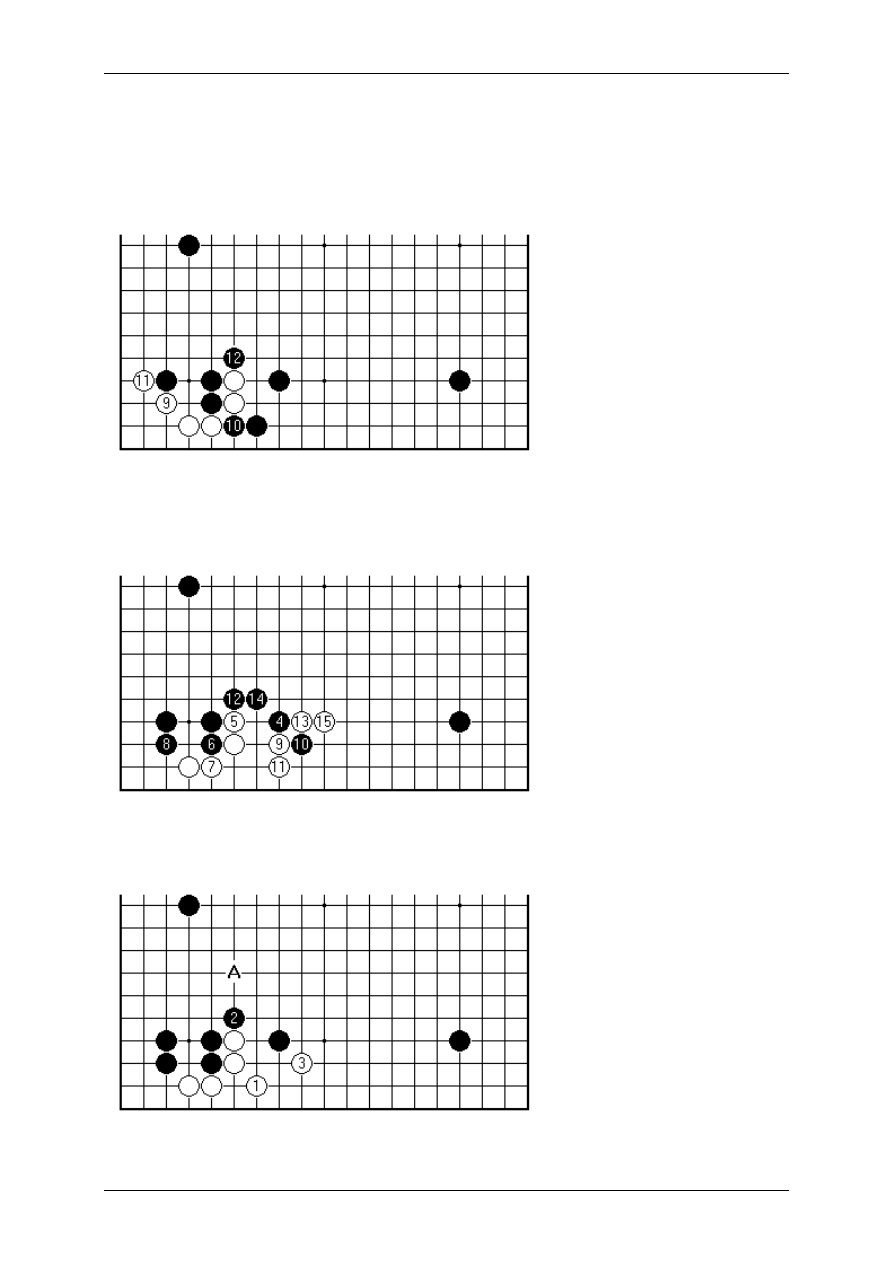
On Your Side by Charles Matthews, 3-dan
Page 102 sur 138
Black 4 here can be seen as an allied idea, but with more emphasis on attack. There
is a complex textbook sequence starting with 6 at A, but it has fallen into disrepute in
this position, the reason being that the marked black stone can end up less than
ideally placed. So now the tough-minded plan of Black 6 is standard. What about the
immediate peep Black 8?
In a game Rin Kaiho-Ryu Shikun (Tengen match 1996 game 2) White resisted,
trading the outside for points in the corner. This sort of result may be hard to
evaluate. There is the chance that Black's other stones will look misconceived.
Therefore it is usual for Black to defend with 8. This gives White a chance to guard
against the peep on the second line. This variation has been seen more than once.

On Your Side by Charles Matthews, 3-dan
Page 103 sur 138
An alternative is this idea of Ma Xiaochun. White played calmly with 1 and 3, then
shortly afterwards invaded at A.
More ideas on this set of variations in Chapter 10 of the new book The World of
Chinese Go by Guo Juan (Kiseido).
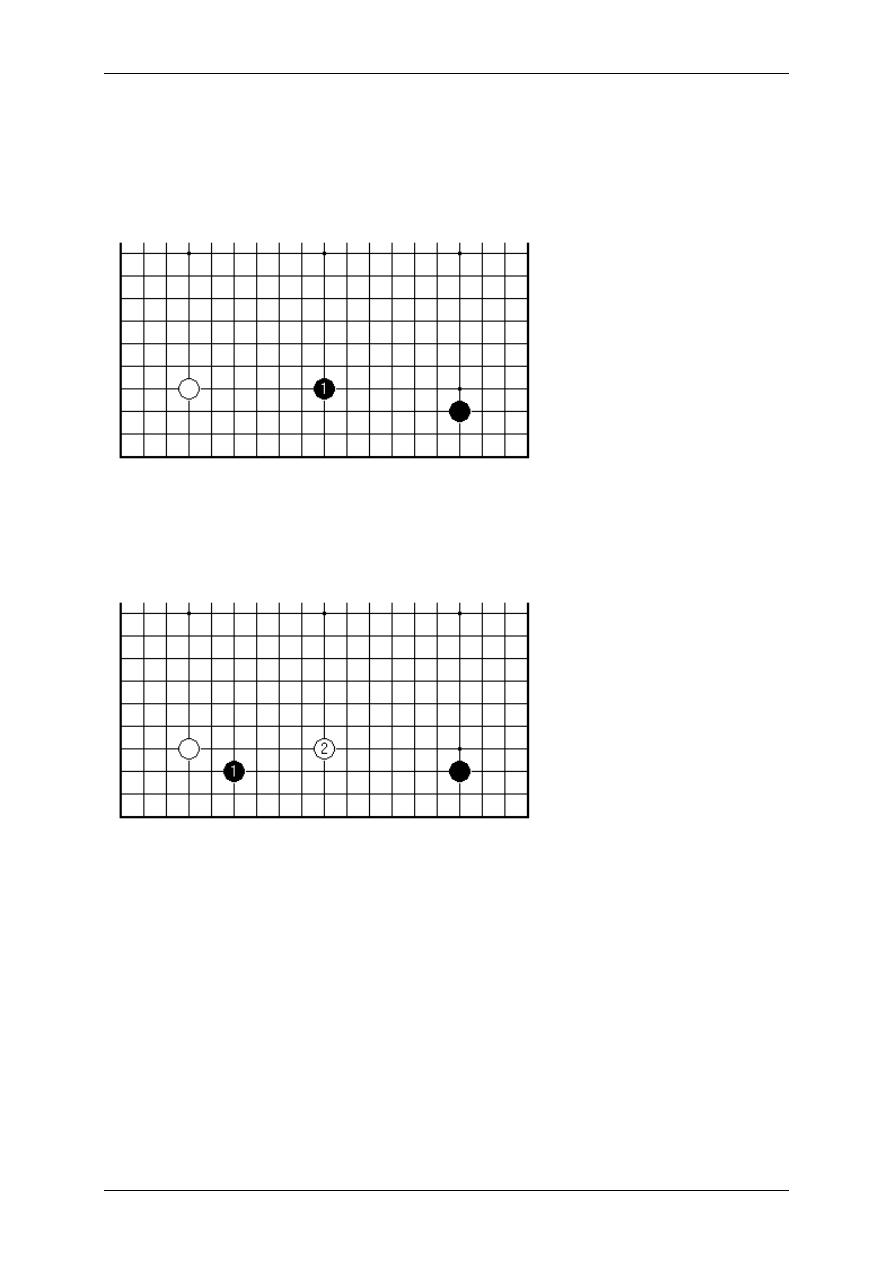
On Your Side by Charles Matthews, 3-dan
Page 104 sur 138
20.
Takagi's Extension
Takagi Shoichi 9 dan is one of the most admired stylists amongst Japanese
professionals. In 1986 he started playing a variation on the Kobayashi formation, in
which Black extends immediately to the middle of the side.
This is an unorthodox idea, but had enough advantages for it to be taken up at the
time, appearing in two big matches (1986 Honinbo final game 3 Yamashiro-
Takemiya, 1989 Kisei final game 3 Kobayashi-Takemiya). In recent years this is
being played once more, in China.
In the case of Takemiya's opponents, the thought may well have been to avoid the
pincer 2. Now if Black invades the left corner at the 3-3 point, White can start building
a large-scale framework. Therefore choosing the immediate extension can be seen
as a way of retaining strategic control.
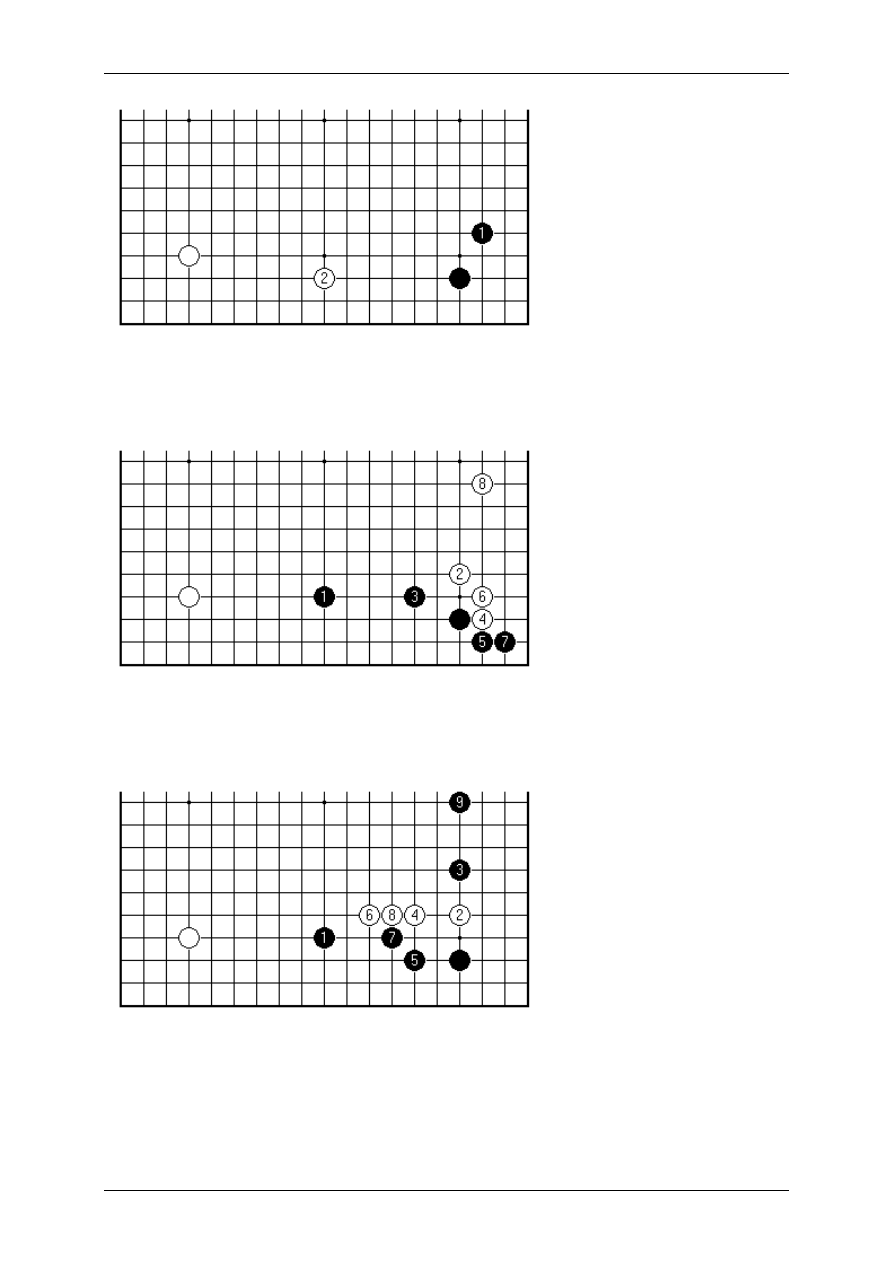
On Your Side by Charles Matthews, 3-dan
Page 105 sur 138
The textbooks have always disapproved. The corner enclosure 1 is supposed to be
a bigger point than the extension to 2. Of course much of modern Go theory is based
on disregarding this principle.
What is true is that for Black to play territorially with 1 and 3 here is somewhat
disappointing. Black's territory may look healthy, but in fact it's not efficient or
secure enough for this plan to rise above mediocrity.
Black ought to make better use of the extension stone by playing a tight pincer such
as 3. In this case Black develops quickly on both sides, while White is still unsettled.
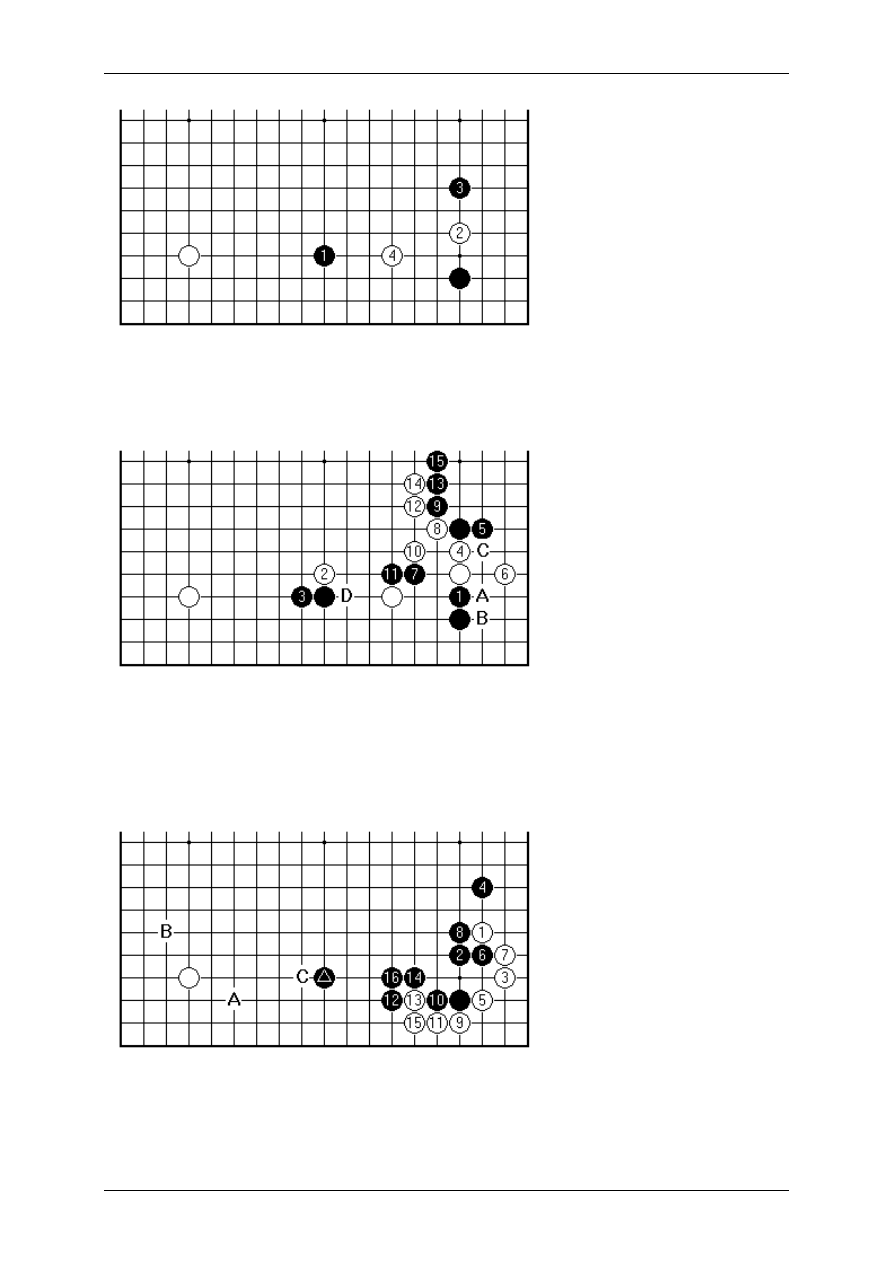
On Your Side by Charles Matthews, 3-dan
Page 106 sur 138
In a game Takagi-Fujisawa Shuko from the Judan Tournament in 1987, White tried 4.
This is an early challenge. If White can play this way with impunity in Black's strong
area, the game will start to look favourable.
This was the continuation. Next White played D, to run out into the centre with a
second weak group. However White 6 was criticised (analysis in Abe's New Moves,
New Patterns for 1987). Instead White should keep Black separated with White A,
Black B, White C. This would reduce the liberties on the pair of stones above
including 5.
If the right-hand corner is played out according to normal patterns such as have been
given in the previous two articles, one can look at whether the exchange Black A,
White B would be a good one in context. For example here in a game from 1989
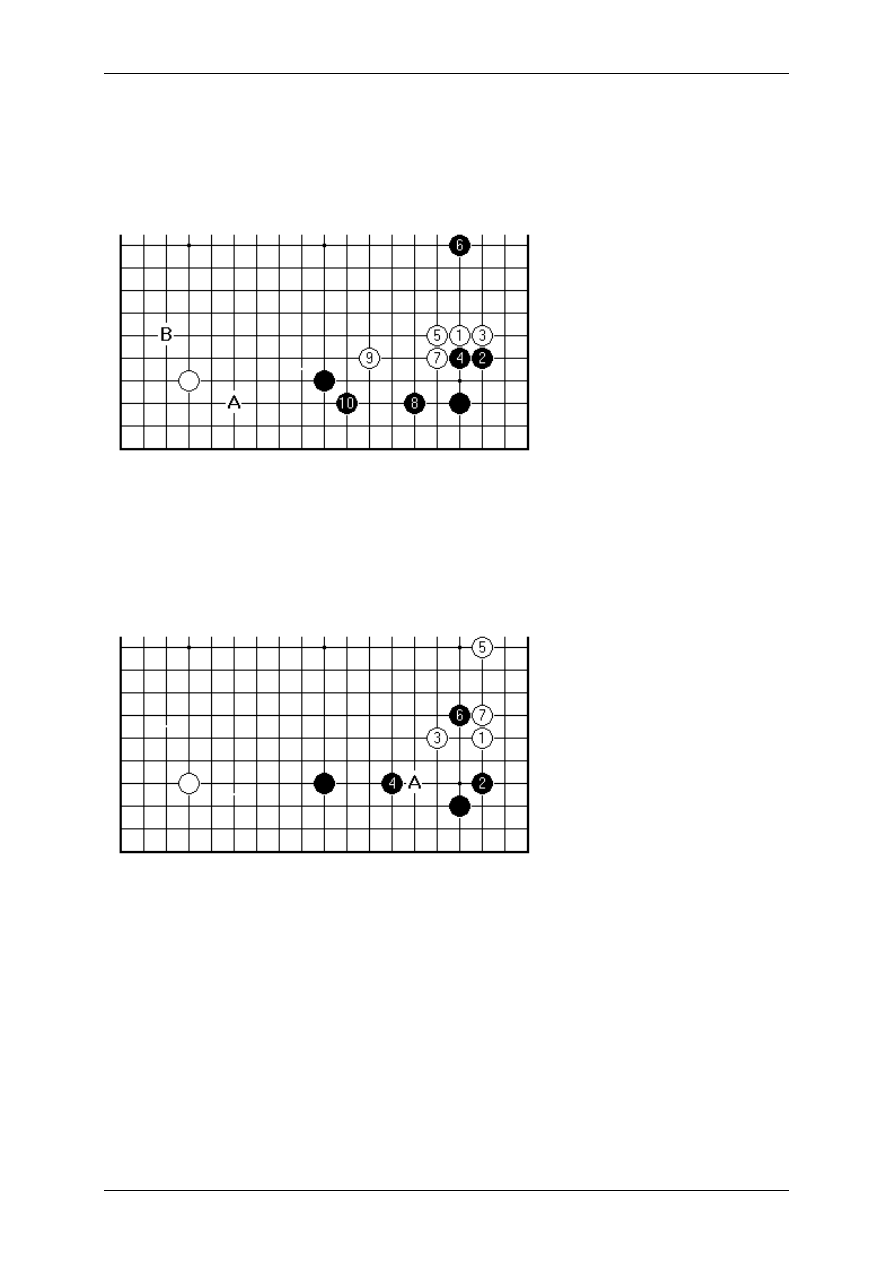
On Your Side by Charles Matthews, 3-dan
Page 107 sur 138
Black gives up the corner, gaining much outside and central influence. The lower
edge is left open-skirted, and White can later jump in from 15. A general comment
therefore applies: Black can be happy not to have exchanged A for B. European
Champion Lee Hyuk has said, however, that the marked black stone belongs at C in
this sort of position.
In the Kobayashi-Takemiya Kisei match game from 1989, White approached the
lower right at 1, and what followed was a standard line for Takemiya. Next White
attacked 6 with the influence built up below. However professional opinion, as
represented by the Go World commentary, felt that Black had gained by omitting the
A-B exchange. After Black has 10 in place, it may well suit Black to start at B in the
left corner instead.
Finally a thought from China's imaginative Yu Bin for this position, in 1994. White 3
is an idea that is very tempting in the Kobayashi formation. Here Black would have to
be careful about stealing White's base on the side with a play 4 at 5. White at A in
answer would threate n to isolate the corner, and also leave a question mark over the
original extension stone. Therefore White 3 comes across as a successful piece of
opportunism, to exploit the absence of the exchange in the left corner. After 5 it
seems clear that White's result has an edge over the comparable positions seen in
the previous part.
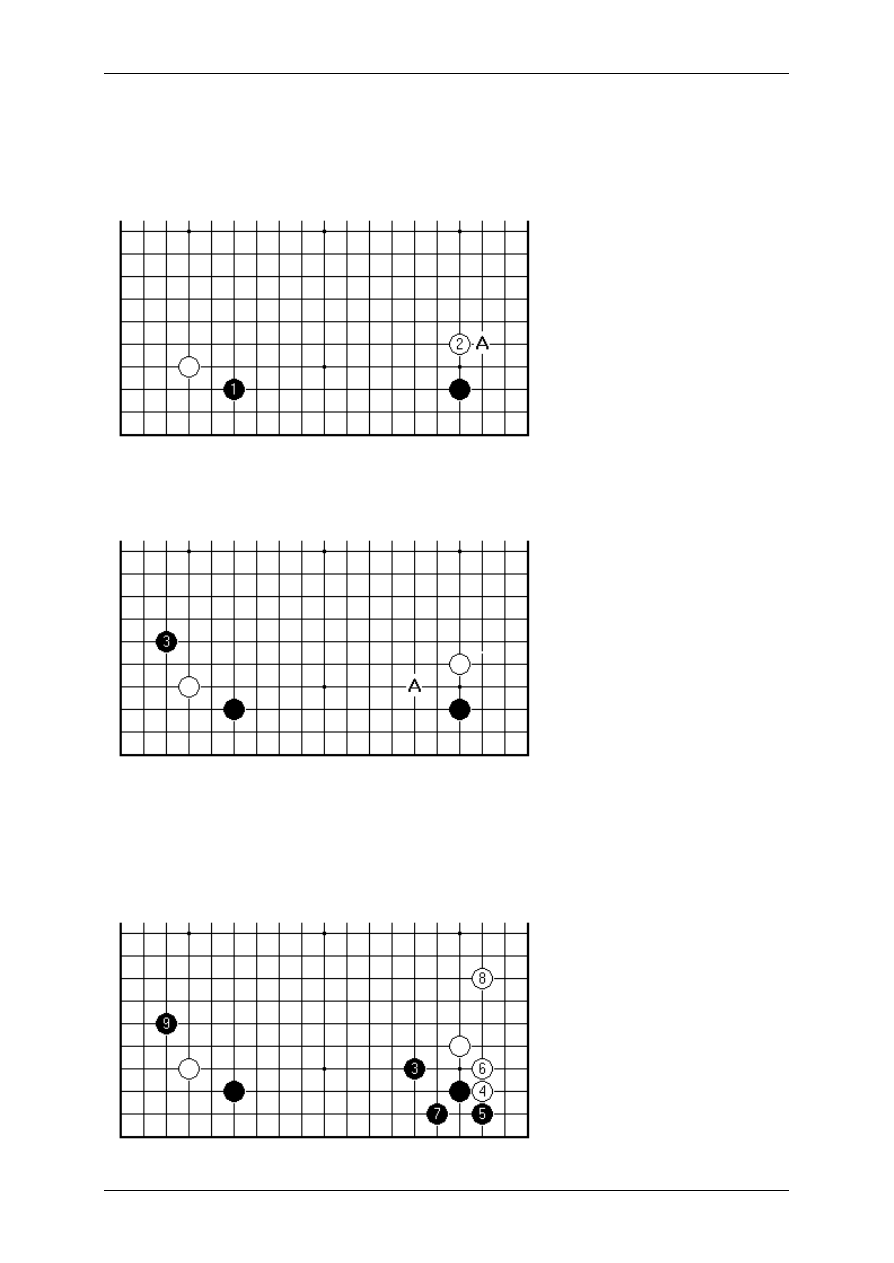
On Your Side by Charles Matthews, 3-dan
Page 108 sur 138
21.
Anti-Kobayashi: Double Approach
It is quite common for White to react with an immediate approach, to prevent Black
laying out the Kobayashi formation.
White 2 is the expected approach - White at A instead was tried often enough in the
past decade, particularly in Korea, without becoming established.
The idea at which we shall look is the natural one of Black 3 played as a double
approach in the left corner. An advantage of White's fourth line approach in the right-
hand corner is that White may have a chance to play later at A. This is a key position
for influence, and if White takes possession of it, Black cannot pursue a framework
strategy on the lower side.
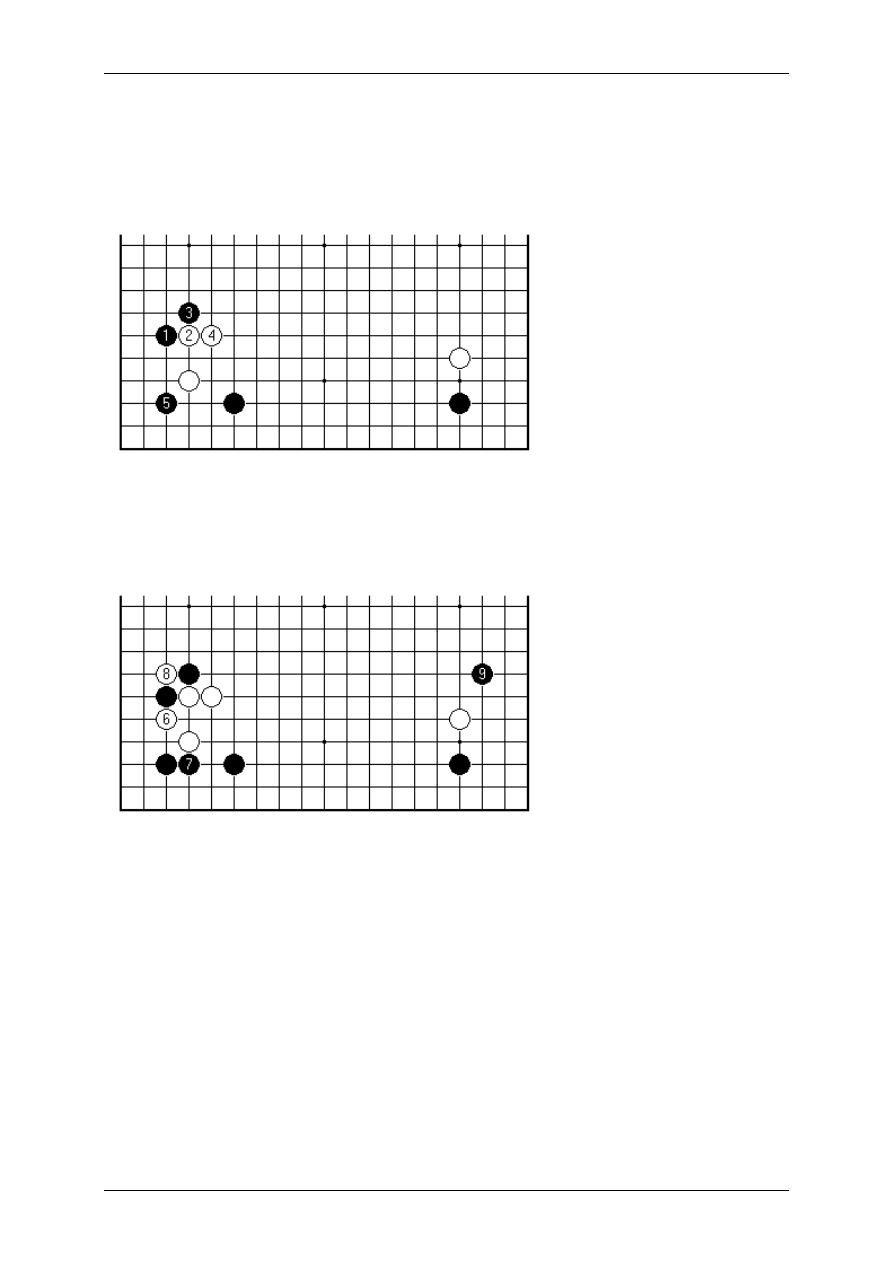
On Your Side by Charles Matthews, 3-dan
Page 109 sur 138
Therefore it is also a possible strategy for Black to play the calm knight's move on
the right first, as in this game Zhou Heyang -Shao Weigang from last year's Qisheng
in China. White plays out the corner to avoid severe attack, and then Black turns to
the double approach. The virtue of this plan is going to be seen a little later as Black
chooses a variation on the left, a decision we now discuss.
There are around ten variations that have been seen in pro play after the double
approach 1; but only three that are well-attested, at least in the presence of a white
4-4 stone in the upper left. White has the choice of side on which to play contact with
2. Black 5 is one way in which Black settles the position.
This was the continuation in game 1 of the 1983 Kisei match (Fujisawa Shuko-Cho
Chikun), in which this opening was played almost out of the blue (in fact it was
known earlier in China). The strategic point is that Black opts to become settled in the
left-hand corner, rather than to try for development on both sides.
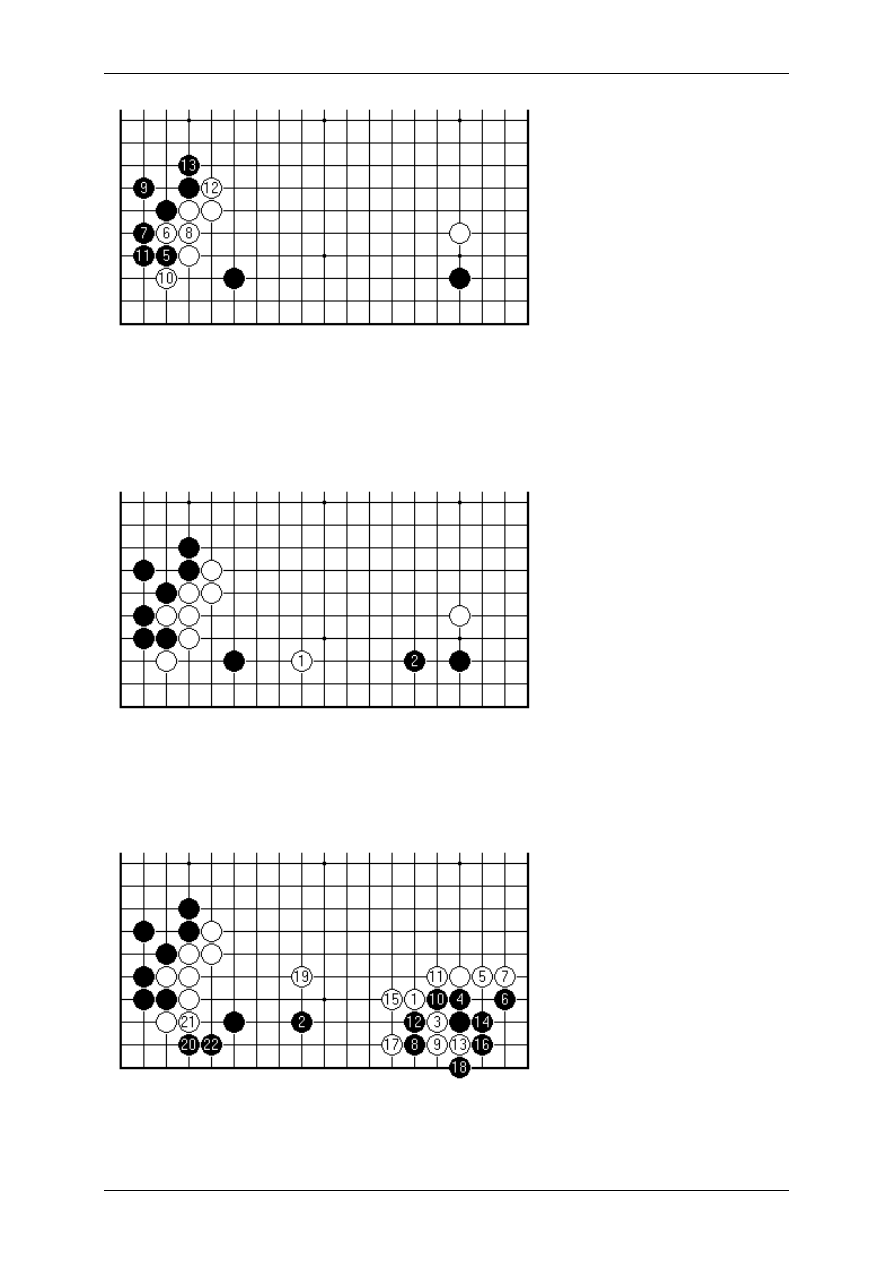
On Your Side by Charles Matthews, 3-dan
Page 110 sur 138
The other popular line for Black, when White plays contact on the left-side sto ne, is
this one. With 5 Black ensures a very sound shape, and effectively prevents White
from taking corner territory. This position has occurred numerous times in Chinese
and Korean games, and we take a look at how White addresses the problem of
dealing with the lower side.
There have been games in which White has played the straightforward pincer 1, and
Black has reacted by making the solid extension at 2. White hasn't yet taken
territory, because Black still has the chance to cut to the left of the isolated stone, or
to run it out to the centre.
In a game Seo Pong-su - Yi Ch'ang -ho from 1989, White struck first at the key point
with 1, and Black reacted to settle the stone on the side. White's plan unfolded as the
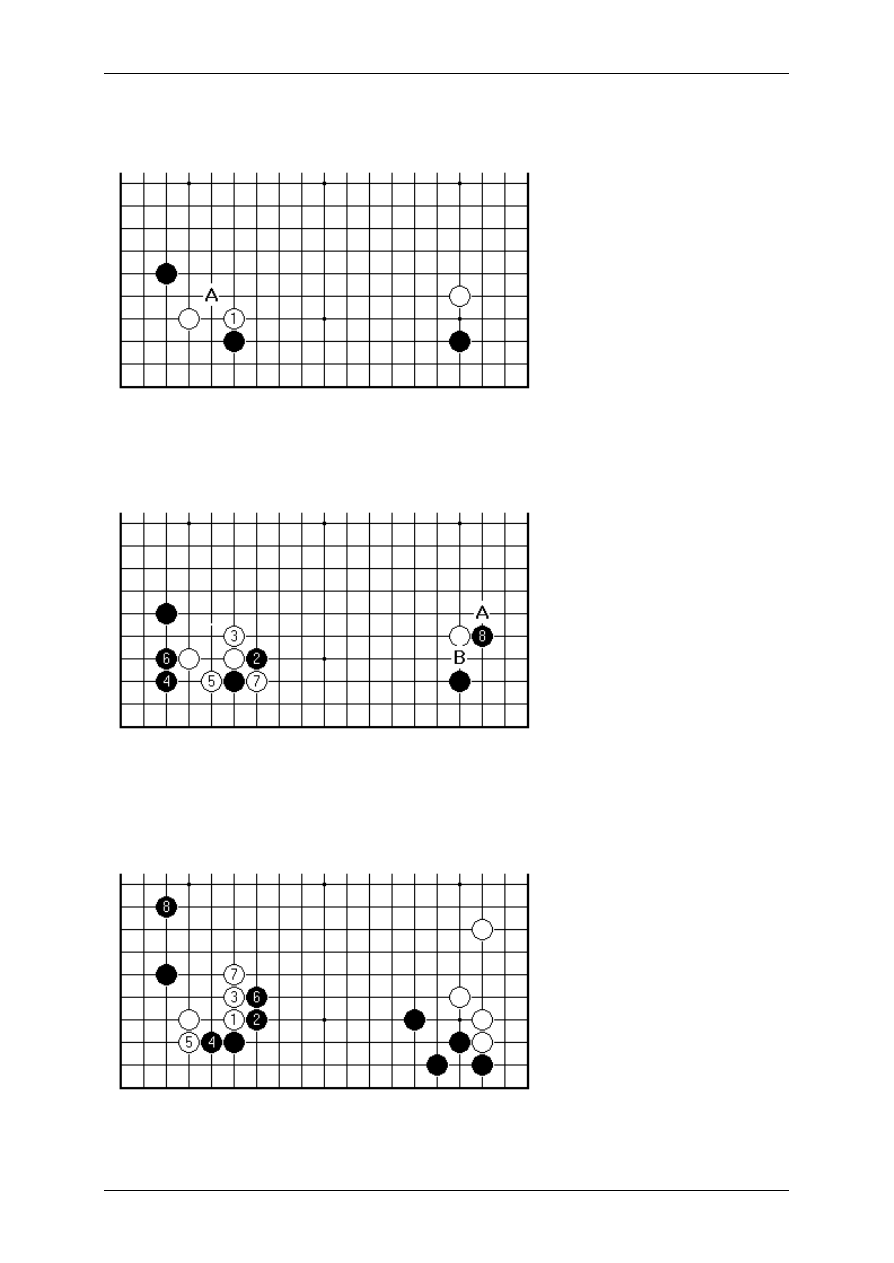
On Your Side by Charles Matthews, 3-dan
Page 111 sur 138
construction of a large-scale framework, next by extending on the right side, leading
to a game of raging fights.
White's other main option is to play contact on the lower side with 1. The diagonal
play at A, which has a reputation as locally somewhat slack, has been seen in recent
games.
Again it is a clear-cut strategy for Black to invade the corner with 4. White 7 creates
an influential position, so that Black 8 to stabilise and take the other corner is natural.
At this point White at A may seem to be dancing too much to Black's tune, so that
White instead may launch into the avalanche opening with B.

On Your Side by Charles Matthews, 3-dan
Page 112 sur 138
Returning to the Zhou-Shao game discussed above, in which Black played out the
right corner first, what happened shows a different type of development. With the
strong position to the right, Black used 6 and 8 to reinforce on both sides. Overall
judgement of the result must of course also take into account White's possible gains
based on becoming firmly established on the right side.
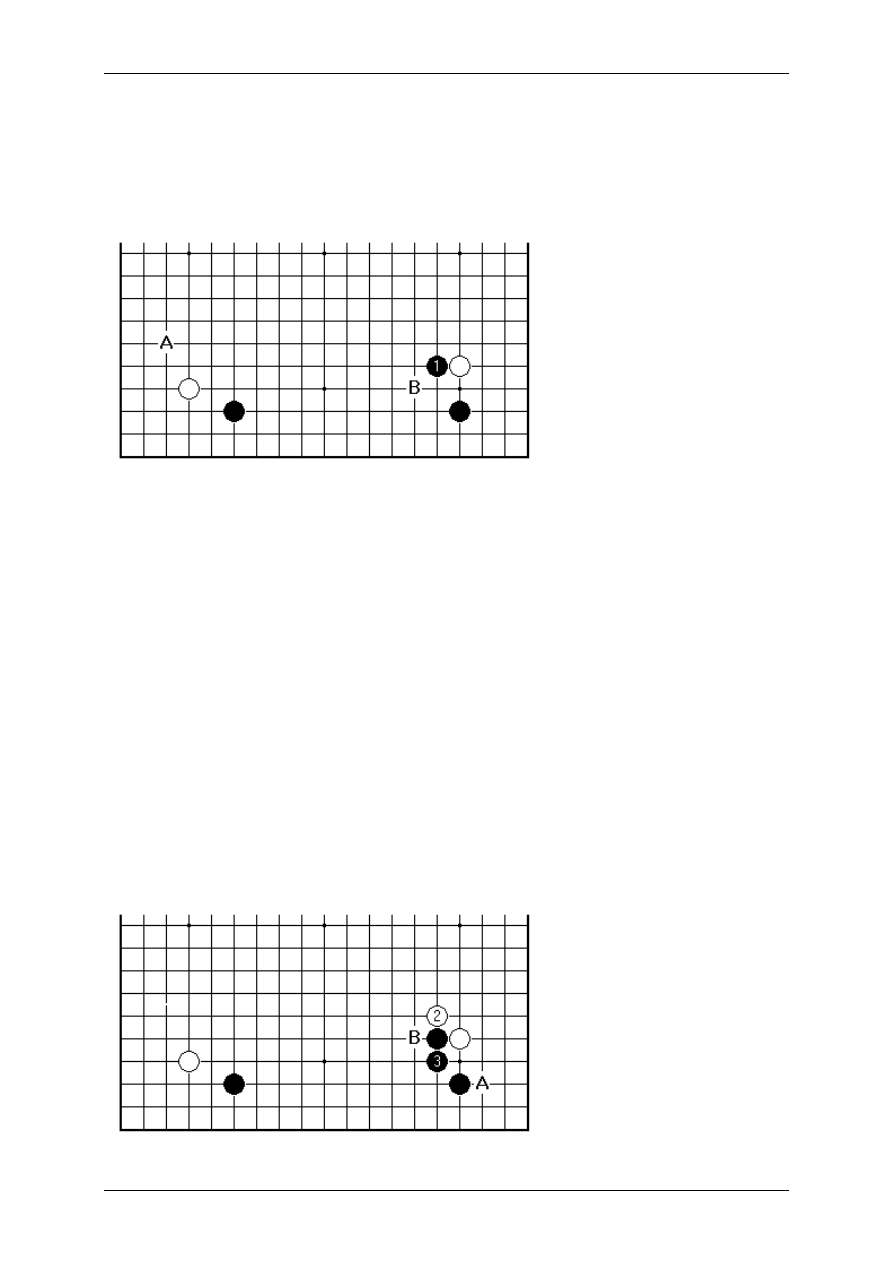
On Your Side by Charles Matthews, 3-dan
Page 113 sur 138
22.
Anti-Kobayashi: Outside Contact
There is another, so far less developed way for Black to respond in the position
considered last time. In a fashion that has hardly been seen so far in this series, it
speaks to the acquisition of raw power early in the opening.
When Black plays 1 as here, the outside contact move, the meaning is quite
different from contact on the other side of the white stone. The latter is a stand-by of
professional Go, is a very steady play, and has been seen often in previous articles.
Black 1 has a number of distinctive features:
it bids for side and central influence, rather than corner territory;
it is more forceful than the play at B, which we have already discussed;
it is hard to imagine White ignoring it.
Looking at the strategy Black is unrolling for the side as a whole:
Black is postponing the double approach at A, with the hope that shortly the options
there will open up (see discussion last time after Black 1 at B);
the framework Black is developing across the lower side has aspirations for central
expansion, but it is not yet clear how Black might close it off, so this is an open-ended
project quite likely to cause violent fighting.
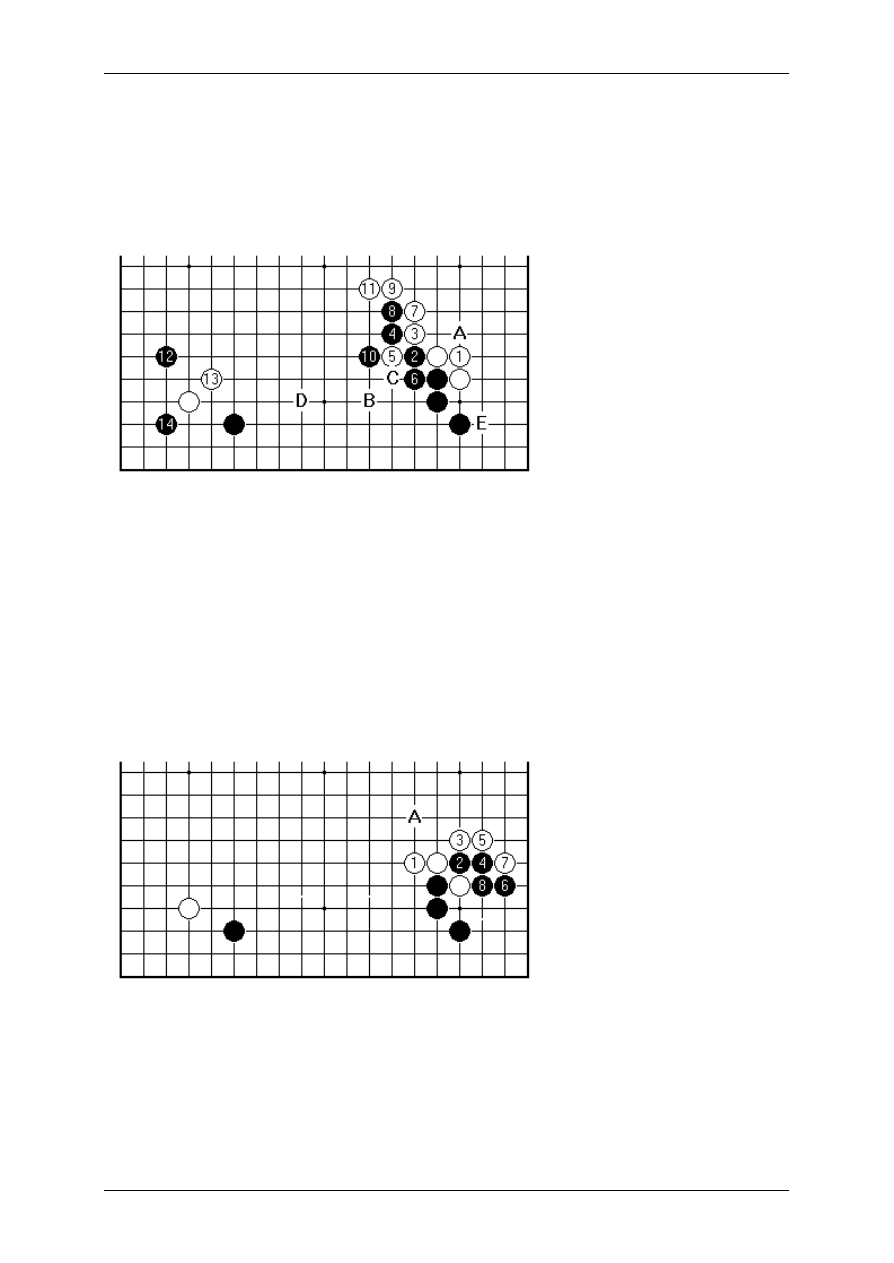
On Your Side by Charles Matthews, 3-dan
Page 114 sur 138
Much therefore depends on the next few plays in the right-hand corner. This is a fluid
position, but it is in the nature of the set corner openings to bring the planning
process down to earth. Here White 2 is the usual play; White also can play at A to try
to get settled quickly without worrying so much about conceding influence. Black 3 is
normal. This is also seen at B (for example in a game Sonoda-Wang from the 1983
China-Japan exchange series, an early occurrence of this pattern).
This was the continuation in the game Cho Hun-Hyeon against Takemiya, from the
1992 final of the TV Asia international title. First White 1 (rather than A) is a revision
of the book line, and changes the tactics later after White E. With 2 and 4 Black
expands at top speed into the centre; neither player can back down in the
subsequent pushing battle. Having dealt swiftly with the left corner with 13, Takemiya
built his own framework on the right side. Later White was able to play B, Black C,
White D to enter Black's stronghold, for a close game.
This is a model strategy for Black. It seems to be favoured by Laurent Heiser (6 dan)
of Luxembourg; see his game against Pedrini of Italy from the World Amateur, in the
1995 Ranka Handbook.
Supposing White dislikes losing control of the centre like this, it is possible to extend
out with White 1 in this fashion. This was played in the game 'Jimmy' Ch'a Min-su
(Black) against He Xiaoren in the 1997 North American Masters. After the sequence
shown, White built a framework on the right side. The ladder question did however
require attention and a white play shortly at A (a good ladder for White is a
precondition for adopting the variation, but that leaves the possibility of a ladder-
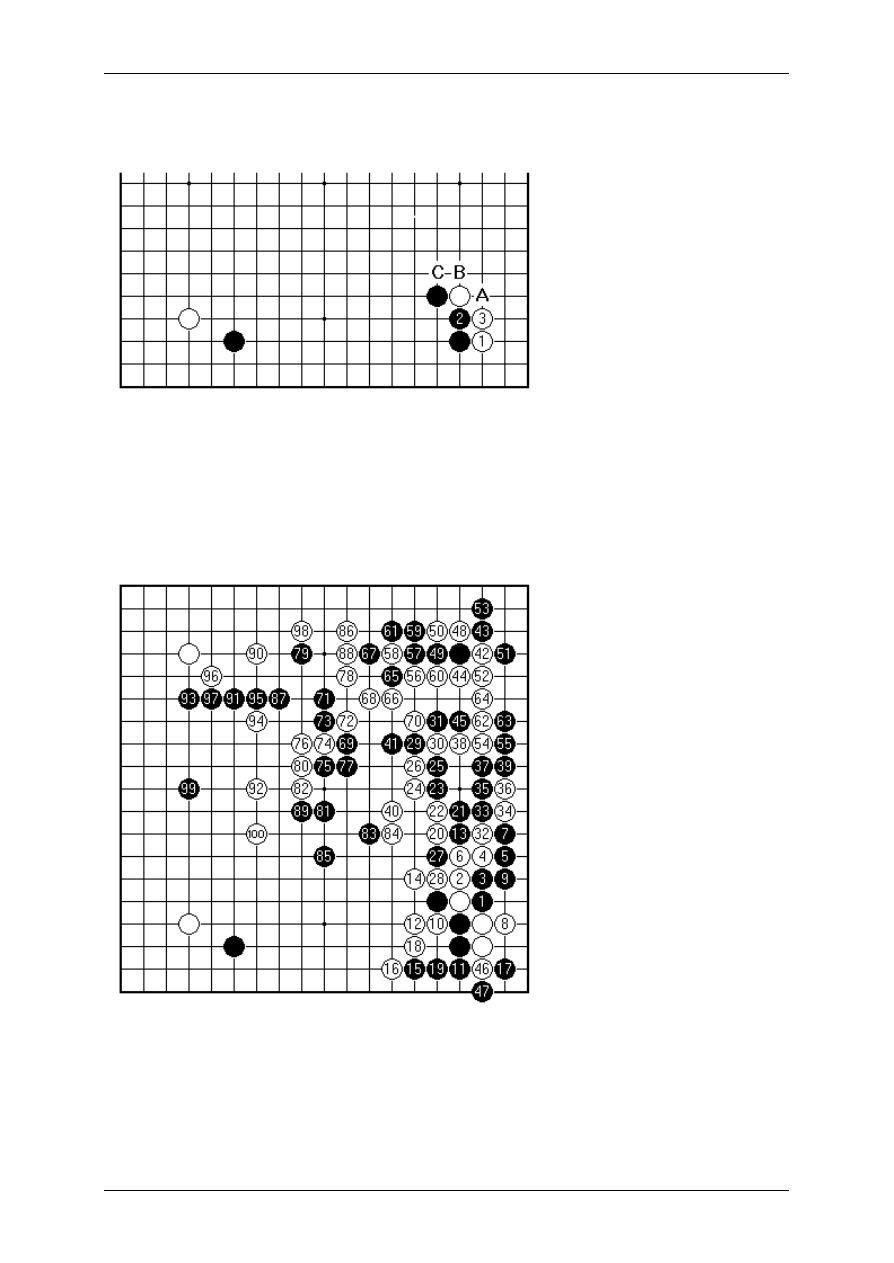
On Your Side by Charles Matthews, 3-dan
Page 115 sur 138
breaker from Black). It therefore looks very much as if Black can expect to exploit the
double approach in the left corner.
The other way for White to play is to run for cover in the corner with White 1 here,
leaving Black to claim influence. In reply Black invariably pushes up with 2, the most
difficult move. Now after the inevitable White 3 Black at A is the traditional answer. It
leads to some scary, not completely explored fighting variations. Black B and C are
more modern plays, consistent with the aim of acquiring influence in a controlled
manner.
In this game O Rissei-Cho Chikun from the 1990 Kakusei tournament in Japan, Black
chose the cut and crawl variation with 1 and 3, an innovation. This led to some all-out
fighting to the knife. It is relatively rare to see such uninhibited Go at the top level. In
the plays given in the diagram here matters have been sorted out to some extent.
According to the Kido Yearbook the game is still roughly in balance; a serious
mistake shortly by White tipped it Black's way.
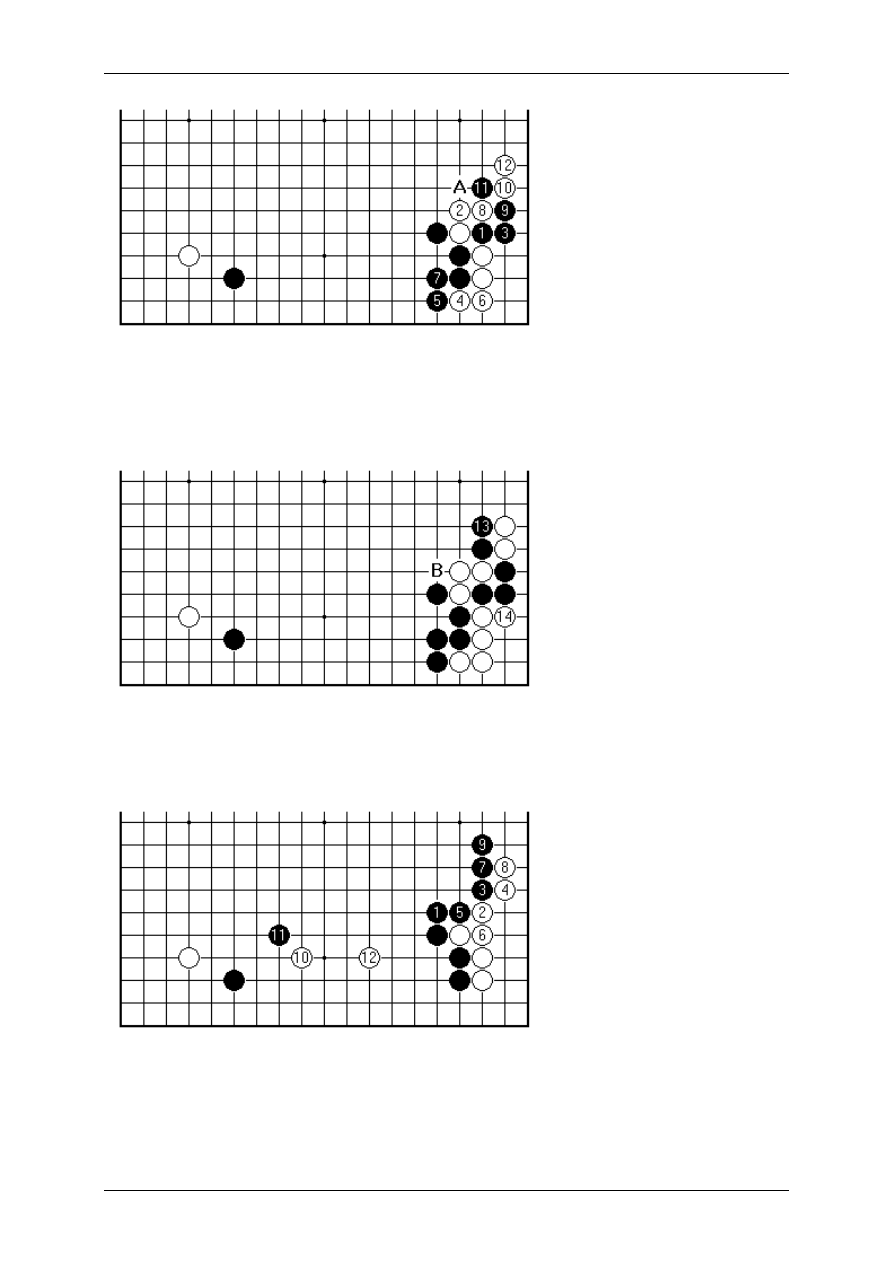
On Your Side by Charles Matthews, 3-dan
Page 116 sur 138
For reference, the normally seen continuation of Black 1 and 3 here involves a
ladder. After White 10 Black relies on a ladder capture of White's cutting stones at A.
In the game under examination, though, this ladder is good for White, broken as it is
by White's 4-4 stone in the upper left.
There is also this further, insidious ladder. After Black 13 White had better play 14,
whereupon Black has a ladder at B. You can check that in the O-Cho game this too is
broken by White's stone top left.
Black 1 as played here is an idea of Kajiwara's from around 30 years ago. Since it
isn't mentioned in the Ishida Joseki Dictionary (English translation of first edition),
which still counts as a standard reference for many, it perversely qualifies as a 'new'
move. (In fact it is now common in pro play.) This line is taken from a Korean 1993
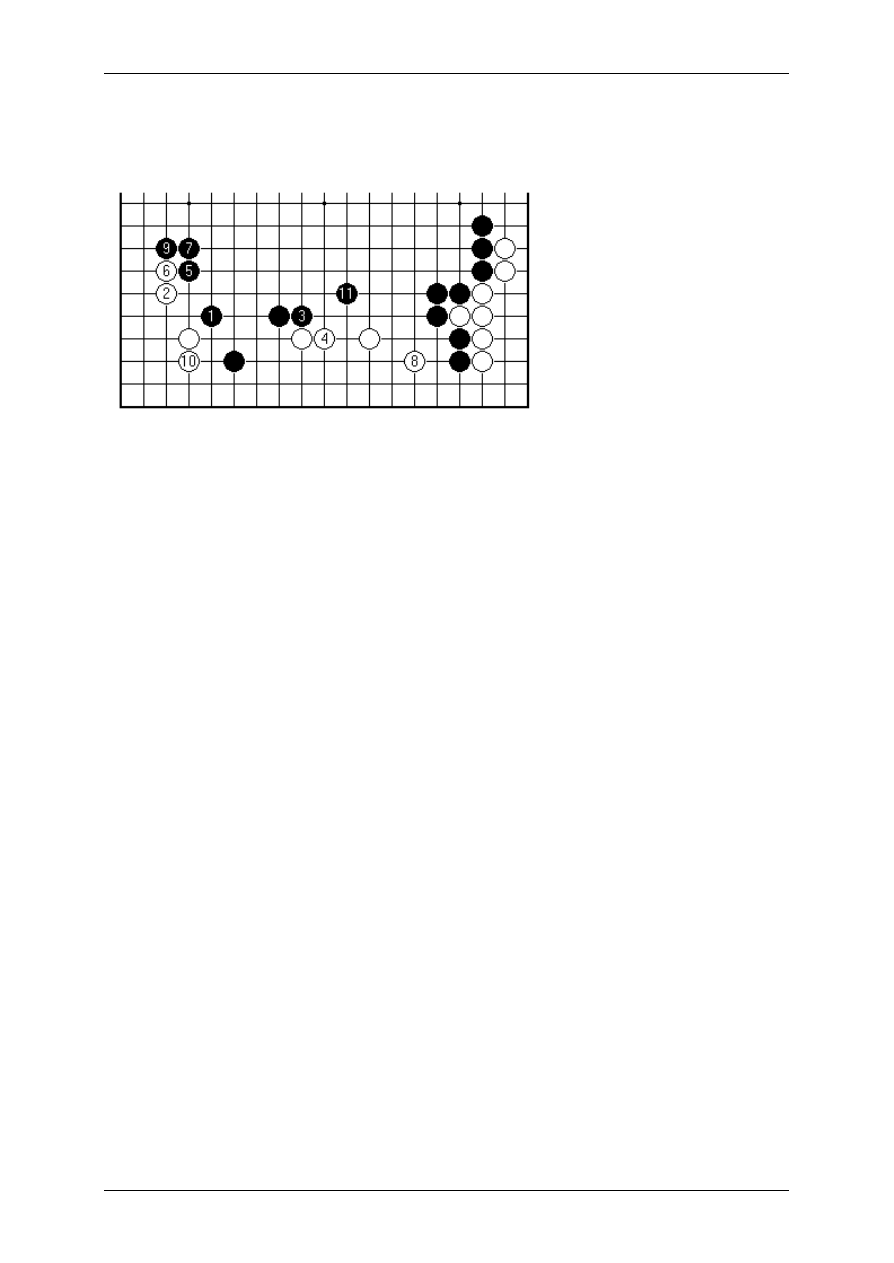
On Your Side by Charles Matthews, 3-dan
Page 117 sur 138
game Hwang Weon-chun (7 dan - Ch'oe Kyu-pyeong (6 dan), cited in a middlegame
book by Yu Ch'ang-hyeok. Black having built substantial influence on the right, but
giving up the initiative, White pincers at 10 and the middlegame is swiftly upon us.
A complete analysis of this position would be very circumstantial (in fact it also occurs
in volume 2 of the recently-published Ch'ung Am research archive mentioned earlier
in this series, so I'm sure the point doesn't need further emphasis). Here anyway is
one worked-out line. Black has a problem cutting point in the wall to the right. Time
will be saved, at the expense of territory, by treating it as a side-issue. Black's plays
here are vigorous and consistent, in the way of building a central framework.
There is clearly considerable mileage left in this opening pattern, which is still
appearing in games from China .
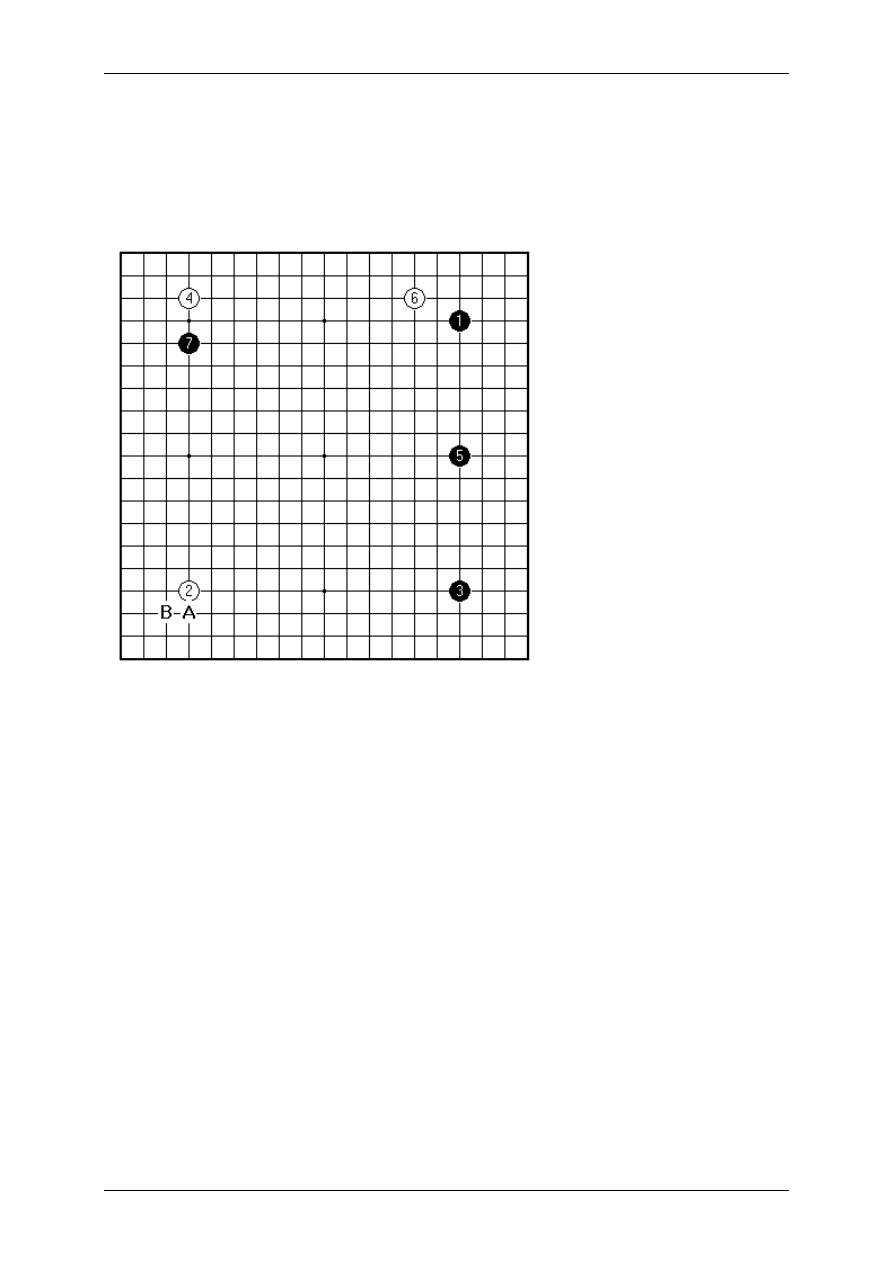
On Your Side by Charles Matthews, 3-dan
Page 118 sur 138
23.
Anti-Kobayashi: Extra Star
One of the main branches of the Three Stars (sanrensei in Japanese) opening leads
to a side position that is a variant on the Anti-Kobayashi pattern that has been under
study.
This position has been reached often in professional play. The top side is the same
as in the two previous articles in the series, with the superficial change of the reverse
of colours, and the addition of the stone 5 at the star point on the side. This extra
stone doesn't directly obstruct any of the normal plans for White, but must be taken
into account in evaluating them.
The same formation at the top is also seen with the white stone lower left at A or B. If
White is found facing the Three Stars with a position based on a 4 -3 point, it is almost
certain to belong to this family. Black rarely plays the Three Stars against a 3 -4 point,
the other orientation, the reasons being quite similar to those underlying the Anti-
Chinese.
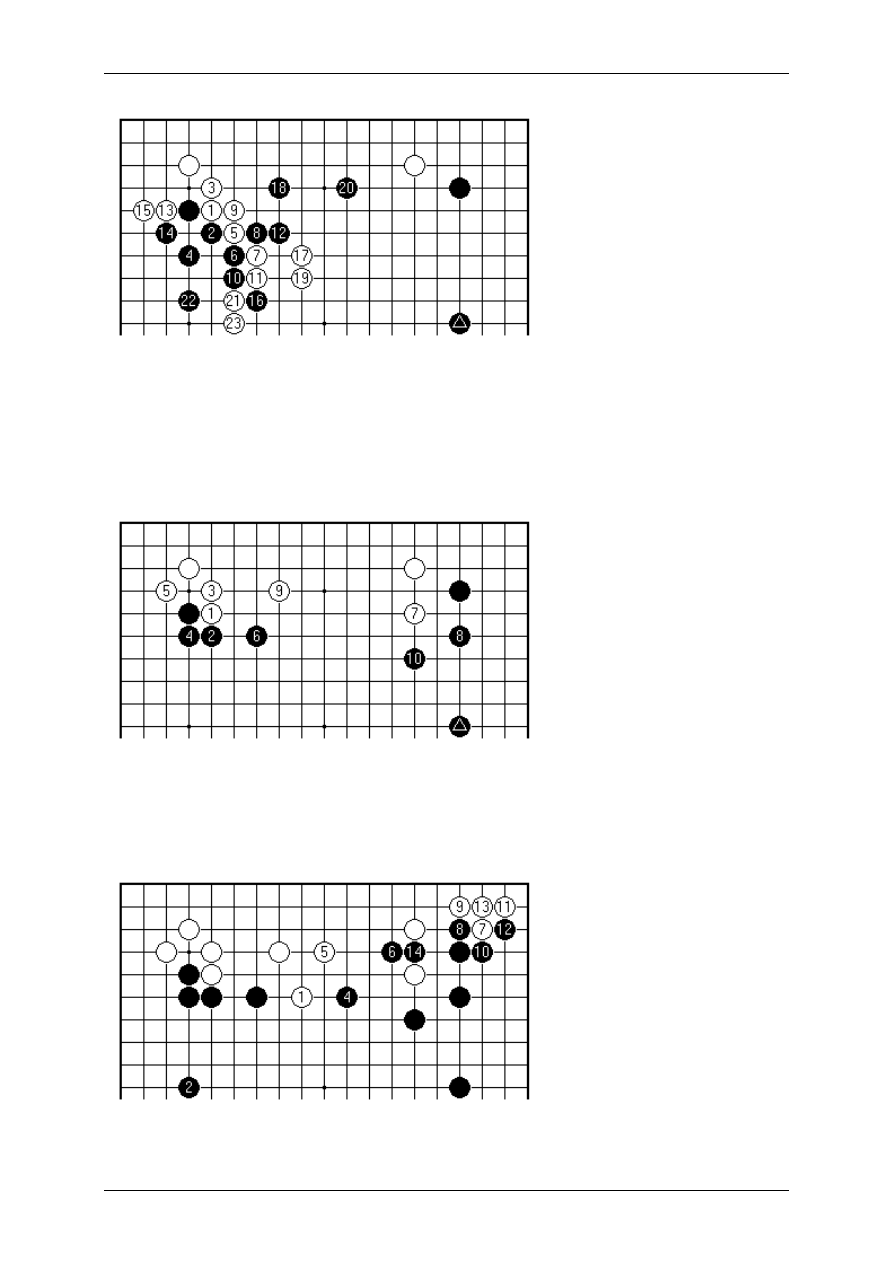
On Your Side by Charles Matthews, 3-dan
Page 119 sur 138
This example is from Rin Kaiho-Ryu Shikun in the 1998 Meijin League. Central to pro
thinking about Go in general is that a stone like the marked black one must not lie
idle awaiting developments. Black must actively seek to create positions in which it is
clearly well placed. In this case Black varies with 12 from the peaceable variation
seen before after White's outside contact play 1. Black must suffer some loss on the
left side, but the general aim is to have the centre swarming early with weak groups.
As played by Takemiya, the modern master of the Three Stars, the meaning of
Black's marked stone can be read quite differently. Black develops into the centre on
firm foundations, apparently without concern about White's framework on the top
side. This is from Takemiya Masaki-Awaji Shuzo in the 1988 Oza final, game 2.
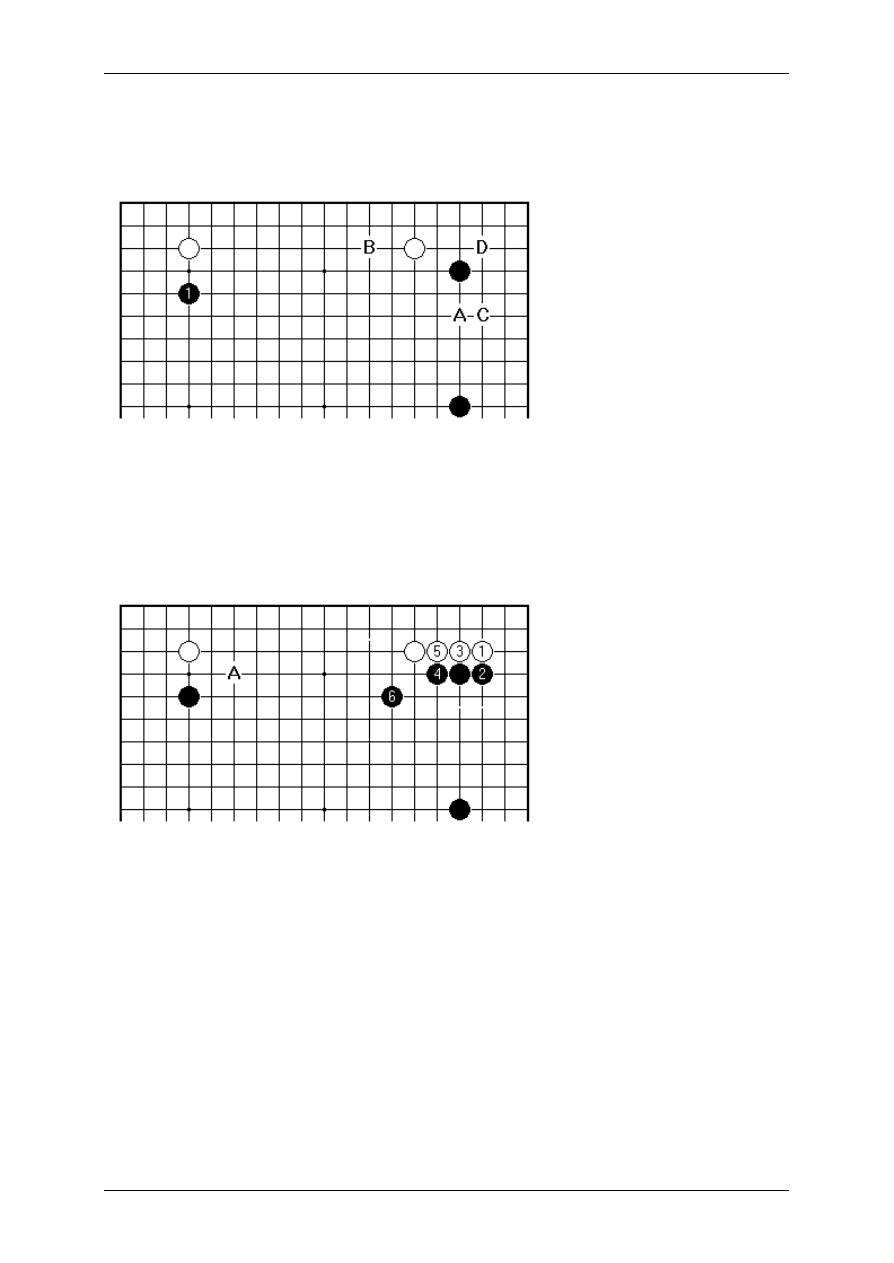
On Your Side by Charles Matthews, 3-dan
Page 120 sur 138
In what followed White played 3 on the lower side of the board. Black created great
influence with 14, but gave up the initiative once more to do so. Black won this game
by killing a white group on the right side, a fighting justification of his strategy.
Looking more closely at Black 1 here, it fits with Takemiya's conception of Go (the
famous 'cosmic' style, though he himself calls it 'natural'). In fact it seems as if this
approach play, ignoring for a moment the top right, may have been an invention of
Kato Masao; it occurs in a game of his against Ohira in the 1973 Nihon Ki-in
Championship. Black's normal plays in the top right would be at A or B. White can
continue in the top right with the double approach C or the invasion D.
This occurred in Takemiya's game against Sakakibara Shoji from the Gosei
tournament in 1984. Shortly Black took the point A, and the stage was set for Black to
colonise the centre. In cosmic Go certain concessions such as Black 2 are made -
earning the epithet 'slack' - but the real test of the plan comes later as the central
framework is poked, punched and punctured in the fighting.
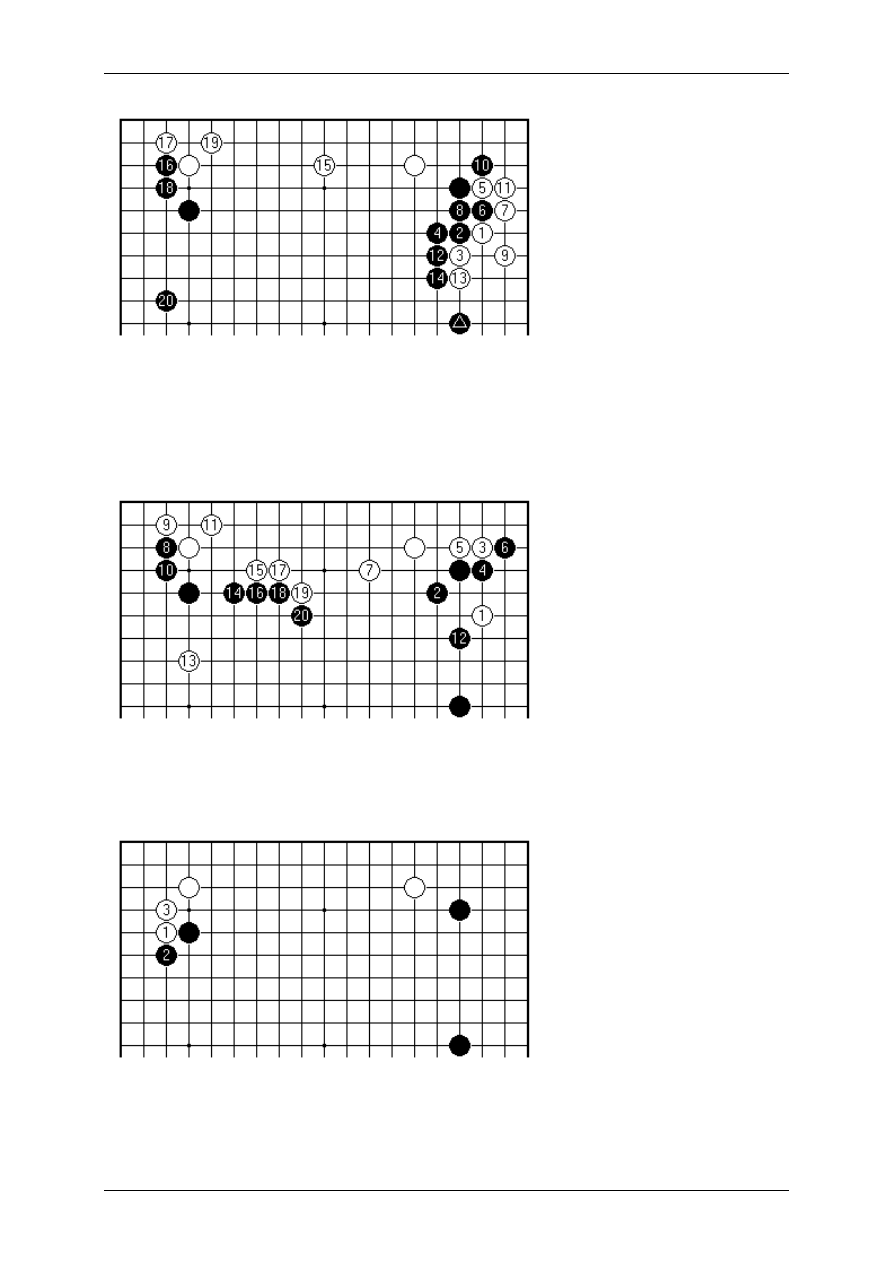
On Your Side by Charles Matthews, 3-dan
Page 121 sur 138
One article of faith for the followers of cosmic Go is that Black has no reason to fear
the double approach 1 here, in the Three Stars context. This seems to be so
generally accepted, that examples are thin on the ground. This is from Cheong Su-
hyeon 7 dan versus Paek Seong -ho 8 dan in the Korean Wangwi League from 1992.
This time Black's marked stone ends up on a key point for shape.
This Chinese game from 1988 shows the diagonal answer Black 2, normally
considered one of the hallmarks of the cosmic style - but, as the true believers
explain, these matters cannot be boiled down to a routine.
All in all, White's inside contact play 1 here is a good choice in this position. White
tries to settle in one place, first of all. Black's wish to sweep the game forward into
early combats will be resisted. Black could in fact commit to the avalanche opening,
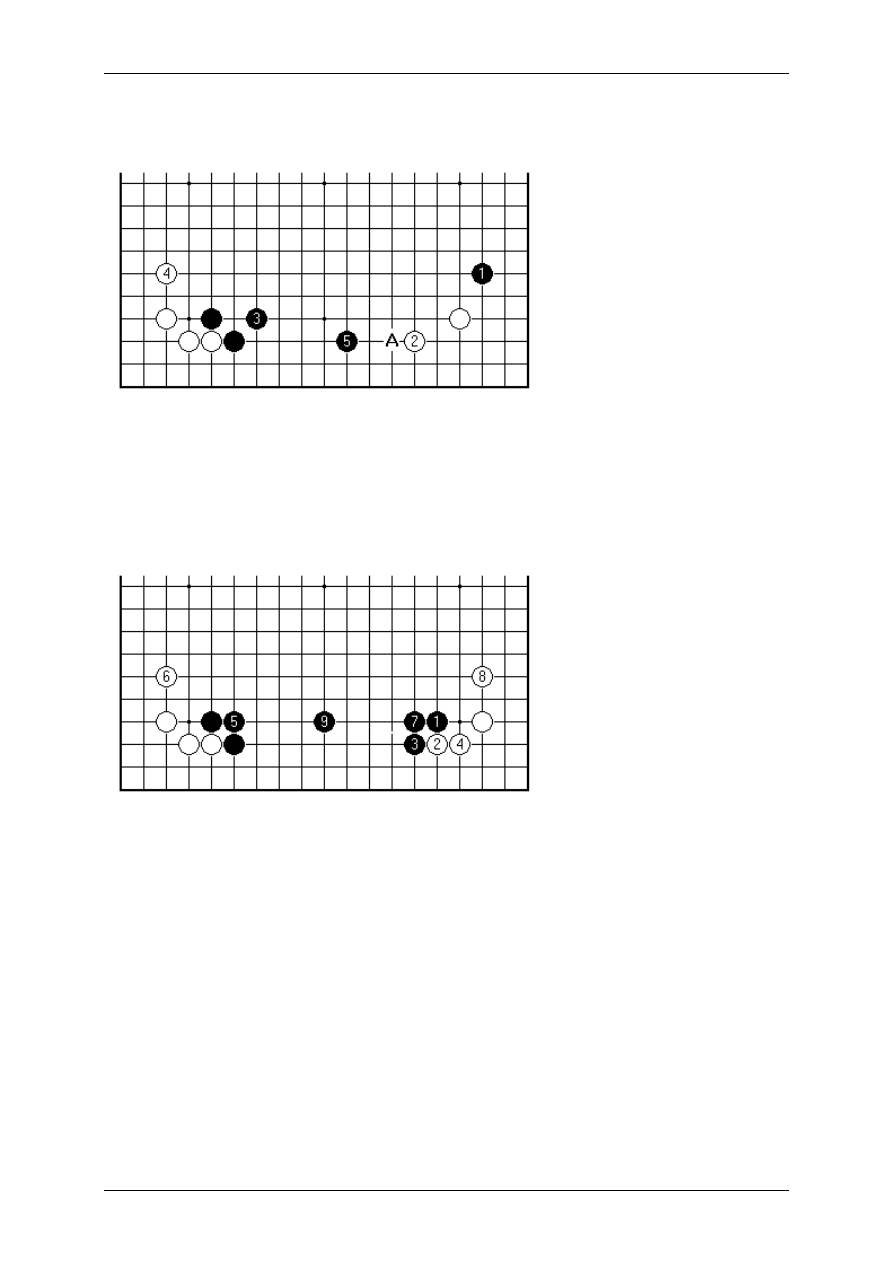
On Your Side by Charles Matthews, 3-dan
Page 122 sur 138
instead of playing 2 as here, to stoke up the fighting, as in the Kato-Ohira game
mentioned before.
Another way for Black to keep up momentum is to leave the upper left for a minute.
This diagram representing the left side of the board, Black can trans fer to the lower
left corner with the approach 1. Now fighting may well break out if White refuses to be
pushed around; but assuming White 2, Black can return to 3 and 5. From the point of
view of invading Black's formation later, White 2 ought to be at A. This is certainly a
dynamic plan for Black, and one that involves only ordinary plays.
Assuming a white stone at 4 -3 in the lower left ins tead, this is a classic sequence.
This has actually occurred from our starting position (a Korean game Kim Il-hwan
against Pak Yeong -ch'an from 1992, which White won); it is much better known in the
Two Stars opening. White's strong stones 6 and 8 restrict the expansion of Black's
framework.
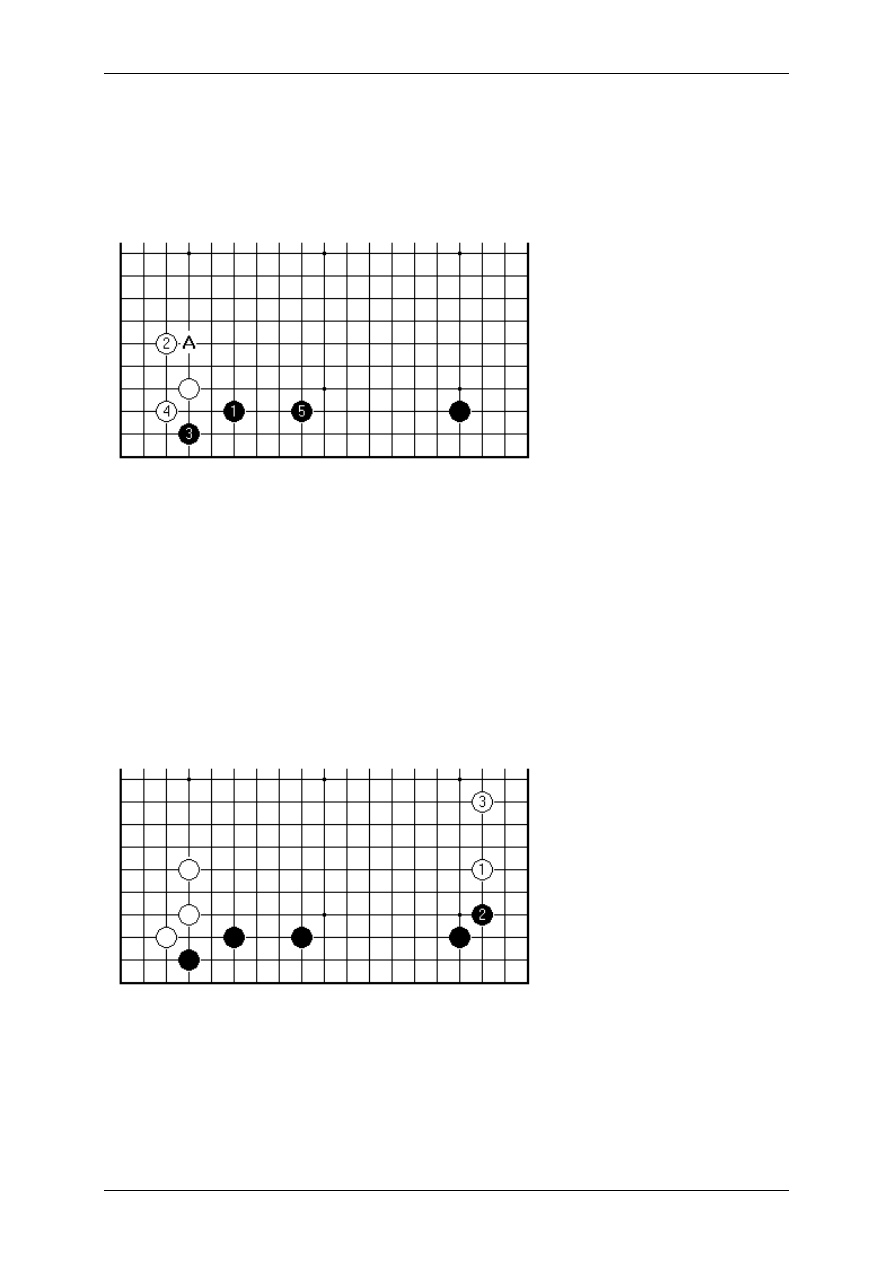
On Your Side by Charles Matthews, 3-dan
Page 123 sur 138
24.
Iwata's Formation
There is one more typical side to add to those associated with the Chinese style. It is
a sort of cross between the Kobayashi and Shimamura formations considered earlier
in this series.
This combination from Black, where White 2 may also be at A, we shall name for
Iwata Tatsuaki 9 dan, a Kitani disciple from Nagoya, who played it in 1982. It was
known before that for White. Black's three stones on the third line pose a problem for
the opponent to find a good play in the whole right-hand area. Correspondingly,
though, Black has to watch out for balance, avoiding a low position.
A comment on nomenclature. Attributing patterns to Japanese players is convenient,
but may not meet with general approval. Going back 20 years the focus of Go was
very much on the Japanese professional scene. No other arena at that time had a
large group of players of 9 dan level, competing in well-documented events.
Nowadays matters are different. In fact this formation was known in China in 1982
also (and earlier).
One way for White to treat this position is to play the distant approach 1, in line with
the Kobayashi formation. This happened in Rin Kaiho -Sakata from the Meijin League
in 1983, leading to a tight game. White later invaded the lower side, but Black's
groups on both sides are solid. This is in contrast with the Kobayashi formation,
where a porous group on the left implies that defending the lower side is urgent.
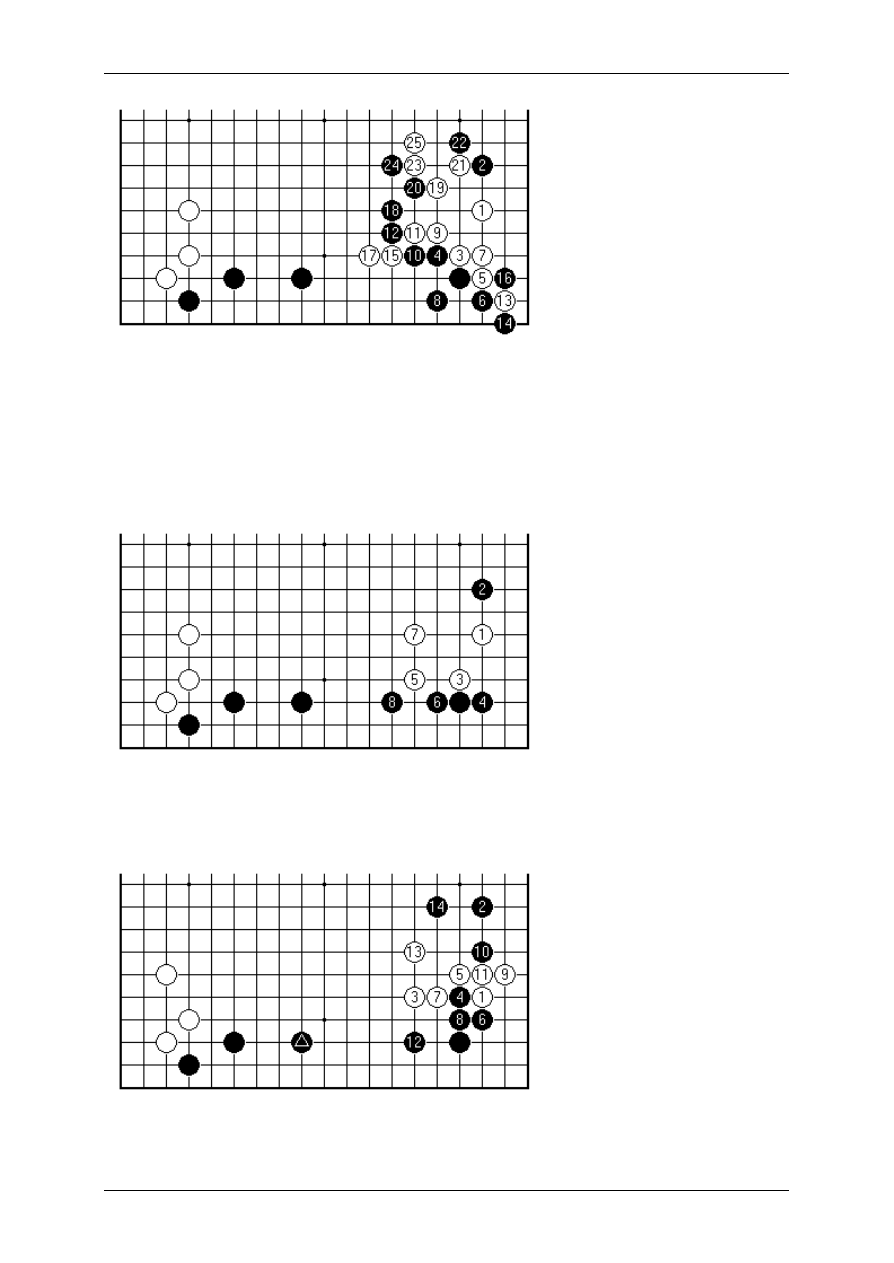
On Your Side by Charles Matthews, 3-dan
Page 124 sur 138
If Black plays a pincer such as 1 in this position, it is with the aim of building a well-
balanced formation across the side. White 3 is an interesting way to resist. Black 4
avoids being pressed too low. However after 12, natural as it may be, Black is
suffering from a lack of liberties; and plays 16 to relieve the pressure. An early fight
ensues. The interest of this opening (Konishi Kazuko 5 dan against Nakazawa Ayako
4 dan, from the 1996 Women's Kakusei) lies in the tension created by the mere
presence of Black's strong group to the left.
For comparison, this is the sort of result Black must avoid . The sequence up to 8 is
standard, considered on its own; but is a major transgression against good balance if
you look at all those black stones on the third line.
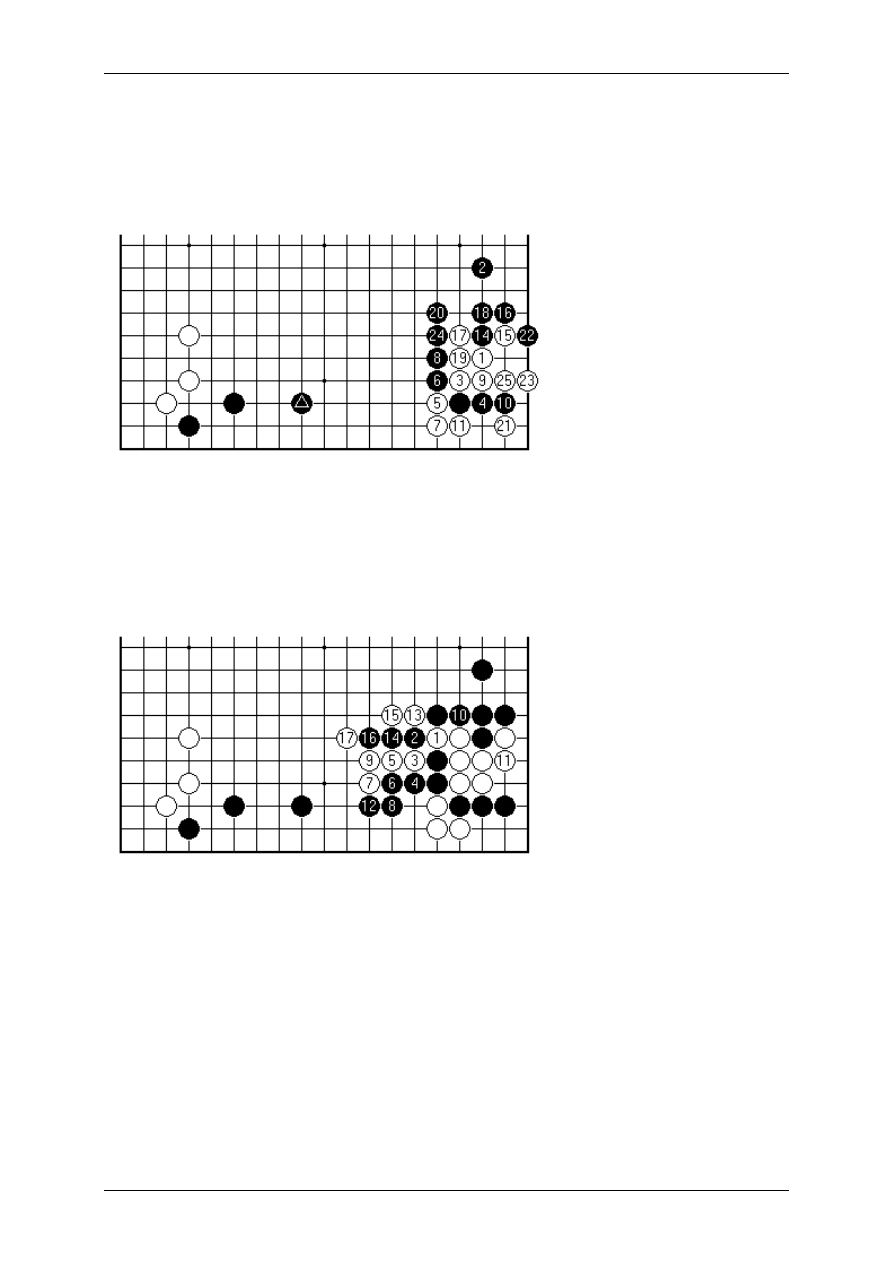
On Your Side by Charles Matthews, 3-dan
Page 125 sur 138
Michael Redmond relied on the Iwata formation when taking Black in the 1996 North
American Masters, with 100% success. Here against Yang Yilun he played the three-
point pincer Black 2 when White approached low. In the resulting position the marked
black stone is working properly, because the white group to the right is still subject to
attack.
In his game against Huang Liping White played 3, aiming for immediate life in the
corner with a play next at 4. Redmond opted for the complex variation at 4. Black 12
was played as a ladder-breaker in the upper left, and White 13 replied there (see next
diagram). In the end Black built considerable influence, in sente , while White took the
corner. Here the marked black stone and White's stones 5 and 7 pretty well cancel
each other out.
The ladder in question is well masked. White's resistance to Black's fencing play at
20 in the previous diagram would start with 1, 3 and 5 here. White is playing with fire,
as far as lack of liberties is concerned. After White returns to 11 (a black play here
would now connect along the edge while squeezing White), Black rescues the cutting
stones with 12. At this point everything turns on the ladder with 13, 15 and 17 (Ishida
Joseki Dictionary, 1996 edition). By the way, can you read what happens if 12 is at
13?
Redmond, a Nihon Ki-in professional who recently became 9 dan, has an orthodox,
even sober style. Perhaps the unspectacular qualities of the Iwata formation appeal
to him.
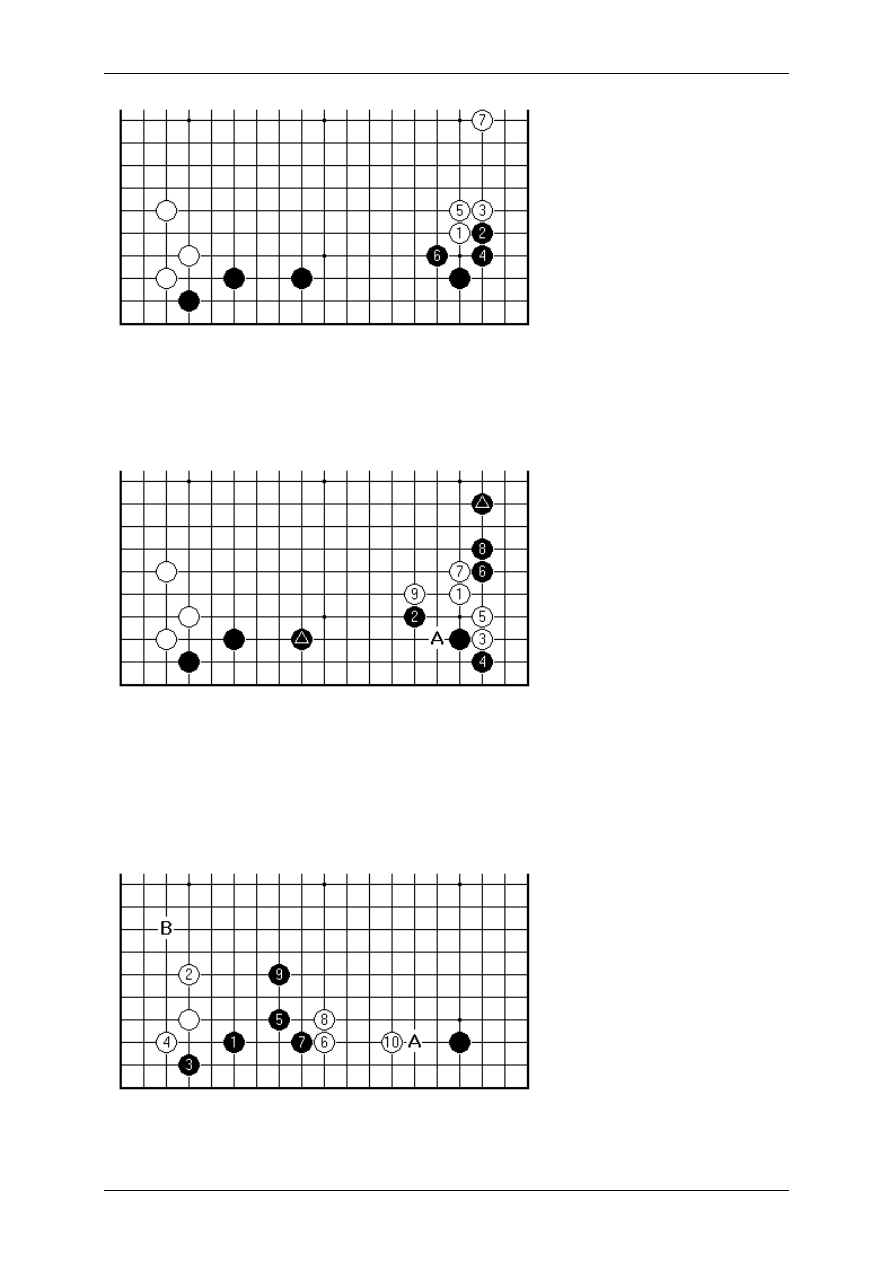
On Your Side by Charles Matthews, 3-dan
Page 126 sur 138
To conclude, a look at the balance issue once more. If White approaches high with 1
here, Black 2 to 6 are a simple way to play, and retain the initiative. Black 6 makes it
easier for White to invade on the lower side; but with a solid position to the left Black
isn't so concerned about this area.
Normally the reply Black 2 to the approach White 1 would be good balance but too
easy-going. However assuming the Chinese enclosure to the right is already in place,
it leads into an interesting idea. Playing Black 6 leaves behind some weaknesses (for
example at A), but it is hard for White to do other than move out with 7 and 9. In this
position both marked black stones are working flat out. One can question whether
White should actually play out the lower left before approaching the lower right.

On Your Side by Charles Matthews, 3-dan
Page 127 sur 138
When White plays 2 on the fourth line, as here, it may occur to Black to try 5. This
gives White a chance to challenge immediately with 6, gaining a base with 10 (or A).
Black's idea is that B will become a good play shortly, putting the central play 9 to
work. Just at the moment Black is likely to attend to the right-hand corner.
With this pattern we finish what has been a fairly thorough survey of formations from
contemporary Go that stem in one way or another from the introduction of the
Chinese style .
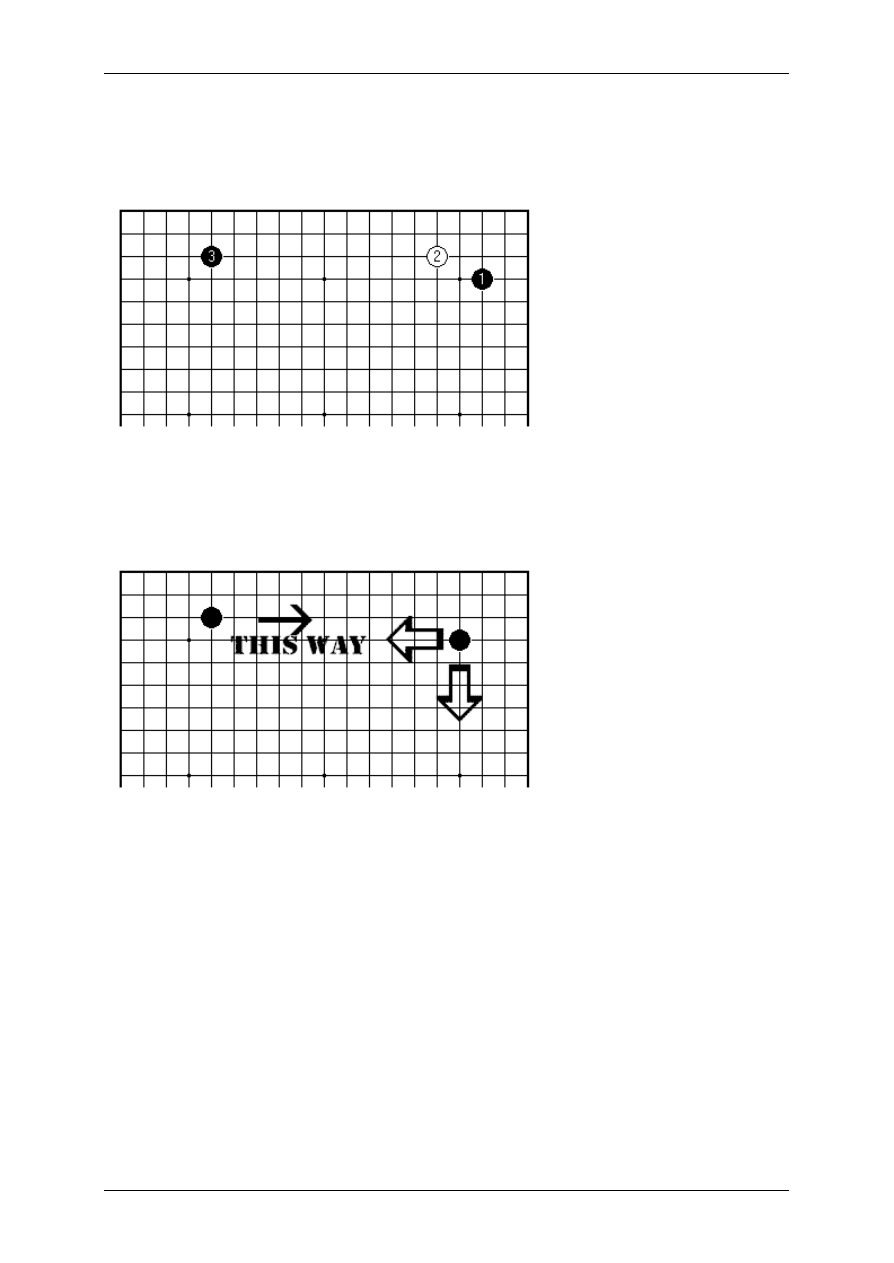
On Your Side by Charles Matthews, 3-dan
Page 128 sur 138
25.
Empty Corner and 5-3
In the old days many games started like this:
What is going on here? In those times there was no komi to compensate White for
playing second. The immediate approach 2 is one way to complicate the game into
something more tense than a share-out of territory. But Black 3 on a 5 -3 point has a
special, e xplicable meaning.
A 5-3 point exerts influence, to be sure. As used by Go players, the term 'influence' is
so broad as to be in danger of meaning just about any effect that isn't purely to do
with secure territory. There is a difference if we compare with a 4 -4 point, which also
of course is a play for influence. As suggested by the diagram, the 5 -3 point comes
with a preferred direction, along the side, while the 4-4 point acts equally in two
directions.
There is also a difference in quality, when it comes to fighting. The 4 -4 point works
best when the opponent builds a weak group at about the distance suggested by the
points of the arrows. The 5-3 point prepares for all-out fighting anywhere along the
side - its position on the third line means it isn't quickly undermined, as a fourth line
position may easily be.
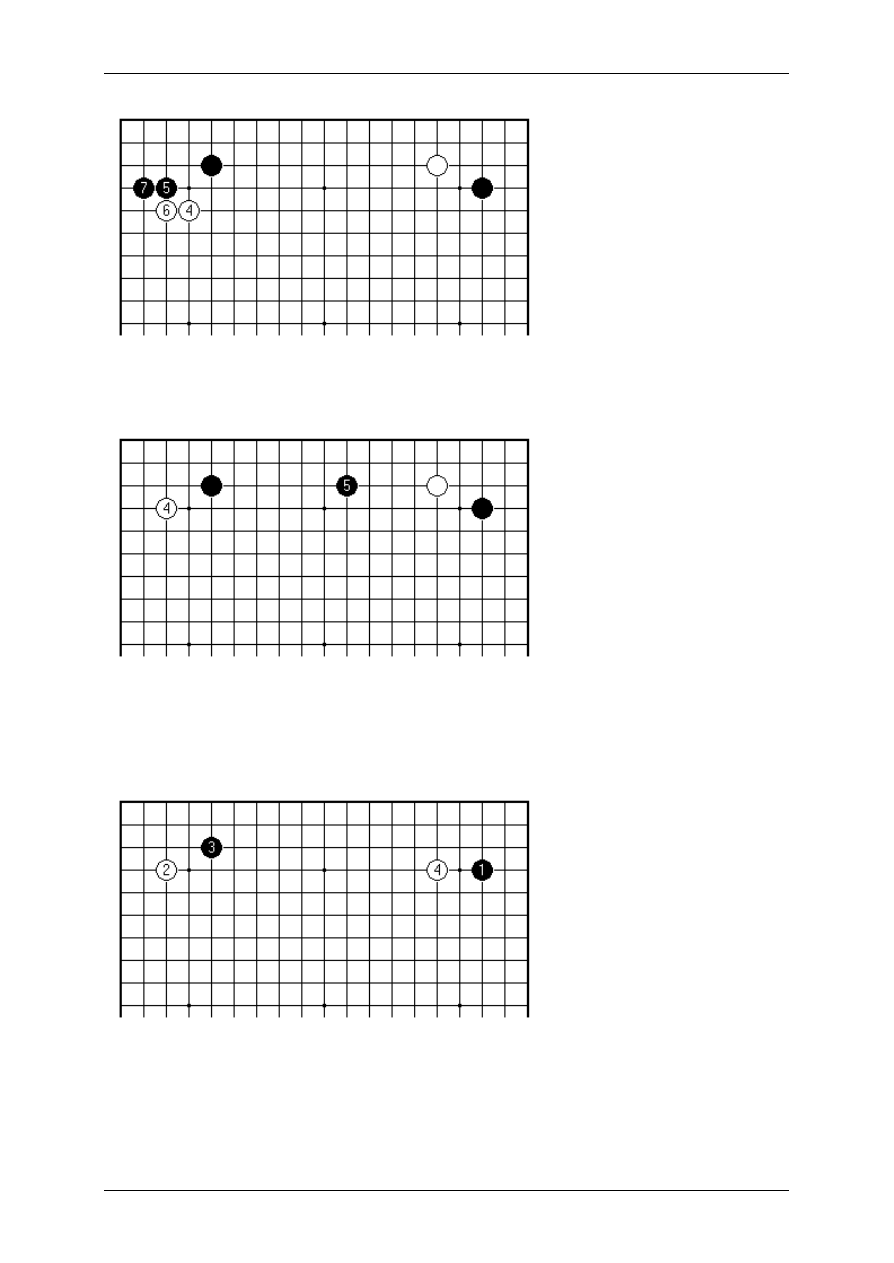
On Your Side by Charles Matthews, 3-dan
Page 129 sur 138
In classical Go of the Edo period in Japan, White most often approached at 4,
allowing Black to take territory with 5. There is a story behind this play.
The assumption was that if White approaches in the more conventional way with 4,
Black 5 is an ideal combination of pincer on the white stone to the right, and
extension from the black stone to the left. This teaching was believed to the extent of
creating a taboo. And in fact it is still held to be an important insight.
For example, if Black and White play 3-4 points in this way with 1 and 2, the side is
likely to be played out almost instantly (because first play here is urgent, in other
words this is a 'hot' area); and after Black 3 White normally avoids symmetry by
choosing 4 rather tha n the approach on the third line.
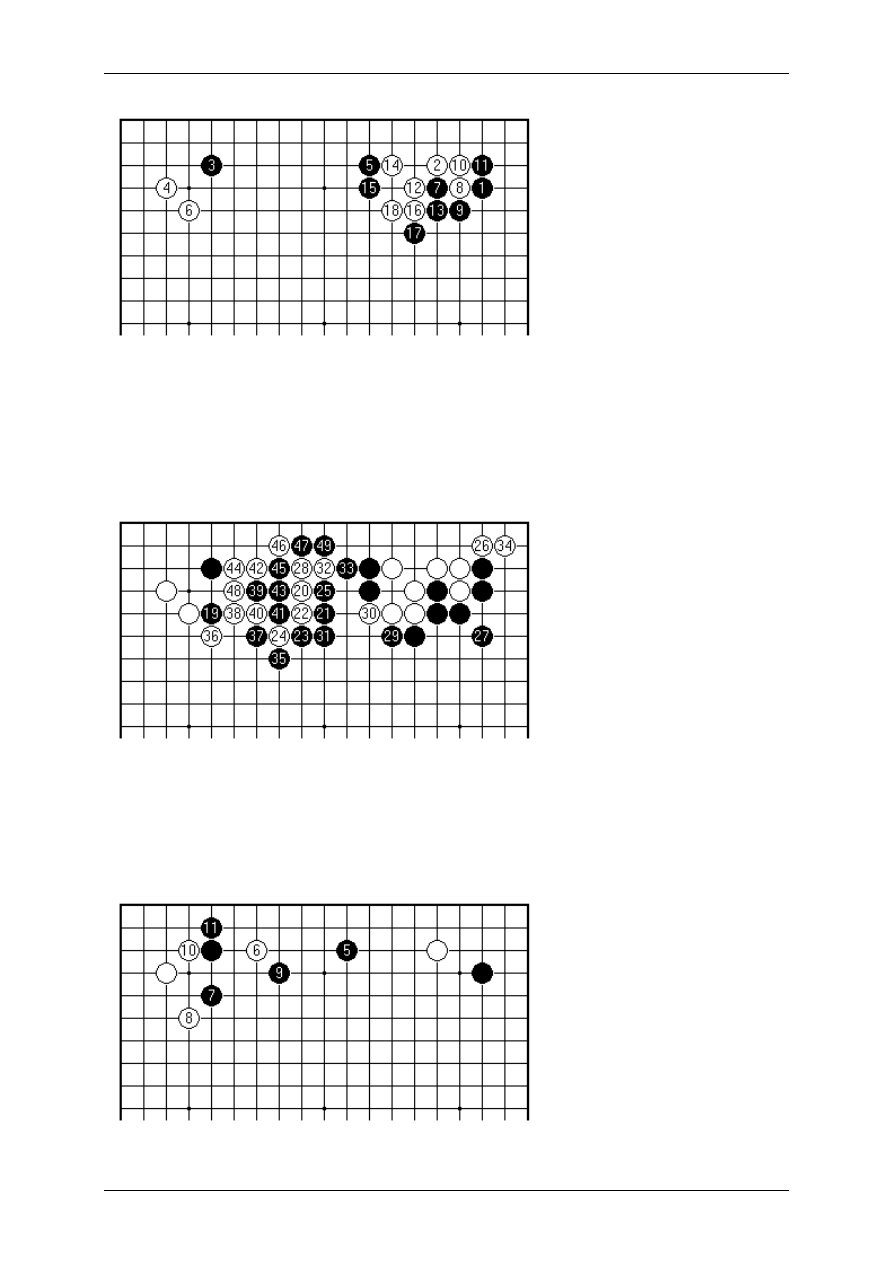
On Your Side by Charles Matthews, 3-dan
Page 130 sur 138
What has been said so far is conventional doctrine, supporting the play Black 3 as a
logical plan (though it is far from the only one). Since this follows on from material in
Chapter 9 of my Teach Yourself Go, I was interested to find a number of examples
where the underlying symmetric pattern was tested in professional play, nearly all in
games of Kitani Minoru. Here in 1926 (aged 17 and 2 dan) he had Black against the
highly aggressive Shinohara 'Heavy Tank' Misami 3 dan.
In what followed White invaded Black's framework, but changed horses in midstream,
setting up instead one of those trades beloved of professionals. The point to notice is
that Black's influence in this game underwent a transformation, ending up pointing
south where it started pointing due east. Nothing could be more characteristic of
fighting.
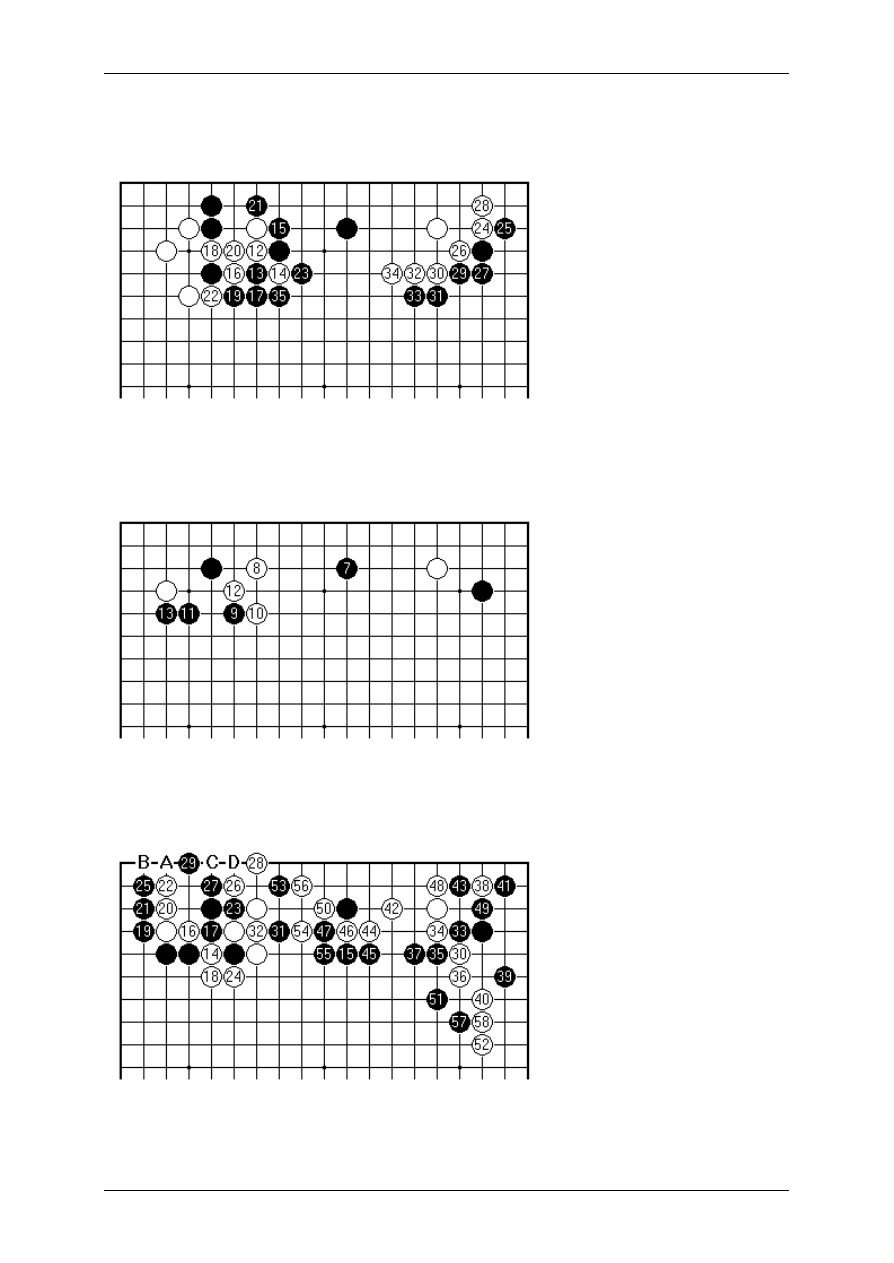
On Your Side by Charles Matthews, 3-dan
Page 131 sur 138
A year later Kitani tried this strategy himself when taking White against the higher-
ranked Hayashi Yutaro. Up to 11 it looks like White is playing for a quick fix here.
The end result is comparable to the previous game, in general terms, if reached by a
quite different route. Black 35 is professional play, dismantling the ladder before it
causes complications.
In 1931 the imaginative Kubomatsu Katsukiyo played this pattern on Go Seigen
(Black), after a couple of plays that occupied the lower corners first. Black dodges
away from White with 9, 11 and 13.
For a while the whole side becomes a fighting area. Assessment of the end position
is complicated by the sinister ko left behind (White A, Black B, White C, Black D),
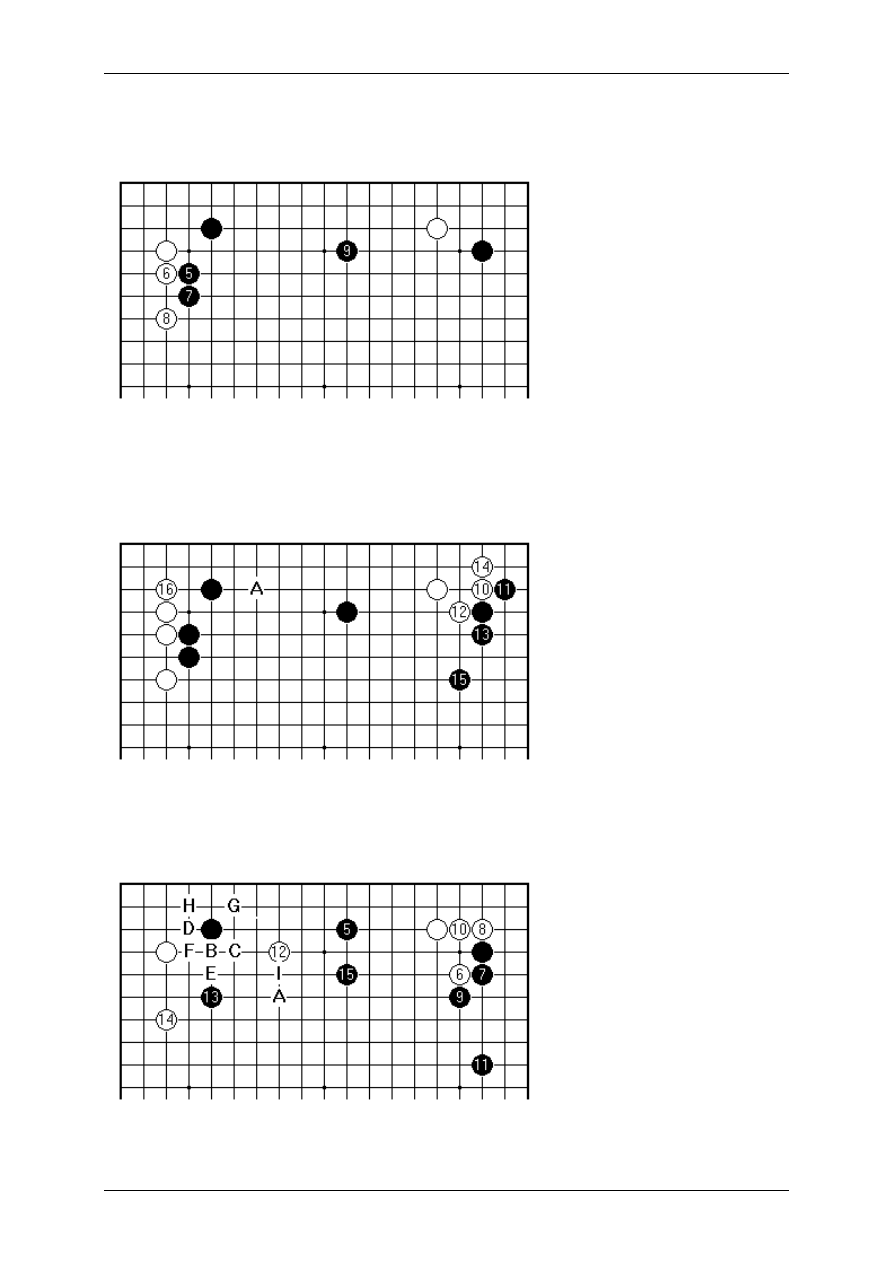
On Your Side by Charles Matthews, 3-dan
Page 132 sur 138
meaning also that Black 53 was far from a waste of time. (If White starts and loses
the ko, the stones 53 and 31 will cut White, as you should check.)
In 1941 Kitani tried this plan again in the Oteai, on Sekiyama Riichi (Black), who later
in the year became the first victor in a Honinbo title match. Black 5 and 9 show
another option for putting the 5-3 point to work: first press and only then play the
pincer-cum -extension. At the time Black 9 was an unexplored play.
White's approach is sober enough, reflecting the older, deep-thinking Kitani. White 16
is a slow play at a key point, setting up an invasion at A (which happened as soon as
Black took an empty corner). Black won the game by a small margin.

On Your Side by Charles Matthews, 3-dan
Page 133 sur 138
Kitani, nothing if not a stubborn individualist, returned once more to play the same
way against Segoe Kensaku in 1945 (both players then 8 dan). With the formation
later fixed by the sequence Black A, White B through to Black I, Kitani was giving rein
to his acquired taste for territory; losing however this game too, by resignation.
One can therefore say that the merits or otherwise of symmetrical play by White in
the initial position were tested by top players in the second quarter of the twentieth
century. As far as I can tell the taboo hasn't been that much dented, making Black 3
of the initial diagram still quite an effective answer to White 2.
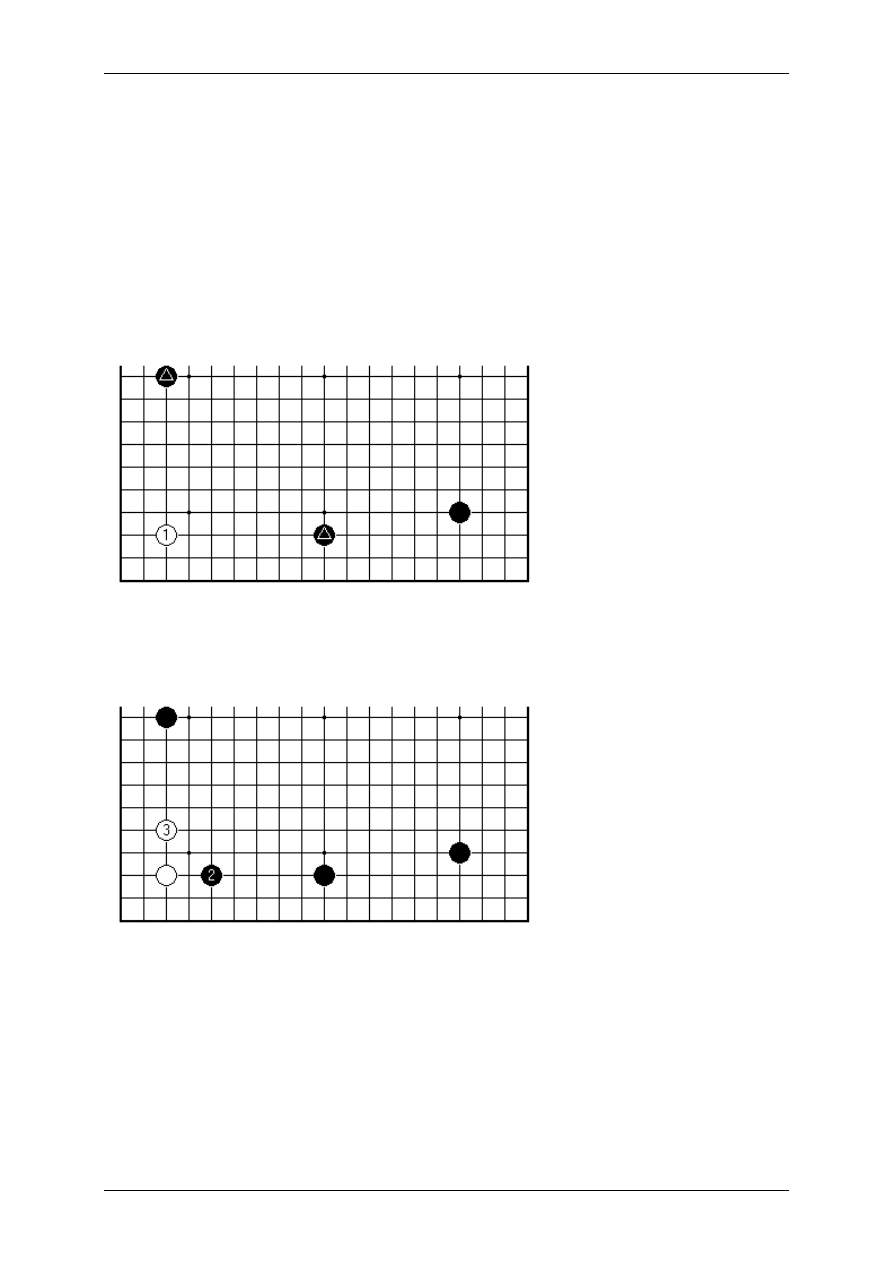
On Your Side by Charles Matthews, 3-dan
Page 134 sur 138
26.
Empty Corner and 3-3
In this article I'll introduce the 3 -3 point. And then with 4-4, 3-4, 3-3 and 5-3 points
covered, the vast majority of corner opening plays seen in modern Go will be
accounted for.
I was talking last time about a taboo from classical Go, and the considered choice of
plays in an empty corner. In the eyes of the classical masters there was a ban on
playing the 3-3 point corner opening at all. To begin with, I want to explain why that
prohibition was too sweeping, according to current notions, in particular for empty
corner occupation.
The nature of the 3 -3 point can be understood through this schematic example.
Supposing White needs to play in the lower left corner, when the two marked black
stones are already in place. Then White 1 is ideal.
The reason is that White's life in the corner will not be threatened. After Black 2,
White 3 is simple and good. You can say that the points 2 and 3 are miai. In any case
White is quite comfortable here.

On Your Side by Charles Matthews, 3-dan
Page 135 sur 138
In contrast, White 1 at the 4-4 point isn't a good idea. If Black immediately invades at
the 4-4 point, the standard sequence leaves White short of a plan for further
development. In fact Black's stones on the sides occupy two points that can be
considered miai; since Black has both, it is hard for White to get a good result.
These examples are artificial, though they convey a correct way of thinking. Here's
an early use of the 3-3 point in a related context.
This is from a game played in 1891 between Osawa Ginjiro 4 dan, one of the few
'southpaw' Go players (being left-handed he started in the top left, from his point of
view, the bottom right as we look at it), and Tamura Hoju 2 dan (White), the future
Honinbo Shusai. White 10 on the lower side exceeds the conventional length of
extension at 15 by such a margin that Black invades almost immediately. In the
subsequent running fight neither player finds time to occupy the top left corner.
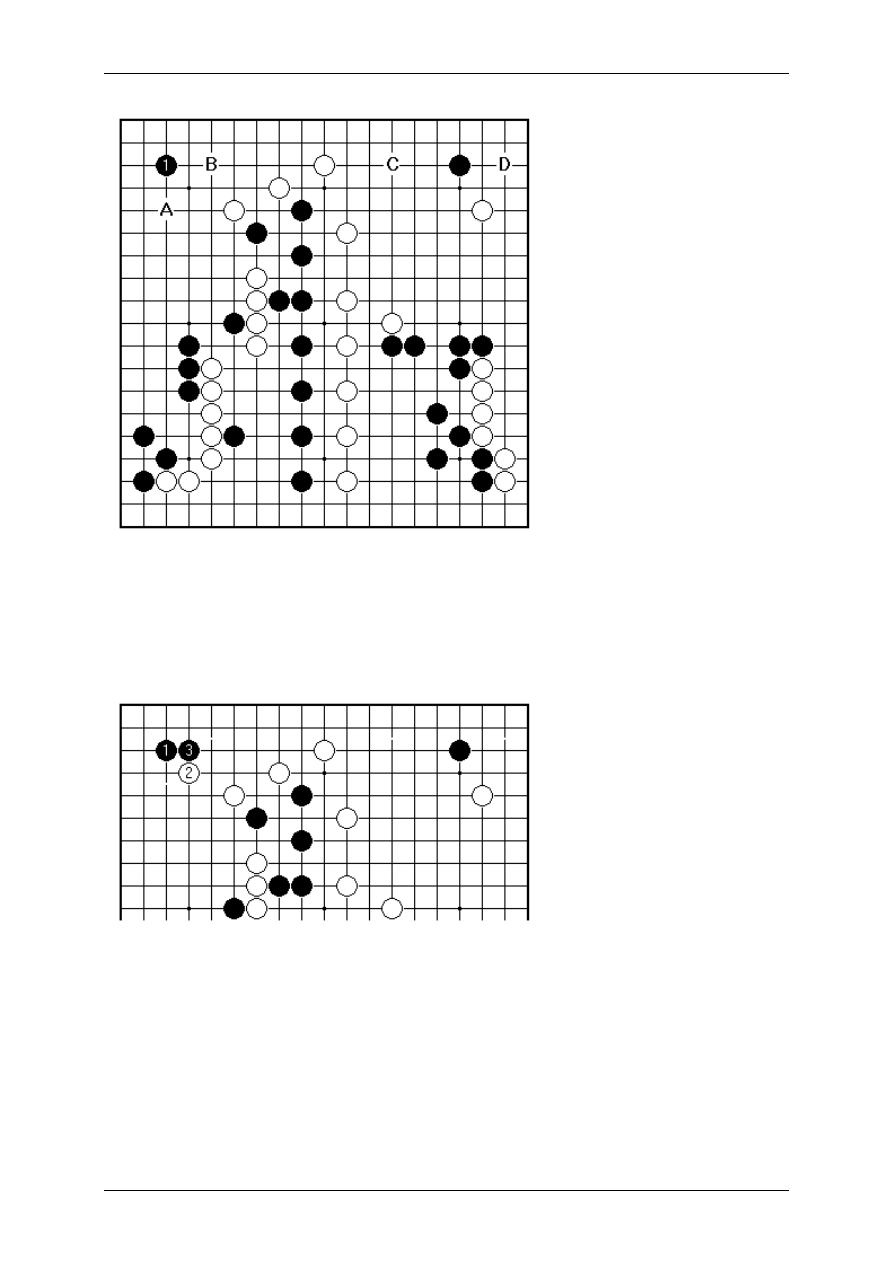
On Your Side by Charles Matthews, 3-dan
Page 136 sur 138
Black's next play was at 1 in the upper left corner. In this position the virtues of the
miai points A and B for Black are fairly clear. White B, Black A is unambitious for
White, while White A, Black B leaves White with serious weaknesses. If we look
instead at the top right corner, the points C and D also are like miai for Black, but
White might be able to develop a more effective attack here.
It seems that the traditional dislike of the 3 -3 opening was because of the
shoulderhit reply at the 4 -4 point, as with White 2 here. In this case White 2 is a
pointless play and Black 3 a quite adequate answer.
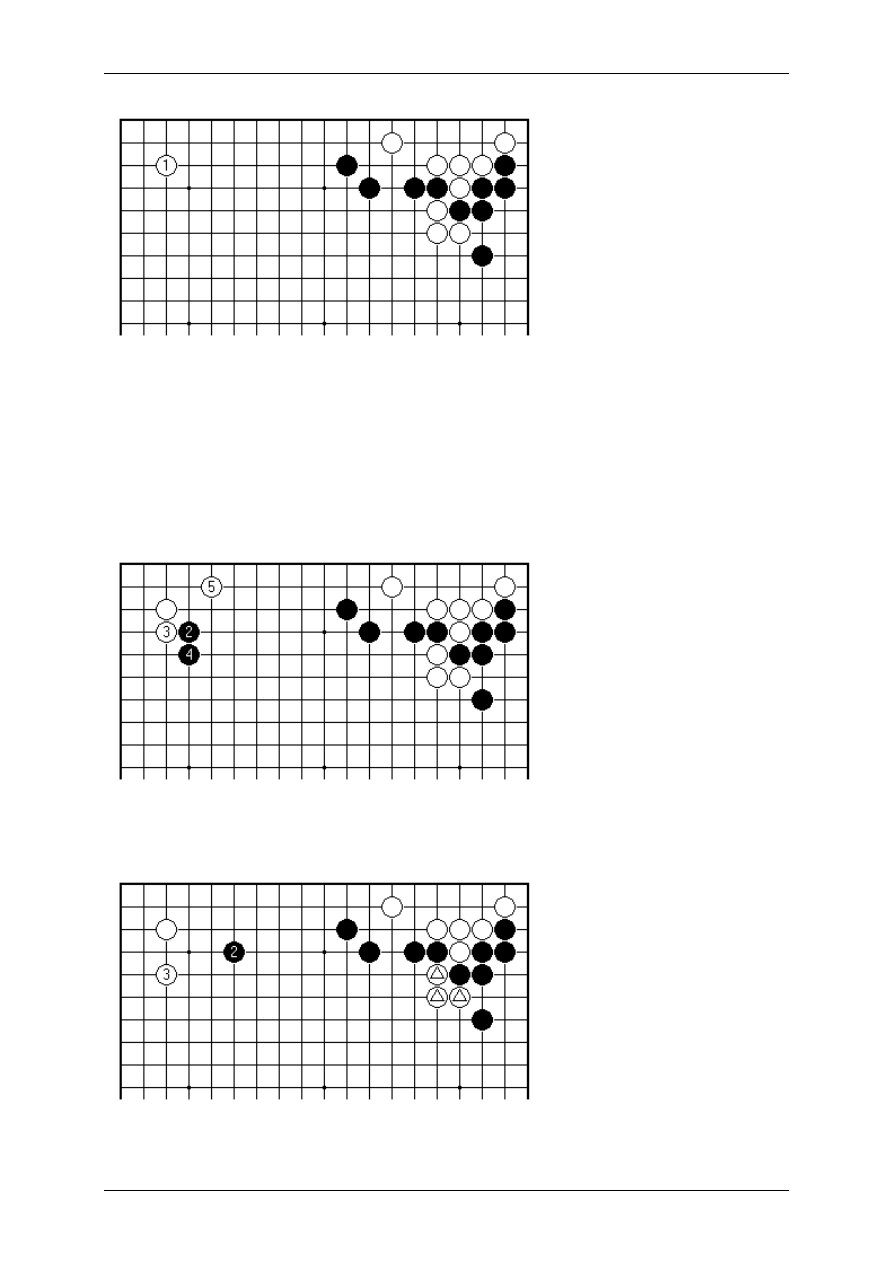
On Your Side by Charles Matthews, 3-dan
Page 137 sur 138
Reaching back into Japan of the nineteenth century, here is a position that might
have arisen in the celebrated sequence of victories of Shusaku of the Honinbo
house, in the 'Castle' or official games commissioned by the shoguns. In this game
Shusaku-Yasui from 1851 the first 19 plays were all in the top right corner, following
an opening pattern that is still current today.
Playing next at the 3-3 point upper left is a suggestion by Sanno (commentary in
Invincible: The Games of Shusaku).
In this case too the shoulderhit Black 2 is out of focus. White 5 is well placed to stop
Black using the stones on the top side in combination.
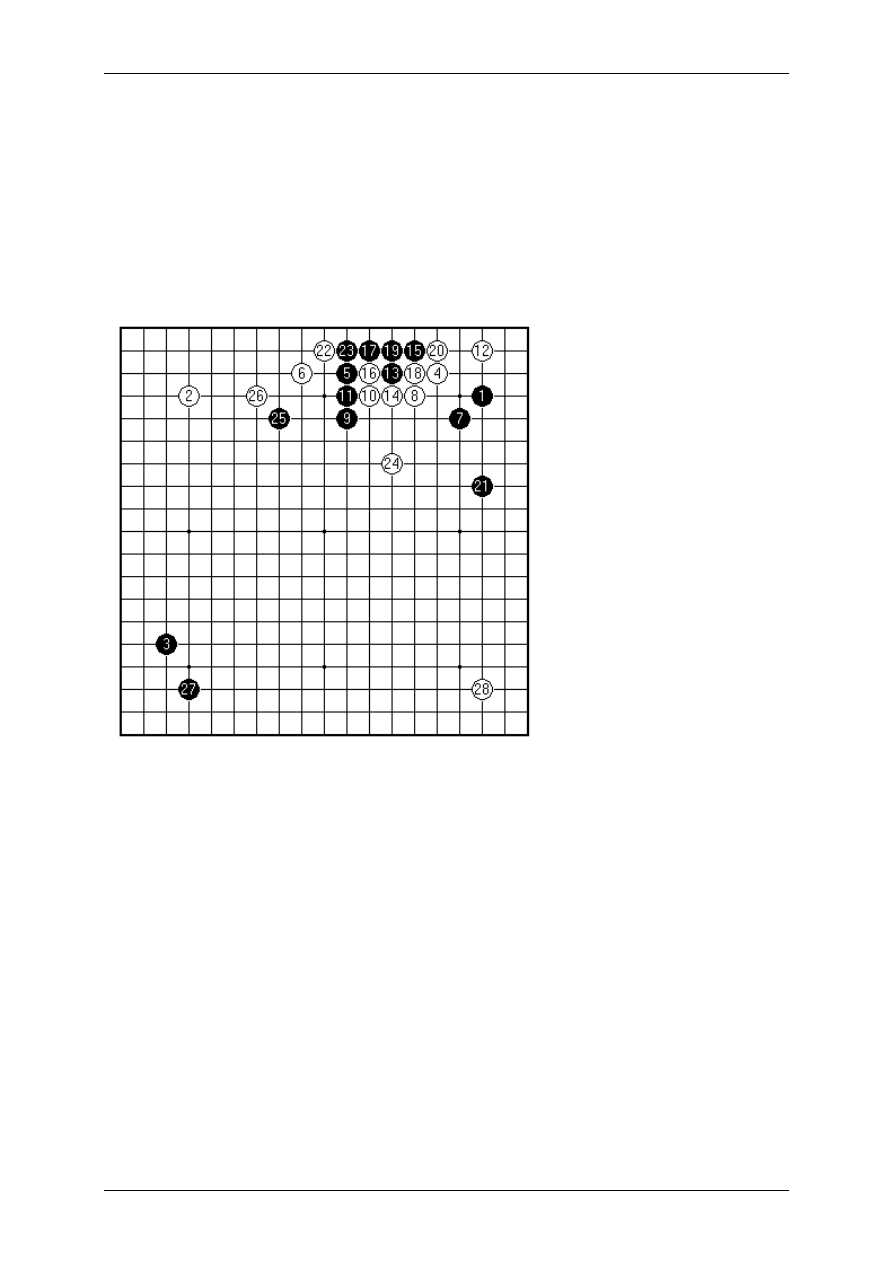
On Your Side by Charles Matthews, 3-dan
Page 138 sur 138
The more modern approach of Black 2 allows White quick life with 3. Very soon the
fate of the three marked white stones will be in question; the value to White of dealing
rapidly with the corner shouldn't be underestimated.
In the real game Yasui played a different way (at the 4-5 point), and consequently
didn't retain control of the corner. Well, modern Go has been the subject of intensive
research, though hardly exhaustive. In the case of the 3 -3 point new chapters of
technique have been opened up, starting rather tentatively in the 1930s, and
fashionably in the Sakata ascendancy of the early 1960s.
It is not however true to say that the 3-3 point was unknown in classical Go. Here is
another of Shusaku's games, from 1844; in it as White he occupies the lower right
corner at 3-3. The thinking seems in a way quite modern, with White 4 at 4-4 too.
Both 4 -4 and 3-3 plays favour rapid development, the second plays in the corners
being less urgent. (Black was Sanai Tokujiro, also of the Honinbo house, and a
travelling companion of Shusaku; this may well have been an exhibition game.)
In a diagonal pattern (Black 1 and 3 in opposite corners) each side is typically divided
between the players. Four shared sides, rather than two if Black 1 and 3 are along
one side of the board, can make for sudden complexity. The 3-3 point is often used
in contemporary Go by White to stake out one corner quickly. The assumption is that
fighting elsewhere will be quite enough to occupy White's attention.
Wyszukiwarka
Podobne podstrony:
Amon Amarth With Oden on Our Side
Polish On Your Desk Na Biurku 1
201 Best Questions To Ask On Your Interview
ECP Lost Teachings on Your Higher Self [OCR perfect]
Creating a Board aka Forum on your own PC !
Have me on your mind
Wren Boudreau Ice Cream on the Side
U2 Sometimes You Cant Make It On Your Own
Rolling Stones Time Is On My Side
How to Learn Any Language Quickly, Easily, Inexpensively, Enjoyably and On Your Own
John Kador 201 Best Questions to Ask On Your Interview
201 Best Questions To Ask On Your Interview
You are on your first military mission
I LOVE YOU BUT I’VE CHOSEN DARKNESS Fear is on Our Side CDLP (Secretly Canadian) SC123sc123
Gary Vaynerchuk Crush It! Why NOW Is the Time to Cash In on Your Passion
GAL Quick Start Setup Office 365 on your Windows Phone COMBINED AF104372237
Practise English on your own
więcej podobnych podstron