Page 1 of 18
Page
1
Grid-fu: A Practical Manual
Page 2 of 18
Page
2
Grid-fu: A Practical Manual
This Document is classified as
Hurf-Blurf. If you are not a
member or GARPA, a Goonswarm Director or a qualified Fleet
Commander, reading this document will cause your balls to shrivel
up and fall off, get cancer and/or AIDS.
Grid-fu: An Introduction
Everything you know about Grids is wrong.
Through experimentation and luck we have discerned not only the nature of grids, but a set of
techniques to quickly shape them to our advantage. We have dubbed this knowledge Grid-fu.
You may have heard people refer to the grid at this or that location as being strange, big or fucked up, but
in fact they were nothing of sort as that would imply that grids are of a fixed size or shape. The grid is
simply a subset of objects in space that are able to see each other. With knowledge of the underlying
code dynamics, it is possible to maintain that relationship regardless of speed or location.
Grid-fu makes it possible to quickly create multi 1,000 km warp-ins on grid with the target, grids within
other grids, and a variety of shapes useful for hiding forces or confusing and tricking opponents. This
knowledge has been used in the past to save POS, provide spots for fleets to load grids without the
hindrance of lag and create truly debilitating confusion among the enemy.
Lesson 1 – Expanding Grids
The "Natural" Grid
It should be remembered that
grids are only defined in space that contains objects (because grids are
generated on-the-fly by the server when needed). When you warp to a location, the server checks to see
if you're landing on a grid that has already been defined (by other objects in the vicinity). If you are, you
load that particular grid and your client attempts to render everything that it contains. If not, the server
creates a new grid, and you're all by yourself there (until someone warps to you).
Static celestial objects (
stargates, planets, moons, asteroid fields, cans, etc) create their own grids by the very
nature of their existence - they are an object in space. As such, when a system first loads on the server
after downtime,
grids are created for each of the static celestial objects present. As such, there is
always a grid present for these objects.
Page 3 of 18
Page
3
Grid-fu: A Practical Manual
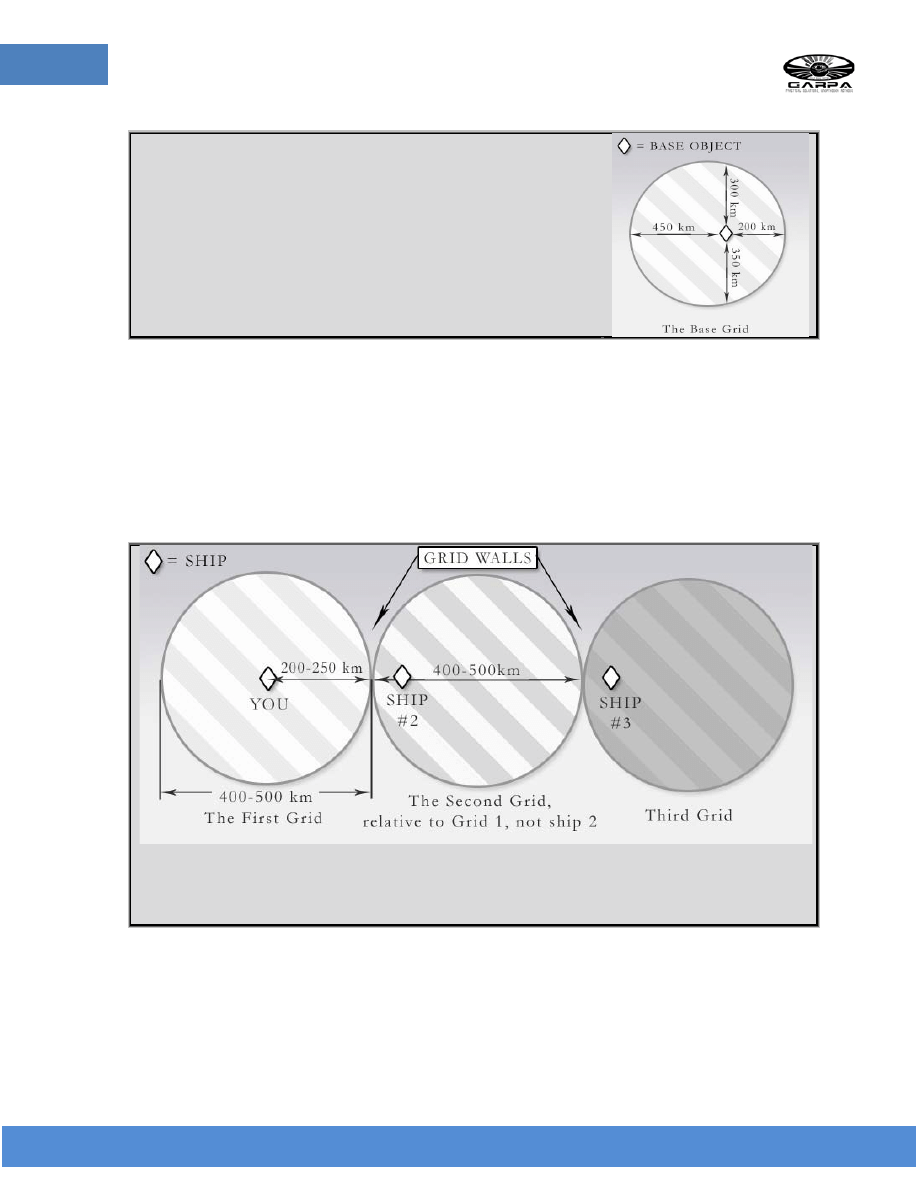
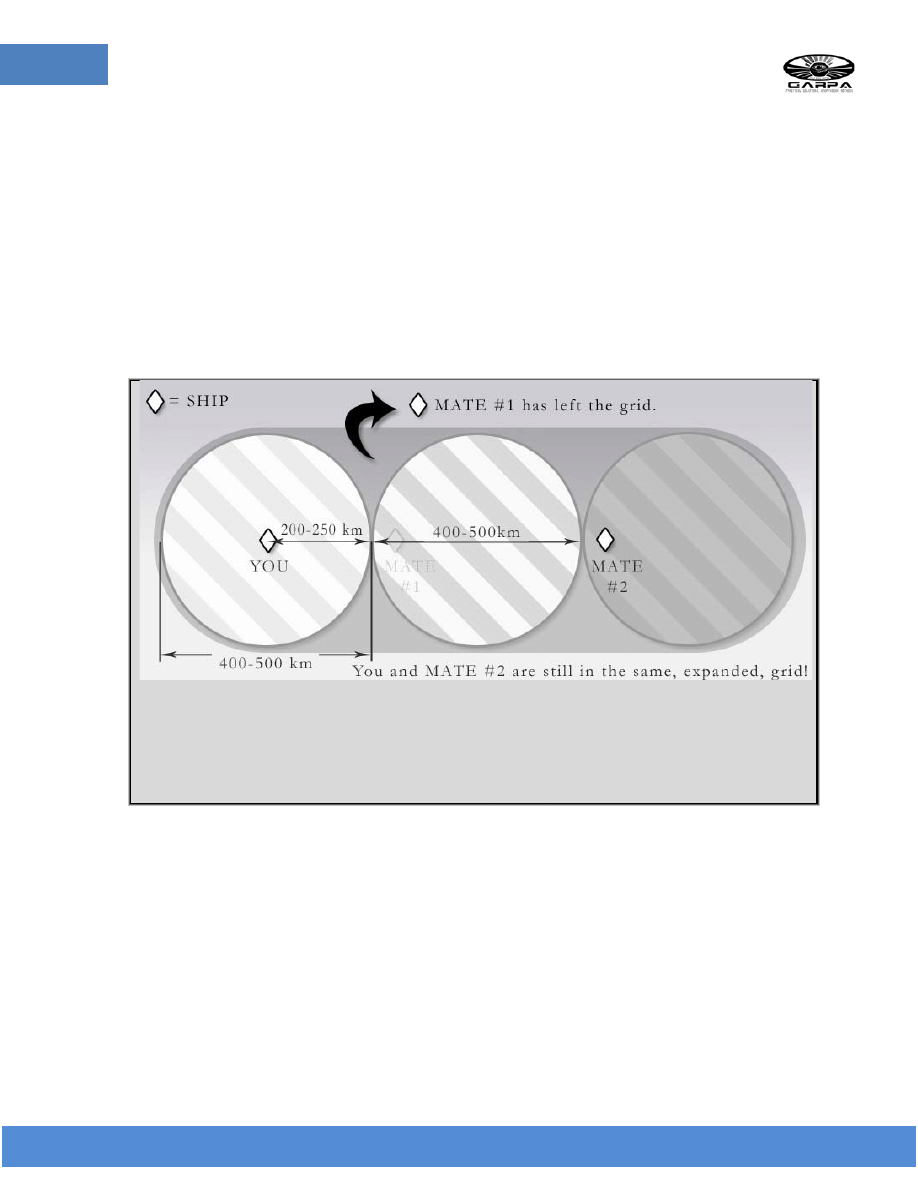
When grids are created, they seem to be (for the most part)
centered on the object that created them. Furthermore, they tend
to be about 400 to 500 kilometers across, meaning that you can go
roughly 200 to 250 km before "dropping off grid," at which point an
entirely new grid is created (though its position and orientation is
dictated not by your position, but by its
relation to the previously-
defined grid).
For example, if you warp to a bookmark in empty space, a grid is created at your destination, centered on
you. If your gang-mate warps to you, then motors away in a random direction, he'll typically travel about
250 km before he "drops off grid," at which point a new, contiguous grid is created. This boundary
between grids is hereafter referred to as the "
grid wall," and will be addressed in more depth in Lesson 2.
Remember that this second grid is also roughly 500km across, but is
not centered on the ship that made
it, but rather
centered relative to the original grid.
Example:
If the second ship stops immediately after crossing the grid wall, and a third ship were to follow it
onto the second grid, the third ship would need to travel another 400 to 500 km past the second to drop off
grid again and create a third grid.
Note that grids are dynamically created
and destroyed. If there's no object present to "hold a grid open,"
it is disposed of as soon as all of the objects within it are gone.
Page 4 of 18
Page
4
Grid-fu: A Practical Manual
Size Variation (or "That's not six inches!")
As indicated previously, the base grid is roughly 500 km across, meaning that traveling 250 km from the
center of the grid will trigger the creation of a new grid. However, CCP has correctly theorized that fleet
battles are ugly, messy affairs. The more objects are on a grid, the larger the "natural" size of that grid
grows (if it can - more on this below).
Experience has shown natural grid sizes
as large as 1200km present at gates during large fleet battles, as
well as at POSes while a fleet is idling there. It is clear that there is some kind of dynamic sizing going on
in these cases.
However, there is one immutable factor of grids, and that is that once created, they
can not be merged.
Furthermore, once a gridwall has been created, it cannot be moved. As such, a grid will only expand its
volume until it reaches a grid wall. If a gate or a POS had grids created around it such that boundaries
already existed, that grid would not be able to expand to accommodate a large, sprawling fleet fight, and
targets roughly 250km from the POS or stargate would drop off grid.
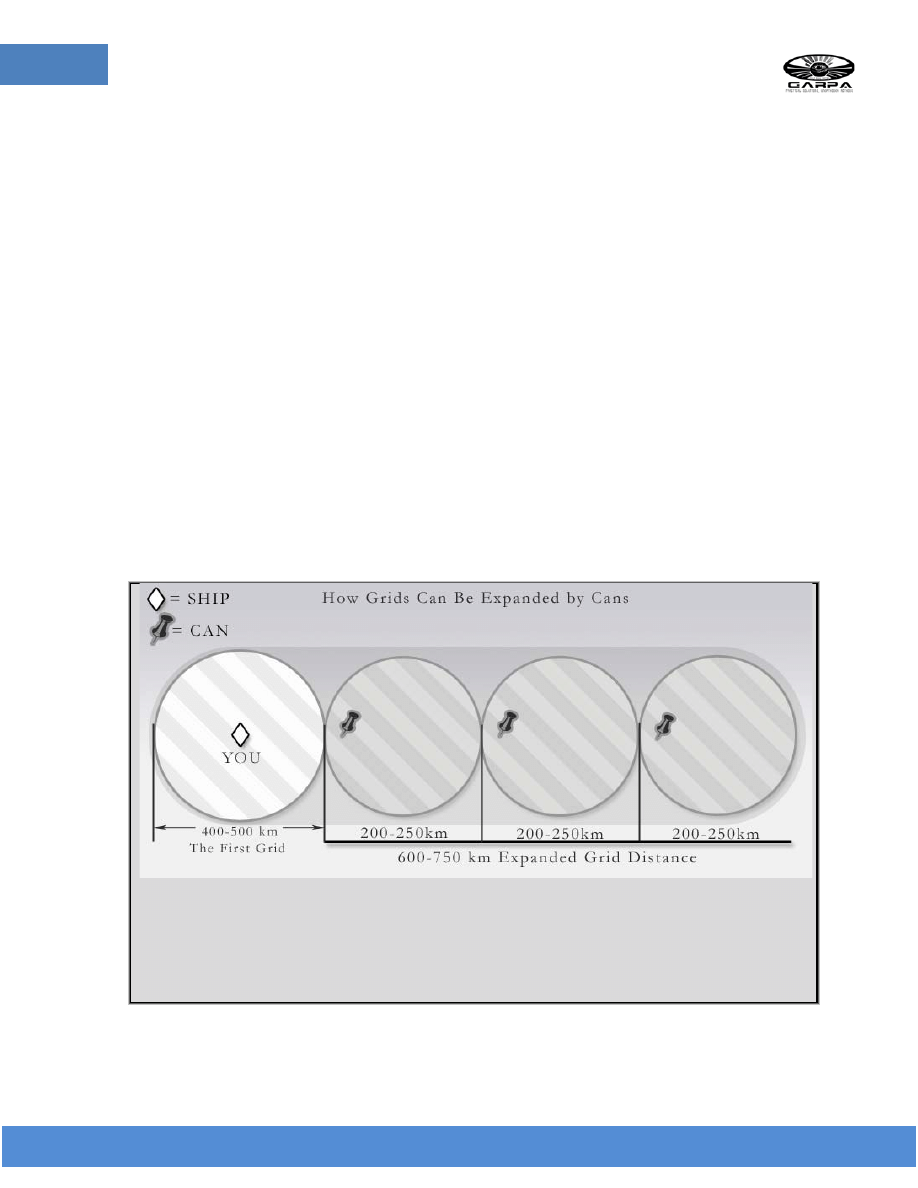
Grid Expansion
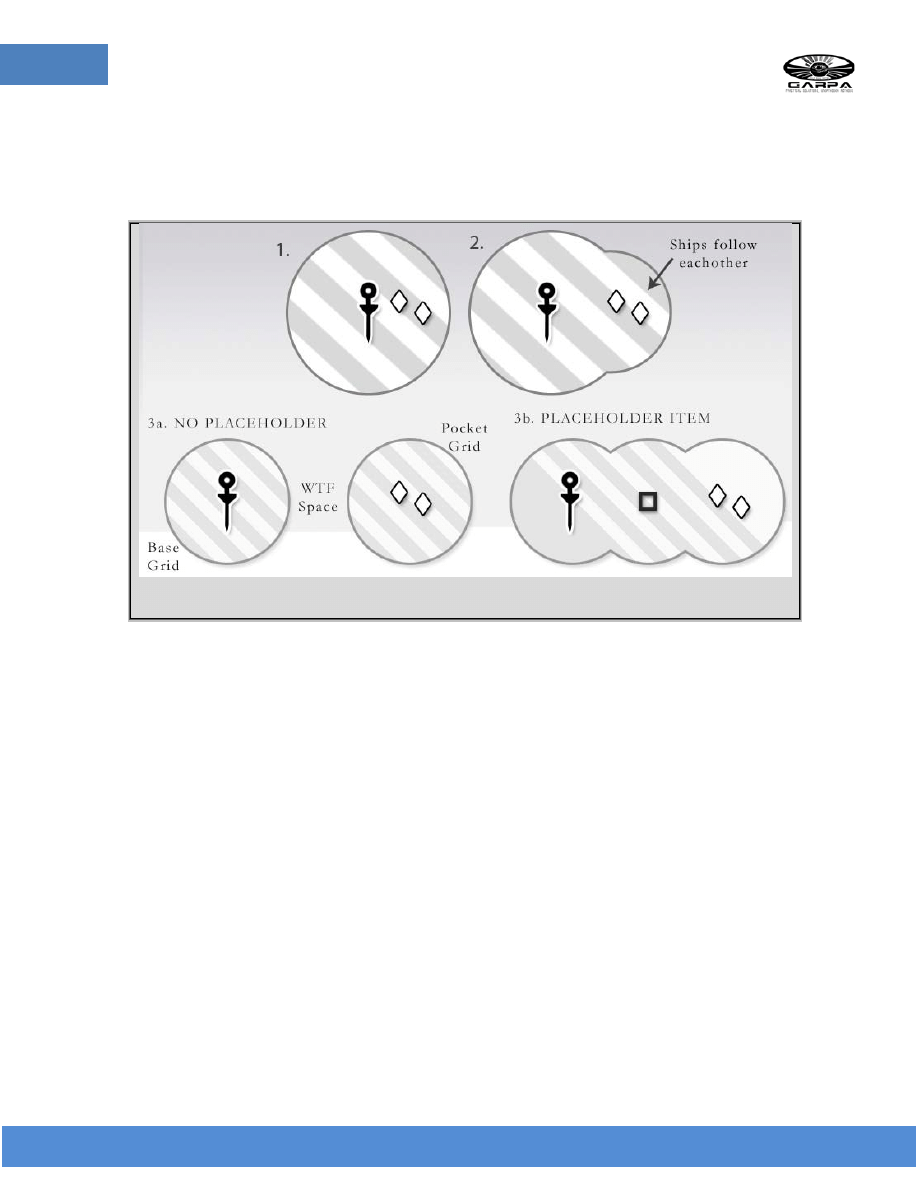
In addition to expanding because of a large number of objects, grids can be expanded manually. This can
be done because the grid always tries to keep objects that are within about 250 km of each other on the
same grid where at all possible, and because stationary objects can never swap between grids.
Example: You warp to your bookmark deep in space and cause a grid to be created. Your gang-mate warps to
you, and motors away at top speed. At 200 km away from you, he drops a jettison can. This can "holds the
grid open." Now in order to drop off grid, the second ship would have to go another 250 km away from the
can, or a total of 450km from you. And if he dropped another can at 200 km from the first can, the grid would
be held open again,
and he could travel 650 km from you before dropping off grid.
Page 5 of 18
Page
5
Grid-fu: A Practical Manual
Here's where the fun starts - there doesn't seem to be much of an upper limit on this kind of expansion
(so long as your patience holds out and you don't hit and existing grid wall). The Grid-Fu team has
successfully created grids that are 10,000 km long. That's right, you can be 10,000 km from another
object and it will still appear on your Overview. One obvious application of this is clear - you can create a
grid that is large enough to allow ships to arrive safely and load the grid without being in range of POS
guns, Doomsdays, or an enemy sniper fleet.
Holding a Grid Open
So long as two objects are on the same grid, that grid is held open. This occurs regardless of whether
things between them come or go.
For example: You have warped to your bookmark and a grid is created. A gangmate warps to you and goes
200 km away. A third gangmate warps to him and goes a further 200km away (400km from you). At this
point, the 2nd gangmate leaves. Even though you're 400km away from the nearest object, the grid is "held
open" and you will appear on each others' Overviews. So long as neither of you warps away, or drops off grid,
the grid is "held open."
It is important to note that
any object can be used to hold open a grid. Ships, cans, probes, and even
corpses work. Corpses in particular are especially useful.
They do not have an icon in space, and since
they no longer de-cloak ships, they are filtered out of most peoples' Overview in order to reduce lag. This
makes them a
virtually invisible method of holding open a grid.
If even more subtlety is called for,
cloaked ships can hold open a grid. Using this technique, a group of
Covert Ops or recon pilots can quickly expand a grid with no outward sign at all. This requires a little bit
of time and some good coordination, but it can be used to radically alter the size or shape of a grid
without alerting your enemy.

Page 6 of 18
Page
6
Grid-fu: A Practical Manual
Precise Navigation and Orientation in Space
Space is a confusing place, and being able to extend a grid in a specific direction requires you to be able
to fly a consistent heading for a long period of time. For many applications, you will be extending the
grid between celestial objects. In this case, maintaining your direction is very easy - you just fly towards
the appropriate moon, planet, star-gate, etc. Where things become slightly more difficult is where you're
trying to extend your grid towards an object that doesn't have an icon in space (or at least not on the grid
you happen to be on).
For these kinds of applications, the Tactical Overlay actually proves to be a really useful tool. What
makes it useful is its consistency - the flat plane of your Tactical Overlay is
always parallel to the system's
ecliptic plane (on which the sun and virtually all planets and moons lie). Also handy are the fact that
there are ranks of numbers illustrating various ranges at the four "cardinal" directions around the overlay.
By lining up your overview such that the highlighted disk is "flat" and zooming out, you can
rotate your
view to line up all of the numbers in a given cardinal direction, and then double-click the numbers. Voila!
You're traveling on a heading almost exactly along a cardinal line.
Since the "cardinal" directions are the same every time the Tactical Overlay is opened, you can rotate
your view to a "top-down" aspect, pick a moderately precise "clock" direction, rotate your view to that
direction, drop back down to the ecliptic, and again achieve a fairly precise heading.
"Why does this shit matter?" you might find yourself asking. It matters when you're trying to
coordinate
the movements of several Covert Ops ships on the same grid
without de-cloaking each other. Since no
one can see anyone else, it becomes very important to have a common frame of reference just to make
sure no one's about to do something boneheaded and blow any potential element of surprise. The
Tactical Overlay provides that common frame of reference.
Page 7 of 18
Page
7
Grid-fu: A Practical Manual
Tag-Team Grid Expansion
We've already seen ways in which a solo pilot dropping markers can "hold open" a grid and make it
expand to ludicrous dimensions. But there are easier ways, and one of them involves using a wingman.
Example: The two ships take turns when moving, capable of expanding a grid on their own. Also known
as
“the Wingman technique”
In this application, a pilot begins flying away from the central point in a grid. As the first pilot approaches
the magic 250km distance, his wingman warps to him. The wingman effectively then becomes the object
that is holding open the grid. Because neither pilot is going far enough to drop off-grid from the nearest
object that's holding open that grid, this process can be repeated ad nauseum.
In essence, the wingman is a moving jet can. Theoretically, a Rorqual could do this on its own simply by
heading in a given direction and tractoring the same can to itself every 200 km or so, though this would
be ridiculously slow and therefore mostly pointless.
What is less pointless is using an interceptor and a wingman to rapidly expand a grid. When you can
travel 5km+ per second, a grid can be expanded very quickly using the tag-team method. You can also
hide the wingman by using a Covert Ops or recon ship.
From the perspective of any observer on-grid, all they will see is the interceptor getting farther and
farther away, but never dropping off the grid. This is but one of the many ways grids can be altered in
such a way as to make observers think, "WTF?"

Page 8 of 18
Page
8
Grid-fu: A Practical Manual
Lesson 2 – Advanced Grids
Advanced grid shaping and grid structures
There are certain fundamental rules to shaping grids. Using these rules in combination allow grids to be
shaped into a variety of structures which can give a tactical advantage.
o
250, the pi of eve
250 is the magic number of natural expansion all objects imbue on the base grid in dead space. If a grid is
established at a center point with a single can, the edge of that grid will be between 250 and 600km from
the can. Each expansion done by dropping placeholders at the edge of the base grid will increase the size
of the grid in a bubble with a 250km radius away from the placeholder.
This is important to know when using the wingman technique, because 250 is therefore the farthest the
wingman can get from the lead ship before the lead ship will fall off grid.
o
Separate grids do not merge
Two independent grids will never merge into a single grid, no matter how you shape them. A grid wall is
established when placeholders are used to lock the edge of two grids in place. It is only a wall (as
opposed to an edge) if it is a hard barrier that does not move regardless of the ships on either side.
This is usually done by having two expansion objects at the very edge of each of the two grids such that
they may be physically 1km apart, but are invisible to each other.
o
Grid walls have different effects on different objects.
1. Area of effect weapons such as doomsdays, bubbles, exploding bombs and smartbombs
do
not cross grid walls. This was most notably proven when Deadtear’s first ever doomsday
failed to damage an interceptor that was only 5km away from the Titan and the time of
activation, due it their being on separate grids.
2. Fighters lose control when the slow boat across grid boundaries in pursuit of a target, unless
the target warps to the other grid in which case they follow the target into warp.
3. A launched bomb can and will travel across a grid wall before exploding.
Page 9 of 18
Page
9
Grid-fu: A Practical Manual
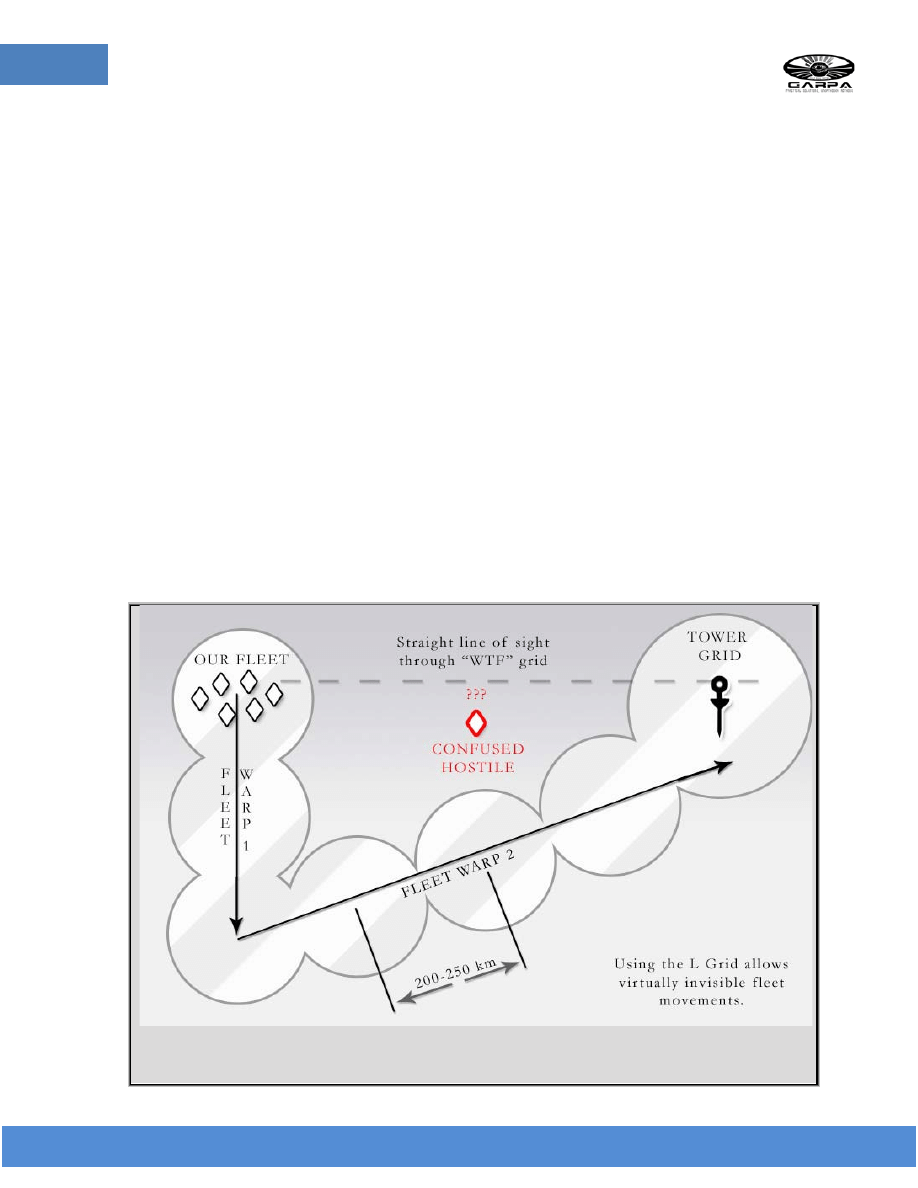
o
The “L” shaped grid
The L shaped grid is started in the same fashion as the previously mentioned 1000km long grid, except
that rather than continuing in a straight line, at some point the placeholders are placed at an angle to the
original line, such that the grid is continuous, but bent.
Traveling from the very end of the “L” to the origin point will cause the pilot to drop grid as it leaves the
“L” and then pick it up again as he approaches the origin. If the pilot wanted to make it from the end of
the “L” to the origin, he would have to travel along the original path of the grid.
o
The “WTF” Grid
This kind of grid is useful in that for an enemy interceptor to travel from the origin to a fleet that loaded
the grid at the end of the “L” they would drop grid and be confused if they traveled in the straight line.
That secret grid, trapped between two sides of a known grid is called the “WTF” grid because of the
reaction it causes in the pilots that pass into it.
The fleet, on the other hand will have loaded the grid at a safe distance, and then be able to travel along
the “L” using a series of on grid warps to end up at the enemy fleet, thus allowing engagement after the
grid has been fully loaded.
Example: The “L”-shaped grid and the “WTF” grid.
Page 10 of 18
Page
10
Grid-fu: A Practical Manual
o
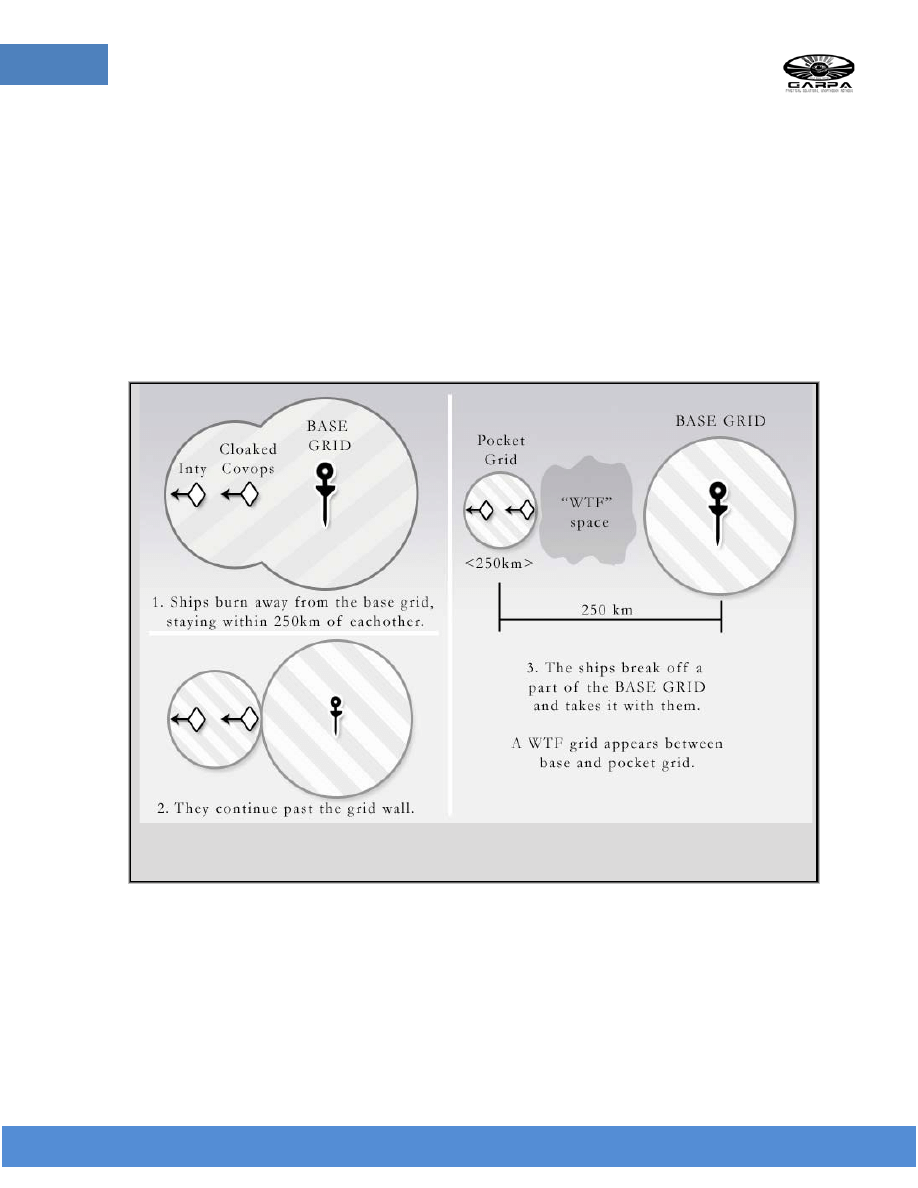
The Pocket Grid
If a grid is expanded long enough (700km+ without placeholders), either using the wingman
technique and no placeholders, or using placeholders which are destroyed or removed, the grid
will split into two separate pieces that are separated by a WTF grid.
There is no upwards limit to the distance that a grid can be split and pockets that are 10,000 km
away are not unheard of.
This means that you can be on grid with a POS at a distance of 10,000 km, able to see everything
on grid using your overview, but if a pilot tries to move between the two pockets they will fall
off into the WTF grid.
Example: Pocket grids – note the “WTF” space that is created by this procedure!
Any separate grid between a grid and itself is a WTF grid. All rules for grid apply and in the case
of large pocket grids there will naturally be more than one WTF grid between the two pockets.
There only limit to the number of grids that can touch on each others boundaries is geometric.
The largest number of grids observes touching on each other was seven.

Page 11 of 18
Page
11
Grid-fu: A Practical Manual
Lesson 3 – Grid Shaping
With the knowledge that you cannot merge grids and that you can expand grids in various directions.
How can this be applied to modify other grids than the one that you are on? The ability to shrink and
shape grids to our will is a powerful tool. It has been employed a few times successfully, if somewhat
haphazardly and uncoordinated. Hopefully, this document will show you what is possible and how to
employ it so that it can be used as a tactic regularly.
Imagine we have two grids, called A and B. A is some grid that contains an object such as a Tower that
we are trying to defend. B is the other grid that we enter as we fly away from the Tower. In most cases,
A is spherical and has a radius of around 350km if it hasn't already been fucked with. This can also be
applied to any grid. You can shrink grids at stargates, stations, safespots, etc.
Wouldn't it be nice to make A really small? Forcing hostile fleets to get really close to the Tower in order
to target it and denying them room to maneuver. By employing one pilot in an interceptor or covert ops
this is very easy to accomplish. The general theory is to expand B towards the Tower; thereby, forcing A
to get smaller and smaller until it hits a hard size. This is all possible because grids cannot be merged. As
you stretch B towards the Tower, A has to shrink in order to accommodate B and the wall between the
two grids is moved closer and closer to the Tower.
Example: How shrinking a grid works
Page 12 of 18
Page
12
Grid-fu: A Practical Manual
How to Shrink Grids
It’s very easy to shrink a grid and is something that can be setup before a conflict and bookmarks can be
made to quickly re-shrink the grid. General Steps:
1. Pilot starts at the Tower and chooses a direction to fly towards.
2. Start burning away from the Tower.
3. When you fall off-grid. Stop the ship, drop a can/corpse/etc, and make a Bookmark.
1. Name the bookmark something meaningful.
4. Start flying back towards the Tower.
5. When you get back on-grid with the Tower, stop and turn back around.
6. When you fall off-grid again you should see your first can/corpse/etc. Stop the ship, drop a
can/corpse/etc, and make a Bookmark.
7. Repeat steps 4-6 until you hit a hard wall.
1. Normally, this will occur when you are about 140km from the Tower.
Example: Shrinking grids with another grid and the grid wall.
Page 13 of 18
Page
13
Grid-fu: A Practical Manual
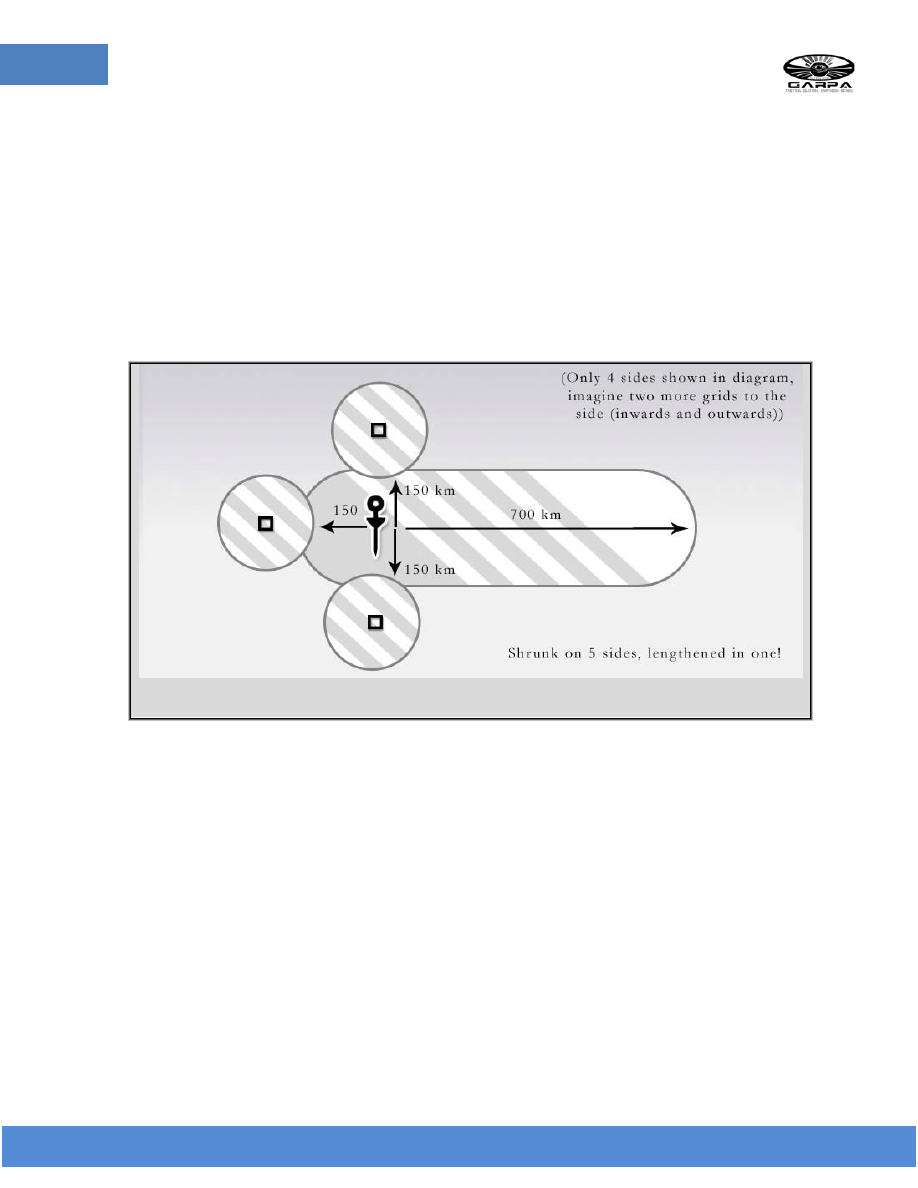
Caveats to Shrinking Grids
• You can only shrink a grid in 5 directions. The 6th direction will most likely be
elongated. It seems that the "volume" of a grid can only be made so small.
• You do not need to fly out in all 5 directions to shrink a grid. In most cases, you only
need to fly out in 3 directions and you'll have shrunk the grid sufficiently enough.
• When shrinking a grid, you should determine the likely directions the enemy will come
from. Those are the directions you will want to shrink towards. For example, towards
entry stargates or even enemy towers.
Example: If you shrink a grid from five directions, the sixth one will enlarge, not shrink!
Why Shrink Grids?
I really hope you aren't asking yourself this... It’s not going to win a fight for you; but, it can help swing
the tactical advantage towards you if employed correctly.
Advantages:
• YOU dictate the shape of the battlefield
• YOU force the enemy into a box and lessen the advantage of range
• YOU can setup traps by combining this with WTF grids
Use your imagination and think how you can take advantage of these tactics.

Page 14 of 18
Page
14
Grid-fu: A Practical Manual
Lesson 4 – Tactical Structures
Long grid loads
Creating long grids for warp-in points for fleets has its advantage, mainly that the fleet can fully load the
grid prior to engagement.
However, there are disadvantages as well. For one, even using the wingman technique it can take several
minutes to create a proper load point. And then once the grid is created, and the fleet warps in the
element or surprise is lost, and the enemy now has more time than they would have otherwise to decide
whether to engage or warp away. Lastly, you only have about 30 seconds of true safety, before it’s
possible that an enemy covops has probed you out.
Remember that as soon as an object that can be locked by a warp drive, such as cans and wrecks, is
dropped near the fleet, all advantage given by distance is lost.
Celestial bridges
This is when a pocket grid is setup thousands of km away in order to all a fleet to view the contents of a
target grid and select their exact destination, long before they end up on the target grid. This can be
useful if you want distinct classes of ships to find their ways to specific points in an engagement.
They are somewhat safer than a simple long grid due to the distances involved, but also have the
disadvantages of the long grid. Additionally, because there is a WTF grid in between, it will not speed up
load time at the destination grid.
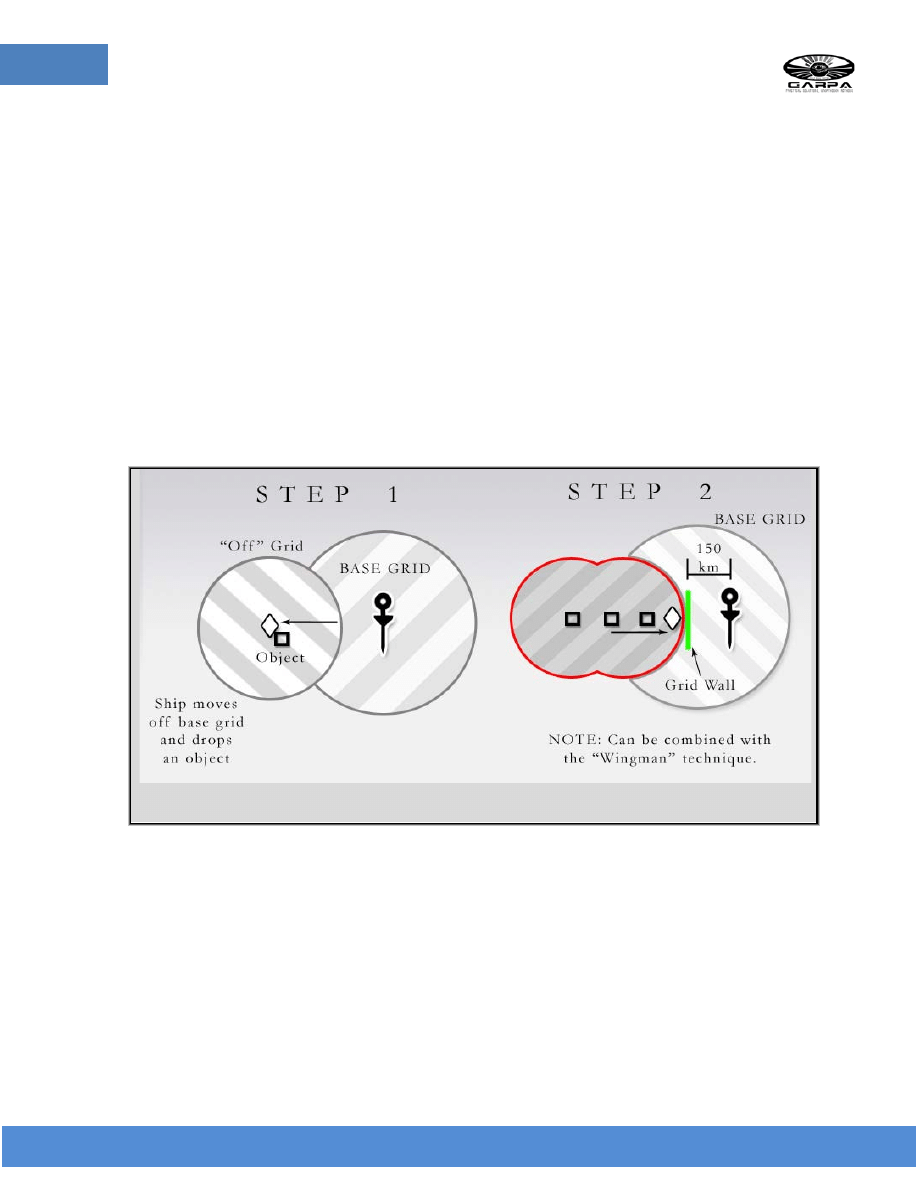
Off Grid loads
A grid wall is established between a base grid, where the enemy resides, and the “off grid” a grid that is
separate from the base grid, but directly adjacent to it.
The fleet then warps into the “off grid” before slowboating across the grid wall. When that wall is placed
as a tactically advantageous range, (say sniper range off a POS), the fleet has an added element of safety
because ships that are taking too much damage can cross back onto the off-grid to break locks, and visit
the pit crew. This can also sew a lot of confusion into the enemy fleet if they come to engage and
everyone crosses back into the off grid.
Page 15 of 18
Page
15
Grid-fu: A Practical Manual
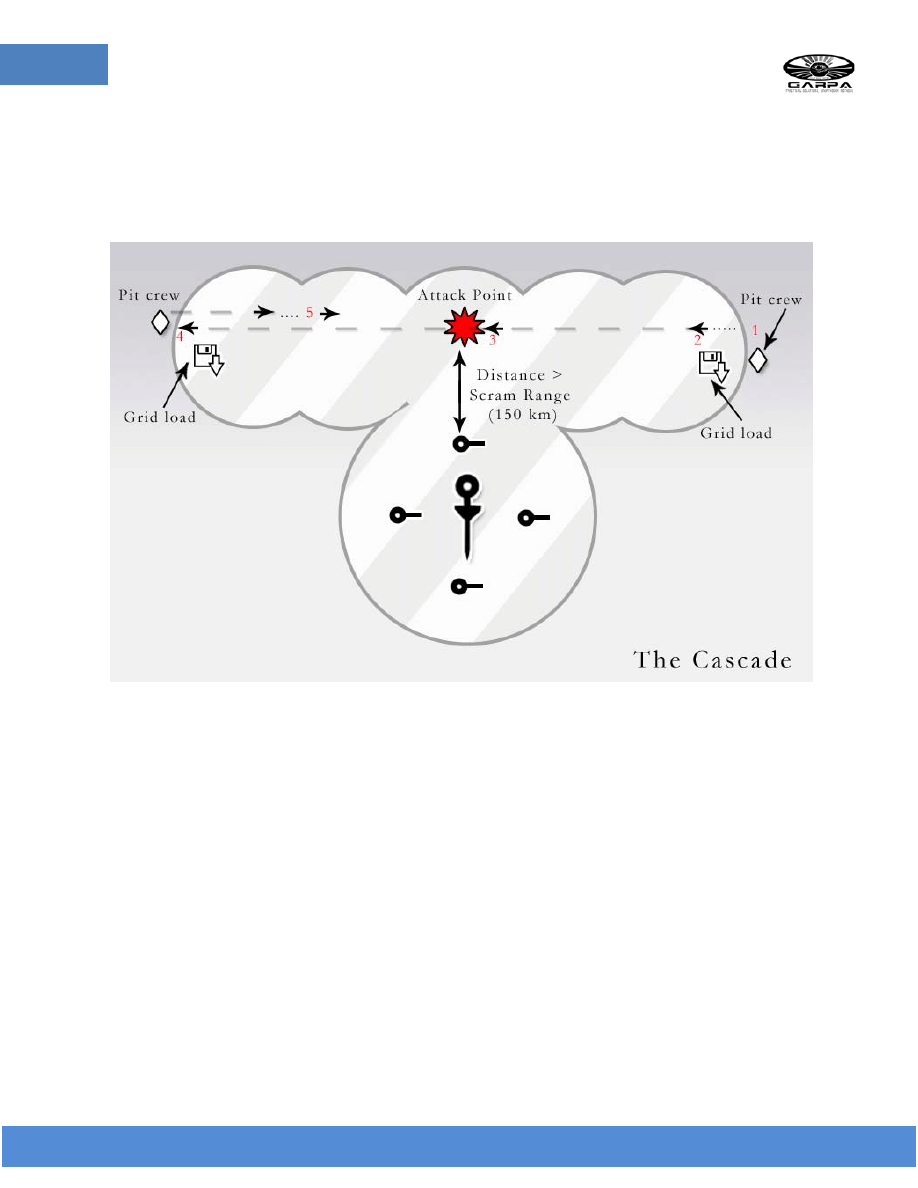
The Cascade
A cascade is where a grid is shaped around an enemy POS to allow a series of inline warps for grid load,
engagement and disengagement. Generally it is done as a straight line that runs tangentially across the
POS at sniper range.
Snipers load grid at a safe distance, warp into position and engage, and while engaging they stay at align
speed. Then they warp off to an off-grid safe spot where they can turn around, heal and repeat the
process.
In essence it is a very tight rapid fire drive by.
Boxing a POS
Shortening the grid to a POS in a defensive measure by creating a giant single grid all the way around the
POS using cans. Basically: creating a defensive shell around the POS. When doing this, it can be
extremely helpful if someone drops a cyno at the pos. Since the cyno shows up on the screen even
though it is at the POS grid, it makes it much easier to orient around the POS.
Gate Camps
If you are trying to use grid-fu at a gate, you can determine whether or not you are on grid with the gate
by targeting it. If you can lock the gate, you are on grid with the gate. If you cannot target the gate, you
are not on the same grid.

Page 16 of 18
Page
16
Grid-fu: A Practical Manual
Useful tools of note:
A. Ships:
Covops:
Advantages:
• Warps cloaked, so following as a wingman can make it
harder to tell what you are doing.
• Only ship that can manipulate a grid close up to an
enemy POS.
• Usually carries probes.
• Can go relatively fast.
• Best all around grid-fu implementation ship
Disadvantages:
• Speed it moves when
cloaked is frustrating for
an FC if he is waiting on
you to get the grid shaped.
• Expensive if blown up.
Intercecptor:
Advantages:
• Speed, best lead ship for the wingman technique.
Disadvantages:
• Can’t work close to a
hostile POS.
Hauler:
Advantages:
• Cargo capacity allows for many empty containers to be
held.
• Containers deploy faster than ejecting cargo, (which will
greatly speed up shaping) and containers can be
anchored for more permanent setups.
Disadvantages:
• It’s a hauler.
B. Corpses: Works as a placeholder, does not decloak a covops, and cannot be warped to.
C. Probes: Hold space, and can be destroyed remotely.
D. Bookmarks: You can create and drop these as you like and never run out. Sometimes this is the
only placeholder you can find.

Page 17 of 18
Page
17
Grid-fu: A Practical Manual
Lesson 5 – Anti Grid-Fu
So at this point you may be wondering: what do our enemies know about grids? We have observed them
using off-grid grid loads, which require locking walls. We have also observed them inside grid pockets.
This implies at least a basic understanding of how grids in eve work. Anti-grid-fu is the art of fucking over
other peoples attempts to shape grids.
Signs that grid-fu is being used include:
It is possible for grid-fu to be used right under your nose without knowing, two cloaked covops can easily
stretch a grid out to about 700km, and you would never know without constantly checking the
boundaries. The same goes for shrinking grids. However there is a lot that cannot be accomplished
without dropping placeholders and this is where you are going to have the best luck finding and
disrupting others.
Signs to look for:
• Ships farther than 400km off the main fleet.
• Bridges of objects, often in a straight line going off into the distance.
• A quick blip in your overview prior to landing on a destination grid
• Objects, ships and wayward drones in an off grid at a POS.
• Grids that are unusually short near a POS, gate or station.
Probes and bookmarks. One of the easiest ways to find ships off grid, or on the other side of the wtf
grid, is to probe them out. This is why you should expect that every long grid load will have to be trashed
after being used. Because a smart enemy will have probed you out, and at the very lest bookmarked the
position.
By that token,
fleets can only stay hidden inside the wtf grid for so long before they are probed out.
Their biggest defense is that it can be difficult to discern whose ships are whose when probing, and if the
enemy is 160 km from a POS but off-grid, it can be confusing.

Page 18 of 18
Page
18
Grid-fu: A Practical Manual
Don’t get fooled by the wtf grid. So you see an enemy pod 700km away from you, and when you start
burning towards it in your 10km/s interceptor looking for a cheap kill. After about 30sec you drop grid.
Welcome to the wtf grid. At this point most people will get confused, and have to warp back to the
starting point, and that pod will still be there.
The answer to killing it, is to continue burning after
you drop grid. Droping a marker just after changing the grid will help you gauge distance, at least for
250km, or alternatively you brought a stopwatch and can measure your distance with that. In either case
you will eventually enter the pocket grid. Whether you make the kill or not,
bookmark the location to
prevent its future use.
Breaking other people’s off grid grid-loads
An off-grid grid-load only works if there is a placeholder locking the boundaries between the two grids. If
you remove the placeholder, you can move the boundaries. Removing enemy placeholders in general
will fuck with their plans. Removing the middle links in a bridge will open up a wtf grid, making that long
grid-grid load less useful as entering the destination grid from a wtf grid, also requires a grid load.
Document Outline
Wyszukiwarka
Podobne podstrony:
ESMAP mini grid design manual
ESMAP mini grid design manual
PANsound manual
als manual RZ5IUSXZX237ENPGWFIN Nieznany
hplj 5p 6p service manual vhnlwmi5rxab6ao6bivsrdhllvztpnnomgxi2ma vhnlwmi5rxab6ao6bivsrdhllvztpnnomg
BSAVA Manual of Rabbit Surgery Dentistry and Imaging
Okidata Okipage 14e Parts Manual
Bmw 01 94 Business Mid Radio Owners Manual
Manual Acer TravelMate 2430 US EN
Drunken Style Kung Fu
manual mechanika 2 2 id 279133 Nieznany
4 Steyr Operation and Maintenance Manual 8th edition Feb 08
Oberheim Prommer Service Manual
cas test platform user manual
Kyocera FS 1010 Parts Manual
juki DDL 5550 DDL 8500 DDL 8700 manual
Grid Trading
Forex Online Manual For Successful Trading
więcej podobnych podstron