A r t J e w e l r y • J a n u a r y 2 0 0 5
1
polymer clay
beginner
Making
waves
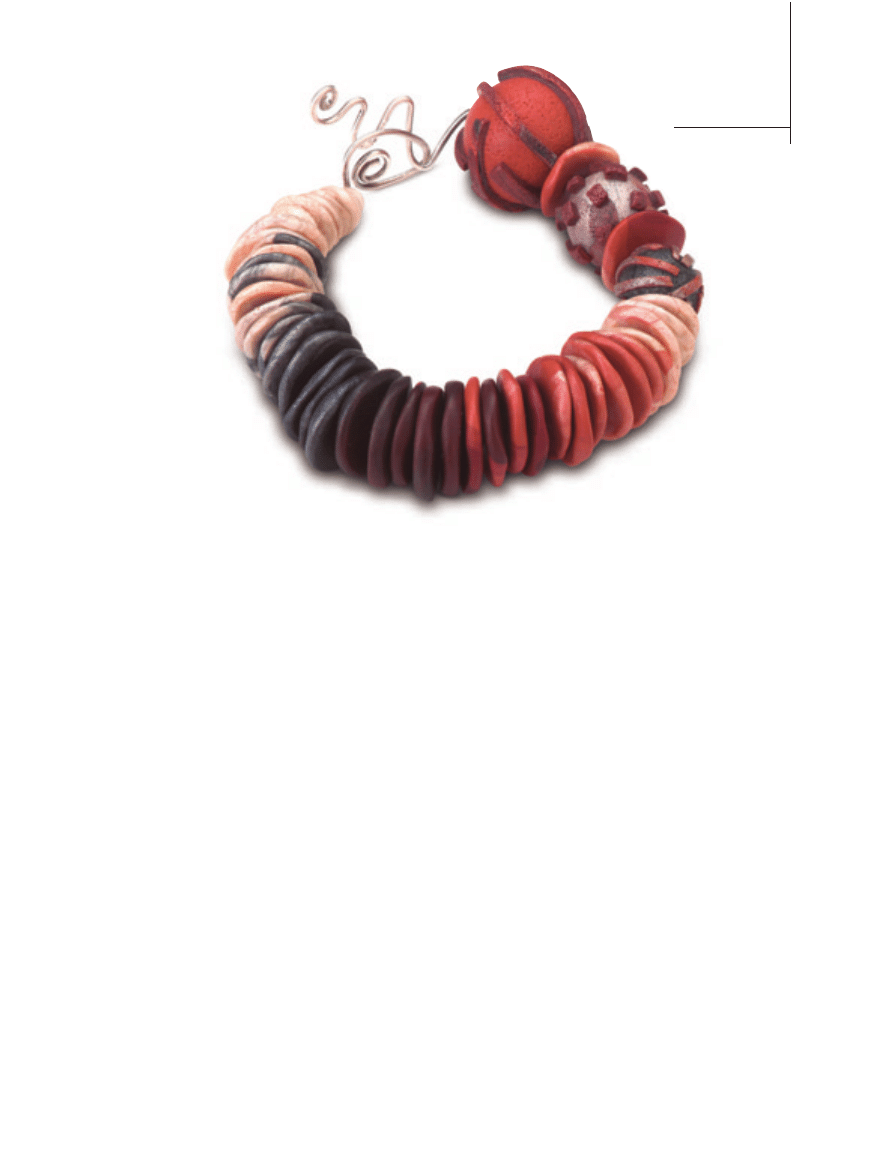
Undulating disks and color-blocked beads create a bracelet
with its own ebb and flow.
by Ronna Sarvas Weltman
D
ive headfirst into the world of polymer clay with this disk bracelet.
The design leaves ample room for creative license, and it’s an easy
beginner piece with sophistication enough for those of more
advanced skills. A succession of clay disks resembling large heishi beads flows
across the wrist in a gradation of colors, while the size of the disks rises and
falls like the tide. The piece flows together gently with a curvaceous sterling-
silver clasp—a perfect finishing touch to this wavy illusion.

A r t J e w e l r y • J a n u a r y 2 0 0 5
2
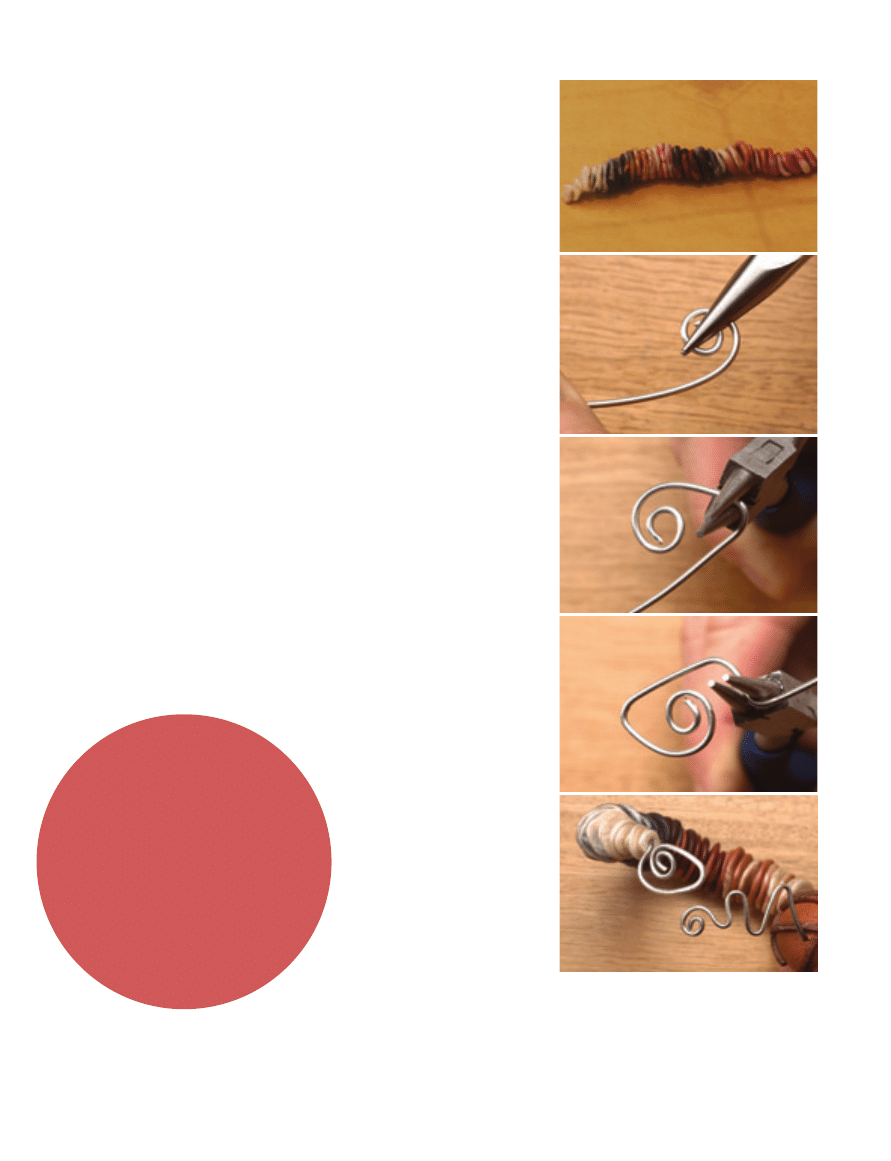
[1–2] Create spheres. Choose colors that complement each other
well but have enough contrast to make your bracelet interesting.
Separately condition each color of clay and form balls or spheres of
varying sizes in each color. You’ll need to make enough so that the
bracelet will fit properly. (The 9-inch [22.8cm] bangle as shown
features 45 disks and 3 beads.) Line up the balls from small to large
and back to small again to be sure neighboring colors work well with
each other.
If you’d like a blended effect for some of the spheres, use a pasta
machine or manually combine a few different solid-color balls and roll
them into a snake. Once they’re rolled, cut small or large portions and
roll each portion into a sphere. You also can add a pinch of another
color to a solid-color sphere and roll it into a ball again to get a more
defined striation. (Editor’s note: Different colors have different
saturation levels. A little bit of black added to pearl will look much
deeper or more saturated than a little bit of yellow.)
[3] Create disks. Flatten each clay ball between your thumb and
forefinger to make a disk; maintain the order in which you lined up the
spheres in steps 1–2. The disks at each end of the bracelet should be
smaller than the disks in the middle. That way the bangle will appear
to “undulate.” Pinch around the edges of each disk to give them more
dimension. Then hold each disk with the thumbs and forefingers of
both hands and twist toward you with one hand and away from you
with the other. This will give each disk a slightly warped or wavy
shape. Poke a hole in the middle of each disk using a needle tool or
toothpick. Take care to make the hole large enough for the 14-gauge
wire you will be using. Since polymer clay doesn’t shrink upon baking,
there’s no need to factor that into your hole size.
[4] Create three beads. Make three spheres in successive sizes—
small, medium, and large—and decorate them with clay strips, squares,
or impressions. Be sure to form the balls firmly; if you leave pockets of
air, your beads may crack when baking. To give the beads texture, roll
them on 36-grit sandpaper. Make a hole through each bead large
enough to fit 14-gauge wire. Once you’ve embellished the beads,
lightly tap the decorations into place. Then gently roll the bead in your
hands so the additions adhere firmly. Roll the bead over the sandpaper
again to texture the embellishments. These beads will be placed next
to the clasp on the bracelet to add flair.
1
4
3
2
Since these beads have an organic
appearance, the fingerprints you leave on
them are part of their charm and appeal—
the artist’s signature, so to speak. However,
if you’re looking for a slicker look, smooth the
disks with a little water after you’ve formed
them and pinched the edges, but before you
twist them to give them dimension. Another
option would be to wear surgical gloves while
forming the disks.
The great fingerprint
controversy
■
Complementary colors of polymer clay
■
14-gauge sterling-silver wire
tools
■
Pasta machine (optional)
■
Heavy plastic sheet or Teflon® surface
■
Tissue blade (optional)
■
Disposable baking sheet
■
36-grit (extra coarse) sandpaper
■
Oven or toaster oven reserved for
nonfood use
■
Tongs
■
Wire cutters
■
Roundnose pliers
■
Chainnose pliers
■
Hammer or mallet (optional)
■
Steel bench block or anvil (optional)
materials
[5] Check measurement and bake. Check the bracelet’s length by
temporarily stacking the disks together. Measure the length of the
disks and the three beads, and compare that measurement to your
wrist measurement, adding
1
⁄
2
–1 inch (1.3–2.5cm) for comfort and the
clasp. Remember to take into account that the disks are wide and will
stand off your wrist somewhat, which means you need to make the
bangle longer than a standard bracelet would be. Remove or add disks
to tailor the fit.
Line the disks up on your baking surface. Place them in the order in
which you will string them to keep from having to regroup them later.
While baking, disks should lie flat. Bake the disks and beads
according to the manufacturer’s directions and allow to cool completely.
To avoid flattening one side while baking round beads, fold a
narrow piece of paper in half lengthwise, rest the folded part of the
paper between the slats of the rack in your toaster oven, and then
place the beads in this “cradle.” This way, they won’t be resting on a
flat surface as they bake and thus they’ll keep their shape. Don’t worry
about burning the paper—the bead will bake at 265°F, and paper
doesn’t burn at that temperature. Use tongs to remove the beads from
the oven and immediately place the pieces in ice water for a few
moments to harden the polymer even more.
Assemble the bracelet. Double-check the lineup of your disks to
make sure you are satisfied with the gradation in color and size. Then
string the disks and beads onto 12 inches (30.5cm) of 14-gauge wire,
centering the polymer pieces on the wire so that there is an equal
amount of wire exposed on each end. Bend the wire to shape it to
your wrist; remember that bending hardens the wire and will help it
keep its form.
[6–9] Create the clasp. You can either add a premade clasp or create
one similar to the project bracelet shown here. In this example, one
side of the clasp is a large, C-shaped coil, and the other side undulates
in a snakelike pattern and ends with a small coil. Use roundnose and
chainnose pliers to help shape the clasp. Hammer the
clasp on a steel bench block if you desire a
flatter look; hammering also hardens the
wire, making it less prone to bend
out of shape. Refer to Basic
Techniques on our website for
additional information on
wireworking.
Z
A r t J e w e l r y • J a n u a r y 2 0 0 5
3
9
8
7
Consider using more colors, or
using the same number of colors
and adding more undulation. For
example, rather than repeating a
three-color disk pattern (red, purple,
brown; red, purple, brown), go
from red to purple to brown, then
reverse back to purple and red
again. This forward and
reverse pattern will increase
your bracelet’s wavelike
appearance.
tips
on waves
5
6

Make jewelry
that makes a
statement . . .
your statement
Looking for projects that use different
materials such as metalwork, wirework,
stone, glass, polymer, and enamel? Then
Art Jewelry
is the magazine for you!
Discover the secrets you need to create
breathtaking pieces that express your own
distinctive style like never before! Whether
you want to learn a new technique, try a
different material, or get ideas for your
own jewelry projects, there’s something for
you in
Art Jewelry!
Order online at
Enter code: I4XZ1
or call 800-533-6644
Monday-Friday, 8:30 a.m. - 5:00 p.m. Central Time.
Outside the U.S. and Canada, call 262-796-8776, ext. 661.
I4XZ1
Subscribe
Today!
04X1384
Wyszukiwarka
Podobne podstrony:
Polymer clay Glass Act bead
art clay bracelet 0106
Degradable Polymers and Plastics in Landfill Sites
Development of Carbon Nanotubes and Polymer Composites Therefrom
17 Money Making Candle Formations
Polymer Processing With Supercritical Fluids V Goodship, E Ogur (Rapra, 2004) Ww
Inorganic Polymers
Propylene Polymers
Fundamentals of Polymer Chemist Nieznany
Polymer Supported Reagents
Electrochemical properties for Journal of Polymer Science
Dendronized Polymers
Modeling of Polymer Processing and Properties
Newell, Shanks On the Role of Recognition in Decision Making
Metal Containing Polymers
Making Robots With The Arduino part 1
Ethylene Polymers, HDPE
Amorphous Polymers
Hoffrage How causal knowledge simplifies decision making
więcej podobnych podstron