http://www.instructables.com/id/Ugly-Duckling-Robot/
Ugly Duckling Robot
on February 8, 2015
Table of Contents
.
.
.
.
.
.
.
.
.
.
.
.
.
.
.
.
.
.
.
.
.
.
.
.
.
.
.
.
.
.
.
.
.
.
.
.
.
.
.
.
.
.
.
.
.
.
.
.
.
.
.
.
.
.
.
.
.
.
.
.
.
.
.
.
.
.
.
.
.
.
.
.
.
.
.
.
.
.
.
.
.
.
.
.
.
.
.
.
.
.
.
.
.
.
.
.
.
.
.
.
.
.
.
.
.
.
.
.
.
.
.
.
.
.
.
.
.
.
.
.
.
.
.
.
.
.
.
.
.
.
.
.
.
.
.
.
.
.
.
.
.
.
.
.
.
.
.
.
.
.
.
.
.
.
.
.
.
.
.
.
.
.
.
.
.
.
.
.
.
.
.
.
.
.
.
.
.
.
.
.
.
.
.
.
.
.
.
.
.
.
.
.
.
.
.
.
.
.
.
.
.
.
.
.
.
.
.
Step 1: Assemble Your Materials
.
.
.
.
.
.
.
.
.
.
.
.
.
.
.
.
.
.
.
.
.
.
.
.
.
.
.
.
.
.
.
.
.
.
.
.
.
.
.
.
.
.
.
.
.
.
.
.
.
.
.
.
.
.
.
.
.
.
.
.
.
.
.
.
.
.
.
.
.
.
.
.
.
.
.
.
.
.
.
.
.
.
.
.
.
.
.
.
.
.
.
.
.
.
.
.
.
.
.
.
.
.
.
.
.
.
.
.
.
.
.
.
.
.
.
.
.
.
.
.
.
.
.
.
.
.
.
.
.
.
.
.
.
.
.
.
.
.
.
.
.
.
.
.
.
.
.
.
.
.
.
.
.
.
.
.
.
.
.
.
.
.
.
.
.
.
.
.
.
.
.
.
.
.
.
.
.
.
.
.
.
.
.
.
.
.
.
.
.
.
.
Step 3: Cut Out Your Body Parts
.
.
.
.
.
.
.
.
.
.
.
.
.
.
.
.
.
.
.
.
.
.
.
.
.
.
.
.
.
.
.
.
.
.
.
.
.
.
.
.
.
.
.
.
.
.
.
.
.
.
.
.
.
.
.
.
.
.
.
.
.
.
.
.
.
.
.
.
.
.
.
.
.
.
.
.
.
.
.
.
.
.
.
.
.
.
.
.
.
.
.
.
.
.
.
Step 4: Hook Up Your Electronics.
.
.
.
.
.
.
.
.
.
.
.
.
.
.
.
.
.
.
.
.
.
.
.
.
.
.
.
.
.
.
.
.
.
.
.
.
.
.
.
.
.
.
.
.
.
.
.
.
.
.
.
.
.
.
.
.
.
.
.
.
.
.
.
.
.
.
.
.
.
.
.
.
.
.
.
.
.
.
.
.
.
.
.
.
.
.
.
.
.
.
.
.
.
.
.
.
.
.
.
.
.
.
.
.
.
.
.
.
.
.
.
.
.
.
.
.
.
.
.
.
.
.
.
.
.
.
.
.
.
.
.
.
.
.
.
.
.
.
.
.
.
.
.
.
.
.
.
.
.
.
.
.
.
.
.
.
.
.
.
.
.
.
.
.
.
.
.
.
.
.
.
.
.
.
.
.
.
.
.
.
.
.
.
.
.
.
.
.
.
.
.
.
.
.
.
.
.
.
.
.
.
.
.
.
.
.
.
.
.
.
.
.
.
.
.
.
.
.
.
.
.
.
.
.
.
.
.
.
.
.
.
.
.
.
.
.
.
.
.
.
.
.
.
.
.
.
.
.
.
.
.
.
.
.
.
.
.
.
.
.
.
.
.
.
.
.
.
.
.
.
.
.
.
.
.
.
.
.
.
.
.
.
.
.
.
.
.
.
.
.
.
.
.
.
.
.
.
.
.
.
.
.
.
.
.
.
.
.
.
.
.
.
.
.
.
.
.
.
.
.
.
.
.
.
.
.
.
.
.
.
.
.
.
.
.
.
.
.
.
.
.
.
.
.
.
.
.
.
.
.
.
.
.
.
.
.
.
.
.
.
.
.
.
.
.
.
.
.
.
.
.
.
.
.
.
.
.
.
.
.
.
.
.
.
.
.
.
.
.
.
.
.
.
.
.
.
.
.
.
.
.
.
.
.
.
.
.
.
.
.
.
.
.
.
.
.
.
.
.
.
.
.
.
.
.
.
.
.
.
.
.
.
.
.
.
.
.
.
.
.
.
.
.
.
.
.
.
.
.
.
.
.
.
.
.
.
.
.
.
.
.
.
.
.
.
.
.
.
.
.
.
.
.
.
.
.
.
.
.
.
.
.
.
.
.
.
.
.
.
.
.
.
.
.
.
.
.
.
.
.
.
.
.
.
.
.
.
.
.
.
.
.
.
.
.
.
.
.
.
.
.
.
.
.
.
.
.
.
.
.
.
.
.
.
.
.
.
.
.
.
.
.
.
.
.
.
.
.
.
.
.
.
.
.
.
.
.
.
.
.
.
.
.
.
.
.
.
.
.
.
.
.
.
.
.
.
.
.
.
.
.
.
.
.
.
.
.
.
.
.
.
.
.
.
.
.
.
.
.
.
.
.
.
.
.
.
.
.
.
.
.
.
.
.
.
.
.
.
.
.
.
.
.
.
.
.
.
.
.
.
.
.
.
.
.
.
.
.
.
.
.
.
.
.
.
.
.
.
.
.
.
.
.
.
.
.
.
.
.
.
.
.
.
.
.
.
.
.
.
.
.
.
.
.
.
.
.
.
.
.
.
.
.
.
.
.
.
.
.
.
.
.
.
.
.
.
.
.
.
.
.
.
.
.
.
.
.
.
.
.
.
.
.
.
.
.
.
.
.
.
.
.
.
.
.
.
.
.
.
.

http://www.instructables.com/id/Ugly-Duckling-Robot/
Intro:
Ugly Duckling Robot
This is a fun and easy toy that is sure to delight any children and terrify any cats that you may have.
It is a mechanical duck that flaps its wings as is rolls forwards.
The one I made is mainly composed of recycled materials and requires very few tools, although obviously you could make a longer-lasting version by cutting out the
same pattern pieces in wood or metal.
Enjoy!
Step 1:
Assemble Your Materials
1. Corrugated cardboard to make the two body pieces
2. A Cereal box to make the wings, tail, and bill.
4. Two toy motors (I used the ones from
).
).
6. Two large toy wheels and one small toy wheel.
7. 3 AA batteries and a battery holder.
8. Electrical wire (I used 24 gauge steel).
9. Heavy wire to make the crankshaft.
10. 2 Chopsticks
11. 2 nails
12. Hot Glue
13. A sock, to make the duck's head.

http://www.instructables.com/id/Ugly-Duckling-Robot/
Step 2:
Make Your Crankshaft.
There are many ways to make a crankshaft, and your best option will depend on how you have to connect to your motors, and what kind of tools you have to work with.
In my case, the motors had a pre-attached hollow rotating shaft, but it was too wide for my wire to fit snugly and too thin for me to want to drill through. Thus, I used the
double-bend to allow myself to "pinch" the crankshaft in place.
For those who have a snugly fitting crankshaft, I recommend using the simple U-Bend shown in the pictures above.
I recommend making the crankshaft first, because the rest of the duck can be sized around this piece.
To make the pinch shaft:
First, cut a piece of strong wire roughly 8 cm long.
Next, use your pliers to make a "Z" shape bend at either end of the wire. Each leg of the Z should be just slightly shorter than the motor shaft (in my case, 0.75 cm).
Now, Stick the ends of the wire inside each motor shaft, and use your pliers to pinch them down, as necessary.
You should now have a shaft that rotates in a small circle.

http://www.instructables.com/id/Ugly-Duckling-Robot/
Image Notes
1. Alternative Crankshaft
Step 3:
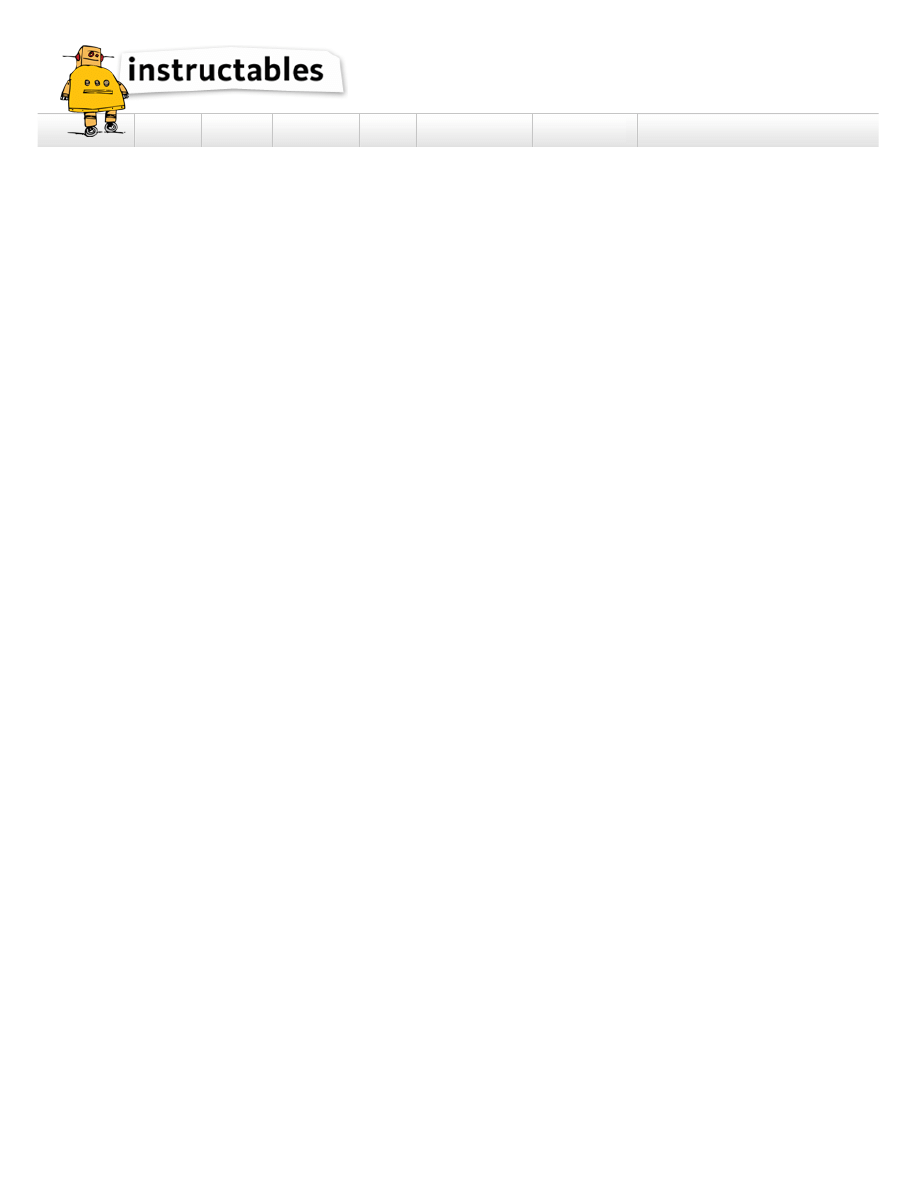
Cut Out Your Body Parts
Measure the width of your motors + crankshaft.
This will be the width of your duck body.
For the length of the body, make sure you have enough room for your battery pack and switch to fit above the motors.
The size of the wings and the bill are not terribly important, and can be adjusted to suit your fancy.
If you'd like to, you can paint your body parts to make your robot a slightly-less-ugly duckling.
http://www.instructables.com/id/Ugly-Duckling-Robot/
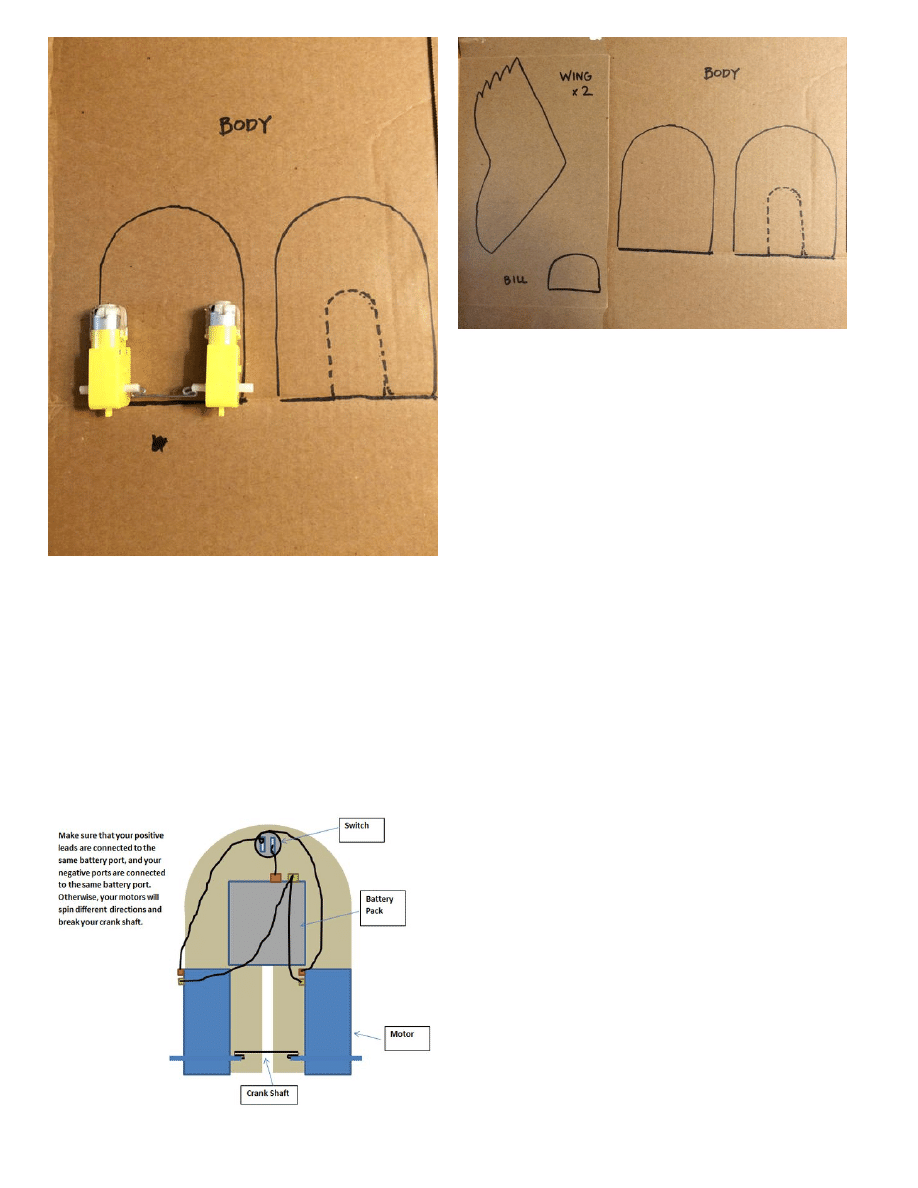
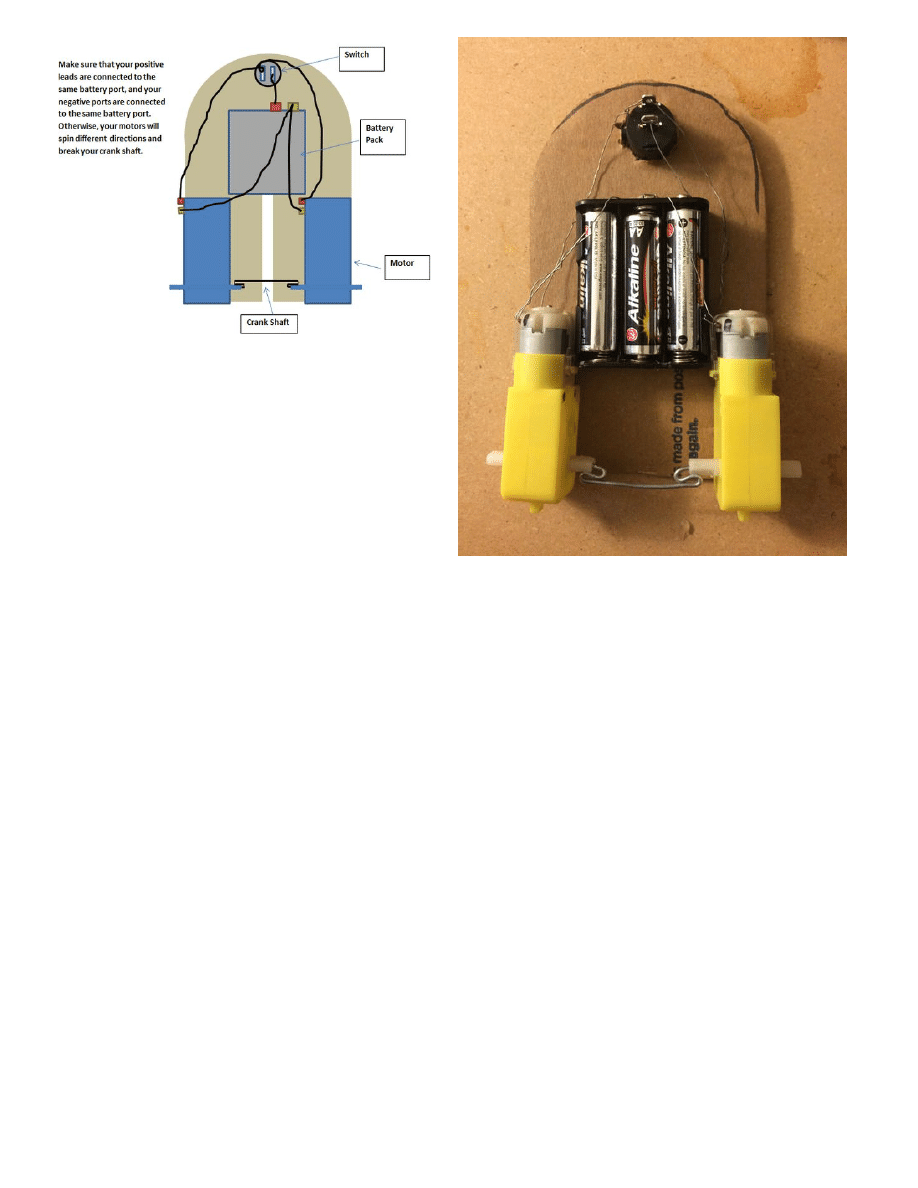
Step 4:
Hook Up Your Electronics.
I made the mistake of attaching most of my electronics to the bottom body piece of the duck, making it difficult to get at the batteries once assembled.
Here's what you should do instead.
Take the top body piece of the duck (the one with the long slit it in):
1.
Hot glue your motors to the cardboard in the bottom left and bottom right corners. Make sure the motors are aligned the same way (i.e. positive contact on top,
2.
negative on bottom).
Your crank should have plenty of room to rotate. If it doesn't, cut duck body as needed.
3.
Glue Your battery pack on above/between the motors.
4.
Cut a hole and stick you switch through so that the prongs are available.
5.
Connect the negative leads of the motors to the negative lead of the battery pack.
6.
Connect the positive leads of the motors to one one prong of the switch (it doesn't matter which one).
7.
Connect the other prong of the switch to the positive lead of the battery pack
8.
When you flip the switch, both wheels should now rotate forward at the same speed.
9.
Now you can glue the bottom body piece on to the duck, but cut a flap so that you can access the batteries.
10.
http://www.instructables.com/id/Ugly-Duckling-Robot/
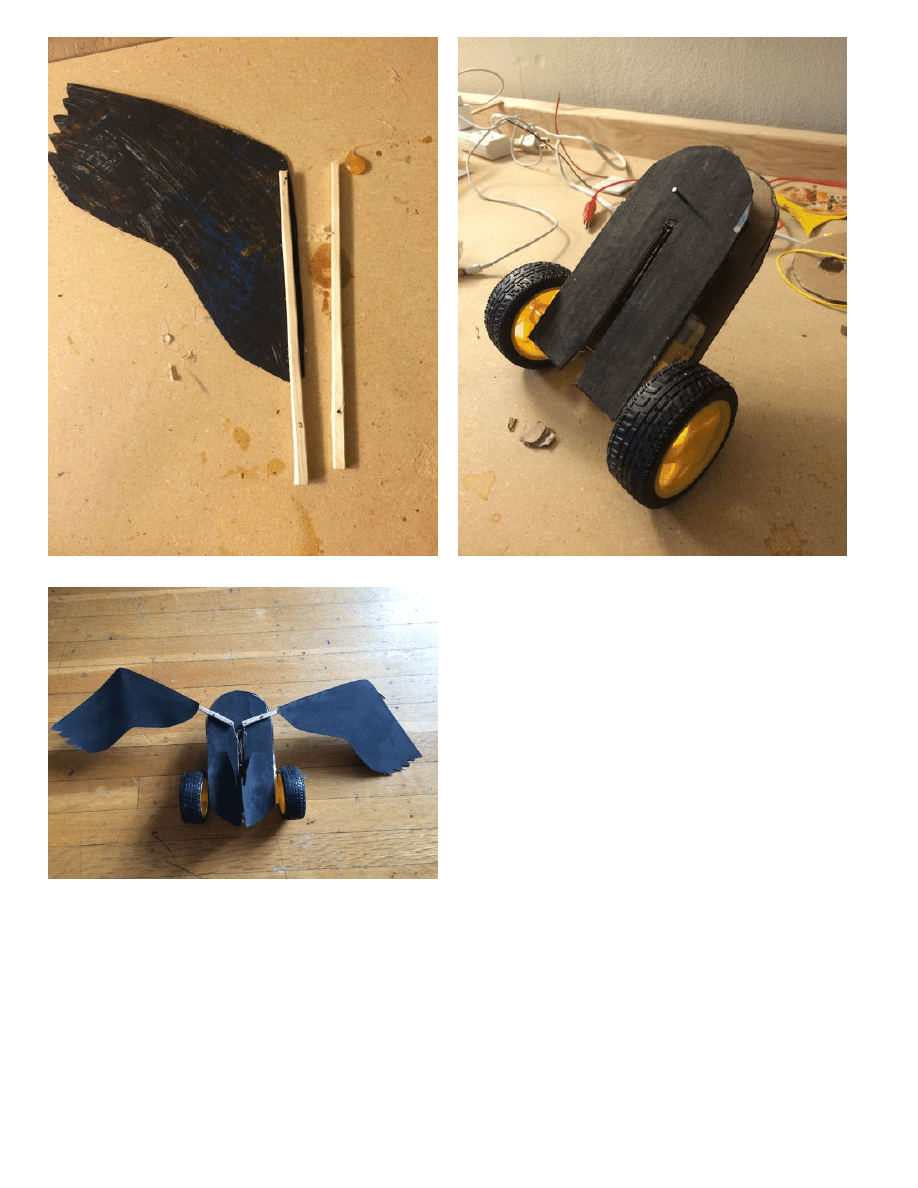
Step 5:
Attach Your Wings
1. Cut your wings out of the cereal box (I painted mine black).
2. Drill hoes in the thicker end of two chopsticks, one right at the end, and one 2.5 cm up the shaft. These will serve as joints.
3. Glue the chopsticks to the wings, leaving the side of the chopsticks with two holes protruding by roughly 4 cm.
4. Draw two dots on the duck body, with the bottom being 9 cm from the bottom of the body, and the top being 1.5 cm from the nearest side.
5. Poke a nail through the hole in the chopstick, through the cardboard, and into the second piece of cardboard. It should be loose enough that the wing can rotate
around the nail, but not so loose that it moves up and down the nail.
Put a drop of hot glue on the underside of the body to keep the nails in place.
6. Now, take a piece of thin wire or string. tie one end to the hole in the end of the chopstick, wind it around the crankshaft, and tie the other end to the other chopstick.
Note: the part would around the crankshaft must be able to rotate around the crankshaft, so don't make it too tight.
7. When you turn the switch on, the crankshaft should now pull the bottoms of the wings down, causing them to flap. Adjust string length until you're satisfied with the
range of motion.
http://www.instructables.com/id/Ugly-Duckling-Robot/
Step 6:
Finishing Touches
Add on your wheels, a head and a tail to make your robot look more duck-like.
I created my head by stuffing a sock with some crumpled tin foil, and supporting it by a long piece of wire.
The tail is just another piece of cardboard, bent in half and glued to the body piece.

http://www.instructables.com/id/Ugly-Duckling-Robot/
Step 7:
Enjoy!
Set this little guy loose and watch it chase down small children, house pets, and slow-moving adults.
Enjoy!!

http://www.instructables.com/id/Ugly-Duckling-Robot/
Related Instructables
by
by
by
5-Minute
Project: The
WowWee
Robotics
Keychain
by
Advertisements
Comments
Wyszukiwarka
Podobne podstrony:
Nuelow Ugly Ducklings and Ice Queens
The ugly duckling
Projektowanie robót budowlanych w obiektach zabytkowych
Projektowanie robót ziemnych i transp
Kosztorysowanie robot id 248674 Nieznany
Protokół końcowego odbioru robót, BUDOWNICTWO, potrzebne druki
egz TRB I 2009 c, Politechnika Poznańska, Budownictwo, Technologia Robót Budowlanych, Zaliczenie wyk
TRB - Zabezpieczenie konstrukcji, Budownictwo S1, Semestr IV, Technologia robót budowlanych, Pomoc
Opodatkowanie VAT robót budowanych wykonanych w, Gazeta Podatkowa
Wykonywanie robót ziemnych przy użyciu koparek
04i Wykonywanie robót ziemnych
06 Wykonywanie podstawowych robót ślusarskich
Control of Redundant Robot Manipulators R V Patel and F Shadpey
14 01 Maszyny do robot ziemnychid 15606
Dobieranie materiałów, narzędzi i sprzętu do robót okładzinowych
07 05 Materialy wybuchowe do robot budowlanychid 7042
Opis zawodu Operator sprzętu do robót ziemnych, Opis-stanowiska-pracy-DOC
więcej podobnych podstron