Audi A6 Sedan 1998-2004, Audi A6 Avant 1999-2004, Audi allroad quattro 2001-2004, Audi S6 Avant 2002-2004, Audi RS6 2003-2004 - Body Interior
just
a
test.
69-76
Airbag, servicing
CAUTION!
Before beginning repairs on the electrical system:
Obtain the anti-theft radio security
code.
Switch the ignition
off.
Disconnect the battery Ground (GND)
strap.
On vehicles equipped with Audi Telematics by
OnStar
, switch-off the emergency (back-up)
battery for the Telematic/Telephone Control
Module prior to disconnecting vehicle battery
Repair Manual, Communication, Repair Group
01
.
Advanced
Search
Version: 2.5r01sp0003
Search

Audi A6 Sedan 1998-2004, Audi A6 Avant 1999-2004, Audi allroad quattro 2001-2004, Audi S6 Avant 2002-2004, Audi RS6 2003-2004 - Body Interior
After reconnecting vehicle battery, re-code and
check operation of anti-theft radio. Also check
operation of clock and power windows according
to Repair Manual and/or Owner's Manual.
After reconnecting vehicle battery on vehicles
equipped with Audi Telematics by OnStar
,
switch-on the emergency (back-up) battery for
the Telematic/Telephone Control Module
Repair Manual, Communication, Repair Group
01
.
Audi A6 Sedan 1998-2004, Audi A6 Avant 1999-2004, Audi allroad quattro 2001-2004, Audi S6 Avant 2002-2004, Audi RS6 2003-2004 - Body Interior
69-77
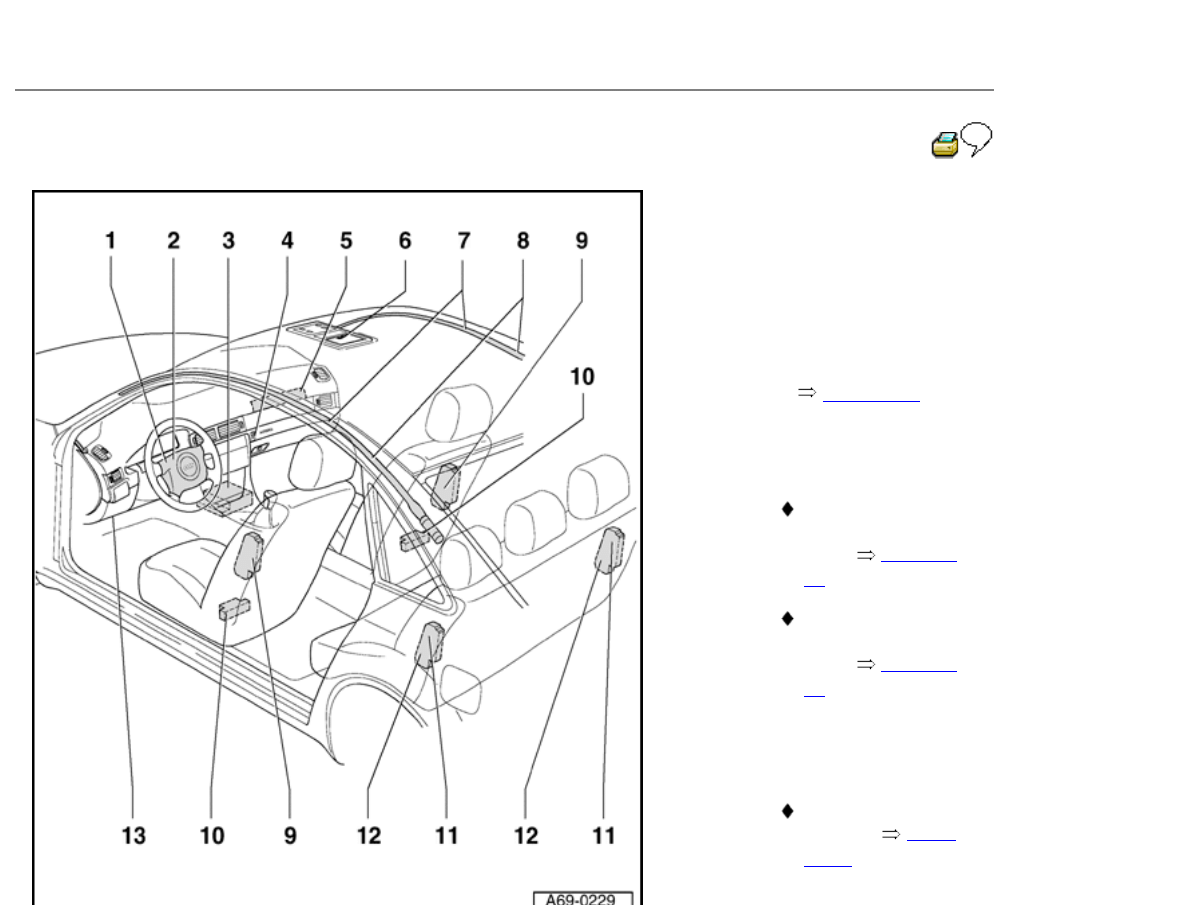
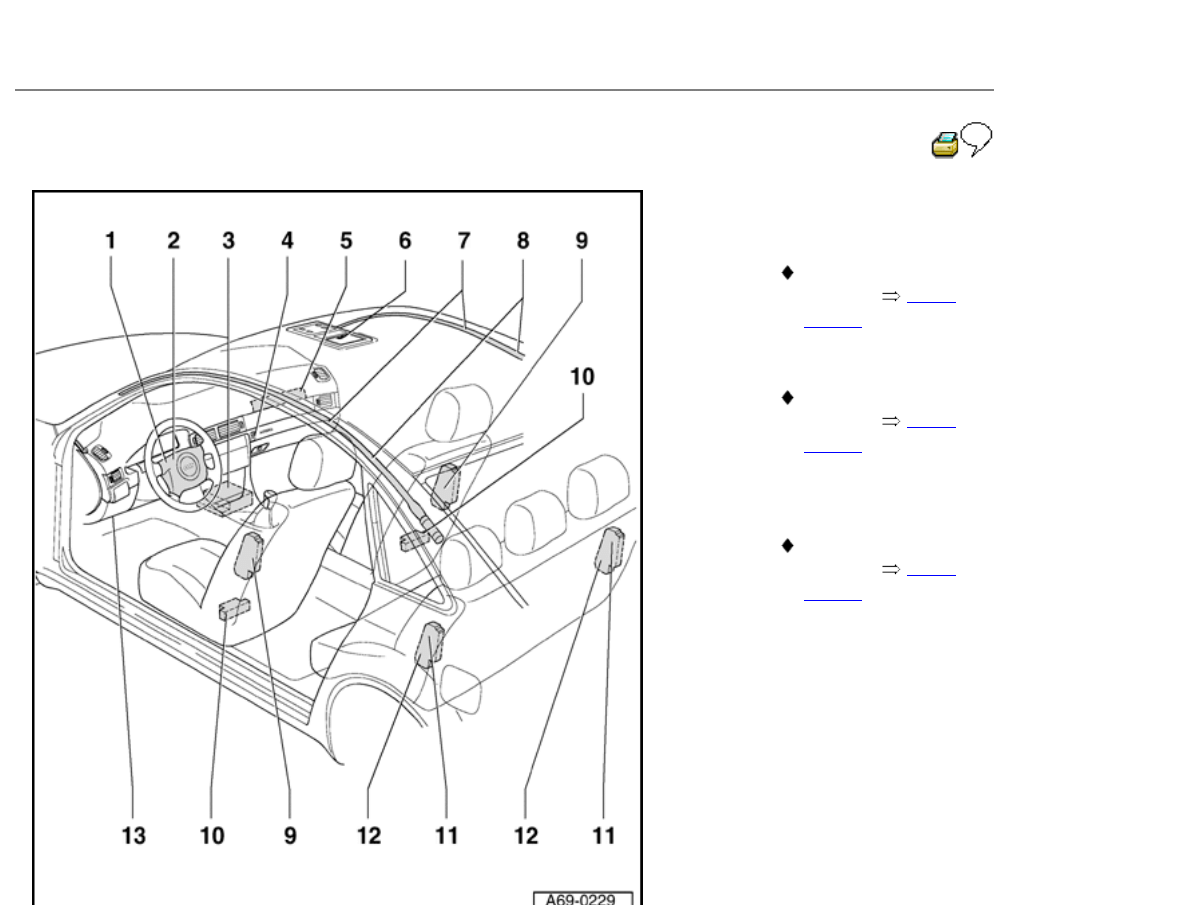
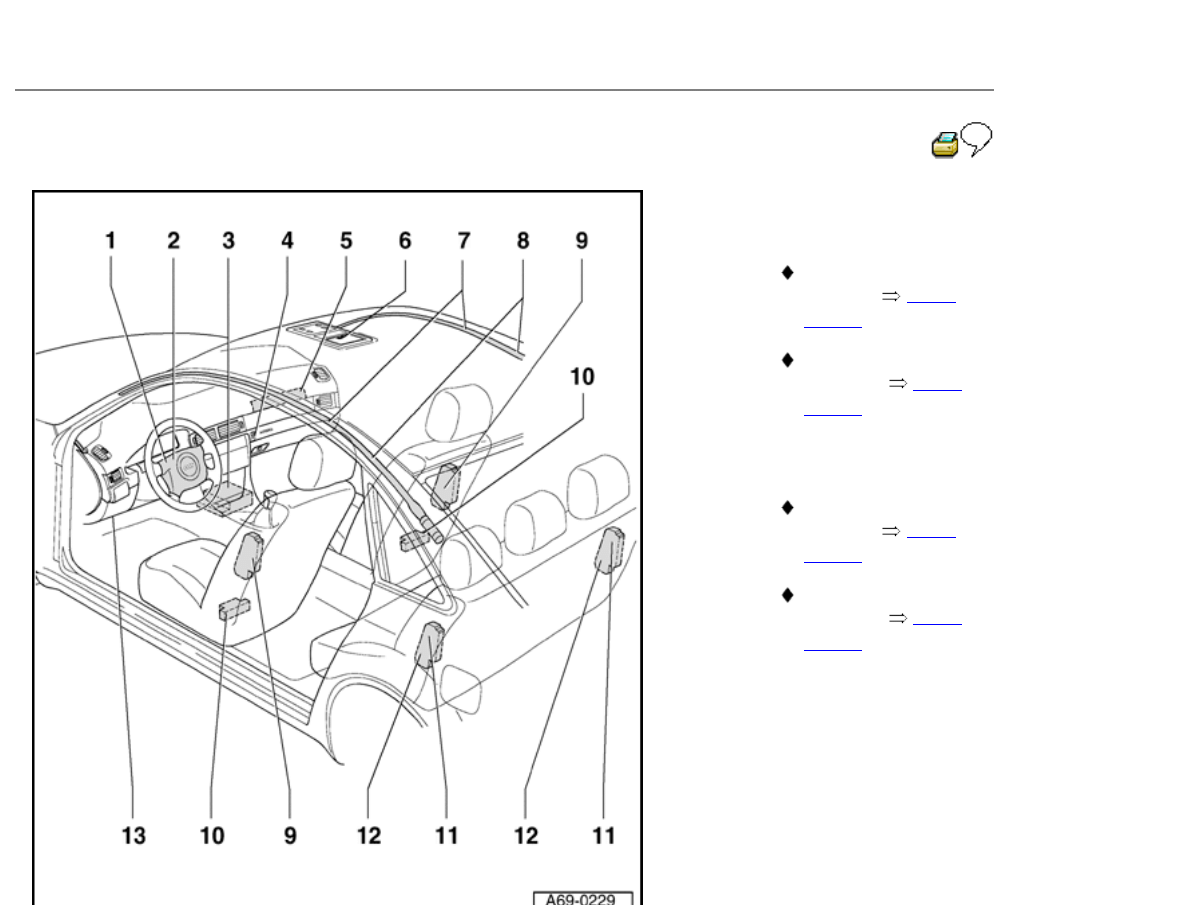
Component locations,
overview
WARNING!
Observe all safety
precautions before starting
work on any part of airbag
system
Page 69-58
1 - Airbag unit - driver's
side
Removing and
installing up to
08/97
Page 69-
86
Removing and
installing as of
08/97
Page 69-
92
2 - Airbag unit driver's
side (sport steering
wheel)
Removing and
installing
Page
69-98
Audi A6 Sedan 1998-2004, Audi A6 Avant 1999-2004, Audi allroad quattro 2001-2004, Audi S6 Avant 2002-2004, Audi RS6 2003-2004 - Body Interior
3 - Airbag control
module
Removing and
installing up to KW
35, 1998
Page
69-81
Removing and
installing up to KW
35, 1998
Page
69-83
4 - Not applicable for
USA/Canada
Audi A6 Sedan 1998-2004, Audi A6 Avant 1999-2004, Audi allroad quattro 2001-2004, Audi S6 Avant 2002-2004, Audi RS6 2003-2004 - Body Interior
69-78
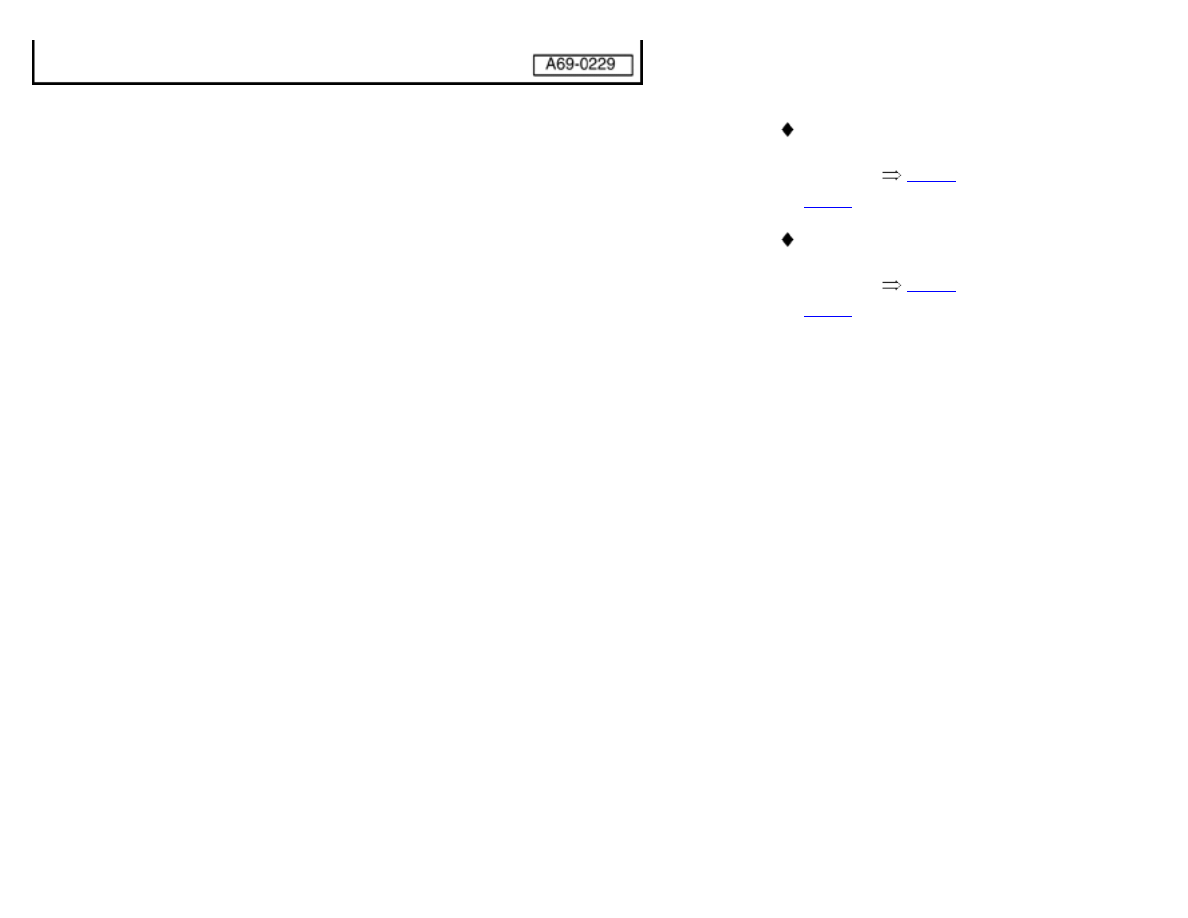
5 - Passenger side
airbag unit
Removing and
installing
Page
69-107
Deactivation and
activation possible
via key switch (if
equipped).
6 - Not applicable for
USA/Canada
7 - Side curtain airbag,
sedan
Removing and
installing
Page
69-136
Audi A6 Sedan 1998-2004, Audi A6 Avant 1999-2004, Audi allroad quattro 2001-2004, Audi S6 Avant 2002-2004, Audi RS6 2003-2004 - Body Interior
69-79
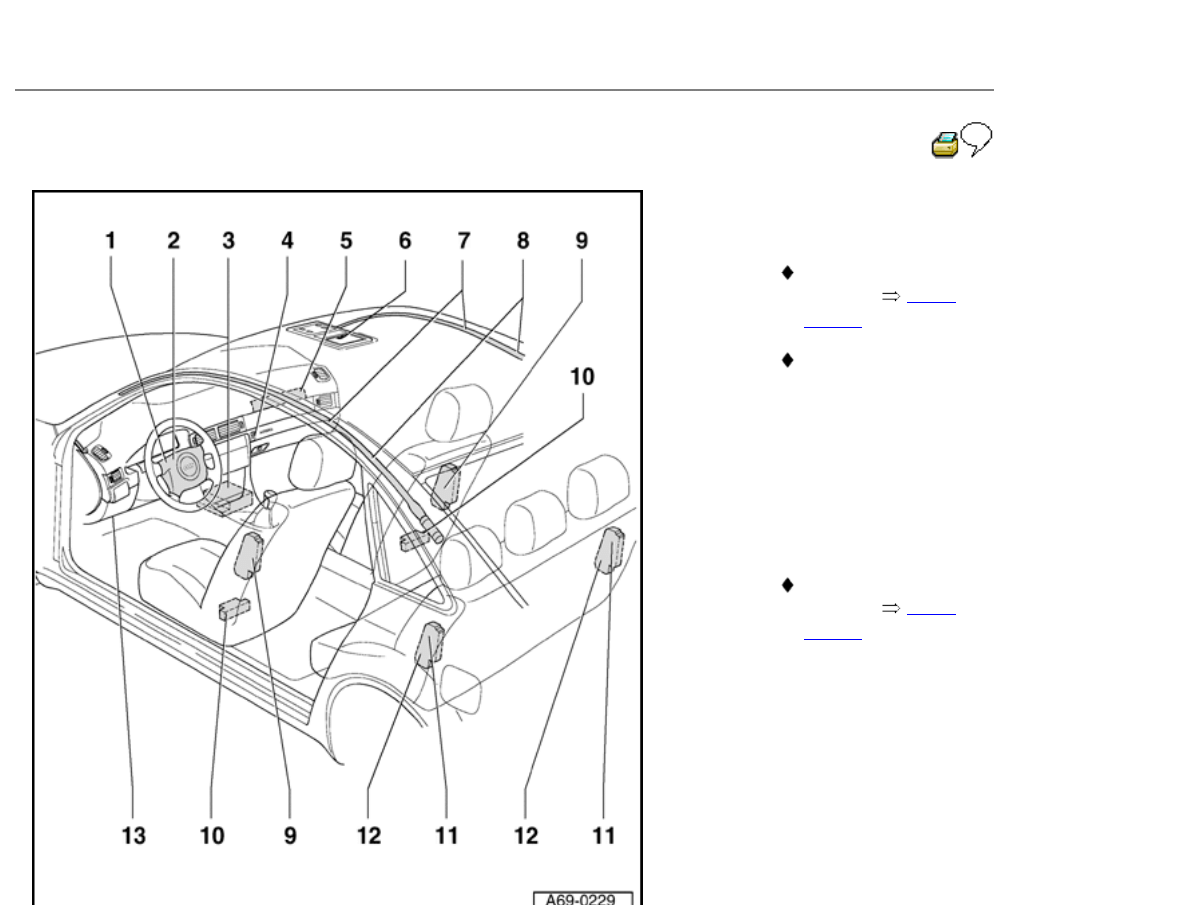
8 - Side curtain airbag,
Avant
Removing and
installing
Page
69-145
9 - Side airbag
Removing and
installing
Page
69-113
10 - Lateral acceleration
sensor
Removing and
installing
Page
69-125
Audi A6 Sedan 1998-2004, Audi A6 Avant 1999-2004, Audi allroad quattro 2001-2004, Audi S6 Avant 2002-2004, Audi RS6 2003-2004 - Body Interior
69-80
11 - Side airbag, rear
(folding backrest)
Removing and
installing
Page
69-121
Deactivating and
activating
Page
69-180
12 - Side airbag, rear
(fixed backrest)
Removing and
installing
Page
69-124
Deactivating and
activating
Page
69-180
13 - Data Link Connector
(DLC)

Audi A6 Sedan 1998-2004, Audi A6 Avant 1999-2004, Audi allroad quattro 2001-2004, Audi S6 Avant 2002-2004, Audi RS6 2003-2004 - Body Interior
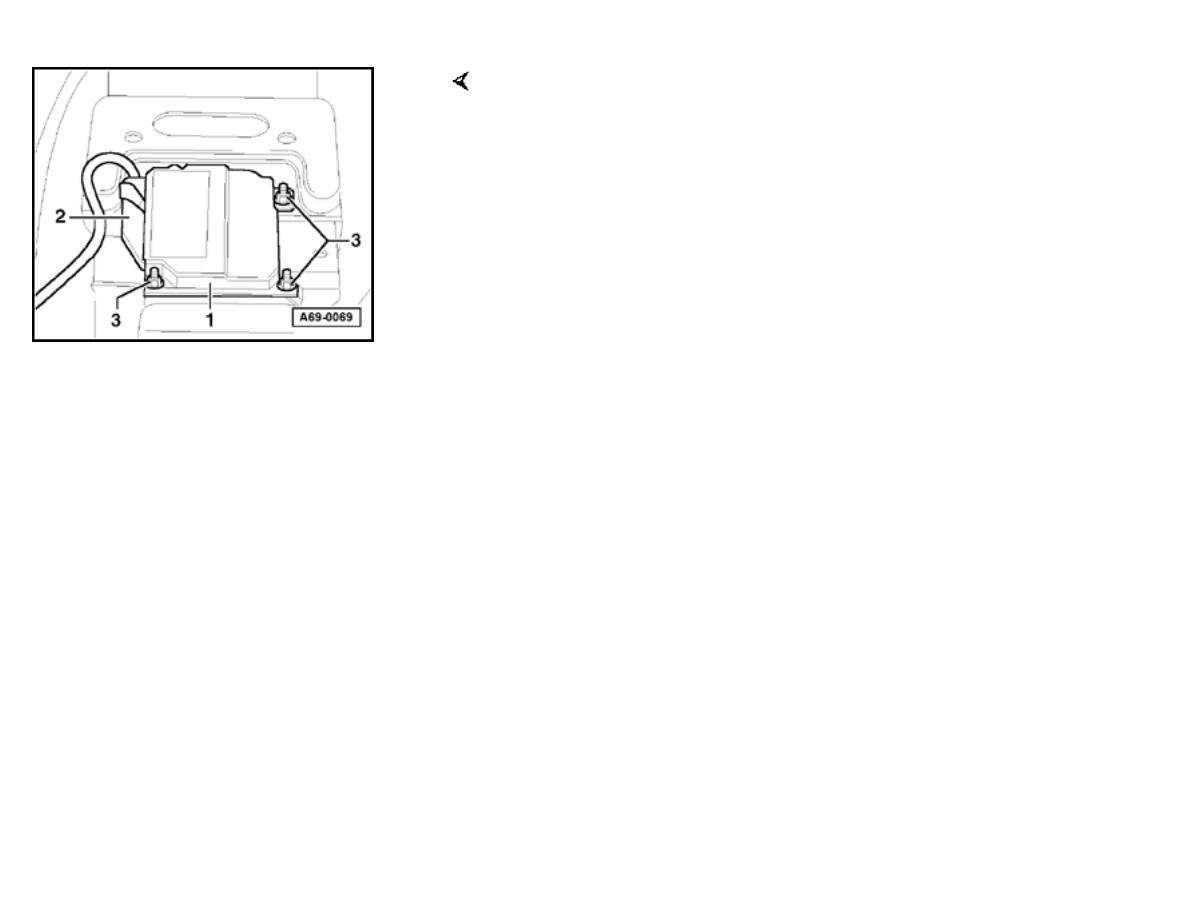
69-81
Airbag control module -J234- (through CW
35.99), removing and installing
WARNING!
Observe all safety precautions before starting work
on any part of airbag system
Page 69-58
See Caution before beginning repairs on the
electrical system
Page 69-76
-
Disconnect battery Ground (GND) strap/
cable.
-
Remove front section of center console
Page 68-
28
.
Audi A6 Sedan 1998-2004, Audi A6 Avant 1999-2004, Audi allroad quattro 2001-2004, Audi S6 Avant 2002-2004, Audi RS6 2003-2004 - Body Interior
-
Remove connecting pieces for air ducts to rear left
and right footwell vents.
-
Release retainer on connector -
2-.
-
Pull connector -2- out of control module -
1-.
-
Remove nuts -3-
(3x).
Tightening torque: 6 Nm (53 in.
lb)
-
Remove control
module.

Audi A6 Sedan 1998-2004, Audi A6 Avant 1999-2004, Audi allroad quattro 2001-2004, Audi S6 Avant 2002-2004, Audi RS6 2003-2004 - Body Interior
69-82
See Caution for connecting Telematics battery
Page 69-76
Note:
If control module is replaced, it must be coded.
After connecting battery, check vehicle equipment
(radio, clock, power windows) as per Repair Manual
and/or Owner's manual.
If the airbag Malfunction Indicator Lamp (MIL) -K75-
signals a malfunction after assembling then the
DTC memory must be erased and checked again
with VAG 1551 scan tool
Repair Manual, Body On Board Diagnostic (OBD),
Repair Group 01

Audi A6 Sedan 1998-2004, Audi A6 Avant 1999-2004, Audi allroad quattro 2001-2004, Audi S6 Avant 2002-2004, Audi RS6 2003-2004 - Body Interior
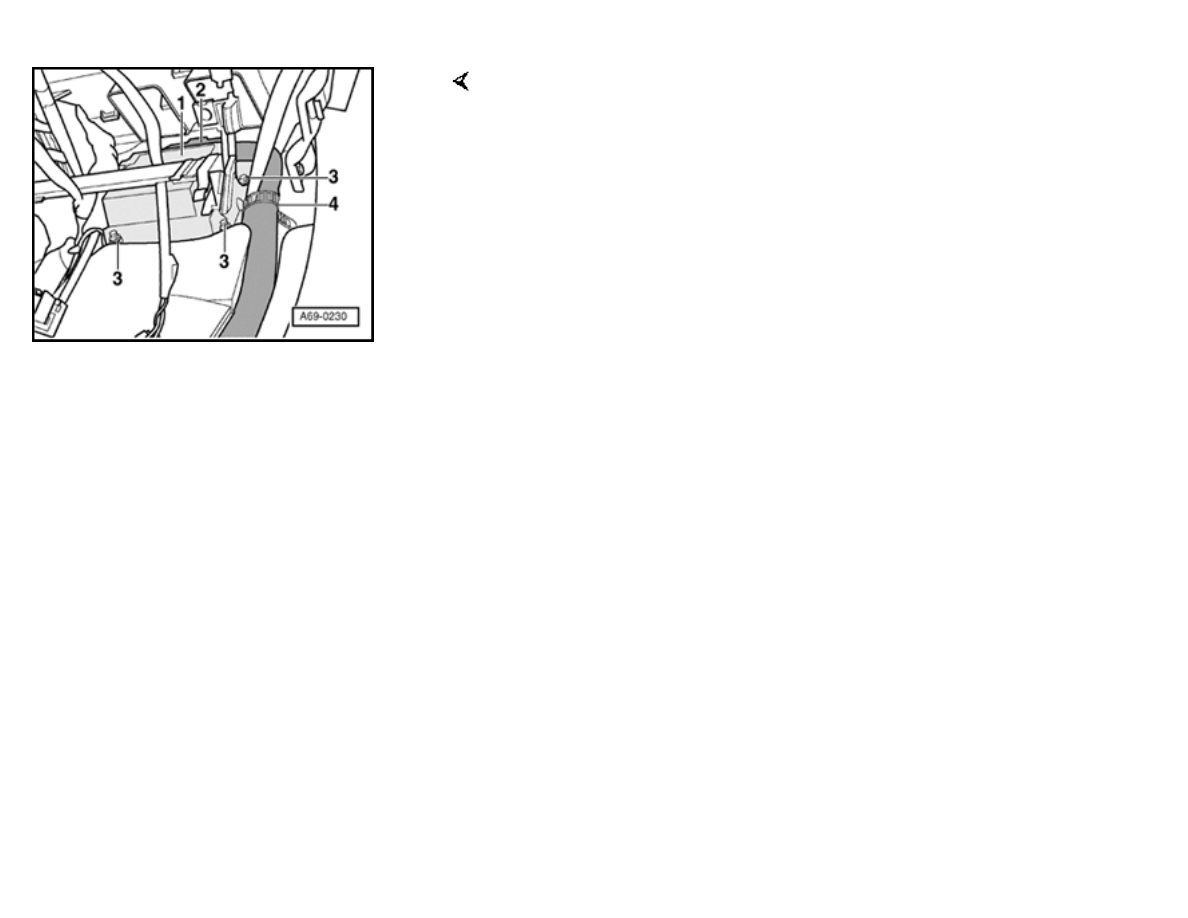
69-83
Airbag Control Module -J234- (from CW
36.99 on), removing and installing
WARNING!
Observe all safety precautions before starting work
on any part of airbag system
Page 69-58
See Caution before beginning repairs on the
electrical system
Page 69-76
-
Disconnect battery Ground (GND) strap/
cable.
-
Remove front section of center console
Page 68-
28
.
Audi A6 Sedan 1998-2004, Audi A6 Avant 1999-2004, Audi allroad quattro 2001-2004, Audi S6 Avant 2002-2004, Audi RS6 2003-2004 - Body Interior
-
Remove connecting pieces for air ducts to rear left
and right footwell vents.
-
Open cable tie -
4-.
-
Remove bolts -3-
(3x).
Tightening torque: 6 Nm (53 in.
lb)
-
Pull out control module -
1-.
-
Release retainer on connector -
2-.
-
Pull connector -2- out of control module -
1-.
-
Remove control
module.

Audi A6 Sedan 1998-2004, Audi A6 Avant 1999-2004, Audi allroad quattro 2001-2004, Audi S6 Avant 2002-2004, Audi RS6 2003-2004 - Body Interior
69-84
See Caution for connecting Telematics battery
Page 69-76
Note:
If control module is replaced, it must be coded.
After connecting battery, check vehicle equipment
(radio, clock, power windows) as per Repair Manual
and/or Owner's manual.
If the airbag Malfunction Indicator Lamp (MIL) -K75-
signals a malfunction after assembling then the
DTC memory must be erased and checked again
with VAG 1551 scan tool
Repair Manual, Body On Board Diagnostic (OBD),
Repair Group 01
Wyszukiwarka
Podobne podstrony:
Audi A6 C5 2000 AirbagWiring
2000 09 a6 c5 25tdi
Instrukcja obslugi AUDI A6 C5 PL up by dunaj2
Audi A6 C5 Front Bumper Removal
Fourtitude com Audi A6 C5 Brake Information PartNumbers
Audi A6 C5 Podstawowe Informacje
BentleyPublishers com Audi A6 C5 Service Reset
BentleyPublishers com Audi A6 C5 4 2L Secondary Air Injection Maintenance
Audi A6 C5 QuickReferenceGuide [4s]
Audi A6 C5 AirConditioner OutputDiagnosticTesting
BentleyPublishers com Audi A6 C5 Sunroof drain cleaning
AudiForums com Audi A6 C5 IceLink iPod Install
Instrukcja obslugi AUDI A6 C5 PL up by dunaj2
Audi A6 C5 Front Bumper Removal
Audi A6 C5 Climatronic ukryte menu serwisowe
Bentley Audi A6 C5 FrontSuspensionServicing
AudiWorld com Audi A6 C5 Boor Blade Installation DIY
więcej podobnych podstron