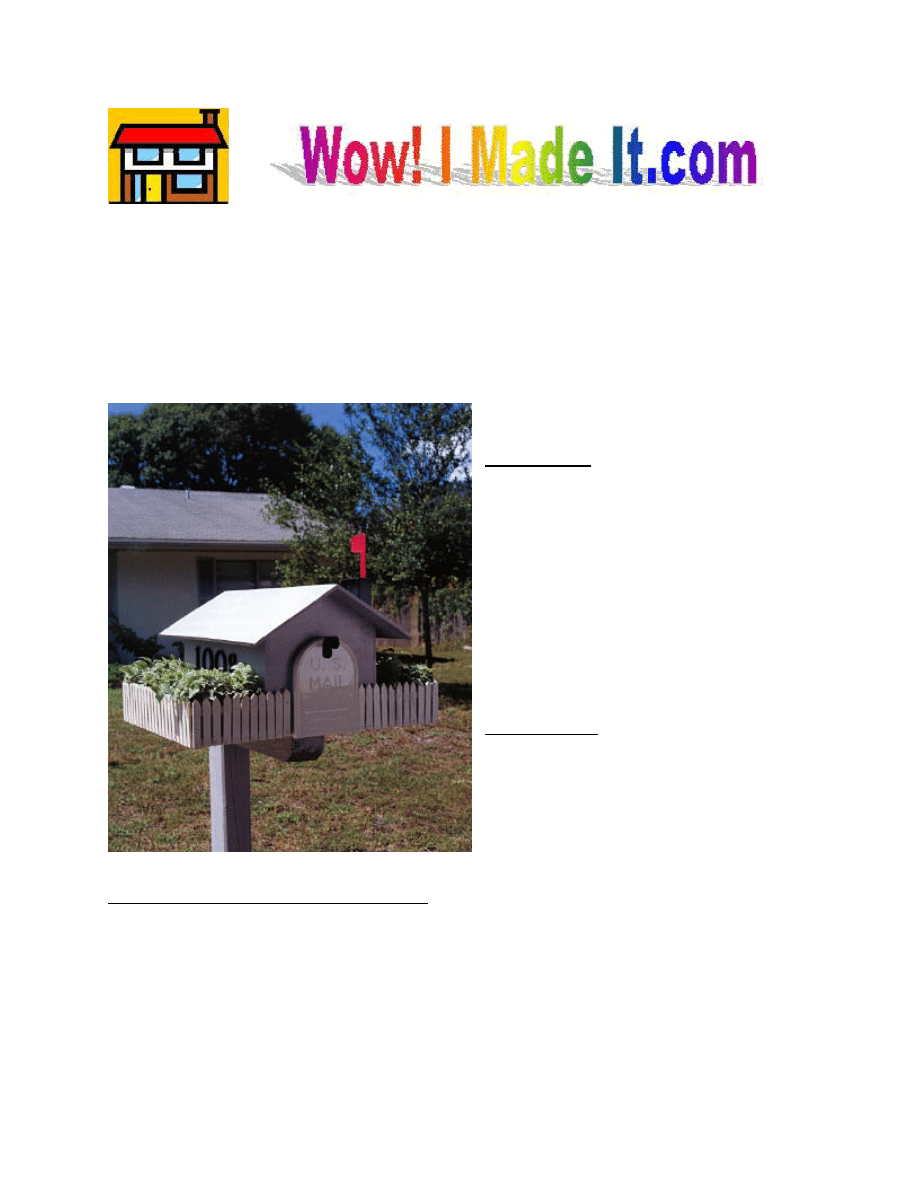
ottage Mailbox
When we bought our house it came complete with a standard boring mailbox. When we
shopped for a new one we discovered that all the good-looking mailboxes had a very healthy
price tag attached to them. So we covered our standard boring mailbox with inexpensive
plywood, we think a few delightful details. We're very happy with the result, and it brings smiles
to people passing by.
Materials
§ ½ sheet of 3/8”-thick exterior plywood,
measuring 4’ x 4’
§ 2 linear feet of 2 x 4 pine
§ 11 picket fence sections*
§ 6-10 plants in 3” pots (optional)
§ Pre-made numbers for your address
§ Standard size mailbox
§ *Pre-made pickets are available at most
hobby and craft-supply stores, or you
can construct your own.
Hardware
§ 60 1” 3d finishing nails
§ 1-1/2” wood screws
Special Tools and Techniques
§ Beveling
C
2
Cutting List
Code Description Qty. Materials
Dimensions
A
Front
1
3/8” plywood
11-1/4” x 13”
B
Back
1
3/8” plywood
11-1/4” x 13”
C
Sides
2
3/8” plywood
19-3/4” x 9-3/4”
D
Roof
2
3/8” plywood
9-1/4” x 23-1/2”
E
Chimney
1
2 x 4 pine
14” long
F
Base
2
3/8” plywood
9-3/4” x 6-1/2”
Making the Front, Back, and Sides
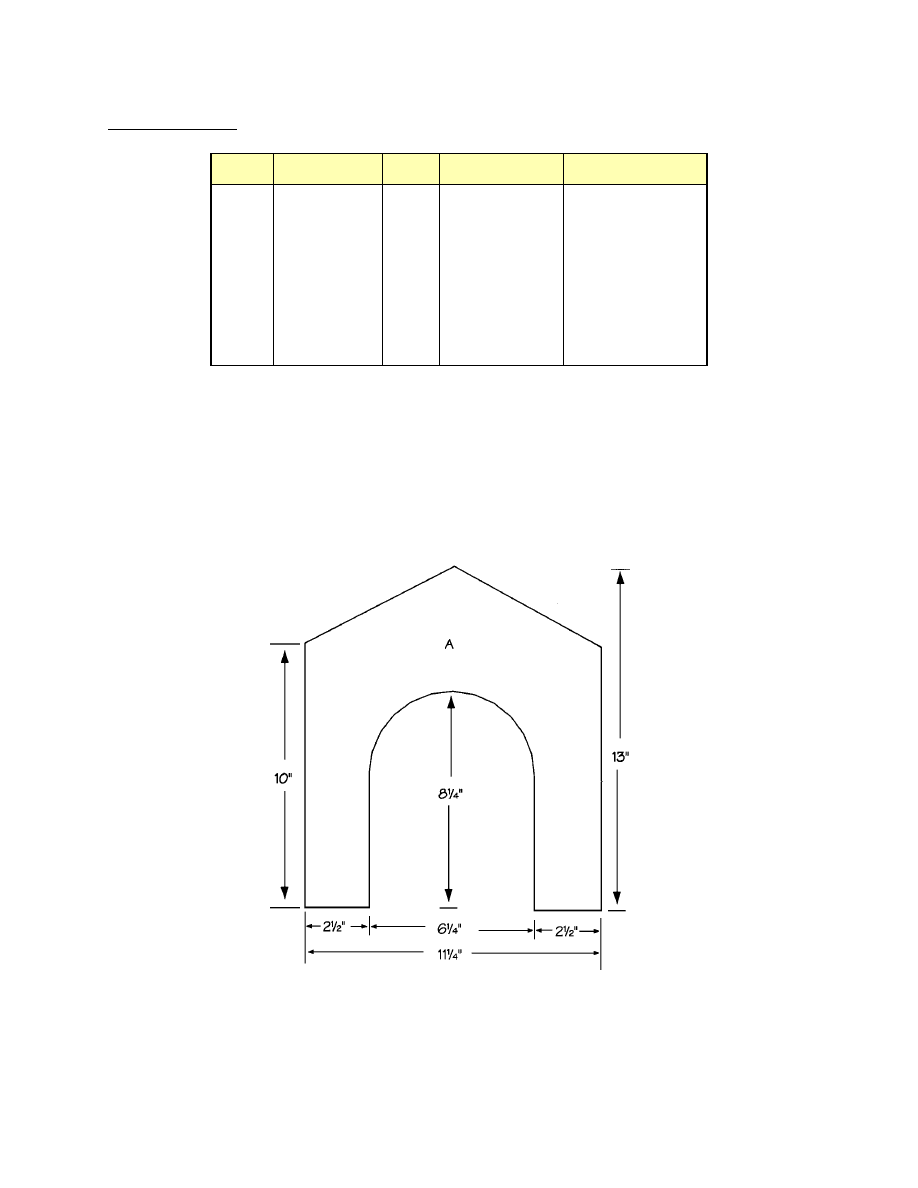
1. Cut one front (A) from 3/8”-thick plywood, measuring 11-1/4 x 13 inches.
2. Refer to Figure 1 to cut a curved doorway and a peaked roof on the front (A). Double-
check to make certain that the curved doorway is sized to accommodate your mailbox.
3. Cut one back (B) from 3/8”-thick plywood, measuring 11-1/4 x 13 inches.
4. Use the front (A) to cut a peaked roof on the back (B). Do not cut the curved doorway on
Figure 1
3
the back (B).
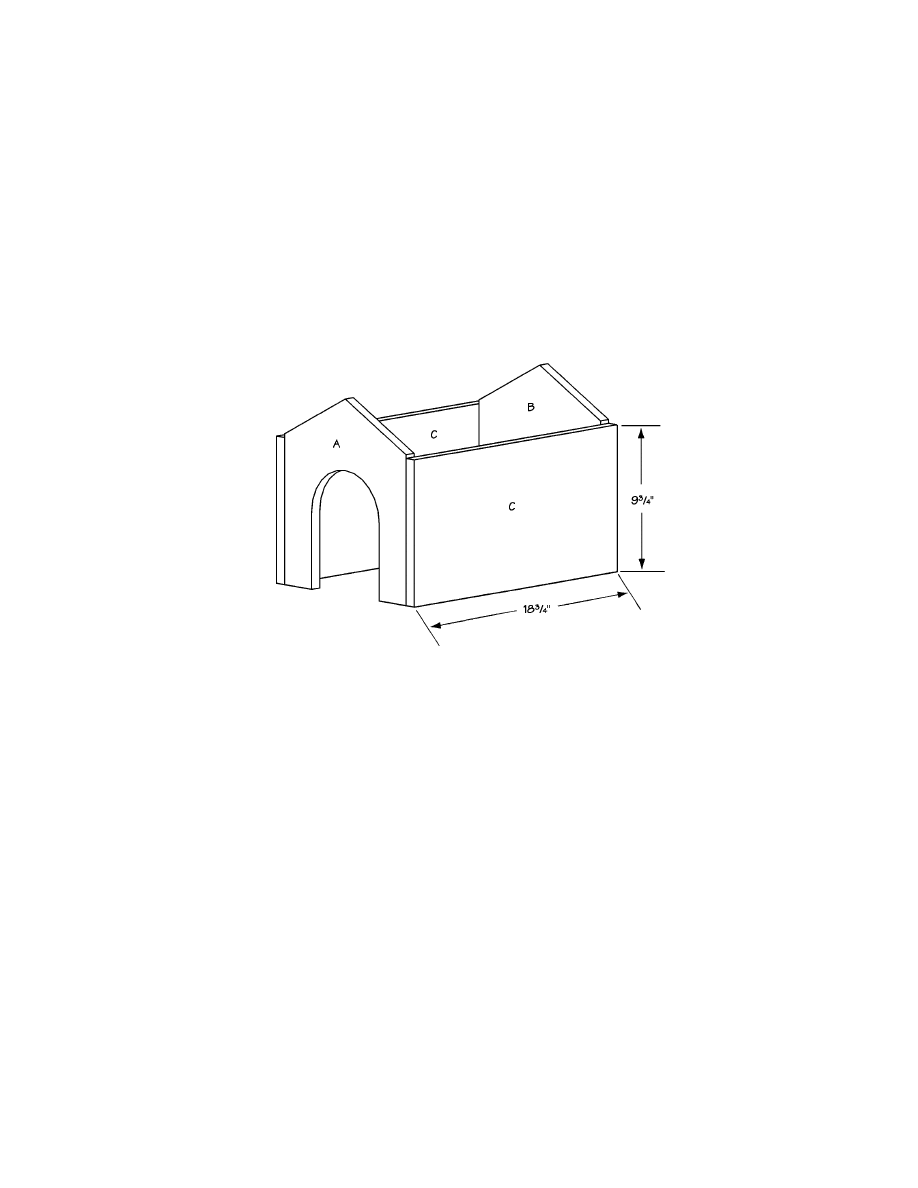
5. Cut two sides (C) from 3/8”-thick plywood, each measuring 18-3/4 x 9-3/4 inches.
6. Place the two sides (C) on a level surface, parallel to each other, and 11-1/4 inches apart.
The 18-3/4” long edge of the sides should face down. Fit the front (A) and back (B)
between the two sides (D), as shown in Figure 2. Note that the sides (C) will be slightly
shorter at the top edges than the front (A) and back (B). That distance will allow for the
angle of the roof peak. Apply glue to the meeting surfaces and use four 1-inch-long nails
on each joint.
Adding the Roof
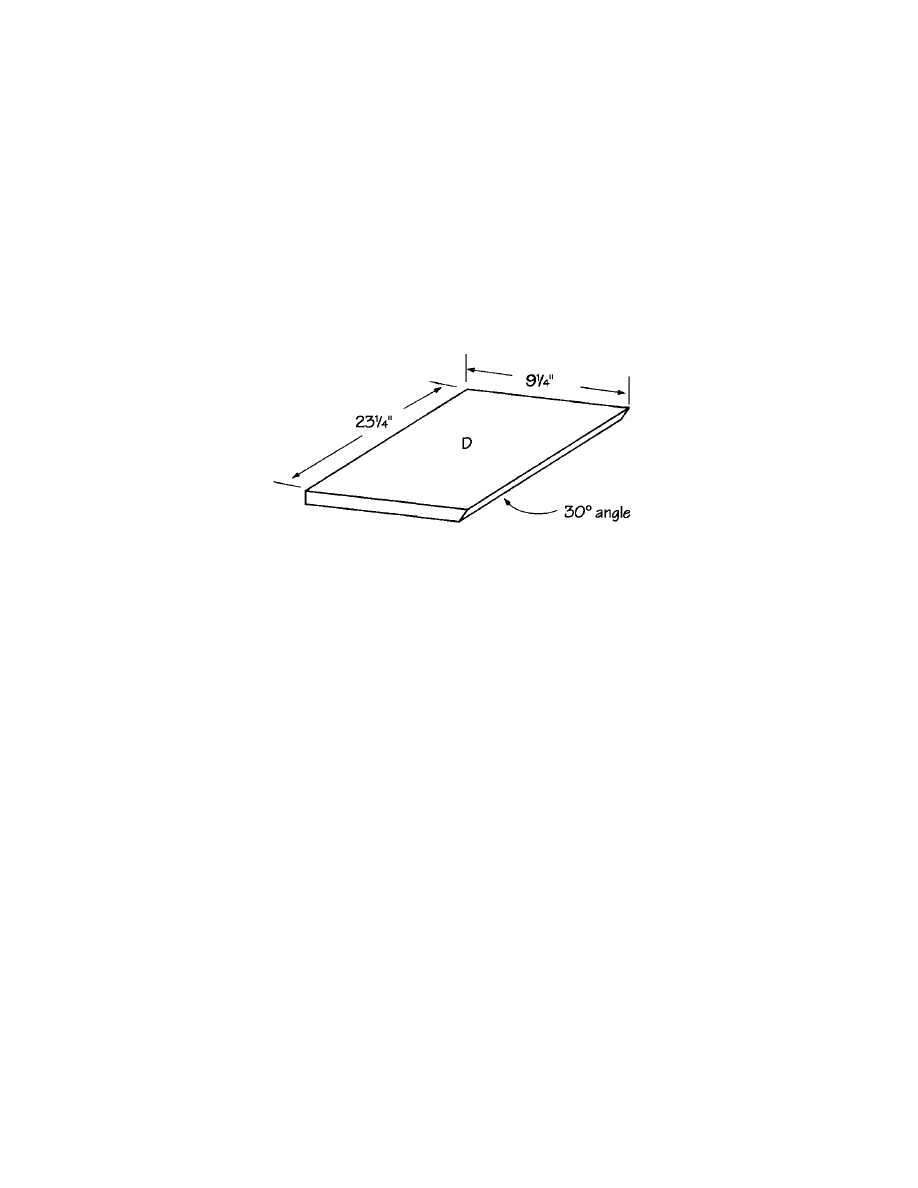
1. Cut two roofs (D) from 3/8”-thick plywood, each measuring 9-1/4 x 23-1/4 inches.
2. Bevel one 23-1/4 edge of each of the roofs (D) at a 30-degree angle, as shown in Figure 3.
3. Fit the two roofs (D) over the sides (C), front (A) and back (B) matching the bevels. The
roof should overhang the front (A) and back (B) and equal amount. Apply glue to the
meeting surfaces, and nail through the roof into the front, back, and sides (A, B, and C)
using 1-inch-long nails.
Adding the Chimney
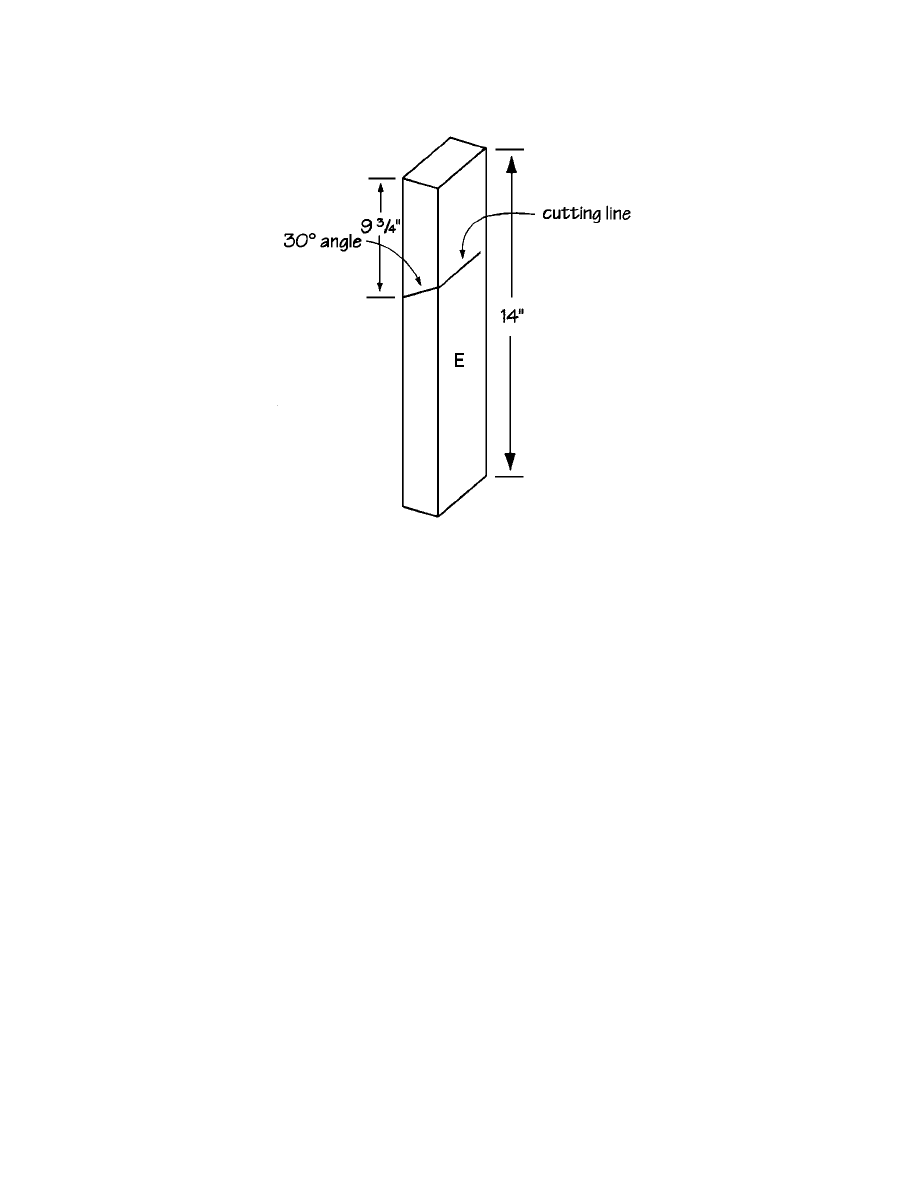
1. Cut one chimney (D) from 2 x 4 pine, measuring 14 inches long.
2. Measure 9-3/4” from one end of the chimney (E), and mark the spot. Cut across the width
of the chimney (E) at that point at a 30-degree angle, as shown in Figure 4.
Figure 2
4
3. Fit the shorter portion of the chimney (E) on top of the roof (D), just above where the
longer portion of the chimney will fit. Screw through the underside of the roof into the
short chimney, using two 1-1/2”-long screws. Countersink the screws.
4. Fit the longer portion of the chimney under the roof against one side of the house. Apply
glue to the meeting surfaces, and screw through the inside of the side(C) into the chimney
(E) using two 1-1/2”-long screws. (Note: The longer portion of the chimney is not visible
in the project photograph.)
Adding the Base
1. Cut two bases (F) from 3/8-inch-thick plywood, each measuring 19-3/4 x 6-1/2 inches.
2. Attach one base (F) to the right bottom of the house assembly, flush on the inside with the
front door and extending 1 inch from the house front. Apply glue to the meeting surfaces,
and nail through the base (F) into the edges of the front, back and side (A, B, and C) using
1”-long nails spaced every 3 inches.
3. Repeat Step 2 to attach the remaining base (F) to the left side of the house.
Adding the Fencing
1. We purchased pre-made sections of white picket fence at a hobby store. Each section is 6-
1/2 inches long.
If you prefer to make your own picket fence, simply cut two 5/8-inch-wide strips, each
measuring 6-1/2 inches long. These will be the fence rails. Then cut eight pickets from
5/8-inch-wide strips, each measuring 4 inches long. Space the pickets evenly over the two
fence rails and glue and nail together using small brads.
2. Cut and fit the picket fence sections to fit all the way around both of the bases.
Figure 3
5
Finishing
1. Remove the flag from the old mailbox and attach it to the chimney.
2. Fill any cracks, crevices, or screw holes with wood filler, and thoroughly sand all surfaces
of the completed birdhouse.
3. Seal and paint or stain your birdhouse the colors of your choice.
4. Attach the numbers for your address on the side of the mailbox.
5. Slip the cottage mailbox over your purchased mailbox.
6. As a final decorative touch, we placed several live plants in 3-inch containers in our
mailbox "yard".
Figure 4
Wyszukiwarka
Podobne podstrony:
Mail Smart Mailbox(Inteligentne skrzynki pocztowe)
Outlook to Unix Mailbox
Otrzymywanie serka Cottage Cheese
cosy cottage
mailbox post
Cottage
mailbox bungalow
Mailbox Stand
Bungalow Mailbox
Cottage Shore Pair buckets planters
Mail Smart Mailbox(Inteligentne skrzynki pocztowe)
Outlook to Unix Mailbox
Otrzymywanie serka Cottage Cheese
Mailbox Bungalow 1
a trip to the cottage
trip to the cottage
the glen cottage number one
więcej podobnych podstron