
Contents
Overview
1
Introduction to Statements
2
Using Selection Statements
6
Using Iteration Statements
17
Using Jump Statements
29
Lab 4.1: Using Statements
32
Handling Basic Exceptions
41
Raising Exceptions
51
Lab 4.2: Using Exceptions
62
Review
72
Module 4: Statements
and Exceptions
This course is based on the prerelease Beta 1 version of Microsoft
®
Visual Studio .NET.
Content in the final release of the course may be different from the content included in
this prerelease version. All labs in the course are to be completed with the Beta 1 version
of Visual Studio .NET.

Information in this document is subject to change without notice. The names of companies,
products, people, characters, and/or data mentioned herein are fictitious and are in no way intended
to represent any real individual, company, product, or event, unless otherwise noted. Complying
with all applicable copyright laws is the responsibility of the user. No part of this document may
be reproduced or transmitted in any form or by any means, electronic or mechanical, for any
purpose, without the express written permission of Microsoft Corporation. If, however, your only
means of access is electronic, permission to print one copy is hereby granted.
Microsoft may have patents, patent applications, tradem arks, copyrights, or other intellectual
property rights covering subject matter in this document. Except as expressly provided in any
written license agreement from Microsoft, the furnishing of this document does not give you any
license to these patents, trademarks, copyrights, or other intellectual property.
2001 Microsoft Corporation. All rights reserved.
Microsoft, ActiveX, BizTalk, IntelliSense, JScript, Microsoft Press, MSDN, PowerPoint, Visual
Basic, Visual C++, Visual #, Visual Studio, Windows, and Windows Media are either registered
trademarks or trademarks of Microsoft Corporation in the U.S.A. and/or other countries.
Other product and company names mentioned herein may be the trademarks of their respective
owners.
Module 4: Statements and Exceptions 1
Overview
n
Introduction to Statements
n
Using Selection Statements
n
Using Iteration Statements
n
Using Jump Statements
n
Handling Basic Exceptions
n
Raising Exceptions
One of the fundamental skills required to use a programming language is the
ability to write the statements that form the logic of a program in that language.
This module explains how to use some common statements in C#. It also
describes how to implement exception handling in C#.
In particular, this module shows how to throw errors as well as catch them, and
how to use try-finally statement blocks to ensure that an exception does not
cause the program to abort before cleaning up.
After completing this module, you will be able to:
n
Describe the different types of control statements.
n
Use jump statements.
n
Use selection statements.
n
Use iteration statements.
n
Handle and raise exceptions.

2 Module 4: Statements and Exceptions
u
Introduction to Statements
n
Statement Blocks
n
Types of Statements
A program consists of a sequence of statements. At run time, these statements
are executed one after the other, as they appear in the program, from left to
right and from top to bottom. In this section, you will learn how to group a set
of statements together in C#. You will also learn about the different types of
statements that are available in the C# language.
Module 4: Statements and Exceptions 3
Statement Blocks
n
Use Braces As Block Delimiters
n
A Block and Its Parent
Block Cannot Have a
Variable with the Same
Name
n
Sibling Blocks Can Have
Variables with the Same
Name
{
// code
}
{
// code
}
{
int i;
...
{
int i;
...
}
}
{
int i;
...
{
int i;
...
}
}
{
int i;
...
}
...
{
int i;
...
}
{
int i;
...
}
...
{
int i;
...
}
When developing C# applications, you need to group statements together just as
you do in other programming languages. To do so, you use the syntax of
languages such as C, C++, and Java, which means that you enclose groups of
statements in braces: { and }. Yo u do not use keyword matched delimiters such
as the If ... End If of Microsoft
®
Visual Basic
®
for grouping statements.
Grouping Statements into Blocks
A group of statements enclosed between braces is referred to as a block. A
block can contain a single statement or another block that is nested within it.
Each block defines a scope. A variable that is declared in a block is called a
local variable. The scope of a local variable extends from its declaration to the
right brace that ends its enclosing block. It is good practice to declare a variable
in the innermost block possible because the restricted visibility of the variable
helps to make the program clearer.

4 Module 4: Statements and Exceptions
Using Variables in Statement Blocks
In C#, you cannot declare a variable in an inner block with the same name as a
variable in an outer block. For example, the following code is not allowed:
int i;
{
int i; // Error: i already declared in parent block
...
}
However, you can declare variables with the same name in sibling blocks.
Sibling blocks are blocks that are enclosed by the same parent block and are
nested at the same level. The following is an example:
{
int i;
...
}
...
{
int i;
...
}
You can declare variables anywhere in a statement block. Given this freedom,
you can easily follow the recommendation of initializing a variable at the point
of declaration.
Module 4: Statements and Exceptions 5
Types of Statements
Selection Statements
The if and switch statements
Selection Statements
The if and switch statements
Iteration Statements
The while, do, for, and foreach statements
Iteration Statements
The while, do, for, and foreach statements
Jump Statements
The goto, break, and continue statements
Jump Statements
The goto, break, and continue statements
As the complexity of the problem being solved by a program increases, so does
the complexity of the logic of the program. Consequently, the program requires
structured flow control, which you can achieve by using higher-level constructs
or statements. These statements can be grouped into the following categories:
n
Selection statements
The if and switch statements are known as selection statements. They make
choices based on the value of expressions and selectively execute statements
based on those choices.
n
Iteration statements
The while, do, for, and foreach statements execute repeatedly while a
specific condition is true. They are also known as looping statements. Each
of these statements is appropriate for a certain style of iteration.
n
Jump statements
The goto, break, and continue statements are used to unconditionally
transfer control to another statement.
6 Module 4: Statements and Exceptions
u
Using Selection Statements
n
The if Statement
n
Cascading if Statements
n
The switch Statement
n
Quiz: Spot the Bugs
The if and switch statements are known as selection statements. They make
choices based on the value of expressions and selectively execute statements
based on those choices. In this section, you will learn how to use selection
statements in C# programs.

Module 4: Statements and Exceptions 7
The if Statement
n
Syntax:
n
No Implicit Conversion from int to bool
int x;
...
if (x) ...
// Must be if (x != 0) in C#
if (x = 0) ... // Must be if (x == 0) in C#
int x;
...
if (x) ...
// Must be if (x != 0) in C#
if (x = 0) ... // Must be if (x == 0) in C#
if ( Boolean-expression )
first-embedded-statement
else
second-embedded-statement
if ( Boolean-expression )
first -embedded-statement
else
second-embedded -statement
The if statement is the primary decision-making statement. It can be coupled
with an optional else clause, as shown:
if ( Boolean-expression )
first-embedded-statement
else
second-embedded-statement
The if statement evaluates a Boolean expression to determine the course of
action to follow. If the Boolean expression evaluates to true, the control is
transferred to the first embedded statement. If the Boolean expression evaluates
to false, and there is an else clause, the control is transferred to the second
embedded statement.

8 Module 4: Statements and Exceptions
Examples
You can use a simple embedded if statement such as the following:
if (number % 2 == 0)
Console.WriteLine("even");
Although braces are not required in embedded statements, many style guides
recommend using them because they make your code less error prone and
easier to maintain. You can rewrite the previous example with braces as follows:
if (number % 2 == 0) {
Console.WriteLine("even");
}
You can also use an if statement block such as the following:
if (minute == 60) {
minute = 0;
hour++;
}
Converting Integers to Boolean Values
Implicit conversion from an integer to a Boolean value is a potential source of
bugs. To avoid such conversion-related bugs, C# does not support integer to
Boolean value conversion. This is a significant difference between C# and other
similar languages.
For example, the following statements, which at worst generate warnings in
C and C++, result in compilation errors in C#:
int x;
...
if (x) ...
// Must be x != 0 in C#
if (x = 0) ... // Must be x == 0 in C#
Module 4: Statements and Exceptions 9
Cascading if Statements
enum Suit { Clubs, Hearts, Diamonds, Spades };
Suit trumps = Suit.Hearts;
if (trumps == Suit.Clubs)
color = "Black";
else if (trumps == Suit.Hearts)
color = "Red";
else if (trumps == Suit.Diamonds)
color = "Red";
else
color = "Black";
enum Suit { Clubs, Hearts, Diamonds, Spades };
Suit trumps = Suit.Hearts;
if (trumps == Suit.Clubs)
color = "Black";
else if (trumps == Suit.Hearts)
color = "Red";
else if (trumps == Suit.Diamonds)
color = "Red";
else
color = "Black";
You can handle cascading if statements by using an else if statement. C# does
not support the else if statement but forms an else if-type statement from an else
clause and an if statement, as in C and C++. Languages such as Visual Basic
support cascading if statements by using an else if statement between the initial
if statement and the final else statement.
By using the else if construct, you can have any number of branches. However,
the statements controlled by a cascading if statement are mutually exclusive, so
that only one statement from the set of else if constructs is executed.
Nesting if Statements
Nesting one if statement within another if statement creates a potential
ambiguity called a dangling else, as shown in the following example:
if (percent >= 0 && percent <= 100)
if (percent > 50)
Console.WriteLine("Pass");
else
Console.WriteLine("Error: out of range");

10 Module 4: Statements and Exceptions
The else is indented to the same column as the first if. When you read the code,
it appears that the else does not associate with the second if. This is dangerously
misleading. Regardless of the layout, the compiler binds an else clause to its
nearest if statement. This means that the compiler will interpret the above code
as follows:
if (percent >= 0 && percent <= 100)
{
if (percent > 50)
Console.WriteLine("Pass");
else
Console.WriteLine("Error: out of range");
}
One way you can make the else associate with the first if is to use a block, as
follows:
if (percent >= 0 && percent <= 100) {
if (percent > 50)
Console.WriteLine("Pass");
} else {
Console.WriteLine("Error: out of range");
}
It is best to format cascading if statements with proper indentation;
otherwise, long decisions quickly become unreadable and trail off the right
margin of the page or screen.
Tip
Module 4: Statements and Exceptions 11
The switch Statement
n
Use switch Statements for Multiple Case Blocks
n
Use break Statements to Ensure That No Fall Through
Occurs
switch (trumps) {
case Suit.Clubs :
case Suit.Spades :
color = "Black"; break;
case Suit.Hearts :
case Suit.Diamonds :
color = "Red"; break;
default:
color = "ERROR"; break;
}
switch (trumps) {
case Suit.Clubs :
case Suit.Spades :
color = "Black"; break;
case Suit.Hearts :
case Suit.Diamonds :
color = "Red"; break;
default:
color = "ERROR"; break;
}
The switch statement provides an elegant mechanism for handling complex
conditions that would otherwise require nested if statements. It consists of
multiple case blocks, each of which specifies a single constant and an
associated case label. You cannot group a collection of constants together in a
single case label. Each constant must have its own case label.
A switch block can contain declarations. The scope of a local variable or
constant that is declared in a switch block extends from its declaration to the
end of the switch block, as is shown in the example on the slide.
Execution of switch Statements
A switch statement is executed as follows:
1. If one of the constants specified in a case label is equal to the value of the
switch expression, control is transferred to the statement list following the
matched case label.
2. If no case label constant is equal to the value of the switch expression, and
the switch statement contains a default label, control is transferred to the
statement list following the default label.
3. If no case label constant is equal to the value of the switch expression, and
the switch statement does not contain a default label, control is transferred
to the end of the switch statement.

12 Module 4: Statements and Exceptions
You can use a switch statement to evaluate only the following types of
expressions: any integer type, a char, an enum, or a string. You can also
evaluate other expression types by using the switch statement, as long as there
is exactly one user-defined explicit conversion from the disallowed type to one
of the allowed types.
Unlike in Java, C, or C++, the governing type of a switch statement in
C# can be a string. With a string expression, the value null is permitted as a
case label constant.
For more information about conversion operators, search for “conversion
operators” in the .NET Framework SDK Help documents.
Grouping Constants
To group several constants together, repeat the keyword case for each constant,
as shown in the following example:
enum MonthName { January, February, ..., December };
MonthName current;
int monthDays;
...
switch (current) {
case MonthName.February :
monthDays = 28;
break;
case MonthName.April :
case MonthName.June :
case MonthName.September :
case MonthName.November :
monthDays = 30;
break;
default :
monthDays = 31;
break;
}
You use the case and default labels only to provide entry points for the control
flow of the program based on the value of the switch expression. They do not
alter the control flow of the program.
The values of the case label constants must be unique. This means that you
cannot have two constants that have the same value. For example, the following
example will generate a compile-time error:
switch (trumps) {
case Suit.Clubs :
case Suit.Clubs : // Error: duplicate label
...
default :
default : // Error: duplicate label again
}
Note

Module 4: Statements and Exceptions 13
Using break in switch Statements
Unlike in Java, C, or C++, C# statements associated with one or more case
labels cannot silently fall through or continue to the next case label. A silent fall
through occurs when execution proceeds without generating an error. In other
words, you must ensure that the last statement associated with a set of case
labels does not allow the control flow to reach the next set of case labels.
Statements that help you to fulfill this requirement, known as the no fall
through rule, are the break statement (probably the most common), the goto
statement (very rare), the return statement, the throw statement, and an infinite
loop.
The following example will generate a compile-time error because it breaks the
no fall through rule:
switch (days % 10) {
case 1 :
if (days / 10 != 1) {
suffix = "st";
break;
}
// Error: fall through here
case 2 :
if (days / 10 != 1) {
suffix = "nd";
break;
}
// Error: fall through here
case 3 :
if (days / 10 != 1) {
suffix = "rd";
break;
}
// Error: fall through here
default :
suffix = "th";
// Error: fall through here
}

14 Module 4: Statements and Exceptions
You can fix the error in this example by rewriting the code as follows:
switch (days % 10) {
case 1 :
suffix = (days / 10 == 1) ? "th" : "st";
break;
case 2 :
suffix = (days / 10 == 1) ? "th" : "nd";
break;
case 3 :
suffix = (days / 10 == 1) ? "th" : "rd";
break;
default :
suffix = "th";
break;
}
Using goto in switch Statements
In C#, unlike in Java, C, or C++, you can use a case label and a default label as
the destination of a goto statement. You can use a goto statement this way to
achieve the fall through effect, if necessary. For example, the following code
will compile without any problem:
switch (days % 10) {
case 1 :
if (days / 10 != 1) {
suffix = "st";
break;
}
goto case 2;
case 2 :
if (days / 10 != 1) {
suffix = "nd";
break;
}
goto case 3;
case 3 :
if (days / 10 != 1) {
suffix = "rd";
break;
}
goto default;
default :
suffix = "th";
break;
}
Because of the no fall through rule, you can rearrange sections of a switch
statement without affecting the overall behavior of the switch statement.

Module 4: Statements and Exceptions 15
Quiz: Spot the Bugs
if number % 2 == 0 ...
if number % 2 == 0 ...
if (percent < 0) || (percent > 100) ...
if (percent < 0) || (percent > 100) ...
if (minute == 60);
minute = 0;
if (minute == 60);
minute = 0;
switch (trumps) {
case Suit.Clubs, Suit.Spades :
color = "Black";
case Suit.Hearts, Suit.Diamonds :
color = "Red";
default :
...
}
switch (trumps) {
case Suit.Clubs, Suit.Spades :
color = "Black";
case Suit.Hearts, Suit.Diamonds :
color = "Red";
default :
...
}
2
2
2
3
3
3
4
4
4
1
1
1
In this quiz, you can work with a partner to spot the bugs in the code on the
slide. To see the answers to this quiz, turn the page.

16 Module 4: Statements and Exceptions
Answers
1. The if statement is not in parentheses. The C# compiler traps this bug as a
compile-time error. The corrected code is as follows:
if (number % 2 == 0) ...
2. The if statement as a whole is not fully parenthesized. The C# compiler
traps this bug as a compile-time error. The corrected code is as follows:
if ((percent < 0) || (percent > 100)) ...
3. The if statement has a single semicolon as its embedded statement. A single
semicolon is called an empty statement in the C# Language Reference
document and a null statement in the C# compiler diagnostic messages. It
does nothing, but it is allowed. The layout of the statements does not affect
how the compiler parses the syntax of the code. Hence, the compiler reads
the code as:
if (minute == 60)
;
minute = 0;
The C# compiler traps this bug as a compile-time warning.
4. The following errors are present:
a. There is more than one constant in the same case label. The C# compiler
traps this bug as a compile-time error.
b. The statements associated with each case fall through to the next case.
The C# compiler traps this bug as a compile-time error.
c. The keyword default has been misspelled. Unfortunately, this is still
allowable code, as it creates a simple identifier label. The C# compiler
traps this bug as two compile-time warnings: one indicating unreachable
code, and another indicating that the default: label has not been used.

Module 4: Statements and Exceptions 17
u
Using Iteration Statements
n
The while Statement
n
The do Statement
n
The for Statement
n
The foreach Statement
n
Quiz: Spot the Bugs
The while , do, for, and foreach statements are known as iteration statements.
You use them to perform operations while a specific condition is true. In this
section, you will learn how to use iteration statements in C# programs.
18 Module 4: Statements and Exceptions
The while Statement
n
Execute Embedded Statements Based on Boolean Value
n
Evaluate Boolean Expression at Beginning of Loop
n
Execute Embedded Statements While Boolean Value Is
True
int i = 0;
while (i < 10) {
Console.WriteLine(i);
i++;
}
int i = 0;
while (i < 10) {
Console. WriteLine(i);
i++;
}
0 1 2 3 4 5 6 7 8 9
The while statement is the simplest of all iteration statements. It repeatedly
executes an embedded statement while a Boolean expression is true. Note that
the expression that the while statement evaluates must be Boolean, since C#
does not support implicit conversion fr om an integer to a Boolean value.
Flow of Execution
A while statement is executed as follows:
1. The Boolean expression controlling the while statement is evaluated.
2. If the Boolean expression yields true, control is transferred to the embedded
statement. When control reaches the end of the embedded statement, control
is implicitly transferred to the beginning of the while statement, and the
Boolean expression is re-evaluated.
3. If the Boolean expression yields false, control is transferred to the end of the
while statement. Therefore, while the controlling Boolean expression is true,
the program repeatedly executes the embedded statement.
The Boolean expression is tested at the start of the while loop. Therefore, it is
possible that the embedded statement may never be executed at all.

Module 4: Statements and Exceptions 19
Examples
You can use a simple embedded statement as shown in the following example:
while (i < 10)
Console.WriteLine(i++);
When using embedded statements, you do not need to use braces. Nevertheless,
many style guides recommend using them because they simplify maintenance.
You can rewrite the previous example with braces as follows:
while (i < 10) {
Console.WriteLine(i++);
}
You can also use a while statement block as shown in the following example:
while (i < 10) {
Console.WriteLine(i);
i++;
}
Despite being the simplest iteration statement, the while statement poses
potential problems for developers who are not careful. The classic syntax of a
while statement is as follows:
initializer
while ( Boolean-expression ) {
embedded-statement
update
}
It is easy to forget the update part of the while block, particularly if your
attention is focused on the Boolean expression.
Tip

20 Module 4: Statements and Exceptions
The do Statement
n
Execute Embedded Statements Based on Boolean Value
n
Evaluate Boolean Expression at End of Loop
n
Execute Embedded Statements While Boolean Value Is
True
int i = 0;
do {
Console.WriteLine(i);
i++;
} while (i < 10);
int i = 0;
do {
Console. WriteLine(i);
i++;
} while (i < 10);
0 1 2 3 4 5 6 7 8 9
A do statement is always coupled with a while statement. It is similar to a while
statement, except that the Boolean expression that determines whether to
continue or exit the loop is evaluated at the end of the loop rather than at the
start. This means that, unlike a while statement, which iterates zero or more
times, a do statement iterates one or more times.
Therefore, a do statement always executes its embedded statement at least once.
This behavior is particularly useful when you need to validate input before
allowing program execution to proceed.
Flow of Execution
A do statement is executed as follows:
1. Control is transferred to the embedded statement.
2. When control reaches the end of the embedded statement, the Boolean
expression is evaluated.
3. If the Boolean expression yields true, control is transferred to the beginning
of the do statement.
4. If the Boolean expression yields false, control is transferred to the end of the
do statement.

Module 4: Statements and Exceptions 21
Examples
You can use a simple embedded do statement as shown in the following
example:
do
Console.WriteLine(i++);
while (i < 10);
Just as with the if and while statements, you do not need to use braces in
embedded do statements, but it is a good practice to use them.
You can also use a do statement block as follows:
do {
Console.WriteLine(i);
i++;
} while (i < 10);
In all cases, you must end a do statement with a semicolon, as follows:
do {
Console.WriteLine(i++);
} while (i < 10) // Error if no ; here
22 Module 4: Statements and Exceptions
The for Statement
n
Place Update Information at the Start of the Loop
n
Variables in a for Block are Scoped Only Within the Block
n
A for Loop Can Iterate Over Several Values
for (int i = 0; i < 10; i++) {
Console. WriteLine(i); }
for (int i = 0; i < 10; i++) {
Console.WriteLine(i); }
0 1 2 3 4 5 6 7 8 9
for (int i = 0; i < 10; i++)
Console. WriteLine(i);
Console.WriteLine(i); // Error: i is no longer in scope
for (int i = 0; i < 10; i++)
Console. WriteLine(i);
Console.WriteLine(i); // Error: i is no longer in scope
for (int i = 0, j = 0; ... ; i++, j++)
for (int i = 0, j = 0; ... ; i++, j++)
When using while statements, developers often forget to update the control
variable. The following code provides an example of this mistake:
int i = 0;
while (i < 10)
Console.WriteLine(i); // Mistake: no i++
This mistake occurs because the developer’
s attention is focused on the body of
the while statement and not on the update. Also, the while keyword and the
update code may be very far apart.
You can minimize these errors by using the for statement. The for statement
overcomes the problem of omitted updates by moving the update code to the
beginning of the loop, where it is harder to overlook. The syntax of the for
statement is as follows:
for ( initializer ; condition ; update )
embedded-statement
In a for statement, the update code precedes the embedded
statement. Nevertheless, the update code is executed by the runtime after the
embedded statement.
Important

Module 4: Statements and Exceptions 23
The syntax of the for statement is essentially identical to that of the while
statement, as shown in the following example:
initializer
while ( condition ) {
embedded-statement
update
}
As with all iteration statements, the condition in a for block must be a Boolean
expression that serves as a continuation condition and not a termination
condition.
Examples
The initializer, condition, and update components of a for statement are
optional. However, an empty condition is considered implicitly true and can
easily cause an infinite loop. The following code provides an example:
for (;;) {
Console.WriteLine("Help ");
...
}
As with the while and do statements, you can use a simple embedded statement
as shown in the following example:
for (int i = 0; i < 10; i++)
Console.WriteLine(i);
You can also use a for statement block:
for (int i = 0; i < 10; i++) {
Console.WriteLine(i);
Console.WriteLine(10 – i);
}

24 Module 4: Statements and Exceptions
Declaring Variables
One subtle difference between the while statement and the for statement is that
a variable declared in the initializer code of a for statement is scoped only
within the for block. For example, the following code generates a compile-time
error:
for (int i = 0; i < 10; i++)
Console.WriteLine(i);
Console.WriteLine(i); // Error: i is no longer in scope
In conjunction with this rule, it is important to note that you cannot declare a
variable in a for block with the same name as a variable in an outer block. This
rule also applies to variables declared in the initializer code of a for statement.
For example, the following code generates a compile-time error:
int i;
for (int i = 0; i < 10; i++) ...
However, the following code is allowed:
for (int i = 0; i < 10; i++) ...
for (int i = 0; i < 20; i++) ...
Further, you can initialize two or more variables in the initializer code of a for
statement, as follows:
for (int i = 0, j = 0; ... ; ...)
However, the variables must be of the same type. Therefore, the following is
not permitted:
for (int i = 0, long j = 0; i < 10; i++)
...
You can also use two or more expression statements separated by a comma or
commas in the update code of a for statement, as follows:
for (int i = 0, j = 0; ... ; i++, j++)
The for statement is best suited to situations in which the number of iterations
is known. They are particularly well suited to modifying each element of an
array.

Module 4: Statements and Exceptions 25
The foreach Statement
n
Choose the Type and Name of the Iteration Variable
n
Execute Embedded Statements for Each Element of the
Collection Class
ArrayList numbers = new ArrayList( );
for (int i = 0; i < 10; i++ ) {
numbers.Add(i);
}
foreach (int number in numbers) {
Console.WriteLine(number);
}
ArrayList numbers = new ArrayList( );
for (int i = 0; i < 10; i++ ) {
numbers.Add(i);
}
foreach (int number in numbers) {
Console. WriteLine(number);
}
0 1 2 3 4 5 6 7 8 9
Collections are software entities whose purpose is to collect other software
entities, much as a ledger can be thought of as a collection of bank accounts or
a house as a collection of rooms.
The Microsoft .NET Framework provides a simple collection class called
ArrayList. You can use ArrayList to create a collection variable and add
elements to the collection. For example, consider the following code:
Using System.Collection;
...
ArrayList numbers = new ArrayList( );
for (int i = 0; i < 10; i++) {
numbers.Add(i);
}
You can write a for statement that accesses and prints each collection element
from this collection class in turn:
for (int i = 0; i < numbers.Count; i++) {
int number = (int)numbers[i];
Console.WriteLine(number);
}
This for statement contains many individual statements that in combination
implement the mechanism used to iterate through each collection element of
numbers. However, this solution is not easy to implement and is prone to error.
To address this problem, C# provides the foreach statement, which allows you
to iterate through a collection without using multiple statements. Rather than
explicitly extracting each element from a collection by using syntax specific to
the particular collection, you use the foreach statement to approach the problem
in the opposite way. You effectively instruct the collection to present its
elements one at a time. Instead of taking the embedded statement to the
collection, the collection is taken to the embedded statement.

26 Module 4: Statements and Exceptions
By using the foreach statement, you can rewrite the previous for statement as
follows:
foreach (int number in numbers)
Console.WriteLine(number);
The foreach statement executes the embedded statement for each element of
the collection class numbers. You only need to choose the type and name of the
iteration variable, which in this case are int and number, respectively.
You cannot modify the elements in a collection by using a foreach statement
because the iteration variable is implicitly readonly. For example:
foreach (int number in numbers) {
number++; // Compile-time error
Console.WriteLine(number);
}
You can use a foreach statement to iter ate through the values of an
enumerator by using the Enum.GetValues() method, which returns an array of
objects.
It is important to be cautious when deciding the type of the foreach iteration
variable. In some circumstances, a wrong iteration variable type might not be
detected until run time. This would cause an error.
Tip
Module 4: Statements and Exceptions 27
Quiz: Spot the Bugs
for (int i = 0, i < 10, i++)
Console.WriteLine(i);
for (int i = 0, i < 10, i++)
Console.WriteLine(i);
int i = 0;
while (i < 10)
Console.WriteLine(i);
int i = 0;
while (i < 10)
Console.WriteLine(i);
for (int i = 0; i >= 10; i++)
Console. WriteLine(i);
for (int i = 0; i >= 10; i++)
Console. WriteLine(i);
do
...
string s = Console.ReadLine( );
guess = int.Parse(s);
while (guess != answer);
do
...
string s = Console.ReadLine( );
guess = int.Parse(s);
while (guess != answer);
2
2
2
3
3
3
4
4
4
1
1
1
In this quiz, you can work with a partner to spot the bugs in the code on the
slide. To see the answers to this quiz, turn the page.

28 Module 4: Statements and Exceptions
Answers
1. The for statement elements are separated by commas rather than semicolons.
The C# compiler traps this bug as a compile-time error. The corrected code
is as follows:
for (int i = 0; i < 10; i++)
...
2. The while statement does not update the continuation expression. It will
loop forever. This bug does not generate a warning or an error at compile
time. The corrected code is as follows:
int i = 0;
while (i < 10) {
Console.WriteLine(i);
i++;
}
3. The for statement has a termination rather than a continuation condition. It
will never loop at all. This bug does not generate a warning or an error at
compile time. The corrected code is as follows:
for (int i = 0; i < 10; i++)
...
4. The statements between do and while must be grouped together in a block.
The C# compiler traps this bug as a compile-time error. The corrected code
is as follows:
do {
...
string s = Console.ReadLine( );
guess = int.Parse(s);
} while (guess != answer);

Module 4: Statements and Exceptions 29
u
Using Jump Statements
n
The goto Statement
n
The break and continue Statements
The goto, break , and continue statements are known as jump statements. You
use them to transfer control from one point in the program to another, at any
time. In this section, you will learn how to use jump statements in C# programs.
30 Module 4: Statements and Exceptions
The goto Statement
n
Flow of Control Transferred to a Labeled Statement
n
Can Easily Result in Obscure “Spaghetti” Code
if (number % 2 == 0) goto Even;
Console. WriteLine("odd");
goto End;
Even:
Console. WriteLine("even");
End:
if (number % 2 == 0) goto Even;
Console.WriteLine("odd");
goto End;
Even:
Console.WriteLine("even");
End:
The goto statement is the most primitive C# jump statement. It transfers control
to a labeled statement. The label must exist and must be in the scope of the goto
statement. More than one goto statement can transfer control to the same label.
The goto statement can transfer control out of a block, but it can never transfer
control into a block. The purpose of this restriction is to avoid the possibility of
jumping past an initialization. The same rule exists in C++ and other languages
as well.
The goto statement and the targeted label statement can be very far apart in the
code. This distance can easily obscure the control-flow logic and is the reason
that most programming guidelines recommend that you do not use goto
statements.
The only situations in which goto statements are recommended are in
switch statements or to transfer control to the outside of a nested loop.
Note
Module 4: Statements and Exceptions 31
The break and continue Statements
n
The break Statement Jumps out of an Iteration
n
The continue Statement Jumps to the Next Iteration
int i = 0;
while (true) {
Console.WriteLine(i);
i++;
if (i < 10)
continue;
else
break;
}
int i = 0;
while (true) {
Console. WriteLine(i);
i++;
if (i < 10)
continue;
else
break;
}
A break statement exits the nearest enclosing switch, while, do, for, or
foreach statement. A continue statement starts a new iteration of the nearest
enclosing while, do, for, or foreach statement.
The break and continue statements are not very different from a goto
statement, whose use can easily obscure control-flow logic. For example, you
can rewrite the while statement that is displayed on the slide without using
break or continue as follows:
int i = 0;
while (i < 10) {
Console.WriteLine(numbers[i]);
i++;
}
Preferably, you can rewrite the previous code by using a for statement, as
follows:
for (int i = 0; i < 10 ; i++) {
Console.WriteLine(numbers[i]);
}
32 Module 4: Statements and Exceptions
Lab 4.1: Using Statements
Objectives
After completing this lab, you will be able to:
n
Use statements to control the flow of execution.
n
Use looping statements.
Prerequisites
Before working on this lab, you should be familiar with the following:
n
Creating variables in C#
n
Using common operators in C#
n
Creating enum types in C#
Estimated time to complete this lab: 30 minutes

Module 4: Statements and Exceptions 33
Exercise 1
Converting a Day of the Year into a Month and Day Pair
In this exercise, you will write a program that reads an integer day number
(between 1 and 365) from the console and stores it in an integer variable. The
program will convert this number into a month and a day of the month and then
print the result to the console. For example, entering 40 should result in
“February 9” being displayed. (In this exercise, the complications associated
with leap years are ignored.)
å
To read the day number from the console
1. Open the WhatDay1.csproj project in the install folder\
Labs\Lab04\Starter\WhatDay1 folder. The WhatDay class contains a
variable that contains the number of days in each month stored in a
collection. For now, you do not need to understand how this works.
2. Add a System.Console.Write statement to WhatDay.Main that writes a
prompt to the console asking the user to enter a day number between 1 and
365.
3. Add a statement to Main that declares a string varia ble called line and
initializes it with a line read from the console by the
System.Console.ReadLine method.
4. Add a statement to Main that declares an int variable called dayNum and
initializes it with the integer returned from the int.Parse method.
The complete code should be as follows:
using System;
class WhatDay
{
static void Main( )
{
Console.Write("Please enter a day number between 1
Êand 365: ");
string line = Console.ReadLine( );
int dayNum = int.Parse(line);
//
// To do: add code here
//
}
...
}
5. Save your work.
6. Compile the WhatDay1.cs program and correct any errors. Run the program.

34 Module 4: Statements and Exceptions
å
To calculate the month and day pair from a day number
1. Add a statement to Main that declares an int variable called monthNum and
initializes it to zero.
2. An if statement for each month from January to October has been provided
for you. Add similar if statements for the months November and December
to Main.
3. Add an identifier label called End to Main after the last if statement.
4. Add a statement after the End label that declares an uninitialized string
variable called monthName.
5. A switch statement has been partially provided for you after the End label.
The case labels for the months January to October are already present. Add
to the switch statement similar case labels and their contents for the months
November and December. Add a default label to the switch statement. Add
a statement to the default label that assigns the string literal “not done yet”
to the variable monthName.
6. The completed program should be as follows:
using System;
class WhatDay
{
static void Main( )
{
Console.Write("Please enter a day number between 1
Êand 365: ");
string line = Console.ReadLine( );
int dayNum = int.Parse(line);
int monthNum = 0;
if (dayNum <= 31) { // January
goto End;
} else {
dayNum -= 31;
monthNum++;
}
if (dayNum <= 28) { // February
goto End;
} else {
dayNum -= 28;
monthNum++;
}
if (dayNum <= 31) { // March
goto End;
} else {
dayNum -= 31;
monthNum++;
}
(Code continued on following page.)

Module 4: Statements and Exceptions 35
if (dayNum <= 30) { // April
goto End;
} else {
dayNum -= 30;
monthNum++;
}
if (dayNum <= 31) { // May
goto End;
} else {
dayNum -= 31;
monthNum++;
}
if (dayNum <= 30) { // June
goto End;
} else {
dayNum -= 30;
monthNum++;
}
if (dayNum <= 31) { // July
goto End;
} else {
dayNum -= 31;
monthNum++;
}
if (dayNum <= 31) { // August
goto End;
} else {
dayNum -= 31;
monthNum++;
}
if (dayNum <= 30) { // September
goto End;
} else {
dayNum -= 30;
monthNum++;
}
if (dayNum <= 31) { // October
goto End;
} else {
dayNum -= 31;
monthNum++;
}
if (dayNum <= 30) { // November
goto End;
} else {
dayNum -= 30;
monthNum++;
}
(Code continued on following page.)

36 Module 4: Statements and Exceptions
if (dayNum <= 31) { // December
goto End;
} else {
dayNum -= 31;
monthNum++;
}
End:
string monthName;
switch (monthNum) {
case O :
monthName = "January"; break;
case 1 :
monthName = "February"; break;
case 2 :
monthName = "March"; break;
case 3 :
monthName = "April"; break;
case 4 :
monthName = "May"; break;
case 5 :
monthName = "June"; break;
case 6 :
monthName = "July"; break;
case 7 :
monthName = "August"; break;
case 8 :
monthName = "September"; break;
case 9 :
monthName = "October"; break;
case 1O :
monthName = "November"; break;
case 11 :
monthName = "December"; break;
default:
monthName = "not done yet"; break;
}
Console.WriteLine("{0} {1}", dayNum, monthName);
}
...
}
7. Save your work.

Module 4: Statements and Exceptions 37
8. Compile the WhatDay1.cs program and correct any errors. Run the program.
Verify that the program is working correctly by using the following data.
Day number
Month and day
32
February 1
60
March 1
91
April 1
186
July 5
304
October 31
309
November 5
327
November 23
359
December 25
å
To calculate the name of the month by using an enum
1. You will now replace the switch statement that determines the month name
from a month number with a more compact mechanism. Declare an enum
type called MonthName and populate it with the names of the twelve
months, starting with January and ending with December.
2. Comment out the entire switch statement.
3. In place of the switch statement, add a statement that declares an enum
MonthName variable called temp. Initialize temp from the monthNum int
variable. You will need the following cast expression:
(MonthName)monthNum
4.
Replace the initialization of monthName with the expression
temp.Format( )

38 Module 4: Statements and Exceptions
5. The completed program should be as follows:
using System;
enum MonthName
{
January,
February,
March,
April,
May,
June,
July,
August,
September,
October,
November,
December
}
class WhatDay
{
static void Main( )
{
Console.Write("Please enter a day number between 1
Êand 365: ");
string line = Console.ReadLine( );
int dayNum = int.Parse(line);
int monthNum = 0;
// 12 if statements, as above
End:
MonthName temp = (MonthName)monthNum;
string monthName = temp.Format( );
Console.WriteLine("{0} {1}", dayNum, monthName);
}
...
}
6. Save your work.
7. Compile the WhatDay1.cs program and correct any errors. Run the program.
Use the preceding table of data to verify that the program is still working
correctly.

Module 4: Statements and Exceptions 39
å
To replace the 12 if statements with one foreach statement
1. You will now replace the 12 statements that calculate the day and month
pairs with one foreach statement. Comment out all 12 if statements. You
will replace these statements in the next steps.
2. Write a foreach statement that iterates through the provided DaysInMonths
collection. To do this, add the following statement:
foreach (int daysInMonth in DaysInMonths) ...
3. Add a block statement as the body of the foreach statement. The contents of
this block will be very similar to an individual commented-out if statement
except that the daysInMonth variable is used instead of the various integer
literals.
4. Comment out the End label above the commented-out switch statement.
Replace the goto statement in the foreach statement with a break statement.
5. The completed program should be as follows:
using System;
enum MonthName { ... }
class WhatDay
{
static void Main( )
{
Console.Write("Please enter a day number between 1
Êand 365: ");
string line = Console.ReadLine( );
int dayNum = int.Parse(line);
int monthNum = 0;
foreach (int daysInMonth in DaysInMonths) {
if (dayNum <= daysInMonth)
{
break;
} else
{
dayNum -= daysInMonth;
monthNum++;
}
}
MonthName temp = (MonthName)monthNum;
string monthName = temp.Format( );
Console.WriteLine("{0} {1}", dayNum, monthName);
}
...
}

40 Module 4: Statements and Exceptions
6. Save your work.
7. Compile the WhatDay1.cs program and correct any errors. Run the program.
Use the preceding table of data to verify that the program is still working
correctly.
8. Run the program, entering day numbers less than 1 and greater than 365, to
see what happens.

Module 4: Statements and Exceptions 41
u
Handling Basic Exceptions
n
Why Use Exceptions?
n
Exception Objects
n
Using try and catch Blocks
n
Multiple catch Blocks
As a developer, you sometimes seem to spend more time checking for errors
and handling them than you do on the core logic of the actual program. You can
address this issue by using system exceptions that are designed for the purpose
of handling errors. In this section, you will learn how to catch and handle
exceptions in C#.
42 Module 4: Statements and Exceptions
Why Use Exceptions?
n
Traditional Procedural Error Handling Is Cumbersome
int errorCode;
File source = new File("code.cs");
if (errorCode == -1) goto Failed;
int length = (int)source.Length;
if (errorCode == -2) goto Failed;
char[] contents = new char[length];
if (errorCode == -3) goto Failed;
// Succeeded ...
Failed: ...
int errorCode;
File source = new File("code. cs");
if (errorCode == -1) goto Failed;
int length = (int)source.Length;
if (errorCode == -2) goto Failed;
char[] contents = new char[length];
if (errorCode == -3) goto Failed;
// Succeeded ...
Failed: ...
Error handling
Error handling
Core program logic
Core program logic
Planning for the unexpected, and recovering if it does happen, is the mark of a
good, robust program. Errors can happen at almost any time during the
compilation or execution of a program.
The core program logic from the slide is as follows:
File source = new File("code.cs");
int length = (int)source.Length;
char[ ] contents = new char[length];
...
Unfortunately, these core statements are lost in a confusing mass of intrusive
error-handling code. This error-handling code obscures the logic of the program
in a number of ways:
n
Program logic and error -handling code become intermixed.
The core program statements lose their conceptual wholeness as they
become intermixed with alternating error-handling code. The program is
then difficult to understand.
n
All error code looks alike.
All of the error-checking statements are similar. All of them test the same
error code by using if statements. Also, there is a lot of duplicate code,
which is always a warning sign.
n
Error codes are not inherently meaningful.
In this code, a number such as –1 does not have an explicit meaning. It
could represent “Security error: no read permission,” but only the
documentation can tell you what –1 represents. Therefore, integer error
codes are very “programmatic”; they do not describe the errors they
represent.

Module 4: Statements and Exceptions 43
n
Error codes are defined at the method level.
Every method reports its error by setting the error code to a specific value
unique to it. No two methods can use the same value. This means that every
method is coupled to every other method. You can clearly see this coupling
in effect when the integer error codes are replaced by an enumeration, as in
the following code:
enum ErrorCode {
SecurityError = -1,
IOError = -2,
OutOfMemoryError = -3,
...
}
This code is better: An identifier such as FileNotFound is certainly more
descriptive than –1. However, when a new named error is added to the
enum, every method that names its errors in the enum will be affected. In
C++, this can easily lead to significant recompilation delays since there is
extremely tight coupling.
n
Simple integers have limited descriptive power.
For example, –1 might be documented to mean “Security error: no read
permission,” but –1 cannot also provide the name of the file that you do not
have permission to read.
n
Error codes are too easy to ignore.
For example, C programmers almost never check the int returned by the
printf function. A printf is unlikely to fail, but if it does, it returns a
negative integer value (usually –1).
As you can see, you need an alternative to the traditional approach of handling
errors. Exceptions provide an alternative that is more flexible, requires less
overhead, and produces meaningful error messages.
44 Module 4: Statements and Exceptions
Exception Objects
CoreException
CoreException
Represents non-fatal
run-time errors
Represents fatal
run-time errors
Exception
Exception
SystemException
SystemException
OutOfMemoryException
OutOfMemoryException
IOException
IOException
OverflowException
OverflowException
NullReferenceException
NullReferenceException
The programmatic error codes used in procedural error-handling code look
similar to the following:
enum ErrorCode {
SecurityError = -1,
IOError = -2,
OutOfMemoryError = -3,
...
}
The use of such error codes makes it difficult to supply information that you
can use to recover from the error. For example, if an IOError is generated, you
do not get information about what kind of error it is. Is it an attempt to write to
a read-only file or a non-existent file, or is it a corrupt disk? Additionally, what
file is being read from or written to?
To overcome this problem of lack of information about the generated error,
the .NET Framework has defined a range of system-defined exception classes
that store information about the exception being thrown.

Module 4: Statements and Exceptions 45
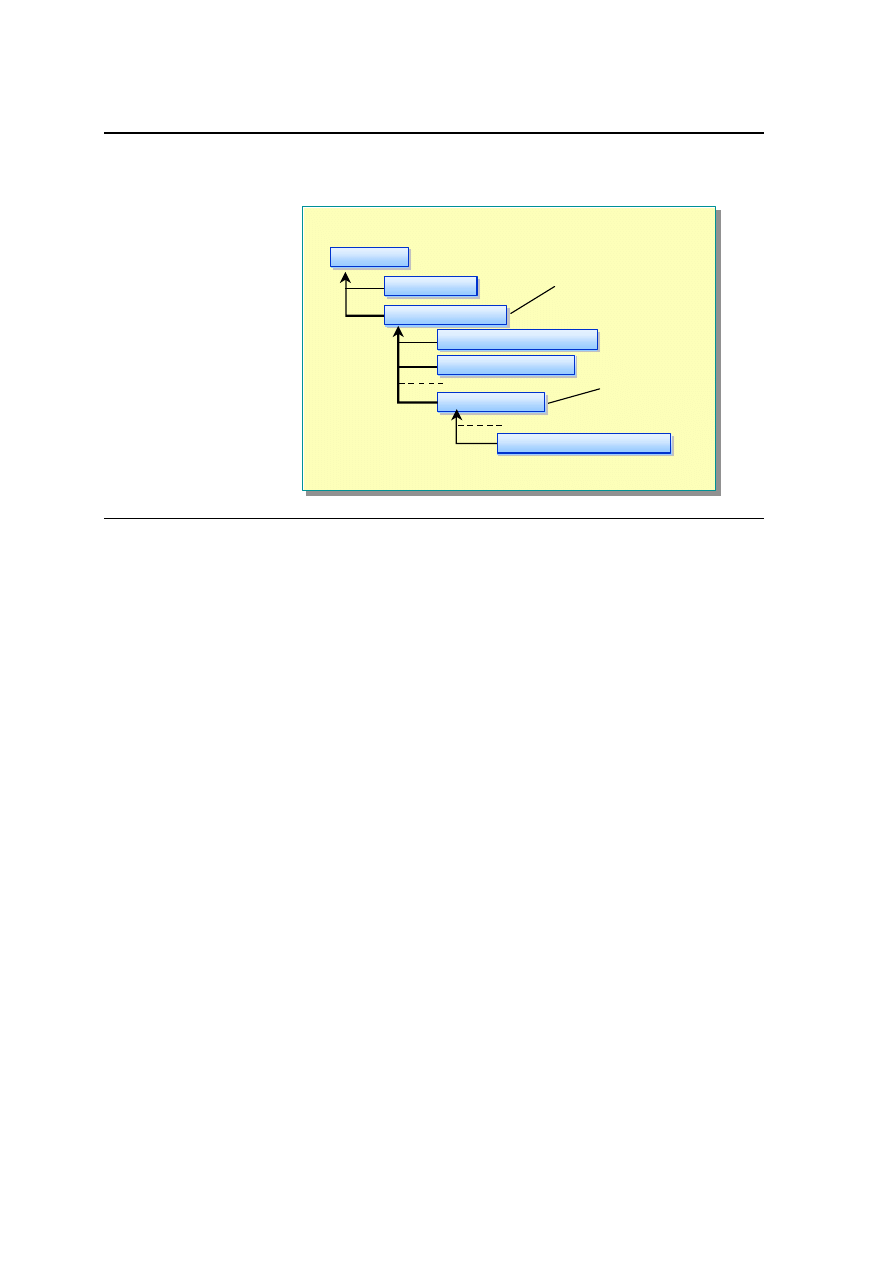
All C# exceptions derive from the class named Exception, which is a part of
the Common Language Runtime. The hierarchy between these exceptions is
displayed on the slide. The exception classes provide the following benefits:
n
Error messages are no longer represented by integer values or enums.
The programmatic integer values such as -3 disappear. In their place, you
use specific exception classes such as OutOfMemoryException. Each
exception class can reside inside its own source file and is decoupled from
all other exception classes.
n
Meaningful error messages are generated.
Each exception class is descriptive, clearly and obviously representing a
specific error. Instead of a –3, you use a class called
OutOfMemoryException. Each exception class can also contain
information specific to itself. For example, a FileNotFoundException class
could contain the name of the file that was not found.
To use exceptions effectively, you need to maintain a balance between
exception classes that are too vague and those that are too precise. If the
exception class is too vague, you will not be able to write a useful catch block.
On the other hand, do not create an exception class that is so precise that it
leaks implementation details and breaks encapsulation.
Tip
46 Module 4: Statements and Exceptions
Using try and catch Blocks
n
Object-Oriented Solution to Error Handling
l
Put the normal code in a try block
l
Handle the exceptions in a separate catch block
try {
File source = new File("code.cs");
int length = (int)source.Length;
char[ ] contents = new char[length];
...
}
catch (System.Exception caught) {
Console. WriteLine(caught);
}
try {
File source = new File("code.cs");
int length = (int)source.Length;
char[ ] contents = new char[length];
...
}
catch (System.Exception caught) {
Console.WriteLine(caught);
}
Error handling
Error handling
Core program logic
Core program logic
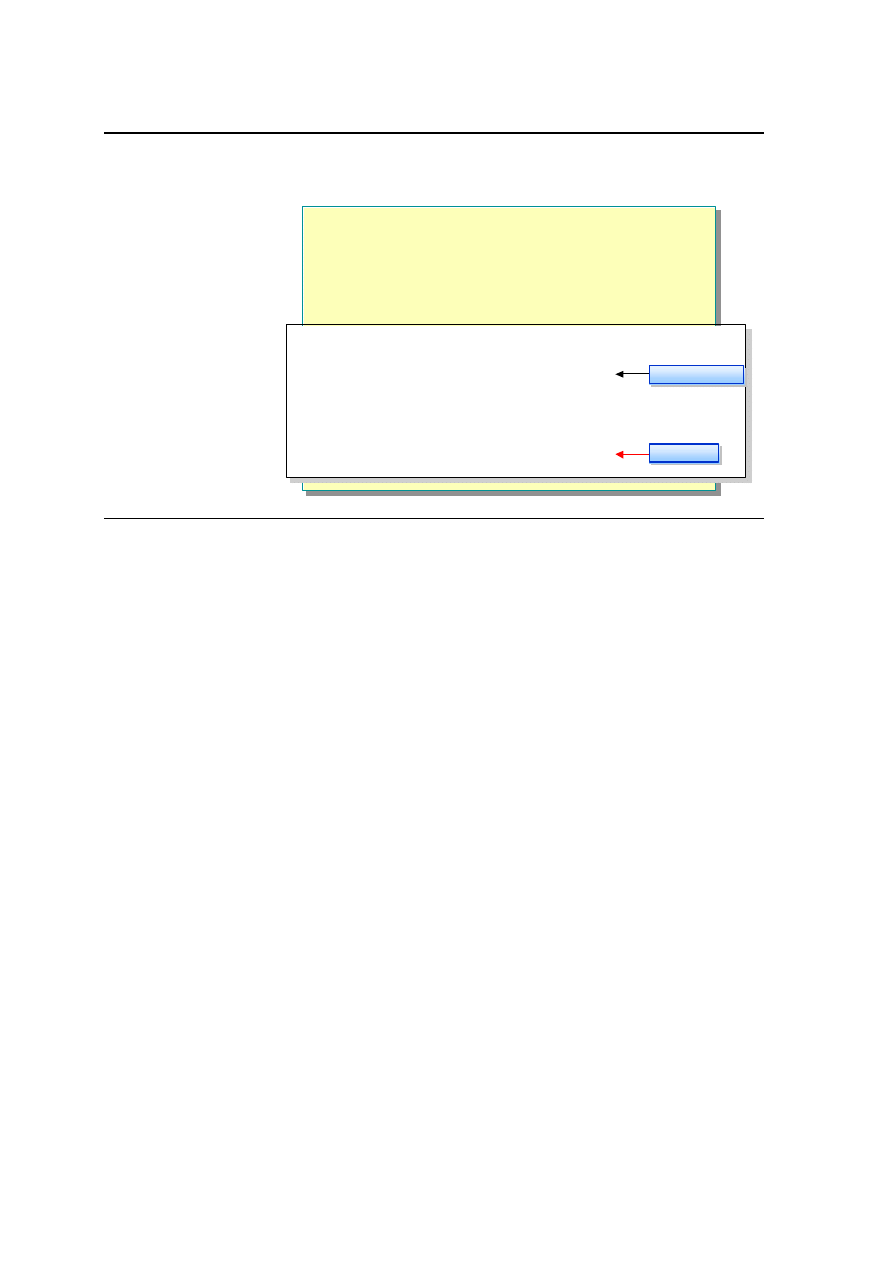
Object orientation offers a structured solution to error-handling problems in the
form of try and catch blocks. The idea is to physically separate the core
program statements that handle the normal flow of control from the error-
handling statements. Therefore, the sections of code that might throw
exceptions are placed in a try block, and the code for handling exceptions in the
try block is placed in a catch block.
The syntax of a catch block is as follows:
catch ( class-type identifier ) { ... }
The class type must be System.Exception or a type derived from
System.Exception.
The identifier, which is optional, is a read-only local variable in the scope of the
catch block.
catch (Exception caught) {
...
}
Console.WriteLine(caught); // Compile-time error:
// caught is no longer in scope

Module 4: Statements and Exceptions 47
The example in the slide shows how to use try and catch statements. The try
block encloses an expression that will generate the exception known as
SystemException. When the exception takes place, the runtime stops executing
and starts searching for a catch block that can catch the pending exception
(based on its type). If an appropriate catch block is not found in the immediate
function, the runtime will unwind the call stack searching for the calling
function. If an appropriate catch block is not found there, it will search for the
function that called the calling function, and so on, until it finds a catch block.
(Or until it reaches the end of Main. If this happens, the program will shut
down.) If it finds a catch block, the exception is considered to have been caught,
and normal execution starts again, beginning with the body of the catch block
(which in the slide writes out the message that is contained within the exception
object SystemException).
Therefore, if you use try and catch blocks, the error-handling statements no
longer intermix themselves with the core logic statements, and this makes the
program easier to understand.

48 Module 4: Statements and Exceptions
Multiple catch Blocks
n
Each catch Block Catches One Class of Exception
n
A try Block Can Have One General Catch Block
n
A try Block Is Not Allowed to Catch a Class That Is
Derived from a Class Caught in an Earlier catch Block
try {
File source = new File("code.cs");
int length = (int)source.Length;
char[ ] contents = new char[length];
...
}
catch (SecurityException caught) { ... }
catch (IOException caught) { ... }
catch (OutOfMemoryException caught) { ... }
try {
File source = new File("code.cs");
int length = (int)source.Length;
char[ ] contents = new char[length];
...
}
catch (SecurityException caught) { ... }
catch (IOException caught) { ... }
catch (OutOfMemoryException caught) { ... }
A block of code inside a try construct can contain many statements. Each
statement could raise one or more different classes of exception. Since there are
many different exception classes, it is acceptable to have many catch blocks,
each catching a specific kind of exception.
An exception is caught solely based on its type. The runtime automatically
catches exception objects of a particular type in a catch block for that type.
To get a better understanding of what is happening in a multiple try-catch
block, consider the following code:
1. try {
2. File source = new File("code.cs");
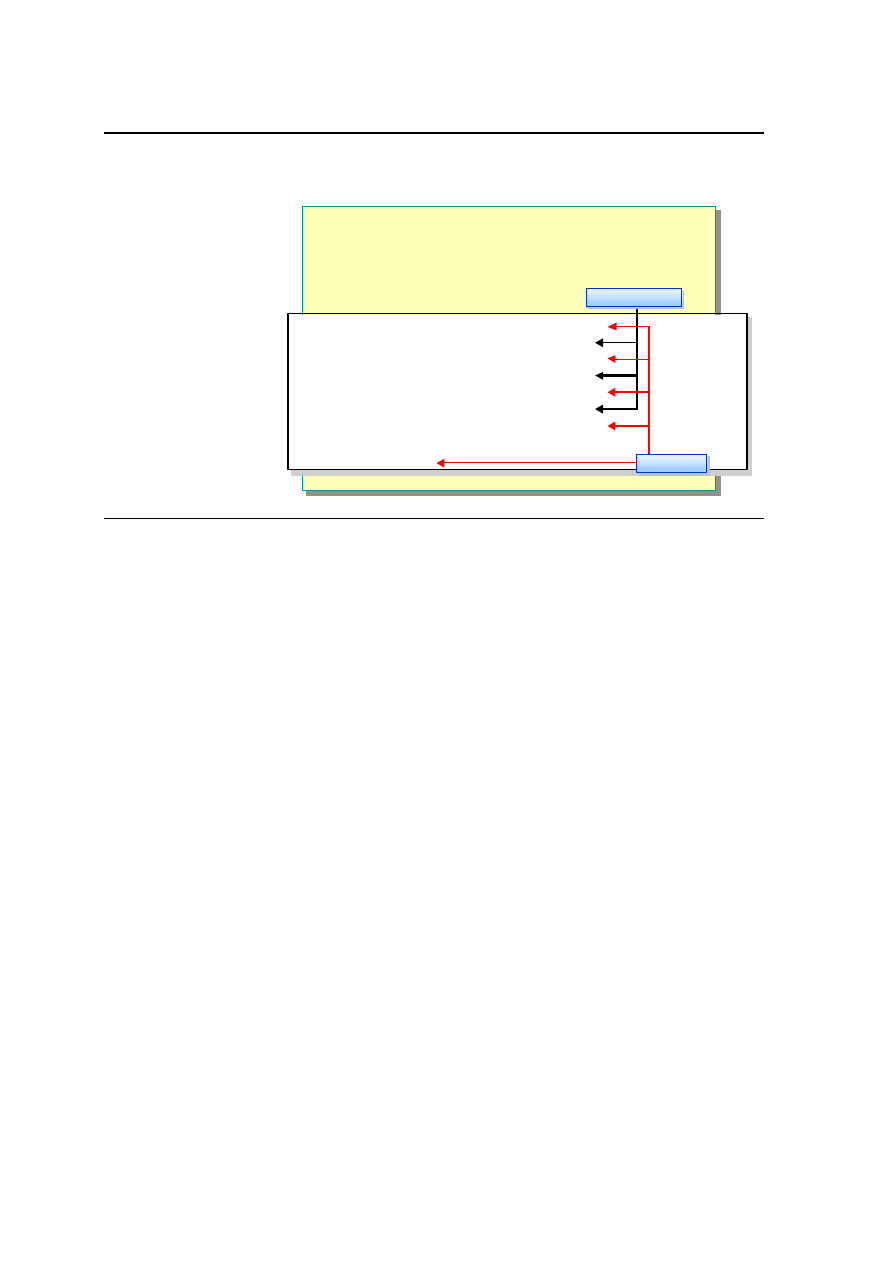
3. int length = (int)source.Length;
4. char[ ] contents = new char[length];
5. ...
6. }
7. catch (SecurityException caught) { ... }
8. catch (IOException caught) { ... }
9. catch (OutOfMemoryException caught) { ... }
10. ...
Line 2 creates a new File object. This can throw an exception object of class
SecurityException. If it does, then line 3 is not executed. Normal sequential
execution is suspended, and control transfers to the first catch block that can
catch that exception. In this example, this catch block is line 7. After control is
transferred to this statement, it executes to its closing brace, and transfers
control to line 10.

Module 4: Statements and Exceptions 49
On the other hand, line 2 may not throw an exception. In this case, sequential
execution will proceed normally to line 3. This line might throw an exception
object of class IOException. If it does, then control flow jumps to the catch
block at line 8, this catch block executes normally, and control then transfers to
line 10.
If none of the statements in the try block throw an exception, then the control
flow reaches the end of the try block and transfers to line 10. Note that the
control flow enters a catch block only if an exception is thrown.
You can write the statements in a try block without being concerned about
whether an earlier statement in the try block will fail. If an earlier statement
does throw an exception, the control flow will not physically reach the
statements that follow it in the try block.
If the control flow fails to find a suitable catch block, it will terminate the
current method call and resume its search at the statement from which the
method call was invoked. It will continue its search, unwinding the call stack all
the way back to Main if necessary. If this causes Main itself to be terminated,
the thread or process that invoked Main is terminated in an implementation-
defined fashion.
General catch Block
A general catch block, also known as a general catch clause, can catch any
exception regardless of its class and is often used to trap any exceptions that
might fall through because of the lack of an appropriate handler.
There are two ways to write a general catch block. You can write a simple
catch statement as shown:
catch { ... }
You can also write the following:
catch (System.Exception) { ... }
A try block can have only one general catch block. For example, the following
code will generate an error:
try {
...
}
catch { ... }
catch { ... } // Error

50 Module 4: Statements and Exceptions
If a general catch block is present, it must be the last catch block in the
program, as follows:
try {
}
catch { ... } // Error
catch (OutOfMemoryException caught) { ... }
You will generate an error if you catch the same class twice, as in the following
example:
catch (OutOfMemoryException caught) { ... }
catch (OutOfMemoryException caught) { ... } // Error
You will also generate an error if you try to catch a class that is derived from a
class caught in an earlier catch block, as follows:
catch (Exception caught) { ... }
catch (OutOfMemoryException caught) { ... }
This code results in an error because the OutOfMemoryException class is
derived from the SystemException class, which is in turn derived from the
Exception class.
Module 4: Statements and Exceptions 51
u
Raising Exceptions
n
The throw Statement
n
The finally Clause
n
Checking for Arithmetic Overflow
n
Guidelines for Handling Exceptions
C# provides the throw statement and the finally clause so that programmers
can raise exceptions if required and handle them as appropriate. In this section,
you will learn how to raise your own exceptions. You will also learn how to
enable checking for arithmetic overflow as appropriate for your programs.
52 Module 4: Statements and Exceptions
The throw Statement
n
Throw an Appropriate Exception
n
Give the Exception a Meaningful Message
throw expression ;
throw expression ;
if (minute < 1 || minute > 59) {
throw new InvalidTimeException (minute +
"is not a valid minute");
// !! Not reached !!
}
if (minute < 1 || minute > 59) {
throw new InvalidTimeException (minute +
"is not a valid minute");
// !! Not reached !!
}
The try and catch blocks are used to trap errors that are raised by a C# program.
You have seen that instead of signaling an error by returning a special value, or
assigning it to a global error variable, C# causes execution to be transferred to
the appropriate catch clause.
System-Defined Exceptions
When it needs to raise an exception, the runtime executes a throw statement
and raises a system-defined exception. This immediately suspends the normal
sequential execution of the program and transfers control to the first catch
block that can handle the exception based on its class.

Module 4: Statements and Exceptions 53
Raising Your Own Exceptions
You can use the throw statement to raise your own exceptions, as shown in the
following example:
if (minute < 1 || minute >= 60) {
string fault = minute + "is not a valid minute";
throw new InvalidTimeException(fault);
// !!Not reached!!
}
In this example, the throw statement is used to raise a user-defined exception,
InvalidTimeException, if the time being parsed does not constitute a valid time.
Exceptions typically expect a meaningful message string as a parameter when
they are created. This message can be displayed or logged when the exception
is caught. It is also good practice to throw an appropriate class of exception.
C++ programmers will be accustomed to creating and throwing an
exception object with a single statement, as shown in the following code:
throw out_of_range("type: index out of bounds");
The syntax in C# is very similar but requires the new keyword, as follows:
throw new FileNotFoundException("...");
Throwing Objects
You can only throw an object if the type of that object is directly or indirectly
derived from System.Exception. This is different from C++, in which objects
of any type can be thrown, such as in the following code:
throw 42; // Allowed in C++, but not in C#
You can use a throw statement in a catch block to rethrow the current
exception object, as in the following example:
catch (Exception caught) {
...
throw caught;
}
You can also throw a new exception object of a different type:
catch (FileIOException caught) {
...
throw new FileNotFoundException(filename);
}
Caution

54 Module 4: Statements and Exceptions
In the preceding example, notice that the FileIOException object, and any
information it contains, is lost when the exception is converted into a
FileNotFo undException object. A better idea is to wrap the exception, adding
new information but retaining existing information as shown in the following
code:
catch (FileIOException caught) {
...
throw new FileNotFoundException(filename, caught);
}
This ability to map an exception object is particularly useful at the boundaries
of a layered system architecture.
A throw statement with no expression can be used, but only in a catch block. It
rethrows the exception that is currently being handled. This action is called a
rethrow in C++ as well. Therefore, the following two lines of code produce
identical results:
catch (OutOfMemoryException caught) { throw caught; }
...
catch (OutOfMemoryException) { throw ; }
You can use a rethrow in a general catch block to implement partial recovery:
StreamReader reader = new StreamReader(filename);
try {
...
}
catch {
reader.Close( );
throw;
}

Module 4: Statements and Exceptions 55
The finally Clause
n
All of the Statements in a finally Block Are Always
Executed
CriticalSection .Enter(x);
try {
...
}
finally {
CriticalSection.Exit(x);
}
CriticalSection.Enter(x);
try {
...
}
finally {
CriticalSection .Exit(x);
}
Any catch blocks are optional
Any catch blocks are optional
C# provides the finally clause to enclose a set of statements that need to be
executed regardless of the course of control flow. Therefore, if control leaves a
try block as a result of normal execution because the control flow reaches the
end of the try block, the statements of the finally block are executed. Also, if
control leaves a try block as a result of a throw statement or a jump statement
such as break , continue, or goto, the statements of the finally block are
executed.
The finally block is useful in two situations: to avoid duplication of statements
and to release resources after an exception has been thrown.
Avoiding Duplication of Statements
If the statements at the end of a try block are duplicated in a general catch
block, the duplication can be avoided by moving the statements into a finally
block. Consider the following example:
try {
...
statement
}
catch {
...
statement
}

56 Module 4: Statements and Exceptions
You can simplify the preceding code by rewriting it as follows:
try {
...
}
catch {
...
}
finally {
statement
}
Releasing Resources
If a statement in a try block acquires a resource such as a file handle, the
corresponding statement that releases the resource can be placed in a finally
block. This ensures that the resource will be released even if an exception arises
from the try block. The following code provides an example:
StreamReader reader = null;
try {
File source = new File(filename);
reader = source.OpenText( );
...
}
finally {
if (reader != null) {
reader.Close( );
}
}
It is an error for a break, continue , or goto statement to transfer control out of
a finally block. They can be used only if the target of the jump is within the
same finally block. However, it is always an error for a return statement to
occur in a finally block, even if the return statement is the last statement in the
block.

Module 4: Statements and Exceptions 57
If an exception is thrown during the execution of a finally block, it is
propagated to the next enclosing try block, as shown:
try {
try {
...
}
catch {
// ExampleException is not caught here
}
finally {
throw new ExampleException("who will catch me?");
}
}
catch {
// ExampleException is caught here
}
If an exception is thrown during the execution of a finally block, and another
exception was in the process of being propagated, then the original exception is
lost, as shown:
try {
throw ExampleException("Will be lost");
}
finally {
throw ExampleException("Might be found and caught");
}

58 Module 4: Statements and Exceptions
Checking for Arithmetic Overflow
n
By Default, Arithmetic Overflow Is Not Checked
l
A checked statement turns overflow checking on
checked {
int number = int.MaxValue;
Console.WriteLine(++number);
}
checked {
int number = int.MaxValue ;
Console. WriteLine(++number);
}
unchecked {
int number = int. MaxValue;
Console.WriteLine(++number);
}
unchecked {
int number = int.MaxValue;
Console.WriteLine(++number);
}
-2147483648
OverflowException
OverflowException
Exception object is thrown.
WriteLine is not executed.
MaxValue + 1 is negative?
By default, a C# program will not check arithmetic for overflow. The following
code provides an example:
// example.cs
class Example
{
static void Main( )
{
int number = int.MaxValue( );
Console.WriteLine(++number);
}
}
In the preceding code, number is initialized to the maximum value for an int.
The expression ++number increments number to –2147483648, the largest
negative int value, which is then written to the console. No error message is
generated.

Module 4: Statements and Exceptions 59
Controlling Arithmetic Overflow Checking
When compiling a C# program, you can globally turn on arithmetic overflow
checking by using the
/checked+
command line option, as follows:
c:\ csc /checked+ example.cs
The resulting executable program will cause an exception of class
System.OverflowException.
Similarly, you can turn off global arithmetic overflow checking by using the
/checked-
command line option, as follows:
c:\ csc /checked- example.cs
The resulting executable program will silently wrap the int value back to zero
and will not cause an exception of class System.OverflowException.
Creating Checked and Unchecked Statements
You can use the checked and unchecked keywords to create statements that are
explicitly checked or unchecked statements:
checked { statement-list }
unchecked { statement-list }
Regardless of the compile-time
/checked
setting, the statements inside a
checked statement list are always checked for arithmetic overflow. Similarly,
regardless of the compile-time
/checked
setting, the statements inside an
unchecked statement list are never checked for arithmetic overflow.
Creating Checked and Unchecked Expressions
You can also use the checked and unchecked keywords to create checked and
unchecked expressions:
checked ( expression )
unchecked ( expression )
A checked expression is checked for arithmetic overflow; an unchecked
expression is not. For example, the following code will generate a
System.OverflowException.
// example.cs
class Example
{
static void Main( )
{
int number = int.MaxValue( );
Console.WriteLine(checked(++number));
}
}

60 Module 4: Statements and Exceptions
Guidelines for Handling Exceptions
n
Throwing
l
Avoid exceptions for normal or expected cases
l
Never create and throw objects of class Exception
l
Include a description string in an Exception object
l
Throw objects of the most specific class possible
n
Catching
l
Arrange catch blocks from specific to general
l
Do not let exceptions drop off Main
Use the following guidelines for handling exceptions:
n
Avoid exceptions for normal or expected cases.
In general, do not throw exceptions in normal or common cases. For
example, it is relatively common to fail to open a named file, so the
File.Open method returns null to signify that the file could not be found
rather than throwing an exception.
n
Never create or throw objects of class Exception.
Create exception classes that are derived directly or indirectly from
SystemException (and never from the root Exception class). The following
code provides an example:
class SyntaxException : SystemException
{
...
}
n
Include a description string in an Exception object.
Always include a useful description string in an exception object, as shown:
string description =
String.Format("{0}({1}): newline in string constant",
filename, linenumber);
throw new SyntaxException(description);
n
Throw objects of the most specific class possible.
Throw the most specific exception possible when the user might be able to
use this specific information. For example, throw a
FileNotFoundException rather than a more general FileIOException.

Module 4: Statements and Exceptions 61
n
Arrange catch blocks from specific to general.
Arrange your catch blocks from the most specific exception to the most
general exception, as shown:
catch (Exception caught) { ... } // Do not do this
catch (SyntaxException caught) { ... }
catch (SyntaxException caught) { ... } // Do this
catch (Exception caught) { ... }
n
Do not let exceptions drop off Main.
Put a general catch clause in Main to ensure that exceptions never drop off
the end of the program.
static void Main( )
{
try {
...
}
catch (Exception caught) {
...
}
}

62 Module 4: Statements and Exceptions
Lab 4.2: Using Exceptions
Objectives
After completing this lab, you will be able to:
n
Throw and catch exceptions.
n
Display error messages.
Prerequisites
Before working on this lab, you should be familiar with the following:
n
Creating variables in C#
n
Using common operators in C#
n
Creating enum types in C#
Esti mated time to complete this lab: 30 minutes

Module 4: Statements and Exceptions 63
Exercise 1
Validating the Day Number
In this exercise, you will add functionality to the program that you created in
Exercise 1. The program will examine the initial day number that is entered by
the user. If it is less than 1 or greater than 365, the program will throw an
InvalidArgument exception (“Day out of range”). The program will trap this
exception in a catch clause and display a diagnostic message on the console.
å
To validate the day number
1. Open the project WhatDay2.csproj in the install folder\
Labs\Lab04\Starter\WhatDay2 folder.
2. Enclose the entire contents of WhatDay.Main in a try block.
3. After the try block, add a catch clause that catches exceptions of type
System.Exception and name them caught. In the catch block, add a
WriteLine statement to write the exception caught to the console.
4. Add an if statement after the declaration of the dayNum variable. The if
statement will throw a new exception object of type
System.ArgumentOutOfRangeException if dayNum is less than 1 or
greater than 365. Use the string literal “Day out of range” to create the
exception object.

64 Module 4: Statements and Exceptions
5. The completed program should be as follows:
using System;
enum MonthName { ... }
class WhatDay
{
static void Main( )
{
try {
Console.Write("Please enter a day number
Êbetween 1 and 365: ");
string line = Console.ReadLine( );
int dayNum = int.Parse(line);
if (dayNum < 1 || dayNum > 365) {
throw new ArgumentOutOfRangeException("Day
Êout of range");
}
int monthNum = 0;
foreach (int daysInMonth in DaysInMonths) {
if (dayNum <= daysInMonth) {
break;
} else {
dayNum -= daysInMonth;
monthNum++;
}
}
MonthName temp = (MonthName)monthNum;
string monthName = temp.Format( );
Console.WriteLine("{0} {1}", dayNum,
ÊmonthName);
}
catch (Exception caught) {
Console.WriteLine(caught);
}
}
...
}
6. Save your work.
7. Compile the WhatDay2.cs program and correct any errors. Run the program.
Use the table of data provided in Lab4.1 (Exercise 1) to verify that the
program is still working correctly.
8. Run the program, entering day numbers less than 1 and greater than 365.
Verify that invalid input is safely trapped and that the exception object is
thrown, caught, and displayed.

Module 4: Statements and Exceptions 65
Exercise 2
Handling Leap Years
In this exercise, you will add functionality to the program that you worked on in
Exercise 1. After you complete this exercise, the program will prompt the user
for a year in addition to a day number. The program will detect whether the
specified year is a leap year. It will validate whether the day number is between
1 and 366 if the year is a leap year, or whether it is between 1 and 365 if the
year is not a leap year. Finally, it will use a new foreach statement to correctly
calculate the month and day pair for leap years.
å
To enter the year from the console
1. Open the WhatDay3.csproj project in the install folder\
Labs\Lab04\Starter\WhatDay3 folder.
2. Add to the beginning of WhatDay.Main a System.Console.Write
statement that writes a prompt to the console asking the user to enter a year.
3. Change the declaration and initialization of the string line to an assignment.
Change string line = Console.ReadLine( ); to
line = Console.ReadLine( );.
4. Add a statement to Main that declares a string variable called line and
initializes it with a line read from the console by the
System.Console.ReadLine method.
5. Add a statement to Main that declares an int variable called yearNum and
initializes it with the integer returned by the int.Parse method.

66 Module 4: Statements and Exceptions
6. The completed program should be as follows:
using System;
enum MonthName { ... }
class WhatDay
{
static void Main( )
{
try {
Console.Write("Please enter the year: ");
string line = Console.ReadLine( );
int yearNum = int.Parse(line);
Console.Write("Please enter a day number
Êbetween 1 and 365: ");
line = Console.ReadLine( );
int dayNum = int.Parse(line);
// As before....
}
catch (Exception caught) {
Console.WriteLine(caught);
}
}
...
}
7. Save your work.
8. Compile the WhatDay3.cs program and correct any errors.
å
To determine whether the year is a leap year
1. Add a statement immediately after the declaration of yearNum that declares
a bool variable called isLeapYear. Initialize this variable with a Boolean
expression that determines whether yearNum is a leap year. A year is a leap
year if the following two statements are both true:
•
It is divisible by 4.
•
It is either not divisible by 100, or it is divisible by 400.
2. Add an if statement immediately after the declaration of isLeapYear. In the
if statement, write the string “ IS a leap year” or “ is NOT a leap year” to the
console, depending on the value of isLeapyear. You will use this if
statement to verify that the Boolean leap year determination is correct.

Module 4: Statements and Exceptions 67
3. The completed program should be as follows:
using System;
enum MonthName { ... }
class WhatDay
{
static void Main( )
{
try
{
Console.Write("Please enter the year: ");
string line = Console.ReadLine( );
int yearNum = int.Parse(line);
bool isLeapYear = (yearNum % 4 == 0)
&& (yearNum % 100 != 0
|| yearNum % 400 == 0);
if (isLeapYear)
{
Console.WriteLine(" IS a leap year");
} else
{
Console.WriteLine(" is NOT a leap year");
}
Console.Write("Please enter a day number
Êbetween 1 and 365: ");
line = Console.ReadLine( );
int dayNum = int.Parse(line);
// As before...
}
catch (Exception caught)
{
Console.WriteLine(caught);
}
}
...
}
4. Save your work.
5. Compile the WhatDay3.cs program and correct any errors. Use the
following table to verify that the Boolean leap year determination is correct.
A leap year
Not a leap year
1996
1999
2000
1900
2004
2001
6. Comment out the if statement that you added in step 2.

68 Module 4: Statements and Exceptions
å
To validate the day number against 365 or 366
1. Immediately after the declaration of isLeapYear, add a declaration of an int
variable called maxDayNum. Initialize maxDayNum with either 366 or 365,
depending on whether isLeapYear is true or false, respectively.
2. Change the WriteLine statement that prompts the user for the day number.
It should display the range 1 to 366 if a leap year was entered and 1 to 365 if
a non–leap year was entered.
3. Compile the WhatDay3.cs program and correct any errors. Run the program
and verify that you have implemented the previous step correctly.
4. Change the if statement that validates the value of dayNum to use the
variable maxDayNum instead of the literal 365.
5. The completed program should be as follows:
using System;
enum MonthName { ... }
class WhatDay
{
static void Main( )
{
try
{
Console.Write("Please enter the year: ");
string line = Console.ReadLine( );
int yearNum = int.Parse(line);
bool isLeapYear = (yearNum % 4 == 0)
&& (yearNum % 100 != 0
|| yearNum % 400 == 0);
int maxDayNum = isLeapYear ? 366 : 365;
Console.Write("Please enter a day number
Êbetween 1 and {0}: ", maxDayNum);
line = Console.ReadLine( );
int dayNum = int.Parse(line);
if (dayNum < 1 || dayNum > maxDayNum) {
throw new ArgumentOutOfRangeException("Day
Êout of range");
}
// As before....
}
catch (Exception caught)
{
Console.WriteLine(caught);
}
}
...
}

Module 4: Statements and Exceptions 69
6. Save your work.
7. Compile the WhatDay3.cs program and correct any errors. Run the program
and verify that you have implemented the previous step correctly.
å
To correctly calculate the month and day pair for leap years
1. After the if statement that validates the day number and the declaration of
the monthNum integer, add an if-else statement. The Boolean expression
used in this if-else statement will be the variable isLeapYear.
2. Move the foreach statement so it becomes the embedded statement in the if-
else statement in both the true and the false cases. After this step, your code
should be as follows:
if (isLeapYear)
{
foreach (int daysInMonth in DaysInMonths) {
...
}
} else
{
foreach (int daysInMonth in DaysInMonths) {
...
}
}
3. Save your work.
4. Compile the WhatDay3.cs program and correct any errors. Run the program
and verify that day numbers in non–leap years are still handled correctly.
5. The next step will use the DaysInLeapMonths collection that has been
provided. This is a collection of int values like DaysInMonths, except that
the second value in the collection (the number of days in February) is 29
rather than 28.
6. Use DaysInLeapMonths instead of DaysInMonth in the true part of the
if-else statement.

70 Module 4: Statements and Exceptions
7. The completed program should be as follows:
using System;
enum MonthName { ... }
class WhatDay
{
static void Main( )
{
try {
Console.Write("Please enter the year: ");
string line = Console.ReadLine( );
int yearNum = int.Parse(line);
bool (isLeapYear = yearNum % 4 == 0)
&& (yearNum % 100 != 0
|| yearNum % 400 == 0);
int maxDayNum = isLeapYear ? 366 : 365;
Console.Write("Please enter a day number
Êbetween 1 and {0}: ", maxDayNum);
line = Console.ReadLine( );
int dayNum = int.Parse(line);
if (dayNum < 1 || dayNum > maxDayNum) {
throw new ArgumentOutOfRangeException("Day
Êout of range");
}
int monthNum = 0;
if (isLeapYear) {
foreach (int daysInMonth in
ÊDaysInLeapMonths) {
if (dayNum <= daysInMonth) {
break;
} else {
dayNum -= daysInMonth;
monthNum++;
}
}
} else {
foreach (int daysInMonth in DaysInMonths) {
if (dayNum <= daysInMonth) {
break;
} else {
dayNum -= daysInMonth;
monthNum++;
}
}
}
(Code continued on following page.)

Module 4: Statements and Exceptions 71
MonthName temp = (MonthName)monthNum;
string monthName = temp.Format( );
Console.WriteLine("{0} {1}", dayNum,
ÊmonthName);
}
catch (Exception caught) {
Console.WriteLine(caught);
}
}
...
}
8. Save your work.
9. Compile the WhatDay3.cs program and correct any errors. Run the program,
using the data in the following table to verify that the program is working
correctly.
Year
Day Number
Month-Day Pair
1999
32
February 1
2000
32
February 1
1999
60
March 1
2000
60
February 29
1999
91
April 1
2000
91
March 31
1999
186
July 5
2000
186
July 4
1999
304
October 31
2000
304
October 30
1999
309
November 5
2000
309
November 4
1999
327
November 23
2000
327
November 22
1999
359
December 25
2000
359
December 24

72 Module 4: Statements and Exceptions
Review
n
Introduction to Statements
n
Using Selection Statements
n
Using Iteration Statements
n
Using Jump Statements
n
Handling Basic Exceptions
n
Raising Exceptions
s
1. Write an if statement that tests whether an int variable called hour is greater
than or equal to zero and less than 24. If it is not, reset hour to zero.
2. Write a do-while statement, the body of which reads an integer from the
console and stores it in an int called hour. Write the loop so that the loop
will exit only when hour has a value between 1 and 23 (inclusive).

Module 4: Statements and Exceptions 73
3. Write a for statement that meets all of the conditions of the preceding
question and only allows five attempts to input a valid value for hour. Do
not use break or continue statements.
4. Rewrite the code that you wrote for question 3, but this time use a break
statement.
5. Write a statement that throws an exception of type
ArgumentOutOfRangeException if the variable percent is less than zero
or greater than 100.

74 Module 4: Statements and Exceptions
6. The following code is meant to read from a file by using a StreamReader
resource. It carefully closes the StreamReader resource by calling its Close
method. Explain why this code is not exception safe and loses resources
when exceptions are thrown. Use a try-finally block to fix the problem.
File source = new File("code.cs");
StreamReader reader = source.OpenText( );
//... Use reader
reader.Close( );
Wyszukiwarka
Podobne podstrony:
CSharp Module 5 Methods and Parameters
CSharp Module 9 Creating and Destroying Objects
CSharp Module 12 Operators Delegates and Events
CSharp Module 13 Properties and Indexers
CSharp Module 11 Aggregation Namespaces and Advanced Scope
CSharp Module 1 Overview of the Microsoft NET Platform
CSharp Module 8 Using Reference Type Variables
CSharp Module 3 Using Value Type Variables
CSharp Module 10 Inheritance in C#
CSharp Module 6 Arrays
EVENT TOURISM STATEMENTS AND QUESTIONS ABOUT ITS IMPACTS ON RURAL AREAS
CSharp Module 7 Essentials of Object Oriented Programming
CSharp Module 14 Attributes
The police exception and the domestic?use law
A selection of OE riddles women and monstrosity module
Measuring and Communication Module
2009 2010 Statement of Profit and Loss
więcej podobnych podstron