
The Kibitzer
Tim Harding
Two Knights Defense:
See the Wood, Not the Trees!
A recent trend in chess publishing is the “electronic book” in ChessBase
format. These are rapidly replacing the little printed monographs one used to
see on minor variations written by minor masters or experts and catering for a
fairly narrow audience of amateur players.
Main-line strategic openings are generally best left to the GMs or to strong
masters with a good track record for writing and research, such as IM John
Watson and FM Graham Burgess. With a few exceptions (such as GM Soltis)
grandmasters are usually not so interested in writing about bizarre variations
or primarily tactical openings that are not much played in master events.
In sharp openings when the assessment of variations mostly depends on a
piece count (after verifying there is no mate or perpetual check) a fairly
strong player (aided by computer) can probably come to much the same
conclusions as a GM would, anyway.
The main danger I see in relying on these “electronic books” (or their printed
equivalent for that matter) is that they make it hard to understand what is
going on overall, because the reader is smothered in detail. Take, for
example, what is probably the best of its kind so far US master Dan
Heisman’s coverage of the Traxler Two Knights, 1 e4 e5 2 Nf3 Nc6 3 Bc4
Nf6 4 Ng5 Bc5!? (see www.chesscentral.com for more information). This
includes games, text and variation notes, and a “tree” database to show how
the material is linked, but and I think this metaphor is appropriate it is
extremely hard to see the wood for the trees.
Heisman includes in the database almost every (not quite all!) game or piece
of analysis ever published on the variation, and there are text surveys to help
you navigate through the material, but even so there are sometimes
contradictions between what is said about a sub-variation in the survey and in
the game notes, and there isn’t really any discussion of how the Traxler fits
into the general scheme of things.
This article, and the second part next month, will be an exercise in the
opposite approach, which is an approach more suited to the beginner and
young player, and the typical amateur who doesn’t have time for detailed
opening research (or the memory).
A correspondence player, able to refer to books and databases between
moves, may appreciate the level of detail in a project like Heisman’s. Even
so, it is a fallacy to think that you can win many games against competent
The Kibitzer
file:///C|/Cafe/Tim/kibb.htm (1 of 10) [3/12/2001 11:44:32 PM]

opposition in email or postal just by having ever-more-thorough
encyclopaedic reference works. From time to time, we do all win a game
against less informed opposition by repeating a known game or trap, but such
games are very much the minority and are outweighed by the occasions
where our attempt to do so is upset by a new move from the opponent that is
not in the encyclopaedia.
For people playing over-the-board against human opponents, or on real-time
Internet servers, tactical alertness and a good general understanding of the
opening is of much more practical value than encyclopaedic reference works
that you can only consult after the game, to see what you forgot or where the
opponent improved!
If chess opening theory as a whole is the ecology of a planet, then the 1 e4 e5
open games are the old continent of Europe, and the open games minus the
mighty Ruy Lopez (Spanish Opening) are thought to be a sub-continent if
dwindling importance. (Although that may be changing, as I will try to assess
next month.)
In that scheme of things, the 3 Bc4 complex including the Giuoco Piano and
Two Knights Defence is a medium-sized group of countries (the
German-speaking heart of Europe), within which the 4 Ng5 lines of the Two
Knights are just a region (Bavaria?). Within that region, the Traxler (or
Wilkes-Barre) variation represents a small mountain region to the south-east
of Munich (Berchtesgaden?).
In other words, it is an interesting and rather notorious part of the chess
world, but compared with the megalopolis of the Sicilian Defence, the wide
open prairies of the English Opening or the vast oceans of the Queen’s
Gambit and Indian Systems, tiny Traxler is seen as a tiny spot on the map
where the vast majority of chessplayers never need to (and never will) set
foot.
This Kibitzer (and its sequel) will, however, attempt to map the 4 Ng5 Two
Knights Defence (Bavaria) at the sort of level of detail which the majority of
players could find of some help. You probably won’t want to “live” or”
work” there, but you may decide it is an interesting region to visit sometimes
for a “holiday”, with White or Black or both. My map will concentrate on the
forests you will find there and say very little about individual trees or clumps
of trees; don’t expect to find secrets or innovations by the dozen here.
1 e4 e5 2 Nf3 Nc6 3 Bc4
Personally I think this move is just as strong as 3 Bb5 and 3 d4, and I play it
partly because it is not as popular as those moves. Of course I have been
known to play other open games as well, not to mention different first
moves...
3...Nf6
This reply is more fun but I think that 3...Bc5 makes it harder for White to get
an advantage. (See Diagram)
The Kibitzer
file:///C|/Cafe/Tim/kibb.htm (2 of 10) [3/12/2001 11:44:32 PM]
4 Ng5
This is the celebrated “Duffer’s Move”
or “Bungler’s Move” as it was termed
by Tarrasch. (Can anyone tell me when
and where, and what the original
German phrase was? If so, I shall write
about that in the next article).
Actually, 4 Ng5 is White’s strongest
move here, and the only one that can
challenge the soundness of the Two
Knights Defence. I know that I have
written elsewhere in favour of 4 d4
exd4 5 e5 but that is because those lines are easier to learn for most people,
but I also think that the 4 d4 lines are closer to being “solved” after having
received quite a lot of exposure in the past 20 years. That line is still
playable for White but is less likely to surprise the opponent. The last time
I played 4 d4 against a master in postal chess we had a draw in about 20
moves without anything very original occurring.
The other approach for White is to play the slow 4 d3 and continue rather
as in the Spanish. In our 1977 book, The Italian Game, IM George
Botterill and I wrote that “4 d3 must be taken seriously as a positional
reply to the Two Knights Defence!” In the 1980s that is exactly what
happened frequently via the move order 1 e4 e5 2 Bc4 Nf6 3 d3 Nc6 4
Nf3 whereby White avoids the Petroff Defence. 4 d3 remains perfectly
playable but it has now been rather deeply studied.
However, we are going to “Bavaria” to look at 4 Ng5!? which of course
creates the direct threat to capture Black’s f-pawn: either with the bishop,
giving check, or with the knight, forking king and queen.
The fundamental idea of 4 Ng5 is that it virtually forces Black to give up
material, for which he may or may not have adequate compensation. Also,
because 4 Ng5 has been out of fashion, some Two Knights Defence
players are even surprised when they have to meet it and do not have their
line so well prepared as against 4 d4 or 4 d3.
The drawbacks for White if he wants to play 4 Ng5 are twofold:
a) he may not want to be in the position of defending a gambit;
b) there are so many different ways that Black may continue at moves 4-8
that White has to know quite a lot, whereas Black needs only know his
chosen variation.
4...d5
My two-part article will deal only with this move, which is the soundest
continuation for Black. There are two other moves which I shall briefly
mention.
a) 4...Bc5 is the Traxler, or Wilkes-Barre, mentioned above. For this, see
The Kibitzer
file:///C|/Cafe/Tim/kibb.htm (3 of 10) [3/12/2001 11:44:32 PM]
my Chess Mail magazine issues 1/2001 and 2/2001 with an update to
follow later in issue 5. Here I will just make a general comment.
You might think that White’s threat on f7 is so strong that Black cannot
ignore it, yet the Czech player Karel Traxler got the idea in 1896 that
4...Bc5 5 Nxf7 Bxf2+! will draw out the white king and bring the black
queen into play with gain of time. Alternatively the white bishop can take
on f7, winning a pawn and depriving Black of castling rights, but then the
white bishop must loses time retreating and maybe Black can
counter-attack down the f-file. About 30 years later, players of the
Wilkes-Barre Chess Club in the USA independently got the same idea.
If you are prepared to absorb tremendous amounts of detailed analysis and
trust your memory, and if you are willing to walk your king all over the
place and give up your queen for a rook and assorted other lumps of wood,
it may well be the case that 5 Nxf7 is objectively a winning reply.
The vast majority of sensible players will (except perhaps in
correspondence chess) opt for 5 Bxf7+ Ke7 6 Bb3 (or 6 Bd5) and hope
that Black knows no more about the Traxler than they do.
b) 4...Nxe4?! is another way of ignoring the threat to f7 in preference for
counter-attack. I don’t discuss it further here as it was already analysed in
Kibitzer 5 with a follow-up in Kibitzer 33. You can find these in
. I will just summarise here by saying that White’s
best line is 5 Bxf7+ Ke7 6 d4! h6!? (if 6...d5 7 Nc3!) 7 Nxe4 Kxf7 8 dxe5!
(The final edition of the Handbuch des Schachspiels has about five pages
on 4...Nxe4 without finding this.) 8...Qe8 9 f4! as in Van Steenis-Vlagsma,
cited in Kibitzer 33.
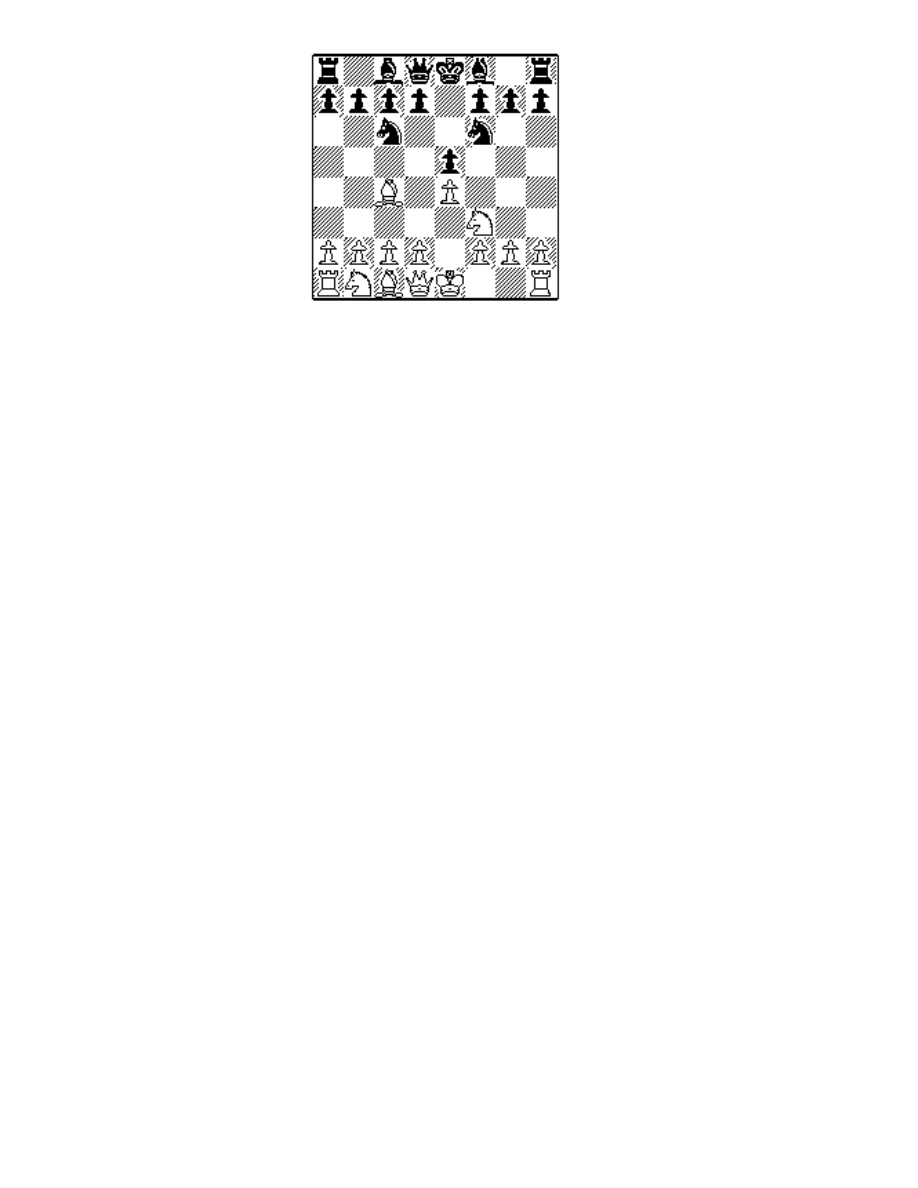
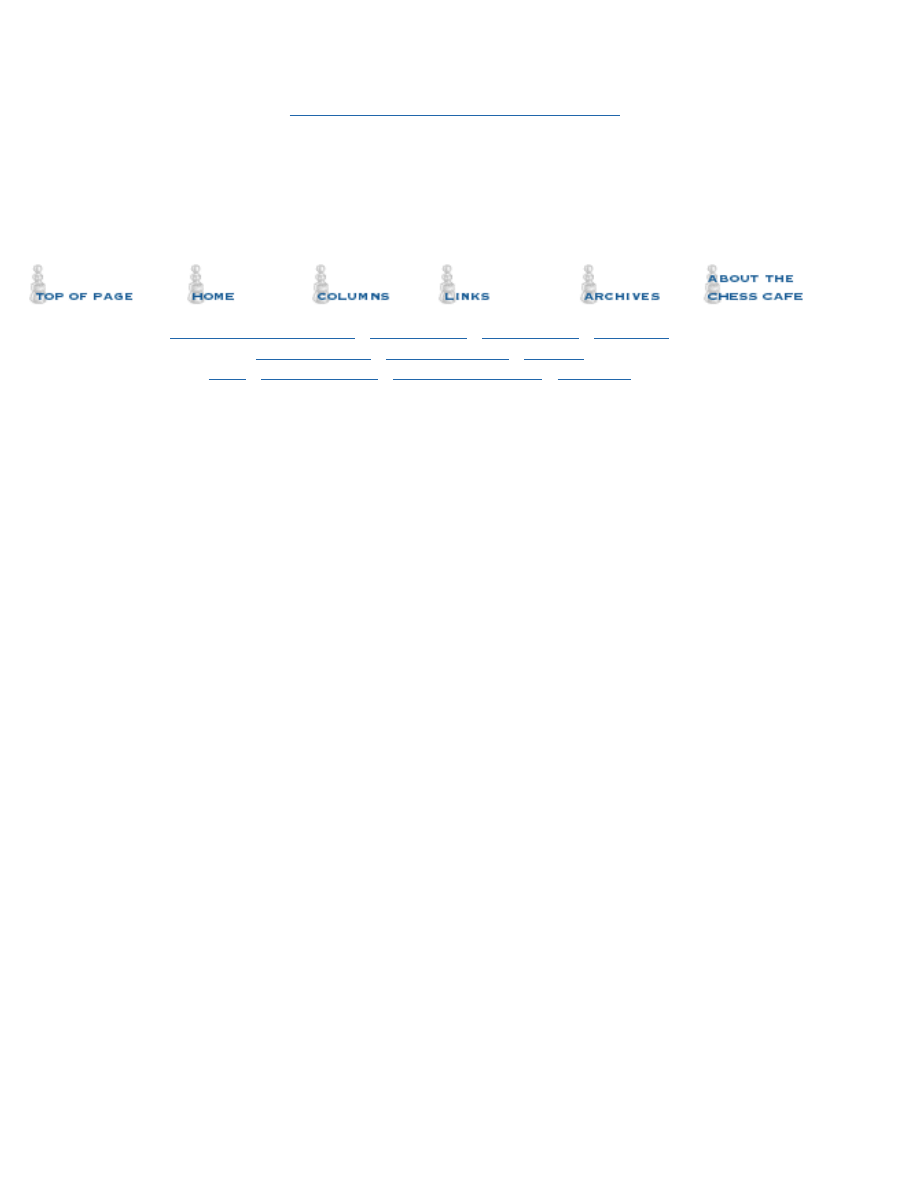
5 exd5
Of course White has no choice since 5 Bxd5? Nxd5 6 exd5 Qxg5 7 dxc6
Qxg2 is painful. (See Diagram)
Now Black is a pawn down and his
c6-knight is attacked. The main line
from this position is the counter-attack
on White’s bishop by 5...Na5, which
will be part of the subject of next
month’s Kibitzer column. Another
important line which I will discuss in
Kibitzer 59 is the Fritz variation,
5...Nd4, which is a rival to 5...Na5 for
soundness. This month I look at all the
less credible alternatives, namely:
A: 5...Nb4
●
B: 5...Bg4;
●
C: 5...Nxd5 6 Nxf7 (or 6 d4);
●
The Kibitzer
file:///C|/Cafe/Tim/kibb.htm (4 of 10) [3/12/2001 11:44:32 PM]
D: 5...b5 (Ulvestad lines)
●
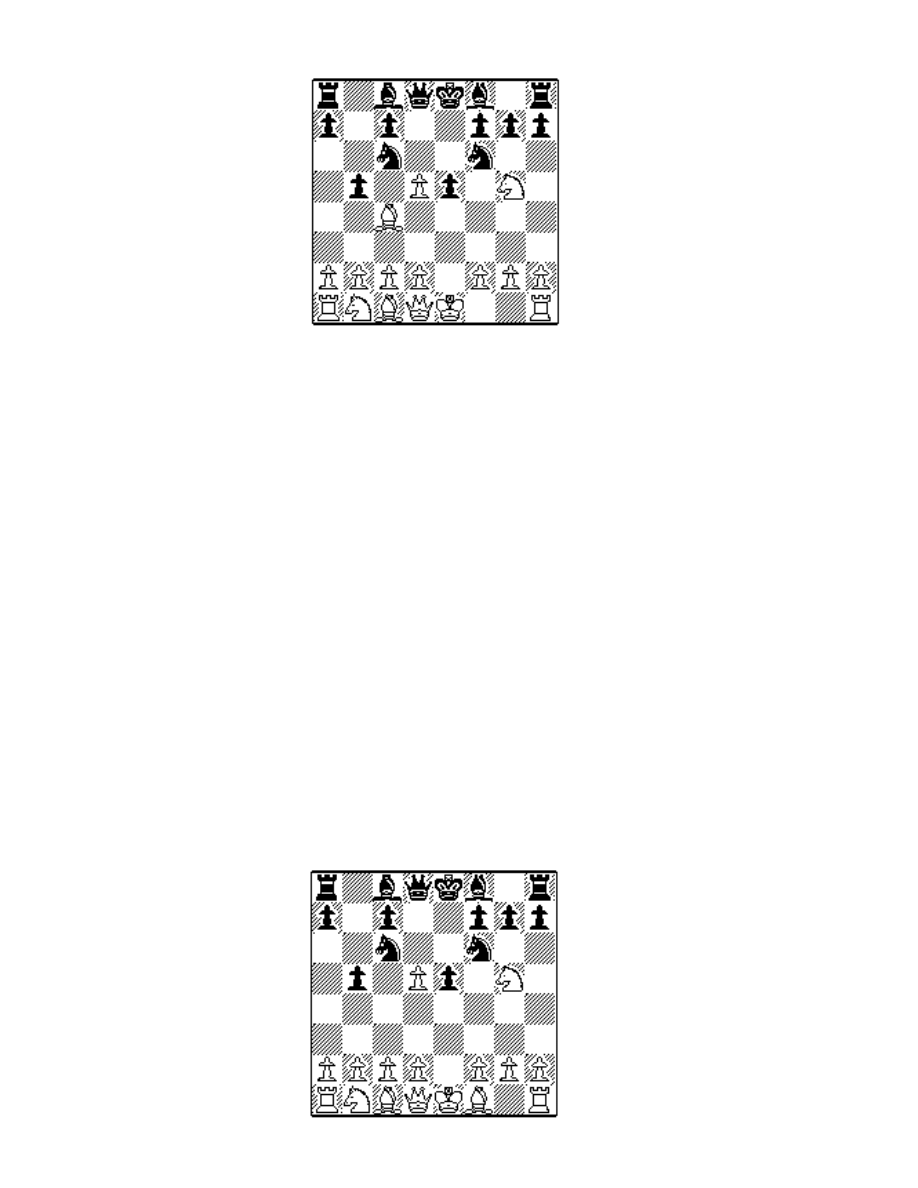
Line A: 5...Nb4 (See Diagram)
A forgotten move, which was probably
first suggested by German postal player
Manfred Kloss in 1954 in the magazine
Fernschach and has lately been seen,
mostly in Internet games. Black intends
to recapture on d5 with the queen’s
knight, but of course White renews the
threat to f7 by pushing 6 d6 (also 6 d4
and 6 Nc3 come into consideration).
After 5...Nb4 6 d6 cxd6 7 Bxf7+! (7
Nxf7 Qc7 8 Bb3 Rg8) 7...Ke7 8 Bb3
d5 9 Qe2 Qc7 Black counter-attacks
against c2, but instead of 10 c3 Bf5 (Estrin) either 10 Nc3 d4 11 Nb5 or 10
d4 seems good for White.
The reply seen most in Internet games is 6...Nbd5 but after 7 dxc7 Black
has nothing really for the pawn. If instead 6...Nfd5 then 7 Nxf7! Kxf7 8 a3
seems very strong e.g 8...Nxc2+ 9 Qxc2 c6 10 00 Bxd6 11 Nc3 Be6 12
Ne4 Be7 13 d3 h6 14 f4! exf4 15 Bxf4 Nf6 16 Bxe6+ Kxe6 17 Rae1! with
a big advantage to White in J.Silva-P.Antunes, Portugal 1995.
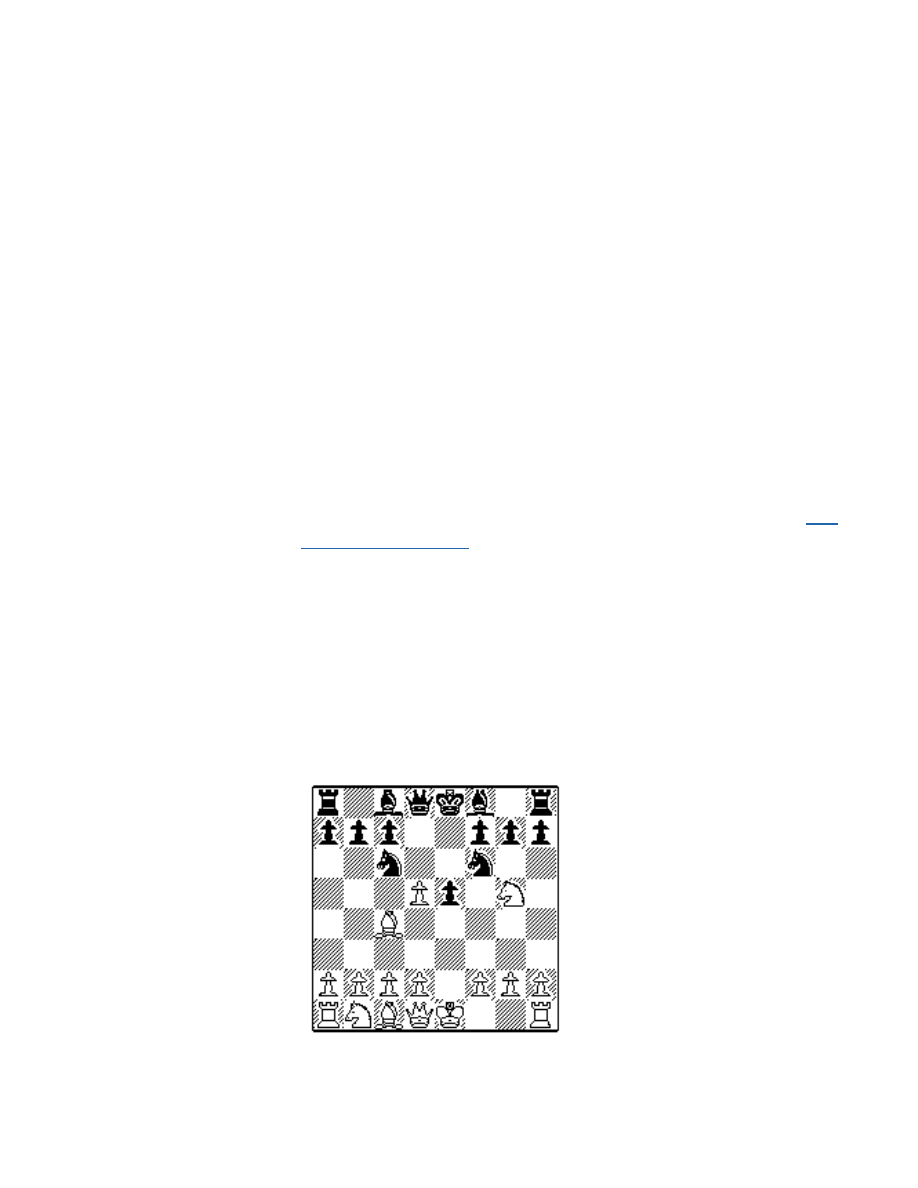
Line B: 5...Bg4
This was described as a “relatively new continuation” by Estrin in the
1980s but in fact it was suggested by Max Lange in the 19th century. The
attack on White’s queen is met by 6 f3 after which Black has two pieces en
prise. (See Diagram)
After 6 f3 Black must counter-attack a
white piece so there are two
possibilities:
a) 6...Nxd5 7 Nxf7! Kxf7 8 fxg4 Bc5 9
d4! with a strong initiative for White;
b) 6...Na5 7 Qe2 and again White has
an extra pawn with nothing to fear.
Instead of 6 f3 White can also consider
Estrin’s move 6 Nxf7!? but this is more
complicated after 6...Qe7! (not
6...Bxd1? 7 Nxd8).
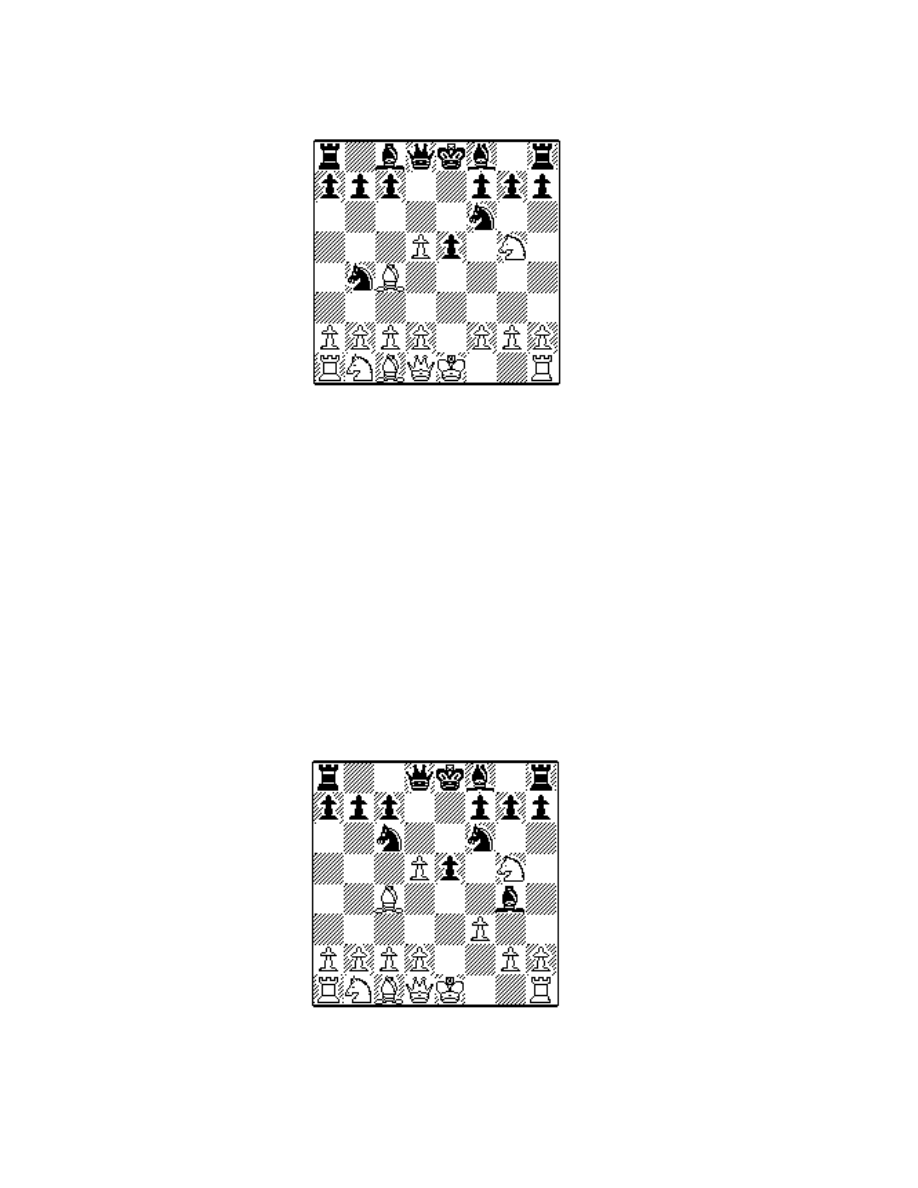
Line C: 5...Nxd5
This is the oldest variation of the Two Knights Defence. Black does not
offer a pawn sacrifice but it reopens the diagonal for White’s bishop
pointing towards f7. White’s knight is threatened but he can sacrifice it or
The Kibitzer
file:///C|/Cafe/Tim/kibb.htm (5 of 10) [3/12/2001 11:44:32 PM]
advance his d-pawn with tempo so that the c1-bishop protects the knight.
In effect, White has a free move to launch an attack.
Usually 5...Nxd5 gets a question mark in the books but periodically there
are attempts to revive it. (See Diagram)
Apparently this variation will be the
subject of Dan Heisman’s next
electronic book so I won’t go into
much detail about it here.
There are two distinct lines now:
C1: 6 Nxf7 (“Fegatello)
●
C2: 6 d4 (Lolli)
●
c1) 6 Nxf7!? Kxf7 7 Qf3+ Ke6 8 Nc3
This is the famous “Fegatello” or Fried
Liver Attack. Is it correct? (See
Diagram)
The enormous amount of detail on this
position can be summarized briefly.
White has sacrificed a piece but the
d5-knight is pinned and trebly attacked.
If White regains the piece, he
obviously has a winning position so the
other knight must move to defend d5.
There are two variations and the
question is whether White has a clear
win in both. If he does not have a clear
win then is it not better to play the 6 d4
line (C2) which gives a strong attack
without the risk of sacrificing a piece?
a) 8...Nce7 9 d4 c6 10 Bg5 h6 11 Bxe7 Bxe7 12 0-0-0 Rf8 13 Qe4 and the
white forces are massed to slaughter the black king in the centre.) .
b) 8...Ncb4 is critical. The recent book (in German) by the Hungarian
master Palkövi claims White is winning by 9 a3 Nxc2+ 10 Kd1 Nd4 11
Nxd5 but he doesn’t mention 11...c6! as analysed by German theoretician
Stefan Bücker in his Kaissiber magazine. Moreover, even 10...Nxa1 may
be playable according to Bücker.
Therefore, until I see a clearer proof, I do not trust 6 Nxf7.
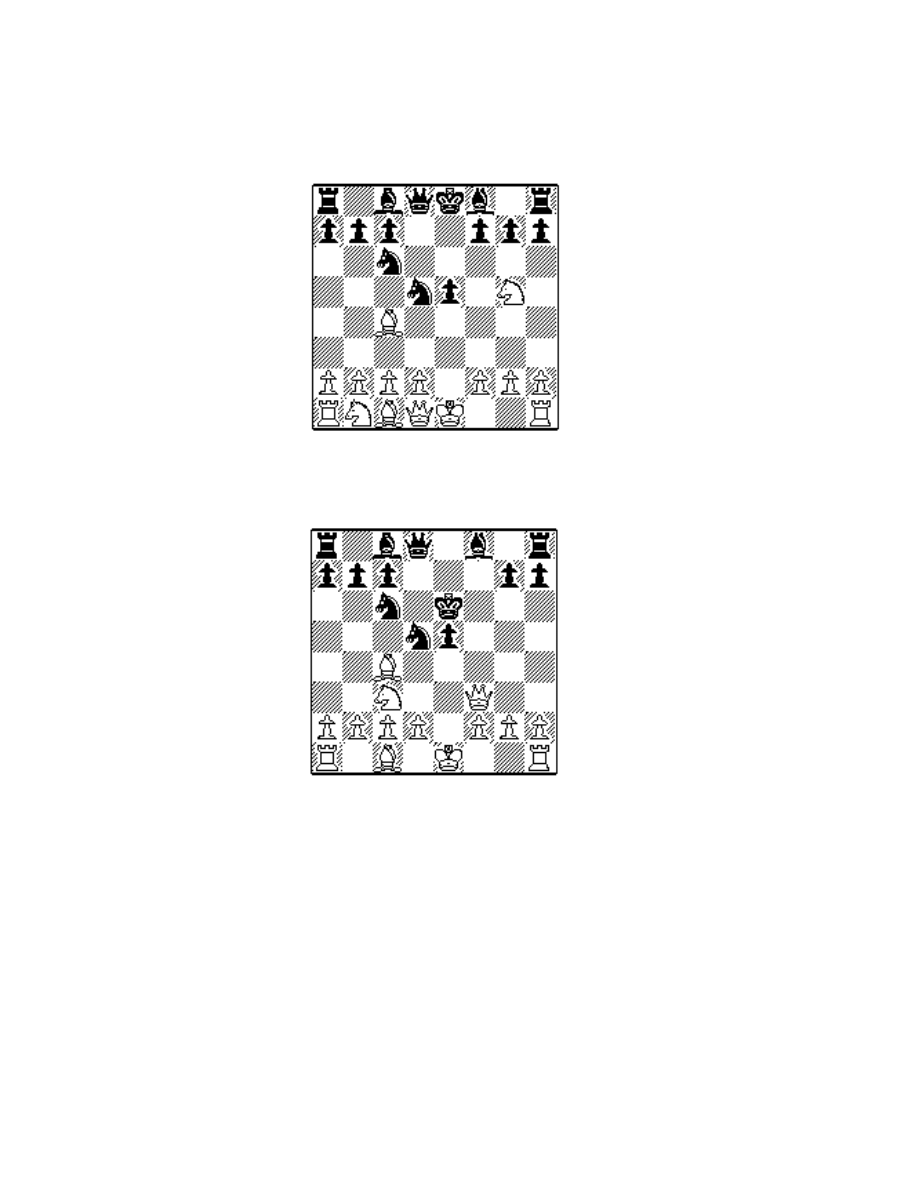
C2: 6 d4 (See Diagram)
The Kibitzer
file:///C|/Cafe/Tim/kibb.htm (6 of 10) [3/12/2001 11:44:32 PM]

This move, suggested by Lolli, has the
main point that after 6...Be7 White can
play the Fegatello under improved
circumstances, 7 Nxf7!, because the
queen’s bishop is ready to come out
and e5 is under pressure.
If 6...exd4 7 0-0! and again White is
ready to launch an attack against the
black king caught in the centre, e.g.
7...Be6 (7...Be7?! 8 Nxf7! Kxf7 9
Qh5+!) 8 Re1 Qd7 9 Nxf7! (pointed
out by Major Jaenisch in the mid-19th
century) 9...Kxf7 10 Qf3+ Kg8 (10..Kg6? 11 Rxe6+! Qxe6 12 Bd3+) 11
Rxe6! (given by Steinitz in his Modern Chess Instructor) 11...Rd8 and
now most books give 12 Bg5, Palkövi recommends 12 Re4 while I played
12 Qe4!? and went on to win in Harding-Knol, Heidenfeld Memorial corr
2000.
Therefore the only real attempt for Black to defend from the last diagram
is: 6... Bb4+ 7 c3 Be7 Black “wastes” a tempo to deny the c3 square to the
white knight. Now White plays a delayed Fegatello by 8 Nxf7 Kxf7 9
Qf3+ Ke6 when new ideas for White requiring testing are 10 a4 (Bücker)
and 10 0-0 (Nunn).
The book move 10 Qe4 is no longer considered clear because of 10...b5!
11 Bxb5 Bb7 12 f4 g6! (Kalvach-Drtina, Czechoslovakia corr 1986). For
more detail on this, see my book Startling Correspondence Chess
Miniatures.
In view of these possibilities, it cannot be said for certain that 5...Nxd5 is
a bad move. However, in practice the positions arising from 5...Nxd5 are
harder for Black than White because White has the initiative and can
afford an inaccuracy more than the defender can.
D: 5...b5!?
Although many lines in the Two Knights Defence are very ancient, this
move was only suggested by American master Ulvestad as recently as
1941. Both sides make paradoxical looking moves in this variation so a
little explanation is necessary. (See Diagram)
The Kibitzer
file:///C|/Cafe/Tim/kibb.htm (7 of 10) [3/12/2001 11:44:32 PM]
The main point of the Ulvestad move
5...b5 is to divert the white bishop from
its defence of the d-pawn. White can
decline the second pawn and play 6
dxc6 but the messy position after
6...bxc4 probably favours Black who
has the bishop pair. Then if 7 Qe2
Black can defend his pawns by 7...Qd5
but 7...h6! 8 Qxe5+ Be7 is reckoned to
be even stronger. He gets castled first
and his pieces come out rapidly to
active squares.
After the other “obvious” answer, 6 Bxb5, White has two extra pawns, but
6...Qxd5 Black forks both b5 and g2 so that White is left with an
unattractive choice:
a) the miserable retreat 7 Bf1 which nobody plays
●
b) 7 Qe2 Qxg2 8 Qxe5+ Be7 9 Rf1 0-0 and it is the white king that
will be attacked in the middle;
●
c) 7 Bxc6+ Qxc6 8 0-0 Bb7 9 Qf3 e4 10 Qb3 0-0-0! or 8 Qf3 e4 9
Qb3 Bc5! when in each case Black has the bishop pair and good
attacking chances.
●
d) 7 Nc3 Qxg2 8 Qf3 returns one pawn to get the queens off, but
Black has a lead in development after 8...Qxf3 9 Nxf3 Bd7.
●
In view of these possibilities, it is generally accepted that the best answer
to 5...b5 is another paradoxical move, 6 Bf1! which is not a “miserable
retreat” because soon the bishop will be coming out again with gain of
tempo. Nevertheless, it may be the case that White can find an
improvement or two in the foregoing lines, for example 6 Bxb5 Qd5 7 Be2
has not been well explored.
Now we return to 6 Bf1. (See Diagram)
The first point is that Black has two
recaptures on d5 but each has a major
drawback.
If 6...Qxd5 then 7 Nc3 threatens the
queen which cannot capture on g2
since the bishop guards the pawn. So
the queen must move defensively, e.g.
7...Qc5, after which White has 8 Bxb5
pinning the black knight and preparing
castling. After 8...Be7 9 d3 White
remains a pawn ahead and Black has
no genuine compensation
The Kibitzer
file:///C|/Cafe/Tim/kibb.htm (8 of 10) [3/12/2001 11:44:32 PM]

(W.Heidenfeld-F.Bohatirchuk, South Africa v Canada corr 1951).
Ulvestad’s original conception was 6...Nxd5 but now White makes his
third bishop move, 7 Bxb5, because the reply...Qd5 is no longer available.
Black must defend his pinned knight, and the usual line is 7...Bb7 8 d4!
exd4 9 0-0 followed by Nf3 with a good game for White.
Possibly 7...Bd7 is better (to meet 8 d4 by 8...Nxd4!) but it can be met by 8
d3 with a promising game for White according to Palkõvi who gives
8...Be7 9 Qh5! Bxg5 10 Bxg5 obtaining the bishop pair.
Curiously, in a recent Dublin league game I had to meet yet another twist
in this line. After 5...b5 6 Bf1 Nxd5 7 Bxb5 my opponent Ciaran Quinn
surprised me with 7...Qf6!? which also defends the knight and keeps
options open for the bishop. This may be just as good as the other moves?
The normal formula of d2-d4 followed by 0-0 may be good but I wasn’t
sure.
Perhaps White should immediately reply 8 Qf3 because after my continuation
8 0-0 Bd7! (threatening to castle queenside) 9 Qf3 Black found 9...Ndb4! and
I had to defend the fork on c2 by 10 Na3. Then 10...Qxg5 leads to great
complications after 11 c3 or 11 d4!? but my opponent chose 10...Rb8 which
does threaten...Nd4 but permits 11 Qxf6 when White keeps some advantage.
However, this certainly wasn’t as clear as I would have liked or expected
after his 6...Nxd5.
Following 6 Bf1, Black normally transposes to the Fritz Variation, by 6...Nd4
7 c3 reaching a position that can also arise via 5...Nd4 6 c3 b5 7 Bf1 but with
different side-possibilities on the way. This is the Fritz/Ulvestad main line
which I shall discuss next time.
Black does have one other interesting possibility after 5...b5 6 Bf1. The move
6...Bg4? is simply answered by 7 f3 but 6...h6!? (discovered in the 1960s) is
very interesting. It provokes the thematic 7 Nxf7!? Kxf7 8 dxc6 but then
comes 8...Bc5! with great complications.
Alternatively, White can retreat the knight by 6...h6 7 Nf3 but then 7...Qxd5 8
Nc3 Qe6 9 Bxb5 Bb7 is more attractive to Black than the 6...Qxd5 line
because the advanced knight has been driven back. In fact, 9 Nxb5 may be
superior. None of these lines with 6...h6!? have received sufficient analysis or
practice for me to come to definite conclusions about them yet.
To sum up at this stage, none of the lines that we have looked at in this
article, except maybe the very last one (5...b5 6 Bf1 h6) offer Black real
compensation for the sacrificed pawn. Either White holds his extra material
without losing the initiative, or the first player seizes control by a sacrifice of
his own.
Therefore the Two Knights player, unless he dares the Traxler, must try to
justify his third move with one or other of the variations that will be
considered in my next column.
I hope you have found this scenic tour of the “wood” interesting. I have
The Kibitzer
file:///C|/Cafe/Tim/kibb.htm (9 of 10) [3/12/2001 11:44:32 PM]
deliberately avoided including complete games that could have introduced
“trees” to confuse the issue, but I am providing on my website a file of
relevant games that you can download. Here is the URL:
http://www.chessmail.com/freegames.html
This file will be added to next month after the coverage of the Fritz main line
and 5...Na5 line is published in Kibitzer 59.
Copyright 2001 Tim Harding. All rights reserved.
]
[
[
] [
]
Copyright 2001 CyberCafes, LLC. All Rights Reserved.
"The Chess Cafe®" is a registered trademark of Russell Enterprises, Inc.
The Kibitzer
file:///C|/Cafe/Tim/kibb.htm (10 of 10) [3/12/2001 11:44:32 PM]
Document Outline
- Local Disk
Wyszukiwarka
Podobne podstrony:
Harding Two Knights Defence Chess Part II Chess café
Harding Two Knights Defence Chess Part III Chess café
Two Knights Defence (Article) Tim Harding
Tim Harding & P R Markland The Sicilian Richter Rauzer
All Flesh Must Be Eaten Two Rotted Thumbs Up
Brit M Two Men and a Lady Prequel [Ravenous] (pdf)
In literary studies literary translation is a term of two meanings rev ag
Day Two Creating Instant Confidence
technika, AWF, TiM Pływania
więcej podobnych podstron