Connecting the grandMA to WYSIWYG
Configuring the grandMA1 (MA-Net 1)
1. Power up the grandMA console, or run the grandMA onPC software.
2. Click the Tools button. The Tools Menu window appears.
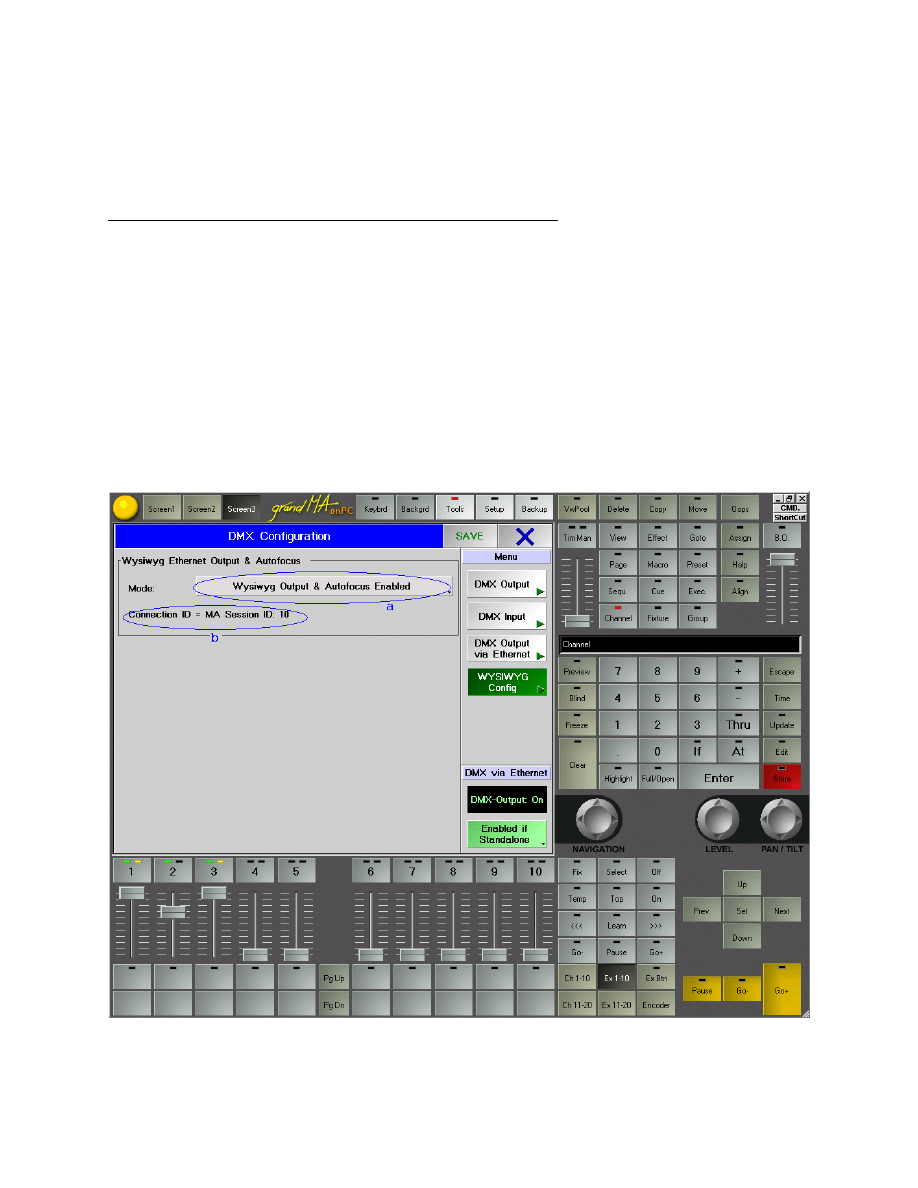
3. Click the DMX & NSP Configuration button. In the WYSIWYG Config window, ensure the
following:
a.
The WYSIWYG Output & Autofocus button reads ‘Enabled’.
b.
A number between 1 and 31 is shown as the Connection ID (MA Session ID).
Please remember this number, because you will need it when you set up the
connection in WYSIWYG driver. If you are running multiple consoles, they must each
have a unique Connection ID.
There must be an active MA Session in order to transmit DMX data to WYSIWYG.
(look at step 5d, below)
4. Once all the settings are confirmed, hit the Save button, and then the X next to it, to
close the DMX Configuration window.
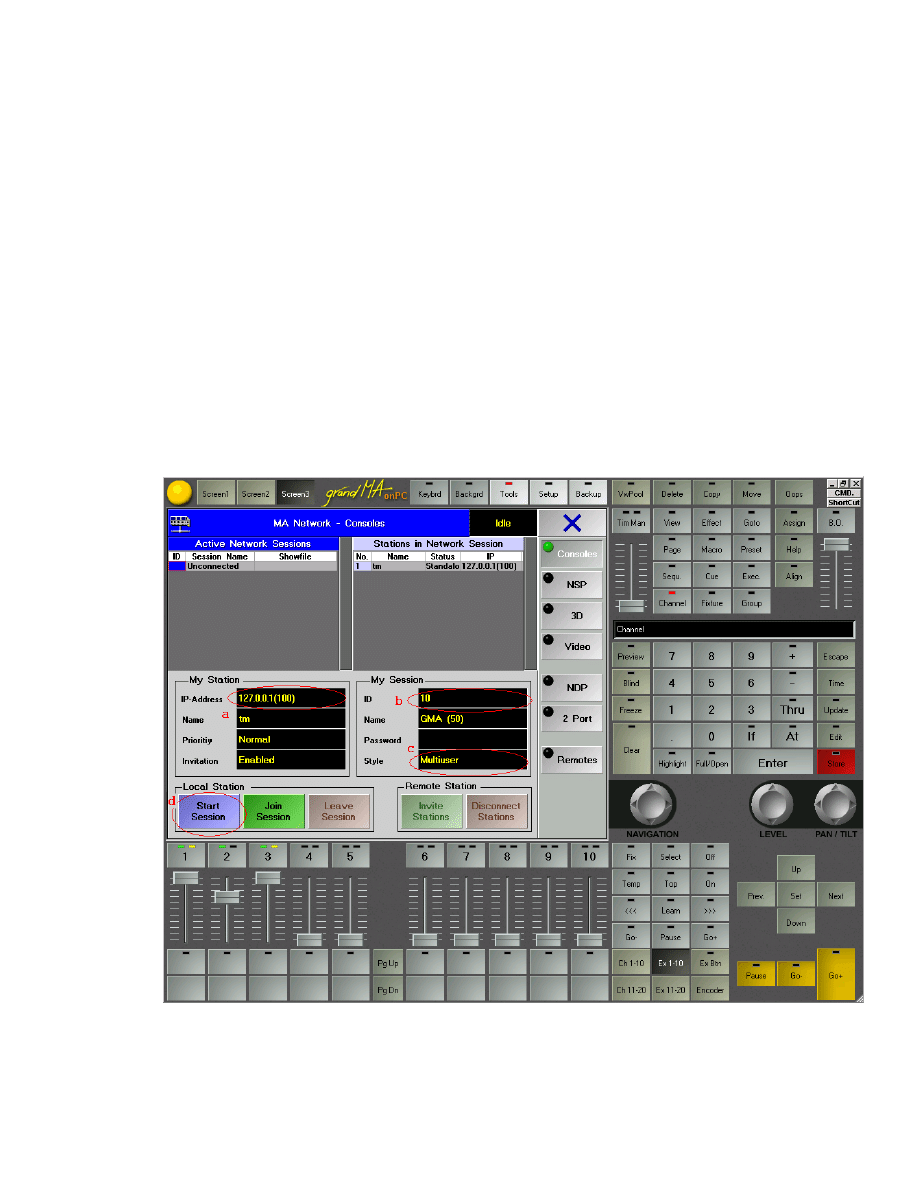
5. Back in the Tools Menu window, click the MA Network button.
a. Enter one of the following in the Station IP Address field. Please remember what you
enter here: you will need this IP address in order to configure the grandMA
WYSIWYG driver.
If WYSIWYG and grandMA onPC are running on the same computer, you must enter
the same IP address as in step 2 of the driver configuration (below), e.g. 127.0.0.1.
In any other case (i.e. grandMA onPC is running on a different computer on the
network than WYSIWYG, or you are using an actual grandMA console connected to
the network the WYSIWYG computer is on), the IP address must be in the same
subnet as the computer with WYSIWYG. For example, if your WYSIWYG computer’s
IP address is 192.168.1.20, the IP address 192.168.1.21 should work for your
console, as long as no other device on your network is using that same address.
b. A number between 1 and 31 is entered in the MA Session ID field. The MA Session ID
is equivalent to the WYSIWYG Connection ID. Please remember this number,
because you will need it when you set up the connection in WYSIWYG. If you are
running multiple consoles, they must each have a unique Connection ID.
c. The session style must be Full Tracking or Multiuser.
d. Hit the Button ‘Start New Session’ to start a MA session.

6. Close the MA Network Connections window by clicking on the X in the upper right hand
corner, and then close the Tools Menu window the same way.
7. Patch the console, ensuring that the patch matches the WYSIWYG show file. You do not
need to assign position information to fixtures.
Configuring the grandMA2 (MA-Net 2)
1. Power up the grandMA2 console, or run the grandMA2 onPC software.
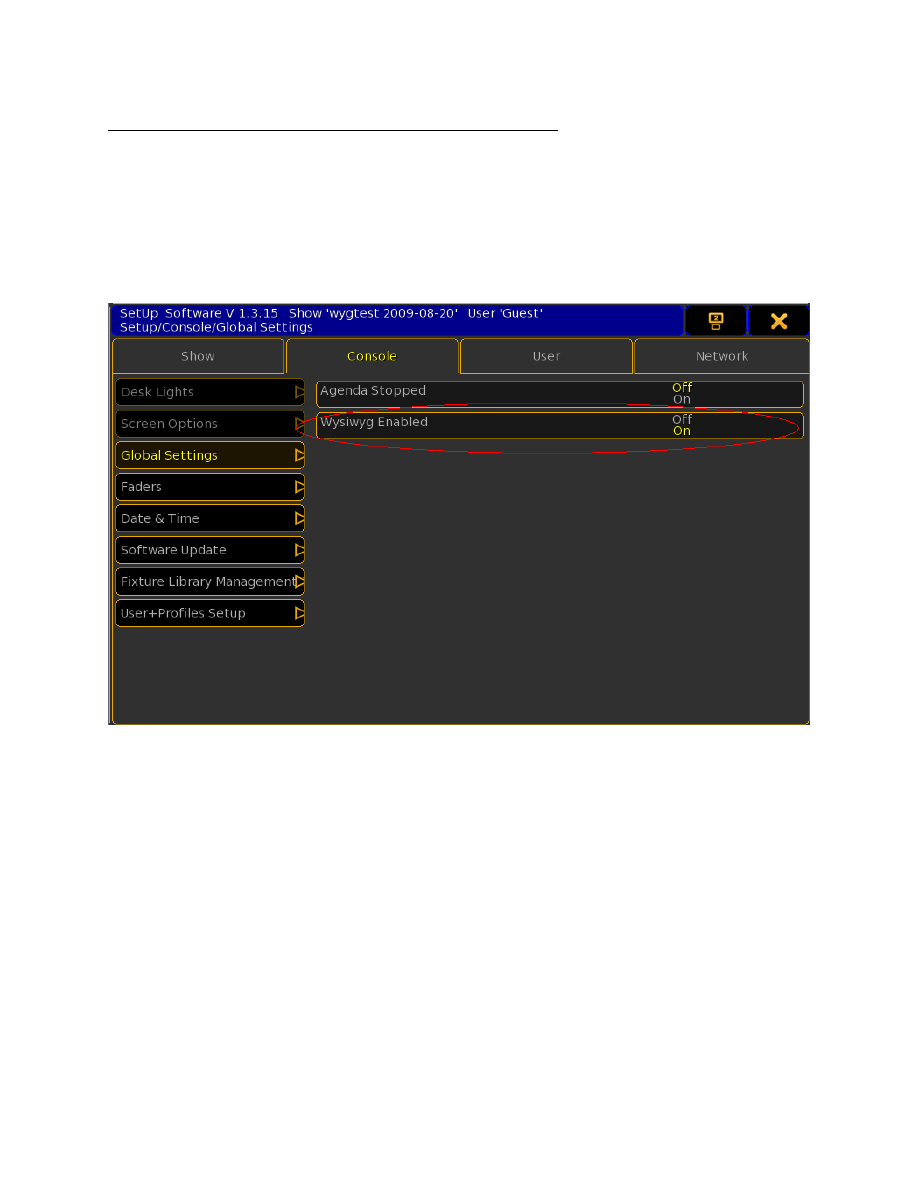
2. Click the Setup button. The Setup Menu window appears.
3. Click the Console Tab and then Global Settings Button.
4. Ensure that Wysiwyg Enabled is On.
5. Click the Network Tab and then MA Network Control Button.
a. A number between 1 and 31 is entered in the Session ID field. The Session ID
is equivalent to the WYSIWYG Connection ID. Please remember this number,
because you will need it when you set up the connection in WYSIWYG. If you are
running multiple consoles, they must each have a unique Connection ID.
b. Enter one of the following in the Station IP Address field. Please remember what you
enter here: you will need this IP address in order to configure the grandMA
WYSIWYG driver.
If WYSIWYG and grandMA2 onPC are running on the same computer, you must enter
the same IP address as in step 2 of the driver configuration (below), e.g. 127.0.0.1.
In any other case (i.e. grandMA2 onPC is running on a different computer on the
network than WYSIWYG, or you are using an actual grandMA console connected to
the network the WYSIWYG computer is on), the IP address must be in the same
subnet as the computer with WYSIWYG. For example, if your WYSIWYG computer’s
IP address is 192.168.1.20, the IP address 192.168.1.21 should work for your
console, as long as no other device on your network is using that same address.
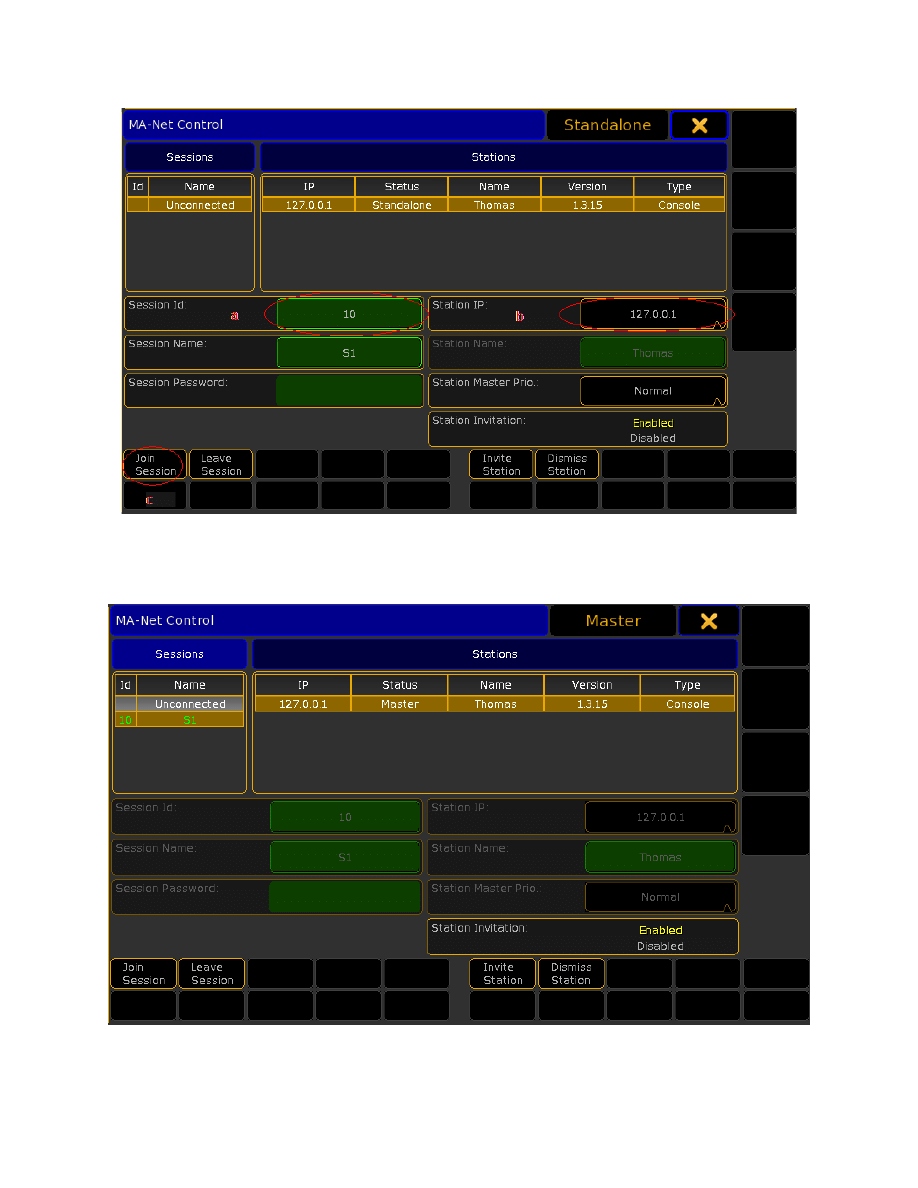
c.
Hit the Button ‘Join Session’ to start a MA session.
Installing and Configuring the grandMA WYSIWYG Driver
The grandMA WYSIWYG driver must be installed in order to establish a connection between
the grandMA console and WYSIWYG. Installation is straight-forward: simply double-click
on gMA-Wysiwyg[Xxxx][Xxxx]-vXxxx.exe and follow the on-screen instructions. Once
installation is complete, you will notice an addition to your Control Panels, “grandMA –
WYSIWYG Driver”.
Steps to configuring the driver:
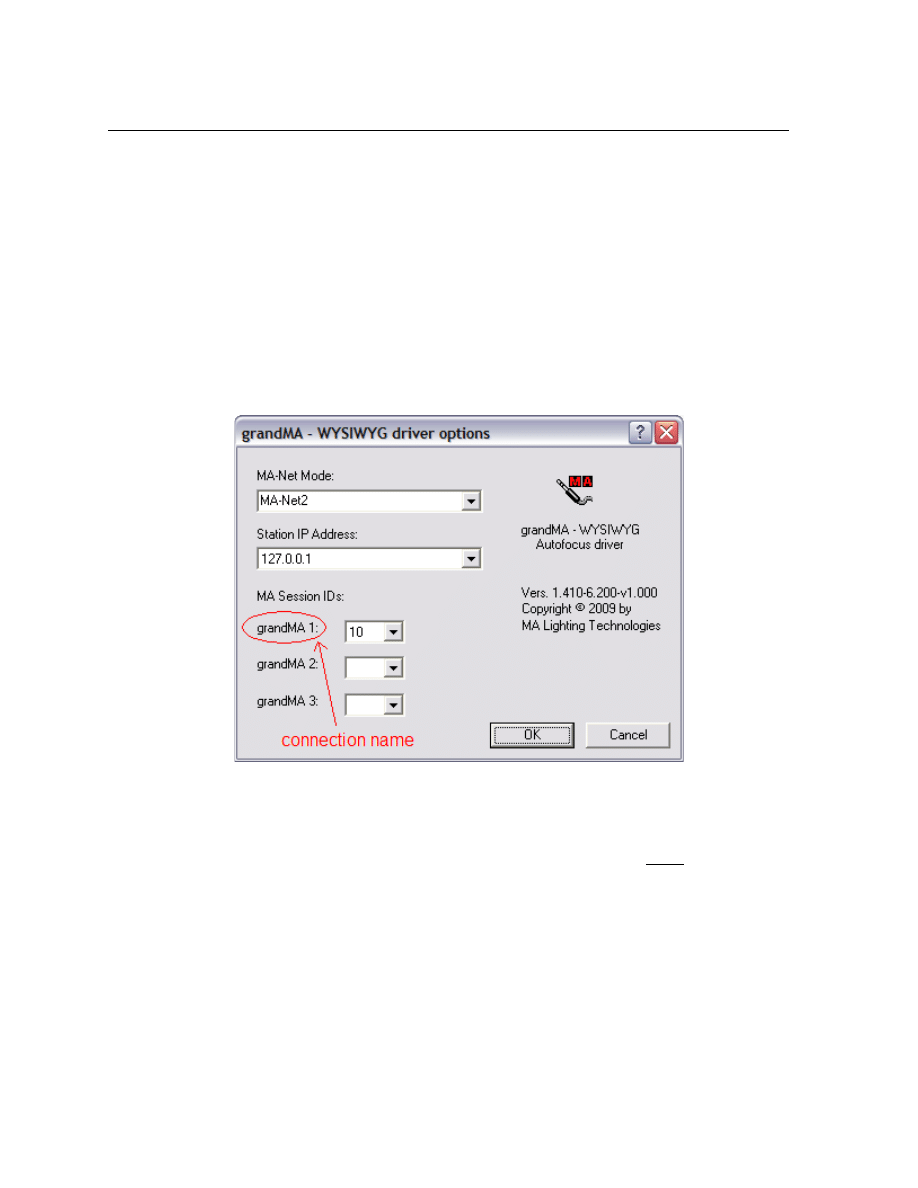
1. Double-click on the grandMA – WYSIWYG Driver icon in your Control Panel.
2. Choose the MA-Net Mode (MA-Net2 corresponds with the grandMA2 range).
3. Select an IP Address which is in the same subnet as the one for the console in step 5 of
the console configuration (above).
a.
Enter the MA Session ID (which you set in step 5, above) to the corresponding
connection name and remember the connection name, because you will need it
when you set up the connection in WYSIWYG. The numbers must match, or a
connection cannot be established.
4. Click OK.

Configuring WYSIYWG and Connecting to the Console
Before attempting the connection described below, please ensure the following:
1. The grandMA onPC application is running, and is configured as described at the
beginning of this document. If you are using a physical grandMA console, please make
sure that it is powered up and connected to the network to which the WYSIWYG
computer connected. It should also be mentioned here that when patching fixtures on
the grandMA, you do not need to assign position information (i.e. X, Y, Z coordinates) to
them. (Of course, you still have the option to do so if you wish.)
2. The proper patch universes are defined in your WYSIWYG show, and that your fixtures
are patched. In addition, all your fixtures have the proper Spot Numbers assigned,
matching what you have in the console. (Spot Number in WYG = FixtureID on the
grandMA)
Follow these steps to connect to the grandMA:
1.
Load the show file and switch to LIVE Mode.
2.
Go to the Live menu, and select Device Manager.
3.
Click the New button.
4.
Expand the Consoles tree (if it is not already expanded), then the MA Lighting tree
and click on the grandMA to select it. Click the Insert button. The grandMA is now
listed in the Device Manager.
5.
With the Grand MA selected, click the Properties button. The console’s Properties
window appears.
6. Ensure the following:
a.
The console’s Connection Name (above) is entered in the Address field.
b. The console’s outputs are bound to the appropriate WYSIWYG Patch
Universes. (Patch A on the console is Output 1 in WYG, Patch B on the
console is Output 2 in WYG, and so on.)
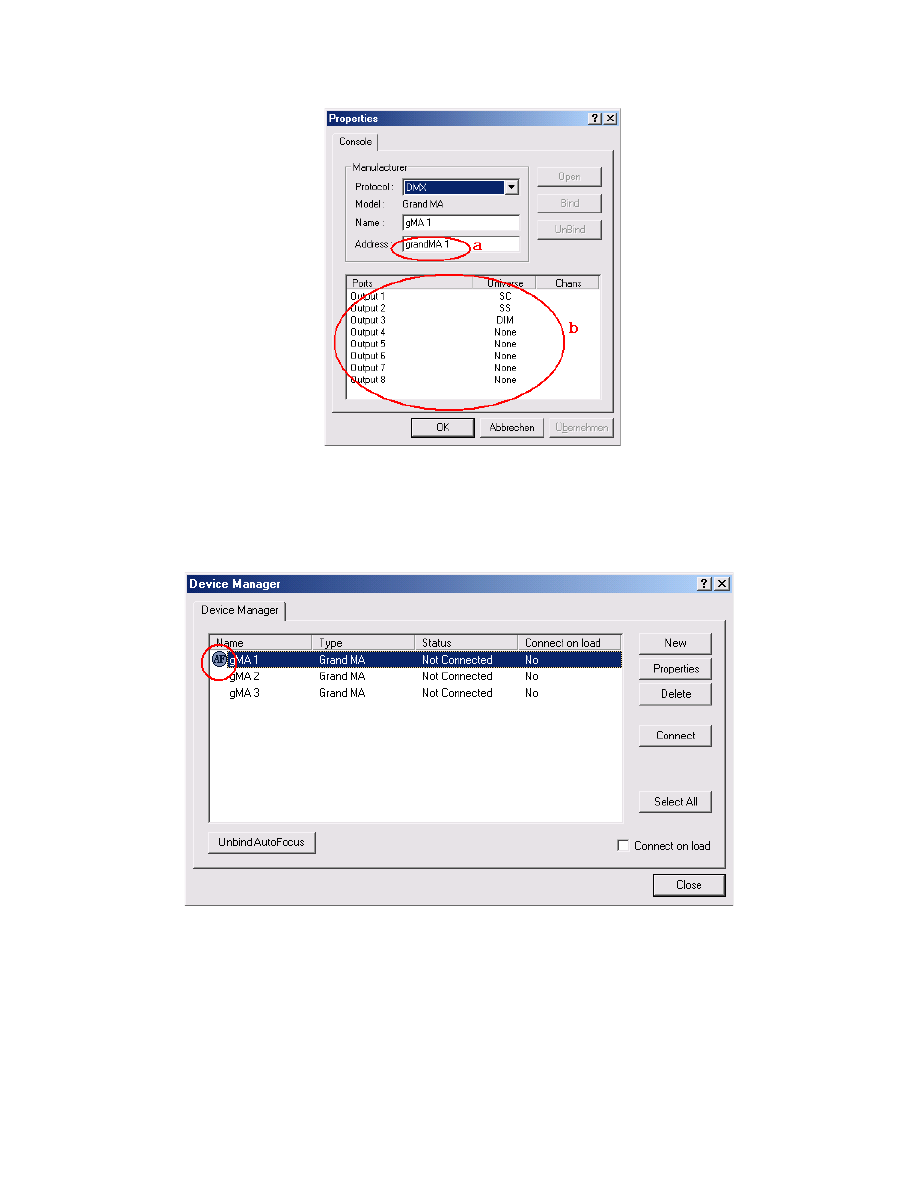
7. Click OK.
8. Back in the Device Manager window, please ensure that the AF icon appears
next to the console. This icon tells you which console AutoFocus is bound to.
Please note that AutoFocus may only be bound to one console at a time.
If you are using multiple consoles for your show, follow these steps in order
to switch the AutoFocus binding between them:
a. Select the console with AutoFocus bound to it.
b. Click the Unbind AutoFocus button at the bottom of the window.
c. Select the next console.
d. Click the Bind AutoFocus button at the bottom of the window.
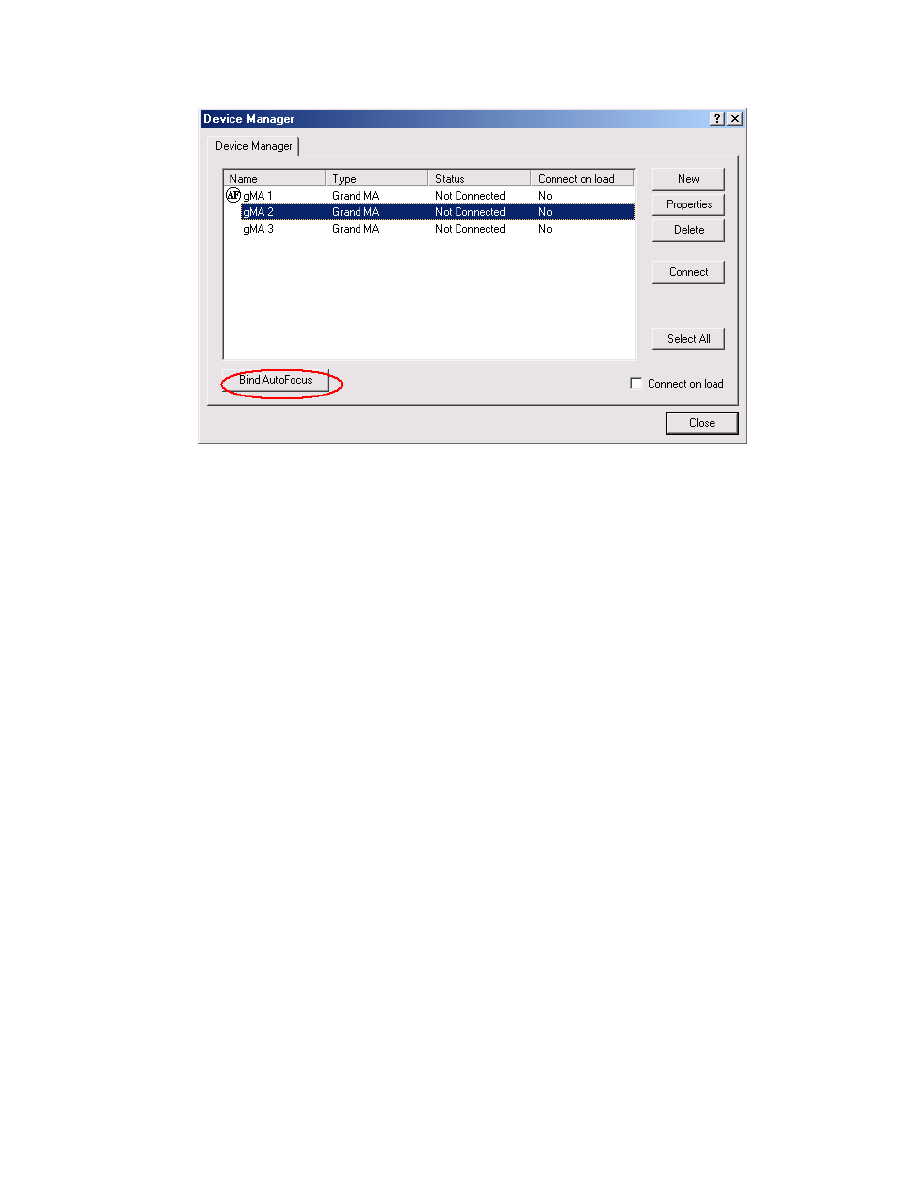
e.
The AF icon will appear next to the selected console, as before.
Click the Connect button. The Status of the selected console changes
to ‘Connected’.
9. Click the Close button in the bottom right hand corner.
10.
Turning fixtures on from the console should display their beams in WYSIWYG’s LIVE
Mode.
11.
In order to use AutoFocus, in LIVE Mode, go to the Live menu, and select the
Designer Tools you want/need to use.
12. Select fixtures in WYSIWYG (you must create Concepts in order to select fixtures in
full Shaded View), and click the Full button on the Intensity Tool: you should now
see their beams in WYG. Clicking and dragging inside the trackpad in the Focus Tool
should move the beams around (if you are using moving head/mirror fixtures).
Colour selection only works for fixtures that support colour mixing. The Iris Tool only
affects fixtures that have an iris.
Happy programming!
Document Outline
- Configuring the grandMA1 (MA-Net 1)
- Configuring the grandMA2 (MA-Net 2)
- Installing and Configuring the grandMA WYSIWYG Driver
- Configuring WYSIYWG and Connecting to the Console
Wyszukiwarka
Podobne podstrony:
Connect the dots to find alphabet
Connect Windows PowerShell to the Service
090219 3404 NUI FR 160 $3 9 million spent on the road to success in?ghanistan
11 3 4 6 Lab Using the CLI to Gather Network?vice Information
III dziecinstwo, Stoodley From the Cradle to the Grave Age Organization and the Early Anglo Saxon Bu
2 The way to ionize a compound (ESI, APCI, APPI)
KveldúlfR Hagan Gundarsson Wotan The Road to Valhalla
11 3 4 6 Lab Using the CLI to Gather Network (2)
The Key to Women
Illustrations of the affinity of the Latin to the Gaelic
EUTHANASIA The Right To Die
The Gateway to The Soul
The Right To A Free Trial
Orwell The Road to Wigan Pier
Angielski - Gramatyka - opracowania, Simple Past of the verb to be, Simple Past of the verb " t
Germany The answer to an old Question
więcej podobnych podstron