
2
Best Practices Guide
Font Management
in Mac OS X
OpenType (.otf or .ttf) .................................................................................................................................... 16
TrueType (.ttf) ................................................................................................................................................ 16
TrueType Collection (.ttc)............................................................................................................................... 16
Mac PostScript Type 1 ................................................................................................................................ 17
Datafork Truetype font (.dfont) ...................................................................................................................... 17
Apple Advanced Typography (AAT) .............................................................................................................. 17
Classic Mac TrueType .................................................................................................................................. 17
Multiple Master ............................................................................................................................................. 18
System Font Caches .................................................................................................................................... 19
Adobe Font Caches ..................................................................................................................................... 20
QuarkXPress JAWS Font Cache .................................................................................................................. 22
Microsoft Office Font Cache ......................................................................................................................... 22
Apple iWork Font Cache .............................................................................................................................. 22

Best Practices Guide
Font Management
in Mac OS X
3
So what’s all the hubbub?
In Mac OS X, professional workflows involving fonts have become seemingly more difficult and
confusing, resulting in delays and problems for users.
Fonts in OS X are located in a variety of locations on the system, and fonts are activated by a very
specific font hierarchy that can make it very challenging for users to accurately verify when and if the
correct fonts are in use.
Several fonts are also required for Mac OS X to properly function. Removing these fonts can affect
the stability of your system.
What can I do about it?
This guide contains detailed recommendations and instructions that can help you work efficiently
with fonts in Mac OS X, configure your system to minimize font problems and improve your workflow.
It covers:
• Howtoorganizeyourfonts
• WhereMacOSXsystemfontsarestored
• WhichfontsarerequiredbyMacOSX
• Howtocleanupyourfonts
• Thefontactivationhierarchy
• Techniquestoworkaroundfontissues
We presume that you have made the decision to use a professional font manager to manage your
fonts. A font management tool is an integral part of making sense of your font mess.
If you are unclear on the need for a professional font manager, please take a moment to review the
Why Professional Font Management? document (PDF):
http://dl.extensis.com/downloads/SC/EN/P/Font-Management-What-the-Pros-Use.pdf
.
If you manage multiple users in a workgroup, you may benefit significantly from the use of a server-
based font management system, such as Universal Type Server. To download white papers,
documentation and related information about the benefits of server-based font management
solutions, please visit the Extensis website:
Conventions Used In This Guide
Because much of the information in this guide is technical in nature, it is important to present that
information clearly and unambiguously. We use the following conventions to help convey exact
meaning:
• Code font: text that you are to type (such as in a Terminal session) is shown in
this typeface.
• File names: When possible, exact file names (including their extensions) are given. When
we refer to multiple files with a shared naming convention, we will indicate the portion of the
filename that differs with an asterisk (*), as well as describe in the surrounding text what
this means.
• File paths: Paths are shown in boldface. When we present a full path, it will start with a slash
character / indicating the root of the hard disk, such as /Library/Fonts/. A relative path will
start with a base folder name, such as My Fonts/System Fonts/. Paths that start in a user’s
home directory are given using the tilde ~ character: ~/Library/Fonts/ is equivalent to /Users/
currentUser/Library/Fonts/. Finally, a path that ends with a folder name will end with a slash,
whereas a path that ends with a filename will not.
NOTE
Thisguidecoversthe
bestpracticesforfont
managementofLatin-
basedlanguages.Font
managementbest
practicesforAsianand
otherlanguagescan
varyfromwhatisinthis
document.

Best Practices Guide
Font Management
in Mac OS X
4
Step 1: Organize Your Font Files
One of the first things you should do is to organize your font files into a neat, systematic and
central location.
To do this, you need to create a folder—for example a folder called My Fonts—and keep it
somewhere locally on your hard drive. A good location to place this folder is in the /Users/Shared/
folder, because that way your font library will be accessible to all users on the computer.
You should also decide whether you want to manually organize your font files, or use a font manager
to do this for you. Suitcase Fusion 3 comes with a product called FontDoctor which, among other
things, can organize all your font files. Suitcase Fusion 3 can also organize all of your font files for
you automatically in a secure location called the Font Vault. Even if you do this, so that you’re sure
that you have gathered all of the fonts on your system, it’s a good idea to organize your fonts with
FontDoctor before adding them to your font manager.
To organize fonts alphabetically with FontDoctor:
1. Open FontDoctor.
FontDoctor is included with Suitcase Fusion 3, or can be purchased separately from the
Extensis website:
http://www.extensis.com/fontdoctor
2. In the FontDoctor window, click the Organize button.
3. In the Search Disks/Folders pane, click the [ + ] button to add folders or disks to the list, then
check the box next to a folder or disk icon to organize fonts in that location.
Warning: You may wish to manually clean up your application font folders in /Library/
Application Support/ before scanning the entire disk.
4. If you want to keep an entirely clean font library, it is a good idea to remove the original font files,
so that the fonts in your library are the only ones available for use. To do so, enable the Delete
Original Files After Copy option.
5. Click the Organize Fonts button.
6. To create a new font library click New.
7. FontDoctor prompts you to choose a location for your new font library. Navigate to your My
Fonts location and click Save.
8. Click Proceed to confirm the settings. FontDoctor searches the selected locations and groups
all of the fonts in the new library.
To manage fonts with Suitcase Fusion 3:
When fonts are added to Suitcase Fusion 3, by default the fonts are copied into a central location,
called the Font Vault. To tell Suitcase Fusion 3 to organize your fonts, do the following:
1. Open Suitcase Fusion 3.
2. Choose Suitcase Fusion 3 > Preferences.
3. In the Preferences dialog, choose the Copy added fonts to the vault option. This copies the
font files into the vault, leaving the original files untouched.
4. Click OK to accept the new preferences.
5. Add your fonts to Suitcase Fusion 3.
Manually organizing your fonts
If you would rather organize your fonts manually, you can organize all of your fonts in the Finder, then
change the Suitcase Fusion 3 vault preference to Add fonts leaving them in place, then add the
fonts to Suitcase Fusion 3.
It is best to choose a strategy before you set out to manually organize your font library. The following
are some typical strategies that users implement to organize physical font files. Keep in mind that
some levels of organization are better suited for implementation in a font manager.
About Font Book
DonotdeleteApple’sFont
Book!Althoughyoumay
useaprofessionalfont
managementapplication
tomanageyourfonts,Font
Bookisintegratedwith
MacOSXandprovides
importantfunctionality,
evenifyoudon’tuseitto
activateanddeactivate
fontsorsetsoffonts.

Best Practices Guide
Font Management
in Mac OS X
5
Alphabetically by family name: Frequently used by designers and creative professionals,
this is often the easiest way to find a particular font. With this method, the library is often
further divided into a number of subfolders within the My Fonts folder, for example A-D, E-H,
etc. If you like this method, FontDoctor can automatically organize fonts for you like this.
By classification: Often used by typographers, or designers who are well versed in typography.
Depending on the level of sophistication needed, you can use a set of subfolders with names like
Serif, Script, and Ornamental.
By job name or number: Often used in production environments like service bureaus or print
shops. Create a separate font folder for each job name or number in your workflow.
By client: Often used in design shops with many clients, where each client uses a specific set of
fonts for all their jobs. In these environments, you may be required to physically separate the font files
for each client. Suitcase Fusion 3 includes the ability to add fonts in separate libraries or even font
vaults to keep fonts used for each client in a separate location.
Whichever way you decide to organize your font library, you must ensure that you keep all PostScript
Type 1 font components (suitcase fonts and outline fonts) together in the same folder. Mac OS X
requires the suitcase font files and corresponding outline font files to be in the same physical folder
in order to function correctly. This level of organization is typically handled by your font manager;
for example, Suitcase Fusion 3 won’t even allow orphan fonts (PostScript Type 1 fonts missing a
component) into the Font Vault.
Step 2: Manage Your System Font and
Application Font Folders
When not using a font manager, fonts are stored in any of the Mac OS X System Font folders or in
any of the Application Font folders. These folders are managed by the operating system
and applications.
The number of locations for fonts in Mac OS X can lead to confusion and cause problems.
Within the professional creative, print and publishing environments, it is strongly recommended
that you use a font management tool to manage all of your available fonts, with the exception of
required system fonts.
For detailed information about the many locations where Mac OS X and applications can place and
store fonts, see “Font Locations” on page 14.
To help you manage which fonts are active in your system font folders, Suitcase Fusion 3 includes
features that allow you to activate and deactivate Mac OS X system fonts.
Automatic Activation Preferences in Mac OS X
Mac OS X v10.5 and 10.6 includes some basic font management capabilities, including auto-
activation and alerts if the contents of the system font folders have been modified. These features
interfere with professional-level font managment tools such as Suitcas Fusion 3, so they should be
disabled to avoid conflicts.
You can access these settings in two different ways: from the Unix command line using the Terminal
application, or from the Preferences dialog in the Font Book application.

Best Practices Guide
Font Management
in Mac OS X
6
Disabling OS X Font Management using Font Book
The advantage to using Font Book is it is readily accessible. The disadvantages are that you must
be logged in to the computer as an administrator, and a change to the Alert setting only affects the
current user.
1. Log in to your computer using an account with administrator privileges.
2. Start the Font Book application (located in the Applications folder on your hard disk).
Tip: In the Finder, press Command-Shift-A to open the Applications folder.
3. Choose Font Book > Preferences.
4. Clear the box labeled Automatic font activation.
This option interferes with automatic font activation performed by Suitcase Fusion 3 and
other professional font managers, and does not allow for automatic font activation across all
applications. Your font manager will allow you to use plug-in based automatic activation for
supported applications.
5. Clear the box labeled Alert me if system fonts change.
If you leave this setting enabled, the Mac OS will automatically place certain fonts back into
your system font folders, even if you remove them. It will also interfere with a professional font
manager’s ability to manage or override your system fonts.
Note: If you are not logged in to the computer as an administrator, this setting will not be saved.
6. Close the Preferences dialog and quit Font Book.
Disabling OS X Font Management using Terminal
The advantages to using the command line are that you can use it on any account (provided you
have the system root password), and a change to the Alert setting is applied to all user accounts on
the system.
1. Start the Terminal application (located in the Utilities folder inside the Applications folder).
Tip: In the Finder, press Command-Shift-U to open the Utilities folder.
2. Type
atsutil autoactivation -d and press Return. (This disables auto-activation for the
current user account.)
3. Type
sudo atsutil fontprotection -off and press Return. (This turns off system font
alerts for all users.)
You’ll be prompted for a password; enter the password for the root user on the computer and
press Return again.
4. Type
exit and press Return, then quit Terminal.
Using both methods
OS X’s automatic activation needs to be disabled individually for each user account; there is no
setting to disable it for all accounts at once. Font Book does not allow a non-administrator user to
save changes to the system font alert setting.
These two facts make it difficult to globally disable Mac OS X’s built-in font management in favor of a
professional font manager like Suitcase Fusion 3. However, if you combine the methods, it can be a
little easier.
1. Log in to the computer as an administrator.
2. Open Terminal.
3. Type
sudo atsutil fontprotection -off and press Return. (This disables the alert that
OS X would raise when you make a change to the system font folders.)
Enter the administrator password when prompted.
4. Type
exit, press Return, then quit Terminal.
Each user on the system should open Font Book and turn off the option for Automatic font
activation. If you have Suitcase Fusion 3 installed, the Suitcase Fusion Core will turn this system
setting off automatically.
Font Book
Preferences
TwoFontBook
preferencesmanage
systemwidebehavior
inMacOS Xv10.5and
later -
Automatic Font
ActivationandAlert me if
system fonts change.
Best Practices Guide
Font Management
in Mac OS X
7
Manually cleaning up your System Font and Application Font folders
In order to manually clean up your System Font and Application Font folders, you need to remove all
fonts that are not absolutely required for Mac OS X to operate.
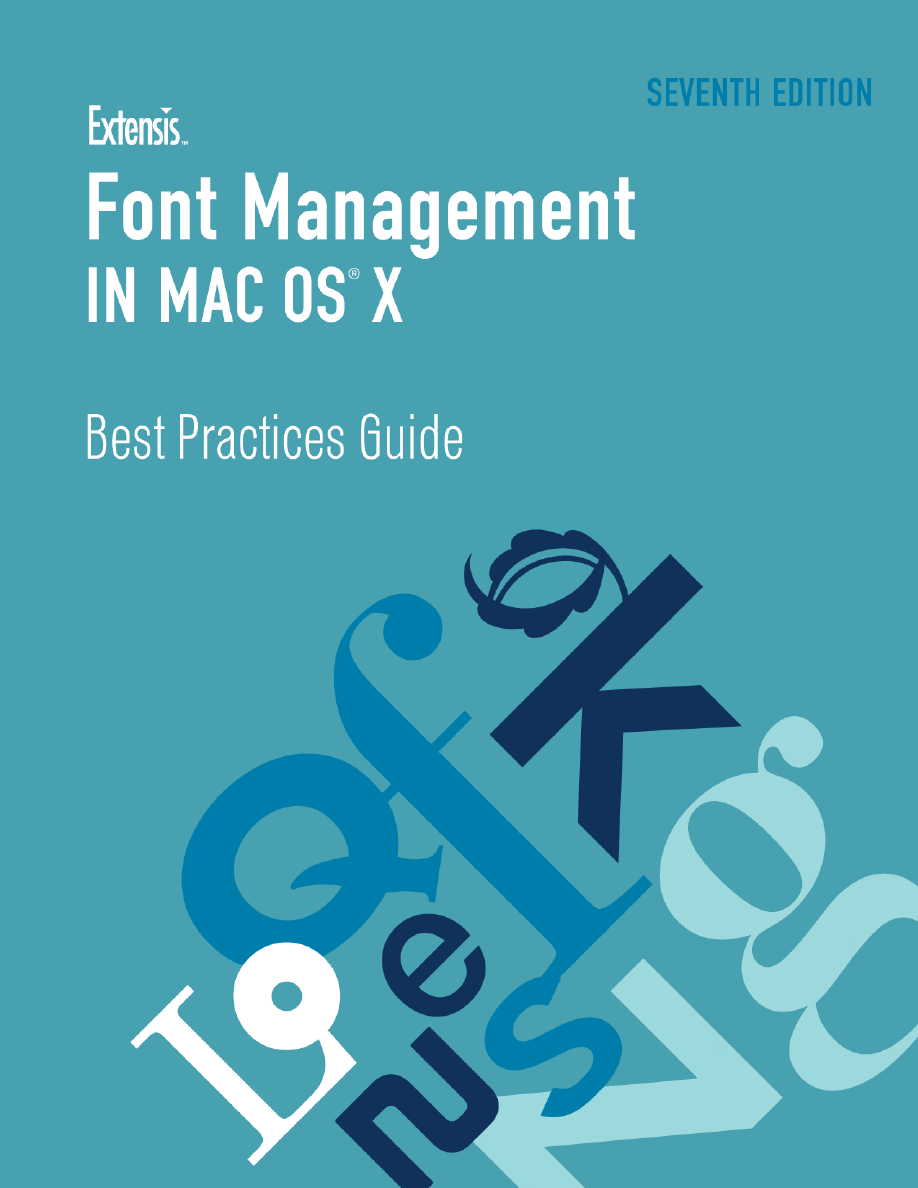
If you manually clean out these folders, we recommend that you create a folder named Moved from
System Font Folders within your My Fonts folder (the folder you created in Step 1). Whether you
will be using these fonts in the future or not, it is good practice to save these fonts and not discard
them just in case you do need them at a later date.
To manually clean up your system fonts:
1. For Local Domain Fonts, create a folder called Library Fonts within the Moved from System
Font Folders folder.
2. Move all fonts that you find in /Library/Fonts/ to your new Library Fonts folder. (This is the
Fonts folder inside the Library folder at the root of your hard disk.)
3. For User Domain Fonts, create a folder called User Fonts within the Moved from System
Font Folders folder.
4. Move all fonts that you find in ~/Library/Fonts/ to your new User Fonts folder. (The tilde ~ is
Unix shorthand for the currently logged in user’s home folder; this is a folder with your login
name located inside the Users folder on your hard disk.)
5. Mac OS X v10.4 users: If you have a Classic System Folder at the root of your startup disk
that has an OS 9 icon, its fonts should be moved if you want them to be managed by your
OS X font manager. Please remember that fonts moved out of the Classic System Folder will no
longer be available for Mac OS 9 applications, unless activated by a font manager running in the
Classic environment.
Create a folder called Classic Fonts within the Moved from System Font Folders folder.
Move all fonts that you find in /System Folder/Fonts/ to your new folder, except these fonts:
Charcoal
Chicago
Geneva
Monaco
FontsRequiredbytheClassicEnvironment
These fonts are required for normal system operation of the Classic environment, and removing
any of them may cause Classic and Classic applications to behave erratically. In no event
should these fonts be moved from /System Folder/Fonts/.
You may also wish to leave any OpenType fonts that you want to use in the Classic environment
in the /System Folder/Fonts/ location. Mac OS X font managers are not able to activate
OpenType fonts for Classic applications.
6. To move System Domain Fonts, you must authenticate with Mac OS X as a user with
administrator rights. If you aren’t sure of your login level, check the Accounts panel of System
Preferences. For more information, see your Mac OS X documentation.
WARNING
Whenremovingfontsfrom
thesystemfontsfolders,
followourinstructionsvery
carefully.Removingcritical
fontscancausesevere
consequences,even
requiringyoutoreinstall
theoperatingsystem.
Best Practices Guide
Font Management
in Mac OS X
8
7. Create a folder named System Domain Fonts in your Moved from System Font Folders
folder.
8. WARNING: Removing required fonts from your /System/Library/Fonts/ folder can have
adverse effects. This includes the operating system not being able to start, and in case of a
mistakenly deleted font could require you to reinstall the operating system.
Review the required operating system fonts listed in the following table with care. These fonts
are required by the operating system. Other fonts may be required by other applications that
you have installed, so remove fonts from the System Domain Fonts folder
with caution.
Select only fonts in the /System/Library/Fonts/ folder that are not listed on the chart, and that
you know are not required by other applications.
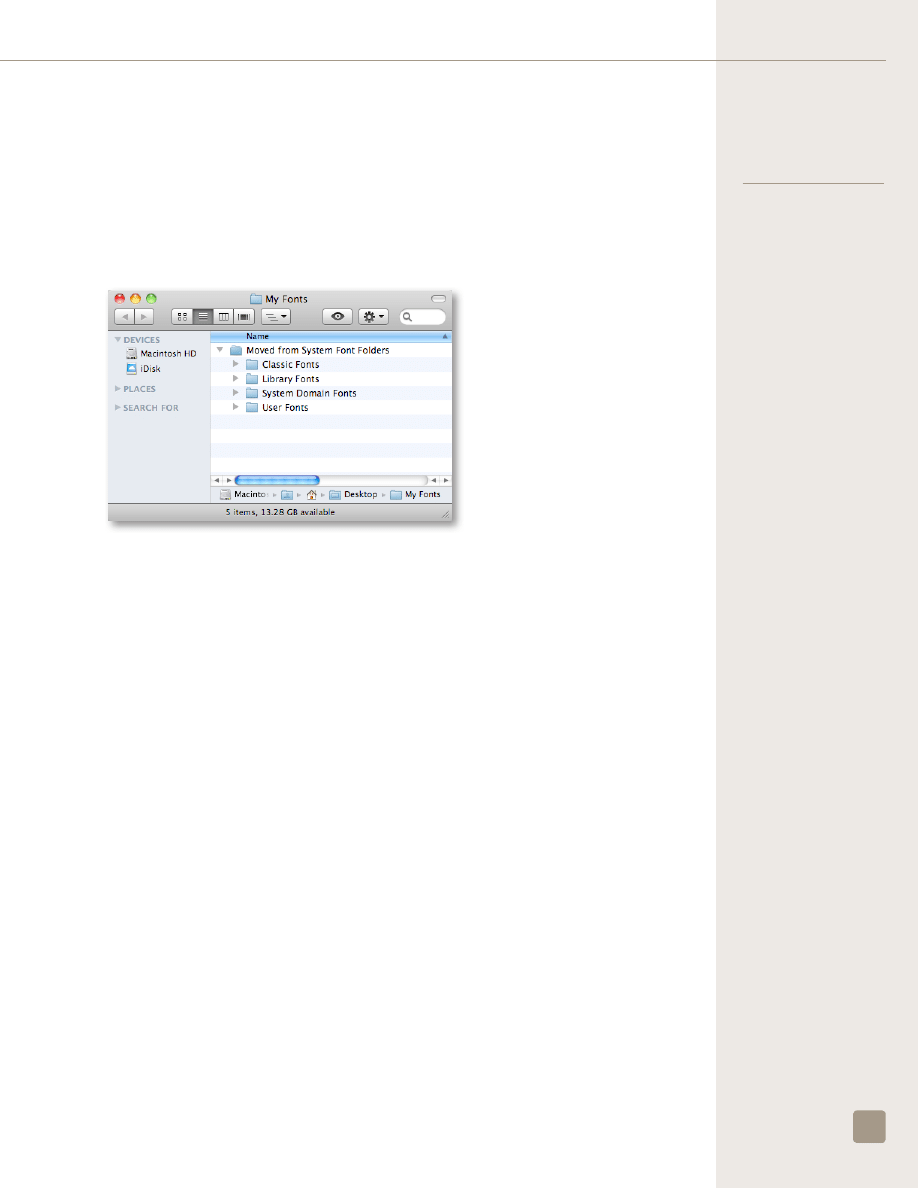
Required /System/Library/Fonts/ by OS
Font file name
10.4 10.5 10.6
Apple Braille Outline 6 Dot.ttf
√
C
Apple Braille Outline 8 Dot.ttf
√
C
Apple Braille Pinpoint 6 Dot.ttf
√
C
Apple Braille Pinpoint 8 Dot.ttf
√
C
Apple Braille.ttf
√
C
Apple LiGothic Medium.dfont
√
Apple Symbols.ttf
√
C
AppleGothic.dfont
√
AppleGothic.ttf
√
C
AquaKanaBold.otf
√
√
AquaKanaRegular.otf
√
√
AquaKana.ttc
C
Courier.dfont*
√
√
C
Geeza Pro Bold.ttf
√
√
C
Geeza Pro.ttf
√
√
C
Geneva.dfont
√
√
B
Hei.dfont
√
HelveLTMM
√
√
C
Helvetica LT MM
√
√
C
Helvetica.dfont*
√
√
B
HelveticaNeue.dfont*
√
B
†
HelveticaNeue.ttc*
B
†
Keyboard.dfont
√
√
Keyboard.ttf
A
LastResort.dfont
√
√
LastResort.ttf
A
LucidaGrande.dfont
√
√
LucidaGrande.ttc
A
Menlo.ttc
A
Monaco.dfont
√
√
A
Osaka.dfont
√
OsakaMono.dfont
√
10.6 Required Fonts
by Importance
A: Super Critical System
Fonts-fontsthatnoMac
OSXsystemcanlive
without.
B: Critical System
Fonts -fontsthat
arerequiredforkey
applicationsthatalso
haveuserinterface
dependencies
C: Core System Fonts -
lesscriticalfontsthat
haveapplicationanduser
interfacedependencies.
Required /System/Library/Fonts/ by OS
Font file name
10.4 10.5 10.6
STHeiti Light.ttc
A
Symbol.dfont*
√
√
Symbol.ttf
C
Thonburi.ttf
√
C
ThonburiBold.ttf
√
C
Times LT MM
√
√
C
Times.dfont*
√
√
C
TimesLTMM
√
√
C
ZapfDingbats.dfont*
√
√
ZapfDingbats.ttf*
C
ヒラギノ丸ゴ Pro W4.otf
(Hiragino Maru Gothic Pro W4)
√
ヒラギノ明朝 Pro W3.otf
(Hiragino Mincho Pro W3)
√
ヒラギノ明朝 Pro W6.otf
(Hiragino Mincho Pro W6)
√
ヒラギノ明朝 ProN W3.otf
(Hiragino Mincho ProN W3)
√
C
ヒラギノ明朝 ProN W6.otf
(Hiragino Mincho ProN W6)
√
C
ヒラギノ角ゴ Pro W3.otf
(Hiragino Kaku Gothic Pro W3)
√
ヒラギノ角ゴ Pro W6.otf
(Hiragino Kaku Gothic Pro W6)
√
ヒラギノ角ゴ ProN W3.otf
(Hiragino Kaku Gothic ProN W3)
√
C
ヒラギノ角ゴ ProN W6.otf
(Hiragino Kaku Gothic ProN W6)
√
C
ヒラギノ角ゴ Std W8.otf
(Hiragino Kaku Gothic Std W8)
√
儷黑 Pro.ttf (LiHei Pro)
√
√
C
华文细黑.ttf (STXihei, STHeiti
Regular)
√
√
C
华文黑体.ttf (STHeiti, STHeiti Light)
√
√
C
*ThesefontsareOK
toreplacewithanother
versionofthefont.
†Laterversionsof
SnowLeopardinclude
HelveticaNeue.dfont
insteadof
HelveticaNeue.ttc.For
moreinformation,see
“InDesignand.dfonts”on
page17.
NOTE: If you run applications requiring additional language support, other fonts may be required.
9. Copy the selected fonts from the /System/Library/Fonts/ folder to your new System Domain
Fonts folder.
10. Move the selected files from the /System/Library/Fonts folder to the Trash. At the prompt,
enter your Mac OS X Administrator password and click OK.
WARNING: Under Mac OS X v10.6 (Snow Leopard) removing or replacing required System
Fonts can prevent future font activation. For solutions to this issue, see the following Extensis
Knowledge Base article:
http://www.extensis.com/en/support/kb_article.jsp?articleNumber=7902300
Best Practices Guide
Font Management
in Mac OS X
9
International Fonts
Mac OS X also comes with a number of international fonts for use
when a non-Latin language is the preferred language. The required
fonts for each language are listed in the chart above.
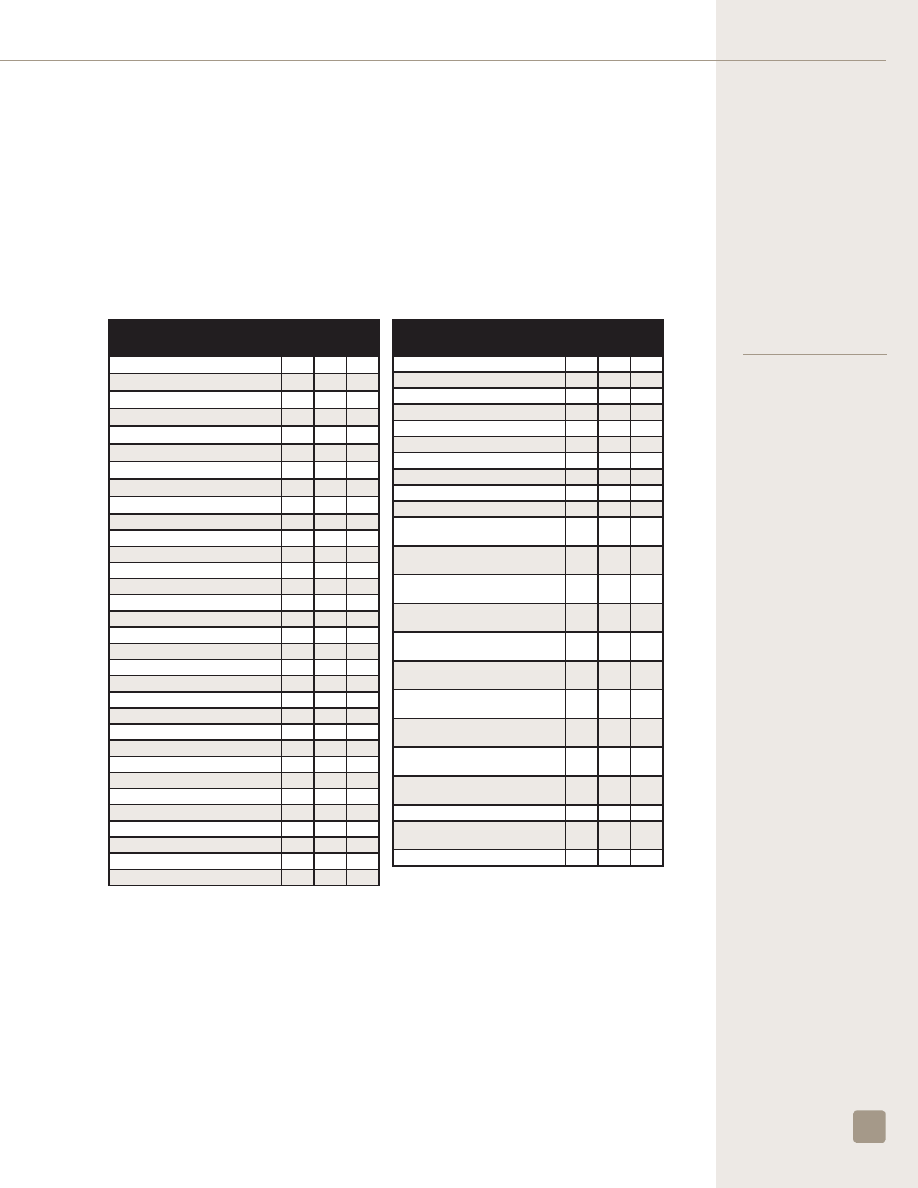
If you have difficulty reading the font name, select the font and choose
File > Get Info (or press Command-I). The full name is listed in the
file’s Info window.
About Helvetica and Helvetica Neue
While Helvetica and Helvetica Neue are not required system fonts,
some applications still require an active version of these fonts in order to operate correctly. If you
regularly use any applications or documents that require these fonts, once you remove them from
your system font folders, be sure to activate your preferred versions using your font manager. It
doesn’t matter which font format you use (PostScript Type 1, TrueType or .dfont), but we recommend
being sure that whatever version you use has all the styles that you require, and if intended to
replace a system font, it must have an identical name.
Working with Helvetica and Helvetica Neue is different in Mac OS X v10.5 and later. In this version
of Mac OS X, Apple introduced a new feature called System Font Protection. This feature is always
enabled and prevents a user from removing critical fonts from the /System/Library/Fonts/ folder by
automatically replacing them with backup copies. These are the protected system fonts:
Geneva
Helvetica
HelveticaNeue
Keyboard
LastResort
LucidaGrande
Monaco
ProtectedSystemFonts
Except as noted below for Helvetica and Helvetica Neue, do not remove any of these fonts. In
fact, doing so will prevent your system from functioning properly.
However, the versions of Helvetica and Helvetica Neue supplied with Mac OS X can cause problems
if you are already using different versions of these fonts in documents, or if you want to use more
styles of the typeface than are supplied with Mac OS X. If you are working in a professional print or
publishing environment, you may want to replace these with another version. You have two options
for activating your chosen replacements:
1. Override these system fonts with your font manager. (Suitcase Fusion 3 has the ability to do
this.) The only risk associated with this option is, if you disable the version you activate with your
font manager, the .dfont version will silently reappear. This may be your only option, if you do
not have permission to remove the .dfont versions of Helvetica and Helvetica Neue. (In Suitcase
Fusion 3, both fonts will be active, but the OS will only show your font in font menus.)
2. Remove the font from both /System/Library/Fonts/ and the system’s ProtectedFonts folder.
Then put the replacement font(s) in /System/Library/Fonts/. Alternatively, you may keep your
preferred version of the fonts that were removed permanently active in your font manager
(always on), although this is slightly riskier. Some version of Helvetica and Helvetica Neue must
always be active for Mac OS X to function properly.
If you want to remove Mac OS X protected fonts, the versions of Helvetica and Helvetica Neue
you choose as a replacement must contain at least as many styles (Regular, Bold, Italic, Bold
Italic, etc.) as the original font. It should also be a modern, high-quality font. For most purposes,
Extensis recommends a PostScript Type 1 font. OpenType versions of these fonts usually have a

Best Practices Guide
Font Management
in Mac OS X
10
new and distinct menu naming scheme, allowing them to be installed alongside .dfonts without
issue. However, they cannot replace the .dfonts, as differently-named fonts are not automatically
substituted for the removed .dfonts.
To remove Helvetica.dfont and HelveticaNeue.dfont from /System/Library/Fonts/:
1. Log in to your Mac OS X computer with an administrator account.
2. Open Font Book.
3. Choose Font Book > Preferences
4. Disable the Alert me if system fonts change preference.
5. Copy the following folder to a safe location on your hard drive:
/System/Library/Frameworks/ApplicationServices.framework/Versions/A/Frameworks/
ATS.Framework/Versions/A/Resources/ProtectedFonts/
NOTE: Never delete your backup copy of the ProtectedFonts folder, in case they are
required by a document or application you encounter in the future.
6. Open the original ProtectedFonts folder listed above and select only Helvetica.dfont and
HelveticaNeue.dfont and move them to the Trash.
7. When prompted for authentication, enter an administrator account name and password.
8. Open the /System/Library/Fonts/ folder and move Helvetica.dfont and HelveticaNeue.
dfont to the Trash.
9. Open your font manager and permanently activate (always on) your preferred versions of
Helvetica and Helvetica Neue.
10. Restart your computer.
Microsoft Core Web Fonts
Many web pages rely on a common set of fonts.These fonts were part Microsoft’s Corefonts
fortheWeb project, and are included with Mac OS X and Microsoft applications. It is a good
idea to have a version of the following fonts active on your system for web pages and for many
Microsoft applications:
Andale Mono
Arial
Arial Black
Comic Sans MS
Courier New
Georgia
Impact
Times New Roman
Trebuchet MS
Verdana
Webdings
MicrosoftCorewebfonts
Mac OS X installs these fonts in /Library/Fonts/. Microsoft Office 2004 installs them in ~/Library/
Fonts/ and Office 2008 installs them in /Library/Fonts/Microsoft/. These fonts can be removed
and managed with a font manager.

Best Practices Guide
Font Management
in Mac OS X
11
Microsoft Office 2004 fonts
Microsoft Office 2004 applications require a number of fonts in addition to the Microsoft Core web
fonts to operate properly.
Batang
Gulim
MS Gothic
MS Mincho
MS PGothic
MS PMincho
MT Extra
PMingLiU
SimSun
Wingdings
MicrosoftOffice2004requiredfonts
The first time that a user opens an Office 2004 application, these required fonts as well as others
are automatically copied into the ~/Library/Fonts/ folder. This only happens the first time each
Mac OS X user opens any Office application on the computer, and never on subsequent starts. To
prevent this from happening, you can remove the file that tells Office to copy these fonts. Office will
continue to function properly after doing so. For data integrity, do not delete these fonts.
To prevent Office from automatically reinstalling these fonts:
1. Close all Microsoft Office applications.
2. Remove the following file:
/Applications/Microsoft Office 2004/Office/Do Fonts
3. Add the Microsoft Office fonts to your font manager and ensure that the required fonts are
active before opening any Office applications.
NOTE: Additional fonts may be required when using templates installed with Office or from
the web.
Microsoft Office 2008 Fonts
Microsoft Office 2008 for Macintosh installs over 70 fonts. None of the fonts are strictly required for
any of the Office applications to run, but some features rely on certain fonts being present.
When you install Office 2008, it creates a folder named Microsoft inside the /Library/Fonts/ folder,
then installs its fonts in this folder. If any of the Office 2008 fonts conflict with an existing font, the
existing font is moved to a folder named /Library/Fonts Disabled/. This folder is actually created
by the Office installer and is not an OS X system fonts folder; the fonts that are moved here are not
actually disabled by the Microsoft installer.
The Office installer creates the /Library/Fonts Disabled/ folder with System as the owner, so you
cannot make changes to this folder without an administrator password.
NOTE: When the Office 2008 installer moves fonts to the /Library/Fonts Disabled/ folder, it does
not take into account the version of the font being moved. In some cases, it may move a font that is
newer than the version it is installing.

Best Practices Guide
Font Management
in Mac OS X
12
Adobe Application Fonts
It is likely that you have a number of applications from Adobe installed on your system. Adobe places
fonts on your system that are required for Adobe applications to function properly.
Adobe Creative Suite 2 required fonts
Adobe CS2 installs font files in a location that is only available to Adobe applications. You may
remove most font files from /Library/Application Support/Adobe/Fonts/. Do not remove any
folders or non-font files from this location, or the following fonts from the Reqrd folder:
MyriaBol
MyriaBolIta
Myriad
MyriaIta
MyriaRom
AdobeCS2requiredfonts
Other fonts in this folder can be removed and managed with a font manager.
Adobe Creative Suite 3, 4, and 5 required fonts
Adobe CS3, CS4, and CS5 include required fonts within the Adobe Illustrator and InDesign
application packages. These fonts are required and should not be removed.
Fonts in Adobe Illustrator CS*.app/Required/Fonts/:
AdobeInvFon
AdobeInvisFont.bmap
AdobeMingStd-Light.otf
AdobeMyungjoStd-Medium.otf
AdobeSongStd-Light.otf
MyriaBol
MyriaBolIta
Myriad
MyriaIta
MyriaRom
AdobeIllustratorpackagefonts
Fonts in Adobe InDesign CS*.app/Contents/MacOS/Required/fonts/:
Adobe Sans MM
AdobeSanMM
KentenGeneric.otf
AdobeInDesignpackagefonts
“Notes” in Apple Mail
The Mail application included with Mac OS X v10.5 and 10.6 includes a feature that allows you to
create notes to yourself. By default, Mail uses the font MarkerFelt.dfont in the /Library/Fonts/
folder. If this font is missing, you cannot use the Notes feature of Mail. You can change the font used
by Notes in Mail’s Preferences dialog.
NOTE: You must change the font in Mail Preferences before you remove or deactivate MarkerFelt.dfont.

Best Practices Guide
Font Management
in Mac OS X
13
Step 3: Clean Up Your Font Library
Cleaning up your font library is probably the most diverse and certainly the most difficult task of
font management. Many font problems encountered in Mac OS X occur because of problem fonts.
Any number of errors can occur because a font is actually corrupt, missing a outline font file, or is a
duplicate of another font you already have in your library. Having a clean, healthy font library is your
best bet to a seamless, problem free workflow.
Corrupt Fonts
Suitcase Fusion 3 comes with a full copy of FontDoctor. The main function of FontDoctor is to
validate fonts, to fix any corrupt fonts that it is able to fix, and warn you about problems that it is
unable to fix.
Suitcase Fusion 3 also performs font corruption checking and repair as you add fonts. Even so, for
that extra level of security, FontDoctor is recommended to ensure that your fonts are healthy and
that missing components are identified and regrouped, if possible.
Any fonts that are found to be corrupt should be discarded. Find and reload a healthy version of the
font from the original media whenever possible, and only use the repair functions of FontDoctor if
you can’t find a healthy original version.
Orphan Fonts
PostScript fonts are comprised of a suitcase font file (sometimes referred to as the bitmap or
screen font file) and a corresponding outline font file (sometimes referred to as the printer font). A
single suitcase file can contain the bitmaps corresponding to multiple outline font files. If either of
these components is missing, the remaining component is referred to as an orphan font. Different
applications deal with these orphan fonts in different ways, but to ensure a trouble free workflow,
both components are required. So one of the steps you should take in cleaning up your font library,
is to either discard any orphan fonts you have in your library, or replace the orphans with copies of
the fonts from the original media.
Once again, FontDoctor can help in this regard by locating and matching suitcase and outline fonts
together. The final check is done when you add your font library to Suitcase Fusion 3. If you are
adding fonts to the Font Vault, orphan fonts are not allowed and thus not added to the Suitcase
Fusion 3 vault.
Step 4: Add Your Fonts To Your Font Manager
Once you have all your font files organized, and have removed all unnecessary fonts from the
various System Font and Application Font folders, the next step is to add all these fonts to your font
manager, so you can activate them as you need them.
Before you add your fonts to a font manager, you will likely need to decide how you will add the
fonts. Suitcase Fusion 3 contains a secure font vault that can be used to keep fonts. The vault
ensures that fonts are complete and safe from corruption.
If you have organized all your font files into a single folder hierarchy, you may want to add these fonts
in place to your font manager. To do so, change the Font Vault option to Add fonts leaving them in
place. After changing the preference, you can drag the entire My Fonts folder into the Fonts pane in
Suitcase Fusion 3 to have all the fonts added to the font manager.
Another decision you need to make is whether you want to follow your physical organization of files
by creating corresponding sets in Suitcase Fusion 3, or simply add the fonts and organize them
into sets at a later time. For example, if you have organized your font files by client or by job name,

Best Practices Guide
Font Management
in Mac OS X
14
you may want to create a separate set for each client or job. To do this, simply drag each client or
job folder into the Sets pane. Suitcase Fusion 3 only adds fonts once, and makes references to the
original font file thereafter. So, there’s no danger of adding duplicate fonts.
For detailed instructions about adding fonts, see the Suitcase Fusion 3 User Guide.
Step 5: Clean Duplicate Fonts
Two fonts that have the same name are considered duplicates because it is often difficult to
determine what, if anything, is different between the fonts. Font libraries often contain many
duplicate fonts, sometimes out of necessity (different versions of these fonts may be needed),
sometimes simply because they have accumulated over time. To avoid confusion and errors, it is
best to keep only the fonts—and the versions of fonts—that you need.
Once all your fonts have been added to your font manager, you should decide which of these fonts—
especially duplicates—that you want or need to keep, and which you should discard. For example,
most people have multiple versions of Helvetica: likely PostScript Type 1, TrueType and .dfont
versions, and even possibly multiple PostScript Type 1 versions of Helvetica from a single foundry,
such as Adobe. This is not uncommon. There are, in fact, many versions of Helvetica available. If
you work on client jobs using client provided fonts, then you will need to make sure you have the
versions of these fonts provided by the client. So, if Client A requires Helvetica “A,” and Client B
requires Helvetica “B,” it is necessary to keep copies of both Helvetica “A” and Helvetica “B” in
your library.
Suitcase Fusion 3 can help you determine if fonts are identical and thus true duplicates. Font Sense
technology examines fonts and gives you a unique identifier for each font. This way, even if fonts
appear to be similar, you can be certain that they are unique.
While determining duplicates can be a time consuming process, it is definitely worth your while to
examine your duplicates and decide which you need and which you do not need.
If you do need to keep multiple versions of fonts in your library, you should probably use the keyword
features of your font manager to tag your duplicate fonts with information to help identify the fonts
required for each client and job.
If you are completely in charge of the fonts you use, you should only keep one version of each
font and remove the duplicate fonts from your font manager as well as removing the duplicate font
files from your system. Within a professional creative, print and publishing environment, fonts with
PostScript style outlines (either Type 1 or OpenType format) are the most commonly preferred.
Although biases against TrueType are mostly for historical rather than practical issues. You might
instead choose to keep the version of the typeface that has the most styles, or the most glyphs per
font, or is from the most reputable vendor.
Font Locations
With Mac OS X, fonts may be stored and used by the system or by applications in a number
of locations.
System Domain
/System/Library/Fonts/
Fonts in this folder are used by the OS, available to all users of the system, and in general should
be left alone. Some of the fonts in this folder are absolutely required by the OS and removing them
will cause the OS or certain applications to crash or behave erratically. Other fonts may be safely
removed from this folder. See page 8 for a list of required fonts that cannot be removed. Fonts stored
in this location are always active and available to the OS and all applications.
Duplicates
Fordetailedinstructions
aboutexaminingduplicate
fontsandFontSense
atttributesinSuitcase
Fusion 3,seethe
Suitcase
Fusion 3 User Guide.

Best Practices Guide
Font Management
in Mac OS X
15
Local Domain
/Library/Fonts/
This folder houses any fonts available to any user who logs-on to the system. Fonts stored in this
location are always active and available to the OS and all applications.
User Domain
~/Library/Fonts/
Fonts in this folder are not required and available only to the specific user who logs-on to the system.
Each individual user who has an account on the system has his/her own User Fonts folder. Fonts
stored in this location are always active and available to the OS and all applications.
Classic Domain
/System Folder/Fonts/
This folder exists only on PowerPC computers with the Classic environment installed, and houses
fonts available to all users of the system. These fonts are specifically for use with the Classic
environment. See page 7 for a list of required Classic fonts that cannot be removed.
NOTE: Fonts in this folder are active even if the Classic environment is not running.
Application Fonts
/Library/Application Support/
In addition to system font folders, Mac OS X allows applications to keep a private store of fonts for
their own use.
Of particular importance to the professional creative, print and publishing community, are the Adobe
CS2 (and earlier) applications, which store fonts in:
/Library/ApplicationSupport/Adobe/Fonts/
These fonts are active and available to any Adobe CS application running in Mac OS X which uses
the core Adobe font engine, but are not available to non-Adobe applications. Adobe CS3 and later
applications store their own fonts in the /Library/Fonts/ folder, but they still recognize and access
fonts in the Adobe fonts folder.
Font Hierarchy
While it is possible to keep duplicate fonts in different locations in the system and application font
folders, it is not a good idea. Mac OS X uses the first instance of a font that it finds according to the
following hierarchy:
1. A specific application’s font folder: /Library/Application Support/
2. The User font folder: ~/Library/Fonts/
3. The Local font folder: /Library/Fonts/
4. The Network font folder (if configured by a network administrator): /Network/Library/Fonts/
5. The System font folder: /System/Library/Fonts/
6. The Classic font folder: /System Folder/Fonts/
The Application Support font folder is the “highest” font location, and the classic font folder is the
“lowest” font location. This means, for example, that if you have a font of the same name (a duplicate
font) in both the ~/Library/Fonts/ folder, and the /System/Library/Fonts/ folder, Mac OS X (and all
running applications) will use the version of the font in the ~/Library/Fonts/ folder, since that is the
“higher” font location.

Best Practices Guide
Font Management
in Mac OS X
16
Adobe applications which use the shared Adobe font engine do not use the standard Mac OS X font
location hierarchy. InDesign’s process for resolving font conflicts is described here:
http://blogs.adobe.com/typblography/2008/05/indesign_font_conflicts.html
For Adobe applications such as Illustrator and Photoshop, the result of font conflicts is undefined.
Font Formats
Following is a synopsis of font formats supported by Mac OS X:
OpenType (.otf or .ttf)
OpenType is the newest major font format, and the format to which OS vendors seem to be
converging. The file format is based on the Windows version of TrueType, but an OpenType font
can contain either PostScript (.otf) or TrueType (.ttf or .otf) outline data, meaning that professional
publishing environments can continue to use PostScript outlines if they are so inclined.
There are several advantages to OpenType. As with TrueType (.ttf), one font is one file, and this
file is cross-platform: the same file can be used on a Mac or Windows platform with consistent
results. Like TrueType, an OpenType font can contain thousands of glyphs. Not only can this
enable extensive language support in a single font, but ligatures, swashes, true small caps, and
other advanced typographical alternate glyphs can be built into a single font, and are accessible in
compatible applications. Finally, OpenType fonts are based on Unicode, the universal cross-platform
character encoding standard. These are significant benefits over PostScript Type 1, which is limited
to 256 encoded characters, and does not directly support Unicode. Font vendors often offer
information on compatibility or upgrade availability, such as this FAQ from Adobe:
http://www.adobe.com/type/opentype/T1_to_OTF_FAQ.htm
Mac OS X natively supports OpenType fonts and Unicode information, making OpenType an
excellent choice for new font purchases. However, unless your budget allows for re-licensing all your
existing fonts, you may want to migrate only gradually, as you cannot simply convert your existing
PostScript Type 1 or TrueType fonts to OpenType and get the same results as with freshly licensed
OpenType fonts. Most font vendors now sell OpenType versions of their font collections, and some
are developing only OpenType fonts at this point.
TrueType (.ttf)
Mac OS X also supports TrueType fonts with the .ttf extension, which are a cross-platform format
originally developed for Windows. Beginning with Mac OS X v10.6, many Mac system fonts are
in this format. These fonts are roughly equivalent to Mac TrueType fonts, but with a different file
structure (they lack the “resource fork” and its associated data, or that data is placed inside a special
table within the data fork). Each .ttf file is a single, complete TrueType font.
TrueType Collection (.ttc)
TrueType Collection files contain multiple .ttf fonts in a single file. TrueType Collections allow multiple
fonts to share glyphs or other tables, and can create a significant saving of file space. Windows
typically uses TrueType Collections for East Asian languages, while Mac OS X uses them for many
purposes. Although this format was originally developed for Windows, beginning with Mac OS X
v10.6, many Mac system fonts are in this format. Older versions of Mac OS X appear to have less
well developed support for TTC fonts.
Mixing Font Formats
Thereisnoinherent
issuewithusingfontsof
multiple,differingformats
inthesamedocument.
Theonlyproblemsarise
fromhavingmultiplefonts
withthesamename,
whethertheyareinthe
sameformatordifferent
formats.(See“Step5:
CleanDuplicateFonts”on
page14.)

Best Practices Guide
Font Management
in Mac OS X
17
Mac PostScript Type 1
These were long the de-facto standard for professionals in creative, print, and publishing environments.
Each PostScript Type 1 font is made up of two parts, a suitcase font file containing bitmaps and
metrics (sometimes called the “screen font”) and the corresponding outline font file (sometimes
called the “printer font”). Both the suitcase and corresponding outline files must be in the same
physical folder in order to work properly in Mac OS X. Note that one suitcase file may contain the
bitmaps and metrics for multiple outline fonts.
Mac PostScript Type 1 fonts have resource forks, which can be an issue for file transfer and backup/
restore; see “File Issues” on page 18.
PostScript Type 1 fonts for Windows consist of a paired .pfb and .pfm file for each font. Windows
PostScript Type 1 fonts are supported by neither Mac OS X, nor by font management applications,
although some Adobe applications can make use of these fonts if they are placed in a private Adobe
application fonts folder.
Datafork Truetype font (.dfont)
With Mac OS X, Apple introduced another way of packaging system fonts. The .dfont is a font
suitcase with TrueType font data stored in the file’s data fork rather than the resource fork. Apple’s
.dfonts are generally high-quality fonts, but this format is only used by Apple for their system fonts.
Unlike other new font formats, the .dfont format only works on Mac OS X (not in Classic, and not on
Windows), and equivalent Windows fonts are not generally available; therefore these fonts should be
avoided in any potentially cross-platform workflows (for example, if your printer or service bureau is
doing output from Windows).
Apple Advanced Typography (AAT)
Apple Advanced Typography (AAT) is an alternative to OpenType for encoding advanced typographic
information in a font. AAT features may be coded in a Mac or Windows TrueType font, a .dfont, or
an OpenType font. Many Apple system fonts have AAT features for advanced typography. Such
features are accessible only in AAT-savvy applications. Few vendors other than Apple have created
AAT fonts, and other than Apple’s own iWork applications (such as Pages and Keynote), few major
applications support AAT typographic capabilities.
Classic Mac TrueType
Classic Mac TrueType fonts consist of a suitcase, containing outlines and (optionally) bitmaps, as
well as all the required font metrics, making them easier to use than PostScript Type 1 fonts. A single
TrueType font suitcase may contain multiple TrueType fonts. TrueType fonts can contain thousands of
glyphs, enabling extended language support in a single font.
Mac TrueType fonts have resource forks, which can be an issue for file transfer and backup/restore;
see “File Issues” on page 18.
Originally, TrueType fonts were not as widely accepted in professional creative, print, and publishing
environments. However, most TrueType fonts will function properly in a professional workflow.
InDesign and .dfonts
SeveralApplesystem
fontssharenameswith
fontscommonlyusedin
publishing.Thesefonts
wouldoftenoverride
theirPostScriptversions
thatareusuallymore
desirableinpublished
output.Adoberealized
thisandmadeInDesign
automaticallyignore
asystem.dfontifits
PostScriptversionwas
installedandactive.This
workedwelluntilMac
OSXv10.6replaced
theHelveticaNeue.dfont
withHelveticaNeue.ttc,
aTrueTypecollection.
SuddenlyInDesignusers
werebackinthesame
situation,wheretheir
PostScriptfontwasbeing
overriddenbyasystem
font.Applegraciously
returnedthe.dfontversion
inasubsequentupdateto
SnowLeopard.

Best Practices Guide
Font Management
in Mac OS X
18
Multiple Master
This special kind of PostScript Type 1 font allows modifications of one or more font parameters to
create variations of the original font, such as varying weight or width. While multiple master (MM)
fonts are supported by Mac OS X 10.2 and later, they are no longer sold or supported by Adobe,
the original creators of the format. Uneven support for MM fonts has been known to cause various
issues and problems in professional workflows, so we recommend not using them, if possible.
Adobe has made OpenType equivalents of all its former MM fonts so there are alternatives available:
http://www.adobe.com/type/browser/mmoffer.html
Since Type 1 Multiple Master fonts have resource forks, they are subject to problems that may arise
during transfer or backup/restore; see “File Issues” on page 18.
As with regular PostScript Type 1 fonts, there is a separate Windows flavor of MM fonts. Windows
MM fonts are not supported on Mac OS X. However, some Adobe applications can make use of
these fonts, if the fonts are placed in an Adobe application fonts folder.
File Issues
Mac OS supports a special way of storing file information, in which what a user sees as a single
file can have both arbitrary information (the “data fork”) and specially structured information (the
“resource fork”). This can create problems because typical Windows and Unix platforms, as well as
many network and backup solutions, don’t accommodate the resource fork data.
Unfortunately, older Mac font file types make use of the resource fork, such as the Mac flavors of
PostScript Type 1 (including Multiple Master) and TrueType. If the resource fork of such a font is
deleted, moved, or damaged, the font will be unusable.
Files including Mac resource forks will usually not survive file transfers via SMB/CIFS, and may not
survive archiving with .ZIP. More recent ZIP support in OS X v10.4 Tiger and later is capable of
preserving resource forks, but does not necessarily do so by default on an HFS+ file system; consult
your documentation.
Just formatting a disk as Mac OS Extended is not, in itself, enough to guarantee that resource
forks will be successfully copied to that disk. If, for example, one is using Windows-based backup
solutions or Windows-based underlying backup infrastructure, you might be missing support for
resource forks. Check your documentation or test restoring a file to verify that resource forks
are supported.
Unicode
You’ve probably heard the term “Unicode” used in one way or another, but may not know exactly
what it refers to. Unicode is a universal character encoding scheme that provides unique character
mappings for all the world’s languages, as well as many other kinds of symbols—about 100,000
characters today.
The Unicode format specifies exact character mappings for all characters, including letters and
symbols, providing predictability across fonts. Prior to Mac OS X, the predominant character
encoding for fonts and text on Mac OS was MacRoman or other single-byte encodings, not
Unicode. These legacy encodings each had only 256 slots for characters, so the same “slot number”
could mean different things in different encodings. Characters not present in any of these encodings
would have to be mapped to some encoded character to allow for output. For example, a non-
Unicode dingbat font might map a variety of symbols to the letters A-Z.
Many font formats can handle up to 65,535 unique glyphs per font, and support Unicode encoding
built into the font. This includes all forms of OpenType and TrueType fonts, and CID-keyed PostScript

Best Practices Guide
Font Management
in Mac OS X
19
Type 1 fonts. However, “regular” PostScript Type 1 fonts (including multiple master fonts) can only
encode 256 characters per font and rely on pre-defined single-byte encodings.
Just because a font is in TrueType or OpenType format does not mean it has extended language
support. It may have been converted from a MacRoman or WinANSI font without adding any new
characters, or not many. You’ll need to check specific fonts to see if they support the particular
languages you need.
Once you have a font with some degree of extended language support, your application must be
“Unicode compliant” to access those additional characters. Otherwise the application will only see a
limited subset of the characters in the font, such as those corresponding to the MacRoman portion
of Unicode. Modern Mac OS X applications are usually Unicode compliant, while older applications
written with for earlier standards are not as likely to be compliant.
Font Cache Issues
If your fonts occasionally appear garbled or you are seeing other strange behavior with your fonts,
you may be seeing a problem with one or more of your “font caches.” The OS X operating system
makes use of these, as do vendors such as Adobe, Microsoft and Quark. A font cache is a file
that stores key information about the currently installed fonts, speeding up operations because
applications and operating systems don’t have to keep on reading that information from the
individual fonts. The system font cache files can affect any font-using application, while the vendor-
specific caches only affect each vendor’s own applications.
Because the font cache files are merely an on-the-fly optimization, deleting them is not harmful:
the operating system and applications can regenerate them. Just close all the vendor-specific
applications (Adobe, Microsoft and Quark) before deleting their respective font caches. If you delete
the OS X font caches, you should not only quit all your applications first, but you’ll also need to
restart your computer afterwards.
Because there are many different locations for font cache files with many different names,
we recommend that you use the font cache cleaner in Suitcase Fusion 3, or a utility such as
FontDoctor (which comes with Suitcase Fusion 3, and is available separately from Extensis at
http://www.extensis.com/fontdoctor
or from FontGear at
http://www.fontgear.net/fontdoctor.html
) or
FontNuke (
) to purge the cache files. However, such utilities do not
always handle the very latest versions of the cache files, so we provide information for doing
it manually.
Suitcase Fusion, FontDoctor, and FontNuke have the ability to purge font cache files for Mac OS X
itself, and also Adobe, Quark and Microsoft applications.
To clean cache files with Suitcase Fusion 3, choose File > Clean Font Caches. You will be
prompted to enter an administrator account name and password, and your system will be restarted
when cleaning is completed.
System Font Caches
If your fonts occasionally appear garbled or you are seeing other strange behavior with your fonts,
you may be seeing a problem with the Mac OS X font cache.
You can use Suitcase Fusion 3, FontDoctor, or FontNuke to clear the system font caches
(recommended), or you can manually clear your system font caches by deleting the appropriate
cache files. Mac OS X v10.5 and later have a command line utility that can clear your system font
caches. For Mac OS X v10.4, you can manually delete caches files.
Cache Cleaning
FontDoctor7.7canclear
fontcachesforMac
OSX10.4,10.5,10.6
QuarkXPress6/7/8,Adobe
CS3,CS4,andMicrosoft
OfficeX/2004/2008
Safe Mode
BootingyourMacin
SafeModewillalsoclear
mostsystemfontcaches
withoutresortingtothe
commandlineordigging
deepintosystemfolders.
Thecatchisthatyouwill
needtorestartyourMac
twicetocompletethe
process.
Fordetails,seethisApple
Supportarticle:
Best Practices Guide
Font Management
in Mac OS X
20
Mac OS X v10.5–10.6
To use the command line utility to clear your system font caches, you need to log in with an
administrator account.
1. Close all applications.
2. Start Terminal (located in the Utilities folder; press Command-Shift-U to open this folder).
3. Type
sudo atsutil databases -remove and press Return.
4. Type your password at the prompt (no characters will echo back to the screen).
5. When the process is complete, type
exit to end your command line session, choose
File > Quit to exit Terminal, then restart your Macintosh.
Mac OS X v10.4
Delete the folder /Library/Caches/com.apple.ATS/, then delete all files with the following naming
patterns. The asterisk * means there may be several files whose names start with the characters
preceding the asterisk; you need to delete them all.
/System/Library/Caches/com.apple.ATS.System*
/System/Library/Caches/com.apple.ATSServer*
/System/Library/Caches/fontTablesAnnex*
Restart your Macintosh immediately after removing these files and folders.
Adobe Font Caches
If your font display problems are limited to Adobe applications, it may be due to a corrupt Adobe-
specific font cache. Suitcase Fusion 3 or FontDoctor can be used to clear Adobe font caches, or you
can manually clear the font caches.
The different versions of Adobe applications create font caches with various names in several
locations. Rather than exhaustively list the possible names and locations for Adobe font caches, it is
simpler to use the Find feature of the Mac OS X Finder to locate these files for you, then delete them.
Finder configuration (Mac OS X v10.5 & 10.6)
These steps set up the Finder so you can locate files in System folders not normally included in Find
operations.
1. In the Finder, press Command-N to open a new window.
2. Press Command-F.
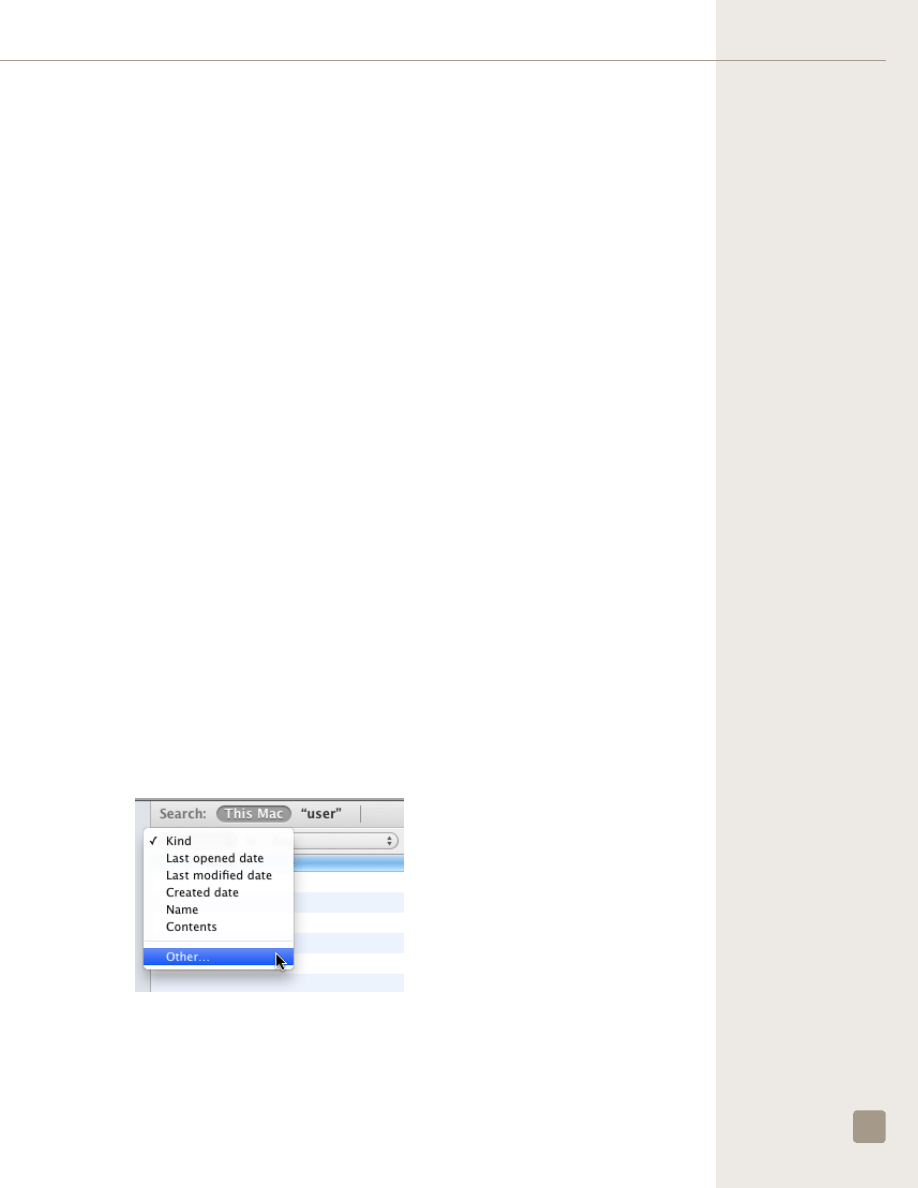
3. Click the pop-up menu that shows Kind and choose Other.
4. Scroll down the list of search attributes to System files, check the box in the In Menu column,
and click OK.
These steps add the “System files” option to the pop-up search menu. You will only need to perform
these steps once; after this, the “System files” option will always be in the pop-up menu.
Best Practices Guide
Font Management
in Mac OS X
21
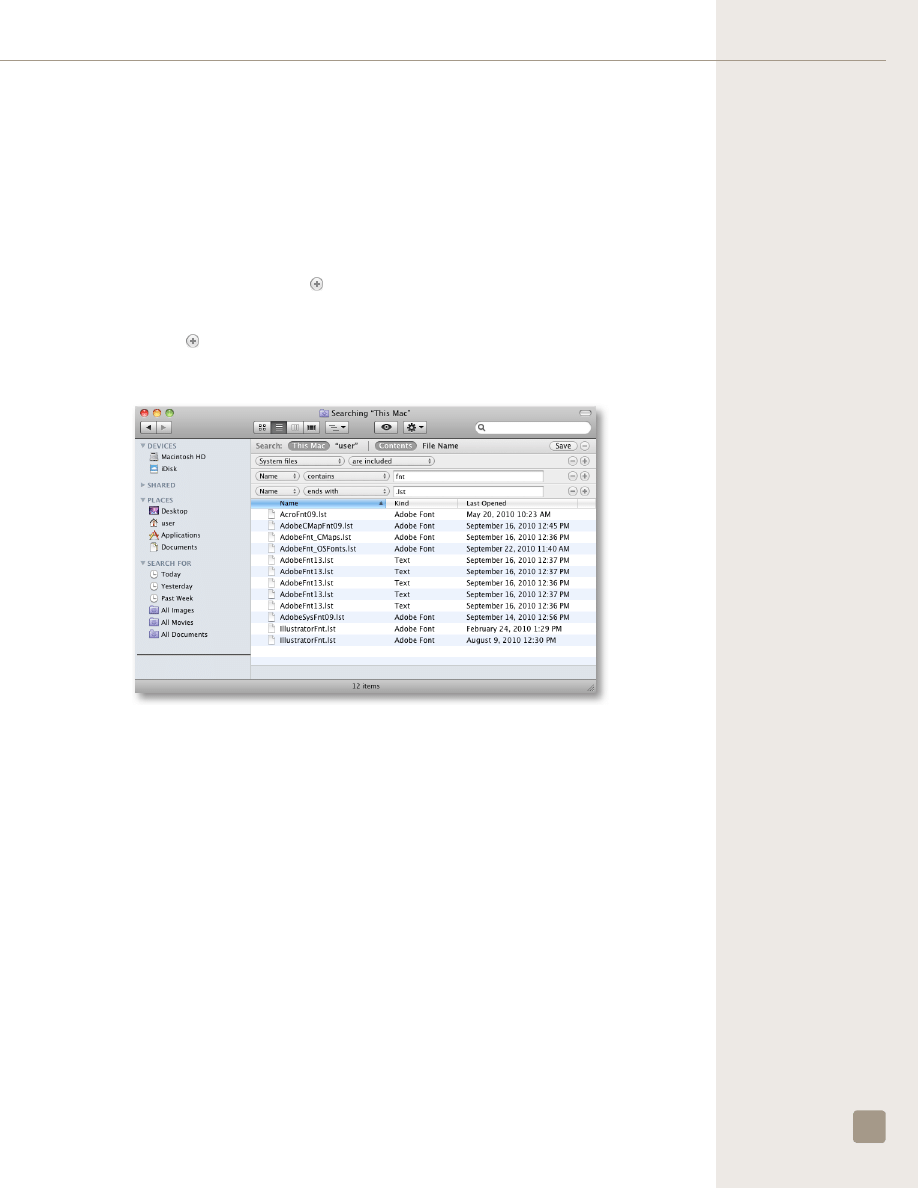
To remove Adobe font caches:
1. Quit all Adobe applications.
2. Open a new Finder window.
3. Press Command-F.
4. Click This Mac in the Search bar. (If you are running Mac OS X v10.4, click Computer.)
5. Mac OS X 10.5/10.6: Choose System files from the first pop-up menu, then choose Are
included from the second pop-up menu.
6. Mac OS X 10.5/10.6: Click the button at the end of the “System files are included” criterion.
7. Choose Name from the first pop-up menu, then choose contains from the second pop-up
menu, then type “fnt” into the field.
8. Click the button at the end of the “Name contains fnt” criterion.
9. Choose Name from the first pop-up menu, then choose ends with from the second pop-up
menu, then type “.lst” into the field.
10. When the search is complete, select the files in the list whose name start with “Acro,” “Adobe,”
and “Illustrator” and move them to the Trash.
In most cases this will be all the files in the search results, but be careful in case another
application has created a file with “fnt” and “.lst” in its name.
11. Empty the Trash.
12. Open the affected Adobe application. Adobe applications automatically create new clean
copies of the removed font cache files.
NOTE: You can click the Save button in the Search bar to save your search criteria to make it very
easy to perform this search again.

Best Practices Guide
Font Management
in Mac OS X
22
QuarkXPress JAWS Font Cache
QuarkXPress uses the JAWS PDF generation engine to create PDF files from documents. This PDF
creation engine places cache files on your system that can become quite large and cause stability
issues. To prevent and solve these issues, the JAWS folder can be cleaned. QuarkXPress will
automatically regenerate any necessary files.
To clear the JAWS folder:
1. Close all Quark applications.
2. Remove the contents of the following folder based on the version of QuarkXPress installed.
QuarkXPress 7.1, 8 and newer store the cache in each user’s home folder:
~/Library/Preferences/Quark/QuarkXPress7.0/jaws/
~/Library/Preferences/Quark/QuarkXPress8/jaws/
Versions earlier than QuarkXPress 7.1 store the cache in the Application folder:
/Applications/<QuarkXPressfolder>/jaws/ttfont/
3. Start QuarkXPress.
If clearing QuarkXPress’ caches doesn’t address your problem, updating Mac OS X may help.
Mac OS X v10.4.11 (and later) includes an important update that improves compatibility when using
OpenType fonts in QuarkXPress.
Microsoft Office Font Cache
If Microsoft Office documents are not displaying or printing fonts correctly, you may need to
manually clear the Microsoft Office font cache.
To clear the Microsoft Office font cache:
1. Close all Microsoft Office applications.
2. Depending upon your version of Office, remove the following files:
~/Library/Preferences/Microsoft/OfficeFontCache(11)
~/Library/Preferences/Microsoft/Office2008/OfficeFontCache(12)
3. Open the affected Office application.
Apple iWork Font Cache
If one of the applications in Apple’s iWork suite (Pages, Numbers, or Keynote) is crashing after
picking a template or clicking in an editable field, clearing the iWork font cache can help.
To clear the iWork font cache:
1. Close all iWork applications.
2. Move the following file to the Trash:
~/Library/Caches/com.apple.iwork.fonts
3. Open the affected iWork application.

Best Practices Guide
Font Management
in Mac OS X
23
FM-OSXBPG-1010
Extensis
1800 SW First Avenue,
Suite 500
Portland, OR 97201
Toll Free: (800) 796-9798
Phone: (503) 274-2020
Fax: (503) 274-0530
Web:
Celartem, Inc.
Email:
sales_ap@celartem.com
Web:
US Press Contact
Email:
Social Media
Blog:
Forums:
Twitter:
Extensis Europe
Suites 17 & 18, Newton House
Northampton Science Park
Kings Park Road, Moulton Park
Northampton
NN3 6LG
United Kingdom
Phone: +44 (0) 1604 654 270
Fax : +44 (0) 1604 654 268
Email:
info@extensis.co.uk
Customer Service
Web:
http://www.extensis.com/customerservice/
Phone: (800) 796-9798
Technical Support
Web:
http://www.extensis.com/support/
US Phone: (503) 274-7030
Europe Phone: +44 (0) 1604-654-270
Documentation Feedback
Web:
http://www.extensis.com/helpfeedback/
Extensis
Document Outline
- So what’s all the hubbub?
- What can I do about it?
- Conventions Used In This Guide
- Step 1: Organize Your Font Files
- Step 2: Manage Your System Font and Application Font Folders
- Step 3: Clean Up Your Font Library
- Step 4: Add Your Fonts To Your Font Manager
- Step 5: Clean Duplicate Fonts
- Font Locations
- Font Hierarchy
- Font Formats
- File Issues
- Unicode
- Font Cache Issues
- Extensis
Wyszukiwarka
Podobne podstrony:
CARE Best Practices in Polish
Connie Moore Project Management Best Practices In Workflow
best practices
Email Marketing Best Practices
Best practice guide 03
O'Reilly Oracle PL SQL Best Practices
Supply Chain Risk Management practices in automotive industry
USE OF ENGLISH Anne Wil Harzing Language competencies, policies and practices in multinational corp
Best Practices Guide
Ebook Java j2Ee Best Practices For Performance
best practices for cyber security on board ships anssi
The best day in my life(1)
10 17 ADJ practice in pairs
Best Practices for Developing Quality Mobil Apps UTI (2011)
więcej podobnych podstron