
PLAY GUIDE
CONTENTS
Garrison.............................................................................................1
Dark Monks.......................................................................................1
Seriss: The Order Keep ......................................................................2
Solution .............................................................................................3
Basic Quest ..................................................................................3
Seriss: The Keep...........................................................................4
Dark Monks.................................................................................4
Maze ............................................................................................4
Abandoned Outpost ....................................................................6
Aram-Dol’s Lair ............................................................................8
Fiend’s Domain ..........................................................................10
Magic Orbs ................................................................................11
The Silver Seed ..........................................................................11
Other Magic Items .....................................................................11
Magic Items .....................................................................................12
Hot Keys ..........................................................................................12
SERPENT ISLE
P A
R T
T
W
O

Revered Order Hierophant,
It is my pleasure to present to thee the first report
concerning my new duty station. I include a map of the
keep to familiarize thee with Seriss and its particulars.
My arrival has caused some agitation in the garrison —
but I prepared for that. I can assure thee that I have the
situation completely under control. The warriors must
learn to obey my orders and pay me the respect that I
deserve as the Commander of the Order Forces at this
post. In time, they will discover the importance of
Ethicality and Discipline, certis. To the best of my ability
I will instruct them more deeply in the virtues and aid
them with their internal conflicts. It honors me that my
superiors have entrusted me with this position. I am
dedicated to carrying out my orders and will meet all
expectations to perfection — as always.
Yours faithfully,
Isstanar

GARRISON
There are only three Order warriors left in this command. Since most of the labor is
performed by automatons, there is little for the human warriors to do around the
keep. All of them are eager for news about the battle that is raging at the front. Being
the new Commander of this post, I am their only source of information. They gener-
ally stay in their rooms and invent new trivialities to overcome the monotony in
their lives. However, I must admit that they work fairly well together.
Tsandar is now Subcommander of this outpost. My arrival seems to have upset him
and made him jealous. I believe he blames me for his demotion. He often discusses
and praises his former commander, Ardiniss, when I am not around. I anticipate
difficulties with this warrior.
Elissa is the Mage at this outpost, giving her rank equal to that of Tsandar. She con-
siders the benefits of eternal life as an Order Automaton more and more often. I
believe she admires me. Perhaps, in time, she will be worthy to make the ultimate
sacrifice.
Surok is the Healer of the keep. He is much older than his companions and seems
weary of the discipline expected of him. I assume that seeing his friends die over the
last several hard years has made him bitter. He does not seem comfortable around
me, which probably has to do with my appearance. I hope to re-instill a sense of
duty in him soon.
DARK MONKS
Occasionally I overhear conversations between the warriors here in Seriss. They
often mention the names of three sorceresses, members of the Dark Monks — Rieya,
Solaria and Drusilla. From the information available to me at this point, I must
assume that these monks have great power.
They are not fond of the Order Forces; they believe in their own distinct prophecies.
These monks speak some drivel about destroying the “Pawn of Prophecy.” They
believe their victim will arrive here through the powers of the Amulet of Balance. I
don’t know what to make of all their prattle. I don’t think they are talking about our
hero, the Champion of Balance. If he ever arrives here, I will give him the magic Key
Ring as I have been ordered by thee, Calithiss, revered Order Hierophant.
The three monks haven’t caused the keep any trouble so far; therefore, I shall allow
them to remain in this area. Although I don’t trust them under any circumstances, a
treaty has been signed — they may each stay at the entrance of a different dungeon,
as long as they repulse any interlopers seeking that route into Seriss. I haven’t been
here long enough to know them well, but I plan on gathering more material for my
next report to thee.
1
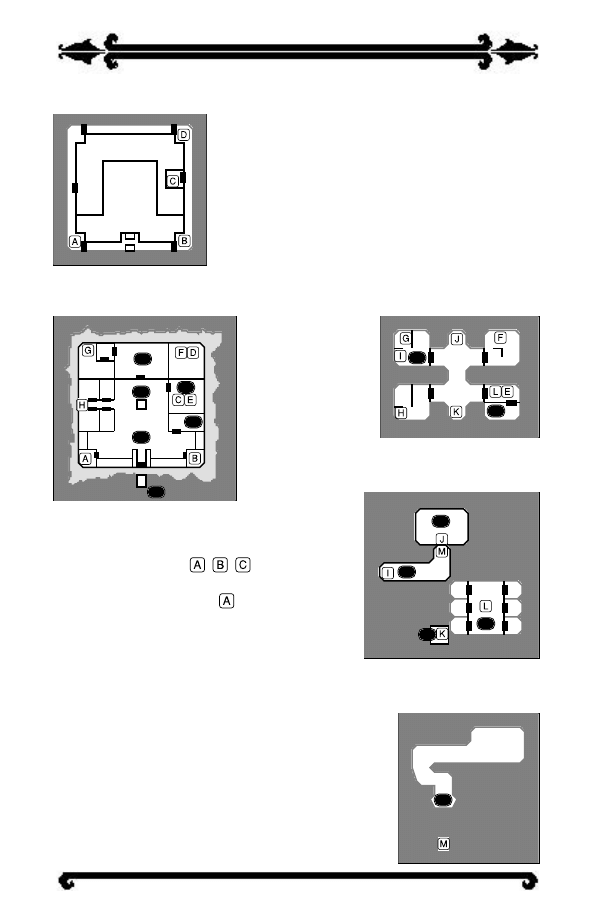
SERISS: THE ORDER KEEP
Note: In this, and in all other maps, letters in
round-cornered boxes (
,
,
and so forth)
indicate the two ends of a stairwell. For exam-
ple, on the map of the keep,
marks a stair-
well that leads from the ground level up to a
corner of the parapet.
Dangerous dungeons surround the keep.
Some were once part of the keep and became
what they are now after being abandoned.
Other dungeons belonged to the Forces of
Chaos. I have heard rumors of gruesome crea-
tures in all of these areas.
1)
Drawbridge
2)
Courtyard
3)
Serpent Gate
4)
Smithy
5)
Barracks
6)
Great Hall
7)
Laboratory
8)
Armory
9)
Library
10) Jail
11) Back path to Aram-
Dol’s lair
12) Path to chasm
13) Chasm with draw-
bridge
2
Parapet
Ground Level
Level 1
Level 2
Level 3
8
9
10
11
12
13
1
2
3
4
5
6
7

SOLUTION
Use the titles to find the section of this walkthrough that you’re looking for. If you
want just a vague, sometimes cryptic hint, read only the bold-face introductory sen-
tence. For full details, read the rest of the section. Material in parentheses at the end
of the section provides interesting information that is not necessary to solve The
Silver Seed.
3
Basic Quest
You must obtain four Magic Orbs to get the Silver Seed and save Serpent Isle
from destruction. (For more information, see Magic Orbs (page 11) and notes
on specific areas in the solution.)
WARNING:
Reading this solution will reveal all
important clues and may spoil the fun
of solving the game on your own.
Read the following only if you need
help to advance in the game!
SERISS: THE KEEP
Find and talk to Isstanar.
Get the magic Key Ring from him. Each passageway out of the keep represents one
quest. Each quest is an opportunity for you to acquire a powerful weapon or a
magic item. The entrances can be found by exploring the city or talking to the war-
riors. Surok the healer will resurrect you, if you are killed during the game. He will
assist you in any way he can.
(Isstanar has switched bodies with an automaton. He demands total obedience
from his subordinates.)
DARK MONKS
Don’t trust everything the Dark Monks tell you.
The three Dark Monks are powerful sorceresses and believe that they must destroy
you after your arrival. They will give you hints at the entrances of the dungeons.
You can only trust Drusilla. You must kill the Dark Monks in the final scene. You
will find a key on each Dark Monk. These keys open the doors leading to the glade
where you must plant the Silver Seed.
(The sorceresses do not get along well.)
MAZE
Cheese, cats and (of course) dead bodies are the crucial points here.
You can trust Drusilla and her information. She is the only Dark Monk who doesn’t
lie to you. Your companions refuse to enter the maze, and when you enter, every-
thing in your inventory disappears until you leave again. You
can find cheese on a dead body within the maze. Find the
Chaos “monster” Yurel. He has the Purple Orb and will
trade it for cheese. The Helm of Light is on Issik’s body.
You will be able to reclaim your inventory once you have
exited the maze.
(This place was originally designed as a storehouse
for the treasures of Order.)
4
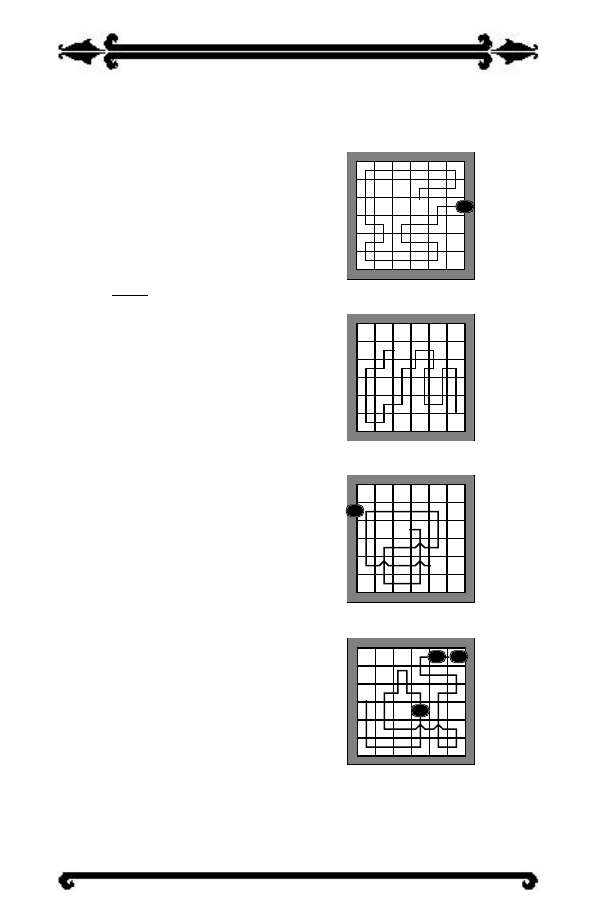
M a z e
1 )
E n t r a n c e
2 )
Dead body
3 )
Yurel’s chamber
4 )
Issik, the dead architect
5 )
E x i t
T 1 - 6 )Teleport pads
5
Maze 1
Maze 2
Maze 4
Maze 3
1
2
3
4
T6
T5
T4
T2
T3
T1
5
ABANDONED OUTPOST
Explore the area and search dead bodies for useful items.
Don’t give up if you can’t
open some of the doors — if
they’re illusionary, you can
just walk through them.
The forcewalls at (5) can
be removed by pressing three
buttons in this order: upper
right, upper left, lower left (ori-
ented according to the map).
Check the bodies for
useful supplies of all sorts.
Place the lightning whip on
the platform at (7) to get
down the stairs. Once you
get down stairwell
, go
through the doorway, kill the
animated armour, then press
the plates in the alcoves in
reverse order: third, second,
first. (The plates must be in
their original positions before
the trap is disarmed: the first
one up, the second down and
the third up.) This dispels the
sleep fields (9) leading to the
Red Orb.
In the torture chamber
(8), find a secret passage (in
the iron maiden) and a
6
Level 1
Level 3
Level 2
8
9
10
11
1
2
3
4
5
6
7
∴
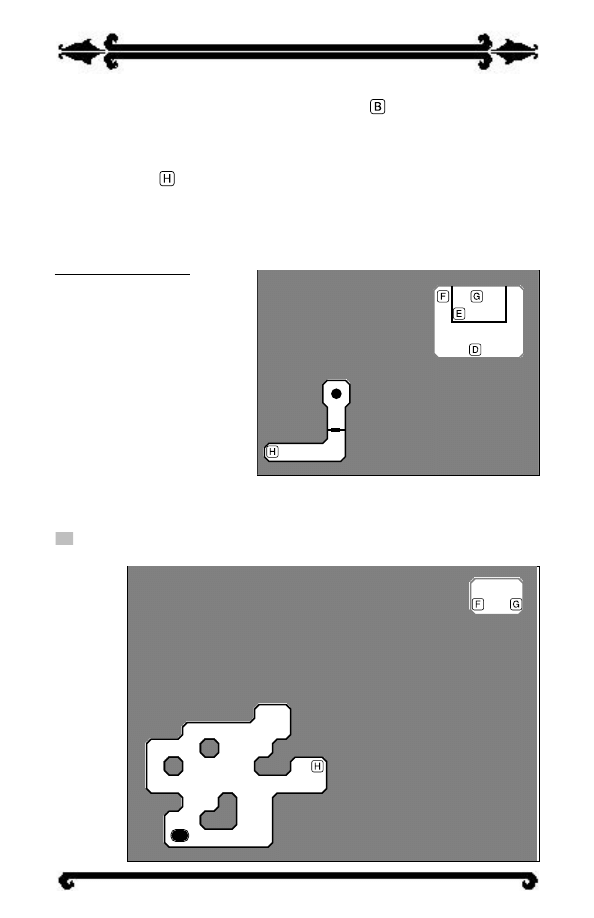
magic scroll (in the left-hand cell). The secret passage leads to several powderkegs,
which will prove useful in clearing the way to stairwell
. Reading the magic scroll
outside the forcewalls at the bottom of the well destroys them.
A coil of rope is on the body at (10). Use the rope on the brass well to lower
yourself all the way down, recite the magic scroll (8) by the forcewalls, then climb
down the stairs at
. Defeat the ice elementals and retrieve the Belt of Strength
from near the treasure pile.
(Loriel made this belt for her husband, out of woven hair from Giants, and
enchanted it to give the bearer great strength.)
Abandoned Outpost
1)
Entrance
2)
Lever to open secret door (3)
3)
Secret door
4)
Brass well
5)
Force walls and buttons
6)
Dead bodies
7)
Stairs to fourth level
8)
Torture chamber
9)
Sleep fields
10) Red Orb
11) Dead body
12) Treasure pile
∴
Rubble blocking path
Illusionary wall
7
Level 5
Level 4
12
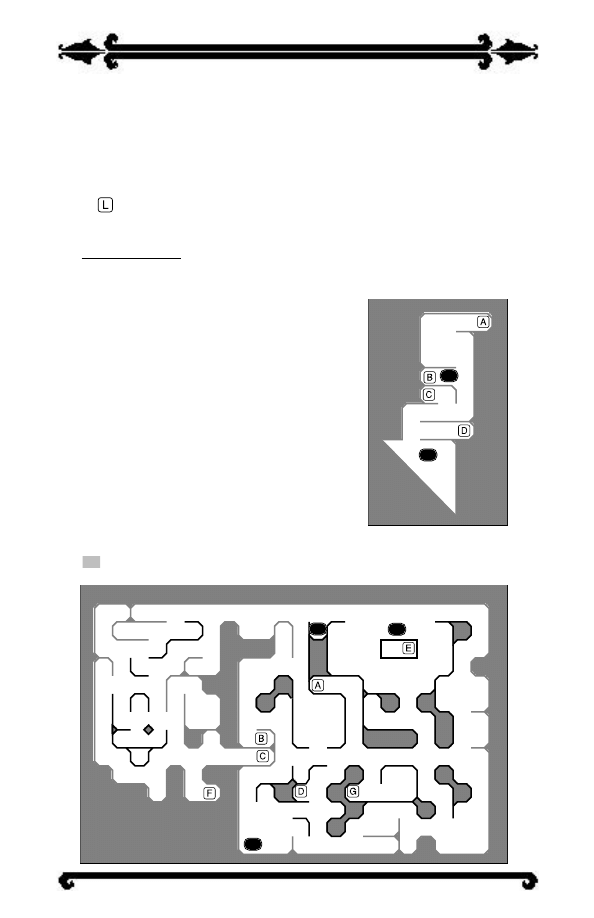
ARAM-DOL’S LAIR
Be prepared to fight a lot. Look out for illusionary walls and passageways, and
read the plaques carefully. Solve the lever puzzles to proceed.
It isn’t necessary to kill Draxinar (the dragon). In fact, it is much better not to.
Draxinar tells riddles and gives information.
After teleporting to (6), the key hidden behind a pedestal can unlock the door
to stair
. This stair leads down to a lever that you must pull to open the secret
door at (9). (However, this secret door hides nothing useful.)
Aram-Dol’s Lair
1)
Entrance
2)
Stairs to Draxinar’s lair
3)
Draxinar’s lair
4)
Main cavern of the Arachnians
5)
Teleporter to (6)
6)
Teleporter from (5)
7)
Lever rooms
8)
Crypts
9)
Looping passages
10) Skeletal dragon
11) Hallway
12) Aram-Dol’s room
13) Treasure room
14) Back path to the Keep
∴
Rubble blocking path
Illusionary wall
8
Level 1
Level 2
14
1
2
3
4
∴
∴
∴
∴

There are several rooms in a row with levers that you must traverse (7). The
first room bears the runic legend: “Guess right or die!” For the first set of three
levers (“Throw two down”), pull only the second lever. At the next set of five levers
(“three will get you eight”), pull levers 1, 2 and 5. At the third set of seven levers
(“throw four to get twelve”), pull levers 1, 2, 3 and 6.
Along the hallway (11), you must pull the switch in each room. After pulling all
ten switches, you must pull the brass lever and the door at the end of the hallway
will be unlocked.
Destroy Aram-Dol. Use the key off his dead body to unlock the nearby treasure
room. The Gloves of Karas the Quick, Erinon’s Axe and the Blue Orb are in that room.
9
Level 3
Level 5
Level 4
8
9
10
11
12
13
5
6
7
K
O
L
M
N
N
M
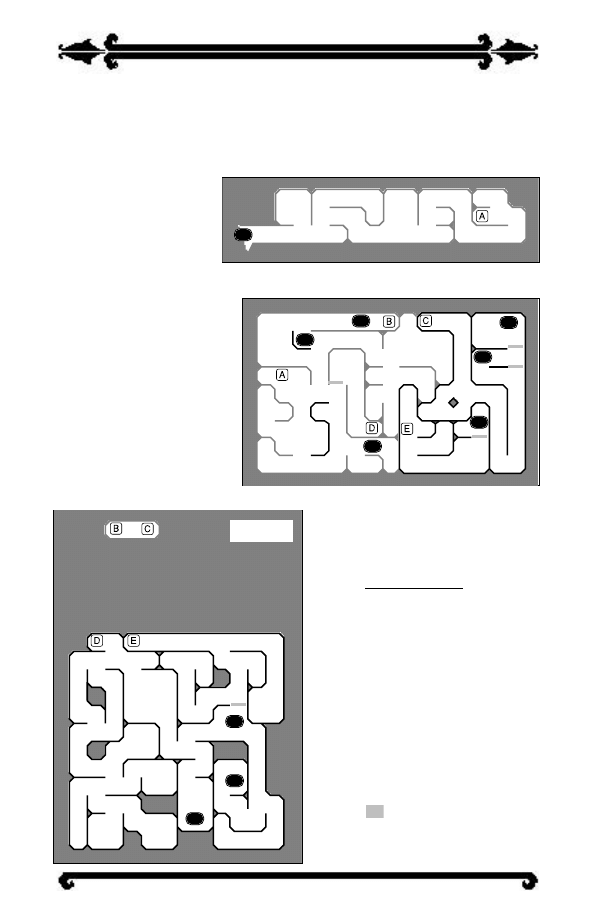
FIEND’S DOMAIN
All is not as it seems in this dungeon. Do not trust the Fiend.
Whatever the Fiend says, it is only in his own interest. The Ring of Shal and the
Golden Orb are hidden here. It’s possible to avoid the buzzsaws (2), but not easy.
Avoid the shortcut (3). It
looks attractive, but is full
of sleep fields. The chests
found in this dungeon are
usually empty, but they
can be of aid because they
explode. Use them against
the Cyclops, for example.
Some passageways may
seem impossible to cross.
Pay attention to your sur-
roundings. Keep an eye
out for illusionary walls.
The shooter traps (9)
won’t harm you if you just
keep walking.
(The true identity of
the Fiend is not hard to
figure out — it is Shal.)
Fiend’s Domain
1)
Entrance
2)
Buzzsaw hallway
3)
Shortcut (dangerous)
4)
Exploding chests
5)
Impassable hallway
6)
Ring of Shal
(under debris)
7)
Fiend’s room
8)
Gazers
9)
Shooter traps
10) Golden Orb
Illusionary wall
10
Level 1
Level 2
Level 3
8
9
10
1
2
3
4
5
6
7

MAGIC ORBS
You must obtain four Magic Orbs during the game to get the Silver Seed and
save Serpent Isle from destruction.
The Orbs have different colors: red, blue, purple and gold. Each dungeon contains
one Orb. The Purple Orb is in the Maze. Aram-Dol’s lair contains the Blue Orb. You
can find the Red Orb in the Abandoned Outpost of the keep, and the Golden Orb in
the Fiend’s Domain.
THE SILVER SEED
Get all other magic items first. Use the Orbs to unlock the vault.
You need the four Magic Orbs to get the Silver Seed. Find the vault with the Silver
Seed under the Keep (down the lab stairs under the wine cask (
) to (13); the wine
cask can be moved by pressing the button behind a candlestick at
). Put an Orb
on each of the pedestals to unlock the vault. Get the Silver Seed. Fight the Dark
Monks when they appear. Get the keys off of the bodies of the Dark Monks. Open
the locked door across from the Silver Seed and enter the tunnels leading up from
the Order Keep. You arrive in a glade. The monk Karnax appears, to help you. Plant
the Silver Seed here and watch the Tree of Balance grow. You can leave via the tun-
nel leading back to the Order Keep.
OTHER MAGIC ITEMS
See back cover for how to use each of these items.
Key Ring. Isstanar gives you the Key Ring after you talk to him.
Gloves of Karas the Quick and Erinon’s Axe. These are very powerful and it
won’t be easy to get them. You can obtain them in Aram-Dol’s treasure room.
Loriel’s Gift — The Belt of Strength. This belt can be found at (12) in the
Abandoned Outpost.
Helm of Light. The helm is on the dead architect, in the fourth sector of the Maze.
Ring of Shal. The ring is hidden under a pile of debris, at (6) in the Fiend’s Domain.
ORIGIN Systems, Inc. LIMITED 90 DAY WARRANTY.
ORIGIN warrants to the original purchaser of this computer software product that the recording medium on which the software programs are recorded
will be free from defects in material and workmanship for 90 days from the date of purchase.
If the recording medium is found defective within 90 days of original purchase, ORIGIN agrees to replace, free of charge, any such product upon
receipt at its Factory Service Center of the produce, postage paid, with proof of date of purchase. This warranty is limited to the recording medium con-
taining the software program originally provided by ORIGIN. This warranty shall not be applicable and shall be void if the defect has arisen through
abuse, mistreatment or neglect. Any implied warranties applicable to this product are limited to the 90-day period described above. If failure of the soft-
ware product, in the judgment of ORIGIN, resulted from accident, abuse, mistreatment of neglect, or if the recording medium should fail after the origi-
nal 90-day warranty period has expired, you may return the software program to ORIGIN, at the address noted below, with a check or money order for
$5.00 (U.S. currency), which includes postage and handling, and ORIGIN will mail a replacement to you. To receive a replacement, you should enclose
the defective medium (including the original product label) in protective packaging accompanied by: (1) a $5.00 check (2) a brief statement describing
the defect and (3) your return address. Canada and Foreign Orders Note: Only U.S. money orders are accepted.
Except as set forth above, this warranty is in lieu of all other warranties, whether oral or written, express or implied, including any warrant of
merchantability or fitness for a particular purpose, and no other representation of claims of any nature shall be binding on or obligate ORIGIN. In no
event will ORIGIN be liable for special, incidental or consequential damage resulting from possession, use or malfunction of this product, including dam-
age to property and to the extent permitted by law, damages for personal injury, even if ORIGIN has been advised of the possibility for such damages.
Some states do not allow limitations on how long an implied warranty lasts and/or the exclusion or limitation of incidental or consequential damages, so
the above limitation and/or exclusion or limitation of liability may not apply to you. This warranty gives you specific legal rights. You may have other
rights that vary from state to state.
11

Magic Items
Here is a short description of all new magic items in The Silver Seed. You can acquire these pow-
erful aids by solving the quests. Refer to the solution (pp. 6-15) if you need help finding them.
Key Ring. Every key you add to your inventory while you have this key ring automatically
attaches itself to the key ring. (You can also Use a key on the key ring to add it to the ring.) The
key disappears, and there is no more searching for the appropriate key in your inventory. Don’t
lose it; it will be gone forever, along with any keys that are on it. See Hot Keys (below) for how
to Use the key ring.
Helm of Light. This helm serves as a permanent light source — you don’t have to carry a lit
torch while wearing it. Your hands will be free to carry weapons and shields. It has a Defense
Value of 4, and keeps you warm like a fur helm. Wear it as you would wear a normal helm.
Belt of Strength. This belt increases your strength by ten points. Wear it as your regular belt.
(Make sure that the belt slot is open before you try to put it on.)
Ring of Shal. This ring supplies you with unlimited reagents to cast spells. Slip it on your fin-
ger like a normal ring, and you no longer need to collect reagents. It cannot help anyone else.
Gloves of Karas the Quick. These gloves increase your dexterity by ten points. They have the
same Defense Value as magic gauntlets (3). Make sure that you aren’t wearing any other gloves
or gauntlets before you try to put them on.
Erinon’s Axe. This powerful weapon increases your combat ability by ten points. Its Damage is
20 and it has a Reach of 4. (It can not be thrown.) The axe automatically equips to your right
hand if you are not holding anything else in that hand.
Orbs. The orbs have no use beyond the Silver Seed quest.
Silver Seed. You must plant the Silver Seed at a hallowed site. It is the seed for the magic Tree
of Balance. This tree can save Serpent Isle from destruction.
Hot Keys
The Silver Seed provides you with several new hot keys, usable both in this module and while play-
ing the rest of Serpent Isle. Several recurring procedures needed to play your game are now a mat-
ter of a single keystroke. Note that Serpent Isle keystrokes and all other functions remain the same.
Checking the Time. If you have a pocket watch, you can always find out what time it is by
pressing
on your keyboard.
Feeding Yourself and Your Party. To feed yourself and/or your party members, press
and
click on the hungry person with your mouse. This function will feed that party member until
he or she is full. (This assumes that someone in your party is currently carrying food.
doesn’t create food, it just quickly distributes any food that is available.)
Using Keys. If you have the magic key ring, you don’t have to search through your keys any
more. Press
and cross-hairs appear. Click the cross-hairs on a locked item and — if you
have the right key — the item opens. (Once you add a key to this ring, you can not remove it
again, but don’t worry; there will be no reason to.) Magically locked doors still require a spell.
Picking Locks. If you have a set of lock picks in your inventory, press
anytime you want to
attempt to pick a lock.
12

NOTE
This manual and the software described in it are copyrighted, with all
rights reserved. Under the copyright laws, this manual or the software may
not be copied, in whole or part, without written consent of Electronic
Arts, except in the normal use of the software or to make a backup copy
of the software. The same proprietary and copyright notices must be
affixed to any permitted copies as were affixed to the original. This excep-
tion does not allow copies to be made for others, whether or not sold, but
all of the material purchased (with all backup copies) may be sold, given,
or loaned to another person. Under the law, copying includes translating
into another language or format.
You may use the software on any computer owned by you, but extra
copies cannot be made for this purpose.
Document Outline
Wyszukiwarka
Podobne podstrony:
101 ielts speaking part two tasks about the past present and future
Ultima VII The Forge of Virtue
Pink Floyd Another Brick in the Wall Part Two
9 Ask?out the underlined part of the sentence
The History of Great Britain - Chapter Two - The Middle Ages (dictionary), filologia angielska, The
podstawy teorii part two bzz v1 07 02 06
7 Ask?out the underlined part of the sentence
20091002 02?ghans turn over weapons and armament?ches as part of the SRP
SD2000 schematic Part two
101 ielts speaking part two tasks about sports and hobbies
Curtis Klause Anette The Silver Kiss (całość)
Joel Rosenberg KOTHW 02 The Silver Stone
The Harlot Seed
terry pratchett podcast part two
Woziwoda, Beata; Kopeć, Dominik Changes in the silver fir forest vegetation 50 years after cessatio
Book Two The Blackmailed Mother
high part of the road
Edgar Rice Burroughs New Tarzan 01 Tarzan and the Silver Globe # Barton Werper
Amanda Grange The Silverton Scandal
więcej podobnych podstron