1
Woodsmith
© 2002 August Home Publishing Company
CROSS-
CUT
BLADE
RIP
BLADE
A STEP WILL
KEEP PANEL
FROM FULLY
SEATING
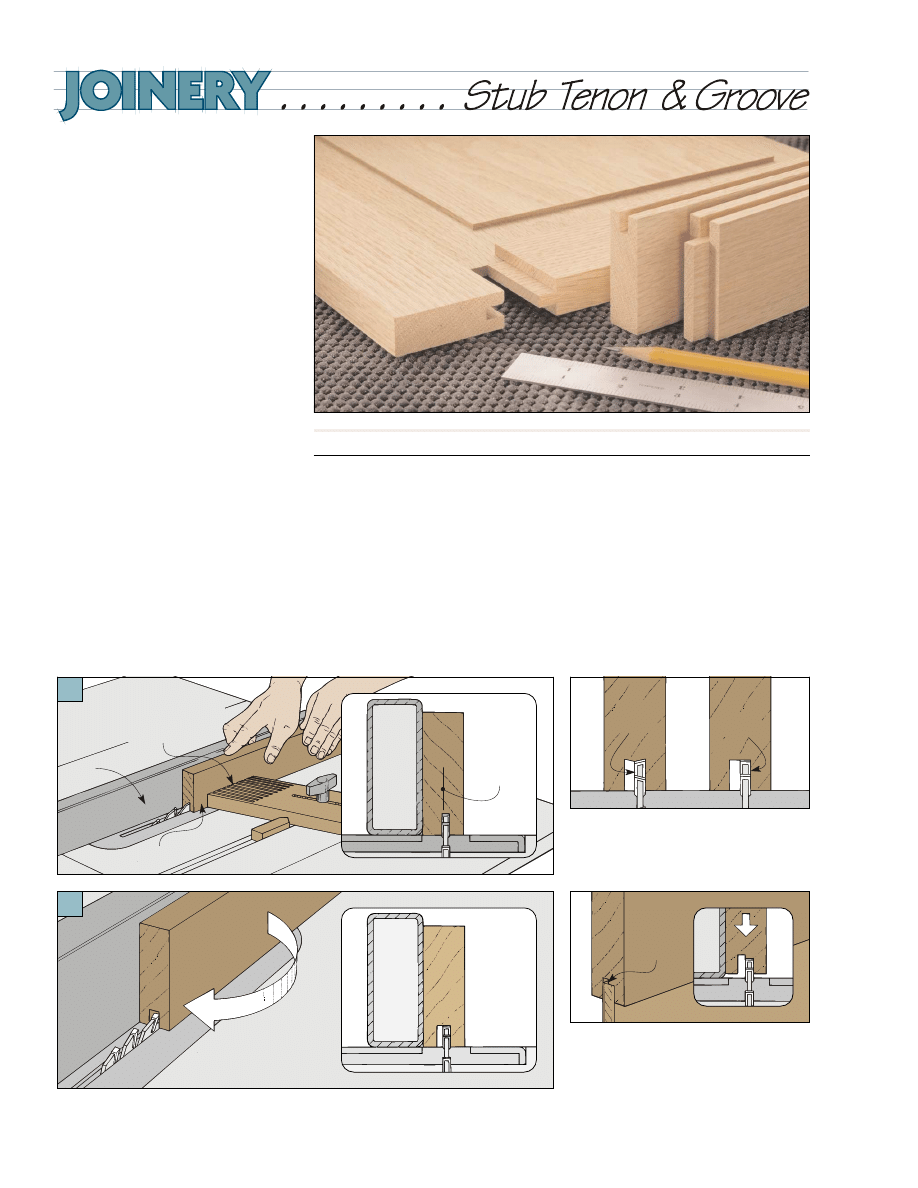
T
he stub tenon and groove joint is
quick and easy to cut. And the entire
joint can be made on the table saw.
It’s made by first cutting a groove on
one edge of each stile (the vertical
pieces) and rail (the horizontal pieces).
These grooves hold a center panel and
short, “stub” tenons cut on the ends of
just the rails.
The depth of the groove (and the
length of the tenon) can vary depending
on the type of panel you plan on using. A
1
/
4
"-deep groove works fine with a ply-
wood panel. But if the panel is solid
wood, you should use a
3
/
8
"-deep
groove. Why the difference?
It has to do with how the frame is
assembled. I glue a plywood panel into
the groove so it becomes a part of the
joint. That way I can get away with a
shorter tenon. But a solid panel can’t be
glued. It has to “float” to allow for wood
movement. So deeper grooves (and
longer tenons) increase the gluing area.
But there’s more to consider than
just the depth of the grooves. The
grooves and tenons should also be cen-
tered on the thickness of the work-
pieces. And the workpieces should all
be the same thickness. This way, there
will only be two setups: one for the
grooves, and another for the tenons.
The first step is to cut the grooves cen-
tered on the frame pieces.
When cutting a groove for a solid
panel, I usually make its width
1
/
3
the
thickness of the stock. For example: a
1
/
4
"-wide groove in
3
/
4
"-thick stock. But
for a plywood panel, I cut the groove to
match the thickness of the plywood.
Cutting the groove so it’s centered
on the edge of a frame piece is easy.
Simply adjust the rip fence on your table
saw so the blade cuts close to the center
(Fig. 1). You don’t need it to be perfect
— here’s why.
After making your first pass, just flip
the board end-for-end and make a
second cut (Fig. 2). Now even if your
blade isn’t centered, the groove will be.
To adjust the width of the groove,
nudge the rip fence and make another
cut. Remember, you’re cutting stock
from both sides of the workpiece. So
make small adjustments and sneak up
on the final width of the groove.
Blade Choices. A rip blade is a good
choice for cutting the grooves in the
rails and stiles. The flat-topped teeth
produce a flat-bottomed groove.
Downward Pressure. Hold the work-
piece firmly against the table as you
make the cut to prevent a “stepped”
bottom in the groove.
a.
A FEATHERBOARD KEEPS
THE WORKPIECE TIGHT
AGAINST FENCE
RIP
FENCE
WORKPIECE
1
RIP FENCE
AFTER FIRST PASS,
FLIP WORKPIECE
END-FOR-END
2
FENCE
FIRST PASS
SHOULD CUT
CLOSE TO
CENTERLINE
a.
FENCE
SECOND PASS
CENTERS
GROOVE ON
WORKPIECE
a.
GROOVES
2
Woodsmith
© 2002 August Home Publishing Company
NOTE:
AVOID EXCESS GLUE
TO REDUCE
SQUEEZE-OUT
RAIL
STILE
TENON
CHEEK
INSTALL BRAD FROM
BACKSIDE OF FRAME
SOLID PANEL
RAIL
RAIL
PLYWOOD PANEL
GLUE PLYWOOD
PANEL IN FRAME
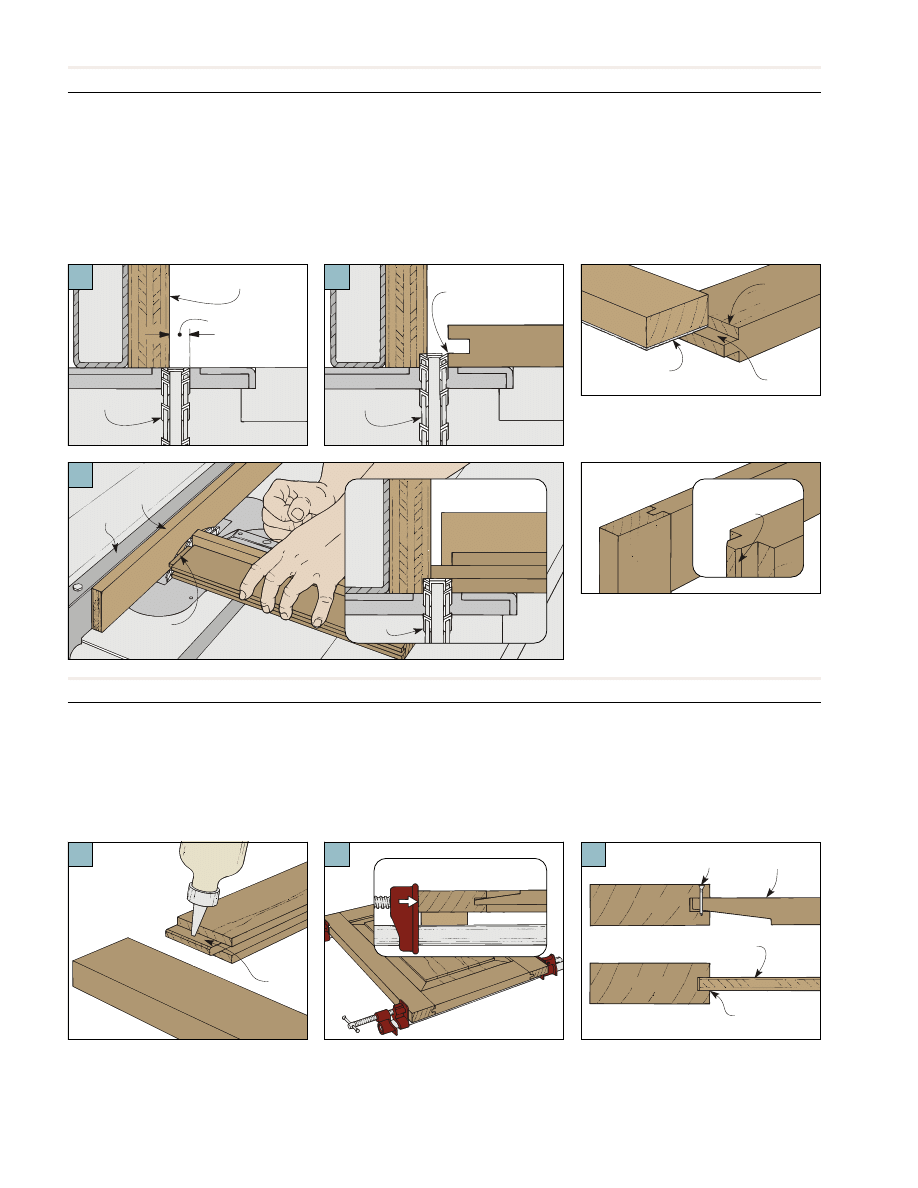
Once the grooves are complete, the
second step is to cut tenons on the ends
of the rails. A single blade will work. But
it takes several passes to remove the
waste. And it leaves small ridges that
make fitting the tenon difficult.
That’s why I like using a dado blade.
It cuts each side of the tenon cleanly
and it does it in a single pass.
STUB TENONS
To use a dado blade, first bury it in
an auxiliary fence (Fig. 3). Then adjust
the fence to set the length of the tenon.
Now set the height of the blade to
establish the thickness of the tenon. A
quick way to get close is to set the blade
flush with the bottom edge of the
groove on a stile (Fig. 4).
To center the tenon on the work-
frame has been assembled.
To assemble a frame with a solid
panel, apply a thin bead of glue on each
tenon cheek only (Fig. 6). Then clamp
the pieces together (Fig. 7). A spacer
under the door will keep clamping pres-
sure centered on the frame.
It’s a good idea to dr y-assemble the
stiles, rails, and center panel to make
sure everything fits together tight.
Now is also a good time to sand the
face of the center panel and the inside
edges of the stiles and rails. These
areas can be difficult to sand once the
ASSEMBLY
One brad driven in the top rail will
keep a solid panel centered. Plywood
panels can be glued in place (Fig. 8).
Finally, check that the frame is flat
and square. If the assembly isn’t flat, try
loosening the clamps a little. If it isn’t
square, try repositioning the clamps.
piece, equal amounts are cut from each
side of the rail (Figs. 5 and 5a). Make
your cuts on a test piece first, then
check for a snug fit in the groove.
If needed, adjust the height of the
blade a little and make another practice
cut. When the tenon fits tight in the
groove, you’re ready to cut all the
tenons on the rail pieces.
SANDPAPER
ATTACHED TO
ONE SIDE ONLY
TENON
SHOULDER
TENON
CHEEK
CHAMFER ENDS
OF TENON FOR
EASY FIT
Sand the Cheek. Sand the tenon cheek
to get a snug fit in the groove. Stay clear
of the shoulder to keep it sharp.
Chamfer Tenon. Small chamfers on the
ends make it easier to fit a tenon into a
groove during assembly. It also provides
some space for excess glue.
Gluing Up. A thin bead of glue spread
evenly on each cheek of the tenon is all
that’s needed when gluing up the joint.
Clamping Pressure. Putting a spacer
under the workpiece aligns the joint
with the clamp jaw for even pressure.
Securing Panel. A solid panel floats in
the frame. Use a brad to keep it cen-
tered. A plywood panel can be glued in.
CHAMFER
TENON
a.
SPACER CENTERS CLAMPING
PRESSURE ON JOINT
SPACER
a.
FENCE
AUXILIARY FENCE
LENGTH OF TENON
DADO BLADE
3
SET DADO BLADE
HEIGHT TO BOTTOM
EDGE OF GROOVE
STILE
DADO BLADE
4
REMOVE
STOCK FROM
BOTH FACES
RIP FENCE
RAIL
AUXILIARY
FENCE
5
SECOND PASS
FINISHES TENON
BACK-UP BOARD
RAIL
DADO BLADE
a.
6
7
8
Wyszukiwarka
Podobne podstrony:
Bass Guitar Lessons Beginning Bass Guitar Exercises And Grooves
grips linear fills and grooves
Groove XR OS53 Operating System Installation and Upgrade Guide 31 Oct 2011
Postmodernity and Postmodernism ppt May 2014(3)
Scoliosis and Kyphosis
L 3 Complex functions and Polynomials
4 Plant Structure, Growth and Development, before ppt
Osteoporosis ľ diagnosis and treatment
05 DFC 4 1 Sequence and Interation of Key QMS Processes Rev 3 1 03
Literature and Religion
lec6a Geometric and Brightness Image Interpolation 17
Historia gry Heroes of Might and Magic
Content Based, Task based, and Participatory Approaches
Lecture10 Medieval women and private sphere
A Behavioral Genetic Study of the Overlap Between Personality and Parenting
Hine P Knack and Back Chaos
Financial Institutions and Econ Nieznany
93 1343 1362 Tool Failures Causes and Prevention
więcej podobnych podstron