Dog House
A roof over the head of that four
legged family friend is often neglected.
Sun, rain, wind and snow can make
their life uncomfortable. But here is a
design for a simple A-Frame
shelter which is easy to put
together and could be
adapted for all sizes of dogs.
While the method of building this kennel is suitable
for all sizes, the measurements given would be
satisfactory only for a medium sized dog about 400
mm high.
If you wish to adjust the size to suit your dog,
remember that the dog should not only be able to
stand upright inside the hennel but should also be
able to turn around before he/she curls up and lies
down.
TOOLS YOU WILL
NEED
MATERIALS YOU WILL NEED
• Hammer
• Saws
• Measuring
tape/rule
• Carpenter's
square and
pencil
• Adjustable
spanner
• Drill and bits
• 60o/30o set
square
TIMBER (For example only)
75 x 50mm, 6 pieces 1.2m* for two A-
Frames (use durable timber)
75 x 25mm, Decking, or equivalents, 16
pieces
1.2m* (for flooring)
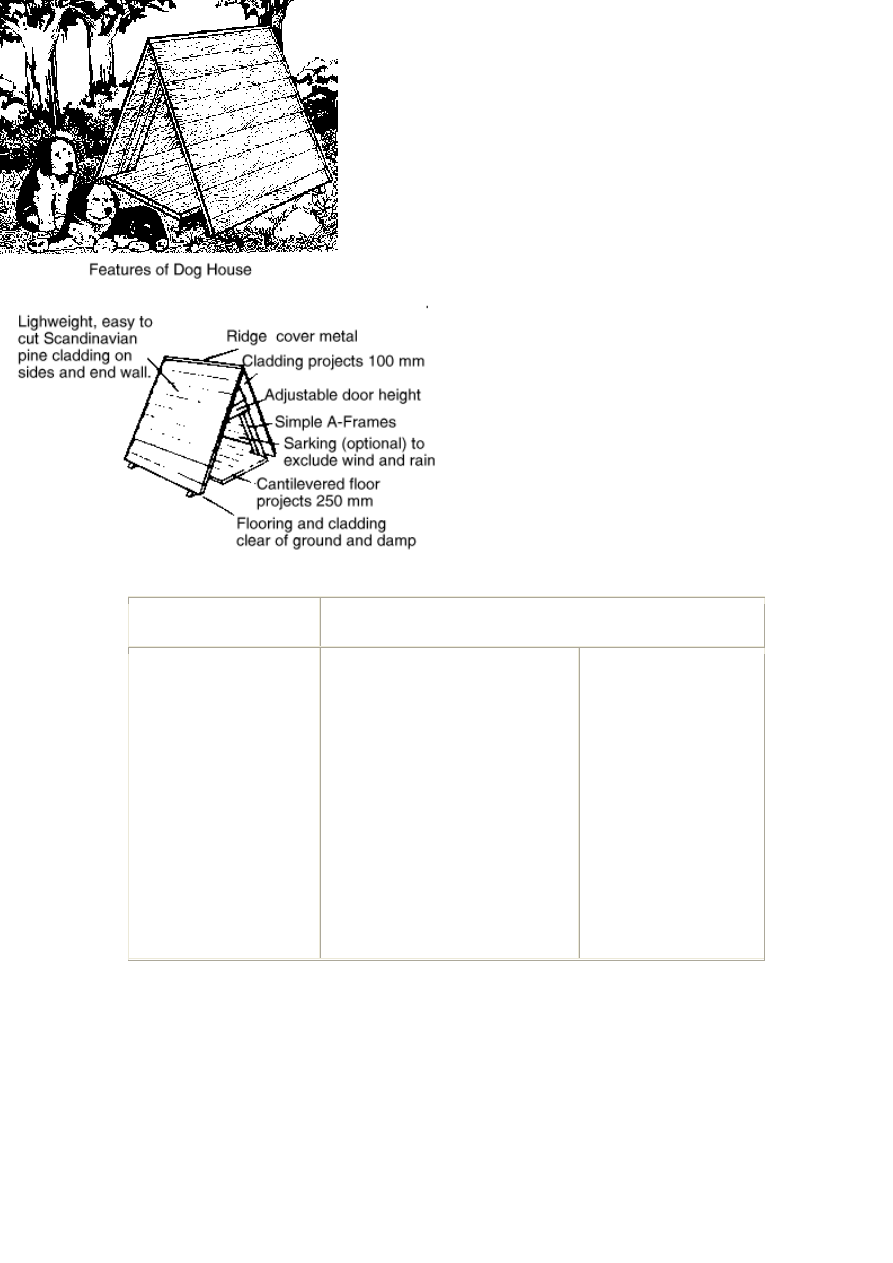
Scandinavian Pine Cladding
lengths (22 lengths should be sufficient for
overall height of wall/roof and the end
walls).
*
Consult your TABMA merchant for
suitable available materials and how these
can be ordered.
HARDWARE
4/125 x 9mm Galvanise cup
head bolts, nuts, washers.
100/50 x 2.8mm Galvanised
flat head nails.
75 x 75mm x 1.2m length of
zincalume angle as ridge
capping OR
1.2m length of aluminium
dampcourse.
12/12 x 3.2m Galvanised
round head, metal thread,
screws.
Features of the Dog House
CUT A-FRAME PIECES
From the 1.2m lengths of 75 x 50mm timber, cut four A-Frame legs (A) to this
pattern using the 60o/30o set square to mark the angles shown.
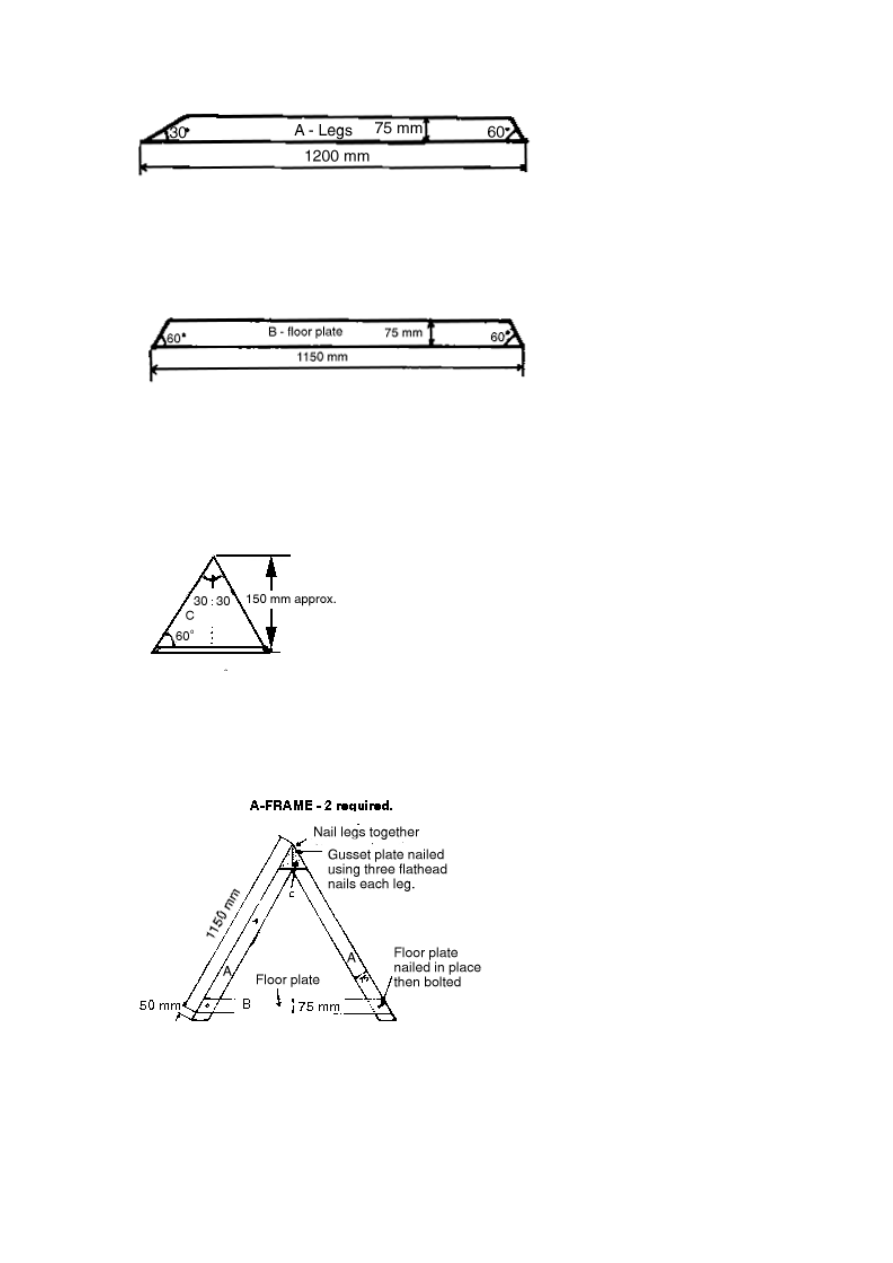
CUT FLOOR PLATE
From the remaining two lengths of 75 x 50mm pieces, cut two floor plates (B) to
pattern below, using the 60o/30o set square to mark the angles shown.
CUT TWO GUSSET PLATES
From a piece of Scandinavian Pine or other flat sheet material cut two gusset
plates (C) to the pattern below using the 60o/30o set square to mark the angles
shown.
ASSEMBLE A-FRAMES
Using two of the legs (A) cut in (1), and a floor (B) as in (2) and gusset plates
(C), assemble and fix components to make two A-Frames as in sketch below.
CUT FLOORING
From the flooring material cut two short boards for side pieces each 900mm long.
Cut two boards approx. 950mm cut remaining floor boards to 1200mm length
sufficient to cover the floor plate, allowing boards to be fixed closely together.
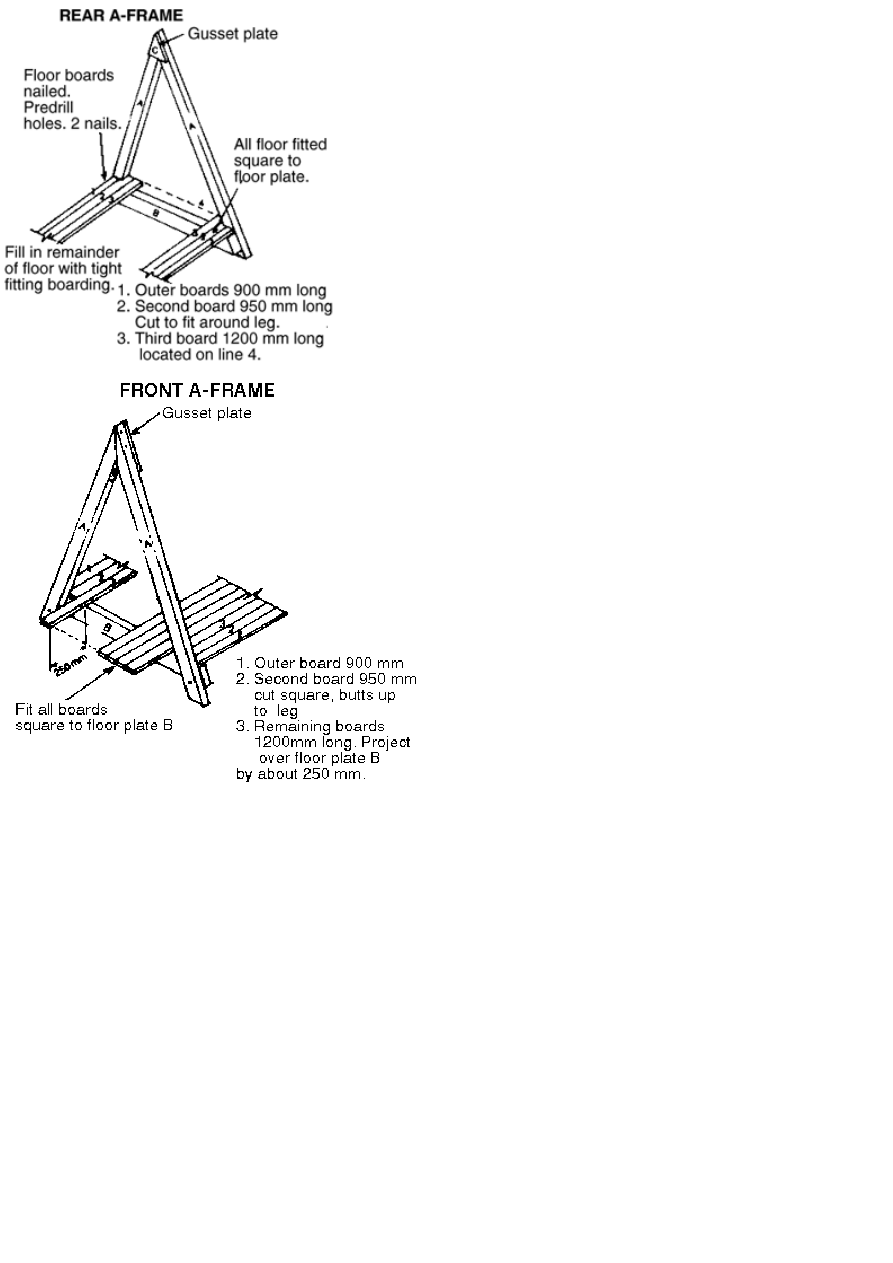
FIX FLOORING
(a) Select one of the assembled A-Frames an fix flooring square to floor
as shown in plan diagram using two nails at each board - pre-drilling nail
holes at end of board.
FIX FLOORING
(b) To the remaining A-Frame fix the floor boards to the floor plate as shown in diagram, similarly pre-drilling
nail holes at end of boards.
CUT AND FIX SIDE CLADDING
(I) Cut lengths of cladding to 1200mm lengths. Commencing with top of (A)
temporarily fix one board square to (A) legs allowing projection of approx.
100mm both front and back beyond A-Frame. Use two nails on each end of the
cladding piece (Note: spacing at top between frames should be exactly the same
as that at flooring level i.e. 900mm).
Sarking of building paper/heavy polythene is suggested. Fix this to
open side by stapling or light tacking with cut tacks or similar. Then
permanently fix a top cladding piece to this covered side, using two
nails each leg. To complete this sarked side, continue fixing cladding
sufficient to cover exposed ends of floor plates (B).
Remove temporary top cladding piece and fix sarking to second s
Fix cladding to second side, as in (II) above.
ide.
(Note: Allow sarking to slightly sag between frames and extend well over the edges of the outer floor boards).
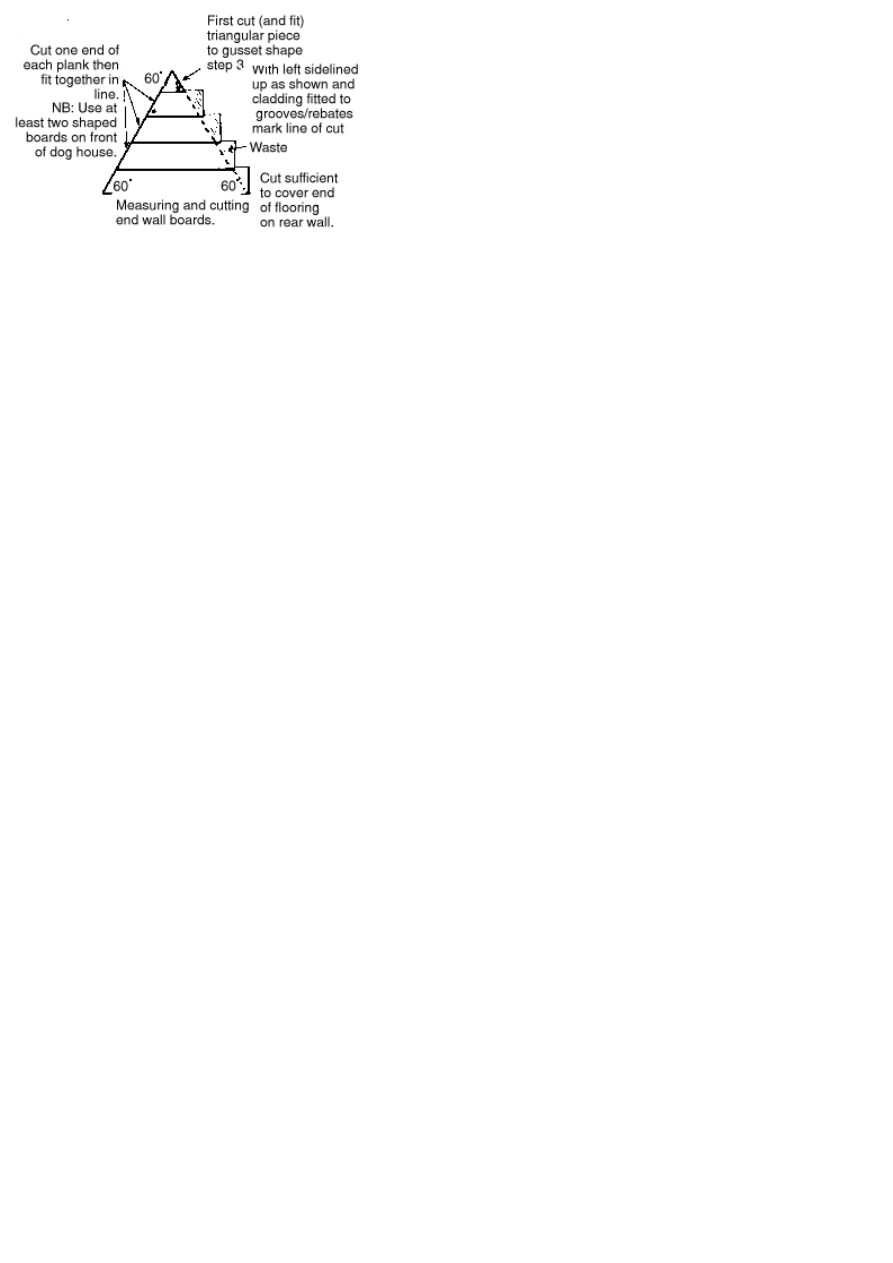
CUT AND FIX END CLADDING
Cut first piece of end cladding to shape given for gusset plate (Step 3). Then continue cutting cladding pieces
as required in diagram (See Step 10).
FIX FRONT CLADDING
Fix at least two pieces of angle cut cladding to front of structure. This could be
increased so as to reduce height of door, depending on size of dog.
FIX REAR CLADDING
Loosely fix shaped piece of selected sarking to outside end frame, so as to drape
outside edges of flooring. Commencing with topmost piece, cut and nail fix
sufficient cladding to cover exposed ends of decking floor. Allow clearance
between end cladding and ground line of at least 50mm.
CUT OFF, SAND OR SMOOTH
Cut off, sand or smooth to common line the exposed ends of cladding, similarly
round off and smooth projecting floor boards.
PRIME COAT DOG KENNEL
Apply recommended prime coat(s) of selected coating system to exposed timbers
including under flooring.
CUT AND FIX RIDGE CAPPING
Cut 1200mm length of selected ridge capping. Fix to ridge using zinc plated,
round head, self tapping metal thread screws in pre-drilled holes. Prime coat
ridge capping.
COMPLETE PAINTING
Apply final coats of selected paint/stain finish and allow several days to
thoroughly dry and all odours to evaporate before introducing dog to new
residence.
LOCATING DOG KENNEL

Locate dog kennel so that the doorway is protected from the worst of the
rainy/windy weather. Place legs so that the floor would slightly slope own towards
the doorway. We suggest you put legs on bricks rather than on grass or soil.
OTHER SIZE DOG KENNELS
The size of the dog kennel can be increased to fit your dog by using longer legs to
the A-Frame and longer floor plates. However retain the angles of 60o/30o where
indicated on frames and on the end cladding.
Document Outline
- Dog House
- Features of the Dog House
- CUT A-FRAME PIECES
- CUT FLOOR PLATE
- CUT TWO GUSSET PLATES
- ASSEMBLE A-FRAMES
- CUT FLOORING
- FIX FLOORING
- FIX FLOORING
- CUT AND FIX SIDE CLADDING
- CUT AND FIX END CLADDING
- FIX FRONT CLADDING
- FIX REAR CLADDING
- CUT OFF, SAND OR SMOOTH
- PRIME COAT DOG KENNEL
- CUT AND FIX RIDGE CAPPING
- COMPLETE PAINTING
- LOCATING DOG KENNEL
- OTHER SIZE DOG KENNELS
- Features of the Dog House
Wyszukiwarka
Podobne podstrony:
Dog House Dog House with Coverd Porch
Dog House Project Plan
AMERICAN BASIC DOG HOUSE
Playhouse A Frame Shelter on Posts
Jacqueline Pearce Dog House Blues (retail) (pdf)
AMERICAN BASIC DOG HOUSE
Cold Frame Seedling Shelter Plans
Wykład12 Sieć z protokołem X 25 i Frame Relay
Wykład10a Sieć z protokołem X 25 i Frame Relay
3E D&D Adventure 06 House of Harpies
Nokia Image Frame SU 7 PL Manual
Dog eat dog-RockyTAB, piosenki chwyty teksty
Dolls house 2
16 Dom Wschodzącego Słońca [The House Of Rising Sun]
house list word impr, ANG
2 bedroom two storey house T shaped
czytanie koło II Man?out the House
więcej podobnych podstron