
Injection Molding
Design Guide

Injection Molding Design Guide
Injection Molding Design Guide
Table of Contents
Injection Mold Tooling Process Comparison...........................................................2
Size Limitations..........................................................................................................3
Straight Pull Design ...................................................................................................4
Other Geometric Considerations..............................................................................5
Parting Line Limitations ............................................................................................................ 5
Deep Ribs................................................................................................................................. 5
Rounded Corners ..................................................................................................................... 5
Rib-to-Wall Thickness Ratios ................................................................................................... 6
Warp......................................................................................................................................... 7
Sufficient Draft .......................................................................................................................... 7
Gating .........................................................................................................................7
Resin Selection ..........................................................................................................8
Surface Finish Selection............................................................................................9
Texturing................................................................................................................................... 9
Polishing ................................................................................................................................... 9
Lead Time .................................................................................................................10
2
Injection Mold Tooling Process Comparison
Rapid Injection Molding
Low-Volume Injection
Molding
Production Injection
Molding
Part Size
Limitation
20” x 20” x 3”
36” x 36” x 15”
36” x 36” x 15”
Part
Geometry
Limitation
No undercuts causing slide action
in tooling; straight pull design
No geometry limits
No geometry limits
Part Material
Over 30 standard materials in stock
including ABS, PC, PP, PE, Nylon
6/6, Acetal & Acrylic
Any commercially
available material
Any commercially
available material
Part Volume
36 in.
3
No volume limit
No volume limit
Parting Line
Geometry
No limit
No limit
No limit
Draft
Draft required in CAD model
Draft required in CAD
model
Draft required in CAD
model
Tolerance
Expectations
+/- 0.005”, or per SPE standards
for material
Tighter tolerances are
possible
Tighter tolerances are
possible
Surface
Finish
Choose from 6 standard finishes
Any finish, including
acid-etched finish
Any finish, including
acid-etched finish
Customer
Owns Tool?
No
Yes
Yes
Method of
Tool
Manufacture
CNC-only manufacturing,
aluminum-only
No manufacturing limits,
aluminum tooling
No manufacturing limits,
tooling per customer
specs
Lead Time
Standard: 10 Days for 10"x10"x3",
20 Days for 20"x20"x3"
Expedited: 5 days, depending upon
your geometry
Standard: 15-20 Days
Expedited: 10 days,
depending upon your
geometry
Standard: 4-6 Weeks
3
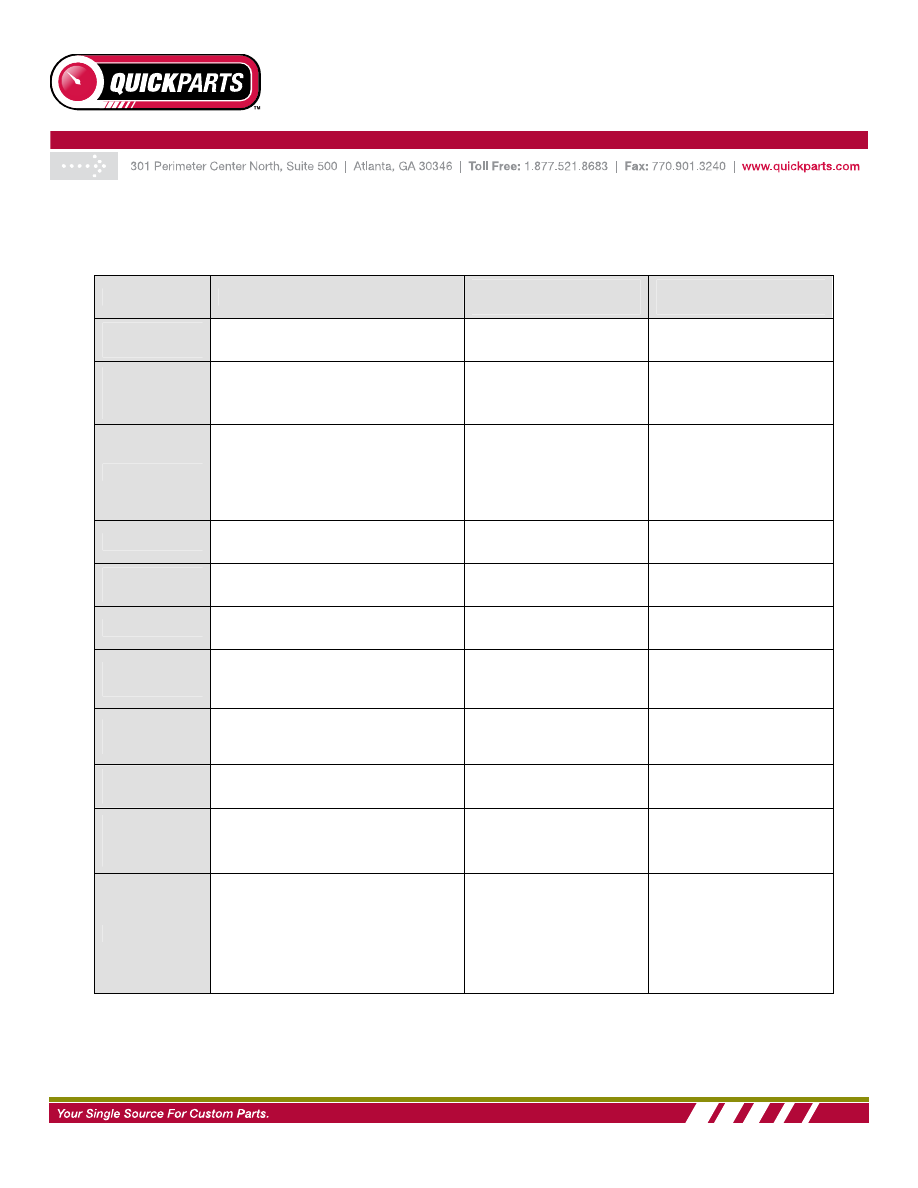
Size Limitations
Size Limits for Rapid Injection Molding
The XY dimensions must be less than 20” x 20”.
Maximum part volume cannot exceed 36 cubic inches.
Maximum part depth can be 3”, given a parting line that can pass through the middle of
the part, or 1.5” if the parting line of the tool must be at one edge of the part.
Parts that fall outside of this ‘box’ can be manufactured, but must be quoted offline by
your Tooling Manager.
Size Limits for Rapid Injection Molding
is 20” x 20” x 3”
The Depth Limit is 1.5” for parts where the parting line is
on the edge of the part, and 3” for parts where the
parting line is central to the part.
Size Limits for Low-Volume Injection Molding
The XY dimensions must be less than 36” x 36”.
1.5”
3.0”
4
No volume limit.
No geometry limits.
Size Limits for Production Injection Molding
The XY dimensions must be less than 36” x 36”.
No volume limit.
No geometry limits.
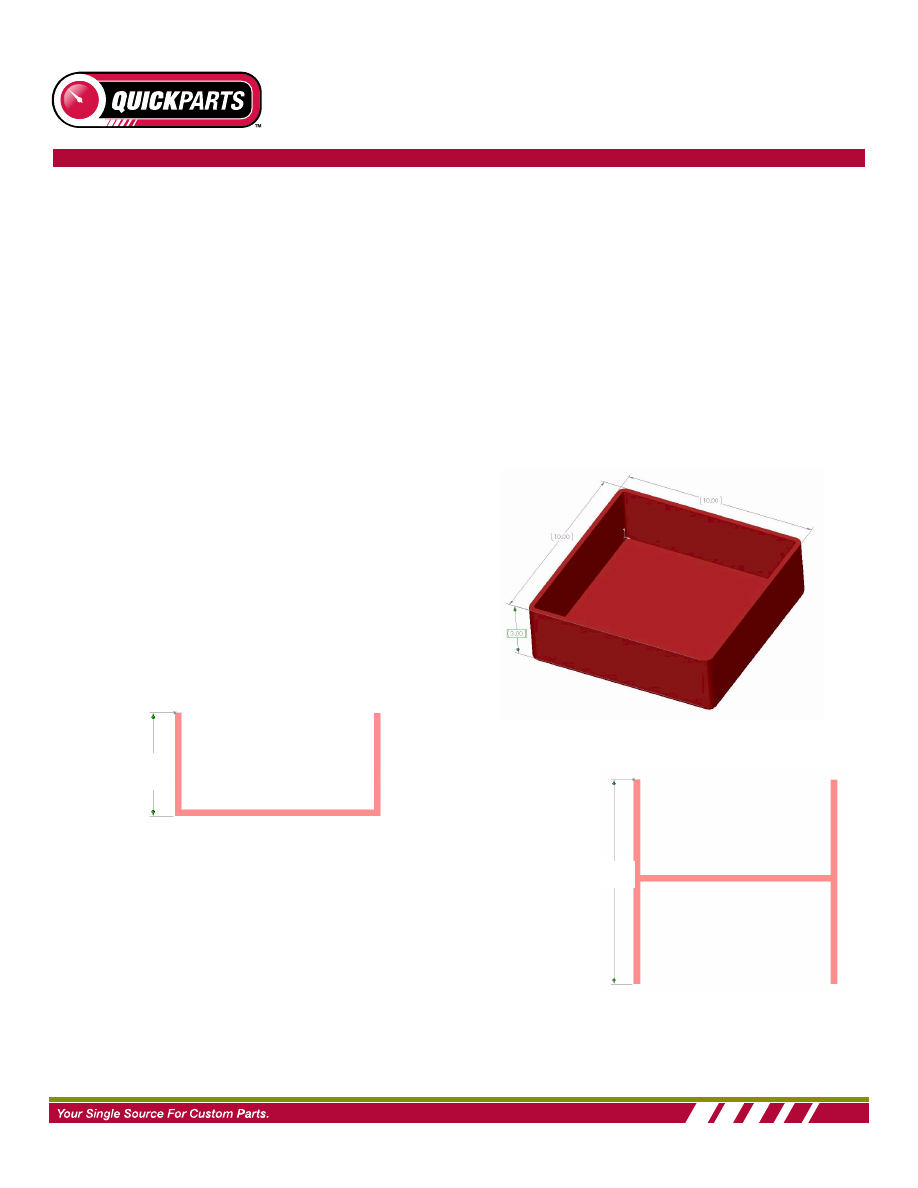
Straight Pull Design
Parts that qualify for Rapid Injection Molding must be designed as straight-pull parts.
A part made with a straight-pull mold is designed such that when the two halves of the mold pull
straight away from each other, there is no mold metal that wants to pass through the part plastic
(an impossible, ‘die locked’ situation).
Undercuts on the part require mold pieces to pull out sideways, perpendicular to the direction of
pull. These are called side actions. Parts with undercuts are not available within the Rapid
Injection Molding process.
However, undercuts are easily produced using either Low-Volume Injection Molding or Production
Injection Molding.
Straight Pull Design
Required for Rapid Injection Molding
5
Other Geometric Considerations
Parting Line Limitations
Rapid Injection Molding, Low-Volume Injection Molding and Production Injection Molding all have
no limitations on the simplicity or complexity of a part’s parting line.
All 3 processes can support simple, complex, and contoured parting lines.
Deep Ribs
The Rapid Injection Molding process uses only high-speed CNC machining centers to mill out the
tooling material. No special manufacturing methods, such as EDM (electric discharge
machining), wire EDM or grinding are used to manufacture the tools.
As a result of the ‘CNC only’ approach, deep ribs must be designed to accommodate this
limitation.
Specifically, deep ribs require proper draft (at least 2 degrees per side) and clearance to allow the
CNC machine tool to cut the root of the rib cavity.
Rule of Thumb: The maximum rib depth is 10 times the width of the rib at its smallest width.
CNC cutting tool lengths (and therefore rib depths) are limited by this.
The following chart provides a rule of thumb for rib depth with 1 degree per side of draft:
Rib Depth
0.5mm
0.75mm
1.0mm
1.5mm
2.0mm
Rib Width
3.5mm
7.5mm
15mm
25mm
36mm
Low-Volume Injection Molding and Production Injection Molding have no restrictions on rib depth.
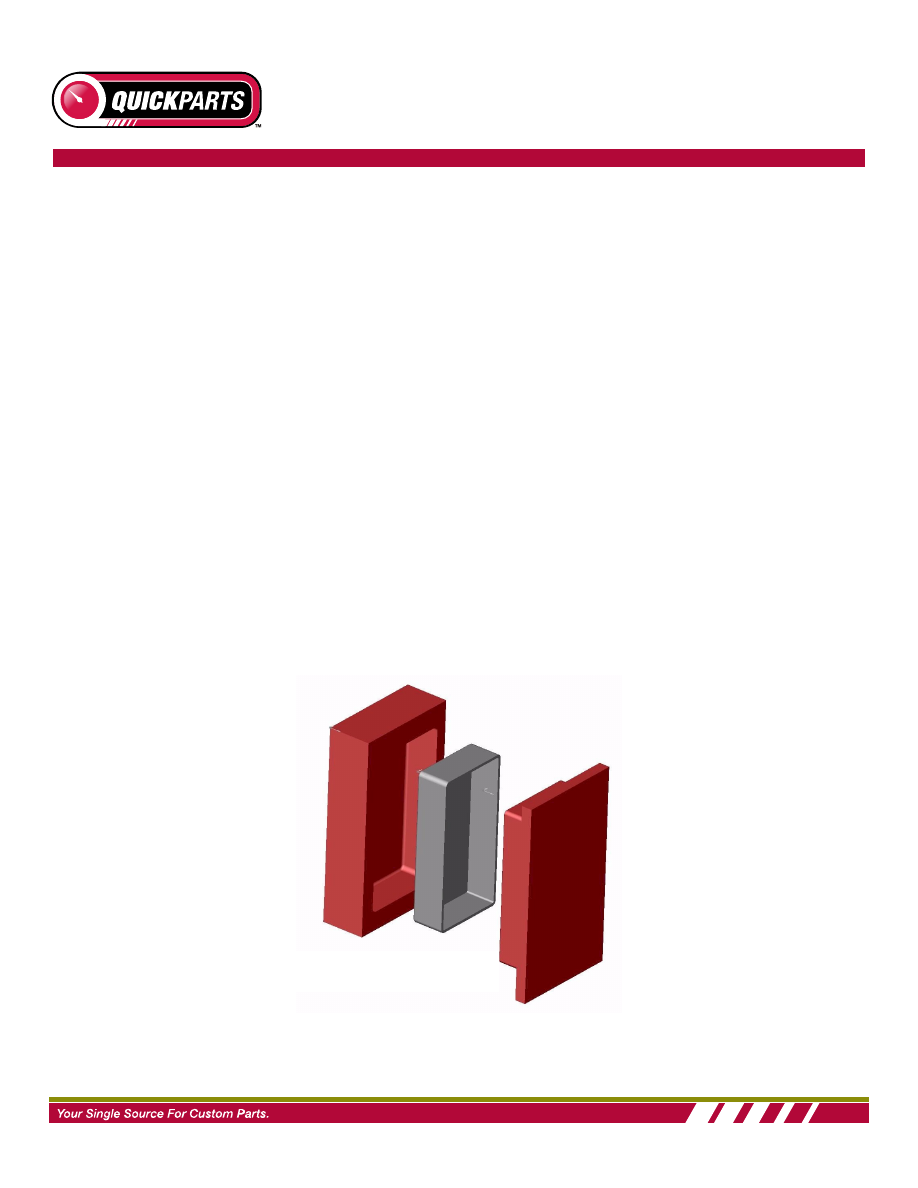
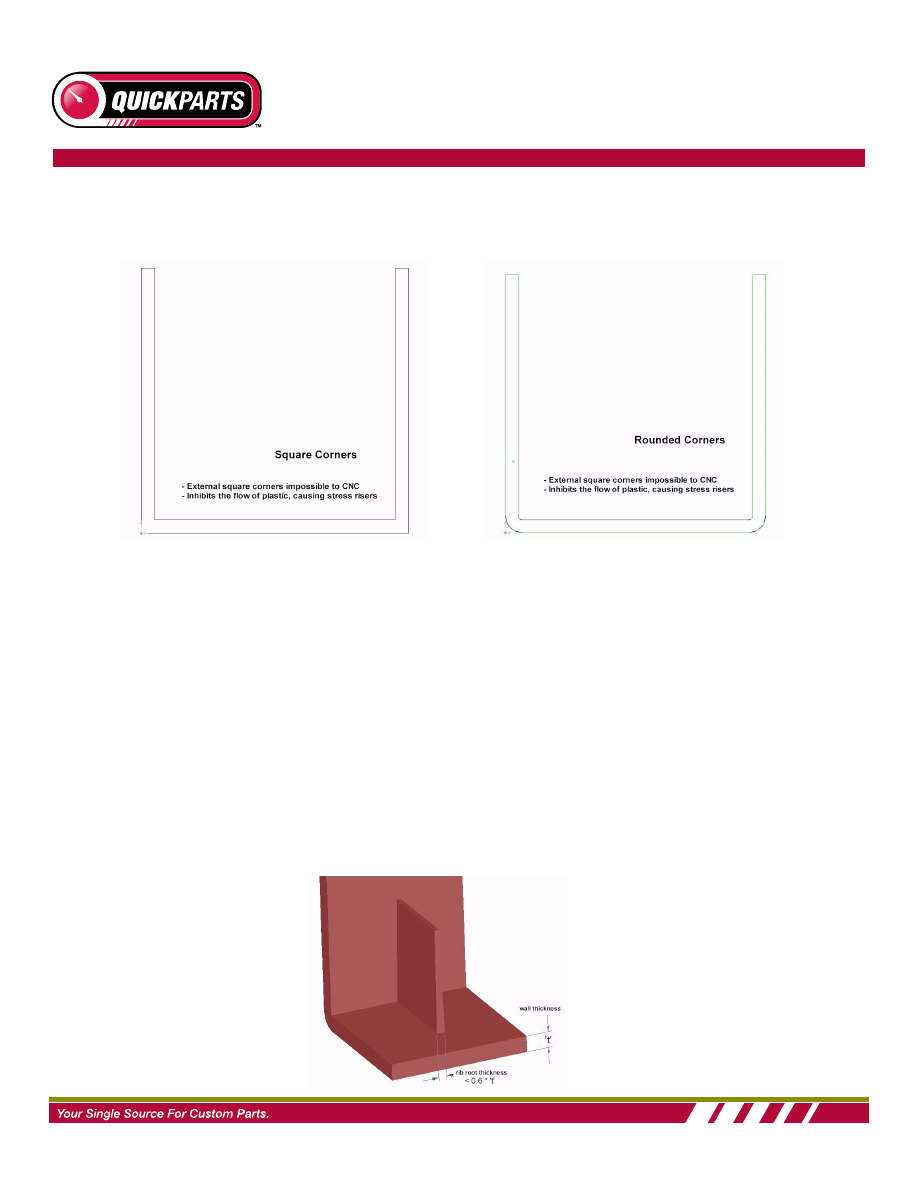
Rounded Corners
Since Rapid Injection Molding is a CNC-only process, sharp corners on the outside of parts
(meaning sharp corners on the inside of the cavity-side of the tool) are not possible.
Available only in Low-
Volume and Production
Injection Molding
Undercuts Require Side
Action in the Tool
6
The following illustrations show a part with sharp corners and a part with rounded corners. If your
design has sharp outside corners, the CNC-only process will ‘round off’ those features to a radius
of .030”.
It is strongly advised that you ensure your design has rounded corners on every rib-to-wall or
wall-to-wall intersection. This design consistency will result in a part with less internal stress -
reducing the chance of warp, short shots, splay and flash.
Sharp Corners
If your design requirements are so stringent that sharp corners on the outside of your part are
critical to the part’s function, only Low-Volume Injection Molding or Production Injection Molding
will meet that need.
Low-Volume Injection Molding and Production Injection Molding can accomplish the cavity-side
sharp corner using EDM machining methods to literally burn the sharp corner into the tool.
Rib-to-Wall Thickness Ratios
Thin ribs on thicker walls may provide stiffness, but they can also result in sink.
Rule-of-Thumb: Rib root thickness should equal 0.6 x Wall Thickness to prevent sink.

7
In some cases, using a glass-filled material will help avoid sink in geometries when adhering to
the rule-of-thumb is impossible.
Warp
The flow of plastic in a tool is a complex phenomenon - sometimes friendly and predictable, other
times evil and erratic.
After the molten plastic has filled the tool cavity, the plastic solidifies in the mold and freezes in a
direction from the outside of the part (near the mold surface) toward the inside.
In thick sections of the part, this results in inward pulling stresses (due to the contraction of
cooling), causing sink marks in the outer surfaces of the part.
Because thinner areas of the part will freeze faster than thicker sections, stresses can build up
between thick and thin sections. The result is a phenomenon called warp.
Rule-of-Thumb, for warp: Design your parts to maintain consistent wall thickness and avoid
thick areas whenever possible.
Sufficient Draft
The existence of draft on vertical surfaces of your part enables the easy removal of your part from
the mold.
Draft is especially important in Rapid Injection Molding since the molds are straight-pull only (i.e.
no side actions) and manufactured using a CNC-only process.
The rules-of-thumb governing the amount of draft required (in degrees) will vary with geometry
and surface texture requirements. Let’s put it this way … the more draft, the better.
Rules-of-Thumb, for draft:
Use at least 1 degree on all "vertical" faces.
2 degrees works very well in most situations.
3 degrees is a minimum for a shutoff (metal sliding on metal).
3 degrees is required for light and medium texture.
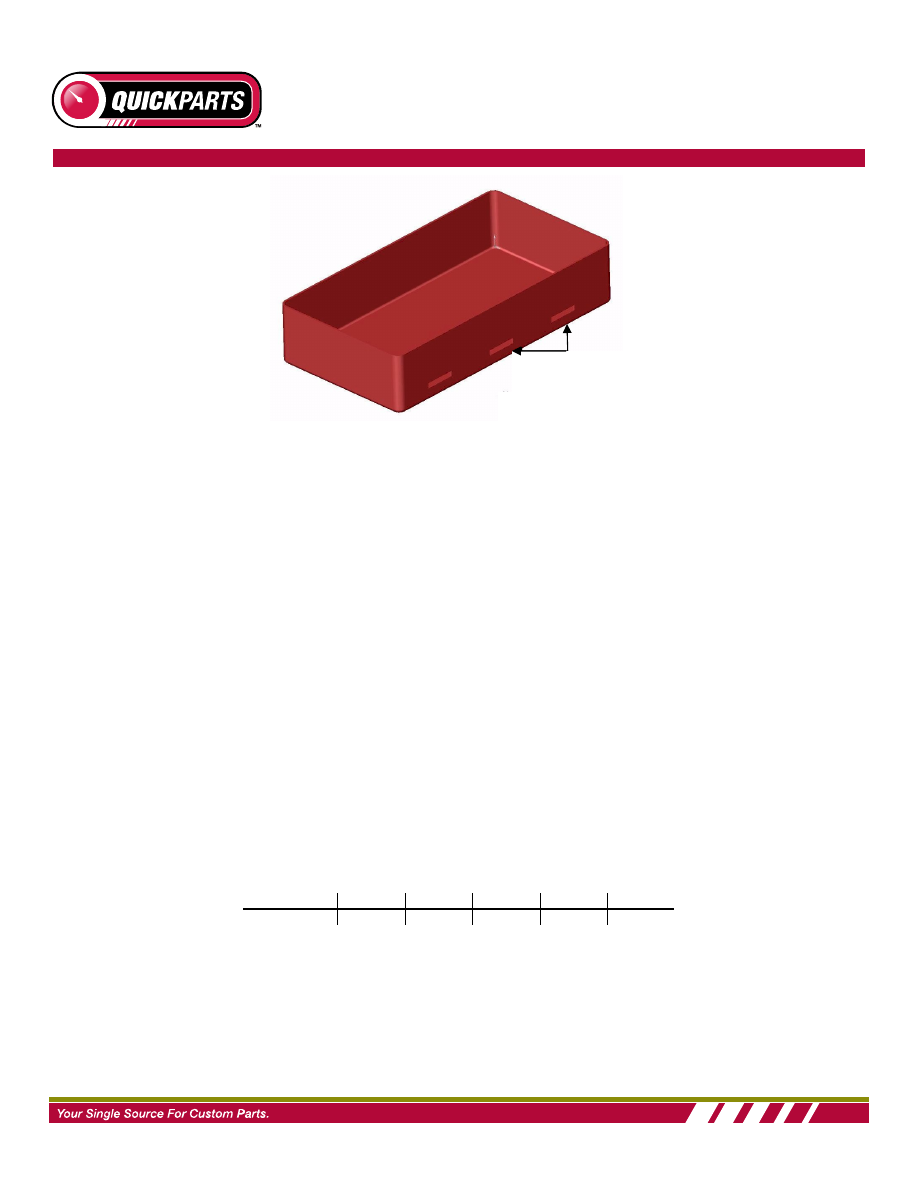
Gating
Rapid Injection Molding tooling is created with one of the following types of gates:
8
Edge Gate
Tab Gate
Center Gate
Sub Gate
Gate vestige will be trimmed to +/-.005”.
Low-Volume Injection Molding and Production Injection Molding have no restrictions on the type
of gate used.
Resin Selection
Selection of the proper material for your molded parts is a critical decision.
One must consider the mechanical properties, molding properties and cost of the resin they
select for the given application. Application-specific requirements will always drive the need for
particular material properties, like tensile strength and elasticity.
Successful plastic part design is based on an understanding of process-related issues during
manufacturing, such as mold filling, likelihood of flash, part ejection and the potential for warp and
sink.
The table below lists some commonly used resins, along with their brand names, and a high-level
summary of their material properties, moldability characteristics and relative costs.
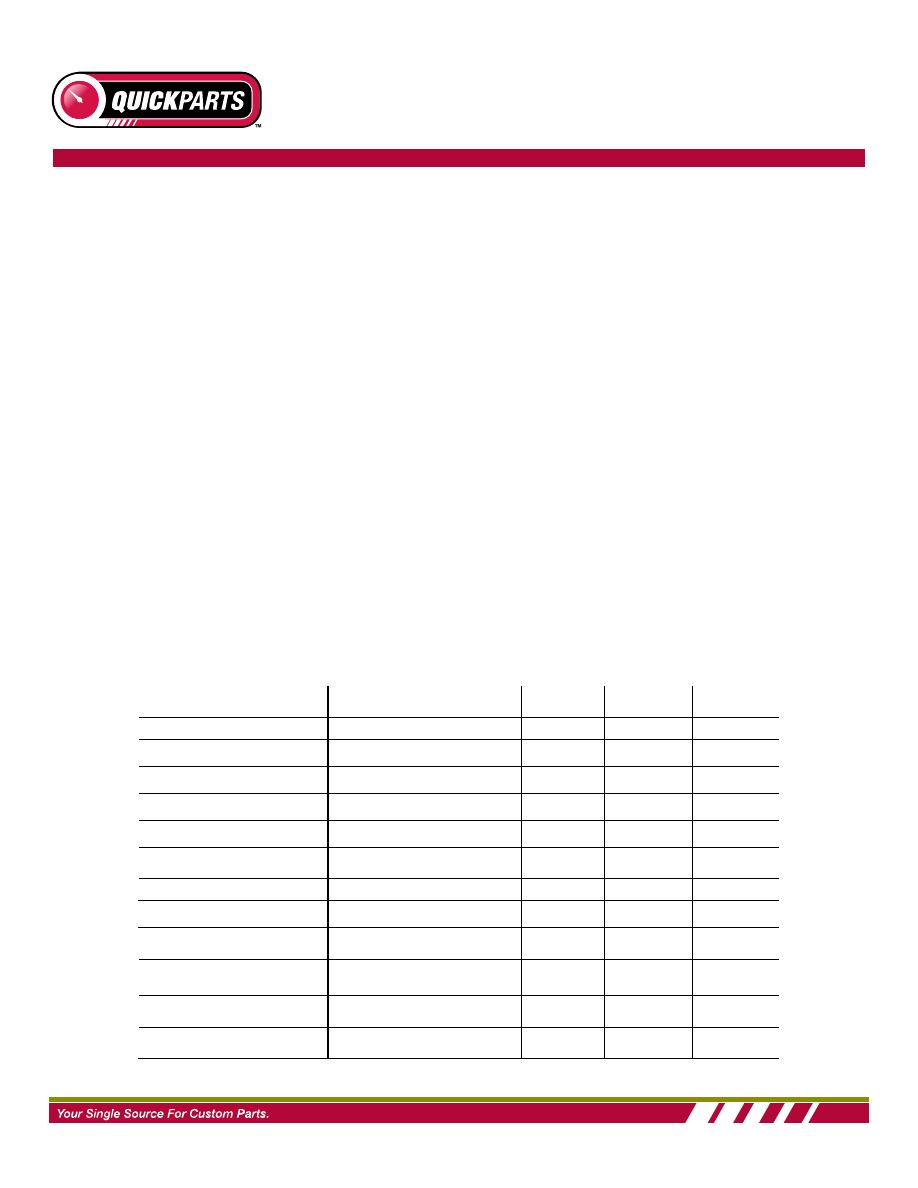
Standard Rapid Injection Molding Resins
Resin Generic Name
Resin Brand Names
Strength
Impact
Resistance
Change to
Stiffnes
Acetal
Delrin
Medium
Medium
Med-Low
Nylon 6/6
Zytel
Medium
High
Low
Nylon 6/6, glass filled
Zytel
High
Medium
High
Polypropylene (PP)
Marlex, Sumika
Low
High
Low
Polycarbonate (PC)
Lexan
Medium
High
Med-High
Acrylonitrile Butadiene
Styrene (ABS)
Cycolac
Med-Low
High
Low
Polycarbonate / ABS Alloy
Cycoloy
Medium
High
Medium
Polyetherimide (PEI)
Ultem
High
Medium
High
Polyetherimide, fiber
reinforced (PEI)
Ultem
Very High
Medium
High
Polybutylene
Terephthalate (PBT)
Valox
Medium
High
Low
Polystyrene
Styron
Med-Low
Low
Low
Thermoplastic Elastomer
Thermoplastic Polyurethane,
Santoprene
Low
High
Low

9
Notes: This list is not comprehensive, nor is it constant. There are many other resins not listed
here. Ask your Tooling Manager for material selections that are currently available.
In order to avoid project delays due to material availability, we limit material selection in Rapid
Injection Molding to the material we have on hand at the time your quote is created. Your quote
worksheet will present you with the currently available materials.
When your project requires a specific engineered material, it becomes either a Low-Volume
Injection Molding or Production Injection Molding project. Virtually any injection moldable material
can be specified in, as we will source the material per your requirements.
Surface Finish Selection
When designing a part for injection molding, it is important to keep in mind the relationships
between surface finish, moldability, cost and lead time.
Rapid Injection Molding offers the following standard surface finishes, listed in order from lowest
to highest cost:
Non-cosmetic: Finish to Rapid Injection Molding discretion
SPI-C3: 320 Stone finish
SPI-B3: 320 Grit Paper
SPI-A3: Grade #15 Diamond Buff (+2 days extra on lead time)
Light matte texture, MoldTech 11010 Equiv. (+2 days on lead time)
Medium matte texture, MoldTech 11060 (+2 days extra on lead time)
** SPI (The Society of the Plastics Industry) denotes an industry-standard finish.
If the part will not be visible to the end user, a non-cosmetic finish is acceptable. But many times
your design will require a cosmetic surface finish.
In these cases of cosmetic finishes, there are two key limitations to be aware of:
Texturing
Since bead blasting is a line-of-sight method, it may not be possible to texture the sides of
minimally drafted ribs on a part, as the mold surfaces may be inaccessible.
Also, texturing has an adverse effect on the ability of the part to release from the mold. Drag
marks may result.
Therefore, we recommend that texture be specified only on areas of the part that are drafted at
least 3 degrees.
Polishing
We use manual mold polishing methods to apply the SPI-A3 finish.
10
Since there is not significant automation in this process, you should expect a significant cost
increase, as it is labor intensive and time consuming to polish deep, narrow slots in molds.
Polishing is time intensive and may also affect the lead time for your parts.
In both Low-Volume Injection Molding and Production Injection Molding, any surface finish can be
produced, including acid-etched finish.
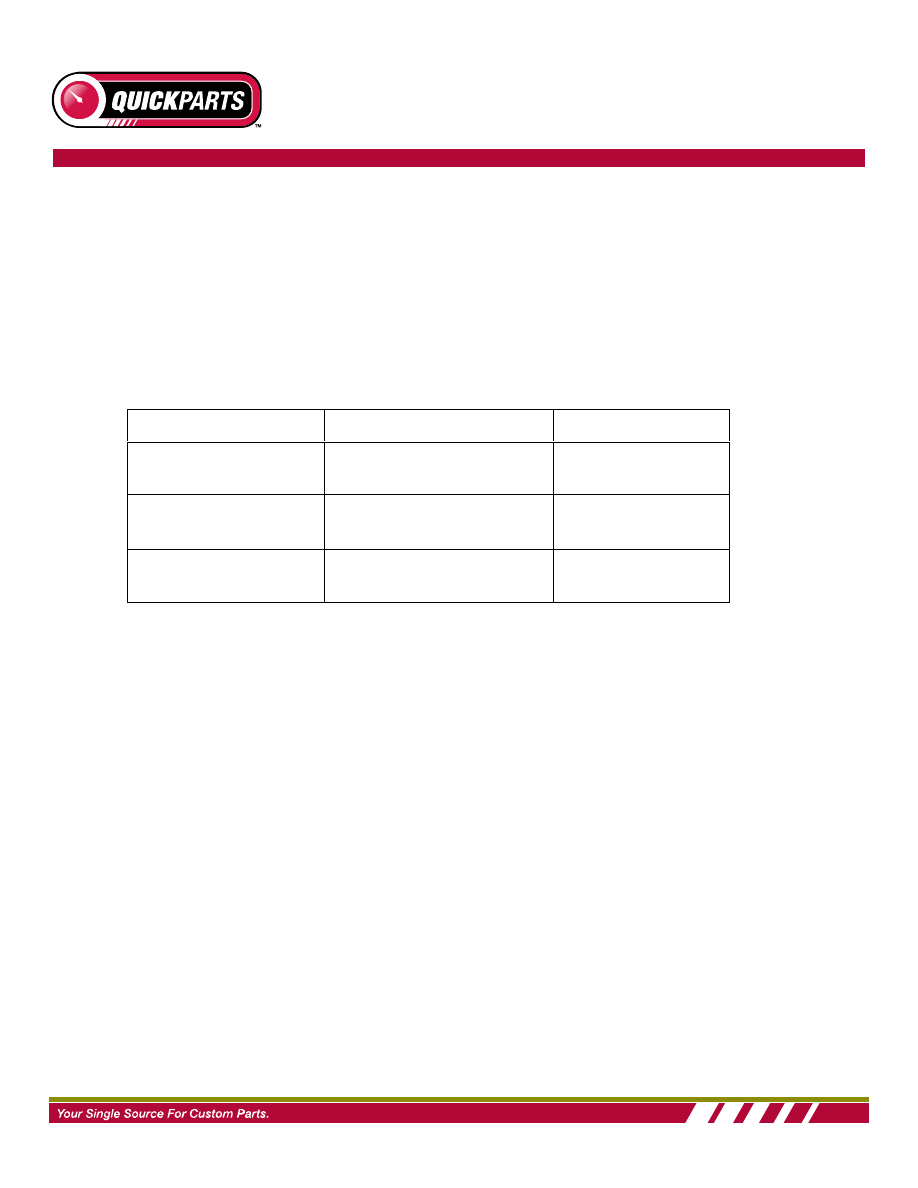
Lead Time
Standard lead time for Injection Molding service is as follows:
Lead times can change based on current factory load. Call your Quickparts Tooling Manager at
1.877.521.8683 to discuss your specific lead time requirements.
Process
Standard Lead Time
Fastest Lead Time
Rapid Injection Molding
10 days for 10”x 10”x 3” parts
20 days for 20”x 20”x 3” parts
5 days,
depending upon
geometry
Low-Volume Injection
Molding
15 – 20 days
10 days,
depending upon
geometry
Production Injection
Molding
4-6 weeks
4 weeks

11
Wyszukiwarka
Podobne podstrony:
Injection Molding Mold Design
4 PIM Powder Injection Molding
Injection Molding
Optimization of injection molding process parameters using sequential simplex algorithm
A Plastic Injection Molding Process Characterisation Using Experimental Technique (Jtdis41a01)
Plastic Injection Molding Machine
Injection Molding Basics for the Minimal Mold(1)
Injection Molding Problems and Solutions PolyPropylene EXXON
Injection Molding & Plastic Prototyping Resource Bin 50 Resbn50
Glossary Plastic Injection Molding Engineering Manufacturing
Din 16903 Threaded Inserts For Plastic Injection Molding
Plastic Injection Molding Machine 2
BOSCH HDI EDC15C2 injection system (2)
History Costume History Costume Design Viking Women
Eurocode 5 EN 1995 1 1 Design Of Timber Structures Part 1 1 General Rules
więcej podobnych podstron